1
DVD26 DVD/CD player User Guide
>
Preface
CAUTION
ATTENTION
RISK OF ELECTRIC SHOCK DO NOT OPEN
RISQUE DE CHOC ELECTRIQUE NE PAS OUVRIR
CAUTION: To reduce the risk of electrical shock do not remove cover (or
back). No user serviceable parts inside. Refer servicing to qualified service
personnel.
WARNING: To reduce the risk of fire or electrical shock, do not expose this
apparatus to rain or moisture.
CAUTION: In Canada and the USA, to prevent electric shock, match the
wide blade of the plug to the wide slot in the socket and insert the plug fully
into the socket.
The lightning flash with an arrowhead symbol within an equilateral
triangle, is intended to alert the user to the presence of
uninsulated 'dangerous voltage' within the product's enclosure
that may be of sufficient magnitude to constitute a risk of
electric shock to persons.
The exclamation point within an equilateral triangle is intended
to alert the user to the presence of important operating
and maintenance (servicing) instructions in the literature
accompanying the product.
IMPORTANT SAFETY INSTRUCTIONS
This product is designed and manufactured to meet
strict quality and safety standards. However, you
should be aware of the following installation and
operation precautions.
1. Take heed of warnings and instructions
You should read all the safety and operating
instructions before operating this appliance. Retain
this handbook for future reference and adhere to all
warnings in the handbook or on the appliance.
2. Water and moisture
The presence of electricity near water can be
dangerous. Do not use the appliance near water
– for example next to a bathtub, washbowl, kitchen
sink, in a wet basement or near a swimming pool,
etc.
3. Object or liquid entry
Take care that objects do not fall and liquids are not
spilled into the enclosure through any openings.
Liquid-filled objects such as vases should not be
placed on the equipment.
4. Ventilation
Do not place the equipment on a bed, sofa, rug or
similar soft surface, or in an enclosed bookcase
or cabinet, since ventilation may be impeded. We
recommend a minimum distance of 50mm around
the sides and top of the appliance to provide
adequate ventilation.
5. Heat
Locate the appliance away from naked flames or
heat producing equipment such as radiators, stoves
or other appliances (including other amplifiers) that
produce heat.
ii
6. Climate
12. Power lines
The appliance has been designed for use in
moderate climates.
Locate any outdoor antenna/aerial away from
power lines.
7. Racks and stands
13. Non-use periods
Only use a rack or stand that is recommended for
use with audio equipment. If the equipment is on a
portable rack it should be moved with great care, to
avoid overturning the combination.
If the unit has a stand-by function, a small amount
of current will continue to flow into the equipment
in this mode. Unplug the power cord of the
appliance from the outlet if left unused for a long
period of time.
8. Cleaning
Unplug the unit from the mains supply before
cleaning.
The case should normally only require a wipe with a
soft, damp, lint-free cloth. Do not use paint thinners
or other chemical solvents for cleaning.
We do not advise the use of furniture cleaning
sprays or polishes as they can cause indelible white
marks if the unit is subsequently wiped with a damp
cloth.
9. Power sources
Only connect the appliance to a power supply of
the type described in the operating instructions or
as marked on the appliance.
This is a Class 1 device and must be earthed.
10. Power-cord protection
Power supply cords should be routed so that they
are not likely to be walked on or pinched by items
placed upon or against them, paying particular
attention to cords and plugs, and the point where
they exit from the appliance.
11. Grounding
Ensure that the grounding means of the appliance
is not defeated.
14. Abnormal smell
If an abnormal smell or smoke is detected from
the appliance, turn the power off immediately and
unplug the unit from the wall outlet. Contact your
dealer immediately.
15. Servicing
You should not attempt to service the appliance
beyond that described in this handbook. All other
servicing should be referred to qualified service
personnel.
16. Damage requiring service
The appliance should be serviced by qualified
service personnel when:
A. the power-supply cord or the plug has been
damaged, or
B. objects have fallen, or liquid has spilled into the
appliance, or
C. the appliance has been exposed to rain, or
D. the appliance does not appear to operate
normally or exhibits a marked change in
performance, or
E. the appliance has been dropped or the
enclosure damaged.
>
Contents
Introduction
Displaying the disc menus ................................{13
Welcome to the DVD26 DVD/CD player ..............{ 1
Changing the audio track .................................{14
Using the DVD26 with other Primare products ......{ 2
Displaying subtitles .......................................{14
Technical specification ....................................{ 2
Programming a selection of tracks ......................{14
Getting started
Configuring the DVD26 DVD/CD
player
Connecting to a digital display or projector ............{ 3
Connecting to an HDTV television or Progressive
Using the SETUP menu ..................................{15
Scan video display .........................................{ 4
Specifying the audio output options ....................{16
Connecting audio ...........................................{ 6
Specifying the video setup options .....................{16
Data connections...........................................{ 6
Choosing the default languages .........................{18
Using the DVD26 CD/DVD player
Front panel controls .......................................{ 7
C22 remote control ........................................{ 8
Switching on and off .......................................{ 9
Dimming the front-panel DISPLAY .....................(9
Playing a disc ...............................................(9
Displaying disc information ...............................{10
Locating a position on the disc ..........................{10
Setting the rating level ...................................{18
Changing the DVD26 settings ...........................{19
Playing music files and displaying
photos
Manipulating JPEG images ...............................{22
Guidelines for creating CD-ROMs containing MP3
and JPEG files ..............................................{22
Language codes ............................................{23
Index ..........................................................{25
Advanced use
Slow motion play ...........................................{13
Repeating playback .......................................{13
iii
>
Preface
COPYRIGHT AND ACKNOWLEDGMENTS
Copyright © 2006 Primare Systems AB.
All rights reserved.
Primare Systems AB
Renvägen 1
SE-352 45 Växjö
Sweden
http://www.primare.net
Issue: DVD26/3
The information in this guide is believed to be correct as of the
date of publication. However, our policy is one of continuous
development and so the information is subject to change
without notice, and does not represent a commitment on the
part of Primare Systems AB.
Primare is a trademark of Primare Systems AB. Manufactured
under license from Dolby Laboratories. “Dolby”, “Pro
Logic”, and the double-D symbol are trademarks of Dolby
Laboratories. Confidential Unpublished Works. Copyright
1992-1997 Dolby Laboratories, Inc. All rights reserved.
LaserDisc is a trademark of Pioneer Electric Corp. All other
product names are trademarks or registered trademarks of
their respective owners.
This guide was produced by Human-Computer Interface Ltd,
http://www.interface.co.uk
SAFETY COMPLIANCE
This product has been designed to meet the IEC 60065
international electrical safety standard.
iv
>
Introduction
Welcome to the Primare DVD26 DVD/CD player! This chapter introduces you to its key features, and
explains how you can take advantage of its configurability to create a system perfectly suited to
your requirements.
WELCOME TO THE DVD26 DVD/CD PLAYER
The DVD26 provides a comprehensive range of features to
make it ideal as the heart of a superb home entertainment
system, including a digital DVI output for the ultimate image
quality.
Enjoy DVD movies at their best
The Primare DVD26 DVD/CD player will show all your
favorite movies in DTS, Dolby Digital, or Dolby Pro Logic
surround. It supports both PAL and NTSC format, and if
your television does not support both formats it can perform
automatic conversion between them.
Provides a DVI output for compatibility with the
latest HDTV displays
The DVD26 provides a wide range of video output formats,
ensuring it will be compatible with your current and future
choices of display technology.
For best results with digital displays or projectors the DVD26
provides a digital DVI output giving up to a full HDTV-quality
1080i signal.
For analogue displays the DVD26 provides Component
outputs with Progressive Scan for a cleaner, sharper picture,
without the jagged artifacts caused by normal interlaced
TV images. Progressive Scan is provided in both NTSC
and PAL mode. The DVD26 also provides the full range of
standard video outputs without Progressive Scan, including
component, S-Video, RGB, SCART, and composite.
Play your existing music collection
The DVD26 can also play your entire CD music collection, as
well as Video CDs, CD-Rs, CD-RWs, SVCDs, and MP3 enoded
music collections or JPEG image collections on CD-ROM.
No compromise design for superb sound and picture
quality
The DVD26 DVD/CD player uses the best components
available to ensure a trouble-free operation for many years.
The video color section includes an additional video buffer
for outstanding picture quality; the D/A converters and audio
electronics are located on separate boards, well away from
the transport and power supply electronics, for the lowest
possible distortion and noise. The resulting sound quality is
comparable to dedicated CD players in the same price range.
Careful mechanical design for long-life
As with all Primare units, the solid mechanical design further
enhances the functionality and quality, and ensures that the
DVD26 DVD/CD player will continue to provide trouble-free
operation for years to come.
Intuitive user interface
In keeping with the philosophy of the Primare range of
systems, the DVD26’s powerful range of features can be
controlled through a very simple and intuitive interface,
designed so that it will not distract you from the pleasure of
watching movies or listening to music on your system.
In fact most of the features of the DVD26 can be accessed
through just eight front panel push buttons. Alternatively
the full set of functions, including menu selection and
programmability, is available using the C22 remote control
supplied with the DVD26.
The DVD26 includes a remote infra-red input and two
alternative data ports to allow it to be controlled from
external equipment or used in a multi-room application.
1
>
Introduction
USING THE DVD26 WITH OTHER PRIMARE
PRODUCTS
TECHNICAL SPECIFICATION
Video section:
Although the DVD26 DVD/CD player is flexible enough to
work with virtually any other equipment you have in your
system, it is ideally suited for use with the Primare SP31
Multi-channel Processor and Primare A30.5 Multi-Channel
Amplifier, or with the SPA21 Surround Processing Amplifier.
Video signal systems
NTSC/PAL, color
Video formats
> 500 lines
DVI HDCP output
480p/576p, 720p, 1080i
Progressive Scan mode
480p
Video output
1Vp-p, 75Ω RCA
S-Video Y-signal
1Vp-p, 75Ω
C-signal
0.286Vp-p, 75Ω
Component video output
Y=IVp-p, B=0.7Vp-p, R=0.7Vp-p,
75Ω
RGB output
IVp-p, 75Ω
Video signal-to-noise
-75dB
Video DAC
Analogue Devices ADV7300A
Audio section:
2
Frequency response
44.1kHz, 10Hz – 20kHz
48kHz, 10Hz – 22kHz
96kHz, 10Hz – 44kHz
THD + Noise
0.009% at 1kHz
Dynamic range
100dB
Signal-to-noise ratio
100dB
Channel separation
100dB
Analogue output level
2.0Vrms
Audio DAC
Burr-Brown PCM1738
Power consumption
Operating 35W, Standby 10W
IR input
3.5mm
Data input
RS232
Construction
2mm heavy duty chassis
Dimensions (WxDxH)
430 x 380 x 100mm
Weight
10.5kg
Formats supported:
CD, VCD, SVCD, CD-R, CD-RW,
DVD-R, DVD+R, MP3, JPEG
Getting started
>
This chapter explains how to connect the DVD26 DVD/CD player to the other audio and video
components in your system.
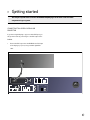
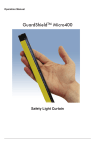
CONNECTING TO A DIGITAL DISPLAY OR
PROJECTOR
If you have a digital display or projector with a DVI input, you
will get best results by connecting it to the DVI output of the
DVD26.
•
Connect the DVI output from the DVD26 to the DVI input
of the display or projector, using a suitable digital DVI
cable.
����������������������������
���
�
���
���������
��
��
��
����
�����
����������������
�������������������
��
�����
���
�
������������
��������
��������������
�������
���
��
�������
���
3
>
Getting started
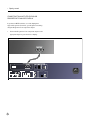
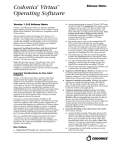
CONNECTING TO AN HDTV TELEVISION OR
PROGRESSIVE SCAN VIDEO DISPLAY
If you have an HDTV television, or a video display that
supports Progressive Scan video, you will get best results by
using the Progressive Scan component outputs.
•
Connect the Progressive Scan component outputs to the
appropriate inputs on your television or display.
�������������������������������������������
���������
�
���
���������
��
��
��
����
�����
����������������
�������������������
��
�����
���
4
�
��
�������
���
������������
��������
��������������
�������
���
>
Getting started
To connect to a television or monitor with a SCART
connector
If your television or video display provides a SCART
connector you can connect to it using a SCART cable from
the DVD26 SCART connector. This provides composite, YUV
component, or RGB outputs which you can configure in the
VIDEO SETUP menu; see To specify the video output mode,
page 17.
CONNECTING TO A CONVENTIONAL TELEVISION
OR DISPLAY
If your television or monitor provides a normal interlaced
video input you should connect to it using the component,
S-Video, or composite video outputs depending on the inputs
available on your television or display.
For best quality use the component outputs, or S-Video if
component video is not supported. Use composite video only
if no other options are available, as it gives the lowest quality.
�
���
���������
��
��
��
����
�����
����������������
������������
�������������������
��
�����
���
��������
��������������
�������
�
���
��
�������
���
�����������������������������
������� ���������
���������
�����
�����������������������������
5
>
Getting started
CONNECTING AUDIO
DATA CONNECTIONS
To connect to a digital surround processor
• Connect the RCA or OPTICAL digital output to the
corresponding digital input of a digital surround processor,
such as the SP31.
To connect to an infra-red repeater
• Connect the IR socket to an infra-red eye or multi-room
system infra-red output.
To connect to an analogue preamplifier
• Connect the LINE OUT outputs from the DVD26 to the
analogue inputs of an analogue preamplifier.
�
���
���������
��
��
��
����
�����
����������������
�������������������
��
�����
���
������������
��������
���
��
�������
���
�������
���������������������
6
��������������
�������
�
����������
������
������������������������������������������
>
Using the DVD26 CD/DVD player
This chapter explains how to operate the basic functions of the DVD26 DVD/CD player, which are
available using either the front panel controls or the remote control.
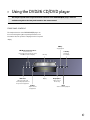
FRONT PANEL CONTROLS
The simplest functions of the DVD26 DVD/CD player can
be accessed using the eight front panel push buttons, and
information about its operation is displayed on the front panel
display.
������
���������������
��������������������������
�������������������
���������������������������������������
������������������������������
���������
���
����
����������
��������������������������
�������������������������������
���������������������������
������
������������������
��������������
���������
������������
��������������
�� �������
��������
�������
�
�
�
�
�
��
��
��
���
���
��
��
��
���
���
�
�
�
��
��
������������
����������������
��������������
�����
�����������������������������
7
>
Using the DVD26 CD/DVD player
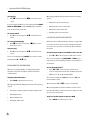
C22 REMOTE CONTROL
You can operate all the functions of the DVD26 with the C22
remote control:
�����������������������
�������������
��������������������������
������������������
����������������
�������������
�������������������
�����������������������
����������������
����������������
��������������
����������������
��������������
�����������������
�������������
����������
����������������
����������
���������������������������
��������������������
������������������
��������������������������������
������������������������
����������������
�������������������������
������������������
����������������
����������������������
�������������������
8
�������������������
����������������������
��������������
>
Using the DVD26 CD/DVD player
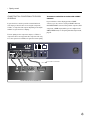
Front panel display
The following illustration shows the information on the front panel
display:
��������������
����������������
�������������
����������
�����������
����
����
�����������
���
�����
������
�������
����
�� ������� ������
�������
����
����� ������� � �� �� �
�������
� �� �� �
� �� �� �
���������
���������
��������
��������������������
�������������
�����������
��������������������������������
���������������
SWITCHING ON AND OFF
PLAYING A DISC
To switch on
• Use the switch under the left-hand edge of the front
panel.
To insert a disc
• Press å on the front panel or hold down */å on the C22
remote control to open the tray.
During normal operation you can leave the DVD26 switched
on and in standby.
The on-screen display shows OPEN.
To switch to standby
• Press O on the front panel or C22 remote control.
DIMMING THE FRONT-PANEL DISPLAY
To dim the front-panel display
• Press DIM on the C22 remote control.
•
Place the DVD or CD in the tray. If it is a CD or a singlesided DVD the label should be uppermost.
•
Press å again to close the tray, or gently push the front
of the tray.
The on-screen display shows CLOSE followed by DISC
LOADING.
The disc will start playing automatically.
The display will dim.
To restore the front-panel display
• Press DIM again.
As the disc plays the front-panel display shows the current
chapter/track and elapsed chapter/track time.
9
>
Using the DVD26 CD/DVD player
To stop play
• Press * on the front panel or */å on the C22 remote
control.
When playing a CD the display steps between the following
options:
•
Elapsed time for the current track.
•
Remaining time for the current track.
•
Elapsed time for the whole disc.
To resume a DVD
• Press > on the front panel or >/= on the C22 remote
control.
•
Remaining time for the whole disc.
To reset to the beginning
• Press * twice on the front panel or */å twice on the
C22 remote control.
DVD movies are normally divided into chapters corresponding
to scenes in the movie, and you can step between chapters to
choose the scene you want to watch. Audio CDs are divided
into tracks.
If you are playing a DVD the on-screen display shows PRESS
PLAY TO CONTINUE, and the DVD/CD player remembers
your current position on the disc.
To pause play
• Press > on the front panel or >/= on the C22 remote
control.
The on-screen display shows PAUSE. You can then resume
play by pressing > or >/= again.
LOCATING A POSITION ON THE DISC
To step between chapters on a DVD or tracks on a CD
• Press [ or ] on the front panel or C22 remote control.
The on-screen display shows PREVIOUS or NEXT as you
step, and the front panel display shows the current chapter or
track number.
DISPLAYING DISC INFORMATION
When you are playing a DVD you can display information
about the current title and chapter, and the elapsed and
remaining times.
To scan through the disc
• Press ¯ or ˘ on the front panel or C22 remote
control to step between 2x, 4x, 6x, and 8x normal speed,
(DVDs), or 2x, 4x, 6x, 8x, and 16x, (CDs).
To display disc information
• Press DISP on the C22 remote control.
The on-screen display shows FR (fast reverse) or FF (fast
forward) and the speed.
When playing a DVD the display steps between the following
options:
Alternatively press > or >/= to return to normal play.
•
Title number, chapter number, and elapsed chapter time.
•
Remaining title time.
•
Elapsed chapter time.
•
Remaining chapter time.
10
When playing DVDs faster than normal the sound is muted,
but with audio CDs you can hear the sound to help you locate
the section you want to find.
To go to a specific chapter or title on a DVD
• Press GOTO on the C22 remote control.
>
Using the DVD26 CD/DVD player
The display shows the current title and chapter number with
the chapter number initially highlighted:
•
Enter the chapter number using the numeric keys.
To go to a chapter number greater than 10 press +10.
To enter a title number press < or > to highlight the current
title number, and then use the numeric keys to enter the new
title number.
•
Press SELECT on the C22 remote control to go to the
chapter or title number you have entered.
To go to a specific position on an audio CD
• Press GOTO on the C22 remote control.
The on-screen display prompts for the total elapsed time you
want to go to:
•
Enter the time using the numeric keys.
•
Press SELECT to go to the time you have entered.
11
>
12
Using the DVD26 CD/DVD player
>
Advanced use
This chapter explains how to make use of the more advanced features of the DVD26 DVD/CD player,
including changing the surround mode and making recordings.
SLOW MOTION PLAY
DISPLAYING THE DISC MENUS
You can play back DVD movies in slow motion, in forward or
reverse, at one of four different speeds. Slow motion playback
is not available for audio CDs.
Most DVD movies provide a Root Menu to allow you to
choose between the different options provided by the disc,
such as special features, extra scenes, and theatrical trailers.
Some discs also provide a Title Menu.
To play in slow motion
• Press ( or ) on the C22 remote control to step
between 1/2, 1/4, and 1/8 normal speed, and then back to
normal play.
The on-screen display shows SR (slow reverse) or SF (slow
forward) and the speed 2X, 4X, or 8X.
REPEATING PLAYBACK
You can choose to repeatedly play back the current chapter or
title of a DVD, or the current track of a CD.
To repeat the current title, chapter, or track
• Press REPEAT on the C22 remote control to repeat the
current chapter or track.
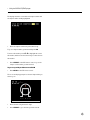
To display the Root Menu
• Press @ on the C22 remote control.
The on-screen display shows ROOT MENU.
•
Use <, >, A, and V on the C22 remote control to
highlight an option on the Root Menu.
•
Press SELECT on the C22 remote control to select the
item you have highlighted.
To display the Title Menu
• Press TOP on the C22 remote control.
The on-screen display shows TITLE MENU.
•
Use <, >, A, V, and SELECT to select items from the
Title Menu as for the Root Menu.
The on-screen display shows CHAPTER REPEAT ON
(DVD) or REP-ONE (CD).
•
Press REPEAT again to repeat the current title or disc.
The on-screen display shows TITLE REPEAT ON (DVD) or
REP-ALL (CD).
•
Press REPEAT a third time to turn repeat off.
The on-screen display shows REPEAT OFF.
13
>
Advanced use
CHANGING THE AUDIO TRACK
PROGRAMMING A SELECTION OF TRACKS
Many DVDs include more than one audio track, to provide
alternate languages, audio formats, or commentary
soundtracks.
On an audio CD or video CD you can create a playlist of tracks
you want to hear.
To change the audio track
• Press MODE to display the current audio setting:
To make a playlist
• Insert the disc. If the disc starts playing, stop it by
pressing * on the front panel or */å on the C22 remote
control.
•
Press PROG on the C22 remote control.
The front panel shows PROGRAM.
•
Select titles using the numeric keys 1-9 and +10.
As you select tracks the front-panel display shows the
number of the track you are programming, the number of the
step in the program, and the duration of the track.
•
Press MODE again to change the audio setting
DISPLAYING SUBTITLES
DVD movies can contain audio soundtracks in up to eight
languages, and subtitles in up to 32 different languages. You
can choose which languages are selected by default using the
SETUP menu; for more information see Using the SETUP
menu, page 15.
You can also turn subtitles on or off, and choose the audio and
subtitle languages, while a disc is playing.
To change the subtitles
• Press BAL/ST on the C22 remote control.
This will step the subtitles between the available languages,
and subtitles off.
The current setting is shown on the on-screen display.
14
A selected track numbered higher than 15 will be indicated by
a flashing 15+ symbol on the front-panel display.
The track number also flashes in the track list on the righthand side of the display.
•
Press SELECT to play the tracks you have selected.
The tracks are played in the same order as they are selected.
The currently played track always flashes in the tracklist on
the front-panel display.
To clear the playlist
• Press */å. Then press PROG twice.
Configuring the DVD26 DVD/CD player
>
This chapter explains how to use the SETUP menu to configure the operation of the DVD26 DVD/CD
player.
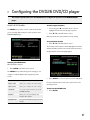
USING THE SETUP MENU
The SETUP menu provides a series of options which allow
you to customize different aspects of the operation of the
DVD26 DVD/CD player:
To select a page of options
• If necessary press A on the C22 remote control to
highlight the title of the current page of options.
•
Press < or > on the C22 remote control.
Each page shows the options and their current setting.
To step between options
• Press < or > on the C22 remote control.
The currently selected option is shown highlighted on the left,
and the alternative values for the current option are shown to
its right with the current setting highlighted.
To display the SETUP menu
When the DVD is stopped:
•
Press SETUP on the C22 remote control.
The SETUP menu provides five pages of settings you can
configure, as indicated by the tabs along the top of the
screen:
•
Tab
Description
AUDIO SETUP
Allows you to configure the audio settings.
VIDEO SETUP
Allows you to configure the video settings.
LANGUAGE
Lets you specify the default audio, subtitle,
and DVD languages.
GENERAL
Allows you to set a parental lock, and
configure other options.
PROGRESSIVE
Lets you select the DVI or Progressive Scan
outputs.
Press SELECT to select the option you have highlighted.
For more information about each of the options refer to the
following sections.
To exit from the SETUP menu
• Press SETUP.
15
>
Configuring the DVD26 DVD/CD player
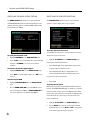
SPECIFYING THE AUDIO OUTPUT OPTIONS
SPECIFYING THE VIDEO SETUP OPTIONS
The AUDIO SETUP page allows you to specify whether
the DVD26 DVD/CD player should perform Dolby Surround
downmix internally, and if so, whether 96kHz signals should
be downsampled to 48kHz.
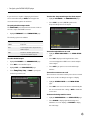
The VIDEO SETUP page allows you to set up the video
options to suit the display device in your system:
To specify the downmix mode
• Highlight DOWNMIX on the AUDIO SETUP page.
•
Select LT/RT to choose the Dolby Laboratories standard
downmix, or STEREO to choose a pure 2-channel
downmix.
To enable or disable the digital outputs
• Highlight DIGITAL OUT on the AUDIO SETUP page.
•
Select OFF to turn the digital outputs off, or ON to turn
them on.
To downsample LPCM
• Highlight LINEAR PCM OUT on the AUDIO SETUP
page.
•
16
Choose DOWN SAMP ON if you want 96kHz sources
to be downsampled to 48kHz, or DOWN SAMP OFF if
your other equipment is compatible with 96kHz.
To set the default screen format
Some DVD movies allow you to choose between a normal or
widescreen version of the movie.
•
Highlight TV SCREEN on the VIDEO SETUP page.
If you have a standard 4:3 television:
•
Select 4:3/PS (Pan-Scan) display widescreen pictures
cropped to fill your television screen.
•
Select 4:3/LB (Letter Box) to display widescreen
pictures with black bars above and below the picture.
If you have a widescreen television:
•
Select 16:9.
To specify the TV system
DVD movies are produced in both PAL and NTSC television
formats. The DVD26 DVD/CD player is capable of converting
between formats, to allow you to view DVD movies in either
format even if your television is not capable of displaying that
format. However the conversion process introduces some
picture degradation.
•
Highlight TV-SYSTEM on the VIDEO SETUP page.
•
Choose AUTO if your television can display both PAL
and NTSC video, or choose NTSC or PAL corresponding
to the format supported by your television.
>
Configuring the DVD26 DVD/CD player
If your television is capable of displaying both formats
the recommended setting is AUTO, which supplies the
unconverted video signal to the television.
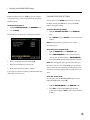
To select the Component Progressive Scan outputs
• Highlight P.S. MODE on the PROGRESSIVE page.
•
To specify the video output mode
The VIDEO OUT option determines the format of video on
the video outputs and SCART connector.
•
Select YUV to provide Y, PB, PR signals on the
Component Progressive Scan outputs:
Highlight VIDEO OUT on the VIDEO SETUP page.
The following options are available:
Option
Description
VIDEO
Composite.
YUV
Y, Cr, Cb signals on the component and
SCART outputs.
RGB
Red, Green, and Blue signals on the
component and SCART outputs.
To select the DVI output
• Highlight P.S. MODE on the PROGRESSIVE page.
•
Select DVI to select the DVI output.
•
Highlight DVI on the PROGRESSIVE page.
•
Select 480p/576p, 720p, or 1080i to specify the
resolution you want to use:
To turn the angle indicator on or off
• Highlight ANGLE INDICATOR on the VIDEO SETUP
page.
•
Select ON to display a multi-angle indicator on the
on-screen display when a DVD scene contains multiple
camera angles.
•
Select OFF if you prefer not to see the multi-angle
indicator.
To turn the screensaver on or off
The screensaver ensures that a static picture does not remain
on the screen, as this can damage some types of display.
•
Highlight SCREEN SAVER on the VIDEO SETUP
page.
•
Select ON to turn on a screen saver to automatically dim
the on-screen menus after a delay, or OFF to disable the
screen saver.
To choose the background for menus
• Highlight BACKGROUND on the VIDEO SETUP page.
•
Select BLACK to display a plain black background
behind the on-screen displays, or PICTURE to display
the video image.
17
>
Configuring the DVD26 DVD/CD player
CHOOSING THE DEFAULT LANGUAGES
•
Select the language you want to use, or select
OTHERS… and enter a language code:
Most DVD movies include a selection of audio tracks,
subtitles, and menu languages which you can choose between
while playing a disc. The LANGUAGE page allows you to
specify which language should be selected by default for each
option:
For a full list of language codes see Language codes, page 23.
SETTING THE RATING LEVEL
The following options are provided:
Option
Description
AUDIO LANGUAGE
Default audio soundtrack language.
SUBTITLE LANG
Default subtitle language.
DVD LANGUAGE
Default language for menus.
CAPTIONS
Whether captions are on or off.
•
Highlight the setting you to change on the LANGUAGE
page.
The DVD26 DVD/CD player allows you to set a parental lock
which will prevent playback of discs whose content exceeds
a specified rating level. Note that not all DVDs support this
function.
To set a parental lock
• Highlight PARENTAL LOCK on the GENERAL page.
•
Select the rating level you want to set, from 1 G (general)
to 8 ADULT (adult).
The following screen prompts you to enter the parental
password:
A list of the most common languages is displayed:
•
18
Enter your four-digit password and press SELECT.
>
Configuring the DVD26 DVD/CD player
Initially the password is set to 3308, but you can change it
to any password you choose as described in To change the
password, below.
To change the password
• Highlight PARENTAL PWD on the GENERAL page.
•
Select CHANGE.
The following screen allows you to change the password:
CHANGING THE DVD26 SETTINGS
Several options on the SETUP menu allow you to change
hardware settings of the DVD26, or reset your DVD/CD
player to its original settings.
To restore the factory settings
• Highlight FACTORY SETTINGS on the GENERAL
page.
•
Select RESET and press SELECT to restore the factory
settings.
Note: Resetting the factory settings do not reset the
parental password.
To set the infra-red remote mode
• Highlight REMOTE IR on the GENERAL page.
•
•
Enter your existing password; initially 3308.
•
Enter the new password you want to use.
•
Enter the new password again to confirm it.
If you forget your password contact your Primare dealer who
will be able to reset it for you.
Select FRONT REMOTE to use an infra-red remote
control pointer at the front panel, or BACK REMOTE to
control the DVD26 using the IR input on the back panel.
Note: After changing this option you will not be able to use
the remote control to control the DVD26. You can reset this
option to the front remote setting by switching off the power,
using the power switch under the left-hend edge of the front
panel.
To set the resume mode
You can choose how the DVD26 DVD/CD player resumes
playing the DVDs when you press >.
•
Highlight RESUME MODE on the GENERAL page.
•
Select ON to resume playing DVDs from the same
position after stopping, or OFF to start from track 1 after
stopping.
19
>
20
Configuring the DVD26 DVD/CD player
>
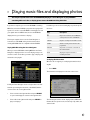
Playing music files and displaying photos
This chapter explains how to use the DVD26 DVD/CD player’s Smart Navigator to play CD-ROMs
containing MP3 music files, or display photos from a CD-ROM containing JPEG files.
If you have a computer, you can create CD-ROMs containing
MP3 files, and use the DVD26 to play these through your hifi
system. You can also create CD-ROMs containing photos from
your digital camera in JPEG format, and use the DVD26 to
display them on your television or display.
In addition you can use the following keys to perform special
functions:
Description
@
Play a ten second intro of each MP3 file,
or nine-picture overview of JPEG files.
SELECT
Play the currently selected folder or track.
PROG
Add the currently selected track to the
program list.
REPEAT
Repeat the current track or all tracks in
the selected folder.
DISP
Display the elapsed track time or
remaining track time.
This chapter explains how to use the Smart Navigator to
locate files on a CD-ROM, and it gives information about
creating CD-ROMs that are compatible with the DVD26.
Key
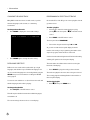
To play MP3 files using the Smart Navigator
When you insert a CD-ROM containing MP3 files the Smart
Navigator is displayed on the on-screen display, and you can
use this to search for the files you want to play or display, and
add tracks to the playlist.
To display file information
When the disc is stopped you can display information about
any file:
•
Press DISP.
The information is displayed in a window on the screen:
Initially the Smart Navigator shows a single folder in the lefthand list representing the whole disc, called ROOT, and the
contents of the disc in the right-hand list.
•
Select a folder in the right-hand list and press SELECT
to open it and display its contents in the right-hand list.
•
Select a file in the right-hand list and press SELECT to
play it or display it.
The following information will be displayed about JPEG files:
filename, file size, picture mode, resolution (w x h), maker, and
camera model.
21
>
Playing music files and displaying photos
MANIPULATING JPEG IMAGES
To rotate or reflect an image
While you are displaying a JPEG image you can use the
following keys to rotate or reflect it on the screen:
GUIDELINES FOR CREATING CD-ROMS CONTAINING
MP3 AND JPEG FILES
The following guidelines will help you create CD-ROMs on
your computer that are compatible with the DVD26.
Key
Description
•
The CD-ROM must be ISO9660 compatible.
<, >
Rotates the picture a quarter turn to the
left or right.
•
Use CD-R or CD-RW media for recording the files.
A
Flips the picture horizontally.
•
V
Flips the picture vertically.
For best results the disc should be finalised. Unfinalised
CD-R or CD-RW discs can be played, but not all the time
information will be displayed.
•
The DVD26 can recognise a maximum of 99 folders and
99 files. If there are more than this only the first 99 will
be recognised in one block.
•
The files should be given an extension .jpg, .JPG, .mp3 or
.MP3. Other extensions will not be recognised.
•
Only the first session of multi-session discs will be
recognised.
•
The DVD26 can play MP3 files encoded with the
following settings; mono or stereo, MPEG-1, Audio Layer
3 format, 44.1 or 48kHz, and fixed bit-rate. Incompatible
files will not play and a ? will be displayed on the onscreen display.
To zoom or pan the image
While you are displaying a JPEG image you can turn on Zoom
mode, and then zoom in and out, and move the position of the
picture.
Press ANG on the C22 remote control.
•
ZOOM ON is displayed on the on-screen display.
•
Use the following keys to zoom and pan:
Key
Description
>>
Zooms in from 100 to 200%.
<<
Zooms out from 100 to 25%
A, V, <, >
Pans a picture in the corresponding
direction.
•
22
Press ANG again to switch off Zoom mode.
>
Language codes
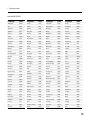
LANGUAGE CODES
Language
Code
Language
Code
Language
Code
Language
Code
Abkhazian
1028
French
1174
Lithuanian
1332
Sindhi
1498
Afar
1027
Frisian
1181
Macedonian
1349
Singhalese
1503
Afrikaans
1032
Galician
1194
Malagasy
1345
Siswati
1513
Albanian
1511
Georgian
1287
Malay
1357
Slovak
1505
Amharic
1039
German
1109
Malayalam
1350
Slovenian
1506
Arabic
1044
Greek
1142
Maltese
1358
Somali
1509
Armenian
1233
Greenlandic
1298
Maori
1347
Spanish
1149
Assamese
1045
Guarani
1196
Marathi
1356
Sundanese
1515
Aymara
1051
Gujarati
1203
Moldavian
1353
Swahili
1517
Azerbaijani
1052
Hausa
1209
Mongolian
1352
Swedish
1516
Bashkir
1053
Hebrew
1257
Nauru
1365
Tagalog
1532
Basque
1151
Hindi
1217
Nepali
1369
Tajik
1527
Bengali, Bangla
1066
Hungarian
1229
Norwegian
1379
Tamil
1521
Bhutani
1130
Icelandic
1253
Occitan
1393
Tatar
1540
Bihari
1060
Indonesian
1248
Oriya
1408
Tegulu
1525
Bislama
1069
Interlingua
1235
Oromo (Afan)
1403
Thai
1528
Breton
1070
Interlingue
1239
Pashto, Pushto
1435
Tibetan
1067
Bulgarian
1059
Inupiak
1245
Persian
1157
Tigrinya
1529
Burmese
1363
Irish
1183
Polish
1428
Tonga
1535
Byelorussian
1057
Italian
1254
Portuguese
1436
Tsonga
1539
Cambodian
1299
Japanese
1261
Punjabi
1417
Turkish
1538
Catalan
1079
Javanese
1283
Quechua
1463
Turkmen
1531
Chinese
1684
Kannada
1300
Rhaeto-Romance
1481
Twi
1543
Corsican
1093
Kashmiri
1305
Romanian
1483
Ukrainian
1557
Croatian
1226
Kazakh
1297
Russian
1489
Urdu
1564
Czech
1097
Kinyarwanda
1491
Samoan
1507
Uzbek
1572
Danish
1105
Kirghiz
1311
Sangro
1501
Vietnamese
1581
Dutch
1376
Kirundi
1482
Sanskrit
1495
Volapuk
1587
English
1144
Korean
1301
Scots Gaelic
1186
Welsh
1103
Esperanto
1145
Kurdish
1307
Serbian
1512
Wolof
1613
Estonian
1150
Laothian
1327
Serbo-Croatian
1502
Xhosa
1632
Faroese
1171
Latin
1313
Sesotho
1514
Yiddish
1269
Fiji
1166
Latvian, Lettish
1334
Setswana
1534
Yoruba
1665
Finnish
1165
Lingala
1326
Shona
1508
Zulu
1697
23
>
24
Language codes
>
Index
A
connecting to other equipment
analogue preamplifier ................................................................................. 6
analogue preamplifier, connecting to............................................ 6
angle indicator, enabling/disabling ...............................................17
audio CDs
digital display................................................................................................ 3
displaying disc information ..................................................................... 10
HDTV television........................................................................................... 4
going to a specific position ...................................................................... 11
multi-room system ...................................................................................... 6
pausing play ................................................................................................ 10
Progressive Scan video display ............................................................... 4
playing a disc ................................................................................................ 9
projector ........................................................................................................ 3
programming a selection of tracks ........................................................ 14
television ....................................................................................................... 5
repeating playback.................................................................................... 13
stopping play .............................................................................................. 10
audio outputs
configuring .................................................................................................. 16
line out ........................................................................................................... 6
optical digital output .................................................................................. 6
RCA digital output ...................................................................................... 6
AUDIO SETUP page ...................................................................... 16
audio track, changing...................................................................... 14
B
background for menus, configuring ..............................................17
BAL/ST (remote control) .............................................................. 14
digital surround processor......................................................................... 6
D
digital display, connecting to ...........................................................3
digital outputs, enabling or disabling .......................................... 16
digital surround processor, connecting to ................................... 6
dimming the front panel display ..................................................... 9
DIM (remote control) ........................................................................ 9
disc information, displaying ........................................................... 10
disc menus, displaying .....................................................................13
DISP (remote control) .................................................................... 10
downmix mode, configuring .......................................................... 16
downsampling LPCM ...................................................................... 16
DVDs
changing the audio track ......................................................................... 14
C
displaying subtitles ................................................................................... 14
C22 remote control ........................................................................... 8
CD-ROMs
displaying the Root Menu ....................................................................... 13
creating ........................................................................................................22
going to a specific chapter or title ........................................................ 10
music files .................................................................................................... 21
pausing play ................................................................................................ 10
photos .......................................................................................................... 21
chapters
displaying the Title Menu ........................................................................ 13
playing a disc ................................................................................................ 9
repeating playback.................................................................................... 13
stepping between...................................................................................... 10
resetting to the beginning ....................................................................... 10
component outputs .......................................................................4, 5
composite output................................................................................5
resuming ...................................................................................................... 10
slow motion play........................................................................................ 13
stopping play .............................................................................................. 10
DVI output ..................................................................................... 3, 17
configuring ...................................................................................................17
25
Index
>
E
M
eject (front panel) .............................................................................. 9
MODE (remote control) ................................................................. 14
MP3 files
F
factory settings, restoring ............................................................. 19
front panel controls ............................................................................7
eject ................................................................................................................ 9
creating CD-ROMs....................................................................................22
playing .......................................................................................................... 21
multi-room system............................................................................. 6
music files, playing............................................................................21
play ............................................................................................................... 10
previous/next ............................................................................................. 10
O
scan............................................................................................................... 10
optical digital output ......................................................................... 6
standby .......................................................................................................... 9
stop ............................................................................................................... 10
P
front panel display ....................................................................7, 9, 11
parental lock ..................................................................................... 18
dimming .......................................................................................................... 9
setting .......................................................................................................... 18
restoring ........................................................................................................ 9
password, changing ........................................................................ 19
pausing play ...................................................................................... 10
photos
G
GOTO (remote control) ............................................................ 10, 11
displaying .................................................................................................... 21
rotating or reflecting ................................................................................22
H
HDTV television, connecting to ..................................................... 4
I
infra-red repeater .............................................................................. 6
configuring .................................................................................................. 19
inserting a disc ................................................................................... 9
L
languages
configuring .................................................................................................. 18
language codes ..........................................................................................23
LANGUAGE page ............................................................................ 18
line output ........................................................................................... 6
locating a position on a disc .......................................................... 10
LPCM, downsampling ..................................................................... 16
zooming or panning ..................................................................................22
play/pause (remote control) ......................................................... 10
playing a disc ...................................................................................... 9
playlists .............................................................................................. 14
play (front panel) ............................................................................. 10
previous/next (front panel) ........................................................... 10
previous/next (remote control) .................................................... 10
programming a selection of tracks .............................................. 14
Progressive Scan outputs ............................................................... 4
configuring ...................................................................................................17
Progressive Scan video display, connecting to ......................... 4
PROG (remote control).................................................................. 14
projector, connecting to ....................................................................3
R
rating level ......................................................................................... 18
configuring .................................................................................................. 18
RCA digital output ............................................................................. 6
26
Index
>
remote control .................................................................................... 8
remote control functions
SETUP menu .....................................................................................15
BAL/ST........................................................................................................ 14
exiting........................................................................................................... 15
DIM ................................................................................................................. 9
selecting options ....................................................................................... 15
DISP ............................................................................................................. 10
slow motion (remote control) ........................................................13
slow motion play ...............................................................................13
Smart Navigator ...............................................................................21
specification ........................................................................................ 2
GOTO ..................................................................................................... 10, 11
MODE .......................................................................................................... 14
next ............................................................................................................... 10
play/pause................................................................................................... 10
previous ....................................................................................................... 10
PROG ........................................................................................................... 14
REPEAT ...................................................................................................... 13
root menu .................................................................................................... 13
scan............................................................................................................... 10
SETUP ......................................................................................................... 15
slow motion ................................................................................................ 13
standby .......................................................................................................... 9
stop/eject ............................................................................................... 9, 10
displaying .................................................................................................... 15
standby ................................................................................................ 9
standby (front panel) ........................................................................ 9
standby (remote control) ................................................................. 9
stepping between chapters/tracks ............................................. 10
stop/eject (remote control) ...................................................... 9, 10
stopping play .................................................................................... 10
stop (front panel) ............................................................................. 10
subtitles, displaying ........................................................................ 14
switching on ........................................................................................ 9
switching to standby ........................................................................ 9
TOP............................................................................................................... 13
repeating playback ...........................................................................13
REPEAT (remote control) ..............................................................13
resetting a DVD to the beginning ................................................ 10
restoring the front panel display.................................................... 9
resuming a DVD ............................................................................... 10
configuring .................................................................................................. 19
Root Menu, displaying .....................................................................13
root menu (remote control) ............................................................13
S
scanning through the disc ............................................................. 10
scan (front panel) ............................................................................ 10
scan (remote control) ..................................................................... 10
SCART output .....................................................................................5
T
technical specification ...................................................................... 2
television, connecting to...................................................................5
Title Menu, displaying......................................................................13
TOP (remote control) ......................................................................13
tracks, stepping between .............................................................. 10
TV system, configuring .................................................................. 16
V
video mode, specifying ....................................................................17
video outputs
component ................................................................................................4, 5
composite ...................................................................................................... 5
configuring .................................................................................................. 16
configuring ...................................................................................................17
DVI .................................................................................................................. 3
screensaver, enabling/disabling ....................................................17
screen format, configuring ............................................................ 16
selection of tracks, programming................................................. 14
SETUP (remote control).................................................................15
Progressive Scan ........................................................................................ 4
SCART ........................................................................................................... 5
video output mode, configuring ....................................................17
VIDEO SETUP page....................................................................... 16
27
>
28
Index