1
MODEL: MX-5500N
MX-6200N MX-6201N
MX-7000N MX-7001N
DIGITAL FULL COLOUR MULTIFUNCTIONAL SYSTEM
Safety
Sa ety Guide
CAUTIONS
INSTALLATION REQUIREMENTS
SUPPLIES
Before installing this product, be sure to read the
"CAUTIONS" and "INSTALLATION
REQUIREMENTS" sections.
SPECIFICATIONS
INFORMATION ON DISPOSAL
TO THE ADMINISTRATOR OF THE MACHINE
REMOVING MISFEEDS
Trou
oubleshooting
leshooting
Troubleshooting
In the unlikely event of you experiencing a
problem with this product, please refer to this
manual before requesting service.
COPYING
PRINTING
FACSIMILE
The contents of this manual are grouped by
situation.
The chapters of the manual appear on the cover.
SCANNING
DOCUMENT FILING
INSTALLATION
Keep this manual close at hand for reference
whenever needed.
OTHER PROBLEMS
Caution!
For complete electrical disconnection, pull out the main plug.
The socket-outlet shall be installed near the equipment and shall be easily accessible.
Shielded network cable and USB cable must be used with this equipment to maintain compliance with standards.
➢➣➢➣➢➣➢➣➢➣➢➣➢➣➢➣➢➣➢➣➢➣➢➣➢➣➢➣➢➣➢➣➢➣➢➣➢➣➢➣➢➣➢➣➢➣➢➣➢➣➢➣➢
Required in IEC-950 (EN 60 950) - Europe
• The equipment should be installed near an accessible socket outlet for easy disconnection.
Required in Appendix ZB of BS 7002 (En 60 950) — United Kingdom
MAINS PLUG WIRING INSTRUCTIONS
The mains lead of this equipment is already fitted with a mains plug which is either a non-rewireable
(moulded) or a rewireable type. Should the fuse need to be replaced, a BSI or ASTA approved fuse
to BS1362 marked
or
and of the same rating as the one removed from the plug must
be used.
Always refit the fuse cover after replacing the fuse on the moulded plug. Never use the plug without
the fuse cover fitted.
In the unlikely event of the socket outlet in your home not being compatible with the plug supplied
either cut-off the moulded plug (if this type is fitted) or remove by undoing the screws if a rewireable
plug is fitted and fit an appropriate type observing the wiring code below.
DANGER: The fuse should be removed from the cut-off plug and the plug destroyed immediately
and disposed of in a safe manner. Under no circumstances should the cut-off plug be inserted
elsewhere into a 13A socket outlet as a serious electric shock may occur.
To fit an appropriate plug to the mains lead, follow the instructions below:
IMPORTANT: The wires in this mains lead are coloured in accordance with the following code:
GREEN-AND-YELLOW: Earth
BLUE:
Neutral
BROWN:
Live
As the colours of the wires in this mains lead may not correspond with coloured markings
identifying the terminals in your plug, proceed as follows:
The wire which is coloured GREEN-AND YELLOW must be connected to the terminal in the plug
which is marked with the letter E, or by the safety earth symbol Å@, or coloured green or greenand-yellow.
The wire which is coloured BLUE must be connected to the terminal which is marked with the letter
N or coloured black.
The wire which is coloured BROWN must be connected to the terminal which is marked with the
letter L or coloured red.
If you have any doubt, consult a qualified electrician.
WARNING: THIS APPARATUS MUST BE EARTHED.
➣➢➣➢➣➢➣➢➣➢➣➢➣➢➣➢➣➢➣➢➣➢➣➢➣➢➣➢➣➢➣➢➣➢➣➢➣➢➣➢➣➢➣➢➣➢➣➢➣➢➣➢➣➢➣➢
➢➣➢➣➢➣➢➣➢➣➢➣➢➣➢➣➢➣➢➣➢➣➢➣➢➣➢➣➢➣➢➣➢➣➢➣➢➣➢➣➢➣➢➣➢➣➢➣➢➣➢➣➢➣➢
➣➢➣➢➣➢➣➢➣➢➣➢➣➢➣➢➣➢➣➢➣➢➣➢➣➢➣➢➣➢➣➢➣➢➣➢➣➢➣➢➣➢➣➢➣➢➣➢➣➢➣➢➣➢➣
EMC (this machine and peripheral devices)
Warning:
This is a Class A product. In a domestic environment this product may cause radio interference in which case the user may be
required to take adequate measures.
This machine contains the software having modules developed by Independent JPEG Group.
For the users of the fax function
FAX interface cable and Line cable:
These special accessories must be used with the device.
Notice for Users in Europe
This equipment has been designed to work on the British analogue public switched telephone network.
This equipment has been tested according to the pan-European TS103 021 regulation.
It will operate on all analogue telephone networks which comply with the TS103 021.
Please contact your dealer or network operator, if you are not sure whether your network operates according to
TS103 021.
The Declaration of Conformity can be viewed at the following URL address.
http://www.sharp.de/doc/MX-FXX1.pdf
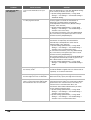
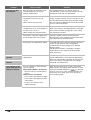
Contents
CAUTIONS . . . . . . . . . . . . . . . . . . . . . . . . . . . . . . . . 2
Finisher specifications . . . . . . . . . . . . . . . . . . . . . 11
Laser information . . . . . . . . . . . . . . . . . . . . . . . . . . 3
Saddle stitch finisher specifications . . . . . . . . . . . 12
INSTALLATION REQUIREMENTS . . . . . . . . . . . . . 4
Punch module specifications
(for finisher / saddle stitch finisher). . . . . . . . . . . . 13
SUPPLIES. . . . . . . . . . . . . . . . . . . . . . . . . . . . . . . . . 5
Inserter specifications. . . . . . . . . . . . . . . . . . . . . . 14
Storage of supplies. . . . . . . . . . . . . . . . . . . . . . . . . 5
Printer specifications . . . . . . . . . . . . . . . . . . . . . . 15
Supply of spare parts and consumables . . . . . . . . 5
Network scanner / Internet Fax specifications . . . 20
SPECIFICATIONS . . . . . . . . . . . . . . . . . . . . . . . . . . 6
Machine specifications / copier specifications . . . . 6
Pull scan function (TWAIN) specifications . . . . . . 16
Facsimile specifications . . . . . . . . . . . . . . . . . . . . 17
Continuous copying speeds . . . . . . . . . . . . . . . . . . 8
INFORMATION ON DISPOSAL . . . . . . . . . . . . . . . 18
Printable sizes . . . . . . . . . . . . . . . . . . . . . . . . . . . . 8
A. Information on Disposal for Users (private
households) . . . . . . . . . . . . . . . . . . . . . . . . . . . . . 18
Ambient environment . . . . . . . . . . . . . . . . . . . . . . . 8
Acoustic noise emission (measurement according to
ISO7779) . . . . . . . . . . . . . . . . . . . . . . . . . . . . . . . . 9
Emission concentration (measurement according to
RAL-UZ62: Edition Jan. 2002) . . . . . . . . . . . . . . . . 9
B. Information on Disposal for Business Users . . 18
TO THE ADMINISTRATOR OF THE MACHINE . . 20
Factory default passwords . . . . . . . . . . . . . . . . . . 20
Automatic document feeder specifications. . . . . . . 9
Forwarding all transmitted and received data to the
administrator (document administration function). . . .20
Large capacity tray (MX-LCX2) specifications . . . 10
For the users of the fax function . . . . . . . . . . . . . . . . .21
Large capacity tray (MX-LCX3) specifications . . . 10
Trademark acknowledgments. . . . . . . . . . . . . . . . . . .22
Note:
• Considerable care has been taken in preparing this manual. If you have any comments or concerns about the manual, please
contact your dealer or nearest authorised service representative.
• This product has undergone strict quality control and inspection procedures. In the unlikely event that a defect or other problem is
discovered, please contact your dealer or nearest authorised service representative.
• Aside from instances provided for by law, SHARP is not responsible for failures occurring during the use of the product or its
options, or failures due to incorrect operation of the product and its options, or other failures, or for any damage that occurs due
to use of the product.
• This manual contains references to the fax function. However, please note that the fax function is not available in some countries
and regions.
Products that have earned the ENERGY STAR® are designed to protect the environment
through superior energy efficiency.
Warranty
While every effort has been made to make this document as accurate and helpful as possible, SHARP Corporation makes no
warranty of any kind with regard to its content. All information included herein is subject to change without notice. SHARP is not
responsible for any loss or damages, direct or indirect, arising from or related to the use of this operation manual.
©Copyright SHARP Corporation 2007. All rights reserved. Reproduction, adaptation or translation without prior written permission is
prohibited, except as allowed under copyright laws.
1
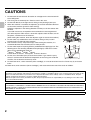
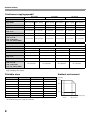
CAUTIONS
1. Do not touch the transfer belt. Scratches or smudges on the transfer belt will
cause dirty prints.
2. The fusing unit is extremely hot. Exercise care in this area.
3. Do not look directly at the light source. Doing so may damage your eyes.
4. When the machine is installed, the adjusters (4) must be lowered to the floor
Fusing unit
to secure the machine (prevent it from moving).
Rotate the adjusters in the locking direction until they are in firm contact with
the floor.
If you find it necessary to reposition the machine due to rearrangement of
your office layout or other reason, retract the adjusters from the floor, turn off
the power, and then move the machine.
(After moving the machine, lower the adjusters again to secure the machine.)
5. Do not make any modifications to this machine. Doing so may result in
personal injury or damage to the machine.
6. The machine is heavy. To prevent injury when moving the machine, it is
recommended that it be moved by four or more persons.
7. Do not make copies of anything which is prohibited from copying by law. The
following items are normally prohibited from printing by national law. Other
items may be prohibited by local law.
● Money ● Stamps ● Bonds ● Stocks
Adjuster
● Bank drafts ● Checks ● Passports ● Driver's licences
8. Do not use a flammable spray to clean the machine. If gas from the spray
Lock
Release
comes in contact with hot electrical components or the fusing unit inside the
machine, fire or electrical shock may result.
9. Do not throw toner, a toner container (toner cartridge), or a waste toner box into a fire. Toner may fly and cause
burns.
10. Store toner, toner containers (toner cartridges), and waste toner boxes out of the reach of children.
The machine includes the document filing function, which stores document image data on the machine's hard drive. Stored
documents can be called up and printed or transmitted as needed. If a hard drive failure occurs, it will no longer be possible to call
up the stored document data. To prevent the loss of important documents in the unlikely event of a hard drive failure, keep the
originals of important documents or store the original data elsewhere.
With the exception of instances provided for by law, Sharp Corporation bears no responsibility for any damages or loss due to the
loss of stored document data.
"BATTERY DISPOSAL"
THIS PRODUCT CONTAINS A LITHIUM PRIMARY MEMORY BACK-UP BATTERY THAT MUST BE DISPOSED OF PROPERLY.
PLEASE CONTACT YOUR LOCAL SHARP DEALER OR AUTHORISED SERVICE REPRESENTATIVE FOR ASSISTANCE IN
DISPOSING OF THIS BATTERY.
Each instruction also covers the optional units used with these products.
2
CAUTIONS
Laser information
Wave length
Colour: 785 nm
+10 nm
-15 nm
B/W: 788 nm
Pulse times
(North America and Europe)
Colour:
MX-5500N/6200N/6201N/
7000N/7001N *1 (4.9 µs ±4.9 ns)/7 mm
MX-5500N/6200N/7000N : (3.5 µs ±3.5 ns)/7 mm
MX-6201N/7001N : (2.8 µs ±2.8 ns)/7 mm
+12 nm
-15 nm
B/W:
MX-5500N/6200N/6201N/
7000N/7001N *1 (4.8 µs ±4.8 ns)/7 mm
MX-5500N/6200N/6201N : (4.0 µs ±4.0 ns)/7 mm
MX-7000N/7001N : (3.4 µs ±3.4 ns)/7 mm
*1: heavy paper
Output power
Max 0.8 mW
At the production line, the output power of the scanner unit is adjusted to 0.40 MILLIWATT PLUS 5% and is maintained constant by
the operation of the Automatic Power Control (APC).
Caution
Use of controls or adjustments or performance of procedures other than those specified herein may result in hazardous radiation exposure.
s
This Digital Equipment is CLASS 1 LASER PRODUCT (IEC 60825-1 Edition 1.2-2001)
For Europe:
CLASS 1 LASER PRODUCT
LASER KLASSE 1
LUOKAN 1 LASERLAITE
KLASS 1 LASERAPPARAT
CAUTION
CLASS 3B INVISIBLE LASER
RADIATION WHEN OPEN AND
INTERLOCKS DEFEATED.
AVOID EXPOSURE TO BEAM.
VORSICHT
UNSICHTBARE
LASERSTRAHLUNG DER
KLASSE 3B, WENN
ABDECKUNG GEÖFFNET UND
SICHERHEITSVERRIEGELUNG
ÜBERBRÜCKT. NICHT DEM
STRAHL AUSSETZEN.
ADVARSEL
USYNLIG LASERSTRÅLNING
AF KLASSE 3B VED ÅBNING,
NÅR SIKKERHEDSBRYDERE
ER UDE AF FUNKTION. UNDGÅ
UDSÆTTELSE FOR STRÅLING.
ADVARSEL
USYNLIG KLASSE 3B
LASERSTRÅLNING NÅR
DEKSEL ÅPNES OG
SIKKERHEDSLÅS BRYTES .
UNNGÅ EKSPONERING FOR
STRÅLEN.
VARNING
OSYNLIG LASERSTRÅLNING
KLASS 3B NÄR DENNA DEL ÄR
ÖPPNAD OCH SPÄRRAR ÄR
URKOPPLADE. UNDVIK
EXPONERING FÖR STRÅLEN.
VARO!
AVATTAESSA JA
SUOJALUKITUS OHITETTAESSA
OLET ALTTIINA NÄKYMÄTÖNTÄ
LUOKAN 3B LASERSÄTEILYLLE.
ÄLÄ KATSO SÄTEESEEN.
The above label is affixed to the laser
unit inside the machine.
3
INSTALLATION REQUIREMENTS
Improper installation may damage this product. Please note the following during initial installation and whenever the
machine is moved.
1. The machine should be installed near an accessible
power outlet for easy connection.
2. Be sure to connect the power cord only to a power
outlet that meets the specified voltage and current
requirements. Also make certain the outlet is properly
grounded.
• For the power supply requirements, see the name
plate in the lower corner of the left side of the
machine.
Connect the machine to a power outlet which is not
used for other electric appliances. If a lighting fixture is
connected to the same outlet, the light may flicker.
3. Do not install the machine in areas that are:
• damp, humid, or very dusty
• exposed to direct sunlight
• poorly ventilated
• subject to extreme temperature or humidity
changes, e.g., near an air conditioner or heater.
4. Be sure to allow the required space around the
machine for servicing and proper ventilation.
5. The machine includes a built-in hard drive. Do not
subject the machine to shock or vibration. In
particular, never move the machine while the power is
on.
30 cm
(11-13/16")
30 cm
(11-13/16")
45 cm
(17-23/32")
A small amount of ozone is produced within the printer during operation. The emission level is insufficient to cause any health
hazard.
NOTE:
The present recommended long term exposure limit for ozone is 0.1 ppm (0.2 mg/m3) calculated as an 8 hr. time-weighted average
concentration.
However, since the small amount that is emitted may have an objectionable odor, it is advisable to place the copier in a ventilated
area.
4
SUPPLIES
Standard supplies for this product that can replaced by the user include paper, toner cartridges, and staple cartridges for
the finisher.
Be sure to use only SHARP-specified products for the toner cartridges, finisher staple cartridge, saddle stitch finisher
staple cartridge, and transparency film.
For best copying results, be sure to use only Sharp Genuine Supplies which are designed,
engineered, and tested to maximize the life and performance of Sharp products. Look for the
Genuine Supplies label on the toner package.
GENUINE SUPPLIES
Storage of supplies
Proper storage
1. Store the supplies in a location that is:
• clean and dry,
• at a stable temperature,
• not exposed to direct sunlight.
2. Store paper in the wrapper and lying flat.
3. Paper stored in packages standing up or out of the wrapper may curl or become damp, resulting in paper misfeeds.
Storing toner cartridges
Store a new toner cartridge box horizontally. Do not store it standing on end. If stored standing on end, the toner may not
distribute well even after shaking the cartridge vigorously, and will remain inside the cartridge without flowing out.
Staple cartridge
The finisher and saddle stitch finisher require the following staple cartridge:
AR-SC2 (for finisher and saddle stitch finisher)
Approx. 5000 per cartridge x 3 cartridges
AR-SC3 (for saddle stitch finisher only)
Approx. 2000 per cartridge x 3 cartridges
Supply of spare parts and consumables
The supply of spare parts for repair of the machine is guaranteed for at least 7 years following the termination of
production. Spare parts are those parts of the machine which may break down within the scope of the ordinary use of
the product, whereas those parts which normally exceed the life of the product are not to be considered as spare parts.
Consumables too, are available for 7 years following the termination of production.
5
SPECIFICATIONS
Machine specifications / copier specifications
Name
Digital Full Colour Multifunctional System MX-5500N/6200N/6201N/7000N/7001N
Type
Console
Photoconductive type
OPC drum
Printing method
Electrophotographic system (laser)
Developer system
Dry-type two-component magnetic brush development
Fusing system
Heat rollers
Black and white scanning: 600 x 300 dpi (factory default values), 600 x 600 dpi
Colour scanning:600 x 600 dpi (factory default values)
Document glass
Scanning resolution
Duplex single pass
feeder (automatic
document feeder)
Printing resolution
600 x 600 dpi
Scanning gradation
10 bits
Printing gradation
Black and white printing: 2 tones (1 bit)
Colour printing: 2 tones per colour (1 bit) or 16 tones per colour (4 bits)
Original sizes / types
Max. A3 (11" x 17") / sheets, bound documents
Copy sizes
Maximum: A3W (12" x 18") Minimum: A5R (5-1/4" x 5-3/4")
Print margins
Leading edge: 4 mm (11/64") or less, trailing edge: 4 mm (11/64") or less, near edge / far edge: total
4 mm (11/64") or less
Warm-up time
295 seconds or less (MX-5500N/6200N/7000N)
320 seconds or less (MX-6201N/7001N)(at room temperature of 23°C (73.4°F) and rated voltage)
First-copy time*1
Colour copy time: 7.2 seconds (MX-6201N/7001N) / 8.4 seconds (MX-5500N/6200N/7000N)
Black and white copy time: 4.0 seconds (MX-7000N/7001N)
4.5 seconds (MX-5500N/6200N/6201N)
(Portrait feeding of A4 (8-1/2" x 11") sheets from 2nd paper tray, without auto colour selection and
auto colour mode.)
Copy ratios
Variable: 25% to 400% in increments of 1%, total 376 increments (25% to 200% when the automatic
document feeder is used)
Fixed presets: 25%, 50%, 70%, 81%, 86%, 100%, 115%, 122%, 141%, 200% and 400% for AB sizes;
25%, 50%, 64%, 77%, 100%, 121%, 129%, 200% and 400% for inch sizes.
Two reduction ratios and two enlargement ratios can be stored.
Continuous copy
999 copies
Automatic document
feeder
See "Automatic document feeder specifications".
Black and white scanning: 600 x 300 dpi (factory default values), 600 x 600 dpi
Colour scanning:600 x 600 dpi (factory default values)
Tray 1
Paper sizes:
Paper weight:
Paper capacity:
Paper types:
A4, B5*2, 8-1/2" x 11"
Plain paper (60 g/m2 to 105 g/m2 (16 lbs. to 28 lbs.))
1200 sheets (80 g/m2 (21 lbs.))
SHARP-recommended plain paper, recycled paper, and coloured paper
Tray 2
Paper sizes:
Paper weight:
Paper capacity:
Paper types:
A4, 8-1/2" x 11"
Plain paper (60 g/m2 to 105 g/m2 (16 lbs. to 28 lbs.))
800 sheets (80 g/m2 (21 lbs.))
SHARP-recommended plain paper, recycled paper, and coloured paper
*1 First copy out time is measured with original on the document glass in full ready condition with fuser at operating temperature and
mirror motor at operating speed in each of black and white mode and colour mode, actual time may vary based on environment
conditions.
*2 It may not be possible to use this size in some countries and regions.
6
SPECIFICATIONS
Machine specifications / copier specifications (Continued)
Paper sizes:
Tray 3
A3W, A3, B4, A4, A4R, B5, B5R, A5R, 12" x 18", 11" x 17", 8-1/2" x 14",
8-1/2" x 13", 8-1/2" x 11", 8-1/2" x 11"R, 7-1/4" x 10-1/2"R, 5-1/2" x 8-1/2"R, 8K,
16K, 16KR (Includes automatic paper size detection function.)
Paper weight: Plain paper (60 g/m2 to 105 g/m2 (16 lbs. to 28 lbs.)), heavy paper (106 g/m2 to
209 g/m2 (28 lbs. to 56 lbs.))
Paper capacity: 500 sheets (80 g/m2 (21 lbs.)), transparency films 40 sheets, heavy paper 80
sheets, tab paper 40 sheets, gloss paper 40 sheets
Paper types:
SHARP-recommended plain paper, recycled paper, coloured paper, heavy paper,
and transparency film
Paper sizes:
Tray 4
A3W, A3, B4, A4, A4R, B5, B5R, 12" x 18", 11" x 17", 8-1/2" x 14", 8-1/2" x 13",
8-1/2" x 11", 8-1/2" x 11"R, 7-1/4" x 10-1/2"R, 8K, 16K, 16KR (Includes automatic
paper size detection function.)
Paper weight: Plain paper (60 g/m2 to 105 g/m2 (16 lbs. to 28 lbs.)), heavy paper (106 g/m2 to
209 g/m2 (28 lbs. to 56 lbs.))
Paper capacity: 500 sheets (80 g/m2 (21 lbs.))
Paper types:
SHARP-recommended plain paper, recycled paper, coloured paper, and heavy paper
Paper sizes: A3W, A3, B4, A4, A4R, B5, B5R, A5R, 12" x 18", 11" x 17", 8-1/2" x 14", 8-1/2" x 13", 8-1/2" x 11",
8-1/2" x 11"R, 7-1/4" x 10-1/2"R, 5-1/2" x 8-1/2"R, 8K, 16K, 16KR (Includes automatic paper size
detection function. Entry of paper sizes up to 297 mm x 420 mm (11" x 17") is possible.)
Bypass tray
Paper weights:
Thin paper (55 g/m2 to 59 g/m2 (15 lbs. to 16 lbs.)), plain paper (60 g/m2 to 105 g/m2 (16 lbs. to 28 lbs.)),
heavy paper (106 g/m2 to 256 g/m2 (28 lbs. to 68 lbs.)), envelopes (75 g/m2 to 90 g/m2 (20 lbs. to 24 lbs.))
Paper capacity: Standard paper 100 sheets
Paper types:
Plain paper, recycled paper, coloured paper, heavy paper, thin paper, transparency film, envelopes
(Monarch, Com-10, DL, C5)
Duplex module
Paper sizes: A3W, A3, B4, A4, A4R, B5, B5R, A5R, 12" x 18", 11" x 17", 8-1/2" x 14", 8-1/2" x 13",
8-1/2" x 11", 8-1/2" x 11"R, 7-1/4" x 10-1/2"R, 5-1/2" x 8-1/2"R, 8K, 16K, 16KR
Paper weight: Plain paper (60 g/m2 to 105 g/m2 (16 lbs. to 28 lbs.)), heavy paper (106 g/m2 to
209 g/m2 (28 lbs. to 56 lbs.))
Paper types: SHARP-recommended plain paper, recycled paper, coloured paper, and heavy paper
Output method: Face-down output
Output capacity:
250 sheets (using SHARP-recommended A4 or 8-1/2" x 11" paper)
Output tray (Centre tray)* (The maximum number of sheets that can be held varies depending on ambient conditions in the
installation location, the type of paper, and the storage conditions of the paper.)
Tray full sensor: Yes
Right tray
Output method: Face-down output
Output capacity:
100 sheets (using SHARP-recommended A4 or 8-1/2" x 11" paper)
(The maximum number of sheets that can be held varies depending on ambient conditions in the
installation location, the type of paper, and the storage conditions of the paper. Envelopes, heavy
paper (106 g/m2 to 209 g/m2 (28 lbs. to 56 lbs.)), and tab paper cannot be used.)
Tray full sensor: Yes
Interface port
LAN connectivity: 10Base-T / 100Base-TX
USB connectivity:Type A connector supports USB 2.0 (Full speed)
Type B connector supports USB 2.0 (Hi speed)
Required power supply
Local voltage ±10% (For the power supply requirements, see the name plate in the lower corner of
the left side of the machine.)
Power consumption
220-240V: 1.84 kW 100-127V: 1.80 kW
Dimensions
795 mm (W) x 715 mm (D) x 1225 mm (H) (31-19/64" (W) x 28-9/64" (D) x 48-7/32" (H))
Weight
Approx. 209 kg (460.8 lbs.)
Overall dimensions
1130 mm (W) x 715 mm (D) (44-31/64" (W) x 28-9/64" (D)) (when bypass tray is extended)
* Output tray (Centre tray) cannot be used when the finisher (MX-FNX3) or saddle stitch finisher (MX-FNX4) is installed.
7
SPECIFICATIONS
Continuous copying speeds*
Model
MX-5500N
MX-6200N
Copy ratio
MX-6201N
100% / Reduced / Enlarged
Copy mode
Colour copying
Black and
white copying
Colour copying
Black and
white copying
Colour copying
Black and
white copying
A3W, 12" x 18"
18 copies/min.
28 copies/min.
18 copies/min.
31 copies/min.
23 copies/min.
31 copies/min.
A3, 11" x 17", 8K
19 copies/min.
30 copies/min.
19 copies/min.
33 copies/min.
24 copies/min.
33 copies/min.
B4, 8-1/2" x 14",
8-1/2" x 13"
22 copies/min.
35 copies/min.
22 copies/min.
38 copies/min.
28 copies/min.
38 copies/min.
A4, B5, 8-1/2" x 11", 16K
41 copies/min.
55 copies/min.
41 copies/min.
62 copies/min.
50 copies/min.
62 copies/min.
A4R, B5R, A5R,
8-1/2" x 11"R,
7-1/4" x 10-1/2"R,
5-1/2" x 8-1/2"R, 16KR
26 copies/min.
40 copies/min.
26 copies/min.
44 copies/min.
32 copies/min.
44 copies/min.
Model
MX-7000N
Copy ratio
MX-7001N
100% / Reduced / Enlarged
Copy mode
Colour copying
Black and white copying
Colour copying
Black and white copying
A3W, 12" x 18"
18 copies/min.
36 copies/min.
23 copies/min.
36 copies/min.
A3, 11" x 17", 8K
19 copies/min.
38 copies/min.
24 copies/min.
38 copies/min.
B4, 8-1/2" x 14",
8-1/2" x 13"
22 copies/min.
44 copies/min.
28 copies/min.
44 copies/min.
A4, B5, 8-1/2" x 11", 16K
41 copies/min.
70 copies/min.
50 copies/min.
70 copies/min.
A4R, B5R, A5R,
8-1/2" x 11"R,
7-1/4" x 10-1/2"R,
5-1/2" x 8-1/2"R, 16KR
26 copies/min.
51 copies/min.
32 copies/min.
51 copies/min.
* Copy speed during output of the second copy and following copies when performing continuous one-sided copying of the same
page (excluding offset output).
Printable sizes
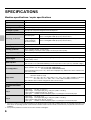
Paper size
Ambient environment
Printable size
Paper size
Printable size
A3W*
297 x 420 mm
12" x 18"*
279 x 432 mm
A3
293 x 413 mm
11" x 17"
275 x 425 mm
B4
253 x 357 mm
8-1/2" x 14"
212 x 349 mm
A4
206 x 290 mm
8-1/2" x 13"
212 x 323 mm
B5
178 x 250 mm
8-1/2" x 11"
212 x 272 mm
A5
144 x 203 mm
5-1/2" x 8-1/2 "
136 x 209 mm
7-1/4" x 10-1/2R"
180 x 260 mm
8K
266 x 383 mm
16K
191 x 263 mm
* When printing on A3W (12" x 18") size paper using the PCL or PS printer driver,
the maximum print area is 299 mm x 450 mm.
8
(Humidity)
85%
60%
20%
10˚C
(54˚F)
30˚C 35˚C (Temperature)
(86˚F) (91˚F)
SPECIFICATIONS
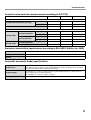
Acoustic noise emission (measurement according to ISO7779)
MX-5500N
MX-6200N / 7000N MX-6201N/7001N
Sound power level LwA
Colour
7.1 B
7.1 B
6.9 B
Black and white
7.2 B
7.3 B
7.1 B
5.1 B
5.1 B
5.0 B
Colour
56 dB (A)
56 dB (A)
55 dB (A)
Black and white
57 dB (A)
57 dB (A)
56 dB (A)
Colour
56 dB (A)
56 dB (A)
55 dB (A)
Black and white
58 dB (A)
58 dB (A)
57 dB (A)
Bystander positions
37 dB (A)
37 dB (A)
35 dB (A)
Operator positions
37 dB (A)
37 dB (A)
35 dB (A)
Printing mode (continuous printing)
Standby mode
Sound pressure level LpA (actual measurement)
Bystander positions
Printing mode
Operator positions
Standby mode
Emission concentration (measurement according to RAL-UZ62: Edition Jan. 2002)
Ozone
0.02 mg/m3 or less
Dust
0.075 mg/m3 or less
Styrene
0.07 mg/m3 or less
Automatic document feeder specifications
Original sizes
A3 to A5, 11" x 17" to 5-1/2" x 8-1/2", long paper
(max. width 297 mm (11-45/64") x max. length 800 mm (31-31/64"), scanning in mono 2 mode of
one side only is possible in fax and image scan modes)
Original weight
One-sided 35 g/m2 to 128 g/m2 (9 lbs. to 34 lbs.) (Paper weights from 35 g/m2 (9 lbs.) to 49 g/m2
(13 lbs.) require the use of slow scan mode.)
Two-sided 50 g/m2 to 128 g/m2 (13 lbs. to 34 lbs.)
Capacity
150 sheets (80 g/m2 (21 lbs.)) Maximum stack height of 19.5 mm (3/4")
9
SPECIFICATIONS
Large capacity tray (MX-LCX2) specifications
Model
MX-LCX2
Paper sizes
A4, B5*, 8-1/2" x 11"
Paper weight
Plain paper (60 g/m2 to 105 g/m2 (16 lbs. to 28 lbs.)), heavy paper (106 g/m2 to 209 g/m2 (28 lbs. to
56 lbs.))
Paper capacity
3500 sheets (80 g/m2 (21 lbs.))
Paper types
SHARP-recommended plain paper, recycled paper, coloured paper, and heavy paper
Power supply
Supplied from the machine
Dimensions
370 mm (W) x 550 mm (D) x 525 mm (H) (14-9/16" (W) x 21-21/32" (D) x 20-43/64" (H))
Weight
Approx. 28 kg (61.7 lbs.)
Overall dimensions when 1165 mm (W) x 715 mm (D) (45-55/64" (W) x 28-9/64" (D))
attached to machine
* It may not be possible to use this size in some countries and regions.
Large capacity tray (MX-LCX3) specifications
Model
MX-LCX3
Paper sizes
A3W, A3, B4, A4, A4R, B5, 12" x 18", 11" x 17", 8-1/2" x 14", 8-1/2" x 13", 8-1/2" x 11" 8-1/2" x 11"R
Paper weight
Plain paper (60 g/m2 to 105 g/m2 (16 lbs. to 28 lbs.)), heavy paper (106 g/m2 to 209 g/m2 (28 lbs. to
56 lbs.))
Paper capacity
3000 sheets (80 g/m2 (21 lbs.))
Paper types
SHARP-recommended plain paper, recycled paper, coloured paper and heavy paper
Power supply
Supplied from the machine
Dimensions
670 mm (W) x 570 mm (D) x 525 mm (H) (26-3/8" (W) x 22-7/16" (D) x 20-43/64" (H))
Weight
Approx. 50 kg (110.2 lbs.)
Overall dimensions when 1465 mm (W) x 715 mm (D) (57-21/32" (W) x 28-9/64" (D))
attached to machine
10
SPECIFICATIONS
Finisher specifications*1
Model
MX-FNX3
Paper sizes
A3W, A3, B4, A4, A4R, B5, B5R, A5R, 12" x 18", 11" x 17", 8-1/2" x 14", 8-1/2" x 13", 8-1/2" x 11",
8-1/2" x 11"R, 7-1/4" x 10-1/2"R, 5-1/2" x 8-1/2"R, 8K, 16K, 16KR
Paper weight
Thin paper (55 g/m2 to 59 g/m2 (15 lbs. to 16 lbs.)) plain paper (60 g/m2 to 105 g/m2 (16 lbs. to 28 lbs.))
heavy paper (106 g/m2 to 256 g/m2 (28 lbs. to 68 lbs.)), envelopes (75 g/m2 to 90 g/m2 (20 lbs. to
24 lbs.))
Modes
Non-staple, staple
Allowed paper sizes for
offset
A3, B4, A4, A4R, B5, 11" x 17", 8-1/2" x 14", 8-1/2" x 13", 8-1/2" x 11", 8-1/2" x 11"R, 8K, 16K
Offset distance
30 mm (1-3/16")
Upper tray
Non-stapling*3:
1550 sheets (A4, B5, A5R, 8-1/2" x 11",
5-1/2" x 8-1/2"R, 16K)
650 sheets (A3W, A3, B4, A4R, B5R, 12" x 18",
11" x 17", 8-1/2" x 14", 8-1/2" x 13",
8-1/2" x 11"R, 7-1/4" x 10-1/2"R, 8K, 16KR)
Stapling*4:
100 sets or 1550 sheets (A4, B5, 8-1/2" x 11",
16K)
50 sets or 650 sheets (A3, B4, A4R, 11" x 17",
8-1/2" x 14", 8-1/2" x 13", 8-1/2" x 11"R, 8K)
Lower tray
Non-stapling*3:
2450 sheets (A4, B5, 8-1/2" x 11", 16K)
1700 sheets (A5R, 5-1/2" x 8-1/2"R)
650 sheets (A3W, A3, B4, A4R, B5R, 12" x 18",
11" x 17", 8-1/2" x 14", 8-1/2" x 13",
8-1/2" x 11"R, 7-1/4" x 10-1/2", 8K, 16KR)
Stapling*4:
100 sets or 1550 sheets (A4, B5, 8-1/2" x 11",
16K)
50 sets or 650 sheets (A3, B4, A4R, 11" x 17",
8-1/2" x 14", 8-1/2" x 13", 8-1/2" x 11"R, 8K)
Tray
capacity*2
Power supply
Supplied from the machine
Dimensions
515 mm (W) x 645 mm (D) x 1100 mm (H) (20-9/32" (W) x 25-25/64" (D) x 43-19/64" (H))
Weight
Approx. 43 kg (94.8 lbs.)
Overall dimensions when 1775 mm (W) x 715 mm (D) (69-55/64" (W) x 28-9/64" (D)) (When tray is extended)
attached to machine
Stapler section
Allowed paper sizes for
stapling
A3, B4, A4, A4R, B5, 11" x 17", 8-1/2" x 14", 8-1/2" x 13", 8-1/2" x 11", 8-1/2" x 11"R, 8K, 16K
(Three stapling positions: one staple at bottom left corner, one staple at top left corner, and two
staples.)
Maximum number of
sheets for stapling*4
50 sheets (A4, B5, 8-1/2" x 11", 16K)
30 sheets (A3, B4, A4R, 11" x 17", 8-1/2" x 14", 8-1/2" x 13", 8-1/2" x 11"R, 8K)
(30 sheets when the sheets are the same width but different lengths.)
*1 Paper pass unit (MX-PBX2) is required to connect the finisher to the machine.
*2 The maximum number of sheets that can be held varies depending on ambient conditions in the installation location, the type of
paper, and the storage conditions of the paper.
*3 Up to 100 sheets of non-standard size paper, envelopes, and transparency film (A4 (8-1/2" x 11")) can be loaded.
*4 The maximum number of sheets for stapling assumes a paper weight of 80 g/m2 (21 lbs.) and includes two cover sheets of
106 g/m2 to 256 g/m2 (28 lbs. to 68 lbs.).
11
SPECIFICATIONS
Saddle stitch finisher specifications*1
Model
MX-FNX4
Paper sizes
A3W, A3, B4, A4, A4R, B5, B5R, A5R, 12" x 18", 11" x 17", 8-1/2" x 14", 8-1/2" x 13", 8-1/2" x 11",
8-1/2" x 11"R, 7-1/4" x 10-1/2"R, 5-1/2" x 8-1/2"R, 8K, 16K, 16KR
Paper weight
Thin paper (55 g/m2 to 59 g/m2 (15 lbs. to 16 lbs.)), plain paper (60 g/m2 to 105 g/m2 (16 lbs. to 28 lbs.)),
heavy paper (106 g/m2 to 256 g/m2 (28 lbs. to 68 lbs.)), envelopes (75 g/m2 to 90 g/m2 (20 lbs. to 24 lbs.))
Modes
Non-staple, staple, saddle stitch
Allowed paper sizes for offset A3, B4, A4, A4R, B5, 11" x 17", 8-1/2" x 14", 8-1/2" x 13", 8-1/2" x 11", 8-1/2" x 11"R, 8K, 16K
Offset distance
30 mm (1-3/16")
Upper tray
Non-stapling*3:
1550 sheets (A4, B5, A5R, 8-1/2" x 11",
5-1/2" x 8-1/2"R, 16K)
650 sheets (A3W, A3, B4, A4R, B5R, 12" x 18",
11" x 17", 8-1/2" x 14", 8-1/2" x 13",
8-1/2" x 11"R, 7-1/4" x 10-1/2", 8K, 16KR)
Stapling*4:
100 sets or 1550 sheets (A4, B5, 8-1/2" x 11",
16K)
50 sets or 650 sheets (A3, B4, A4R, 11" x 17",
8-1/2" x 14", 8-1/2" x 13", 8-1/2" x 11"R, 8K)
Lower tray
Non-stapling*3:
2450 sheets (A4, B5, 8-1/2" x 11", 16K)
1700 sheets (A5R, 5-1/2" x 8-1/2"R)
650 sheets (A3W, A3, B4, A4R, B5R, 12" x 18",
11" x 17", 8-1/2" x 14", 8-1/2" x 13",
8-1/2" x 11"R, 7-1/4" x 10-1/2", 8K, 16KR)
Stapling*4:
100 sets or 1550 sheets (A4, B5, 8-1/2" x 11",
16K)
50 sets or 650 sheets (A3, B4, A4R, 11" x 17",
8-1/2" x 14", 8-1/2" x 13", 8-1/2" x 11"R, 8K)
Tray
capacity*2
Power supply
Supplied from the machine
Dimensions
625 mm (W) x 645 mm (D) x 1100 mm (H) (24-39/64" (W) x 25-25/64" (D) x 43-19/64" (H))
Weigh
Approx. 74 kg (163.1 lbs.)
Overall dimensions when 1885 mm (W) x 715 mm (D) (74-3/16" (W) x 28-9/64" (D)) (When tray is extended)
attached to machine
Stapler section
Allowed paper sizes for
stapling
A3, B4, A4, A4R, B5, 11" x 17", 8-1/2" x 14", 8-1/2" x 13", 8-1/2" x 11", 8-1/2" x 11"R, 8K, 16K
(Three stapling positions: one staple at bottom left corner, one staple at top left corner, and two staples.)
Maximum number of
sheets for stapling*4
50 sheets (A4, B5, 8-1/2" x 11", 16K)
30 sheets (A3, B4, A4R, 11" x 17", 8-1/2" x 14", 8-1/2" x 13", 8-1/2" x 11"R, 8K)
(30 sheets when the sheets are the same width but different lengths.)
Saddle stitch section
Stapling method
Fold in half and staple in two places on centreline
Folding position
Fold at centreline (can be adjusted with [Saddle Stitch Position Adjust] in the System Settings)
Allowed paper sizes for
saddle stitch stapling
A3, B4, A4R, 11" x 17", 8-1/2" x 14", 8-1/2" x 11"R, 8K
Allowed paper weights for 55 g/m2 to 256 g/m2 (15 lbs. to 68 lbs.)
saddle stitch stapling
Maximum: 15 sheets (80 g/m2 (21 lbs.) x 14 sheets + 256 g/m2 (68 lbs.) x 1 sheet) / 10 sets (11 to
Number sheets for saddle
15
sheets), 20 sets (6 to 10 sheets), 25 sets (1 to 5 sheets)
stitch stapling / Number of sets
*1 Paper pass unit (MX-PBX2) is required to connect the saddle stitch finisher to the machine.
*2 The maximum number of sheets that can be held varies depending on ambient conditions in the installation location, the type of
paper, and the storage conditions of the paper.
*3 Up to 100 sheets of non-standard size paper, envelopes, and transparency film (A4 (8-1/2" x 11")) can be loaded.
*4 The maximum number of sheets for stapling assumes a paper weight of 80 g/m2 (21 lbs.) and includes two cover sheets of
106 g/m2 to 256 g/m2 (28 lbs. to 68 lbs.).
12
SPECIFICATIONS
Punch module specifications (for finisher / saddle stitch finisher)
Model
MX-PNX2A
MX-PNX2B
MX-PNX2C
MX-PNX2D
Hole punching
2 holes
2 holes or 3 holes
4 holes
4 holes, broad width
2 holes:
8-1/2" x 14",
8-1/2" x 13",
8-1/2" x 11"R
3 holes:
A3, A4, 11" x 17",
8-1/2" x 11"
A3, A4, 11" x 17",
8-1/2" x 11"
A3, A4, 11" x 17",
8-1/2" x 11"
Allowed paper sizes for
punching
A3, B4, A4, A4R, B5,
B5R, 11" x 17",
8-1/2" x 14",
8-1/2" x 13",
8-1/2" x 11",
8-1/2" x 11"R,
7-1/4" x 10-1/2", 8K,
16K, 16KR
Punchable paper weights 55 g/m2 to 256 g/m2 (15 lbs. to 68 lbs.)
Power supply
Supplied from finisher / saddle stitch finisher
Dimensions
115 mm (W) x 600 mm (D) x 995 mm (H) (4-17/32" (W) x 23-5/8" (D) x 39-11/64" (H))
Weight
Approx. 8 kg (17.6 lbs.)
Note:
Special media such as transparency film and label sheets cannot be stapled or punched.
13
SPECIFICATIONS
Inserter specifications*
Model
MX-CFX1
Paper sizes
A3W, A3, B4, A4, A4R, B5, B5R, A5R, 12" x 18", 11" x 17", 8-1/2" x 14", 8-1/2" x 13", 8-1/2" x 11",
8-1/2" x 11"R, 7-1/4" x 10-1/2"R, 5-1/2" x 8-1/2"R, 8K, 16K, 16KR
Paper weight
Thin paper (55 g/m2 to 59 g/m2 (15 lbs. to 16 lbs.)), plain paper (60 g/m2 to 105 g/m2 (16 lbs. to
28 lbs.)), heavy paper (106 g/m2 to 256 g/m2 (28 lbs. to 68 lbs.))
Paper capacity
100 sheets (80 g/m2 (21 lbs.))
Paper types
SHARP-recommended plain paper, recycled paper, coloured paper, heavy paper, thin paper, and
transparency film
Power supply
Supplied from finisher / saddle stitch finisher
Dimensions
455 mm (W) x 595 mm (D) x 1050 mm (H) (17-59/64" (W) x 23-27/64" (D) x 41-21/64" (H))
Weight
Approx. 23 kg (50.7 lbs.)
* Punch module (MX-PNX2A/B/C/D) is required to connect the inserter to the finisher (MX-FNX3).
14
SPECIFICATIONS
Printer specifications
Type
Built-in
Continuous printing speed
Same as continuous copying speed (When printing same document continuously on A4
(8-1/2" x 11") plain paper in non-offset mode, excluding processing time.)
Printing resolution
600 x 600 dpi / 1200 x 600 dpi*1 (greyscale printing)
Printer driver type
PCL5c, PCL6, PostScript 3 compatible*1
Supported protocols
TCP/IP, IPX/SPX, NetBEUI, EtherTalk
Supported client PC
operating systems
See "VERIFYING SYSTEM REQUIREMENTS" in the Software Setup Guide / Sharpdesk Installation
Manual
Fonts
PCL5c, PCL6
80 European fonts, 28 barcode fonts*2, 1 bitmap font
PostScript 3 compatible*1
136 European fonts
Interface port
MX-5500N/6200N/7000N
LAN connectivity: 10Base-T / 100Base-TX
USB connectivity: Supports USB 2.0 (Hi speed)*3
MX-6201N/7001N
LAN connectivity: 10Base-T / 100Base-TX
USB connectivity: Suports USB 2.0 (Hi speed)*4
Memory
896 MB (MX-5500N/6200N/7000N) / 1 GB (MX-6201N/7001N)
Print area
Entire page excluding margin of 4.2 mm (11/64") at each edge. The actual print area may vary
depending on the printer driver and the software application.
*1
*2
*3
*4
When the PS3 expansion kit (MX-PKX1) is installed and the machine is used as a PostScript printer.
Barcode font kit (AR-PF1) is required.
Supported operating systems are Windows 2000 / XP.
Supported operating systems are Windows 2000 / XP/ Vista.
15
SPECIFICATIONS
Network scanner / Internet Fax*1 specifications
Type
Built-in
100 x 100, 200 x 200, 300 x 300, 400 x 400, 600 x 600
Scanning resolution (dpi) Internet Fax: 200 x 100, 200 x 200, 200 x 400, 400 x 400, 600 x 600 (200 x 100, 200 x 200 when file
type is TIFF-S) Halftone can be selected for resolutions other than 200 x 100 dpi.
Scanning speed
Colour (A4 / 8-1/2" x 11")One-sided: 35 pages/min. (200 x 200 dpi),
Two-sided: 35 pages/min. (200 x 200 dpi)
Black and white (A4 / 8-1/2" x 11") One-sided: 65 pages/min. (200 x 200 dpi),
Two-sided: 65 pages/min. (200 x 200 dpi)
Interface port
LAN connectivity: 10Base-T / 100Base-TX
Supported protocols
MX-5500N/6200N/7000N : TCP/IP (IPv4)
MX-6201N/7001N : TCP/IP (IPv4, IPv6)
File formats
Remarks
Colour
(including greyscale)
File types: TIFF, JPEG, PDF, Encrypted PDF
Compression ratio: High / Medium / Low
Black and white
File types: TIFF, PDF, Encrypted PDF
Compression modes: None / Medium (G3) / High (G4)
Internet Fax
(black and white only)
File types: TIFF-FX (TIFF-F, TIFF-S)
Compression modes: Medium (G3) / High (G4)
Number of one-touch keys for
storing destinations*2
Maximum number of keys: 999
Number of destinations that can be Maximum number of destinations in one group (1 key): 500
stored in a group (1 key)*2
Scan destinations
Scan to E-mail / Scan to FTP / Scan to Desktop / Scan to
Network Folder
*1 Internet fax expansion kit (MX-FWX1) is required.
*2 Total number of all destinations (Scan to E-mail, Scan to FTP, Scan to Desktop, Scan to Network folder, Internet Fax, Fax, and
Group)
Pull scan function (TWAIN) specifications
Supported protocol
TCP/IP
Supported client PC
operating systems
MX-5500N/6200N/7000N : Windows 98 / Me / 2000 / XP / Server 2003
MX-6201N/7001N : Windows 98 / Me / 2000 / XP / Server 2003 / Vista
Colour modes
Full Colour, Greyscale, Mono Diffusion, Mono 2 gradation
Resolution settings
75 dpi, 100 dpi, 150 dpi, 200 dpi, 300 dpi, 400 dpi, 600 dpi
(The resolution can be specified by entering a numerical value from 50 to 9600 dpi. However, when
a high resolution is specified, it is necessary to reduce the scanning area.)
Scanning area
Maximum: A3 (11" x 17")
16
SPECIFICATIONS
Facsimile specifications
Model
MX-FXX1
Applicable telephone line Public switched telephone network, PBX
Scanning resolution
(supports ITU-T
standards)
8 x 3.85 lines/mm (Standard), 8 x 7.7 lines/mm (Fine, Fine-Halftone), 8 x 15.4 lines/mm (Super Fine,
Super Fine - Halftone), 16 x 15.4 lines/mm (Ultra Fine, Ultra Fine - Halftone)
Transmission speed
33.6 kbps down to 2.4 kbps Automatic fallback
Compression method
MH / MR / MMR / JBIG
Transmission modes
Super G3, G3 (the machine can only send faxes to and receive faxes from machines that support G3
or Super G3)
Input document size
AB sizes: A3, B4, A4, A4R, 8-1/2" x 11", 8-1/2" x 11"R, B5, B5R, A5
Inch sizes: 11" x 17", 8-1/2" x 14", 8-1/2" x 13", 8-1/2" x 11", 8-1/2" x 11"R, A4, A4R, 5-1/2" x 8-1/2"
Long originals (max. width 297 mm (11-45/64") x max. length 800 mm (31-31/64") can be transmitted
using the automatic document feeder. Scanning one side is possible.)
Paper sizes
A3, B4, A4, A4R, B5, B5R, A5R (11" x 17", 8-1/2" x 14", 8-1/2" x 13", 8-1/2" x 11", 8-1/2" x 11"R,
5-1/2" x 8-1/2"R)
Transmission time *1
Approx. 2 seconds (Super G3 mode/33.6 kbps, JBIG)
Approx. 6 seconds (G3 ECM mode/14.4 kbps)
Power supply
Supplied from the machine
Dimensions
285 mm (W) x 66 mm (D) x 213 mm (H) (11-7/32" (W) x 2-39/64" (D) x 8-25/64" (H))
Weight
Approx. 1.6 kg (3.5 lbs.)
Extension telephone connection
Possible (1 telephone)
Number of one-touch keys for storing
destinations*2
Maximum number of keys: 999
Number of destinations that can be stored in a Maximum number of destinations in one group
(1 key): 500
group (1 key)*2
Remarks
Timer transmission
Yes
Program function
Yes (48 programs)
F-code transmission
Supported (SUB/SEP (sub-address) and SID/PWD
(passcode) signals can be transmitted / received)
Image memory
8 MB standard
*1 Transmission speed is for an A4 or 8-1/2" x 11" document with approximately 700 characters at standard resolution (8 x 3.85
lines/mm) sent in high speed mode (33.6 kbps (JBIG) or 14.4 kbps). This is only the time required to transmit the image
information; the time required to send protocol signals is not included. Actual transmission times will vary depending on the
contents of the document, the receiving machine type, and telephone line conditions.
*2 Total number of all destinations (Scan to E-mail, Scan to FTP, Scan to Desktop, Scan to Network folder, Internet Fax, Fax and
Group)
17
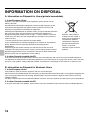
INFORMATION ON DISPOSAL
A. Information on Disposal for Users (private households)
1. In the European Union
Attention: If you want to dispose of this equipment, please do not use the
ordinary dust bin!
Used electrical and electronic equipment must be treated separately and in
accordance with legislation that requires proper treatment, recovery and
recycling of used electrical and electronic equipment.
Following the implementation by member states, private households within the
EU states may return their used electrical and electronic equipment to
designated collection facilities free of charge*. In some countries* your local
retailer may also take back your old product free of charge if you purchase a
similar new one.
*) Please contact your local authority for further details.
If your used electrical or electronic equipment has batteries or accumulators,
please dispose of these separately beforehand according to local
requirements.
By disposing of this product correctly you will help ensure that the waste
undergoes the necessary treatment, recovery and recycling and thus prevent
potential negative effects on the environment and human health which could
otherwise arise due to inappropriate waste handling.
Attention: Your product is
marked with this symbol. It
means that used electrical
and electronic products
should not be mixed with
general household waste.
There is a separate
collection system for these
products.
2. In other Countries outside the EU
If you wish to discard this product, please contact your local authorities and ask for the correct method of disposal.
For Switzerland: Used electrical or electronic equipment can be returned free of charge to the dealer, even if you don't
purchase a new product. Further collection facilities are listed on the homepage of www.swico.ch or www.sens.ch.
B. Information on Disposal for Business Users
1. In the European Union
If the product is used for business purposes and you want to discard it:
Please contact your SHARP dealer who will inform you about the take-back of the product. You might be charged for the
costs arising from take-back and recycling. Small products (and small amounts) might be taken back by your local
collection facilities.
For Spain: Please contact the established collection system or your local authority for take-back of your used products.
2. In other Countries outside the EU
If you wish to discard of this product, please contact your local authorities and ask for the correct method of disposal.
18
✂
Administrator
Name:
Contact at:
Information that the administrator of the machine requires is printed on
the back of this page.
(Separate this page from the manual and keep it in a safe place. In
addition, fill in the name of the administrator and the administrator's
contact information in the left hand margin.)
19
TO THE ADMINISTRATOR OF THE
MACHINE
(Separate this page from the manual and keep it in a safe place.)
Factory default passwords
When accessing the system settings, the administrator password is required to log in with administrator
rights. The system settings can be configured in the Web pages as well as on the operation panel. To
access the system settings using the Web pages, a password is also required.
Factory default administrator password
Factory default setting: admin
Store a new administrator password as soon as the machine is installed.
Once the administrator password has been changed, the new password is required to restore the factory
default password. Take care to remember the new password.
There are two factory default accounts: "Administrator" and "User". A person who logs in as an
"Administrator" can configure all settings in the Web pages. In addition, an administrator can restrict access
to other settings by enabling "User" accounts.
The factory default passwords are shown below.
Factory default account
Factory default password
User
users
users
Administrator
admin
admin
Forwarding all transmitted and received data to the administrator
(document administration function)
This function is used to forward all data transmitted and received by the machine to a specified destination
(Scan to E-mail address, Scan to FTP destination, Scan to Network Folder destination, or Scan to Desktop
destination).
This function can be used by the administrator of the machine to archive all transmitted and received data.
To configure the document administration settings, click [Application Settings] and then [Document
Administration Function] in the Web page menu. (Administrator rights are required.)
Note:
• The format, exposure, and resolution settings of transmitted and received data remain in effect when the data is
forwarded.
• The functions below cannot be used when transmitted faxes are forwarded. In this case, the [Memory TX] key and
[Direct TX] key do not appear.
Quick Online transmission, direct transmission, dialling using the speaker
20
✂
Factory default passwords (Web pages)
TO THE ADMINISTRATOR OF THE MACHINE
For the users of the fax function
Important safety information
• If any of your telephone equipment is not operating properly, you should immediately remove it from your telephone line, as it may
cause harm to the telephone network.
• The AC power outlet shall be installed near the equipment and shall be easily accessible.
• Never install telephone wiring during a lightning storm.
• Never install telephone jacks in wet locations unless the jack is specifically designed for wet locations.
• Never touch uninsulated telephone wires or terminals unless the telephone line has been disconnected at the network interface.
• Use caution when installing or modifying telephone lines.
• Avoid using a telephone (other than a cordless type) during an electrical storm. There may be a remote risk of electric shock from
lightning.
• Do not use a telephone to report a gas leak in the vicinity of the leak.
• Do not install or use the machine near water, or when you are wet. Take care not to spill any liquids on the machine.
21
TO THE ADMINISTRATOR OF THE MACHINE
Trademark acknowledgments
The following trademarks and registered trademarks are used in conjunction with the machine and its peripheral devices and
accessories.
• Microsoft®, Windows®, Windows® 98, Windows® Me, Windows NT® 4.0, Windows® 2000, Windows® XP, Windows Server®
2003, Windows® Vista and Internet Explorer® are registered trademarks or trademarks of Microsoft Corporation in the U.S.A.
and other countries.
• PostScript is a registered trademark of Adobe Systems Incorporated.
• Macintosh, Mac OS, AppleTalk, EtherTalk, LaserWriter, and Safari are registered trademarks or trademarks of Apple Computer, Inc.
• Netscape Navigator is a trademark of Netscape Communications Corporation.
• Adobe, the Adobe logo, Acrobat, the Adobe PDF logo, and Reader are registered trademarks or trademarks of Adobe Systems
Incorporated in the United States and other countries.
• PCL is a registered trademark of the Hewlett-Packard Company.
• IBM, PC/AT, and PowerPC are trademarks of International Business Machines Corporation.
• Sharpdesk is a trademark of Sharp Corporation.
• All other trademarks and copyrights are the property of their respective owners.
Candid and Taffy are trademarks of Monotype Imaging, Inc. registered in the United States Patent and Trademark Office and may
be registered in certain jurisdictions. CG Omega, CG Times, Garamond Antiqua, Garamond Halbfett, Garamond Kursiv,
Garamond and Halbfett Kursiv are trademarks of Monotype Imaging, Inc. and may be registered in certain jurisdictions. Albertus,
Arial, Coronet, Gill Sans, Joanna and Times New Roman are trademarks of The Monotype Corporation registered in the United
States Patent and Trademark Office and may be registered in certain jurisdictions. Avant Garde, ITC Bookman, Lubalin Graph,
Mona Lisa, Zapf Chancery and Zapf Dingbats are trademarks of International Typeface Corporation registered in the United
States Patent and Trademark Office and may be registered in certain jurisdictions. Clarendon, Eurostile, Helvetica, Optima,
Palatino, Stempel Garamond, Times and Univers are trademarks of Heidelberger Druckmaschinen AG, which may be registered
in certain jurisdictions, exclusively licensed through Linotype Library GmbH, a wholly owned subsidiary of Heidelberger
Druckmaschinen AG. Apple Chancery, Chicago, Geneva, Monaco and New York are trademarks of Apple Computer Inc. and may
be registered in certain jurisdictions. HGGothicB, HGMinchoL, HGPGothicB and HGPMinchoL are trademarks of Ricoh
Company, Ltd. and may be registered in some jurisdictions. Wingdings is a registered trademark of Microsoft Corporation in the
United States and other countries. Marigold and Oxford are trademarks of Arthur Baker and may be registered in some
jurisdictions. Antique Olive is a trademark of Marcel Olive and may be registered in certain jurisdictions. Hoefler Text is a
trademark of Johnathan Hoefler and may be registered in some jurisdictions. ITC is a trademark of International Typeface
Corporation registered in the United States Patent and Trademark Office and may be registered in certain jurisdictions. Agfa is a
trademark of the Agfa-Gevaert Group and may be registered in certain jurisdictions. Intellifont, MicroType and UFST are
trademarks of Monotype Imaging, Inc. registered in the United States Patent and Trademark Office and may be registered in
certain jurisdictions. Macintosh and TrueType are trademarks of Apple Computer Inc. registered in the United States Patent and
Trademark Office and other countries. PostScript is a trademark of Adobe Systems Incorporated and may be registered in some
jurisdictions. HP, PCL, FontSmart and LaserJet are trademarks of Hewlett-Packard Company and may be registered in some
jurisdictions. The Type 1 processor resident in Monotype Imaging's UFST product is under license from Electronics For Imaging,
Inc. All other trademarks are the property of their respective owners.
SHARP ELECTRONICS (Europe) GmbH
Sonninstraße 3, D-20097 Hamburg
22
23
Troubleshooting
REMOVING MISFEEDS
COPYING
PRINTING
FACSIMILE
SCANNING
DOCUMENT FILING
INSTALLATION
OTHER PROBLEMS
24
About this manual
This manual provides solutions to possible problems in a question and answer format. The questions are grouped into
the chapters "REMOVING MISFEEDS", "COPYING", "PRINTING", "FACSIMILE", "SCANNING", "DOCUMENT
FILING", "INSTALLATION", and "OTHER PROBLEMS". Locate the question that relates to your problem and use the
answer to help correct the situation. If you are unable to solve a problem using this manual, please contact your dealer
or nearest authorised service representative.
Conventions used in this manual
• System settings
Descriptions of system settings similar to the following example appear in this manual.
Example: ➞ System Settings (Administrator) > "Copy Function Settings" > "Other Settings" > "Rotation Copy Setting" >
This is an abbreviated description of the procedure for selecting the setting. ">" indicates the setting sequence and
indicates the state of the setting after it has been enabled. Use these descriptions as a quick manual to help you configure the
settings. (For detailed explanations of the system settings, see the System Settings Guide.)
• References to other sections
Some of the explanations in this manual refer to other pages or other manuals.
Example: ☞ Illustration of the machine (A) (page 69)
Refer to these pages as well to help solve your problem.
Please note
• For information on installing the drivers and software cited in this manual, please refer to the Software Setup Guide / Sharpdesk
Installation Manual.
• For information on your operating system, please refer to your operating system manual or the online Help function.
• The explanations of screens and procedures in this manual are primarily for Windows® XP in Windows® environments, and
Mac OS X v10.4 in Macintosh environments. The screens may vary depending on the version of the operating system.
• Wherever "MX-xxxx" appears in this manual, please substitute your model name for "xxxx".
• This manual contains references to the fax function. However, please note that the fax function is not available in some
countries and regions.
• Considerable care has been taken in preparing this manual. If you have any comments or concerns about the manual, please
contact your dealer or nearest authorised service representative.
• This product has undergone strict quality control and inspection procedures. In the unlikely event that a defect or other problem
is discovered, please contact your dealer or nearest authorised service representative.
• Aside from instances provided for by law, SHARP is not responsible for failures occurring during the use of the product or its
options, or failures due to incorrect operation of the product and its options, or other failures, or for any damage that occurs due
to use of the product.
Warning
• Reproduction, adaptation or translation of the contents of the manual without prior written permission is prohibited, except as
allowed under copyright laws.
• All information in this manual is subject to change without notice.
Illustrations and the operation panel and touch panel shown in this manual
The peripheral devices are generally optional, however, some models include certain peripheral devices as standard equipment.
The explanations in this manual assume that a saddle stitch finisher, punch module, and inserter are installed on the machine.
For some functions and procedures, the explanations assume that devices other than the above are installed.
The display screens, messages, and key names shown in the manual may differ from those on the actual machine
due to product improvements and modifications.
25
Manuals provided with the machine
This manual provides solutions to possible problems. For the detailed procedures for using the machine, see the
following manuals.
Printed manuals
Manual name
Contents
Safety Guide /
Troubleshooting
(This manual)
This manual contains instructions for using the machine safely and lists the specifications of the machine
and its peripheral devices and explains how to remove paper misfeeds and provides answers to
frequently asked questions regarding the operation of the machine in each mode. Refer to this manual
when you have difficulty using the machine.
Software Setup
Guide /
Sharpdesk
Installation Guide
This manual explains how to install the software and configure settings to use the machine as a printer or
scanner.
Quick Start Guide
This manual provides easy-to-understand explanations of all the functions of the machine in a single
volume.
Detailed explanations of each of the functions can be found in the manuals in PDF format.
Operation manuals in PDF format
The manuals in PDF format provide detailed explanations of the procedures for using the machine in each mode. To
view the PDF manuals, download them from the hard drive in the machine. The procedure for downloading the manuals
is explained in "How to download the manuals in PDF format" in the Quick Start Guide.
Manual name
Contents
User's Guide
This manual provides information, such as basic operation procedures, how to load paper, and machine
maintenance.
Copier Guide
This manual provides detailed explanations of the procedures for using the copy function.
Printer Guide
This manual provides detailed explanations of the procedures for using the printer function.
Facsimile Guide
This manual provides detailed explanations of the procedures for using the fax function.
Scanner Guide
This manual provides detailed explanations of the procedures for using the scanner function and the
Internet fax function.
Document Filing
Guide
This manual provides detailed explanations of the procedures for using the document filing function. The
document filing function allows you to save the document data of a copy or fax job, or the data of a print
job, as a file on the machine's hard drive. The file can be called up as needed.
System Settings
Guide
This manual explains the "System Settings", which are used to configure a variety of parameters to suit
the aims and the needs of your workplace. Current settings can be displayed or printed out from the
"System Settings".
Icons used in the manuals
The icons in the manuals indicate the following types of information:
Caution
26
This alerts you to a situation where there is a risk of human injury or property damage.
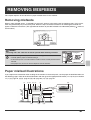
REMOVING MISFEEDS
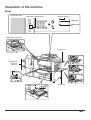
This chapter explains what to do when a paper misfeed occurs in the machine.
Removing misfeeds
When a paper misfeed occurs, "A misfeed has occurred." appears in the touch panel and printing stops. In this event,
touch the [Information] key in the touch panel. When the key is touched, instructions for removing the misfeed will
appear. Follow the instructions. (The approximate locations of possible misfeeds are indicated by blinking
marks as
shown below.)
A misfeed has occurred.
Turning M/C off now causes data loss.
Information
OK
Misfeed location
Caution
Fusing unit
The fusing unit is hot. Take care not to burn yourself when removing a misfeed.
• When removing misfed paper, do not touch or damage the transfer belt.
• Carefully pull the paper out without tearing it.
Transfer belt
• A misfeed may have occurred inside the machine. Check carefully and remove the
misfeed.
• If the paper tears, be sure to remove all pieces from the machine.
Paper misfeed illustrations
If you require more information when reading the instructions in the touch panel, see the paper misfeed illustrations on
the following pages. Refer to the illustration below and then go to the appropriate illustration (1 to 14) for your situation.
☞ (1)-(2): page 28, (3)-(5): page 29, (6)-(10): page 30, (11)-(14): page 31
(1)
(2) (3)
(4) (5)
(6)
(14)
(7)
(8)
(9)
(10)
(11)
(12)
(13)
27
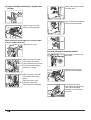
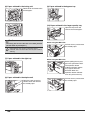
(1) Paper misfeed in the finisher / saddle stitch
finisher
Rotate roller knob (A) until it
no longer turns.
(A)
Push and rotate knob (B) and
remove the misfed paper.
Open the top cover and
remove the misfed paper.
(B)
Paper misfeed in the transport area and the output
area (the saddle stitch unit)
Open the front cover.
(2) Paper misfeed in the punch module
Turn knob as shown in the
illustration.
(A)
Move lever (A) to the right
and remove the misfed
paper. Release the lever and
it will return to the original
position by a spring.
Open the top cover and
remove the misfed paper.
(B)
28
Move lever (B) to the right
and remove the misfed
paper.
Return the lever to the
original position after
removing the misfed paper.
If the paper cannot be
removed by opening the top
cover, open the punch
module cover and remove
the paper.
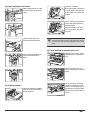
(3) Paper misfeed in the inserter
Open the automatic
document feeder. Rotate the
transfer roller in the direction
of the arrow and remove the
original.
While pulling the lever, slide
the inserter to the left until it
stops.
A
Open the top cover and
remove the misfed paper.
Press switch A to release the
cover lock and remove the
misfed original.
After removing the original,
be sure to attach the cover
securely.
After removing the misfeed, open and close the
automatic document feeder (or the document feeding
area cover) to clear the misfeed display from the touch
panel.
(5) Paper misfeed in the paper pass unit
Raise the paper guide lever
and remove the misfed
paper.
Open the front cover (upper)
and pull out the paper pass
unit.
Open the paper pass unit
cover and remove the misfed
paper.
(4) Original misfeed
Open the document feeding
area cover and remove the
misfed originals.
Check the paper reversing
section inside the tray and
remove any misfed paper. (A
misfeed has occurred inside
the machine. Look inside to
check.)
29
(6) Paper misfeed in the fusing unit
(9) Paper misfeed in the bypass tray
Rotate knob and remove the
misfed paper.
(10) Paper misfeed in the large capacity tray
Open the top cover and
remove the misfed paper.
Caution
The fusing unit is hot. Take care not to burn yourself.
(Do not touch any metal parts.)
When using the MX-LCX2
Pull out the tray and remove
the misfed paper.
Unfused toner may remain on the paper that is
removed. Take care that it does not soil your hands or
clothing.
(7) Paper misfeed in the right tray
When using the MX-LCX3
Before pulling the tray out,
press the operation button.
The operation button
indicator will blink and the
tray's paper table will
descend. When the
operation button indicator
turns off, pull out the tray.
(8) Paper misfeed in the duplex unit
Open the paper reversing
section cover and remove
the misfed paper.
30
Pull out the tray and remove
the misfed paper.
(11) Paper misfeed in the transport area
Turn roller rotating knob in
the direction of the arrow to
remove the misfed paper.
(13) Paper misfeed in tray 2 to tray 4 (side)
While holding the lever, open
the transport area cover.
(12) Paper misfeed in tray 1 to tray 4 (in the tray)
Pull out the tray gently until it
stops and remove the misfed
paper.
The misfeed may have
occurred inside the machine.
Check carefully and remove
it.
After removing the misfeeds,
be sure to close the transport
area cover.
(14) Paper misfeed in the output area
Be sure to check the following points before pulling the
tray out. If you pull the tray out without checking, you
may tear misfed paper and make it more difficult to
remove the pieces that remain in the machine.
Before removing the misfed paper in tray 1...
Check if there is a paper misfed in the transport area.
☞ (11) Paper misfeed in the transport area
Before removing the misfed paper in tray 2 to 4...
Open the right cover and check if there is a paper
misfed.
☞ (13) Paper misfeed in tray 2 to tray 4 (side)
Paper misfeed in the paper guide (tray 1, tray 2)
31
COPYING
This chapter provides solutions to possible copying problems. See the following table of contents to locate the
appropriate page for your question or problem.
Problems related to copying operation
• Copying does not take place. . . . . . . . . . . . . . . . . . . . . . . . . . . . . . . . . . . . . . . . . . . . . . . . . . . . . . . . . 32
• Auto selection of the colour mode does not take place. . . . . . . . . . . . . . . . . . . . . . . . . . . . . . . . . . . . . 32
• Image rotation does not take place. . . . . . . . . . . . . . . . . . . . . . . . . . . . . . . . . . . . . . . . . . . . . . . . . . . . 33
• Two-sided copying does not take place.. . . . . . . . . . . . . . . . . . . . . . . . . . . . . . . . . . . . . . . . . . . . . . . . 33
• The paper size of a tray cannot be set.. . . . . . . . . . . . . . . . . . . . . . . . . . . . . . . . . . . . . . . . . . . . . . . . . 33
Problems related to copy results
• The image is too light or too dark.. . . . . . . . . . . . . . . . . . . . . . . . . . . . . . . . . . . . . . . . . . . . . . . . . . . . . 34
• Colours are off. . . . . . . . . . . . . . . . . . . . . . . . . . . . . . . . . . . . . . . . . . . . . . . . . . . . . . . . . . . . . . . . . . . . 34
• Part of the image is cut off. . . . . . . . . . . . . . . . . . . . . . . . . . . . . . . . . . . . . . . . . . . . . . . . . . . . . . . . . . . 34
• Copies come out blank. . . . . . . . . . . . . . . . . . . . . . . . . . . . . . . . . . . . . . . . . . . . . . . . . . . . . . . . . . . . . 34
• If you cannot find the item that you are looking for in the above table of contents, see "OTHER PROBLEMS" (page 59).
• If you are unable to solve a problem using the solutions in this manual, switch off the [POWER] key (
) and the
main power switch. Wait at least 10 seconds, and then switch on the main power switch and the [POWER] key (
)
in that order.
* When the LINE indicator is lit or the DATA indicator is lit or blinking, do not switch off the main power switch or unplug
the power plug. This may damage the hard drive or cause the data being stored or received to be lost.
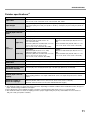
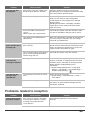
Problems related to copying operation
Problem
Point to check
Solution
Copying does not take
place.
Have functions been disabled by the
administrator?
When user authentication is enabled, the functions that
you can use may be restricted in your user settings.
Check with your administrator.
Auto selection of the
colour mode does not
take place.
Are you using one of the following types
of originals?
Black & White is not selected
When the colour mode is set to "Auto", the machine
detects whether the original is black and white or colour
when the [COLOUR START] key (
) is pressed.
However, when an original similar to one of those at left
is used, automatic detection may not give the correct
result. In this event, specify the colour mode manually.
• Are there colours or colouring in the
paper?
Colour is not selected
• The colour in the original is very light.
• The colour in the original is very dark,
almost black.
• Is only a very small area of the
original coloured?
32
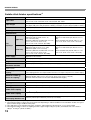
Problem
Image rotation does
not take place.
Two-sided copying
does not take place.
The paper size of a
tray cannot be set.
Point to check
Solution
Did you select the paper size or copy
ratio manually?
Copy using automatic paper selection and automatic
ratio selection.
Are you copying using settings that do
not allow rotate copying?
Rotate copying can generally be combined with other
special modes, however, some combinations are not
possible. If a prohibited combination is selected, a
message will appear in the touch panel.
Is "Rotation Copy Setting" disabled in
the system settings (administrator)?
Check with your administrator.
If you are the administrator, enable "Rotation Copy
Setting".
➞ System Settings (Administrator) > "Copy Function
Settings" > "Other Settings" > "Rotation Copy
Setting" >
Does the paper type setting of the
selected tray specify a type of paper that
cannot be used for two-sided copying?
Check "Tray Settings" in the system settings. If the
[Disable Duplex] checkbox is selected
, two-sided
copying using that tray will not be possible. Change the
paper type setting to a type that can be used for
two-sided printing.
➞ System Settings > "Paper Tray Settings" > "Tray
Settings" > "Change"
Are you using a special size or type of
paper?
For the paper types and sizes that can be used for
two-sided copying, see "SPECIFICATIONS" in this
operation manual.
Are you copying using settings that do
not allow two-sided copying?
Two-sided copying can generally be combined with
other special modes, however, some combinations are
not possible. If a prohibited combination is selected, a
message will appear in the touch panel.
Have functions been disabled by the
administrator?
Some functions may have been disabled in the system
settings (administrator). Check with your administrator.
When user authentication is enabled, the functions that
you can use may be restricted in your user settings.
Check with your administrator.
Have functions been disabled by the
administrator?
Some functions may have been disabled in the system
settings (administrator). Check with your administrator.
33
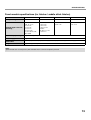
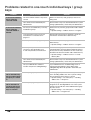
Problems related to copy results
Problem
The image is too light
or too dark.
Point to check
Solution
Is the image too light or too dark?
Select an appropriate exposure mode for the original
being copied and adjust the exposure level manually.
Has an appropriate exposure mode for
the original type been selected?
Select one of the following modes depending on the
original type.
• Text
Use this mode for regular text documents.
• Text/Prtd.Photo
This mode provides the best balance for copying an
original which contains both text and printed
photographs, such as a magazine or catalogue.
• Text/Photo
This mode provides the best balance for copying an
original which contains both text and photographs,
such as a text document with a photo pasted on.
• Printed Photo
This mode is best for copying printed photographs,
such as photos in a magazine or catalogue.
• Photo
Use this mode to copy photos.
• Map
This mode is best for copying the light colour shading
and fine text found on most maps.
• Light original
Use this mode for originals with light pencil writing.
Colours are off.
Did you perform "Registration
Adjustment"?
Ask your administrator to perform "Registration
Adjustment".
➞ System Settings (Administrator) > "Device Control" >
"Other Settings" > "Registration Adjustment"
If the colour tones are off, perform "Auto Colour
Calibration". (If the colours are still off after calibration,
repeating calibration may improve the results.)
➞ System Settings (Administrator) > "Copy Function
Settings" > "Colour Adjustment" > "Auto Colour
Calibration"
Part of the image is
cut off.
Has an appropriate ratio been selected
for the original size and paper size?
Select an appropriate ratio setting.
Are you using an inch (AB) size
original?
When copying an inch (AB) size original, specify the
original size manually.
Is the original placed face up or face
down correctly?
When using the document glass, the original must be
placed face down. When using the automatic document
feeder, the original must be placed face up.
Copies come out
blank.
34
PRINTING
This chapter provides solutions to possible printing problems. See the following table of contents to locate the
appropriate page for your question or problem.
Problems related to printing operation
• Printing does not take place.. . . . . . . . . . . . . . . . . . . . . . . . . . . . . . . . . . . . . . . . . . . . . . . . . . . . . . . . . 35
• Colour printing does not take place. . . . . . . . . . . . . . . . . . . . . . . . . . . . . . . . . . . . . . . . . . . . . . . . . . . . 37
• Two-sided printing does not take place. . . . . . . . . . . . . . . . . . . . . . . . . . . . . . . . . . . . . . . . . . . . . . . . . 37
• A tray, finisher, or other peripheral device installed on the machine cannot be used. . . . . . . . . . . . . . 38
Problems related to print results
• The image is grainy. . . . . . . . . . . . . . . . . . . . . . . . . . . . . . . . . . . . . . . . . . . . . . . . . . . . . . . . . . . . . . . . 38
• The image is too light or too dark.. . . . . . . . . . . . . . . . . . . . . . . . . . . . . . . . . . . . . . . . . . . . . . . . . . . . . 38
• Colours are off. . . . . . . . . . . . . . . . . . . . . . . . . . . . . . . . . . . . . . . . . . . . . . . . . . . . . . . . . . . . . . . . . . . . 38
• Text and lines are faint and difficult to see.. . . . . . . . . . . . . . . . . . . . . . . . . . . . . . . . . . . . . . . . . . . . . . 38
• Part of the image is cut off. . . . . . . . . . . . . . . . . . . . . . . . . . . . . . . . . . . . . . . . . . . . . . . . . . . . . . . . . . . 39
• The image is upside down. . . . . . . . . . . . . . . . . . . . . . . . . . . . . . . . . . . . . . . . . . . . . . . . . . . . . . . . . . . 39
• Many nonsense characters are printed. . . . . . . . . . . . . . . . . . . . . . . . . . . . . . . . . . . . . . . . . . . . . . . . . 40
• If you cannot find the item that you are looking for in the above table of contents, see "OTHER PROBLEMS" (page 59).
• If you are unable to solve a problem using the solutions in this manual, switch off the [POWER] key (
) and the
main power switch. Wait at least 10 seconds, and then switch on the main power switch and the [POWER] key (
)
in that order.
* When the LINE indicator is lit or the DATA indicator is lit or blinking, do not switch off the main power switch or unplug
the power plug. This may damage the hard drive or cause the data being stored or received to be lost.
Problems related to printing operation
Problem
Point to check
Solution
Printing does not take
place.
Is your computer connected correctly to
the machine?
Make sure that the cable is connected securely to the
LAN connector or the USB connector on your computer
and the machine.
If you are on a network, check the connections at the
hub as well.
☞ Illustration of the machine (P) and (Q) (page 70)
Is the machine connected to the same
network (LAN, etc.) as your computer?
The machine must be connected to the same network
as your computer.
If you do not know which network the machine is
connected to, ask the network administrator.
35
Problem
Printing does not take
place.
36
Point to check
Solution
Is the IP address selected correctly?
(Windows)
If the machine does not have a permanent IP address
(the machine receives an IP address from a DHCP
server), printing will not be possible if the IP address
changes. Print the "All Custom Setting List" in the
system settings and check the IP address of the
machine. If the IP address has changed, change the
port setting in the printer driver.
➞ System Settings > "List Print (User)" > "All Custom
Setting List"
☞ Software Setup Guide / Sharpdesk Installation
Manual
If the IP address changes frequently, it is recommended
that a permanent IP address be assigned to the machine.
➞ System Settings (Administrator) > "Network Settings"
Are you using a printer port created
using Standard TCP/IP Port?
(Windows 2000/XP/Server 2003/Vista*)
* Windows Vista is not available for
MX-5500N/6200N/7000N.
When a port created with Standard TCP/IP Port in
Windows is used and the [SNMP Status Enabled]
checkbox is
, it may not be possible to print correctly.
Change the [SNMP Status Enabled] checkbox to
.
☞ Software Setup Guide / Sharpdesk Installation
Manual
Is AppleTalk active?
(Macintosh)
In Mac OS X, click [Network] in [System Preferences]
and select "Built-in Ethernet" in "Show". Click the
[AppleTalk] tab and make sure that [Make AppleTalk
Active] is selected.
In Mac OS 9.0 to 9.2.2, open the [Chooser] from the
Apple menu and make sure that [Active] is selected.
Printing is not possible if [Active] is not selected.
Ask your administrator to check if "Enable EtherTalk" is
enabled in the system settings (administrator). (The
factory default setting is "Enable".)
➞ System Settings (Administrator) > "Network Settings"
> "Enable EtherTalk" >
Is "Connect via" set to [Ethernet] for
AppleTalk?
(Mac OS 9.0-9.2.2)
Open [AppleTalk] from the [Control Panels] and make
sure that [Ethernet] is selected in the "Connect via"
menu. Printing is not possible if [Ethernet] is not selected.
Is your computer in an unstable state?
Printing is sometimes not possible when you run
multiple applications at once or there is insufficient
memory or hard drive space. Restart your computer.
Is the machine specified correctly in the
software application that you are using
for printing?
Make sure that the printer driver of the machine is
selected in the Print window of the application.
If the printer driver does not appear in the list of
available printer drivers, it may not be installed correctly.
Remove the printer driver and then install it once again.
☞ INSTALLATION (page 55)
Are the network connection devices
operating normally?
Make sure that the routers and other network
connection devices are operating correctly. If a device is
not powered on or is in an error state, see the manual of
the device to correct the problem.
Problem
Printing does not take
place.
Point to check
Solution
Is the I/O timeout setting too short?
If the I/O timeout setting is too short, errors may occur
while writing to the printer. Ask the administrator of the
machine to configure an appropriate time in "I/O Timeout".
➞ System Settings (Administrator) > "Printer Settings" >
"Interface Settings" > "I/O Timeout"
Was a Notice Page printed?
A Notice Page will be printed to indicate the cause of the
problem if a print job cannot be performed as specified
and the cause is not shown in the display. Read the
printed page and take appropriate action.
For example, a notice page will be printed in the
following situations.
• The print job is too large to fit in memory.
• A function that has been prohibited by the
administrator is specified.
* By factory default, Notice Pages are not printed.
Colour printing does
not take place.
Two-sided printing
does not take place.
Have functions been disabled by the
administrator?
When user authentication is enabled, the functions that
you can use may be restricted in your user settings.
Check with your administrator.
Is the colour mode set to "Color"?
Select "Automatic" or "Color" for the colour mode
setting.
The colour mode setting is configured as follows:
Windows:
On the [Color] tab of the printer driver.
Macintosh:
In the [Color] menu of the print window.
(In Mac OS x v10.1.5, in "Color Mode" on the [Color 1]
tab in the [Printer Features] menu.)
In Windows, [Black and White Print] can also be
selected on the [Main] tab of the printer driver. If you
wish to print in colour, make sure that the [Black and
White Print] checkbox on the [Main] tab is not selected
.
Have functions been disabled by the
administrator?
When user authentication is enabled, the functions that
you can use may be restricted in your user settings.
Check with your administrator.
Does the paper type setting of the
selected tray specify a type of paper that
cannot be used for two-sided printing?
Check "Tray Settings" in the system settings.
If the [Disable Duplex] checkbox is selected
,
two-sided printing using that tray will not be possible.
Change the paper type setting to a type that can be
used for two-sided printing.
➞ System Settings > "Paper Tray Settings" > "Tray
Settings" > "Change"
Are you using a special size or type of
paper?
For the paper types and sizes that can be used for
two-sided printing, see "SPECIFICATIONS" in this
operation manual.
Have functions been disabled by the
administrator?
Some functions may have been disabled in the system
settings (administrator). Check with your administrator.
When user authentication is enabled, the functions that
you can use may be restricted in your user settings.
Check with your administrator.
37
Problem
A tray, finisher, or
other peripheral
device installed on the
machine cannot be
used.
Point to check
Have the peripheral devices that are
installed on the machine been
configured in the printer driver?
Solution
Open the printer properties and click the [Auto
Configuration] button on the [Configuration] tab.
(Windows)
* If auto configuration cannot be executed, see the
Software Setup Guide / Sharpdesk Installation
Manual.
Problems related to print results
Problem
Point to check
Solution
The image is grainy.
Are the printer driver settings
appropriate for the print job?
(Windows)
If you are using the PCL printer driver, you can set the
resolution to [600 dpi] or [300 dpi] in the print settings at
the time of printing. When you need a very clear image,
select [600 dpi].
If you are using the PS printer driver, you can set the
resolution to [600x600 dpi] or [1200x600 dpi] (only for
black and white printing).
The resolution setting is selected in the [Advanced] tab
of the printer driver properties window.
The image is too light
or too dark.
Does the image (particularly a photo)
need correction?
(Windows)
Brightness and contrast can be corrected by performing
[Color Adjustment] on the [Color] tab of the printer
driver. These settings can be used for simple
corrections when you do not have image editing
software installed on your computer.
Colours are off.
Did you perform "Registration
Adjustment"?
Ask your administrator to perform "Registration
Adjustment".
➞ System Settings (Administrator) > "Device Control" >
"Other Settings" > "Registration Adjustment"
If the colour tones are off, perform "Auto Colour
Calibration". (If the colours are still off after calibration,
repeating calibration may improve the results.)
➞ System Settings (Administrator) > "Printer Settings" >
"Auto Colour Calibration"
Text and lines are faint
and difficult to see.
Was colours data printed in black and
white?
(Windows)
When colour text and lines are printed in black and
white, they may become faint and difficult to see. To
have colour text or lines (areas) that are faint converted
to black, select [Text To Black] or [Vector To Black] on
the [Color] tab of the printer driver. (Raster data such as
bitmap images cannot be adjusted.)
38
Problem
Part of the image is
cut off.
The image is upside
down.
Point to check
Solution
Does the paper size specified by the job
match the size of paper loaded in the
tray?
Make sure that the paper size setting matches the size
of paper loaded in the tray.
The paper size setting is selected as follows:
Windows:
On the [Paper] tab of the printer driver.
If [Fit to Paper Size] is selected, check the loaded
paper and the paper size setting.
Macintosh:
In the [Page Setup] menu.
Is the print orientation setting (portrait or
landscape) correct?
Set the print orientation to match the image.
The print orientation is selected as follows:
Windows: On the [Main] tab of the printer driver.
Macintosh: In the [Page Setup] menu.
Are the margins set correctly in the
layout settings of the application?
If the edge of the image extends outside the printable
area of the machine, the edge will be cut off. Select an
appropriate paper size and margins in the layout
settings of the application.
Are you using a type of paper (tab
paper, punch paper, etc.) that can only
be loaded in a fixed orientation?
When the image size and paper size are the same but
the orientations are different, the orientation of the
image is automatically rotated to match the paper.
However, when the paper can only be loaded in a fixed
orientation, this may result in the image being printed
upside down. In this event, rotate the image 180
degrees before printing.
The 180 degree rotation setting is selected as follows:
Windows:
On the [Main] tab of the printer driver.
Macintosh (OS X v10.3.3 to 10.4):
On the [Page Setup] menu. (Landscape orientation
only.)
(In Mac OS 9.0 to 9.2.2, in the [PostScript Options]
menu of the [Page Setup] menu.)
Is the correct binding position selected
for two-sided printing?
When two-sided printing is performed, every other page
is printed upside down when tablet binding is selected
for the binding position. Be sure to set the appropriate
binding position.
The binding position is selected as follows:
Windows:
On the [Main] tab of the printer driver.
Macintosh:
In the [Layout] menu of the print window. (In Mac OS
X v10.1.5, in the [Duplex] menu of the print window; in
Mac OS 9.0 to 9.2.2, in [Output/Document Style].)
39
Problem
Many nonsense
characters are printed.
40
Point to check
Is your computer or the machine in an
unstable state?
Solution
If little free space remains in the memory or hard drive of
your computer, or many jobs have been spooled on the
machine and it has little free memory remaining, printed
text may turn into nonsense characters. In this situation,
cancel printing, restart your computer and the machine,
and try printing again.
To cancel printing
Windows:
Double-click the printer icon that appears at the lower
right of the task bar and click "Cancel All Documents"
(or "Purge Print Documents") in the [Printer] menu.
Macintosh:
Double-click the name of the machine in the printer
list, select the job that you wish to delete, and delete
it. (In Mac OS 9.0 to 9.2.2, double-click the printer
icon on the desktop, select the print job that you wish
to delete, and delete it.)
At the machine:
Press the [JOB STATUS] key on the operation panel,
touch the [Print Job] tab to change the screen, touch
the key of the print job that you wish to delete, and
touch the [Stop/Delete] key. A message appears to
confirm the cancellation. Touch the [Yes] key.
If nonsense characters are still printed after restarting,
ask your administrator to lengthen the timeout setting of
"I/O Timeout" in the system settings (administrator).
➞ System Settings (Administrator) > "Printer Settings" >
"Interface Settings" > "I/O Timeout"
* If nonsense characters are still printed after taking the
above measures, remove and then reinstall the printer
driver.
FACSIMILE
This chapter provides solutions to possible facsimile problems. See the following table of contents to locate the
appropriate page for your question or problem.
Problems related to transmission
• Transmission does not take place. . . . . . . . . . . . . . . . . . . . . . . . . . . . . . . . . . . . . . . . . . . . . . . . . . . . . 41
• The transmitted fax prints out blank at the receiving side. . . . . . . . . . . . . . . . . . . . . . . . . . . . . . . . . . . 43
• The transmitted fax is reduced by the receiving fax machine. . . . . . . . . . . . . . . . . . . . . . . . . . . . . . . . 43
• Transmission does not begin at the specified time. . . . . . . . . . . . . . . . . . . . . . . . . . . . . . . . . . . . . . . . 43
Problems related to reception
• Printing does not take place after reception.. . . . . . . . . . . . . . . . . . . . . . . . . . . . . . . . . . . . . . . . . . . . . 43
• Manual reception / polling reception are not possible. . . . . . . . . . . . . . . . . . . . . . . . . . . . . . . . . . . . . . 44
• The received image is faint. . . . . . . . . . . . . . . . . . . . . . . . . . . . . . . . . . . . . . . . . . . . . . . . . . . . . . . . . . 44
• The machine does not begin fax reception. . . . . . . . . . . . . . . . . . . . . . . . . . . . . . . . . . . . . . . . . . . . . . 44
Problems related to telephone
• Dialling is not possible. . . . . . . . . . . . . . . . . . . . . . . . . . . . . . . . . . . . . . . . . . . . . . . . . . . . . . . . . . . . . . 44
• You cannot talk to the other party. . . . . . . . . . . . . . . . . . . . . . . . . . . . . . . . . . . . . . . . . . . . . . . . . . . . . 44
Problems related to audible signals
• The volume is too low. . . . . . . . . . . . . . . . . . . . . . . . . . . . . . . . . . . . . . . . . . . . . . . . . . . . . . . . . . . . . . 45
• No sound is heard. . . . . . . . . . . . . . . . . . . . . . . . . . . . . . . . . . . . . . . . . . . . . . . . . . . . . . . . . . . . . . . . . 45
Problems related to one-touch individual keys / group keys
• A one-touch individual key or group key cannot be stored. . . . . . . . . . . . . . . . . . . . . . . . . . . . . . . . . . 46
• A one-touch individual key or group key cannot be edited or deleted. . . . . . . . . . . . . . . . . . . . . . . . . . 46
• You wish to delete or edit an individual key but do not know which group key it is stored in. . . . . . . . 46
• You wish to delete or edit an individual or group key but do not know which program key it is
stored in. . . . . . . . . . . . . . . . . . . . . . . . . . . . . . . . . . . . . . . . . . . . . . . . . . . . . . . . . . . . . . . . . . . . . . . . . 46
• If you cannot find the item that you are looking for in the above table of contents, see "OTHER PROBLEMS" (page 59).
• If you are unable to solve a problem using the solutions in this manual, switch off the [POWER] key (
) and the
main power switch. Wait at least 10 seconds, and then switch on the main power switch and the [POWER] key (
)
in that order.
* When the LINE indicator is lit or the DATA indicator is lit or blinking, do not switch off the main power switch or unplug
the power plug. This may damage the hard drive or cause the data being stored or received to be lost.
Problems related to transmission
Problem
Transmission does
not take place.
Point to check
Is the telephone line connected
securely?
Solution
Check the telephone line socket, the wall socket, and
any extension adapters to make sure that all
connections are secure.
☞ Illustration of the machine (N) (page 70)
41
Problem
Transmission does
not take place.
42
Point to check
Solution
Is the correct dial mode set for your
line?
Ask your administrator to verify that "Dial Mode Setting"
is set correctly for the line you are using.
➞ System Settings (Administrator) > "Image Send
Settings" > "Fax Settings" > "Fax Default Settings" >
"Dial Mode Setting"
Is a busy signal received?
If a busy signal is received, the transmission is
temporarily cancelled and then automatically
re-attempted after a brief interval. (Default setting: 2
attempts, 3 min. intervals)
➞ System Settings (Administrator) > "Image Send
Settings" > "Fax Settings" > "Fax Send Settings" >
"Recall in Case of Line Busy"
To cancel the transmission, press the [JOB STATUS]
key, touch the key of the job that you wish to cancel,
and then touch the [Stop/Delete] key.
Did a communication error occur?
If an error occurs that prevents transmission, the
transmission is temporarily cancelled and then
automatically re-attempted after a brief interval.
(Default setting: 3 min. intervals)
➞ System Settings (Administrator) > "Image Send
Settings" > "Fax Settings" > "Fax Send Settings" >
"Recall in Case of Communication Error"
To cancel the transmission, press the [JOB STATUS]
key, touch the key of the job that you wish to cancel,
and then touch the [Stop/Delete] key.
The machine supports error correction mode (ECM) and
is configured to automatically resend any part of a fax
that is distorted due to noise on the line.
➞ System Settings (Administrator) > "Image Send
Settings" > "Fax Settings" > "Fax Default Settings" >
"ECM"
Does a message appear indicating that
the memory is full?
If the memory becomes full, the transmission will be
cancelled. Divide the originals into sets and fax each set
separately, or use direct transmission.
Does a message appear notifying you
that the original size was not detected?
Place the original again. If the original size is still not
detected correctly, specify the original size manually.
Does the job status screen (completed
jobs) or a transaction report indicate that
the transmission was not successful?
Perform the transmission again.
If the transmission is still not successful after recalling is
performed as set in "Recall in Case of Line Busy" or
"Recall in Case of Communication Error", the
transmission failure will be indicated in the job status
screen and the transaction report.
➞ System Settings (Administrator) > "Image Send
Settings" > "Fax Settings" > "Fax Send Settings" >
"Recall in Case of Line Busy"
➞ System Settings (Administrator) > "Image Send
Settings" > "Fax Settings" > "Fax Send Settings" >
"Recall in Case of Communication Error"
Problem
Point to check
Solution
Did you place a long size original on the
document glass when it is scanned?
A long size original cannot be scanned from the
document glass. Place originals in the document feeder
tray of the automatic document feeder.
Did you place an original that is folded?
If a folded original is placed in the automatic document
feeder, an error will occur and scanning will be
cancelled when the actual original size is detected
during scanning.
Following the instructions in the display, unfold the
original, place it in the automatic document feeder
again, and rescan.
Are the sub-address and passcode
correct?
(When using F-code communication)
Check with the operator of the other machine to make
sure that the sub-address and passcode are correct.
Have functions been disabled by the
administrator?
When user authentication is enabled, the functions that
you can use may be restricted in your user settings.
Check with your administrator.
Is the original placed face up or face
down correctly?
When using the document glass, the original must be
placed face down. When using the automatic document
feeder, the original must be placed face up. Place the
original correctly and send the fax again.
If the receiving machine is using thermal
paper, was the thermal paper loaded
with the wrong side out?
Check with the operator of the other machine.
The transmitted fax is
reduced by the
receiving fax machine.
Has image rotation been enabled?
When "Rotation Sending Setting" is not enabled (the
image is not rotated), an original placed in the vertical
orientation may be reduced by the receiving machine.
Enable "Rotation Sending Settings" before
transmission.
➞ System Settings (Administrator) > "Image Send
Settings" > "Fax Settings" > "Fax Send Settings" >
"Rotation Sending Setting" >
Transmission does
not begin at the
specified time.
Is the machine's clock set to the correct
time?
Set the clock to the correct time.
➞ System Settings > "Default Settings" > "Clock" >
"Clock Adjust"
Is a transmission in progress?
If another transmission is in progress when the specified
time arrives, the timer operation will begin after that
transmission is finished.
Transmission does
not take place.
The transmitted fax
prints out blank at the
receiving side.
Problems related to reception
Problem
Printing does not take
place after reception.
Point to check
Does a message appear in the display
instructing you to add toner or paper?
(Printing is not possible when this
screen appears.)
Solution
Restore printing capability as instructed by the
message.
43
Problem
Point to check
Solution
Printing does not take
place after reception.
Does a password entry screen appear?
"Hold Setting for Received Data Print" is enabled. Enter
the correct password with the numeric keys.
If you do not know the password, check with your
administrator.
Has cut-off printing been disabled in the
system settings (administrator)?
If "Print Actual Size Cut off Disabled" is enabled in "Print
Style Setting" in the system settings (administrator) and
a fax is received that is larger than any paper that is
loaded, the fax will be received to memory without being
printed. (However, when a fax longer than
A3 (11" x 17") size is received, it will be printed using
multiple sheets of paper.)
Load the same size of paper as the received fax.
Is forwarding (Inbound Routing function)
selected in the Web page for a received
fax?
When the Inbound Routing function is enabled in the
Web pages, received faxes are automatically forwarded
to a specified E-mail address. If "Print at Error" is
selected when Inbound Routing is enabled, received
faxes will only be printed when an error occurs. If you
need to print a received fax, ask your administrator.
Manual reception /
polling reception are
not possible.
Is little free memory remaining?
Free memory by printing faxes received by confidential
reception and other received data that is protected by a
password, and by deleting data stored in memory
boxes.
The received image is
faint.
Is the original that was faxed also faint?
Ask the other party to send the fax again using a
suitable (darker) exposure setting.
The machine does not
begin fax reception.
Has the reception mode been set to
"Manual Reception" in the system
settings?
When the reception mode is set to "Manual Reception",
the machine will not receive faxes automatically. To
have the machine receive faxes automatically, set the
reception mode to "Auto Reception".
➞ System Settings > "Fax Data Receive/Forward" >
"Fax Settings" > "Receive Setting"
Is little free memory remaining?
Free memory by printing faxes received by confidential
reception and other received data that is protected by a
password, and by deleting data stored in memory
boxes.
Problems related to telephone
Problem
Point to check
Solution
Dialling is not
possible.
Is the extension phone connected?
Check the telephone line socket, the extension phone
socket, the wall socket, and any extension adapters to
make sure that all connections are secure.
☞ Illustration of the machine (M), (N) (page 70)
You cannot talk to the
other party.
Did you dial using the speaker?
When you dial using the speaker, you will be able to
hear the voice of the other party, but he or she will not
hear your voice. Use the extension phone. (When the
extension phone is not installed, you cannot talk to the
other party.)
44
Problems related to audible signals
Problem
The volume is too low.
• Speaker
• Ringer Volume
Point to check
Solution
Has the volume setting been set to
"Small" in the system settings
(administrator)?
Ask your administrator to set the volumes in "Speaker
Settings" to "Middle" or "Big".
➞ System Settings (Administrator) > "Image Send
Settings" > "Fax Settings" > "Fax Default Settings" >
"Speaker Settings"
Has the ringer volume been turned off in
the system settings (administrator)?
Ask your administrator to set the volumes in "Speaker
Settings" to "Small", "Middle", or "Big".
➞ System Settings (Administrator) > "Image Send
Settings" > "Fax Settings" > "Fax Default Settings" >
"Speaker Settings"
• Line Monitor
• Fax Receive
Complete Signal
• Fax Send Complete
Signal
• Fax Communication
Error Signal
No sound is heard.
• Ringer Volume
• Line Monitor
• Fax Receive
Complete Signal
• Fax Send Complete
Signal
• Fax Communication
Error Signal
45
Problems related to one-touch individual keys / group
keys
Problem
Point to check
A one-touch individual
key or group key
cannot be stored.
Has the maximum number of keys been
stored?
Delete one-touch keys and group keys that are not
being used.
Have functions been disabled by the
administrator?
Some functions may have been disabled in the system
settings (administrator). Check with your administrator.
If the key is an individual key, is the key
included in a group?
Remove the key from the group and then edit or delete
the key.
➞ System Settings > "Address Control" > "Program"
Is the key being used in a reserved
transmission or a transmission in
progress?
Wait until the transmission is finished or cancel the
transmission and then edit or delete the key.
Is the key included in a program key?
Remove the key from the program and then edit or
delete the key.
➞ System Settings > "Address Control" > "Program"
Is the key that you wish to edit or delete
stored as a relay destination of an
F-code relay broadcast transmission?
An individual or group one-touch key that is stored as a
relay destination cannot be edited or deleted. Remove
the key from the relay destinations of the F-code relay
broadcast transmission and then edit or delete the key.
➞ System Settings > "Address Control" > "F-Code
Memory Box"
Have functions been disabled by the
administrator?
Some functions may have been disabled in the system
settings (administrator). Check with your administrator.
Has your administrator enabled a
function that prevents editing/deleting?
If your administrator has enabled settings such as
"Inbound Routing Settings" (in the Web pages),
editing/deleting will not be possible. Check with your
administrator.
You wish to delete or
edit an individual key
but do not know which
group key it is stored
in.
Are multiple group keys stored?
If multiple group keys have been stored, print the Group
List in "Sending Address List" in the system settings.
The list will show where the key is stored.
➞ System Settings > "List Print (User)" > "Sending
Address List" > "Group List"
You wish to delete or
edit an individual or
group key but do not
know which program
key it is stored in.
Are multiple program keys stored?
If multiple program keys have been stored, print the
Program List in "Sending Address List" in the system
settings. The list will show where individual and group
keys are stored.
➞ System Settings > "List Print (User)" > "Sending
Address List" > "Program List"
A one-touch individual
key or group key
cannot be edited or
deleted.
46
Solution
SCANNING
This chapter provides solutions to possible scanning problems. See the following table of contents to locate the
appropriate page for your question or problem.
Problems related to scanning operation
• Transmission does not take place. . . . . . . . . . . . . . . . . . . . . . . . . . . . . . . . . . . . . . . . . . . . . . . . . . . . . 47
• An address cannot be specified.. . . . . . . . . . . . . . . . . . . . . . . . . . . . . . . . . . . . . . . . . . . . . . . . . . . . . . 48
• Mode cannot be selected.. . . . . . . . . . . . . . . . . . . . . . . . . . . . . . . . . . . . . . . . . . . . . . . . . . . . . . . . . . . 48
• Auto selection of the colour mode does not take place correctly.. . . . . . . . . . . . . . . . . . . . . . . . . . . . . 48
• The received image file cannot be opened. . . . . . . . . . . . . . . . . . . . . . . . . . . . . . . . . . . . . . . . . . . . . . 49
• Transmission takes a long time. . . . . . . . . . . . . . . . . . . . . . . . . . . . . . . . . . . . . . . . . . . . . . . . . . . . . . . 49
• A destination is pre-selected. . . . . . . . . . . . . . . . . . . . . . . . . . . . . . . . . . . . . . . . . . . . . . . . . . . . . . . . . 49
• Cannot write to USB memory. (When using USB Memory Scan.) . . . . . . . . . . . . . . . . . . . . . . . . . . . . 49
Problems related to scan results
• The scanned image is clipped. . . . . . . . . . . . . . . . . . . . . . . . . . . . . . . . . . . . . . . . . . . . . . . . . . . . . . . . 50
• The quality of the scanned image is poor. . . . . . . . . . . . . . . . . . . . . . . . . . . . . . . . . . . . . . . . . . . . . . . 50
• The scanned image is blank. . . . . . . . . . . . . . . . . . . . . . . . . . . . . . . . . . . . . . . . . . . . . . . . . . . . . . . . . 50
• The scanned image is upside down or on its side. . . . . . . . . . . . . . . . . . . . . . . . . . . . . . . . . . . . . . . . . 50
• The [COLOUR START] key (
) indictor is not lit. . . . . . . . . . . . . . . . . . . . . . . . . . . . . . . . . . . . . 50
• JPEG was selected for the file type but the file was created as a TIFF file. . . . . . . . . . . . . . . . . . . . . . 51
• The image is too light or too dark. (When using PC Scan.) . . . . . . . . . . . . . . . . . . . . . . . . . . . . . . . . . 51
Problems related to one-touch individual keys / group keys
• A one-touch individual key or group key cannot be stored. . . . . . . . . . . . . . . . . . . . . . . . . . . . . . . . . . 52
• A one-touch individual key or group key cannot be edited or deleted. . . . . . . . . . . . . . . . . . . . . . . . . . 52
• You wish to delete or edit an individual key but do not know which group key it is stored in. . . . . . . . 52
• You wish to delete or edit an individual or group key but do not know which program key it is
stored in. . . . . . . . . . . . . . . . . . . . . . . . . . . . . . . . . . . . . . . . . . . . . . . . . . . . . . . . . . . . . . . . . . . . . . . . . 52
• If you cannot find the item that you are looking for in the above table of contents, see "OTHER PROBLEMS" (page 59).
• If you are unable to solve a problem using the solutions in this manual, switch off the [POWER] key (
) and the main
power switch. Wait at least 10 seconds, and then switch on the main power switch and the [POWER] key (
) in that order.
* When the LINE indicator is lit or the DATA indicator is lit or blinking, do not switch off the main power switch or unplug
the power plug. This may damage the hard drive or cause the data being stored or received to be lost.
Problems related to scanning operation
Problem
Transmission does
not take place.
Point to check
Did you select the correct destination?
Is the correct information (e-mail
address or FTP server information)
stored for that destination?
Solution
Make sure that the correct destination information is
stored for the destination and that the destination is
correctly selected. If delivery by e-mail (Scan to E-mail)
is unsuccessful, an error message such as "Undelivered
Message" may be sent to the designated administrator's
e-mail address. This information may help you
determine the cause of the problem.
47
Problem
Transmission does
not take place.
An address cannot be
specified.
Point to check
Does the image file exceed the e-mail
attachment limit set in the system
settings (administrator)?
If your administrator has set a limit on the size of
transmitted files, a file that exceeds the limit cannot be
transmitted. Check with your administrator.
Did the image file exceed the file
attachment size limit of your mail
server?
(When Scan to E-mail is used.)
Reduce the size of the file attachment (reduce the
number of pages scanned). The size of the file can also
be reduced by scanning using a lower resolution setting.
Ask your mail server administrator what the file size limit
is for one e-mail transmission.
Has the folder on the destination
computer been set as a shared folder so
that files can be sent to it?
(When using Scan to Network Folder.)
If the destination folder is not configured as a shared
folder, select "share" in the folder properties. If the folder
was moved or otherwise changed, the "share" setting
may have been cancelled.
Did you place a long size original on the
document glass when it is scanned?
A long size original cannot be scanned from the
document glass. Place originals in the document feeder
tray of the automatic document feeder.
Did you place an original that is folded?
If a folded original is placed in the automatic document
feeder, an error will occur and scanning will be
cancelled when the actual original size is detected
during scanning.
Following the instructions in the display, unfold the
original, place it in the automatic document feeder
again, and rescan.
Have functions been disabled by the
administrator?
Some functions may have been disabled in the system
settings (administrator). Check with your administrator.
When user authentication is enabled, the functions that
you can use may be restricted in your user settings.
Check with your administrator.
Are you scanning one of the following
types of originals?
When Black & White is not selected:
When the colour mode is set to "Auto", the machine
detects whether the original is black and white or colour
when the [COLOUR START] key (
) is pressed;
however, in the cases at left, automatic detection may
not give the correct result. In this event, specify the
colour mode manually.
Mode cannot be
selected.
Auto selection of the
colour mode does not
take place correctly.
• Are there colours or colouring in the
paper?
When Colour is not selected:
• Is the colour in the original very light?
• Is the colour in the original very dark,
almost black?
• Is only a very small area of the
original coloured?
48
Solution
Problem
The received image
file cannot be opened.
Point to check
Solution
Does the viewer program used by the
recipient support the format of the
received image data?
The recipient may be able to open the file if you change
the file type and compression mode selected at the time
of transmission. Use a software program that is capable
of opening the selected file type and compression mode.
Does a message appear prompting you
to enter your password?
The received file is an encrypted PDF file. Ask the
sender for the password, or have the image sent again
in a non-encrypted format.
Transmission takes a
long time.
Is the resolution setting appropriate at
the time of scanning?
To select resolution and data compression settings that
are suited to the purpose of transmission and create
image data that is balanced in terms of resolution and
file size, pay attention to the following points:
Resolution settings
The default resolution setting is [200X200dpi] in
scanner and USB memory mode, and [200X100dpi] in
Internet fax mode. If the original does not contain a
halftone image such as a photo or illustration,
scanning at the default resolution will create a
practical and useful image. A higher resolution setting
or the "Half Tone" setting (in Internet fax mode)
should only be selected if the original contains a photo
and you wish to give priority to the quality of the photo
image. Exercise caution in this case as a larger file
will be created than when the default setting is used.
A destination is
pre-selected.
Is "Default Address Setting" enabled in
the system settings (administrator)?
If you wish to send to a destination other than the
default destination, touch the [Cancel] key.
If you are the administrator and wish to change or
disable the default destination, change the settings as
appropriate in "Default Address Setting".
➞ System Settings (Administrator) > "Image Send
Settings" > "Scan Settings" > "Default Address
Setting"
Cannot write to USB
memory.
(When using USB
Memory Scan.)
Is the USB memory device connected
securely to the machine?
Make sure that the USB memory device is connected
securely.
49
Problems related to scan results
Problem
Point to check
Solution
The scanned image is
clipped.
Is the original scan size setting smaller
than the actual original size?
Set the scan size to the actual original size.
If you have intentionally set a smaller size than the
actual original size, note carefully the placement
position of the selected scan size when placing the
original. For example, when scanning an A4
(8-1/2" x 11") original using a B5 (5-1/2" x 8-1/2") setting
on the document glass, align the original using the
document glass scale at the left edge to fit the area you
wish to scan into the B5 (5-1/2" x 8-1/2") scanning area.
☞ Illustration of the machine (J) (page 70)
The quality of the
scanned image is
poor.
Is the original printed matter such as a
book or magazine?
When the original is printed matter, vertical patterns
(moiré) may occur. Touch the [Exposure] key in the base
screen to open the exposure setting screen. The [Moiré
Reduction] checkbox appears in this screen. This
checkbox can be selected
to reduce the moiré
effect. (only in scan mode and USB memory scan mode)
It may also be possible to reduce the moiré effect by
changing the resolution setting or shifting the original (or
changing its angle) slightly on the document glass.
When scanning a colour or greyscale
original, is the colour mode set to
"Mono2"?
Setting the colour mode to "Mono2" replaces the
colours in the original with either black or white. This is
suitable for text-only originals; however, for originals
that contain illustrations, it is best to use the [BLACK &
WHITE START] key (
) with the colour mode set to
[Greyscale], or set the colour mode of the [COLOUR
START] key (
) to [Full Colour] or
[Auto]-[Greyscale] and then scan.
Is a destination included that has
[TIFF-S] selected for the format?
When a broadcast transmission is performed that
includes both scan mode destinations and Internet fax
destinations that have [TIFF-S] selected for the format,
the resolution will remain fixed at [200X200dpi] even if a
different resolution setting is selected. If you wish to
send an image scanned at high resolution to scan mode
destinations, send the image in a separate
transmission.
The scanned image is
blank.
Is the original placed face up or face
down correctly?
When using the document glass, the original must be
placed face down. When using the automatic document
feeder, the original must be placed face up.
The scanned image is
upside down or on its
side.
Are Internet fax addresses included in
the transmission?
When both scan mode and Internet fax destinations are
included in a broadcast transmission, the original
transmission orientation of Internet fax takes
precedence, and thus the file may not appear in the
correct orientation when viewed on a computer. In this
event, send the image to the scan mode destinations in
a separate transmission.
The [COLOUR START]
key (
) indictor
is not lit.
Are Internet fax or fax destinations
included?
If Internet fax or fax destinations are included in the
destinations, only the [BLACK & WHITE START] key
(
) can be used.
50
Problem
Point to check
Solution
JPEG was selected for
the file type but the file
was created as a TIFF
file.
Did you press the [BLACK & WHITE
START] key (
) to begin scanning?
When [JPEG] is selected for the file type and the image
is scanned in Mono 2, the file will be created as a TIFF
file. To create the file as a JPEG file, change the colour
mode to [Full Colour] and then press the [COLOUR
START] key (
).
The image is too light
or too dark.
(When using PC
Scan.)
Is the threshold value suitable?
When scanning from the TWAIN driver with [Mono 2
gradation] selected from the [Colour Mode] of the
"Professional" window, check the "B/W Threshold"
setting. A large threshold value makes the image darker
and a small threshold value makes the image brighter.
To adjust the "B/W Threshold" automatically, click the
[Auto Threshold] button on the [Image] tab of the
"Professional" window.
Are the brightness and contrast settings
suitable?
When the brightness and contrast settings are not
suitable (for example, the scanned image is too bright),
click the [Auto Brightness / Contrast Adjustment] button
on the [Colour] tab of the "Professional" window. You
can also click the [Brightness / Contrast] button to set
the brightness and contrast while viewing the scanned
image.
51
Problems related to one-touch individual keys / group
keys
Problem
Point to check
A one-touch individual
key or group key
cannot be stored.
Has the maximum number of keys been
stored?
Delete one-touch keys and group keys that are not
being used.
Have functions been disabled by the
administrator?
Some functions may have been disabled in the system
settings (administrator). Check with your administrator.
If the key is an individual key, is the key
included in a group?
Remove the key from the group and then edit or delete
the key.
➞ System Settings > "Address Control" > "Program"
Is the key being used in a reserved
transmission or a transmission in
progress?
Wait until the transmission is finished or cancel the
transmission and then edit or delete the key.
Is the key included in a program key?
Remove the key from the program and then edit or
delete the key.
➞ System Settings > "Address Control" > "Program"
Have functions been disabled by the
administrator?
Some functions may have been disabled in the system
settings (administrator). Check with your administrator.
Has your administrator enabled a
function that prevents editing/deleting?
If your administrator has enabled "Default Address
Setting" (on the machine) or "Inbound Routing Settings"
(in the Web pages), editing/deleting will not be possible.
Check with your administrator.
You wish to delete or
edit an individual key
but do not know which
group key it is stored
in.
Are multiple group keys stored?
If multiple group keys have been stored, print the Group
List in "Sending Address List" in the system settings.
The list will show where the key is stored.
➞ System Settings > "List Print (User)" > "Sending
Address List" > "Group List"
You wish to delete or
edit an individual or
group key but do not
know which program
key it is stored in.
Are multiple program keys stored?
If multiple program keys have been stored, print the
Program List in "Sending Address List" in the system
settings. The list will show where individual and group
keys are stored.
➞ System Settings > "List Print (User)" > "Sending
Address List" > "Program List"
A one-touch individual
key or group key
cannot be edited or
deleted.
52
Solution
DOCUMENT FILING
This chapter provides solutions to possible document filing problems. See the following table of contents to locate the
appropriate page for your question or problem.
• Document filing does not take place. . . . . . . . . . . . . . . . . . . . . . . . . . . . . . . . . . . . . . . . . . . . . . . . . . . 53
• A filed data can not be printed. . . . . . . . . . . . . . . . . . . . . . . . . . . . . . . . . . . . . . . . . . . . . . . . . . . . . . . . 53
• A job cannot be stored in a custom folder. . . . . . . . . . . . . . . . . . . . . . . . . . . . . . . . . . . . . . . . . . . . . . . 53
• A stored file has disappeared. . . . . . . . . . . . . . . . . . . . . . . . . . . . . . . . . . . . . . . . . . . . . . . . . . . . . . . . 54
• A file cannot be deleted. . . . . . . . . . . . . . . . . . . . . . . . . . . . . . . . . . . . . . . . . . . . . . . . . . . . . . . . . . . . . 54
• The property of a file cannot be set to [Confidential]. . . . . . . . . . . . . . . . . . . . . . . . . . . . . . . . . . . . . . . 54
• A file name cannot be stored or changed. . . . . . . . . . . . . . . . . . . . . . . . . . . . . . . . . . . . . . . . . . . . . . . 54
• A custom folder name cannot be stored or changed. . . . . . . . . . . . . . . . . . . . . . . . . . . . . . . . . . . . . . . 54
• A file name is cut off.. . . . . . . . . . . . . . . . . . . . . . . . . . . . . . . . . . . . . . . . . . . . . . . . . . . . . . . . . . . . . . . 54
• If you cannot find the item that you are looking for in the above table of contents, see "OTHER PROBLEMS" (page 59).
• If you are unable to solve a problem using the solutions in this manual, switch off the [POWER] key (
) and the
main power switch. Wait at least 10 seconds, and then switch on the main power switch and the [POWER] key (
)
in that order.
* When the LINE indicator is lit or the DATA indicator is lit or blinking, do not switch off the main power switch or unplug
the power plug. This may damage the hard drive or cause the data being stored or received to be lost.
Problem
Document filing does
not take place.
Point to check
Solution
Did you select document filing settings
in the printer driver?
In print mode, enable document filing on the [Job
Handling] tab of the printer driver.
In copy mode or image send mode, touch the [Quick
File] key or the [File] key and then use the document
filing function.
Have functions been disabled by the
administrator?
Some functions may have been disabled in the system
settings (administrator). Check with your administrator.
When user authentication is enabled, the functions that
you can use may be restricted in your user settings.
Check with your administrator.
A filed data can not be
printed.
Have functions been disabled by the
administrator?
Some functions may have been disabled in the system
settings (administrator). Check with your administrator.
When user authentication is enabled, the functions that
you can use may be restricted in your user settings.
Check with your administrator.
A job cannot be stored
in a custom folder.
Do custom folders appear in "Folder
Information"?
(When printing)
Click the [Get Folder Name] button in the document
filing save screen of the printer driver to call up the
custom folders that have been created on the machine.
Does the custom folder have a
password?
Enter the password configured in the machine in the
document filing save screen.
53
Problem
Point to check
Solution
A stored file has
disappeared.
Did you touch the [Print and Delete the
Data] key to print a stored file?
A file that is printed using the [Print and Delete the Data]
key is automatically deleted after being printed. To print
a file without deleting it, use the [Print and Save the
Data] key.
The file property can be set to "Protect" to prevent the
file from being easily deleted.
A file cannot be
deleted.
Is the property of the file set to
[Protect]?
A file cannot be deleted when its property is set to
[Protect]. Change the property to [Sharing] and then
delete the file.
The property of a file
cannot be set to
[Confidential].
Is the file in the Quick File folder?
"Confidential" cannot be specified for a file in the Quick
File folder. Move the file to a different folder and then
specify "Confidential". (Note that "Protect" can be
specified for a file in the Quick File folder to prevent it
from being easily deleted.)
A file name cannot be
stored or changed.
Does the name include characters that
cannot be used in a file or folder name?
The following characters cannot be used in a file or
folder name:
\?/";:,<>!*&#|
Was the file name stored in the
advanced transmission settings during a
scan or Internet fax transmission?
If the name was stored in the advanced transmission
settings before Quick File or File settings were
configured, that name will be used for the stored file. If
the number of characters in the name exceeds the
maximum number of characters allowed for a Quick File
name (30 characters), the characters after the 30th
character will be discarded.
A custom folder name
cannot be stored or
changed.
A file name is cut off.
54
INSTALLATION
This chapter provides solutions to possible installation problems. See the following table of contents to locate the
appropriate page for your question or problem.
• The software cannot be installed. . . . . . . . . . . . . . . . . . . . . . . . . . . . . . . . . . . . . . . . . . . . . . . . . . . . . . 55
• The machine is not detected (when connected to a network). . . . . . . . . . . . . . . . . . . . . . . . . . . . . . . . 55
• The plug and play screen does not appear (USB connection in Windows). . . . . . . . . . . . . . . . . . . . . . 56
• The printer driver is not installed correctly by plug and play (USB connection in Windows). . . . . . . . . 57
• The printer driver cannot be installed (Windows 2000/XP/Server 2003) . . . . . . . . . . . . . . . . . . . . . . . 57
• Removing the software . . . . . . . . . . . . . . . . . . . . . . . . . . . . . . . . . . . . . . . . . . . . . . . . . . . . . . . . . . . . . 58
Problem
The software cannot
be installed.
The machine is not
detected (when
connected to a
network).
Point to check
Solution
Is there sufficient free space on your
hard drive?
Delete any unneeded files and applications to increase
free space on your hard drive.
Are you using an operating system that
is not supported?
Make sure that the software can run on your operating
system.
For detailed information on installation requirements for
each software program in Windows, click the [Display
Readme] button in the installer.
In a Macintosh environment, this can be checked in "ReadMe First" in the [English] folder in the [Readme] folder of the "Software CD-ROM".
☞ Software Setup Guide / Sharpdesk Installation
Manual
Is the IP address of the machine
configured?
If the IP address of the machine is not configured, the
machine will not be detected. Make sure that the IP
address is configured correctly in "Network Settings" in
the machine's system settings (administrator).
➞ System Settings (Administrator) > "Network Settings"
55
Problem
The machine is not
detected (when
connected to a
network).
The plug and play
screen does not
appear (USB
connection in
Windows).
Point to check
Solution
Is your computer connected to the same
network as the machine?
Windows:
If the machine and your computer are not connected
to the same local area network, the machine will not
be detected. If the two are connected to different
sub-networks, click the [Specify condition] button and
enter the machine's name (host name) or IP address
to search for the machine.
Macintosh:
If multiple AppleTalk zones exist, select the zone to
which the machine is connected from the menu.
Is the machine power on?
If the machine is powered off, it will not be detected.
Switch on the main power switch and the [POWER] key
(
) in that order. (In Windows, search again after
powering on the machine.)
Is your computer connected correctly to
the machine?
Make sure that the cable is connected securely to the
LAN connectors on your computer and the machine.
Check the connections at the hub as well.
☞ Illustration of the machine (Q) (page 70)
Is the machine power on?
When a USB cable is connected, make sure the power
of the machine is "ON" and then connect a USB cable to
the machine. When the machine is not powered on,
switch on the main power switch and the [POWER] key
(
) in that order.
Can your computer use a USB
connection?
Check your computer whether or not a USB interface
can be used on the Device Manager in your computer.
(For information on "Device Manager", see Help in
Windows.)
If USB can be used, your controller chipset type and
root hub will appear in "Universal Serial Bus controllers"
in "Device Manager". (The items that appear will vary
depending on your computer.)
If these two items appear, USB should be useable. If a
yellow exclamation point appears next to "Universal
Serial Bus controllers" or the two items do not appear,
refer to your computer manual or check with the
manufacturer of your computer to enable USB and then
reinstall the printer driver.
56
Problem
The printer driver is
not installed correctly
by plug and play (USB
connection in
Windows).
Point to check
Solution
In Windows 2000/XP/Server 2003/Vista*, if the machine
was connected to your computer with a USB cable
before the printer driver was installed from the installer,
check if information on the unsuccessful installation
remains in "Device Manager". (For information on
"Device Manager", see Help in Windows.)
If the model name of the machine appears in "Other
devices" in "Device Manager", delete it, restart your
computer, and install the printer driver again.
* Windows Vista is not available for
MX-5500N/6200N/7000N.
Did you connect the machine to your
computer before installing the printer
driver?
The printer driver cannot be installed (Windows 2000/XP/Server 2003)
If the printer driver cannot be installed on Windows 2000/XP/Server 2003, follow the steps below to check your
computer settings.
1
Click the [start] button and then click
[Control Panel].
In Windows 2000, click the [Start] button, point to
[Settings], and click [Control Panel].
2
4
Check the settings in "What action do
you want Windows to take?" ("File
signature verification" in Windows 2000).
Click [Performance and Maintenance]
and then [System].
In Windows 2000, double-click the [System] icon.
3
Click the [Hardware] tab and then the
[Driver Signing] button.
If [Block] is selected, the printer driver cannot be installed.
Select [Warn] and install the printer driver again.
57
Removing the software
To remove the printer driver or software installed using the installer, follow the steps below.
Windows
1
Click the [start] button and then click
[Control Panel].
Mac OS X
1
☞ Software Setup Guide
In Windows 98/Me/NT 4.0/2000, click the [Start] button,
point to [Settings], and click [Control Panel].
2
Click [Add or Remove Programs].
2
• In Windows Vista*, click [Uninstall a program].
Select the program or driver that you
wish to delete.
3
Delete the installation information.
The installation information file has been copied to the
following folder on the startup disk.
[Library] - [Receipts]
Delete the [MX-PBX1.pkg] file from this folder.
For more information, see the manual for the operating
system or Help.
4
Delete the PPD file.
The PPD file has been copied to the following folder on
the startup disk.
[Library] - [Printers] - [PPDs] - [Contents] - [Resources] [en.lproj]
Delete the PPD file of the machine from this folder.
• In Windows 98/Me/NT 4.0/2000, double-click the
[Add/Remove Programs] icon.
3
Delete the printer that uses the
machine's PPD file from the printer list.
Restart your computer.
Mac OS 9.0 to 9.2.2
After deleting the icon of the printer that uses the machine's
PPD file from the desktop, follow the steps below.
* Windows Vista is not available for MX-5500N/6200N/7000N.
1
Insert the "Software CD-ROM" into your
CD-ROM drive.
Insert the "Software CD-ROM" that shows "Disc 2" on the
front of the CD-ROM.
58
2
Double-click the [CD-ROM] icon (
the desktop and double-click the
[MacOS] folder.
) on
3
Double-click the [Installer] icon (
).
4
Select [Remove] in the Install menu and
click the [Remove] button.
OTHER PROBLEMS
This chapter explains how to resolve problems related to the general operation of the machine. Locate your question or
problem in the table of contents below and refer to the appropriate page.
Problems related to machine operation
• Specified machine functions cannot be used.. . . . . . . . . . . . . . . . . . . . . . . . . . . . . . . . . . . . . . . . . . . . 60
• The operation panel cannot be used. . . . . . . . . . . . . . . . . . . . . . . . . . . . . . . . . . . . . . . . . . . . . . . . . . . 60
• Printing is not possible or stops during a job. . . . . . . . . . . . . . . . . . . . . . . . . . . . . . . . . . . . . . . . . . . . . 61
• The original size is not automatically selected or the wrong size is selected. . . . . . . . . . . . . . . . . . . . 61
• The displayed bypass tray paper size is not correct. . . . . . . . . . . . . . . . . . . . . . . . . . . . . . . . . . . . . . . 61
Problems related to paper feeding and output
• The original misfeeds (automatic document feeder). . . . . . . . . . . . . . . . . . . . . . . . . . . . . . . . . . . . . . . 62
• The paper misfeeds. . . . . . . . . . . . . . . . . . . . . . . . . . . . . . . . . . . . . . . . . . . . . . . . . . . . . . . . . . . . . . . . 62
• Paper does not feed from the paper tray. . . . . . . . . . . . . . . . . . . . . . . . . . . . . . . . . . . . . . . . . . . . . . . . 63
• The image on paper is skewed. . . . . . . . . . . . . . . . . . . . . . . . . . . . . . . . . . . . . . . . . . . . . . . . . . . . . . . 63
• The automatic document feeder does not operate. . . . . . . . . . . . . . . . . . . . . . . . . . . . . . . . . . . . . . . . 63
Problems related to quality / print results
• Lines appear in the scanned image. . . . . . . . . . . . . . . . . . . . . . . . . . . . . . . . . . . . . . . . . . . . . . . . . . . . 63
• Smudges appear on printed output. . . . . . . . . . . . . . . . . . . . . . . . . . . . . . . . . . . . . . . . . . . . . . . . . . . . 63
• Toner does not adhere well or creases appear in the paper. . . . . . . . . . . . . . . . . . . . . . . . . . . . . . . . . 64
• Print quality is poor. . . . . . . . . . . . . . . . . . . . . . . . . . . . . . . . . . . . . . . . . . . . . . . . . . . . . . . . . . . . . . . . 64
• Part of the image is cut off. . . . . . . . . . . . . . . . . . . . . . . . . . . . . . . . . . . . . . . . . . . . . . . . . . . . . . . . . . . 64
• Printing takes place on the wrong side of the paper. . . . . . . . . . . . . . . . . . . . . . . . . . . . . . . . . . . . . . . 64
Problems related to peripheral devices
• The connected USB device cannot be used. . . . . . . . . . . . . . . . . . . . . . . . . . . . . . . . . . . . . . . . . . . . . 65
• The finisher / saddle stitch finisher / inserter does not operate. . . . . . . . . . . . . . . . . . . . . . . . . . . . . . . 65
• Stapling does not take place (including pamphlet stapling). . . . . . . . . . . . . . . . . . . . . . . . . . . . . . . . . . 65
• Punching does not take place. . . . . . . . . . . . . . . . . . . . . . . . . . . . . . . . . . . . . . . . . . . . . . . . . . . . . . . . 66
• The stapling position or punch position is not correct. . . . . . . . . . . . . . . . . . . . . . . . . . . . . . . . . . . . . . 66
Other problems
• The touch panel screen is difficult to view. . . . . . . . . . . . . . . . . . . . . . . . . . . . . . . . . . . . . . . . . . . . . . . 67
• You were logged out without having performed logout yourself. . . . . . . . . . . . . . . . . . . . . . . . . . . . . . 67
• You forgot the administrator password. . . . . . . . . . . . . . . . . . . . . . . . . . . . . . . . . . . . . . . . . . . . . . . . . 67
Alarm display of the inserter . . . . . . . . . . . . . . . . . . . . . . . . . . . . . . . . . . . . . . . . . . . . . . . . . . . . . . . . . . 68
Illustration of the machine . . . . . . . . . . . . . . . . . . . . . . . . . . . . . . . . . . . . . . . . . . . . . . . . . . . . . . . . . . . . 69
If you are unable to solve a problem using the solutions in this manual, switch off the [POWER] key (
) and the main
power switch. Wait at least 10 seconds, and then switch on the main power switch and the [POWER] key (
) in that order.
* When the LINE indicator is lit or the DATA indicator is lit or blinking, do not switch off the main power switch or unplug
the power plug. This may damage the hard drive or cause the data being stored or received to be lost.
59
Problems related to machine operation
Problem
Point to check
Solution
Specified machine
functions cannot be
used.
Have functions been disabled by the
administrator?
Some functions may have been disabled in the system
settings (administrator). Check with your administrator.
When user authentication is enabled, the functions that
you can use and page counts may be restricted in your
user settings. Check with your administrator.
The operation panel
cannot be used.
Is the main power indicator lit?
If the main power indicator is not lit, make sure that the
power plug is firmly inserted in the power outlet, switch
the main power switch to the "on" position, and press
the [POWER] key (
) to turn on the power.
☞ Illustration of the machine (A), (E), and (O) (pages
69 and 70)
Did you just power on the machine?
After the [POWER] key (
) is turned on, the machine
requires some time to complete warmup operation.
During this time functions can be selected, however, a
job cannot be run. Wait until a message appears
indicating that the machine is ready.
Is the [POWER SAVE] key (
blinking?
Auto Power Shut-Off mode has activated. To return the
machine to normal operation, press the [POWER SAVE]
key (
).
☞ Illustration of the machine (A) (page 69)
60
)
Is a cover open or a device separated
from the machine?
A warning message will appear when a cover is open or
a device is separated from the machine. Read the
message and take appropriate action.
Did login fail three times in a row?
When "A Warning when Login Fails" is enabled in the
system settings (administrator) and login fails 3 times in
a row, a warning will be displayed and operation will
lock for 5 minutes. After operation unlocks, log in using
the correct user information. (If you do not know your
user information, contact your administrator.)
Does a message appear indicating that
Auto Login failed?
Auto Login failed due to a problem on the network.
Contact your administrator.
If you are the administrator, touch the [Admin Password]
key, log in as an administrator, and temporarily change
the auto login settings in the system settings
(administrator). (Restore the changed settings to their
original state after the network problem has been
solved.)
Problem
Point to check
Solution
The operation panel
cannot be used.
Does the message "Call for service.
Code:xx-xx*." appear in the touch
panel?
*Letters and numbers appear in xx-xx.
Make sure that the LINE indicator is not lit and that the
DATA indicator is not blinking or lit and then switch off the
[POWER] key (
) and the main power switch. Wait at
least 10 seconds and then switch the main power switch
and the [POWER] key (
) back on in that order.
☞ Illustration of the machine (A) and (E) (page 69)
If the message still appears after switching the
[POWER] key (
) and main power switch off and on
several times, it is likely that a failure has occurred that
requires service. In this event, stop using the machine,
unplug the power plug, and contact your dealer or
nearest authorised service representative. (When
contacting your dealer or nearest authorised service
representative, inform them of the displayed error code.)
Printing is not
possible or stops
during a job.
Is a tray out of paper?
Add paper as instructed by the message in the touch
panel.
Is the machine out of toner?
When toner runs low, a message will appear to inform
you that the toner cartridge must be replaced. To
replace the toner cartridge, see "5. MAINTENANCE" in
the User's Guide.
Has a paper misfeed occurred?
Remove the misfeed as instructed by the message in
the touch panel.
☞ REMOVING MISFEEDS (page 27)
Is the output tray full?
When the output tray becomes full, a detector activates
and stops printing.
Remove the output from the tray and resume printing.
☞ Illustration of the machine (B), (C), and (D) (page 69)
Is the waste toner box full?
Replace the waste toner box as instructed by the
message in the touch panel.
☞ "5. MAINTENANCE" in the User's Guide
In the Paper Tray Settings of the system
settings, are restrictions placed on the
trays that can be used in each mode
(copy, print, fax, Internet fax, and
document filing)?
Check the Paper Tray Settings and see if checkmarks
appear in the checkboxes of each mode (Feeding
Approved Job). Functions without a checkmark cannot
be used for printing using that tray.
➞ System Settings > "Paper Tray Settings" > "Tray
Settings" > "Change" >
(Each mode)
The original size is not
automatically selected
or the wrong size is
selected.
Is the original curled or folded?
The correct original size cannot be detected if the
original is curled or folded. Straighten the original.
Did you place an original smaller than
A5 (5-1/2" x 8-1/2") size?
Original sizes smaller than A5 (5-1/2" x 8-1/2") cannot
be detected. Enter the original size manually.
* When scanning a small original on the document
glass, it is convenient to place a blank sheet of paper
on top of the original which is the same size (A4
(8-1/2" x 11"), B5 (8-1/2" x 11"R), etc.) as the paper
that you wish to use for printing.
The displayed bypass
tray paper size is not
correct.
Is the bypass tray extension pulled out?
When loading paper in the bypass tray, be sure to pull
out the extension to enable the paper size to be
detected correctly.
☞ Illustration of the machine (H) (page 69)
61
Problems related to paper feeding and output
Problem
The original misfeeds
(automatic document
feeder).
The paper misfeeds.
62
Point to check
Solution
Is too much paper loaded in document
feeder tray?
Make sure that the stack of paper in the tray is not
higher than the indicator line.
☞ Illustration of the machine (L) (page 70)
Is the original a long original?
When using the automatic document feeder to scan a
long original, set the scan size to [Long Size]. (Note that
long originals cannot be copied using the copy function.)
Is the original on thin paper?
Use the document glass to scan the original. If you need
to use the automatic document feeder, use slow scan
mode in the special modes to scan the original.
Is a torn piece of paper remaining in the
machine?
Make sure all paper is removed.
☞ REMOVING MISFEEDS (page 27)
Is too much paper loaded in the tray?
Make sure that the stack of paper in the tray is not
higher than the indicator line.
☞ Illustration of the machine (I) (page 69)
Are multiple sheets feeding at once?
Fan the paper well before loading it.
Are you using paper that is not within
the specifications?
Use SHARP-recommended paper. Using paper that is
not supported may result in misfeeds, creases, or
smudges.
☞ "SUPPLIES" in this operation manual
* For paper that is prohibited or not recommended, see
"USEABLE PAPER" in the User's Guide.
Has the paper in the tray absorbed
moisture?
If you will not be using paper in a tray for a long time,
remove the paper from the tray and store it in a bag in a
dark and dry location.
Are the bypass tray guides adjusted to
the width of the paper?
Adjust the bypass tray guides to the width of the paper.
☞ Illustration of the machine (F) (page 69)
Is the bypass tray extension pulled out?
When loading a large size of paper, pull out the
extension.
☞ Illustration of the machine (H) (page 69)
Is the bypass feed roller dirty?
Clean the surface of the bypass feed roller.
☞ "5. MAINTENANCE" in the User's Guide
Is A5 (5-1/2" x 8-1/2") size paper
loaded?
Load A5 (5-1/2" x 8-1/2") size paper in tray 3 (the
second tray) or in the bypass tray.
* When loading A5 (5-1/2" x 8-1/2") size paper, place
the paper in the horizontal (A5R (5-1/2" x 8-1/2"R))
orientation.
Problem
The paper misfeeds.
Paper does not feed
from the paper tray.
The image on paper is
skewed.
The automatic
document feeder does
not operate.
Point to check
Solution
Has the correct paper size been set?
If you are using a special size, be sure to specify the
paper size.
If the size of paper loaded in a tray was changed, be
sure to check the paper size setting.
➞ System Settings > "Paper Tray Settings" > "Tray
Settings"
Did you add paper to the bypass tray?
When adding paper, remove any paper remaining in the
bypass tray, combine it with the paper to be added, and
reload as a single stack. If paper is added without
removing the remaining paper, a misfeed may result.
☞ Illustration of the machine (G) (page 69)
Is the paper loaded correctly in the
paper tray?
Set the guides to the size of the paper. Make sure the
height of the paper does not exceed the indicator line.
☞ Illustration of the machine (I) (page 69)
In the Paper Tray Settings of the system
settings, are restrictions placed on the
trays that can be used in each mode
(copy, print, fax, Internet fax, and
document filing)?
Check the Paper Tray Settings and see if checkmarks
appear in the checkboxes of each mode (Feeding
Approved Job). Functions without a checkmark cannot
be used for printing using that tray.
➞ System Settings > "Paper Tray Settings" > "Tray
Settings" > "Change" >
(Each mode)
Is too much paper loaded in the bypass
tray?
Do not load more than the maximum number of sheets.
The maximum number of sheets varies depending on
the paper type setting. For more information, see
"SPECIFICATIONS" in this operation manual.
Are the bypass tray guides adjusted to
the width of the paper?
Adjust the bypass tray guides to the width of the paper.
☞ Illustration of the machine (F) (page 69)
Are the original guides adjusted to the
width of the paper?
Adjust the original guides to the width of the paper.
☞ Illustration of the machine (K) (page 70)
Have functions been disabled by the
administrator?
Some functions may have been disabled in the system
settings (administrator). Check with your administrator.
Problems related to quality / print results
Problem
Lines appear in the
scanned image.
Smudges appear on
printed output.
Point to check
Solution
Are the scanning areas of the document
glass or automatic document feeder
dirty?
Clean the scanning areas of the document glass or
automatic document feeder.
☞ "5. MAINTENANCE" in the User's Guide
Is the bypass feed roller dirty?
Clean the surface of the bypass feed roller.
☞ "5. MAINTENANCE" in the User's Guide
Are you using paper that is not within
the specifications?
Use SHARP-recommended paper. Using paper that is
for other models or special paper that is not supported
may result in misfeeds, creases, or smudges.
☞ "SUPPLIES" in this operation manual
63
Problem
Smudges appear on
printed output.
Toner does not adhere
well or creases appear
in the paper.
Point to check
Solution
Are you printing on pre-punched paper?
If the printed image overlaps the punch holes, smudges
may appear on the reverse side of the paper following
one-sided printing, or on both sides following two-sided
printing. Take care that the image does not overlap the
punch holes.
Does a message appear indicating the
need for maintenance?
Contact your dealer or nearest authorised service
representative as soon as possible.
Are you using paper that is not within
the specifications?
Use SHARP-recommended paper. Using paper that is
for other models or special paper that is not supported
may result in misfeeds, creases, or smudges.
☞ "SUPPLIES" in this operation manual
Did you set the correct paper type?
Set the correct paper type in the tray settings. Make
sure that the following has not occurred:
• Heavy paper is being used, but a paper type other
than heavy paper is selected in the tray settings. (The
image may disappear if rubbed.)
• Paper other than heavy paper is being used, but
heavy paper is selected in the tray settings. (This may
cause creases and misfeeds.)
➞ System Settings > "Paper Tray Settings" > "Tray
Settings"
Is the paper loaded so that printing
takes place on the reverse side?
If printing takes place on the wrong side of label sheets
or transparency film, the toner may not adhere well and
a clear image may not be obtained.
Print quality is poor.
Is "Toner Save Mode" enabled?
When "Toner Save Mode" is enabled, printing takes
place using less toner and thus the print result is lighter.
Check with your administrator.
Part of the image is
cut off.
Has the correct paper size been set?
If you are using a special size, be sure to specify the
paper size.
If the size of paper loaded in a tray was changed, be
sure to check the paper size setting.
➞ System Settings > "Paper Tray Settings" > "Tray
Settings"
Was the original placed in the correct
position?
If you are using the document glass, be sure to place
the original in the far left corner of the document glass.
☞ Illustration of the machine (J) (page 70)
Printing takes place
on the wrong side of
the paper.
64
Is the paper loaded with the print side
facing in the correct direction?
• Trays 1 to 4:
Load the paper with the front side facing up*.
• Bypass tray and tray 5:
Load the paper with the front side facing down*.
* When the paper type is "Pre-Printed" or "Letter Head",
load the paper in the opposite way. (Except when
"Disabling of Duplex" is enabled in the system settings
(administrator). For the current setting, check with your
administrator.)
Problems related to peripheral devices
Problem
The connected USB
device cannot be
used.
The finisher / saddle
stitch finisher /
inserter does not
operate.
Stapling does not take
place (including
pamphlet stapling).
Point to check
Solution
Is the USB device compatible with the
machine?
Ask your dealer if the device is compatible with the
machine.
Is the connected USB device
recognized correctly?
Use "USB-Device Check" in the system settings to
check whether or not the device can be recognized.
➞ System Settings > "USB-Device Check"
If it is not recognized, connect it once again.
Does a message appear indicating that
you need to remove paper from the
stapler compiler?
Remove all remaining paper from the stapler compiler.
Is the [START] key (
) indicator on
the operation panel of the inserter
turned off?
Configure the settings of punching or stapling on the
operation panel of the inserter. For more information,
see "MANUALLY OPERATING THE INSERTER" in the
User's Guide.
Is the indicator blinking on the operation
panel of the inserter?
When the operation does not take place due to the
problem such as paper misfeeds, you will be informed
by the indicators that are lit and/or blinking on the
operation panel. See "Alarm display of the inserter"
(page 68) to solve the problem.
Does the following message appear in
the touch panel?
"Call for service. Code:xx-xx* Please
check the power of the finisher."
*Letters and numbers appear in xx-xx.
Check the finisher / saddle stitch finisher and the power
plug. Remove and then firmly reinsert the power plug,
and restart the machine.
Have functions been disabled by the
administrator?
Some functions may have been disabled in the system
settings (administrator). Check with your administrator.
Does a message appear instructing you
to check the staple unit?
Remove jammed staples.
☞ "FINISHER / SADDLESTITCH FINISHER
MAINTENANCE" in the User's Guide
Does a message appear instructing you
to add staples?
Replace the staple cartridge. Do not forget to replace
the staple case.
☞ "FINISHER / SADDLESTITCH FINISHER
MAINTENANCE" in the User's Guide
Is a different width of paper mixed in?
Stapling is not possible when paper of different widths
are mixed together. To perform mixed size stapling, use
paper of the same width and select the [Same Width]
setting. When copying, select [Same Width] from [Mixed
Size Original] in the special modes.
Are there more sheets than can be
stapled at once?
For the maximum number of sheets that can be stapled,
see "SPECIFICATIONS" in this operation manual.
Is a paper size that cannot be stapled
included in the print job?
For the paper sizes that can be stapled, see
"SPECIFICATIONS" in this operation manual.
65
Problem
Stapling does not take
place (including
pamphlet stapling).
Punching does not
take place.
The stapling position
or punch position is
not correct.
66
Point to check
Solution
Is the paper type setting of the tray
selected in the printer driver set to a
paper type that cannot be stapled?
Check the paper type settings in the machine and select
a tray that has paper that can be used for stapling*.
Click the [Tray Status] button in "Paper Selection" on
the [Paper] tab of the printer properties window and
check the paper type setting of each tray.
* Stapling is not possible on labels, tab paper,
transparency film, or envelopes. In addition, if "Disable
Staple" is selected in the user type, stapling will not be
possible.
Is the paper type setting of the selected
paper tray set to heavy paper?
Pamphlet stapling is not possible on heavy paper.
(However, when cover insertion is selected, pamphlet
stapling is possible when a single sheet of heavy paper
is inserted for use as a cover.)
Have functions been disabled by the
administrator?
Some functions may have been disabled in the system
settings (administrator). Check with your administrator.
Does a message appear instructing you
to check the punch module?
Dispose of punch scraps.
☞ "PUNCH MODULE" in the User's Guide
Is a different size of paper mixed in?
Punching is not possible when different widths of paper
are mixed together. To perform mixed size punching,
use paper of the same width and select the [Same
Width] setting. When copying, select [Same Width] for
[Mixed Size Original] in the special modes.
Is a paper size that cannot be punched
included in the print job?
For the paper sizes that can be punched, see
"SPECIFICATIONS" in this operation manual.
Is the tray selected in the printer driver
set to a paper type that cannot be
punched?
Check the paper type settings in the machine and select
a tray that has paper that can be used for punching*.
Click the [Tray Status] button in "Paper Selection" on
the [Paper] tab of the printer properties window and
check the paper type setting of each tray.
* Punching is not possible on labels, tab paper,
transparency film, and envelopes. In addition, if
"Disable Punch" is selected in the user type, punching
will not be possible.
Have functions been disabled by the
administrator?
Some functions may have been disabled in the system
settings (administrator). Check with your administrator.
Is the stapling position set correctly?
Check the stapling position setting.
☞ "OUT PUT" in the Copier Guide
Are the punching positions set
correctly?
Check the punch position settings.
☞ "OUT PUT" in the Copier Guide
Is the orientation of inserting the paper
correct?
(when using the inserter)
Check the orientation of the paper.
☞ "INSERTER" in the User's Guide
Other problems
Problem
Point to check
Solution
The touch panel
screen is difficult to
view.
Is the display contrast properly
adjusted?
Touch the brightness adjustment key (
) on the
system bar in the touch panel to adjust the brightness.
☞ "SYSTEM BAR" in the User's Guide
You were logged out
without having
performed logout
yourself.
Did Auto Clear activate?
When user authentication is used, the currently logged
in user will be automatically logged out if Auto Clear
activates. (Except when in PC scan mode.)
Log in again.
If you are the administrator, you can change the time
setting of Auto Clear or disable Auto Clear in "Auto
Clear Setting".
➞ System Settings (Administrator) > "Operation
Settings" > "Other Settings" > "Auto Clear Setting"
You forgot the
administrator
password.
Was the administrator password
changed from the factory default
setting?
Contact your dealer or nearest authorised service
representative.
* For the factory default administrator password, see
"TO THE ADMINISTRATOR OF THE MACHINE" in
this operation manual. After changing the password,
take special care to remember it.
67
Alarm display of the inserter
When the indicators are lit and/or blinking as shown below, operation will not take place even if you press the [START]
key (
). Solve the problem according to the combination of the indicators that are lit and/or blinking.
[PUNCH]
indicator
[START]
indicator
[STAPLE] indicator
Any one of the indicators is solidly lit.
Blinking
–
–
–
Any one of the indicators is blinking.
–
–
Any one of the
indicators is blinking.
–
68
–
–
–
–
Solution
A paper size that cannot be
fed has been loaded.
For the paper sizes that can
be used for punching,
stapling, or pamphlet
stapling, see
"SPECIFICATIONS" in this
operation manual.
Dispose of punch scraps.
☞ "PUNCH MODULE" in
the User's Guide
Blinks red
–
Blinks red
The hole punch scrap
container in the punch
module on the finisher or
saddle stitch finisher is full.
–
Blinks red
The finisher or saddle stitch
finisher tray is full.
Remove the paper from the
tray.
The finisher or saddle stitch
finisher is out of staples.
Replace the staple cartridge.
Do not forget to replace the
staple case.
☞ "FINISHER / SADDLE
STITCH FINISHER
MAINTENANCE" in the
User's Guide
The saddle stitch tray on the
saddle stitch finisher is full.
Remove the paper from the
saddle stitch tray.
The saddle stitch finisher is
out of saddle stitch staples.
Replace the staple cartridge.
Do not forget to replace the
staple case.
☞ "FINISHER / SADDLE
STITCH FINISHER
MAINTENANCE" in the
User's Guide
Functions have been
disabled by the
administrator.
Some functions may have
been disabled in the system
settings (administrator).
Check with your
administrator.
The punch waste box is not
installed.
After disposing of punch
scraps, install the punch
waste box.
Functions have been
disabled by the
administrator.
Some functions may have
been disabled in the system
settings (administrator).
Check with your
administrator.
–
Blinking
Any one of the indicators is
blinking.
–
Blinking
–
Cause
–
Blinks red
Blinks red
–
–
Illustration of the machine
Front
(A) Operation panel
LINE indicator / DATA indicator
Main power indicator
HOME
[POWER] key
SYSTEM
SETTINGS
[POWER SAVE]
key
READY
PRINT
DATA
LINE
IMAGE SEND
DATA
JOB STATUS
LOGOUT
(B) Output tray (centre tray)
(C) Right tray
When a finisher/saddle stitch
finisher is not installed.
(F)
(D) Output trays
(upper tray,
lower tray)
(G)
"On" position
(H)
"Off" position
(E) Main power switch
(I) Indicator line
Bypass tray
69
Back
(J) Original placement position on the document glass
Document glass scale
Mark
A5 or
5-1/2" x 8-1/2"
B5
A4 or 8-1/2" x 11"
Document glass scale
Mark
(K)
B5R
A4R or 8-1/2" x 11"R
B4 or 8-1/2" x 14"
A3 or 11" x 17"
(L) Indicator line
(M) Extension phone socket
(N) Telephone line socket
(O) Power plug
USB connector (A type)
(P) USB connector (B type)
(Q) LAN connector
The part indicated in the illustration is only
to be handled by a service technician.
70
MX-5500N/MX-6200N/MX-6201/MX-7000N/MX-7001
Safety Guide / Troubleshooting
PRINTED IN FRANCE
TINSE3896GHZZ