1
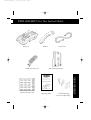
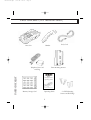
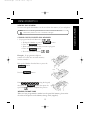
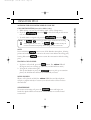
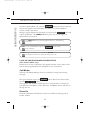
FP102-OM.qxd
7/12/98
09:26
Page 1
FP102
Hands Free Speaker Phone
with Pre-Programmed 5+15 Memory
Operating Guide
Feature•Phone Series
FP102-OM.qxd
7/12/98
09:26
Page 2
INTRODUCTION
Congratulations on the purchase of your Uniden FP102 Telephone.
The FP102 has been designed and engineered to exacting standards for
reliability, long life and outstanding performance.
To obtain the full benefit from your new telephone, please read this Operating
Guide thoroughly. For your future reference, please fill in the panel below and
attach your Purchase Receipt/Sales docket.
Serial No.
(found on the bottom of the unit)
Date of purchase
Name and address of dealer
2
FP102-OM.qxd
7/12/98
09:26
Page 3
CONTENTS
3
CONTENTS
Introduction . . . . . . . . . . . . . . . . . . . . . . . . . . . . . . . . . . . . . . . .2
Contents . . . . . . . . . . . . . . . . . . . . . . . . . . . . . . . . . . . . . . . . . . .3
Important Information . . . . . . . . . . . . . . . . . . . . . . . . . . . . . . .5
Important Notes . . . . . . . . . . . . . . . . . . . . . . . . . . . . . . . . .6
Caring for your Telephone . . . . . . . . . . . . . . . . . . . . . . . . . .6
Parts Checklist . . . . . . . . . . . . . . . . . . . . . . . . . . . . . . . . . . . . . .7
Parts Checklist (For New Zealand Model) . . . . . . . . . . . . . .7
Parts Checklist (For Australian Model) . . . . . . . . . . . . . . . . .8
Features . . . . . . . . . . . . . . . . . . . . . . . . . . . . . . . . . . . . . . . . . . .9
Functions . . . . . . . . . . . . . . . . . . . . . . . . . . . . . . . . . . . . . . . . .11
Installation . . . . . . . . . . . . . . . . . . . . . . . . . . . . . . . . . . . . . . . .13
Handset Cord Connection . . . . . . . . . . . . . . . . . . . . . . . . .13
Telephone Line Cord Connection . . . . . . . . . . . . . . . . . . . .13
Wall Mounting . . . . . . . . . . . . . . . . . . . . . . . . . . . . . . . . . .14
Using your FP102 . . . . . . . . . . . . . . . . . . . . . . . . . . . . . . . . . . .15
Memory Dial Numbers . . . . . . . . . . . . . . . . . . . . . . . . . . .15
Storing One-Touch Speed Dial Memories . . . . . . . . . . . . . .15
Memory Storage Card . . . . . . . . . . . . . . . . . . . . . . . . . . . .15
Pause . . . . . . . . . . . . . . . . . . . . . . . . . . . . . . . . . . . . . . . .16
Dialing Stored Numbers . . . . . . . . . . . . . . . . . . . . . . . . . . .16
Chain Dialing . . . . . . . . . . . . . . . . . . . . . . . . . . . . . . . . . .16
Adjusting the Ringer Volume Control . . . . . . . . . . . . . . . . .17
Adjusting the Ringer Tone Control . . . . . . . . . . . . . . . . . . .17
Adjusting the SpeakerPhone Volume Control . . . . . . . . . . . .17
LED Indicators . . . . . . . . . . . . . . . . . . . . . . . . . . . . . . . . .18
Placing a Telephone Call . . . . . . . . . . . . . . . . . . . . . . . . . .18
Redial . . . . . . . . . . . . . . . . . . . . . . . . . . . . . . . . . . . . . . . .18
7/12/98
09:26
Page 4
CONTENTS
CONTENTS
FP102-OM.qxd
Receiving a Telephone Call . . . . . . . . . . . . . . . . . . . . . . . .18
Accessing Call Waiting (New Zealand Model only) . . . . . . .18
Accessing Call Waiting (Australian Model only) . . . . . . . . . .19
Mute . . . . . . . . . . . . . . . . . . . . . . . . . . . . . . . . . . . . . . . . .19
Placing a Call on Hold . . . . . . . . . . . . . . . . . . . . . . . . . . . .19
Music on Hold . . . . . . . . . . . . . . . . . . . . . . . . . . . . . . . . .19
SpeakerPhone . . . . . . . . . . . . . . . . . . . . . . . . . . . . . . . . . .19
Using the Pre-Programmed Feature Buttons
(New Zealand Model only) . . . . . . . . . . . . . . . . . . . . . . . .20
Using the Pre-Programmed Feature Buttons
(Australian Model only) . . . . . . . . . . . . . . . . . . . . . . . . . .23
Troubleshooting . . . . . . . . . . . . . . . . . . . . . . . . . . . . . . . . . . . .27
Specifications . . . . . . . . . . . . . . . . . . . . . . . . . . . . . . . . . . . . . .28
New Zealand Model . . . . . . . . . . . . . . . . . . . . . . . . . . . . . .28
Australian Model . . . . . . . . . . . . . . . . . . . . . . . . . . . . . . . .28
Warranty . . . . . . . . . . . . . . . . . . . . . . . . . . . . . . . . . . . . . . . . . .29
4
FP102-OM.qxd
7/12/98
09:26
Page 5
IMPORTANT INFORMATION
When using your telephone equipment, basic safety precautions should always be
followed to reduce the risk of fire, electrical shock, and injury to persons,
including the following:
1. Read and understand all instructions.
2. Follow all warnings and instructions marked on the product.
3. Unplug this product from the wall outlet before cleaning. Do not use
liquid cleaners or aerosol cleaners. Use a soft damp cloth for cleaning.
5. Do not place this product on an unstable cart, stand, or table.
The telephone may fall, causing serious damage to the unit.
6. Slots and openings in the cabinet and the back or bottom are provided
for ventilation. To protect the product from overheating, these openings
should never be blocked or covered. This product should never be
placed near or over a radiator or heat register. This product should
not be placed in a built-in installation unless proper ventilation is provided.
7. Never push objects of any kind into this product through cabinet slots,
as they may touch dangerous voltage points or short out parts that
could result in a risk of fire or electrical shock. Never spill liquid of any
kind on the product.
8. Do not disassemble this product. Take it to qualified service personnel
when service or repair work is required. Opening or removing covers may
expose you to dangerous voltages or other risks. Incorrect re-assembly can
cause electrical shock when the appliance is subsequently used.
5
IMPORTANT INFORMATION
4. Do not use this product near water; for example, near a bath tub,
wash bowl, kitchen sink or laundry tub, in a wet basement, or near a
swimming pool.
7/12/98
09:26
Page 6
IMPORTANT INFORMATION
9. Unplug this product and refer servicing to qualified service personnel
under the following conditions:
A. If liquid has been spilled into the product.
B. If the product has been exposed to rain or water.
C. If the product does not operate normally when following the
operating instructions. Adjust only those controls that are
covered by the operating instructions. Improper adjustment of
other controls may result in damage, and will often require
extensive work by a qualified technician to restore to normal operation.
D. If the product has been dropped, or the cabinet has been damaged.
E. If the product exhibits a distinct change in performance.
IMPORTANT INFORMATION
FP102-OM.qxd
IMPORTANT NOTES
We have designed your telephone to conform to local regulations, and you can
connect it to most telephone lines. However, each device that you connect draws
power from the phone line. We refer to the power drawn as the device’s Ringer
Equivalence Number (REN or RN). This number is shown on the bottom of your
telephone. If you are using more than one phone or other device on the line,
add up all the REN’s. If the total is more than three, your phones may not ring.
NOTE: You must not connect your phone to any of the following:
• Coin operated systems
• Party-line systems
• Most electronic key phone systems
CARING FOR YOUR TELEPHONE
Clean your telephone using a soft damp cloth.
CAUTION
Do Not Use solvents, detergents, sprays, abrasive pads,
scouring powder or other products that may damage
your telephone.
Do Not place the telephone in direct sunlight.
Do Not Use in extreme humidity.
PLEASE READ BEFORE USE AND
SAVE THESE INSTRUCTIONS
6
FP102-OM.qxd
7/12/98
09:26
Page 7
PARTS CHECKLIST (For New Zealand Model)
Base Unit
Curly Cord
Handset
Telephone Line Cord
Wall Mounting Bracket
Operating Guide
Feature•Phone Series
Memory Storage Card
Operating Guide
7
2 x Wall Mounting
Screws and Wall Plugs
PARTS CHECKLIST
FP102
Hands Free Speaker Phone
with Pre-Programmed 5+15 Memory
7/12/98
09:27
Page 8
PARTS CHECKLIST (For Australian Model)
Base Unit
Curly Cord
Handset
Telephone Line Cord
and Plug
Wall Mounting Bracket
FP102
PARTS CHECKLIST
FP102-OM.qxd
Hands Free Speaker Phone
with Pre-Programmed 5+15 Memory
Operating Guide
Feature•Phone Series
Memory Storage Card
Operating Guide
8
2 x Wall Mounting
Screws and Wall Plugs
FP102-OM.qxd
7/12/98
09:27
Page 9
FEATURES
• 15 One Touch Speed Dial Buttons
Your most important numbers can be programmed into the memory, for one
touch speed dialling.
• HandsFree Speakerphone
Great for the home or office when handsfree speakerphone conversations are
an important part of your telephone communications.
• Adjustable Speakerphone Volume Control
During a Speakerphone conversation you can adjust the speaker volume to
suit your operating environment.
• Adjustable Ringer Volume and Tone Controls
The ringing volume and tone can be adjusted to suit different home or
office situations.
• Music on Hold
When you place a call on hold, the telephone will play a popular melody to
reassure your caller that the call has not been disconnected.
• Wall Mountable
This telephone can be simply wall mounted, using the enclosed wall mounting
bracket and screws.
• Mute
Press and hold this button to turn off the handset microphone, allowing
private and confidential conversations with others in the same room.
s
9
FEATURES
• Pre-Programmed Feature Buttons
Instant access to some of Telecom’s / Telstra’s most popular network service
features* have been factory programmed into this telephone for your
convenience.
* Some of these services will require subscription.
7/12/98
09:27
Page 10
FEATURES
FEATURES
FP102-OM.qxd
• Last Number Redial
If the number you are dialing is engaged, simply end the call. Then pickup
the handset and press the redial button. The telephone will automatically
redial the last number called.
• Hearing Aid Compatible
Inductive transducer coil handsets provide hearing aid compatibility.
• Status LED
Dual coloured LED provides visual indication and differentiation for calls
'In Use' or 'On Hold' or in ‘SpeakerPhone’ mode.
• Call LED
Bright red LED provides visual indication of an incoming call.
• Pause Button
Allows you to store a timed pause in the memory dialing sequence for
PABX and Banking Services.
• Advanced Build Quality
This telephone has been assembled using the latest state of the art Surface
Mount Device (SMD) technology for your additional assurance of quality
that goes the distance.
• Call Waiting Button
Allows you to access Call Waiting services.
(In New Zealand, Call Waiting is a subscription service)
10
FP102-OM.qxd
7/12/98
09:27
Page 11
FUNCTIONS
NEW ZEALAND MODELS
1.
2.
3.
4.
5.
6.
7.
Button
Button
Button
Button
Button
One Touch Speed Dial Buttons
Memory Storage Card
6
1
2
7
3
4
5
AUSTRALIAN MODELS
Button
Button
6
Button
7
Button
Button
One Touch Speed Dial Buttons
Memory Storage Card
1
2
3
4
5
NOTE: If required the Memory Storage Card can be turned over to give 20 One Touch
memory buttons, as shown below
11
FUNCTIONS
1.
2.
3.
4.
5.
6.
7.
7/12/98
09:27
Page 12
FUNCTIONS
8.
9.
10.
11.
12.
13.
14.
15.
16.
status LED
Button
Button
Not used
tone Slide Switch
speaker Volume Slide Switch
Telephone Line Jack
ringer Volume Switch (Hi/Med/Low)
17.
18.
19.
20.
21.
22.
23.
24.
Button
Button
Button
Button
Handset Retainer Tab
Button
Telephone Number Card
Numeric Keypad
call LED
8
9 10 11
12
13
FUNCTIONS
FP102-OM.qxd
14
15
20
21
16
22
17
18
19
24 23
12
FP102-OM.qxd
7/12/98
09:27
Page 13
INSTALLATION
HANDSET CORD CONNECTION
Plug one end of the Handset Cord (curly) into the Handset and the other end
into the jack on the side of the telephone.
TELEPHONE LINE CORD CONNECTION
Plug one end of the line cord (straight) into the telephone line jack on the back
of the telephone and the other end into the wall outlet.
CAUTION
• Never install telephone wiring during a lightning storm.
• Never touch uninsulated telephone wires or terminals unless
the telephone line has been disconnected.
• Use caution when installing or modifying telephone lines.
13
INSTALLATION
NOTE: Most phone equipment available now use modular jacks. Phone cords are fitted
with a molded plastic connector which plugs into this type of jack. If you do not
have modular phone jacks, contact your local telephone company for information
about their installation.
7/12/98
09:27
Page 14
INSTALLATION
WALL MOUNTING
You can mount your phone directly on a wall. Before mounting your phone,
consider the following:
• Select a location away from electrical cables, pipes or other items behind
the mounting location that could cause a hazard when inserting screws
into the wall.
• Make sure the wall material is capable of supporting the weight of the
Telephone.
• Use the screws (supplied) with anchoring devices suitable for the wall
material where the Telephone will be placed.
1. Insert two mounting screws 85mm apart. Allow
about 5mm between the wall and screw heads for
mounting the phone.
2. Gently pull and turn the Handset Retainer
Tab 180° and release.
INSTALLATION
FP102-OM.qxd
3. Fit the Wall Mounting Bracket to the
Bottom of the telephone as shown.
4. Place the Base Unit on the screws and push down until it’s firmly seated.
14
FP102-OM.qxd
7/12/98
09:27
Page 15
USING YOUR FP101
NOTE: There are 5 x Pre-Programmed memories and 15 x One Touch Memories.
Each memory location can store a maximum of 32 digits.
STORING ONE-TOUCH SPEED DIAL MEMORIES
1. To program One-Touch Memories (
~
).
a. Pickup the Handset or press the
button.
b. Press the
button.
c. Enter telephone number that you want to program.
d. Press the
button.
e. Press the speed dial button (
~
).
Example: To programme telephone
number 273 8383 into one touch memory
location number 3.
Pick up the Handset from the Base or press the
button.
Press the
button.
Enter
using the keypad,
then press the
button, then press the
speed dial
button to complete the process.
MEMORY STORAGE CARD
When you have programmed a number into the speed dial memory, please write
the name of the person on the Memory Storage Card (supplied).
15
USING YOUR FP101
MEMORY DIAL NUMBERS
20 one touch speed dial numbers can be stored into the memory of your telephone.
7/12/98
09:27
Page 16
USING YOUR FP102
USING YOUR FP102
FP102-OM.qxd
PAUSE
During the memory storage procedure you may enter a 4 second delay between
numbers (for accessing a switchboard, or long distance service) by pressing the
button on the Handset at the point in the number sequence you wish to
pause. The
button counts as one digit. Pressing
more than
once will increase the length of the pause between numbers.
DIALING STORED NUMBERS
For example, to dial memory 3 from the telephone
1. Pick up the Handset.
2. Press the
button. The telephone will dial
the number stored in this memory location.
NOTE: If you select a memory location that does not have a stored number, the telephone
will not dial.
3. After you have completed the Phone call, place the Handset back on the Base.
CHAIN DIALING
On certain occasions, after dialing a number, you may be requested by the party
or service you are calling to enter a special access code, such as when
performing a banking transaction. Simply store this number in another memory
location, refer to “Storing Memory Dial Numbers” on Page 15.
In this way you can recall both numbers that are stored into their own memory
locations at the relevant times.
16
FP102-OM.qxd
7/12/98
09:27
Page 17
USING YOUR FP102
ADJUSTING THE RINGER TONE CONTROL
While the phone is ringing, you can adjust the Ringer Tone of your telephone by
moving the tone slide control to the desired position.
ADJUSTING THE SPEAKERPHONE VOLUME CONTROL
During a SpeakerPhone conversation, adjust the speaker volume of your
telephone by moving the speaker slide control until you hear the desired volume.
NOTE: When the telephone is switched to Speakerphone Mode, the status LED
turns green.
17
USING YOUR FP102
ADJUSTING THE RINGER VOLUME CONTROL
While the phone is ringing, you can adjust the ringer volume of your telephone by
moving the ringer switch to the desired low/medium/high position.
7/12/98
09:27
Page 18
USING YOUR FP102
USING YOUR FP102
FP102-OM.qxd
LED indicators
1. call LED indicator: Red light which flashes when the
telephone is ringing.
This is sometimes referred to as a ‘Visual Ringing Indicator’.
2. status LED indicator:
a. Solid red light when ‘In Use’.
b. Solid green light when in Speakerphone mode.
c. Flashing green light when on ‘Hold’.
PLACING A TELEPHONE CALL
1. Remove the Handset from the Base, or press the
button.
2. Press the keypad buttons to dial the phone number you want.
3. After you have completed the phone call, place the Handset back on the Base.
REDIAL
If you want to redial the last number dialed, simply pick up the Handset or
press the
button, then press the
button. The telephone
will automatically redial the last number dialled.
RECEIVING A TELEPHONE CALL
When the phone rings, pickup the Handset from the Base, or press the
button and begin the conversation.
ACCESSING THE CALL WAITING SERVICE USING THE
CALL WAITING BUTTON (New Zealand Model only)
While talking you hear the Call Waiting beep signal.
Press the
button. This feature sends a 600mS timed “hook-flash”
on the telephone line for accessing services such as Call Waiting, etc.
NOTE: You must subscribe to Telecoms Call Waiting Service before you can use this feature.
18
FP102-OM.qxd
7/12/98
09:27
Page 19
USING YOUR FP102
NOTE: The
+
call waiting procedure toggles call between the incoming
and the original call (vice versa). The
+
procedure will drop the
current call connection and pick up the incoming call or the call on hold.
MUTE
Press and hold the
button to turn off the Handset microphone, allowing
private and confidential conversations in the same room without the calling party
hearing. Release the
button to resume the conversation with the calling
party.
PLACING A CALL ON HOLD
1. To place a call on hold, press the
button. The status LED will
flash green and you can hang up. (The Party on Hold will hear music).
2. To begin the conversation again:
Pick up the Handset or press the
button or pick up an extension
phone, the hold function will then be automatically released.
MUSIC ON HOLD
When a call is placed on Hold, the status LED flashes and the telephone
will play a popular melody to reassure your caller that the call has not been
disconnected.
SPEAKERPHONE
To answer an incoming call, press the
button and begin your
hands free SpeakerPhone conversation. Lift the Handset to resume normal
conversation
19
USING YOUR FP102
ACCESSING THE CALL WAITING SERVICE USING THE
CALL WAITING BUTTON (Australian Model only)
1. While talking, you hear the call waiting signal (series of beep tones).
2. Press the
button then
to switch call and put the current
call on hold.
3. To switch back to original call, press the
button then .
7/12/98
09:27
Page 20
USING YOUR FP102
USING YOUR FP102
FP102-OM.qxd
To make a SpeakerPhone call, press the
button, listen for the dial tone
then use the keypad to dial the number you want to call. Lift the Handset to
resume normal conversation.
During a regular telephone conversation you can press the
button and
replace the Handset. The status LED turns green and you can begin your
SpeakerPhone conversation.
NOTE: The status LED turns green during SpeakerPhone use, and red during
normal use.
NOTE: It is not recommended to operate the
noisy conditions.
function under
NOTE: During a conversation you can adjust the speaker Volume Control on the side of
the telephone to increase or reduce the other parties voice.
USING THE PRE-PROGRAMMED FEATURE BUTTONS
(New Zealand Model only)
Instant access to some of Telecom’s most popular network service features have
been factory programmed into this telephone for your convenience.
Call Minder
Telecom’s Call Minder Message Centre is available for leaving and retrieving
messages.
Pick up the handset or press the
button. Wait for the dial tone then
press the
button.
The telephone will automatically dial the access code ‘083210’ to connect you
with Telecom’s ‘Call Minder’ service. Telecom’s ‘Call Minder’ Service will talk you
through the rest.
Divert On
Telecom’s ‘Immediate Call Diversion’ Service is available for diverting calls to
another number.
20
FP102-OM.qxd
7/12/98
09:28
Page 21
USING YOUR FP102
To program, or re-program the ‘immediate call diversion’ number assigned to
‘161’ follow the example below, replacing the number 345 6789 with the
telephone number you wish to divert calls to.
Example
Pick up the handset or press the
then press
button. Wait for the dial tone and
.
NOTE: To confirm the diverted number, stay on the line. The number will automatically be
dialled for you to check. You can then hang up. The normal Local, National, Mobile
or International Call charges will apply.
NOTE: Until you cancel the Call Diversion, all incoming calls will be immediately diverted
to the number you have previously assigned to ‘161’
Divert Off
To cancel ‘immediate call diversion’ to another number.
Pick up the handset or press the
button and listen for the
‘confirmation tone’ (long-short-long), then press the
button and
hang up.
The telephone will automatically dial the access code ‘160’ which will cancel
‘immediate call diversion’.
Call Waiting Off
Telecom’s ‘Call Waiting’ Service let’s you know if you have a call waiting by
sounding 4 beeps.
However, you may wish to cancel ‘Call Waiting’ for your next call, so you can relax
and talk undisturbed.
21
USING YOUR FP102
Pick up the handset or press the
button. Listen for the dial tone then
press the
button.
The telephone will automatically dial the access code ‘161’ and will enable
‘immediate call diversion’ to the number you have assigned the divert to. Wait for
the ‘confirmation tone’ (long-short-long) and then hang up.
7/12/98
09:28
Page 22
USING YOUR FP102
USING YOUR FP102
FP102-OM.qxd
Pick up the handset or press the
button, then press the
button and dial the number you wish to call.
Call Back
When the party you are calling is engaged or doesn’t answer, hang up.
Pick up the handset or press the
button and then the
button. The telephone will automatically dial the access code ‘*51’ to enable the
‘auto callback’ feature.
Listen for an interrupted dial tone and hang up.
Telecom’s ‘auto callback’ Service will automatically ring you with a distinctive
ringing tone. Your ‘call back’ will go through as soon as you pick up your
handset, and you will hear the standard ringing tone.
You can apply up to 3 ‘auto callbacks’ at one time by repeating this procedure.
‘Auto callback’ will monitor the number for 30 minutes - if the callback is not
successful within this time, it will be cancelled automatically.
‘Auto callback’ will only call you once. If your line is busy or you do not answer,
‘auto callback’ will be cancelled automatically.
If ‘auto callback’ cannot work for that number, you will hear an unobtainable
tone (pip-pip-pip-pip-pip)
NOTE: Call Minder, Call Diversion, Call Waiting and Auto Callback are all network services
provided by Telecom New Zealand Limited.
They are all subscription services, and may not be available to all customers in all
areas. To subscribe to any of these services, or check on the availability for you in
your area, please contact Telecom Residential Sales and Service on ‘123’ or
Telecom Business on ‘126’.
NOTE: If you do not want to use the above services, simply turn over the memory card and
program any or all of the 20 speed dial buttons to your own requirements.
22
FP102-OM.qxd
7/12/98
09:28
Page 23
USING YOUR FP102
Block CID
Each time you make a call, your telephone number is automatically forwarded to
the party you are calling (unless your number is a silent number). In certain
cases you may wish to prevent your number being sent.
Pick up the handset or press the
button. Wait for the dial tone, press
the
button and then dial the telephone number of the person you
wish to call. Your telephone number will be withheld for this call only.
Divert On
Telstra’s ‘Call Forward No Answer’ Service is available for diverting calls to
another number if your phone is not answered within 20 seconds (approximately
7 or 8 rings).
Pick up the handset or press the
button. Wait for the dial tone, press
the
button and then hang up. The telephone will automatically dial
the access code ‘*61#’ and will enable ‘Call Forward No Answer’ to the fixed number you have previously assigned the divert to.
NOTE: To program, or re-program the fixed ‘Call Forward No Answer’ number, follow the
example below, replacing the number 9876 5432 with the number you wish to
divert calls to.
Pick up the handset or press the
button. Wait for the dial tone then
press
. You will hear a long beep and a
voice announcement confirming that this feature has been activated, then you can
hang up.
To confirm the diverted number, turn ‘Call Waiting’ off, then dial your own
number. The number you are forwarding your calls to will begin to ring.
The normal Local, Mobile or National Call charges will apply.
23
USING YOUR FP102
USING THE PRE-PROGRAMMED FEATURE BUTTONS
(Australian Model Only)
Instant access to some of Telstra’s most popular network service features have
been factory programmed into this telephone for your convenience.
7/12/98
09:28
Page 24
USING YOUR FP102
USING YOUR FP102
FP102-OM.qxd
NOTE: Until you cancel the ‘Call Forward No Answer’ diversion, (use
)
all incoming calls will be diverted after 20 seconds (approximately 7 or 8 rings).
Divert Off
To cancel ‘Call Forward No Answer’ to another number.
Pick up the handset or press the
button. Press the
button and then hang up. The telephone will automatically dial the access code
‘#61#’ and will cancel the diversion.
Call Return
Telstra’s ‘Call Return’ Service lets you return the last unanswered call.
Pick up the handset or press the
button, wait for the dial tone and
then press the
button. The telephone will automatically dial the
access code
. You will hear a recorded voice announcement advising the calling parties number. Press
if you would like to be connected to
this number.
NOTE: Using the ‘Call Return’ Service will incur an immediate Telstra charge equivalent of
a local calling charge. Pressing
to be connected to the announced number will
incur an additional charge equivalent to the type of call being made, Eg. Local,
Community, National or Mobile. Please check with Telstra to confirm the current
charges before using this service.
Message Bank
‘Message Bank’ is Telstra’s “invisible answering machine”.
When your line is busy, or you are not able to answer your phone, ‘Message
Bank’ will play callers your own personal greeting and they will be prompted to
leave a message.
You can tell if you have a message in your ‘Message Bank’ by picking up the
handset and listening for the special ‘stutter’ dial tone.
If you hear this special ‘stutter’ dial tone, simply press the
button. This button has been pre-programmed to dial the Sydney FREECALL
number 1800 351 244. When prompted, enter your PIN number and then press
the
key. Once you reach the main menu press
to listen to your messages.
24
FP102-OM.qxd
7/12/98
09:28
Page 25
USING YOUR FP102
If you live outside the Sydney area, you will need to re-program the
button as follows;
Brisbane
: Pick up the handset, then press
Melbourne : Pick up the handset, then press
Adelaide
: Pick up the handset, then press
Perth
: Pick up the handset, then press
Telstra is a registered trademark of Telstra Corporation Limited CAN
051 775 556
NOTE: Some of the Telstra network services described above are subscription or user pays
services. These services may not be available to all customers in all areas.
To subscribe to any of these services, or check on the availability for you in your
area, please contact Telstra Residential Sales and Service on ‘13 2200’ or Telstra
Business on ‘13 2000’.
NOTE: If you do not want to use the above services, simply turn over the memory card and
program any or all of the 20 speed dial buttons to your own requirements.
25
USING YOUR FP102
NOTE: There is a monthly fee using the Message Bank service.
For subscription and further information about Message Bank please call
1800 052 052 (this is a free call unless from a mobile phone).
FP102-OM.qxd
7/12/98
09:28
Page 26
This page intentionally left blank.
26
FP102-OM.qxd
7/12/98
09:28
Page 27
TROUBLESHOOTING
If your Telephone is not performing to your expectations, please try these simple
steps. If you are still unable to resolve the problems, contact Uniden Customer
Service for assistance.
New Zealand: 0800 4 UNIDEN
4 864336
Australia:
1800 632 789
Suggestion
Can’t make or receive calls.
• Make sure you use only the line cord supplied
with this telephone.
• Check that both ends of the telephone
line cord and Handset cord are plugged in.
• Make sure you do not have too many
telephones connected to the telephone line.
• Adjust the Ringer Volume to either
med/high.
• Plug another telephone into the telephone
socket and check for a dial tone.
• During speakerphone conversation, adjust the
speaker volume slider control on the side of
the telephone.
• Repeat the memory storage procedures detailed
on page 19.
• Make sure the Handset Retainer Tab has been
turned around (point facing up) and the
Handset is placed firmly into the cradle.
Can’t hear the telephone ringing.
Speakerphone Volume too low.
One Touch Speed Dial Numbers are not
working correctly.
Handset does not hang up in the wall mount
position.
27
TROUBLESHOOTING
Problem
7/12/98
09:28
Page 28
SPECIFICATIONS
Specifications for New Zealand Model
Compliance
PTC200
Size:
150mm(W) x 225mm(D) x 70mm(H)
Weight:
Approx. 536g
Specifications, Features and availability of Optional Accessories shown are typical
and subject to change without notice.
NOTE: FOR USE OF THIS DEVICE IN NEW ZEALAND
1. The grant of a Telepermit for any item of terminal equipment indicates only that
Telecom has accepted that the item complies with minimum conditions for
connection to its network. It indicates no endorsement of the product by
Telecom, nor does it provide any sort of warranty. Above all, it provides no
assurance that any item will work correctly in all respects with another item of
Telepermitted equipment of a different make or model, nor does it imply that
any product is compatible with all of Telecom's network services.
2. Immediately disconnect this equipment should it become physically damaged,
and arrange for its disposal or repair.
3. This equipment shall not be used in any manner which could constitute a
nuisance to other Telecom customers.
Specifications for Australian Model
Compliance
TS001, TS002, TS004, AS/NZS3548, TS008
Size:
150mm(W) x 225mm(D) x 70mm(H)
Weight:
Approx. 536g
Specifications, Features and availability of Optional Accessories shown are typical
and subject to change without notice.
SPECIFICATIONS
FP102-OM.qxd
28
FP102-OM.qxd
7/12/98
09:28
Page 29
WARRANTY
One-Year Limited Warranty
Important: Evidence of original purchase is required for warranty service.
ELEMENTS OF WARRANTY: Uniden warrants to the original retail owner for the duration of this warranty its FP102
(hereinafter referred to as the Product), to be free from defects in materials and craftsmanship with only the limitations
or exclusions set out below.
WARRANTY DURATION:This warranty to the original retail owner only, shall terminate and be of no further effect 12
months after the date of original retail sale. This warranty will be deemed invalid if the product is: (A) Damaged or not
maintained as reasonable and necessary, (B) Modified, altered or used as part of any conversion kits, subassemblies, or
any configurations not sold by Uniden, (C) Improperly installed, (D) Repaired by someone other than an authorised
Uniden Repair Agent for a defect or malfunction covered by this warranty, (E) Used in conjunction with any equipment or
parts or as a part of a system not manufactured by Uniden.
PARTS COVERED:This warranty covers for one (1) year, the Telephone and Handset only. All accessories
(Cable, Modular Plug, etc) are covered for 90 days only.
STATEMENT OF REMEDY: In the event that the product does not conform to this warranty at any time while this warranty
is in effect, the warrantor, at its discretion, will repair the defect or replace the product and return it to you without
charge for parts and service. THIS WARRANTY DOES NOT COVER OR PROVIDE FOR THE REIMBURSEMENT OR PAYMENT
OF INCIDENTAL OR CONSEQUENTIAL DAMAGES. THIS GUARANTEE IS IN ADDITION TO AND DOES NOT IN ANY WAY
AFFECT YOUR RIGHTS UNDER THE CONSUMER GUARANTEE ACT.
WARRANTY CARD: If a Warranty Card has been included with this Product, please complete and return to us within 14
days of purchase. Your name and the serial number of the Product will then be registered in our database and this will
help us process your claim with greater speed and efficiency should you require warranty service.
PROCEDURE FOR OBTAINING PERFORMANCE OF WARRANTY: In the event that the product does not conform to
this warranty, the Product should be shipped or delivered, freight pre-paid, with evidence of original purchase (e.g. a
copy of the sales docket) to the warrantor at:
UNIDEN AUSTRALIA PTY LIMITED
SERVICE DIVISION
345 Princes Highway, Rockdale, NSW 2261
Ph: (02) 9599 3577
Fax: (02) 9599 3278
FREE CALL 1800 632 789
Customers in other States should ship or deliver the Product freight pre-paid to their nearest Uniden Authorised Repair
Centre. (Contact Uniden for the nearest Warranty Agent to you)
UNIDEN NEW ZEALAND LIMITED
SERVICE DEPARTMENT
150 Harris Road, East Tamaki, Auckland
Ph: 0-9-273 8383
Fax: 0-9-274 0009
Toll Free: 0800 4 U N I D E N
4864336
Customers in other States should ship or deliver the Product freight pre-paid to their nearest Uniden Authorised Repair
Centre.(Contact Uniden for the nearest Warranty Agent to you)
29
WARRANTY
WARRANTOR: Uniden Australia Pty Limited ACN 001 865 498
Uniden New Zealand Limited
09:28
Page 30
FOR PURCHASING A UNIDEN PHONE!
7/12/98
THANK YOU
FP102-OM.qxd
UNIDEN ©1998 Uniden Australia Pty Limited ©1998 Uniden New Zealand Limited