1
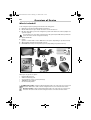
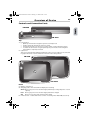
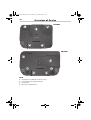
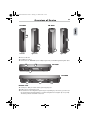
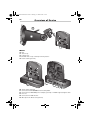
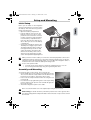
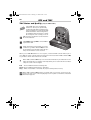
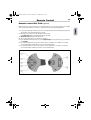
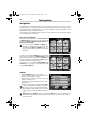
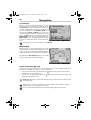
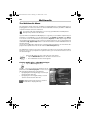
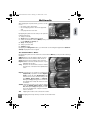
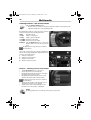
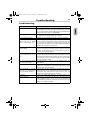
QSG-PN2050-3000.book Seite 25 Montag, 23. Oktober 2006 3:09 15
Contents
25
Contents
General Instructions . . . . . . . . . . . . . . . . . . . . . . . . . . . . . . . . . . . . . . . . . . . . . . . . . . . . . . . 26
Safety Advice and Important Information. . . . . . . . . . . . . . . . . . . . . . . . . . . . . . . . . . . . . . . . 26
Maintenance and Cleaning. . . . . . . . . . . . . . . . . . . . . . . . . . . . . . . . . . . . . . . . . . . . . . . . . . . . 27
Overview of Device . . . . . . . . . . . . . . . . . . . . . . . . . . . . . . . . . . . . . . . . . . . . . . . . . . . . . . . . 28
What's Included? . . . . . . . . . . . . . . . . . . . . . . . . . . . . . . . . . . . . . . . . . . . . . . . . . . . . . . . . . . . . 28
Controls and Connection Ports . . . . . . . . . . . . . . . . . . . . . . . . . . . . . . . . . . . . . . . . . . . . . . . . . 29
Setup and Mounting . . . . . . . . . . . . . . . . . . . . . . . . . . . . . . . . . . . . . . . . . . . . . . . . . . . . . . 33
Initial Setup . . . . . . . . . . . . . . . . . . . . . . . . . . . . . . . . . . . . . . . . . . . . . . . . . . . . . . . . . . . . . . . . 33
Assembly and Mounting . . . . . . . . . . . . . . . . . . . . . . . . . . . . . . . . . . . . . . . . . . . . . . . . . . . . . . 33
Configuration . . . . . . . . . . . . . . . . . . . . . . . . . . . . . . . . . . . . . . . . . . . . . . . . . . . . . . . . . . . . . 34
Settings. . . . . . . . . . . . . . . . . . . . . . . . . . . . . . . . . . . . . . . . . . . . . . . . . . . . . . . . . . . . . . . . . . . . 35
GPS and TMC . . . . . . . . . . . . . . . . . . . . . . . . . . . . . . . . . . . . . . . . . . . . . . . . . . . . . . . . . . . . . . . 37
Remote Control . . . . . . . . . . . . . . . . . . . . . . . . . . . . . . . . . . . . . . . . . . . . . . . . . . . . . . . . . . . . . 39
Navigation . . . . . . . . . . . . . . . . . . . . . . . . . . . . . . . . . . . . . . . . . . . . . . . . . . . . . . . . . . . . . . . . 40
The Multimedia Menu . . . . . . . . . . . . . . . . . . . . . . . . . . . . . . . . . . . . . . . . . . . . . . . . . . . . . . 44
Troubleshooting . . . . . . . . . . . . . . . . . . . . . . . . . . . . . . . . . . . . . . . . . . . . . . . . . . . . . . . . . . . 47
Technical Data . . . . . . . . . . . . . . . . . . . . . . . . . . . . . . . . . . . . . . . . . . . . . . . . . . . . . . . . . . . . . . 48
QSG-PN2050-3000.book Seite 26 Montag, 23. Oktober 2006 3:09 15
26
General Instructions
Safety Advice and Important Information
Before you start to mount and use this navigation system, please familiarise yourself with its
various components and functions. Furthermore, please read through the safety instructions
carefully to avoid causing injury to yourself and/or other road users.
The use of the navigation system does not under any circumstances release the driver
from his/her personal responsibility. The applicable road traffic regulations and current traffic conditions always have priority.
For safety reasons, you should install the device and enter the required information in
the navigation system before you start your journey or when your vehicle is stationary.
If you decide to install the device in your vehicle using a mount, please be aware of
the following: On no account should the screen be adjusted by moving the device itself. Position the screen so that you are able to glance at the display quickly and easily.
The device should also be positioned in a way that avoids reflections and glare from
the screen. The screen should not be installed/positioned in a place that obstructs your
view of things that are necessary for driving the vehicle (e.g. the view of the road or
the vehicle's instruments). The screen should also not be positioned within the area directly in front of the airbag as this may prevent the airbag from inflating. Make sure
the device is sufficiently secure so that it will not become dislodged even in the event
of emergency braking or a collision.
Only look at the screen when it is safe to do so. If you need to look at the screen for a
longer period of time, stop the vehicle at an appropriate and safe place.
The values in the status bar are calculated for the current speed, remaining travel time
and remaining travel distance. However the accuracy of these values cannot be guaranteed in every case. The actual speed can always be determined by reading the vehicle's speedometer.
Earphone-Volume control: high volumes can damage or decrease the sensitivity of
your hearing.
The navigation system does not take the relative safety of the suggested routes into
consideration. Road closures, roadworks, height and weight restrictions, traffic and
weather conditions, or other factors that can influence the safety and the journey time
of the route are not taken into consideration for the suggested routes. Use your own
judgement to check the suitability of the suggested routes. If required, use the
“Change Route” function to calculate alternatives to the original route. Alternatively
take the road you prefer and the software will automatically perform a re-routing
(i.e. calculate a new route based on your new position).
In certain areas, one-way streets, turning restrictions and no entry signs (e.g. pedestrian zones) cannot be accounted for. In such situations, pay particular attention to the
road signs and rules of the road that apply.
If you need the help of the emergency services (police, fire, ambulance, etc.), do not
rely exclusively on the navigation system. Act in a way that you consider to be suitable
and sensible in order to receive help in such a situation.
QSG-PN2050-3000.book Seite 27 Montag, 23. Oktober 2006 3:09 15
General Instructions
27
Do not subject the navigation system to high temperatures or extreme exposure to
sunlight. Temperatures over 50 °C can severely damage the navigation system, especially the lithium ion battery. The lithium ion battery can only be charged within a
temperature range of 0-45 °C. Please note the safety instructions when operating the
battery! In many countries it is forbidden to dispose of empty batteries with normal
household waste. Please find out the regulations that apply in your area regarding the
disposal of used batteries.
The battery should only be charged if someone is monitoring the device. Do not open
the battery with force as this may release corrosive acids. Damaged batteries or batteries that are past their expiry date should no longer be used and should be disposed
of in a safe and suitable way.
Never expose the navigation system to humidity as this can result in damage. It is
especially important to protect the navigation system from getting wet if you are on
a motorcycle, bicycle or in a convertible car. This is because the device is not splashproof.
Avoid touching the screen with sharp or rough-edged objects as these can damage the
sensitive touchscreen display.
GPS (Global Positioning System) is a satellite-based system that supports geographical
and time-related information all around the world. The system is operated and controlled by the United States of America. The USA is also responsible for the availability
and accuracy of this system. All changes to the GPS availability and accuracy as well as
other factors from the surrounding environment can influence the operation of the
navigation system. The supplier of this system does not accept any liability whatsoever
for the availability and accuracy of GPS data.
Please ensure that every person intending to use the navigation system reads this safety information and the recommendations for operating the system beforehand.
Before attaching the mount to the front windscreen, you should clean the area of the
windscreen that you wish to stick the suction cup to. This is to remove grease and dust
from the area.
Differences between daytime and nighttime temperatures and/or humidity and moisture can break the vacuum seal under the suction cup of the mount. Therefore you
should attach the navigation system so that it will not cause any damage if it fell off
the windscreen. As a precautionary measure, you should detach the navigation system
at night.
Furthermore, if you plan to leave the vehicle unattended for a long period of time, you
should remove the navigation system from the vehicle in order to avoid theft.
Maintenance and Cleaning
Please do not use any cleaning agents or detergents to clean the screen and case of
the device. The best method is to use a soft, damp cloth.
QSG-PN2050-3000.book Seite 28 Montag, 23. Oktober 2006 3:09 15
Overview of Device
28
What's Included?
Your navigation system package includes the following parts:
1
2
3
4
5
6
7
Navigation system (including lithium ion battery)
Mount with suction cup to attach the device to the windscreen.
DC cable 12V/24V to power the navigation system from within the vehicle (adapter for
cigarette lighter)
You should not use any cables other than the AC (optional) and DC cables provided to
power the device and to charge the battery!
Quick Start Guide
Cradle
(passive or active TMC or active TMC + BT as an option depending on product version)
SD Card with map data and navigation voices
DVD-ROM with European map data (optional, depending on product version)
1
3
2
5
6
4
7
What you can get as an option:
• External GPS antenna
• Additional battery pack
• Steering wheel remote control (infrared)
• 100/240 V power adaptor
• Car Connectivity Cable
TMC active cradle: features marked with this symbol are only active if you have purchased an TMC active cradle and the navigation device is mounted in this cradle.
BT active cradle: features marked with this symbol are only active if you have purchased an BT active cradle and the navigation device is mounted in this cradle.
QSG-PN2050-3000.book Seite 29 Montag, 23. Oktober 2006 3:09 15
Overview of Device
29
Controls and Connection Ports
PN 3000
1
2
PN 2050
Top
1
2
Power button
• Quick tap: switches the navigation system to stand-by mode.
• Another quick tap will turn the system on again.
• Hold down the button for about 3 seconds to switch off the navigation system.
• To switch the device back on again quick tap the power button. The navigation
system will be completely restarted.
Light sensor
This sensor automatically adapts the brightness of the screen according to the surrounding light. This function can be switched on and off in the settings menu.
PN 3000
4
5
3
PN 2050
Front
3
4
5
Display / touchscreen
Charging symbol. This status LED can display the following:
Green Device gets power from external supply and battery is charged by 95 % of total
capacity
Red
Device gets power from external supply and will be charged
Off
Device is not powered by external power supply
Infrared sensor – Usable with remote control on steering wheel RCS 5100 (accessories)
QSG-PN2050-3000.book Seite 30 Montag, 23. Oktober 2006 3:09 15
Overview of Device
30
7
PN 2050
8
6
9
9
PN 3000
7
6
8
8
9
9
Back
6
7
8
9
Compartment for lithium ion battery (cover)
Connection for external GPS antenna
Loud speaker
Grooves for cradle fixation
QSG-PN2050-3000.book Seite 31 Montag, 23. Oktober 2006 3:09 15
Overview of Device
31
PN 3000
PN 2050
10
10
12
11
right side
left side
12
11
left side
right side
10 Slot for SD card
11 Headphone socket
12 Connection for 100V/240V power adapter (optional) or 12V/24V cigarette lighter cable
14
PN 2050
13
15
PN 3000
14
13
15
Bottom side
13 Serial port – Only for active cradle (optional) purposes!
14 USB port for connecting to a PC
15 Reset button: If the navigation systems stops responding to your actions, you can reset
the system by pressing this button (e.g. with a straightened-out paper clip or a pencil).
The data you have saved will not be lost!
QSG-PN2050-3000.book Seite 32 Montag, 23. Oktober 2006 3:09 15
Overview of Device
32
18
16
17
19
Mount
16 Base
17 Suction cup
18 Locking lever
Mount with suction cup could vary from the picture!
19 Passive cradle (optional)
20
20
21
22
23
24
25
21
22 23
24
25
Active cradle (optional)
Connection for MA 3040/00 Car Connectivity Cable
Connection for 100V/240V power adapter (optional) or 12V/24V cigarette lighter cable
Line-out
Connection for TMC antenna
Microphone-in / Bluetooth (optional)
QSG-PN2050-3000.book Seite 33 Montag, 23. Oktober 2006 3:09 15
Setup and Mounting
33
Initial Setup
Before you can switch on the navigation
system for the first time, you must connect
the battery. This can be done by performing the following steps:
• Open the battery compartment.
• Plug the battery connector into the
battery socket as you can see on the
picture. Be sure to have the connector
in right orientation. Slide the battery
into the battery compartment and
place the cable into the small groove
above. Now you can close the battery
compartment.
• Connect the navigation system to the
12V/24V power supply in your vehicle.
The battery will then start to charge. It
takes approximately 5 hours to fully
charge the battery. The battery life
without an external power source is
approx. 4 hours depending on application and adjusted display brightness.
When you have an active cradle you can use the car battery/keyswitch connection in
combination with the optional car connectivity cable. By switching your car key the
navigation device will automatically switch on or off. When the navigation device is
mounted in the active cradle the battery will charge itself.
In case of the passive cradle:
• you must use the power button to switch the navigation device on or off.
• You can charge the battery by using the cigarette lighter cable.
Assembly and Mounting
To mount the device in the vehicle, proceed as follows:
• Find a suitable place in the vehicle for mounting the mount.
The screen be must be clearly visible from the driver's seat
but the device should not obscure the driver's view.
• Please note the safety instructions when choosing the location page 26.
• Press the suction cup against the glass in a free sky viewing
position and move the pressure lever towards the glass until it locks into place.
• Attach the navigation system to the cradle.
On no account should the screen be adjusted by moving the device itself.
Dismounting: To detach the device, switch the pressure lever in the opposite direction and carefully pull the transparent rubber end of the suction cup to remove it from
the window.
QSG-PN2050-3000.book Seite 34 Montag, 23. Oktober 2006 3:09 15
Configuration
34
Configuration
•
•
•
After switching on the system, the legal disclaimer screen appears.
Tap OK after reading the screen.
As soon as the system is ready, the main menu
will appear on the screen.
Touchscreen The navigation system is
equipped with a touchscreen. You can tap
the on-screen button with your finger. Avoid
touching the screen with sharp or roughedged objects as these can damage the sensitive touchscreen display.
Main Menu
The following functions are available in the Main
Menu:
Destination (page 40)
Tap the Destination button to select the destination if you want the navigation system to guide you
from your present location to a specific destination.
Home
Short cut. After you defined Home you can navigate to this address, simply by tapping the Home
button in the main selection menu.
Work
Short cut. After you defined Work you can navigate to this address, simply by tapping the
Work button in the main selection menu.
Map Display (page 35)
Tap the Map Display button if you want to view the navigation screen.
Settings (page 35)
Tap the Settings button if you want to change basic settings e.g. language, volume, brightness, unit of measurement (kilometres or miles).
Multimedia (page 44)
Tap the Multimedia button to open the multimedia selection screen i.e. if you want to play
music or view images.
The PN 3000 (wide-screen) differs from the PN 2050. It always shows 6 instead of
4 icons on the Status bar.
QSG-PN2050-3000.book Seite 35 Montag, 23. Oktober 2006 3:09 15
Settings
35
Settings
Tap the Settings button in the main menu to change basic settings.
• Tap Settings. A sub-menu opens. Tap the arrow button on the bottom right
of the screen to scroll through the other pages of the sub-menu.
Tap Back to exit from a selection list without saving changes. You return to the previous menu. If you select an item from a selection list or if you tap OK, the selections
you have made are confirmed and you return to the previous menu.
There are several system settings:
Map display, Screen, Regional, Address book, Information, Sound, Change route, Simulation, TMC (only with TMC active cradle), BT (only with BT active cradle), Alert points,
Position & speed, Select map and System ID.
Map display
This opens a selection of map display settings e.g.:
Heading up
Tap this option to select your preferred orientation. You can switch Heading up
On or Off. When it is On the car is heading up (the map faces the direction of
travel). When it is switched Off the map is shown with north up (the car travels
in all directions).
Screen
Tap this option to set e.g. Day or night, Colour scheme and Brightness.
Status bar The status bar is visible on the bottom of the screen.
In the Settings status bar menu you can set preferences (e.g. local time, remaining travel time, GPS status, current speed). The preferences you have chosen, will be visible as icons in the Status bar. The status bar preferences can also
be changed by tapping on the status bar fields directly.
Regional
This opens a list of regional settings, e.g.:
• Language Select your preferred language.
• Voice Select the desired type of voice
(additional voice files are stored on the SD card).
• Km/miles Select your preferred unit of measurement.
• Clock 12/24 Select how you wish the time to be displayed:
12-hour or 24-hour clock.
Address book
You can store addresses as your favourite destinations in the Address book. In
this menu you can delete these destinations as well. The addresses you have set
can be used for navigation at any time.
Sound
Choose this option if you want to change sound settings (e.g. mute, set volume
or set button click).
QSG-PN2050-3000.book Seite 36 Montag, 23. Oktober 2006 3:09 15
Settings
36
If you purchased an active cradle and the navigation device is sticked to this cradle, you
can activate the external speakers of your connected car audio system. By tapping the
button External speakers only the internal speaker of the navigation system will be
turned off.
Change route
You can change your route by planning Short, Medium or Long Route diversions.
If using the optional TMC cradle, you can also refresh your route or allow the system to take traffic information into consideration.
Simulation
In this menu it is possible to simulate your route. For example set start location
and the navigation system can simulate driving to your desired destination and
back.
TMC
If using the optional TMC cradle, Traffic Message Channel (TMC) allows you to
obtain traffic information. During navigation the system regularly accesses the
latest TMC traffic information in the background; provided that this information
is available in the part of the country you are in.
Alert points
Alert points can give visible and audible notifications.
Position & speed
In this menu you can change the current position.
Select map
This opens a selection screen where you can choose from the installed maps.
System ID
Tap this option to show product and Map database versions.
Factory defaults
In this menu you can tap Clear addresses if you want to erase all addresses in
the Address book. If you want to reset your system tap Factory defaults.
BT settings
These settings are only available by using the optional BT cradle and mounting
the navigation device in this cradle.
What you select here can be changed at any time. Updates can change the structure
of the menu.
QSG-PN2050-3000.book Seite 37 Montag, 23. Oktober 2006 3:09 15
GPS and TMC
37
Toolbar
The toolbar is a shortcut to different functions and information (e.g. Mute, Volume
setting, day or night, change route and information). You can open and close the Toolbar
by tapping the bottom right of screen.
GPS Status and Quality
When you switch on the device for the first time, it can take several minutes for the GPS reception to reach a sufficient level and to determine your current position. If you are unable
to obtain a sufficient GPS signal, please read the Troubleshooting chapter for suggestions on
solving the problem.
Hold the navigation system vertically to obtain a better GPS signal.
If you are using the navigation system in an inner-city area, it may take longer to refresh the map items on screen. This is due to the large number of roads and additional
information (e.g. hotels, restaurants) as well as the high-density housing areas. Furthermore it may take longer to establish the GPS reception if you have just driven out
of an underground car park or another type of building where GPS signals are
blocked.
The GPS reception can be checked by doing the following
Check the GPS status in the status bar.
In case the status bar does not show the GPS status: tap on a status bar element and select
GPS status from the list.
The amount of tracked GPS satellites is shown. The quality of the GPS signal is indicated by
the shape and colour of the check mark:
Red
Yellow
Yellow
Green
No reception
Initializing or insufficient signal quality, less than 3 satellites found
Sufficient signal quality, but not very accurate position
Good signal quality, accurate position
QSG-PN2050-3000.book Seite 38 Montag, 23. Oktober 2006 3:09 15
38
GPS and TMC
TMC Status and Quality
(only for TMC cradle)
Using TMC offers you an additional
function to allow you to dynamically
avoid traffic jam. During navigation the
system regularly accesses the latest TMC
traffic information in the background;
provided that this information is available in the part of the country you are in.
TMC reception information can be made visible in the status bar.
Tap Settings and tap TMC to switch TMC reception On or Off.
Traffic information is depending on several
conditions e.g. TMC is switched On, the traffic information is known and send by the provider, the information can be received.
When you set TMC On and there is no reception, a red checkmark is shown. When you receive TMC, the name of the provider is shown green in the status bar. If TMC is switched Off,
no provider is shown and a narrow line is visible.
When TMC is switched On and you receive traffic information, the status bar also visualises the delay time. For example caused by traffic jam or road works. This is indicated by the colour of the hourglass:
Red
There is TMC information and delay time
Green There is TMC information but no delay time
Grey TMC is not available or switched off (only for traffic product version)
When TMC is switched On and there is a traffic jam on your route, a pop up icon appears in the left corner on the map display screen. Tap this icon and a list of detailed
information appears.
QSG-PN2050-3000.book Seite 39 Montag, 23. Oktober 2006 3:09 15
Remote Control
Remote control RCS 5100
39
(optional)
With the remote control placed on your steering wheel, you can easily operate the navigation system while driving. You have to switch the mode switch (3) to Navigation.
1
2
3
4
5
6
7
If you press this button briefly the voice message will repeat itself. Pressing it longer the
alternative route planning Menue is shown.
With the cursor keys you can navigate in the menus.
If in Map View, Cursor left/right will zoom the map.
Mode switch (Navigation N / Audio A).
By pressing this button you confirm a selection.
Press this button briefly and you see the Map display. If you press longer you will open
the Toolbar.
Pressing this button decreases the volume of the navigation voice advice. In setting
screens with sliders it will decrease the selected slider value.
Pressing this button increases the volume of the navigation voice advice. In setting
screens with sliders it will increase the selected slider value.
QSG-PN2050-3000.book Seite 40 Montag, 23. Oktober 2006 3:09 15
Navigation
40
Navigation
The purpose of the navigation system is to guide you from your present location to your desired destination. The navigation function automatically determines your present location
using the GPS signal. You simply have to enter your destination and the navigation process
starts with spoken and visual instructions.
The following section explains all the steps you need to perform: from entering the address
to the arrival at your destination.
Enter your destination
First select your destination. Tap Destination in
the Main menu. In this menu you see several main
possibilities: Address, Address book, History and
Point of interest (POI).
For your convenience Home and Work are
directly accessible from the main menu. Just
by tapping the Home and Work button on
the screen you will be navigated to these destinations.
You can enter an address (Address) or select an address from your address list (Address book), from
the list with your previous destinations (History) or
from the list with special destinations (POI, e.g. restaurant, petrol station and car dealer).
You can also set co-ordinates (Geographical coordinates). If you want to stop navigation guidance tap Stop guidance.
Address
•
•
•
•
•
Tap the Address button on the screen.
Tap the country entry. Scroll up and down the
list to select the desired country.
Tap the city entry and type the name of the city
where you want to go.
Tap the street entry and type the name of the
desired street.
Finally choose the house number and tap OK.
Use the toggle buttons in Address for alternative ways to enter your destination address.
Switch between City and ZIP code (only needed for specific countries), Number and Crossing.
Quick tap: In the Address screen you can tap the POI button. You can quickly choose
from the list with special destinations (e.g. restaurant, hotel, airport, petrol station
and car dealer).
QSG-PN2050-3000.book Seite 41 Montag, 23. Oktober 2006 3:09 15
Navigation
41
Intelligent typewriter The navigation system is equipped with an intelligent typewriter. This allows possible characters only.
List button After you have typed a few
letters you can tap the “list button“. A
list of matching results appears.
Switch between alphabetical, numerical
and accented elements by using the
keyboard toggle
Using the “backspace“ button, you can delete incorrect entries (either whole
terms or individual letters).
Address book
By tapping the Address book button on the screen a list of your previously
stored addresses appears. For adding, renaming and deleting your stored addresses tap Address book in Settings.
History
By tapping the History button on the screen a list of your (recent) destinations
appears.
POI menu
POI are special destinations. When you want to select POI tap the button Point
of interest. When you want to select a POI you must know where you want to
search: around Current Position or around Destination.
For example, you want to find a hotel near current position. Tapping POI opens the POI
menu. Here you can tap Current position. The navigation system shows you a list with all
known POI categories. After selecting Hotel the navigation systems shows a list of all
known hotels in the area. The hotel nearest to your current position will be at the top of the
list. Tap the desired list entry in order to select your hotel. You have now selected the hotel
as the destination. The route will now be calculated automatically and displayed on the map.
To start navigation, tap OK in the Confirmation screen.
Geographical co-ordinates
If you enter co-ordinates you must select northern or southern hemisphere.
Stop guidance
By tapping the Stop Guidance Button the current guidance will be stopped.
QSG-PN2050-3000.book Seite 42 Montag, 23. Oktober 2006 3:09 15
Navigation
42
Confirmation
When you have entered the destination, all elements for the desired destination appear on the
Confirmation screen; the system will confirm your
selection. Additionally you have the possibility to
store the destination: in the Address book or as
shortcuts under Home and Work. You can also adjust the navigation settings (e.g. plan short or fast
route). Tap OK on the screen or wait a moment: the
Map Display screen will automatically appear. The
Map Display screen is displayed and the navigation process starts with spoken and visual instructions.
Every destination is automatically stored in History.
Map Display
When you have set your destination the route will
automatically be calculated and displayed on the
map. You can now start driving and the navigation
system will guide you to your specified destination.
By tapping the Map Display button in the Main
Menu, you directly enter the map display.
Zoom in/out with the map
Using these two buttons
and
you can adjust the scale of the displayed map. These
buttons are not visible if the automatic scale is activated.
•
To zoom out of the map, repeatedly tap the
magnification to the desired level.
•
To zoom in to the map, repeatedly tap the
nification to the desired level.
button until you have decreased the
button until you have increased the mag-
Compass: Tapping the compass will switch the map orientation between facing north
and heading up.
While you are on route you can always set a new address. The navigation system recalculates the route and navigation continues.
You can easily switch back and forth from 2D to 3D by tapping on the map.
QSG-PN2050-3000.book Seite 43 Montag, 23. Oktober 2006 3:09 15
Navigation
43
Note
The transparent column right on the
map shows visible instructions (e.g. a
dotted arrow representing "Follow the
road"). The map itself shows different
elements witch can be switched on and
off.
You can do this by tapping Map display in the Toolbar or in Settings.
Toolbar
Tapping the bottom right of screen, you can open
the Toolbar, a shortcut to different functions and
information.
Example: Route & sound
Tap the Route & sound button to open the music player. You can now use the
functions of the music player and listen to your desired title. The song being
played will be interrupted by the voice alerts for navigation. From the music player you can easily switch back to the navigation function.
Example: Information
When you tap this icon the sub-menu Information in Settings will be visible.
Simulation
It is possible to simulate routes. When you have entered a destination this mode enables you to see
the route at forehand. It is possible to simulate your
route from a different point of departure instead of
you current position. You enter Simulation by tapping the Settings button in the main menu. Here
you will see a range of settings including Start location and Simulation.
QSG-PN2050-3000.book Seite 44 Montag, 23. Oktober 2006 3:09 15
44
Multimedia
The Multimedia Menu
The navigation system offers the possibility of playing MP3 files, viewing JPEG images or
playing games. In order to be able to use these multimedia functions, the MP3 or JPEG files
in question must be saved on an SD card.
If you have a SD card reader/writer, you can copy your MP3 files and JPG pictures
directly from your PC to the SD card!
If you use Microsoft® Windows® Mediaplayer to copy files you can submit complemetary information to each MP3-file. You can assign the file to the Album, the Artist or the Genre.
You can also create an individual list of your titles (Playlist). The MP3 player supports this
categorization and enables an easy selection of titles/songs. Please, do not forget that your
individual list My_playlist.wpl must be located in the list that contains individual names of
the titles as well.
If you save your MP3 files without these complementary information, the files will be displayed in the alphabetical order in the main list Current Playlist only.
The JPEG viewer offers you an easy-to-use browser to help you choose pictures using folders.
Therefore if you save your pictures in separate folders, you can use the browser to choose
the desired images.
Insert the SD card in the slot on the left side of the device.
• Tap the Multimedia button in the main selection screen.
• The multimedia selection menu appears.
Playing Audio Files – The Music-Player
Tap the Music-Player button.
On the screen you see the list of all titles in the alphabetical order Current playlist. You can select a
title directly by tapping the requested title.
• By tapping the arrow (right up) you scroll up in
this list and all other lists.
• By tapping the arrow (right down) you scroll
down in this list and all other lists.
By tapping the left up arrow you return to
the start menu. Playing will stop.
QSG-PN2050-3000.book Seite 45 Montag, 23. Oktober 2006 3:09 15
Multimedia
After tapping the requested title, you´ll see on the
screen:
• the name of the current title
• the total playing time in the in the upper bar
and
• time played in the lower bar.
45
1
2
3
4
By tapping the symbols on the left you can perform
6
5
following functions:
1 Jump to next title
2 Start playing, or pause during playing
3 Switch to the selection menu (Menu). Here you can choose titles according to the criteria: the Album, the Artist, etc.
4 Stop – finish playing
5 Jump to previous title
6 Volume control
By tapping the Navigation button, you will return to the navigation application (Route &
Sound). Replay will not be stopped.
The Selection Menu – Menu
By tapping the symbols on the left in the selection menu (Menu) you can perform following
functions:
Album Switch to the list and the album selection.
Artist Switch to the list and the artist selection.
Genre Switch to the list and the genre selection.
Playlist Switch to the list and the selection of your
individual list of titles.
Song Switch to the list and the selection of titles
from the list of all titles in the alphabetical
order.
Repeat Turn function of repetition of playing off
(Repeat off), repeat the last title (Repeat
Track), repeat all titles (Repeat All). This
function refers to the current setting of the
list (Album, Artist, Genre, or Playlist).
During the Song setting (the list of titles in
the alphabetical order) this function refers
to all titles.
Shuffle This function refers to the current setting
of the list (Album, Artist, Genre, or Playlist). During the Song setting (the list of titles in the alphabetical order) this function
refers to all titles.
VOL Tapping the volume scale controls the volume.
By tapping the left up arrow you return to the main menu.
QSG-PN2050-3000.book Seite 46 Montag, 23. Oktober 2006 3:09 15
46
Multimedia
Viewing Pictures – The Picture-Viewer
Tap the Picture-Viewer button.
• On the screen, you will see the picture and the number of the picture in the
upper bar within the corres-ponding folder.
By tapping the symbols on the left in the selection
menu you can perform following functions:
Slide
Start slide show
>> File
Jump to next picture
<< File
Jump to previous picture
>> Folder Switch to next folder
<< Folder Switch to previous folder
Browser Tap the Browser button to open a file
browser where you can choose your pictures
By tapping the left up arrow you return to
the start menu.
If you tap on the picture, the image is displayed in
full screen mode. By tapping the large picture you´ll
return to the small picture.:
1 Jump to next picture
2 Jump to previous picture
3 Switch to next folder
4 Switch to previous folder
1
2
3
4
Browser – Selecting Pictures from Folders
•
•
•
•
•
•
Tap the Browser button on the screen.
The folder selection screen appears.
By tapping the right up arrow you scroll up in
this folder and all other folders.
By tapping the right down arrow you scroll
down in this folder and all other folders.
By tapping the left up arrow you return to
the start menu.
Tap the desired folder in the browser screen.
The picture selection screen appears.
Tap the name of the desired picture in the
browser screen. The picture is displayed.
Games
By tapping this button you will open the game selection list.
QSG-PN2050-3000.book Seite 47 Montag, 23. Oktober 2006 3:09 15
Troubleshooting
47
Troubleshooting
Problem
Solution
No GPS signal in vehicle
The GPS signal can be blocked by heated windscreens or
tinted windscreens with a vacuum-metallised surface. In this
case, you will need an external GPS antenna. (available from
accessory dealers, Article-no. MA2010/00)
No GPS signal
Make sure that the GPS antenna on the top of the navigation system is not obstructed by other objects.
Poor-quality GPS signal
Always keep the navigation system positioned vertically.
The navigation system no If the navigation systems stops responding to your actions,
longer responds to finger you can press the reset button on the bottomside of the device (e.g. with a straightened-out paper clip or a pencil). The
taps or doesn't switch off.
data you have saved will not be lost! Restart the navigation
system by pressing the power button.
System doesn't start, screen Make sure that the battery is fully charged and/or that the
remains blank.
device is connected to a power source. If you are using the
DC cable, check that the plug is securely and correctly connected to the cigarette lighter.
The system shuts itself down In the case of extremely low or high temperatures, the sysafter a certain time in opera- tem will temporarily shut down to prevent itself from being
damaged. It will switch itself on again once the temperature
tion.
has returned to normal. A sudden shutdown is also possible
when the battery is empty.
The voice alerts for naviga- Check whether the volume is set to an audible level in the
tion cannot be heard.
basic settings.
Navigation is not accurate.
A level of inaccuracy of 50 m is within acceptable limits. If a
higher level of inaccuracy occurs repeatedly, please contact
an authorised specialised dealer.
Driving/navigation instruc- It may be the case that the position determined by the navtions do not correspond to igation system is at the moment incorrect. The current traffic situation may have changed and therefore does not
the actual traffic situation.
correspond to the information on the map.
No sound
In case of no sound, mute might be on or the volume is low.
Only English voice
All voices are on the SD card. When the SD card is inserted
in the navigation device, these voices will be available on
the navigation system. By removing the SD card, only the
English voice will be available.
QSG-PN2050-3000.book Seite 48 Montag, 23. Oktober 2006 3:09 15
Further Information
48
Technical Data
PN 2050
3.5" colour TFT LCD with a 320 x 240 pixel resolution, touchscreen, anti-reflex surface
Processor: 300 MHz
64 MB Flash ROM and 64 MB SD RAM
12 channel GPS receiver
Lithium-ion battery with a capacity of 1400 mAh
Dimensions: approx. 105 mm width x 79 mm height x 23 mm depth
Weight: approx. 189 g
Operating temperature: -20 °C to + 60 °C
Short-time storage temperature: -30 °C to + 60 °C
Charging temperature for lithium ion battery: 0 °C to + 45 °C
Support of SD cards up to 2 GB
PN 3000
4,3" colour TFT LCD with a 480 x 272 pixel resolution, touchscreen, anti-reflex surface
Processor: 300 MHz
64 MB Flash ROM and 64 MB SD RAM
12 channel GPS receiver
Lithium-ion battery with a capacity of 2500 mAh
Dimensions: approx. 125 mm width x 83 mm height x 24 mm depth
Weight: approx. 259 g
Operating temperature: -20 °C to + 60 °C
Short-time storage temperature: -30 °C to + 60 °C
Charging temperature for lithium ion battery: 0 °C to + 45 °C
Support of SD cards up to 2 GB
Imprint
© 2006 Siemens VDO Trading GmbH
All rights reserved. This documentation is protected by copyright.
Subject to technical and optical changes as well as printing errors.
The information contained in this document is subject to change at any time without prior
notification. Siemens VDO Trading GmbH reserves the right to modify or improve its products and modify the contents without being obliged to inform any particular persons or organisations. The device specifications and the contents of the package may deviate from
what is stated in this document.
Service
For current information on VDO Dayton Multimedia Systems, service addresses, software
updates please visit our website:
www.vdodayton.com
or contact a VDO Dayton dealer.
Subject to technical modifications and errors.