1
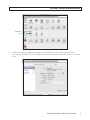
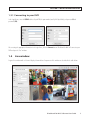
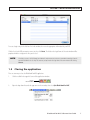
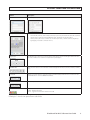
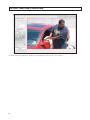
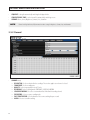
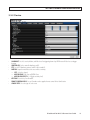
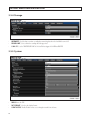
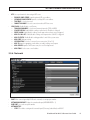
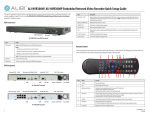
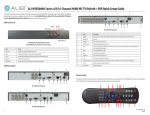
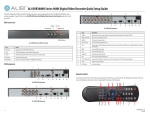
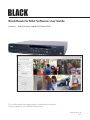
BlackHawk for MAC Software User Guide
Products: BLK-DH2 Series and BLK-HD Series DVRs
Please read this manual before using your software, and always follow the instructions
for safety and proper use. Save this manual for future reference.
BLK-DH_Blackhawk_RM
11/9/12
LEGAL NOTICE
Observint Technologies (Observint) products are designed to meet safety and performance standards with the use
of specific Observint authorized accessories. Observint disclaims liability associated with the use of non-Observint
authorized accessories.
The recording, transmission, or broadcast of any person’s voice without their consent or a court order is strictly
prohibited by law.
Observint makes no representations concerning the legality of certain product applications such as the making,
transmission, or recording of video and/or audio signals of others without their knowledge and/or consent. We
encourage you to check and comply with all applicable local, state, and federal laws and regulations before
engaging in any form of surveillance or any transmission of radio frequencies.
Other trademarks and trade names may be used in this document to refer to either the entities claiming the marks
and names or their products. Observint disclaims any proprietary interest in trademarks and trade names other than
its own.
No part of this document may be reproduced or distributed in any form or by any means without the express written
permission of Observint.
© 2012 by Observint, Inc. All Rights Reserved.
11000 N. Mopac Expressway, Building 300, Austin, TX 78759
For Sales and Support, contact your distributor.
ii
TABLE OF CONTENTS
Table of Contents
SECTION 1
SECTION 2
SECTION 3
Installation and Setup. . . . . . . . . . . . . . . . . . . . . . . . . . . . . . . . . . . . . . . . . . . . . . . . . . . . . . . . . . . . . . . . 1
1.1 About BlackHawk for MAC. . . . . . . . . . . . . . . . . . . . . . . . . . . . . . . . . . . . . . . . . . . . . . . . . . . . . . . . . . . . . 1
1.1.1 System requirements . . . . . . . . . . . . . . . . . . . . . . . . . . . . . . . . . . . . . . . . . . . . . . . . . . . . . . . . . . . . 1
1.2 Getting started. . . . . . . . . . . . . . . . . . . . . . . . . . . . . . . . . . . . . . . . . . . . . . . . . . . . . . . . . . . . . . . . . . . . . . 1
1.2.1 Finding the DVR network settings. . . . . . . . . . . . . . . . . . . . . . . . . . . . . . . . . . . . . . . . . . . . . . . . . . 1
1.2.2 Finding your Apple Macintosh network settings. . . . . . . . . . . . . . . . . . . . . . . . . . . . . . . . . . . . . . 2
1.2.3 Connecting to your DVR. . . . . . . . . . . . . . . . . . . . . . . . . . . . . . . . . . . . . . . . . . . . . . . . . . . . . . . . . . 4
1.3 Installing and starting BlackHawk for MAC. . . . . . . . . . . . . . . . . . . . . . . . . . . . . . . . . . . . . . . . . . . . . . . 4
1.3.1 Connecting to your DVR . . . . . . . . . . . . . . . . . . . . . . . . . . . . . . . . . . . . . . . . . . . . . . . . . . . . . . . . . . 5
1.4 Live window. . . . . . . . . . . . . . . . . . . . . . . . . . . . . . . . . . . . . . . . . . . . . . . . . . . . . . . . . . . . . . . . . . . . . . . . 5
1.4.1 Using Site Entry registration. . . . . . . . . . . . . . . . . . . . . . . . . . . . . . . . . . . . . . . . . . . . . . . . . . . . . . . 6
1.5 Closing the app. . . . . . . . . . . . . . . . . . . . . . . . . . . . . . . . . . . . . . . . . . . . . . . . . . . . . . . . . . . . . . . . . . . . . . 7
Search and Playback Video . . . . . . . . . . . . . . . . . . . . . . . . . . . . . . . . . . . . . . . . . . . . . . . . . . . . . . . . . . . . 8
Remote Configuration Setup. . . . . . . . . . . . . . . . . . . . . . . . . . . . . . . . . . . . . . . . . . . . . . . . . . . . . . . . . . 11
3.5.1 DISPLAY setup . . . . . . . . . . . . . . . . . . . . . . . . . . . . . . . . . . . . . . . . . . . . . . . . . . . . . . . . . . . . . . . . . 11
3.5.2 Record. . . . . . . . . . . . . . . . . . . . . . . . . . . . . . . . . . . . . . . . . . . . . . . . . . . . . . . . . . . . . . . . . . . . . . . . 12
3.5.3 Device. . . . . . . . . . . . . . . . . . . . . . . . . . . . . . . . . . . . . . . . . . . . . . . . . . . . . . . . . . . . . . . . . . . . . . . . 13
3.5.4 Storage. . . . . . . . . . . . . . . . . . . . . . . . . . . . . . . . . . . . . . . . . . . . . . . . . . . . . . . . . . . . . . . . . . . . . . . 14
3.5.5 System. . . . . . . . . . . . . . . . . . . . . . . . . . . . . . . . . . . . . . . . . . . . . . . . . . . . . . . . . . . . . . . . . . . . . . . . 14
3.5.6 Network . . . . . . . . . . . . . . . . . . . . . . . . . . . . . . . . . . . . . . . . . . . . . . . . . . . . . . . . . . . . . . . . . . . . . . 15
3.5.7 Upgrade . . . . . . . . . . . . . . . . . . . . . . . . . . . . . . . . . . . . . . . . . . . . . . . . . . . . . . . . . . . . . . . . . . . . . . 16
3.5.8 Information . . . . . . . . . . . . . . . . . . . . . . . . . . . . . . . . . . . . . . . . . . . . . . . . . . . . . . . . . . . . . . . . . . . 16
BlackHawk for MAC Software User Guide
iii
NOTES
iv
SECTION 1: INSTALLATION AND SETUP
SECTION 1
Installation and Setup
1.1 About BlackHawk for MAC
BlackHawk for MAC, the network-based administrative interface to the DVR, is used with an Apple® Macintosh® OS X® computer
to monitor and control the DVR across a network. It can be used to view live video, configure the DVR SETUP menus, and search for
and watch recorded video. BlackHawk for MAC can display up to 16 video channels (live or recorded video) simultaneously.
1.1.1 System requirements
To install and use the BlackHawk for MAC application, your Macintosh computer must have at least:
•
•
•
•
Operating system: OS X 10.6 and above
CPU: Intel® Core™2 Duo processors
RAM: 2GB
VGA: NVIDIA® or AMD ATI™ graphics interface
1.2 Getting started
To connect to your DVR, the DVR must be configured and connected to a network. The URL (internet address) to use with
BlackHawk for MAC to connect to the DVR depends what network(s) your Apple Macintosh computer and DVR are connected to.
You can determine the network settings of your computer and DVR using the following procedures.
1.2.1 Finding the DVR network settings
To find the network settings of your DVR:
a.
b.
c.
Right click anywhere on the DVR desktop screen and then click SETUP.
Enter your administrator password, if needed, to open the system setup menus.
Click the NETWORK menu icon to see your network settings. NOTE: The local IP address and port number of your DVR
may be different from that shown in the window below.
BlackHawk for MAC Software User Guide
1
SECTION 1: INSTALLATION AND SETUP
NETWORK menu icon
System menu (left) and SETUP NETWORK menu (right)
1.2.2 Finding your Apple Macintosh network settings
To find the network settings of your Apple Macintosh computer:
1.
Click the “gear-like” System Preferences icon in the desktop dock.
2.
In the System Preferences window, click the Network icon.
2
SECTION 1: INSTALLATION AND SETUP
Network
icon
3.
Find the current network settings for your computer on the Network window. This window shows your network
connection(s), your IP address(es), etc. The settings in the window for your computer will be different from the ones shown
below.
BlackHawk for MAC Software User Guide
3
SECTION 1: INSTALLATION AND SETUP
1.2.3 Connecting to your DVR
Considering the network settings of your DVR and those of your computer, determine the best way to connect. For instance:
•
•
•
If your computer and DVR are on the same LAN (connected to the same router), you can address your DVR in BlackHawk
for MAC with the local IP address of your DVR. See the DVR NETWORK menu window above.
If you are accessing your DVR across the internet, your DVR is may be addressed through a port forwarded by the
router your DVR is connected to, or through a connection to a DDNS web service such as ddnscenter.com (preferred). To use
this service for accessing your DVR across the internet, refer to ddnscenter.com for more information.
Other: Depending on the network configuration of your computer and DVR, there may be other ways to addressing your DVR
across the network. For more information, consult with the support organization provided by your vendor.
1.3 Installing and starting BlackHawk for MAC
The BlackHawk for MAC application is contained on the software disk provided with your system. To use the program:
1.
Insert the software disk into the optical drive on your Macintosh computer.
2.
Install the BlackHawk for MAC application using standard OS X installation procedures. When the installation is complete, the
following icon will appear on the desktop.
3.
Double-click the BlackHawk for MAC icon to start the application.
4
SECTION 1: INSTALLATION AND SETUP
1.3.1 Connecting to your DVR
In the Login frame, enter the IP/DNS address of your DVR, the port number (usually 5445 by default), and your user ID and
password (PW).
..
After entering the appropriate information in the Login frame, click the Connect button. BlackHawk for MAC will connect to your
DVR and open the “live” window.
1.4 Live window
A typical Live window with a 4-channel display is shown below. Components of the window are described in the table below.
BlackHawk for MAC Software User Guide
5
SECTION 1: INSTALLATION AND SETUP
Table 1. Live window controls
Button
Description
Time Display
After connecting to the DVR, the date and time is displayed as following.
Login frame
Enter the required information in each field, then click Connect to access DVR.
PTZ CONTROL
Control the PTZ function of PTZ enabled cameras. Functions issued by the controls are passed to the camera of the
channel selected in the “live” display.
CHANNEL SPLIT
Click one of these buttons to select the number of channels displayed in the window (1 channel, 4 channel, 9 channels,
etc.).
SITE ENTRY
Click the icon and the window to register the number of site will be displayed. When the network connection is done,
SITE ENTRY button is converted to REMOTE SETUP Button.
REMOTE SETUP
Remote Setup Button. This button is converted from SITE ENTRY button when the network connection is done.
Window Control
Red – Close the window
Yellow – Minimize the window
Green – Toggles between normal size and full screen width
1.4.1 Using Site Entry registration
The Site Entry feature allows you to preset login settings for different DVRs, then access those settings to connect easily and quickly.
Click the Site Entry button to preset a login for your DVR.
6
SECTION 1: INSTALLATION AND SETUP
To create a login entry, click a field on a line in the window, then enter the appropriate information for your DVR.
Click the line for the DVR you want to connect to, then click Select. The fields on the Login frame of the main window will be
populated with the settings on the line you selected.
NOTE
If multiple users access the DVR through your Macintosh, and you want to restrict access to an administrator login, leave the
password field blank on the Site Entry line and enter your password in the Login frame of the main window before clicking
Connect.
1.5 Closing the application
There are two ways to close the BlackHawk for MAC application:
1.
Click the red ball in the upper left corner of the application window.
Close
the window
2.
Open the drop-down list under the app name on the menu bar, then select Quit BlackHawk for MAC.
BlackHawk for MAC Software User Guide
7
SECTION 2: SEARCH AND PLAYBACK VIDEO
SECTION 2
Search and Playback Video
To access the search and playback features of BlackHawk for MAC, open a “Live” window, then in the menu bar, open the File
drop-down list and select New Search View.
The Search window will open.
Table 2.Search window controls and indicators
8
Button
Description
Time Display
After connecting to the DVR, the date and time is displayed as following.
SECTION 2: SEARCH AND PLAYBACK VIDEO
Button
Description
Info frame
Enter the required information in each field, then click Connect to access DVR.
Date & Time
The Date & Time frame indicates:
• Year and month (at the top). In the example to the left, the year is 2012, then month is the 9th month (September)
• The days when recordings were made (highlighted in gray), and the date selected (blue number).
• The hour, minute, and second to search for. You can select a specific time, or click the search icon (magnifier) to
begin playing recorded video on the date selected.
Play Controls
The Play Controls icon buttons are used to play and/or position the video clip selected through the Date & Time frame.
The icons are similar to those used in most computer desktop media players.
CHANNEL SPLIT
Click one of these buttons to select the number of channels displayed in the window (1 channel, 4 channel, 9 channels,
etc.)..
SITE ENTRY
Click the icon and the window to register the number of site will be displayed. When the network connection is done,
SITE ENTRY button is converted to REMOTE SETUP Button.
REMOTE SETUP
Remote Setup Button. This button is converted from SITE ENTRY button when the network connection is done.
Window Control
Red – Close the window
Yellow – Minimize the window
Green – Toggles between normal size and full screen width
Following is a 1-channel view captured from recorded video.
BlackHawk for MAC Software User Guide
9
SECTION 2: SEARCH AND PLAYBACK VIDEO
The BlackHawk for MAC application cannot be used to backup video clips or create screen captures.
10
SECTION 3: REMOTE CONFIGURATION SETUP
SECTION 3
Remote Configuration Setup
The DVR system SETUP configuration can be controlled through BlackHawk for MAC. You must be logged into the DVR with
Administrator privileges to use this feature. To access the DVR SETUP menus, click the REMOTE SETUP button, enter the password
of your administrator login, then click the LOGIN button.
DVR SETUP menus shown through REMOTE SETUP are nearly identical to those viewed at the DVR. Differences exist depending on
the DVR model you connect to. SETUP screens shown below were captured from BlackHawk for MAC connected to an BLK-DH2 HD
DVR.
•
•
To move to another screen, click the respective tab.
To close REMOTE SETUP, click the RED window control button.
NOTE
REMOTE SETUP is prohibited if the DVR local SETUP menu is open.
3.5.1 DISPLAY setup
•
•
OSD: Enables the display of date - time and channel number on each video channel display.
OSD CONTRAST: Adjust the character contrast on the screen.
BlackHawk for MAC Software User Guide
11
SECTION 3: REMOTE CONFIGURATION SETUP
•
•
•
SEQUENCE: Setting for automatically switching the displayed video.
SEQUENCE DWELL TIME: Sets the interval for automatically switching screens.
CHANNEL: Name, Covert, Brightness, Contrast, Hue, Saturation
NOTE
Channels with high definition (HD) cameras do not have settings for Brightness, Contrast, Hue, and Saturation.
3.5.2 Record
•
12
CHANNEL setup
—— RESOLUTION: Set the resolution for the recordings. The set value applies to an channel selected.
—— FRAME RATE: Set the recording rate.
—— QUALITY: Set the image quality to one of 5 levels.
—— RECORDING: Set the recording mode. CONTINUOS, SCHEDULE, MOTION
—— SENSOR RECORDING: Select the sensor number that is linked with recording channel.
—— PRE RECORD: Select to set pre recording mode.
—— POST EVENT RECORD: Sets the duration of the event recording after pre-record.
—— AUDIO: Select to set audio recording.
SECTION 3: REMOTE CONFIGURATION SETUP
3.5.3 Device
•
•
•
•
•
•
•
ALARM OUT: Set the Sensor In, Motion, and Video Loss for triggering alarm relay HDD Error and Video Loss can trigger
beeping.
CONTROLLER: Set the controller baud rate and ID.
PTZ: Set the PTZ baud rate, protocol, and RS-485 network ID.
MOTION: Setup the motion detection area and the sensitivity.
—— SITE: Select the channel
—— MOTION ZONE: FULL Zone or PARTIAL Zone
—— MOTION SENSITIVITY: 1~9 (High sensitivity level)
KEY TONE: Sets the Key Tone On or Off.
REMOTE CONTROLLER ID: Sets an ID number on the supplied remote control for its identification.
SENSOR TYPE: Select the type of each sensor.
BlackHawk for MAC Software User Guide
13
SECTION 3: REMOTE CONFIGURATION SETUP
3.5.4 Storage
•
•
•
OVERWRITE: Check the box to continue recording by overwriting data when the hard disk becomes full.
RECORD LIMIT: Select to limit the recording data storage period.
S.M.A.R.T.: Sets the TEMPERATURE LIMIT of the Hard Disk to trigger the ALARM and BUZZER.
3.5.5 System
•
•
•
14
DVR ID: Name the DVR
DATE FORMAT: Select the date display format.
CLIENT ACCCESS: Enable/Disable remote access through network client software.
SECTION 3: REMOTE CONFIGURATION SETUP
•
•
NTP: Set to synchronize the time using an NTP server.
—— PRIMARY SNMP SERVER: Input the primary NTP server address.
—— SECONDARY SNMP SERVER: Input the secondary NTP server address.
—— TIME ZONE: Select the time zone.
—— CONNECTION MODE: Select the connection mode to NTP time server.
SEND E-MAIL: Enable/disable e-mail feature.
—— TRANSMISSION MODE: Select the mail transmission mode (TEXT or VIDEO).
—— IP NOTIFICATION: Enable/disable sending e-mail when the IP address is changed.
—— EVENT ALARM: Enable/disable sending e-mail reports when an alarm event is triggered.
—— MAIL BY S.M.A.R.T.: Enable/disable sending e-mail reports when S.M.A.R.T. is triggered
—— MAIL BY STATUS: Enable/disable sending periodical e-mail of the system status.
—— MAIL PORT: Mail port setting.
—— SECURE OPTION: Select the secure mail server connection. (SSL or TLS)
—— MAIL TO: Input the appropriate email address to enable sending e-mail reports
—— MAIL SERVER: Input the SMTP server name, the user ID and password.
—— MAIL FROM: Set the source e-mail address.
3.5.6 Network
•
•
•
•
PORT: When connecting multiple DVRs to the network, set a unique port number.
NETWORK AUDIO PORT: Display the network audio port (NETWORK PORT + 1).
WEB PORT: Set a web server port number.
NETWORK TYPE
—— STATIC: The address setting mode is manual. Input IP, Gateway, Subnet Mask, and DNS IP.
BlackHawk for MAC Software User Guide
15
SECTION 3: REMOTE CONFIGURATION SETUP
DHCP: The address setting mode is automatic.
DDNS: Set whether to use DDNS service or not.
NETWORK STREAM: Set the Resolution, Frame Rate, and the Quality.
——
•
•
3.5.7 Upgrade
•
•
Browse: Select BROWSE to locate the firmware file.
Upgrade: Select UPGRADE to upgrade the firmware of the DVR.
3.5.8 Information
16