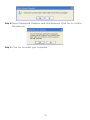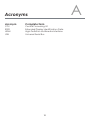
1
CDL-160ETH Ethernet and USB to HDMI Converter Operation Manual CDL-160ETH Disclaimers The information in this manual has been carefully checked and is believed to be accurate. Cypress Technology assumes no responsibility for any infringements of patents or other rights of third parties which may result from its use. Cypress Technology assumes no responsibility for any inaccuracies that may be contained in this document. Cypress also makes no commitment to update or to keep current the information contained in this document. Cypress Technology reserves the right to make improvements to this document and/or product at any time and without notice. Copyright Notice No part of this document may be reproduced, transmitted, transcribed, stored in a retrieval system, or any of its part translated into any language or computer file, in any form or by any means - electronic, mechanical, magnetic, optical, chemical, manual, or otherwise - without express written permission and consent from Cypress Technology. © Copyright 2009 by Cypress Technology. All Rights Reserved. Version 1.0 July 2009 Trademark Acknowledgments All products or service names mentioned in this document may be trademarks of the companies with which they are associated. Safety Precautions Please read all instructions before attempting to unpack or install or operate this equipment, and before connecting the power supply. Please keep the following in mind as you unpack and install this equipment: Always follow basic safety precautions to reduce the risk of fire, electrical shock and injury to persons. To prevent fire or shock hazard, do not expose the unit to rain, moisture or install this product near water. Never spill liquid of any kind on or into this product. Never push an object of any kind into this product through module openings or empty slots, as you may damage parts. Do not attach the power supply cabling to building surfaces. Do not allow anything to rest on the power cabling or allow it to be abused by persons walking on it. To protect the equipment from overheating, do not block the slots and openings in the module housing that provide ventilation. Revision History Version No V1 Date 20090625 Summary of Change Preliminary Release Table of Contents 1. Introduction…………………………………………................................ 1 2. Applications...........................…………………………………………… 1 3. Package Contents.............………………………………………………. 1 4. System Requirements..................……………………………………….. 2 5. Features.............................……………………………………………….. 2 6. Specifications...................................................................................... 3 7. Hardware Description......................................................................... 4 7.1 Product overview........................................................................... 4 8. 7.2 Front Panel...................................................................................... 4 7.3 Rear Panel....................................................................................... 5 Software Installation...............………………………………….……….. 6 8.1 USB to HDMI Software.................................................................... 6 8.2 USB device driver........................................................................... 6 9. Launch USB Server............................................................................... 7 10. Using the DisplayLink Manager.......................................................... 7 10.1 Using DisplayLink Manager......................................................... 7 10.2 Using More DisplayLink Manager................................................ 12 10.3 Firmware Update......................................................................... 12 11. Uninstall the Device Driver.................................................................. 14 12. Connection and Installation............................................................... 15 13. Troubleshooting................................................................................... 16 14. Acronyms.............................................................................................. 17 1. Introduction The Ethernet and USB to HDMI Converter allow users to use TV as the PC's primary display with keyboard and mouse at hand for Internet browsing, Microsoft Office tasking, music and movies entertainment from a PC on the network. Simply connect the TV to the device and then plug the device using an Ethernet network. Your TV instantly become the PC monitor with keyboard and mouse for any computer linked on that network. The distance between TV and computer can be 100 meters apart within the same LAN.Aside from enabling a TV to be your primary PC display the device also removes the limitations of running expensive audio and video wiring in long distance digital signage extending. All that is needed is an Ethernet network to fulfill such task. Multiple users will likewise to have the ability to access the same TV without being physically connected with computers-an easy and cost effective solution when sharing AV among computer. 2. Applications Ethernet to HDMI Displays USB to HDMI Display Long distance PC dispaly and control PC application sharing Docking stations Projectors display 3. Package Contents Ethernet to HDMI device x 1 Operational Manual x 1 Driver CD x 1 Power adaptor x 1 1 4. System Requirements System Hardware Requirements: 2.4 GHz single core CPU with at least 1GB RAM for optimal performance Operating Systems: Windows 2K SP4 Windows XP Home or Professional 32 bits SP2 Windows Vista 32 bits USB Port Extension: An available USB 2.0 port with USB to mini USB cable Network Extension: An available Ethernet port at home, or commercial network with RJ-45 cable Keyboard and Mouse for extra pair of control tool Note: •The converter can only support ethernet transfer bandwith of 60 Mbits/s •480p/576p resolutions work best on ethernet connection for up to 100M long cable (max) •720p resolution works best with an USB connection up to 2M long •The ethernet interface does not support Mac OS whereas the USB can support Mac OS X v10.4.11 and v10.5.6 Upgrade the graphics drivers to the latest version Upgrade the DisplayLink software to the latest version Upgrade the main board's chip set driver to the latest version 5. Features Move the complete PC operation environment into a TV with100 meters away from computer. Content on the original PC monitor can different from the TV content. Allows TV to be the PC primary display with keyboard and mouse on hand a smart solution when browsing internet, using Microsoft Office, listening music and watching movies from a PC on the network. Extend or mirror video through network or USB cable to HDMI display, including both video and audio output signals. Share HDMI displays with multiple users through your existing office or home IP network. Add a HDMI display to your computer through a USB 2.0 port. Supports mirror and extended video modes. A friendly interface for easy configuration and monitoring. 2 6. Specifications Input port 1 x Mini USB; 1 x Ethernet Output ports 1 x HDMI Extender Ports 2 x USB Power Supply 5VDC/2.6A (US/EU standards, CE/FCC/UL certified) ESD Protection Human body model: ± 10kV (air-gap discharge) ± 6kV (contact discharge) Core chipset: ± 2kV Dimensions (mm) 90(W) x 120(D) x 30(H) Weight(g) 220 Chassis Material Aluminum Silkscreen Color Metal Black Power Consumption 8W Operating Temperature 0˚C~40˚C / 32˚F~104˚F Storage temperature -20˚C~60˚C/ -4˚F ~ 140˚F Relative Humidity 20~60% RH (non condensing) 3 7. Hardware Description The following sections describe the hardware components of the unit. Note: Install the device driver of your Ethernet/USB to HDMI converter before operating the device. 7.1 Product overview Ethernet or mini USB PC/NB HDMI Monitor Ethernet to HDMI device 7.2 Front Panel MINI USB MINI USB IN USB Port ① Ethernet Ethernet IN ② ③ INPUT ④ Reset IP ⑤ ① USB Port: These ports are the converter's USB Hub provision that allows user to connect a USB Hard Drive, USB web camera, Keyboard or Mouse. Note: •These two USB ports cannont be connected to USB Hub extension. Doing so will trigger the system to detect the external USB Hub and thereby cause a system failure. •Before removed the USB device, user must follow the USB device's safely hardware removal procedure when removing the device. Failure to do such action will cause the system to crash. ② Mini USB IN: This port supports extension or mirror of video (via USB cable) to your HDMI display, including both video and audio output signals. ③ Ethernet IN: This slot lets you connect a RJ-45 CAT5 cable to home IP router or PC Ethernet port. •When connected directly to a PC Ethernet port, the user needs to manually set the Internet Protocol (TCP/IP) to “169.254.10.1”. •If connect to an IP router, the system will automatically be connected without the user setting up its Internet Protocol. ④ Input connection switch: This switch allows you to select the PC source either via Mini USB port or through Ethernet port. ⑤ Reset IP: This button is only pressed to reset Ethernet IP address when the system's IP address is incorrect. 4 7.3 Rear Panel DC 5V HDMI OUT POWER EDID OFF ON LINK ① ② ③ ④ ⑤ ① Power: This slot is where user plugs the 5V DC power supply of the unit before connecting the adaptor to an AC wall outlet. ② HDMI OUT: The display output port of the converter that is only compatible with HDMI display. ③ EDID control switch: The default setting of this switch is “ON”. Leave as it is if the display is properly. If the display has built-in native EDID, the screen will show display’s resolution and user can selected from SCREEN RESOLUTION. When switched OFF, the screen will show internal EDID and user can select from SCREEN RESOLUTION . Note: When switch from ON to OFF position, user needs to go to “Launch USB Server ” to disconnect DisplayLink USB to HDMI and reconnect it again. If not, the system will remain ON . However, from OFF to ON, the user does not need to reconnect the DisplayLink USB to HDMI device, the system will automatically switch to ON mode.(See section 9 for details) ④ LINK LED Indicator: When input switch to MINI USB the blue LED will illuminate when the source signal is connected. When input switch to Ethernet a blinking blue LED means its doing signal connection. ⑤ Power LED Indicator: Red LED will illuminate when power is connected to the converter. 5 8. Software Installation The following sections list the procedures to follow when installing the USB to HDMI and USB device drivers. 8.1 USB to HDMI Software Insert the provided driver CD into your CD-ROM driver. Using the Program Manager, select and double-click on the “USB to HDMI Software ” folder. Locate and then execute the “Setup.exe” file to start install action. Once prompted with the display message below, choose your preferred language and tick the "Automatically check for updates" item before you click on the "I Accept" button. The installation program will automatically run and complete in seconds without prompting you to do any further actions. 8.2 USB device driver From the root directory of your driver CD, double-click on "XP_VS_Setup. ext" to install the USB device driver. After installation is completed, select "Yes" from the display message below to restart the computer. 6 9. Launch USB Server Press “Launch USB Server ” icon from your desktop screen to connect the DisplayLink USB to HDMI device and C-Media USB Sound Device. Once connection completes, the status icons beside each driver will change from GREEN to ORANGE as illustrated below. Note: Doube clicking on the device driver toggles the status mode between enable and disable. Double click on the GREEN sign, the system will connect the devices and after connect successfully it will turn to ORANGE sign. When connect other devices with USB port, "Launch USB Server" will detect it and show out a GREEN sign. Double click the GREEN sign to connect the device(s) in order to activate and use it. Note: This USB Server screen will appear only when input is from Ethernet. When users wish to switch input from Ethernet to USB the Launch USB Server must be disconnected before the switch. Skipping the disconnection step may result in Launch USB Server's failure for the next time using. 7 10. Using the DisplayLink Manager 10.1 Using DisplayLink Manager After the driver is completely installed, (the DisplayLink Manager-utility) will automatically appear on the system tray. The utility allows you to quickly change the settings and resolution for DisplayLink Manager. Right-clicking the icon will launch its context menu. Screen Resolution: This item allows you to select the screen resolution (available only in extended mode). Note: When the display has a built-in native EDID the screen will show the display’s resolution, Without a built-in EDID, the screen will only have the following resolutions on the screenshot bellow. 8 Color Quality: This option allows you to select the screen color quality (available only in extended mode). Screen Rotation: This item allows you to rotate the screen by 90, 180 or 270 degrees, on the additional monitor. 9 Extend to: This option lets you reposition the extended screen to the top, bottom, left or right of the primary display. Extend: This item lets you set the DisplayLink Manager to Extended mode. 10 Mirror: This option allows you to set the DisplayLink Manager to Mirror mode. Enabling this will let you see an identical desktop image on the additional monitor. Off: This item disable the DisplayLink Manager on the system. 11 Advanced: This item directly access your system's Display Properties. From this menu item, you will be able to adjust the resolution, color quality, position and refresh rate via the Display Properties. 10.2 Using More DisplayLink Manager It is not necessary to install driver again if you have completed the driver installation in advance. The driver automatically define the ID of newly added DisplayLink Manager. All the installed DisplayLink Manager will be listed in the Display Properties on the display manager menu. 2 Note: When connecting additional DisplayLink Manager to a computer, a system with higher CPU performance is recommend. 12 10.3 Firmware Update Updates on your firmware version may be done manually or automatically. Pease refer to the following procedures when performing either type of update. Manually Update: Manual updating of your firmware is possible by click the Updates → Check Now…, it will then check and download the latest firmware. Note: Before performing updates, please make sure that your computer is connected to a network. Automatic Update: Automatic updating of the firmware is also possible by click the Updates → Configure… Once the Updates Options window below appears, you can configure parameters such as the update method and frequency. Click on the OK button to save your settings. 13 11. Uninstall the Device Driver Follow the steps below to uninstall the USB to HDMI drivers installed in your system. Step 1: Open the Control Panel: Start → Control Panel → Add or Remove Programs. Step 2: Select USB to HDMI Converter and click Remove. Step 3: Click Yes to confirm the removal. 14 Step 4: Select DisplayLink Graphics and click Remove. Click Yes to confirm the removal. Step 5: Click Yes to restart your computer. 15 12. Connection and Installation ▼RJ-45 Cable Keybord Mouse HDD Flash PC NB IP Router RJ-45 Cable ▲ ▲ USB Cable HDMI ▲ HDMI Cable TV/Display 16 Situation 13. Troubleshooting The device driver has been installed, but the DisplayLink Manager is not working Check Point 1. Make sure you restart your computer after the driver installation. 2. Check all the connectors are plugged in correctly. 3. Make sure the USB port that you are using is USB 2.0. 4. Check the additional monitor is connected correctly and the power is on. 5. Make sure the operating system, the DisplayLink Manager is compatible with Windows 2000, XP and Vista (32bit). 6. Try a different USB 2.0 or computer. 7. Check USB cable’s specification. DVD player not working when move it over to the extended display 1. Try to open the program in the additional display first before playing the DVD. The mouse not move pass the right side of the screen as it should on extended desktop 1. Check the display settings and make sure that your display number 2 is on the right side of display number 1. System constantly ask for reboot and not function 1. Check the display card of your PC's version and make sure it is with the latest update one. 2. If necessary, boot into Safe mode and use Vista's Backup and Restore Center to recover. 3. May also report the issue via your support channel. 17 A Acronyms Acronym CPU EDID HDMI USB Complete Term Central Processing Uit Extended Display Identification Data High-Definition Multimedia Interface Universal Serial Bus 18 CYPRESS TECHNOLOGY CO., LTD. Home page: http://www.cypress.com.tw 20090713 MPM-CDL160ETH