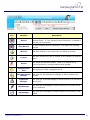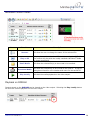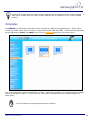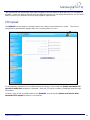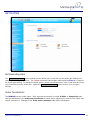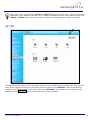
1
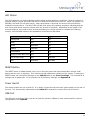
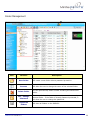
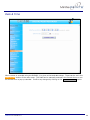
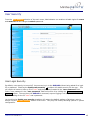
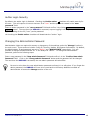
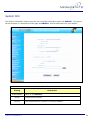
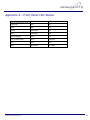
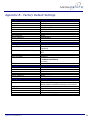
DMR160
DIGITAL VIDEO CONFERENCE
MEDIA RECORDER
User’s Guide
Version 2.0
1
DMR160 User’s Guide V2.0
2
Copyright and Trademarks
©2006, Advanced Media Design, Inc.
667 Rancho Conejo Blvd.
Newbury Park, CA 91320
USA
All rights reserved. This document contains information that is proprietary to Advanced Media Design, the
manufacturer of all MediaPOINTE® products. No part of this publication may be reproduced, stored in a
retrieval system, or transmitted, in any form, or by any means, electronically, mechanically, by photocopying,
or otherwise, without the prior written permission of Advanced Media Design, Inc. Nationally and
internationally recognized trademarks and trade names are the property of their respective holders and are
hereby acknowledged.
MediaPOINTE® is a registered trademark of Advanced Media Design, Inc
Disclaimer
The information in this document is furnished for informational purposes only, is subject to change without
prior notice. Documentation may include technical or other inaccuracies or typographical errors. The
technical documentation is being delivered to you AS IS and Advanced Media Design, Inc. makes no warranty
as to its accuracy or use.
Safety Precautions
For your protection, please read all related safety instructions, observe all warnings and precautions, and
exercise common sense while operating this electronic equipment.
•
•
•
•
•
•
•
•
•
•
•
Always place the unit on a stable cart, stand or table.
Do not use the unit near water or sources of heat.
Do not drop or shake the unit. Do not place or install the unit in environments where it can be dropped or
shaken. Make sure the unit is powered off while being moved even for short distances.
Observe the power requirements of the unit; if you are not sure of the power available, consult your local
dealer or power company.
When plugging into a power outlet, insert the plug firmly into the outlet. Route the power cord so as to
avoid any activity that may result in fraying or other damage to the cord or the plug.
Do not attempt to defeat the polarization or grounding protection on the plug under any circumstances.
Do not overload wall outlets, extension cords, or integral convenience receptacles.
Unplug the unit from the wall before cleaning. Do not use liquid or aerosol cleaners.
For proper ventilation, do not block the slots and openings in the case. Do not install the unit in a location
where the ventilation slots and openings can be plugged during everyday use.
Do not place or install the unit under, on top of or near any heat-producing equipment (i.e. radiators,
stoves, or amplifiers), or in a heated place.
Unplug the unit during lighting storms or when it will not be used for extended periods of time.
If the unit is visibly damaged either by not observing the precautions above or for any other reason, contact
your local dealer immediately. If the unit does not operate normally when you follow the operating
instructions, or it exhibits a distinct change in performance, this may be an indication of a problem needing
repair.
DMR160 User’s Guide V2.0
3
Table of Contents
Copyright and Trademarks -------------------------------------------------------------------- 3
Disclaimer -------------------------------------------------------------------------------------- 3
Safety Precautions ----------------------------------------------------------------------------- 3
Table of Contents ------------------------------------------------------------------------------ 4
About This Guide------------------------------------------------------------------------------- 7
Reliability of Information------------------------------------------------------------------- 7
Service Support and Training -------------------------------------------------------------- 7
Document Conventions -------------------------------------------------------------------- 8
Package Contents -------------------------------------------------------------------------- 8
Chapter 1: Introduction, Overview & Requirements ---------------------------------------- 9
Introduction ------------------------------------------------------------------------------- 10
Front Panel -------------------------------------------------------------------------------- 10
Keypad------------------------------------------------------------------------------------------- 10
LED Status--------------------------------------------------------------------------------------- 11
RESET Button ----------------------------------------------------------------------------------- 11
Power Switch ------------------------------------------------------------------------------------ 11
USB Port ----------------------------------------------------------------------------------------- 11
Overview----------------------------------------------------------------------------------- 12
Uses and Features ------------------------------------------------------------------------------ 12
How It Works ------------------------------------------------------------------------------------ 12
Chapter 2: Setup----------------------------------------------------------------------------- 13
Connecting the DMR160 ------------------------------------------------------------------ 14
The Rear Panel ---------------------------------------------------------------------------------- 14
Auxiliary Connections --------------------------------------------------------------------------- 15
Network Setup----------------------------------------------------------------------------- 15
How to Assign an IP Address ------------------------------------------------------------------- 15
Logging In --------------------------------------------------------------------------------------- 16
As a Guest User --------------------------------------------------------------------------------- 16
As an Administrator ----------------------------------------------------------------------------- 17
As an Author ------------------------------------------------------------------------------------ 17
IP Settings--------------------------------------------------------------------------------------- 17
Chapter 3 – Control & Operation ------------------------------------------------------------- 19
Web Portal --------------------------------------------------------------------------------- 20
Web Portal --------------------------------------------------------------------------------- 20
Overview ---------------------------------------------------------------------------------------- 20
Toolbar ------------------------------------------------------------------------------------------ 20
DMR160 User’s Guide V2.0
4
Folder Management ----------------------------------------------------------------------------- 22
On-Screen Menu / Front Control Panel --------------------------------------------------- 23
External Control --------------------------------------------------------------------------- 24
RS-232------------------------------------------------------------------------------------------- 24
Telnet25
Infra-Red ---------------------------------------------------------------------------------------- 25
Relay Closure------------------------------------------------------------------------------------ 25
Chapter 4: Recording, Archiving & Streaming----------------------------------------------- 26
Recording ---------------------------------------------------------------------------------- 27
Recording Start / Stop -------------------------------------------------------------------------- 27
Recorded Content Detail ------------------------------------------------------------------------ 28
Playback on DMR160---------------------------------------------------------------------------- 28
Archiving----------------------------------------------------------------------------------- 30
Mail Attachment --------------------------------------------------------------------------------- 30
Download Manager------------------------------------------------------------------------------ 31
CD Burning -------------------------------------------------------------------------------------- 32
USB Offload / Upload --------------------------------------------------------------------------- 33
Streaming --------------------------------------------------------------------------------- 34
Live Streaming While Recording (Unicast) ----------------------------------------------------- 34
Chapter 5: Options --------------------------------------------------------------------------- 35
Recording Options ------------------------------------------------------------------------- 36
Naming ------------------------------------------------------------------------------------ 37
Titles & Credits ---------------------------------------------------------------------------- 38
Templates --------------------------------------------------------------------------------- 39
FTP Upload--------------------------------------------------------------------------------- 40
AV Controls -------------------------------------------------------------------------------- 41
Set Recording Gain------------------------------------------------------------------------------ 41
Video Connections ------------------------------------------------------------------------------ 41
AV Test ------------------------------------------------------------------------------------ 42
Chapter 6: Configuration --------------------------------------------------------------------- 43
Date & Time ------------------------------------------------------------------------------- 44
User Security ------------------------------------------------------------------------------ 45
User Login Security ----------------------------------------------------------------------------- 45
Author Login Security --------------------------------------------------------------------------- 46
Changing the Administrator Password --------------------------------------------------------- 46
IP Settings --------------------------------------------------------------------------------- 47
System Name ----------------------------------------------------------------------------------- 47
Network Settings -------------------------------------------------------------------------------- 47
DMR160 User’s Guide V2.0
5
SMTP Mail---------------------------------------------------------------------------------- 49
Command Line ---------------------------------------------------------------------------- 50
Telnet (TCP/IP) ---------------------------------------------------------------------------------- 50
RS-232------------------------------------------------------------------------------------------- 50
Chapter 7: Management & System Tools ---------------------------------------------------- 51
Notifications ------------------------------------------------------------------------------- 52
Storage Limits ----------------------------------------------------------------------------------- 52
Logging ------------------------------------------------------------------------------------ 53
Update (Upgrades) ------------------------------------------------------------------------ 54
Upgrade System Software ---------------------------------------------------------------------- 54
Reset Configuration ----------------------------------------------------------------------------- 55
Delete All Content ------------------------------------------------------------------------------- 55
System Info ------------------------------------------------------------------------------- 56
Shutdown---------------------------------------------------------------------------------------- 57
Reboot ------------------------------------------------------------------------------------------- 57
Appendix A - Front Panel LED Status -------------------------------------------------------- 58
Appendix B - Factory Default Settings ------------------------------------------------------- 59
DMR160 User’s Guide V2.0
6
About This Guide
Welcome
to the user’s guide to the MediaPOINTE® DMR160 digital videoconference media
recorder.
This user’s guide describes how to set up and use the DMR160 to record and transport graphic video and
audio content over IP networks.
Reliability of Information
The information in this document is believed to be accurate and reliable; however Advanced Media
Design, Inc. assumes no responsibility or liability for any errors or inaccuracies that may appear in
this document, nor for any infringements of patents or other rights of third parties resulting from
its use. No license is granted under any patents or patent rights of Advanced Media Design, Inc.
This document was written by the Development Department of Advanced Media Design, Inc. We
are fully committed to and take pride in maintaining high quality documentation, so we welcome
and appreciate any comments or suggestions you may have regarding content, presentation,
structure and distribution of this document. Please use the contact information below for all
correspondence:
Development Department
Advanced Media Design, Inc.
667 Rancho Conejo Blvd.
Newbury Park, CA 91320
USA
[email protected]
Service Support and Training
MediaPOINTE®, Inc. is committed to providing the service support and training needed to install,
manage, and maintain you MediaPOINTE® equipment.
All MediaPOINTE® products are sold through a wide network of Authorized MediaPOINTE® Dealers.
For help with your products, contact your local dealer for assistance first. If for any reason, you
would like to contact MediaPOINTE® directly for information regarding service programs and
extended warranty information, training, installation or usage, we are glad to be of assistance. You
can contact us at the phone number listed below, or visit our website.
MediaPOINTE® Technical Support
Hours: 8:30 a.m. – 5:30 p.m. Pacific Standard Time
(866) 709-0444
[email protected]
DMR160 User’s Guide V2.0
7
Document Conventions
The following conventions are used throughout this user’s guide.
The hand symbol indicates a note, containing special instructions, and in some cases,
circumstances that require caution.
The light bulb symbol highlights suggestions or hints.
Warning! Do not attempt to service the apparatus yourself as opening equipment may
expose you to dangerous voltages or other hazards and will void your warranty. Refer all
servicing to your MediaPOINTE® representative.
The lightning flash with an arrowhead symbol within a triangle is intended to alert the user
to the presence of un-insulated, dangerous voltages.
Selection
Button
Main menu selections are shown as highlighted in Orange.
References to Web Portal buttons are shown as a Gray button.
Package Contents
•
•
•
•
•
•
•
•
•
•
MediaPOINTE® DMR160 Digital Video Conference Media Recorder
2 – RCA Video Cables
2 – S-Video Cables
1 - CAT-5e LAN Cable
1 - RCA Stereo Audio Cable
1 - AC Power Cable
1 – IR Remote Control plus 2 AAA batteries
Documentation CD-ROM
Warranty Document
Registration Sheet
DMR160 User’s Guide V2.0
8
Chapter 1: Introduction, Overview & Requirements
This chapter provides a brief introduction and overview of the MediaPOINTE® DMR160.
Topics in This Chapter
Chapter 1: Introduction, Overview & Requirements ---------------------------------------- 9
Introduction ------------------------------------------------------------------------------- 10
Front Panel -------------------------------------------------------------------------------- 10
Keypad------------------------------------------------------------------------------------------- 10
LED Status--------------------------------------------------------------------------------------- 11
RESET Button ----------------------------------------------------------------------------------- 11
Power Switch ------------------------------------------------------------------------------------ 11
USB Port ----------------------------------------------------------------------------------------- 11
Overview----------------------------------------------------------------------------------- 12
Uses and Features ------------------------------------------------------------------------------ 12
How It Works ------------------------------------------------------------------------------------ 12
DMR160 User’s Guide V2.0
9
Introduction
Welcome
to one of the easiest to use, reliable and cost-effective archiving and streaming products
on the market today. The DMR160 can archive important graphical data and simultaneously transmit the
same data to anywhere on your network. It is specifically designed to provide superb video and audio
quality by simultaneously recording two discreet streams into a pre-determined template of the users’
preference.
As with almost all of MediaPOINTE’s AV-over-IP products, you can control the DMR160 via many different
methods. Some of these methods include, web portal interface, remote control, contact closure, RS-232
serial port, Telnet, or by the convenient button panel on the front of the unit. One push of the REC button
will start archiving and streaming (if desired) in a pre-configured template layout.
Front Panel
The front panel of the unit is shown below.
The front panel consists of the main operation Keypad with a BLUE LED Status indicator, a YELLOW LED
status indicator, a CD slot, IR receiver, a small RESET button, a small power switch and a USB port. The
following is a brief description of each of these components.
Keypad
The DMR160 has a front keypad that allows the user to start and
stop recording as well as navigate the on screen menus without
using the remote control. When pressed, the REC button will
immediately begin recording content to the specified Default
Folder.
DMR160 User’s Guide V2.0
10
LED Status
The LED indicators are used to describe system states, actions and error conditions. When the system is
idle and ready to record, the BLUE LED will be on and the YELLOW LED will be off. When the system is in
RECORD, the BLUE LED will blink slowly. After each session is archived, the archive file must be fully
indexed to the hard drive. The BLUE LED will fast blink during the indexing procedure indicating that the
unit is busy and cannot record or stream until this process is complete. Depending on the length of the
archived material, this could be from several seconds up to several minutes to complete the indexing
process. See the table below for an explanation of the various LED states.
LED 1 (BLUE)
YELLOW)
LED 2 (Y
Powering ON
ON
ON
Ready
ON
OFF
Record
Slow Blink
OFF
Indexing
Fast Blink
OFF
Local Playback
OFF
OFF
Copying to USB / Burn to CD
OFF
OFF
Error or Fail to Copy
OFF
Fast Blink
Mute
Slow Blink
Slow Blink
RESET Button
The RESET button is hidden behind a tiny hole in the front panel and requires activation using a small
device such as a pin or paperclip. This is done to avoid inadvertent resetting of the system. Pressing the
RESET button will reset all the settings on the DMR160 back to the factory settings. This includes all IP
settings and all passwords. For a complete list of the factory settings, see Appendix B.
Power Switch
This switch powers the unit on and off. It is used in conjunction the with main power switch on the rear of
the unit. It is intentionally made small as the DMR160 is expected to remain ON most of the time.
USB Port
The USB port in the front of the unit can be used for upload or offload of video content and for network
configuration of the DMR160.
11
Overview
Uses and Features
The DMR160 may be used in a variety of situations for live communication and collaboration.
You can start an archiving / streaming session to:
•
Archive Video Conference near and far end camera views for record keeping or corporate
intellectual property management for a complete and accurate record of each event.
•
Share visual information, designs, and concepts with dispersed groups of people to gather input
during a video conference.
•
Stream important videoconferences to other locations such as overflow rooms or remote
conference locations along your corporate network.
•
Conduct customer and employee training across vast geographical areas.
•
Discuss research, engineering, architecture, product design, or process analysis when the
participants are not able to meet in one central location.
•
Access a centralized bank of expertise from a field location.
•
Disseminate archived presentations and training seminars to remote employees.
How It Works
The DMR160 captures two separate video input streams from your videoconferencing system (in a video
conference the near and far-end camera video). The DMR160 also accepts line level stereo audio inputs.
The two separate streams along with the stereo audio inputs are captured and combined into a single file
which can be simultaneously streamed out along your network during the archival process if desired.
Users can select from three pre-defined layout templates for capturing and subsequent playback of the
recorded material.
The DMR160 combines the two recorded streams into a single file that is stored on-board locally on a
hard drive. The recorded file can then be viewed on your PC or replayed directly from the DMR160 on a
local monitor if desired. The content can also be copied to a USB memory stick, burned to CD, or
downloaded to your PC.
The DMR160 records content in Microsoft Windows® Media format1. The file is a standard *.wmv file
readable by any viewer that can access this format. A free Windows Media Player is available on the
Microsoft® website. CD-quality audio is recorded in MPEG-3 format.
1
Microsoft, Windows and the Windows logo are either registered trademarks or trademarks of Microsoft Corporation in the United
States and/or other countries.
DMR160 User’s Guide V2.0
12
Chapter 2: Setup
This chapter describes how to get started using the DMR160.
Configuring and using the DMR160 is easy. You do not need to install an application or remote
configuration software. If you know how to browse the internet, then you already know how to access
and control the DMR160 using its Web portal via a web browser.
Topics in This Chapter
Chapter 2: Setup----------------------------------------------------------------------------- 13
Connecting the DMR160 ------------------------------------------------------------------ 14
The Rear Panel ---------------------------------------------------------------------------------- 14
Auxiliary Connections --------------------------------------------------------------------------- 15
Network Setup----------------------------------------------------------------------------- 15
How to Assign an IP Address ------------------------------------------------------------------- 15
Logging In --------------------------------------------------------------------------------------- 16
As a Guest User --------------------------------------------------------------------------------- 16
As an Administrator ----------------------------------------------------------------------------- 17
As an Author ------------------------------------------------------------------------------------ 17
IP Settings--------------------------------------------------------------------------------------- 17
DMR160 User’s Guide V2.0
13
Connecting the DMR160
Use this procedure when you first purchase the DMR160 and when you are ready to install the hardware
at your site. This section shows the back panel and explains how to connect the separate input
connections to the unit. For clarity purposes, INPUTS are shown in RED, OUTPUTS are shown in GREEN
and CONTROL ports are shown in BLUE.
The Rear Panel
AC Power Input – insert the included IEC cable to the AC power input plug. Make sure the Power on/off
switch is in the off position before plugging in the power cable.
Video Inputs – Video inputs 1 and 2 on the DMR160 can be set from the Web portal to be either
composite or S-video inputs.
Stereo Audio Input – there are two, line level stereo audio inputs that use standard RCA connectors.
LAN Cable Input – insert the included standard 10/100Mb CAT-5e LAN cable into the connector labeled
LAN1 on the DMR160. The connector labeled LAN2 is reserved for future use.
The above listed cables are all that are necessary to archive and stream video. The remaining cables and
connectors not mentioned above are for alternate methods of control or for viewing the output of the
DMR160 locally; i.e. connecting a local monitor.
DMR160 User’s Guide V2.0
14
Auxiliary Connections
Video Output – This connection can be used to connect a local monitor to playback files directly from the
DMR160 or to use the On Screen Menu to control the unit.
Stereo Audio Output – use the two line level stereo audio outputs when playing back files audio portion
of the recorded material on the display. These can be routed to local speakers or back into the main
videoconferencing audio system.
Remote Contact Closure – this connection uses a standard 3.5 mini mono connector. This connector
allows a remote switch (contact closure) to control the start / stop function of the DMR160. This is the
same as pushing the record (REC) button on the front keypad.
RS-232 – This standard serial DB9 connector allows connection for serial control (note: a null-modem
serial cable is required).
USB – The USB port on the back of the unit can be used for upload or offload of video content and for
network configuration of the DMR160.
Network Setup
Use this procedure when you first purchase the DMR160 and when you are ready to install the hardware
at your site.
How to Assign an IP Address
IP addresses may be assigned to the DMR160 by two ways: DHCP and Fixed (Static) IP. If your network
is configured for DHCP, the IP address will be provided automatically and will be visible on the video
output of the DMR160. To set a Fixed (Static) IP address, see the procedure below for setting fixed or
static IP addresses.
Setting the IP Address
1. Connect the Ethernet cable and power up the DMR160.
2. On your Internet browser, enter the current IP address of the DMR160. (Note: If the unit has
factory settings, the default static IP address is: 192.168.1.253 /24)
3. Login to the DMR160 using the procedure shown below in the Logging In section.
4. Navigate to the network settings page by selecting IP Settings.
5. To allow the DMR160 to pick up an IP address, set the DHCP Client checkbox to Enabled.
Navigate to the Info section and click on the Reboot button to reboot the unit. The
DMR160 will now have the new IP address. To find out the newly assigned IP address,
connect a monitor to the video output. The new IP address is displayed in the upper left
corner of the video output signal.
DMR160 User’s Guide V2.0
15
6. In order to change to a Fixed or Static IP address, set the DHCP Client checkbox to Enabled
Fill in the IP Address, IP Subnet Mask, Default Gateway fields.
7. Once you have completed all of the above steps, select the Apply Changes button. You will
receive a pop-up window warning you that you to use this option with caution as you are
changing the default address and should remember the new settings.
8. Navigate to the Info section and click on the Reboot button to reboot the unit. The DMR160
will now have the new IP address. You will have to login again using the new IP Address.
Logging In
This section describes how to login to the DMR160 for the first time, and also covers levels and access
rights.
The default IP address is:
192.168.1.253
To log into the DMR160, browse to its IP address using your Internet browser. There are three levels of
access rights. There is a ‘Guest’ user, a content author as well as a system admin.
As a Guest User
The user maintains has the ability to view existing content on the DMR160.
1. Once you have navigated to the site, you will be presented with the default menu page. Anyone
who logs into the DMR160 is considered a ‘Guest’ user until they complete the admin login.
Admin logins are required to make changes to the system settings under the Configure and
Manage sections of the menu. If all you want to do is playback content from the DMR160 you
will not need administrator rights.
No password is required for the standard Guest user login as a default. However, the
administrator has the ability to modify this feature to require a password for viewers to login.
2. In order to change the default IP settings of the DMR160 or any of the other settings listed under
the Configure section of the menu, you must log in with administrator rights.
DMR160 User’s Guide V2.0
16
As an Administrator
The Administrator maintains all rights to the DMR160.
1. If you are already logged into the DMR as a user or author, click on the LOGOUT selection at the
top of the main menu. You will be prompted to enter a username and password.
2. Use the login id “admin”. The default password is “MediaPOINTE”. Note that the login id and the
password are case sensitive.
As an Author
The Author maintains content creation rights on the DMR160. The Author can set recording Options but
does not have access to the Configure and Manage sections of the menu.
1. If you are already logged into the DMR as a user or admin, click on the LOGOUT selection at the
top of the main menu. You will be prompted to enter a username and password.
2. Use the login id “author”. The password will be user defined in the User Security section of the
main menu. Note that the login id and the password are case sensitive.
IP Settings
This section describes how to establish network settings on the DMR160.
To quickly find the system’s IP Address, connect a video display to the video output. The units
current IP Address will be displayed in the upper left corner of the confidence monitor.
1. Login as Administrator.
2. Click on the IP Settings under the “Configure” section of the menu.
3. Verify that the IP Address, subnet mask and Gateway are correct.
4. Once the setting changes are complete, click on the Apply Changes button.
5. The screen should refresh and display your new settings.
6. See the Network Configuration Table below for a more in-depth description of all fields.
DMR160 User’s Guide V2.0
17
Network Configuration
Setting
DHCP Client
IP Address
IP Subnet Mask
Default
Gateway
DMR160 User’s Guide V2.0
Description
Enable/Disable DHCP settings for automatic address retrieval from the
network.
Assign a specific address to the DMR160.
This will also display the current address assigned.
The Netmask ID. A range of IP addresses defined so that only machines
with IP addresses within the range are allowed access to an Internet
service.
Gateway address connecting disparate networks.
18
Chapter 3 – Control & Operation
The DMR160 can be controlled by several different methods. These include, a web portal interface,
remote control, contact closure, RS-232 serial port, Telnet, or by the convenient button panel on the front
of the unit. This section will cover each of these control interfaces in detail.
Topics in This Chapter
Chapter 3 – Control & Operation ------------------------------------------------------------- 19
Web Portal --------------------------------------------------------------------------------- 20
Web Portal --------------------------------------------------------------------------------- 20
Overview ---------------------------------------------------------------------------------------- 20
Toolbar ------------------------------------------------------------------------------------------ 20
Folder Management ----------------------------------------------------------------------------- 22
On-Screen Menu / Front Control Panel --------------------------------------------------- 23
External Control --------------------------------------------------------------------------- 24
RS-232------------------------------------------------------------------------------------------- 24
Telnet25
Infra-Red ---------------------------------------------------------------------------------------- 25
Relay Closure------------------------------------------------------------------------------------ 25
DMR160 User’s Guide V2.0
19
Web Portal
Overview
The DMR160 has a fully featured Web Portal that can be accessed via a web browser. Enter the unit’s IP
address in the web browser’s Address bar. From this screen you can start and stop a recording session,
play or download previously archived material, set recording preferences and move content off or within
the DMR160.
Selecting the Browse Content selection from the main menu will show a list of all current recordings in
the Root directory.
Toolbar
When logged in as either author or admin selecting the Browse Content selection from the main menu
will provide the main system Toolbar.
DMR160 User’s Guide V2.0
20
Icon
Function
Description
Record
This button will start a recording session into the currently
selected folder. If “Live Streaming while Recording” is enabled it
will start the live stream.
Stop Record
To stop recording and live streaming. This begins the indexing
process.
Move to
Will allow content to be moved from one folder to another.
Copy to
Will allow a copy of a piece of content to be created in a different
folder.
Delete
Expand Folder
View
Mail Attachment
Manager
Download
Manager
Will delete the selected content. There is no recycle bin or
recovery process for content that has been deleted.
Will display the folder management tree.
Will open the Mail Attachment Manager to allow content to be
emailed.
Will open the Download Manager to allow content to be moved to
the local PC.
USB Manager
Will open the USB Manager to allow content to be moved to and
from a USB stick.
CD Manager
Will open the CD Manager to allow content to be burned to a CDR disk.
DMR160 User’s Guide V2.0
21
Folder Management
Icon
Function
New Folder
Description
Will create a new folder without password protection.
Rename
Will allow the user to change the name of the selected folder.
Delete Folder
This will permanently delete a folder including all content held
within.
Set / Change
Password
This icon will allow the user to password protect the currently
selected folder. If the folder is already password protected, it
will allow the user to change the password.
Expand all
Folders
DMR160 User’s Guide V2.0
Will show all folders on the DMR160.
22
Contract all
Folders
Close Folder
Management
Will show only the highest tier folders of the folder tree.
Will hide all folders on the DMR160
ROOT directory
Is the highest level directory/folder that content can be stored in.
Password
Protected Folder
A folder that has been password protected will be displayed with
a Lock icon.
Default Folder
A recording from the Remote Control or the Record button on the
front of the DMR160 will be saved to the BLUE Default Folder
On-Screen Menu / Front Control Panel
The On-Screen Menu is displayed on the video output of the DMR160. The DMR160 IR remote or Front
Control Panel (keypad) will provide some of the configuration features of the Web Portal as well as provide
the ability to navigate and playback non-password protected content stored on the DMR160.
Currently the on screen menus give the user the
following capabilities:
•
•
•
•
•
•
•
•
•
•
•
DMR160 User’s Guide V2.0
Start / Stop Recording
Enable/Disable Streaming while Recording
Enable/Disable Titles & Credits
Browse and Play non password protected
content
Browse and Play recent content
Burn content to CD
Copy content to USB
Display test images and tones
Set audio input recording level
Adjust the Menu opacity, position and
timeout
Get System Information
23
External Control
RS-232
On the back of the DMR160 there is a single control port configured as a DTE supporting the RS-232
protocol. A Null-Modem cable should be used between the DMR160 and the COM port on your PC – the
pin-out is shown here.
Terminal session settings required for RS-232 control are: 9600, 8, None, 1 with No Flow Control.
There is no password protection on this interface and, by default, the RS-232 port is enabled
however the administrator has the ability to disable the port from the Web portal.
See below for a list of the available commands.
For more information on external control, please refer to the MediaPOINTE Command Line Interface
document.
DMR160 User’s Guide V2.0
24
Telnet
The telnet client within the DMR160 provides access to the Command Line Interface through the TCP/IP
protocol. By default, telnet is disabled but can be activated from the Web portal with an optional
password. The available commands are the same as listed in the RS-232 section.
To access the telnet client, start an MS_DOS session on your computer and enter:
telnet <ipaddress>
Once connected to the DMR160, a connect message will be displayed.
DMR160 Welcome to MediaPOINTE
Password:_
Once logged in, type ‘help’ or ‘?’ for a list of commands.
Infra-Red
The Infra-Red receiver for the remote control is located on the front of the DMR160. It can also be used
for IR control via control systems such as AMX and Crestron.
Relay Closure
The external closure connection is mounted on the back as a 1/8th (3.5mm) phone plug. Either a mono
or stereo plug can be used, but in the case of the stereo phone plug, short the sleeve to the ring as the
negative connection. This connection can be wired to a simple switch closure and will start or stop a
recording.
This closure can be in the form of a relay, manual switch or semi-conductor switch. This allows for relay
control via external control systems such as AMX and Crestron, or by a plain momentary trigger such as a
footswitch.
Semi conductor closures are found on AMX or Crestron controllers in the form of a D I/O port. If using a
semi conductor closure, polarity is important. The phone plug tip must be wired to the + or individual
input of the D I/O port, and the sleeve connected to the ground or - connector. Note that, unlike relay
connections, these connections are not isolated and can form grounding or hum loops.
DMR160 User’s Guide V2.0
25
Chapter 4: Recording, Archiving & Streaming
This section describes how to start and stop a recording session, move the content and watch the stream
live.
Topics in This Chapter
Chapter 4: Recording, Archiving & Streaming----------------------------------------------- 26
Recording ---------------------------------------------------------------------------------- 27
Recording Start / Stop -------------------------------------------------------------------------- 27
Recorded Content Detail ------------------------------------------------------------------------ 28
Playback on DMR160---------------------------------------------------------------------------- 28
Archiving----------------------------------------------------------------------------------- 30
Mail Attachment --------------------------------------------------------------------------------- 30
Download Manager------------------------------------------------------------------------------ 31
CD Burning -------------------------------------------------------------------------------------- 32
USB Offload / Upload --------------------------------------------------------------------------- 33
Streaming --------------------------------------------------------------------------------- 34
Live Streaming While Recording (Unicast) ----------------------------------------------------- 34
DMR160 User’s Guide V2.0
26
Recording
A recording can be started and stopped from the main toolbar of the Web Portal.
Recording Start / Stop
The BLUE LED will blink slowly when the DMR160 is recording / streaming and the Web Portal will Display
a “Recording” action message at the top of the page. The recording will use the inputs and audio levels
selected in the AV Controls section along with the currently selected layout template selected from the
Templates section.
To stop the recording and create the archived file, press the Stop button to begin the “indexing” action
process. The BLUE LED on the front of the unit will fast blink during the indexing procedure indicating that
the unit is busy and cannot record or stream until the process is complete. Depending on the length of
the archived material, this could be from several seconds up to several minutes to complete the indexing
process.
Note: Configuration settings of the DMR160 cannot be changed while recording.
DMR160 User’s Guide V2.0
27
Recorded Content Detail
Icon
Function
Rename
Play on PC
Email Media
Download Media
Play Locally
Description
Will allow the user to change the name of the selected file.
Will play the media on the local PC that is browsing the DMR160.
The content will play with the locally installed a Windows® Media
file viewer application
Will allow the selected file(s) to be moved to be emailed.
Will allow the selected file to be moved to the local PC. A pop-up
dialog box will ask for a file location and name for the saved file.
Will start the media playback on the video output.
Playback on DMR160
Content stored on the DMR160 can be viewed on the video output. Selecting the Play Locally button
will start the content playback on the video output.
DMR160 User’s Guide V2.0
28
During playback, pause, stop, skip forward and skip backward will be provided.
To play content on the local PC that is browsing the DMR160 click on the Play on PC button. In order to
play the file, a Windows® Media file viewer application (such as Windows® Media Player) is required on the
viewing PC.
DMR160 User’s Guide V2.0
29
Archiving
Mail Attachment
Icon
Function
Attach to Mail
Add Folder
Remove Folder
Add Media
Remove Media
Close Mail
Attachment
Pane
DMR160 User’s Guide V2.0
Description
Will attach the selected content to the email.
Will add the selected folder to the email attachment.
Will remove the selected folder from the email attachment.
Will add the selected media to the email attachment.
Will remove the selected media from the email attachment.
Will close the Mail Attachment Pane
30
Download Manager
Files and Folders can be downloaded to the browsing computer using the Download Manager.
Select the Download Manager icon from the main menu to bring up the Download Manager Toolbar.
Icon
Function
Download
Will download the selected content to the browsing PC.
Add Folder
Will add the selected folder to the download list.
Remove Folder
Add Media
Remove Media
Close Download
Manager Pane
DMR160 User’s Guide V2.0
Description
Will remove the selected folder from the download list.
Will add the selected media to the download list.
Will remove the selected media from the download list.
Will close the download manager Pane.
31
CD Burning
Content can be moved from the DMR160 to a CD-R. Insert a blank CD-R disk into the DMR160 and
select the CD icon from the main menu. This will display the CD Drive Toolbar that will provide icons for
burning media files and folders to CD-R drive.
Icon
Function
Burn CD
Add Folder
Remove Folder
Add Media
Description
Will begin the CD burning process.
Will add the selected folder to the burn list.
Will remove the selected folder from the burn list.
Will add the selected media to the burn list.
Remove Media
Will remove the selected media from the burn list.
Close CD
Manager Pane
Will close the CD Manager Pane.
DMR160 User’s Guide V2.0
32
USB Offload / Upload
Both the front or back USB port can be used to move media from or to the DMR160. Connect a USB
memory stick and select the USB icon from the main menu. This will display the USB toolbar that will
provide icons for moving media files to and from the USB drive.
Icon
Function
Description
Export Media
Move the selected files to the attached USB device.
Import Media
Move the selected files on the USB device to the DMR160.
Delete Media
Will delete the selected Media.
Close USB
Management
Pane
Will close the USB Management Pane.
DMR160 User’s Guide V2.0
33
Streaming
Live Streaming While Recording (Unicast)
This option turns on and off simultaneous live streaming of the content during a recording session. This
option allows remote users to login to the DMR160 and view the session as it occurs. This feature can be
disabled from the Recording Options section of the menu.
To watch a live broadcast, enter the IP address of the DMR160 on your internet browser. The main
DMR160 screen appears with the top recording showing a LIVE session as highlighted below.
To view the live broadcast, select the Play link to launch your Windows® Media Viewer to watch the live
broadcast. The broadcast will be shown to you in the template format selected by the author prior to
beginning the broadcast.
DMR160 User’s Guide V2.0
34
Chapter 5: Options
This section describes how to set up all configurable recording options on the DMR160. Only
author and admin users have access to these settings.
Topics in This Chapter
Chapter 5: Options --------------------------------------------------------------------------- 35
Recording Options ------------------------------------------------------------------------- 36
Naming ------------------------------------------------------------------------------------ 37
Titles & Credits ---------------------------------------------------------------------------- 38
Templates --------------------------------------------------------------------------------- 39
FTP Upload--------------------------------------------------------------------------------- 40
AV Controls -------------------------------------------------------------------------------- 41
Set Recording Gain------------------------------------------------------------------------------ 41
Video Connections ------------------------------------------------------------------------------ 41
AV Test ------------------------------------------------------------------------------------ 42
DMR160 User’s Guide V2.0
35
Recording Options
The Recording Mode pull-down menu has two options: Standard and Tandberg. In Standard mode,
all commands for starting and stopping the DMR160 are “manual” referring to starting and stopping the
unit via the Web portal or via the REC button on the front of the unit or by any of the other methods
described in this user guide that require user intervention to occur. In the Tandberg mode, the DMR160
will automatically start recording (and streaming if desired) when a call comes into the videoconferencing
system or is initiated by the system and automatically stop once the call has been terminated.
If you select the Tandberg mode, an additional pull-down menu appears for the IP Address of the
Tandberg codec or the serial port used to control the codec. The password of the Tandberg codec is also
required. Enter the IP Address and IP Password of the Tandberg codec’s telnet session and the DMR160
will automatically start when a videoconference call is detected or initiated and will automatically stop
when the call is terminated.
DMR160 User’s Guide V2.0
36
Naming
The Naming selection in the main menu allows the content naming conventions to be set.
If the Include date & time in the media name is checked, all subsequent recordings will have the date
and time appended to the content name. A prefix of up to 10 alpha-numeric characters may also be
entered. All newly recorded content will adhere to these naming conventions
Select the Save Name Settings button to save your new content naming convention.
A default folder can be set to house all recordings that are started from outside the Web portal (ie. Using
the REC button, remote control or Command Line Interface). Select the Set Default Folder button to
save the default folder. In the Folder tree, the Default Folder will be identified in BLUE.
DMR160 User’s Guide V2.0
37
A recording started from the Web portal will always be stored in the active folder at the time of recording
irrespective of the default folder selected.
Titles & Credits
In the Titles & Credits selection of the main menu, a title and credit image/slide can be added to the
beginning and end of content created using the DMR160. Checking the Enable titles & credits box will
activate all start and end slide settings. Un-checking this box will over-ride the start and end slide
settings that follow.
Slides must be in JPEG format.
To upload a slide, browse to the JPEG image you wish to use and click on the Upload button. Slides may
be enabled for 5, 10 or 15 seconds. The start slide will overlay the recorded content from the beginning
of the recording for the time period chosen. The end slide will overlay the end of the recording for the
specified time period.
For all Titles & Credits settings to take affect, the Save Titles & Credits Settings button needs to be
pressed.
DMR160 User’s Guide V2.0
38
A slide that is larger than the native content captured will be scaled to fill the content window. A
slide that is smaller than the native content captured will be centered in front of the recorded
content.
Templates
The DMR160 has 2 discreet inputs that can be recorded into different template layouts. These inputs
include two video inputs (either S-Video or Composite) labeled “V1” and “V2”. These recording templates
can be adjusted by author and admin users from the Template selection in the main menu.
The current template is always highlighted in orange. Switching templates is not instantaneous and takes
time to reconfigure encoder. You will receive a “Successful” message when the template change has
taken effect.
It is not possible to change templates while recording.
DMR160 User’s Guide V2.0
39
We recommend you experiment with each template to see the layout of each and how it is recorded for
playback. Once you become familiar with the different layouts, you can easily decide which one will work
best for each of your different archiving and playback requirements.
FTP Upload
The DMR160 has the ability to upload content to a network connected server via ftp.
configured to automatically happen after the recording session is over.
This can be
To automatically upload newly recorded media to the server, ensure that the Enable automatic FTP
upload of media files checkbox is selected. Enter the FTP server location (IP address) and the login
information.
To keep a copy of the recorded media on the DMR160, ensure that the Delete local media after
successful FTP upload checkbox is un-checked.
DMR160 User’s Guide V2.0
40
AV Controls
Set Recording Gain
The Set Recording Gain button and bar control allows you to view the current audio gain setting and
change that setting if you desire. The red bar shows the current gain setting and the blue bar is used to
set a new gain setting. To change the audio gain for a new recording session, click on the blue bar where
you would like to set the audio gain. Select the Set Recording Gain button to save your new gain
settings.
Video Connections
The DMR160 has two video inputs. Each input has connectors for either S-Video or Composite video.
Use the checkboxes in the Video source selection to select which signal type is used for the Video1 and
Video2 connections. Changes to the Video source selection take effect immediately.
DMR160 User’s Guide V2.0
41
Note: your menu may not show a Video1 or Video2 Connection on this menu. These choices vary
depending on the selected Template. If you select a template that does not include any input from
Video1 or Video2, then you will not see any reference to that connection on this menu page.
AV Test
The DMR160 has the ability to test connected output devices without having to connect live input sources.
There are four audio test tones for confirming the audio outputs of the DMR160. There are three test
images for confirming output on the video output of the DMR160. Once a test tone or image has been
selected, use the Stop Test button to stop the tone or clear the image.
DMR160 User’s Guide V2.0
42
Chapter 6: Configuration
This section describes how to configure the DMR160. Changes in the Configure section of the
Main Menu require Administrator privileges and cannot be accessed by users logged in with author
or user profiles.
Topics in This Chapter
Chapter 6: Configuration --------------------------------------------------------------------- 43
Date & Time ------------------------------------------------------------------------------- 44
User Security ------------------------------------------------------------------------------ 45
User Login Security ----------------------------------------------------------------------------- 45
Author Login Security --------------------------------------------------------------------------- 46
Changing the Administrator Password --------------------------------------------------------- 46
IP Settings --------------------------------------------------------------------------------- 47
System Name ----------------------------------------------------------------------------------- 47
Network Settings -------------------------------------------------------------------------------- 47
SMTP Mail---------------------------------------------------------------------------------- 49
Command Line ---------------------------------------------------------------------------- 50
Telnet (TCP/IP) ---------------------------------------------------------------------------------- 50
RS-232------------------------------------------------------------------------------------------- 50
DMR160 User’s Guide V2.0
43
Date & Time
When content is recorded using the DMR160, it is given a time and date stamp. These can be set in the
Date & Time section of the main menu. The Date can be manually entered in the format shown or can
be selected from a pop-up calendar. Confirm any changes by clicking on the Set Date & Time button
DMR160 User’s Guide V2.0
44
User Security
From the User Security selection of the main menu, Administrator can enable or disable logins for users
and authors and can change the admin password.
User Login Security
By default, user security is turned off. Anyone can log in to the DMR160 without being asked for a login
ID or password. Checking the Enable user security checkbox will enable security for the user. This
will require all users to have an ID of “user” and the password created in the “user password” field.
Enter a user password in the “user password” field and confirm it by clicking the Save user Security
Settings button. The next time the DMR160 is accessed, anyone logging in will be presented with a
login box asking for the ID “user” and a password.
Un-checking the Enable user security checkbox will restore the default settings of allowing a user to
access only the Browse Content section of the menu. They may not modify recording options or system
configuration.
DMR160 User’s Guide V2.0
45
Author Login Security
By default, the author login is disabled. Checking the Enable author checkbox will enable security for
the user. This will require all users to have an ID of “user” and the password created in the “user
password” field.
Enter an author password in the “user password” field and confirm it by clicking Save author Security
Settings button. The next time the DMR160 is accessed, anyone logging in will be presented with a
login box asking for the ID (“user”) and a password.
Un-checking the Enable author checkbox will deactivate the “author” login.
Changing the Administrator Password
Administrator rights are required to access or change any of the settings under the “Manage” section in
the main menu. These sections include: Config IP, Security, Update, and System Information. By default,
the Administrator ID and password are set to “admin” and “MediaPOINTE” respectively. It is not
possible to change the Administrator ID. It will always be “admin”. To change the Administrator
password, perform the following steps:
Enter a new password in the “New admin Password” field and confirm it in the “Confirm New admin
Password” field. Click on the “Change admin Password” button and the password will be changed.
The next time the DMR160 is accessed, the new admin password will take effect.
Be sure to write down the new administrator password and keep it in a safe place. If you forget the
admin password, the DMR160 will have to be reset back to the factory defaults to enable an
administrator to access the Manage section of the unit.
DMR160 User’s Guide V2.0
46
IP Settings
System Name
By default, the system name will be the unit serial number. You can change default name by entering a
new name in the text field. A reboot is required for the new name to take effect. The name can be up to
15 characters long and consist of alpha-numeric characters. No special characters or symbols will be
accepted except for a hyphen.
Network Settings
Network Configuration
Setting
DHCP Client
DMR160 User’s Guide V2.0
Description
Enable/Disable DHCP settings for automatic address retrieval from the
network.
47
IP Address
IP Subnet Mask
Default
Gateway
Assign a specific address to the DMR160.
This will also display the current address assigned.
The Netmask ID. A range of IP addresses defined so that only machines
with IP addresses within the range are allowed access to an Internet
service.
Gateway address connecting disparate networks.
If you have made any changes to the network settings, select the Apply Changes button. You will
receive a pop-up window warning you that you to use this option with caution as you are changing the
default address and should remember the new settings.
To quickly find the system’s IP Address, connect a video display to the video output. The units
current IP Address will be displayed in the upper left corner of the confidence monitor.
DMR160 User’s Guide V2.0
48
SMTP Mail
The DMR160 has the ability to send email messages either from a locally configured SMTP server or a
remote SMTP server. Enter the IP Address of the SMTP server in the appropriate text box. The Email field
will set the default “From” field to the entered email. Leave this blank to allow the user to enter their own
“From” field.
DMR160 User’s Guide V2.0
49
Command Line
The DMR160 has a Command Line interface that can be accessed from Telnet or RS-232. A list of
commands can be found in the External Control section of this manual.
Telnet (TCP/IP)
The Telnet port by default is not enabled. To turn on Telnet control, set the Telnet port number (typically
Port 23) and check the TCP/IP port enable checkbox. A password challenge to the Telnet session can
be enabled by entering a password in the Password for TCP/IP connection text box. If a password is
not desired on the Telnet session, leave the text box blank.
RS-232
On the back of the DMR160 there is a control port configured as a DTE supporting RS-232 protocol. A
Null-Modem cable should be used between the DMR160 and the COM port on your PC.
Terminal session settings required for RS-232 control are: 9600, 8, None, 1 with No Flow Control.
There is no password protection on this interface and, by default, the RS-232 port is enabled. The
administrator has the ability to disable the port by un-checking the COM port enable checkbox.
DMR160 User’s Guide V2.0
50
Chapter 7: Management & System Tools
This section describes the usage of the DMR160’s system tools for event notifications and logging as well
as the procedure for upgrading the unit.
Topics in This Chapter
Chapter 7: Management & System Tools ---------------------------------------------------- 51
Notifications ------------------------------------------------------------------------------- 52
Storage Limits ----------------------------------------------------------------------------------- 52
Logging ------------------------------------------------------------------------------------ 53
Update (Upgrades) ------------------------------------------------------------------------ 54
Upgrade System Software ---------------------------------------------------------------------- 54
Reset Configuration ----------------------------------------------------------------------------- 55
Delete All Content ------------------------------------------------------------------------------- 55
System Info ------------------------------------------------------------------------------- 56
Shutdown---------------------------------------------------------------------------------------- 57
Reboot ------------------------------------------------------------------------------------------- 57
DMR160 User’s Guide V2.0
51
Notifications
The DMR160 can be configured by the Administrator to send email event notifications from the
Notifications section of the main menu. Enter the email address to which the notifications will be sent
and select the events to track. Confirm these settings with the Save Notification Settings button.
Storage Limits
The Administrator can determine the action to take when the DMR160 hard drive is full. Make the
selection and press the Submit button.
DMR160 User’s Guide V2.0
52
Logging
The DMR160 can be configured by the Administrator to log events from the Logging section of the main
menu. Select the events you wish to save to a log and confirm these settings with the Save Logging
Options button.
DMR160 User’s Guide V2.0
53
Update (Upgrades)
The Update section of the DMR160 menu enables the system administrator to perform several key
functions. These are: Upgrade the system software to a new version, reset the DMR160 configuration to
factory default settings and delete all recorded content on the hard drive.
Upgrade System Software
MediaPOINTE’s Development Team is constantly striving to refine and upgrade the features on the
DMR160 to lead technological advances in the archiving and streaming marketplace.
In order to keep the DMR160 up to date with all of the latest features, you may want to update the
system software from time to time. Follow the following steps to upgrade the DMR160 software.
1. Download the latest software edition from the MediaPOINTE website. This file will have an *.mpup
extension. Note: if none is available, MediaPOINTE support number and ask for directions on how
to download the latest firmware version. The downloaded file must be placed on the same network
as the PC that will be used to connect to the DMR160.
DMR160 User’s Guide V2.0
54
2. Go to the Update section of the main menu and click on the browse button to search for the
downloaded *.mpup file. Locate the file and make the path to the file is shown in the window for
the file path.
3. You can select the Cancel button if you do not wish to modify your current software version.
4. Select the Upgrade button to begin the upgrade. Be sure to wait until the upgrade is complete
before proceeding.
5. If your DMR160 doesn’t automatically reboot, manually do this by selecting the Reboot button in
the Info section. This will reboot the unit and the new software will be in place.
Reset Configuration
Selecting the Reset Configuration button will reset all settings in the DMR160 back to the factory
settings. This will not delete any of your recorded files, only the system configuration settings. You can
find a list of the factory settings in Appendix B in this user guide. This is the same as using the reset
button within the hold on the front on the DMR160.
Delete All Content
Selecting the Delete All Content button in the Update section of the DMR160 will erase ALL recorded
material from the hard drive. In addition to removing all material, the recording “number” is reset back to
zero (0).
Make sure you want to delete all recordings on the hard drive because this selection is not
recoverable. You can not “undo” this selection once the files have been erased!
DMR160 User’s Guide V2.0
55
System Info
The System Information section gives the user important information about the DMR160. The system
can be shutdown or rebooted from this page the DMR160. See the table below for more details.
Sys Info
Setting
Description
Product Name
Name of the DMR160.
Series
Product series number.
Version
DMR160 User’s Guide V2.0
The installed Version number of currently software.
56
MxT Version
Version number of current encoding engine. For Engineering diagnosis
purposes only.
Manufacturer
Name of Company that Manufactured the DMR160.
Copyright
Available Disk
Space
SDI
Options
Option Keys
Copyright date of the DMR160 product.
This is the amount of space available for content recording.
This is a unique identifier, specific to your DMR160. Provide
MediaPOINTE technical support with this number should you call in to
start a ticket.
Future optional features will be listed here.
This key will be required to activate an option.
Shutdown
Select the Shutdown button to remotely power-down (shut off) the DMR160. Any access to the unit will
be lost as the unit is powered down. In order to power up the unit, the user must physically turn on the
switch on the rear of the unit as well as the small power switch on the front of the unit. No
communication is possible when the DMR160 via any means when in a powered down state.
Reboot
Select the Reboot button to power off the DMR160 and then turn the unit back on. This is a useful
option after changing passwords or IP Addresses.
DMR160 User’s Guide V2.0
57
Appendix A - Front Panel LED Status
LED 1 (BLUE)
LED 2 (Y
YELLOW)
Power ON
ON
ON
Ready
ON
OFF
Record
Slow Blink
OFF
Index
Fast Blink
OFF
Play or Copying
OFF
OFF
Error or Fail to Copy
OFF
Fast Blink
Burn
OFF
OFF
Mute
Slow Blink
Slow Blink
DMR160 User’s Guide V2.0
58
Appendix B - Factory Default Settings
Configure
IP Settings
System Name
DHCP Client
IP Address
IP Subnet Mask
Default Gateway
Enable user security
User password
Admin password
Author password
Options
Settings
Recording Mode
Live Streaming while Recording
Default Folder
Titles & Credits
Select Video Template:
FTP Upload
Configure
User login
Enable user security
User password
Author Login
Author password
Admin password
Manage System
Enable Event Notifications
Storage Limit Action
Logging
Product Name
Series
Manufacturer
Copyright
DMR160 User’s Guide V2.0
DMR160
Disable
192.168.1.253
255.255.255.0
192.168.1.1
Disabled
Blank
MediaPOINTE
Disabled
Standard
Tandberg
ON
OFF
Root
Disabled
• Video1
• Video1 And Video2
• Video2
Disabled
Enabled
Disabled
Blank
Disabled
Blank
MediaPOINTE
Disabled
Show Alert Message
Delete Oldest Media Automatically and Continue
Disabled
Digital Media Recorder VC
160
Advanced Media Design Inc.
© 2005 MediaPOINTE
59