1
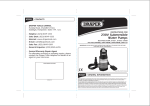
12V POWER PACK
WITH 230V/A.C. OUTPUT INVERTER
■ STOCK No.56364.
■ PART No.PP12/230V.
• INSTRUCTIONS •
IMPORTANT: PLEASE READ THESE INSTRUCTIONS CAREFULLY TO
ENSURE THE SAFE AND EFFECTIVE USE OF THIS POWER PACK.
01/99
12V POWER PACK
WITH 230V/A.C. OUTPUT INVERTER
■ STOCK No.56364.
■ PART No.PP12/230V.
Whilst every effort has been made to ensure accuracy of information given in this manual is correct at the
time of going to print, the Draper Tools policy of continuous improvement determines the right to change
specification without notice.
CONTENTS:Page Nos.
Features.......................................................................................................................................
2
Charging.....................................................................................................................................
2-3
Jump starting...............................................................................................................................
3-4
Powering 12V/D.C. accessories...................................................................................................
4
Powering A.C. accessories ..........................................................................................................
4
Inverter safety features ...............................................................................................................
5
Emergency light..........................................................................................................................
5
Safety precautions.......................................................................................................................
5-6
Specification ...............................................................................................................................
6
Guarantee ...................................................................................................................................
6
DECLARATION OF CONFORMITY
We
Draper Tools Ltd. Hursley Road, Chandlers Ford, Eastleigh, Hampshire. SO53 1YF. England.
Declare under our sole responsibility that the product:
Stock No. 56364
Part No.PP12/230V
Description:- 12V power pack with 230V/A.C. output inverter.
To which this declaration relates is in conformity with the following directive(s) 73/23/EEC, 89/336/EEC.
With reference to EN55011, EN61000-3-2, EN61000-3-3, EN50082-1, prEN55024-2 and BS3535 (BSEN60742)
JOHN DRAPER
Managing Director
-1-
FEATURES
IMPORTANT:
Read and understand these instructions before using the power pack. Correct use and storage will keep it
in good condition and ensure trouble free operation.
Power pack must be charged before initial use.
The unit is powered by an internal, rechargeable battery which produces 12V of direct current (D.C.). It also
features an internal power inverter which converts 12V direct current (D.C.) to household current
(230V/A.C.).
The power pack is designed to perform the following functions:
■ Use to jump start vehicles with depleted 12V batteries.
■ Power 12V/D.C. accessories.
■ Power A.C. appliances (maximum 230W).
■ Serve as an emergency light.
Power inverter On/Off switch.
A.C. charging adaptor.
Worklight On/Off switch.
12V/D.C. charging lead (not shown).
LED voltage meter On/Off switch. 12V/D.C. charging lead storage compartment.
LED voltage meter indicator.
Positive (+) terminal compartment.
12V/D.C. power port.
Negative (-) terminal compartment.
A.C. power outlet.
Positive (red) & negative (black) heavy duty power cables/clamps.
A.C. power indicator.
Emergency light.
A.C. charging input socket
CHARGING
NOTE:■ The battery pack will reach optimum performance after 3 to 4 full charges/discharges.
Although the internal battery of the power pack is fully charged when shipped from the factory, the charge
will diminish in storage and with usage. Prior to initial use recharge if required.
To ensure optimal battery life, we recommend the internal battery be fully charged at least every six
months.
-2-
CHARGING - continued
BATTERY POWER METER
Voltage/charging LED indicator lights
BATTERY POWER
OK
4
3
2
1
LOW
BATTERY POWER
A
B
FULL
C
D
E
To check the voltage level of the internal battery, turn the LED voltage meter switch to the ON position.This
switch operates a series of five LED’s which provide a visual reading of the internal battery charge level.
When all five LED’s are illuminated, the internal battery is fully charged.Three or four LED’s indicate a
diminished charge. One or two LED’s indicate that the battery is nearly depleted.When no LED’s are
illuminated, the battery is fully depleted.
The power pack may be recharged either from a 12V vehicle battery or from a standard 230V/A.C. household
outlet.The A.C. charging adaptor plugs directly into the A.C. charging input socket on the unit.
The 12V/D.C. charging cord is equipped with an adaptor which plugs into the cigarette lighter socket in
your vehicle. LED A also serves as a charging indicator and will remain on while the battery is being charged.
When the battery is fully charged, this LED will flash.
If fully depleted, the battery may require up to 36 hours to recharge. A partially depleted battery will recharge
in approximately 8 to 10 hours. During recharging, turn the meter on periodically to check the battery charge
level.
NOTE:■
Do not charge the battery for more than 36 continuous hours or permanent damage to the unit may result.
■
To avoid serious damage to the unit, do not attempt to recharge it with any charging cords other than those
supplied with the unit.
■
If charging from a vehicle the vehicle engine must be running. Failure to do this will result in the vehicle
battery becoming depleted.
■
When recharging, the LED indicator will flicker, as the unit becomes fully charged the indicator will
repeatedly flash, stop then flash.
JUMP STARTING
$ Turn off vehicle ignition and all accessories (headlights, interior lights, air conditioning, heater, radio, etc.)
% Make certain the inverter, voltage meter and worklight switches on the power pack are in the OFF position.
& Access the positive terminal which is located in the compartment at the lower left side of the unit.
Unscrew the wing nut from the terminal, slip the fitting on the end of the positive power cable (red) over the
terminal and retighten the wing nut securely.
' Access the negative terminal which is located in the compartment at the lower right side of the unit.
Repeat the connection process as described above in step &.
( Connect the red terminal clamp on the positive power cable to the positive (+) terminal on the vehicle
battery. Make certain the connection is secure.
) Earth the black terminal clamp on the negative power cable by attaching it to a metal section of the vehicle
chassis as far removed from the vehicle battery as practical. Make certain the connection is secure.
* Start the vehicle.
+ Disconnect the negative (-) power cable from the vehicle earth point.
, Disconnect the positive (+) power cable from the vehicle battery terminal.
NOTE:■
We would advise the use of the Draper voltage surge protector Stock No.39107 when using this power pack
for jump starting.
-3-
JUMP STARTING - continued
NOTE:■
If possible, the vehicle should be started by a second person as soon as the negative (-) connection is
made to the vehicle earth in order to maximize the power boost to the battery.
■
If the vehicle does not start within 10 seconds, turn the ignition off and allow the internal battery to
cool for approximately three minutes before attempting to start the vehicle again. Failure to follow this
procedure may result in damage to the unit.
■
Do not attempt to operate 12V or A.C. accessories while the unit is being used to jump start a vehicle,
as this will take power from the jump starting process.
POWERING 12V/D.C. ACCESSORIES
The power pack will operate most 12V accessories which are equipped with “cigarette lighter” type plugs
and draw 12A or less.When fully charged, the unit will provide power to a 12A accessory for
approximately one hour; a 6A accessory for approximately two hours; a 4A accessory for approximately
three hours and so on. To operate a 12V accessory, make certain the accessory is turned off, plug the
accessory into the 12V/D.C. power port and then turn the accessory on.
NOTE:■
The power pack is equipped with an internal circuit breaker which automatically interrupts the power
if the current draw of the 12V accessory exceeds 12A. This feature prevents damage to the unit.
■
In the event of a power interruption, unplug the 12V accessory from the power port. Do not attempt to
use the power pack until the circuit breaker has reset.
■
The circuit breaker will automatically reset when the internal temperature has returned to normal, this
takes 15 to 30 minutes.
POWERING A.C. ACCESSORIES
The power pack is designed with an internal power inverter which converts 12V/D.C. current to 230V/A.C.
household current. This internal inverter enables you to operate certain 230V/A.C. appliances and
equipment from one of two power supplies:The internal 12V/D.C. battery or an independent 12V/D.C. power source such as your vehicle battery.
To power your A.C. appliance or equipment from the internal battery pack:
$ Make certain the appliance or equipment is turned off.
% Turn the power inverter switch on. The A.C. power indicator will flash briefly and then remain
on indicating the unit is producing A.C. power output.
& Plug the appliance or equipment into the A.C. outlet .
' Turn the appliance or equipment on.
To power your A.C. appliance or equipment from an external 12V power source using the units inverter:
$ Make certain the appliance or equipment is turned off.
% Plug the cigarette lighter socket adaptor on the 12V inverter charging cord into the cigarette lighter
socket in your vehicle or into the socket on the external 12V power source. It will make a brief “click”
indicating that the power source has transferred from the internal 12V battery to the 12V vehicle
battery or other external 12V power source.
& Turn the power inverter switch on. The A.C. power indicator will turn on indicating A.C. output.
' Plug the appliance or equipment into the A.C. outlet.
( Turn the appliance or equipment on.
NOTE:■ If you wish to change the power source while operating the appliance or equipment, you must turn off
the appliance or equipment before making the change.
-4-
INVERTER SAFETY FEATURES
Overload protection
The internal inverter is designed to operate appliances and equipment which draw no more than 230W of
continuous power. Operating appliances or equipment with higher continuous power requirements will
overload the inverter.
In the event of an overload, the internal circuit breaker will interrupt the power to the A.C. outlet and the A.C.
power indicator will flash.
Unplug your appliance or equipment from the unit at once.The circuit breaker will automatically reset and the
A.C. power indicator will cease flashing when the inverter has returned to its normal operating temperature.
High voltage protection.
In the event that an independent 12V power source such as a vehicle battery produces an output voltage in
excess of 15V, the internal circuit breaker will interrupt the power to the A.C. outlet and the A.C. power
indicator will flash.
Unplug the appliance or equipment from the unit at once and disconnect the 12V power lead from the external
power source.The circuit breaker will automatically reset and the A.C. power indicator will cease flashing
when the inverter has returned to its normal operating temperature. Locate and resolve the source of the
power overload before attempting to reuse.
Low voltage protection.
In the event that the power pack or an independent 12V power source produces output of approximately 10V,
the circuit breaker will automatically interrupt the power to the A.C. outlet and the A.C. power indicator will
flash.This feature protects the power source from damage and indicates the power supply must be recharged.
Before recharging, unplug the appliance or equipment.The circuit breaker will automatically reset.
EMERGENCY LIGHT
The power pack is equipped with an emergency light .To operate the light, turn the switch to the ON
position.
SAFETY PRECAUTIONS
When jump starting:$ Do not allow the negative (-) and positive (+) terminal clamps to come into contact with each other.
Contact may cause sparking or an explosion, or damage to the power pack.
% Make certain that the power cables are correctly connected to the vehicle battery terminals (positive to
positive, negative to earth). Failure to make these connections correctly will result in reverse polarity
which may cause sparking or an explosion, or damage to the power pack.
& Do not pull the cables when disconnecting them from the vehicle battery terminals.To remove the cables,
squeeze the handles on the terminal clamps.
' Wear eye protection whenever possible.When working with batteries, always avoid any hand contact with
the eyes.
( If battery acid comes into contact with the eyes, flood the eyes with water for at least 10 minutes. Seek
medical attention immediately.
) If skin or clothing comes in contact with battery acid, immediately wash the affected area with soap and
water.
* Before jump starting a vehicle, remove all metal items such as rings. necklaces, bracelets and watches.
+ Do not smoke or use an open flame when working in proximity to the vehicle battery or engine.
, This power pack can also be used to recharge 12V batteries, do not attempt to recharge any power source
other than a 12V battery.
- Do not attempt to operate 12V accessories while the unit is being used to recharge a battery.
In general:$ Do not expose the unit to damp or wet conditions.
% Do not expose the unit to extremely hot conditions.
-5-
SAFETY PRECAUTIONS - cont.
& Do not attempt to modify the supplied cables, connectors or adaptors. Such attempts may cause damage
to the unit.
' Do not recharge the internal battery for more than 36 hours continuously.
( Do not attempt to disassemble the unit. In the event the unit is damaged or malfunctions, contact your
authorised stockist or Draper Tools Limited. Any attempt to dismantle the unit will invalidate any warranty.
) Always turn the unit off when it is not in use.
SPECIFICATION
Whilst every effort has been made to ensure accuracy of information given in this manual is correct at the
time of going to print, the Draper Tools policy of continuous improvement determines the right to change
specification without notice.
Internal battery
Battery type................................................................maintenance free 17A/h sealed dry lead acid battery
Maximum boost rate ..............................................................................................................................600A
Approximate battery charging time...............................................................up to 36 hours (fully depleted)
Power inverter
A.C. outlet .................................................................................................................230V continuous power
Maximum wattage.................................................................................................................................230W
Input voltage range.....................................................................................................................11-15V/D.C.
Wave form .......................................................................................................................modified sine wave
General
Approximate weight................................................................................................................................9kg.
Approximate dimensions.......................................................Width: 350mm, Height: 285mm, Depth: 100mm
GUARANTEE
Draper power packs have been carefully tested and inspected before shipment and are guaranteed to be
free from defective materials and workmanship for a period of 12 months from the date of purchase
except where tools are hired out when the guarantee period is reduced to ninety days from the date of
purchase. Please retain your receipt as proof of purchase.
Should the power pack develop any fault, please return the complete tool to your nearest authorised
stockist or contact Draper Tools Limited, Chandler's Ford, Eastleigh, Hampshire, SO53 1YF. England.
Telephone: (01703) 266355.
If upon inspection it is found that the fault occurring is due to defective materials or workmanship, repairs
will be carried out free of charge. This guarantee does not apply to normal wear and tear, nor does it
cover any damage caused by misuse, careless or unsafe handling, alterations, accident, or repairs
attempted or made by any personnel other than authorised Draper repair personnel.
This guarantee applies in lieu of any other guarantee expressed or implied and variations of its terms are
not authorised.
Your Draper guarantee is not effective unless you can produce upon request a dated receipt or invoice to
verify your proof of purchase within the 12 month period.
Please note that this guarantee is an additional benefit and does not affect your statutory rights.
Draper Tools Limited
DRAPER HELPLINE: (01703) 494344
-6-
DRAPER TOOLS LTD.
Hursley Road, Chandler’s Ford,
Eastleigh, Hants. SO53 1YF. England.
Tel: (01703) 266355.
Fax: (01703) 260784.
YOUR DRAPER STOCKIST
©Published by Draper Tools Ltd.
No part of this publication may be reproduced,
stored in a retrieval system or transmitted in any
form or by any means, electronic, mechanical
photocopying, recording or otherwise without
prior permission in writing from Draper Tools Ltd.