1
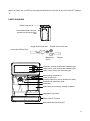
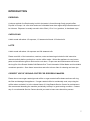
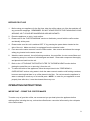
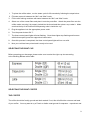
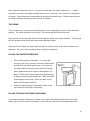
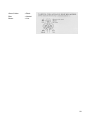
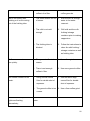
INSTRUCTIONS AND WARRANTY MODEL NO. RHCM45 CAFÉ BARISTA ONE TOUCH AUTOMATIC COFFEE MAKER 1 Congratulations on purchasing our Russell Hobbs Café Barista One Touch Coffee Maker. Each unit is manufactured to ensure safety and reliability. Before using this appliance for the first time, please read the instruction manual carefully and keep it for future reference. FEATURES OF THE RUSSELL HOBBS CAFÉ BARISTA ONE TOUCH AUTOMATIC COFFEE MAKER The Russell Hobbs Café Barista is the ultimate One Touch Automatic Coffee Maker. It is a barmen style coffee maker which lets you prepare coffee with flair (just a little showing off) and just the way you like it. The Café Barista is very easy to use and will give you a perfect result time and time again! The best feature of this machine is its patented one touch technology for brewing a Single Shot or Double Shot of Espresso, Cappuccino, Latte, Hot Milk or Hot Water at a single touch of a button. Suitable for ground coffee Hot milk system - removable 480ml milk frothing container – can be stored in the fridge Advanced milk frothing control to adjust intensity of foam for ideal serving preference – from steamed milk to beautiful glossy froth Illuminated control buttons Optimal delivery system and preset brewing temperature for preparation of beautiful coffee with a thick, creamy and smooth crema Brewing temperature: 70-85℃ will not burn the coffee during brewing Able to prepare two cups of coffee with single brewing Your choice of single or double shot espresso Custom brew functionality allows you to brew your coffee just the way you like it! Cup holder for larger cups as well as patented „pull-out‟ cup holder for smaller (demitasse) cups Removable 1.6L water tank for ease of use and cleaning Removable drip tray for easy cleaning Fast 90 second pre-brewing/ priming cycle for optimal flavour extraction 30 second self-cleaning function Cup warming plate preheats your cups for best results Includes porta-filter, single shot crema filter, double shot crema filter as well as measuring scoop/tamper tool 15 bar pressure 2 1050W IMPORTANT SAFEGUARDS When using any electrical appliance, basic safety precautions should always be followed including the following: 1. Please read the instructions carefully before using any appliance. 2. Always ensure that the voltage on the rating label corresponds to the mains voltage in your home. 3. Incorrect operation and improper use can damage the appliance and cause injury to the user. 4. This appliance is intended for household use only. Commercial use invalids the warranty and the supplier cannot be held responsible for injury or damage caused when using the appliance for any other purpose than that intended. 5. Avoid any contact with moving parts. 6. This appliance is not intended for use by persons (including children) with reduced physical, sensory or mental capabilities, or lack of experience and knowledge, unless they have been given supervision or instruction concerning use of the appliance by a person responsible for their safety. 7. Children should be supervised to ensure that they do not play with the appliance. 8. Check the power cord and plug regularly for any damage. If the cord or the plug is damaged, the manufacturer or a qualified person must replace it in order to avoid an electrical hazard. 9. Do not use the appliance if it has been dropped or damaged in any way. In case of damage, take the unit in for examination and/or repair by an authorised service agent 10. To reduce the risk of electric shock, do not immerse or expose the unit, plug or the power cord to water or any other liquid. Do not use it with wet hands. 11. Never immerse the unit in water or any other liquid for cleaning purposes. 12. Remove the plug from the socket by gripping the plug. Do not pull on the cord to disconnect the appliance from the mains. Always the unit to cool and unplug it when not in use, before cleaning or when adding or removing parts. 13. Insert and use only original parts. 14. The use of accessory attachments that are not recommended or supplied by the manufacturer may result in injuries, fire or electric shock. 3 15. A short cord is provided to reduce the hazards resulting from becoming entangled in or tripping over a longer cord. 16. Do not let the cord hang over the edge of a table or counter. Ensure that the cord is not in a position where it can be pulled on inadvertently. 17. Do not allow the cord to touch hot surfaces and do not place on or near a hot gas or electric burner or in a heated oven. 18. Keep the appliance and cord away from direct radiant heat from the sun, from damp, from sharp edges and other dangers. 19. Do not use the appliance on a gas or electric cooking top or over or near an open flame. 20. Use on a hard, flat level surface only, to avoid interruption of airflow underneath the appliance. 21. Use of an extension cord with this appliance is not recommended. However, if it is necessary to use an extension lead, ensure that the lead is suited to the power consumption of the appliance to avoid overheating of the extension cord, the appliance or plug point. Do not place the extension cord in a position where it can be pulled on by children or animals or tripped over. 22. This appliance is not suitable for outdoor use. Do not use this appliance for anything other than its intended use. 23. This appliance is intended to be used in household and similar applications such as: o Staff kitchen areas in shops, offices and other working environments; o Farm houses; o By clients in hotels, motels and other residential type environments; o Bed and breakfast type environments. 24. Do not operate this appliance by means of an external timer or separate remote control system. 25. Always be sure to place the water reservoir tightly back in the unit with its lid closed and fill with water at or above the minimum level marking before turning the appliance ON. 26. Do not remove the porta-filter while brewing coffee. Please make sure that the three lights are ON before you remove the porta-filter to make additional coffee. Caution should also be taken while removing the porta-filter since the metal parts will be hot. Please make sure to hold it by the handle and to use the filter retention clip to dispose the grounds. Caution should be taken when moving any appliance containing or in contact with hot liquids. 27. Do not remove the water reservoir until the unit is turned OFF. 28. Before removing any of the parts and accessories, make sure that the three lights are ON, press the power button to the OFF position “0” and unplug the appliance. 29. Do not remove the porta-filter at any time during the brewing process. 4 30. Use caution when removing the porta-filter. The metal parts may still be very hot. There may also be hot water floating on the top of the filter. Hold it only by its handle and dispose of the brewed coffee ground by using the filter retention clip. 31. If coffee does not drip from the porta-filter during operation, the filter is blocked. Turn the appliance OFF “0” and allow it to cool down. The blockage may be caused by the coffee being too finely ground. Refer to the “PROBLEM SOLVING” section. 32. WHEN CLEANING THE MILK FROTHING DISPENSING TUBE: Place a large cup under the tube. Fill the milk reservoir with water and place it back on the unit. Turn the Froth Control Knob clockwise to the clean position “ ” then press the latte/ clean button for 3 seconds and release to activate the cleaning function. Let the unit dispense the water through the tube for approximately 30 seconds and then press the Latte/ Clean Button once to stop the process. 33. DO NOT carry any appliance by the power cord. 34. Do not leave this appliance unattended during use. Always unplug the unit when not in use or before cleaning. 35. Always operate the coffee maker on a smooth, even, stable surface. Do not place the unit on a hot surface. 36. It is absolutely necessary to keep this appliance clean at all times as it comes into direct contact with food. 37. Do not touch any hot surfaces, use handles or knobs. 38. Ensure that the switch is in the “0” / “Off” position after each use. 39. The manufacturer does not accept responsibility for any damage or injury caused by improper or incorrect use, or for repairs carried out by unauthorised personnel. 40. In case of technical problems, switch off the machine and do not attempt to repair it yourself. Return the appliance to an authorised service facility for examination, adjustment or repair. Always insist on the use of original spare parts. Failure to comply with the above mentioned pre-cautions and instructions, could affect the safe operation of this machine. CAUTION: PRESSURE In order to avoid possible burns to body parts and/or other injury from hot steam and water or damages to the unit, never remove the water reservoir or the porta-filter while your coffee maker is brewing coffee or frothing. Make sure that the three lights are ON before you can remove the porta-filter to make additional cups of coffee. If you need to add more water to the water reservoir or milk to the milk frothing/ storage container, please make sure that the three lights are ON and 5 ensure to switch the unit OFF by pressing the red button on the side of the unit to the OFF position “0”. PARTS DIAGRAM Water tanklid lid Water reservoir Removable waterreservoir tank Removable water (located on the back of the unit) Espresso/Custom button with indicator Cappuccino/Froth button with indicator button with indicator Filter forfilter Latte/Clean Filter forshot double Double crema filter Single shot crema Porta-Filter single shot of espresso Milk reservoir lid Porta-filter Measuring Porta-filter retention clip Froth control knob shot of retention clip Frothing tube lever Frothed milk scoop/tamper espresso dispensing tube Removable /Clear milk Cup height adjusting drawer reservoir Removable drip tray Power button Tamper Measuring and drip grid spoon Espresso/ Custom button with indicator light Cappuccino/ Froth button with indicator light Latte/ Clean button with indicator light Milk frothing container lid Froth control knob Frothing tube lever (use to position the tube) Frothed milk dispensing tube Porta-filter Removable milk frothing/ storage container Adjustable cup holder Power ON/ OFF button Removable drip tray and grid 6 INTRODUCTION ESPRESSO A unique method of coffee brewing in which hot water is forced through finely ground coffee. Popular in Europe, it is a far richer and more full-bodied brew than regular drip coffee because of its richness. Espresso is usually served in 44 to 59ml (1.5 to 2 oz.) portions, in demitasse cups. CAPPUCCINO A drink made with about 1/3 espresso, 1/3 steamed milk and 1/3 frothed milk. LATTE A drink made with about 1/4 espresso and 3/4 steamed milk. Please read ALL of the instructions, cautions, notes and warnings included in this instruction manual carefully before you begin to use the coffee maker. When this appliance is used, some parts and accessories get hot and need to cool down. Proper care and maintenance will ensure the long life of the Russell Hobbs Café Barista One Touch Automatic Coffee Maker and its reliable/ consistent operation. Save these instructions and refer to them often for cleaning and care tips. CORRECT USE OF GROUND COFFEE FOR ESPRESSO MAKERS Please do not use sugar roasted ground coffee or sugar roasted coffee beans as these will clog the filter and damage the appliance. If sugar roasted coffee is accidentally used, stop using the coffee maker and take it in to the closest Home of Living Brands Service Center for maintenance. We recommend descaling the machine periodically to keep it in good working condition. Contact any of our nationwide Service Centers should you want to learn more about this process. 7 BEFORE FIRST USE 1. Before using your appliance for the first time, take the coffee maker out of the box and take off any protective wrappings. REMEMBER: DO NOT LEAVE PROTECTIVE PACKAGING LYING AROUND, AS IT COULD BE DANGEROUS AROUND INFANTS. 2. Place the appliance on a dry, level surface. 3. Please refer to the “PARTS DIAGRAM” section to familiarize yourself with the coffee maker and identify all the parts. 4. Please make sure the unit is switched OFF “0” by pressing the power button located on the side of the unit. Make sure that it is unplugged from the electrical outlet. 5. First remove the water reservoir from the coffee maker. Now remove and discard the orange safety plug located on the water reservoir. 6. Wash the water reservoir, the milk frothing container, the porta-filter, the two crema filters and measuring scoop in a mixture of mild detergent and water. Rinse each component thoroughly and place them back into the unit. 7. Refer to the “ATTACHING THE PORTA-FILTER TO THE BREW HEAD” section before placing the porta-filter on or removing it from the unit. 8. To clean the inside of the appliance, follow the steps listed in the “PREPARING A CAPPUCCINO” section using water in both the water reservoir and the milk frothing container, however ensuring that there is no coffee placed in the filter. Do not immerse the appliance in water or attempt to reach any of its internal parts. NOTE: In order for your appliance to work properly time after time, it must be cleaned after every use. OPERATING INSTRUCTIONS IMPORTANT – PRIME THE COFFEE MAKER To make a cup of good hot coffee, we recommend you pre-heat/ prime the appliance before making coffee, including the cup, so that the coffee flavour cannot be influenced by the cold parts of the coffee maker. 8 1. To prime the coffee maker, run the steam cycle for 90 seconds by following the steps below: 2. Fill water reservoir between the “Min” and “Max” levels. 3. Fill the milk frothing container with water between the “Min” and “Max” levels. 4. Select one of the crema filters and place it onto the porta-filter. Attach the porta-filter onto the coffee maker ensuring it is properly locked into the brew head then place a cup under it. Make sure that the tip of the frothed milk dispensing tube is inside the cup. 5. Plug the appliance into the appropriate power outlet. 6. Turn the power button ON “I”. 7. The three control panel lights will start flashing. Once these lights stop flashing and become solid/uninterrupted, press the cappuccino button twice. 8. Once this process is completed, the three control panel lights will turn on solid. 9. Now your unit has been primed and is ready to be used. SELECTING THE RIGHT CUP Before preparing your beverage, please make sure to select the right cup size according to the following Barista ratio‟s table: SELECTING THE RIGHT COFFEE THE COFFEE The coffee should be freshly ground and dark roasted. If not, this will affect the outcome and taste of your coffee. You may want to try a French or Italian roast ground for espresso – experiment and 9 find a regional coffee that you love. Pre-ground coffee will only retain its flavour for 7 – 8 days, provided it is stored in an airtight container and in a cool, dark area. Do not store in a refrigerator or freezer. Whole beans are recommended to be ground just before use. Coffee beans stored in an airtight container will keep its flavour for up to 4 weeks. THE GRIND This is a vital step in the espresso making process if you are grinding your own coffee and takes practice. The coffee must be of a fine grind. The correct grind should look like salt. If the grind is too fine, the water will not flow through the coffee even under pressure. These grinds look like powder and feel like flour when rubbed between fingers. If the grind is too coarse, the water flows through the coffee too fast, preventing a full-flavoured extraction. Be sure to use a quality grinder for uniform consistency. FILLING THE WATER RESERVOIR Fill the water reservoir with water. You may either use a jug to fill it up or remove it from the coffee maker and then fill it up underneath the tap. If you have removed the water reservoir from the unit to fill up with water, please make sure to place it back tightly in its place. Fill the water reservoir with the desired amount of water ensuring it ranges within the“MIN” and “MAX” level markings on the tank. Never use warm or hot water to fill the water reservoir. Close the water reservoir lid and place it back in the unit ensuring it fits tightly and correctly. FILLING THE MILK FROTHING CONTAINER If you plan to prepare a cappuccino or latte, remove the milk frothing container from the coffee maker, open the lid then pour the quantity of cold milk you estimate you will need between the 10 “Min” and“Max” levels. When done, attach the milk frothing container onto the coffee maker ensuring that it fits tightly and correctly. Note: You can use the type of milk that you preference, i.e. whole milk, low fat milk, organic or soy milk. CHOOSE THE CORRECT CREMA FILTER FOR A SINGLE SHOT– use the shorter crema filter for a single shot of espresso. FOR A DOUBLE SHOT OR TWO SINGLE SHOTS - use the taller crema filter. FILLING WITH COFFEE Place the selected crema filter on porta-filter as follows: a. Fill the filter with fresh, fine ground espresso coffee (do not overfill). b. Tamp and firmly compress the ground coffee so that it is compressed and appears flat/ even inside the filter. c. Clean any excess coffee from the rim to ensure that the porta-filer will fit properly when attached to the brew head. 11 ATTACHING THE PORTA-FILTER TO THE BREW HEAD a. Position the porta-filter underneath the brew head. Now attach the porta-filter by first moving the retainer clip back into its original position. b. Position the filter handle so that the handle lines up with the open lock icon “ ” on the unit and so that it fits into the groove. c. Now slowly turn the porta-filter to the right until the retention clip is aligned with the closed lock symbol “ ” on the unit. PLACING THE CUP(S) a. Pull out the adjustable cup holder (located underneath the milk frothing container) if you are using a small “demitasse” cup to brew espresso. b. Keep the adjustable cup holder inside its storage compartment if you are using a larger cup to brew cappuccino/ latte. 12 CAUTION: when brewing cappuccino or latte, you will need to adjust the frothing tube lever in order to position the froth milk dispensing tube inside the selected cup. TURNING/ SWITCHING THE UNIT “ON” Make sure that the coffee maker is plugged into the appropriate power outlet. Turn unit ON “I”. The three control panel lights will start flashing whilst the coffee maker is heating and until the water reaches the perfect temperature. Once these lights turn to a solid/uninterrupted state then the coffee maker is ready to use. SELECT THE DESIRED FUNCTION PREPARING ESPRESSO 1. Press the Espresso button once to brew one single shot. 2. OR press the Espresso button twice to brew a double shot. 3. OR press and hold the Espresso button for 3 seconds to customize the brewing amount to your preference. When done, press the Espresso button once again to stop it. 4. The coffee maker will start brewing the espresso according to your selection. The coffee maker will turn to standby mode automatically and the lights will become solid indicating that the cycle has been completed. Your delicious espresso is ready to be enjoyed. NOTE: Wipe the froth tube immediately after the cycle has completed to keep your appliance in a clean and hygienic condition. Be very careful when doing this and ensure that it is only done once the cycle has completed and the coffee cup removed, as the steam may scald you. 13 TIP: To brew less coffee than the preset serving, press the function button to stop the brewing process when the amount of coffee desired is reached. PREPARING CAPPUCCINO Prior to preparing your cappuccino, adjust the quantity of frothed milk according to your preference by turning the Froth Control knob to the right for more foam and to the left for less foam. Note:The foam intensity can also be adjusted during the brewing cycle. 1. Press the Cappuccino button once to brew a small cup of cappuccino. 2. Press the Cappuccino button twice to brew a large cup of cappuccino. 3. The unit will start brewing the cappuccino according to your selection. 4. Your delicious cappuccino is ready to be enjoyed. NOTE: Wipe the froth tube immediately after the cycle has completed to keep your appliance in in a clean and hygienic condition. Be very careful when doing this and ensure it is done only once the cycle has completed and the coffee cup removed, as the steam may scald you. TIP: Sweeten to taste and if desired, sprinkle the froth with a little cocoa powder. PREPARING LATTE Prior to preparing your cappuccino, adjust the quantity of frothed milk according to your preference by turning the Froth Control knob to the right for more foam and to the left for less foam. 1. Press the Latte button once to brew a small cup of latte. 2. Press the Latte button twice to brew a large cup of latte. NOTE: Wipe the froth tube immediately after the cycle has completed to keep your appliance in in a clean and hygienic condition. Be very careful when doing this and ensure it is only done once the cycle has completed and the coffee cup removed, as the steam may scald you. 14 PREPARING FROTHED MILK The Café Barista One Touch Automatic Coffee Maker also allows you to prepare frothed milk separately. Press and hold the Cappuccino button for 3 seconds if you wish to add more foam to your beverage or to prepare frothed milk for any other beverage e.g. macchiato, hot chocolate, chai latte, etc. When done, press the Cappuccino button again to stop it. NOTE: Wipe the froth tube immediately after the cycle has completed to keep your appliance in in a clean and hygienic condition. Be very careful when doing this and ensure it is done only once the cycle has completed and the cup removed, as the steam may scald you. AFTER PREPARING YOUR BEVERAGES WITH MILK Once you are done preparing your beverage with milk, you can either store the unit‟s milk reservoir directly in the refrigerator (ready to be used for the next time) or dispose of the leftover milk. CLEANING AND MAINTENANCE This appliance is for household use only and is not user-serviceable. Do not open or change any parts by yourself. Please refer to a qualified electrical service department or return to the supplier if servicing is necessary. Always remember to unplug the unit from the electrical outlet when not in use and before cleaning. Ensure that the power button is set to OFF “0”. 15 CLEANING THE MILK FROTHING CONTAINER AND FROTHING TUBE Even though you can store the milk frothing container with left over milk in the refrigerator, it is important to clean the container and the frothing tube regularly to avoid clogging and build-up of residues. In order to clean the milk frothing container, please follow the instructions listed below: 1. Remove the milk frothing container from the coffee maker. 2. Remove the lid of the container. 3. Discard any left-over milk, rinse and wash the milk frothing container and its lid thoroughly with warm soapy water. Do not use abrasive cleaners and scouring pads, as they will scratch the finish. The milk frothing container is also dishwasher safe (top rack). Do not place the lid of the milk frothing container in the dishwasher. 4. Rinse and dry well. 5. Now place a large empty cup underneath the frothing tube. 6. Press and hold the Latte/ clean button for 3 seconds and then release it. The coffee maker will start releasing steam through the frothing tube - let it run for a few seconds until you don‟t see any milk in the cup. 7. When done, press the Latte/ clean button once to stop the process. 8. Dispose any water leftover in the milk frothing container and place it back onto the unit. CLEANING THE BREW HEAD, THE PORTA-FILTER AND FILTER 1. Switch the power button on the side of the coffee maker to the OFF position “0” and unplug the power cord from the electrical outlet. 2. Some of the metal parts may still be hot. Do not touch them with your hands until they have cooled. 3. Remove the porta-filter and discard the coffee grounds. Wash both the porta-filter and crema filter with warm soapy water, rinsing them well. Do not wash the porta-filter or crema filters in the dishwasher. 4. Wipe the lower part of the brew head in the coffee maker with a damp cloth or paper towel to remove any coffee grounds/ residues that may be left over. 5. Place the porta-filter (without any crema filter) back in the brew head of the coffee maker. 6. Place an empty large cup underneath the porta-filter. 16 7. Press the Espresso button once and let the unit brew with water only until it stops automatically. CLEANING THE WATER RESERVOIR Discard the remaining water by removing the water reservoir and turning it upside down over the sink. It is recommended to empty the water reservoir between uses. Wash the water reservoir with soapy water, rinse it well and wipe it dry. Do not wash the water reservoir in the dishwasher. CLEANING THE UNIT 1. Wipe the housing of the coffee maker with a soft wet cloth. Do not use abrasive cleaners or scouring pads, as they will scratch the finish. 2. Do not store the porta-filter in the brew head. This can adversely affect the seal between the brew head and the porta-filter while brewing espresso. CAUTION: Do not immerse the appliance in water. DESCALING Mineral deposits building up in the coffee maker will have an adverse effect in the operation of the appliance. Your appliance must be descaled when you begin to notice an increase in the time required to brew espresso or when there is excessive steaming. You may also notice a build-up of white deposits on the surface of the brew head. The frequency of cleaning depends upon the hardness of the water used. The following table will provide you with a guideline for suggested cleaning intervals. 17 TO DESCALE THE WATER RESERVOIR: 1. Fill the water reservoir with fresh, undiluted white household vinegar. 2. Allow the coffee maker to sit overnight with the vinegar solution in the water reservoir. 3. Discard the vinegar by removing the reservoir and turning it upside down over the sink. 4. Rinse the water reservoir thoroughly with tap water by filling tank half full with water and then pouring the water back out into the sink, repeating this step twice. TO DESCALE THE INTERNAL PARTS OF THE COFFEE MAKER: 1. Make sure you descale the inside of the water reservoir first by following the “Descaling” steps above. 2. Make sure to switch the power button to the “0” position and the power cord is disconnected from the electrical outlet. Fill the reservoir with white vinegar above the minimum level into reservoir. 3. Insert the porta-filter (with filter and no coffee) and place the jar/ carafe or regular cup on top of the drip tray and under the porta-filter. 4. Plug the power cord into the electrical outlet. 5. Press the power button switch onto “I”, once the 3 control panel lights turn solid blue, press the Espresso/ Custom button twice. The vinegar will start flowing through the unit and it will stop flowing automatically. 6. Place a pitcher or large cup (with at least 325ml capacity) underneath the tube. Fill the milk frothing container with water and fit it back onto the unit. Turn the froth control knob clockwise to the clean position “ ” then press the Latte/ Clean button for 3 seconds to activate the self- cleaning function. Let the unit dispense the water through the tube for approximately 30 seconds and then press the Latte/ Clean button once to stop the process. 7. Repeat steps 1 – 7 as necessary using only tap water to rinse any remaining traces of vinegar out of the coffee maker. STORING THE APPLIANCE Ensure that the unit is switched to the OFF position. Unplug the coffee maker from the power outlet. Remove the porta-filter from the appliance. 18 Clean all the parts as instructed above. Ensure that all parts are dry before storing. Store the appliance in a clean, dry place. Never store the appliance while it is still wet or dirty. Never wrap the power cord around the appliance. SERVICING THE APPLIANCE There are no user serviceable parts in this appliance. If the unit is not operating correctly, please check the following: You have followed the instructions correctly That the unit has been wired correctly and that the wall socket is switched on. That the mains power supply is ON. That the plug is firmly in the mains socket. If the appliance still does not work after checking the above: - Consult the retailer for possible repair or replacement. If the retailer fails to resolve the problem and you need to return the appliance, make sure that: The unit is packed carefully back into its original packaging. Proof of purchase is attached. A reason is provided for why it is being returned. If the supply cord is damaged, it must be replaced by the manufacturer or an authorised service agent, in order to avoid any hazard. If service becomes necessary within the warranty period, the appliance should be returned to an approved Home of Living Brands (Pty) Limited service centre. Servicing outside the warranty period is still available, but will, however, be chargeable. CHANGING THE PLUG Should the need arise to change the fitted plug, follow the instructions below. This unit is designed to operate on the stated current only. Connecting to other power sources may damage the appliance. Connect a three-pin plug as follows: The wires in this mains lead are coloured in accordance with the following code: 19 Green/Yellow = Earth Blue = Neutral Brown = Live 20 TROUBLE SHOOTING PROBLEM POSSIBLE CAUSES SOLUTIONS Coffee does not dispense 1. No water in water 1. Add water. from the porta-filter. reservoir. 2. The coffee grind is too fine. 2. Replace the ground coffee with medium ground coffee. 3. There is too much ground coffee in the 3. Fill the filter with less coffee. filter. 4. The appliance was not 4. Plug the coffee maker turned ON or plugged in into the electrical outlet to the wall socket. and turn it ON. 5. Coffee has been tamped/ 5. Refill the filter with compressed too much. ground coffee but do not tamp too much. Coffee comes out 1. The porta-filter was not around the edge of rotated to full lock the porta-filter. position. 1. Rotate the filter holder to the full lock position. 2. There may be coffee 2. Wipe off the rim ensuring grounds/ grounds it is residue and coffee residue around the rim of grounds free. the filter. 21 3. There may be too much coffee in the filter. Milk is not foamy after frothing or it is not coming 3. Fill the filter with less coffee grounds. 1. The coffee maker ran out 1. Ensure there is enough of steam. out of the frothing tube. water in the water reservoir. 2. The milk is not cold enough. 2. Chill milk and the milk frothing/ storage container prior to making cappuccino. 3. The frothing tube is blocked. 3. Follow the instructions to clean the milk frothing/ storage container as well as frothing tube. Coffee comes out too quickly. 1. The ground coffee is too 1. Use a finer grind. coarse. 2. There is not enough 2. Use more ground coffee. coffee in filter. The coffee comes out too weak. 1. Using a small crema 1. Use the taller/ large filter for double shot of crema filter for double espresso. shot of espresso. 2. The ground coffee is too 2. Use a finer coffee grind. coarse. The three control panel The water tank is out of lights are flashing water. Add water to reservoir. alternatively, 22 RECIPES TO GET YOU STARTED Iced Latte Double shot of espresso 90ml fruit flavoured syrup Cold Milk Ice Begin by filling up a 355ml (12-ounce) glass with ice. Then add the espresso, syrup and cold milk. # This is a great alternative to hot drinks for summer time. Café Breva Double shot espresso 90ml half and half, steamed 90ml half and half, frothed The Café Breva looks like a Cappuccino but it uses half and half. #Remember it takes practice to get a good froth with half and half but it is achievable. Café Macchiato Double shot espresso Dollop of frothed milk With this drink the ratio of espresso to milk is usually 80:20. The best way to serve this coffee drink is in a demitasse cup because it is just one shot of espresso with a small amount of frothed milk added to the top. Café Latte Double shot espresso 118-148ml steamed milk 23 A café latte has no frothed milk, just velvety smooth steamed milk. Flavourings can be added to vary the taste. # In the summer, you may want to add raspberry syrup, while caramel or hazelnut flavouring may be a nice addition for a cup of latte on a wintery day. Café Mocha Double shot espresso 177ml steamed milk 15ml chocolate syrup Whipped cream (optional) Chocolate sprinkles (optional) This drink will please your sweet tooth and you can adjust the amount of syrup depending on your preference. Add the syrup, espresso and steamed milk to a cup, then top it off with a little whipped cream and chocolate sprinkles. 24 IN THE EVENT OF A CLAIM UNDER WARRANTY THIS RECEIPT MUST BE PRODUCED. WARRANTY 1. 3. Home of Living Brands (Pty) Limited warrants to the original purchaser of this product (“the customer”) that this product will be free of defects in quality and workmanship which under normal personal, family or household use and purpose may manifest within a period of 1 (one) year from the date of purchase (“warranty period”). Where the customer has purchased a product and it breaks, is defective or does not work properly for the intended purpose, the customer must notify the supplier from whom the customer bought the product (“the supplier”) thereof within the warranty period. Any claim in terms of this warranty must be supported by a proof of purchase. If proof of purchase is not available, then repair, and/or service charges may be payable by the customer to the supplier. The faulty product must be taken to the supplier's service centre to exercise the warranty. 4. The supplier will refund, repair or exchange the product in terms of this warranty subject to 2. legislative requirements. This warranty shall be valid only where the customer has not broken the product himself, or used the product for something that it is not supposed to be used for. The warranty does not include and will not be construed to cover products damaged as a result of disaster, misuse, tamper, abuse or any unauthorised modification or repair of the product. 5. This warranty will extend only to the product provided at the date of the purchase and not to any expendables attached or installed by the customer. 6. If the customer requests that the supplier repairs the product and the product breaks or fails to work properly within 3 (three) months of the repair and not as a result of misuse, tampering or modification by or on behalf of the customer, then the supplier may replace the product or pay a refund to the customer. 7. The customer may be responsible for certain costs where products returned are not in the original packaging, or if the packaging is damaged. This will be deducted from any refund paid to the customer. HOME OF LIVING BRANDS (PTY) LTD www.homeoflivingbrands.co.za 011 490-9600 (Jhb) 031 792-6000 (Dbn) 021 552-5161 (CT) www.russellhobbs.co.za www.facebook.com/RussellhobbsSA 25