1
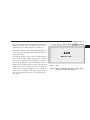
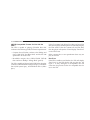
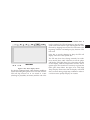
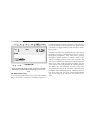
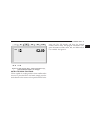
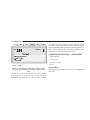
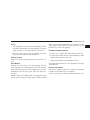
VIDEO ENTERTAINMENT SYSTEM (VES)
CONTENTS
m Video Entertainment System (VES) Description . . . 3
▫ Remote Removal and Storage Instructions . . . . .16
▫ Controls . . . . . . . . . . . . . . . . . . . . . . . . . . . . . 3
m Video Entertainment System (VES) Remote
Functions . . . . . . . . . . . . . . . . . . . . . . . . . . . . .18
▫ CD/DVD Compatible Formats for Use with the
VES™ . . . . . . . . . . . . . . . . . . . . . . . . . . . . . .12
▫ Operating Instructions — Remote Control . . . . .19
▫ Disk Error . . . . . . . . . . . . . . . . . . . . . . . . . . .12
m Setup Soft Menu Options . . . . . . . . . . . . . . . . . .23
▫ CD Multi-session Play . . . . . . . . . . . . . . . . . .14
m M3 Functions . . . . . . . . . . . . . . . . . . . . . . . . . .24
m Operating Instructions — CD/DVD Player . . . . . .15
m CD Mode (Radio’s CD Changer) . . . . . . . . . . . . .26
▫ Loading the VES CD/DVD Player . . . . . . . . . .15
m Satellite Radio Functions . . . . . . . . . . . . . . . . . . .27
▫ EJECT (EJT) Button . . . . . . . . . . . . . . . . . . . . .16
m Operating Instructions — Headphones . . . . . . . . .28
1
2
INTRODUCTION
▫ Power Button . . . . . . . . . . . . . . . . . . . . . . . . .28
▫ General Information . . . . . . . . . . . . . . . . . . . .29
▫ Volume Control . . . . . . . . . . . . . . . . . . . . . . .29
m Operating Instructions — AUX MPS Player . . . . .30
▫ Scan Button . . . . . . . . . . . . . . . . . . . . . . . . . .29
m Operating Instructions — AUX Video
Games/Camcorders . . . . . . . . . . . . . . . . . . . . . .30
▫ Headphone Battery Service . . . . . . . . . . . . . . .29
INTRODUCTION
VIDEO ENTERTAINMENT SYSTEM (VES™)
DESCRIPTION
This manual is intended to help with the operation of
your rear seat Video Entertainment System (VES). The
VES consists of a flat 79 LCD display, DVD drive, and
remote control, packaged into an overhead console. VES
comes equipped with auxiliary input audio/video RCA
jacks for listening and viewing other consumer electronic
device media.
The VES DVD player is capable of reading CD-DA,
DVD-Video, and MP3 media formats on either 12mm or
8mm diameter discs. For rear passenger listening, the
VES has a pair of RF wireless headphones and an
infrared remote control input to allow rear seat audio and
video control function capability. The features of this
system are shown below:
3
Controls
The VES offers control buttons on the unit faceplate
accessible from the second row seats. The buttons are
illuminated for nighttime visibility when the upper right
button on the remote is pressed. In addition to the
faceplate controls, there is a wireless infrared remote
control that is stored inside the console.
• From the faceplate, you may: Power on/off, Eject disk,
up, down, left, right, enter, menu, play, stop, pause,
mode, and set-up DVD player options.
• From the remote control, you may: Power on/off, Eject
disk, up, down, left, right, enter, menu, play, stop,
pause, mode, and set-up DVD player options. See
Video Entertainment System Remote Functions for
more information on how to operate the remote control.
1
4
INTRODUCTION
• The VES is able to eject the disk at any time by
pressing the remote or faceplate eject button. The VES
will be able to load a disk when the key is in either
ignition on or accessory on position.
• When a CD is loaded into the VES, it will automatically start playing the music tracks. If a DVD movie is
loaded, the movie will start automatically within 10
seconds after the main DVD menu is displayed if the
disc supports the auto play feature. If the disk contains
MP3 files, it will play the first file in it (9first file9
meaning the file that is first in the order it was
recorded onto the disk). If the first file happens to be a
9folder9, then the first file in that folder will be played
first. The VES is able to play MP3 files in a sequential
9play list9 with ID3 tags displayed on the screen. An
example of MP3 display is shown in figure 8.
• The VES has a 9MODE9 button to switch between
different sources. The system will cycle through available MODES, captured in the VES, based on devices
installed in the vehicle. This MODE button is on the
VES faceplate and remote control. The current active
mode corresponds to an active tab displayed on the
VES display. The VES and radio are capable of communicating with each other. This allows the VES to
output radio audio to the headphones and the radio to
output VES audio to the vehicle speakers. When the
radio and VES are in shared mode, the same audio
source is heard in the headphones and vehicle speakers simultaneously. The available modes for VES are:
• VES: Disk Player (DVD/CD/MP3) or VES Aux Port
• Tuner (AM/FM) from radio
• CD (if available) from radio
• TAPE (if available) from radio
INTRODUCTION
• CD Changer – radio (if available) from radio
• SAT (Satellite Digital Audio Receiver Services), if
available from an SDARS module.
• When an auxiliary (AUX) device, such as a game
system is connected to the VES AUX inputs, VES will
automatically detect the device whenever a video or
audio signal is output from the device. For instance, a
game system usually sends these signals when powered on with a game inserted. The AUX inputs are
located on the hinged portion of the console directly
behind the screen. Devices that may be plugged in
should have low-level audio/video RCA type outputs
in order to be compatible with these VES inputs. VES
needs to be in VES mode in order to view or listen to
the AUX device, so you may need to press the mode
button to advance into VES mode. VES will then
display the AUX video and send AUX audio to the
headphones. Examples of what could be connected to
5
these AUX inputs are: MP3 players, CD players, video
cameras, VCR’s, gaming systems, and other compatible devices.
#1 = Video in
#2 = Left audio in
#3 = Right audio in
1
6
INTRODUCTION
display 9Locked9 on its display and no audio or video
can be played by the system until it is unlocked. To
unlock, press the parental lockout button again, this
enables the VES to operate normally. The other
method to unlock is by turning ignition off and then
on again.
Figure 1: When an audio only AUX device is connected,
the screen above will appear:
• There is a round button located behind the screen. This
is called the parental lockout button. This button is for
parents who need to disable the VES. In any mode if
the parental lockout button is pressed, the VES will
INTRODUCTION
7
the VES, the radio controls radio functions. In this
case, VES can share the radio mode, but not change
stations or tracks until the radio mode is changed to a
mode that is different from the VES selected radio
mode. When shared, the radio has priority over the
VES for all radio modes except VES mode. The VES
can activate the radio even when the radio is off by
turning on the VES and activating a radio mode such
as FM. In this case, a VES icon will be visible on the
radio’s display. The VES has the ability to control the
following radio modes as long as it is not in shared
mode:
Figure 2: When the parental lockout button is activated,
the screen above will appear. To clear it, press button
again.
• The radio can control the VES or the VES can control
the radio. The radio is the master controller in the
system. If the radio is in the same (shared) mode with
1. Tuner: Ability to switch tuner (AM/FM), SEEK,
SCAN, TUNE, and recall10-12 presets per tuner selection.
2. Tape: Ability to Fast Forward, Rewind, and Switch
Sides.
3. CD: Ability to Fast Forward, Rewind, Scan, and
Track Up/Down.
1
8
INTRODUCTION
4. CD Changer (in radio): Ability to Disk Up/Down
and all listed CD controls (Fast Forward, Rewind, Scan,
and Track Up/Down).
5. SAT: Ability to SEEK, SCAN, TUNE, and recall
10-12 presets per tuner selection.
When the display screen is closed up into the console
VES automatically turns power off to the display. The
radio can still operate the VES for audio playback of CD
or DVD media even while the screen is closed. If a CD
audio disc is loaded into the VES player and the radio is
switched to VES mode, the radio can still control the VES.
Audio is heard through the vehicle speakers. The following functions may be used by the radio to control the VES
while playing a CD-Audio disc.
A. Seek up/down tracks or MP3 files
B. Fast forward/Rewind within tracks or MP3 files
C. Random track/MP3 file selection
Figure 3: When VES is in same mode as the radio,
(Shared( will be displayed below the active tab.
If the radio is in VES mode with VES playing CD-Audio
or MP3, the user may press the random button on the
radio. This will cause the tracks to sequence in a random
order. In this case, RND is displayed on both radio and
VES screens. The VES display will look like figure 4 to
indicate that random is active.
INTRODUCTION
9
VES mode, both may control operation of the VES player,
so no beeps will be heard in the headphones. In all other
modes, the radio is considered the master controller
while in shared mode with the VES.
Figure 4: When radio places VES in Random track mode,
RND will be displayed on VES screen.
The mentioned control functions can be selected from
both faceplate and remote controls. If trying to control a
function that is currently not allowed, a beep will be
heard in the headphones. When the radio and VES are in
The VES comes with two wireless RF headphones. The
VES transmits audio to the headphones over 2 available
RF channels. If interference is heard in the headphones,
try changing the headphone channel. To do so, the
headphone symbol button is pressed on the remote
control. The headphones will temporarily lose audio
until they can lock onto the new channel. When the new
channel is found, the headphone LED will turn from red
to green. Pressing the Scan button on the headphone will
force the headphone to seek the new channel. The
headphones will automatically search, after a short time,
whenever the channel is switched. CH with headphone
icon will appear on the VES screen, and will disappear
after 3 seconds indicating the channel change. See figure
5 below.
1
10
INTRODUCTION
back on. If an audio or video source is being played in the
VES, and the screen is closed up into the console, the VES
continues to send audio to the headphones and/or to the
vehicle speaker system. When the screen is opened, then
the rear video screen will automatically turn back on and
show the appropriate display menu or media.
• VES will power on in VES mode. VES mode may be
changed by front panel mode button or remote mode
button.
Figure 5: When changing RF channels for headphones,
the CH icon will be displayed in the lower right side of
display.
The VES remembers where the movie was at before the
ignition/power was turned off. Then VES returns to
playing the movie where it left off when ignition comes
• When the VES is in the same mode as the radio, the
VES screen will display 9shared9 to depict shared
mode. If the user tries to operate the rear controls
(either on the remote or the VES faceplate) to change
something (i.e. Station or CD track #) on the radio. The
VES unit will send an audible 9beep9 through the
remote headphones reminding the listener that they
cannot control certain radio functions from the rear
seat controls when in shared mode with the radio.
INTRODUCTION
11
• The radio faceplate buttons and remote steering wheel
buttons can control the VES operation as if it is a
remote CD player (Track up/down, FF/RW, etc.).
1
• The remote steering wheel control MODE button can
cycle through all possible vehicle audio MODES (including the 9VES9)
• The remote steering wheel control Volume buttons
will only control the vehicle audio system volume.
This will not change the VES headphone volume. A
dial on the headphones controls headphone volume.
• When VES has a signal in the Aux Ports, the radio will
display (9VES Aux9). An AUX device may be audio or
video only. A portable MP3 player is an example of
what may be connected to the audio inputs. In this
case, the VES display will show 9AUX Audio Only9.
See figure 6.
Figure 6: Display for Audio only device, such as MP3
player connected to VES AUX port.
12
INTRODUCTION
CD/DVD Compatible Formats for Use with the
VES™
The VES is capable of playing CD-Audio discs that
conform to the following DVD/CD Forum requirements:
− Compact discs (CD) that conform to the Phillips and
Sony’s 9Red Book9 and 9Blue Book9 and the IEC 908
specification for audio CD’s.
− Recordable compact discs (CD-R/CD-RW, DVD-R)
that conform to Phillips’ 9Orange Book9 (part II).
The VES is capable of playing back DVD-Video discs that
conform to DVD Book Part 1 (Physical Spec.), DVD Book
Part 2 (File System Spec.), and DVD Book Part 3 (Video
Spec.).
If the CD contains both CDA (CD Audio) and non-CDA
data, the CD player shall skip the non-CDA data and play
the CDA tracks. If the disc contains all non-CDA data,
then the player will eject the CD and display 9Disc Error9
on the VES screen.
Other compact discs or non-specification discs may not
play in the VES.
Disc Error
If the VES is unable to read the disc, the VES will display
9Disc Error9 on the VES display and eject the disc. See
figure 7. A dirty, damaged, or incompatible disc will
cause this. See previous section for compatible discs for
use in the VES.
INTRODUCTION
13
track is reached. The VES will attempt to play all subsequent tracks in this manner. Upon reaching the end of the
last track by skipping forward, the VES will return to the
beginning of the disc and attempt to play the start of the
first track.
If the disc is severely damaged or dirty, the VES will
display 9Disc Error9 and eject the disc.
Figure 7: Disc Error display shown
If a disc has a damaged track, which results in audible or
visible mistracking that persists for 2.0 seconds, then the
VES will skip forward 1.0 to 3.0 second at a time
(checking for playability each time) until the end of the
The VES may shut down during extremely hot conditions, interior above 120°F. When this occurs the player
will display 9VES High Temp9 for a short time and shut
off the display until the temperature becomes safe to
operate again. This shutdown is necessary to protect the
DVD optics from failure. See figure 8 for 9VES High
Temp9 display. Please note that the display will blank
after 7 seconds during a high temp condition in order to
cool down more quickly and play can resume.
1
14
INTRODUCTION
maintained between sessions. Therefore, each track number will be unique for each particular disc. Random and
scan work as a single session CD after the above renumbering event.
Figure 8: VES High Temp display shown for 7 seconds,
then display will shut down until temperature is lowered.
CD Multi-session Play
If a CD has more than one session, the VES will renumber
the tracks so that a continuous numbering sequence is
The rear seat Video Entertainment System (VES) allows
passengers to listen to a different music source or video,
through the headphones, other than what is playing
through the vehicle speakers. A remote control is provided for changing stations, tracks, discs or modes. The
VES works with the radio allowing the rear passengers to
listen to any radio mode. The front passengers can also
access VES so it may play through the vehicles speakers.
This allows rear seat passengers to listen to any audio
source from the radio or the VES video. This audio may
be heard in the wireless headphones, vehicle speakers, or
both if the radio and VES are in a shared mode (Radio
and VES in same mode -AM, FM, SAT, TAPE, CD, or
VES).
INTRODUCTION
15
OPERATING INSTRUCTIONS — CD/DVD PLAYER
Power to operate the VES is supplied by the vehicle
battery when any of the following occur:
Loading the VES CD/DVD Player
The CD/DVD player will accept a single disc. Gently insert
one disc into the DVD player with the label facing up.
1. Whenever the radio is placed in VES mode.
The disc will automatically be pulled into the DVD
Player. If the radio is in VES mode, the radio display will
show the chapter number and index time in hours and
minutes of the DVD, and the track number, minutes and
seconds of the CD. Play will begin automatically in
approximately 15 seconds. If the DVD does not play
automatically, press the 9ENTER9 button on the remote
control or on the front panel of the VES console to select
play from the menu options.
2. When the power button from the remote is received.
3. The power button is depressed on the VES front panel.
4. When disc is inserted with vehicle key in ignition on
or in accessory position.
NOTE: The ignition switch must be in the ON or ACC
position before the VES will operate. Pressing the Power
button on the remote or front panel again will power off
the VES.
1
16
INTRODUCTION
NOTE:
• It is recommended to label home made burned discs
with a permanent marker instead of adhesive labels.
These types of labels may become loose and cause the
disc to be stuck in the DVD player. This may cause
permanent damage to the DVD mechanism.
• You may eject a disc at any time, even with the VES off
or Ignition off. To insert a disc, the ignition switch
must be in the ON or ACC position.
EJECT (EJT) Button
A CD/DVD disc may be ejected by pressing the eject
button on the front panel of the console. If you do not
remove the disc from the slot within 10 seconds, it will be
reloaded automatically and the display will show the
main DVD menu.
Remote Removal and Storage Instructions:
The VES comes with a built in storage compartment for
the remote control. To access this remote storage, fold the
screen down from the console. The remote storage compartment is located inside the screen storage area. When
the screen is closed into the console, the remote is hidden.
To remove the remote, use your index finger to pull and
rotate the remote towards you. Do not try to pull straight
down as it will be very difficult. When placing the remote
back into the storage area, simply reverse the procedure
used to remove it. Insert one long edge of the remote into
2 retaining clips first, and then rotate the remote back up
into the other 2 retaining clips until it snaps back into
position. See Figure 9.
INTRODUCTION
17
1
Figure 9: Remote Control Storage and Removal.
18
INTRODUCTION
VIDEO ENTERTAINMENT SYSTEM REMOTE FUNCTIONS
VES Mode
Audio/SDAR Mode
MP3/WMA
Playing in VES
CD/CD-C/Tape Mode
1. Power
1. Power
1. Power
2. Light
2. Light
2. Light
1. Power
2. Light
3. Menu Up
3. Tune Up
3. Menu Up Next song
3. Next Track
4. Previous Selection
4. Seek Down
4. Fast Rew Track
4. Fast Rew Track
5. Enter
5. Next Preset
5. Select / play first
song
5. No Function
6. Next Selection
6. Seek Up
6. Fast FF Track
6. Fast Fwd Track
7. Menu Down
7. Tune Down
7. Menu Dn / Previous
Song
7. Previous Track
8. Return
8. No Function
8. Return / Resume
Song
8. No Function
9. Setup (1)
9. Setup (1)
9. Setup (1)
9. Setup (1)
10. Menu ??
10. No Function
10. Main Menu
10. No Function
11. Pause/Play
11. No Function
11. Pause / Play
11. Pause/Play
12. Stop
12. No Function
12. Stop
12. Stop
13. Mute
13. Mute
13. Mute
13. Mute
14. Slow
14. No Function
14. No Function
14. No Function
15. Headphones
15. Headphones
15. Headphones
15. Headphones
16. Mode
16. Mode
16. Mode
16. Mode
17. Pgm Up (2)
17. Preset Up
17. Menu Up / Next
Folder
17. Next CD
18. Pgm Down (2)
18. Preset Down
18. Menu Dn / Prev
Folder
18. Previous CD
INTRODUCTION
(1) Setup Soft Menu Options
Language
Sub-Title On/Off
Audio Compression ON/OFF
Brightness, Color, Tint, Contrast +/Operating Instructions — Remote Control
Power Button (PWR) 1
Pressing the 9POWER9 button will turn the VES ON/
OFF. The headphones will be able to receive audio
whenever the VES is powered on. Once the VES is on,
simply depress the power switch on the headphones so
that the red/green LED is illuminated. If the LED is red,
press the scan button once. When the LED turns green, it
is now ready to receive audio from the VES.
19
(2) DVD Program Options
Chapter +/- buttons 3, 7
Next/Previous Menu Entry buttons 17, 18
MENU Button 10
This button only functions in the DVD video and MP3
audio modes. Press this button once to go to the onscreen menu, press the button a second time to clear the
menu.
PAUSE/STOP/ PLAY Button 11
This button only functions in the DVD video mode. Press
this button once to pause the video, press a second time
to resume play of the video.
1
20
INTRODUCTION
ENTER/ARROW Buttons 3-7
Depending on the active mode, these buttons function
differently. Use the 9ENTER9 button to play the DVD
video or to enter selections from the menu screens. Use
the arrow buttons to toggle through the menu screen
options.
MODE Button 16
Press this button to select between AM/FM, Radio CD
player, or SAT (Satellite Digital Audio Receiver), if installed.
The first press of the 9MODE9 button will toggle the
system between available modes. The radio and VES may
share modes or operate independently. If they are in
shared mode, the radio display will show reverse text for
the mode indication.
SEEK/Selection/FF/Rewind Buttons 4, 6
• VES Mode
Press and release the fast forward or Rewind button
(left or right arrow), to advance or reverse the DVD in
the direction that it is playing. The DVD will advance
or reverse until the button is pressed again or the end
of the DVD is reached.
• AM/FM/SDARS Mode
Press and release these buttons (left or right arrow), to
seek for the next station in AM, FM or SAT modes.
• Tape Mode (if available from radio)
Press and release the fast forward or Rewind button
(left or right arrow), to advance or reverse the tape in
the direction that it is playing. The tape will advance
or reverse until the button is pressed again or the end
of the tape is reached. At the end of the tape, the tape
will play in the opposite direction.
INTRODUCTION
• CD/DVD Changer (Internal to radio)
Press the right side of the 9SEEK9 button for the next
chapter or track on the CD/DVD. Press the left side to
return to the beginning of the current chapter or track.
Press the left side of the 9SEEK9 button twice within 2
seconds to return to the previous chapter or track.
Each press of the 9SEEK9 button up or down will
toggle through the chapters or tracks.
FF/RW Button 4, 6
• AM/FM Mode
Press the 9FF/RW9 button up or down to increase or
decrease the frequency. If you press and hold the
button, the radio will continue to tune until you
release the button. The frequency will be displayed
and continuously updated while the button is pressed.
21
• Tape Mode
Press the 9FF9 button up momentarily to advance the
tape in the direction that it is playing. The tape will
advance until the button is pressed again or until the
end of the tape is reached. At the end of the tape, the
tape will play in the opposite direction. Press the 9RW9
button momentarily to rewind the tape. The tape will
rewind until the button is pressed again or until the
end of the tape is reached. At the end of the tape, the
tape will play in the opposite direction.
• CD Player & CD/DVD Changer Mode
Press and hold 9FF9 (Fast Forward) once and the
CD/DVD player will begin to fast forward until the FF
button is released. The RW (Reverse) button works in
a similar manner.
1
22
INTRODUCTION
PARTIAL SECTION 9
Program Button (PROG UP) 17
• AM/FM Mode
Press and release the 9PROG UP9 button to search for
the next preset memory station in either the AM or FM
mode. The radio will remain tuned to the new station
until you make another selection. This function is not
available in shared mode since the radio is in control.
• Tape Mode
Changes the direction the tape is playing. The lighted
arrow in the display window will show the new
direction.
• CD Mode
No function.
• CD/DVD Changer Mode
Changes the CD selection between disc 1, disc 2, disc
3, disc 4, disc 5 and disc 6.
Channel Button 15
Press this button to select between channel 9A9 and
channel 9B9, or if interference is heard through the
headphones.
Remote Control Battery Service
• To replace the batteries for the remote control slide the
cover rearward. The replacement batteries for the
remote control are two AAA batteries.
INTRODUCTION
SETUP SOFT MENU OPTIONS
The VES has some user options available while playing a
DVD. Some options may already seem familiar since
many home DVD players have similar options. With a
DVD playing, press setup button on the remote control.
You will see a menu for adjusting the VES display. These
options are normally not needed and are preset at the
factory with default settings. However if you would like
to adjust brightness, contrast, tint, or color settings, you
may do so. Use the arrow up and down buttons on the
remote to move the asterisk to the desired item you wish
to adjust. By pressing the left arrow, the item will be
adjusted down or by pressing the right arrow button the
item will be adjusted up. Once these options are at your
desired setting, press the setup button again to clear the
screen. If you would like to restore the display back to the
original factory defined settings, select the DEFAULT
SETTING option and press enter. This should restore the
display to normal.
23
There are other DVD options that may be accessed while
a DVD is playing. Press the menu button and the display
will show the play menu options as shown in Figure 11.
These options are standard DVD play menu options that
are seen on most home players that meet DVD forum
requirements. Use the arrow buttons to move yellow
highlight to the option you would like to change. Press
enter to select the option and use arrow buttons to
change the option to the desired choice. To clear this
menu, press the menu button again.
There is one DVD menu that is available while the DVD
player is stopped. With a DVD in and playing, press stop
and then press setup button on remote control or front
panel. Use the right and left arrows to move between tabs
for language, rating, mark, audio, and aspect. Use the up
and down arrows to move between options within each
tab. To change an item highlighted in blue, press enter.
This should cause the highlight to turn yellow. Again,
using the up/down arrow will cause arrow on the screen
1
24
INTRODUCTION
to move up/down. Once the arrow is pointing to your
desired selection, press enter. When finished, press setup
again to clear the menu.
MP3 FUNCTIONS
When playing a disc containing MP3 files, the VES is
capable of displaying ID3 tag information on its display.
This ID3 information includes Title, Artist, and Album
information. The VES supports up to 255 MP3 files
contained within up to 99 sub- directories. Navigation
within sub-directories is possible. For example, if you
make a CD-R disc containing a directory with CD audio
files, and another directory containing MP3 files and
another with computer data files After the disc is read by
the VES and the menu button is pressed on the remote or
front panel, the display will look like figure 13 below.
Figure 10: CD-R disc main menu with 3 types of files on
the disc. CD audio, MP3, and computer data files are
shown.
By using the up/down button on the remote, an arrow
cursor will move up/down next to the directory list. To
select a directory, point to it, and then press enter. For
INTRODUCTION
example, if the directory Music Data Files is entered, the
VES will display any sub-directories or file names within
the Music Data Files directory. See Figure 14.
25
If the Billy Joel sub-directory is entered, a list of Billy Joel
MP3 files are shown. By moving the arrow cursor to file
number 6 and pressing enter, the song will play and the
display will look like figure 12.
Figure 11: Sub-directories of Music Data Files are shown.
Figure 12: VES playing MP3 file number 6, displaying
ID3 information Artist and Title.
1
26
INTRODUCTION
The ID3 information displayed is dependant on the disc.
Of course if the ID3 information is not copied to the disc,
VES will not be able to display any ID3 information.
It is not necessary to navigate through the disc. VES will
auto play files in an order of precedence. CD-A files will
play first, then MP3 files sequentially. If VES is in shared
mode with the radio playing MP3 files in the VES. The
radio random button may be activated placing VES in
random mode. In this case the files will play in a random
order instead of sequential. The VES will display 9RND9
to indicate random mode. To cancel random, press the
random button again on the radio and VES will clear
9RND9.
CD MODE (RADIO’S CD CHANGER)
When the VES is in CD mode, this is actually using the
radios 6 disc CD player. In all VES modes, the status of
this 6 disc changer is displayed in the lower left area of
the VES display. If a disc icon appears above the disc
number, this indicates that a disc is loaded into the
corresponding slot of the CD changer. When VES is in CD
mode playing a disc, the icon above the disc number will
turn grey indicating the disc number that is playing. See
Figure 16 below.
INTRODUCTION
27
active tab. The VES display will show the channel
number, station name, and program information. Program information includes artist, title, and album title if
it is available. See figure 16.
Figure 13: VES playing disc 2, track 12 and discs 1,2,3,
and 6 loaded in Radio’s CD changer.
SATELLITE RADIO FUNCTIONS
VES is capable of working with the Sirius satellite radio
receiver. To place the VES in SAT mode, simply press the
mode button on the remote or front panel until SAT is the
1
28
INTRODUCTION
not be able to change satellite channels. In this case, only
the radio controls will work the SAT channels. Please
note that satellite station presets can only be stored by the
radio. VES will display the radio preset number if that
station was stored previously by the radio.
OPERATING INSTRUCTIONS — HEADPHONES
1. Power Button
2. Scan Button
3. Volume Control
4. LED
Figure 14: VES display in SAT mode. Channel Name,
Song, Artist, and Album information is displayed by
VES.
The VES may control the selected channel by pressing
Prog up/down or up/down arrows on the remote or
front panel. If in shared mode with the radio, VES will
Power Button
Pressing the power button will turn the headphones
ON/OFF.
INTRODUCTION
NOTE:
• The headphones will turn off automatically and the
red LED will illuminate for approximately 2 minutes
when the radio or rear audio system is turned off.
• The rear audio system must be turned ON before
sound can be heard from the headphones.
Volume Control
Rotate the volume control upward to increase the volume.
Scan Button
Pressing the scan button will automatically find the
audio signal that is transmitted from the VES when the
Rear Seat Audio System and the headphones are on. The
headphone LED will turn green when the channel is
received.
NOTE: When the 9GREEN LED9 is showing the headphones are receiving the audio signal. When the 9RED
29
LED9 is showing the headphones are searching for the
audio signal. If the LED is off when power is on, the
batteries may need to be replaced.
Headphone Battery Service
• Using a key or similar flat object insert into the slot.
• Pry upward, towards the top of the headphones on the
release tab and remove the cover.
• Replace the batteries and reinstall the cover.
The replacement batteries for the headphones are three
AAA batteries.
General Information
This device complies with part 15 of the FCC Operation
is subject to the following two conditions:
5. This device may not cause harmful interference and
1
30
INTRODUCTION
6. This device must accept any interference received,
including interference that may cause undesired operation.
If you experience static or the headphones will not hold
a channel, check for the following two conditions:
1. A weak battery in the headphones.
2. Closeness to a radio transmitter such as a radio station
tower, airport transmitter, and some mobile or CB radios.
OPERATING INSTRUCTIONS — AUX MP3
PLAYER
An MP3 player can be connected to the audio system.
Connect the cables to the RCA jacks located behind the
VES screen.
NOTE: Follow the manufactures instructions for the
correct colors when connecting the RCA cables.
OPERATING INSTRUCTIONS — AUX VIDEO
GAMES/CAMCORDERS
A video game unit or camcorder can be connected to the
audio system. Connect the cables to the RCA jacks
located behind the VES screen.
NOTE: To operate a video game unit a 12 VDC to 120
VAC adapter may be required; plug the adapter into any
12V power outlet. Follow the manufacturer’s instructions
for the correct colors when connecting the RCA cables.
See figure 1 for VES AUX input definitions.