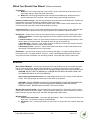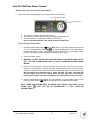
1
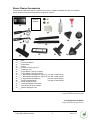
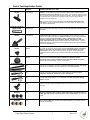
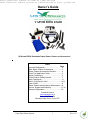
Servie Questions: Contact US Steam at 1-888-788-1234
Sales Inquiries: Contact Sylvane at 1-800-934-9194 or visit sylvane.com
Owner’s Guide
VAPOR BOSS ES600
US Steam ES600 Residential Vapor Steam Cleaner and Accessories
Index
Page
Important Safeguards………………..…………. 2
Main Steam Cleaner Components……….…… 3
Steam Cleaner Accessories Checklist………... 4
Quick Tool Application Guide…………………...5
Water Conditioning…………………………….... 6
Quick Guide to Getting Started…………….…...7
Work Techniques………………………………....8
Which Tool Should I Use?...…………………...9-14
How to Refill…………………………………..…15
Steam Cleaner and Accessory Maintenance.. 16
Service, Support and Warranty…..…………...17-18
Warranty Registration ……………………..…..19
Customer Service
www.ussteam.net or
Call: 1 888-788-1234
Monday-Friday, 9 am - 5 pm CST
Vapor Boss Steam System
1
Rev 6/11
Important Safeguards for Steam Cleaner Safety
KEEP FOR YOUR RECORDS. THIS MANUAL MUST BE RETAINED FOR FUTURE REFERENCE.
PLEASE READ, UNDERSTAND AND FOLLOW THE INSTRUCTIONS AND WARNINGS CONTAINED IN
THIS MANUAL BEFORE USING THIS VAPOR STEAM CLEANER.
In order to reduce the risk of fire, electric shock, personal injury or damage to property, follow these
instructions carefully. When using electrical appliances, basic safety precautions should be followed,
including the following:
NOTICES
1.
2.
3.
4.
Read all instructions before using this steam cleaner. Save these instructions for future reference.
View instructional video before operating this steam cleaner.
Use of Vapor Boss Steamer for any other use besides private household cleaning voids all warranties.
Use of any replacement parts other than authorized Vapor Boss Steamer parts voids all warranties and can
cause bodily injury to the operator and damage equipment. Service performed by anyone other than factory
authorized personnel will void warranty.
WARNINGS
1. DO NOT leave the steam cleaner unattended while plugged in. Turn off all controls and
unplug the electrical cord when not in use, when moving to another location and before
servicing.
2. DO NOT use with a damaged cord or plug. If the steam cleaner is not working as it should,
has been dropped, damaged, left outdoors or dropped into water, call for service before
using.
3. NEVER attempt to disassemble this product in a way not instructed in this manual.
4. DO NOT handle the plug with wet hands.
5. DO NOT allow this steam cleaner to be used as a toy. DO NOT use near children.
5. DO NOT pull or carry by cord. Keep cord away from heated surfaces.
6. DO NOT use extension cords greater than 25 ft. or cords or outlets with inadequate current
carrying capacity (12 - gauge capacity, and must have ground wire capabilities).
7. DO NOT add anything other than clean, drinkable water to the boiler tank (see Water
Conditioning Section on p.5 of the Manual).
8. DO NOT add water to boiler while boiler is hot.
9. NEVER unscrew the safety cap while boiler tank is under pressure (see Refill Section on
p.15 of this manual).
10. Keep body away from nozzle or brush steam. Steam can cause burns.
11. ALWAYS set safety switch on hose handle to the forward or locked position when not in use.
Not setting safety switch to locked position could result in an injury.
12. ALWAYS test a small area before cleaning a large area on any type of surface to make sure
no damage will occur.
13. DO NOT expose machine to freezing temperatures while not in use.
14. DO NOT store gasoline or other flammable vapors and liquids in the vicinity of this or any
other appliance.
ELECTRICAL CONNECTIONS
The steam cleaner uses 110 Volts and will pull 12.9 Amps when starting. It should be the only
appliance plugged into an outlet.
1. Any alteration of electrical cord supply on this steam cleaner will void all warranties.
2. Once electrical hook-up meets requirements, make sure all switches on front of unit are in the off
position before plugging unit into electrical outlet.
3. For circuit breaker protection, if possible plug the unit into an outlet isolated from other equipment,
or turn the other equipment off while using the steam cleaner — the combined electrical amperage
of other equipment and the steam cleaner together may cause a circuit breaker to trip.
4. Always press the power button (
) to OFF before you unplug the unit.
SAVE THESE INSTRUCTIONS!
Vapor Boss Steam System
2
Rev 6/11
Main Steam Cleaner Components
Unpack Vapor Boss Steamer and an 8-foot flexible hose with connector as pictured below.
8
11
10
9
7
2
3
5
1
6
18
4
13
12
14
15
16
1.
2.
3.
4.
5.
6.
7.
8.
9.
10.
11.
12.
13.
Control Panel
Power Button (
) ( for On/Off)
Steam Release Button (
) (to send steam from boiler to hose)
Steam Ready Light
Low Water Indicator
Pressure Gauge
Safety Cap
Carrying Handle
Variable Steam Control Knob
Optional Iron Holder
Power Cord w/Cord Wrap Handles
Wheels
Hinged Cover for Hose Socket
14.
15.
16.
17.
18.
8-foot Flexible Hose with Connector
Hose Connector Release Button
Hose Handle
Safety Switch for Hose Handle (To lock push forward - away from hose)
Hose Handle Trigger
17
© Copyright 2011 US Steam
Property of US Steam All rights reserved.
Vapor Boss Steam System
3
Rev 6/11
Steam Cleaner Accessories
These are the added items that you should find in the box. Unpack and identify all parts. Use checklist
below. View the instructional video before using steam cleaner.
Owners
Manual
19.
20.
21.
22.
23.
24.
25.
26.
27.
28.
29.
30.
31.
32.
33.
34.
___Video
___ Instruction Manual
___ Water Bottle
___ Funnel
___ Extension Tubes (qty of 2)
___ Towel (qty of 6)
___ 3 Hole Nozzle (see tip of nozzle)
___ 1 Hole Nozzle (see tip of nozzle)
___ 1” Nylon Bristle Round Brush (qty of 3)
___ 1” Brass Bristle Round Brush (qty of 3)
___ 3” Nylon Bristle Round Brush
___ Small Triangular Brush
___ Large Triangular Brush
___ Large Rectangular Floor Brush
___ Floor Brush Cover for Carpets
___ Window Squeegee Tool
(use with 1 Hole Nozzle)
(use with 1 Hole Nozzle)
(use with 3 Hole Nozzle)
(use with 3 Hole Nozzle)
© Copyright 2011 US Steam
Property of US Steam All rights reserved
© Copyright 2011 US Steam
Property of US Steam All rights reserved
Vapor Boss Steam System
4
Rev 6/11
Quick Tool Application Guide
TOOL
LARGE RECTANGULAR
BRUSH
PRESSURE DIAL
SETTING
Low / Medium
INSTRUCTIONS AND TOOL USES
Use with clipped on doubled towel for overall cleaning. Use brush without towel for deck
cleaning. Use the brush with a clipped on towel at low or medium pressure setting for
wood and tile floors (not linoleum) and work quickly. You can mist the clipped on towel
with your favorite natural cleaner when the floor is extra dirty. Rotate the clipped on towel
to a clean side when it gets too dirty. Be careful: towel may be hot. Keep a bucket
available to toss dirty towels into.
Note: If you are using the large rectangular brush, take off large rectangular brush
cover first so you can see the brush’s bristles. The brush cover is only used for going
over carpets to kill dust mites.
LARGE RECTANGULAR
BRUSH COVER
Low / Medium
LARGE TRIANGULAR
BRUSH
Low / Medium
SMALL TRIANGULAR
BRUSH
Medium
3 INCH ROUND BRUSH
Medium
Slide on to the bottom of the large rectangular brush to kill dust mites and mold spores
in carpets.
Use this brush without a clipped on towel for cleaning hard to reach corners of floors,
under baseboards or wall tiles, then wipe immediately. Use uncovered at a 12-inch
distance at low pressure for removing wrinkles in clothes. Use with towel at low/medium
pressure for spot cleaning of upholstery, carpets, small windows, porcelain
bathtubs, refrigerator exterior, countertops, cabinets, walls kitchen or bath door
fronts, and vertical blinds. Please test an inconspicuous surface area first. Can use
diapered with towel on a low-pressure setting to sanitize and kill dust mites in mattresses
and other upholstered items.
Use to get into corners. Attach the 3 hole nozzle to the hose handle and then the brush to
the nozzle. Set the steam dial to medium pressure for stovetops, kitchen countertops,
kitchen or bathroom sinks, dishwasher interior, fiberglass bathtubs, and glass
shower doors. You can spray a natural cleaner of your choice on the surface to be
cleaned if the area is extremely dirty. The steam will enhance the cleaning power of the
steam.
Attach the 3 hole nozzle to the hose handle and then the brush to the nozzle. Use at
medium pressure for stovetops, kitchen countertops, refrigerator interior,
dishwasher interior, kitchen or bathroom sinks, fiberglass bathtubs, and toilets.
Wipe up with towel immediately. Use with 3 hole nozzle.
EXTENSION WANDS
Any
Use with any nozzle/brush combination to extend reach for floors, walls and ceilings.
Can use up to 3 wands at a time. Two wands come in the standard package.
Any
Use with 1 inch nylon round brush where focused cleaning is needed. Tile grout,
refrigerator, dishwasher, toilet bowls, corners, and crevices.
Any
Use with small triangle brush or 3 inch round brush when multi-directional cleaning
action is needed.
Low
Use on low pressure setting for windows. Wipe excess water with microfiber towel or lint
free cloth.
1 HOLE NOZZLE
3 HOLE NOZZLE
WINDOW SQUEEGEE
1 INCH ROUND NYLON
BRUSHES
Any
1 INCH ROUND BRASS
BRUSHES
Any
Vapor Boss Steam System
Attach the 3 hole nozzle to the hose handle and then the brush to the nozzle. For
stovetops, refrigerator door moldings, hard to reach corners, toilet bowls, base of
toilets, golf clubs, shower crevices and grout, animal and birdcages. Use with 1 hole
nozzle.
Oven interiors, BBQ grills and other non-scratch surfaces that need deep cleaning.
Use with 1 hole nozzle.
5
Rev 6/11
Water Conditioning
It is recommended to supply the Vapor Boss ES600 with clean low mineral content water (distilled water) to
help prevent scale build-up. Even though the ES600 is engineered to minimize scale formation, scale
development depends on the hardness of your water and the number of hours the equipment operates.
Most tap water sources are full of minerals, which form scale during operation. It is this scale which could
lead to early component failure.
Your water utility can tell you about the mineral content of your water. For ES600 optimal performance and
component longevity, water should have between 10 and 30 parts per million (PPM) total dissolved solids
(TDS) and should have a pH (acidity rating) of 7.0 or higher.
Using distilled water, especially in areas with hard tap water, will provide longer life to the unit,
higher steam capacity, and reduce maintenance requirements.
If you notice a reduction in steam production, check the unit for scale build-up. Heavy scale reduces the
unit’s ability to boil water, and may cause the boiler to overheat and burn out. (See p.16 “Maintenance”
section for information about removing mineral deposit build up.)
Vapor Boss Steam System
6
Rev 6/11
Quick Guide to Getting Started with Your Steam Cleaner
1. DO NOT PLUG IN STEAM CLEANER UNTIL INSTRUCTED TO DO SO.
2. CONNECT HOSE TO STEAM CLEANER: Locate the 8 ft. flexible steam hose (item 14 - on
page 4). Lift the hinged hose socket cover (item 13) on the front of the steam cleaner and insert
the square end of the Steam Hose into the hose socket with the hose connector button facing
up. Push the square end of the hose connector into the socket until you hear a “click” which
means that the connector is inserted properly. If it does not click in, remove the connector and
try again until it clicks in.
3. LOCK STEAM SAFETY SWITCH: On the steam hose handle is a safety switch (item 16) for
the trigger (item 18). When you lock the safety switch, it will prevent steam from traveling from
the boiler into the hose. Lock this safety switch by pushing it forward away from the hose.
4. OPEN SAFETY CAP AND FILL TANK WITH WATER: Press and hold down the safety cap
(item 7). Turn the cap counter clockwise to open. Remove the cap. Use the water bottle
provided to fill the steam cleaner tank with clean drinkable water before each use. We
recommend using distilled water in areas with hard tap water. This water will provide
longer life to the unit, higher steam capacity, and reduce maintenance requirements. Do
NOT under any circumstance put cleaning fluids into the machine. If you have a steady
hand, you can simply pour in the water from the filler bottle without the top on leaving about 1
inch of water in the bottle to prevent overflow in the tank. You can also pour the water into a
funnel placed in the tank opening, or use the bottle with the top on and keep squeezing the
bottle to accelerate the fill. Do not overfill the tank to the rim of the opening. This should give
you up to two plus hours of cleaning time.
5. REPLACE THE SAFETY CAP AND HAND TIGHTEN: Insert the safety cap into the tank
opening. Press and hold down the safety cap. Turn the cap clockwise to close. Keep pressing
and turning the cap until it is tight. Note: This cap does not sit flush on the machine once fully
tightened.
6. PLUG IN THE STEAM CLEANER: Plug the pronged plug unit (item 11) into a grounded 120V
outlet. This steam cleaner uses 110 Volts and will draw 12.9 Amps when turned on. The steam
cleaner should be the only appliance plugged into an outlet. Do not plug this unit into an
electrical outlet with inadequate current carrying capacity. If you use an extension cord, the
heating will take longer and steam pressure may be less than optimum.
7. POWER ON THE STEAM CLEANER: Depress the ON/OFF button (
) (item 2) once to heat
the water in the boiler. This is the ON Position. (The orange light on button should illuminate).
After a few minutes, the needle on the pressure gauge should begin to move to the right.
The Steam Ready ( ) light to the left of the pressure gauge will turn green after 7-10 minutes.
The pressure gauge should read around 3.5 to 4.5 bar and be in the green zone of the dial.
8. SELECT AND ATTACH TOOL TO HOSE: Securely attach whichever tool and towel (if
needed) to accomplish the task at hand, by using your QUICK TOOL/APPLICATION GUIDE. If
you use the extension wands (items 23), insert one wand into the other making sure the
lengthwise lines on them are all lined up with each other on each piece. This will make sure that
the wands remain securely fastened. They should click easily into place. Click the extension
wands into the hose handle (item 16).
9. PRESS THE STEAM RELEASE BUTTON: Depress the STEAM RELEASE button (item 3) to
release the steam from the boiler to the hose. This is the ON Position. (The orange light on
button should illuminate). No steam will come out yet.
10. UNLOCK STEAM SAFETY SWITCH: The safety switch for the trigger is on the hose handle.
When you unlock the safety switch (item 16), it will let steam travel from the boiler into the hose.
Unlock this safety switch by pushing it back away from the hose. You are now ready to start
Vapor Boss Steam System
7
Rev 6/11
steam cleaning. ALWAYS SET SAFETY SWITCH TO LOCKED POSITION AFTER EACH
USE. NOT SETTING SWITCH TO LOCKED POSITION COULD RESULT IN INJURY
11. SET STEAM CONTROL DIAL: This dial (item 9) is to control the amount of steam to be used.
By turning the dial counter-clockwise (toward the “+” sign on the dial), the steam will increase.
To reduce amount of steam used, turn dial clockwise (toward the “–“ sign on the dial). Do not
turn the dial all the way clockwise. This is the lowest possible setting and no steam will come
out when you press the steam trigger. Most of the time you should keep this dial pointed to
the “Optimum Steam” position as marked with a dark line between your low and high
steam level next to the dial unless you are instructed to use a different steam setting for
a particular cleaning task.
12. PRESS STEAM TRIGGER: Now “bleed” the hose of water by squeezing the trigger (item 18) to
shoot excess water from the hose into a towel for about 10 seconds. The hose will be filled with
steam not water. Wait until pressure gauge (item 6) reaches 3.5 to 4.5 or the steam ready
green light ( ) (item 4) comes on again before starting to clean. Now the system is ready to
use for cleaning.
13. MONITOR PRESSURE WHILE STEAM CLEANING: Monitor the pressure gauge. If pressure
drops below 2.5, release trigger, let pressure rebuild. Pressure gauge should read 3.5 to 4.5
before restarting. If pressure does not rebuild, check orange low water light next to the faucet
icon.
Work Techniques
Work from the top down on any area so dirt will not fall on cleaned surfaces. First, start with cleaning
corners and other tight areas with the nozzle and small brushes, working your way up to larger surfaces and
brushes. The temperature of the steam at the tip of the nozzle is between 205ºF - 220ºF, but since the
vapor is so dry, it cools to less than 100ºF, 9-10 inches from the tip. Using a towel clipped to the large
rectangular or triangular brush allows you to control cleaning temperatures. Use this method to regulate the
temperature you apply to surfaces where heat is a concern, like paint, wood, plastic, etc.
PRE-STEAM
Get into the habit of pre-steaming a surface if it is heavily soiled. At a 5”
distance, spray steam on surface from all directions for 10 seconds.
Depending on the size of surface, use a nozzle, triangular or rectangular
brush. See the Quick Tool/Application Guide for details.
SPEED
Let the heat do the work for you! Do not move too quickly, unless surface
is sensitive to heat like wood, paint, wallpaper, colored fabrics, plastic.
WIPE
Always remember to wipe the area you just cleaned with a cotton towel or
use one of the larger brushes with a doubled or tripled towel attached to
the brush using the brush clips. All surfaces have pores, even glass.
Steam cleaners use the steam vapor to open and deep clean into the
surface pores. Wipe off dirt immediately before the surface cools down.
OTHER
EQUIPMENT
The only other equipment you need is a good HEPA vacuum cleaner.
Always vacuum carpets and floors before steam cleaning.
Vapor Boss Steam System
8
Rev 6/11
Which Tool Should I Use Where?
KITCHEN
Floors – Pre-vacuum or sweep up large dirt and dust particles. Use the large rectangular brush with
clipped on diapered double towel at low/medium steam volume. If you use the extension wands, insert
one wand into the other making sure the lengthwise lines on them are all lined up with each other on
each piece. This will make sure that the wands remain securely fastened. They should click easily into
place. Click the extension wands into the hose handle. Keep a bucket available for dirty towels.
a. Tile – Remove and refold doubled towel to clean side so that towel is absorbing dirt and not
pushing it around. If floor is very dirty, use the rectangular brush without attached towels, and mop
dirt immediately as you go with a spare cotton towel.
b. Vinyl or Wood – Use the large rectangular brush with diapered doubled towel at low steam
volume. Use extension wands as needed. Spray area lightly with cleaner such as Murphy’s Oil
Soap if especially dirty. Work rapidly and lightly to avoid taking shine off floor. Go over area two or
three times if heavily soiled and frequently remove and change towel to a clean side.
NOTE: WHEN STEAMING A WOOD FLOOR, NEVER LET BRUSH STAND IN ONE PLACE
WHILE STEAM TRIGGER IS ON. ALWAYS KEEP BRUSH MOVING.
c. Waxed Vinyl Floors - Use large floor brush and if necessary, use the 3-inch round brush in
corners and tight areas. Clip a clean cotton towel over the large floor brush. Apply steam, cleaning
a small area quickly as you go. This should melt a top layer of wax holding the dirt in the pores of
the floor. If the floor is greasy or very dirty, you may need to repeat this procedure, or use a
cleaning formula if desired.
d. Unwaxed Vinyl Floors - Use the large floor brush with clip on towel. Pull trigger every 3 to 5
seconds to keep towel heated. Use a back and forth motion.
NOTE: DO NOT OVERHEAT ANY KIND OF VINYL, SINCE THIS COULD SOFTEN THE
SURFACE AND AFFECT THE TEXTURE. THIS ALSO APPLIES WHEN USING SMALL
BRUSHES TO REMOVE TOUGH SPOTS.
e. Wood Parquet Floors - Use large rectangle brush with a cotton towel clipped over it and
squeeze trigger every 3 to 5 seconds. Move quickly to avoid heat or moisture buildup in wood. Use
Murphy’s wood cleaner for dirty floors.
f. Marble Floors - Use the same techniques as used for wood floors, keeping heat and moisture off
the surface as much as possible. Always use Marble conditioner after cleaning.
NOTE: SOME MARBLE SURFACES CAN DISCOLOR.
Sink – Use the 3” nylon bristle round brush or small triangular brush with the 3 hole nozzle. Attach to
the hose handle. Use separate towel to mop up loosened dirt. For tough stains, you can pre-spray
surface with natural bleaching agent.
Stovetop – Make sure stovetop and burners are cool to the touch. Use the 3” nylon bristle round brush
or small triangular brush with the 3 hole nozzle. Attach to the hose handle. Use separate towel to mop
up loosened dirt. Can use the 1 inch nylon round brush attached to the 1 hole nozzle for cleaning
burners.
Oven Interior – Make sure oven is cool to the touch. Use the 1” brass bristle round brush with the 1
hole nozzle. Attach to the hose handle. Use separate towel to wipe up loosened dirt. DO NOT SCRUB
SURFACE. THIS MAY DAMAGE THE ENAMEL.
Vapor Boss Steam System
9
Rev 6/11
Which Tool Should I Use Where? (Kitchen continued)
Countertops
a. Method 1 - Use 3-inch round with 3 hole nozzle in slow, back and forth movements to cover
area being cleaned. Wipe with clean cotton towel.
b. Method 2 - Use the large triangular brush with diapered doubled towel. Attach to the hose
handle. Heat towel 3 to 5 seconds. Clean surface using back and forth movements.
Cabinet or Drawer Facings – Use the large triangular brush with diapered doubled towel. Attach to the
hose handle. Use extension wands as needed to extend your reach.
Optional: For extra shine, you can spray some favorite citrus or other cleaner on the cabinet face first.
For wood facings, spray with cleaner such as Murphy’s Oil soap.
Corners/Crevices – Use the 1 hole nozzle attached to the hose handle to blow out dirt. Catch dirt with
a spare cotton towel to prevent it from spraying everywhere. Use extension wands as needed.
Refrigerator – Please remove food, bins and shelves from the refrigerator before cleaning the interior.
a. Exterior Surfaces – Use the large triangular brush with a diapered double towel. Attach to the
hose handle.
b. Interior Surfaces – Use the 3” nylon bristle round brush or small triangular brush with the 3 hole
nozzle. Attach to the hose handle. Use separate towel to wipe up loosened dirt.
c. Door Moldings – Use the 1” nylon bristle round brush with the 1 hole nozzle. Attach to the hose
handle. Use separate towel to mop up loosened dirt.
d. Defrosting Freezer – Use the 1” nylon bristle round brush with the 1 hole nozzle. Attach to the
hose handle. Use separate towel to mop up water.
Dishwasher – Use the 1 hole nozzle to clean out corners and edges. For light scrubbing, add the 1”
round nylon brush. For larger surfaces, use the 3 “ round or small triangle brush with 3 hole nozzle,
using back and forth movements over area being cleaned. Wipe clean with a spare cotton towel.
BATHROOM
Mirrors/Glass/Windows – Use the large triangular brush with doubled towel or the window squeegee
tool on a low steam setting. Attach to the hose handle. Use wands to extend your reach if needed.
Follow up if necessary by turning off steam and re-squeegee window, wipe with lint free microfiber cloth.
CAUTION: DO NOT USE THE BRUSH IN A CONCENTRATED AREA FOR MORE THAN TWO
OR THREE SECONDS, GLASS COULD BREAK.
Deep cleaning glass/window frame: Use small triangle brush and move quickly in back and forth
motion. Then use squeegee and clean with lint free towel to dry window.
CAUTION! ALWAYS PREHEAT GLASS WITH THE SQUEEGEE 2-3 INCHES FROM SURFACE
BEFORE CLEANING! DO NOT CLEAN GLASS WHEN TEMPERATURES ARE BELOW
FREEZING POINT! NEVER CLEAN A GLASS THAT HAS A CRACK!
Window Sills and Thresholds – Use the small nylon nozzle brush with 1 hole nozzle. Use a medium
steam setting. Attach to the hose handle. Use the extension wands if you need to extend your reach. If
these areas are very dirty wipe up dirt and debris with disposable paper towels.
Window Frame a. Painted wood and plastic - Use nozzle with detail brush. Place 1 towel around the brush and
wipe frame. Or use same technique as MOLDINGS.
b. Aluminum - Use 1” brass brush directly on the surface to remove dirt and to polish. Wipe with
towel.
Vapor Boss Steam System
10
Rev 6/11
Which Tool Should I Use Where? (Bathroom continued)
Window Screens – Use the large triangular brush with doubled towel or the window squeegee tool on
a low steam setting. Attach to the hose handle. Use the extension wands if you need to extend your
reach. Do both sides of the screens working top to bottom. Remove and reattach a clean area of the
towel to the brush if the towel becomes too dirty.
Toilet – Use the small triangular brush with the 3 hole nozzle for the exterior. Use the 1” nylon bristle
round brush with the 1 hole nozzle for cleaning inside the rim. Start from the top of the toilet and work
down to the base. Use the 1” nylon bristle round brush with the 1 hole nozzle for cleaning inside the
rim. Be sure to clean the floor up to 2 feet around the toilet to kill odor-causing bacteria. DO NOT PUT
THE BRUSH OR HOSE HANDLE UNDER WATER.
Faucets – Use the 3” nylon bristle round brush or small triangular brush with the 3 hole nozzle. Attach
to the hose handle. Use low steam volume. Wipe dry with a spare cotton or microfiber towel as you go.
Bathtub/Shower
a. Fiberglass – Pre-spray the area with a non-toxic cleaning fluid. For crevices use the small
triangular brush with the triple nozzle without towel attached to the hose handle and wipe up the
released dirt with a spare cotton towel as you go. Use large triangle brush with diapered towel on
walls of tubs with extension wands if needed.
b. Ceramic – Use the larger triangular brush. Attach a diapered towel. Use a low steam setting in
order to avoid scratching surface. Attach to the hose handle. Use extension wands if you need to
extend your reach.
c. Shower door – Use the large triangle brush. Attach a diapered towel. Wipe surface dry with a
spare cotton or microfiber towel as you go. Lightly applying lemon juice assists in naturally
removing mineral deposits or soap scum.
CAUTION: DO NOT USE THE BRUSH IN A CONCENTRATED AREA FOR MORE THAN
TWO OR THREE SECONDS, GLASS COULD BREAK.
d. Tile Grout – Use the 1” nylon bristle round brush with the 1 hole nozzle. Attach to the hose
handle. Add extension wands as needed to extend your reach. Pre-spraying the grout crevices with
a non-toxic cleaner will help loosen dirt before applying steam. Wipe released dirt with a spare
cotton towel as you go.
e. Silicone Sealant – Use the 1 hole nozzle, no closer than one-inch, use back and forth
movement blowing out debris.
NOTE: DO NOT OVERHEAT SEALANT. IF MOLD AND MILDEW DOES NOT COME OFF
WHILE CLEANING, HEAT WILL KILL THE GROWTH.
BEDROOM
Carpet
Eliminate dust mites and mold spores. You can pre-treat stubborn stains (see “spot cleaning” in
Miscellaneous section below) with a non-toxic cleaner to loosen spot. Blast surface dirt with single
nozzle (no brush) sideways into a spare cotton towel. Put the floor brush cover on the large rectangular
brush covering the bristles. Use a low to medium steam setting. Move slowly over the carpet allowing
time for deep penetration of the carpet fibers. Use double or triple diapered towel if the surface seems
to be getting too wet. Vacuum up loosened dirt immediately from dirt now available in fibers loosened by
steaming. Air out to dry. (Refer to instructional video)
Always VACUUM carpet first! Always TEST an area for discoloring before cleaning! Some carpets
are made with vegetable dyes, which are not “set” by boiling — the color can bleed from too much
heat and moisture.
Man made carpet fibers melt at temperatures 300ºF and above. The heat from the vapor system
Vapor Boss Steam System
11
Rev 6/11
Which Tool Should I Use Where? (Bedroom continued)
does not melt the fibers, but it can change their shape at temperatures 185ºF-250ºF - use method
described in first paragraph of “Work Techniques” to regulate the heat.
a. Industrial type - Use rectangular brush, 2 inches above carpet, and pre-steam a 6x6 foot area.
The steam causes the dirt and soil particles to loosen their grip on the carpet fibers and opens
up the fibers. Then use the rectangular brush with 2 towels on medium pressure and go over
pre-steamed area with same movements as when you vacuum. Change towels when dirty.
Repeat these steps if necessary. Move on to next area.
b. Stain resistant - The heat from the steam can remove the chemicals that make the carpet stain
resistant at temperatures between 150ºF - 200ºF. If the carpet is heavily soiled, the stain
resistance is already gone and the carpet should be re-treated after it is cleaned. Use same
technique as INDUSTRIAL TYPE carpet, but do not stay on one spot too long.
c. Non-colorfast - Use nozzle 2” - 4” above carpet and shoot steam from the side with quick sideto-side movements, lengthwise and crosswise. Hold a towel to the side to catch all dirt particles
as they blow out of the carpet. Do not get closer than 2” with the nozzle. Fluff up the fibers
evenly with a dry towel.
d. Delicate carpets (not recommended for silk) - Use rectangular brush with diapered towel.
Preheat towels and wipe with no steam. Wait a few minutes. To dry, use the large triangle
brush with 1 towel, without steam, and wipe with vertical and diagonal strokes.
Mattress – To eliminate dust mites, use the large triangle brush diapered with a triple towel at a low
steam setting. Move quickly over the mattress and go over each area more than once to ensure
complete and thorough elimination of dust mites. Mattress should be slightly damp to the touch but not
wet. Air dry the mattress before putting bed linens back on the mattress. (Refer to instructional video)
Clothing – Use the large triangular brush (no towel) at a low steam setting. Apply steam 12 inches from
clothes. Before continuing, test an inconspicuous area of the clothing for colorfastness first. Clothing
should be slightly damp to the touch but not wet. Air dry the clothing.
LIVING ROOM
Walls, painted trim or molding – Use a low steam setting with the large triangular brush with a
doubled or tripled diapered towel. Pretest an inconspicuous area to be cleaned for paint thickness since
it is easy to take paint off walls. ALWAYS USE A CLIPPED ON TOWEL FOR PAINTED SURFACES.
Wallpaper
a. Washable - If surface is heavily soiled, presteam surface or spray the towel with a cleaning
formula. Follow up with a clean towel to remove soap residue. If wallpaper is textured, presteam
2” off surface. Wipe with towel. Do not stay on one spot too long.
b. Deep Cleaning - If surface is heavily soiled, presteam surface or spray the towel with a
cleaning formula. Follow up with a clean towel to remove soap residue. If wallpaper is textured,
presteam 2” off surface. Wipe with towel. Do not stay on one spot too long.
c. Non-Washable - Use large triangle brush with 1 towel. Preheat towel and wipe with no steam.
Move quickly with smooth strokes. Do not stay on one spot too long.
d. Removing - Use diapered triangle start in one corner hold in one spot for 5 to 10 seconds. Pull
corner out start peeling back while moving diapered triangle slowly back and forth.
Painted walls and ceilings
CAUTION: THE HEAT MAY REMOVE SOME PAINT IF IT IS THIN.
a. Oil Paint - Use large triangle brush with 1 towel, steam and wipe. Do not stay on one spot too
long. Use extension tubes to reach ceilings.
Vapor Boss Steam System
12
Rev 6/11
Which Tool Should I Use Where? (Living room continued)
b. Latex Paint - Use large triangle brush with 1 towel. Preheat towel and wipe with no steam. Do
not apply pressure. Move quickly with smooth strokes. Or use nozzle about 5” off surface to
presteam spot. Do not get surface too wet. Wipe gently with towel.
Tracks, Moldings
a. Tracks - Use one hole nozzle with detail brush. Wipe cleansed area with towel.
b. Moldings - Use single-hole nozzle. Hold the nozzle in one hand and a towel in the other hand.
Move the nozzle and towel at the same time in one direction, blowing the dirt into the towel.
Hold the nozzle parallel to surface. Move quickly. Wipe with dry towel.
Blinds – Use only on metal blinds. Close blinds. Use a low steam setting with the large triangular brush
with a doubled diapered towel attached. Work gently in a horizontal direction.
NOTE: NOT FOR USE ON VINYL BLINDS
Slats
a. Dusting - Open blinds and use 1-hole nozzle to blow dust onto window.
b. Deep Cleaning - Close blinds with top of slats facing you. Use large triangle brush with one
towel. Wipe side-to-side from the top down. To reach the whole slat spread the slats with the
other hand while wiping. Close the blinds from the opposite direction and clean from the bottom
up. Keep changing towels until clean. If needed, prespray the blinds with cleaning formula.
Strings - Pull the blind all the way up. Wipe the string with a towel wet with cleaning formula. Pull the
string slowly through a detail brush.
Hardwood floors – Use on sealed wood only. Use the large rectangular brush with clipped on diapered
double towel at low/medium steam volume. If you use the extension wands, insert one wand into the
other making sure the lengthwise lines on them are all lined up with each other on each piece. This will
make sure that the wands remain securely fastened. They should click easily into place. Click the
extension wands into the hose handle. Keep a bucket available to put dirty towels into.
Upholstery – Use the large rectangular brush or large triangle brush with diapered towel, heat towel 3
to 5 seconds at low steam setting. Pretest an inconspicuous area and work quickly and lightly
especially if fabric has Scotch Guard. Clean furniture using back and forth movement. If material seems
to be getting too wet, cut steam off. Reheat towel as needed.
NOTE: ALWAYS CHECK AREA FOR SCOTCH GUARDING.
a. Leather – DO NOT CLEAN INTERIOR LEATHER FURNITURE WITH STEAM.
b. Vinyl - Using 1-hole nozzle, blow out cracks and crevasses. Use appropriate brush.
Carpets – See “carpets” in Bedroom section above.
Windows – See “mirrors/glass/windows” in Bathroom section above.
AUTO – Open the car windows or doors to let the steam escape while you are cleaning.
Wheels – Use large triangular brush at medium steam volume and vigorously brush dirt away. Use
smaller tools for crevices if needed to finish job.
Carpets and Upholstery – See “carpets” and “upholstery” in Bedroom section above.
a. Leather interior - Using 1-hole nozzle, blow out cracks and crevasses. Clean the same as
UPHOLSTERY in “bedroom” section. Leather interior in cars is made to handle moisture and is fine
to steam clean, unlike residential leather furniture.
Vapor Boss Steam System
13
Rev 6/11
Which Tool Should I Use Where? (Auto continued)
Windows – See “mirrors/glass/windows” in Bathroom section above.
Air Conditioning or Heating Vents – Turn OFF air conditioning or heating. Put down a large towel
under the vents on the floor and cover the seats. Use the 1 hole nozzle (no brush) attached to the hose
handle and insert nozzle tip into the vent. Spray the steam into each vent to clean out the passageways.
Wipe up the residue with a spare cotton or microfiber towel. To finish job, turn on air conditioning to dry
out vents.
Dashboard – Use the small triangular brush with the 3 hole nozzle. Wipe immediately with a microfiber
cloth.
MISCELLANEOUS
Cleaning and Sanitizing Bird or Pet Cages – Pre-vacuum the cage. Use the 1-inch round brass
bristle brush with 1 hole nozzle attached to the hose handle. When done steam cleaning. Rinse the
cage and towel it dry.
Deck – Use the large floor brush uncovered at low steam volume. Increase volume on tough areas.
Rinse with a garden hose.
Golf Clubs – Use the small nylon nozzle brush with 1 hole nozzle. Scrub lightly and wipe with cotton
microfiber towel immediately.
Spot Cleaning for Carpets – We do not recommend this steam cleaner for cleaning large carpeted
areas but rather for spot cleaning.
Do not apply nozzle directly on to the spot — this keeps the heat from exceeding 180ºF - 185ºF,
which can chemically “set” protein-based and food dye stains onto the fibers. Once a stain is set, it
is hard to remove. To remove a set stain, treat it first with a proper cleaning formula, then see below
– and then follow up with the above procedure.
a. Protein Stain: Dab with towel dampened with a solution of 1 teaspoon white vinegar and 1
quart of cold water.
b. Food Dye Stain: Wet stain with a solution of water and lemon juice or white vinegar.
c. Water Stain: First wet the stain with carbonated water, and then use triangular brush with
towel.
d. Reoccurring Stain: If a stain comes up again and again, it has a “reservoir” under the padding.
Before removing the stain you have to dry it out first. Press a drying agent such as talcum
powder, a mixture of cornstarch and cornmeal, or clean unscented, uncolored cat litter into the
fibers — do not rub. Let sit for 20 minutes, and then vacuum it out.
e. Surface Stain: If the stain is only on the surface of the carpet, it can be removed by shooting
the steam against the spot from the side, 1”-2” above surface. Hold a towel on the other side to
catch the residue. This prevents driving the particles deeper into the fibers.
f. Gum: Same technique as SURFACE STAIN, except use paper towel instead of cotton towel. If
the gum melts too much, let it cool off before trying again. Once major part of gum is removed
mist with a non-toxic cleaning formula and re-clean.
Vapor Boss Steam System
14
Rev 6/11
How Do I Refill the Steam Cleaner?
How do I know if my steam cleaner needs refilling?
When one of the following happens, your steam cleaner is low on water:
Low water indicator light
Pressure Gauge
1. The orange Low Water Indicator Light turns on.
2. The pressure drops fast (below 2 bars) and pressure gauge stays low.
3. Amount of steam is very light and moisture content is low.
Once it is determined water is low, follow directions listed below.
How to refill your steam cleaner
1. Press the On/Off power button (
) to the OFF position. The orange light on the button will
turn off. The Steam Release Button (
) must be in the ON position. The orange light on
this button will light up. (This is important because the unit will not cool sufficiently in order
to refill.) Pull trigger on handle until pressure gauge reads ”0” (zero).
2. Unplug the steam cleaner.
3. WARNING - DO NOT ATTEMPT TO ADD WATER WHILE THE BOILER TANK IS STILL
HOT. LET THE STEAM BOILER COOL AT LEAST 20 MINUTES BEFORE ADDING
WATER.
4. Cover the safety cap with a towel, press down on cap and turn cap very slowly counterclockwise. You may hear some steam escaping. Keep the towel over the cap. Remove the
safety cap. Refill the steam cleaner tank with clean drinkable water using the water bottle.
We recommend using distilled water in areas with hard tap water. This water will
provide longer life to the unit, higher steam capacity, and reduce maintenance
requirements. Do NOT under any circumstance put cleaning fluids into the machine.
5. Replace safety cap and hand tighten the cap clockwise. Plug the steam cleaner in and
press the On/Off button (
) ON (the orange light on the button should illuminate).
NOTE: WHEN UNIT IS BEING USED, THE GREEN LIGHT (READY LIGHT) NEXT TO THE
STEAM ICON ( ) WILL NOT BE ON CONTINUOUSLY. IT WILL COME ON
INTERMITTENTLY.
Vapor Boss Steam System
15
Rev 6/11
Steam Cleaner and Accessory Maintenance
Tank Cleaning (remove mineral deposits) – Do once a month
1. When the steam cleaner tank is cold and unplugged, open the safety cap by pressing down on
the cap and turning it slowly counter-clockwise. Turn your steam cleaner upside down over a
sink and drain the leftover water out.
2. On the steam hose handle is a safety switch (item 16) for the trigger (item 18). When you lock
the safety switch, it will prevent steam from traveling from the boiler into the hose. Lock this
safety switch by pushing it forward away from the hose.
3. Mix ½ cup CLR and 3 cups of water together. Add this mixture to the steam cleaner tank. Let
mixture sit for 2 to 3 minutes, fill tank with clean water turn machine upside down over sink and
drain. Refill with clean water and rinse until all mineral deposits are rinsed out.
VERY IMPORTANT – NEVER ADD CHEMICALS INTO THE TANK! Adding any form of chemicals or
fragrance to the tank will void the warranty and could result in malfunction or damage to the system.
For most jobs, you do NOT need to use cleaners. However, for cleaning surfaces that may have an oil base
mixed with dirt, we recommend Vapormate (Available at www.homedepot.com or www.ussteam.net)
cleaning agent, which is 100% all natural, and formulated for EXTERNAL use with the steam cleaner. When
using a cleaner, lightly mist area to be cleaned with solution mixed 4 parts water and 1 part concentrate. If a
4 to 1 ratio does not seem strong enough, try changing formulation to 3 parts water, and 1 part concentrate.
Accessory Cleaning – Do after each time used
Always wash accessory brushes with warm, mild soapy water after each use. Get in the good habit of
cleaning brushes before the dirt dries on them. All accessories can also be cleaned in the dishwasher,
except for the flexible hose. Accessories can be sanitized by steaming them with the steam hose and the 1
hole nozzle.
Vapor Boss Steam System
16
Rev 6/11
STANDARD TERMS AND CONDITIONS
ONE YEAR LIMITED WARRANTY
Austin K. Inc (“AKI”) warrants that the Vapor Boss Steam System sold by US Steam. (Seller) will be free from
defects in material and workmanship for a period of one (2) years, boiler 5 years from the date of shipment. The Vapor
Boss is not intended for commercial use; warranties will be voided for any use in commercial environments.
TERMS OF LIMITED WARRANTY
The limited warranty becomes effective on the date of shipment from US Steam and is granted to the initial customer
end user only and is nontransferable. Any claims under this warranty must be made before the end of the applicable
warranty period. During such period if AKI determines that a part or system is defective in material or workmanship,
AKI, at its option, will provide you with a repaired part or replace any part that is covered by the limited warranty.
AKI reserves the right to substitute functionally equivalent new or serviceable reconditioned parts or systems. AKI’s
responsibility is limited to repair, replacement, credit or refund, any of which may be selected by AKI at its sole
discretion.
The limited warranty covers only defects arising from normal use and does not include malfunctions or failures arising
from: misuse, abuse, neglect, alteration, usage not in accordance with user manual and instructions, depletion of
consumables, acts of nature or damage caused by repairs where such repairs were made without AKI’s express
approval.
The Warranty does not cover defects or damage arising from the disassembly or attempted disassembly of Vapor Boss
Steamer without AKI’s approval.
SERVICE and SUPPORT
If you need support for your Vapor Boss Steamer call 1-888-788-1234 (M-F 9am-5pm CST) to speak with a Customer
Service Representative, or contact us through the web atwww.ussteam.net Representative will troubleshoot the
problem and determine if the Vapor Boss Steamer should be returned for further diagnosis. The customer service
representative will advise you if you should ship your machine to our National Customer Service Center.
Before you ship your Vapor Boss Steamer for service, you must call 1-888-788-1234 (M-F 9am-5pmCEST) or contact
us through the web at www.ussteam.net Our customer service representative will explain how you must package and
ship your Vapor Boss Steamer to prevent further damage. The Customer Service Representative will also provide you
with a return authorization (RMA), if required.
RETURN PROCEDURES
You are responsible for returning products to either supplier, Austin K. Inc., 110 S. Hampton, Crowley, TX, 76036, or
the designated service center at your expense. Prior to returning the product(s) you must obtain a Return
Merchandise Authorization (RMA) by calling 1-888-788-1234. No returns will be accepted without RMA #. When
packing the Vapor Boss Steamer, you must use the original packing material to prevent damage in shipping. Make sure
you include all items as listed on pages 3-4 of this manual.
LIMITATIONS
EXCEPT AS SET FORTH HEREIN, AKI MAKES NO WARRANTIES, EXPRESSED OR IMPLIED, AND DISCLAIM AND
NEGATE ALL OTHER WARRANTIES, INCLUDING WITHOUT LIMITATIONS, IMPLIED WARRANTIES OF
MERCHANTABILITY, FITNESS FOR THE PARTICULAR PURPOSE AND CONFORMITY TO MODELS OR SAMPLES.
SOME JURISDICTIONS DO NOT ALLOW LIMITATIONS ON IMPLIED WARRANTIES, SO THESE LIMITATIONS MAY
NOT APPLY TO YOU.
THE WARRANTY SET FORTH HEREIN GIVES YOU SPECIFIC LEGAL RIGHTS, AND YOU MAY HAVE OTHER
RIGHTS, WHICH VARY FROM STATE TO STATE. IN NO EVENT SHALL AKI BE LIABLE FOR ANY INDIRECT,
SPECIAL, INCIDENTAL, OR CONSEQUENTIAL DAMAGES, SO THE ABOVE EXCLUSION OR LIMITATION MAY NOT
APPLY TO YOU. NO VARIATION OR EXCEPTIONS IN THE TERMS STATED HEREIN CAN BE MADE.
Vapor Boss Steam System
17
Rev 6/11
GOVERNING LAW, JURISDICTION AND COSTS
THESE LIMITED WARRANTIES ARE INCORPORATED INTO AND ARE ESSENTIAL AND MATERIAL PROVISIONS OF
THE TERMS AND CONDITIONS OF SALE OR SELLER PRODUCTS TO YOU. ALL DISPUTES ARISING OUT OF OR
RELATED TO THE LIMITED WARRANTY SET FORTH HEREIN (CUSTOMER DISPUTES) SHALL BE GOVERNED BY
THE LAWS OF THE STATE OF TEXAS. THE CUSTOMER HEREBY CONSENTS TO THE JURISDICTION AND VENUE
OF THE STATE COURTS OF TEXAS TO RESOLVE ANY AND ALL CUSTOMERS DISPUTES WITH BOSTON GREEN
GOODS, INC., AND THE CUSTOMER WAIVES ALL DEFENSES TO SUCH JURISDICITON AND VENUE INCLUDING,
BUT NOT LIMITED TO, ANY DEFENSE BASED ON INCONVENIENT FORUM. IN THE EVENT THE CUSTOMER AND
BOSTON GREEN GOODS, INC. ARE UNABLE TO RESOLVE ANY CUSTOMER DISPUTE, AND ANY COLLECTION
ACTION, SUIT OR OTHER JUDICIAL PROCEEDING IS COMMENCED; THE PREVAILING PARTY IN ANY SUCH
ACTION, SUIT OR PROCEEDING SHALL BE ENTITLED TO RECOVER ITS COSTS AND REASONABLE ATTORNEY’S
FEES INCURRED.
Vapor Boss Steam System
18
Rev 6/11
Servie Questions: Contact US Steam at 1-888-788-1234
Sales Inquiries: Contact Sylvane at 1-800-934-9194 or visit sylvane.com
-------------------------------------------------------------------------------------------------------------------------------------------------
WARRANTY REGISTRATION
To help us serve you better and to activate your warranty,
please fill information below and mail to manufacturer’s service center:
Austin K. Inc
P.O. Box 601
Crowley TX, 76036
Name: _______________________________________________________________
Address: __________________________________________________
__________________________________________________________
State:_____
Zip Code: _______________
Phone #: _____ - _____ - _____________
E-Mail:_________________________________
Serial #:______________ Date Purchased :__________ Purchased from:___________________
How did you hear about the Vapor Boss Steamer?
___TV ___WEB ___ Friend ___ ABC Sales Rep Other_______________________________________
If you have any questions or comments,
Please contact our Customer Service Department:
Email [email protected] or
call toll-free 1-888-788-1234 (Monday-Friday 9am-5pm CST)
Vapor Boss Steam System
19
Rev 6/11