1
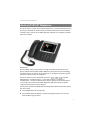
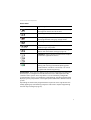
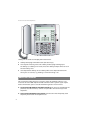
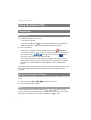
Aastra 6739i
SIP Telephone at the Communications Systems
Aastra 800 and OpenCom 100
User Guide
Welcome to Aastra
Thank you for choosing this Aastra product. Our product meets the strictest
requirements with regard to quality and design.
The following operating instructions will assist you in using your Aastra 6739i and
answer most of the questions that may arise.
If you should require any further technical support or information about other
Aastra products, please first contact the person responsible for your system or get
in touch with your local retailer.
You can also find information about this phone and other products on our website
at http://www.aastra.de or http://www.aastra.com.
We hope you enjoy using your Aastra 6739i.
Aastra 800 and OpenCom 100
This user guide applies to the Aastra 800 and OpenCom 100 communications
systems.
The OpenCom 100 product family comprises the OpenCom 130, OpenCom 131,
OpenCom 150, OpenCom 510 and OpenCom X320 communications systems.
If individual features differ on the systems, a reference is made in this user guide.
Contents
Aastra 6739i SIP Telephone. . . . . . . . . . . . . . . . . . . . . . . . . . . . . . . . . . . . . . . . . . . . . . 1
Key Description. . . . . . . . . . . . . . . . . . . . . . . . . . . . . . . . . . . . . . . . . . . . . . . . . . . . . . . . . . . . . 2
About this Manual . . . . . . . . . . . . . . . . . . . . . . . . . . . . . . . . . . . . . . . . . . . . . . . . . . . . . . . . . . 4
Distinctive Features of the Communications System . . . . . . . . . . . . . . . . . . . . . . . . . 5
Using the Aastra 6739i . . . . . . . . . . . . . . . . . . . . . . . . . . . . . . . . . . . . . . . . . . . . . . . . . . 6
Telephoning . . . . . . . . . . . . . . . . . . . . . . . . . . . . . . . . . . . . . . . . . . . . . . . . . . . . . . . . . . . . . . . . 6
Making Calls . . . . . . . . . . . . . . . . . . . . . . . . . . . . . . . . . . . . . . . . . . . . . . . . . . . . . . . . . . . . 6
Calling with Selective Line Seizure . . . . . . . . . . . . . . . . . . . . . . . . . . . . . . . . . . . . . . . 6
Answering a Call . . . . . . . . . . . . . . . . . . . . . . . . . . . . . . . . . . . . . . . . . . . . . . . . . . . . . . . . 7
Accepting a Call while Telephoning . . . . . . . . . . . . . . . . . . . . . . . . . . . . . . . . . . . . . . 7
Holding a Call . . . . . . . . . . . . . . . . . . . . . . . . . . . . . . . . . . . . . . . . . . . . . . . . . . . . . . . . . . . 8
Taking a Call from Another Terminal (Take) . . . . . . . . . . . . . . . . . . . . . . . . . . . . . . . 8
Accepting a Call for Another Terminal (Pickup) . . . . . . . . . . . . . . . . . . . . . . . . . . . 8
Ending a Call . . . . . . . . . . . . . . . . . . . . . . . . . . . . . . . . . . . . . . . . . . . . . . . . . . . . . . . . . . . . 9
Three-Party Calls. . . . . . . . . . . . . . . . . . . . . . . . . . . . . . . . . . . . . . . . . . . . . . . . . . . . . . . . . . . . 9
Enquiry . . . . . . . . . . . . . . . . . . . . . . . . . . . . . . . . . . . . . . . . . . . . . . . . . . . . . . . . . . . . . . . . . 9
Toggling . . . . . . . . . . . . . . . . . . . . . . . . . . . . . . . . . . . . . . . . . . . . . . . . . . . . . . . . . . . . . . .10
Transferring Call to Another Caller . . . . . . . . . . . . . . . . . . . . . . . . . . . . . . . . . . . . . .10
Conference. . . . . . . . . . . . . . . . . . . . . . . . . . . . . . . . . . . . . . . . . . . . . . . . . . . . . . . . . . . . .11
Other Device Functions . . . . . . . . . . . . . . . . . . . . . . . . . . . . . . . . . . . . . . . . . . . . . . . . . . . .11
Handsfree / Open-Listening Mode . . . . . . . . . . . . . . . . . . . . . . . . . . . . . . . . . . . . . .11
Mute Function . . . . . . . . . . . . . . . . . . . . . . . . . . . . . . . . . . . . . . . . . . . . . . . . . . . . . . . . .11
Adjusting Volume Level . . . . . . . . . . . . . . . . . . . . . . . . . . . . . . . . . . . . . . . . . . . . . . . .12
Call Protection . . . . . . . . . . . . . . . . . . . . . . . . . . . . . . . . . . . . . . . . . . . . . . . . . . . . . . . . .12
Call Waiting Protection . . . . . . . . . . . . . . . . . . . . . . . . . . . . . . . . . . . . . . . . . . . . . . . . .12
Using a Headset . . . . . . . . . . . . . . . . . . . . . . . . . . . . . . . . . . . . . . . . . . . . . . . . . . . . . . . .12
Speed Dialling . . . . . . . . . . . . . . . . . . . . . . . . . . . . . . . . . . . . . . . . . . . . . . . . . . . . . . . . . . . . .13
Caller Lists . . . . . . . . . . . . . . . . . . . . . . . . . . . . . . . . . . . . . . . . . . . . . . . . . . . . . . . . . . . . . . . . .13
Messages. . . . . . . . . . . . . . . . . . . . . . . . . . . . . . . . . . . . . . . . . . . . . . . . . . . . . . . . . . . . . . . . . .14
Phone book . . . . . . . . . . . . . . . . . . . . . . . . . . . . . . . . . . . . . . . . . . . . . . . . . . . . . . . . . . . . . . .15
Call Forwarding. . . . . . . . . . . . . . . . . . . . . . . . . . . . . . . . . . . . . . . . . . . . . . . . . . . . . . . . . . . .16
Voicebox . . . . . . . . . . . . . . . . . . . . . . . . . . . . . . . . . . . . . . . . . . . . . . . . . . . . . . . . . . . . . . . . . .16
Busy Lamp Field . . . . . . . . . . . . . . . . . . . . . . . . . . . . . . . . . . . . . . . . . . . . . . . . . . . . . . . . . . .17
Messenger . . . . . . . . . . . . . . . . . . . . . . . . . . . . . . . . . . . . . . . . . . . . . . . . . . . . . . . . . . . . . . . .18
Hot Desking . . . . . . . . . . . . . . . . . . . . . . . . . . . . . . . . . . . . . . . . . . . . . . . . . . . . . . . . . . . . . . .18
i
Configuring the Aastra 6739i . . . . . . . . . . . . . . . . . . . . . . . . . . . . . . . . . . . . . . . . . . .19
Programming Function Keys . . . . . . . . . . . . . . . . . . . . . . . . . . . . . . . . . . . . . . . . . . . . . . . 19
Programming on the Web Configurator. . . . . . . . . . . . . . . . . . . . . . . . . . . . . . . . . 19
Programming on the Aastra 6739i . . . . . . . . . . . . . . . . . . . . . . . . . . . . . . . . . . . . . . 21
Settings via the Options Menu . . . . . . . . . . . . . . . . . . . . . . . . . . . . . . . . . . . . . . . . . . . . . 22
Aastra 6739i restarting . . . . . . . . . . . . . . . . . . . . . . . . . . . . . . . . . . . . . . . . . . . . . . . . . 22
Deleting a Local Configuration . . . . . . . . . . . . . . . . . . . . . . . . . . . . . . . . . . . . . . . . . 23
Restoring Factory Settings. . . . . . . . . . . . . . . . . . . . . . . . . . . . . . . . . . . . . . . . . . . . . . 23
Aastra 6739i Passwords . . . . . . . . . . . . . . . . . . . . . . . . . . . . . . . . . . . . . . . . . . . . . . . . . . . . 24
Picture ID Server. . . . . . . . . . . . . . . . . . . . . . . . . . . . . . . . . . . . . . . . . . . . . . . . . . . . . . . . . . . 24
Index . . . . . . . . . . . . . . . . . . . . . . . . . . . . . . . . . . . . . . . . . . . . . . . . . . . . . . . . . . . . . . . . . .25
ii
Aastra 6739i SIP Telephone
Aastra 6739i SIP Telephone
The Aastra 6739i is a Voice over IP (VoIP) telephone in accordance with the internationally standardised SIP standard (Session Initiation Protocol). Connected to the
communications system Aastra 800 / OpenCom 100 you have additional comfort
functions available.
Aastra 6739i
A special feature of the Aastra 6739i is its high resolution backlit touchscreen
display and full VGA resolution (640 x 480 pixels). Using the latest in technology,
navigation menus are shown on this display for accessing the complete range of
functions available on this SIP telephone.
The Aastra 6739i has three dedicated trunk keys
/
/
with LED.
Along with the 14 dedicated keys – e.g. for the “Forward”, “Conference”,
“Hold”features – the device offers 55 user-specific softkeys on the display which
can have functions of the Aastra 800 / OpenCom 100 communication system
assigned to them (please refer to page 2).
The key extensions Aastra M670i or Aastra M675i offer additional function keys for
the Aastra 6739i:
■
Aastra M670i: offers 36 function keys
■
Aastra M675i: offers 20 softkeys respectively programmable on three levels
(total of 60 storage locations)
1
Aastra 6739i SIP Telephone
Up to three key extensions can be connected: three key extensions of either the
M670i type or three of the M675i type. Key extensions cannot be combined on the
Aastra 800 / OpenCom 100 communications system.
Aastra M670i
Aastra M675i
Key Description
The following table explains the 14 dedicated keys of the Aastra 6739i.
Aastra 6739i
Keys
Key Description and Function
Options key: accesses the Options List menu card
(please refer to Settings via the Options Menu
starting on page 22).
Caller key: opens the list of missed calls (please refer
to Caller Lists starting on page 13).
Phone book key: opens the phone book of the
Aastra 800 / OpenCom 100 communications system
(please refer to Phone book starting on page 15).
Services key: this key is not used on the Aastra 800 /
OpenCom 100 communications system.
Conference key: establishes a conference
Transfer key: transfers the current call to another
subscriber
2
Aastra 6739i SIP Telephone
Aastra 6739i
Keys
Key Description and Function
Hold key: puts the current call on hold. Press this key
once again to retrieve the call on hold.
Redial key: redials previously dialled numbers.
Goodbye key: ends an active call or exits an open
menu page without saving any changes made.
Mute key: turns the microphone on or off.
Volume control keys: adjusts the volume for the
handset, ringer and speaker.
Voice mail key: opens the list of voicebox messages
(please refer to Voicebox starting on page 16).
Trunk keys: connect you to a specific line or accept a
call which is signalled on the line.
Handsfree key: activates the Handsfree function for
making and receiving calls without picking up the
handset. When a headset is connected, a call can be
accepted and ended using this key.
Function keys: These keys are softkeys on the touchscreen display. The functions
of these keys are configured and labelled with the Aastra 800 / OpenCom 100
communications system. These keys offer access to individually configurable
system functions such as e.g. configuring call forwarding, executing speed dialling,
displaying a busy lamp field or accessing the phone book of the communications
system.
Depending on the function programmed the respective state is signalled via the
softkey lighting up red or blinking red (please refer to the chapter Programming
Function Keys starting on page 19).
3
Aastra 6739i SIP Telephone
1
1
3
.....
1
4
GHI
7 PQRS
2 ABC
3 DEF
5
6 MNO
JKL
8 TUV
9 WXYZ
0
#
2
Softkeys on the touchscreen display of the Aastra 6739i
1 Softkeys with programmed functions (function keys)
2 Level key for switching levels: This softkey enables programming up to
55 softkeys (11 softkeys on 5 levels). Press this softkey multiple times to reach
the desired key level.
3 state-dependent softkeys: These softkeys offer state-dependent functions
which you can activate, e.g. holding a call while making a call.
About this Manual
This manual describes how to use an Aastra 6739i SIP telephone which is connected to an Aastra 800 / OpenCom 100 communications system. If you require
further information, please consult the following Aastra 6739i manuals:
4
■
Aastra 6739i SIP IP Phone Installation Guide (print version included with the
product): describes features, controls and possible connections of your SIP
telephone.
■
Aastra 6739i SIP IP Phone User Guide: describes the most frequently used
telephony features for the telephone user.
Aastra 6739i SIP Telephone
■
Aastra SIP IP Phone Administrator Guide: contains extensive information for
the administrator and describes how to configure the SIP telephone within the
network.
These manuals may also be downloaded as PDF files from the Aastra website.
Please note the information on configuration and operation of SIP telephones in
the Aastra 800 / OpenCom 100 communications system documentation:
■
Mounting and Commissioning manual (for the Aastra 800 communications
system: Installation and Commissioning)
■
Aastra 800 and OpenCom 100 Online Help
This documentation is available on the OpenCom 100 product CD (on the USB
stick for the Aastra 800). Current versions are available for download on the Aastra
website.
Distinctive Features of the Communications System
When you operate an Aastra 6739i on the Aastra 800 / OpenCom 100 communications system, some functions differ from how they are described in the installation
guide and in the user guide.
This applies especially to functions which are provided locally on the device as
well as via the Aastra 800 / OpenCom 100 communications system. In these cases,
the functions provided by the communications system are used. The corresponding local device menus will not appear then.
■
The Aastra 6739i does not execute its own call forwarding. Use the call
forwarding function of the Aastra 800 / OpenCom 100 communications system
(please refer to Call Forwarding starting on page 16).
■
The Aastra 6739i does not manage a local caller list nor a local phone book.
Configure function keys instead to access the callers list (Caller Lists starting on
page 13) and the phone book (please refer to Phone book starting on page 15)
of the Aastra 800 / OpenCom 100 communications system.
■
The Aastra 6739i has a separate Web interface. This is blocked by the
Aastra 800 / OpenCom 100 communications system.
5
Using the Aastra 6739i
Using the Aastra 6739i
Telephoning
Making Calls
1. In order to establish a connection,
– pick up the handset or
– press the handsfree key
, to make the following call in the handsfree
mode (see Handsfree / Open-Listening Mode starting on page 11).
2. Dial a call number:
– Enter the call number using the number keys. Press the
Dial softkey.
– Or: Press the redial key
to call back a previously dialled call number. Use
the navigation keys
to browse the list. Press the
softkey
next to the desired entry or pick up the handset.
– Or: Press the function key with the phone book function (please refer to
Phone book starting on page 15). This function is for selecting a call number
from the phone book of the Aastra 800 / OpenCom 100 communications
system.
The display shows a picture (photo) of the user called if an image has been saved
on the Aastra 800 / OpenCom 100 communications system (please refer to
page 24).
Calling with Selective Line Seizure
If multiple trunk keys are configured for your telephone, you can seize a line selectively.
1. Press a trunk key
/
/
to seize a specific line.
2. Dial a call number (see page 6).
Note
If the administrator has linked a trunk key
/
/
with a SIP user
account, you will be calling under the call number of the SIP user account. If the
trunk key is not linked, the call number of trunk key 1
is used.
6
Using the Aastra 6739i
Answering a Call
An incoming call is signalised via ringer, a blinking trunk key and the blinking red
LED indicator to the upper right. The display shows a picture (photo) of the person
you are speaking with if an image has been saved on the Aastra 800 /
OpenCom 100 communications system (please refer to page 24).
To accept the call, you:
■
pick up the handset or
■
press the
■
press the blinking trunk key
■
press the handsfree key
mode (see page 11).
Answer softkey or
/
/
or
to accept the following call in the handsfree
During call signalling you can:
■
press the
Silence softkey to mute the ringer. The person calling continues
to hear the ringing tone.
■
press the
busy tone.
Reject softkey to reject the call. The person calling now hears the
Accepting a Call while Telephoning
You are telephoning, e.g. on trunk key 1
, hear the call-waiting tone and see
the call on the display. The LED next to your available trunk key, e.g.
, is
blinking.
1. Press the trunk key where the caller is waiting. The first caller is put on hold. You
talk with the caller.
2. You can also toggle back and forth between callers or initiate a conference
with both callers (please refer to page 11 also).
3. Press the goodbye key
to terminate the current call. Then press the trunk
key where the other caller is waiting. You are now connected with the caller on
hold once again.
Note
If you have switched on call waiting protection (please refer to page 12 also) no
other calls will be signalled (no call-waiting tone, no LED of an available trunk key
blinking). Callers now receive the busy signal.
7
Using the Aastra 6739i
Holding a Call
You can briefly interrupt an ongoing call:
1. Press the hold key
music on hold.
or the
Hold softkey. The person calling now hears
2. Press the hold key
the call.
once again or press the
Hold softkey to continue
Taking a Call from Another Terminal (Take)
You can accept an ongoing call from another terminal on your Aastra 6739i and
continue it there. To be able to do so, your telephone and the other terminal have
to have the same internal call number. To do so, the administrator of the
Aastra 800 / OpenCom 100 communications system has to configure a Take
function key (please refer to Programming Function Keys starting on page 19).
To accept the call on the Aastra 6739i you:
■
pick up the handset and press the Take function key or
■
– when the handset is not picked up – press the Take function key to accept
the call in the handsfree mode (please refer to page 11).
Accepting a Call for Another Terminal (Pickup)
You can accept a call for another telephone in your Pickup group. To do so, the
administrator of the Aastra 800 / OpenCom 100 communications system has to
configure a Pickup function key (please refer to Programming Function Keys
starting on page 19).
Another telephone in your Pickup group is ringing. To accept the call, you:
■
pick up the handset and press the Pickup function key or
■
– when the handset is not picked up – press the Pickup function key to accept
the call in the handsfree mode (please refer to page 11).
If you are telephoning and would like to accept a call using Pickup …
1. Press an unassigned trunk key, e.g. trunk key 2
.
The person calling is put on hold and now hears music on hold.
2. Press the Pickup function key.
3. You can also toggle back and forth between callers or initiate a conference
with both callers (please refer to page 10 also).
8
Using the Aastra 6739i
Note
“Pickup” is not possible if the person called belongs to a user group which has
pickup protection activated.
Ending a Call
To end a call you do as follows:
■
Put down the handset.
or
■
press the goodbye key
.
Three-Party Calls
You are making a call, e.g. on the trunk key 1
, its corresponding LED indicator
is lit. You can now forward the call, execute an enquiry, switch back and forth
between two callers (“toggle”) or set up a conference. You can use any available
trunk key
/
/
for three-party conference calls.
Enquiry
While telephoning, you can make an enquiry to another caller.
Note
The enquiry function cannot be used to transfer calls on SIP telephones.
Alternatively, use the
Transfer softkey or the transfer key
.
1. Press an unassigned trunk key, e.g. trunk key 2
. Alternatively press the
Hold softkey and then press an available trunk key.
You hear the internal dialling tone. The person calling is put on hold and now
hears music on hold.
2. Now dial the call number of the caller desired and make the enquiry call.
3. Press the goodbye key
to terminate the enquiry call.
4. Press the trunk key where the first caller is waiting or press the
Hold softkey. You are now connected with the caller on hold once again.
9
Using the Aastra 6739i
Note
If after ending the enquiry call you put down the handset, after a few seconds
you will automatically be called back with the connection on hold.
Toggling
While you are conducting an enquiry call, the first caller is put on hold (see
page 9). Now you can toggle between callers (switch back and forth).
1. Press the trunk key (e.g.
) of the caller waiting currently. The other caller is
put on hold. The LED indicator of the trunk key of the respectively held caller
blinks during this process. The held caller hears music on hold.
2. Press the trunk key of the caller waiting to switch to that caller. The other caller
is now put on hold.
Tip:
While you are talking with the first caller (the second caller is
on hold), you can initiate a conference with both callers. To do
so, press the
Conf softkey or the
conference key. To
end the conference specifically, please read the description
on page 11.
3. Ending toggling: Press the goodbye key
to terminate the current call.
4. Then press the trunk key where the other caller is waiting or press the
Hold softkey. You are now connected with the caller on hold once again.
Transferring Call to Another Caller
1. Press the
Transfer softkey or the transfer key
.
You hear the internal dialling tone. The person calling is put on hold and now
hears music on hold.
2. Dial the call number of the internal caller desired.
– Transferring a call with notification: When the caller answers, announce
the call transfer. Press the
Transfer softkey or the transfer key
.
– Transferring a call without notification: When you wish to wish to transfer
the call without notification, wait for the ringing tone. Press the
Transfer softkey or the transfer key
. The caller on hold now hears the
ringing tone of the transfer destination and waits for the call to be accepted.
10
Using the Aastra 6739i
Conference
You can speak with two callers simultaneously in a so-called “three-party conference”.
1. You are speaking with someone on the telephone.
2. Press the
hold.
Conf softkey or the
conference key. Your caller is put on
3. Dial the call number of the conference caller desired.
4. When the second caller answers, announce the conference. Press the
Conf softkey or the
conference key.
You are now connected with both callers in a three-party conference. The
display shows the list of conference partners.
5. Do the following to end the conference:
– Disconnecting individual callers from the conference: Press the
softkey of the caller. This ends the connection to the caller selected.
– Ending a conference: Put down the handset or press the goodbye key
to end the conference (connection to both callers).
Other Device Functions
Handsfree / Open-Listening Mode
You can make a call in the handsfree mode, e.g. to let anyone present in the room
listen in. To do so, press the Loudspeaker key
before or during a call. The
speaker is switched on. The red LED indicator next to the handsfree key lights up.
Press the key once again to switch the speaker off.
Mute Function
If you do not want the caller to listen in to what, e.g. you are discussing with
someone in the room, you can temporarily mute the telephone. During a call press
the mute key
or the
Mute softkey. The microphone is switched off. The
red LED indicator next to the key blinks and your caller can no longer hear you.
Press the mute key
once again or the
Mute softkey to switch the microphone back on.
11
Using the Aastra 6739i
Adjusting Volume Level
You can adjust the volume of the ringer, of the handset or of the speaker with the
volume keys
.
■
During call signalling you can adjust the volume of the ringer.
■
While making a call, you adjust the volume of the handset or – in the handsfree
mode – the volume of the speaker.
Call Protection
The administrator of the Aastra 800 / OpenCom 100 communications system can
configure a Call prot. function key (please refer to Programming Function Keys
starting on page 19).
1. Press the Call prot. function key to activate call protection.
The softkey lights up red. The person calling hears the ringing tone, but your
telephone does not signal the call.
2. Press the function key once again to deactivate the call protection function.
Call Waiting Protection
The administrator of the Aastra 800 / OpenCom 100 communications system can
configure a Call waiting protection function key (please refer to Programming
Function Keys starting on page 19).
1. Press the Call waiting protection function key to activate call waiting
protection.
The softkey lights up red. While you are telephoning, other calls will not be
signalled by a call-waiting tone; the caller hears the busy tone.
2. Press the function key once again to deactivate the call waiting protection
function.
Using a Headset
Instead of using a handset, a headset can be connected to the Aastra 6739i. You
can press the
handsfree key in this case in order to accept and end calls.
You can configure whether to use the headset or the speaker for handsfree operation via the menu Options list > Audio (see Settings via the Options Menu
starting on page 22).
12
Using the Aastra 6739i
Note
Establishing a call can be delayed with SIP telephony. When using a headset, e.g.
you should wait a second before you begin to speak.
Speed Dialling
The administrator of the Aastra 800 / OpenCom 100 communications system can
configure function keys with speed dialling destinations (please refer to Programming Function Keys starting on page 19).
■
Pick up the handset and press the function key where the speed dialling
destination is programmed.
alternatively – when you wish to call in the handsfree mode:
■
Press the function key – with the handset down – where the speed dialling
destination is programmed.
Caller Lists
The administrator of the Aastra 800 / OpenCom 100 communications system can
configure Missed calls and Accepted calls function keys (please refer to Programming Function Keys starting on page 19). Use these function keys to access
the caller lists managed on the Aastra 800 / OpenCom 100 communications
system. The Missed calls softkey blinks when the list contains new entries.
1. Press the Missed calls or Accepted calls function key to show the respective
call list. Press the
caller key to display the list of missed calls.
The caller list appears.
2. Use the navigation keys
to go to the desired entry.
3. To call the caller back, pick up the handset or press the
softkey.
If you would like to conduct the following call in the handsfree mode, press the
handsfree key
and then the
Dial softkey.
The call number is called. The display shows a picture (photo) of the user called
if an image has been saved on the Aastra 800 / OpenCom 100 communications
system (please refer to page 24).
4. To show detailed information on the entry selected, press the
softkey. The
call number of the caller, number of calls from this call number and date of the
last call is displayed. You can now call the caller back as described in the
previous step.
13
Using the Aastra 6739i
5. To delete calls from the list press one of the following softkeys:
– Delete: You delete the entry selected.
– Delete all: You delete all entries on the call list.
6. Press the goodbye key
to exit the menu card.
Note
The list of dialled call numbers is displayed with the redial key
.
Messages
Aastra 800 / OpenCom 100 communications system users with a system terminal
can send you short messages. The Aastra 800 / OpenCom 100 communications
system also has a configuration determining whether or not you are informed of
incoming e-mails.
The administrator of the Aastra 800 / OpenCom 100 communications system can
configure a Messages function key for you (please refer to Programming Function
Keys starting on page 19) which enables to read messages on the telephone
display. The Messages softkey blinks red when there are new messages.
1. Press the Messages function key.
2. Use the navigation keys
to go to the desired entry.
3. To show detailed information on the entry selected, press the
text, date and time of the message is shown.
softkey. The
4. To delete calls from the list press one of the following softkeys:
– Delete: You delete the entry selected.
– Delete all: You delete all entries on the message list.
Notes
14
■
You can send short messages yourself with the OpenCTI 50 web application.
The online help of the Aastra 800 / OpenCom 100 communications system
offers information in this regard.
■
When you delete an e-mail message the e-mail itself is not deleted. You can
query, process and delete the e-mail with your e-mail programme.
Using the Aastra 6739i
Phone book
The administrator of the Aastra 800 / OpenCom 100 communications system can
configure a “Phone Book” function key (Ph.book) (please refer to Programming
Function Keys starting on page 19). Use this function key to access the phone
books managed on the Aastra 800 / OpenCom 100 communications system.
1. Press the “Phone Book” function key (Ph.book) or also the
key.
phone book
The Phonebook menu card appears.
2. Activate the Search field by pressing on it. A softkey keyboard appears on the
display. If you wish to open the entire phone book press the Submit softkey.
Alternatively you can search the phone book for the desired entry:
– Enter one or more initial letters of the phone book entry desired by pressing
softkeys on the keyboard.
– Use the Shift, Abc, Abc2, 123, &%* softkeys to make the desired character
appear on the keyboard.
– To correct a mistaken entry use the Bksp (backspace) softkey.
– Press the Hide softkey to hide the keyboard.
3. Confirm using the Enter softkey.
A list of the corresponding phone book entries of the Aastra 800 /
OpenCom 100 communications system will appear.
4. Use the navigation keys
to go to the desired entry.
If there are multiple call numbers saved in the phone book (Work, Mobile or
Home) these are shown on the display. Press on the display line showing the
desired call number.
5. To call the selected call number, pick up the handset or press the
softkey.
If you would like to conduct the following call in the handsfree mode, press the
handsfree key
and then the
Dial softkey.
The call number is called. The display shows a picture (photo) of the user called
if an image has been saved on the Aastra 800 / OpenCom 100 communications
system (please refer to page 24).
15
Using the Aastra 6739i
Call Forwarding
The administrator of the Aastra 800 / OpenCom 100 communications system can
configure a “Call forwarding” function key (Call forw.) (please refer to Programming Function Keys starting on page 19).
1. Press the “Call forwarding” function key (Call forw.).
The display shows a separate line with immediately, after Time or busy for
each type of call forwarding along with the status (on/off ). A separate call
forwarding can be configured for each type of call forwarding.
2. Press the
type.
softkey on the display line showing the desired call forwarding
3. Program the following call forwarding parameters by pressing the respective
softkey next to it:
– switch on / switch off: Switches call forwarding on or off.
– Phone No.: Activate the Phone No. field by pressing on it. A softkey
keyboard appears on the display.
Enter the destination call number to be forwarded to via the number keys.
To correct a mistaken entry use the Bksp (backspace) softkey.
Press the Hide softkey to hide the keyboard.
Confirm using the Enter softkey.
– Call type: Select the calls to be forwarded: intern (internal calls), extern
(external calls) or int.+ext. (internal and external calls). To do so, press the
softkey next to it.
4. Press the goodbye key
to exit the menu card.
Voicebox
The administrator of the Aastra 800 / OpenCom 100 communications system can
configure a voicebox for you as an answering machine. This voicebox is operated
via a “Voice message” function key (Voice msg.) (please refer to Programming
Function Keys starting on page 19). Activating or deactivating the voicebox is
done via call forwarding to a voicebox call number (please refer to Call Forwarding
starting on page 16).
Any time there are new messages on your OpenVoice voicebox, the Aastra 6739i
display shows the symbol
(upper left) and below it the number of voicebox
messages received. The Voice msg. softkey as well as the
voice mail key blink
red.
16
Using the Aastra 6739i
1. Press the “voice message” function key (Voice msg.) or also the
mail key.
voice
The display shows the list of received messages.
2. Use the navigation keys
to go to the desired entry.
3. To listen to the message, pick up the handset or press the Loudspeaker
key
. Your voicebox is called and the message is played.
If you would like to access the voicebox in the handsfree mode, press the
handsfree key
and then the
Dial softkey.
4. To show detailed information on the entry selected, press the
softkey. Date
and time of receipt of the message as well as duration of the message are
shown.
5. To delete entries from the list press one of the following softkeys:
– Delete: You delete the message from your voicebox selected.
– Delete all: You delete all messages in your voicebox.
6. Press the goodbye key
to exit the menu card.
It is also possible to configure a Voicebox function key. Use this function key to
call your voicebox.
1. Press the Voicebox function key.
The voicebox is called.
2. The next steps are voice controlled. Follow the voice menu instructions.
3. Press the goodbye key
to exit the voicebox system.
Busy Lamp Field
Use the “Busy Lamp Field” (BLF) to view another internal caller's state: free or busy.
You have to configure a separate BLF function key for every desired subscriber
number (please refer to Programming Function Keys starting on page 19). The
connection state of the user connected will be displayed on the function key as
follows:
■
Unlit: The caller is free. Press the BLF function key to call the caller.
■
Blinking: The caller is being called. Press the BLF function key to accept the call
(“Pickup”).
■
Lit: The caller is busy.
17
Using the Aastra 6739i
Messenger
The messenger function is for communicating your presence status to an internal
caller. When there is a call, the text is shown on the display of the caller, as long as
the caller's telephone is a terminal. Change your status using a Presence function
key (please refer to Programming Function Keys starting on page 19).
1. Press the function key with the Presence function.
The Presence menu card appears. There are prepared status texts available.
2. Use the navigation keys
to select the desired status. If a
presence status is not to appear for the caller, select the Available text.
3. Confirm the text selection by pressing the
softkey.
The Messenger status is changed.
The softkey lights up red when activated. Exception: The “available” status is not
indicated via softkey.
Hot Desking
The Aastra 6739i supports the “Hot Desking” feature. This feature enables you to
apply the user configuration of your Aastra 6739i to any other Aastra 6739i.
1. If the designated Aastra 6739i is currently in operation, press the Logout
function key and confirm the restart query prompt with the OK softkey.
The Aastra 6739i restarts. After restarting, the Login phone menu card
appears.
2. Activate the Phone No. field by pressing on it. A softkey keyboard appears on
the display. Use the number keys to enter your call number and press the
Enter softkey.
3. Activate the PIN field by pressing on it. A softkey keyboard appears on the
display. Use the number keys to enter your user PIN and press the
Enter softkey.
The Aastra 6739i restarts – it is configured with your configuration. If your configuration is currently active on another Aastra 6739i, the other Aastra 6739i will be
logged out automatically.
18
Configuring the Aastra 6739i
Configuring the Aastra 6739i
This chapter describes the configuration settings relevant for operating the
Aastra 6739i on the Aastra 800 / OpenCom 100 communications system.
A description of all possible settings of the Aastra 6739i can be found in your
“Aastra 6739i SIP IP Phone User Guide” (please refer to page 4).
Programming Function Keys
The function keys are implemented as softkeys. By switching between up to five
levels, the assignment capacities of each softkey are multiplied on the
Aastra 6739i.
Programming on the Web Configurator
With the Web Configurator of the Aastra 800 / OpenCom 100 communications
system the administrator can configure and change the following function keys
for your Aastra 6739i.
Function keys of Aastra 6739i
Key type
Parameter
Function
none
–
none
Speed dial
Call number
Direct dialling of a call number or code
procedure.
BLF
Call number
Busy Lamp Field; softkey shows when
caller is busy.
Ph.book
–
Shows phone book managed by the
Aastra 800 / OpenCom 100
communications system.
Missed calls
–
Shows the list of missed calls which is
managed on the Aastra 800 /
OpenCom 100 communications
system; softkey blinks red when there
are missed calls
Accepted calls
–
Shows list of answered calls accepted
by the Aastra 800 / OpenCom 100
communications system.
19
Configuring the Aastra 6739i
Function keys of Aastra 6739i
20
Key type
Parameter
Function
Voice msg.
–
Shows the list of recorded voice
messages; softkey blinks red when
there are messages
Voicebox
–
Calls your voicebox
Messages
–
Displays the list of short messages and
e-mails received; softkey blinks red
when there are messages
Presence
–
Display and change of your status as
present or absent (“Messenger”);
softkey blinks red when status
activated (exception: “Available” status
not displayed by softkey)
Call forw.
–
Displays “Call forwarding” menu
Call prot.
–
Switches call protection on or off;
softkey lights up red when function
activated
Call waiting
protection
–
Switches call waiting protection on or
off; softkey lights up red when function
activated
Pickup
–
Picks up a call from another device in
your pickup group
Take
–
Transfers an active call from another
device operated using your internal call
number
Logout
–
Logs out the telephone and shows the
Login Display
XML
URL
Calls the specified URL from a Web
server. Programmable function control
via XML data retrieval (please refer to
the “Aastra SIP IP Phone Administrator
Guide”)
Configuring the Aastra 6739i
Note
When the administrator has assigned you the corresponding user authorisation
you can also change these settings yourself in the menu Telephony: Devices:
System phones of the Configurator. Consult the Configurator online help for
further information.
Programming on the Aastra 6739i
You can also directly assign functions to available softkeys on the Aastra 6739i.
Furthermore, you can change or delete function keys which were programmed on
the Aastra 800 / OpenCom 100 Web Configurator. This programming is stored in
the local configuration of the Aastra 6739i.
Please note:
When the local configuration of your Aastra 6739i is deleted
(please refer to page 23) all function keys programmed on
the device are deleted. The configuration restored is the one
configured on the Web Configurator of the Aastra 800 /
OpenCom 100 communications system.
1. Press the options key
.
The Options list menu card appears.
2. Press the Softkeys softkey.
The display shows the overview of storage locations. Programmed function
keys are labelled; available storage locations are labelled Empty.
3. Press the softkey you wish to program.
Note: The Aastra 6739i user guide provides you with an overview of
programmable functions (in the “Options Key > Softkeys” chapter of the
manual).
4. Press the Type softkey to select the function you wish to program.
When you wish to delete a programmed function key select the Empty setting
and then press the
Save softkey to save the programming.
5. Enter the corresponding texts and parameters in the following menu card into
the Label and Value fields, e.g. a call number, on, or write over the existing
entries.
21
Configuring the Aastra 6739i
Activate a field by pressing on it. A softkey keyboard appears on the display:
– Use the Shift, Abc, Abc2, 123, &%* softkeys to make the desired character
appear on the keyboard.
– To correct a mistaken entry use the Bksp (backspace) softkey.
– Press the Hide softkey to hide the keyboard.
6. Press the
Save softkey to save the programming.
Settings via the Options Menu
Some Aastra 6739i configuration settings are made via the Options menu. You
navigate in this menu as follows:
1. Press the options key
.
The Options list menu card appears.
2. Press one of the softkeys displayed to access the menu entry assigned to it.
– Use the navigation keys
card.
– Use the
to browse through a displayed menu
softkey to go back a menu level.
3. Press the goodbye key
to exit the menu.
Use the “Aastra 6739i SIP IP Phone User Guide” when you require information on
the wide variety of settings of the Options lists menu.
Aastra 6739i restarting
You have to restart the Aastra 6739i sometimes, for example, to activate a changed
trunk key assignment.
1. Press the options key
.
The Options list menu card appears.
2. Press the Restart softkey.
3. Confirm the Restart The Phone? restart query with the Yes softkey.
The Aastra 6739i starts and is quickly ready for operation once again.
22
Configuring the Aastra 6739i
Deleting a Local Configuration
The Aastra 6739i saves local settings (e.g. audio settings, newly programmed or
changed function keys) in a local configuration. Use the following procedure to
delete the local configuration and to restore the configuration that was configured
in the Web Configurator of the Aastra 800 / OpenCom 100 communications
system.
1. Press the options key
.
The Options list menu card appears.
2. Press the Advanced softkey.
The display shows Enter Administrator Password.
3. Enter the administrator password with the number keys (please refer to
Aastra 6739i Passwords on page 24). Confirm using the Enter softkey.
The Advanced menu card appears.
4. Press the Reset softkey.
The Reset menu card appears.
5. Press the Erase Local Cfg. softkey.
The Aastra 6739i starts and is quickly ready for operation once again.
Restoring Factory Settings
It is possible that you have been operating the Aastra 6739i with another communications system or with an Internet SIP provider. To operate the Aastra 6739i with
the Aastra 800 / OpenCom 100 communications system, you should restore
factory settings.
1. Establish an Ethernet connection to the Aastra 6739i by connecting it to the
Aastra 800 / OpenCom 100 communications system. The Aastra 6739i requires
a DHCP address to execute the restart.
2. Wait until the Aastra 6739i has started. Now press the options key
.
The Options list menu card appears.
3. Press the Advanced softkey.
The display shows Enter Administrator Password.
4. Enter the administrator password with the number keys (please refer to
Aastra 6739i Passwords on page 24). Confirm using the Enter softkey.
The Advanced menu card appears.
23
Configuring the Aastra 6739i
5. Press the Reset softkey.
The Reset menu card appears.
6. Press the Factory Default softkey.
The Aastra 6739i restarts and obtains its configuration from the Aastra 800 /
OpenCom 100 communications system.
Aastra 6739i Passwords
Certain functions of the Aastra 6739i can only be accessed via password for
security reasons:
■
Logging in to the Aastra 6739i: Enter your call number and your user PIN
(please refer to Hot Desking starting on page 18).
■
Local settings on the telephone: The factory settings password is “22222”.
After the first log in of the Aastra 6739i onto the Aastra 800 / OpenCom 100
communications system this password is overwritten by the communications
system for security reasons.
Picture ID Server
The Aastra 6739i can show a picture of the caller on the display (for both incoming
and outgoing calls as well as for phone book entries, on the caller list and on the
redial list). To do so, there must be an image of the caller saved on the Picture ID
server.
The address of the Picture ID server is configured in the Web Configurator of the
Aastra 800 / OpenCom 100 communications system (System: Common menu).
Please consult the online help for information on the configuration and file format
of the images.
24
Index
Index
A
Aastra M670i 1
Aastra M675i 1
Accepted calls 19
Administrator password 23
B
Busy lamp field 19
C
Call forwarding 16, 20
Call protection 12, 20
Call waiting protection 12, 20
Caller key 2
Caller list 13
Call-waiting tone 7, 12
Conference 9, 11
Conference key 2
E
Enquiry 9
F
Factory settings 23
Function keys 3
G
Goodbye key 3, 9
H
Handsfree 11
Handsfree key 3
Hold key 3
Hot desking 18
K
Key extensions 1
Aastra M670i 1
Aastra M675i 1
L
Logout 20
M
Messages 14, 20
Messenger 20
Missed calls 19
Mute key 3
O
Open-listening 11
Options key 2
P
Password 24
Ph.book 19
Phone book 15
Phone book key 2
Pickup 20
Presence 20
R
Redial key 3
Restarting 22
S
Short messages 14, 20
Speed dial 19
Speed dialling 13
T
Take 20
Toggling 9, 10
Transfer 9, 10
Transfer key 2
Trunk keys 3
25
Index
V
Voice mail key 3
Voice message 20
Voicebox 20
Volume
adjusting 12
Volume control keys 3
X
XML 20
26
Copyright 2010 www.aastra.com
All rights reserved
As of 26.05.2010 • Subject to changes