1
1 RITRON, INC. LIMITED
1
WARRANTY 1
WHAT THIS WARRANTY COVERS
RITRON, INC. ("RITRON") provides the following warranty against defects in materials and/ or workmanship in
RITRON JOBCOM Radios, Rechargeable Batteries and Accessories under normal use and service during the
applicable warranty period, as stated below. "Accessories" means antennas, chargers, headsets, earphones,
speakers, holsters and microphones. Rechargeable batteries will be replaced during the applicable warranty period
only if leakage occurs, or the batteries drop below 75% of rated capacity.
WHAT IS COVERED
FOR HOW LONG
WHAT RITRON WILL DO
RITRON JOBCOM
Radios
1 year parts*
1 year labor*
During the first year after date of purchase, RITRON will refund
your purchase price or repair or replace the defective product, at
RITRON's option, parts and labor included at no charge to you.
RITRON JOBCOM
Rechargeable Batteries
1 year parts*
RITRON will replace the defective battery.
RITRON JOBCOM
90 days *
RITRON's
*After date of purchase
1
1
1
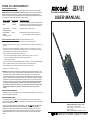
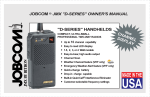
The Leader In Jobsite Radios
JBX-151
1
USER MANUAL
RITRON will repair or replace the defective accessory, at
option, parts and labor included at no charge to you.
WHAT THIS WARRANTY DOES NOT COVER This warranty statement does not cover:
Any technical information provided with the covered product or any other RITRON products;
Installation, maintenance or service of the product, unless this is covered by a separate written agreement with
RITRON;
Any products not furnished by RITRON which are attached or used with the covered product, or defects or
damage from the use of the covered product with equipment that is not covered, such as defects or damage
from the charging or use of batteries other than with covered product;
Defects or damage, including broken antennas, resulting from:
- misuse, abuse, improper maintenance, alteration, modification, neglect, accident or act of God,
- the use of covered products other than in normal and customary manner or,
- improper testing or installation;
Defects or damages from unauthorized disassembly, repair or modification, or where unauthorized disassembly,
repair or modification prevents inspection and testing necessary to validate warranty claims;
Defects or damages in which the serial number has been removed, altered or defaced.
Batteries if any of the seals are not intact.
IMPORTANT: This warranty sets forth the full extent of RITRONs express responsibilities regarding the covered
products, and is given in lieu of all other express warranties. What RITRON has agreed to do above is your sole
and exclusive remedy. No person is authorized to make any other warranty to you on behalf of RITRON.
Warranties implied by state law, such as implied warranties of merchantability and fitness for a particular purpose,
are limited to the duration of this limited warranty as it applies to the covered product. Incidental and consequential damages are not recoverable under this warranty (this includes loss of use or time, inconvenience, business
interruption, commercial loss, lost profits or savings). Some states do not allow the exclusion or limitation
of incidental or consequential damages, or limitation on how long an implied warranty lasts, so the
above limitations or exclusions may not apply to you. Because each covered product system is unique,
RITRON disclaims liability for range, coverage, or operation of the system as a whole under this
warranty.
WHO IS COVERED BY THIS WARRANTY
This warranty is given only to the purchaser or lessee of covered products when acquired for use, not resale. This
warranty is not assignable or transferable.
HOW TO GET WARRANTY SERVICE
To receive warranty service, you MUST deliver or send the defective product, delivery costs and insurance
prepaid, within the applicable warranty period, to RITRON, INC., 505 West Carmel Drive, Carmel, Indiana 46032,
Attention: Warranty Department.
Please point out the nature of the defect in as much detail as you can. You MUST retain your sales or lease
receipt (or other written evidence of the date of purchase) and deliver it along with the product. If
RITRON chooses to repair or replace a defective product, RITRON may replace the product or any part or
component with reconditioned product, parts or components. Replacements are covered for the balance of the
original applicable warranty period. All replaced covered products, parts or components become RITRONs
property.
Publication No. 01451172
Rev. H
07-02
© 2002 RITRON, INC. ALL RIGHTS RESERVED
RITRON, JOBCOM, JBX, Quick Assist, and Quiet Call are registered
trademarks of RITRON, INC.
TORX® is a registered trademark of Camcar Division of Textron, Inc.
®
505 West Carmel Drive, Carmel, IN 46032 P.O. Box 1998 Carmel, IN 46082-1998
800-USA-1-USA Fax: 317-846-4978 [email protected] www.ritron.com
2
2
TABLE OF CONTENTS
DESCRIPTION
2
2
2
2
2
HOW TO OBTAIN AN FCC RADIO LICENSE
PAGE
INTRODUCTION
General ................................................................................... 3
Model and Frequency Identification ....................................... 3
OPERATING CONTROLS ................................................... 3
RADIO CARE
General ................................................................................... 5
Battery ..................................................................................... 5
Battery Maintenance ............................................................... 5
TROUBLESHOOTING ........................................................... 8
QUIET CALL PRIVACY MODULE
General ................................................................................. 10
Installation ............................................................................ 10
ACCESSORIES
Optional Items ........................................................................ 9
Replacement Items ................................................................ 9
Belt Clip Installation ............................................................. 11
HOW TO OBTAIN AN FCC RADIO LICENSE ........... 11
RITRON, INC. LIMITED WARRANTY ........................... 12
DIAGRAMS
FIG-1: JBX Portable Operating Controls ............................... 4
FIG-2: JBX Radio Assembly .................................................. 6
FIG-3: RTS-5PA Quiet Call Module Installation .................. 10
Federal Communications Commission
(FCC) Licensing Information
Because your Ritron radio operates on Private Land
Mobile frequencies, it is subject to the Rules and
Regulations of the FCC, which requires all operators
of these frequencies to obtain a station license before
operating their equipment. Make application for your
FCC license on FCC Forms 600 and 159.
To have forms and instructions faxed to you by
the FCC, call the FCC Fax-On-Demand system at
202-418-0177 from your fax machine;
request Document 000600 & Form 159.
To have Document 000600 & Form 159 mailed to you,
call the FCC Forms Hotline at
800-418-FORM (800-418-3676).
For help with questions concerning the
license application, contact the FCC at
888-CALL-FCC (888-225-5322).
You must know which radio frequency(ies) you
can operate on before filling out your application.
For help determining your frequencies, call Ritron at
800-USA-1-USA (800-872-1872).
ACCESSORIES
BELT CLIP INSTALLATION
The JBX portable belt clip is unique because
it is designed to bend away rather than
damage the radio case or break. The clip
may be removed and then bent back into its
original shape.
If you are going to attach the belt clip (model
CBX-A) to your JBX portable, follow the
instructions below.
1) See FIG-2 (page 4). The belt clip is
fastened to the radio case back with the
screws and washers (two of each)
provided.
CAUTION: Use only the screws included,
since longer screws might damage the
radio's electronics.
2) To reveal the screw holes, carefully
remove the peel-off tab from the belt
clip attachment points shown in FIG-2.
3) Place the belt clip on the radio case
back, aligning the two screw holes in
the clip with the holes in the radio case.
4) Use the included screws and washers
to attach the clip to the radio.
NOTES: If you remove the belt clip, reassemble the screws and
washers to the case to seal out
dirt and moisture.
DO NOT use petroleum solvents
of any kind on the JBX handheld.
These can corrode the radio
case.
page 11
3
3
QUIET CALL PRIVACY
MODULE
3
3
3
INTRODUCTION
GENERAL
An optional Quiet Call module may
be plugged into the JBX portable
for locations where an operating
frequency must be shared by
sev-eral licensees. Quiet Call
allows you to screen out
broadcasts from other licensees
so you will hear only calls from
other users in your group. With
Quiet Call squelch turned ON, the
radio is quiet unless an incoming
message carries the appropriate
Quiet Call code.
Radios equipped with Quiet Call
transmit a programmable code. To
be heard by other users having
Quiet Call squelch turned ON, a
broadcast must carry the same
code programmed for receiving
unit(s). Note that any radio user
on the channel can listen to a
con-versation coded with Quiet
Call, as long as his radio is not
set for coded squelch.
NOTE:
Quiet Call is RITRON's
tradename for what the
communications industry
calls sub-audible tone,
tone squelch or CTCSS.
GENERAL
The RITRON JBX JOBCOM two-way
radio is designed for business and
industry, and features easy-to-use
controls. The standard JBX portable
operates on one channel in the
professional VHF FM communications
band.
JBX Radio PCB
Each JBX radio is packaged with a
flexible antenna, plug-in battery charger,
rechargeable battery and a belt clip.
Accessories are listed on page 9.
9-Pin Socket
RTS-5PA Module
9-Pin Connector
Since the JOBCOM portable transmits on
communications frequencies authorized
by the Federal Communications
Commission (FCC), your radios must be
licensed before being used. See "How
To Obtain A FCC Radio License" (page
11).
MODEL AND FREQUENCY
IDENTIFICATION
The model number appears on a label
attached to the case back. The JBX-151
radios are VHF units.
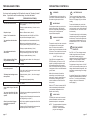
FIG-3: RTS-5PA QUIET CALL MODULE INSTALLATION
INSTALLATION
To install an optional RTS-5PA Quiet Call module, remove the PC board
assembly from the radio case. Refer to Steps 1-4 below, and to FIG-2, page 6.
1) Remove the battery door by unlocking the door latch and sliding the door away.
2) Take out the battery pack. (Turn the radio over and tap the battery compartment
against the palm of your free hand until the battery pack drops out.)
3) Remove the three T-10 TORX® screws holding the PC board assembly to the radio
case. You can insert a screwdriver through the holes in the case, as shown.
4) Holding the antenna base between your thumb and forefinger, slide the PC board
assembly out of the case top.
Refer to FIG-3 ABOVE for the remaining steps.
5) Turn the PC board assembly over so the speaker is facing up as shown in FIG-3.
6) Align the module as shown in the diagram, with the tape side of the module toward the
radio. NOTE: Do not remove the backing from the tape insulator.
7) Plug the module socket onto the radios 9-pin connector. NOTE: Ensure that all nine
pins are fully inserted.
MODEL
JBX-151
BAND
VHF FM
NO. CHANS.
1
Radios in a system must be programmed
to the same frequency to communicate
with one another. Identifying the frequency of a RITRON JBX portable is
simple. Look at the "color dot" label on
the radio case bottom. Use the table
below to match the label to a frequency.
The only JOBCOM radios you can call or
receive from display the same color dot
as your own JBX handheld.
COLOR DOT
VHF
FREQUENCY
RED DOT
BLUE DOT
GREEN DOT
151.625 MHZ
154.570 MHZ
154.600 MHZ
3
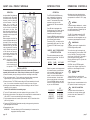
OPERATING
CONTROLS
Operating controls are described below.
The circled number beginning each section
corresponds to the numbers in FIG-1 (page
4).
1
ANTENNA
The flexible antenna radiates and receives
radio signals. Before using the radio, make
sure the antenna base is threaded fully into
the radios antenna bushing.
The JBX-151 portable comes with a VHF
antenna, shown in FIG-1. VHF and UHF
antennas are not interchangeable; use only
the antenna type packaged with the radio.
2
CHARGE JACK
The battery pack may be charged with the
RITRON charger cube provided.
To use this cube, plug the charger's cord
into the charge jack, which is marked "CHG"
on top of the radio. Then plug the charger
cube into an 110 VAC outlet. The chargers
green lamp lights while the battery is
charging, and should go OFF only when the
cube is unplugged.
CAUTION: Use only RITRON-supplied
chargers; other chargers might cause fire,
explosion, or other damage to the radio.
3
ON-OFF/VOLUME
CONTROL
To switch ON the unit, rotate this knob
clockwise out of the "click" position. Further
rotation increases the volume.
Rotate this control counterclockwise into the
OFF position if the radio is not being used.
4
PUSH-TO-TALK BUTTON
This push-button switch activates the
transmitter, and must be held down while
you talk into the radio. Release the PTT
button to receive.
8) Program the RTS-5PA Quiet Call module according to the programming instructions
guide packaged with the module.
9) Reassemble the radio.
IMPORTANT:
page 10
The screws fastening the PC board assembly to the case must be
snug against the battery contacts.
page 3
3
4
4
4
4
4
TROUBLESHOOTING
4
4
NOTES:
1)
Try using a battery pack from a working radio. If the radio in question works with
that pack, the original battery is suspect. Charge the suspect battery as
recommended on page 7. If the charged original battery cannot power a JBX
handheld, charge it again with a different charger. If the battery still does not hold a
charge, replace it. If the battery appears to be "good" after using the second
charger, the first charger may be faulty.
NOTE:
1
2)
Reception can often be improved by moving the unit a short distance. This effect is
more noticeable inside buildings. The range of JBX portables equipped with a
standard battery pack is about two miles line-of-sight.
3)
Adjusting the squelch for "threshold" allows the receiver to detect all except very
weak incoming radio signals.
4)
If you want to call or hear someone who is using a "blue dot" JOBCOM handheld, for
example, you must use a blue dot radio. A color dot label attached to the case
indicates the radios frequency. Refer to the table on page 3.
5)
Maximum power drain occurs while the radio transmits, so dont hold down the
Push-To-Talk button more than necessary. Battery power is used while the
handheld is left ON to receive calls. If practical, switch the unit OFF.
6)
In extreme cold, a battery's charge capacity is greatly reduced. If you use the radio
in very cold weather, periodically warm the JBX portable underneath your coat if
possible. Using an optional remote speaker/ microphone allows keeping the radio
under your coat while transmitting and receiving.
7)
A supervisor (or the appointed person n your group) will probably know which
radios are equipped with Quiet Call, and with which codes. The JBX portable may
be opened to check for a QC module, or to program a different code. The QC
module is located below the radio speaker, plugged into the 9-pin connector (FIG-3,
page 10).
7
2
O
LU
M
S
Q
U
E
TS
LC
H
V
O
FF
E
3
8
C
H
G
X
JB RON
BY
RIT
5
4
JOBCOM radio accessories come with a 90-day limited warranty. If an
accessory does not operate properly, contact your dealer or RITRON.
TO PROGRAM THE QUIET CALL MODULE, REFER TO THE GUIDE PACKAGED WITH
THE RTS-5PA.
Contact your dealer or the RITRON Repair Department for assistance.
ACCESSORIES
6
The following accessories are
available through authorized
RITRON dealers:
OPTIONAL ITEMS
ITEM
9
10
FIG-1: JBX PORTABLE OPERATING CONTROLS
page 4
MODEL NO.
standard rate)
BCJ-FD
Mobile Battery
Charger
CCL-B
Holster (nylon)
MHX-A
Holster (leather)
LHX-A
RTS-5PA
Remote Speaker/
Microphone
RSM-3X
Quiet Call Module
Earphone
REP-2
Drop-in Charger
Adapter
Contact your authorized RITRON
dealer for other options.
BCJ-AD
Drop-in Charger
(single well,
fast/standard rate)
Drop-in Charger
(dual well, fast/
REPLACEMENT ITEMS
ITEM
BCJ-FS
MODEL NO.
Battery Pack
BPX-8N
Battery Charger
BC-A
Belt Clip
CBX-A
page 9
5
5
TROUBLESHOOTING
5
If you have trouble operating the JBX handheld, review the "Operating Controls"
section. If you think the radio is malfunctioning, check the table below.
PROBLEM
POSSIBLE SOLUTION(S)
GENERAL
The radio does not work at all.
Make sure the battery is installed correctly, as shown in
FIG-2 (pages 6).
Recharge or replace the battery. (See note 1 on the
next page.)
5
OPERATING5CONTROLS
5
SPEAKER
The speaker allows you to hear calls on
your channel. Note that the speaker can
be muted using the squelch control.
6
MICROPHONE
The microphone allows your voice to be
heard in other radios. Hold the radio
about two inches away while talking into
the front grille. Shouting does not
improve listener reception.
Reception is poor.
Move to a different location. (Note 2.)
Noise or "hiss" sounds in the
radio
Rotate the squelch control fully CW, then CCW to
the point that noise disappears. (Note 3.)
You cannot hear calls from other
radios.
Adjust the squelch control as stated above. (Note 3.)
NOISE
Make sure your radio operates on the same
frequency as the radio(s) you want to hear. (Note 4.)
The squelch control knob can mute noise
in the absence of an incoming radio
signal. To silence noise, rotate the
squelch control knob clockwise until noise
first occurs. Then rotate the knob counterclockwise to the point that noise stops.
Recharge or replace the battery. (Note 1.)
Your calls cannot be heard in
other radios.
Make sure your radio operates on the same frequency as the radio(s) you want to call. (Note 4.)
7
Recharge or replace the battery. (Note 1.)
Radio performance falls off after
only a short time each day.
See the battery section below. Also, refer to page 6,
"Charging."
BATTERY
The batteries lose their charge
sooner than expected.
Conserve the battery. (Note 5.)
The battery loses its charge sooner
than expected.
Replace the battery. (Note 1.) Also, refer to page 6,
"Charging."
If the radio is used in extreme cold, warm the radio
under your coat. (Note 6.)
Use an optional high capacity battery.
QUIET CALL
You cannot screen out calls from
users outside of your Quiet Call
group.
Rotate the squelch control CCW into the click position.
You cannot hear Quiet Call calls
while your radio is in Quiet Call
squelch.
Confirm that your portable is equipped with a Quiet Call
module. (Note 7.)
Others in your Quiet Call group
cannot hear your Quiet Call
messages.
page 8
Program your Quiet Call module with the same code as
the calling radio(s) use. (Note 7.)
Verify that your portable is equipped with a Quiet Call
module. (Note 7.)
Program your Quiet Call module with the same code as
the radios you want to call use. (Note 7.)
SQUELCH CONTROL
QUIET CALL (QC)
If the JBX unit is equipped with an
RTS-5PA module, you can turn on QC
squelch by rotating the squelch control
fully counterclockwise until the switch
clicks. The radio will then stay quiet until
it receives a call from a unit that transmits
your QC code.
Wait until the channel is free before
transmitting, to avoid interfering with
other users. Listen for others talking on
the channel by rotating the squelch
control clockwise out of the Quiet Call
click position.
5
9
5
BATTERY DOOR
This door covers the battery compartment, holding the battery pack in place.
Refer to FIG-2 (page 6) as you continue
reading.
To remove the battery door, unlock the
door latch at the bottom of the radio using
your thumbnail or a coin. When the latch
is unlocked, the color "red" shows. Slide
the door away.
To install the door, align it with the battery
compartment (the doors top edge faces
the antenna). Place the door against the
compartment and slide the door up, into
the slots shown in FIG-2. Then lock the
door latch.
10 DROP-IN CHARGER
CONTACTS
See FIG-1, left. Three charger contacts,
visible through the bottom of the radio
case, allow the battery pack to be
charged with an optional RITRON drop-in
charger. You may charge the battery
pack inside or out of the radio case.
Plug the drop-in charger into an 110 VAC
outlet. Set the portable or battery into the
charger, three contacts facing down, with
each battery contact resting on a charger
contact pin.
An optional "fast rate" drop-in charger unit
charges the standard battery in less than
two hours. For a list of optional battery
chargers, refer to the "Accessories"
section (page 9).
When the PTT button is pressed, the QC
code is automatically transmitted with
your broadcast, independent of the
squelch control setting.
8
AUDIO JACK
The audio jack can be used to connect
optional accessories, such as a remote
speaker/microphone or an earphone.
NOTE: The remote speaker/microphone
(RSM-3X) has a two-plug
connector. Insert the smaller
plug into the charge jack.
page 5
6
6
6
6
6
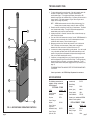
RADIO CARE
6
6
GENERAL
Battery Door (Top Edge)
NOTE: The battery door slides on and off
once the door latch is unlocked
(see door latch below). Lock this
latch after replacing the door.
f
Of
ide
Sl
REMOVE ONLY TO INSTALL OR RE-PROGRAM
AN OPTIONAL QUIET CALL MODULE!
ide
Sl
On
To take the printed circuit board assembly out of
the radio case, first remove the 3 "T-10 TORX®"
screws shown below. Then lift the assembly out by the
antenna's base.
Belt Clip
Attachment
Points
0
X-15
IEJB .
ID: A N, INC
FCC RITRO: JBX-151.A.
el
.S
Mod e in U 6-1201
Mad 17) 84 35
(3
4
PH: A 13
SN:
NOTE: Install the battery (left) AS SHOWN,
with the battery label facing you right
side up.
17
13979
UP
END
THIS
9
C. 2 USA
N, IN 4603
ry
RO
ly.
May
Batte
RIT mel, IN1201 6N
rs on cuit.
Car 846- BPX- rgeablecapablecharge ort cir
317- DEL: Recha harge RON or sh
MO VDC st C RIT utilate
7.2 le / FaN: Use fire, m rns.
.
Trick TIO put in e bu U.S.A
CAU NOT or caus ade in
DO de lls m
explottery ce
Ba
MOISTURE
The JBX portable is not waterproof
DO NOT immerse it or expose it to
excessive moisture.
EXTREME HEAT
Like all electronic equipment, the radio
should not be subjected to extreme heat,
such as being left in direct sunlight in a
closed vehicle.
VIBRATIONS/SHOCKS
Though your RITRON portable is designed
to be rugged, it cannot be expected to
survive excessive abuse.
CHEMICALS
Detergents, alcohol, aerosol sprays and/or
petroleum products can damage the radio
case. Clean it with a soft cloth moistened
with water.
BATTERY
Charger Contacts
Slot (Two slots mate to the
battery door top edge tabs)
Battery Compartment
Frequency Color Dot
k
Loc
Door Latch
ck
Unlo
FIG-2: JBX RADIO ASSEMBLY
page 6
The JB portable is powered by a
rechargeable battery pack, which fits into
the radio case battery compartment (FIG2). The battery door and latch hold the
pack in place.
CHARGING
The battery pack can lose its charge
during storage and shipment, and should
be fully charged before first use.
Thereafter, to ensure peak radio
performance, charge the battery overnight
after each day of use.
The standard battery pack will charge
completely in 12 hours using the cube
charger (model BC-A) provided.
Charge the battery pack using either the
cube charger (BC-A) or an optional
RITRON drop-in charger. For standard
cube charger instructions, refer to
"Charge Jack" on page 3. For drop-in
charger instructions, see "Drop-in Charger
Contacts" on page 5.
NOTE: Cycle a new battery packcharge
and discharge itseveral times so
it will take a maximum charge.
Typical battery pack service life is one
year. Use the following guidelines to
ensure maximum service life:
Do not discharge a battery that is
already "run down." If the battery
cannot power your radio, recharge
the battery.
Do not overcharge a battery. The
standard battery is not to be charged
for more than 16 hours at a time.
Before storing a battery, charge it for
16 hours. Thereafter, charge it for 16
hours once a month.
At the end of battery service life, the
pack loses its ability to hold a charge,
and will not operate the radio for long.
Try charging the pack continuously for
16 hours. If the battery still fails, replace
it.
MAINTENANCE
Because JOBCOM battery packs have
extended run time, some users may
never fully discharge the battery pack
during normal use. After exposing the
battery pack to many cycles of not fully
discharging and then charging, the radio
may exhibit reduced battery capacity.
To avoid this effect and achieve
maximum life from the battery pack,
periodically condition it once a month
by the follow-ing procedure:
1.
2.
3.
4.
Use your radio through a normal
work day without charging it.
Put the radio in open squelch
mode by rotating the SQ control
fully clockwise. When a loud
rushing is heard on the radio
speaker, adjust the Volume control
to maximize the sound.
Place the radio out of the way, such
as in a desk drawer. Let the radio
run until the battery pack is dischargedthis may typically require
as much as 8 hours.
Charge the radio overnight for 1214 hours. It will be ready for use
with renewed capacity.
page 7
6
6
6
6
6
RADIO CARE
6
6
GENERAL
Battery Door (Top Edge)
NOTE: The battery door slides on and off
once the door latch is unlocked
(see door latch below). Lock this
latch after replacing the door.
f
Of
ide
Sl
REMOVE ONLY TO INSTALL OR RE-PROGRAM
AN OPTIONAL QUIET CALL MODULE!
ide
Sl
On
To take the printed circuit board assembly out of
the radio case, first remove the 3 "T-10 TORX®"
screws shown below. Then lift the assembly out by the
antenna's base.
Belt Clip
Attachment
Points
0
X-15
IEJB .
ID: A N, INC
FCC RITRO: JBX-151.A.
el
.S
Mod e in U 6-1201
Mad 17) 84 35
(3
4
PH: A 13
SN:
NOTE: Install the battery (left) AS SHOWN,
with the battery label facing you right
side up.
17
13979
UP
END
THIS
9
C. 2 USA
N, IN 4603
ry
RO
ly.
May
Batte
RIT mel, IN1201 6N
rs on cuit.
Car 846- BPX- rgeablecapablecharge ort cir
317- DEL: Recha harge RON or sh
MO VDC st C RIT utilate
7.2 le / FaN: Use fire, m rns.
.
Trick TIO put in e bu U.S.A
CAU NOT or caus ade in
DO de lls m
explottery ce
Ba
MOISTURE
The JBX portable is not waterproof
DO NOT immerse it or expose it to
excessive moisture.
EXTREME HEAT
Like all electronic equipment, the radio
should not be subjected to extreme heat,
such as being left in direct sunlight in a
closed vehicle.
VIBRATIONS/SHOCKS
Though your RITRON portable is designed
to be rugged, it cannot be expected to
survive excessive abuse.
CHEMICALS
Detergents, alcohol, aerosol sprays and/or
petroleum products can damage the radio
case. Clean it with a soft cloth moistened
with water.
BATTERY
Charger Contacts
Slot (Two slots mate to the
battery door top edge tabs)
Battery Compartment
Frequency Color Dot
k
Loc
Door Latch
ck
Unlo
FIG-2: JBX RADIO ASSEMBLY
page 6
The JB portable is powered by a
rechargeable battery pack, which fits into
the radio case battery compartment (FIG2). The battery door and latch hold the
pack in place.
CHARGING
The battery pack can lose its charge
during storage and shipment, and should
be fully charged before first use.
Thereafter, to ensure peak radio
performance, charge the battery overnight
after each day of use.
The standard battery pack will charge
completely in 12 hours using the cube
charger (model BC-A) provided.
Charge the battery pack using either the
cube charger (BC-A) or an optional
RITRON drop-in charger. For standard
cube charger instructions, refer to
"Charge Jack" on page 3. For drop-in
charger instructions, see "Drop-in Charger
Contacts" on page 5.
NOTE: Cycle a new battery packcharge
and discharge itseveral times so
it will take a maximum charge.
Typical battery pack service life is one
year. Use the following guidelines to
ensure maximum service life:
Do not discharge a battery that is
already "run down." If the battery
cannot power your radio, recharge
the battery.
Do not overcharge a battery. The
standard battery is not to be charged
for more than 16 hours at a time.
Before storing a battery, charge it for
16 hours. Thereafter, charge it for 16
hours once a month.
At the end of battery service life, the
pack loses its ability to hold a charge,
and will not operate the radio for long.
Try charging the pack continuously for
16 hours. If the battery still fails, replace
it.
MAINTENANCE
Because JOBCOM battery packs have
extended run time, some users may
never fully discharge the battery pack
during normal use. After exposing the
battery pack to many cycles of not fully
discharging and then charging, the radio
may exhibit reduced battery capacity.
To avoid this effect and achieve
maximum life from the battery pack,
periodically condition it once a month
by the follow-ing procedure:
1.
2.
3.
4.
Use your radio through a normal
work day without charging it.
Put the radio in open squelch
mode by rotating the SQ control
fully clockwise. When a loud
rushing is heard on the radio
speaker, adjust the Volume control
to maximize the sound.
Place the radio out of the way, such
as in a desk drawer. Let the radio
run until the battery pack is dischargedthis may typically require
as much as 8 hours.
Charge the radio overnight for 1214 hours. It will be ready for use
with renewed capacity.
page 7
5
5
TROUBLESHOOTING
5
If you have trouble operating the JBX handheld, review the "Operating Controls"
section. If you think the radio is malfunctioning, check the table below.
PROBLEM
POSSIBLE SOLUTION(S)
GENERAL
The radio does not work at all.
Make sure the battery is installed correctly, as shown in
FIG-2 (pages 6).
Recharge or replace the battery. (See note 1 on the
next page.)
5
OPERATING5CONTROLS
5
SPEAKER
The speaker allows you to hear calls on
your channel. Note that the speaker can
be muted using the squelch control.
6
MICROPHONE
The microphone allows your voice to be
heard in other radios. Hold the radio
about two inches away while talking into
the front grille. Shouting does not
improve listener reception.
Reception is poor.
Move to a different location. (Note 2.)
Noise or "hiss" sounds in the
radio
Rotate the squelch control fully CW, then CCW to
the point that noise disappears. (Note 3.)
You cannot hear calls from other
radios.
Adjust the squelch control as stated above. (Note 3.)
NOISE
Make sure your radio operates on the same
frequency as the radio(s) you want to hear. (Note 4.)
The squelch control knob can mute noise
in the absence of an incoming radio
signal. To silence noise, rotate the
squelch control knob clockwise until noise
first occurs. Then rotate the knob counterclockwise to the point that noise stops.
Recharge or replace the battery. (Note 1.)
Your calls cannot be heard in
other radios.
Make sure your radio operates on the same frequency as the radio(s) you want to call. (Note 4.)
7
Recharge or replace the battery. (Note 1.)
Radio performance falls off after
only a short time each day.
See the battery section below. Also, refer to page 6,
"Charging."
BATTERY
The batteries lose their charge
sooner than expected.
Conserve the battery. (Note 5.)
The battery loses its charge sooner
than expected.
Replace the battery. (Note 1.) Also, refer to page 6,
"Charging."
If the radio is used in extreme cold, warm the radio
under your coat. (Note 6.)
Use an optional high capacity battery.
QUIET CALL
You cannot screen out calls from
users outside of your Quiet Call
group.
Rotate the squelch control CCW into the click position.
You cannot hear Quiet Call calls
while your radio is in Quiet Call
squelch.
Confirm that your portable is equipped with a Quiet Call
module. (Note 7.)
Others in your Quiet Call group
cannot hear your Quiet Call
messages.
page 8
Program your Quiet Call module with the same code as
the calling radio(s) use. (Note 7.)
Verify that your portable is equipped with a Quiet Call
module. (Note 7.)
Program your Quiet Call module with the same code as
the radios you want to call use. (Note 7.)
SQUELCH CONTROL
QUIET CALL (QC)
If the JBX unit is equipped with an
RTS-5PA module, you can turn on QC
squelch by rotating the squelch control
fully counterclockwise until the switch
clicks. The radio will then stay quiet until
it receives a call from a unit that transmits
your QC code.
Wait until the channel is free before
transmitting, to avoid interfering with
other users. Listen for others talking on
the channel by rotating the squelch
control clockwise out of the Quiet Call
click position.
5
9
5
BATTERY DOOR
This door covers the battery compartment, holding the battery pack in place.
Refer to FIG-2 (page 6) as you continue
reading.
To remove the battery door, unlock the
door latch at the bottom of the radio using
your thumbnail or a coin. When the latch
is unlocked, the color "red" shows. Slide
the door away.
To install the door, align it with the battery
compartment (the doors top edge faces
the antenna). Place the door against the
compartment and slide the door up, into
the slots shown in FIG-2. Then lock the
door latch.
10 DROP-IN CHARGER
CONTACTS
See FIG-1, left. Three charger contacts,
visible through the bottom of the radio
case, allow the battery pack to be
charged with an optional RITRON drop-in
charger. You may charge the battery
pack inside or out of the radio case.
Plug the drop-in charger into an 110 VAC
outlet. Set the portable or battery into the
charger, three contacts facing down, with
each battery contact resting on a charger
contact pin.
An optional "fast rate" drop-in charger unit
charges the standard battery in less than
two hours. For a list of optional battery
chargers, refer to the "Accessories"
section (page 9).
When the PTT button is pressed, the QC
code is automatically transmitted with
your broadcast, independent of the
squelch control setting.
8
AUDIO JACK
The audio jack can be used to connect
optional accessories, such as a remote
speaker/microphone or an earphone.
NOTE: The remote speaker/microphone
(RSM-3X) has a two-plug
connector. Insert the smaller
plug into the charge jack.
page 5
4
4
4
4
4
TROUBLESHOOTING
4
4
NOTES:
1)
Try using a battery pack from a working radio. If the radio in question works with
that pack, the original battery is suspect. Charge the suspect battery as
recommended on page 7. If the charged original battery cannot power a JBX
handheld, charge it again with a different charger. If the battery still does not hold a
charge, replace it. If the battery appears to be "good" after using the second
charger, the first charger may be faulty.
NOTE:
1
2)
Reception can often be improved by moving the unit a short distance. This effect is
more noticeable inside buildings. The range of JBX portables equipped with a
standard battery pack is about two miles line-of-sight.
3)
Adjusting the squelch for "threshold" allows the receiver to detect all except very
weak incoming radio signals.
4)
If you want to call or hear someone who is using a "blue dot" JOBCOM handheld, for
example, you must use a blue dot radio. A color dot label attached to the case
indicates the radios frequency. Refer to the table on page 3.
5)
Maximum power drain occurs while the radio transmits, so dont hold down the
Push-To-Talk button more than necessary. Battery power is used while the
handheld is left ON to receive calls. If practical, switch the unit OFF.
6)
In extreme cold, a battery's charge capacity is greatly reduced. If you use the radio
in very cold weather, periodically warm the JBX portable underneath your coat if
possible. Using an optional remote speaker/ microphone allows keeping the radio
under your coat while transmitting and receiving.
7)
A supervisor (or the appointed person n your group) will probably know which
radios are equipped with Quiet Call, and with which codes. The JBX portable may
be opened to check for a QC module, or to program a different code. The QC
module is located below the radio speaker, plugged into the 9-pin connector (FIG-3,
page 10).
7
2
O
LU
M
S
Q
U
E
TS
LC
H
V
O
FF
E
3
8
C
H
G
X
JB RON
BY
RIT
5
4
JOBCOM radio accessories come with a 90-day limited warranty. If an
accessory does not operate properly, contact your dealer or RITRON.
TO PROGRAM THE QUIET CALL MODULE, REFER TO THE GUIDE PACKAGED WITH
THE RTS-5PA.
Contact your dealer or the RITRON Repair Department for assistance.
ACCESSORIES
6
The following accessories are
available through authorized
RITRON dealers:
OPTIONAL ITEMS
ITEM
9
10
FIG-1: JBX PORTABLE OPERATING CONTROLS
page 4
MODEL NO.
standard rate)
BCJ-FD
Mobile Battery
Charger
CCL-B
Holster (nylon)
MHX-A
Holster (leather)
LHX-A
RTS-5PA
Remote Speaker/
Microphone
RSM-3X
Quiet Call Module
Earphone
REP-2
Drop-in Charger
Adapter
Contact your authorized RITRON
dealer for other options.
BCJ-AD
Drop-in Charger
(single well,
fast/standard rate)
Drop-in Charger
(dual well, fast/
REPLACEMENT ITEMS
ITEM
BCJ-FS
MODEL NO.
Battery Pack
BPX-8N
Battery Charger
BC-A
Belt Clip
CBX-A
page 9
3
3
QUIET CALL PRIVACY
MODULE
3
3
3
INTRODUCTION
GENERAL
An optional Quiet Call module may
be plugged into the JBX portable
for locations where an operating
frequency must be shared by
sev-eral licensees. Quiet Call
allows you to screen out
broadcasts from other licensees
so you will hear only calls from
other users in your group. With
Quiet Call squelch turned ON, the
radio is quiet unless an incoming
message carries the appropriate
Quiet Call code.
Radios equipped with Quiet Call
transmit a programmable code. To
be heard by other users having
Quiet Call squelch turned ON, a
broadcast must carry the same
code programmed for receiving
unit(s). Note that any radio user
on the channel can listen to a
con-versation coded with Quiet
Call, as long as his radio is not
set for coded squelch.
NOTE:
Quiet Call is RITRON's
tradename for what the
communications industry
calls sub-audible tone,
tone squelch or CTCSS.
GENERAL
The RITRON JBX JOBCOM two-way
radio is designed for business and
industry, and features easy-to-use
controls. The standard JBX portable
operates on one channel in the
professional VHF FM communications
band.
JBX Radio PCB
Each JBX radio is packaged with a
flexible antenna, plug-in battery charger,
rechargeable battery and a belt clip.
Accessories are listed on page 9.
9-Pin Socket
RTS-5PA Module
9-Pin Connector
Since the JOBCOM portable transmits on
communications frequencies authorized
by the Federal Communications
Commission (FCC), your radios must be
licensed before being used. See "How
To Obtain A FCC Radio License" (page
11).
MODEL AND FREQUENCY
IDENTIFICATION
The model number appears on a label
attached to the case back. The JBX-151
radios are VHF units.
FIG-3: RTS-5PA QUIET CALL MODULE INSTALLATION
INSTALLATION
To install an optional RTS-5PA Quiet Call module, remove the PC board
assembly from the radio case. Refer to Steps 1-4 below, and to FIG-2, page 6.
1) Remove the battery door by unlocking the door latch and sliding the door away.
2) Take out the battery pack. (Turn the radio over and tap the battery compartment
against the palm of your free hand until the battery pack drops out.)
3) Remove the three T-10 TORX® screws holding the PC board assembly to the radio
case. You can insert a screwdriver through the holes in the case, as shown.
4) Holding the antenna base between your thumb and forefinger, slide the PC board
assembly out of the case top.
Refer to FIG-3 ABOVE for the remaining steps.
5) Turn the PC board assembly over so the speaker is facing up as shown in FIG-3.
6) Align the module as shown in the diagram, with the tape side of the module toward the
radio. NOTE: Do not remove the backing from the tape insulator.
7) Plug the module socket onto the radios 9-pin connector. NOTE: Ensure that all nine
pins are fully inserted.
MODEL
JBX-151
BAND
VHF FM
NO. CHANS.
1
Radios in a system must be programmed
to the same frequency to communicate
with one another. Identifying the frequency of a RITRON JBX portable is
simple. Look at the "color dot" label on
the radio case bottom. Use the table
below to match the label to a frequency.
The only JOBCOM radios you can call or
receive from display the same color dot
as your own JBX handheld.
COLOR DOT
VHF
FREQUENCY
RED DOT
BLUE DOT
GREEN DOT
151.625 MHZ
154.570 MHZ
154.600 MHZ
3
OPERATING
CONTROLS
Operating controls are described below.
The circled number beginning each section
corresponds to the numbers in FIG-1 (page
4).
1
ANTENNA
The flexible antenna radiates and receives
radio signals. Before using the radio, make
sure the antenna base is threaded fully into
the radios antenna bushing.
The JBX-151 portable comes with a VHF
antenna, shown in FIG-1. VHF and UHF
antennas are not interchangeable; use only
the antenna type packaged with the radio.
2
CHARGE JACK
The battery pack may be charged with the
RITRON charger cube provided.
To use this cube, plug the charger's cord
into the charge jack, which is marked "CHG"
on top of the radio. Then plug the charger
cube into an 110 VAC outlet. The chargers
green lamp lights while the battery is
charging, and should go OFF only when the
cube is unplugged.
CAUTION: Use only RITRON-supplied
chargers; other chargers might cause fire,
explosion, or other damage to the radio.
3
ON-OFF/VOLUME
CONTROL
To switch ON the unit, rotate this knob
clockwise out of the "click" position. Further
rotation increases the volume.
Rotate this control counterclockwise into the
OFF position if the radio is not being used.
4
PUSH-TO-TALK BUTTON
This push-button switch activates the
transmitter, and must be held down while
you talk into the radio. Release the PTT
button to receive.
8) Program the RTS-5PA Quiet Call module according to the programming instructions
guide packaged with the module.
9) Reassemble the radio.
IMPORTANT:
page 10
The screws fastening the PC board assembly to the case must be
snug against the battery contacts.
page 3
3
2
2
TABLE OF CONTENTS
DESCRIPTION
2
2
2
2
2
HOW TO OBTAIN AN FCC RADIO LICENSE
PAGE
INTRODUCTION
General ................................................................................... 3
Model and Frequency Identification ....................................... 3
OPERATING CONTROLS ................................................... 3
RADIO CARE
General ................................................................................... 5
Battery ..................................................................................... 5
Battery Maintenance ............................................................... 5
TROUBLESHOOTING ........................................................... 8
QUIET CALL PRIVACY MODULE
General ................................................................................. 10
Installation ............................................................................ 10
ACCESSORIES
Optional Items ........................................................................ 9
Replacement Items ................................................................ 9
Belt Clip Installation ............................................................. 11
HOW TO OBTAIN AN FCC RADIO LICENSE ........... 11
RITRON, INC. LIMITED WARRANTY ........................... 12
DIAGRAMS
FIG-1: JBX Portable Operating Controls ............................... 4
FIG-2: JBX Radio Assembly .................................................. 6
FIG-3: RTS-5PA Quiet Call Module Installation .................. 10
Federal Communications Commission
(FCC) Licensing Information
Because your Ritron radio operates on Private Land
Mobile frequencies, it is subject to the Rules and
Regulations of the FCC, which requires all operators
of these frequencies to obtain a station license before
operating their equipment. Make application for your
FCC license on FCC Forms 600 and 159.
To have forms and instructions faxed to you by
the FCC, call the FCC Fax-On-Demand system at
202-418-0177 from your fax machine;
request Document 000600 & Form 159.
To have Document 000600 & Form 159 mailed to you,
call the FCC Forms Hotline at
800-418-FORM (800-418-3676).
For help with questions concerning the
license application, contact the FCC at
888-CALL-FCC (888-225-5322).
You must know which radio frequency(ies) you
can operate on before filling out your application.
For help determining your frequencies, call Ritron at
800-USA-1-USA (800-872-1872).
ACCESSORIES
BELT CLIP INSTALLATION
The JBX portable belt clip is unique because
it is designed to bend away rather than
damage the radio case or break. The clip
may be removed and then bent back into its
original shape.
If you are going to attach the belt clip (model
CBX-A) to your JBX portable, follow the
instructions below.
1) See FIG-2 (page 4). The belt clip is
fastened to the radio case back with the
screws and washers (two of each)
provided.
CAUTION: Use only the screws included,
since longer screws might damage the
radio's electronics.
2) To reveal the screw holes, carefully
remove the peel-off tab from the belt
clip attachment points shown in FIG-2.
3) Place the belt clip on the radio case
back, aligning the two screw holes in
the clip with the holes in the radio case.
4) Use the included screws and washers
to attach the clip to the radio.
NOTES: If you remove the belt clip, reassemble the screws and
washers to the case to seal out
dirt and moisture.
DO NOT use petroleum solvents
of any kind on the JBX handheld.
These can corrode the radio
case.
page 11
1 RITRON, INC. LIMITED
1
WARRANTY 1
WHAT THIS WARRANTY COVERS
RITRON, INC. ("RITRON") provides the following warranty against defects in materials and/ or workmanship in
RITRON JOBCOM Radios, Rechargeable Batteries and Accessories under normal use and service during the
applicable warranty period, as stated below. "Accessories" means antennas, chargers, headsets, earphones,
speakers, holsters and microphones. Rechargeable batteries will be replaced during the applicable warranty period
only if leakage occurs, or the batteries drop below 75% of rated capacity.
WHAT IS COVERED
FOR HOW LONG
WHAT RITRON WILL DO
RITRON JOBCOM
Radios
1 year parts*
1 year labor*
During the first year after date of purchase, RITRON will refund
your purchase price or repair or replace the defective product, at
RITRON's option, parts and labor included at no charge to you.
RITRON JOBCOM
Rechargeable Batteries
1 year parts*
RITRON will replace the defective battery.
RITRON JOBCOM
90 days *
RITRON's
*After date of purchase
1
1
1
The Leader In Jobsite Radios
JBX-151
1
USER MANUAL
RITRON will repair or replace the defective accessory, at
option, parts and labor included at no charge to you.
WHAT THIS WARRANTY DOES NOT COVER This warranty statement does not cover:
Any technical information provided with the covered product or any other RITRON products;
Installation, maintenance or service of the product, unless this is covered by a separate written agreement with
RITRON;
Any products not furnished by RITRON which are attached or used with the covered product, or defects or
damage from the use of the covered product with equipment that is not covered, such as defects or damage
from the charging or use of batteries other than with covered product;
Defects or damage, including broken antennas, resulting from:
- misuse, abuse, improper maintenance, alteration, modification, neglect, accident or act of God,
- the use of covered products other than in normal and customary manner or,
- improper testing or installation;
Defects or damages from unauthorized disassembly, repair or modification, or where unauthorized disassembly,
repair or modification prevents inspection and testing necessary to validate warranty claims;
Defects or damages in which the serial number has been removed, altered or defaced.
Batteries if any of the seals are not intact.
IMPORTANT: This warranty sets forth the full extent of RITRONs express responsibilities regarding the covered
products, and is given in lieu of all other express warranties. What RITRON has agreed to do above is your sole
and exclusive remedy. No person is authorized to make any other warranty to you on behalf of RITRON.
Warranties implied by state law, such as implied warranties of merchantability and fitness for a particular purpose,
are limited to the duration of this limited warranty as it applies to the covered product. Incidental and consequential damages are not recoverable under this warranty (this includes loss of use or time, inconvenience, business
interruption, commercial loss, lost profits or savings). Some states do not allow the exclusion or limitation
of incidental or consequential damages, or limitation on how long an implied warranty lasts, so the
above limitations or exclusions may not apply to you. Because each covered product system is unique,
RITRON disclaims liability for range, coverage, or operation of the system as a whole under this
warranty.
WHO IS COVERED BY THIS WARRANTY
This warranty is given only to the purchaser or lessee of covered products when acquired for use, not resale. This
warranty is not assignable or transferable.
HOW TO GET WARRANTY SERVICE
To receive warranty service, you MUST deliver or send the defective product, delivery costs and insurance
prepaid, within the applicable warranty period, to RITRON, INC., 505 West Carmel Drive, Carmel, Indiana 46032,
Attention: Warranty Department.
Please point out the nature of the defect in as much detail as you can. You MUST retain your sales or lease
receipt (or other written evidence of the date of purchase) and deliver it along with the product. If
RITRON chooses to repair or replace a defective product, RITRON may replace the product or any part or
component with reconditioned product, parts or components. Replacements are covered for the balance of the
original applicable warranty period. All replaced covered products, parts or components become RITRONs
property.
Publication No. 01451172
Rev. H
07-02
© 2002 RITRON, INC. ALL RIGHTS RESERVED
RITRON, JOBCOM, JBX, Quick Assist, and Quiet Call are registered
trademarks of RITRON, INC.
TORX® is a registered trademark of Camcar Division of Textron, Inc.
®
505 West Carmel Drive, Carmel, IN 46032 P.O. Box 1998 Carmel, IN 46082-1998
800-USA-1-USA Fax: 317-846-4978 [email protected] www.ritron.com