1
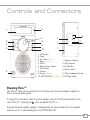
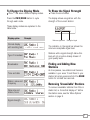
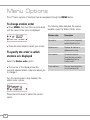
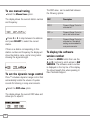
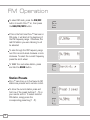
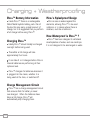
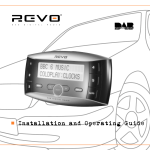
D A B
D I G I T A L
R A D I O
Operating Guide
w w w . r e v o . c o . u k
Preface
Copyright and
Acknowledgements
Copyright © 2007 Revo Technologies Ltd.
All rights reserved.
Revo Technologies Ltd
The Inox Building
Caldwellside
Lanark
Scotland
United Kingdom
ML11 7SR
Safety Warnings
Do not operate this radio near water.
Avoid small objects and liquids from getting into
this product. Do not remove screws or casing
parts. Use only the power supply unit supplied.
EEC: This product has been designed and typetested to comply with EU requirements and
carries a CE mark.
When using a USB lead of over 3m with
Pico+™, please ensure that according to the
manufacturer’s specification, it has been
designed for this purpose.
Tel. 01555 666 161
Fax. 01555 66 33 44
Email. [email protected]
Website: www.revo.co.uk
The information in this guide is believed to
be correct at the time of publication.
However, our policy is one of continuous
development and so the information is
subject to change without notice.
Revo™, Pico+™ and M-Port™ are
trademarks or registered trademarks of
Revo Technologies Limited.
iPod® is a registered trademark of Apple
Computer, Inc.
2
Technical Support
Should you encounter any difficulties with
the operation of your Revo Pico+™, or
should you suspect that it may be faulty in
some way, please call our technical support
department on the number below:
01555 666 161
Alternatively, email [email protected] or
visit the troubleshooting section of our
website at: www.revo.co.uk/support
Contents
Welcome to Revo
4
Manual Tuning
10
Benefits of DAB radio
4
Set DRC
10
Pico+™ overview and key features
4
Display software version
10
Warranty
4
TimeShift™ Features
11
Warranty registration
4
Pausing Live Radio
11
Controls and Connections
5
Rewind/Forward Live Radio
11
Powering Pico+™
5
Recording Live Radio
11
DAB Operation
6
FM Operation
12
Change display mode
7
Station presets
12
Show signal strength
7
M-Port™
13
Finding and adding new stations
7
Charging + Weatherproofing
14
Removing ‘unavailable’ stations
7
Pico+™ Battery Information
14
Menu Options
8
Charging Pico+™
14
To change station order
8
Charge Management Circuit
14
Memory Card Management
9
Pico’s Splashproof Design
14
USB File Copy
9
How Waterproof is Pico+™?
14
Delete
9
Trouble-shooting
15
Format
9
Technical Specification
16
Free Space
9
Accessories and Spares
17
3
Welcome to Revo DAB
Thank you for buying our Pico+™ DAB Digital Radio, we feel sure that it will
provide you with years of enjoyment and reliable service.
This guide has been designed to quickly get you up-and-running and listening
to DAB digital radio, offer guidance on the more complex features of this
product and provide information on safety, warranty and registration.
Benefits of DAB Radio
Clear, interference free digital sound
Many more stations, much more choice
No frequencies, select by station name
No re-tuning
Text information via LCD screen
Pico+™ Overview
Pico+™ combines high quality DAB and FM
radio reception in a splashproof casing, with
the convenience of internal battery power.
Pico+™ can also be used as a high quality
speaker system for your iPod™ (or other
MP3 player of external sound source).
Warranty
Revo Technologies Ltd warrants to the
purchaser that this product will be free
from parts and manufacturing defects in
the course of normal use for a period of
two years from the date of purchase.
This warranty does not apply in cases of
accidental damage, where the case has
been removed, wear and tear, negligence,
modification or inappropriate use.
Should you encounter problems with this
product, please contact your supplier or
alternatively see page 2 of this guide for
technical support contact details.
Warranty Registration
Pico+™ has the ability to pause, rewind and
record live radio broadcasts. Add an SD
card to store and play MP3 files downloaded
from your PC or Apple Mac.
4
It is a warranty condition that you register
your purchase by either completing the
warranty card enclosed with your radio or
alternatively registering online at
www.revo.co.uk/register
Controls and Connectors
1.
2.
3.
4.
5.
6.
4.
7.
3.
8.
2.
5.
6.
9.
10.
1.
1. LCD Screen
2. Power
3. Info/Scan + Pause
4. Menu + Record
5. M-Port
6. Remote Control Sensor
7. Scroll Wheel
8. Function
9. Volume + Rewind
10. DAB/FM/MP3 + Forward
1. Telescopic Antenna
2. USB Connector
3. SD Card Slot
4. Stereo Line-Out
5. 3.5mm Headphone Socket
6. DC Power Socket
Powering Pico+™
Your Pico+™ radio can be powered from the mains using the power adaptor supplied, or
from it’s internal battery pack.
To power from the mains, insert the power adaptor plug into the DC power socket on the
rear of Pico+™. Pressing the
button will switch Pico+™ on.
Only use the power adaptor supplied. Replacements can be purchased from our website
www.revo.co.uk, or alternatively call us on 01555 666 161.
5
DAB Operation
Extend the telescopic antenna found on
the rear of Pico+™.
Press the ON/OFF button to switch on
your radio.
If this is the first time Pico+™ has been
used, press and hold the SCAN button.
Pico+™ will now scan for DAB stations in
your area and store them in memory.
When the station scan has been
completed, stations will be displayed in
numeric then alphabetic order. The first
station in the list will be selected.
If no DAB signal is found, it may be
necessary for you to relocate your radio.
Alternatively, visit www.ukdigitalradio.com/
coverage to check that DAB coverage is
available in your area.
The top line of Pico+’s LCD screen shows
the name of the station currently selected.
Turn Pico+’s scroll wheel to cycle through
the available stations. Press the scroll
wheel to select the chosen station.
To change Pico+’s volume level, press the
VOLUME button and then rotate the
SCROLL WHEEL. The numeric volume
level will be displayed on Pico+’s screen.
6
To Change the Display Mode
Pico+™ has seven different display modes.
Press the INFO/SCAN button to cycle
through each mode.
To Show the Signal Strength
Press the scroll wheel.
The display shows a signal bar with the
strength of the current station:
These display modes are explained in the
table below:
Display option
Example
Minimum signal level
Normal display
with scrolling text
Type of broadcast
Broadcaster
Time and date
Station name and
frequency
Data rate and
stereo/mono
Strength of signal
The indicator on the signal bar shows the
minimum acceptable signal level.
Stations with a signal strength below this
level will not provide a steady stream of
good quality audio.
Finding and Adding New
Stations
As time passes, new stations will become
available in your area. To add them to your
station list simply press and hold the SCAN
button for at least two seconds.
Removing ‘Unavailable’ Stations
To remove ‘unavailable’ stations from Pico+’s
station list, ie. those that display a ? before
the station name, see the ‘Menu Options’
section on page 8.
Signal strength
7
Menu Options
Pico+™ has a number of functions that are accessed through the MENU button.
To change station order
Press MENU, then turn Pico+’s scroll wheel
until the name of the option is displayed:
Press the scroll wheel to select your choice.
To specify the order in which
stations are displayed
The following table describes the options
available under the ‘Station Order’ menu:
Station order
Description
Fav station
Lists the most frequently
selected stations first.
Alphanumeric
Displays all stations in
alphanumeric order.
Active station
Lists active stations
[ones that are currently
broadcasting] before
inactive ones.
Prune stations
Remove inactive stations
from the station list.
Select the Station order option.
The top line of the display shows the
currently selected station order and allows you
to change it.
Turn the scroll wheel to step between the
station order options:
Press the scroll wheel to select the current
option.
8
Memory Card Management
Press MENU, then turn Pico+’s scroll
wheel until ‘Memory Card’ is displayed.
On an Apple Mac computer the procedure
is the same, though Pico+’s SD card will
appear on your desktop as “Untitled”.
Please remember that in order to access
Pico+’s SD card for any reason, Pico+™
must be in USB File Copy mode.
Press the SCROLL WHEEL to select.
The following options will be available:
Delete
USB File Copy
Used to delete MP3 files or recorded radio
broadcasts on the SD card. Follow onscreen instructions.
Used to transfer MP3 files to Pico+™ and
for transferring recorded radio broadcasts
(in MP2 format) from Pico+™ to your
PC/Mac. Please note, an SD card must be
in place to use this feature.
Format
Use this function to prepare your SD card
for use with Pico+™.
To transfer files between Pico+’s SD card
and your PC/Mac, connect your computer
to Pico+™ using a suitable USB lead.
Select USB File Copy from the Memory
Card menu. On a PC, a mass storage
device icon named “Pico+” will appear on
your desktop (this is the SD card located
inside Pico+™). An empty folder named
“TRACKS” is located on this device.
You can now drag and drop MP3 files to this
folder, or transfer files in the opposite direction
- from Pico+’s SD card to your computer.
Free Space
Shows the amount of available memory on
your SD card.
IMPORTANT:
It is essential that you format your SD card
before attempting to record or drag files to it.
9
To use manual tuning
Select the Manual tune option.
The display shows the current station number
and frequency:
Press < or > to step between the stations
and press SELECT to select the current
station.
If there is a station corresponding to this
station number and frequency the display will
show the station name, and a tuning meter
showing the signal strength.
To set the dynamic range control
Pico+™ includes a dynamic range control that
automatically boosts the volume of quieter
sounds for listening in noisy environments.
Select the DRC value option.
The display shows the current DRC value and
allows you to adjust it:
10
The DRC value can be switched between
the following options:
DRC
Description
DRC 0
Dynamic Range Control is
switched off
DRC
Dynamic Range Control is
set to half normal level.
1/2
DRC 1
Dynamic Range Control is
switched on; the default
setting recommended for
noisy environments.
To display the software
version number
Press the MENU button then use the
< and > buttons to scroll across to SW
VERSION. The software version number
is displayed on the top line of the display.
You should specify this when speaking to
Revo Technical Support.
TimeShift™ Features
Pico+™ incorporates our advanced
TimeShift™ system.
Pico+’s display will tell you how far behind
the live broadcast you are.
TimeShift™ allows the user to pause, rewind
and record live radio - simply, and at the
touch of a button.
TimeShift™ features are highlighted in
orange on Pico+’s keys and are accessed by
holding down the FUNCTION button and
pressing either |
|, R , << or >>.
REWIND/FORWARD live radio
Press and hold the FUNCTION button then
either << or >> to rewind or forward
through the audio held in memory.
RECORDING live radio
Press and hold the FUNCTION button then
press R .
Pico+™ will start to record the broadcast
until FUNCTION + R are pressed again to
halt recording.
PAUSING live radio
Pico+™ constantly stores audio from the
station you are tuned to - allowing you to
pause or rewind for up to 30 minutes.
When Pico+’s memory is full, the oldest
stored audio is overwritten.
The recording will then be saved to Pico+’s
SD card with the filename DAB000.MP2.
Further recordings will be named
DAB001.MP2, then DAB002.MP2 etc.
To pause live radio press and hold the
FUNCTION button then press|
|.
11
FM Operation
To select FM radio, press the ON/OFF
button to switch Pico+™ on, then press
the DAB/FM/MP3 button.
DAB/FM
/MP3
If this is the first time Pico+™ has been in
FM mode, it will start at the beginning of
the FM frequency range. Otherwise, the
last FM station you were listening to will
be selected.
To scan through the FM frequency range
turn Pico+’s scroll wheel clockwise or anticlockwise. To select the current frequency,
press the scroll wheel.
To ‘SEEK’ the next active station, press
and hold the SCAN button.
SCAN
Station Presets
Pico+™ can store up to five favourite FM
stations as presets via its remote control.
To store the current station press and
hold one of the preset buttons (1 - 5) on
your remote control. To select a stored
FM station, simply press the
corresponding preset key (1 - 5).
12
1
1
M-Port™
Using M-Port™
Revo’s M-Port™ technology allows for
quick and easy connection of an iPod®
(or other MP3 player or external sound
sources).
Using the connection lead supplied,
Pico+™ is transformed into a high quality
digital audio speaker system.
Connect one end of the supplied audio
lead to the headphone (or auxiliary out)
socket of your source device, then
connect the other end to the M-Port™
on the front of Pico+™.
Pico+’s LCD screen will now display the
words “M-Port Active”.
You should adjust the output volume level
on both the source device and on Pico+™
itself to gain optimal volume levels and
sound performance.
13
Charging + Weatherproofing
Pico+™ Battery Information
Pico+’s Splashproof Design
Inside Pico+™ there is a rechargeable
Nickel Metal Hydride battery pack. Out-ofthe-box this may carry a small amount of
charge, but it is suggested that you perform
a full charge before using Pico+™.
Pico+’s case is sealed against the
elements, allowing Pico+™ to be used
outdoors, or in places where there is
moisture, such as a bathroom.
How Waterproof is Pico+™ ?
Charging Pico+™
Ideally Pico+™ should initially be charged
overnight before being used.
Thereafter a full charge will take
approximately four hours.
It can take 3 or 4 charges before Pico+’s
internal batteries are performing at their
optimum level.
Pico+™ charges it’s batteries whenever it
is plugged into the mains, whether it is
being used at the time, or switched off.
Charge Management Circuit
Pico+™ has a charge management circuit
that ensures that it’s battery is never
over-charged. When the batteries have
taken a full charge, Pico+™ will
automatically stop charging them.
14
Pico+™ has been designed to withstand
small splashes of water, such as raindrops.
It is not designed to be submerged in water.
Trouble-Shooting
Q. I hear a ‘burbling’ noise on some
stations.
A. If the signal strength is too low, a breakup in reception can occur. This sound is
the result. Make sure that Pico+’s
antenna is fully extended and in an
upright position. If the problem persists,
move Pico+™ to another location or
check that you are in an area where
reception of this station is possible (visit
www.ukdigitalradio.com/coverage to check).
Q. I get a ‘?’ before some stations in my
station list, and don’t seem to be able to
select them.
A. ‘?’ before a station name means that it is
either inactive or unavailable. This can be
because they are not currently
broadcasting, you are outside their
broadcast area or you have simply lost
reception. To remove inactive or
unavailable stations press the MENU
button and go to the ‘Prune Stations’
option (available through the Station
Order menu), see page 8.
Q. Sometimes when I’m listening to Pico+™
the volume dips slightly and the sound
becomes distorted.
A. A loss of volume, sound quality and/or
reception sensitivity usually indicates that
Pico+’s internal battery needs to be
charged.
Q. Even after I’ve given Pico+™ a full charge,
the battery doesn’t seem to last very
long. Certainly not as long as it used to.
A. It sounds like Pico+’s internal battery
needs to be replaced. Replacement
batteries are available as a spare part,
see page 17 for details.
Q. My Pico+™ seems to have frozen and I
can’t get it to do anything.
A. Sounds like Pico+’s software has
‘crashed’. To perform a ‘software reset’,
press and hold the MENU button and
follow the on-screen instruction. This
should solve the problem. If not, please
call our technical support department on
01555 666 161.
Q. I get a ‘No stations available’ message?
A. Make sure that your antenna is fully
extended and vertical. Check the signal
strength and move Pico+™ to another
location if necessary.
15
Technical Specification
16
General:
Mono DAB and FM radio with Band III reception, pause, rewind
(30 minutes) and record live radio. Storage and playback of MP3 files.
Speaker:
2” Weatherproof, full-range neodymium, 8W power handling.
Audio Power Output:
2W
Frequency Ranges:
DAB Band III (174 - 240 MHz) - FM (87.5 - 108 MHz)
Antenna:
Integral telescopic aerial.
Input Connectors:
DC power adaptor socket (230V adapter supplied).
3.5mm line-in for auxiliary devices (M-Port).
Mini USB for connection to PC/Apple Mac.
SD card slot for storage of recorded radio or MP3 files.
Output Connectors:
3.5mm headphone socket and stereo RCA line-out.
LCD Display:
High resolution 2 x 16 character negative display.
Controls:
Power, left, right, select, volume up/down, alarm,
scan/info, menu, DAB/FM
Weatherproofing:
‘Splashproof’ case design.
Remote Control:
Infra-red remote control.
Mains Power Supply:
12V 1.2mA
Battery Power:
Nickel Metal Hydride – 12 hour life (average)
Approvals:
CE marked and RoHS compliant.
Dimensions:
167mm (H) x 103mm (W) x 98mm (D)
Accessories and Spares
The following optional accessories and spare parts are available for Pico+™.
Please contact your local retailer or alternatively call us on 01555 666 161.
Accessories and spare parts can also be purchased online at www.revo.co.uk
Remote Control:
Control Pico+™ with our compact infra-red remote control.
Mains Power Supply Unit:
Replacement power supply as supplied with Pico+™.
M-Port™ Lead:
Used to connect an iPod® (or similar device) to Pico+™.
Protective Carry Case:
Keep Pico+™ safe and sound with our custom made protective case.
In-Car Power Cord/Charger:
Charge or power your Pico+™ from your vehicle’s cigarette lighter socket with this handy
accessory.
SD Storage Card:
For storage of recorded radio broadcasts or MP3 music files. Available in a variety of
memory sizes.
17
Notes
18
Notes
19
D A B
Revo Technologies Ltd
D I G I T A L
The Inox Building
Caldwellside
Telephone Support
Online Support
R A D I O
Lanark
Scotland
United Kingdom
01555 666 161
www.revo.co.uk/support
[email protected]
ML11 7SR