1
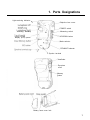
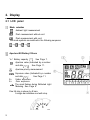
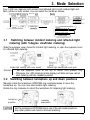
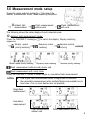
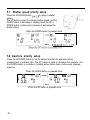
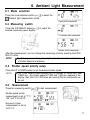
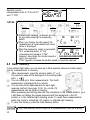
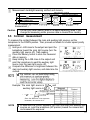
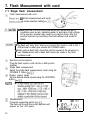
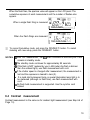
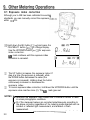
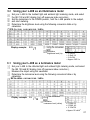
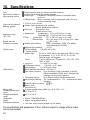
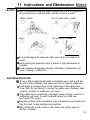
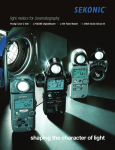
EXPOSURE METER
8
Operating Instructions
SAFETY PRECAUTIONS
This manual uses the following safety labels fork WARNING andA CAUTION
that you must follow.
&,
Indicates hazards or unsafe practices that can result in severe
personal injury or death.
WARNING
n CAUTION
Indicates hazards or unsafe practices that can result in the personal
injury or a damage to your L-408 exposure meter.
Indicates an operation note or limitation you must use. Please read
the notes to avoid an incorrect L-408 operation.
Provides the reference information and related functions that are
useful for your L-408 operations.
+ Store your L-408 in a safe place so that a little child cannot take 8
it and not to wind the strap around his/her neck.
Q) Never drop dry cells in a fire. Also, do not jumper, disassemble,
or overheat the dry cells. If done, the cells may explode and
you may be injured or the ambient may be contaminated.
A
CAUTION
I
i
0 To avoid injury to your eyes, never look at the sun through the
viewfinder.
8 To avoid an electrical shock, never plug in or remove the
syncro cord when water drops, the moisture is too high, or your
hands are wet.
FEATURES
Thank you for your purchase of the Sekonic Multimaster L-408.
It features:
1.
Built-in non-parallax viewfinder with 5 degree acceptance
angle.
0 Built-in viewfinder eliminates parallax error caused by separate
viewfinders.
l Built-in design eliminates troublesome viewfinder mounting and removal
in the field.
2.
Unique, new combination of Lumisphere and Lumidisc.
l
l
3.
All operations directly on meter body.
Reduces workload, speeds operation and removes risk of losing
accessories.
Fast and accurate light balancing reading because the unit features an
exclusive, retracting Lumisphere which allows fast, accurate light
balancing readings, while eliminating the need for additional accessories.
Water-resistant.
l
The first photographic apparatus that has the water-resistant construction.
Stands up to dirty, sooty, damp industrial locations and wet weather,
outdoors.
4. Aperture or shutter speed priority.
ID Aperture or shutter speed priority can be selected according to choice.
Both modes are available for ambient light reading.
5.
Memory function is useful for subject contrast measurement,
0 The three memory values are displayed on the LCD analog scale to
provide simple balancing of light and subject contrasts.
6. Multiple flash measurement.
0 When a single flash is insufficient to illuminate a subject, repeated flash
exposures on the same film frame or sheet of film will build exposure to
the correct level and the cumulative effect of these exposures can be
accurately measured by the meter.
ii
CONTENTS
i
SAFETY PRECAUTIONS ..........................................................
ii
FEATURES ................................................................................
1
Parts Designations ..............................................................
2
:: Display ...............................................................................
2
2-1 LCD panel ...............................................................................
4
2-2 Light-receiving indicator ..........................................................
4
....................
2-3 Viewfinder information ........................................
5
3 . Mode Selection ...................................................................
5
3-1 Switching between lumisphere UP and DOWN positions ......
5
3-2 Switching between incident and reflected light metering ........
6
4 . Light-receiving Method ........................................................
4-1 Incident light metering (with eyepiece cover closed) ............ 6
6
4-2 Reflected light metering (with eyepiece cover open) ...............
7
5 . Preparation for Measurement .............................................
7
5-1 Mounting a type-AA battery ...................................................
.......... 7
5-2 Battery check ................................................................
8
5-3 Auto Power OFF ......................................................................
8
5-4 ISO film speed setup ...............................................................
8
..........................
5-5 Light-receiving method setup ......................
9
5-6 Measurement mode setup ......................................................
10
5-7 Shutter speed priority setup ...................................................
10
5-8 Aperture priority setup ...........................................................
11
6 . Ambient Light Measurement ..............................................
11
6-1 Mode selection ......................................................................
11
6-2 Measuring switch ...................................................................
11
6-3 Shutter speed priority setup ...................................................
11
6-4 Measurement .........................................................................
12
6-5 Data memory .........................................................................
13
6-6 Contrast measurement ..........................................................
7. Flash Measurement with Cord ................................................... 14
14
7-1 Single flash measurement .....................................................
15
7-2 Data memory .........................................................................
15
7-3 Cumulative flash measurement .............................................
16
7-4 Contrast measurement ..........................................................
17
8. Flash Measurement without Cord ..............................................
17
8-1 Single flash metering .............................................................
18
8-2 Data memory .........................................................................
18
8-3 Cumulative measurement ......................................................
19
8-4 Contrast measurement ..........................................................
20
9 . Other Metering Operations ................................................
20
9-1 Exposure index correction ....................................................
21
9-2 Using your L-408 as an illumination meter ...........................
21
9-3 Using your L-408 as a luminance meter ................................
22
Specifications ....................................................................
23
Instructions and Maintenance Notes .................................
1. Parts Designations
Light-receiving indicator- _ ____
Objective lens cover
POWER switch
receiving element)
Measuring switch
UP/DOWN button
display (LCD) panel
Mode selector
F/EV/MULTI selector
’ Synchro terminal
Viewfinder
Eye-piece
cover
Memory
button
Battery case cover lock
1
2. Display
.~
2.1 LCD panel
@ Mode selection
m
Ambient light measurement
Flash measurement without cord
Flash measurement with cord
The mode symbols are switched in the following sequence:
@ Aperture/EV/Battery/Others
“b.c” Battery capacity 2‘:“;
See Page 7.
Aperture value (Indicated by a number
and dots 2’:‘i )
See Page 11.
Aperture-priority measurement
Exposure value (Indicated by a number
and dots $:‘$ )
See Page 11.
Eu
Under exposure
Eo
Over exposure
- I - The mark flashes during Reflected Light
Metering. See Page 6.
One full stop is shown by 9 bars.
A single bar indicates one tenth stop.
2
@ m Number of cumulative flashes
When the flash is fired, this mark appears and the measurement times are
acccumulated. More than 10 measurement causes the “E” (error) mark to
appear.
See Pages 15 and 18.
IS0 film speed
The film speed of IS0 3 to 8000 is shown.
See Page 8.
0
Measuring-level adjustment
This mark appears when the measuring-level
adjustment is carried out. See Page 20.
@ @ T Shutter speed or film frame count (F. P. S.)
(?J
M
Shutter speed in minutes
Q
Shutter speed in seconds
m
Number of frames per second
R~J
Shown during exposure index correction.
See Page 20.
Analog display
2 Underexposure
; Overexposure
e I. Aperture (A bar or dot indicates 0.5 stop.)
The analog display can be switched to memory dot
display using the memory function.
See Page 12.
2.2 Light-receiving indicator
Slide the eyepiece cover up or down to set metering to either incident light or reflected
light (with 5-degree viewfinder metering).
Light receiving
indicator
‘...
-1
Incident light metering
Reflected light metering
2.3 Viewfinder information
Circle e) indicates 5 degree spot measurement. Center spot @ is for positioning
of spot measurement.
Viewfinder information
4
3. Mode Selection
Your L-408 can measure both incident and reflected light in both ambient light and
flash (strobe or bulb) modes. You can switch the modes as follows:
[LighM~fng
[Llghk$\mg
[Measured light)
IMl
speed priority measurement
(Can be stored in memory)i )
See Page 11
Exposure priority measurement
(Cannot be stored in memory)
3.1
‘
1
Switching between incident metering and reflected light
metering (with 5-degree viewfinder metering)
Slide the eyepiece cover closed for incident light metering, or open the eyepiece cover
for reflected light metering.
Incident light metering (with cover closed)
Caution
I
Reflected light metering (with cover open)
Set the eyepiece cover at the top or button click position only.
Otherwise, the LCD markings (entire display) will blink and you cannot
start metering with the measuring switch.
3.2 Switching between lumisphere up and down positions
Manually rotate the lumisphere UP/DOWN ring counterclockwise to move the
lumisphere up. You can now start incident light metering.
Rotate the ring clockwise to retract the lumisphere for balancing light metering.
Lumisphere
up position
@6%$
Lumisphere
down position
Set the lumisphere UP/DOWN ring to one of the dot marked positions.
Any other position will result in incorrect metering.
L
,
5
4. Light-receiving Method
Incident light metering (with eyepiece cover closed)
4.1
Hold the L-408 close to the subject, point the lumisphere towards the camera, and
measure the incident light intensity.
.\; q
Lumisphere in up position:
For incident measurement
Lumisphere in down position:
For light balance and simple illuminance
eflected light metering (with eyepiece cover open)
Your L-408 has a built-in viewfinder. By sliding the eyepiece cover down to its open
position, you can use it as a 5-degree spot meter for accurate spot metering.
Hold the L-408 at your camera position, and place the circle in the viewfinder on the
target subject.
@@%I
+ Spot metering under 50 cm (20 inches) is not possible.
NOTE
* When you open the eyepiece cover, 141 appears in the light-receiving
indicator and _ i _ flashes in the bar display area.
r
5. Preparation for Measurement
5.1
Mounting a battery and strapping
Use a 1.5volt, type-AA (UM3 dry, LR-6 or R-6) battery. Do not use a NiCd battery.
@ Unlock the cover lock and remove the battery case cover. @ Insert the battery in
the battery case aligning the polarities as indicated on the inside of the case.
@ insert the claws of the cover into the holes of the
, Pull down the strap ring.
bodv. Lock the cover lock.
Battery
case cover
Cover lock
Attaching the strap
Remove the battery case cover.
(3 Move the cover lock toward the battery
case (arrow a).
a Pass the strap through strap eyelet 0.
@ Pass the opposite side of the strap through
a strap ring.
ICAUTION 1 l
To save your current setup, turn the POWER switch OFF first, then
replace the battery.
e If the LCD message is abnormal or if nothing occures when you press
an operation button, remove the battery. Wait at least 10 seconds.
Then, mount the battery (in the correct polarity) and try again.
l Wipe and clean the rubber seal of battery cover. Sand and dust may
cause water leakage, corrosion or other problems.
5.2 Battery check
Turn the POWER switch on, and the LCD panel
(“b.c” message and bar marking 2‘:“; ) displays
the current battery level. The battery level is
indicated by a number of bars for one second.
Then, the LCD panel automatically switches to the
normal measurement mode.
NOTES 0 You can sustain battery level display by holding down the Power switch.
* When the battery capacity drops below the limit, the “b.c” display blinks
and then goes out.
* When the battery level is indicated by only two or three dots, replace the
battery.
5.3 Auto Power-off
To save battery capacity, the L-408 is automatically turned off (and all readings are
erased) 10 minutes after your last operation.
.~
NOTE @ When the L-408 is automatically turned off by Auto Power-off,
settings (such as mode selection, exposure setup and measured
values) are saved. They are displayed again when the POWER switch
is turned on.
-
5.4 IS0 film speed setup
Hold down the IS0 button (@iJ) and press the UP or
DOWN button (c=@) to set the IS0 film speed. The UP
button is used to select higher film speed, and the DOWN
button for more than one second continuously increases
or decreases the film speed.
- NOTE /e You can also change the IS0 film speed after taking measurement.
-
The new calculated value is displayed when the film speed is changed after taking the
measurement.
5.5 Light-receiving method setup
Select incident light metering (with lumisphere in the UP or DOWN position) or
reflected tight metering (with 5-degree spot meter).
Eyepiece
\
cover
Closed Q
8
Incident light metering
(with cover closed)
Open
3
Eyepiece
cover
/
Reflected light metering
(with cover open)
5.6 Measurement mode setup
Press the mode selection button (&iJ) to select the
desired measurement mode. Mode switching sequence:
,+
❂ Ambient
Flash measurement
Flash measurement
--) w with cord
without cord
light
+
measurement
I
The following shows the meter display of each selected mode.
❂
(Ambient liqht measurement) mode:
Press the F/EV/MULTI button (~0) to switch the display. Display switching
sequence:
+ 6 Shutter speed + m Exposure value + i Aperture priority ._____
priority metering
metering
metering
1
~~~~o;;~s;1’
I 14 2 28 4 ib 8 II 13?:3:f-6490
Shutter speed priority metering
Exposure value metering
Aperture priority metering
(Flash measurement without cord) mode, and
[Flash measurement with cord) mode
Press the F/EV/MULTI button to select single or cumulative flash measurement.
NOTES i
l
l
Use single flash measurement when a single flash is sufficient.
Use cumulative measurement when multiple flashes are needed (one to
nine times.) Ten or more flashes are not possible,
Single flash
measurement
i LiiiL’Ld.,,ti/?iL:il3ri
i *li5lib: ,, lo‘2>il’t”4,
1
1
Cumulative
measurement
1 I‘ / /a 4 c. E 1
i ‘I 3‘4
?i ‘6
Flash measurement
without cord
J
[ cl<-4 bi 1 Ire_ /‘ctes- J
Flash measurement with cord
9
5.7 Shutter speed priority setup
Press the UP/DOWN button (~=a) to select a shutter
speed.
The UP button is used to increase shutter speed, and the
DOWN button to decrease it. Holding down the UP or
DOWN button continuously increases or decreases the
shutter speed.
When the DOWN button is pressed once
; ;4 2 ;& 3 56 i i! 162232C:E4
93
5.8 Aperture priority setup
Press the UP/DOWN button to set the desired aperture for aperture-priority
measurement in ambient light. The UP button is used to decrease the aperture, and
the DOWN button to increase it. Holding either button down continuously changes
aperture.
When the DOWN button is pressed once
pJ
m-- :;‘c
\+
gJ
-EJg IL%
i-I
When the UP button is pressed once
10
6. Ambient Light Measurement
6.1 Mode selection
Press the mode selection button (c==@) to select the
a Ambient light measurement mode.
Shutter priority measurement
6.2 Measuring switch
Press the F/EV/MULTI button (e=@) to select the
desired measuring value display.
EV exposure value measurement
Exposure priority measurement
After this measurement, you can change the measuring mode by pressing the F/EV/
MULTI button.
NOTE e The EV (exposure value) shows light value based on the combination
of shutter speed and aperture.
6.3 Shutter speed priority setup
Press the UP or DOWN button to set the desired shutter speed.
* Your L-408 covers shutter speeds from 30 minutes to 1/8000 sec. After
NOTE
1/8000 sec. , the shutter speed of 1/200 and 1/400 sec. appears in the
display, then from 8 to 128 frames per second (f/s) for cine speeds can
be set.
6.4
Measurement
Press the measuring switch (*a) to start measurement.
Shutter speed priority
measurement is set at "T:1/
125” and “F:2.8+3/10”.
U
1 14 2 2.8
4 56 8 11 1622324154 90
Exposure Value
measurement is set at
“EV10.3”.
11
Aperture priority
measurement is set at “F:5.6+3/10”
and “T: 1/30".
i
@iJ “3:’
El
is r- Ii
D -1 rr
--1 .ar-1 z 3 1_ 3 !J
NOTES * Bars and analog values are displayed.
@ Ambient light metering continues as long
as you keep pressing the measuring
switch.
0 When you change the film speed, the
measurement is recalculated and a new
value is displayed.
@ When the measuring range is exceeded, [
“Eu” (underexposure) or “Eo”
;a r::
G /3r
(overexposure) appears. If "Eu"
b.cL ’ - IL 3
appears, slow down the shutter speed or i 1~1.1.1.1.1.1.1.,~,.,~,...,
open the aperture.
If “Eo” appears, increase the shutter speed or close the aperture.
1 1.4 2 2.8
t
4 5.6 8 11 16 22 32 45 64 90 0
6.5 Data memory
In the ambient light mode, you can store up to three aperture values at shutter speed
priority measurements in memory.
After measurement, press the memory button (@c=).
The aperture value will be displayed on the analog scale
with ( l or 1).
You can store up to three measurements. The fourth
measurement is displayed but not stored.
You can store three measurements for each lightreceiving method. (See page 13 (5). So, a total of 9
measurements can be stored in memory.
When measuring and storing data with the lumisphere in the DOWN position, your
L-408 does not display the values measured with the lumisphere in the UP
position or in the reflected light metering mode, To recall these measurements,
switch the mode to lumisphere UP position or reflected light metering.
To clear the memory, press the Clear Memory button.
fI
I
m * The Clear Memory button clears all 9 measurements from the memory .
12
(3 Measurement mode/light-receiving method and memory
Measuring mode
R
b
c
Ambient light
Flash with cord
Flash without cord
Memory data count
Light-receiving method
lncldent light metering
Reflected light metering
Lvorphu. UP
L-e
(in the ambient light mode, memo; can be syored only in shu;ter priority
measurement.)
Caution
You can only recall memory data in the same measuring mode. If you
change the measuring mode, previous data is cleared from memory.
6.6 Contrast measurement
To measure the contrast between the main and auxiliary light sources, set the
lumisphere to the DOWN position. Then proceed as follows for shutter speed priority
measurement:
a Hold your L-408 close to the subject and point the
lumisphere toward the main light source (turn the
auxiliary light source off). Take reading.
ia Press the Memory button to store the measured
data in memory.
@ Keep holding the L-408 close to the subject and
point the lumisphere to ward the auxiliary light
source (turn the main light source off).
@ Compare the difference in brightness between the
main and auxiliary light sources, and determine the
contrast.
* The contrast can be determined easily
NOTE
Example: The main light source is :b 2 1 _ and
auxiliary light source is $c$ _
f - -,-A_u~p&w&~
1 14
2 28 4 56
8*1116*22324564 9 0
Since the difference is two exposure
increments, the contrast is 4:1.
NOTE
* To determine the correct exposure, turn both the main and auxiliary light
sources on, point the lumisphere (UP position) toward the camera lens,
and measure the exposure.
13
7. Flash Measurement with cord
7.1 Single flash measurement
(II
Flash measurement with cord
(Flash measurement with cord)
e mode selection button (e(Q)*
0 Never use the L-408 in flash mode when your hands are wet in
conditions such as rain, splashing water or wet place. High voltage
at the synchro terminal may result in an electric shock. Use the
synchro terminal cap and select the flash without cord mode for
safety.
* The flash unit may “pop” when you connect the synchro cord to the L408 terminal or when you operate the POWER switch.
* When using a flash bulb, check the synchro speed of the camera you
use. Measurement with a flash bulb cannot be made in the flash
cordless mode.
Synchro cord connection
Plug the flash synchro cord into the L-408 synchro
terminal.
Single flash measurement
Select the single flash measurement mode using the
F/EV/MULTI button (e@).
@ Shutter speed setup
Set the desired shutter speed using the UP/DOWN
button (e@).
NoTE
@
Measurement
Press the measuring switch (=a).
The flash will fire and the correct aperture will
appear on the LCD panel.
I
14
8.1.8.8.848.8*
1 14 2 2.8 4 56 8
11 1622324564
30
1
NOTES
l
l
l
l
If the camera’s flash does not fire, use flash measurement without cord.
When the IS0 setup is changed, the measurement data is recalculated
and redisplayed.
If the shutter speed is changed after measurement, the measurement is
lost and the aperture is cleared to zero (0).
When the measuring range is exceeded, “Eu” (underexposure) or “Eo”
(overexposure) appears. Correct the shutter speed or the light source.
* Synchro cord (optional):
A 5-meter-long synchro cord with three
plugs is available for synchronous metering
between your L-408 and the flash unit or
between the camera and the flash unit. It is
very convenient as no cord replacement is
required during shooting pictures. The L408 is also equipped with a connector
terminal lock for securing cable connection.
light
7.2 Data memory
In the single flash measurement mode, up to three measurements can be stored in
memory. Memory storage is same as for the ambient light measurement (see 6.5 of
Page 12).
7.3 Cumulative flash measurement
@ Flash measurement with cord
Select the
(Flash measurement with cord) mode
using the mode selection button (~=a).
@J Cumulative flash measurement
Select the cumulative flash measurement mode using
the F/EV/MULTI button (G@).
@ Shutter speed setup
Set the desired shutter speed using the UP/DOWN
button (=@).
NOTE
@
l
--_l
In this mode, you can set the shutter speed from 1 sec to 1/500 sec.
After 1/500 sec., 1/75,1/80, 1/90, 1/100, 1/200 and 1/400 sec. appear in
the display and you can select a particular shutter speed.
_ --_ -._ /
Measurement
Press the measuring switch (=@). The flash will fire, and the aperture will
appear on the LCD panel. Also! the cumulative aperture of each measurement
and the number of accumulated flashes also appear.
When a single flash firing is
measured
When four flash firings are
measured
ra
:
ii j-jIT
j /J$:‘- re 5
I~l*l*l.l*I*l*l.~*
1 1 4 2 2 8 4 E6 8 111622324564
90
@ To cancel the Cumulative mode, just press the F/EV/MULTI button, To restart
metering with new setup, press the F/EV/MULTI button.
NOTES e When the IS0 setup is changed, the measurement data is recalculated
and redisplayed.
* If the shutter speed is changed after measurement, the measurement is
lost and both the number of accumulated flashes and aperture are
cleared to zero (0).
7.4 Contrast measurement
The contrast measurement is the same as for ambient light measurement (see 6.6 of
Page 13).
16
8. Flash Measurement without cord
8.1 Single flash metering
<jr! Flash measurement without cord
(Flash measurement without cord) mode using the mode selection
button.
@I Single flash measurement
Select the single flash measurement mode using the F/EV/MULTI button.
(3 Shutter speed setup
Set the desired shutter speed using the UP/DOWN button.
NOTE
Cj>
+ In this mode, you can set the shutter speed from 1 sec to 1/500 sec.
After 1/500 sec., 1/75, 1/80, 1/90, 1/100, 1/200 and 1/400 sec. appear in
the display and you can select a particular shutter speed.
Measurement
Press the measuring switch. The
mark will
appear and your L-408 is ready to measure
(Standby mode).
When the flash fires, your L-408 displays the
correct exposure.
mark continues to blink and your L-408
NOTES * After this measurement, the
remains in standby mode.
0 The standby mode continues for approximately 90 seconds and you can
measure again within this time. If the mark goes out after 90 seconds
press the measuring switch again.
* When you change the film speed, the measurement is recalculated and
a new correct value is displayed.
l If the flash is NOT metered by your L-408 (when the flash is dimmer
than the ambient light), use flash measurement with cord.
@ If the shutter speed is changed after measurement, the measurement is
lost and the aperture is cleared to zero (0).
NOTES e When the measuring range is exceeded, “Eu” (underexposure) or “Eo”
(overexposure) appears. Correct the shutter speed or the light source.
@ If a rapid start luminescent lamp or special illumination lamp is to be
measured (although no flash fires), connect the synchro cord and use
the flash measurement with cord.
8.2 Data memory
In the single flash measurement mode, up to three measurements can be stored in
memory. Memory storage is the same as for ambient light measurement (see 6.5 of
Page 12).
8.3 Cumulative measurement
(i’/ Flash measurement without cord
Select the
(Flash measurement without cord)
mode using the mode selection button (+a).
@ Cumulative measurement
Select the flash cumulative measurement mode
using the F/EV/MULTI button (&)).
@ Shutter speed setup
shutter
speed
using
the UP/DOWN
NOTESet the desired
,
,)
)
)
)
button (&)).
+ In this mode, you can set the shutter
speed from 1 sec to 1/500 sec. After 1/
500 sec 1/75, 1/80, 1/90, 1/100, 1/200
and 1/400 sec. appear in the display and
you can select a particular shutter speed.
@
Measurement
Press the measuring switch. The
mark
continues blinking and your L-408 enters the
standby mode.
18
a- imom I’;2
/ I \’ I
174
, -- i ICJ
Ia w:f
1 1.4 2 2.8 4 Ei 5 11162232C64
30
i
~_
When the flash fires, the aperture value will appear on the LCD panel. The
cumulative exposure of each measurement and the number of flashes also
appear.
ii ,-,When a single flash firing is measured b‘ 0 rj
j iJ/J$‘- d c 3
/,
,.e..r,.l*.*l.
1 1.4 2 2.8 4 5.6 8
11
’
162?324564d
When four flash firings are measured
(
*.,.,*,.,..*..,.,*
1 1.4 2 2.8 4 5.6 8 11 16 22 32 45 64 90
~3 To cancel Cumulative mode, just press the FEV/MULTI button. To restart
metering with new setup, press the F/EV/MULTI button.
mark continues to blink and your L-408
NOTES @ After this measurement, the
remains in standby mode.
0 The standby mode continues for approximately 90 seconds.
8 If the flash is NOT metered by your L-408 (when the flash is dimmer
than the ambient light), use flash measurement with cord.
* If the shutter speed is changed after measurement, the measurement is
lost and the exposure is cleared to zero (0).
l If a rapid start luminescent lamp or special illumination lamp light is to
be measured (although no flash fires), use flash measurement with
cord.
* No flash bulb measurement is supported. Use the synchro cord
instead.
8.4 Contrast measurement
Contrast measurement is the same as for ambient light measurement (see Step 6.6 of
Page 13).
19
9.1 Exposure index correction
Although your L-408 has been calibrated to exacting
standards, you can manually correct the exposure
within B.9 EV.
@ Hold down the IS0 button (@a) and press the
F/EV/MULTI button (~=a) to change display.
Use the UP/DOWN button (e@) for exposure
index correction.
mark continues until the exposure index
correction is canceled.
q
1g-,-y;;
~
ii
0
The UP button increases the exposure index 0.1
step at a time (the exposure is reduced), while
the DOWN button decreases the value (the
exposure is increased). Holding down the button
continuously increases or decreases the
exposure index.
(3j To cancel exposure index correction, hold down the UP/DOWN button until the
exposure value reaches zero (0). The
mark goes out.
NOTES @ Determine the exposure index values after a sufficient number of tests
in actual photographic conditions.
0 All of the measured values are corrected simultaneously according to
the above correction regardless of the metering mode selected such as
incident or reflected light measurement, and ambient or flash
measurement.
---___-- --1_1-I --____-- - - - - 20
9.2 Using your L-408 as an illuminance meter
@
Set your L-408 to the incident light and ambient light metering mode, and select
the IS0 100 and EV display (turn off exposure index correction ).
@ Set the lumisphere to the DOWN position, hold the L-408 parallel to the subject,
and start metering.
@ Determine the brightness level using the following conversion table or by
calculation.
I? EV-to-Lux conversion table
Display example:
EV9 2‘: _
@ Calculation
Brightness level (Lx)
= 2.5x2 EV
= 2.5x2 9.4
= 2.5x724
= Approx. 1800 Lx
9.3 Using your L-408 as a luminance meter
(0 Set your L-408 to the reflected light and ambient light metering mode, and select
the IS0 100 and EV display (turn off exposure index correction ).
Q; Measure the object using the viewfinder.
i-3;) Determine the luminance level using the foliowing conversion table or by
calculation.
ti EV-to-cd/m2 conversion table
Display example: EV9 21: _
a t-$Cl the conversion
@ Calculation
Luminance level (cd/m2)
= 0.125x2 EV
= 0.125x2 4.5
= 0.125x724
= Approx. 90 cd/m2
21
10. Specifications
Type
Light-receiving method
Light-receiving section
Light receiving element
Metering systems
Measuring range
(IS0 100)
Repeat accuracy
Calibration constant
Display range
Other function
Battery used
Operating temperature
range
Storage temperature
range
Dimensions
Weight
Standard accessories
* Digital exposure meter for ambient and flash metering
* Incident and reflected light metering system
* Incident light:
Lumisphere /Flat diffuser function (Lumisphere down
position)
Built-in viewfinder (with 5-degree spot meter); 50 cm to
l Reflected light:
unlimited metering range
l Silicon photo diode
0 Ambient light: Aperture-priority metering
Shutter speed-priority metering
* Flash light:
With synchro cord
Without synchro cord
EV-1 to EV19.9 (in 0.1 step)
l Ambient light:
Incident light
Reflected light EV2.5 to EV22.9 (in 0.1 step)
Incident light
F1.0 to F90 +0.9 stop (in 0.1 step)
l Flash:
F2.0 +0.5 stop to F90 +0.9 stop (in 0.1 step)
Reflected light
k09.1 EV or less
C=340 (lumisphere), C=250 (Flat diffuser
0 Incident light metering:
function/lumisphere DOWN)
* Reflected light metering:
K=12.5
* IS0 (film speed):
3 to 8000 (at 1/3 SV)
* T (shutter speed):
Ambient light:
30 min to 1/800 sec (in 1 sec step) plus 1/200 or 1/400
f/s (frames/sec): 8, 12, 16, 24, 25, 30, 32, 64, 128
Opening angle: 180 degrees
Flash:
1 sec to 1/500 sec (at 1 TV) plus 1/75, 1/80, 1/90, 1/100,
1/200 or 1/400
l Aperture:
1.0 to 90.9 (in 0.1 step)
- 9.9 to 36.1 (in 0.1 step)
@ EV (Exposure Value):
@ Analog display:
F1.0 to 90 (in 0.5 step)
0 Water-resistant construction: JIS Class 4
@ Data memory function: Up to 9 readings (3 with lumisphere, 3 with flat
diffuser/lumisphere DOWN, and 3 reflected light
readings) can be stored in memory.
l Cumulative function:
Up to 9 flash readings can be accumulated.
* Out-of-range metering: “Eu” (underexposure) or “Eo” (overexposure) alarm
indication
@ Exposure index correction: 3.9 EV
0 Battery check
l Auto power-off
l A single type-AA battery (UM3 dry, L-6 or LR-6), 1.5 V
0 -10°C to +50°C
* -20°C to +60°C
l
l
l
Approx. 77Wx144Hx41D mm
Approx. 180 g (without battery)
Soft case, strap, synchro terminal cap, AA battery
The specifications and appearance of the L-408 are subject to change without notice
due to improvement.
22
11. Instructions and
aintenance
CAUTION IB Your L-408 exposure meter is water-resistant, but it is NOT water-proof.
Do not wash your L-408 with water, and do not use it in water.
i Water splash
Rain
~i DO not wash with a water.
Do not use in a water.
@ To avoid damaging the exposure meter, never drop it or subject it to
impact.
@ Avoid keeping the exposure meter in places of high temperature or
humidity.
b Avoid excessive temperature changes, otherwise, condensation will
occur, resulting in malfunction.
MAINTENANCE NOTES
a If your L-408 is splashed with water, immediately wipe it with a soft and
dry cloth. Water leakage could cause corrosion or system malfunction.
@ Avoid applying excessive force to the rubber seal of the battery case
cover, Also, do not attempt to remove the rubber seal, otherwise, water
invasion, corrosion or malfunction will result.
e If the rubber seal is scratched or damaged, water invasion, corrosion or
malfunction will result. Consult the dealer where the L-408 was
purchased if this occurs.
* Keep the surfaces of the lumisphere, lens and objective cover clean and
free from dust, foreign particles and scratches.
* Wipe off dirt with a soft or silicon cloth. Never use solvent such as
thinner or benzine.
23