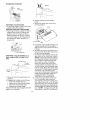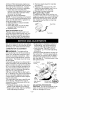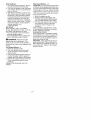
1
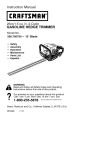
Operator's
Manual
I CRRFTSMRN°I
19cc/1.2 cu. in. 2-Cycle
GASOLINE HEDGE TRIMMER
Model No.
358.795700
- 18" Blade
WARNING:
Read and follow all Safety Rules and Operating
Instructions
before first use of this product.
For answers
Call 7 am-7
to your questions about this product:
pm, Mon-Sat;
10 am-7 pm, Sun
1-800-235-5878
Sears,
530086386
Roebuck
3/22/01
and Co., Hoffman
(Hours
listed
are
Central
Time)
Estates,
IL 60179 U.S.A.
Warranty Statement
Safety Rules
Assembly
Operation
Maintenance
Service & Adjustments
2
2
4
5
7
8
Storage
Troubleshooting
Table
Emissions Statement
Parts List
Spanish
Parts and Ordering
10
11
11
13
16
Back Cover
FULL ONE YEAR WARRANTY ON CRAFTSMAN ® GAS POWERED HEDGE
TRIMMER
For one (1) year from the date of purchase, when this Craftsman Gas Powered
Hedge Trimmer is maintained, lubricated, and tuned up according to the operating and maintenance instructions in the operator's manual, Sears will repair, free
of charge, any defects in materials or workmanship.
This warranty excludes spark plug, air filter, and the blade which are expendable
parts and may become worn during normal use.
Ifthis Hedge Trimmer is used for commercial purposes, this warranty applies for only
90 days from the date of purchase. If this Hedge Trimmer is used for rental purposes,
this warranty applies for only 30 days from the date of purchase. This warranty applies only while this product is used in the United States.
WARRANTY SERVICE IS AVAILABLE BY RETURNING THE HEDGE TRIMMER TO THE
NEAREST SEARS STORE OR SERVICE CENTER IN THE UNITED STATES.
This warranty gives you specific legal rights, and you may also have other rights
which vary from state to state.
Sears, Roebuck and Co,, D/817WA, Hoffman Estates, IL 60179
PLAN AHEAD
z't
DANGER:
THIS POWER TOOL CAN
BE DANGEROUS! This unit can cause serious injury including amputation or blindness to the operator and others. The
warnings and safety instructions in this
manual must be followed to provide reasonable safety and efficiency in using
this unit. The operator is responsible for
following the warnings and instructions in
this manual and on the unit. Never allow
children to use this tool.
,_k WARNING:
Failure to follow all
Safety Rules and Precautions can result in serious injury.
KNOW YOUR UNIT
• Read your Operator's Manual carefully until you completely understand
and can follow all warnings and
safety rules before operating the unit.
• Restrict unit to users who understand
and will follow all warnings and safety
rules in this manual and on the unit.
WARNING:
Inspect the area before starting the unit. Remove all debris
and hard objects such as rocks, glass,
wire, etc. that can ricochet, be thrown,
or otherwise cause injury or damage
during operation.
• Always wear eye protection when operating, servicing, or performing maintenance on unit. Wearing eye protection will help to prevent brush or debris
from being thrown or ricocheting into
eyes and face which can result in
blindness and/or serious injury. Eye
protection should be marked Z87.
• Wear hearing protection when using
this unit.
• Secure hair above shoulder length. Secure or remove jewelry, loose clothing,
or clothing with loosely hanging straps,
ties, tassels, etc. They can be caught
in moving parts.
• Stay alert. Do not operate unit when
you are tired, ill, upset, or if you are
under the influence of alcohol, drugs,
or medication.
Blades
can
throw
objects
violently.
• You
canbeblinded
orinjured.
• Wear
safety
glasses.
Glasses
Boots
HAZARD
ZONE
_ ..............
_
%_:d
& WARNING:
Hazard
zone
forthrown
objects
• Blades
can
throw
objects
violently.
• Others
canbeblinded
orinjured,
• Keep
people
and
animals
30feet
(10m)away.
Blades move Allow blades to stop _
Ot_entarily before removing
_
after the them from the cut.
trigger is
• Keep children, bystanders, and animals away from work area a minimum of 30 feet (10 m) when starting
or operating unit.
If situations occur which are not covered in this manual, use care and good
judgment. If you need assistance, contact your Sears Service Center or call
the Customer Assistance Helpline at
1-800-235-5878.
HANDLE FUEL WITH CAUTION
• Eliminate all sources of sparks or
flame (including smoking, open
flames, or work that can cause
sparks) in the areas where fuel is
mixed, poured, or stored.
• Mix and pour fuel in an outdoor area;
store fuel in a cool, dry, well ventilated
place; use an approved, marked container for all fuel purposes.
• Do not smoke while handling fuel or
while operating the unit.
• Do not fill fuel tank while engine is
running.
• Make sure the unit is properly assembled and in good operating condition.
• Avoid spilling fuel or oil. Wipe up fuel
spills before starting the engine.
• Move at least 10 feet (3 meters)
away from fuel and fueling site before
starting engine.
• Always store gasoline in a container
approved for flammable liquids.
WARNI NG:
Blades move momentarily
after the
trigger is released.
• The blades can seriously cut you or
others.
• Allow blades to stop before removing
them from the cut.
OPERATE
YOUR UNIT SAFELY
DANGER:
RISK OF CUT; KEEP
HANDS AWAY FROM BLADE - Blade
moves momentarily after the trigger is
released. Do not attempt to clear away
cut material when the blade is in motion. Make sure the switch is in the OFF
position, the spark plug wire is disconnected, and the blade has stopped
moving before removing jammed material from the cutting blade. Do not grab
or hold the unit by the cutting blade.
• Inspect unit before each use for
worn, loose, missing, or damaged
parts. Do not use until unit is in
proper working order.
• Keep outside surfaces free from oil
and fuel.
• Never start or run engine inside a
closed room or building. Breathing
exhaust fumes can kill.
• Avoid dangerous environments.
Do
not use in unventilated areas or
where explosive vapors or carbon
monoxide build up could be present.
• Do not overreach or use from unstable surfaces such as ladders, trees,
steep slopes, rooftops, etc. Keep firm
footing and balance at all times.
• Do not raise unit above your shoulders; the cutting blade can come
dangerously close to your body.
• Always keep unit in front of your body.
Keep all parts of your body away from
the cutting blade.
• Keep
thecutting
blade
andairvents SAFETY
NOTICE:
Exposure
tovibrafreefromdebris.
tionsthrough
prolonged
useofgaso• Useonlyforjobsexplained
inthis
linepowered
hand
toolscouldcause
manual.
blood
vessel
ornerve
damage
inthe
MAINTAIN
YOUR
UNITPROPERLYfingers,
hands,
andjoints
ofpeople
• Have
allmaintenance
andservice prone
tocirculation
disorders
orabnormalswelling.
Prolonged
useincold
notexplained
inthismanual
perhasbeenlinked
toblood
vesformed
byaSears
Service
Center. weather
inotherwise
healthy
• Disconnect
spark
plugbefore
per- seldamage
Ifsymptoms
occur
suchas
forming
maintenance
except
forcar- people.
numbness,
pain,
lossofstrength,
buretor
adjustments.
• Donotuseacutting
blade
thatis
change
inskincolor
ortexture,
orloss
offeeling
inthefingers,
hands,
or
bent,
warped,
cracked,
broken,
or
joints,
discontinue
theuseofthistool
damaged
inanyother
way.Have
attention.
An
worn
ordamaged
partsreplaced
by andseekmedical
antivibration
system
doesnotguaranyourSears
Service
Center.
ofthese
problems.
• Useonlyrecommended
Craftsman teetheavoidance
cutting
blades
andreplacement Users
whooperate
power
toolsona
continual
andregular
basis
mustmoniparts;
useofanyother
partsmay
theirphysical
condition
and
voidyourwarranty
andcause
dam- torclosely
thecondition
ofthistool.
agetoyourunit.
• Empty
fueltankbefore
storing
theunit. SPECIAL
NOTICE:
Your
hedge
trimUseupfuelleftincarburetor
bystartingmerisequipped
withatemperature
engine
andletting
itrununtilitstops. limiting
muffler
andspark
arresting
• Hand
carrytheunitwiththeengine screen
which
meets
therequirements
Codes
4442and4443.All
stopped
andthemuffler
andcutting ofCalifornia
U.S.
forest
landandthestates
ofCaliblade
away
fromyourbody.
Idaho,
Maine,
Minnesota,
New
• Allow
engine
tocool,empty
thefuel fornia,
tank,
andsecure
theunitbefore
stor- Jersey,
Oregon,
andWashington
reinternal
comingortransporting
itinavehicle. quirebylawthatmany
• Donotstore
theunitorfuelina
bustion
engines
beequipped
witha
closed
areawhere
fuelvapors
can spark
arresting
screen.
Ifyouoperate
trimmer
inastateorlocale
reach
sparks
oranopenflame
from ahedge
hotwater
heaters,
electric
motors
or where
suchregulations
exist,
youare
switches,
furnaces,
etc.
legally
responsible
formaintaining
the
condition
ofthese
parts.
• Store
theunitsothecutting
blade operating
Failure
todosoisaviolation
ofthelaw.
cannot
accidentally
cause
injury.
Fornormal
homeowner
use,themuffler
• Store
inadryareaoutofreach
of
children.
andspark
arresting
screen
willnotrequireanyservice.
After50hours
of
use,werecommend
thatyourmuffler
beserviced
orreplaced
byyourSears
Service
Center.
CARTON
CONTENTS
Check
carton
contents
against
thefollowing
list.
Model
358,795700
• Hedge
Trimmer
• 2-Cycle
Engine
Oil
NOTE:
Itisnormal
forthefuelfilterto
rattleintheempty
fueltank.
ASSEMBLY
Yourhedge
trimmer
isfullyassembled;
noassembly
isrequired.
KNOW
YOUR
HEDGE
TRIMMER
READ
THIS
OPERATOR'S
MANUAL
AND
SAFETY
RULES
BEFORE
OPERATING
YOUR
UNIT.
Compare
theillustrations
withyourunittofamiliarize
yourself
withthelocation of the various controls and adjustments.
ence.
ON/OFF
Switch _
-- Choke
.,v .........
....... Spark Plug
Primer Bulb
__
T h rottl e
Trigger
!.___
"_--._/_._
....
7-_:_',,__..
Starter Rope
".,
--P_j_-'_.*-4_,,.
Muffler
ON/OFF SWITCH
The ON/OFF SWITCH is used to stop the
engine. To stop the engine, move the
switch to the OFF position.
CHOKE
The CHOKE helps to supply fuel to the
engine to aid in cold starting. Activate the
choke by moving choke lever to the desired position. See STARTING YOUR ENGINE for complete starting information.
BEFORE
STARTING
,_L WARNING:
Save this manual for future refer-
ENGINE
Be sure to read the
fuel information in the safety rules
before you begin. If you do not
understand the safety rules, do not
attempt to fuel your unit. Call
1-800-235-5878.
FUELING ENGINE
This engine is certified to operate on
unleaded gasoline. Before operation,
gasoline must be mixed with a good
quality 2-cycle air-cooled engine oil.
We recommend Craftsman brand oil.
Mix gasoline and oil at a ratio of 40:1
(A 40:1 ratio is obtained by mixing 3.2
ounces of oil with 1 gallon of unleaded
gasoline). DO NOT USE automotive oil
or boat oil. These oils will cause engine
damage. When mixing fuel, follow
instructions printed on the oil container.
Once oil is added to gasoline, shake
container momentarily to assure that
the fuel is thoroughly mixed. Always
read and follow the safety rules relating
to fuel before fueling your unit.
_o
""_
PRIMER BULB
The PRIMER BULB removes air from the
fuel lines and fills them with fuel. This
allows you to start the engine with fewer pulls on the starter rope. Activate the
primer bulb by pressing it and allowing
it to return to its original form.
THROTTLE TRIGGER
The THRO-FILE TRIGGER controls engine
speed. Squeeze the trigger for full speed
operation; release it for idle speed.
IMPORTANT
Experience indicates that alcohol
blended fuels (called gasohol or using
ethanol or methanol) can attract moisture which leads to separation and
formation of acids during storage. Acidic gas can damage the fuel system of
an engine while in storage.
To avoid engine problems, empty the
fuel system before storage for 30 days
or longer. Drain the gas tank, start the
engine and let it run until the fuel lines
and carburetor are empty. Use fresh
fuel next season.
Never use engine or carburetor cleaner
products in the fuel tank or permanent
damage may occur.
See the STORAGE section for additional
information.
OPERATING
POSITION
ON
OFF
...... Switch
_
Eye
Protection
€ t_LX,
k._/
3. Slowly press the primer bulb 6
times.
4. Move the choke lever to the FULL
STOPPING YOUR ENGINE
• To stop the engine, move the ON/OFF
switch to the OFF position.
BEFORE STARTING THE ENGINE
• Fuel engine. Move at least 10 feet (3
meters) away from the fueling site.
• Hold the unit on the ground in the
starting position as shown. Support
unit so the blade is off of the ground
and away from trees, bushes, onlookers, etc.
CHOKE position.
Choke
Primer
STARTING A COLD ENGINE (or a
warm engine after running out of
fuel)
Throttle
f
Lock
Throttle
_
Lock-out
Throttle
Trigger
1. Move the ON/OFF switch to the ON
position.
2. Engage the throttle lock as follows:
• press the throttle lock-out;
• squeeze and hold throttle trigger;
• press and hold throttle lock;
• release the throttle trigger
Keep the throttle lock engaged until the
engine runs smoothly.
-6-
Bulb
5. Pull starter rope handle sharply until
engine sounds as if it is trying to
start, but do not pull rope more than
6 times.
6. As soon as engine sounds as if it is
trying to start, move the choke lever
to HALF CHOKE position.
7. Pull starter rope sharply until the engine runs, but no more than 6 pulls.
NOTE: If the engine doesn't start after 6 pulls (at the HALF CHOKE position), check to make sure the ON/
OFF switch is in the ON position.
Move the choke lever to the FULL
CHOKE position and press the primer bulb 6 times; pull the starter rope
2 more times. Move the choke lever
to the HALF CHOKE position and pull
the starter rope until the engine
runs, but no more than 6 more pulls.
If the engine still doesn't start, it is
probably flooded. Proceed to
STARTING A FLOODED ENGINE.
8. Once the engine starts, allow it to
run 10 seconds, then move the
choke lever to the OFF CHOKE position. Allow the unit to run for 30 more
seconds at the OFF CHOKE position
before squeezing and releasing the
throttle trigger to release the throttle
lock. NOTE: If engine dies with the
choke lever in the OFF CHOKE posi-
tion, move the choke lever to the
HALF CHOKE position and pull the
rope until engine runs, but no more
than 6 pulls.
STARTING A WARM ENGINE
1. Move the ON/OFF switch to the ON
position.
2. Move the choke lever to the HALF
CHOKE position.
3. Engage the throttle lock as directed
in STARTING A COLD ENGINE.
Keep the throttle lock engaged until the
engine runs smoothly.
4. Pull starter rope sharply until engine
runs, but no more than 5 pulls.
5. Allow the engine to run 10 seconds,
then move choke lever to the OFF
CHOKE position.
CUSTOMER
6. Release the throttle lock by squeezing and releasing the throttle trigger.
NOTE: If engine has not started, pull
starter rope 5 more pulls. If engine still
does not run, it is probably flooded.
Proceed to STARTING A FLOODED ENGINE.
STARTING A FLOODED ENGINE
Flooded engines can be started by
placing the switch in the ON position
and the choke lever in the OFF CHOKE
position; then, pull the rope to clear the
engine of excess fuel. Starting could
require pulling the starter rope many
times depending on how badly the unit is
flooded.
If the unit still doesn't start, refer to the
TROUBLESHOOTING TABLE or call
1-800-235-5878.
RESPONSIBILITIES
WARNING:
Disconnect the spark plug before performing
except for carburetor adjustments.
CARE & MAINTENANCE
TASK
Check for loose fasteners
and parts
Check for damaged
WHEN TO PERFORM
Before each use
Before each use
or worn parts
After each use
Inspect and clean unit and labels
Clean air filter
Inspect muffler and spark arresting
Replace
Every 5 hours of operation
screen
spark plug
Replace fuel filter
GENERAL RECOMMENDATIONS
The warranty on this unit does not cover items that have been subjected to
operator abuse or negligence. To receive full value from the warranty, the
operator must maintain unit as instructed in this manual. Various adjustments
will need to be made periodically to
properly maintain your unit.
CHECK FOR LOOSE
FASTENERS AND PARTS
• Spark Plug Boot
• Air Filter
• Housing Screws
Every 50 hours of operation
Yearly
Yearly
sure engine stops; then restart engine
and continue.
• Fuel Tank - Do not use unit if fuel tank
shows signs of damage or leaks.
INSPECT AND CLEAN UNIT AND
LABELS
• After each use, inspect complete unit
for loose or damaged parts. Clean
the unit and labels using a damp
cloth with a mild detergent.
• Wipe off unit with a clean dry cloth.
CLEAN AIR FILTER
Air
Filter
CHECK FOR DAMAGED
OR
WORN PARTS
Contact Sears Service Center for replacement of damaged or worn parts.
• ON/OFF Switch - Ensure ON/OFF
switch functions properly by moving
the switch to the OFF position. Make
maintenance
jJ
Air
Filter Cover
Screws
Adirtyairfilterdecreases
engine
per- 2.Remove
spark
plugfromcylinder
formance
andincreases
fuelconsump- anddiscard.
tionandharmful
emissions.
Always 3.Replace
withChampion
RCJ-8Y
clean
afterevery
5hours
ofoperation. spark
plugandtighten
witha3/4in.
1.Clean
thecover
andthearea
socket
wrench
(10-12
ft.-Ibs).
around
ittokeepdebris
fromfalling 4.Reinstall
thespark
plugboot.
intothecarburetor
chamber
when REPLACE
FUEL
FILTER
thecover
isremoved.
Toreplace
fuelfilter,
drainunitbyrun2.Remove
parts
asillustrated.
ningitdryoffuel,thenremove
fuelcap/
NOTE:
Toavoid
creating
afirehazard retainer
assembly
fromtank.Pullfilter
orproducing
harmful
evaporative
emis- fromtankandremove
itfromthefuel
sions,
donotclean
filteringasoline
or line.Install
newfuelfilteronfuelline;
other
flammable
solvent.
reinstall
parts.
3.Wash
thefilterinsoap
andwater.
Fuel Filter
4.Allow
filtertodry.
5.Addafewdrops
ofoiltothefilter;
squeeze
filtertodistribute
oil.
6.Replace
parts.
REPLACE
SPARK
PLUG
Replace
spark
plugeachyeartoenFuel Line
suretheengine
starts
easier
andruns
better.
Setspark
pluggapat0.025
in.
Ignition
timing
isfixed,
nonadjustable.
1.Twist,
thenpulloffspark
plugboot.
We recommend all service and adjustments not listed in this manual be performed by your Sears Service Center.
CARBURETOR
,_L WARNING:
ADJUSTMENT
The blade will be
moving during most of this procedure.
Wear your protective equipment and
observe all safety precautions.
After
making mixture adjustments, recheck
idle speed. The blade must not move
at idle speed.
Carburetor adjustment is critical and if
done improperly can permanently damage the engine as well as the carburetor. If you require further assistance or
are unsure about performing this procedure, call our customer assistance
help line at 1-800-235-5878.
Old fuel, a dirty air filter, a dirty fuel filter, or flooding may give the impression
of an improperly adjusted carburetor.
Check these conditions before adjusting the carburetor.
The carburetor has been carefully set
at the factory. Adjustments may be
necessary if you notice any of the following conditions:
• The blade moves at idle. See IDLE
SPEED under adjusting procedure.
• Engine will not idle. See IDLE SPEED
under adjusting procedure.
-8-
• Engine dies or hesitates instead of
accelerating. See ACCELERATION
CHECK under adjusting procedure.
• Loss of power. See MIXTURE ADJUSTMENT (L or H) under adjusting
procedure.
There are three adjustment screws on
the carburetor. The low speed adjustment screw is marked with the letter L,
and the high speed screw is marked
with the letter H. The third screw is the
idle speed screw.
Low Speed
Screw \
Idle Speed
Screw
H
High Speed
Screw
2,
L
Screws with (¢£_)00L_)"_'_
Limiter Caps
ADJUSTING
PROCEDURE
CAUTION:
Do not force plastic limiter
caps on screws beyond the built-in
stops or damage will occur.
Initial Settings
1. Turn both mixture screws (L and H)
counterclockwise
until they stop.
2. Turn the idle speed screw clockwise
until it stops. Now turn counterclockwise 4-1/2 turns.
3. Start engine and let it run for 3 minutes, then proceed to adjust screws
according to the instructions below.
If engine performance at initial settings is acceptable, no further adjustments are necessary. If engine
does not start, refer to the TROUBLESHOOTING TABLE. If still unable to
remedy situation, call
1-800-235-5878.
Idle Speed
Allow engine to idle. If the blade
moves, idle speed is too fast. If the engine stalls, idle speed is too slow.
• Turn idle speed screw clockwise to
increase engine speed.
• Turn idle speed screw counterclockwise to decrease engine speed.
_WARNING:
Recheck
the idle
speed after each adjustment. The
blade must not move at idle speed to
avoid serious injury to the operator and
others.
Low Speed Mixture - L
1. Allow the engine to idle.
2. Turn low speed mixture screw (L)
slowly clockwise until the speed
starts to drop.
3. Turn the low speed mixture screw (L)
counterclockwise until the speed increases and then starts to drop again.
4. Set the low speed mixture screw (L)
at the midpoint between the two
positions.
Readjust the idle speed (see IDLE
SPEED).
-9-
High Speed Mixture - H
CAUTION: Do not operate engine at full
throttle for prolonged periods while making high speed adjustments as damage
to the engine can occur. Adjust the high
speed screw 1/16 of a turn at a time. A
1/16 turn is about the width of the slot in
the top of the screw.
1. Allow the engine to idle.
2. Squeeze the throttle trigger fully.
Turn the high speed mixture screw
(H) counterclockwise
until it stops.
3. Turn the high speed mixture screw
(H) screw the minimum amount
clockwise until the engine runs
smoothly.
After completing adjustments, check
for acceleration and blade movement
at idle. Reset if necessary.
Acceleration
Check
If the engine dies or hesitates instead
of accelerating, turn the low speed mixture screw (L) counterclockwise
until
you have smooth acceleration with no
blade movement at idle.
CAUTION:
If the engine does not operate according to these instructions
after repeating the adjusting steps, do
no use the unit. Take it to your Sears
Service Center.
,_ WARNING:
Perform the following
steps after each use:
• Allow engine to cool, and secure the
unit before storing or transporting.
• Store unit and fuel in a well ventilated
area where fuel vapors cannot reach
sparks or open flames from water
heaters, electric motors or switches,
furnaces, etc.
• Store unit with all guards in place.
Position unit so that any sharp object
cannot accidentally cause injury.
• Store unit and fuel well out of the
reach of children.
SEASONAL
STORAGE
Prepare unit for storage at end of season or if it will not be used for 30 days
or more.
If your unit is to be stored for a period
of time:
• Clean the entire unit before lengthy
storage.
• Store in a clean dry area.
• Lightly oil external metal surfaces, including the blade.
To oil the blade:
• Stop the engine and allow blade to
come to a complete stop.
• Disconnect the spark plug wire.
• Clean all parts and check for damage.
Have damaged parts repaired or replaced by your Sears Service Center.
• Apply a light machine oil along the
edge of the top strap as shown.
-10-
FUEL SYSTEM
Under FUELING ENGINE in the OPERATION section of this manual, see message labeled IMPORTANT regarding
the use of gasohol in your engine.
Fuel stabilizer is an acceptable alternative in minimizing the formation of fuel
gum deposits during storage. Add stabilizer to gasoline in fuel tank or fuel storage container. Follow the mix instructions
found on stabilizer container. Run engine
at least 5 minutes after adding stabilizer.
Craftsman 40:1,2-cycle
engine oil (air
cooled) is already blended with fuel
stabilizer. If you do not use this Sears
oil, you can add a fuel stabilizer to your
fuel tank.
ENGINE
• Remove spark plug and pour 1 teaspoon of 40:1,2-cycle
engine oil (air
cooled) through the spark plug opening. Slowly pull the starter rope 8 to
10 times to distribute oil.
• Replace spark plug with new one of
recommended type and heat range.
• Clean air filter.
• Check entire unit for loose screws,
nuts, and bolts. Replace any damaged, broken, or worn parts.
• At the beginning of the next season,
use only fresh fuel having the proper
gasoline to oil ratio.
OTHER
• Do not store gasoline from one season to another.
• Replace your gasoline can if it starts
to rust.
TROUBLESHOOTING
TABLE
WARNING:
Always stop unit and disconnect spark plug before performing all of the recommended
remedies below except remedies that require
operation
of the
unit.
REMEDY
TROUBLE
CAUSE
Engine will not
start.
1. ON/OFF switch
position,
2. Engine flooded,
in the OFF
1. Move ON/OFF switch to the ON
position.
2. See "Starting a Flooded Engine"
in Operation Section.
3. Fill tank with correct fuel mixture.
4. Install new spark plug.
5. Check for dirty fuel filter; replace.
Check for kinked or split fuel line;
repair or replace.
6. Contact Sears Service Center.
3. Fuel tank empty.
4. Spark plug not firing.
5. Fuel not reaching
carburetor.
6. Compression
low.
Engine will
not idle
properly.
1. Carburetor requires
adjustment.
2. Crankshaft seals worn.
3. Compression
low.
1. See "Carburetor Adjustment"
in
Service and Adjustments Section.
2. Contact Sears Service Center.
3. Contact Sears Service Center.
Engine will not
accelerate,
lacks power,
or dies under
a load.
1. Air filter dirty.
2. Spark plug fouled.
1. Clean or replace air filter.
2. Clean or replace plug
and regap.
3. See "Carburetor Adjustment"
in
Service and Adjustments Section.
4. Contact Sears Service Center.
Engine
smokes
excessively.
3. Carburetor requires
adjustment.
4. Carbon build-up on
muffler outlet screen.
5. Compression
low.
5. Contact
1. Fuel mixture
Center.
1. Adjust choke.
2. Empty fuel tank and refill with
correct fuel mixture.
3. Clean or replace air filter.
4. See "Carburetor Adjustment" in
Service and Adjustments Section.
1. Choke partially on.
2. Fuel mixture incorrect.
3. Air filter dirty.
4. Carburetor requires
adjustment.
Engine runs
hot.
Sears Service
incorrect.
1. See "Fueling Engine" in Operation
section.
2. Replace with correct spark plug.
3. See "Carburetor Adjustment"
in
Service and Adjustments Section.
4. Contact Sears Service Center.
2. Spark plug incorrect.
3. Carburetor requires
adjustment.
4. Carbon build-up on
muffler outlet screen.
If situations occur which are not covered in this manual, use care and good
judgment.
If you need assistance, contact your Sears Service Center or
call the Customer Assistance Helpline at 1-800-235-5878.
YOUR WARRANTY RIGHTS AND OBLIGATIONS: The U. S. Environmental
Protection Agency and Sears, Roebuck
and Co., U.S.A., are pleased to explain
the emissions control system warranty
on your lawn and garden equipment engine. All new utility and lawn and garden
equipment engines must be designed,
built, and equipped to meet the stringent
anti-smog standards. Sears must warrant the emission control system on your
lawn and garden equipment engine for
-11
the periods of time listed below provided
there has been no abuse, neglect, or improper maintenance of your lawn and
garden equipment engine. Your emission
control system includes parts such as
the carburetor and the ignition system.
Where a warrantable condition exits,
Sears will repair your lawn and garden
equipment engine at no cost to you. Expenses covered under warranty include
diagnosis, parts and labor. MANUFACTURER'S WARRANTY COVERAGE: If
-
any emissions related part on your engine (as listed under Emissions Control
Warranty Parts List) is defective or a defect in the materials or workmanship of
the engine causes the failure of such an
emission related part, the part will be repaired or replaced by Sears. OWNER'S
WARRANTY RESPONSIBILITIES: As
the lawn and garden equipment engine
owner, you are responsible for the performance of the required maintenance
listed in your Owner's Manual. Sears
recommends that you retain all receipts
covering maintenance on your lawn and
garden equipment engine, but Sears
cannot deny warranty solely for the lack
of receipts or for your failure to ensure
the performance of all scheduled maintenance. As the lawn and garden equipment engine owner, you should be
aware that Sears may deny you warranty coverage if your lawn and garden
equipment engine or a part of it has
failed due to abuse, neglect, improper
maintenance, unapproved modifications,
or the use of parts not made or approved by the original equipment
manufacturer. You are responsible for
presenting your lawn and garden equipment engine to a Sears authorized repair
center as soon as a problem exists.
Warranty repairs should be completed in
a reasonable amount of time, not to exceed 30 days. If you have any questions regarding your warranty rights and
responsibilities, you should contact your
nearest authorized service center or call
Sears at 1-800-473-7247 WARRANTY
COMMENCEMENT
DATE: The warranty period begins on the date the lawn
and garden equipment engine is purchased. LENGTH OF COVERAGE:
This warranty shall be for a period of two
years from the initial date of purchase.
WHAT IS COVERED: REPAIR OR REPLACEMENT OF PARTS, Repair or replacement of any warranted part will be
performed at no charge to the owner at
an approved Sears servicing center. If
you have any questions regarding your
warranty rights and responsibilities, you
should contact your nearest authorized
service center or call Sears at
-12-
1-800-473-7247. WARRANTY PERIOD:
Any warranted part which is not scheduled for replacement as required maintenance, or which is scheduled only for
regular inspection to the effect of "repair
or replace as necessary" shall be warranted for 2 years. Any warranted part
which is scheduled for replacement as
required maintenance shall be warranted
for the period of time up to the first
scheduled replacement point for that
part. DIAGNOSIS: The owner shall not
be charged for diagnostic labor which
leads to the determination that a warranted part is defective if the diagnostic
work is performed at an approved Sears
servicing center. CONSEQUENTIAL
DAMAGES: Sears may be liable for
damages to other engine components
caused by the failure of a warranted part
still under warranty. WHAT IS NOT COVERED: All failures caused by abuse, neglect, or improper maintenance are not
covered. ADD-ON OR MODIFIED
PARTS: The use of add-on or modified
parts can be grounds for disallowing a
warranty claim. Sears is not liable to cover failures of warranted parts caused by
the use of add-on or modified parts.
HOW TO FILE A CLAIM: If you have
any questions regarding your warranty
rights and responsibilities, you should
contact your nearest authorized service
center or call Sears at 1-800-473-7247.
WHERE TO GET WARRANTY SERVICE: Warranty services or repairs shall
be provided at all Sears service centers.
call: 1-800-473-7247.
MAINTENANCE,
REPLACEMENT AND REPAIR OF
EMISSION RELATED PARTS: Any
Sears approved replacement part used
in the performance of any warranty
maintenance or repair on emission related parts will be provided without
charge to the owner if the part is under
warranty. EMISSION CONTROL WARRANTY PARTS LIST: Carburetor, Ignition System: Spark Plug (covered up to
maintenance schedule), Ignition Module.
MAINTENANCE STATEMENT: The
owner is responsible for the performance
of all required maintenance as defined in
the owner's manual.