1
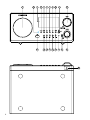
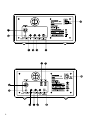
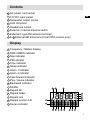
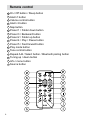
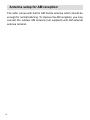
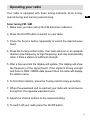
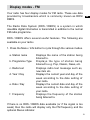
WR-22
中文
GB
Version 1
Important safety instructions
1. Read these instructions.
GB
2. Keep these instructions.
3. Heed all warnings.
4. Follow all instructions.
5. Do not use this apparatus near water.
6. Clean only with dry cloth.
7. Do not block any ventilation openings. Install in accordance
with the manufacturer’s instructions.
8. Do not install near any heat sources such as radiators, heat
registers, stoves, or other apparatus (including amplifiers) that
produce heat.
9. Do not defeat the safety purpose of the polarized or groundingtype plug. A polarized plug has two blades with one wider
than the other. A grounding type plug has two blades and
a third grounding prong. The wide blade or the third prong
are provided for your safety. If the provided plug does not fit
into your outlet. consult an electrician for replacement of the
obsolete outlet.
10. Protect the power cord from being walked on or pinched
particularly at plugs, convenience receptacles, and the point
where they exit from the apparatus.
11. O n l y u s e a t t a c h m e n t s / a c c e s s o r i e s s p e c i f i e d b y t h e
manufacturer.
12. Use only with the cart, stand, tripod, bracket, or table specified
by the manufacturer, or sold with the apparatus. When a cart is
used, use caution when moving the cart/apparatus combination
to avoid injury from tip-over.
13. Unplug this apparatus during lightning storms or when unused
for long periods of time.
14. Refer all servicing to qualified service personnel. Servicing is
required when the apparatus has been damaged in any way,
such as power-supply cord or plug is damaged. liquid has been
spilled or objects have fallen into the apparatus, the apparatus
has been exposed to rain or moisture, does not operate
normally, or has been dropped.
15. To Reduce the Risk of Fire or Electric Shock, Do not Expose
This Appliance To Rain or Moisture.
16. The Shock Hazard Marking and Associated Graphical Symbol
is provided on the rear of unit.
GB
17. Apparatus shall not be exposed to dripping or splashing and no
objects filled with liquids, shall be placed on the apparatus.
18. Excessive sound pressure on ear- and headphones could
impair the hearing ability. Higher setting that idle on the
equalizer leads to higher signal voltages on the output for ear
and headphones.
19. The power plug should be close to the radio, and easy to be
approached that during the emergency, to disconnect the power
from the radio, just unplug the power plug from the AC power
slot.
20. Where the MAINS plug or an appliance coupler is used as the
disconnect device, the disconnected device shall remain readily
operable.
IMPORTANT NOTE:
To comply with the FCC RF exposure compliance requirements, no
change to the antenna or the device is permitted. Any change to
the antenna or the device could result in the device exceeding the
RF exposure requirements and void user’s authority to operate the
device.
1
2
3
20
4 5
6 7
8
9
10
19 18 17 16 15 14 13
11
12
Controls
Speaker
2 Bluetooth indicator
3 Display
4 Source button
5 Play mode button
6 Alarm 1 button
7 Alarm 2 button
8 Nap button
9 Menu / Info button
10 On / Off button / Sleep button
11 Rotary tuning control
12 Volume control / Tone control
13 Dimmer sensor
14 Remote control sensor
15 Preset 5 / Fast-forward button
16 Preset 4 / Play / Pause button
17 Preset 3 / Backward button
18 Preset 2 / Fold up button
19 Preset 1 / Fold down button
20 USB port
21 Reset button
1
GB
Controls
22
23
24
25
26
27
28
29
AC power cord socket
12V DC input socket
Subwoofer output socket
AUX IN socket
Headphone socket
External / Internal antenna switch
External F-type FM antenna terminal
& 30 External AM antenna terminal (USA version only)
GB
Display
A
B
C
D
E
F
G
H
I
J
K
L
M
N
O
P
Q
Frequency / Station display
RDS / RBDS indicator
Nap indicator
PM indicator
Time indicator
Sleep indicator
Alarm 1 indicator
Alarm 2 indicator
Fast-forward indicator
Play / pause indicator
Backward indicator
Shuffle
Repeat all
Repeat folder
Repeat one
Repeat section A-B
Stereo indicator
Remote control
a
b
c
d
e
f
g
h
i
j
k
L
m
n
o
p
On / Off button / Sleep button
Alarm1 button
Volume control button
Alarm 2 button
Nap button
Preset 1 / Folder down button
Preset 3 / Backward button
Preset 2 / Folder up button
Preset 4 / Play / Pause button
Preset 5 / Fast-forward button
Play mode button
Tone control button
Repeat A-B / Select button / Bluetooth pairing button
Tuning up / down button
Info / menu button
Source button
Power your radio
AC operation
Before plugging the AC cord into the radio, make sure the AC
voltage is correct. Insert the plug on the end of the supplied power
cord into the AC power socket on the back of the radio.
DC operation
For outdoor use, you can power the radio by using 12v DC input
socket from a DC power supply (example, from the power supply of
vehicles or boats). An AC power adaptor with 1 Ampere and center
positive in polarity can also power the radio in house.
Antenna setup for FM reception
The radio comes with built-in AM/FM antenna and external antenna.
To use FM internal antenna, make sure to switch FM external/
internal antenna switch in the back of your radio to internal antenna
position (i.e. INT. FM ANTENNA). As for external antenna, there
are two types of antenna can be used to improve FM reception.
You can connect the supplied FM antenna to the F-type antenna
terminal and adjust the wire for best reception. You can also
connect a 75 ohm coaxial cable of outdoor antenna to the terminal.
Make sure to switch external/internal antenna switch to external
position while connecting the outdoor / rooftop antenna.
Note:
In some of the European countries, you may have to use adaptor
plug to connect with the outdoor/rooftop antenna in case your
antenna has an incorrect type of plug.
GB
Antenna setup for AM reception
The radio comes with built-in AM Ferrite antenna which should be
enough for normal listening. To improve the AM reception, you may
connect the outdoor AM antenna (not supplied) with AM external
antenna terminal.
10
Operating your radio
Your radio is equipped with three tuning methods- Scan tuning,
manual tuning and memory preset tuning.
Scan tuning FM / AM
1. Make sure you have set up the FM antenna in advance .
2. Press the On/Off button to switch on your radio.
3. Press the Source button repeatedly to select the desired wave
band.
4. Press the Tuning control rotary. Your radio will scan in an upwards
direction (low frequency to high frequency) and stop automatically
when it finds a station of sufficient strength.
5. After a few seconds the display will update. The display will show
the frequency of the signal found. If the signal is strong enough
and there is RDS / RBDS data present then the radio will display
the station name.
6. To find other stations, press the Tuning control rotary as before.
7. When the waveband end is reached your radio will recommence
tuning from the opposite waveband end.
8. Adjust the Volume buttons to the required setting.
9. To switch off your radio press the On/Off button.
11
GB
Manual tuning – FM / AM
1. Press the On/Off button to switch on your clock radio.
2. Press the Source button repeatedly to select the desired wave
band.
3. Rotate the Tuning control rotary to tune to a station. The frequency
will change in steps of 50kHz/100 kHz in FM or 9 kHz/10 kHz in AM.
4. When the waveband end is reached the radio will recommence
tuning from the opposite waveband end.
5. Adjust the Volume buttons to the desired settings.
6. To switch off your clock radio press the On/Off button.
Setting up the tuning step increment
1. Press and hold the Info/menu button to enter the menu setting
when the radio source is in AM/FM mode.
2. Rotate the Tuning control rotary button until FM xxK or AM xxkHz
shown on the display, and press the Tuning control rotary to enter
the step increment setting.
3. Rotate the Tuning control rotary button to select 50kHz/100kHz
for FM radio, and 9kHz/10kHz for AM radio. Then press the
Tuning control rotary to confirm the setting.
12
Display modes - FM
Your radio has four display modes for FM radio. These use data
provided by broadcasters which is commonly known as RDS/
RBDS.
The Radio Data System (RDS / RBDS) is a system in which
inaudible digital information is transmitted in addition to the normal
FM radio programme.
RDS / RBDS offers several useful features. The following are
available on your radio:1. Press the Menu / Info button to cycle through the various modes.
a. Station name
b. Programme Type
c. Radio text
d. Year / Day
e. Date / Day
f. Frequency
Displays the name of the station being
listened to.
Displays the type of station being
listened to e.g. Pop, Classic, News, etc.
Displays radio text message such as,
new item etc.
Displays the current year and day of the
week according to the date setting of
your radio.
Displays the current date and day of the
week according to the date setting of
your radio.
Displays the frequency of the station
being listened to.
If there is no RDS / RBDS data available (or if the signal is too
weak) then the radio will display only the FM frequency and the
optional Stereo indicator.
13
GB
FM range setting
FM range is different from countries to countries. It is necessary to
adjust FM range to allow the radio to work properly.
1. Press and hold the Menu/ Info button to enter the menu setting.
2. Rotate the Tuning control rotary till the range of FM shows on
the display. Press the Tuning control rotary to confirm the desired
FM range. FM range setting is then completed.
The available FM range is as following:
87-108 for the common area (default)
76-90 for Japan
64-108 for Eastern European countries and Russia
76-108 for some of China area
14
FM stereo / mono setting
If the FM radio station being listened to has a weak signal some
hiss may be audible by headphone. It is preferable to reduce this
hiss by forcing the radio to play the station in mono rather than
stereo.
1. Press the Standby button to switch on your radio.
2. Tune to the required FM radio station as previously described.
3. Press and hold the Menu/Info button to enter the menu setting.
4. Press the Tuning control rotary until ‘FM AUTO or FM MONO’
shown on the display. Press the Tuning control rotary to enter
the setting. If the setting is Auto rotate the Tuning control rotary
to switch to Mono mode to reduce the hiss.
5. To return to Auto (stereo) mode, rotate the Tuning control rotary
to alter the setting, so that the radio will switch back to Auto mode.
15
GB
Presetting stations
There are 5 memory presets for each FM/ AM wavebands.
1. Press the On/ Off button to turn on the radio.
2. Tune to desired station using one of methods previously described.
3. Press and hold the desired Preset button until the radio beeps.
The preset number will appear in the display and the station will
be stored under the chosen preset button.
4. Repeat this procedure for the remaining presets.
5. Station stored in preset memories may be overwritten by following
the above procedure.
Recalling a preset station
1. Press the On/ Off button to turn on the radio.
2. Select the desired waveband by repeatedly pressing the Source
button.
3. Momentarily press the desired Preset button. The preset number
and station frequency will appear in the display.
16
Clock and Alarms
Setting the time format
The clock display used in stand-by mode and on the playing mode
screens can be set to 12 or 24 hour format. The selected format is
then also used when setting the alarms.
1. Press and hold the Info/menu button to enter the menu setting.
2. Rotate the Tuning control rotary until CLOCK XXH appears on
the display, then press the Tuning control rotary to enter the
setting and the setting of time format begins to flash.
3. Rotate the Tuning control rotary to select either 12 or 24 hour format.
Press the Tuning control rotary to confirm your choice of clock
format. The display will then revert to the previous menu.
If the 12 hour clock format is chosen, the radio will then use the 12
hour clock for the setting of alarms with a PM indicator.
Setting the date format
1. Press and hold the Info/menu button to access the menu setting.
2. Rotate the Tuning control rotary until a series digit for month/date/day
shown on the display. Press the Tuning control rotary to enter
the date format setting and the digit for month and date will flash.
3. Rotate the Tuning control rotary to select the required date format.
Press the Tuning control rotary to confirm your choice of date
format. The display will then revert to the previous menu.
17
GB
Setting the clock time
Manual setting
1. When radio power is off, press and hold Menu/ info button to
enter the menu setting.
2. Rotate the Tuning control rotary until ‘CLOCK SET’ shown on the
display. Press the Tuning control rotary to enter the setting.
3. The hour setting on the display will begin flashing. Rotate the
Tuning control rotary to select the desired hour, and press the
Tuning control rotary to confirm the setting. Then rotate the Tuning
control rotary to select the desired minute, and press the Tuning
control rotary to confirm the setting.
Radio Data System (RDS/ RBDS)
When you set the clock time using the RDS/ RBDS function, your
radio will synchronize its clock time whenever it tunes to a radio
station using RDS / RBDS with CT signals.
1. When tuning to a station transmitting RDS / RBDS data, press
and hold the Info/menu button.
2. Rotate the Tuning control rotary until a clock symbol shown on
the display. Press the Tuning control rotary to enter the setting.
18
3. Rotate the Tuning control rotary until ‘RDS CT’ shown on the
display. Press the Tuning control rotary to confirm the setting.
The clock time of the radio will set up automatically according to
the RDS/ RBDS data received.
4. When the action is completed, the RDS/ RBDS icon will appear
on the LCD display indicating the radio time is RDS/RBDS clock
time. The radio cock time will be valid for 2 days each time the
radio time is synchronized with RDS CT.
19
GB
Setting the alarm clock
There are two alarms which can each be set to wake you to AM,
FM radio, USB buzzer alarm . The alarms may be set while the unit
is in standby mode or while playing.
1. Before setting an alarm ensure the clock time is set.
Press and hold the Alarm 1 button to enter the alarm 1 setting.
2. The hour setting of alarm 1 will begin to flash. Rotate the Tuning
control rotary to select the required alarm hour, and press the
Tuning control rotary to confirm the setting. Rotate the Tuning
control rotary to select the required alarm minute, and press the
Tuning control rotary to confirm the setting.
3. Then the display will show the frequency options for the alarm.
Rotate the Tuning control rotary to select the desired option and
press the Tuning control rotary to confirm the setting.
The alarm options are as follows:
ONCE – the alarm will sound once
DAILY – the alarm will sound everyday
WEEKDAY – the alarm will sound only on weekdays
WEEKEND – the alarm will sound only at weekends
20
4. Rotate the Tuning control rotary to choose the required alarm
type, and then press the Tuning control rotary to confirm the
setting. The alarm can be set to buzzer, FM, AM or USB.
When radio mode is selected, the radio frequency and the preset
number on the display will begin to flash. Rotate the Tuning control
rotary to adjust the required radio frequency or the required preset
number for the radio alarm, then press the Tuning control rotary
to confirm the setting.
5. Rotate the Tuning control rotary to choose the required sound
level for the alarm. Press the Tuning control rotary to confirm the
setting. The alarm has now been set. Symbol for active alarm is
shown on the display.
Note:
If USB is selected as your alarm type, but USB is not inserted when
the alarm is sounding, the buzzer alarm will be used instead.
21
GB
When the alarm sounds
To cancel a sounding alarm, press the Standby button to cancel a
sounding alarm.
When the buzzer alarm activates, the alarm will start softly and
gradually increase in level. It will sound for 1 minute and silence
for 1 minute in repetition for 60 minutes unless cancelled. When
the other alarm types are set, the radio will sound non-stop at the
selected time for up to 60 minutes.
When the radio alarm is activated, the alarm will go off in Humane
Waking System. It will increase its volume in 0.5increments from 0
to your set volume.
Disabling / cancelling alarm setting
To cancel the alarm setting, press and hold the corresponding
alarm button before the alarms sound off.
22
Snooze
1. When the alarm sounds, press any button other than the Standby
button will silence the alarm for 5 minutes. “SNOOZE’ will appear
on the display.
2. To adjust the silence time for the snooze timer, press and hold
the Info/menu button to enter the menu setting.
3. Rotate the Tuning control rotary until “SNOOZE X” shown on the
display, then press the Tuning control rotary to enter the setting.
Rotate the Tuning control rotary to adjust the silence time. There
are 5, 10, 15 and 20 minutes for the snooze timer.
4. To cancel the snooze timer while the alarm is suspended, press
the Standby button.
Sleep timer
Sleep timer will automatically switch off the radio after a preset time
has elapsed.
1. Press and continue to hold the Power On/ Off button, the display
will cycle through the available sleep time in the order of
60-45-30-15-120-90-60. Release the button when the required
sleep time shown in the display and the radio will play the last
station selected.
2. Cancel the sleep function, press the Power On/Off button, The
radio power will be off and the symbol
will disappear from
the display.
23
GB
Playback MP3 or WMA Files from USB
This section describes how to use your radio to access and
playback your audio files via USB memory devices. USB slots are
located on the front panel of the unit. Important: Your radio is only
designed to work with USB memory flash memory devices. It is not
intended to be connected to hard disk drives or any other type of
USB device.
It is possible to use SD or SDHC cards for media playback when
held in a suitable USB adaptor. However, due to the wide variation
of such adaptors, it is not possible to guarantee that all adaptor /
card combinations will work with the radio.
The unit has been tested with a range of USB memory devices
of up to 32GB capacity. It supports USB 2.0 full-speed and USB
3.0. (Note: when using USB 3.0, at the beginning it will show ‘No
device’ on the display, please allow the unit to detect the device for
a longer period of time.) USB memory must use the FAT or FAT 32
filing system in order to operate with the sound system, it does not
support NTFS.
Audio formats supported for playback are MP3 and WMA. Playback
does not support files encoded using WMA lossless, WMA Voice,
WMA 10 professional, nor files of any format which have DRM
protection.
24
Cautions:
In order to minimize the risk of damage to your radio, your USB
Memory, please place the unit such that the device cannot easily
be knocked while it is inserted in the socket.
Remove the USB before carrying the unit or if not using the USB
feature for a prolonged period.
Place the unit in Standby mode removing your USB memory
device.
The USB connection is intended only for flash memory devices.
The use of hard disk storage media is not supported.
Play back via USB files stored on MP3 players is not guarantee.
25
GB
Playing MP3 and WMA files in USB
1. When USB is inserted, press the On/Off button to turn the radio
on and then press Source button to select USB. The LCD display
will show “reading“and the number of files and folders stored in
the USB will appear momentarily. However, under some circumstances,
some error messages may appear. If the display shows ‘Unkown’
indicating your radio does not support the filing system of the
inserted USB; whereas it shows ‘No music’ indicating there are
no suitable MP3/ WMA files for playback.
2. Press the Play / Pause button to start playing from the USB. The
display will show track number momentarily, e.g. ‘TRACK 25 ’.
3. To pause playing, press the Play / Pause button. To resume
playing, press the Play / Pause button again.
4. Press the Info button repeatedly to view the information related
to the specific media files. (Note: This function only supports
English letters, if the media files contain symbols other than
English letters, the symbols will be blank.)
26
Note:
a) If you put the unit into standby mode without pressing the pause
button, the next time the unit is turned on, it will resume to the
last play track.
b) It is highly recommended to store only music files (MP3 / WMA)
in your USB device, because if there is one folder contains files
other than music files, then your radio will skip this folder and the
folder number shown on the display will not be serial.
c) Your WR-22 allows a maximum of 200 folder (including root folder)
and 9999files and 6 layers maximum within a folder. If the USB
stores more than 200 folders, the extra folders will not show on
the display.
Selecting a file
1. While the USB device is playing, press either the fast-forward or
rewind buttons to change to the desired file. The track number is
updated on the display. If there’s more than one folder, all files in
the current folder should have been played and the next folder
will be played.
2. You can skip to the desired file by pressing the fast-forward or
rewind buttons and release the button when the desired track
number is displayed.
Your WR-22 allows a maximum of 200 folder and 9999files and
6 layers maximum within a folder.
27
GB
Search function
While the USB memory device is playing, press and hold the Fastforward or Rewind button. Release the button when the desired
part of the current file is reached.
To skip to another folder
With the USB memory is in stop or play mode, press and release
either the Folder Up / Down button. The first file of the next or
previous folder will be played.
Note:
If your USB contains a folder without files, the device will skip the
folder and play the files in the next folder.
Play mode
When playing the files in USB, press and release Play mode button
to select.
Repeat 1: repeatedly play the file you are listening to.
Repeat Folder: repeatedly play the files within the folder you are
listening to.
Repeat All: repeatedly play the folders in the USB.
Random: it will play files in the USB by in random.
28
Repeat File within Section A–B
If you’d like to repeat the file only within the selected section (e.g.
learning languages), during the playback, press and release the
Tuning Down button for the selection you’d like to start the repeat,
press the button once again for the selection you’d like to end the
repeat.
The radio will repeat the playback only within the selected section
and it will show
on the display.
The cancel the repeat, simply press the button again. The display
icon
will disappear.
Charging with USB socket
● The USB jack can only provide power for the USB memory stick
only with 1A 5V maximum and most of iPhone models. However,
it does not support external Hard disk drive and all of mobile
phones and electronic device.
● The USB jack charging function can only be charged in AUX-IN,
USB or Bluetooth mode.
● The maximum volume of the output power speaker will decrease
when your USB is charging.
Important:
Do not connect this USB socket with your PC USB port, as it highly
possible may cause breakdown of the units.
29
GB
Listening to Bluetooth music
You need to pair your Bluetooth device with your radio before you
can auto-link to play/stream Bluetooth music through your WR-22.
Paring creates a permanent ‘bond’ so two devices can always
recognize each other.
Paring your Bluetooth device for the first time
1. Press the Source button to select Bluetooth function.
The Bluetooth icon on the panel will flash.
2. Press and release the Tuning control rotary to activate the paring
function.
3. Activate Bluetooth on your device according to the device’s user
manual to link to your WR-22.
4. Once connected, there will be a beep sound and the Bluetooth
icon will remain illuminated. The display will also show the model
name of you Bluetooth-enabled device.
5. WR-22 will auto link with the last linked device when that device
is in range.
30
Note:
a) For version BT 2.0 Bluetooth device, you may be asked to input
PIN code, the pass code is “0000”.
GB
b) If ‘SANGEAN WR-22’ shows in your Bluetooth device list but your
device cannot connect to WR-22, please delete the Sangean
WR-22 item from your list and pair the device with WR-22 again
following the steps described previously.
c) The effective operation range between the docking system and
the paired device is approximately 10 meters (30 feet).
d) Any obstacle between the system and the device can reduce the
operational range.
31
Pair with your Bluetooth device before
If your Bluetooth device already paired with WR-22 previously, the
unit will memorize your Bluetooth device, so when the device is in
range, it will be asked the permission to link with the radio.
WR-22 can memorize up to 8 sets of Bluetooth device, when the
memory exceed this amount, the earliest paired device will be
cancelled from the radio.
Delete pairing device memory in your radio
Press and hold the Tuning control rotary to cancel all the paring
device memory stored in WR-22.
Playing Bluetooth music
1. Once your device and the WR-22 are linked you can start to play
Bluetooth music via the WR-22.
2. Press the Play / Pause button on the panel or the remote control
to start playing from your Bluetooth-enabled device.
3. To pause playing, press the Play / Pause button. To resume
playing, press the Play / Pause button again.
Selecting a file
1. While the Bluetooth-enabled device is playing, press either the
fast-forward or rewind buttons to change to the desired file.
32
Nap timer
1. Press and hold the Nap timer button to enter the menu setting.
Keep holding the Nap timer button and the options will start
switching on the display from 1 to 120 minutes. Stop until the
required Nap Timer setting appears on the display. The setting
will be saved and the LCD will return to normal display with the
‘NAP’ icon shown on the display.
2. To view the remaining time of an active timer setting, press the
Nap timer button. To cancel a sounding Nap timer, press Standby
button. If any button other than the Standby button is pressed
when the alarm sounds, snooze function will be activated.
To cancel the function when countdown is progressing, go to nap
timer setting menu and select ‘OFF’.
33
GB
Time zone setting
Your radio can set up the time zone for its radio clock time.
1. Press and hold the Info/menu button to enter the menu setting.
2. Rotate the Tuning control rotary until ‘TIME ZONE’ shown on the
display.
Press the Tuning control rotary to enter the setting.
3. Rotate the Tuning control rotary to choose the Time zone setting
for your area, then press the Tuning control rotary to confirm the
setting.
Note:
When switching on the radio after a power disconnection, you will
need to complete the time zone setting before the normal operation
of the radio.
Daylight Saving Time
1. Press and hold the Info/menu button to enter the menu setting.
2. Rotate the Tuning control rotary until “DST XX” shown on the
display. Press the Tuning control rotary to enter the setting.
3. Rotate the Tuning control rotary to choose, for example, +1H to
set the clock 1 hour faster, and press the Tuning control rotary to
confirm the setting.
4. To set the clock back from D.S.T., choose OFF and then press
the Tuning control rotary to confirm the setting.
34
Tone control- treble and bass
If you find the preset equalizer functions not to your liking, you may
set up a custom treble and bass setting as follows:
GB
1. Press the Volume control rotary once to get into Treble control
setting. Rotate the control until desired treble level is reached.
2. Press the Volume control rotary again to enter Bass control
setting. Rotate the control until the desired bass level is reached.
Press the Volume control to confirm the setting.
Loudness
You can get compensation on lower and higher frequency for your
radio by adjusting the Loudness function.
1. Press and hold the Info/menu button to enter the menu setting.
2. Rotate the Tuning control rotary until ‘LOUD ON or OFF’ shown
on the display. Press the Tuning control rotary to enter the setting.
3. Rotate the Tuning control rotary to choose ON to turn on the
loudness function, then press the Tuning control rotary to confirm
the setting.
4. To turn off the loudness function, select OFF and press the
Tuning control rotary to confirm the setting.
35
Auto Dimmer
The dimmer sensor is located on the front of the radio which will
adjust the intensity of the display to suit room brightness.
Dimmer control
The brightness of the LCD display may be adjusted.
1. Press and hold the Info/ menu button to enter the menu setting.
2. Rotate the Tuning control rotary until ‘DIMMER’ shown on the
display. Press the Tuning control rotary to enter the setting.
3. Rotate the Tuning control rotary to adjust the LCD backlight to be
darker or brighter. Press the Tuning control rotary to confirm the
setting.
Note:
The default setting of the dimmer level is at the lowest. Please
adjust your dimmer level as appropriate.
36
Auxiliary input socket
A 3.5mm stereo Auxiliary Input socket is provided on the rear of
your radio to permit an audio signal to be fed into the unit from an
external audio device such as iPod, MP3 or CD player.
1. Repeatedly press and release the Band button until AUX IN is
shown.
2. Connect an external audio source (for example, iPod, MP3 or
CD player) to the Auxiliary Input socket.
3. Adjust the volume setting on your iPod, MP3 or CD player to
ensure an adequate signal level from the player, and then rotate
the Volume control on the radio as needed for comfortable
listening.
Headphone socket
A 3.5mm Headphone socket located on the rear of your radio is
provided for use with either headphones or an earpiece. Inserting a
plug automatically mutes the internal loudspeaker.
IMPORTANT:
Excessive sound pressure from earphones and headphones can
cause hearing loss.
37
GB
Software version
The software display cannot be altered and is just for your
reference.
1. Press and hold the Info/menu button to enter the menu setting.
2. Rotate the Tuning control rotary until “P XX” appears on the
display to view the software version of your radio.
RESET the radio
If your radio fails to operate correctly or some digits on the display
are missing or incomplete, please carry out the following procedure.
1. Switch off the radio.
2. With the aid of a suitable implement (e.g. paper clip), press the
RESET button located in the bottom of your radio for at least 2
seconds. This will reset the microprocessor clock time and clear
all stations stored in the preset memory.
Subwoofer out socket
Connect the subwoofer input with built-in amplifier. Subwoofer
output level will change in accordance to the volume adjustment of
the radio.
38
Specifications
Powered:
AC 120V/60Hz/24W (US version)
AC 230V/50Hz 24W (European version)
GB
Frequency Coverage:
FM 87.50 – 108 MHz
AM 520 – 1710 kHz (10 kHz version) or
MW 522 – 1629 kHz (9 kHz version)
Bluetooth 2.4 - 2.485GHz class-II
Internal Antenna system:
AM built-in ferrite antenna
FM built-in wire antenna
External antenna terminal:
AM antenna terminal
FM F-type antenna terminal
Output power
7 W 10% T.H.D.@100 Hz
Subwoofer out socket
3.5 mm diameter mono jack
output level: 1.5 Vrms(max.)
Frequency Response: 40~220Hz (+20/-10Hz)
Headphones socket
3.5 mm diameter stereo jack
output power 1mW+1mW (load 32 ohm)
39
Aux In socket
3.5 mm diameter stereo jack.
Input sensitivity: In 350 mVrms, Output 7W @ 100 Hz
Input impedance: 47 Kohm
DC IN
12V/1A center pin positive (operational voltage 9-14V)
Accessories
FM F-terminal wire antenna
AC power cord
F-PAL terminal adaptor (European version only)
Dimension: WxHxD in mm: 240x115x183.
Weight: 2.6 kgs
Notice:
The changes or modifications not expressly approved by the
party responsible for compliance could void the user’s authority to
operate the equipment.
The Company reserves the right to amend the specification without notice.
If at any time in the future you should need to dispose of this
product please note that: Waste electrical products should not be
disposed of with household waste. Please recycle where facilities
exist. Check with your Local Authority or retailer for recycling advice.
(Waste Electrical and Electronic Equipment Directive)
40