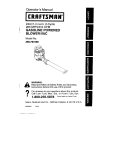
1
Operator's Manual
CRRFTSMRW
18cc/1.1 cu. in. 2-Cycle
GASOLINE HEDGE TRIMMER
Model No.
358.795390 - 18" Blade
&
9
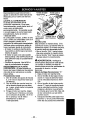
WARNING:
Read and follow all Safety Rules and Operating
Instructions before first use of this product.
For answers to your questions about this product:
Call 7 am-7 pm, Mon-Sat; 10 am-7 pm, Sun
1-800-235-5878
(Hours
listed
are Central
Time)
Sears, Roebuck and Co., Hoffman Estates, IL 60179 U.S.A.
530O88614
9/20/00
2
2
4
5
7
8
Warranty Statement
Safety Rules
Assembly
Operation
Maintenance
Service & Adjustments
FULL ONE YEAR WARRANTY
TRIMMER
Storage
Troubleshooting Table
Emissions Statement
Repair Parts List
Spanish
Parts and Ordering
ON CRAFTSMAN
® GAS POWERED
9
10
11
13
15
Back Cover
HEDGE
For one (1) year from the date of purchase, when this Craftsman Gas Powered
Hedge Trimmer is maintained, lubricated, and tuned up according to the operating and maintenance instructions in the operator's manual, Sears will repair, free
of charge, any defects in materials or workmanship.
This warranty excludes spark plug, air filter, and the blade which are expendable
parts and may become worn during normal use.
Ifthis Hedge Trimmer is used for commercial purposes, this warranty applies for only
90 days from the date of purchase. If this Hedge Trimmer is used for rental purposes,
this warranty applies for only 30 days from the date of purchase.
THIS WARRANTY APPLIES ONLY WHILE THIS PRODUCT IS USED IN THE UNITED
STATES. WARRANTY SERVICE IS AVAILABLE BY RETURNING THE HEDGE TRIMMER
TO THE NEAREST SEARS SERVICE CENTER IN THE UNITED STATES.
This warranty gives you specific legal rights, and you may also have other rights
which vary from state to state.
Sears, Roebuck and Co., Dept. 817WA, Hoffman Estates, IL 60179
followed to provide reasonable safety
and efficiency in using this unit.
The operator is responsible
for following the warnings and instructions
in this
manual and on the unit. Never allow
DANGER - THISPOWERTOOL
CAN BE DANGEROUS!
This unit can
cause serious injury including amputation or blindness to the operator and
others. The warnings and safety instructions in this manual must be
children to use this tool.
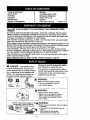
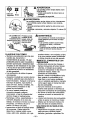
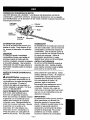
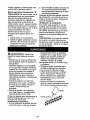
WARNING:
Safety
Glasses
Blades can throw objects violently
• You can be blinded or injured.
• Wear safety glasses.
t
Boots
_, WARNING:
Hazard zone for thrown objects
• Blades can throw objects violently.
Others can be blinded or in ured.
: Keep people and an mas 30 feet
(10 m) away.
._ _
._)_"._
Blades move I Allow blades to stop,_
momentarily before removing
after the them from the cut.
"_K_
t_ggeris[
-_,_..._
_
-_leaseo.
] _
_:
I
....
I
_
."_
"/ !
-2-
WARNING:
Blades move momentarily after the trigge
is released
• The blades can seriously cut you or
others
• Allow I_lades to stop before
"_ removing them from the cut.
WARNING:
Failure to follow all
Safety Rules and Precautions can result in serious injury.
KNOW YOUR UNIT
• Read your Operator's Manual carefully until you completely understand
and can follow all warnings and
safety rules before operating the unit.
• Restrict unit to users who understand
and will follow all warnings and safety
rules in this manual and on the unit.
PLAN AHEAD
• Always wear eye protection when operating, servicing, or performing maintenance on unit. Wearing eye protection will help to prevent brush or debris
from being thrown or ricocheting into
eyes and face which can result in
blindness and/or serious injury.
• Wear hearing protection when using
this unit.
• Secure hair above shoulder length.
Secure or remove jewelry, loose
clothing, or clothing with loosely
hanging straps, ties, tassels, etc.
They can be caught in moving parts.
• Do not operate unit when you are tired,
ill, upset, or if you are under the influence of alcohol, drugs, or medication.
• Keep children, bystanders, and animals away from work area a minimum of 30 feet (10 m) when starting
or operating unit.
• Inspect the area before starting the
unit. Remove all debris and hard objects such as rocks, glass, wire, etc.
that can ricochet, be thrown, or otherwise cause injury or damage during
operation.
HANDLE FUEL WITH CAUTION
• Eliminate all sources of sparks or
flame (including smoking, open
flames, or work that can cause
sparks) in the areas where fuel is
mixed, poured, or stored.
• Mix and pour fuel in an outdoor area;
store fuel in a cool, dry, well ventilated
place; use an approved, marked container for all fuel purposes.
• Do not smoke while handling fuel or
while operating the unit.
• Do not fill fuel tank while engine is
running.
• Wipe up fuel spills before starting the
engine.
• Move at least 10 feet (3 meters)
away from fuel and fueling site before
starting engine.
OPERATE YOUR UNIT SAFELY
• Inspect unit before each use for
worn, loose, missing, or damaged
parts. Do not use until unit is in
proper working order.
• Keep outside surfaces free from oil
and fuel.
_IL DANGER:
RISK OF CUT; KEEP
HANDS AWAY FROM BLADE-Blade
moves momentarily after the trigger is
released. Do not attempt to clear away
cut material when the blade is in motion. Make sure the switch is in the OFF
position, the spark plug wire is disconnected, and the blade has stopped
moving before removing jammed material from the cutting blade. Do not grab
or hold the unit by the cutting blade.
• Never start or run engine inside a
closed room or building. Breathing
exhaust fumes can kill.
• Avoid dangerous environments. Do
not use in unventilated areas or
where explosive vapors or carbon
monoxide build up could be present.
• Do not overreach or use from unstable surfaces such as ladders, trees,
steep slopes, rooftops, etc. Keep firm
footing and balance at all times.
• Do not raise unit above your shoulders; the cutting blade can come
dangerously close to your body.
• Always keep unit in front of your body.
Keep all parts of your body away from
the cutting blade.
• Keep the cutting blade and air vents
free from debris.
• Use only for jobs explained in this
manual.
MAINTAIN YOUR UNIT PROPERLY
• Have all maintenance other than the
recommended procedures described
in the Operator's
Manual performed
by Sears Service.
• Disconnect
spark plug before performing maintenance except for carburetor adjustments.
• Do not use a cutting blade that is
bent, warped, cracked, broken, or
damaged in any other way. Have
worn or damaged parts replaced by
your Sears Service Center.
• Use only recommended Craftsman
cutting blades and replacement
parts; use of any other parts may
void your warranty and cause damage to your unit.
• Empty fuel tank before storing the unit.
Use up fuel left in carburetor by starting
engine and letting it run until it stops.
• Hand carry the unit with the engine
stopped and the muffler and cutting
blade away from your body.
• Allow engine to cool, empty the fuel
tank, and secure the unit before storing or transporting it in a vehicle.
• Do not store the unit or fuel in a
closed area where fuel vapors can
reach sparks or an open flame from
hot water heaters, electric motors or
switches, furnaces, etc.
• Store the unit so the cutting blade
cannot accidentally cause injury.
• Store in a dry area out of reach of
children.
SPECIAL NOTICE: Your hedge trimmer is equipped with a temperature
limiting muffler and spark arresting
screen which meets the requirements
of California Codes 4442 and 4443. All
U.S. forest land and the states of California, idaho, Maine, Minnesota, New
Jersey, Oregon, and Washington require by law that many internal combustion engines be equipped with a
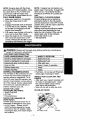
CARTON CONTENTS
Check carton contents
lowing list.
Model 358.795390
spark arresting screen. If you operate
a hedge trimmer in a state or locale
where such regulations exist, you are
legally responsible for maintaining the
operating condition of these parts.
Failure to do so is a violation of the law.
For normal homeowner use, the muffler
and spark arresting screen will not require any service. After 50 hours of
use, we recommend that your muffler
be serviced or replaced by your Sears
Service Center.
SAFETY NOTICE: Exposure to vibrations through prolonged use of gasoline powered hand tools could cause
blood vessel or nerve damage in the
fingers, hands, and joints of people
prone to circulation disorders or abnormal swelling. Prolonged use in cold
weather has been linked to blood vessel damage in otherwise healthy
people. If symptoms occur such as
numbness, pain, loss of strength,
change in skin color or texture, or loss
of feeling in the fingers, hands, or
joints, discontinue the use of this tool
and seek medical attention. An
antivibration system does not guarantee the avoidance of these problems.
Users who operate power tools on a
continual and regular basis must monitor closely their physical condition and
the condition of this tool.
NOTE:
against the fol-
It is normal for the fuel filter to
rattle in the empty fuel tank.
ASSEMBLY
No assembly
• Hedge Trimmer
• 2-Cycle Engine Oil
-4-
is required.
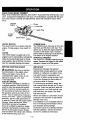
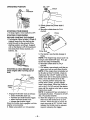
KNOW YOUR HEDGE TRIMMER
READ THIS OPERATOR'S
MANUAL AND SAFETY RULES BEFORE OPERATING YOUR
UNIT. Compare the illustrations
with your unit to familiarize
yourself with the location of the various controls and adjustments.
Save this manual for future reference.
ONIOFF
Switch _
_
Choke
Primer Bulb
Spark Plug
Throttle
Trigger
Starter Rope
Muffler
CHOKE
The CHOKE helps to supply fuel to the
engine to aid in cold starting. Activate the
choke by moving choke lever to the desired position. See STARTINGYOUR ENGINE for complete starting information.
PRIMER BULB
The PRIMER BULB removes air from the
fuel lines and fills them with fuel. This
allows you to start the engine with fewer pulls on the starter rope. Activate
primer bulb by pressing it and allowing
it to return to its original position.
THRO'I-rLE TRIGGER
The THROTTLE TRIGGER controls engine
speed. Squeeze the trigger for full speed
operation; release it for idle speed.
BEFORE
IMPORTANT
ON/OFF SWITCH
The ON/OFF SWITCH is used to stop the
engine. To stop engine, move switch to
OFF.
STARTING
_WARNING:
ENGINE
Be sure to read the
fuel information in the safety rules
before you begin. If you do not
understand the safety rules, do not
attempt to fuel your unit. Call
1-800-235-5878.
FUELING ENGINE
This engine is certified to operate on
unleaded gasoline. Before operation,
gasoline must be mixed with a good
quality 2-cycle air-cooled engine oil.
We recommend Craftsman
brand oil.
Mix gasoline and oil at a ratio of 40:1
(A 40:1 ratio is obtained by mixing 3.2
ounces of oil with 1 gallon of unleaded
gasoline). DO NOT USE automotive oil
or boat oil. These oils will cause engine
damage. When mixing fuel, follow
instructions printed on container.
Once oil is added to gasoline, shake
container momentarily to assure that
the fuel is thoroughly mixed. Always
read and follow the safety rules relating
to fuel before fueling your unit.
-5-
Experience
indicates that alcohol
blended fuels (called gasohol or using
ethanol or methanol) can attract moisture which leads to separation and
formation of acids during storage. Acidic gas can damage the fuel system of
an engine while in storage.
To avoid engine problems, empty the
fuel system before storage for 30 days
or longer. Drain the gas tank, start the
engine and let it run until the fuel lines
and carburetor are empty. Use fresh
fuel next season.
Never
use
engine
or carburetor
cleaner
products in the fuel tank or permanent
damage may occur.
Fuel stabilizer is an acceptable
alternatire in minimizing
the formation of fuel
gum deposits during storage.
Craftsman
brand oil is already blended
with fuel stabilizer. See the STORAGE
section for additional information.
OPERATING
POSITION
ON
OFF
Eye
Protection
3. Slowly press the primer bulb 6
times.
4. Move the choke lever to FULL
CHOKE.
Choke
STOPPING YOUR ENGINE
• To stop engine, move switch to OFF.
STARTING
YOUR
ENGINE
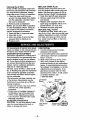
BEFORE STARTING THE ENGINE
• Fuel engine. Move at least 10 feet (3
meters) away from the fueling site.
• Hold the unit on the ground in the
starting position as shown. Support
unit so the blade is off of the ground
and away from trees, bushes, onlookers, etc.
Primer Bulb
5. Pull starter rope handle sharply 6
times.
NOTE: The engine may sound as if it is
trying to start before 6th pull. If so, go
to the next step immediately.
6. Move the choke lever to HALF
CHOKE.
7. Pull starter rope sharply until the engine runs, but no more than 6 pulls.
NOTE: If the engine has not started after 6 pulls (at HALF CHOKE), check to
make sure the ON/OFF switch and the
STARTING A COLD ENGINE (or a
warm engine after running out of
fuel)
Throttle Lock
choke lever are in the proper positions.
Then, move the choke lever to the
Throttle
1. Engage the throttle lock as follows:
• press the throttle lock-out;
• squeeze and hold throttle trigger;
• press and hold throttle lock
• release the throttle trigger
Keep the throttle lock engaged until the
engine runs smoothly.
2. Make sure switch is in ON position.
-6-
FULL CHOKE position and press the
primer bulb 6 times; pull the starter
rope 2 more times. Move the choke lever to HALF CHOKE and pull the starter
rope until the engine runs, but no more
than 6 more pulis.
NOTE: If engine still has not started, it
is probably flooded.
Proceed to STARTING A FLOODED ENGINE.
8. Allow the engine to run 10 seconds,
then move the choke lever to OFF
CHOKE. Allow the unit to run for 30
more seconds at OFF CHOKE, then
release the throttle lock by squeezing and releasing the trigger.
NOTE: If engine dies with the choke
lever at the OFF CHOKE position, move
the choke lever to HALF CHOKE and
pull the rope until the engine runs.
9. To stop engine, move switch to OFF.
FOR A WARM ENGINE
1. Make sure switch is in ON position.
2. Move the choke lever to HALF
CHOKE.
3. Engage the throttle lock as directed
in STARTING A COLD ENGINE. Keep
the throttle lock engaged until the
engine runs smoothly.
4. Pull starter rope sharply until engine
runs, but no more than 5 pulls.
5. Allow the engine to run 10 seconds,
then move the choke lever to OFF
CHOKE. Release the throttle lock by
squeezing
and releasing the trigger.
NOTE: If engine has not started, pull
starter rope 5 more pulls. If engine still
does not run, it is probably flooded.
Proceed to STARTING A FLOODED ENGINE.
STARTING A FLOODED
ENGINE
Flooded engines can be started by
placing the switch in the ON position
and the choke lever in the OFF CHOKE
position; then, pull the rope to clear the
engine of excess fuel.
Starting could require pulling the starter
rope many times depending on how
badly the unit is flooded. If the unit still
doesn't start, refer to the TROUBLESHOOTING TABLE or call
1-800-235°5878.
_)A WARNING:
Disconnect
the spark plug before
except for carburetor
adjustments.
CUSTOMER
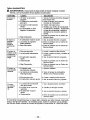
RESPONSIBILITIES
CARE
& MAINTENANCE
Check
for loose fasteners
Check for damaged
TASK
and parts
or worn
parts
performing
maintenance
WHEN
TO PERFORM
Before
each use
Before
each use
Inspect and clean unit and labels
Clean air filter
After each use
Replace
Replace
Yearly
Every 5 hours of operation
spark plug
fuel filter
GENERAL RECOMMENDATIONS
The warranty on this unit does not cover items that have been subjected to
operator abuse or negligence. To receive full value from the warranty, the
operator must maintain unit as instructed in this manual. Various adjustments
will need to be made periodically to
properly maintain your unit.
CHECK FOR LOOSE
FASTENERS
AND PARTS
• Spark Plug Boot
• Air Filter
• Housing Screws
Yearly
• Fuel Tank - Do not use unit if fuel tank
shows signs of damage or leaks.
INSPECT AND CLEAN UNIT AND
LABELS
• After each use, inspect complete unit
for loose or damaged pads. Clean
the unit and labels using a damp
cloth with a mild detergent.
• Wipe off unit with a clean dry cloth.
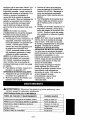
CLEAN AIR FILTER
CHECK FOR DAMAGED
OR
WORN PARTS
Contact Sears Service Center for re-
Air
Filter
placement of damaged or worn parts.
• ON/OFF Switch - Ensure ON/OFF
switch functions properly by moving
the switch to the OFF position. Make
sure engine stops; then restart engine
and continue.
Air Filter Cover
-7-
Screws
REPLACE SPARK PLUG
Replace spark plug each year to ensure the engine starts easier and runs
better. Set spark plug gap at 0.025 in.
Ignition timing is fixed, nonadjustable.
1. Twist, then pull off spark plug boot.
2. Remove spark plug from cylinder
and discard.
3. Replace with Champion RCJ-8Y
spark plug and tighten with a 3/4 in.
socket wrench (10-12 ft.-Ibs).
4. Reinstall the spark plug boot.
REPLACE FUEL FILTER
To replace fuel filter, drain unit by running it dry of fuel, then remove fuel cap/
retainer assembly from tank. Pull filter
from tank and remove it from the fuel
line. Install new fuel filter on fuel line;
reinstall pads.
Cleaning the air filter:
A dirty air filter decreases engine performance and increases fuel consumption and harmful emissions. Always
clean after every 5 hours of operation.
1. Clean the cover and the area
around it to keep debris from falling
into the carburetor chamber when
the cover is removed.
2. Remove parts as illustrated.
NOTE: Do not clean filter in gasoline
or other flammable solvent. Doing so
can create a fire hazard or produce
harmful evaporative emissions.
3. Wash the filter in soap and water.
4. Allow filter to dry.
5. Add a few drops of oil to the filter;
squeeze filter to distribute oil.
6. Replace pads.
We recommend all service and adjustments not listed in this manual be performed by your Sears Service Center.
CARBURETOR ADJUSTMENT
Carburetor adjustment is critical and if
done improperly can permanently damage the engine as well as the carburetor. If you require further assistance or
are unsure about performing this procedure, call our customer assistance
help line at 1-800-235-5878.
Old fuel, a dirty air filter, a dirty fuel filter, or flooding may give the impression
of an improperly adjusted carburetor.
Check these conditions before adjusting the carburetor.
The carburetor has been carefully set
at the factory. Adjustments may be
necessary if you notice any of the following conditions:
• Engine will not idle. See IDLE SPEED
and MIXTURE under adjusting
procedure.
• Engine dies or hesitates instead of
accelerating. See ACCELERATION
CHECK under adjusting procedure.
• Loss of power. See MIXTURE under
adjusting procedure.
ADJUSTING PROCEDURE
CAUTION: Do not force plastic limiter
caps on screws beyond the built-in
stops or damage will occur.
-8-
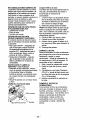
Initial Settings
1. Turn the mixture screw counterclockwise until it stops.
2. Turn the idle speed screw clockwise
until it stops. Now turn counterclockwise 4-1/2 turns.
3. Start motor and let it run for 3 minutes, then proceed to the adjust
screws according to the instructions
below. If engine performance at initial settings is acceptable, no further
adjustments are necessary. If engine does not start, refer to TROUBLESHOOTING TABLE. If still unable
to remedy situation, call
1-800-235-5878.
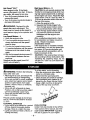
Low Speed
Screw
Idle Speed
/._...
Screw
H
High Speed
Screw
Screws with
Umiter
L
Idle Speed "IDLE"
Allow engine to idla If the blade
moves, idle speed is too fast. If the engine stalls, idle speed is too slow.
• Turn IDLE screw clockwise to increase idle speed.
• Turn IDLE screw counterclockwise
decrease
to
idle speed.
,_ WARNING:
Recheck the idle
speed after each adjustment. The
blade must not move at idle speed to
avoid serious injury to the operator and
others.
Low Speed Mixture - L
1. Allow the engine to idle.
2. Turn low speed mixture screw (L)
slowly clockwise until the speed
starts to drop.
3. Turn the low speed mixture screw
(L) counterclockwise until the speed
increases and then starts to drop
again.
4. Set the low speed mixture screw (L)
at the midpoint between the two
positions.
Readjust the idle speed (see IDLE
SPEED ADJUSTMENT).
_ILWARNING:
Perform
the following
steps after each use:
• Allow engine to cool, and secure the
unit before storing or transporting.
• Store unit and fuel in a well ventilated
area where fuel vapors cannot reach
sparks or open flames from water
heaters, electric motors or switches,
furnaces, etc.
• Store unit with all guards in place.
Position unit so that any sharp object
cannot accidentally cause injury.
• Store unit and fuel well out of the
reach of children.
High Speed Mixture - H
CAUTION:
Do not operate engine at full
throttle for prolonged periods while making high speed adjustments as damage
to the engine can occur. Adjust the high
speed screw 1/16 of a turn at a time. A
1/16 turn is about the width of the slot in
the top of the screw.
1. Allow the engine to idle.
2. Squeeze the throttle trigger fully.
Turn the high speed mixture screw
(H) counterclockwise
until it stops.
3, Turn the high speed mixture screw
(H) screw the minimum amount
clockwise until the engine runs
smoothly.
After completing adjustments, check
for acceleration and blade movement
at idle. Reset if necessary.
Acceleration
Check
If the engine dies or hesitates instead
of accelerating, turn the low speed mixture screw (L) counterclockwise
until
you have smooth acceleration with no
blade movement at idle.
CAUTION:
If the engine does not operate according to these instructions after
repeating the adjusting steps, do not
use the unit, Take it to your Sears Sewice Center,
To oil the blade, do the following:
• Stop the engine and allow blade to
come to a complete stop.
• Disconnect the spark plug wire.
• Clean all parts and check for damage.
Have damaged parts repaired or replaced by your Sears Service Center.
• Apply a light machine oil along the
edge of the top strap as shown.
OIL
Prepare unit for storage at end of season or if it will not be used for 30 days
or more.
EXTERNAL
SURFACES
• If your unit is to be stored for a period
of time, clean it thoroughly before
storage. Store in a clean dry area.
• Lightly oil external metal surfaces, including the blade.
-9-
FUEL SYSTEM
Under FUELING ENGINE in the OPERATION section of this manual, see message labeled IMPORTANT
regarding
the use of gasohol in your engine.
Fuel stabilizer is an acceptable alternative in minimizing the formation of fuel
gum deposits during storage. Add stabilizer to gasoline in fuel tank or fuel storage container. Follow the mix instructions
found on stabilizer container. Run engine
at least 5 minutes after adding stabilizer.
Craftsman 40:1, 2-cycle engine oil (air
cooled) is already blended with fuel
stabilizer. If you do not use this Sears
oil, you can add a fuel stabilizer to your
fuel tank.
INTERNAL ENGINE
• Remove spark plug and pour I teaspoon of 40:1, 2-cycle engine oil (air
cooled) through the spark plug openTROUBLESHOOTING
•
•
•
•
ing. Slowly pull the starter rope 8 to
10 times to distribute oil.
Replace spark plug with new one of
recommended type and heat range.
Clean air filter.
Check entire unit for loose screws,
nuts, and bolts. Replace any damaged, broken, or worn parts.
At the beginning of the next season,
use only fresh fuel having the proper
gasoline to oil ratio.
OTHER
• Do not store gasoline from one season to another.
• Replace your gasoline can if it starts
to rust.
TABLE
WARNING:
Always stop unit and disconnect spark plug before performing
all of the recommended remedies below except remedies that require operation of the unit.
TROUBLE
CAUSE
Engine will 1.
not start.
2.
3.
4.
Engine flooded.
Fuel tank empty.
Spark plug not firing.
Fuel not reaching carburetor.
5. Compression
Engine will
not idle
properly.
Engine will
not acceler-i
ate, lacks
power, or
dies under
a load.
Engine
smokes
excessively.
Engine
runs hot.
REMEDY
low.
1. See "Starting a Flooded Engine" in
Operation Section.
2. Fill tank with correct fuel mixture.
3. Install new spark plug.
4. Check for dirty fuel filter; replace.
Check for kinked or split fuel line;
repair or replace.
,5. Contact Sears Service.
1.
Carburetor requires adjustment 1. See Service and Adjustments section
2. Crankshaft seals worn.
2. Contact Sears Service,
3. Compression low.
3. Contact Sears Service.
1. Air filter dirty.
Spark plug fouled.
Carburetor requires adjustment
Carbon build up.
Compression low.
1. Choke partially on.
2. Fuel mixture incorrect.
2.
3.
4.
5.
1. Clean or replace air filter.
2.
3.
4.
5.
1.
2.
Clean or replace spark plug; re-gap.
See Service and Adjustments section.
Contact Sears Service.
Contact Sears Service.
Adjust choke.
Empty fuel tank and refill with
correct fuel mixture.
3. Clean or replace air filter.
3. Air filter dirty.
4. Carburetor requires adjustment. 4. See Service and Adjustments
1.
2.
3.
4.
Fuel mixture incorrect.
Spark plug incorrect.
Carburetor requires adjustment.
Carbon build up.
1.
2.
3.
4.
section
See "Fueling Engine."
Replace with correct spark plug.
See Service and Adjustments section
Contact Sears Service.
If situations
occur which are not covered in this manual, use care and good
judgment.
If you need assistance,
contact your Sears Service Center or call the
Customer Assistance
Helpline at 1-800-235-5878.
-10-
YOUR WARRANTY RIGHTS AND OBUGATIONS:
The U. S. Environmental
Protection Agency and Sears, Roebuck
and Co., U.S.A., are pleased to explain
the emissions control system warranty
on your lawn and garden equipment engine. All new utility and lawn and garden
equipment engines must be designed,
built, and equipped to meet the stringent
anti-smog standards. Sears must warrant the emission control system on your
lawn and garden equipment engine for
the periods of time listed below provided
there has been no abuse, neglect, or improper maintenance of your lawn and
garden equipment engine. Your emission
control system includes parts such as
the carburetor and the ignition system.
Where a warrantable condition exits,
Sears will repair your lawn and garden
equipment engine at no cost to you. Expenses covered under warranty include
diagnosis, parts and labor. MANUFACTURER'S WARRANTY
COVERAGE:
If
any emissions related part on your engine (as listed under Emissions Control
Warranty Parts List) is defective or a defact in the materials or workmanship of
the engine causes the failure of such an
emission related part, the part will be repaired or replaced by Sears. OWNER'S
WARRANTY
RESPONSlBlUTIES:
As
the lawn and garden equipment engine
owner, you are responsible for the performance of the required maintenance
listed in your Owner's Manual. Sears
recommends that you retain all receipts
covering maintenance on your lawn and
garden equipment engine, but Sears
cannot deny warranty solely for the lack
of receipts or for your failure to ensure
the performance of all scheduled maintenance. As the lawn and garden equipment engine owner, you should be
aware that Sears may deny you warranty coverage if your lawn and garden
equipment engine or a part of it has
failed due to abuse, neglect, improper
maintenance, unapproved modifications,
or the use of parts not made or approved by the original equipment
manufacturer.
You are responsible for
presenting your lawn and garden equip-
-11
ment engine to a Sears authorized repair
center as soon as a problem exists.
Warranty repairs should be completed in
a reasonable amount of time, not to exceed 30 days. If you have any questions regarding your warranty rights and
responsibili_es, you should contact your
nearest authorized sewice center or call
Sears at 1-800-473-7247
WARRANTY
COMMENCEMENT
DATE: The warranty period begins on the date the lawn
and garden equipment engine is purchased. LENGTH OF COVERAGE:
This warranty shall be for a period of two
years from the initial date of purchase.
WHAT IS COVERED: REPAIR OR REPLACEMENT
OF PARTS, Repair or replacement of any warranted part will be
performed at no charge to the owner at
an approved Sears servicing center. If
you have any questions regarding your
warranty rights and responsibilities,
you
should contact your nearest authorized
service center or call Sears at
1-800-473-7247.
WARRANTY
PERIOD:
Any warranted part which is not scheduled for replacement as required maintenance, or which is scheduled only for
regular inspection to the effect of "repair
or replace as necessary" shall be warranted for 2 years. Any warranted part
which is scheduled for replacement as
required maintenance shall be warranted
for the period of time up to the first
scheduled replacement point for that
part. DIAGNOSIS: The owner shall not
be charged for diagnostic labor which
leads to the determination that a warranted part is defective if the diagnostic
work is performed at an approved Sears
servicing center. CONSEQUENTIAL
DAMAGES: Sears may be liable for
damages to other engine components
caused by the failure of a warranted part
still under warranty. WHAT IS NOT COVERED: All failures caused by abuse, neglect, or improper maintenance are not
covered. ADD-ON OR MODIFIED
PARTS: The use of add-on or modified
parts can be grounds for disallowing a
warranty claim. Sears is not liable to cover failures of warranted parts caused by
the use of add-on or modified parts.
-
HOW TO FILE A CLAIM: If you have
any questions regarding your warranty
rights and responsibilities,you should
contact your nearest authorized service
center or cell Sears at 1-800-473-7247.
WHERE TO GET WARRANTY SERVICE: Warranty services or repairs shall
be provided at all Sears service centers.
cell: 1-800-473-7247. MAINTENANCE,
REPLACEMENT AND REPAIR OF
EMISSION RELATED PARTS: Any
Sears approved replacement part used
-12-
in the performance of any warranty
maintenance or repair on emission related parts will be provided without
charge to the owner if the part is under
warranty. EMISSION CONTROL WARRANTY PARTS LIST: Carburetor, Ignition System: Spark Plug (covered up to
maintenance schedule), Ignition Module.
MAINTENANCE STATEMENT: The
owner is responsiblefor the performance
of all required maintenance as defined in
the owner's manual.
REPAIR PARTS
SEARS MODEL 35a.Tg_,_gO
60
49
51
52
53
54
57
WARNING
AJ! repaJn_ ad|usUmmts and
maintenance not described
In the Operatot"$ Manual
rn.st be performedbyq._
fled service pm'sonnel.
Ref.
Part No.
Desc_pCon
1.
53OO15935 Screw
2.
3.
4.
53OO4.9328
530029oj29 _rankc:_e Cover
530019181 P_a.sket_rankcase/
5,
530014307
530032125 Inner Beanng
53OO15945
530019179 _._-C'ca.se
530032124
530014861 Out_' Beating
(Inc_ S-9)
530015941
530016080 _p-Retaine'-C'sh_t
53OO39149 Rywhe_ Aes'y.
(led. 17, 18 & 31)
53OO36145 Spacer-lgnit. Mod_e
530039163 Ignition Module
53OO15954 Screw
530016191 Spr_,-Smr_rDog
5300492Z_ IS_art_r Dog
530015_8
Wa.Cner-Flm
53OO1593O F_v_
S_r
53OO69232 iP,ope )_t
53001,5_63 Retainer
530015496
530069353 _arte¢ Puby led
6.
7,
8.
9.
10
11,
12
13
14
15
16
17
1B
19
20
21
22
23
24
12)
Ref.
Part No.
25.
26.
27.
28.
53O042O85
53(X:Q7569
530015886
530014396
I:m=rlpU_
R_',
Pm't No.
StarterSprig
50. 53006,96_
Sta_e¢ Handle
Screw
s_. ,_ooi_:m4_
•52. 530029934
Clutch ._ss'y. I_
53. 530036193
Fan Housing Kd
54. 530015635
Grommet-lgni_on
Module
55. 530015162
,Sa_w
56. 530014973
31. 530016197
53001_B82
32.
Muffler Spring
,Scn_w
57. 530069_2
I 530015934
Muffler Screen
58. 530069599
35. S30023877
Fuel Line F_ng
Mufll_ l_t
36.
37. 530069659
_1_3
Cylind__..-..-..-..-..-.._
_ •_
59. 530016103
60. 530014362
38. S3003S404
Rk'n
9
39. ! 530069621
61. 530069615
{Ind. 28 & 55)
.Screw
40. s3OOlS.._3
41. $30069619
Cylnder
Not Shown
42. C_mp_
43.
53001_33
sparkP_.,g(CJ.-SY)
Gesv_-O_ne_r!
Ca,._.Aaz_mr
44. ,S_004_0_4 Carburetor Ada_o_
45. 530016014
46..530014384
47. 5300157"/5
48. 530019194
4,9. 5_00361
_
Screw
Thro_e C.aUe A._'y.
Saw
_-Camureto_
AirB_
13
W14
53004_76
5300_4498
D_=iF_on
Carbureter Ass',!. _at
(Inds. LirnlterCaps)
S_ew
Air Filter Foam
Air'Rlter Cover
Screw
F_stonPin Retainer
C'case & C'sh_It Assy.
(Incl. 5-11)
Gasket l_t
(Ind. 4. 37, 43 & 48)
Fue_Line _ (ind.
(Fue_aria Vent lines)
Retainer Clip
Fuel Pic_-up A.ss'y.
Connecting Rod Ass'y.
Ope_or
_uucdo_Dec_
ShoedDe_
REPAIR PARTS
SEARS MODE]. 35_795._)0
Carburetor A._embly
13
#S300_9_,
26
9
I1
12
810
4
°°
7
19
32
Ref.
1.
2.
3.
4.
5.
6.
7.
8.
9.
10.
11.
12.
13.
14.
15.
16.
17.
18.
19.
20.
21.
22.
23.
Part No.
530(_9_34
530O54133
530015775
5300_>9958
530015940
530015770
530038305
5300538_
530053896
53OO36123
5_0015_4
530047879
530094992
530029946
530048113
530015814
$30029916
_121
530403228
530029948
530036228
530016013
530069355
Descf(l[_n
31
Ref.
J_
Swath
Lea_re/Sw_chAssy.
Sa'ew
Tngger Lever
• So'ew
Screw
Handle Cover
"l_o_e Trigger
TrJ_erSp_ng
Pin
No.
5,30O36O46
5,30O47877
,530015955
530015805
530014_9
Isolator
Fuel Cap Ass'y. w/retainer
Screw
Screw
Gear Box Ass'y.
(Ind. 21, 22 & 27)
29.
30.
31.
530038318
530038317
530069e_
Urger Cap-H_
L_er _
32,
Saew
Reer Handle & Tank Ass'y.
Front Handle
Sp_ng
Clumh & Drum _s'y.
Screw
Gear Box Rate (Cover)
Blade-Bushing
B_le Ass'y. lS"
33.
34.
35.
SeJ-8_de peR)
Pinion Ass',/.
Ddve Gear Ass'y. I_
0_. 18)
14
Des_p.on
24.
25.
26.
27.
28.
,53OO35443
530O35444
530035445
Caz1:)u_or Repair l_t
(Kn'=cQr_r_)
Gasket_1:_tphragmh_
(I<= Cements)
Nee_e-Hlgh
Need_e.-Low
Needle Spdng
Declaraci6n de Garantia
Reglas de Seguridad
Montaje
Uso
Mantenimiento
Servicio y Ajustes
15
15
18
19
21
23
Almacenaje
24
Tabla Diagn6stica
Declaracibn de Emision
26
27
Lista de Piezas
13
Repuestos
y Encargos
Contratapa
GARANTIA COMPLETA DE UN ANO EN LA PODADORA DE SETOS A GASOLINA DE LA MARCA CRAFTSMAN ®
Por un aSo completo, apartir de la fecha original de compra, cuando esta Podadora
de Setos de la marca Craftsman sea mantenida, lubricada y ajustada de acuerdo
con las instrucciones de Uso y de Mantenimiento del manual del usuario, Sears reparard, sin cargo alguno, cualquier defecto en material y mano de obra.
Esta garanSa excluye la bujia, el filtro de aire, y la cuchilla que son piezas fungibles
que se gastan con el uso normal.
Siesta Podadora de Setos es usada con fines comerciales, la garantia aplicarb,por
90 dias a partir de la fecha original de compra. Siesta Podadora de Setos es usada
con fines de alquiler, la garantia aplicar& por 30 dias a partir de la fecha original de
compra. Esta garantia tendra validez solamente cuando el producto sea usado dentro de los Estados Unidos.
ESTA GARANTiA CONFIERE DERECHOS ESPECiFICOS AL PROPIETARIO, QUE ASIMISMO PUEDE QUE TENGA OTROS DERECHOS QUE VARIAN ENTRE ESTADOS.
Sears, Roebuck and Co., D/817WA, Hoffman Estates, IL 60179
'_
PELIGRO:
iESTA HERRAMIENTA
DE FUERZA PUEDE SER PELIGROSA!
Este aparato puede causar accidentes
de gravedad,
incluyendo
amputacibn
o
la p_rdida de la vista al usuario o a
terceras personas.
Se deber&n sequir
las advertencias
e instrucciones
de
seguridad en este manual para ser
provisto con razonable seguridad y
efficiencia
con respecto al uso de este
aparato.
El usuario ser_ responsable
de cumplir con las advertencias
y
sequir todas las instrucciones
en este
manual como en el aparato.
No
permita nunca que los niSos jueguen
con esta herramienta.
-1R-
_ADVERTENCIA:
De no sequir todas las Reglas de Seguridad y Precauclones, usted estarb arriesgado a sulrir
accidentes de gravedado
CONOZCA SU APARATO
• Lea cuidadosamente el Manual del
Usuario hasta que usted entienda
completamente y pueda cumplir todas
las advertencias y reglas de seguridad
antes de comenzar con el uso de este
aparato.
• Restrinja el uso a personas que
entiendan y vayan a cumplir con todas
las advertencias y reglas de seguridad
en este manual yen el aparato.
ADVERTENCIA
Gafas de
seguridad
I_as cuchillas pueden arrojar objetos al sire
violentamente.
• Usted puede perder la vista o tenet un
accidenta.
• Use gafas de seguridad.
Botas
ADVERTENCIA
• Las cuchillas pueden arrojar objetos al aire violentamanta.
• Terceras personas podrian perder la vista o tenet accidentes.
Las
cuchillas pueden arrojar objetos al sire violentamente.
• Mantenga a personas y animales alejados 10 metros (30
pies).
Las cuchillas se-I
mover&n mo- I
ment&neamente
despues que el mo-J
tor se haya I
Permita qua las
cuchillas se detengan antes de
remover las del
&rea de corte.
"_
_J
_i
Las cuchillas se mover&n moment&neamanta despu_s qua el motor se haya
apagado.
• Las cuchillas pueden causar serias
_._
_.______-_
._
_.
PLANIFIQUE
CON TIEMPO
• Siempre use proteccibn para los ojos
cuando use, de servicio o
•
•
•
•
•
ADVERTENCIA
mantenimiento al aparato. El usar
protecci6n para los ojos le ayudar_, a
prevenir qua brozas o desechos sean
arrojados al aire rebotando en sus ojos
yen su cara Io qua podrla resultar en
la p_rdida de la vista o en accidentes
de alta gravedad.
Use protecci6n de oidos al operar
este aparato.
Asegure el cabello por encima de los
hombros, at&ndolo para tal efecto si
fuese necesario.
Asegure o remueva
todo tipo de joyeria, ropa suelta o
ropa con tiras, borlas, corbatas, etc.
Estas pueden enredarse
en las
piezas en movimiento.
No use el aparato cuando se
encuentre cansado, enfermo,
preocupado, o bajo la influencia del
alcohol, drogas o medicamentos.
Mantenga a ni_os, espectadores y
animales alejados de la zona de
trabajo, al arrancar el motor o al usar
el aparato; un minimo de por Io
menos 10 metros (30 pies).
Inspeccione el &rea de trabajo antes
de comenzar.
Retire todos los
desechos y material s61ido como
rocas, vidrio roto, alambre, etc. qua
-16-
personas.
• Permita qua las cuchillas se detengan
cortaduras a usted y a terceras
antes
code. de remover las del _.rea de
puedan rebotar, ser arrojados al aire
o de otra manera causar accidentes
o daSos durante el uso del aparato.
MANEJE EL COMBUSTIBLE
CON
PRECAUClON
• Elimine todo recurso de chispas o
llamas (incluyendo el fumar, llamas
abiertas, o trabajos qua puedan
ocacionar chispazos) en las &reas en
donde se mezcla, vierte o se
almacena el combustible.
• Mezcle y vierta el combustible al aire
libra; guarde el combustible en un
lugar seco y con buena ventilaci6n;
use un recipiente aprobado y marcado
como segur6 para el manejo de todo
tipo de combustible.
• No fume mientras se encuentre
usando este aparato o mientras se
encuentre manejando
el combustible.
• No Ilenne el tanque de combustible
mientras el motor se encuentre en
marcha.
• Limpie todo derrame de combustible
antes de poner en marcha el motor.
• Al_jese por Io menos 3 metros (10
pies) del &rea de abastecimiento.
SEGURIDAD
EN EL MANEJO DEL
APARATO
• Inspeccione el aparato antes de
cada uso para verificar piezas
da_adas, gastadas o perdidas. No
use el aparato hasta que este no se
encuentre en perfecto estado de
funcionamiento.
• Mantenga las superficies externas
libreas de aceite y combustible.
_, PELIGRO:
RIESGO DE CORTADURAS; MANTENGA I_AS MANOS
ALEJADAS DE LA CUCHILLA - La cuchilla continuar& girando momentbneamente al soltar el gatillo acelerador.
No intente limpiar material ya cortado
mientras la cuchilla se encuentre girando. AsegSrese de que el interruptor se
encuentre en la posicibn OFF, el cable
de la bujla desconectado, y la chuchilla
detenida antes de remover el material
que se haya atascado en la cuchilla.
No sostenga o agarre el aparao por la
cuchilla.
• Nunca ponga el motor en marcha ni
Io deje en marcha en un recinto
cerrado. Respirar los gases de
escape le podria causar la muerte.
• Evite ambientes peligrosos. No
ponga el aparato en marcha en
lugares con poca ventilaci6n o donde
se encuentren presentes vapores
explosivos o alta concentraci6n de
mon6xido de carbono.
• No se extienda demasiado o use el
aparato desde superficies inestables
como escaleras manuales, &rboles,
cuestas empinadas, techos, etc.
Mantenga el balance yen pie firme
todo el tiempo.
• No levante el aparato m_.s arriba de
sus hombros; la cuchilla podrfa
acercarse a su cuerpo de manera
muy peligrosa.
• Siempre mantenga el aparato en
frente suyo. Mantenga todas las
partes del cuerpo alejadas de la
cuchilla.
• Mantenga la cuchilla y los
respiraderos de aire libres de
desechos.
• Use exclusivamente para trabajos
descritos en este manual.
MANTENIMIENTO
APROPIADO
DE
SU APARATO
• Permito que todo mantenimiento
que
no haya sido recomendado en este
Manual del Usuario, sea efectuado
por el Servicio de Sears.
• Desconecte
la buj_a antes de
efectuar mantenimiento,
-17-
exceptuando los ajustes al
carburador.
• No use el aparato si la cuchilla se
encuentra doblada, torcida, astillada,
rota o daSada de cualquier manera.
Permita
• Use _nicamente cuchillas y piezas
de repuesto recomendadas de la
marca Craftsman; el uso de cualquier
otro tipo de piezas puede cancelar su
garat_a y causar daSos a su aparato.
• Vacie el tanque de combustible antes
de almacenar su aparato. Use todo el
combustible que quede en el
carburador poniendo el motor en
marcha y dej_.ndoloen marcha hasta
que se detenga.
• Cargue el aparato manualmente con
el motor detenido, y con el
silenciador y la cuchilla alejados de
su cuerpo.
• Permita que el motor se enfrie, vacie
el tanque de combustible, y asegure
el aparato antes de guardar o
transpcrtar en un vehiculo.
• No almacene el aparato ni el
combustible dentro de un &tea cerrada
donde los vapores del combustibles
entren en contacto con chispas y
llamas abiertas procedentes de
calentadores de agua, motores e
interruptores el_ctricos, calefactores
centrales, etc.
• Almacene el aparato de manera que
la cuchilla no pueda causar heridas
accidentales.
• Almacene en un lugar seco fuera del
alcance de los niSos.
AVISO ESPECIAL: Su podadora de
setos viene equipada con silenciador
limitador de temperature y con rejilla
antichispa que cumple los requisitos de
los C_digos de California 4442 y 4443.
Todas las tierras forestadas federales,
m_,s los estados de California, Idaho,
Maine, Minnesota, Nueva Jersey,
Washington, y Oreg6n, requieren pot ley
que muchos motores de combusti6n
interna est_n equipados con rejilla
antichispa. Si usted usa una podadora
de setos en un estado y otra Iocalidad
donde existen tales reglamentos, usted
tiene la responsabilidad juridica de
mantener estas piezas en correcto
estado de funcionamiento. De Io
contrario, estar& en infracci6n de la ley.
Para el uso normal del duer_o de la
casa, el silenciador y la rejiila antichispa
no requerir&n ning=3nservicio. Despues
de 50 horas de uso, recomendamos que
al silenciador se le de servicio o sea
substituido por su Centro de Servicio
Sears.
AVISO DE SEGURIDAD: Estar
expuesto a vibraciones a trav_s del
uso pro- Iongado de herramientas
manuales a gasolina puede causar
daSo en los vasos sanguineos o los
nervios de dedos, manos y coyunturas
a personas propensas a los trastomos
de la circulaci6n o alas hichazones
anormales. El uso prolongado en
tiempo de clima fr{o ha sido vinculado
a dafios en los vasos sanguineos de
personas que por otra parte se
encuentran en perfecto estado de
salud. Si ocurrieran sintomas como el
entumecimiento, dolor, p_rdida de
fuerza, cambios de color y textura de la
piel, p_rdida del tacto en las manos,
dedos o coyunturas, descontinue el
uso de este aparato y busque ayuda
m_dica. Un sistema anti-vibratorio no
garantizar& que se eviten tales
problemas. Los usuarios que operan
herramientas de fuerza de manera
prolongaria y regular, deber&n vigilar
de cerca su condiciSn fisica y la
conriici6n de su aparato.
CONTENIDO DE LA CAJA
Usa la siguiente lista para virificar que
todas las piezas hayan sido incluidas:
Modelo 358.795390
• Podadora de Setos
• Aceite de Motor a 2 Tiempos
AVISO: Es normal oir que el flltro de
combustible golpetee cuando el tanque
se encuentre vacio.
-18-
MONTAJE
No ser& necesario
de montaje.
hacer nung_n tipo
CONOZCA
SU PODADORA
SE SETOS
LEA ESTE MANUAL DEL USUARIO Y LAS REGLAS DE SEGURIDAD ANTES DE
COMENZAR A USAR ESTE APARATO. Compare las ilustraciones con su aparato
para familiarizarse
con la ubfcacibn de los varios controles y ajustes Guarde este
manual para uso futuro.
Interruptor
ON/OFF "_
Cebador
Bombeador
Bujia
Gatillo
Acelerador
Cuerda de
arranque
Silenciador
INTERRUPTOR
ON/OFF
Se usa el INTERRUPTOR ON/OFF para
detener el motor. Para detener el motor, mueva
OFF.
el interruptor
a la posici6n
CEBADOR
El CEBADOR ayuda a suministrar
combustible al motor para facilitar el
arranque cuando el motor est_ ffio.
Accione el cebador rnoviendo la palanca
a la posici6n deseada. Vea la secci6n
ARRANQUE DELMOTOR para obtener ]a
informaci6n completa sobre el arranque
del motor.
ANTES DE PONER EN MARCHA EL
MOTOR
A0&ADVERTENCIA:
Aseg_rese de
leer la informaci6n relacionada con el
combustible en las reglas de seguridad
antes de comenzar. Si usted no
entiende las reglas de seguridad, no
intnete abastecer el aparato. Por favor
Ilame al 1-800-235-5878.
ABASTECIMIENTO
DEL MOTOR
Este motor est& habilitado para
funcionar con gasolina sin plomo.
Antes de comenzar, se deber& mezclar
la gasolina con un aceite de buena
calidad para motores de 2 tiempos
enfriados a aire. Recomendamos
el
aceite de la marca Craftsman.
Mezcle
la gasolina con el aceite en la
proporci6n 40:1 (Se obtiene una
proporci6n de 40:1 mezclando 3.2
onzas de aceite con cada gal6n de
gasolina sin plomo). NO USE aceite
-19-
BOMBEADOR
El BOMBEADOR es usado para remover
aire de el carburador y de las Ifneas de
combustible y las Ilena de mezcla de
combustible. Esto le permite poner el
motor en rnarcha con menos tirones de
la cuerda de arranque. Active el
bombeador apret&ndolo y huego
dej&ndo que retome su forma original.
GATILLO ACELERADOR
El GATILLOACCELERADORcontrola la
velocidad del motor. Apriete el gatillo
para m&xima vetocidad; suelte el gati]lo
para volver a la marcha lenta.
para autom6vil ni para barcas. Estos
aceites daSar&n el motor. AI mezclar el
combustible, siga las instrucciones
impresas en el recipiente de aceite.
Una vez aSadido el aceite a la
gasolina, agite el recipiente
brevemente para asegurarse que el
combustible est_ completamente
mezclado. Siempre lea y siga las
instrucciones de seguridad que tienen
que vet con el combustible antes de
abastecer el aparato.
IMPORTANTE
La experiencia
indica que los combustibles mezclados con alcohol (los
Ilamados gasohol o los que tienen
etanol o metanol) pueden atraer la hu• medad, Io que puede causar la
separaci6n y la formaci6n de _cidos
durante el almacenaje.
Para evitar
problemas
con el motor, deber__
vaciarse el sistema de combustible
1, Accione
antes de almacenar el aparato por 30
dias o m_is, Vacie el tsnque de
combustible, ponga el motor en
marcha y d_jelo en marcha hasta que
las lineas de combustible y el
carburador queden vacios. Use
combustible fresco la prbxima
temporada. Vea ka secc'_6n de
ALMACENAJE pars informaci6n
adicional.
POSICION
• apriete y sostenga
acelerador
• presione y sostenga
del acelerador
el gatillo
el cierre
• suelte el gatillo acelerador
Mantenga el cierre de/acelerador
accionado hasta que e/motor
marche sin prob/emas.
2. Aseg_rese
de que el interruptor
est_ en la positibn ON.
ON OFF
Proteccibn
p.ara los
ojos
, _;._'
si-
instruc-
• presione la pieza de abertura
del cierre del acelerador
DE USO
!.
el cierre del acelerador
guiendo las siguientes
clones:
i
PARA DETENER EL MOTOR
• Pars detener el motor, mueva el )nterruptor a la posicibn OFF.
3. Oprima lentamente
el bombeador
6
veces.
4. Mueva la palanca del cebador a la
posici6n FULL CHOKE.
Cebador
ANTES DE PONER EN MARCHA EL
MOTOR
• Abastezca el motor. Al_jese por Io menos 3 metros (10 pies) del brea de
abastecimiento.
• Sostenga
posici6n
Apoye el
chilla no
_.rboles,
el aparato en el suelo en la
de arranque como se ilustra.
aparato de manera que la cuIlegue al suelo y alejada de
arbustos, espectadores,
etc.
ARRANQUE
DE MOTOR
motor caliente despu_s
sin combustible)
FRIO (o de
de quedar
Cierre del
Abetura del Cierre
Acelerador"_
det Acelerador
Gatillo _
Acelerador
/
Bombeador
5. Tire firmemente
del mango de la
cuerda de arranque de 6 veces.
AVISO: El motor puede que suene
como si quisiera arrancar antes del
sexto tir6n e la cuerda de arranque.
Si
es asi, pase al siguiente paso de
inmediato.
6. Mueva la palanca del cebador a la
posici6n HALF CHOKE.
7. Tire del mango de la cuerda de arranque hasta que el motor se ponga en marcha, pero no m&s de 6
veces.
AVISO: Si el motor no arranca despu_s de haber tirado de la cuerda de
arranque 6 veces (con la palanca del
cebador en la posici6n HALF CHOKE),
- 20 -
verifique que el interruptor ON/OFF y la
palanca del cebador se encuentren el
la posicibn correcta. Luego, mueva la
palanca del cebador a la posicibn FULL
CHOKE y oprima el bombeador
6
veces; tire de la cuerda de aranque
otras dos veces.
Mueva la palanca del
cebador a la posicibn HALF CHOKE y
tire de la cuerda de arranque hasta
que el motor se ponga en marcha,
pero no tire de la cuerda por m&s de 6
veces.
AVISO: Si el motor no arranca,
probablemente
se encuentre ahogado.
Proceda con las instrucciones
de
ARRANQUE DE MOTOR AHOGADO.
8. Permita que el motor marche por 10
segundos, entonces mueva la palanca del cebador a la posicibn OFF
CHOKE. Permita que el motor
marche por otros 30 segundos con
la palanca en la posici6n OFF
CHOKE, entonces suelte el cierre
del acelerador
apretando y luego
soltando el gatillo acelerador.
AVISO: Si el motor se cala con la
palanca del cebador en la posici6n
OFF CHOKE, mu_vala a la posicibn
HALF CHOKE y tire de la cuerda de
arranque hasta que el motor se ponga
en marcha.
9. Para detener el motor, mueva el interruptor
ARRANQUE
a la posici6n OFF.
DE MOTOR CALIENTE
1. Asegurese de que el interruptor se
encuentre en la posici6n ON.
2. Mueva la palanca del cebador a la
posici6n HALF CHOKE.
_iL ADVERTENCIA:
tenance except
Disconnect
for carburetor
the spark plug before
adjustments.
RESPONSABILIDAD
DEL CONSUMIDOR
TAREA
Y MANTENIMIENTO
DE CUIDADO
3. Accione el cierre del acelerador
como se instruye el la seccibn ARRANQUE DE MOTOR. Mantenga el
cierre del ace/erador accionado
hasta que el motor marche sin problemas.
4. Tire firmemente de la cuerda de arranque hasta que el motor se ponga en marcha, pero no m&s de 5
veces.
5. Permita queet motor marche por 10
segundos, entonces, mueva la palanca del cebador a la posicibn OFF
CHOKE. Suelte el cierre del acelerador apretando y soltando el gatillo
acelerador.
AVISO: Si el motor no se ha puesto en
marcha, tire de la cuerda de arranque
otras 5 veces. Si el motor no se pone
en marcha, probablemente se encuentre
ahogado. Proceda con la secci6n
ARRANQUEDE MOTORAHOGADO.
ARRANQUE DE MOTOR AHOGADO
Un motor que se encuentre ahogado
podr_, ponerse en marcha moviendo el
interruptor a la posici6n, on y la
palanca del cebador a la posiciSn OFF
CHOKE; luego, tire de la cuerda de
arranque para aclarar el motor del
exceso de combustible.
Que el motor se ponga en marcha
podrb,significar que se tire de la
cuerda de arranque muchas veces,
dependiendo cu_.nahogado se
encuentre el motor. Si el motor no
arranca despu_s de este
procedimiento, vea la TABLA
DIAGNOSTICA o Ilame al
1-800-235-5878.
performing
CUANDO
main-
HACER
Verifique que no haya piezas ni fijadores sueltos
Antes de cada uso
Verifique que no haya piezas d_adas
Antes de cada uso
o gastadas
Inspeccione y limpie el aparato y las placas
Limpie el filtro de aire
Despu_s de cada uso
Cambie la bujia
Cambie el filtro de combustible
Anualmente
Cada 5 horas de uso
Anualmente
-21
-
RECOMENDACIONES GENERALES
La garantia de este aparato no cubre
piezas que hayan sido sometidas a la
negligencia ni al maltrato del usuario.
Pare recibir el valor completo de la
garantia, el usuario deber_ mantener el
aparato como se instrye en este
manual. Ser& necesario hacer varios
ajustes peri6dicos para mantener el
aparato apropiadamente.
VERIFICAR QUE NO HAYA PIEZAS
NI FIJADORES SUELTOS
• Cubierta de la bujia
• Filtro de aire
• Tornillos de la caja
VERIFICAR QUE NO HAYA
PIEZAS DANADAS O GASTADAS
El contacto Centro de Servicio Sears
pare el reemplazo de piezas daSadas
o gastadas.
• Interruptor ON/OFF - Aseg(_rese de
que el interruptorON/OFF funcione
correctamente colocdndolo en la
posici6n OFF. Asegllrese de que el
motor se detenga; luego, vuelva a
arrancar el motor y continue.
• Tanque de Combustible - Deje de
usar el aparato si hay seSales de
daSos o p_rdidas en el tanque de
combustible.
INSPECCIONE Y LIMPIE EL
APARATO Y LAS PLACAS
• Despuds de que cada uso, inspeccione la aparato completa para saber
si hay piezas flojas o da_ados.
Limpie el aparato y sus placas usando u trapo h0medo con detergente
suave.
• Seque el aparato con un trapo limpio
y seco.
LIMPIE EL FILTRO DE AIRE
_ire
Tape del Filtro de Aire
Limpie el filtro de aire:
Los filtros de aire sucios disminuyen la
vide _til y el rendimiento del motor e
incrementan el consumo de
combustible.
t. Lirnpie la tapa y la superficie alrededor de la tape para evitar que caiga
suciedad o desechos en el carburador cuando se saque la tape.
2. Retire las piezas como se ilustra.
AVISO: No limpie el filtro de aire con gasolina ni cualquier otto solvente inflamable. De Io contrario, se podHa crear peligro de incendio o produciremiciones
evaporativas nocivas.
3. Limpie el filtro con agua y jab6n.
4. Permita que el filtro se seque.
5. Aplique varias gotas de aceite al filtro; exprima el filtro pare distribuir el
aceite.
6. Reponga las piezas.
CAMBIE LA BUJIA
Deber& cambiarse la bujia anualmente
para asegurarse que el motor arranque
f&cilmente y tenga un mejor
rendimiento. Ajuste la separaci6n de
los electrodos a 0,025 de pulgada. El
encendido es fijo e inalterable,
1. Gire y saquela cubierta de la bujia.
2. Retire la bujia del cilindro y deskchela.
3. Cbmbiela por una bujia Champion
RC.,J-SYy ajuste la bujfa nueva con
una Ilave de cubo de 3/4 de pulgada
(10 a 12 libras/pie).
4. Instale nuevamente la cubierta de
la bujia.
CAMBIE EL FILTRO DE
COMBUSTIBLE
Pare cambiar el filtro de combustible,
vacie por completo el tanque de combustible, entonces, remueva la tapa Y
retentor del tanque. Tire del filtro en el
tanque y remuevalo de la linea de
combustible. Instale un filtro de
combustible nuevo en la linea de
combustible
piezas.
- 22 -
y vuelva a instalar las
TornUlode bajas
revoluciones
Recomendamos que todo servicio y
ajuste no descrito en este manual sea
efectuado por su Centro de Servicio
Sears.
Tornillo para la
marcha lenta
AJUSTE AL CARBURADOR
El ajuste del carburador es de
primordial importancia. Si se hace
incorrectamente,
puede daSar tanto el
motor como el carburador
permanentemente.
Si necesita ayuda
o no est& seguro de como hacer este
procedimiento, Ilame al nSmero
1-800-235-5878.
El combustible vencido, el flltro de aire
sucio, el filtro de conbustibie sucio o el
motor ahogado pueden dar la
impresi6n de carburaci6n desajustada.
Verifique estas condiciones antes de
hacer cualquier ajuste al carburador.
• El motor no anda en marcha lenta.
Vea MARCHA LENTA bajo el procedimiento de ajuste.
• El motor se para o se cala cuando
debe acelerar. Vea VERIFICACION DE
ACELERACION bajo el procedimiento
de ajuste.
• P_rdida de potencia, Vea MEZCLA
bajo el procedimiento
de ajuste.
PROCEDIMIENTO
DE AJUSTE
PRECAUClON:
AI hacer ajustes no
fuerce las tapas limitadoras de pl&stico
m&s all& de los retenedores o podria
haber da_os.
Procedimiento
Inicial
1. Gire el tornillos de ajuste de mezcla
(L y H) hacia la izquierda hasta que
se detenga.
2. Gire el tornUlo de marcha lenta hacia la derecha hasta que se detenga. Luego, girelo hacia la izquierda
4 vueltas y media.
3. Ponga el motor en marcha, d_jelo
en marcha por 3 minutos y proceda
con la secci6n de ajustes. Si el motor no arranca, vea la TABLA
DIAGNOSTICA o Ilame al
1-800-235-5878.
H
Tornino para
altas revoluclones
Tornillos con tapas limitadoras
L
_(_/_(_
Marcha Lenta
Deje el motor en marcha lenta. Si la
cuchilla se mueve, la marcha lenta es
demasiado r&pida. Si el motor se para,
la marcha lenta es demasiado lenta.
• Gire el tornillo =IDLE" hacia la derecha para aumentar la marcha lenta.
• Gire el tornillo "IDLE" hacia la izquierda para reducir la marcha lenta.
ADVERTENCIA:
Veriflque la
marcha lenta despu_s de cada ajuste.
La cuchilla no deber& moverse en
marcha lenta para evitar accidentes de
gravedad al usuario o a otras
personas.
Mezcla de Bajas Revoluciones "L"
1. Deje el motor en marcha lenta.
2. Gire el tornillo de las bajas revoluclones "L" hacia la derecha hasta
que la velocidad empiece a disminuir.
3. Gire el tornillo de las bajas revoluciones "L" hacia la izquierda hasta
que la velocidad aumente y luego
empiece a disminuir nuevamente.
No intente girar los tornillo m&s all&
de los retenedores ya que daSos
podHan ocurrir.
4. Coloque el tornillo para bajas revoluciones "L" en un punto intermedio
entre las dos posiciones anteriores.
- 23 -
Vuelva a ajustar la marcha lenta (vea
AJUSTE DE LA MARCHA LENTA).
Mezcla para Altas Revoluciones "H"
PRECAUCION: No use el motor con el
aceleradora fondo por prolongados
periodos de tiempo mientras se
encuentre haciendo los adjustes de
altas revoluciones y que daSos al
motor podrian ocurrir. Ajuste el tornillo
de altas revoluciones por incrementos
de 1/16 de vuelta cada vez. Un 1/16 de
vuelta es alrededor del mismo
di&metro que la renura que se
encuentra en la parte superior del
tornillo.
1. Deje el motor en marcha lenta.
2. Apriete el gatillo acelerador
completamente. Gire el tornillo de attas revoluciones
"H" hacia la izquierda
hasta que se detenga.
'I_ADVERTENCIA:
Realice los
siguientes pasos despu_s de cada
USO:
• Permita que el motor se enfrle y fije
bien el aparato antes de guardarlo o
transportarlo.
• Guarde el aparato y el combustible
en un lugar bien ventilado donde los
vapores del combustible no puedan
entrar en contacto con chispas ni
llamas abiertas provenientes de
calentadores de agua, motores o
interruptores el_ctricos, calefactores
centrales, etc.
• Guarde el aparato con todos los
protectores en su iugar y col6quelo
de modo que las piezas filosas no
puedan causar heridas por
accidente.
• Guarde el aparato y el combustible
enun lugar seguro y completamente
fuera del alcance de los ni_os.
Prepare el aparato para almacenarlo al
final de la temporada o si no Io va a
usar por mas de 30 dias.
SUPERFICIES EXTERNAS
• Siva a almacenar el aparato durante
un periodo largo de tiempo, limpielo
3. Gire el tornillo de altas revoluciones
"H" la cantidad minima permitida
hacia la derecha hasta que el motor
marche sin problemas.
Despu_s de terminar ajustes, verifique
de aceleraci6n y movimiento de la cuchilla en la marcha lenta. Reajuste en
caso de necesidad.
Verificacibn de Aceleracibn
Si el motor trata de parar en vez de
acelerar, gire el tomillo de la mezcla
para bajas revoluciones "L" en contra
del sentido del reloj hasta que la aceleraci6n sea estable y ningSn movimiento de la cuchilla durante marcha
lenta.
PRECAUClON: Si el motor no marcha
de acuerdo con estas instrucciones
despu_s de repetir los pasos de ajuste,
no use el aparato. Ll_velo a su Centro
de Servicio Sears.
rigurosamente antes de guardarlo.
Gu_rdelo en un lugar iimpio y seco.
• Aplique una pequeSa cantidad de
aceite alas superficies externas
met&licas, inclusive la cuchilla.
Para aplicar aceite a ia cuchilla, haga
Io siguiente:
• Detenga el motor y permita que la
cuchilla se detenga por completo.
• Desconecte el cable de la buj_a.
• Limpie todas las piezas y verifique
que no haya dar3os. Permita que
piezas daSadas sean reparadas o
reemplazadas por su Centro de
Servicio Sears.
• Aplique una peque_a cantidad de
aceite de m&quina alrededor del borde
de la banda superior como se ilustra.
- 24 -
Banda superior _
^ (_
SISTEMA DE COMBUSTIBLE
Vea el mensaje marc,ado como
IMPORTANTE, que se refiere al uso de
combustibles con mezcla de alcohol en
su aparato, en la seccibn de USO, bajo
ABASTECIMIENTODEL MOTORen este
manual.
Los estabilizadores de combustible son
una alternativa aceptable para minimizar
la formaci6n de dep6sitos de gorna durante el almacenaje. Ar3ada estabUizador
a la gasolina en el tanque de combustible o en el recipiente para almacenar el
mismo. Siga las instruccionesde mezcla
que se encuentran impresas en el
envase. Ponga el motor en marcha y
d_jelo en marcha por unos 5 minutos
despu_s de habede puesto estabilizador.
El aceite Craftsman 40:1 para motores
de 2 tiempos (enfriados a aire) viene
rnezclado con estabilizador de
combustible. Si no se usa este aceite
de Sears, usted podr& a_adir estabilizador al tanque de combustible.
INTERIOR DEL MOTOR
• Retire la bujla y vierta una cucharadita de aceite 40:1 para motores a 2
tiempos (enfriados a aire) por la
abertura para la bujia. Lentamente,
tire de la cuerda de arranque de 8 a
10 veces para distribuir el aceite.
• Cambie la bujia por una nueva del
tipo y de la gama de calor
recornendados.
• Limpie el flltro de aire.
• Examine toda el aparato para verificar
que no haya tornillos,tuercas ni pernos sueltos. Cambie todas las piezas
daSadas, quebradas o gastadas.
• AI principio de la prbxima temporada,
use exclusivamente combustible
fresno con la proporci6n correcta de
gasolina a aceite.
OTROS
• No guarde la gasolina de una temporada a la prbxima.
• Cambie el recipiente de gasolina si
_ste se empieza a oxidar.
- 25 -
TABLA
DIAGNOSTICA
ADVERTENCIA:
imiento,
Desconecte
la bujfa antes de hacer cualquier mantencon la excepci6n de los ajustes al carburador.
SINTOMA
El motor no
arranca.
CAUSA
1. El motor se encuentra
ahogado.
2. El tanque de combustible
est& vacio
3. La bujia no est& haciendo
chispa.
4. El combustible no est&
Ilegando al carburador.
5. Baja compresi6n.
El motor no
mantiene
debidamente la
marcha lenta
El motor no
acelera, le falta potencia, o
se para bajo
carga.
El motor
se calienta
demasiado.
1. Vea las =Arranque de Motor Ahogado'
en la secci6n Uso.
2. Uene el tanque con la mezcla
correcta de combustible.
3. Instale una bujia nueva.
4. Verifique que el flltro de combustible
no est_ sucio; c&rnbielo. Inspeccione
la linea de combustible; rep&rela o
c&mbiela si se encuentra partida o
torcida.
5. Entre en contacto con su Centro de
Servicio Sears.
1. El carburador requiere ajuste.
2. Las juntas del cigEeEal
est&n gastadas.
3. Baja compresi6n.
1. Vea la secci6n Servicio y Ajustes.
2. Entre en contasto con su Centro de
Servicio Sears.
3. Entre en contacto con su Centro de
Servicio Sears.
1. Filtro de aJre sucio.
1. Umpie o cambie el filtro de aire.
2. Limpie o cambie la bujia y recalibre le
separacibn.
3. Vea la secci6n Servicio y Ajustes.
2. La bujia est& carbonizada.
3. El carburador requieire
ajuste.
4. Carbonizaci6n.
5. Baja Compresi6n.
El motor humea excessivamente.
SOLUCION
4. Entre en contacto con su Centro de
Servicio Seam.
5. Entre en contacto con su Centro de
Servicio Sears.
1. El cebador est&
parcialmente activado.
2. La mezcla de combustible
est,_ equivocada.
2. Vacie el tanque de combustible
II_nelo con la mezcla correcta.
3. Filtro de aim sucio.
4. El carburador requiere ajuste.
3. Limpie o cambie el filtro de aJre.
4. Vea la seccibn Servicio y Ajustes.
1. La mezcla de combustible
est& equivocada.
2. La bujia no es la que cor
responde.
3. El carburador requiere
ajuste.
4. Carbonizaci6n.
1. Ajuste el cebador.
1. Vea "Abastecimiento
del Motor".
2. Cambie por la bujia correcta.
3. Vea la seccion Servicio y Ajustes.
4. Entre en contacto con su Centro de
Servicio Sears.
Si ocurrieran situaciones
que no hayan sido cubiertas pot este manual, sea cuidadoso y use el buen sentido.
Si necesita ayuda, entre en contacto con su Centro
de Servicio Sears o Ilame la nEmero de Ayuda al Consumidor
al 1-800-235-5878.
- 26 -
SUS DERECHOS
Y OBUGACIONES
DE GARANTIA:
La Agencia de Protecci6n Ambiental de los Estados Unidos y Sears, Roebuck and Co., U.S.A.,
se complacen en explicarle la garanfia
del sistema de control de emisiones en
el motor de su equipo de jardln y
c_sped. Todos los motores de equipo
utilitario, de c_sped y jardfn nuevos
deberbn ser dise_ados, construidos y
equipados para satisfacer las normas
rigurosas en contra de la contaminaci6n del ambiente. Sears deberb garantizar el sistema de control de emisi6n en el motor del equipo de cesped
y jardin por los periodos de tiempo enumerados a continuaci6n, estipulando
que no haya habido ning_n tipo de
abuso, negligencia, o mantenimiento
no apropiado del motor de su equipo
de c_sped y jardfn. Su sistema de
control de emisi6n incluye piezas tales
como el carburador y el sistema de ignici6n. Cuando existe una condici6n
bajo garanfia, Sears repararb el motor
de su equipo de c_sped y jardin sin
costo alguno para usted. Los gastos
cubiertos bajo garantia incluyen
diagn6stico,
piezas y servicio. CUBIERTA DE GARANTIA
DEL FABRICANTE: Si cualquier pieza relacionada
con la emisi6n en su motor (como se
enumeran en la Lista de Piezas de
usted debe saber que Sears puede negarle la cubierta de garant|a si el motor
de su equipo de c_sped y jardin o una
pieza del mismo, ha fallado debido al
abuso, negligencia,
mantenimiento
no
apropiado,
modificaciones
sin aprobaci6n, o el uso de Ibiezas que no han
sido hechas o aprobadas
por el fbricante original del equipo. Usted ser_l el
responsable
de pre-sentar
el motor del
equipo de c_sped y jardfn a un centro
de reparaciones
autorizado
Sears tan
pronto como surjaa el problema.
Las
reparaciones
bajo garantfa deber&n
ser completadas
en una cantidad razonable de tiempo, no excediendo
los
30 d{as. Si cuenta con alguna pregunta en referencia
a sus derechos y responsabilidades,
usted deber& entrar
en contacto con su centro de servicio
autorizado
m&s cercano o Ilamar a
Sears al 1-800-473-7247.
FECHA
DEL COMIENZO
DE LA GARANTIA:
El periodo de garantia comienza en la
fecha en que se compr6 el motor del
equipo de c_sped yjardfn.
DURACION DE LA GARANTIA:
Esta garant_a tiene un periodo de cubierta de
dos afios desde la fecha inicial de
compra.
QUE CUBRE: REPARACLONES O REEMPLAZO
DE PIEZAS.
tal pieza relacionada
con la emisi6n,
esta pieza ser& reparada o reemplazada por Sears. GARANTIA
DE RESPONSABILIDAD
DEL DUENO:
Las reparaciones o reemplazo de cualquier pieza en garantia ser&n efectuadas sin cargo alguno para el dueSo en
un centro de servicio Sears aprobado.
Si tiene alguna pregunta en relaci6n
con sus derechos y responsabilidades
de garantia, usted deber& comunicarse
con su centro de servicio autorizado
m&s cercano o Ilamar a Sears al
1-800-473-7247.
PERIODO DE GA-
Como duello del equipo de c_sped y
jardln, usted es responsable
del mantenimiento
requerido indicado en el
Manual del Usuario.
Sears recomien-
RANTIA: Cualquier pieza bajo garant_a
que no est_ programada
para set reemplazada
como requisito del programa de mantenimiento,
o la cual est_
da que guarde todos los recibos que
cubren el mantenimiento
del motor de
programada para ser inspeccionada de
forma regular para efectos de "reparaciones o reemplazos si es necesario"
deber_ garantizarse por dos aSos. Cualquier pieza garantizada qiJe est_ programada para set reemplazada como
Io es requerido por el programa de
mantenimiento,
deber_ ser garantizada
Control de Emisi6n Bajo Garanfia) se
encontrara
defectuosa
o un defecto en
los materiales o mano de obra del motor causara el mal funcionamiento
de
su equipo de c_sped y jardin, pero
Sears no puede negar la garantfa 6nicamente por la falta de recibos o por el
incumplimiento
de las indicaciones
de
mantenimiento.
Como dueSo del motor del equipo
de c_sped
y jardin,
- 27 -
pot el periodo de tiempo hasta el primer cambio programado para el reemplazo. DIAGNOSTICO: No se deber&
cargar al dueho ning_n tipo de recargos por el servicio de diagn6stico el
cual nos conduce a la determinaci6n
de que una pieza bajo garantia est&
defectuosa, si el trabajo de diagnbstico
ha sido Ilevado a cabo en un centro de
servicio Sears aprobado. DA_IOS POR
CONSECUENCIAMAGES:
Sears
puede ser responsable por da_os a
otros componentes del motor causados por el fallo de una pieza garantizada mientras _sta se encuentre en garantia. QUE NO CUBRE: Todos los
fallos causados por el abuso, la negligencia, o el mantenimiento no apropiado no est&n cubiertos. PIEZAS PARA
AI_IADIR O MODIFICADAS: El uso de
piezas aSadidas o modificadas puede
ser la base para anular la garantfa.
Sears no se hace responsable de cubrir fallos de piezas garantizadas debido al uso de piezas ahadidas o modificadas. COMO ENTABLAR UNA RECLAMACION: Si cuenta usted con alguna pregunta en referencia a sus derechos y responsabilidades de garantia,
usted deber& contactar a su centro de
servicio autorizado m_s cercano o Ilamar a Sears al 1-800-473-7247. EN
DONDE OBTENER SERVIClO DE
GARANTIA: Servicio o reparaciones
de garantia deber& ser provistas pot
todos los centros de servicio Sears,
llame al: 1-800-473-7247. MANTENIMIENTO, REEMPLAZO Y REPARACLONES DE PIEZAS RELAClONADAS
CON LA EMISION: Cualquier pieza de
reemplazo Sears aprobada usada en la
programacibn de cualquier mantenimiento de garantia o reparaci6n de piezas relacionadas con la emisi6n ser_.
provista al due_o sin cargo alguno si la
pieza se encuentra bajo garantia. LISTA DE PIEZAS DE CONTROL DE
EMISlON BAJO GARANTIA: Carburador, Sistema de Ignici6n: Bujia (cubierta _nicamente hasta el periodo del
primer mantenimiento programado),
M6dulo de Ignici6n. DECLARAClON
DE MANTENIMIENTO: El dueSo es
responsable de efectuar todo mantenimiento programado como Io define el
Manual del Usuario.
- 28 -
For repair of major brand appliances in your own home...
no matter who made it, no matter who sold it!
1-800-4-MY-HOME sMAnytime,
day or night
?iii _
_iii_ii_!i_:
(1-800-469-4663)
www.searsocom
,i!i!i!_il
To bring in products such as vacuums,
lawn equipment
and electronics for repair, call for
the location of your nearest Sears Parts & Repair Center.
!i_i!ii_il
1-800-488-1222
Anytime, day or night
_.sears.com
....
....
..........
......................
...........
,=
i
For the replacement parts, accessories and owner's manuals
that you need to do-it-yourself,
call Sears PartsDirect
s_ !
1-800-366-PART 6a.r..11p.m.
CST,
(1-800-366-7278)
7 days a week
www.sears.com/partsdirect
To purchase or inquire about a Sears Service Agreement:
1-800-827-6655
7 a.m. - 5 p.m. CST, Mon. - Sat.
Para pedir servicio de reparaci6n a domicilio,
y para ordenar piezas con entrega a domicilio:
1-888-SU-HOGAR
sM
Au Canada pour service en fran;ais:
1-877-LE-FOYER
sM
(1-877-533-6937)
HomeCentral"
® Sears, Roebuck and Co.
® Registered Trademark / m Trademark of Sears. Roebuck and Co.
® Marca Registrada / _ Marca de Fdbrica de Sears, Roebuck and Co.