1
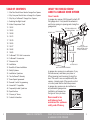
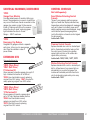
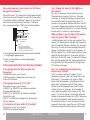
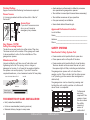
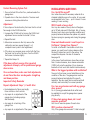
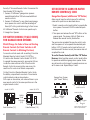
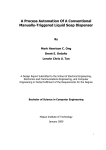
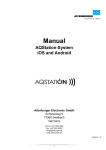
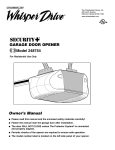
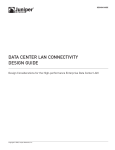
2011 CRAFTSMAN®
Garage Door Openers and
Accessories Reference Guide
TABLE OF CONTENTS:
3
4
5
6
10
13
14
15
16
17
18
19
20
21
22
24
27
28
32
33
35
36
37
39
46
48
50
52
53
2
What You Should Know About a Garage Door Opener
Why Everyone Should Have a Garage Door Opener
Why Buy a Craftsman® Garage Door Opener
Selecting the Right Model
Model Comparison Chart
18452
18453
18458
18473
18570
18455
18477
18489
18405
Craftsman® 315 MHz Accessories
Craftsman® Accessories
Extension Kits
Installation
Benefits of Sears Installation
Safety Systems
Installation Questions
The Craftsman® Warranty
Sears Repair Agreement
Remote Control Programming
HomeLink® Compatible
Frequently Asked Questions
Specifications
Glossary of Terms
Contact Information
TABLE OF CONTENTS
WHAT YOU SHOULD KNOW
ABOUT A GARAGE DOOR OPENER
How it works
A garage door opener (GDO) doesn’t actually lift
the garage door. It only assists the extension
and torsion springs in opening and closing the
garage door.
HEADER WALL
DOOR CENTER
EXTENSION SPRING OR
TORSION SPRING
RAIL
TROLLEY
EMERGENCY
RELEASE HANDLE
MOTOR
A 3-prong grounded
outlet must be within
3 feet of the motor.
ACCESS DOOR
SAFETY REVERSING SENSORS
A garage door opener is an extension of you,
the homeowner, and takes your place in
lifting (opening) and lowering (closing) the
door. The work is now accomplished by the
opener. A simple push of the remote control
or control panel button starts the process.
A garage door opener can be installed on
any residential garage door.
Installation will depend on
the type of door you have.
Doors need to be
well-balanced and
maintained for optimum
safety and efficiency.
WHAT YOU SHOULD KNOW ABOUT
A GARAGE DOOR OPENER
SECTIONAL DOOR
3
WHY EVERYONE SHOULD HAVE A
GARAGE DOOR OPENER
WHY BUY A CRAFTSMAN ® GARAGE
DOOR OPENER
Convenience
Craftsman® is the Number One Selling North
American Retail Brand of Garage Door Openers!
Garage door openers are no longer a luxury item.
Common in most houses today, the garage door
opener welcomes people home and keeps them
from having to lift their garage door by hand.
Here’s Why...
• Exclusive Models
• Rail Systems
Safety
All Craftsman® Garage Door Openers have 2 built-in
safety features:
Automatic Safety Reversing Sensors
Required by Federal Law, an infrared device mounts
inside the garage on each side of the garage door
opening. These sensors send an invisible beam to
each other constantly. If anything or anyone breaks
this beam, the door automatically reverses before
making contact with the object.
Contact Reversal
If the Safety Reversing Sensors are not obstructed
and an object is in the path of the door, the opener
will automatically reverse after making contact with
the object.
• Important Safety Features
• Performance Enhancement Features
• Advanced Remote Controls
• Convenient Accessories
• HomeLink® Compatible
• Designed for Easy Installation
or Sears Professional Installation
• Hassle-Free Warranty Coverage
• Extended Coverage with a
Sears Protection Agreement
Security
Once the garage door is completely closed, it is
securely locked and cannot be forced open. Models
with Security+® Remote Controls also provide the
highest level of code protection available to keep
your home, family and valuables safe.
Reliability
Craftsman® Garage Door Openers are designed to
provide years of dependable service. Sears also
offers a full 1-year labor satisfaction warranty as
well as a specific motor warranty on each model.
4
WHY EVERYONE SHOULD HAVE
A GARAGE DOOR OPENER
WHY BUY A CRAFTSMAN®
GARAGE DOOR OPENER
5
SELECTING THE RIGHT MODEL
IMPORTANT FEATURES
To help each customer choose the best garage
door opener, start by asking these questions:
Drive Systems
Chain
Are you replacing a garage door opener or
is this a brand-new installation?
Research has shown that new customers often
look for models based on performance with few
added accessories.
Experienced consumers will often find value in
models with accessories that provide additional
safety and convenience.
What type of garage door do you have?
One-piece or sectional?
Our openers will work with either.
Do you have a room over the garage?
Is noise an issue?
Belt drive openers are designed for ultra-quiet
operation.
How important is security to you?
Security+® models offer greatest protection.
Is the garage attached to or detached from
the home?
Customers with detached garages often request
more security features.
If there is no access door, customers should
consider an emergency key release (sold separately)
in case of power failure.
How many people will need to access the
garage? Spouse, children, neighbors, family
members?
Different accessories are designed for different
access needs including the Keyless Entry Pad and
additional remote controls.
6
SELECTING THE RIGHT MODEL
Rugged and reliable, chain drive models are
the most popular selling models.
Belt
The quietest type of opener available,
these models feature a high-performance,
steel-reinforced polyurethane drive belt.
Motor
1/2 HP - Powerful enough to lift residential garage doors
up to 10' high (with extension kit).
3/4 HP - Opens garage doors faster than any other chain
drive model available. Powerful enough for today's heavy
wood garage doors.
Rail Systems
Structural Steel Rail (SSR) and Trolley System
• Featured on belt and chain drive openers
• Quick snap together rail makes installation faster
• Black powder paint finish provides scratch
resistance and smoother operation
• Trolley features wear pads for smooth, quiet operation
Lights
Models with one or two lights with 100-watt light bulbs
(not included) are available. High-end models with two
100-watt bulbs can deliver as much as 33% more light
for added safety and convenience.
Opener lights will turn on automatically for 4-1/2
minutes whenever the opener is activated. Models with
Security+® include a safety light feature that also turns
the opener lights on when anything breaks the invisible
beam of the Safety Reversing Sensors. This only occurs
when the door is in the open position and the opener
light is turned off.
IMPORTANT FEATURES
7
MVIS®
Available on select models, the Motor Vibration
Isolation System is designed to eliminate
powerhead vibration, substantially reducing
the overall noise of the opener.
Safety Reversing Sensors and
Contact Reversal
DIP Switch
Used in older garage door openers, codes were set by
matching all DIP switches on the back of the remote to
the DIP switches on the motor back panel.
Standard on all models, the door will automatically
reverse if anything breaks the invisible safety beam
or if the door comes into contact with any object.
(For more information, see page 4)
Billion Code
Emergency Release Handle
Security+® Rolling Code
Standard on all models, it allows you to open the
garage door during power outages.
Warranty
6 and 10-year motor warranties are available
depending on the model, along with the Sears
1-year labour warranty. Belt drive models feature
a lifetime warranty on the belt.
Accessories
All models include various accessories for added
safety, security and convenience. (For detailed
descriptions, see pages 22-27.)
8
REMOTE CONTROL
TERMINOLOGY EXPLAINED
IMPORTANT FEATURES
Remote controls are pre-programmed at the factory
with one of 3.5 billion different codes to eliminate
code duplication.
Just like the name implies, every time the remote control
is activated, the code rolls forward to the next new code.
There are 100-billion rolling codes, never to be repeated
or duplicated.
Important Safety Information
A “code grabber” is a device that thieves use to steal
your remote control code. With your code, they can enter
your garage and potentially your home, if your garage is
attached. Remote controls with Security+® Rolling Code
Technology are designed to access a different code
every time to defeat these “code grabbers” and keep
your family safer and more secure.
IMPORTANT FEATURES
9
Model#
18452
18453
18458
18473
18570
18455
18477
18489
18405
Belt
Chain
Chain
Chain
Chain
Chain
Chain
Belt
Belt
Motor HP
1/2
1/2
1/2
1/2
1/2
3/4
1/2
3/4
DC
Limited
Warranty
6-Year
Motor
6-Year
Motor
6-Year
Motor
6-Year
Motor
6-Year
Motor
10-Year
Motor
10-Year
Motor and
Lifetime Belt
10-Year
Motor and
Lifetime Belt
10-Year
Motor and
Lifetime Belt
•
•
•
•
Drive System
MVIS®
Security+®
•
•
•
•
•
•
•
•
•
Wall Control
Standard
Control
Console
Standard
Control
Console
Premium
Control
Console
Standard
Control
Console
Premium
Control
Console
Premium
Control
Console
Premium
Control
Console
MotionDetecting
Control Console
Smart MotionDetecting
Control
Console
Remote
Control(s)
(2)
1-Function
(2)
3-Function
(2)
3-Function
(2)
3-Function
(2)
3-Function
(2)
3-Function
(2)
3-Function
(2)
3-Function
(2)
3-Function
•
•
•
Wireless
Keyless
Entry Pad
•
Garage Door
Monitor
•
•
(1)
100-Watt
Bulb
(1)
100-Watt
Bulb
(2)
100-Watt
Bulbs
(1)
100-Watt
Bulb
(2)
100-Watt
Bulbs
(2)
100-Watt
Bulbs
(2)
100-Watt
Bulbs
(2)
100-Watt
Bulbs
(2)
100-Watt
Bulbs
Safety
Sensors
•
•
•
•
•
•
•
•
•
Auto-Reverse
•
•
•
•
•
•
•
•
•
Emergency
Release
Handle
•
•
•
•
•
•
•
•
•
Lights (Not
Included)
Laser Garage
Parking Assist
•
Surge
Protector
•
8-ft. Extension
Rail
10
•
CRAFTSMAN® MODELS
CRAFTSMAN® MODELS
11
MODEL 18452
2011 CRAFTSMAN®
Garage Door Openers
1/2 HP CHAIN DRIVE
Rugged and reliable
25% brighter light with one
100-watt light bulb (not included)
• Security+® anti-burglary coding
• Infrared safety sensors
• 6-year motor warranty
• Extension kit for 8' doors -18828
• Extension kit for 10' doors -18840
Includes:
Two singlefunction
remote
controls
12
Standard
control
console
CRAFTSMAN® MODELS
13
MODEL 18453
1/2 HP CHAIN DRIVE
Rugged and reliable
25% brighter light with one
100-watt light bulb (not included)
1/2 HP CHAIN DRIVE
Rugged and reliable
33% brighter light with two
100-watt light bulbs (not included)
• Security+® anti-burglary coding
• Security+® anti-burglary coding
• Infrared safety sensors
• Infrared safety sensors
• 6-year motor warranty
• 6-year motor warranty
• Extension kit for 8' doors -18828
• Extension kit for 8' doors -18828
• Extension kit for 10' doors -18840
• Extension kit for 10' doors -18840
Includes:
Includes:
Two
3-function
remote
controls
14
MODEL 18458
Standard
control
console
CRAFTSMAN® MODELS
Two
3-function
remote
controls
Premium
control
console
CRAFTSMAN® MODELS
15
MODEL 18473
1/2 HP CHAIN DRIVE
Rugged and reliable
25% brighter light with one
100-watt light bulb (not included)
SEARS More Value
MODEL 18570
1/2 HP CHAIN DRIVE
Rugged and reliable
33% brighter light with two
100-watt light bulbs (not included)
• Security+® anti-burglary coding
• Security+® anti-burglary coding
• Infrared safety sensors
• Infrared safety sensors
• 6-year motor warranty
• 6-year motor warranty
• Extension kit for 8' doors -18828
• Extension kit for 8' doors -18828
• Extension kit for 10' doors -18840
• Extension kit for 10' doors -18840
• 20% faster than other Craftsman® 1/2 HP
chain drive models
Includes:
Two
3-function
remote
controls
16
Includes:
Standard
control
console
Garage
door
monitor
CRAFTSMAN® MODELS
Two
3-function
remote
controls
Premium
control
console
Wireless
keyless
entry pad
Surge
protector
CRAFTSMAN® MODELS
17
MODEL 18455
SEARS Best Value
MODEL 18477
3/4 HP CHAIN DRIVE
Rugged and reliable
33% brighter light with two
100-watt light bulbs (not included)
1/2 HP BELT DRIVE
Strong and dependable
33% brighter light with two
100-watt light bulbs (not included)
• Motor Vibration Isolation System – MVIS®
• Motor Vibration Isolation System–MVIS®
• Security+® anti-burglary coding
• Security+® anti-burglary coding
• Infrared safety sensors
• Infrared safety sensors
• 10-year motor warranty
• 10-year motor warranty
• Extension kit for 8' doors -18828
• Lifetime belt warranty
• Extension kit for 10' doors -18840
• Extension kit for 10' doors -18870
• 20% faster than other Craftsman® 1/2 HP
chain drive models
Includes:
Two
3-function
remote
controls
18
Includes:
Premium
control
console
Laser
garage
parking
assist
CRAFTSMAN® MODELS
Two
3-function
remote
controls
Premium
control
console
CRAFTSMAN® MODELS
Wireless
keyless
entry pad
8-ft.
extension
rail
19
MODEL 18489
3/4 HP BELT DRIVE
Strong and dependable
33% brighter light with two
100-watt light bulbs (not included)
• Motor Vibration Isolation System – MVIS®
• Security+® anti-burglary coding
DC BELT DRIVE
w/DieHard® battery back-up inside
33% brighter light with two
100-watt light bulbs (not included)
Strong and dependable
• Patented steel-reinforced polyurethane belt
• Infrared safety sensors
• Structural steel rail and chassis
• 10-year motor warranty
• 10-year motor warranty
• Lifetime belt warranty
• Lifetime belt warranty
• Extension kit for 8' doors -18867
• Extension kit for 8' doors -18828
• Extension kit for 10' doors -18870
• Extension kit for 10' doors -18840
Includes:
Two
3-function
remote
controls
20
MODEL 18405
Includes:
Motiondetecting
control
console
Wireless
keyless
entry pad
Garage
door
monitor
CRAFTSMAN® MODELS
Two
3-function
remote
controls
Smart motiondetecting
control console
CRAFTSMAN® MODELS
Wireless
keyless
entry pad
CRAFTSMAN®
21
CRAFTSMAN® 315 MHz ACCESSORIES
Security+® 315 MHz Accessories
Compatible with all 315 MHz Security+® Rolling
Code Garage Door Openers and Accessories updated
with the Universal Radio Control Conversion Kit.
(For a description of Security+® Rolling Code
Technology, see page 9)
18796
Security+® Universal Radio Control
Conversion Kit
Converts any brand of garage door
opener to rolling code technology.
Includes 3-function remote control
and plug-in receiver.
SECURITY+® UNIVERSAL RADIO
CONTROL CONVERSION KIT–18796
18192
3-Function Compact Security+® Remote Control
Operates up to three garage doors.
Ideal for pocket, purse or keychain. (315 MHz)
Range – 75 ft. maximum.
(Black button remote)
18191
3-Function Security+® Remote Control
Operates up to three garage doors. (315 MHz)
Range – 75 ft. maximum.
(Black button remote)
18195
Security+® Wireless Keyless Entry Pad
Allows garage access without a remote control or key.
Lets you set your own 4-digit entry code or temporary
code to allow access to neighbors and family members.
Keypad with hinged cover mounts to garage door
frame. Cover will indicate 315 MHz. Battery operated.
Operates All Craftsman®, Genie®, Stanley®
and Most Other Garage Door Openers
When the receiver is installed, with every push of
the button your Security+® remote control transmits
a brand-new security code, one of over 100-billion
codes, never to be repeated. The Security+® remote
control operates on one 3-volt lithium battery, installed.
Has 3 Push Buttons
Allows you to operate most garage
door openers (up to 3) and/or optional
Craftsman® lighting accessories.
22
CRAFTSMAN® ACCESSORIES
CRAFTSMAN® ACCESSORIES
23
CRAFTSMAN® ACCESSORIES
Security+® Accessories
Compatible with all Security+® Rolling Code Garage
Door Openers and light controls. (For a description
of Security+® Rolling Code Technology, see page 9)
18792
3-Function Compact
Security+® Remote Control
Operates up to three garage doors.
Ideal for pocket, purse or keychain.
(390 MHz) Range – 75 ft. maximum.
UNIVERSAL ACCESSORIES
18732
Clicker® Universal Remote Control
Replaces a lost or broken remote control, or
complements your existing garage access system.
It is designed to work with a variety of brands of
garage door openers to give you convenient,
secure access to your garage and home. Operate
two different garage door manufacturers and/or
frequencies at the same time. A single coin cell
battery is included.
(Blue button remote)
18733
Clicker® Universal Wireless Keyless
Entry System
18791
3-Function Security+®
Remote Control
Operates up to three garage doors.
(390 MHz) Range – 75 ft. maximum.
(Blue button remote)
18795
Security+® Wireless Keyless
Entry Pad
Designed to work with a variety of brands of garage
door openers to give you convenient, secure access
to your garage and home. It's completely wireless powered by one, 9-volt battery (included), with a
backlit keypad that makes the numbers easy to see,
even in the dark. Easy to program and weatherproof.
Allows garage access without a remote control
or key. Lets you set your own 4-digit entry
code or temporary code to allow access to
neighbors and family members. Keypad with
hinged cover mounts to garage door frame.
Battery operated. (390 MHz)
24
CRAFTSMAN® ACCESSORIES
CRAFTSMAN® ACCESSORIES
25
UNIVERSAL HARDWARE/ACCESSORIES
CONTROL CONSOLES
Not Sold Separately
18745
Garage Door Monitor
Provides added peace of mind by letting you
know if the garage door is open or closed from
any room in the house. Sensor mounted on the
garage door sends a signal to the receiver
inside. A flashing red light on the receiver
shows the door is open, a glowing green
light indicates the door is closed.
Range – 300 ft. maximum.
18752
Emergency Key Release
Designed for garages without a separate
entry door. Allows you to open garage
door from the outside in case of
power failure.
EXTENSION KITS
Chain and belt drive kits
Smart Motion-Detecting Control
Console
“Senses” your presence and turns opener
lights on, hands free! Display indicates time,
temperature and system diagnostic messages
such as if system is on battery power and if
safety reversing sensors are misaligned. Large
control button opens/closes garage door.
Lock button blocks out remote control signals
for extra security.
Included with 18405
Premium Control Console
Replaces standard door control or doorbell push
button. Illuminated push button helps you find
the control even in the dark. Also operates
opener lights and locks out all outside radio
signals while you’re away.
Included with 18455, 18458, 18477, 18570
Motion-Detecting Control Console
18828 (Chain Drive)
18867 (Belt Drive)
8' Extension Kit
Allows openers to handle a garage door up to 8'
high. Includes front section of an SSR rail.
18828: New chain/cable is used, replacing
original from GDO carton. 18867: New belt is
used, replacing original from GDO carton.
Replaces standard door control or doorbell push
button. Infrared sensor turns opener lights on
automatically as you enter the garage. Also
includes an illuminated push button and locks
out all outside radio signals while you’re away.
Included with 18489
18840 (Chain Drive)
18870 (Belt Drive)
10' Extension Kit
Allows openers to handle a garage door
up to 10' high. Replaces header section.
18840: New chain/cable is used,
replacing original from GDO carton.
18870: New belt is used, replacing
original from GDO carton.
26
CRAFTSMAN® ACCESSORIES
CRAFTSMAN® ACCESSORIES
27
INSTALLATION
Always check the condition and balance
of the garage door before installing a
new opener.
Horizontal and vertical reinforcement may
be needed for lightweight garage doors.
DOOR CENTER
HEADER WALL
Slack in chain tension
is normal when garage
door is closed.
EXTENSION SPRING
OR
TORSION SPRING
• If a GDO is installed with the door closed, pull the
emergency release cord to disconnect the trolley
from the rail.
• Raise the door to waist height and let go.
• The door should remain at waist level. If the door
crashes to the ground or flies up to the open
position, the door needs to be properly adjusted.
The door must be corrected before the new
garage door opener is installed.
SAFETY REVERSING SENSORS
Floor must be level
across width of door.
28
INSTALLATION
INSTALLATION
29
How much room do I need to put in a Craftsman®
Garage Door Opener?
You must have a 2" (A) clearance for chain/cable and belt
drives from the door’s highest arc point (B) to the ceiling
to be able to install a Craftsman® opener. In the case of
sectional doors where there is less than 2" clearance,
door clearance brackets (18785) will solve the problem.
Plafond
Ferrure
de linteau
A
Min. 2 po
Can I change the timer for the light(s) on
the opener?
Yes, only if a premium control console is in use.
The time period is pre-set for 4.5 min. There are
4 settings. To change the settings, press and hold
the Lock Button until the light/s blink (about 10
seconds). A single blink indicates the timer is set for
1.5 minutes. Repeat the procedure and the light will
blink twice, resetting the time to 2.5 minutes. Repeat
the process for 3.5 and 4.5 minute settings.
When my door is up, the light of the opener
does not go out. What is wrong?
Rail
INSTALLATION QUESTIONS THAT MUST BE ANSWERED
A safety feature is built into the logic system of the
opener. This feature allows the light of the opener to
turn ON when the IR beam is broken, only when the
door is up. This will allow safe passage through the
garage. This feature is always ON in the opener. To
turn this feature OFF, with the opener light ON, press
and hold the light button for 10 seconds, until the
light turns ON and OFF again. To restore this feature,
start with the opener light ON, then press and hold
the light button for 10 seconds until the light goes
OFF and then ON again.
Is the garage door the only entrance into
the garage?
Can I set a temporary password on my
keyless entry system?
le plus élevé
B Point
de la course
Porte
S’il n’y a pas un dégagement
suffisant au-dessus de la porte,
il vous faudra peut-être un ensemble
de ferrures pour faible dégagement.
A. Horizontal and vertical reinforcement may be needed
for lightweight garage doors.
B. Slack in chain tension is normal when garage
door is closed.
If the answer is yes, you will need:
#18752 emergency release and an extra remote
control for the house
Is the garage door over 7-1/2' tall?
If the answer is yes, you will need:
#18828 (8') or 18840 (10') rail extension available
for chain/cable drive only
#18867 (8') or 18870 (10') rail extension available
for belt drive only
#18477 1/2 HP Belt Drive Garage Door Opener with
8-ft. rail extension
Is the high arc of door within 2" of ceiling?
If the answer is yes, you will need:
#18785 door clearance brackets
30
INSTALLATION
Only if you have a Security+® opener. To set a
temporary password, enter your 4-digit pass code,
then press (*). The opener work light will flash 3
times. Enter the temporary 4-digit password, then
press enter. The opener light will flash 4 times.
Decide to set the temporary pass code for either
number of hours or openings. To set number of
hours, enter the number of hours (up to 255), then
press (*). To set for number of openings, enter the
number of openings/closings (up to 255), then press
(#). Once the temporary code has been used up,
the number of hours or cycles, the opener will not
respond to the code to open the door. BUT the last
temporary code entered will always close the door.
INSTALLATION
31
Finished Ceiling
Support bracket and fastening hardware are required.
• Merchandise is professionally installed by someone
who specializes in garage door openers
Power Source
• The installer is insured (and licensed where necessary)
A 3-prong grounded outlet must be within 3 feet of
the motor.
Access Door
If you don’t have an access
door you will need an
emergency key release.
GARAGE
DOOR
• The installer can answer all your questions
• One-year warranty on installation
• Sears stands behind the entire job
Approved Professional Installers
Local Installer:
Name______________________________________________
LOCK IS
ATTACHED
TO THE
GARAGE DOOR
Address ___________________________________________
Phone _____________________________________________
Key Release (18752)
Safety Reversing Sensor
The photo-eyes are located on either side of the door.
This area as well as the center of the garage will need
to be accessible to allow for the installation of the
garage door opener.
Non-Contact Safety System Test
• Press remote control push button to open door.
• Place opener carton in the path of the door.
Maintenance Parts
Normal installation will take care of lubrication and
tightening bolts. But if a spring, roller or hinge is
damaged or broken, it will need to be replaced before
the opener can work properly. If you don’t have the
required headroom, a low-clearance bracket kit may help.
LOW-CLEARANCE BRACKET KIT
SAFETY SYSTEMS
ROLLER
• Press remote control push button to close the door.
The door should not move more than an inch, and
the opener light will flash, indicating an obstruction.
The garage door opener will not close from a
remote control if the indicator light in either sensor
is off (alerting you the sensors are misaligned or
obstructed).
The garage door can be closed by pressing and
holding the wall control push bar or button until
down travel is completed.
SPRINGS
Torsion Spring
Extension Spring
Professional
service is
required if the
opener closes
the door when
the safety
reversing
sensor is
obstructed
THE BENEFITS OF SEARS INSTALLATION
• Fast, hassle-free installation
• No tax on merchandise (varies by province)
• Reduced delivery charges in many cases
32
INSTALLATION
INSTALLATION
33
Contact Reversing System Test
INSTALLATION QUESTIONS
1. Place a 2x4 laid flat on the floor, centered under the
garage door.
Can I install this myself?
2. Operate door in the down direction. The door must
reverse on striking the obstruction.
Adjustment
If door stops on the obstruction, the travel limit is not set
far enough in the DOWN direction.
3. Increase the DOWN limit by turning the DOWN limit
adjustment screw counter-clockwise 1/4 turn.
4. Repeat the test.
6. If the door now reverses upon contact with the floor,
the travel limit is set too far down. Turn the DOWN
limit screw clockwise slightly.
7. Repeat test steps 1-5.
If the door will not reverse after repeated
adjustment attempts, call for professional garage
door service.
On a sectional door, make sure limit adjustments
do not force the door arm beyond a straight up
and down position.
Important Safety Reminder
Repeat Adjustment Steps 1, 2 and 5 after:
GARAGE DOOR
• Any repair to or adjustment of the
garage door (including springs
and hardware).
Yes. Any door made of wood, steel or fiberglass
up to 18 feet wide and 10 feet high. But, of course,
the door has to be in good working condition and
properly balanced because the opener only assists
the door springs in opening and closing the garage
door.
To install a Craftsman® chain/cable or belt drive
opener, you must have 2 inches clearance from
the door’s highest arc point to the ceiling. The
competition requires 4 inches of clearance.
See page 30.
In the case of sectional doors where there is less
than 2 inches clearance, door clearance brackets
(18785) will solve the problem. (Door clearance
brackets will not work with double track hardware.)
What is the biggest problem with installation?
The most critical issue in most installations is the
condition of the door. The garage door must be
properly balanced and adjusted for smooth
operation. The door must also be reinforced both
vertically and horizontally for normal operation.
Can I use an extension cord with my garage
door opener?
No. A 3-prong grounded electrical outlet must
be available to accept the garage door opener
plug directly.
If I have twin garage doors, do I need
separate operators?
• Any repair to or buckling of the
garage floor.
Yes. You will need an opener for each door.
• Any repair to or adjustment of the opener.
34
Will it handle a heavy door?
How much headroom do I need to put in a
Craftsman® Garage Door Opener?
5. When door reverses on the 2x4, remove the
obstruction and run opener through 1 or 2
complete travel cycles to test adjustment.
• Each adjustment of door arm length,
force controls or limit controls.
Yes. Instructions and all necessary materials for a
standard installation are in the carton. All you need
are household tools. Time – up to 5 hours: 2 hours
reading, 3 hours working.
2x4 Laid Flat
INSTALLATION
Will I need an extension kit?
Only if the garage door exceeds 7.5 feet in height.
INSTALLATION
35
THE CRAFTSMAN ® WARRANTY
SEARS REPAIR AGREEMENT
Full 1-Year Warranty on Garage Door Openers
Comfort in knowing you are covered with a Repair
Agreement should you have any repair issues with
your Craftsmen product.
For 1 year from the date of purchase, Sears will repair
this garage door opener free of charge if defective in
material or workmanship.
Limited Warranty on 1/2 HP Motor (6-year)
After 1 year and through 6 years, if the motor on
the garage door opener is defective, Sears will furnish
a replacement motor free of charge.
You pay the labour. (Chain drive models only)
Limited Warranty on 1/2 HP Motor (10-year)
Belt Model 18405, 18477
Lifetime Warranty on Belt, Model 18405,
18489, 18477
Limited Warranty on 3/4 HP Motor (10-year),
Model 18455 & 18489
Limitation on Liability
SEARS WILL NOT BE LIABLE FOR LOSS OR DAMAGE TO
PROPERTY OR ANY INCIDENTAL OR CONSEQUENTIAL LOSS OR
EXPENSE FROM PROPERTY DAMAGE DUE DIRECTLY OR
INCIDENTALLY FROM THE USE OF THIS PRODUCT. Some
provinces do not allow the exclusion or limitation of incidental
or consequential damages, so the above limitation or exclusion
may not apply to you.
Put your comfort and safety in the hands you trust
with Sears.
For details or call 1-800-361-6665.
Your Craftsman manufacturer warranty has a 1 Year
term. Sears offers 3 and 5 year Repair plans that
provides comfort in knowing your protection
continues as the product ages. The 3 year plan
for .10 per day can offer you trust that you are
protected if something should go wrong.
Repair Agreement
Coverage – PA
Craftsman Manufacturer
Warranty – W
Years of Ownership
1
2
3
4
5
1. Payback Feature Coupon.
RA
RA
RA
RA
RA
2. Parts required due to
defects in materials or
workmanship.
W
W
RA
RA
RA
RA
RA
RA
RA
RA
W
RA
RA
RA
RA
THIS WARRANTY DOES NOT COVER LIGHT BULBS or repair parts
necessary because of operator abuse or negligence, including the
failure to install, adjust and operate this garage door opener
according to the instructions contained in the owner’s manual.
3. Service by certified
technician required due
to defects in materials
or workmanship.
WARRANTY SERVICE IS AVAILABLE BY SIMPLY CONTACTING THE
NEAREST SEARS SERVICE CENTER/DEPARTMENT IN CANADA. This
warranty applies only while the product is in use in Canada. This
warranty gives you specific legal rights, and you may also have
other rights, which vary from province to province.
4. Most parts & service
required for proper
operation not covered
by the warranty.
W
RA
RA
RA
RA
These products also qualify for the Sears Protection Agreement.
Sears Canada Inc.
Toronto, ON M5B 2B8
Canada
6. Service Call Centre
RA
available at 1-800-361-6665.
RA
RA
RA
RA
6. Transferability.
RA
RA
RA
RA
RA
Repair Agreement covers parts and service
not covered by Warranty.
36
THE CRAFTSMAN® WARRANTY
SEARS REPAIR AGREEMENT
37
PROTECTION AGREEMENT COVERAGE
REMOTE CONTROL PROGRAMMING
• Most parts and labour charges
Which Remote Do You Have?
• Customer instruction if required at time of service
• Adjustments including door force and limits
• Repairs due to manufacturer’s defects
• One-time remote control replacement
Trip charges vary by region and are subject to
change without prior notice.
EXCLUSIONS
• Cosmetic parts and non-functional parts
• Expenses related to correction of improperly
installed units (e.g. outlets, brackets)
• Repairs due to operator misuse or failure to
maintain the equipment according to owner’s
manual instructions
Billion Code remote controls feature gray buttons.
Keyless Entry units do not include * and # keys on
the keypad.
Security+® remote controls feature blue or black
buttons. Keyless Entry units do include * and # keys
on the keypad.
To Erase All Remote Controls
Press and hold the SRT button on the back panel of
the garage door opener (see diagram) until the
indicator light turns off (about 6 seconds). All
remote controls and keyless entry codes are now
erased. Follow the steps below to re-program each
remote control and keyless entry.
Bac Panel o Opener
• Housing replacement unless safe operation
is compromised
1
2
RED
WHT
ANNUAL MAINTENANCE CHECK
• Lubricate T-rail and wormgear/helical gear
as required to ensure smooth travel for easy
garage door movement
• Check emergency door release to ensure
proper operation in case of power failure
or malfunction
BLK
9
• Installation is not covered
• Expendable items – e.g. batteries
3
1
3
7
Kl
SRT
Learn Button
Orange
Green
Purple
9
1
3
7
Kl
Indicator
Light
ellow
Green
To Program a Remote Control
(Billion Code and Security+® only)
1. Press and hold the remote control button you wish
to operate that garage door.
• Test safety reverse system and adjust as required
2. Press and release the SRT button on the back panel
of the garage door opener. The indicator light on
the panel will begin to blink and the opener work
light will flash once.
• Check and adjust chain/belt and cable tension to
provide quiet operation
3. Release the remote control button. Test by pressing
the remote control button just programmed.
• Check and adjust up and down force and
lift tension
38
SEARS PROTECTION AGREEMENT
REMOTE CONTROL PROGRAMMING
39
REMOTE CONTROLS (TRANSMITTERS)
Advantages
The following pages will explain coding of the various
remote controls with garage door openers.
To Program a Keyless Entry System
Each garage door opener comes with at least one
computer-programmed remote control. Whether you
have a single-function or a 3-function remote control,
the advanced security code system is state of the art.
No one has your code.
(Billion Code and Security+® only)
1. Press and release the SRT button on the back
panel of the opener.
Billion Code:
3. Press ENTER.
Rolling Code:
5. Keyless Entry Systems can operate more than
one garage door. Each GDO must have a different
4-digit code programmed.
Remote controls are pre-programmed at the factory by
computer to totally eliminate code duplication with over
3.5-billion codes to choose from.
Security+® feature gives the customer maximum
security with over 100-billion codes to choose from.
When the remote and opener are programmed to each
other, a sequence of code rolling is established. When
the remote is activated and the door opens, both
remote and opener will roll to the next code at the
same time. Results in ultimate security.
Each remote has its own receiver location, which is
much like a separate parking spot. Only when that
remote, which is assigned to that parking spot, is
activated, will that remote and parking spot roll to the
next code. Any other remote programmed to the
receiver will not affect other receiver locations or
parking spots.
Code Storage Capabilities
All current Craftsman® Billion Code receivers have the
capability of storing 1 wireless keyless entry code and
12 computer-programmed remote control codes.
Models with Blue force control shafts will have the
capability of storing 8 computer-programmed remote
control codes.
Every 18000/18400 series garage door opener
(with SRT button) has been factory-set to operate when
you press the large push button of the remote control.
The additional push buttons on a 3-function remote
control can also activate other garage door openers.
40
REMOTE CONTROL PROGRAMMING
2. Enter the 4-digit code.
4. The work light(s) will flash one time, which means
the code has been accepted.
Important Tip: If your remote control has been lost or
stolen, always erase the memory and re-program the
existing remote controls and keyless entry. This ensures
that the lost remote cannot be used on your opener.
ADDITIONAL/REPLACEMENT
REMOTE CONTROLS
ORIGINAL REMOTE CONTROLS
Physical
Description
Red
Green
No
Light
Light
Light
390 MHz 390 MHz 390 MHz
Blue
Button
390 MHz
Black
Button
315 MHz
100 Billion 100 Billion
Rolling
Rolling
Codes
Codes
Number of
Codes
19,683
3.5
Billion
3.5
Billion
Year
Manufactured
19791993
19931996
1996Present
1997Present
2005Present
Item
Numbers
18778
18779
18305
18306
18307
18777
18759
18760
18761
18790
18791
18792
18190
18191
18192
Compatible
18778
18779
18759
18760
18761
18778
18779
18759
18760
18761
18778
18779
18790
18791
18792
18190
18191
18192
REMOTE CONTROL PROGRAMMING
41
Security+® Universal Remote Control Conversion Kits
Item Number 18796 Ideal for:
1. Owners of Craftsman® garage door openers
manufactured before 1990 who need additional
remote controls.
2. Owners of Craftsman® or any other brand garage
door opener who wish to add the advantage of
Security+® rolling code technology to their home.
All Craftsman® Remote Controls can operate up to
3 Garage Door Openers
DIP-SWITCH CODING (19,683 CODES)
FOR GARAGE DOOR OPENERS
Match/Change the Code in New and Existing
Remote Controls (Set Code Switches in All
Remote Controls to Matching Positions)
For remote controls used with an existing 3-Function
Standard Remote Control Model 139.18778 or
3-Function Mini Remote Control Model 139.18779
to operate the same receiver(s), proceed as follows:
Locate the code switches in the 3-Function Mini
Remote Control by removing the case screw. Be
careful not to move circuit board components.
On the 3-Function Standard Remote Control, slide
the battery compartment cover back. Place remote
controls side by side as shown below.
With a pen or screwdriver, set code switches in your
new remote control to the same positions as in the
original remote control.
Model 139.18779
Model 139.18778
SET RECEIVER TO LEARN OR MATCH
REMOTE CONTROL(S) CODE
Garage Door Openers (with Receiver “SR” Button)
Make sure all remote controls are set to matching
code switch positions as described above.
1. Select a remote control push button to operate the
door opener. Press and HOLD the selected push
button.
2. Then press and release the red “SR” button on the
opener panel. The opener light will flash once.
Release the remote control push button.
The receiver has accepted the remote control code
and the opener will now operate the selected push
button. NOTE: If remote control push button is not
held down until the door moves, the receiver has not
accepted the code.
To use the Remote Control(s) with Other “SR” Button
Receivers: Select another remote control push button
to operate an additional garage door opener. Make
sure all remote controls used to operate receiver are
set to same code. Repeat Steps 1 and 2.
Garage Door Opener
(with “Smart” Button)
1
2
3
RED
WHT
BLK
Push Button Push Button Push Button
(+)
(0)
(-)
Model 139.18778
Model 139.18779
Match
Code
Switches
(2-9)
Code Switches (1-9)
42
SRT
Indicator
Code Button Light
Push Button
(-)
Push Button
(0)
Push Button
(+)
Select a remote control push
button to operate receiver
Code Switches (1-9)
REMOTE CONTROL PROGRAMMING
REMOTE CONTROL PROGRAMMING
43
SPECIAL PROGRAMMING
FOR SECURITY+® MODELS ONLY
To Program a Remote Control Using a Premium
Control Console
Be sure to follow this exact sequence:
1. With the garage door closed, press and hold the
remote control button you wish to operate that garage
door.
2. Press and hold the light button, then the door control
button on the Premium Control Console.
3. After the garage opener work light flashes, release all
buttons. Test by pressing the remote control button
just programmed.
To Program the Opener Work Light Using a Remote
Control Through the Premium Control Console
One of the buttons on the remote control can be
programmed to only operate the work light(s) without
operating the garage door opener.
1. With the garage door closed, press and hold the
remote control button you wish to operate the
work light.
2. Press and hold the light button, then the lock button
on the Premium Control Console.
3. After the garage opener work light flashes, release all
buttons. Test by pressing the remote control button
just programmed. The work light should turn on and
off but the garage door should not move.
To Program Light Timer Using a Premium Control
Console or Motion-Detecting Control Console
The Light Timer feature is pre-set to turn the opener light
on for 4-1/2 minutes when the opener is activated. The
timer interval can be changed to 1-1/2, 2-1/2, 3-1/2 or
4-1/2 minutes as follows:
1. Press and hold the lock button until the lights blink
(about 10 seconds).
44
REMOTE CONTROL PROGRAMMING
2. A single blink indicates the timer is reset to 1-1/2
minutes.
3. Repeat the procedure and the light will blink
twice, resetting the timer to 2-1/2 minutes.
4. Repeat again for a 3-1/2 minute interval or repeat
once more for a 4-1/2 minute setting.
To Program a Keyless Entry Through the
Premium Control Console
Programming the 4-digit entry code:
1. With the garage door closed, press the 4-digit
code for the password, then press and hold the
enter button.
2. Press and hold the light button, then the door
control button on the Premium Control Console.
3. After the garage opener work light flashes,
release all buttons.
OR
4. The unit can also operate more than one garage
door. Each GDO must have a different 4-digit
code programmed.
Programming a Temporary Password:
1. Enter your personal 4-digit password, then press
(*). The opener work light(s) will flash
3 times.
2. Enter the temporary 4-digit password, then press
ENTER. The opener work light(s) will flash 4 times.
Next, decide to set the password for either
number of hours or number of openings.
a. To set the number of hours, enter the
number of hours (up to 255), then press (*).
b. To set the number of openings, enter the
number of openings/closings (up to 255),
then press (#).
To Change a Keyless Entry Password
1. Enter the current password, then press (#).
2. Now enter the new password and press ENTER.
REMOTE CONTROL PROGRAMMING
45
HOMELINK® COMPATIBLE
HomeLink® is the universal remote control system that
comes standard in many new cars and trucks. It is
compatible with both Billion Code and Security+® systems.
Programming
Once programmed, the HomeLink® system and the original
remote control may be used to activate the garage door
opener. For programming questions, call toll-free: 1-800355-3515. NOTE: For best results, replace the battery in the
hand-held remote control with a fresh battery before
programming. If your garage door opener receiver is
equipped with an antenna, make sure it is hanging straight
down.
1. For first-time programming, press and hold the two
outside buttons until the indicator light begins to flash
(after 20 seconds). Release both buttons. NOTE: Some
vehicles may require the ignition switch to be turned to
the second (or “accessory”) position during the
programming sequence.
2. Hold the end of your hand-held remote between 1 and 3
inches away from the HomeLink® surface, keeping the
indicator light in view.
3. Using both hands, simultaneously push the hand-held
remote button and the desired HomeLink® button.
Do not release the buttons until after step 4.
4. Hold down both buttons until the indicator light on the
HomeLink® panel flashes, first slowly, then rapidly. When
the indicator light flashes rapidly, both buttons may be
released. To activate the garage door or other
programmed device press and hold the HomeLink®
button until the device begins to activate.
5. To program the remaining buttons, follow steps 2 - 4.
Security+® Programming
Four ways to determine if your opener has Security+®
technology:
1. Reference the owner’s manual for verification.
2. Your Craftsman® remote control has blue buttons.
46
HOMELINK® COMPATIBLE
3. The hand-held remote appears to program the
HomeLink® but does not activate the garage door opener.
4. Press and hold the trained HomeLink® button. Your
opener has Security+® technology if the indicator light
flashes rapidly and then stays lit after two seconds.
To program an opener with Security+® technology, follow these
instructions: NOTE: The aid of a second person will make the
process quicker and easier.
1. Locate the SRT or “training” button on the back panel of
the opener. Press the button, the training light will come
on.
2. Within 30 seconds of pressing the training button, firmly
press and release the HomeLink® button of choice. Press
and release this button a second time to complete the
training process. (Some garage door openers may require
you to do this a third time to complete the process.)
3. To program the remaining buttons, follow steps 1 and 2.
Re-programming a Single HomeLink® Button
1. Press and hold the desired HomeLink® button.
Do not release the button until after step 4.
2. When the indicator light begins to flash slowly (after 20
seconds), position the hand-held remote 1 to 3 inches
away from the HomeLink® surface.
3. Press and hold the hand-held remote button; the
HomeLink® indicator light will flash, first slowly and then
rapidly.
4. When the indicator light flashes rapidly, both buttons
may be released.
The previous device has now been erased and the new device can
be activated by pushing the HomeLink® button that has just been
programmed. This procedure will not affect any other programmed
HomeLink® buttons.
Erasing Channels
To erase all three programmed buttons:
1. Press and hold the two outside buttons until the indicator
light begins to flash (after 20 seconds).
2. Release both buttons.
The HomeLink® system is now in the training mode and can be
programmed at any time following steps 2 - 4 in the Programming
Section.
HOMELINK® COMPATIBLE
47
FREQUENTLY ASKED QUESTIONS
What happens if I leave something under the door?
Every Craftsman® opener manufactured after
December 1992 includes a safety reversing sensor
that must be installed and working properly for the
opener to function. The sensor emits an infrared
beam that, if broken, causes a closing door to stop
and safely reverse to full open position.
Can I stop the door while it’s moving?
Yes. All models can be stopped at any point while
opening with a touch of the remote control button
or control console. However, if the remote control is
pushed while the door is closing, the door will
reverse and open fully.
Can the door be operated by hand if the
power fails?
Yes. Pull the emergency release cord on the trolley
and you can operate the door by hand. When power
is restored and the trolley lockout released, a push
of the button will reconnect the trolley; no tools are
required.
If having a problem closing the garage door,
what should I check?
Check for obstructions of the door or misalignment
of the safety reversing sensor. If something is
breaking the safety reversing sensor’s beam, the
door will not close and the lights on the power unit
will flash 10 times. Next, check the battery in your
remote control. If your control console has a lockout
switch be sure it is not activated by checking for the
flashing lighted push bar.
What if I have to be right up to the door for
my remote control to operate the door?
Check the battery and replace if old. If the battery
is OK, a steel garage door or aluminum siding may
be interfering with the remote control signal. An
antenna range extension kit may be required to
overcome this interference. Contact your local
service department.
Part #41A3504
48
FREQUENTLY ASKED QUESTIONS
What if the remote control won’t work from
inside the car?
Again, check the battery in your remote control. A
weak battery creates a weak signal that is blocked
by the metallic content in windshields on some
new cars.
Why does the light(s) on my garage door
opener always stay on with the door open?
This symptom could be the result of a) activating the
manual light switch on the premium control console,
b) continuous breaking of the infrared sensor beam
with the door open.
To turn this feature OFF, with the opener lights ON,
press and hold the light button for 10 seconds, until
the light turns ON and OFF again. To restore this
feature, start with the opener light ON, then press
and hold the light button for 10 seconds until the
light goes OFF and then ON again.
How safe are garage door openers?
Very safe. In fact, every Craftsman® opener has a
three-stage safety system: The first is a non-contact,
infrared system that is mounted inside the garage,
4" to 6" from the floor. The system will cause a
closing door to reverse, without touching the object,
when the infrared beam is obstructed. The second
stage is a contact reversing system which will
reverse a closing door if the door makes contact
with an object, or stop if the door is opening.
Finally, a cycle completion system causes the door
to open completely (within 30 seconds) if the down
limit or the reversing system were to fail.
Will it handle a heavy door?
Yes. Any door made of wood, steel or fiberglass and
up to 18 feet wide and 10 feet high. But, of course,
the door has to be in good working condition and
properly balanced because the opener only assists
door springs in opening and closing.
FREQUENTLY ASKED QUESTIONS
49
SPECIFICATIONS
MOTOR
TYPE
SPEED
VOLTS
CURRENT
MVIS®
SAFETY
REVERSAL
Permanent Split Capacitor
RPM - No Load
120 VAC - 60 Hz
4.5 Amps
Rubber Mounted Motor Vibration
Isolation System
Push Button & Auto Reversal in Down Direction
Push Button & Auto Stop in Up Direction
Independent Up & Down Force Adjustments
Safety Reversing Sensor
Remote Control Reversal
Cycle Completion Monitor
ELECTRICAL Motor Overload Protector
& Low Voltage Push Button
DRIVE MECHANISM
GEAR
16:1 Wormgear Reduction
YES
NO
NO
NO
NO
YES
YES
YES
YES
YES
YES
YES
YES
YES
YES
YES
YES
YES
YES
YES
YES
YES
YES
YES
YES
YES
YES
YES
YES
YES
YES
YES
YES
YES
YES
YES
YES
YES
YES
YES
YES
YES
YES
YES
YES
YES
YES
YES
YES
YES
YES
YES
YES
YES
YES
YES
YES
YES
YES
YES
YES
YES
YES
Belt
Chain/
Cable
Chain/
Cable
Chain/
Cable
Chain/
Cable
Chain/
Cable
Belt
YES
YES
YES
YES
YES
YES
YES
YES
YES
YES
YES
YES
YES
YES
TRAVEL RATE Inches per Second
YES
8.5
YES
7.5
YES
9.0
YES
7.5
YES
7.5
YES
9.0
YES
8.5
DOOR
LINKAGE
YES
YES
YES
YES
YES
YES
YES
137.0
125.5
125.5
128.5
125.5
125.5
125.5
125.5
2
2
2
2
2
2
2
DRIVE
Methods of Opening Door
LUBRICATION Motor Self-Lubricated,
Bronze Oiltight Bearings on Drive Shaft
LENGTH
OF TRAVEL
Will Open 7.5 Foot Door
LIMIT DEVICE Independent Up & Down External Adjustment
Adjustable Door Arm,
Emergency Pull Cord Trolley Release
DIMENSIONS
OVERALL
LENGTH
In Inches (head and rail included)
HEADROOM
REQUIRED In Inches
50
18477
18453
18489 18458 18570 18473 18452 18455 18405
Belt
Chain Chain Chain Chain Chain Belt
YES
YES
YES
YES
YES
YES
NO
1750 1750 1750 1750 1750 1750 5670
YES
YES
YES
YES
YES
YES
12V
4.5
4.5
4.5
4.5
4.5
4.5
4.5
SPECIFICATIONS
SPECIFICATIONS
51
GLOSSARY OF TERMS
Belt Drive – Drive system used in Craftsman®
Garage Door Openers where a motor causes a belt
to open/close a garage door quietly.
Billion Code Technology – Remote controls are
pre-programmed at the factory to totally eliminate
code duplication with 3.5 billion codes.
Chain/Cable Drive – Drive system used in
Craftsman® Garage Door Openers where a motor
causes a chain to open/close garage door.
Control Console(s) – Wired to GDO. Opens doors,
controls lights (optional), locks out radio signals
(optional), and indicates time, temperature and
system diagnostic messages (optional).
Mounts on garage wall.
DIP Switch – Multiple position code switch found
in competitors’ remote controls and receivers and
previous Craftsman® models. Provides coded
transmitted signal.
Door Arm – Steel bar that connects trolley to
garage door.
Electronic Force Controls – Electronic controls that
set the amount of force used to open and close a
garage door. The up and down forces are set
independently.
Limit Switches – The limit switches are set to tell
the opener how far it must travel to open and close
the garage door.
Motor Vibration Isolation System (MVIS ®) – Motor
is mounted on neoprene rubber isolators that
cushion metal-to-metal contact.
Remote Control – Hand-held device that activates
opener through a radio signal it sends to power
unit/receiver.
Safety Reversing Sensor – An infrared device that
mounts inside the garage on each side of the garage
door. If the invisible infrared beam is broken by an
obstruction when the door is moving in a downward
direction, the door safely stops, then reverses before
making contact.
Security+® with Rolling Code – Every time the
remote control is activated, the remote and the
opener change or roll to a new code, one of
100 billion codes.
Smart Button/Smart Receiver – Replaced DIP switch
in Craftsman® power unit/receiver in 1990 and continues
in use. Puts receiver in learn or program mode.
Smart Button Control – Craftsman® remote control
with green battery light (or no light at all) has
computer programmed coding that totally
eliminates code duplication.
SRT – Craftsman® terminology for Smart Receiver
and Remote Control.
SSR – New structural steel rail system.
T-Rail – Steel rail that trolley slides on and bears
load when door is opened or closed.
Trolley – Travels on T-Rail and connects opener to
door arm. Trolley can be disconnected during power
failure to allow for manual operation of garage door.
UL 325 – Underwriters Laboratories standard
governing GDO safety reversing requirements.
All Craftsman® Garage Door Openers comply with
UL safety standards.
One Inch Reversal Test – Test of opener’s back-up
safety systems where garage door must reverse on
a 1 inch obstruction laid on the floor under the door.
Power Unit/Receiver – Located near the ceiling in
garage, contains radio receiver, related electronics
and motor to open door.
52
GLOSSARY OF TERMS
CRAFTSMAN® GARAGE DOOR
OPENER SUPPORT PHONE NUMBERS
For Installation, Service or Parts Call: 1-800-4-MYHOME
(1-800-469-4663)
CONTACT INFORMATION
53
Printed in USA
SCCAML11