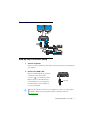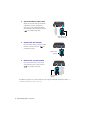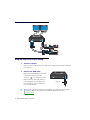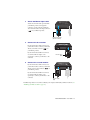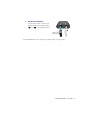
1
ENGLISH Matrox® DualHead2Go™ Analog Edition • Digital Edition • DP Edition • Digital SE User Guide (Windows® version) 20000-301-0210 2012.10.05 Contents About this user guide ...............................................................................................4 Using this guide.........................................................................................................................................4 More information .....................................................................................................................................4 Overview ...................................................................................................................5 Hardware supplied....................................................................................................................................5 Software supplied......................................................................................................................................6 Installation overview.................................................................................................................................7 Connecting your DualHead2Go Analog Edition product .......................................8 Before you begin .......................................................................................................................................8 Connection overview................................................................................................................................9 Step-by-step connection setup .................................................................................................................9 Connecting your DualHead2Go Digital Edition product.......................................11 Before you begin .....................................................................................................................................11 Connection overview..............................................................................................................................12 Step-by-step connection setup ...............................................................................................................12 Connecting your DualHead2Go DP Edition product ............................................14 Before you begin .....................................................................................................................................14 Connection overview..............................................................................................................................15 Step-by-step connection setup ...............................................................................................................15 Connecting your DualHead2Go Digital SE product..............................................18 Before you begin .....................................................................................................................................18 Connecting a second DualHead2Go product.......................................................22 Before you begin .....................................................................................................................................22 Connecting two DualHead2Go products..............................................................................................23 Installing your Matrox software .............................................................................26 Before you begin .....................................................................................................................................26 Obtaining Matrox PowerDesk software.................................................................................................26 Installing your Matrox PowerDesk software .........................................................................................27 Starting the Matrox quick setup utility..................................................................................................27 2 Matrox DualHead2Go – User Guide Matrox PowerDesk software................................................................................. 28 Accessing PowerDesk..............................................................................................................................28 Accessing Matrox PowerDesk help ........................................................................................................28 Troubleshooting ..................................................................................................... 29 What to do if you have a problem..........................................................................................................29 Common problems and solutions .........................................................................................................29 Product information............................................................................................... 36 Specifications ..........................................................................................................................................36 Environmental ........................................................................................................................................37 Notes........................................................................................................................................................37 Customer support ................................................................................................. 39 Matrox Web.............................................................................................................................................39 Technical support ...................................................................................................................................39 Driver and software download...............................................................................................................40 View your warranty information...........................................................................................................40 Register your Matrox product................................................................................................................40 Index ...................................................................................................................... 41 Matrox DualHead2Go – User Guide 3 About this user guide Your Matrox user guide provides information on installing and using your Matrox hardware. For information on Matrox PowerDesk software features and options, see the help file included with your PowerDesk software. Note: This guide has references specific to version 2.07.00 or later of the Matrox software. If you’re using a previous version of the Matrox software, certain references in this guide may not reflect the software you have. Using this guide This guide assumes you’re familiar with basic functions like click, right-click and double-click, and that you’re familiar with the basics of the operating system you’re using. Also, we use the following conventions: Bold for headings and for references to text that appears on-screen. Italics for emphasis, file names, paths, publication titles, and new terms. Bold Italics for emphasis. Keyboard keys in square brackets, with a plus sign separating keys that you press simultaneously. For example: press [Ctrl]+[Alt]+[Del] to start Windows Task Manager. Arrows (“Æ”) to separate ordered directions. For example, “click OK Æ Close Æ OK” is the same as “click OK, then click Close, then click OK”. Green for cross-references. If you’re viewing online, click green text to jump to what’s being referenced. More information We provide additional information in help and Readme files. Be sure to check for any last-minute release notes included with your product. Also, check the Matrox Web site (www.matrox.com/graphics) for the latest Matrox software, technical support, and product information. 4 Matrox DualHead2Go – User Guide Overview Thank you for purchasing Matrox DualHead2Go. This product allows your single-display graphics hardware to support up to two monitors at a time. Depending on your Matrox product, you can connect up to two analog, digital, or DisplayPort™ monitors at a time to your Matrox DualHead2Go product. Hardware supplied* DualHead2Go Analog Edition Matrox hardware Matrox input cable (HD-15 to HD-15) USB cable Matrox input cable (HD-15 to HD-15) USB cable DualHead2Go Digital Edition Matrox hardware * The hardware supplied with your Matrox product may vary depending on the SKU or part number of your product. For more information, contact your Matrox representative. Matrox DualHead2Go – User Guide 5 DualHead2Go DP Edition Matrox hardware Matrox input cable (DisplayPort to DisplayPort) USB cable Mini DisplayPort to DisplayPort adapter DualHead2Go Digital SE Matrox hardware Matrox input cable (DisplayPort to DisplayPort) USB cable Optional hardware (sold separately) Depending on your connection setup, you may also need any of the following hardware: DVI to HD-15 adapter DisplayPort to DVI adapter Mini DisplayPort to DisplayPort adapter Power adapter kit for GXM* For more information on connecting your product, see the “Connection setup” section for your Matrox product. To purchase any Matrox cables or adapters not included with your Matrox product, see the Matrox online store (shopmatrox.com). Software supplied Matrox PowerDesk – to use your Matrox product. Matrox PowerDesk software supports Windows® 8, Windows® 7, Windows® Vista®, Windows® Server® 2008, Windows® XP, and Windows® Server® 2003. Matrox makes new software available on the Matrox Technical Support Web site (www.matrox.com/graphics/en/support/gxm/software). * Required if connecting two DualHead2Go Analog Edition, DualHead2Go Digital Edition, or DualHead2Go DP Edition products at a time. For more information, see “Connecting a second DualHead2Go product”, page 22. 6 Matrox DualHead2Go – User Guide Installation overview To install your Matrox product: 1 Connect your product – see the “Connection setup” section for your Matrox product. 2 Install the software – see “Installing your Matrox software”, page 26. Matrox DualHead2Go – User Guide 7 Connecting your DualHead2Go Analog Edition product This section describes how to connect two (2) analog monitors to your Matrox product. Before you begin To avoid possible problems that could damage your monitors or prevent you from using your Matrox product, read the following guidelines before connecting your Matrox product. 8 Whenever you change your connection setup, make sure you’re using the correct connectors and that all connectors are properly fastened. Don’t change monitor connections while your computer is turned on. While your computer is turned on, it may be using monitor settings that are specific to the current monitor connections. Some devices may be permanently damaged if incorrect settings are used. To get the most out of your Matrox product, we recommend you use two identical monitors (that is, monitors that support the same settings such as display resolution and refresh rate). For information on the settings your monitor supports, see your monitor documentation. Matrox DualHead2Go – User Guide Connection overview Step-by-step connection setup 1 Turn off computer Before you connect your Matrox product, make sure you shut down your system and turn off your computer. 2 Connect the USB cable Plug one end of the USB cable provided with your Matrox product into the USB connector ( ) on your Matrox product. Plug the other end of the USB cable into a powered USB port on your computer. For more information on powered USB ports, see your system manual. USB cable Note: If your computer doesn’t have a powered USB port, you’ll need a separate adapter. To purchase a Matrox power adapter kit for GXM, see the Matrox online store (shopmatrox.com). Matrox DualHead2Go – User Guide 9 3 Attach the Matrox input cable Attach one end of the cable provided with your Matrox product to the graphics connector on your computer. Attach the other end of the cable to the input connector ( ) on your Matrox product. Matrox input cable (HD-15 to HD-15) 4 Connect the first monitor Use your monitor cable to connect your first monitor to the first connector ( ) on your Matrox product. Monitor cable (HD-15) 5 Connect the second monitor Use your monitor cable to connect your second monitor to the second connector ( ) on your Matrox product. Monitor cable (HD-15) Your Matrox product is now connected. Restart your computer and install your Matrox software (see “Installing your Matrox software”, page 26). 10 Matrox DualHead2Go – User Guide Connecting your DualHead2Go Digital Edition product This section describes how to connect two (2) digital or analog monitors to your Matrox product. Note: To purchase any cables or adapters not included with your Matrox product, see the Matrox online store (shopmatrox.com). Before you begin To avoid possible problems that could damage your monitors or prevent you from using your Matrox product, read the following guidelines before connecting your Matrox product. Whenever you change your connection setup, make sure you’re using the correct connectors and that all connectors are properly fastened. Don’t change monitor connections while your computer is turned on. While your computer is turned on, it may be using monitor settings that are specific to the current monitor connections. Some devices may be permanently damaged if incorrect settings are used. To get the most out of your Matrox product, we recommend you use two identical monitors (that is, monitors that support the same settings such as display resolution and refresh rate). For information on the settings your monitor supports, see your monitor documentation. Matrox DualHead2Go – User Guide 11 Connection overview Step-by-step connection setup 1 Turn off computer Before you connect your Matrox product, make sure you shut down your system and turn off your computer. 2 Connect the USB cable Plug one end of the USB cable provided with your Matrox product into the USB connector ( ) on your Matrox product. Plug the other end of the USB cable into a powered USB port on your computer. For more information on powered USB ports, see your system manual. USB cable Note: If your computer doesn’t have a powered USB port, you’ll need a separate adapter. To purchase a Matrox power adapter kit for GXM, see the Matrox online store (shopmatrox.com). 12 Matrox DualHead2Go – User Guide 3 Attach the Matrox input cable Attach one end of the cable provided with your Matrox product to the graphics connector on your computer. Attach the other end of the cable to the input connector ( ) on your Matrox product. Matrox input cable (HD-15 to HD-15) 4 Connect the first monitor If your monitor has a DVI connector, use your monitor cable to connect your monitor directly to the first connector ( ) on your Matrox product. If your monitor has an HD-15 connector, use a DVI to HD-15 adapter (sold separately) to connect your monitor to the connector. 5 Monitor cable (DVI) Connect the second monitor If your monitor has a DVI connector, use your monitor cable to connect your monitor directly to the second connector ( ) on your Matrox product. If your monitor has an HD-15 connector, use a DVI to HD-15 adapter (sold separately) to connect your monitor to the connector. Monitor cable (DVI) Your Matrox product is now connected. Restart your computer and install your Matrox software (see “Installing your Matrox software”, page 26). Matrox DualHead2Go – User Guide 13 Connecting your DualHead2Go DP Edition product This section describes how to connect two (2) DisplayPort or digital (DVI) monitors to your Matrox product. WARNING: To avoid damaging the DisplayPort connector on your DisplayPort monitor cable or on your Matrox product, carefully remove the DisplayPort cable by pressing the latch on the top of the DisplayPort connector while removing the connector. Note: To purchase any cables or adapters not included with your Matrox product, see the Matrox online store (shopmatrox.com). Before you begin To avoid possible problems that could damage your monitors or prevent you from using your Matrox product, read the following guidelines before connecting your Matrox product. Whenever you change your connection setup, make sure you’re using the correct connectors and that all connectors are properly fastened. Don’t change monitor connections while your computer is turned on. While your computer is turned on, it may be using monitor settings that are specific to the current monitor connections. Some devices may be permanently damaged if incorrect settings are used. To get the most out of your Matrox product, we recommend you use two identical monitors (that is, monitors that support the same settings such as display resolution and refresh rate). For information on the settings your monitor supports, see your monitor documentation. 14 Matrox DualHead2Go – User Guide Connection overview Step-by-step connection setup 1 Turn off computer Before you connect your Matrox product, make sure you shut down your system and turn off your computer. 2 Connect the USB cable Plug one end of the USB cable provided with your Matrox product into the USB connector ( ) on your Matrox product. Plug the other end of the USB cable into a powered USB port on your computer. For more information on powered USB ports, see your system manual. USB cable Matrox DualHead2Go – User Guide 15 3 Attach the Matrox input cable Attach one end of the Matrox DisplayPort cable provided with your Matrox product to the graphics connector on your computer. Attach the other end of the cable to the DisplayPort input connector ( ) on your Matrox product. Matrox input cable (DisplayPort to DisplayPort) Laptops with mini DisplayPort connector – Attach one end of the mini DisplayPort to DisplayPort adapter to the DisplayPort connector on your Matrox input cable. Attach the other end of the adapter to the mini DisplayPort graphics connector on your laptop computer. Mini DisplayPort to DisplayPort adapter Matrox input cable (DisplayPort to DisplayPort) 4 Connect the first monitor Use your monitor cable to connect your monitor directly to the first connector ( ) on your Matrox product. Monitor cable (DisplayPort) If your monitor has a DVI connector, use a DisplayPort to DVI adapter (sold separately) to connect your monitor to the connector. DisplayPort to DVI adapter Monitor cable (DVI) 16 Matrox DualHead2Go – User Guide 5 Connect the second monitor Use your monitor cable to connect your monitor directly to the second connector ( ) on your Matrox product. Monitor cable (DisplayPort) If your monitor has a DVI connector, use a DisplayPort to DVI adapter (sold separately) to connect your monitor to the connector. DisplayPort to DVI adapter Monitor cable (DVI) Your Matrox product is now connected. Restart your computer and install your Matrox software (see “Installing your Matrox software”, page 26). Matrox DualHead2Go – User Guide 17 Connecting your DualHead2Go Digital SE product This section describes how to connect two digital (DVI-D) monitors to your Matrox product. Note: To purchase any cables or adapters not included with your Matrox product, see the Matrox online store (shopmatrox.com). Before you begin To avoid possible problems that could damage your monitors or prevent you from using your Matrox product, read the following guidelines before connecting your Matrox product. Whenever you change your connection setup, make sure you’re using the correct connectors and that all connectors are properly fastened. Don’t change monitor connections while your computer is turned on. While your computer is turned on, it may be using monitor settings that are specific to the current monitor connections. Some devices may be permanently damaged if incorrect settings are used. To get the most out of your Matrox product, we recommend you use two identical monitors (that is, monitors that support the same settings such as display resolution and refresh rate). For information on the settings your monitor supports, see your monitor documentation. 18 Matrox DualHead2Go – User Guide Connection overview Step-by-step connection setup WARNING: To avoid damaging the DisplayPort connector on your DisplayPort monitor cable or on your graphics hardware, carefully remove the DisplayPort cable by pressing the latch on the top of the DisplayPort connector while removing the connector. 1 Turn off computer Before you connect your Matrox product, make sure you shut down your system and turn off your computer. Matrox DualHead2Go – User Guide 19 2 Connect the USB cable Plug one end of the USB cable provided with your Matrox product into the USB connector ( ) on your Matrox product. Plug the other end of the USB cable into a powered USB port on your computer. For more information on powered USB ports, see your system manual. 3 USB cable Attach the Matrox input cable Attach one end of the Matrox DisplayPort to DisplayPort cable provided with your Matrox product to the DisplayPort input connector ( ) on your Matrox product. Matrox input cable (DisplayPort to DisplayPort) Laptops with mini DisplayPort connector – Attach one end of the mini DisplayPort to DisplayPort adapter (sold separately) to the DisplayPort connector on your Matrox input cable. Attach the other end of the adapter to the mini DisplayPort graphics connector on your laptop computer. Mini DisplayPort to DisplayPort adapter Matrox input cable (DisplayPort to DisplayPort) Note: To avoid problems related to image quality, make sure the DisplayPort connection to your graphics hardware is firmly in place. 20 Matrox DualHead2Go – User Guide 4 Connect the first monitor Connect the DVI connector on your monitor cable directly to the first connector ( ) on your Matrox product. Monitor cable (DVI) 5 Connect the second monitor Connect the DVI connector on your monitor cable directly to the second connector ( ) on your Matrox product. Monitor cable (DVI) Your Matrox product is now connected. Restart your computer and install your Matrox software (see “Installing your Matrox software”, page 26). Matrox DualHead2Go – User Guide 21 Connecting a second DualHead2Go product If you want to further expand your desktop, you can connect a second DualHead2Go product to your graphics hardware to support up to four monitors at a time. Note: The following provides a brief overview of how to connect a second DualHead2Go product to your graphics hardware. For more detailed information, see the “Step-by-step connection setup” for your product. Before you begin Only two Matrox DualHead2Go products at a time can be connected to your computer. Connecting two DualHead2Go Analog Edition, DualHead2Go Digital Edition, or DualHead2Go DP Edition products at a time requires a Matrox power adapter kit. To purchase a Matrox power adapter kit for GXM, see the Matrox online store (shopmatrox.com). You can only use two DualHead2Go products from the same series (for example, you can use two DualHead2Go DP Edition products, but you can’t use a DualHead2Go Digital Edition product and a DualHead2Go DP Edition product). To connect a second DualHead2Go product, you must have a dual-monitor graphics card or a second graphics card installed in your system. Support for multiple DualHead2Go products is limited to desktop computers. 22 Matrox DualHead2Go – User Guide Connecting two DualHead2Go products Note: Connecting two DualHead2Go Analog Edition, DualHead2Go Digital Edition, or DualHead2Go DP Edition products at a time requires a Matrox power adapter kit. To purchase a Matrox power adapter kit for GXM, see the Matrox online store (shopmatrox.com). Connection overview (DualHead2Go DP Edition shown) Step-by-step connection setup 1 Turn off computer Before you connect your Matrox product, make sure you shut down your system and turn off your computer. Matrox DualHead2Go – User Guide 23 2 Connect the Power/USB cable Plug one end of the Power/USB cable into the USB connector ( ) on your Matrox product. Power/USB cable Plug the USB connector into a USB port on your computer. Plug the power supply connector of the Power/USB cable into the external power supply. Finally, plug the power supply cord into an electrical outlet. Power/USB cable Power supply connector External power supply 3 Attach the Matrox input cable Attach one end of the input cable either to a second connector on your graphics card or to a connector on a second graphics card installed in your system. Attach the other end of the cable to the input connector on your second DualHead2Go product. Matrox input cable (DisplayPort to DisplayPort) 24 Matrox DualHead2Go – User Guide USB connector 4 Connect the monitors Use your monitor cables to connect each monitor directly to the connectors labeled ( ) and ( ) on your Matrox product. Monitor cable (DisplayPort) For more information, see the “Step-by-step connection setup” for your product. Matrox DualHead2Go – User Guide 25 Installing your Matrox software This section describes how to install Matrox software for Windows 8, Windows 7, Windows Vista, Windows Server 2008, Windows XP, and Windows Server 2003. You may need administrator rights to install certain software. For more information, see Windows documentation or contact your system administrator. Before you begin If Matrox software is already installed on your system, you need to uninstall the software currently installed. Windows 8/7/Vista/XP – To uninstall Matrox software: Windows 8 – 1 Click Settings Æ Control Panel Æ Programs Æ Programs and Features Æ Uninstall a program Æ Matrox PowerDesk (or Matrox PowerDesk-SE) Æ Uninstall Æ Yes. 2 Restart your computer for the changes to take effect. Windows 7/Vista – 1 Click Start Æ Settings* Æ Control Panel Æ Programs* Æ Programs and Features Æ Matrox PowerDesk (or Matrox PowerDesk-SE) Æ Uninstall Æ Yes. (* Depending on your version and configuration of Windows, this part of the step may not be necessary.) 2 Restart your computer for the changes to take effect. Windows XP – 1 Click Start Æ Settings* Æ Control Panel Æ Add/Remove Programs (double-click*) Æ Matrox PowerDesk (or Matrox PowerDesk-SE) Æ Change/Remove Æ Yes. (* Depending on your version and configuration of Windows, this part of the step may not be necessary.) 2 Restart your computer for the changes to take effect. Obtaining Matrox PowerDesk software Matrox makes the latest software available on the Matrox Technical Support Web site (www.matrox.com/graphics/en/support/gxm/software). 26 Matrox DualHead2Go – User Guide Installing your Matrox PowerDesk software Insert the Matrox CD-ROM in your CD-ROM drive, then follow the on-screen instructions. Starting the Matrox quick setup utility Matrox provides an easy way for you to set up and configure your Matrox product. The quick setup utility starts automatically after you install your PowerDesk software. Matrox DualHead2Go – User Guide 27 Matrox PowerDesk software Matrox PowerDesk software helps you get the most out of your Matrox product. Use Matrox PowerDesk software to change certain display settings or access Matrox features. Note: To avoid possible problems, unless otherwise specified, we recommend you use only PowerDesk software to change your display settings. Accessing PowerDesk Windows 8/7/Vista/XP – To access Matrox PowerDesk: Windows 8 – Click the Start menu, then select Matrox PowerDesk. Right-click your Windows desktop and select Launch Matrox PowerDesk. Windows 7/Vista/XP – Click Start Æ All programs (or Programs) Æ Matrox Graphics Æ Matrox PowerDesk. Right-click your Windows desktop and select Launch Matrox PowerDesk. Accessing Matrox PowerDesk help For information on Matrox PowerDesk software features and options, see the help file included with your PowerDesk software. While using Matrox PowerDesk software, you can access the help file in several ways: From the main PowerDesk interface, click Help and Troubleshooting Æ PowerDesk help. For information on a specific feature or control on a page, click the Help button ( on that page. To find all topics that contain specific words, use the Search tab in the navigation window of the help file. 28 Matrox DualHead2Go – User Guide ) Troubleshooting This section addresses possible problems that could prevent you from using your Matrox product. What to do if you have a problem If you experience problems with your Matrox product: After making any changes to your system (such as changing your graphics hardware or display driver version), we recommend you check the compatibility of your system by running the GXM System Compatibility Tool. For the latest compatibility information, see the Matrox Web site (www.matrox.com/graphics/en/support/gxm_main). Make sure your Matrox product is properly installed, you’re using the correct connectors, and all connectors are properly fastened. For more information, see the “Connection setup” section for your product. Review the documentation provided with your Matrox product, including the information in this section, to see if your problem is already addressed. If your problem persists, contact Matrox. For more information, see “Customer support”, page 39. Common problems and solutions This section addresses common problems that could prevent you from using your computer or graphics hardware. Problem 1Cause Computer doesn’t display information after Matrox product is connected Your Matrox product may not be properly connected. 1Solution Make sure your Matrox product is properly connected and that all connectors are properly fastened. 2Solution Try reconnecting your monitors and USB cable. 2Cause 1Solution Your Matrox product may not support the selected display mode. Make sure your Matrox product supports the selected display mode. For more information, see “Product information”, page 36. Matrox DualHead2Go – User Guide 29 3Cause Your computer’s built-in graphics hardware may not be enabled. 1Solution If graphics hardware is built into your computer motherboard, it may not be enabled. Check your system manual for instructions on how to enable your computer’s built-in graphics hardware. Problem Matrox product isn’t automatically detected 1Cause Your Matrox product may not support the selected display mode or the graphics hardware in your computer. 1Solution Make sure your Matrox product supports the selected display mode. For more information, see “Product information”, page 36. 2Solution Make sure your Matrox product supports your graphics hardware. Problem No power indicator light (black) 1Cause Your USB cable may not be properly connected. Power indicator light (DualHead2Go DP Edition shown) 1Solution 2Cause 3Solution Make sure your USB cable is properly connected. Your USB cable may not be connected to a powered USB port. Make sure your USB cable is connected to a powered USB port. If the USB port you’re currently using isn’t powered, try using a different USB port. Note: The powered USB port must be able to provide up to 2.5 W (5 VDC, up to 500 mA) of power. For more information on powered USB ports, see your system manual. Problem 1Cause 1Solution Power indicator light is red Your Matrox product may not support the selected display mode. Make sure your Matrox product supports the selected display mode. For more information, see “Product information”, page 36. 30 Matrox DualHead2Go – User Guide 2Cause There may be unsupported graphics hardware in your computer. 1Solution Make sure your Matrox product supports your graphics hardware by running the GXM System Compatibility Tool. For the latest compatibility information, see the Matrox Web site (www.matrox.com/graphics/en/support/gxm_main). 2Solution If graphics hardware is built into your computer motherboard, it may not be enabled. Check your system manual for instructions on how to enable your compute