1
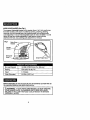
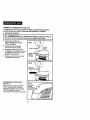
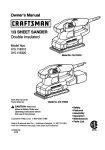
Owner'sManual
CORNER
SANDER
Model No.
172.11624
CAUTION:
Read understand and follow
all Safety Rules and Operating Instructions
in this manual before using th_s product.
Sears,
Roebuck
and Co., Hoffman
Estates,
• SAFETY
• OPERATION
• MAINTENANCE
• ESPANOL, PAGE 17
IL 60179 U.S.A.
Warranty. ...................................................................
Safety Instructions ....................................................
Safety Symbols .........................................................
Description ................................................................
Operation ..................................................................
Maintenance .............................................................
Accessories ..............................................................
Page
Pages
Page
Page
Pages
Page
Page
2
3-8
8
9
9-13
14
15
ONE FULL YEAR WARRANTY ON CRAFTSMAN SANDER
If this product fails to give complete satisfactionwithin one year from the
date of pumhase, RETURN ITTO THE NEAREST SEARS STORE INTHE
UNITED STATES, and Sears will replace it, free of charge.
If this product is used for commercialor rental purposes, this warranty
applies for only 90 days from the date of purchase.
This warranty gives you specific legal rights,and you may also have other
rights which vary from state to state.
Seam, Roebuck and Co., Dept. 817 WA, Hoffman Estates, IL 60179
SAVE THESE INSTRUCTIONS!
READ ALL INSTRUCTIONS!
Failure to follow all instructions listed below may result in electric
I shock,
_WARNING:
BE serious
SURE to personal
read and Injury.
understand all instructions.
fire and/or
WORK AREA SAFETY
1. ALWAYS keep your work area clean and well lit. Cluttered benches and
dark areas invite accidents.
2. DO NOT operate power tools in explosive atmospheres, such as in the
presence of flammable Itqulds, gases, or dust. Power tools create sparks
which may ignite the dust or fumes.
3. ALWAYS keep bystanders, children, and visitors away while operating
a power tool. Distractionscan cause you to lose control.
ELECTRICAL SAFETY
1. Double insulated tools are equipped with a polarized plug (one blade
Is wider than the other.)This plug will fit in a polarized outlet only one
way. If the plug does not fit fully in the outlet, reverse the plug. if it still
does not fit, contact a qualified electrician to install a polarized outlet.
DO NOT change the plug in any way.
2. Double insulation[] eliminates the need for the three wire grounded power
cord and grounded power supply system.Applicableonly to Class II
(doubleinsulated) tools.
3. Before plugging in the tool. BE SURE that the outlet voltage supplied is
within the voltage marked on the toots data plate. DO NOT use "AC only"
rated tools with a DC powersupply.
4. ALWAYS avoid body contact with grounded surfaces such as pipes,
radiators, ranges and refrigerators. There is an increased risk of electric
shock if your body is grounded.
5. If operating the power tool in damp locations is unavoidable, ALWAYS
use a Ground Fault Circuit Interrupter to supply power to your tool.
ALWAYS wear electrician's rubber gloves and footwear in damp
conditions.
6. DO NOT expose power tools to rain or wet conditions. Water entering a
power tool will increase the riskof electricshock.
7. DO NOT abuse the cord. NEVER use the cord to carry the tools or pull
the plug from the outlet. Keep cord away from heat, oil, sharp edges
or moving parts. Replace damaged cords immediately. Damaged cords
increasethe risk of electric shock.
8. When operating a power tool outside, ALWAYS use an outdoor
extension cord marked "W-A" or"W'. These cords ere rated for outdoor
use and reduce the risk of electric shock.
3
ELECTRICAL
SAFETY
cont.
NOTE:Theextension
cordmusthaveadequate
wiresizeAWG (American
Wire Gauge) for safe, efficientuse. Smaller gauge wires have greater
capacity (16 gauge wire has more capacity than 18 gauge wire).
PERSONAL SAFETY
I. ALWAYS stay alert, watch what you are doing and use common sense
when operating a power tool. DO NOT use tool while tired or under the
Influence of drugs, alcohol or medlcetlon. A moment of inattentionwhile
operating power tools may result in serious personal injury.
2. ALWAYS dress properly. DO NOT wear loose clothing or jewelry. Pull
back long hair. Keep your hair, clothing and gloves away from moving
parts. Loose clothing,jewelry or long hair can be caughtin movingparts.
3. ALWAYS avoid accidental starting. BE SURE switch is in the "Off"
position before plugging in. DO NOT carry toolswith yourfinger on the
switch.Carrying tools with your finger on the switch or pluggingin tools that
have the switch in the "On" position invitesaccidents.
4. ALWAYS remove adjusting keys or wrenches before turning the tool
on, A wrench or a key that is left attached to a rotatingpart of the tool may
result in personal injury.
5. DO NOT overreach. ALWAYS keep proper footing and balance at all
times. Proper footingand balance enables better control of the tool in
unexpected situations.
6. ALWAYS use safety equipment. ALWAYS wear eye protection. Dust
mask, non-skidsafety shoes, hard hat, or hearing protectionmust be used
for appropriate conditions
TOOL USE AND CARE SAFETY
1. ALWAYS use clamps or other practical ways to secure and support th_
workpiece to a stable platform. Holding the work by hand or against your
body is unstable and may lead to loss of control.
2. DO NOT force the tool. Use the correct tool for your application. The
correcttool willdo the job better and safer at the rate for whichit is designed.
3. DO NOT use the tool if the switch does not turn it "On" or "Off".
Any tool that cannot be controlled with the switch is dangerous and must be
repaired.
4. ALWAYS disconnect the plug from the power source before making
any adjustments, changing accessories or storing the tool. Such
preventive safety measures reduce the risk of starting the tool accidentally.
4
TOOLUSEANDCARESAFETY
cont.
5.ALWAYS
storeidletoolsoutofthereachof childrenandother
untrainedpersons.Toolsare dangerous in the hands of untrained users.
6, ALWAYS maintain tools with care. Keep cuffing tools sharp and clean.
Properly maintainedtools with sharp cuttingedges are less likelyto bind
and are easier to control.
7. ALWAYS check for mlsallgnment or binding of moving parts, breakage
of parts, and any other condition that may affect the tool's operation.
If damaged, have the tool serviced before using. Many accidents are
caused by poody maintainedtools.
Z_WARNING:
USE OF ACCESSORIESTHAT ARE NOT RECOMMENDED I
FOR USE WlTHTHISTOOL MAY CREATE A HAZARDOUS CONDITION.
|
I
8. ALWAYS use only accessories that are recommended for this tool.
Accessories that may be suitable for one tool can become hazardous when
used on another tool.
SERVICE SAFETY
1. if any part of this sander is missing or should break, bend, or fail in any
way; or should any electrical component fail to perform properly:
ALWAYS shut off the power switchand remove the sander plug from the
power source and have the missing, damaged or failed parts replaced
BEFORE resuming operation.
2. Tool service must be performed only at a Sears Service Center. Service
or maintenance performed by unqualified personnel could result in a risk of
injury.
SAFETY RULES FOR SANDERS
1. NEVER use this or any power sander for wet sanding or liquid
polishing. Failureto follow this rule will increasethe risk of electrical shock.
ADDITIONAL
RULESFORSAFEOPERATION
Failure to follow all Instructions listed below may result In
I Z_WARNING:
BEand/or
SURE serious
to read and
understand
electric shock, fire
personal
injury. all instructions.
I
I
1. Know your power tool. Read operator's manual carefully. Learn the
applications and limitations, as well as the specific potential hazards
related to this tool. Followingthis rule will reduce the risk of electricshock,
fire or serious injury.
2. ALWAYS wear safety glasses or eye shields when using this sander.
Everyday eyeglasses have only impact-resistant lenses; they are NOT
safety glasses. Followingthis rule will reduce the risk of serious personal
injury.
3. ALWAYS protect your lungs. Wear a face mask or dust mask if the
operation is dusty. Followingthis rule will reduce the risk of serious
personal injury.
4. ALWAYS protect your hearing.Wear hearing protection during extended
periods of operation. Followingthis rule will reducethe risk of serious
personal injury.
5. ALWAYS Inspect the tool cords periodically and If damaged have them
repaired at your nearest Sears Service Center or other qualified Service
Facility. ALWAYS be aware of the cord location. Followingthis rule will
reduce the risk of electric shock or fire.
6. ALWAYS check for damaged parts. Before further use of the tool, a
guard or other part that is damaged should be carefully checked to
determine If it will operate properly and perform its intended function.
Check for mlsalignment or binding of moving parts, breakage of parts,
and any other condition that may affect the tool's operation. A guard
or other part that is damaged, should be properly repaired or replaced
at an qualified Service Center. Followingthis rule will reduce the risk of
electric shock, fire or serious injury,
7. DO NOT abuse the cord. NEVER use the cord to carry the tools or pull
the plug from the outlet. Keep cord away from heat, oil, sharp edges or
moving parts. Replace damaged cords immediately. Damaged cords
increase the risk of electricshock. Following this rule will reduce the risk of
electric shock or fire.
6
ADDITIONAL
RULES
FORSAFEOPERATION
CONT.
8.ALWAYS
makesurethatyourextensioncordIsIngoodcondition.
Whenusingan extension cord be sure to use one that is heavy
enough to carry the current that your tool will draw. A wire gauge
(AWG) of at least 14 is recommendedfor an extension cord 25 feet or less
in length.When working outdoorsALWAYS use an extension cord that is
suitable for outdooruse. The cord'sjacket will be marked WA_Smaller
gauge wires, have greater capacity (16 gauge wire has more capacity
than 18 gauge wire). An undersized cord will cause a drop in line voltage.
resultingin loss of power and overheating.
9. ALWAYS inspect and remove all nails from lumber before sanding.
Followingthis rule will reduce the risk of serious personal injury.
10.DO NOT use the tool while tired or under the influence of drugs,
alcohol or any medication. Followingthis rule will reduce the risk of
electric shock, fire or serious personal injury.
11.SAVE THESE INSTRUCTIONS. Refer to them frequently and use them
to instruct others who may use this tool. If someone borrows this tool,
make sure they have these instructions also.
/_WARNING:
Some dust particles created by power sanding,
sawing, grinding, drilling and other construction jobs contain
chemicals known to cause cancer, birth defects or other reproductive
harm. Some examples of these chemicals are:
• Lead from lead-based paints.
• Crystalline silica from bricks and cement and other masonry products.
• Arsenic and chromium from chemically treated lumber.
Your risk from these exposures varies, depending upon how often you do
this type of work. To reduce your exposure to these chemicals:
• Work in a well-ventilated area.
• Work with approved safety equipment, such as those dust masks that
are specially designed to filter out microscopic particles.
7
ADDITIONAL
RULESFORSAFEOPERATION
CONT.
Z_ WARNING:
The operation of any sander can
result in foreign objects being thrown into your eyes,
which san result in severe eye damage. Before
beginning power tool operation, ALWAYS wear
safety goggles or safety glasses with side shield
and a full face shield when needed. We recommend
a Wide Vision Safety Mask for use over eyeglasses
or standard safety glasses with side shield, available
at Sears Retail Stores.
The label of your tool may include the following symbols:
V
...........................................................
VOltS
A...........................................................
Hz .........................................................
W..........................................................
rain .......................................................
.......................................................
.........................................................
Hz .........................................................
no ........................................................
[] .........................................................
..Jmin ...................................................
OPM ......................................................
Z_ .........................................................
IMPORTANT!
Amps
Hertz
Watts
Minutes
.Alternating current
Direct current
Frequency
No-load speed
Class II Construction
Revolutions or Strokes per minute
JObitsPer Minute
Indicates Danger, Warning or
Caution+It means attentiont
Your safety is involved.
READ ALL INSTRUCTIONS!
I
I
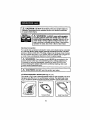
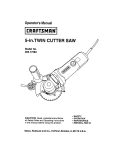
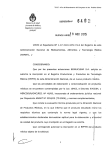
KNOWYOUR SANDER (See Fig.l)
The compact, lightweightdesign of this sander allows it to fit intosmall areas
that other sanders can_ reach. It is ideal for sanding, polishing,detailing,
removingrust with sanding pads, tips, polishingpads and scrubbingpads
(soldseparately). It has 2 interchangeable bases for extra versatilityin a wide
variety of large and small applications.It also features hook-and-loop
attachment for fast, easy sandingpads attachment or removal.
Fig I
Handle
Rocker
Triangular
Base
No-load
Speed
12,000 OPM (Orbits Per Minute)
Rating
120 Volts, 60 Hz AC
Input
1.5 Amps
Orbit Diameter
5/16-in. (0.31-in,)
Before attempting to use any tool, be sure to familiarize yourself with all
the operating features and safety instructions.
/-'_WARNING:
IF ANY PARTS ARE MISSING, DO NOT OPERATE
YOUR SANDER UNTILTHE MISSING PARTS ARE REPLACED.
FAILURE TO FOLLOW THIS RULE COULD RESULT IN SERIOUS
PERSONAL INJURY.
I
I
I
careless. Remember that a careless fraction of a second is sufficient
CAUTION:
DO NOT let familiarity with your sander make you
to cause
severe injury.
or safety glasses with side shield and a full face
shield when operating your sander. Failure to do so
could result in foreign objects being thrown into your
L_
ALWAYSwser
safety
goggles
eyes,WARNING:
resulting in possible
serious injury.If
the
sanding
operation is dusty, also wear a face or dust mask.
_1
Electrical Connection
Yoursander has a precision-builtelectricmotor and it shouldonly be connected
to a 120-volt, 60-Hz. power supply (normal household current). DO NOT
operate on direct current (DC). This large voltagedrop willcause a lossof power
that will overheat the motor. If your sander does not operate when plugged into
an outlet, have a professionalelectrician check the power supply.
Z_ WARNING:
Your sander should NEVER be connected to the
power source when you are assembling parts, making adjustments,
installing or removing sandpaper, cleaning or when it is not in use.
Disconnecting the sander will prevent accidental starting, that could
cause serious personal injury.
J Z_
CAUTION:
I
DO NOT use this sander near water.
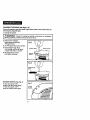
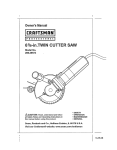
2 INTERCHANGEABLE BASES (See Figs. 2, 3, 4)
This sander (Fig. 2) has 2 interchangeable bases for extraversatility.The large
triangularbase (Fig. 3) is for sanding larger surfaces. The detail finger base
(Fig. 4) is ideal for sending corners and small, intricate hard-to-reachareas.
Fig. 3
g.4
Detail Finger Base_
Triangular Base
10
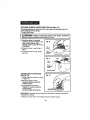
CHANGING
THEBASES
(SeeFigs.5,6)
Ifyourjobrequires
usingtheDetail Finger Base, followthese simple steps for
removingthe attached base.
1. Unplug the sander.
/I_WAHNINL_:
Failure to unplug the sander could result in accidental
starting causing possible serious personar injury,
2. Remove the 5 Phillips
head screws holding the
Triangular Base.
3. Lift Triangular Base off of sander.
4. Place Detail Finger Base
onto sander and line up holes
in base with holes in sander
5. Re-insert the 5 screws
and tighten securely.
iz
Fig. 5
\
Fig. 6
Delail Finger
Base
ROCKER SWITCH (See Fig. 7)
To turn the sander "ON",
simply push the rocker switch.
To turn the sander "OFF",
push the rocker switch again.
Fig. 7
On/Off
Switch
11
I
I
I
ATTACHING
SANDING
SHEETS
ANDPADS(SeeFigs.8,9)
Thissanderfeatures an easy hook and loop accessory fastening system for
quickchanging without clamps,
1. Unplug the sander.
L WARNING:
Failure to unplug the sander could result in accidental I
starting causing possible serious personal injury.
I
2. Carefully center the sanding
sheet or pad over the base to be
used. Une up the tip of the
sanding sheet or pad with the tip
of the base.
3, Press the sheet or pad firmly in
place.
4. To remove sheet or pad, simply
pull it off.
Fig. 9
Base
Tip of
SANDING WITH EITHER BASE
(See Fig. 10)
1. Always hold the sander as shown
in figure 10.
2. Move the sander in long,
sweeping strokes across the
sanding surface.
3. Light pressure is all that is
needed for sanding, polishing
and scrubbing.
Let the sander do the work.
IMPORTANT:
unsatisfactory
Applying
results,
excessive
Fig. 10
pressure will slow the sander and produce
4. Check your work often. This sander removes material
12
quickly.
SANDING TIPS
1. DO NOT force the sander.The weight of the sander supplies adequate
pressure.Let the sander and the sandpaper do the work,
A. Applyingadditionalpressure will onlyslow the motor,wear the
sandpaper out faster and reduce sander speed.
B. Excessivepressure willoverload the motor and cause possibledamage
to the sander from the motor overheating.
C. Excessive pressure will also result in inferiorwork.
2. Any existingfinish or resin on wood may soften from the heat of the friction.
3. DO NOT sand in one spot for too long a time because the sander's
rapid action may remove too much material and make the surface uneven.
SELECTING THE RIGHT SANDPAPER
Selecting the correct grit of sandpaper is an extremely important decision that
will allow you to achieve the best quality sanding finish,
1. Coarse grit will remove the most material and finer grit will give you the best
finish in all sanding operations
2, The condition of the surface to be sanded will determine which grit will do
the job.
3. If the surface is rough:
A. Start with a coarse grit (soldseparatly)and sand until the surface is uniform.
B. Then use medium to remove any scratches left by the coarse grit.
C. Then use a finer grit (sold separatly) for finishing the surface.
NOTE: ALWAYS continuesandingwith each grit until the surface is uniform.
USING THE POLISHING AND SCRUBBING PADS
This tool is also ideal for cleaning, polishingand removingrust with the
polishingend scrubbingpads (soJdseparately), See AttachingSanding Sheets
and Pads on page 12.
13
SERVICE
personnel may result in misplacing of internal wires and components,
I Z_WARNING:
PreventaUve
maintenance performed by unauthorized
which could cause
s serious hazard,
I
• All service that requires opening the sander MUST only be performedby a
Sears Service Center. All motor parts represant an importantpart of the double
insulationsystem and MUST only be serviced by a Sears Service Canter.
Service performed by unqualifiedpersonnel could result in a risk of injury.
• When servicingthis tool, ALWAYS use only identicalreplacement parts.
Follow instructionsin the Maintenance Section of this manual. Use of
unauthorized parts or failure to follow Maintenance instructionsmay create a
risk of electrical shock or injury.
• Avoid solventswhen cleaning plastic parts. Most plasticsare susceptible to
damage from varioustypes of commercial solventsand may be damaged by
their use. Use clean cloths to remove dirt, carbon dust, etc.
Z_.WAR
NING:
To avoid
accidants,
ALWAYS disconnectthe
tool from the I
power source
BEFORE
cleaning
or performingany
maintanance.
All parts represent an important part of the double insulation system and should
be serviced only at a Sears Service Center,
I
/tkWARNING:
DO NOT at any time let brake fluids, gasoline, petroleum- I
based products, penetrating oils, etc. to come in contact with plastic parts.
They contain chemicals that can damage, weaken or destroy plastic.
Use clean cloths to remove dirt, carbon dust, etc.
I
14
EXTENSION
CORDS
Theuseofanyextension cord willcause some loss of power.To keep the loss
at a minimum and to preventoverheating, use an extension cord that is heavy
enough to carry the current that the tool willdraw.
A wire gauge (AWG) of at least 16 is recommended for an extensioncord
100 feet or less in length. When working outdoors ALWAYS use an extension
cord that is suitable for outdoor use, The cord'sjacket will be marked WA.
replace it immediately.NEVER use a tool with a damaged cord because
touching the damaged area could cause electrical shock, resulting in
serious injury.
Extension cords that are suitablefor use with your sander are available at your
nearest Sears Store.
The following recommended accessories are currently available at your local
Sears Store. They are available for both the triangular base and the detail
finger base,
Medium (120) Grit Sandpaper for paint, varnish, rust removal
and light stock removal
Fine (180) Grit Sandpaper for surface blending and sanding
Extra Fine (220) Grit Sandpaper for sanding between paint coats and
finish sanding
Detail SandingTips for use in corners and hard-to-reach areas
Light Gray Polishing / Stripping Pad for polishing metal, stripping varnish
and urethane
Dark Gray Fine Polishing Pad for fine polishing to a satin finish on paint,
metal, varnish and urethane
Gray Foam Pad for applying and removing polish
White Non-Woven Pad for light-duty scrubbing
Red Non-Woven Pad for heavy-duty scrubbing / rust removal
Z_WARNING:
The use of attachments or accessories that are not
recommended might be dangerous.
15
J
I
NOTES
16
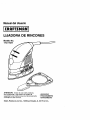
Manual del Usuario
LIJADORA DE RINCONES
Modelo No.
172,11624
ATENCION:
Antes de usar este producto,
lea comprenda y siga todas tas reglas de
seguridad y las instrucciones de funcionamiento
incluidas en este manual,
Sears,
Roebuck
and Co., Hoffman
Estates,
• SEGURIDAD
• FUNCtONAMIENTO
0 MANTENIMIENTO
IL 60179 U.S.A.
Garantfa ...............................................................
Instrucciones de Seguridad .................................
Sfmbolos de Seguridad .......................................
Descripci6n ..........................................................
Funcionamiento ...................................................
Mantenimiento .....................................................
Accesorios ...........................................................
P_,gina
Pdginas
Pdgina
Pdgina
Pdginas
Pdgina
P_.gina
18
19-24
24
25
25-29
30
31
GARANTIA COMPLETA DE UN A_IO DE LA
LIJADORA CRAFTSMAN
Si este producto no le otorga completa satisfaccibn dentro de un afio de la
fecha de compra DEVUELVALO AL ALMACEN SEARS MAS CERCANO
EN LOS ESTADOS UNIDOS y Sears Io reemplazar._gratuitamente,
Si este producto se usa para prop6sitos comerciales o de arriendo, esta
garantia es v_lida solamente durante 90 dfas desde la fecha de compra.
Esta garantia le otorga derechos legales especfficosy usted ademds
puede tener otros derechos que varfan de un estado a otto.
Sears, Roebuck and Co,, Dept. 817 WA, Hoffman Estates, IL 60179
iCONSERVE
iLEATODAS
ESTAS INSTRUCClONES!
LAS INSTRUCClONES!
18
ADVERTENClA: ASEGURESE de leer ¥ comprender todas |as
I_lones.
[] Incumplindefltode todas las Instrucciones sigulentespuede
producir un choque eldctrl¢o, Incendlo y/o leslones personales graves.
SEGURIDAD
DEL AREA DETRABAJO
1. Slempre mantenga el lugar de traba|o llmp|o y b|en itumlnado. Los bancos
de trabajo desordenados y real iluminados favorecen los accidentes.
2. NO utilice las herramientas el_=ctricas en una atm6sfera explosiva, tal
como en presencla de Iiquldos infiamables, gases 0 polvo. Las
herramientas eldctricas crean chispas que pueden inflamar el polvo o los vapores.
3. Siempre msntenga a los espectadores, ni_os o v|sitantes a una distancia
prudente cuando est_ uUlizando una herramlenta el_ctrlca. Las
distracciones pueden hacede perder el control.
SEGURIDAD
EL_CTRICA
1. Las herramlentas con alslamiento dob_ est_n equlpadas con un enchufe
polarizado (una hoja de contacto es mds ancha que la otra.) Este enchufe
puede colocarse en un tomacorrlente polarlzado en una s61a direccl6n.
Si el enchufe no calza blenen el tomacorriente, invlerta el enchufe.
Si todavl'a no calza, p6ngase en ¢ontacto con un electrlclsta callflcado
para que instale un tomacorriente adecuado. NO modifique el enchufe
de ninguna manera.
2. El aislamiento doble [] elimina la necesidad del cord6n el(§ctrico trifilar puesto
a tierra y de1 sistema de atimentacibn de energia puesto a tierra. Esto se
aplica s51o a tas herramientas de Clase II (de doble aistamiento)
3. Antes de enchufar la herramienta,ASEGURESE
que el interruptor de vollaje
corresponde al indicado en la placa de informacidn de la herramienta. NO USE
"CA solamente" en herramientas que dicen CC
4. SIEMPRE evite el contacto del cuerpo con |as superficies puestas a tierra
tales como tuberias, tad|adores, cocinas y refrigeradores. Existe mayor
riesgo de sufrir choque el_ctrico si su cuerpo esta a tierra.
5. SI no puede evitar usar su herramlenta en lugares hdmedos, SIEMPRE
use Interruptor de Circuito de Falla aTierra pars proporcionar energl'a a el
herramlenta, ten amblentes h_medoa use s|empre guantes de electrlclsta
y catzado.
6. NO exponga las herramientas el_ctricas a la Iluvia ni a ambientes
hdmedos. Cuando entra agua a una herramienta electdca, se aumenta el
riesgo de sufrir un cheque el_ctrico.
7, NO abuse del cord6n ei_ctrico. Nunca transporte Is herramienta pot el
cordbn ni tire del cordbn para desenchufarla. Mantenga el cord6n alejado
del calor, del aceite, bordes afilados o piezas mdviles, Reemplace
inmediatamente
los cordones el6ctricos que est_n dafiados. Los cordones
da_aclos aumentan el riesgo de sufrir un choque el_ctrico.
6. Cuando ut|lice una herramienta el_ctrica al sire libre, use un cordbn de
extensi6n marcado "W-A" o "W". Estos cordones estan aprobados pars
uso al aire libre y reducen el riesgo de choque electrico.
19
SEGURIDAD ELECTRICA cont.
NOTA: El cord6n de extensk_ndebe tener el tama_o de alambre adecuado
AWG (American Wire Gauge) para uso eficiente y seguro.Alambres de calibre
mds peque_5otienen mayorcapacidad (alambre de calibre 16 tiene rods
capacidad que el alambra de 18).
SEGURIDAD PERSONAL
1. SIEMPRE mant6ngase alerts, observe Io que es_ haclendo y use sentido
comdn cuando est6 cansado o bajo le Influencla de drogas, alcohol o
medlcamentos. Un momentode distracck_ncuando esld trabajandocon las
herramientaseldctricas,puede ocasionaruna lesi6n personalgrave.
2. SIEMPRE use vestlmenta adecuada. NO use ropas sueltas o joyas.
Amdrrese el cabello largo. Mantenga su cabello, ropas y guantes
aleJados de lee plezas m6viles. Las ropas suettas, las joyaso el cabello
largo pueden quedar atrapados en las piezas m6viles.
3. SIEMPRE evite la puesta en marcha accidental. ASEGURESE de que el
interruptor est6 en la poslei6n "Off" (apagado) antes de enchufar la
herramlenta. NO transportelas herramientascon su dedo colocadoen el
interruptor.Se puede producirun acoidente si transportala herrarnientacon
su dedo en el interruptoro si enchufa la herramienta cuando el interruptor
esta en la posici6n "On" (encendido).
4. SlEMPRE saque las Ilaves de ajuste o Ilaves inglesas antes de poner en
marcha la herramienta, Si se deja una Ilave inglesa o una Ilave de ajuste en
una pieza m6vil o en una pieza giratoriade la herramienta,se puede producir
una lesi6n personal.
5. NO use la herramlenta a una dtstancla demasiado alejada. Mantenga
SIEMPRE un buen equllibrio y una posici6n firme. El buen equilibrioy
la posicibnfirme permiten un mejorcontrolde la herramientaen
situacionesimprevistas.
6. SIEMPRE use equipo de seguridad. Use SIEMPRE lentes protectores.
Se debe usar m_scarascontrael polvo,zapatosde seguridadantirresbaladizos,
casco de seguridad o protecci6nauditiva de acuerdo con las circunstancias.
USOY
CUIDADO
DE LAS HERRAMIENTAS
DE SEGURIDAD
1. SIEMPRE use mordazas u otto mdtodo prdctico para asegurar y apoyar
la pleza de trabajo en una plataforma eatable. Si sujeta el trabajo con la mane
o contra su cuerpo queda inestable y puede conducir a la p6rdida de control.
2. NO fuerce la herramlenta. Use la herramienta aproplada para el trabajo.
La herramienta correcta hard el trabajo mejor y de manera rods segura, a la
velocidad para la cual rue dise_ada.
3. NO use la herramlenta si el Interrupter no funciona debldamente.
Es peligroso si la herramienta no puede ser controlada con el interruptor
y por Io tanto debe set reparada.
4. SIEMPRE desenchufe la herramienta antes de hacer algOn ajuste, cambiar
accesorios o guardarla. Estas medidas preventivas de seguridad reducen
el riesgo de que la herramienta se ponga en marcha accidentalmente.
20
USOY CUIDADO DE LAS HERRAMIENTAS DE SEGURIDAD cont.
5. SIEMPRE guarde las herramientas lejos del alcance de los niho$ y de
otrae personas Inexpertas. Las herramientas son peligrosasen manos de
personas inaxpertas.
6. SIEMPRE mantenga blen cuidadas las herramientas. Lea herramientas
cortantea deben mantenerse aflladas y llmplas. Las herramientasque se
mantienen bien cuidadas y bien afUadastienen menos probabUidad de
atascarse y se pueden oontrolar mds fdcilmente.
7. SIEMPRE veriflque s! hay plezas desalineadas o atascadas, ai hay
ple.zas quebradas o s| ex|ste cua|quler otra sttuac|6n qua pueda afectar
el funcionamiento de la herramienta, Si la herramienta est&daSada, debe
repararse antes de usarla nuevamente. Muchos accidentes son causados
debido at mat estado de las herramientas.
USADOS CON ESTA HERRAMIENTA PUEDEN CREAR UNA
I _SITUACION
EL USO PELIGROSA
DE ACCESORIOS NO RECOMENDADOS PARA SER
8. SIEMPRE use so|amente los accesorios recomendedos pot el fabricante
para su modelooLos accesorios que pueden ser adecuados pare una
herramienta, pueden ser peligrosossi se utilizan en otra.
SERVICIO TECNICO SEGURO
1. SI falta cualquter plaza de esta lljadora o se rompe, dobla o falla de
cue|quiet manera; o sl a|guno de |os componentes el_ctricos no
funciona en forma debida, SIEMPRE apague el interruptorde puesta en
marcha, desenchufe la lijadoray reemplace las piezas da_adas, faltantes o
falladas ANTES de volvera poneda en tunc'_onamiento.
2. La reparacidn de las herramientas DEBE SER efectuada solamente en
un Centro de Servlclo Sears. La reparaci6n o mantenimientoefectuado por
persona_ no especiatizadopuede causar una lesibn.
REGLAS DE SEGURIDAD PARA LIJADORAS
1. NUNCA use esta o cualquler otra lijadora mecanica para lijar superficies
hdmedas o para pulir con liquido. El incumplimientode esta regla puede
aumentar la posibilidad de un choque electrico.
21
REGLAS
ADICIONALES
PARAFUNCIONAMIENTO
SEGURO
z_ADVERTENCIA:
ASEGURESE de leer y comprenda todas
las Instrucciones. El incumpllmlento de todas las Instrucclonea
sigulentes puede produclr un choqua el6ctr|co, incend|o y/o lesiones
personales graves.
I
I
1. Conozca su herramlenta. Lea culdadosamente el manual del usuado.
Aprenda sus apllcaciones y limltaciones asf como tambl6n los rlesgos
potenclalee espec_cos relacionados con esta herramienta. El cumplimiento
de esta mgla reducirael riesgo de un choque ek_ctrico,incendioo lesi6ngrave.
2. Use SIEMPRE lentes de seguddad o pantallas cuando use esta I|jadora.
Los anteojos regulars tienen solamente lentes resistentes al impacto;
ellos no son lentes de seguridad. El cumplimiantode esta regla reducir& el
riesgo de sufrir una lesion personalgrave.
3. SIEMPRE proteja sos pulmones. Utilice una mdscam contra el polvo
si la operacl6n de corte va a despedir mucho polvo. El cumplimientode
esta regla reducird el riesgo de sufrir una lesi6n personalgrave.
4. SlEMPRE protaja su audici6n. Utilice protecci6n para los oidos durante
perl'odos prolongados de funclonamiento. El cumplimientode esta regla
reducird el riesgo de sufrir una lesi6n personal grave.
5. SIEMPRE inspeccione peri6dicamente los cordones de ta herramienta
y sl estan da_ados, hdgalos reparar pot su Centro de Servicio de Sears
mds cercano u otro Centro de ServIcio Autorizado. Siempre est6 atento
a la ubicaci6n del cordon. El cumplimiento de esta regla reducir_el nesgo
de un choque electrico o incendio,
6. SIEMPRE Inspeccione por piezas dafiadas. Antes de segulr utllizando
la hermmlenta, tnspeccione para determinar sl algt_nprotector o cualquier
plaza que est6 dafiada funcionard debidamente. Verifique la alineaci6n
de las p|ezas m6vlles, si est_n atascadas o si hay rotura de piezas, revise
ademds el montaje y cualquier otra condici6n que pueda afectar su
funcionamtento. Si se dafia un protector o cualquier otra plaza, debe
ser reparada o rosmplazada por un centre de servicio autorizado.
El cumplimientode esta regla reducirdel riesgo de un choque electrico,
incendio o lesi6n grave,
7. NO abuse del cord6n. NUNCA use el cord6n para Ilevar la herramienta
o Io tire del enchufe. Mantenga el cord6n aleJado del calor, del acelte y
de los bordes fllosos o repuestos en movimlento. Rsemplace
inmediatamente los cordones el_ctricos qua estdn da_ados. Los cordones
dafiados aumentan el riesgo de sufrir un cheque el_ctrico. El cumplimiento
de esta regla reducird el riesgo de un choque el6ctrico o incendio.
22
REGLAS
ADICIONALES
PARAFUNCIONAMIENTO
SEGURO
cont.
8.SIEMPRE
asegdresa
dequasucord6ndeextensionestdenbuen
estado.Cuandouseuncord6ndeextensl6n,asegurese
dequesu
calibreseasuflclenteparaportarla corrlentequenaces|tasu
herramienta.
Serecomianda
uncord6ndepotIomenoscalibre14(A.W.G.)
parauncord6ndeextensibn
de25pies0 menosdelargo.Cuando
trabajeal
aim libra SIEMPRE use un cordbnde extensionadecuado para uso al aire
libra. La envolturadel cordon estara marcada WA. Los alambres de calibre
rods peque_o tienen mayor capacldad (el alambre de calibre 16 tlene
rods capacldad que el alambre de 18). Un cordonde calibre inferior
causard una p_rdida en el voltajede Ifnea resultando en pdrdida de potencia
y sobreca_entamiento.
9. SIEMPRE inspeccione y saque todos los clavos de la madera antes
de Iljar. El cumplimiento de esta regla reducird el riesgo de sufrir una lesiSn
personal grave.
10.NO haga funclonar esta herramlenta cuando est6 bajo la influencla de
drogas, alcohol o haya tomado medlcina, El cumplimientode esta regia
reducira el riesgo de un choque el_ctrico, incendio o lesi6n grave.
11.CONSERVE ESTAS INSTRUCCIONES. Cons_ltelas con frecuencla ¥
dselas para ayudar a otros qua puedan usar esta herramlenta.
Si usted presta esta herramienta a otra persona, entregue tambidn
las Instrucciones.
/_ADVERTENCIA:
Algunas particulas de polvo creada al Iljar con
una herramienta, moler, taladrar y hacer otros trabajos de construcci6r
contienen quimicos qua se sabe pueden produclr c=tncer,defectos al
nacer u otros dafios reproductivos. AIgunos eiemplos de eatos
quimicos son:
• Plomo de las pinturas a base de plomo,
• Silice cristalino a partir de ladrillos y cemento y otros productos
de albafiileria,
• Ars_nico y cromo a partir de maderas tratadas con quimicos
Su riesgo a estas exposiciones varia, dependiendo de la frecuencia con
que hace este tipo de trabajo. Para reducir su exposiciSn a estos quimicos:
• Trabaje en un &tea bien venli_ada,
• Trabaje con equipo de seguridad aprobado, como por ejemplo m&scaras
para polvo disefiadas especfficamente para filtrar las particulas
microscopicas.
23
REGLAS
ADICIONALES
PARAFUNCIONAMIENTO
SEGURO
€onL
/t_ ADVERTENCIA:
La utilizaci6nde cuatquier
liJadorapuede causar la proyecci6nde objetosextraSosa
SUSojos, io cual puede ocasionardahosoculares severos.
Antes de comenzar a usar la herramienta mecdnica,
SIEMPRE use sus lentes protectoreso pantallas de
seguridad con protecci6n lateral y una m_scara completa
¢uando sea necesario. Reosmendamos una Mdscara de
Visi6n Amplia para usar sobre sus lentes protectoreso
lentes de seguridad est_ndar, con protecci6nlateral,
disponible en los Almacenes Sears.
La etiqueta en su herramienta puede inclulr los siguientes sfmbolos.
V...........................................................
A ...........................................................
Hz .........................................................
W..........................................................
min .......................................................
,_, ........................................................
.........................................................
Hz .........................................................
no ........................................................
[] ........................................................
..Jmln ...................................................
OPM .......................................................
Z_ ........................................................
ilMPORTANTE!
.Voltios
Amperios
Hertz
Watts
Minutos
Corriente Alterna
Corriente Continua
Frecuencia
.Velocidadsin carga
.Construcci6nClase II
Revolucioneso Golpes por Minuto
Orbitas por Minuto
Indica peligro,advertencia o atencibn.
Puede usarse conjuntamentecon otros
sfrnboloso pictogramas.
iLEATODAS
24
LAS INSTRUCCIONES!
CONOZCA
SULIJADORA
(VerFig.1)
Eldise_ocompacto
ylivianodeestalijadoralepermite
poderusarlaendreas
estrechas
queotraslijadoras
nopueden
alcanzar. Es ideal para lijado, pulido,
trabajo de detalles, mmocibn de oxidacibncon bloquesde lijar,puntas, bloques
pulidoresy bloques restregadores(vendidos por separade). Tiene dos bases
intercambiablespara mayor versatilidaden una amplia variedad de
aplicacionesgrandes y pequeSas. Ademds tiene un sistema de fijacibn especial
que permite instalaci6no remoci6n rdpiday facil de las hojas y bloquesde lijar.
Fig 1
Base
de Detalles
Velocidad sin carga
12.000 OPM (Orbitas
Potencia Nominal
120 voltios, 60 Hz CA
Alimentaci6n
1,5 Amps
DiAmetro
5/16 (0,31) pulgada
de la Orbita
por Minuto)
Antes de intentar usar cualquier herramienta, as necasarlo familiarizarse
con todas las caracterfstlcas
de funcionamiento
y las instrucciones
de segurtdad
I
HAGA FUNClONAR ESTA HERRAMIENTA
HASTA QUE LAS PIEZAS
FALTANTES
NO HAYAN SIDO
REEMPLAZADAS.
LO PIEZAS
CONTRARIO
_ADVERTENCI._I
FALTA
CUALQUlERA DEDE
LAS
NO
SE PUEDE CAUSAR UNA LESION PERSONAL GRAVE.
25
I
interfiera con su atenci6n. Recuerde qus un descuido de una fraccibn de
I segundo
A'k ATENCION:
NO
que su familiaridad con la lijadora
puede causar
unapermita
lesi6n grave.
I
Z_ ADVERTENCIA:
SIEMPRE use lentes
protectores o galas de segur|dad con proteccl6n
lateral y una mdscara completa ¢uando utillce su
liJadora. De Io contrariose puede producirproyecci6nde
objetosextrafiosa sus ojos Io cual puede ocasionardahos
ocularesgraves.Si el Iliads va a despedirmucho polvo,
tambi_n utiliceuna m_scara facial o una m_scara contra
el polvo.
Conexl6n Eldctrtca
Su lijadora tiene un motor eldctricoconstruidoa precisibnel cual debe ser
conectado solamente a una fuente de alimentaci6n de 120 voltios, 60 Hz.
(corrlente normal del hogar). NO haga funcionaresta lijadoracon corriente
continua(CC}. Una cafda significativade voltajecausar_ p_rdidade potenciay
el motorse sobrecalentar_.Si su lijadorano funcionacuando est_ enchufadaen
un tomacorriente,solicitsa un electricistaprofesionalque verifiquela fuente
de alimentaci6nel_ctdca.
en la fuente de suministroel_ctrisoCuandoest_ instalando piezas, haciendo
ajustes, instalandoo retirando el papel de Ilia, limpi&ndola o cuando no est_
desenchufar la lijadorase
evitar_
puesta
marchaenchufada
accidental,
I en
Z_ uso.AI
ADEVERTENCIA:
Su lijadora
nola
debe
estarenNUNCA
que podrfa causar una lesi6n personal grave.
I Z_ ADVERTENCIA:
NO use esta lijadoracercadel agua
2 BASES INTERCAMBIABLES (Ver Figs. 2, 3, 4)
Esta lijadora (Fig. 2) tiene 2 bases intercambiables para mayor versatilidad.
La base grands triangular (Fig. 3) es para lijar _reas grandes. La base para
trabajo de detatles (Fig. 4) es ideal para tiiar rinconesy areas pequehas e
intrincadas, dificiles de alcanzar.
Base
riangular
26
I, '
I
I
I
Base para
Trabajo de
Deta]les
X_\
_
"_
"_
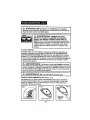
CAMBIO DE LAS BASES (Ver Figs. 5, 6)
Si necesita usar la base para trabajo de detalles, simplemente siga estos
sencillospasos para retirarla base que estd instalada en la lijadora.
1. Desenchufe la lijadora
I Z_
ADVERTENCIA:
Si nocausando
desenchufa
laposible
lijadoralesi6n
se puede
producirla
puesta
en marcha accidental
una
grave.
F,g.,
%J
2. Retire los 5 tornillosde
cabeza Phillipsque sujetan
la base triangular.
3, Levante la base triangular
para sacarla de la lijadora.
4. Coloqua la base para trabajo
de detalles en la lijadora y alinee
los agujeros de la base con los
agujeros de la lijadora.
5. Vuelva a insertar los 5 tornillos
y apri_telos firmemente.
INTERRUPTOR OSCILANTE
(Ver Fig. 7)
Para poner en marcha la ]ijadora
("ON"_, simplemente oprima el
interruptor oscilante. Para apagar
("OFF") la lijadora, optima
nuevamente el interruptor oscilante.
BaseTd
. _
Agueros--_ _
paralos
_,____
Tomillos )
Fig. 7
Interrupto¢
'On/Oil'
(Encendido/
Apagado)
27
Tornios
. _J
INSTALACION DE LAS HOJAS Y BLOQUES DE UJAR (Ver Figs. 8, 9)
Esta lijadora tiene un f&cilsistema de sujecionpara cambio rapido sin el uso
de colas ni grapas.
1. Desenchufe la lijadora.
/ila puesta
ADVERTENClA:
si no secausando
desenchufa
lalesi6n
lijadora,se
en marcha accidental
una
grave.puede producir
2. Centre cuidadosamente la hoja o
bloque de lijar sobre la base que
va a usar. Alinee la punta de la
hoja o bloque de lijar con la punta
de la base,
3. Oprima la hoja o el bloque de
lijar firmemente en su lugar.
4. Para reUrarla hoja o el bloque
de lijar, simplemente tire de _1
para extraerlo.
Fig. 9
Punta de
la Base
Punta de
la Hoja
de IJjar
Hoja de Ujar
LIJADO CON CUALQUIERA
DE LAS BASES (Vet Fig. 10)
1. Siempre sostenga la lijadora
come se muestra en la Figura 10.
2. Mueva la lijadora en pasadas
largas y emplias a traves de la
superficie que necesita ser lijada.
3. Una leve presi6n es todo Io que
se necesita para lijar, puliry
restregar. Deje que la lijadora
haga el trabajo.
Fig. 10
IMPORTANTE: Si aplica presion excesiva se reducira la velocidady producirb
resultadosno satisfactorios.
4. Verifiquea menudosu trabajo.Esta lijadoraextraeel materialen forma rdpida.
28
SUGERENCIAS PARA EL LIJADO
1. NO fuerce la lijadora. El peso de la herramientaproporcionapresi6n
adecuada. Deje que el papel de lijar y la lijadorahagan el trabajo.
A. Si aplica presibnadieional solamente conseguir_hacer mfJs lento el
motor, desgastarrods rdpidamenteel papel de lijar y reducir la velocidad
de Jalijadora.
B. La presion excesivasobrecalentar_ el motorcausando posible dafio a
la lijadora a causa del sobrecalentamientodel motor.
C. La presi6n excesiva tambi_n puede causar un trabajo deficiente.
2. Cualquier acabado o resina de la madera puede ablandarse con el calor
de la fricci6n.
3. NO lije durante mucho tiempo en un mismo punto pues la rdpidaacci6n de
la lijadora puede sacar demasiado material dejando la supedicie dispareja.
SELECCION DEL PAPEL DE LIJAR ADECUADO
Es muy importante seleccionarel grano correcto de papel de lijar para Iograr
un lijadode alta calidad.
1. El grano dspero es el que lijar&rods material y el grano m&s fino producird
el mejor acabado en todas las operaciones de lijado.
2. El estado de la superficie a set lijada determinard que grano har_, mejor
el trabajo.
3. Si la superficJe es dspera:
A. Comience con un grano aspero y lije hasta que la superficie quede
uniformemente suave.
B. Luego use grano mediano para sacar las rayaduras dejaclas pot el
grano dspero.
C. Use despu6s grano fino para el acabado de la superficie.
NOTA: SIEMPRE continue lijando con cada grano hasta que la superficie
quede uniformemente suave.
USO DE LOS BLOQUES PULIDORES Y RESTREGADORES
Esta herramienta tambi6n es idea] para limpiar, pulir y eliminar la oxidaci6n
utilizando los bloques pulidoresy restregadores (vendidos por separado). Vet
Instalacion de las Hojas y Bloques de Lijar en la pdgina 12.
29
REPARACION
personal no autorizado puede resultar en colocacl6n Incorrecta de los
I cables
/KADVERTENCIA:
mantenimlento
preventive
efectuado
per
y componentes El
internes,
Io cual podrfa
causal"un
riesgo
grave. I
• Todo tipo de servicio que requiem tener qua abrir la lijadoraDEBE set
realizado selamente per un Centre de Servicio Sears. Todas[as piezas del
motor representan una parte importante del sistema de aislamientodoble y
DEBEN ser reparadas solamente per un Centre de Sewicio Sears.
Las reparaciones efectuadas pot personal no calificadopuede causar desgo
de sufrir una lesi6n.
• Cuando repare esta herramienta, SlEMPRE use repuestos autOnticos
solamente. Siga las instrucciones indicadas en la secci6n Mantenimiento de
este manual. El uso de piezas no autorizadas o el incumplimiento de las
instrucciones de mantenimiento puede crear un riesgo de choque el_ctrico o
lesi6n.
• Evite el uso de solventes cuando limpie las piezas de pldstico. La mayona de
los pldstieos son suseeptiblesa diversos tipos de solventes eomerciales y
pueden daSarse con su uso. Use pa£=oslimpiospara sacar la suciedad, polvo
de carb6n, etc.
herramientade la luente de alimentaci6nANTES de la limpiezao de realizar
I /KADVERTENCIA:
Afin de evitar accidentes, SIEMPRE desconecte la
cualquier labor de mantenimiento.
Todas ras piezas representan una parte importante del sistema de ais]amiento
doble y deben ser reparadas solamente en un Centro de Servicio Sears.
I
frenos, gasolina, productos a base de petroleo, aceites penetrantes, etc.
entrenen contacto con las piezas de pl_,stico. Ellos contienen productos
_ADVERTENCIA:
NO permita
en ningt_n
memento
liquidos
de
quimicos
que pueden daSar,
debilitar que
o destruir
el pl&stico
Uselos
paSos
limpios
para quitar la suciedad, polvo de carbon, etc.
3O
CORDONES DE EXTENSION
El use de cualquier cord6n de extensi6n causar_,una cierta p_rdida de potenaia.
Para mantener la p_rdida a un m_nimoy evitar sobrecalentamiento,use un
cord6n de extensi6ncuyo calibre sea sufieientepara portar la corriente qua
necesitar._la herramianta.
Se recomiendaun cord6n de per Io menos calibre 16 (AWG) para un cord6n de
extension de 100 pies o manes de largo.Cuando trabaje al aira libra SIEMPRE
use un cord6n de extension adecuado para use al aire libra.La envolturadel
cord6n estard marcada con las letras WA.
I
I
use. Si estdn da_ados, reempl_.celosinmediatamente. NUNCA use una
herramienta con un cord6n
dahado
al tocar
&rea daSada
I Z_ADVERTENCIA:
Verifiqua
lospues
cordones
de el
extensibn
antespuede
de cada |
causer un cheque el_ctrico, ocasionando una lesi6n grave.
Los cordones de extensi6n que son adecuados para use con su [ijadora est&n
disponibles en su Almaeen Sears m&s cercano.
Los siguientes accesorios recomendados est&n actualmente disponibles en su
AImac_n Sears local, Est_n disponibles tanto para la base triangular come
para la base para trabajo de detalles.
Papel de lija de grano mediano (120) para remocion de pintura, barniz,
herrt_mbre y lijado _iviano
Papel de lija de grano flno (180) para alisamiento y lijado de superficies
Papel de liJa extraflno (220) para lijado entre capas de pintura y lijado de
aeabado
Sugerancias para lijado de detalles en rinconee y dreas dificile$ de
alcanzar
Bloque gris claro pulidor/decapador para pullr metal, decapado de barnlz
y uretano
Bloque 9ris oscuro pulidor para pulido fino hasta acabado satinado en
pintura, metal, barniz y uretano
Bloque de espuma gris para aplicar y remover putldor
Bloque blanco no tejido para restregado Ilviano
Bloque rojo no tejido para restregadolremoci6n de herrumbre de servicto
pesado
I z_ADVERTENCIA:
Ique no hayan side recomendades.
Puede ser peligros° usar acces°rios ° dispositivos
31
::::::::::::::
::::::::::::::
::::::;::::::::::;:::::;:::::::::::::::::::::::::::::
:::;:
:::::<_;>:.>
:+:<.>:.::.:,>::>:+:.:.:.:.:.±.:._:_+_:.:<_:, :.:.:.:
:_*:*:.:::_::::::_:
:_ :_:_:
_:::_:::_:.:::;::::_
:::::::
:.:::::::
_<::,:+:<:>:_: >::.:_.:.:.:.;.
:.:.;.:.::.:.:._.:.
:.
i_iiiiiiiiiiiii!ililililililill!iiii
i_;_::::::;:_:_::::_::::;"
^w_
.,_:•_!_
_i• _
•
.<+.
_... _::
_->_i_•
,:,:. _:.;_ _.
. _;
+_"
_
>__._>_×<<_>>>_
__i>:
_< - _:*_+>_+>>>_
:
: _:::::::::>
:::;::_iiiili!i!ilililililiiiiii!ili!ililil"
:::;::::::%
Your Home
For repair In your home of all major brand appliances,
.............. lawn and garden equipment, or heating and cooling systems,
no matter who made It, no matter who sold It!
For the replacement parts, accessories and
owner's manuals that you need to do-it-yourself.
::::::::
;::::::
:::::::::::::
;::::::
;:;::::
:::;:;:::::::;
:::::::::::::
For Sears professionalinstallationof home appliances
and items like garage door opensm and water heaters.
1-800-4-MY-HOME e
Anytime, day or night
(1-800-469-4663)
(U.S.A. and Canada)
www.se_rs.com
www.se_rs.ca
Our Home
For repair of carry-in products like vacuums, lawn equipment,
and electronics, call or go on-line for the nearest
Sears Parts and Repair Center.
iiiiilil
2
1-800-488-1222
Anytime, day or night (U,S.A
only)
i i i!ilil,
www.sears.com
ili!ii!iiii!i
To pumhase a protectionagreement (U.S.A.) or maintenance
agreement (Canada) on a productserviced by Sears:
1-800-827-6655
(u.s.A.)
1-800-361-6665
.......... Parape_r sewicio de reparaci_
:::_;_:_a damici_o,y para_dana_ piezas:
.....
i:iii:
1-888-SU.-HOGAR
_
(Cs,,ada)
Au Canada pour serviceen fran_ais:
1-8004-E-FOYER_c
(I_00-_7)
:ii;iiiiiiiiiiii
www.sears.ca
iiiiiiiiiiiiiii
;!:i: