1
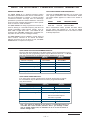
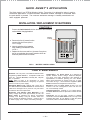
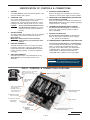
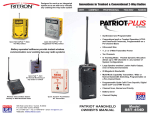
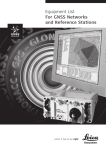
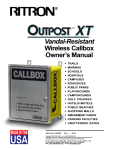
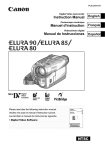
Quick Assist II ® WIRELESS CALLBOX TRANSMITTER Owner's Manual MODELS: RQA-150 (VHF) RQA-450 (UHF) Designed for indoor use only Website: www.ritron.com Pub. No. 14500034 Rev B 05-06 © 2002-2006 RITRON, INC. ALL RIGHTS RESERVED RITRON, Quick Assist, and Quiet Call are registered trademarks of RITRON, INC. Quick Talk is trademark of RITRON, INC. P.O. Box 1998, Carmel, IN 46032-1998 505 W. Carmel Dr., Carmel, IN 46032 USA PH: 317-846-1201; 800-USA-1-USA (800-872-1872) FAX: 317-846-4978 E-mail: [email protected] qtm9322b.pm5 TABLE OF CONTENTS DESCRIPTION WARNING IMPORTANT SAFETY INFORMATION PAGE WHAT THIS MANUAL COVERS .................................... ii NOTICE: The Quick Assist II unit should not be used to report conditions relating to safety of life or property. WARNINGS AND CAUTIONS ........................................ ii To reduce the risk of fire, electric shock or personal injury, follow these basic safety instructions when using this unit. FEATURES ..................................................................... ii INTRODUCTION ............................................................ 1 General ................................................................ 1 Model Identification ............................................. 1 1. Read and follow all instructions. DEFAULTS ..................................................................... 1 Factory Programmed Defaults ........................... 1 Resetting Factory Programmed Defaults .......... 1 3. Use only approved power sources for the unit. 2. Disconnect the unit before cleaning. Do not use liquid or aerosol cleaners. 4. During thunderstorms, avoid contact with this unit and any external antenna system or wiring. CARE AND MAINTENANCE ........................................... 2 Battery Installation/Replacement ....................... 2 Low Battery Alert Message .................................. 2 5. If you are unsure whether your installation will be safe, contact an experienced electrician or electronics technician. CONTROLS & CONNECTORS ...................................... 3 QUICK ASSIST® II F E ATURES PROGRAMMING ............................................................ 4 Frequently Asked Questions ............................... 4 Testing Your Programming Telephone .............. 4 Programming Transmitter Frequency ................ 6 Programming Quiet Call Coded Squelch Codes ................................................................. 6 Programming Digital Quiet Call Squelch Codes ................................................................. 6 TABLE 1: Transmitter Frequency Codes .......... 7 TABLE 2: Quiet Call Tone Codes ....................... 7 TABLE 3: Digital Quiet Call Tone Codes ........... 7 Recording Voice Messages ............................... 8 Playing Back Voice Messages ........................... 8 Programming Voice Phrase Repetitions .......... 8 TABLE 4: Time Between Repeat Messages ..... 8 Limiting the Number of Transmissions ............ 8 TABLE 5: Message Repeat Limit ....................... 8 Recording a Unique Low Battery Message to Identify a Quick Assist II ................................. 8 Programming a Transmission Schedule ......... 8 Quick Assist II Pre-installation Checklist .......... 8 DESCRIBED IN THIS MANUAL: Internal radio transmitter (separate VHF and UHF models). User-recorded voice messages; total recording time of 16 seconds. Typical range of 1/2 mile. Longer range is possible using an optional antenna. Internal battery holder for six (6) AA Alkaline cells. Typical operating battery life of 1 year. Automatic low battery message. Jumper Selectable Features - Setting Narrow (12.5 kHz) or Wide-band (25 kHz) Channel Spacing. - Compressed or Non-compressed Audio Transmitter. - Battery Type Settings (Alkaline or Rechargeable Ni-Cd). Connection and use of an external 12 Volt DC power supply. The following features are programmable using a dial pulse telephone: - Transmit Frequency; - Tone Coded Squelch Encoder (Quiet Call® Interference Eliminator); - Digital Coded Squelch Encoder (Digital Quiet CallTM Interference Eliminator); - Message transmission schedules and limits. Limited One-year Factory Warranty. ADVANCED FEATURES ................................................ 9 Selecting Narrow or Wide-Band Channels ..... 9 Selecting Audio Selector Jumper ..................... 9 Important Note ................................................... 9 Battery Type Settings ......................................... 10 Connecting to External Power Source .............. 10 INSTALLATION ............................................................. 11 RITRON WIRELESS SOLUTIONS ................................ 12 F.C.C. LICENSING ......................................................... 14 WARRANTY ................................................................. 14 WHAT THIS MANUAL COVERS This manual covers basic operation of the Quick Assist II Wireless Callbox Transmitter. For most applications, this is all the information you will need. NOT DESCRIBED IN THIS MANUAL: Use of solar power panels to operate and charge internal Ni-Cd batteries. Enabling and disabling the low battery or external power failure messages. Battery saver options. External antenna. For assistance, call RITRON at 800-USA-1-USA (800-872-1872) or visit us at www.ritron.com ii qtm9322b.pm5 ABOUT THE QUICK ASSIST® II WIRELESS CALLBOX TRANSMITTER GENERAL INFORMATION QUICK ASSIST II MODELS AND FREQUENCIES The Quick Assist II is a RITRON Wireless Callbox Transmitter, specialized for indoor retail or commercial use, and pre-programmed to transmit a custom-recorded "assistance needed" message when the Message push-button is pressed for customer assistance. Personnel know from these message transmissions in which specific areas a customer needs assistance. There are two Quick Assist II models, one for each of the most popular professional radio communications bands. The model number appears on a label on the bottom of the case. The Quick Assist II is easily programmed to transmit on either an existing or a new radio frequency, with the most popular sub-audible coded squelch formats, such as Quiet Call® or Digital Quiet CallTM. This enables all your personnel with JOBCOM®, PATRIOT® or equivalent twoway radios to hear the voice messages instantly. MODEL RQA-150 RQA-450 BAND VHF-FM UHF-FM FREQUENCY RANGE 150 to 165 MHz 450 to 470 MHz Ritron manufactures mobile, portable and base station two-way radios and repeaters for use with the Quick Assist II. Ritron pioneered the use of Color Dots on radios to identify frequencies. The Quick Assist II can be installed in a wide variety of indoor locations. Because its six internal AA Alkaline batteries will power the unit for about a year, the Quick Asssist II does not require AC line power. QUICK ASSIST II FACTORY PROGRAMMED DEFAULTS: Since the radio board assembly in the Quick Assist II can be programmed to meet a wide variety of uses, programming options may be different for each use. For Models RQA-150 and RQA-450, the programmed Factory Defaults are as follows; Model Model Default RQA-150 RQA-450 Transmit Frequency 154.570 MHz 467.850 MHz Coded Squelch none none Assistance Needed Message Switch 1 Closed Switch 1 Closed Time Between Messages 30 sec 30 sec Low Battery Message Low Battery Low Battery Message Repeat Limit 2 times 2 times QUICK ASSIST II RESET DEFAULTS: If for some reason a reset is performed on the Quick Assist II(refer to page 4), the reset defaults may be different from the Factory Programmed Defaults. They are as follows; Default Model RQA-150 Model RQA-450 Transmit Frequency 154.570 MHz 467.925 MHz Coded Squelch none none Assistance Needed Message last message programmed Time Between Messages on changes only - message will be transmitted anytime the button is pressed Low Battery Message Message Repeat Limit last message programmed forever forever Note: Even though the messages do not change, it is recommended that they be re-recorded after a reset has been performed. Even if your message is shorter than the allotted message time, the transmitter will be on for the full amount of allotted message time. For assistance, call RITRON at 800-USA-1-USA (800-872-1872) or visit us at www.ritron.com 1 qtm9322b.pm5 QUICK ASSIST ® II APPLICATION The Quick Assist II is a RITRON Wireless Callbox Transmitter. It is deisned for indoor in retail or commercial applications. A custom-recorded "assistance needed" message is transmitted when the push-button is pressed. The customer assistance message is instantly transmitted to all radio equipped personnel. INSTALLATION / REPLACEMENT OF BATTERIES CAUTION ! ! Remove the Quick Assist II unit from the wall or other mounting surface before changing batteries. Battery Polarity + + + + + FIG-1: + a. Remove the four (4) screws from the corners of the front cover (refer to FIG-1 at right). b. Note the polarities of the batteries when installing new batteries. Refer to FIG.-1. c. Replace the front cover and four (4) screws. Snug down, but do not overtighten the screws; excessive force can break the plastic enclosure material. BATTERY INSTALLATION CARE & MAINTENANCE Batteries: Use only fresh, new alkaline batteries when programming Quick Assist II. Acceptable brands and types are: Duracell MX1500B, Eveready E91, Rayovac 815, or equivalent. NOTE: Refer to page 8 for information on using rechargeable Ni-Cd AA batteries, charged by an optional external 12 Volt DC power supply. Temperature: The Quick Assist II is designed to operate between -22 and +140 F. Within this temperature range, good radio performance also depends on specifications of batteries powering the unit. Alkaline battery power decreases in extreme colde.g.: a power loss of 20% at 14 F. Like all electronic equipment, Quick Assist II should not be subjected to extreme heat. Estimated Battery Life: Starting with a fresh set of AA alkaline batteries, Quick Assist II can transmit about 7,000 voice messages over a period of one year before the batteries will need replacement. Moisture: Keep the Quick Assist II away from any moisture. This unit is designed for indoor use and it is not environmentally sealed. Automatic Low Battery Alert Message: If the battery voltage drops below approximately 6 Volts, the Quick Assist II transmits the factory prerecorded message "Low Battery" every 60 minutes. When this occurs, replace the batteries promptly within a day or so. Refer to page 10 for "unique" low battery message. Vibrations/ Shocks: Although it is of rugged design, the Quick Assist II cannot be expected to survive extreme abuse. Chemicals: Do not use harsh, corrosive or abrasive chemicals to clean the Quick Assist II case; use only a cloth moistened with water. Do not attempt to clean the printed circuit board, which is located inside the housing. For assistance, call RITRON at 800-USA-1-USA (800-872-1872) or visit us at www.ritron.com 2 qtm9322b.pm5 IDENTIFICATION OF CONTROLS & CONNECTIONS 1. ANTENNA The Quick Assist II contains an internal antenna. This antenna radiates radio signals. 6. EXTERNAL POWER TERMINALS Refer to the page 10 for information to connect an external 12 Volt DC power supply to these terminals. 2. TELEPHONE JACK The modular telephone jack provides for a temporary connection to a standard pulse or rotary mode telephone unit, used to program Quick Assist II voice messages and other settings. Refer to FIG-2, below. 7. FRONT PANEL (CUSTOMER SERVICE) PUSH-BUTTON NOT SHOWN ON DIAGRAM When this push-button is pressed and released, the Quick Assist II transmits a voice message (typically a Customer-service message). CAUTION: 8. TRANSMITTER BANDWIDTH SELECT JUMPER Do not remove this jumper. As described on page 9 this jumper controls selection of wide or narrow bandwidth. 9. BATTERY TYPE SELECTOR Do not remove this jumper. As described on page 10 this jumper controlsIt controls charging the optional NiCad batteries. 3. Do not connect the Quick Assist II to a line from the telephone company; doing so will damage the unit and void the manufacturer's warranty. BATTERY HOLDER The battery holder accommodates the six (6) standard "AA" alkaline cells That are required to power the Quick Assist II. IMPORTANT: Always install a fresh set of alkaline batteries before programming the Quick Assist II. 4. SWITCH #1 TERMINALS Switch #1 terminals connect to the unit's front panel (Customer) push-button. When this push-button is pressed and released, the Quick Assist II transmits a voice message (typically, a Customer-assistance message). 5. SWITCH #2 TERMINALS Switch #2 terminals are connected together for the Quick Assist II. (a Re-set button version is not available). 10. COMPRESSED/NOT-COMPRESSED AUDIO SELECTOR Do not remove this jumper. The Quick Assist II can be used with two-way radios that use "companded audio." For radios with Companded Audio -place the jumper in the COMP position. For radios without Companded Audio - place the jumper in the NONCOMP position. To determine if your radio uses companded audio, call Ritron or your radio supplier. IMPORTANT: Do not remove any other fasteners or further disassemble the Quick Assist II unit; doing so risks damage to the unit and voiding the manufacturer's warranty. FIG-2: CONTROL & CONNECTION LOCATIONS O WNER - S U P P L I E D S TANDARD DESK T ELEPHONE SET, SWITCHED TO P ULSE D IALING MODE 9 Battery Type Selector 3 Battery Holder TO QUICK ASSIST II TELEPHONE JACK, (ITEM 2). OWNER-SUPPLIED MODULAR TELEPHONE CORD: DO NOT CONNECT TO TELEPHONE LINE, BUT TO A TELEPHONE SET ONLY. 8 6 External Power Input Terminals 7 Customer Service Push-button Connection 4 Switch #1 Terminals 5 2 Transmitter Bandwidth Select Jumper 1 Antenna Switch #2 Terminals Standard Modular Telephone Jack 10 Compressed/Not-Compressed Audio Select Jumper For assistance, call RITRON at 800-USA-1-USA (800-872-1872) or visit us at www.ritron.com 3 qtm9322b.pm5 PROGRAMMING YOUR QUICK ASSIST ® II FREQUENTLY ASKED QUESTIONS : 1. You may not need to program your Quick Assist II at all. If you purchased a Quick Assist II unit that is factory programmed to your radio system frequency (check the frequency on your radios and the Quick Assist II), and you do not use a form of Quiet Call coded squelch, you can install the batteries and start using Quick Assist II. The factory default voice message is "Switch 1 Closed". Otherwise, read this manual, then program your Quick Assist II. 2. Do I need to program every feature? 3. How do I program my Quick Asssit II? 4. What if I don't find what I need in this manual? 5. In many cases, no. The factory pre-programmed settings, explained in the instructions, may meet many of your needs. This unit is designed to be programmed using a commonly available standard telephone unit to enter programming information and also to record custom voice messages. However, the telephone must be both capable of and also switched to "Pulse" operation. The telephone is used only for programming; it is to be disconnected when the unit is operating normally. Call Ritron (317-846-1201); we will be glad to help you. For most applications, this manual should cover everything you will need to know. However, the Quick Assist II has more capabilities and features than described here. A series of three short tones cues you to begin speaking when you dial the command for recording a voice message into the unit. a. Remove the screws from the Quick Assist II, then remove the cover from the unit. Use care to not damage or disturb any exposed internal components. b. Install six new alkaline "AA" batteries in the unit, matching the polarity marks on the batteries with the marks on the battery holder. c. Be sure your telephone is capable of "Pulse" mode. Most modern telephones have a selection switch for "P" (Pulse) and "T" (Tone). A "Pulse" mode telephone generates a rapid series of clicks (rather than Touch Tones) with the input (dialing) of each digit. If the telephone has this switch, it must be set to "P" (Pulse) to program the unit. d. The telephone must have a cord with a standard modular plug attached; insert the plug into the telephone jack on the Quick Assist II. e. Test the telephone for suitability by plugging it into the Quick Assist II's telephone jack and dialing "0" (Operator). A repeating busy signal in the telephone earpiece indicates it is acceptable for programming the unit. If this telephone does not check out, try another. USING THE TELEPHONE TO PROGRAM QUICK ASSIST II Can my settings or messages get lost or erased if the battery runs down, or if my Quick Assist II is disconnected? 9. What if I need more range? To increase the range of your Quick Assist II transmissions, we suggest you first relocate the unit. Program the Quick Assist II by dialing telephone numbers representing commands and settings, as this manual instructs. If you make a dialing error while programming, hang up the handset, then pick it up and dial again. What is my Radio System Frequency? Ritron pioneered the Color Dot system to simplify the identification of radio system frequencies for Ritron Jobcom radios. Color Dots are placed on the bottoms of and inside the enclosures of all Jobcom radios. Other manufacturers have also adopted this idea. To identify your assigned frequency if your radios do not have a color dot, locate a label identifying the receiver frequency in megahertz (MHz). Your assigned frequency is also shown on your F.C.C. Station License. Consult your radio user manual, your dealer, or call Ritron for help if you cannot determine your radio's receiver frequency. Ritron manufactures radio repeaters to increase the range not only for your Quick Assist II, but also for your entire radio system. 8. Will it harm the Quick Assist II if I program it improperly? No. The settings and voice messages you enter are stored in special electronic memory devices in the Quick Assist II that do not require power to hold the information. This means that if the batteries run down or if you remove them, you will not need to reprogram the Quick Assist II. All your settings and messages will be there for you when you install fresh batteries. 7. Quick Assist II responds with a confirmation tone after you dial command and setting numbers; you may then either hang up or dial another command. Most special office telephones, speaker phones, and telephones with lighted dials usually cannot be used. No; however, you may need to erase all programming and start over; see page 5 to do this. Feel free to experiment with the various features and possible configurations. 6. Do I have to program my Quick Assist II? What the Tones (Beeps) in the Telephone Receiver Mean? Quick Assist II sounds a brief acknowledgment tone when you pick up the telephone handset; wait to hear this tone before you dial. Quick Assist II emits a series of repeating tones until you hang up, if you mis-dial or if you use an invalid command; you may then pick up the handset and try your command again. TEST THE TELEPHONE YOU WILL USE TO PROGRAM YOUR QUICK ASSIST II: A telephone that generates only Touch Tones CANNOT BE USED for programming purposes. For assistance, call RITRON at 800-USA-1-USA (800-872-1872) or visit us at www.ritron.com 4 Do I need to program my Quick Assist II transmitter frequency? The original factory-programmed transmitter frequency of your Quick Assist II is marked on the outside of the shipping box, and is also indicated by a color dot inside the unit case. If the Quick Assist II frequency matches your radio system frequency, and if the Quick Assist II has not been reprogrammed since it left the factory, you may skip this section and proceed to the next. What is Quiet Call Sub Audible Coded Squelch? The Quick Assist II radio transmitter is compatible with two standard communications industry sub-audible signaling formats: QC® (Quiet Call Interference Eliminator), and DQCTM (Digital Quiet Call Interference Eliminator). Both Quiet Call formats unlock receivers programmed to require these codes -- they screen out interference from other radio systems operating on your same frequency. QC® Quiet Call is Ritrons trade name for what the communications industry calls sub-audible (below the range of human hearing) tone squelch, or CTCSS (Continuous Tone Coded Subaudible Squelch) or Interference Eliminator. Other radio manufacturers use different trade-names for essentially the same system. You may program a specific QC code into your Quick Assist II to transmit with the voice messages, which will "unlock" the receivers in your radio system. DQC TM Digital Quiet Call is Ritrons digital coded squelch, and works the same as QC, except it is a digital code that is transmitted with the voice messages. Do I need to program my Quick Assist II with a Quiet Call Code? Your radio system may or may not use coded squelch signaling. If you have programmed the Quick Assist II to match your radio frequency, and your radios are not receiving Quick Assist II transmissions unless the "monitor" or "test" button is pressed on your radio, your system is probably using Coded Squelch. Refer to your radio manual, or contact your radio dealer or Ritron if you are unsure about this issue. qtm9322b.pm5 TO TEST THE Quick Assist II RADIO TRANSMITTER: a. Turn on your radio receiver. b. Momentarily place a screwdriver, paper clip or other electrically conductive item across the Switch #1 terminals. c. Quick Assist II transmits the Closed Switch #1 message, which you should be able to hear on your radio receiver. If you do not hear the messages, you have probably not properly programmed the Quick Assist II transmitter frequency or the Quiet Call Coded Squelch. In this case, repeat the programming, then perform this test again. What is the purpose of recording a unique Voice Phrase for the Low Battery Message? When it senses the installed batteries are nearly run down, Quick Assist II will transmit one time each hour the factoryprogrammed message: "Low Battery". If you maintain several Quick Assist II transmitters within radio range of each other, you may customize this feature to easily determine which unit needs new batteries. Do I need to program this feature? If you use only one Quick Talk in any area, or if you regularly change Quick Talk batteries, the factory-programmed message may be sufficient for your application. You can skip to the next section. What is the purpose of restarting the Quick Assist II? If you have changed message schedules or limits, restarting the Quick Assist II ensures that all of internal clocks and counters are set properly. Do I need to restart the Quick Assist II? It is best if you do. To Leave Telephone Programming Mode and Restart the Quick Assist II: Pick up the telephone receiver, wait for the beep and dial "999". The unit responds with a single short tone. NOTE: Be certain to hang up and to disconnect the telephone from Quick Assist II. If your Quick Assist II was previously programmed with a Quiet Call code and you need to remove it, follow the procedure below, using No Tone code, "44", as shown in the table. What is Digital Quiet Call? Digital Quiet Call (DQC) is a digital sub-audible coded squelch system. Do I need to program my Quick Assist II with a Digital Quiet Call code? If your radio system does not use Digital Quiet Call, or any other tradename equivalent, skip this section and go to the next programming feature. What is the purpose of testing the Quick Assist II radio transmitter? After following the previous instructions, your Quick Assist II will be programmed to transmit on the same frequency as your radio receivers, and you also will have programmed your Quick Assist II to transmit any coded squelch signals required for your radio system. Do I need to test my Quick Assist II Transmitter? Yes; performing this test now will save you time and confusion later. For assistance, call RITRON at 800-USA-1-USA (800-872-1872) or visit us at www.ritron.com 5 qtm9322b.pm5 BEFORE PROGRAMMING THE QUICK ASSIST II: 1. Remove the four (4) screws at the corners of the enclosure. 2. Lift the cover from the unit. Use care to not damage or disturb any exposed internal components. 3. Plug a telephone unit that passes the following test into the telephone jack on the radio board. IMPORTANT The Most specialized and office telephones, speaker The telephone telephone must must be be capable capable of of "Pulse" "Pulse" mode mode dialing. dialing. Most phones, with lighted dials and only Touch Tones CANNOT BECANNOT USED to BE program phones, those telephones with lighted dialsthat andgenerate those that generate only Touch Tones USED the to Quick Assist II. the Quick Talk. program IfMany the telephone has a mode selection switch, it must to "P"and (Pulse), rather Athan "T" (Tone), to program modern telephones have a selection switch for be "P"set (Pulse) "T" (Tone). "Pulse" mode telethe Quick Assist II. phone generates a rapid series of clicks (rather than Touch Tones) with each dialed digit. If the telehas this mode switch, must be set to "P"plug. (Pulse) to program the Quick Talk. -phone The telephone must selection have a cord with it a standard modular The telephone must have a cord with a standard modular plug. - Test the telephone for suitability by plugging it into the telephone jack of the Quick Assist II, then (Operator). A repeating busy signal in telephone the telephone is acceptable forA - dialing Test the"O" telephone for suitability by plugging it into the jack ofearpiece the Quickindicates Talk, thenitdial "O" (Operator). programming the QuickinAssist II. repeating busy signal the telephone earpiece indicates it is acceptable for programming the Quick Talk. 4. Remove batteries from the unit. Install a fresh set of six AA alkaline batteries, matching polarity marks on the batteries with the marks in the battery holder. 5. Program the Quick Assist II as follows: A. TO PROGRAM THE TRANSMITTER FREQUENCY: B. TO PROGRAM THE QUIET CALL SUB-AUDIBLE CODED SQUELCH INTERFERENCE ELIMINATOR: 1. Determine the frequency of your radio system. 2. Find your frequency in Table 1, page 7, then determine its corresponding two-digit code. If your frequency is not listed in Table 1, skip to Step 7. Otherwise, go on to Step 3: For frequencies listed in Table 1: 3. Pick up the telephone receiver and listen for the acknowledge tone. 4. Dial 11, then enter the digits of your frequency code from Table 1. EXAMPLES: If your Quick Assist II is a VHF RQA-150 operating on the frequency 154.570 MHz, dial 1102. If your Quick Assist II is a UHF RQA- 450 operating on the frequency of 467.925 MHz, dial 1108. For frequencies not listed in Table 1: 7. Pick up the telephone receiver and listen for the acknowledge tone. 8. Dial 12, then the first six digits of your frequency. EXAMPLES: If your Quick Assist II is a VHF RQA-150 operating on a frequency of 153.220 MHz, dial 12153220. If your Quick Assist II is a UHF RQA- 450 operating on a frequency of 464.3125 MHz, dial 12464312. 9. Quick Assist II responds with a single beep to indicate it has programmed the transmitter frequency. 10. You may either continue programming additional features, or you may dial 999 and hang up the telephone to stop programming. For QC codes: 2. Find your QC tone frequency and its corresponding 2-digit code in Table 2, page 2. NOTE: If your radio system does not use coded squelch, program No Tone Code 44. 3. Pick up the telephone receiver and listen for the acknowledge tone. 4. Dial 21, then enter the 2-digit code from Table 2. If your QC frequency is 103.5 (Code 13), dial 2113. EXAMPLE: 5. Quick Assist II responds with a single beep to indicate the transmitter frequency programming is completed. 6. You may either continue programming additional features, or you may dial 999 and hang up to stop programming. 1. Determine if your radio system uses QC- or DQCcoded tones. To program DQC tones, skip to Step 7. 5. Quick Assist II responds with a single beep to indicate it has programmed the QC code. 6. You may either continue programming additional features, or you may dial 999 and hang up the telephone to stop programming. For DQC codes: 7. Find your 3-digit DQC Code in Table 3, page 2. If your code does not appear in Table 3, call your radio service provider or Ritron. 8. Pick up the telephone receiver and listen for the acknowledge tone. 9. Dial 22, then enter the 3-digit DQC code from Table 3. EXAMPLE: If your DQC code is 131, dial 22131. 10. Quick Assist II responds with a single beep to indicate it has programmed the DQC code. 11. You may either continue programming additional features, or you may dial 999 and hang up the telephone to stop programming. (Programming Instructions continued on page 8) For assistance, call RITRON at 800-USA-1-USA (800-872-1872) or visit us at www.ritron.com 6 qtm9322b.pm5 TABLE 1: TRANSMIT FREQUENCY CODES (For frequencies not listed in these tables, see page 4, note 9) (UHF Business Band) (VHF Business Band) QUICK ASSIST II FREQ CODE Bandwidth Wide = 25 kHz Narrow = 12.5 kHz Bandwidth QUICK ASSIST II FREQ. CODE 25 25 25 25 01 02 03 04 467.7625 467.8125 464.5500 464.5000 J K Yellow Dot Brown Dot 12.5 12.5 12.5/25 12.5/25 Model RQA-150 MHz Color Green Dot Blue Dot Red Dot Purple Dot Model RQA- 450 MHz Color Bandwidth 01 02 03 04 154.600 154.570 151.625 151.955 05 06 07 08 151.925 154.540 154.515 154.655 25 25 25 25 05 06 07 08 467.8500 467.8750 467.9000 467.9250 Silver Star Gold Star Red Star Blue Star 12.5/25 12.5/25 12.5/25 12.5/25 09 10 11 12 151.685 151.715 151.775 151.805 25 25 25 25 09 10 11 12 469.2625 462.5750 462.6250 462.6750 White Dot Black Dot Orange Dot 12.5 12.5/25 12.5/25 12.5/25 13 14 15 16 151.835 151.895 154.490 151.655 25 25 25 25 13 14 15 16 464.3250 464.8250 469.5000 469.5500 12.5/25 12.5/25 12.5/25 12.5/25 17 18 151.745 151.865 25 25 17 18 19 20 463.2625 464.9125 464.6000 464.7000 12.5 12.5 12.5/25 12.5/25 INTERFERENCE ELIMINATOR CODES TABLE 2: QUIET CALL TONE CODES QUICK Other ASSIST II Radio Brands Freq. QC Tone ( Hz ) CODE Code 01 02 03 04 05 06 07 08 09 10 11 12 13 14 15 16 17 18 19 20 21 22 23 24 25 26 67.0 71.9 74.4 77.0 79.7 82.5 85.4 88.5 91.5 94.8 97.4 100.0 103.5 107.2 110.9 114.8 118.8 123.0 127.3 131.8 136.5 141.3 146.2 151.4 156.7 162.2 XZ XA WA XB SP YZ YA YB ZZ ZA ZB 1Z 1A 1B 2Z 2A 2B 3Z 3A 3B 4Z 4A 4B 5Z 5A 5B QUICK ASSIST QC CODE 27 28 29 30 31 32 33 34 35 36 37 38 39 40 41 42 43 *44 45 46 47 48 49 50 51 Freq. ( Hz ) 167.9 173.8 179.9 186.2 192.8 203.5 210.7 218.1 225.7 233.6 241.8 250.3 69.4 159.8 165.5 171.3 177.3 No Tone 183.5 189.9 196.6 199.5 206.5 229.1 254.1 Other Radio Brands Tone Code 6Z 6A 6B 7Z 7A M1 -------------------- TABLE 3: DIGITAL QUIET CALL CODES Normal Invert Normal Invert Normal Invert 023 025 026 031 ........ ........ ........ ........ 047 244 464 627 174 205 223 226 ........ ........ ........ ........ 074 263 134 411 445 464 465 466 ........ ........ ........ ........ 043 026 331 662 032 043 047 051 ........ ........ ........ ........ 051 445 023 032 243 244 245 251 ........ ........ ........ ........ 351 025 072 165 503 506 516 532 ........ ........ ........ ........ 162 073 432 343 054 065 071 072 ........ ........ ........ ........ 413 271 306 245 261 263 265 271 ........ ........ ........ ........ 732 205 156 065 546 565 606 612 ........ ........ ........ ........ 132 103 631 346 073 074 114 115 ........ 506 ........ 174 ........ 712 ........ 152 306 311 315 331 ........ 071 ........ 664 ........ 423 ........ 465 624 627 631 632 ........ ........ ........ ........ 632 031 606 624 116 125 131 132 ........ 754 ........ 365 ........ 364 ........ 546 343 346 351 364 ........ ........ ........ ........ 532 612 243 131 654 662 664 703 ........ ........ ........ ........ 743 466 311 565 134 143 152 155 ........ ........ ........ ........ 223 412 115 731 365 371 411 412 ........ 125 ........ 734 ........ 226 ........ 143 712 723 731 732 ........ ........ ........ ........ 114 431 155 261 156 162 165 172 ........ ........ ........ ........ 265 503 251 036 413 423 431 432 ........ ........ ........ ........ 734 ........ 371 743 ........ 654 754 ........ 116 054 315 723 516 For assistance, call RITRON at 800-USA-1-USA (800-872-1872) or visit us at www.ritron.com 7 qtm9322b.pm5 (Programming Instructions continued from page 6) C. TO PROGRAM THE ASSISTANCE NEEDED MESSAGE: 1. Pick up the telephone receiver and listen for the acknowledge tone. 2. Dial 312. Quick Assist II responds with three short tones to prompt you to begin speaking, then records the message. This message is to be no longer than 8 seconds. Remember: speak loudly and clearly. EXAMPLE: Customer needs assistance in Aisle 9. 3. When you have finished speaking, press and release the telephone flash-hook. 4. You may either continue programming additional features, or you may dial 999 and hang up the telephone to stop programming. NOTE: To review your recorded message, dial "412". D. TO PROGRAM TIME BETWEEN REPEATED MESSAGES: (DEFAULT SETTING IS 30 SECONDS) F. TO PROGRAM THE "ASSISTANCE NEEDED" MESSAGE REPEAT LIMIT: (DEFAULT SETTING IS 2 TIMES) 1. Look up the code for the desired number of message repeats on Table 5, below. 2. Pick up the telephone receiver and listen for the acknowledge tone. 3. Dial "612", then the code digit from Table 5. EXAMPLE: If you select 3 times as the message repeat limit, dial 6123. 4. Quick Assist II responds with a single beep to indicate it has programmed the message repeat limit. 5. Dial 999 and hang up the telephone to stop programming. TABLE 5: MESSAGE REPEAT LIMIT 1. Look up the code for the desired time between messages on Table 4, below. CODE NUMBER 1 time ....................................................... 1 2 times ..................................................... 2 DEFAULT 3 times ..................................................... 3 4 times ..................................................... 4 5 times ..................................................... 5 6 times ..................................................... 6 7 times ..................................................... 7 8 times ..................................................... 8 Repeat forever; no limit ............................. 9 2. Pick up the telephone receiver and listen for the acknowledge tone. 3. Dial 512, then the code digit from Table 4. If you select 2 minutes as the time between messages, dial 5124. EXAMPLE: 4. Quick Assist II responds with a single beep to indicate it has programmed the time between messages. 5. You may either continue programming additional features, or you may dial 999 and hang up the telephone to stop programming. TABLE 4: TIME BETWEEN MESSAGES CODE NUMBER No Message ............................................. 0 On Changes Only ..................................... 1 30 seconds .............................................. 2 DEFAULT 1 minute ................................................... 3 2 minutes ................................................. 4 5 minutes ................................................. 5 10 minutes ............................................... 6 30 minutes ............................................... 7 1 hour ...................................................... 8 2 hours .................................................... 9 ! ! ! IMPORTANT ! ! ! If your Quick Assist II unit fails to operate correctly, or is programmed incorrectly, put the unit into default Quick Assist II mode using the following procedure: 1. Pick up the telephone receiver and listen for the acknowledge tone. 2. Dial the correct option (A or B as indicated below), to restore factory defaults; a short beep indicates successful completion. A. For RQA-150, dial 978. B. For RQA-450, dial 979. 3. Dial 814 to put the unit into Quick Assist II mode; a short beep indicates successful completion. 4. Dial "5110" to complete the setting of Quick Assist II mode, a short beep indicates successful completion 5. Program Sections A through F, above. 6. Programming of the Ritron Quick Assist II is complete! E. TO PROGRAM A "UNIQUE" LOW BATTERY MESSAGE: 1. Pick up the telephone receiver and listen for the acknowledge tone. 2. Dial "35". Quick Assist II responds with three short tones to prompt you to begin speaking, then records the message. This message is to be no longer than 1.5 seconds. EXAMPLE: "Low battery Aisle 9" 3. When you have finished speaking, press and release the telephone flash-hook. 4. You may either continue programming additional features, or you may dial 999 and hang up the telephone to stop programming. NOTE: To review your recorded message, dial "45". For assistance, call RITRON at 800-USA-1-USA (800-872-1872) or visit us at www.ritron.com 8 qtm9322b.pm5 Selecting Wide (25kHz) or Narrow (12.5kHz) Bandwidth/Channel Spacing The Quick Assist II offers selectable bandwidth Wide or Narrow. The Quick Assist II must match the bandwidth setting of your existing 2-way radios for optimal quality. As a general rule, if the operating frequency of your radios has less than three numbers to the right of the decimal point your frequency is Wide band. Example: frequency 154.570 MHz or 462.625 MHz If more than three numbers to the right of the decimal point, your frequency is most likely Narrow band. Wide: (Refer to FIG-3) To set your Quick Assist II into wideband position, place the Transmitter Bandwidth Select Jumper so that both pins of the 2 pin connector are covered by the jumper. Narrow: (Refer to FIG-3) To set your Quick Assist II into narrowband position, place the Transmitter Bandwidth Select Jumper so that only 1 pin of the 2 pin connector is covered by the jumper. Example: frequency 467.7625 MHz or 467.8125 MHz To determine your operating frequency and bandwidth check your 2-way radio, yourowners manual, or call Ritron for help. You can also look for your frequency and corresponding bandwidth/channel spacing in the table listed on page 7 of this manual. If you are unable to determine if your 2-way radios are Narrow or Wide band, we suggest you take the following logical steps: 1. Leave the radio in the Wide band factory default mode. 2. If the received audio is acceptable, skip the rest of this section, if its not acceptable continue to step #3. 3. Change the jumper setting to Narrow and listen to the voice message. Narrow-Band Wide-Band FIG3. J102 SETTING FOR NARROW OR WIDE-BAND OPERATION Place the jumper in the setting that produces the best received audio message in the radio you will be using. Selecting Compressed or Non-Compressed Transmitted Audio The Quick Assist II offers selectable compressed or non-compressed transmitted audio. Some manufacturers call this feature X-pand or Companding. The Quick Assist II must match your existing 2-way radios for optimal quality. To determine if your existing 2-way radios are using companding you can call the manufacturer of the radio, refer to your owners manual or call Ritron for help. If you are unable to determine if your 2-way radios are using the companding feature, we suggest you take the following logical steps: 1. Leave the jumper in the factory default setting NONCOMP. 2. Activate the transmitter of the Quick Talk or Quick Assist (I or II) and listen to the message from your portable radio. If the received audio is acceptable, skip the rest of this section, if its not acceptable continue to step #3. 3. Change the jumper setting to the COMP position and activate the Quick Talk or Quick Assist (I or II) transmitter again, and listen to the voice message. Not-Compressed: (Refer to FIG-4) To set the Quick Assist II for standard audio or notcompressed, place the jumper so that the middle pin and the pin closest to the word NON-COMP are covered by the jumper. Compressed: (Refer to FIG-4) To set the Quick Assist II for compressed audio, place the jumper so that the middle pin and the pin closest to the word COMP are covered by the jumper. Place the jumper in the setting that produces the best received audio message in the radio you will be using. Not-Compressed Compressed FIG4. POSITION FOR NOT-COMPRESSED/ COMPRESSED AUDIO IMPORTANT You may change the Transmitter Bandwidth and Compressed/Non-Compressed Audio jumper settings without re-recording your custom voice message. For assistance, call RITRON at 800-USA-1-USA (800-872-1872) or visit us at www.ritron.com 9 qtm9322b.pm5 J103 JUMPER SETTINGS FOR BATTERY TYPE NOTE: When programming, use either fresh Alkaline batteries (or an external power supply), to power the Quick Assist II. When programming is finished, you may either insert Ni-Cd batteries or leave Alkaline batteries in place. WARNING: DO NOT attempt to charge Alkaline batteries from an external +12VDC power supply. When powering Quick Assist II with ALKALINE BATTERIES, set J103 as follows to disconnect the charging current paths: a. To set the Quick Assist II for use with alkaline batteries, move Jumper J103 to cover only one pin of the jumper base, as shown in FIG-5; this setting prevents the flow of charging current. Alkaline b. Dial "943" to program the Quick Assist II for use with alkaline batteries. NI-CD FIG5. J103 POSITION FOR USE WITH ALKALINE OR NI-CD BATTERIES When powering Quick Assist II with NI-CD BATTERIES, set J103 as follows to connect the charging current paths: c. Cover both pins with Jumper J103, as shown in FIG5, to charge the Ni-Cd batteries from the External Power connection. d. Dial "944" to adjust the Quick Talk voltage; the unit then transmits a "Low Battery" phrase. NOTE: Because Ni-Cd batteries self-discharge rapidly, you must constantly charge them with an external +12VDC power. CONNECTING AN EXTERNAL 12 VDC POWER SUPPLY TO CONNECT AN EXTERNAL 12 VDC POWER SUPPLY: The standard Quick Assist II may be used with an external 12 VDC power supply. Optional items are not supplied. + Instructions: 1. Remove the Quick Assist II electronics from the housing. 2. Carefully drill or punch a 0.484" hole in the bottom of the Quick Assist II enclosure. 3. Route the power supply cable trough the Ritron #02500127 strain relief fitting. (not supplied) 4. - SWITCH 1 Use Ritron #RPS-203 Power Supply (not suplied), 11-15 VDC, 200mA, or equivalent, to power the Quick Talk. The Quick Assist II requires 11-15 VDC, 150 mA minimum. 5. Connect the positive (+) terminal of the power supply cable to the +EXT. PWR screw terminal on the Quick Assist II, refer to FIG-6. 6. Connect the negative (-) terminal of the power supply cable to the -EXT. PWR screw terminal on the Quick Assist II, refer to FIG-6. EXTERNAL POWER SUPPLY FIG6. EXTERNAL POWER SUPPLY CONNECTIONS For assistance, call RITRON at 800-USA-1-USA (800-872-1872) or visit us at www.ritron.com 10 qtm9322b.pm5 QUICK ASSIST ® II INSTALLATION WHEN YOU ARE FINISHED PROGRAMMING: 1. Hang up and disconnect the telephone from the internal jack on the Quick Assist II. Pre-drilled Mounting Hole 2. Test the operation of the Quick Assist II before putting it into service by activating the front switch. Listen to the message received on your radio. 3. Replace the cover and (4) cover screws. Snug down, but do not overtighten the screws; excessive force can break the plastic enclosure material. 6. Test for sufficient broadcast range when choosing the location for the Quick Assist II unit. For maximum range and coverage, install it as high from ground level as possible. Be aware that metal or wires; such as, steel or concrete walls or metal shelving near the unit can block or absorb radio transmissions. 7. Position the unit as shown in FIG.-7, and secure it in place with screws through the enclosure flanges. Do not overtighten these screws, as you might break the plastic flanges. IMPORTANT: Contact a qualified technician or electrician if you are not certain your installation will work properly and safely. Pre-drilled Mounting Hole FIG.-7: QUICK ASSIST INSTALLATION IMPORTANT: Contact a qualified technician or electrician if you are not certain your installation will work properly and safely. For assistance, call RITRON at 800-USA-1-USA (800-872-1872) or visit us at www.ritron.com 11 qtm9322b.pm5 Complete Wireless Communication SolutionsFrom The Leader in Workplace Two-Way Radio Systems Ritron - We Build Wireless Solutions For nearly 3 decades Ritron has been designing, manufacturing, and supplying reliable, professional wireless communication products for users worldwide. Ritron wireless products will improve the operation, safety, and profitability of any organization by providing instant voice communication between key employees throughout the workplace. D-Series Portable Radios Communicate with multiple workgroups instantly with a push-of-the-button. Rugged and lightweight with built-in weather scan (VHF models only) automatically finds NOAA broadcasts. Other features include Interference Eliminator, Loud and Clear Audio, Removable Quick Swap Battery, and Drop-in Charging Capability. Accessories Ritron offers a wide variety of headsets, earsets, remote speaker microphones, multi-unit chargers, and carry holsters to meet all your wireless communication needs. A RITRON EXCLUSIVE Two-way Base Station/ Wireless Intercom Monitor 110 VAC or 12 VDC desktop or wall mountable radio that is compatible with any VHF/UHF radio system. Includes built-in Weather Scan (VHF models only), loud audio output for noisy locations, built-in microphone with automatic gain control, and rugged metal housing. Optional Public Address (PA) modification available. Ideal for in-plant schools retail stores jobsite vehicles community repeater systems, loading docks construction trailers or anywhere that fixed two-way communication is needed. For assistance, call RITRON at 800-USA-1-USA (800-872-1872) or visit us at www.ritron.com 12 qtm9322b.pm5 Advantages of Ritron Wireless Products: Unique products and features not available from any other source Adds speed, flexibility, and responsiveness to any organization Fully compatible with virtually any existing two-way radio system Designed to work together as a complete system No monthly service fees or airtime charges Made in the U.S.A. OutPost TM Wireless Radio Callboxes A Battery-operated (6 alkaline "D" cells) callboxes, available in basic or rugged models, provide instant wireless communication over existing two-way radio systems without costly trenching, extensive wiring, or dedicated phone lines. RITRON EXCLUSIVE Ideal for Hotels/Motels Golf Courses Schools, Public Parks Playgrounds Roadsides Marinas Parking Lots or Garages Receiving or Delivery Docks Campuses Shopping Malls Beachs and Pools Campgrounds and Hiking Trails Unattended Gates. XT Model Basic Model Quick TalkTM Wireless Voice Alarm Reporter No need to run wires, phone lines, or pay a person for 24/7 monitoring. The low-cost, battery-operated (6 alkaline "AA" cells) Quick Talk Monitor permits wireless monitoring of virtually any sensor or switch from a two-way radio. When the switch opens or closes, a user recordable "custom" voice message is automatically transmitted to all radios on the same channel frequency. A RITRON EXCLUSIVE Ideal for remote monitoring of power failures liquid levels intrusion or tampering temperature sensing unattended doors to name only a few of the 1000s of applications. For assistance, call RITRON at 800-USA-1-USA (800-872-1872) or visit us at www.ritron.com 13 qtm9322b.pm5 F.C.C. LICENSING AND REGULATIONS The Rules and Regulations of the United States Federal Communications Commission (FCC) require you or your radio service provider to have a license for your radio system before activating the Quick Talk radio transmitter. If you already are operating a licensed radio system, you probably can add a Quick Talk without any changes to that license. The station licensee is responsible for ensuring that transmitter power, frequency and modulation are within the limits specified by the station license, and also for proper operation and maintenance of the radio equipment.These responsibilities include checking the transmitter frequency and modulation periodically, using appropriate methods. Ritron or your Ritron Dealer can assist you with all these requirements. You may also contact the FCC directly by any of the following methods: To obtain copies of FCC forms and instructions use the FCC Fax-On-Demand system at 202-418-0177. Request Document 000600. For more information, go to the FCC Internet Website at: http://www.fcc.gov SAFETY STANDARDS The FCC has adopted a safety standard for human exposure to radio frequency electromagnetic energy emitted by FCC regulated equipment. The Quick Talk conforms to the standards effective at the time of its equipment authorization by the FCC. In general these standards recommend that you: DO NOT allow the antenna to come very close to, or to touch exposed parts of the body, especially the face or eyes, while transmitting. DO NOT transmit near electrical blasting caps or in an explosive atmosphere. DO NOT allow children to play with radio transmitters. BE AWARE of the conditions which cause the unit to transmit. SERVICE - Federal law prohibits you from making any internal adjustments to the transmitter, and from changing transmit frequencies unless you are specifically designated by the licensee. DO NOT ADJUST OR TAMPER with components or the printed circuit board in any manner not directed in this manual. Unauthorized adjustments may render the unit inoperable; repair will be at owner's expense. If your radio equipment fails to operate properly, or if you wish to have the Ritron Quick Talk serviced, contact your authorized dealer, or call Ritron at 317-846-1201 and ask for the Repair Department. RITRON, INC. LIMITED WARRANTY WHAT THIS WARRANTY COVERS: RITRON, INC. ("RITRON") provides the following warranty against defects in materials and/or workmanship in RITRON RQA-150 AND RQA-450 QUICK ASSIST II Voice Alarm Reporter units under normal use and service during the applicable warranty period, as stated below. "Accessories" means antennas, chargers, wire, cable and items contained in the programming and programming/ service kits. WHAT IS COVEREDFOR HOW LONG WHAT RITRON WILL DO Quick Assist II 1 year * During the first year after date of Telemetry Unit purchase, RITRON will repair or replace the defective product, at RITRON's option, parts and labor included at no charge. Accessories 90 days * * After date of purchase WHAT THIS WARRANTY DOES NOT COVER: Any technical information provided with the covered product or any other products; Installation, maintenance or service of the product, unless this is covered by a separate written agreement with RITRON; Any products not furnished by RITRON which are attached or used with the covered product, or defects or damage from the use of the covered product with equipment that is not covered; Defects or damage, including broken antennas, resulting from: - misuse, abuse, improper maintenance, alteration, modification, neglect, accident or act of God, or, - the use of covered products other than in normal and customary manner, or, - improper testing or installation; Defects or damages from unauthorized disassembly, repair or modification, or where unauthorized disassembly, repair or modification prevents inspection and testing necessary to validate warranty claims; Defects or damages in which the serial number has been removed, altered or defaced. IMPORTANT: This warranty sets forth the full extent of RITRON's express responsibilities regarding the covered products, and is given in lieu of all other express warranties. What RITRON has agreed to do above is your sole and exclusive remedy. No person is authorized to make any other warranty to you on behalf of RITRON. Warranties implied by state law, such as implied warranties of merchantability and fitness for a particular purpose, are limited to the duration of this limited warranty as it applies to the covered product. Incidental and consequential damages are not recoverable under this warranty (this includes loss of use or time, inconvenience, business interruption, commercial loss, lost profits or savings). Some states do not allow the exclusion or limitation of incidental or consequential damages, or limitation on how long an implied warranty lasts, so the above limitations or exclusions may not apply to you. Because each covered product system is unique, RITRON disclaims liability for range, coverage, or operation of the system as a whole under this warranty. WHO IS COVERED BY THIS WARRANTY: This warranty is given only to the purchaser or lessee of covered products when acquired for use, not resale. This warranty is not assignable or transferable. HOW TO GET WARRANTY SERVICE: To receive warranty service, you must deliver or send the defective product, delivery costs and insurance prepaid, within the applicable warranty period, to RITRON, INC., 505 West Carmel Drive, Carmel, Indiana 46032, Attention: Warranty Department. Please point out the nature of the defect in as much detail as you can. You must retain your sales or lease receipt (or other written evidence of the date of purchase) and deliver it along with the product. If RITRON chooses to repair or replace a defective product, RITRON may replace the product or any part or component with reconditioned product, parts or components. Replacements are covered for the balance of the original applicable warranty period. All replaced covered products, parts or components become RITRON's property. RIGHTS TO SOFTWARE RETAINED: Title and all rights or licenses to patents, copyrights, trademarks and trade secrets in any RITRON software contained in covered products are and shall remain in RITRON. RITRON nevertheless grants you a limited non-exclusive, transferable right to use the RITRON software only in conjunction with covered products. No other license or right to the RITRON software is granted or permitted. YOUR RIGHTS UNDER STATE LAW: This warranty gives you specific legal rights, and you may also have other rights which vary from state to state. WHERE THIS WARRANTY IS VALID: This warranty is valid only within the United States, the District of Columbia and Puerto Rico. For assistance, call RITRON at 800-USA-1-USA (800-872-1872) or visit us at www.ritron.com 14