1
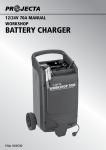
���������
BATTERY CHARGER
������������������
WARNING
• Explosive gases. Prevent flames and sparks. Provide adequate ventilation
during charging.
• Before charging, read the instructions.
• For indoor use. Do not expose to rain.
• For charging lead acid batteries ONLY (of the size & voltage specified in the
specifications table).
• Disconnect the 240V mains supply before making or breaking the connections
to the battery.
• Do not attempt to charge non-rechargeable batteries.
• Never charge a frozen battery.
• This appliance is not intended for use by young children or infirm persons
unless they have been adequately supervised by a responsible person to
ensure that they can use the appliance safely.
• Young children should be supervised to ensure that they do not play with
the appliance.
2
FEATURES
Automatic Charger
An automatic battery charger stops charging when the battery is full. You can leave the charger
connected to the battery without risk of overcharging. Once the battery is full, the battery
charger will automatically start to maintain the battery. The charger monitors the battery Voltage
and continues to top up the battery, keeping it fully charged and ready for use.
Thermal Overload/Polarity Protection
Prevents the output leads from sparking due to accidental reverse connection or short circuit
making the charger safer to use around batteries.
LED Charge Indication
Three LEDs display the charger’s status (except AC250B).
• RED LIGHT ON: Power On,
• ORANGE LIGHT ON: Charging,
• GREEN LIGHT ON: Fully charged and maintaining.
Wiring harness (AC150 & AC250B only)
The wiring harness allows for easy connection to vehicles that have hard to reach batteries.
Includes an inline fuse (AC150) to protect the harness from accidental short circuits.
‘On Board’ Battery Charging (AC250B only)
The AC250B ‘On Board’ charger allows the charger to be conveniently mounted on the vehicle
next to the battery. This is an ideal solution for vehicles left unused for some time. When the
vehicle is to be garaged, simply pop the hood and plug the charger in to a 240 Volt extension
cord. When the vehicle is to be used, disconnect the extension cord, close the hood and start
the engine, it’s that easy!
Multi Voltage (AC400 only)
Can charge either 6V or 12V batteries.
Engine Start (AC800 only)
When time is short, this feature will deliver the battery a short yet powerful enough charge
to start the engine.
Toroidal Transformer (AC1000, AC1500 & AC600-24 only)
Using the latest technology in transformer design, toroidal transformers don’t use a solid iron
core (like traditional transformers) making them lighter and more compact. They deliver more
power than a traditional transformer charger of the same size.
3
P/No.
AUTOMATIC
AC150
0.2A (28W)
240VAC 50Hz
AUTOMATIC
AC250B
0.23A (53W)
240VAC 50Hz
AUTOMATIC
AC400
0.37A (70W)
240VAC 50Hz
AUTOMATIC
AC600
0.43A (91W)
240VAC 50Hz
AUTOMATIC
AC800
0.5A (108W)
240VAC 50Hz
AUTOMATIC
AC1000
0.83A (161W)
240VAC 50Hz
AUTOMATIC
AC1500
0.6A (116W)
240VAC 50Hz
AUTOMATIC
AC600-24
SPECIFICATIONS
Type:
0.09A (17W)
240VAC 50Hz
3500mA@24V
24VDC
Input power:
10000mA@12V
12VDC
Input:
6200mA@12V
12VDC
N/A
5400mA@12V
N/A
2 x 12V
in series (24V)
12VDC
N/A
12V Battery
400-900*
450-1000*
35-70
4300mA@12V
3 Cycles:
5min ‘ON’
20min ‘OFF’
12V Battery
450-1000
600-1200
65-150
15V
12VDC
N/A
12V Battery
300-800
375-900
50-100
3V
28.4V
26.8V
6 VDC/12VDC
12V Battery
300-700
375-800
35-100
3V
14.2V
13.4V
1600mA@12V
6 or 12V Battery
250-650
300-700
25-80
3V
14.2V
13.4V
12VDC
12V Battery
250-550
250-600
20-70
3V
14.2V
13.4V
2700mA
@6 or 12V
12V Battery
200-650*
250-700*
16-40
3V
14.2V
13.4V
N/A
Suitable for Charging
100-350*
150-400*
7-24
5V
7.1/14.2V
6.7/13.4V
N/A
Battery Range: (CCA)
(MCA)
(Ah)
5V
14.2V
13.4V
2.5Kg
190x220x120mm 190x220x120mm 190x220x120mm 190x220x120mm
N/A
900mA@12V
Output Voltage: (Nominal) 12VDC
Output Current:
(Continuous)
Minimum Start Voltage:
14.2V
13.4V
1.9Kg
150x140x85mm
Engine Start:
Charge Control: (Cut out)
(Cut in)
1.5Kg
150x140x85mm
2.6Kg
1.3Kg
123x43x120mm
3.4Kg
0.75Kg
65x85x95mm
2.6Kg
Weight:
Size:
*Only suitable for maintaining larger size batteries.
4
AC150
�����������������������
���������������
FULLY
CHARGED
CHARGING
POWER ON
��������������
��������������
��������������
�������������������
�������������
��������������
AC250B
��������������������������
����������������
�����������������������
������������
������������������������
��������������
���������������
Input: 240VAC 50Hz 0.2A Output: 12VDC 1600mA
FOR 12V LEAD ACID BATTERIES ONLY
APPROVAL No. Q95325
N12506
�������������
��������������������
AC400
��������������
��������������
�������������������
��������
����������������������
�������������
��������������
5
AC600
��������������
��������������
�������������������
��������
�������������
��������������
AC800
��������������
��������������
�������������������
��������
�������������
��������������
������������������������
������������
�������������������
AC1000/1500/600-24
��������������
��������������
�������������������
��������
�������������
��������������
������������������������
6
CHARGING INSTRUCTIONS
STEP 1 - CHECK THE ELECTROLYTE LEVEL
Prior to charging the battery, remove the vent caps and check the electrolyte level.
(Not required on sealed & maintenance free batteries).
The electrolyte should be 6mm (1/4”) above the battery’s plates.
If low, top up the electrolyte with distilled water to the correct level and refit the vent caps.
STEP 2A - CONNECTION OUT OF VEHICLE
Connect the RED lead (battery clip) from the charger to the Positive (+) battery post.
Connect the BLACK lead (battery clip) from the charger to the Negative (-) battery post.
FULLY
CHARGED
CHARGING
POWER ON
CONNECTION OUT OF VEHICLE
STEP 2B - CONNECTION IN VEHICLE
Determine if the vehicle is Positively (+) or Negatively (-) earthed. Negatively earthed vehicles
have a cable (usually black) from the Negative battery terminal to the vehicle’s chassis.
Negatively earthed (Most Vehicles)
Connect the RED lead (battery clip) from the charger to the Positive (+) battery terminal.
Connect the BLACK lead (battery clip) from the charger to the vehicle’s chassis away from the
fuel line or moving parts.
CONNECTION IN VEHICLE (NEGATIVELY EARTHED)
7
Positively earthed
Connect the BLACK lead (battery clip) from the charger to the Negative (-) battery terminal.
Connect the RED lead (battery clip) from the charger to the vehicle’s chassis away from the
fuel line or moving parts.
CONNECTION IN VEHICLE (POSITIVELY EARTHED)
STEP 2C - CONNECTION IN VEHICLE WITH HARNESS (AC150 & AC250B ONLY)
Connect the RED ring terminal of the harness to the Positive (+) battery terminal.
Connect the BLACK ring terminal of the harness to the Negative (-) battery terminal.
Connect the plug on the harness to the charger’s output lead socket.
FULLY
CHARGED
CHARGING
POWER ON
CONNECTION IN VEHICLE USING HARNESS
Vehicle Harness
STEP 3 - BATTERY CHARGER SETTINGS (AC400 & AC800 ONLY)
Set the voltage selection switch to either 6V or 12V (AC400)
Set the ‘Charge/Engine Start’ switch to the ‘Charging’ position (AC800).
SWITCH SELECTION
8
AC400
AC800
Push in 12V side
for 12V Battery
Push in Charging
side for charging
STEP 4 - CONNECT TO 240V MAINS POWER.
Connect the battery charger to a 240V mains powered socket.
Turn on the 240V Mains Power.
The RED ‘POWER ON’ LED will illuminate to confirm that the charger is receiving power
(except AC250B).
STEP 5 - CHARGING
The orange ‘Charging’ LED (or red LED on AC250B) will illuminate to confirm that the
battery is charging.
When the battery is fully charged the Orange ‘Charging’ LED (or red LED on AC250B) will
extinguish and the Green ‘Fully Charged’ LED will illuminate. The battery is now fully charged
and ready for use.
If left connected, the charger will monitor the battery and maintain the battery ready for use
until required. This prevents the battery from slow self-discharge, which is detrimental to
lead acid batteries.
STEP 6 - DISCONNECTION.
Turn the 240V mains power off.
Battery out of vehicle
Remove the BLACK lead (battery clip) from the battery.
Remove the RED lead (battery clip) from the battery.
Battery in vehicle
Remove the chassis connection.
Remove the battery terminal connection.
Battery in vehicle using harness (AC150 & AC250B only)
Unplug the harness from the charger’s output lead.
9
ENGINE START (AC800 ONLY)
The Engine start function on the AC800 is designed to provide a short term ‘Boost” to the
battery and then assist the battery to start the vehicle.
1. Connect the charger to the battery as described above in step 2b ‘In Vehicle Connection’.
2. Connect the battery charger to the 240V mains power.
3. Set the ‘Charge/Engine Start’ switch to the ‘Engine Start’ position.
Push in
Engine Start side
4. Turn on the 240V Mains Power. The RED ‘POWER ON’ LED will illuminate to confirm that the
charger is receiving power. If the battery is connected properly and above the charger’s minimum
voltage the Orange ‘Charging’ LED will illuminate to confirm that the battery is being charged.
5. After 5 minutes or if the Green ‘Fully Charged’ LED illuminates, attempt to crank the engine
(with the charger connected / turned on).
6. If the engine starts,
• Turn ‘OFF’ the 240V mains power and disconnect the charger from the mains power.
• Remove the chassis connection.
• Remove the battery terminal connection.
7. If the engine does not start,
• Turn ‘OFF’ the 240V mains power
• Wait 20 minutes and then repeat steps 4-6
• If after 3 cycles the engine does not start, the battery is probably too flat or defective.
Recharge the battery completely.
‘ON BOARD’ BATTERY CHARGING (AC250B ONLY)
The AC250B ‘On Board’ charger allows the charger to be conveniently mounted on the vehicle.
The charger can be mounted to any flat surface using the mounting tabs or bolted to the
supplied ‘L’ Bracket (Bolts, Washers & Nuts Supplied) and mounted next to the battery as per
the diagram.
10
FREQUENTLY ASKED QUESTIONS
Q. How do I know if the battery is charged?
A. The battery charger’s GREEN ‘FULLY CHARGED’ LED will illuminate to indicate when the battery
is fully charged. Alternatively use a Battery Hydrometer (Projecta Part No. BH100). A reading of
1.250 or more in each cell indicates a fully charged battery.
Q. Why does the battery charger have two ratings?
A. Battery chargers for automotive use have traditionally been given an RMS rating or peak rating
in the past. This rating is now used as an industry reference only.
Australian Standards now require all battery chargers to be rated at the charger’s
continuous output at 12.0 Volts, we express this as mA (milliamps) rather than A (Amps)
to avoid confusion.
Q. Why does the ‘FULLY CHARGED’ LED come on straight away?
A. There are three possible reasons why the ‘FULLY CHARGED’ LED may come on straight away.
1. The battery is fully charged.
2. The battery has taken a surface charge.
3. The battery has a faulty cell.
Q. What is Surface Charge?
A. Batteries unused or left flat for some time build up a resistance to being recharged. When the
charger is first connected, these batteries will take a surface charge, and the ‘FULLY CHARGED’
LED will illuminate within a short while. The battery however is not fully charged, the charger
is voltage sensitive and cannot differentiate between a surface charge and a fully charged
battery. After a few hours the battery may start to accept some charge but most batteries with
this condition will not recover.
Q. What is a Faulty Cell?
A. 12 Volt batteries contain 6 cells and one faulty cell is enough to ruin your battery. If after eight
hours of charging your battery is still flat, you should test the cells using a hydrometer. If one
reading is lower than the rest it indicates a faulty cell. It is pointless to continue charging, as the
battery needs replacing.
Q. I have connected the charger properly but the ‘Orange’ charging light does
not come on?
A. In some cases batteries can be flattened to the point where they have very little or no Voltage,
this is called a deep discharge. This can occur if a small amount of power is used for a long
time, for example a map reading light is left on for a week or more. Projecta automatic chargers
are designed to charge from as little as 3 Volts (except AC150 & AC250B which is 5 Volts).
If the battery is below this voltage the charger will not start charging, the battery may be
permanently damaged.
11
Q. Can I use the charger as a power supply?
A. Projecta automatic chargers are designed to only supply power to the battery clips when they
are correctly connected to a battery, this is to prevent sparks or damage to the charger or
battery if connected incorrectly by mistake. This safety feature prevents the charger from being
used as a ‘Power Supply’. No Voltage will be present at the clips.
Q. Why does the ‘Overload’ button pop out?
A. The larger chargers (AC800, AC1000, AC1500 & AC600-24) incorporate a manual reset
overload breaker. If there is a fault with the battery or vehicle and the charger is overloaded
the ‘Overload’ button will pop out to protect the charger from damage. Simply check the
battery/vehicle to find the fault and check that the battery is within the size specified for
the model, once the problem is fixed, press in the ‘Overload’ button and the charger will
resume charging.
VICTORIA (HEAD OFFICE)
Brown & Watson International Pty Ltd
3 Millennium Court, Knoxfield
Victoria 3180.
Telephone (03) 9730 6000
Facsimile (03) 9730 6050
National Toll Free 1800 113 443
NEW SOUTH WALES
Brown & Watson International Pty Ltd
PO Box 995
Campbelltown, NSW 2560
Facsimile (02) 4628 3403
National Toll Free 1800 113 443
SOUTH AUSTRALIA
Brown & Watson International Pty Ltd
5 Phillips Street, Thebarton
South Australia 5031
Telephone (08) 8443 3018
Facsimile (08) 8443 3008
12
WESTERN AUSTRALIA
Brown & Watson International Pty Ltd
85 Sheffield Road, Welshpool
Western Australia 6106
Telephone (08) 9451 4526
Facsimile (08) 9358 1445
QUEENSLAND
Brown & Watson International Pty Ltd
2A/3375 Pacific Highway, Underwood
Queensland 4119
Telephone (07) 3808 2482
Facsimile (07) 3208 3137
NEW ZEALAND
Narva New Zealand Ltd
22-24 Olive Road
PO Box 12556 Penrose
Auckland, New Zealand
Telephone (09) 525 4575
Facsimile (09) 579 1192