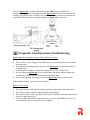
1
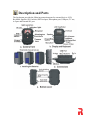
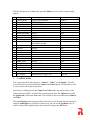
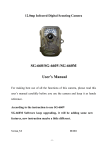
12.0 MP Infrared Digital Spydercam USER MANUAL Thank you for purchasing the Spydercam. In order to optimize the functionality of the Spydercam, please read this manual carefully BEFORE operating the device. Also ensure that you keep it handy for future reference. Ensure that you register your Spydercam at www.spydercam.co.za Contents Safety Warnings Precautions Key Features Description and Parts Additional Requirements Getting Started Advanced Operations Mounting the Spydercam Frequently Asked Questions/Troubleshooting Technical Specifications Included Parts List GPRS Notice Safety Warnings To reduce the risk of electric shock, do not remove the cover of the Spydercam at any time. While the Spydercam comes with a high waterproof rating (IP54), it should never be submersed in water. If the Spydercam is no longer within the service guarantee period, we are still able to provide services such as repairing and part replacements, at a cost. The Spydercam is covered by a one year Limited Warranty on parts and labor from the date of registering the product on www.rikrhino.co.za. Such registration should take place within 7 days from date of purchase. The purchase must have been made through an authorized dealer. The warranty covers defects in workmanship and materials. The warranty does not apply to units that have been damaged or abused intentionally. Any tampering with the unit will also void the warranty. For repairs, please contact your local distributor or visit www.rikrhino.co.za . As a result of the reliance on communications networks we are not able to guarantee 100% success of sending and receiving MMS/E-Mail. When using the Spydercam, be mindful of the National Laws and Regulations. The Spydercam should not be utilized for the invasion of privacy and/or any illegal operations. The manufacturer and distributor will take no legal responsibility for this. Precautions Ensure the Spydercam’s power is switched off prior to inserting/removing the SD Card, SIM Card or batteries. For optimum performance it is recommended to use new high-performance AA alkaline batteries only. (Lithium rechargeable batteries may also be used.) The battery life will vary with operating temperature and the number of images sent. The Spydercam will however be able to take up to 800 pictures before the batteries need replacement. If an AC power adaptor is used, please ensure that the power supply in your house as well as the adaptor is compliant with the specifications listed in this manual. Always ensure that no liquids contaminate the battery depot. Please ensure that the battery polarity matches that on the battery cover. While in the Test Mode the Spydercam will automatically shut down within one minute if no key is pressed. If you want to continue, simply turn power on again. When the Power is switched ON, do not remove the SD Card, SIM Card, batteries or external DC power. Always switch the Spydercam OFF prior to any of these actions. When mounting the Spydercam please ensure that there are not any objects within three meters that will unnecessarily trigger the device. These would include items such as trees and heat sources such as air conditioners of chimneys. When installing the Spydercam always ensure that it is firmly connected and that it will not drop to the ground for whatever reason. Do not stack anything on top of the Spydercam. In order to avoid internal damage to the Spydercam, the Microphone (Mic) rubber cover should NEVER be removed when the camera is installed outdoors. The Mic cover can be removed when operating indoors to facilitate high quality audio recording. Spydercam is not intended to replace existing security measures (eg. Armed Response). It should be applied as a supplementary device to other measures. Key Features The Spydercam was designed, developed and produced in China under registered patent rights. It is a well designed surveillance device that operates automatically with digital camera functionality. The highly sensitive Infra-Red motion sensor enables it to take pictures (up to 12 Mega Pixels) or video clips of any movements. The Spydercam supports MMS/E-mail via GPRS Network. The Spydercam can be used as an automatic surveillance device for guarding and recording unexpected intrusions to homes, farms, shops, warehouses, schools, offices, etc. It can also be used as a trial camera for hunting or monitoring of animals. When powered by 8 new AAA alkaline batteries it has a stand by time of up to six months. Once a motion is detected within the monitored area, the Spydercam will be triggered and take a picture or video according to the previously programmed settings. The Spydercam is equipped with a built-in infrared LED that functions as a flash, to facilitate clear pictures (black and white) in the dark. The picture can then be sent to up to four cell phone numbers as well as up to four e-mail addresses. The design of the Spydercam allows it to be used in both in- and outdoors. While it is weather resistant, it should not be used close to heat sources and/or under water. Description and Parts The Spydercam provides the following connection ports for external devices: LCD, Keyboard, Speaker, SD Card slot, SIM Card port, Microphone port, USB port, TV out, AA port and External DC port. Additional Requirements The following items are not included and are required to get you started: SD Card The Spydercam uses a standard SD (Secure Digital) memory card to store pictures/videos in .JPG and .ASF format. The normal SD card size that is supported by the Spydercam is from 8MB to 32GB. In case the card cannot be read by the Spydercam it is advisable to format the card. This can be done via a computer (that has an SD slot) or with the Spydercam itself. For detailed instruction on how to format a SD card with the Spydercam, please refer to ADVANCED OPERATIONS (Point14). Always remember to make back-ups of data before formatting. Since the Spydercam has limited internal memory it would always require an SD card. When inserting the SD Card, please ensure that the device is switched OFF. Before inserting the SD Card, ensure that the write-protection is off so that it is writable. When inserting the SD Card into the slot, a slight clicking sound of the card indicates that the card is connected successfully. If the card is inserting in the incorrect way it will not click in. It is therefore important not to force the card into the slot, since it would break. To remove the SD card, simply push it in gently. There will be another clicking sound after which it will be released. Power Supply There are three ways of power supply: External DC power supply source, input 110-240V, 50/60Hz, Output 6V/1A. Always plug adaptor into Spydercam first, before connecting to wall socket. Solar Powered DC power supply source, input 110-240V, 50/60Hz, Output 6V/1A. Always plug adaptor into Spydercam first, before connecting to Solar Power Unit. Eight (8) alkaline or lithium rechargeable AA batteries. Please ensure that the battery polarity matches that on the battery cover. SIM Card The Spydercam is compatible with all three the major cell phone companies in South Africa. In order to ensure that the device sends the MMS, please refer to ADVANCED OPERATIONS (Point20). When purchasing the SIM Card, please ensure that you adhere to the RICA process. When buying the SIM Card you need to request the service provider to activate the MMS ability on the Card. You also need to ask the service provider to disable the need for a PIN to be punched in when activating the SIM Card. When installing the Spydercam, please ensure that the ―False Triggers‖ are kept to a minimum, since there will be a charge from the cell phone company for every MMS sent. Because the Spydercam works on GPRS technology ALWAYS ensure that you have cell phone reception at the place where it is installed. Getting Started Powering On: Once you have prepared the Spydercam by properly installing the SD Card, SIM Card and batteries (or external DC) you can switch the Power on. There are three basic operating modes: OFF : Test : ON : Power is off. Menu Settings and Test Mode Live Mode In order to save battery power the Spydercam will automatically shut down after one minute if no key is pressed while the device is in Test Mode. While in Test Mode the Red IR Light on the front of the device will remain on. When switching the Spydercam on, allow 5 seconds for stable start-up. In the Live Mode the LCD screen will be off and the green IR light on the front of the device will flicker for 15 seconds. Test Mode: In this mode you will be able to do the following (See Figure 2) : Press Menu key for Parameter settings Press Up to capture Pictures manually Press OK button for 5 seconds continuously for Playback of Picture. Press Down to capture Video Clips manually Press OK button to Stop Video recording. Then hold Stop for 5 seconds continuously for Playback of video. On/Live Mode: When the Power switch is moved to ON, the Spydercam will be in the Live mode. At this stage the motion indicator LED on the front will blink green for about 15 seconds. In this mode the settings, as per ADVANCED OPERATIONS below, will be activated. Powering Off: To switch the Spydercam off, slide the switch to the OFF position. Please note that even while the device is switched off, it will still consume power at the UA level. It is therefore advisable to remove the batteries from the battery depot if the device is not going to be used for an extended period. Advanced Operations Now that you have familiarized yourself with the basic functionalities of the Spydercam, it is strongly advised that you please read the advanced operation instructions below to optimize the benefits you can get from the use of your new Spydercam. Category Settings In order for you to change the category settings on the Spydercam, you are required to switch it into the Test mode. For your convenience it is also possible to set categories while the Spydercam is linked to the TV output if you find the LCD screen to be too small. Once you have switched the Spydercam into Test mode, the following screen will appear After the Spydercam has started, this screen will change to the following: a. b. c. d. e. f. g. Camera/Video Mode Image/Video size Number of Images/Videos taken and available space SD Card Status Battery Level Date/Month-Day-Year, time: Hour-Minute-Second Auto Recording In order to navigate in the Test mode, use the following keys: Up/Down to navigate in Sub Categories (Otherwise it is the shortcut keys between Camera and Video functions) OK to save a selected a setting Menu to cancel Left to go back OK to Set With the Spydercam is in Test mode, press the Menu key to access the various setting options. No 1 2 3 4 5 6 7 8 9 10 11 Sub Categories Camera/Video/Playback 1X/2X/3X/4X 12MP/8MP/5MP 1/2/3 720X480/ 640 X480/QVGA 320X240 5 to 60 Seconds Yes/No 00 Seconds to 60 Minutes 15/30 Frames per Second ON/OFF Month/Day/Year Hour/Minute/Second 12 Sensor Level High/Normal/Low 13 IR LED ON/OFF 14 Format YES/NO 15 TV Out NTSC/PAL 16 Language English 17 Timer Setting YES/NO 18 Default Set YES/NO 19 GPRS Mode ON/OFF 20 GPRS Setting URL/APN/IP/Port 21 Send To Phone/E-Mail 22 Frequency 50/60Hz OTHER NON-ADJUSTABLE SETTINGS File System FAT 12 and FAT 16 File Format Pictures saved as .jpg or .asf 1. Category Camera Mode Digital Zoom Image Size Capture Number Video Size Video Lengths Audio Recording Interval Video Frames Time Stamp Set Clock Recommended Setting Camera 1X 12MP 1 720 X 480 5 Seconds Yes 0 Seconds 30 Frames per Sec ON 01/12/2010 – 12:01:01 Normal ON NO NTSC English NO NO OFF NO Phone 50Hz FAT 16 \DCIM CAMERA MODE This category has three sub settings, ie ―Camera‖, ―Video‖ and ―Playback‖. The first two can be used to switch between the Camera and Video options. The third one is used to view pictures/videos previously taken. Apart from switching between the Camera and Video mode as per above there is also shortcut option available. To utilize this you only need to press the Up/Down key when the Spydercam is still in the Test mode. This will allow you to switch between Camera and Video. When the Playback sub-category has been selected, you can navigate between images by using the Left/Right keys. In order to zoom in/out, you can use the Up/Down keys. In order to return to the original image, once zoomed in, depress the OK button. In order to navigate between video clips use the Left/Right button. The OK button to play the requested clip and the Up/Down keys to increase/decrease the playback volume. (If there is a power interruption during the capturing of a video clip, the file will show a ―file error‖ message on the display. To delete any picture/video, press Menu and then OK while the image/video is reflected. You will than have the option to Delete One or to Delete All. In order to delete it then, just press OK. 2. DIGITAL ZOOM (2X< 3X< 4X) In the Digital Zoom mode: a) Press Up/Down to select Yes b) Press OK key to enter. Press Up/Down to select zoom (2X, 3X or 4X) c) Press OK to complete setting or press Left key to return to the previous screen without making a change to the existing setting. 3. IMAGE SIZE There are three sub-categories to this category, ie. 12 MP, 8MP or 5MP. The higher the MP, the better the quality of the picture. To change between the options: a) Press Up/Down to select Photo Size (12MP/8MP/5MP) b) Press OK to save the selection c) Press Left to return to the previous screen without making a change to the existing setting. d) Press Menu to return to Test mode. 4. CAPTURE NUMBER In order to change the number of pictures to be taken, in Capture Number mode: a) Press Up/Down to select 1/2/3. b) Press OK to save the selection c) Press Left to return to the previous screen without making a change to the existing setting. d) Press Menu to return to Test mode. 5. VIDEO SIZE There are 3 sub-categories, ie VGA (720X480), VGA (640X480) and QVGA (320X240). In order to change the video size, in Video Size mode: a) Press Up/Down to select Video Size720/640/320. b) Press OK to save the selection c) Press Left to return to the previous screen without making a change to the existing setting. d) Press Menu to return to Test mode. 6. VIDEO LENGTH This category can only be adjusted when the device is in the Live Video Mode. In order to change the video length, in the Video Length mode: a) Press Up/Down to select 5-60 seconds. b) Press OK to save the selection c) Press Left to return to the previous screen without making a change to the existing setting. d) Press Menu to return to Test mode. 7. AUDIO RECORDING In the Audio Recording mode: a) Press Up/Down to select Yes/No. b) Press OK to save the selection c) Press Left to return to the previous screen without making a change to the existing setting. d) Press Menu to return to Test mode. 8. INTERVAL This setting determines how long the PIR of the camera will be disabled after each triggering in the ON/Live mode. During this time the Spydercam will therefore not take any pictures/videos. In order to change the interval period, in the Interval mode: a) Press Up/Down to select 0-60 minutes. b) Press OK to save the selection c) Press Left to return to the previous screen without making a change to the existing setting. d) Press Menu to return to Test mode. 9. VIDEO FRAMES In the Video Frames mode: a) Press Up/Down to select 30/15 frames per second. b) Press OK to save the selection c) Press Left to return to the previous screen without making a change to the existing setting. d) Press Menu to return to Test mode. 10. TIME STAMP This functionality determines whether the date/time should be stamped onto the pictures and video clips. It is important to note that it is required when the photos/videos are to be used as evidence with SAPS. In the Time Stamp mode: a) Press Up/Down to select ON/OFF. b) Press OK to save the selection c) Press Left to return to the previous screen without making a change to the existing setting. d) Press Menu to return to Test mode. 11. SET CLOCK In the Set Clock mode: a) Press Up/Down to select Month/Day/Year – Hour/Minutes. b) Press OK to save the selection c) Press Left to return to the previous screen without making a change to the existing setting. d) Press Menu to return to Test mode. 12. SENSOR LEVEL This category determines the sensitivity of the PIR. The higher the setting, the more sensitive the device would be to activation. The High setting should ideally be used indoors only, while low sensitivity should be used outdoors. It is important to note that the sensitivity of the PIR is related to temperature – the higher the temperature, the lower the sensitivity. In the Sensor Level mode: a) Press Up/Down to select High/Normal/Low. b) Press OK to save the selection c) Press Left to return to the previous screen without making a change to the existing setting. d) Press Menu to return to Test mode. 13. IR LED The IR (Infrared) Led allows the Spydercam to operate effectively during night time or when there is insufficient natural light. In the IR LED mode: a) Press Up/Down to select ON/OFF. b) Press OK to save the selection c) Press Left to return to the previous screen without making a change to the existing setting. d) Press Menu to return to Test mode. 14. FORMAT WARNING! Be extremely careful when using this functionality. You could accidentally delete all the stored images/videos. Always ensure you have made back-ups before using the functionality. In the Format mode: a) Press Up/Down to select YES/NO. b) Press OK to save the selection c) Press Left to return to the previous screen without making a change to the existing setting. d) Press Menu to return to Test mode. Once you have pressed OK after selecting YES, the display message will be ―Format Success‖ 15. TV OUT The normal video standard in South Africa is NTSC In the TV Out mode: a) Press Up/Down to select NTSC/PAL. b) Press OK to save the selection c) Press Left to return to the previous screen without making a change to the existing setting. d) Press Menu to return to Test mode. 16. LANGUAGE The default setting is English. 17. TIMER SETTING PLEASE NOTE: The Start and Stop times will only be activated if the Timer Setting is changed to Enable. In the Timer Setting mode: a) First select Enable. Then press Left or Right to select Start/Stop Hour/Minute b) Press Up/Down to change the value. c) Press OK to save the selection d) Press Menu to return to Test mode. 18. DEFAULT SET This is the original factory setting. In the Default Set mode: a) Press Up/Down to select YES/NO. b) Press OK to save the selection c) Press Left to return to the previous screen without making a change to the existing setting. d) Press Menu to return to Test mode. 19. GPRS MODE This mode is to activate the Spydercam to send MMS/E-Mail Messages. In the GPRS Mode: a) Press Up/Down to select YES/NO. b) Press OK to save the selection c) Press Left to return to the previous screen without making a change to the existing setting. d) Press Menu to return to Test mode. 20. GPRS SETTING In South Africa the following setting will apply: URL Setting APN Setting IP Setting Port : : : : mmsc.vodacom4me.co.za internet 196.006.128.013 8080 Service providers in various countries will require different settings. These settings will be available on request from [email protected] 21. SEND TO Here the option is to choose as much as 4 cell phone numbers and/or 4 e-mail addresses to receive the MMS/E-Mail messages. It is important to keep in mind that there is a separate cost involved in each MMS/E-Mail, 22. FREQUENCY In the Frequency Mode: a) Press Up/Down to select 50/60 Hz. b) Press OK to save the selection c) Press Left to return to the previous screen without making a change to the existing setting. d) Press Menu to return to Test mode. Mounting the Spydercam There are various options to mount the Spydercam: Using the strap supplied with the device. Using a steel cable lock – recommended. Using a lockable steel box Points to remember when setting up: When the Spydercam is attached to a tree, please ensure that the diameter is at least 15 cm. To achieve optimal results the Spydercam should be 3-6 meters away from the object and at a height of 1,5 to 2 meters. When used as a security device try to ensure that possible movement will be captured from straight ahead. The Spydercam should be angled at a 70-80º relative to the ground for optimal use. Do not enter within the monitored area once the Spydercam has been set up since it would capture/send an image/video. Ensure that there are not any moving objects (such as grass/leaves) within a three meter radius in from of the Spydercam. The PIR is sensitive to temperature variances. The PIR is only effective up to 15 meters, while this distance reduces to 6 meters when the temperature exceeds 32ºC. Once the Spydercam is switched to Live mode, the LED (Green) will blink for approximately 15 seconds. During this time the Spydercam will not be activated. This is to allow you sufficient time to lock the cover and move away. Please note, that once the green PIR indication light has stopped blinking, the Spydercam is activated. Frequently Asked Questions/Troubleshooting Spydercam takes continuous images with no subject in picture: There will be a ―False Trigger‖ if the PIR sensor is activated by motion or heat in the activation zone. To avoid this from happening try and move the Spydercam to an area where there is no interference. A further option would be to adjust the sensor level to a less sensitive level. In cases where the Spydercam is set up where there is high movement volumes at a certain time of day, use the timer to switch it off at those times. If it persists in getting false triggers, move the Spydercam indoors and test again. If the problem persists, contact your local supplier. Battery life too short The expected battery life depends on the temperature and number of pictures taken. Ensure that you have used new alkaline/lithium AA batteries. Ensure that you have used a good quality SD card (ie SanDisk), since poor quality SD cards can reduce battery life. Since the GPRS functionality uses more battery power as/when MMS’s are sent, it is recommended to use an external DC 6V/1A adaptor. Spydercam stops taking images First ensure that the SD Card has memory available. If the card is full, the Spydercam will stop taking pictures and shut down automatically. Check the batteries (as per above). Ensure the Spydercam is in the ON Mode and not in the OFF or TEST modes. The Spydercam cannot switch on Ensure that you have installed the batteries in accordance to the indications in the battery depot. If you are using an external adaptor, ensure it is switched on. Photograph and/or Video Quality Issues: Nigh time Photos/Videos appear too dark: Check if the battery power is full. The flash will stop operating towards the end of the battery life. You will achieve the best results if the subject is within the ideal flash range. Anything beyond 12m (outside the 62º angle) will appear dark. If the Spydercam is set to take more than one image (Capture Number), the latter images might be darker because of the time it takes for the flash to fully recharge. As per above the latter images might be darker if the interval (Interval Setting) between images are too short. Day time Photos/Videos appear too dark: Ensure that the Spydercam is not aimed directly into the sun or other light sources, since it may cause the auto exposure to produce darker images. Nigh time Photos/Videos appear too light: You will achieve the best results if the subject is within the ideal flash range. Anything closer than 3m (inside the 10º angle) will appear too light. Ensure that you have not set the Spydercam up in such a way that light will reflect back from a painted wall. Day time Photos/Videos appear too light: Ensure that the Spydercam is not aimed directly into the sun or other light sources, since it may cause the auto exposure to produce bright images. If the IR LED is used, images within a 2 meter area will be too bright. Pictures are blurred: In these cases the subject moved too quickly. Red, green or blue color cast In certain lighting conditions, such as the period just after sunset, the sensor might distort images. Video Clips not recording in accordance with setting Ensure that the SD Card memory is not full. Check that the battery power is full. The Spydercam may record shorter video clips to conserve power towards the end of the battery life. Short video clips—not recording to the length set Check to make sure that the SD card is not full. Make sure that the camera has good batteries in it. Near the end of the battery life, the camera may record shorter video clips to conserve power. When IR LED is on, the pictures/videos are sometimes in black & white This will happen if photographs are taken in poorly lit indoor areas or at dusk if taken outdoors. This is as a result of the Spydercam’s ability to automatically sense the brightness of the light. If the problem persists, you just need to move the set up angle of the Spydercam slightly. It is also recommended not to turn on the IR LED for indoor use during the day. Date/time Stamp not appearing on images Make sure that the ―Time Stamp‖ setting is set to ―On‖ in the Menu. Photos do not reflect any subjects Check the ―Sensor Level‖ (PIR sensitivity) parameter setting. For warm environmental conditions, set the Sensor Level to ―High‖ and for cold weather use set the sensor to ―Low‖. Try to set your camera up in an area where there is not a heat source in the camera’s line of sight. In some cases, setting the camera near water will make the camera take images with no subject in them. Try aiming the camera over ground. Try to avoid setting the camera up on small trees that are prone to being moved by strong winds. PIR Sensor LED Flashes/Does not Flash When in operation the LED will not flash or it will only flash for a short time. Remember the aim is to keep the Spydercam hidden. The Spydercam will not retain settings Make sure that you have saved the changes that you make during the menu setup of the camera. If you don’t select and save these settings, the camera will revert back to the default settings. The Spydercam captured a video and is only showing the message ―damaged video can’t open‖ This is normally caused by a low quality SD card. Format the card or replace it. Irregular power off. When the batteries are low, it is recommended to first switch off the camera, then take out the old batteries. Sometimes the software on the Spydercam freezes This can also be the cause of a low quality SD Card. Restart your camera in order for the settings to be saved. The first/last couple of images are fuzzy or too white When you switch the Spydercam to the ON position, while mounting the device, your hand movement will cause ―false‖ pictures to be taken. When entering into the ON position, the device has a 15s waiting time, in the meantime the green indicated LED will blink. As a solution you should mount the Spydercam while it is in the OFF position. Once finished affixing the camera, open the cover, switch to ON position, close the cover, and leave the area within 15 seconds. It is therefore also suggested that you approach the Spydercam from behind when switching it OFF. When Spydercam connected to TV, the image is unstable This is caused by the voltage unsteadiness which relate to your local area power supply. Setup the Frequency, choice 50Hz or 60Hz, to correspond with your local area power frequency. After inserting the SIM card into the Spydercam it does not send MMS/email Before inserting the SIM card ensure that PIN of SIM card is disabled. You can disable the PIN of a SIM card by inserting the card into your mobile phone. Be sure to open the GPRS service for both the camera and your cellular receiving phone. In the GPRS Setting mode input the correct data according to the user manual. Before using MMS function it is recommended to use the network service provider which has the widest fraction of coverage in your area. You are able to manually test the connectivity in ―Test‖ mode. Press ―Left‖ key to search for the GPRS signal, if it is successful it will show as ―Signal search done‖. If it fails, it will show as ―signal search fail‖. The time on the photo is different from the time received The photos are usually received within 15s-2mins. Sometimes it can be delayed when sent to Email as a result of your computer setting. While there is movement in the monitoring region the Spydercam did not send any pictures within the first 2 minutes after switching the GPRS function on The device will search the signal automatically once activated and during this process, even it have been triggered it will not send the picture. The picture size of the MMS is different than the setting on the Spydercam If you open the GPRS function with capture number of 1or 2 pictures, the device will save the first one as a 640X480 image size and send it to your email or mobile. This is as a result of only MMS sizes of less than 50K accepted. In GPRS, we did not receive all the photos via MMS The cell phone signal in different areas will be different although it supplied by same operator. As an example you sometimes start to have conversation on a cell phone where the signal is very good, but it then varies between weak and strong as you talk. As a result of this, the Spydercam cannot guarantee 100% success with the sending and receiving of MMS’s. Will the Spydercam work with any wireless network/carrier? NO, it does not support CDMA or Non-Sim card networks. Also, even with the SIM card carriers, the SIM card size need to be the standard size (15mm by 25 mm), micro SIM card (12mm by 15 mm) for Iphone 4 or Ipad will not work. Will the Spydercam connect to an external solar or battery power unit? Yes, as long as the input power supply is 6V/1A. Technical Specifications Display Screen Image Sensor Angle Lens Size IR-Flash IR-LED Internal Memory SD Card (Not Included) Picture Size (JPEG) Video Size Compressed Format Audio Recording Operation Trigger Time Triggering Interval Shooting Numbers Power Supply Standby Current Interface Operating Temperature Operating Humidity Waterproof Specification Security Authentication Color viewer LCD Maximum 12 Mega Pixels PIR: 100º 14 X 9 X 6 CM Yes Up to 15m (26 lights) 32MB 8MB to 32 GB 12MP – 4 000 X 3 000 8MP – 3 264 X 2 448 5MP – 2 592 X 1 944 H.264 Available Day/Night 0.8-1s (GPRS – 1,2s) 0 Sec – 60 Min (Programmable) 1–3 < 0.3mA (<7mAh/day) TV out (NTSC/PAL); USB; SD Card -20º - 60 º 5% - 90% IP54 CE FCC ROSH Included Parts List Part Name Spydercam USB Cable TV Out Cable Mounting Strap User Manual Quantity 1 1 1 1 1 GPRS NOTICE 1. If you set both phone and email it will send to your phone and email. The MMS default setting image size is 640 X 480. At the same time it will automatically save the pictures to the SD card as per your parameter settings. 2. If you want download the pictures/videos via USB the device must be on Test mode. 3. It is recommended to switch the GPRS mode to OFF, if you not using the MMS function since it will save the battery power. 4. The Spydercam sends MMS messages through GPRS network, so before using this function, you need to open GPRS service from your service provider. It supports four bands: 850MHz, 900MHz, 1800MHz, and 1900MHz. 5. Be sure that the PIN of the SIM card is disabled before inserting the SIM card (you can disable the PIN of a SIM card via your mobile phone) 6. Please ensure that your battery power is sufficient. 7. When you search the signal, it will take 30-60seconds, if it is failed first time, please restart the camera and press Left key for search it again. 8. If the signal of mobile is not so strong or steady, this may lead failures on sending MMS. Be sure proper GPRS network coverage is available. 9. In order to better control the junk MMS, there are some limits to the number of MMS sending per day per cell phone & also there is some restrict in the GPRS flow per day as well in some countries. So if exceed the limitation number, the GPRS function will be closed automatically via the system in telecom communication, the MMS can't be sent out successfully, but will back to normal on next day. 10. Be sure to open the GPRS service for both the camera and your cellular receiving phone. 11. In Test mode, the camera will shut down automatically after 1 minute without a keyin action. Please turn on the power again for new actions.