1
Operator's Manual
CRAFTSMAN°
2.2 cu. in./36cc 2-Cycle
GASOLINE CHAIN SAW
Model No.
358.352181 - 18 in. Bar
@
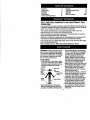
Read and follow alISafety
Rules and Operating
WARNING:Instructions bef6re first use of this product.
F_
•
For answers
to your
questionsor about
this pm,
product:
Call
7 am-7 pm,
Mon.-Sat.,
10 am-7
Sun.
1-800-235-5878
Sears, Roebuck
530-087295
03/13/98
_.ou_,,=o_=ooo°_mo_
and Co., Hoffman
Estates, IL 60179 USA
Warranty
Safety Rules
Assembly
Operation
Maintenance
Service and Adjustments
2
2
5
6
11
14
FULL ONE YEAR WARRANTY
CHAIN SAW
Storage
TroubleShootingChart
Pads List
Spanish
Parts& Ordering
ON CRAFTSMAN
16
17
19
22
Back
® GAS
Forone year fromthedate of purchase,whenthisCraftsmanGas ChainSaw is
maintained,lubricatedand tunedupaccordingto theowner'smanual,Sears will
repair,freeof charge,anydefectin materialor workmanship.
Thiswarrantyexcludesthe bar,chain,spark plugand air filter,whichare
expendablepads,and becomewomduringnormaluse.
If thisGas ChainSaw isused forcommercialor rentalpurposes,this warranty
appliesfor30 daysfromthe date ofpurchase.
WARRAN_ SERVICE iS AVAILABLEBY RETURNINGTHIS CHAINSAW TO
THE NEAREST SEARS SERVICECENTER IN THE UNITED STATES.
Thiswarrantygivesyou specificlegal rights,and you may also haveotherrights
whichvaryfromstateto state.
Sears, Roebuck and Co., D/817 WA, Hoffman Estates, IL 60179
duty, non-slipgloves;eye protection
suchas non*fogging,ventedgoggles
or face screen;an approvedsafety
hard hat;and soundbarriers(ear
plugsor mufflers) to protectyour
hearing.Regularusersshouldhave
hearingcheckedregularlyas chain
saw noisecan damagehearing.Se. Restrictthe use ofyour saw,toadult
curehairaboveshoulderlength.
users who understandand canfollow • Keepall padsof yourbodyaway from
the safetyrules,precautions,and opthe chainwhen the engineis running.
eratinginstructions
found in this
• Keep children,bystanders,and animanual,
malsat least 30 feet (10 meters)
away from the workarea whenstartingand usingthesaw.
• Do nothandleor operatea chain saw
whenyou are fatigued, ill,or upset,or
ifyou havetaken alcohol,drugs,or
medication.Youmustbe in good
physicalconditionand mentallyalert.
safety
if you haveany conditionthatmight
Shoes
be aggravatedby strenuous work,
checkwith doctorbeforeoperating.
• Do notstartcuttinguntilyou h_vea
clearwork area, securefooting, and
• Wearprotectivegear.Alwaysuse
steel-toedsafetyfootwear withnonespeciallyifyou are fellinga tree, a
slipsoles;snug-fittingclothing;heavy- retreatpath. : ....
WARNING: Always disconnectspark
plugwirewhen makingrepairsexcept
for carburetoradjustments. Becausea
chainsaw isa high-speedwoodcutting
tool,carelessor improperuse ofthis
tootcancauseseriousinjury.
PLAN AHEAD
OPERATE YOUR SAW SAFELY
• Store the unit and fuel in a cool, dry
• Do not operate with one hand. Seriwell ventilated space where fuel vapore cannot reach sparks or open
ous injury to the operator, helpers, or
flames from water heaters, electric
bystanders may result from onemotors or switches, furnaces, etc.
handed operation. A chain saw is intended for two-handed use.
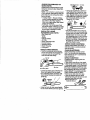
GUARD AGAINST
KICKBACK
• Operate the chain saw only in a well- Follow all safety rules to help avoid
ventilated outdoor area.
kicl_backand other forces which can
• Do not operate saw from a ladder or
result in serious injury.
in a tree, unless you are specifically
trained to do so.
"-_)_
_
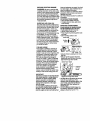
KickbackPath
• Make sure the chain will not make
contact with any object while starting
the engine. Never try to start the saw
when the guido bar is in a cut.
• Do not put pressure on the saw, esAvoidObstructions
pecially at the end of the cut. Doing
so can cause you to lose control
when the cut is completed.
• Stop engine before setting saw down.
• Hand carry saw only when engine is
stopped. Carry with muffler away from
Clear The WorkingArea
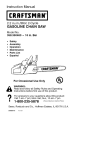
body; guide bar & chain projecting beWARNING:
Rotational Kickback can
hind you; guide bar preferably covered with a scabbard.
occur when the moving chain contacts
an object at the upper portion of the tip
MAINTAIN
YOUR SAW IN GOOD of the guide bar. Contact at the upper
WORKING
ORDER
portion of the tip of the guide bar can
• Have all chain saw service performed cause the chain to dig into the object,
which stops the chain for an instant.The
by a qualified service dealer except
the items listed in the maintenance
result is a lightning fast, reverse reaction
section of this manual.
which kicks the guide bar up and back
• Make certain the saw chain stops
.-towardthe operator.
moving when the throttle trigger is re- Pinch-Kickback and Pull-In occur when
leased. For correction, refer to =Carthe chain is suddenly stopped by being
buretor Adjustments."
pinched, caught, or by contacting a for• Keep the handles dry, clean, and fr_e eign object in the wood. This sudden
from oil or fuel mixture.
stopping of the chain results in a rever• Keep caps and fasteners securely
sal of the chain force used to cut wood
tightened.
and causes the saw to move in the op• Use only Craftsman accessories and posite direction of the chain rotation.
replacement parts as recommended.
Pinch-Kickback drives the saw straight
Never modify your saw.
back toward the operator. Pu!l*Inpulis
the saw away from the operator.
HANDLE FUEL WITH CAUTION
REDUCE THE CHANCE OF
• Do not smokewhilehandlin_fuel or
KICKBACK
whileoperatingthe saw.
*
Recognize that kJckl_ck can happen.
• Eliminateall sourcesofsparksor frame
in areaswherefuelis mixedot"poured. W'_ha basic understandingof kickback,
you can reduce the element of surprise
• Mix and pourfuel in an outdoorarea
which contributes to acc{dents.
and use an approved, marked con, Never let (he moving chain Contact
tainerfor all fuel purposes.Wipe up
any object at the tip of the guide bar.
all fuel spillsbeforestartingsaw.
• Keep working area free from obstruc• Move at least 10 feet (3 meters)from
tions such as other trees, branches,
fueling site beforestarting.
rocks, fences, stumps, etc. Eliminate
- Turn the engineoff and letsaw coolin or avoid any obstruction that your saw
a non-combustible
area, noton dry
leaves, straw,paper, etc.Slowlyremovefuel cap and refuelunit.
o chain could hit while cutting.
Keep saw chain sharp and properly
tens=oned. A loose or dull chain can
increasethechanceof kickback,Fotlowmanufacturer'schainsharpening
andmaintenance instructions.
Check
tensionat regularintervals,butnever
withenginerunning, Makesure bar
clampnutsare securelytightened.
• Beg_nand continuecutting!
at full
speed,if thechainis mowngat a
slowerspeed, thereis greaterchance
of }dekbackoccurring.
• Use extremecautionwhen reentering
a cut.
keep your bodyfrom beingin a direct
linewiththe cuttingchain,
° Standwith your weightevenlyhal*
anced on both feet.
• Do not overreach, Youcouldbe drawn
orthrown off balanceand Josecontrol.
• Do not cut above shoulderheight, It is
difficult to maintain controlof saw
above shoutderheight,
KICKBACK SAFETY FEATURES
WARNING: The following features are
includedon yoursawto help reduce
hazardof kickback; however,such featipof
thebar(plungecuts).
i Do not attemptcutsstartingwiththe tureswillnot totallyeliminatethisdanWatchfor shiftinglogsor otherforces
thatcouldclosea cut and pinchor fal! ger.Do not relyonlyon safetydevices,
intochain,
• Handguard:designedto reducethe
• Use the specifiedReduced-Kickback chanceof yourleft handcontacting
GuideBar and Low-Kickback
Chain.
the chainif your handslipsoffthe
front handlebar.
Avoid Pinch-Kickback:
° Positionoffront and rear handlebars:
• Be extremelyawareof situationsor
designedwith distancebetweenhanobstructions thatcan cause material
dles and "in-line"witheachother.The
to pinch the top of or otherwise stop
spreadand "in-line"positionof the
the chain.
handsprovidedbythis designwork
• Do not cut more than one log at a
togetherto givebalanceand resistime,
tancein controllingthepivotofthe
• Do not twist saw as bar is withdrawn
saw backtowardthe operatorif kickfrom an undercutwhen bucking,
back occurs.
Avoid PulHn:
• _ways begin cuttingwiththe engine • Reduced-Kickback GuideBar:designedwith a small radiustip which
at ful/spaed and the saw housing
reduces the size of the kickback danagainst wood.
• Usewedges madeof plasticor wood. ger zone. Thistype bar has been
Neveruse metal to holdthe cut open. demonstrated to significantly reduce
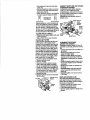
the number and seriousness of kickMAINTAIN CONTROL
backs when tested in accordancewith
ANSI B175.1.
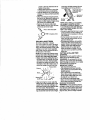
Stand to the left of the saw
Small Radius
Thumb on
underside
ofhandlebar;
_(
Elbow
locked
Neverreversehandpositions
• A good,firmgrip on the saw withboth
hands willhelp ,you maintaincontrol,
Don'tlet go. Gripthe rear handlewith
yourrighthandwhetheryou are right
or left handed.Wrapthe fingersof
your left handoverand around the
fronthandlebar,and yourleft thumb
underthe frontt_andlebar.Keep your
, leftarm straight withthe elbowlocked.
Position your lefthand on the front
handlebarso it isin a straightlinewith
yourrighthandon the rear handle
when making buckingcuts. Stand
slightlyto the left side ofthe saw to
TipGuideBar I:
...... ! _,J
° Low-f_ckback
Cha_ri:hasmet kickback
performancerequimmants
whentested
on a representative
sampleof chain
sawsbelow3.8 cubicinch
displacement
specifiedin ANSIB175.1.
Low-Kickback
Chain
Contoured
DepthGauge
_,,='_'_
Elongated
GuardLink
,_z;;;llaz:;l_,,P-----"Deflects
Kickback
%
"_
ForceAndAltows
Tt,,_ WoodTOGradually
RideIntoCutter
SAFETY NOTICE: Exposureto
vibrationsthroughprolongeduseof
gasolinepoweredhandtoolscould
causeblood vesselor nerveaamagein
the fingers,hands,and jointsof people
4
pronetocirculation
disorders
or
muffler and spark arresting screen
abnormalswelling.Prolongeduse in
which meets the requirements of
coldweatherhasbeen linkedto blood Califomia Codes 4442 and 4443. All
vesseldamagein otherwisehealthy
U.S. forest land and the states of
people.Ifsymptomsoccursuchas
California, Idaho, Maine, Minnesota,
numbness,pain,lossof strength,
New Jersey, Oregon, and Washington
changein skincoloror texture,or loss require by law that many internal
offeeling in thefingers, hands,or joints, combustion engines be equipped with a
discontinue
theuse ofthis tooland
spark arrestor screen. If you operate a
seek medical attention.An
chain saw in a state or locale where
anti-vibration
systemdoesnot
such regulations exist, you are legally
guaranteethe avoidanceof these
responsible for maintaining the
problems.Userswho operatepower
operating condition of these parts.
toolson a continualand regularbasis
Failure to do so is a violation of the law.
must closelymonitortheirphysfcal
conditionand the conditionof thistool
Refer to Customer Responsibilities
CHAIN BRAKE Ifthis saw is to be used chart in the MAINTENANCEs_ection.
for commerciallogging,you mustorder STANDARDS: This chain saw is listed
and install a chainbraketo complywith by Underwriters Laboratories, Inc. in
accordance with American National
FederalOSHA Regulationsfor Commercial Logging.Contactyour Sears
Standards for Gas01ine-Powered Chain
ServiceCenteror call 1-800-235-5878. Saws Safety Requirements (ANSI
SPARKARRESTOR:Yoursaw is
B175.1-I99t).
equippedwith a temperaturelimiting
CARTON CONTENTS
Check carton contents against the following liSt.
Model 358.352181
• Chain Saw (fully assembled)
• Bar tool
• Chain
• Car_ing Case
* Gloves
• Gas Can
. Bar & Chain Lube
.2-cycle engine oil
• Examine parts for damage. Do not
use damaged parts.
• If you need assistanceor findthat
pads are missing or damagedFplease
call 1-800-235.5878. • •
NOTE: It isnormalto hearthe fuel filter
rattlein an emptyfueltank.
Yourunithas beenfactorytestedand
the carburetor preciselyadjusted. As a
resultyou may smellgasolineor finda
dropofoil/fuelresidueon the muffler
whenyou unpackthe unit.
ASSEMBLY
Yoursaw isfully assembled;no
assemblyis necessary.
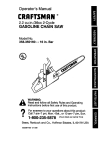
KNOW YOUR SAW
RF.AD THIS OPERATOR'S MANUAL AND SAFETY RULES BEFORE OPERATING YOUR CHAIN SAW Compare the illustrations with your unit to familiarize
yourself with the location of the various controls and adjustments. Save this
manual for future reference.
Bar Oil FillCap
Housing
Fuel Mix FillCap
Cylinder Cover [1
Fast
Idle FL,JI
ThrottleL
--,-----
k
_J
Throttle Choke
t/_
Screw
--
.
T"ggor
K.obBar
O,amp
_
ulreCtlOn
_-.,-.,---.,,.,- GuideBar
"
BarClampNuts
ui ear
ON/STOP SWITCH
The ON/STOP Switchis usedto stop
the engine.
THRO'rFLETRIGGER
The throttletriggercontrolsengine
speed.
THROTTLE LOCKOUT
The throttlelockoutmustbe pressed
beforeyou cansqueezethe throttletrigger.Thisfeature preventsyou from accidentallysqueezingthe tdgger.
FAST IDLE LOCK
The fast idle lockholdsthethrottletrigger in the startingposition.Activatethe
fast idlelockby pressingthethrottle
lockoutand squeezingthe throttletrigger.Withthethrottletriggersqueezed,
press thefast idle lock.Release the
throttle lockout and trigger while holding
the fast idle lock button.
CHOKE KNOB
The Choke Knob activates the choke to
dprovideadditional fuel to the engine
uring cold starting.
PRIMER BULB
The Primer Bulb circulates fuel to the
carburetor to provide quicker starting.
CHAIN TENSION
It is normal for a new chain to stretch
during first 30 minutes of operation. You
should check your chain tenston frequently, See Chain Tension under the
Service and Adjustments section.
6
BEFORE
STARTING
ENGINE
WARNING:
Be sure to read the fuel
lines and carburetorare empty. Use fresh
fuel next season. See STORAGEinstructions for addi_onal information.
handling i,_forrnation in the safety rules
section of this manual before you beg_n. Never use engine or carburetor cleaner
products in the fuel tank or permanent
If you do not understand the fuel handamage may occur.
dling information do not attempt to fuel
See the STORAGEsection for additional
your unit. Seek help from-s0meone that information.
does understand the information or call
STOPPING YOUR ENGINE
the customer assistance help line at
1-800-235-5878.
• Move On/Stop switch to STOP.
• if engine does not stop, pull choke
GUIDE BAR AND CHAIN OIL
knob out fully.
The chain oiler provides continuous luSTARTING YOUR ENGINE
brication to the chain and guide bar. Be
COLD ENGINE OR WARM ENGINE
sure to flu the bar oil tank when you fill
AFTER RUNNING OUT OF FUEL
the fuel tank (Capacity = 6.8 ft. oz.).
• Fuel engine with 40:1 fuel mix.
For maximum guide bar and chain life,
• Fill bar oil tank with bar OIL
we recommend you use Craftsman
chain saw bar oil. If Craftsman bar oil is • Prime engine by pressing primer bulb
six times.
not available, you may use a good
• Move On/Stop switch to ON.
grade SAE 30 oil until you are able to
Primer Bulb
obtain Craftsman brand. The oil output
is automatically metered during operation. Your saw will use approximately
one tank of bar oil for every tank of fuel
mix. Always fill the bar oil tank when
you filI the fuel tank,
o o,o
___..
FUELING ENGINE
This engine is certified to operate on
unleaded gasoline. Before operation,
gasoline must be mixed with a good
quality 2-cycle air-cooled engine oil. We
recommend Craftsman brand oil. Mix
gasoline and oil at a ratio of 40:t (A
40:1 ratio is obtained by mixing 3.2
ounces of oil with 1 gallon of unleaded
gasoline). DO NOT USE automotive oil
or boat oil. These oils will cause engine
damage. When mixing fuel follow the
instructionsprinted on the container.
Once oil is added to the gasoline,
shake container momentarily to assure
that the fuel is thoroughly mixed.
Always read and follow the safety rules
relating to fuel before fueling your unit.
I ,
I ,
I ur/ l-,aruat I'klll
• Actuate choke by pulling choke knob
fully out.
• Set saw on the ground. Grip front
handle with your left hand and place
right foot through rear handle.
StarterRope Handle
IMPORTANT
Experience indicatesthat alcohol blended
FootThroughRear Handle
fuels(caJledgesoho_
or usingethanolor
methanol) can attract moisturewhich
leads to separationand formation of
ackls duringstorage. Acidic gas can
damage the fuel system of an engine
while in storage.
To avoid engine problems, the fuel system shouldbe emptied before storage for
30 days or longer. Drain the gas tank,
start the engine and let it run untilthe fuel
Choke Positions
• Set fast idle by depressing the throttle
lock with your right hand, Then,
squeeze and hold throttle tdgger. With
your thumb, .press the fast idle lock
down and hold. Next, release the
throttle trigger.
° DO NOT squeeze throttle trigger during starting; otherwise, it will be necessary to reset the fast id!_ l_P.k.
.-y
NOTE:
When pulling the starter rope,
do not use the full extent of the rope.
Do not let starter rope snap back. Hold
handle. Let rope rewind slowly.
• Pull starter rope handle firmly and
quickly with your dght hand until the
engine attempts to start';but no more
than 5 pulls. Then, push in choke
knob to the partial position. Resume
pulting handle until engine starts.
• Above 40°1=,allow engine to run for
approximately 5 seconds. Push the
choke knob in to the OFF position;
then squeeze and release throttle tdgger to allow engine to idle.
• Below 40°F, allow engine to warm up
for 30 seconds to 1 minute with choke
at padial position. Push choke knob in
to the OFF position; then squeeze and
release throttle trigger to allow engfne
to idle.
• To stop engine, move On/Stop switch
to the STOP position.
STARTING A WARM ENGINE
DO NOT use the choke to start a warm
engine or flooding and hard starting
may occur.
OPERATING TIPS
• Checkchaintensionbeforefirstuse
andafter f minute of operation.See
ChainTensionin the Maintenance
section.
° Cut woodonly.Do not cut metal,plastics,masonry,non-woodbuildingmaterials,etc.
° Stopthe sawff the chainstdkesa foreignobject.Inspect the saw and repairparts_s necessary.
• Keepthe chainout,ofdirtand sand.
Evena srhall_amount
of dirtwillquickly du!la chainand increase the possibility of kickback.
• Practicecuttinga few smalllogsusing
the following steps. This willhelpyou
getthe "feel" of usingyour saw before
you begina majorsawingoperation.
° Squeezethe throttletriggerand allow the engineto reach full speed
beforecutting.
• Begincuttingwith thesaw frame
againstthelog.
• Keep the engineat fullspeedthe
entiretimeyou are cutting.
• Allow the chainto cutfor you. Exert
onlylightdownwardpressure.
• Releasethethrottletriggeras soon
as the cutiscompleted,allowingthe
engineto idle. If you runthe saw at
full throttlewithouta cuttingload,
unnecessarywear can occur.
• To avoid losingcontrolwhen cutis
complete,do notput pressureon
saw at end of cut.
• Stop enginebeforesettingsaw down.
: Move
On/Stop
switch to ON.
Set fast
idle lock.
Be sure choke is in the OFF position.
With saw on ground, gdp front handle
with left hand and place your dght foot
through rear handle.
• Pull starter rope handle until engine
starts.
• Squeeze and release throttle tdgger
to return engine to idle speed.
TREE FELLINGTECHNIQUES
DIFFICULT STARTING
OR
STARTING A FLOODED
ENGINE
The engine may be flooded if it has not
started after 10 pulls. Flooded engines
can be cleared of excess fuel with the
following procedure:
Engage the fast idle lock.
•"Verify that the On/Stop switch is in the
ON position.
• Push choke knob to the OFF position.
• With saw on ground, gdp front handle
with left hand and place dght foot
through rear handle.
- Puff starter rope handle until engine
starts.
° Starting could require many pulls depending on how badly the unit is
flooded. If engine still fails to start, refer to the TROUBLESHOOTINGchart or
call 1-800-235-5878.
WARNING: .Check for brokenor.dead
branches wllichcanfall whgeCutting`
causing seriousinjury. Do not cutnear
buildings or electricalwiresif you do not
knowthe directionof tree fall, nor cutat
nightsinceyou willnot be able tosee
well,nordudngbad weathersuchas
rain, snow,or strongwinds,etc.
• Carefullyplanyoursawingoperation
in advance.
• Clearthework area. You need a clear
area all aroundthe tree so youcan
have securefooting.
• Study the naturalconditions thatcan
causethe treeto fall in a particular
direction.These conditionsinclude:
° The winddirectionand speed.
• The leanof the tree. The leanof a
tree mightnot be apparentdue to
unevenorslopingterrain.Use a
plumb or level to determine the direction of tree lean.
° Weight and branches on one side.
• Surrounding trees and obstacles.
• Look for decay and rot. If the trunk is
rotted, it can snap and fall toward the
operator.
....
• Make sure there is enough room for
the tree to fail. Maintain a distance of
2-1/2tree lengths from the nearest
person or other objects. Engine noise
can drown out a warning call.
• Remove dirt, stones, loose bark,
nails, staples, and wire from the tree
where cuts are to be made.
This hinge witl help prevent the tree
from fairing in the wrong direction.
Hinge holdstree on
stumpandhelps
controlfail
Openingof
felting cut
NOTE: Before felling cut is complete,
use wedges to open the cut when
necessary to control the direction of fall.
TO avoid kickback and chain damage,
usa wood or plastic wedges, but never
steel or iron wedges.
_
Plana clearretreatpath
• Be alert to signs that the tree is ready
to fall: cracking sounds, widening of
()--,,=,,_Directionof Fall
the felling cut, or movement in the upf
per branches.
• As tree starts to fall, stop saw, put it
down, and get away quickly on your
planned retreat path.
FELLING LARGE TREES
• Be extremely cautious with partially
fallen trees that may be poorly sup(6 inches in diameter or larger)
ported. When a tree doean't fall comThe notch method is used to fell large
pletely, set the saw aside and pull
trees_ A notch is cut on the side of the
down the tree witha cable winch,
tree in the desired direction of fail. After
block and tackle, o[ tractor. D.o_not
a felling cut is made on the opposite
use your saw to cut down a partially
side of tree, the tree will tend to fall in
fallen tree.
the direction of the notch.
CUTTING
A FALLEN TREE
NOTE: If tree has large buttress roots,
(BUCKING)
remove them before making the notch.
Bucking is the term used for cutting a
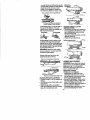
NOTCH CUT AND FELUNG TREE
fallen tree to the desired log size.
• Make notch cut by cutting the top of
WARNING: Do not stand on the log
the notch first. Cut through 113of the
being cut. Any portion can rollcausing
diameter of the tree. Next complete
loss of footing arid control. Do not stand
the notch by cutting the bottom. See
illustration. Once the notch is cut, re- downhill of the log being cut.
IMPORTANT POINTS
move the wedge of wood from tree.
Finalcut here
• Cut only one log at a time.
Firstcut
• Cut shattered wood very carefully;
:,
/
sharp pieces of wood could be flung
toward operator.
_! ;--- .....
• Use a sawhorse to cut small togs.
Notch
Never allow another person to hold
the log white cutting and never hold
7
the log with your leg or foot.
• Do not cut in an area where logs,
limbs, and roots are tangled. Drag logs
into a clear area before cuttingthem.
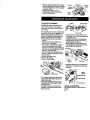
• After removingthe wood, make the
BUCKING
TECHNIQUES
fellingcuton the oppositesideof the
WARNING:
If saw becomes pinched
notch.Thisis doneby making a cut
abouttwo inches higherthan the cen* or hung in a log, don_ttry to force it out.
You can Josecontrol of the saw result*
ter ofthe notch.This willleave
enoughuncutwoodbetween thefell- ing in injury and/or damage to the saw,
ingcutand the notch to form a hinge. Stop the saw, drive a wedge of plastic
,
orwoodintothecutuntilthesawcanbe Usinga log
removed
easily.
Restart
sawandcarefullyfor support
reenter
the cut. Do not use a metal
2ndCut
wedge. Do not attempt to restartyour
saw when it is pinched or hung in a fog,
1stCut
Usea wedgeto removepinchedsaw
1= Cut
Turnsaw OFF enduse a plasticor
woodenwedgeto forcecutopen.
Overcutting begins on the top side of
the togwith the bottom of the saw
against the fog, When overeutting use
light downward pressure.
Overcuttlng
Undemuttlng
Undercutting involves cutting on the
underside of the log with top of saw
against the log. When undercutting use
light upward pressure. Hold saw firmly
and maintain control. The saw will tend
to push back toward you.
WARNING: Never turn saw upside
down to undercut, The saw cannot be
controlled in this position,
2ndCut
BUCKING USING A LOG OR
SUPPORT STAND
, Remember your first cut is always on
the compression side of the log. (Refer to the i!lustrationbelow for your
first and second cut).
• Your first cut should extend 1/3 of the
diameter of the log.
• Finish with your second cut.
Usinga_
ndCut
stCut
Atways make your first cut on the
compression side of the log.
__Rr=st
cut on com,p_resston
side of fog
Second cut
P3ts_
cut on compression side of log
BUCKING WITHOUT A SUPPORT
Overcut through 1/3 of the diameter of
the log.
• Roll the log over and finish with a second overcut.
• Watch for logs with a compresion
side. See illustration above for cutting
logs with a compression side.
UMBING AND PRUNING
WARNING: Never climbintoa treeto
limbor prune.Do notstandon ladders,
platforms,a log,orin any position
whichcancauseyou to loseyourbalance or controlofthe saw.
IMPORTANTPOINTS
• Watchout for springpoles.
Spdngpolesare smallsize limbs
whichcan whiptowardyou,or pull
you off balance.Use extremecaution
whencuttingsmallsize limbs.
° Be atert for spdngback.Watch outfor
branchesthatare bentor underpressure.Avoidbeingstruckby the
branchor the saw when the tensionin
the woodfibers is released.
° Frequentlyclearbranchesout of the
way to avoid trippingoverthem.
10
LIMBING
• Limb a tree only after it is cut down.
* Leave the larger limbs underneath the
felled tree to support the tree as you
work.
• Start at the base of the feUed tree and
work toward the top, cutting branches
and limbs. Remove smaZllimbs with
branches are higherthan your shouldef. Get a professional to do the job.
• Make your first cut 1/3 of the way
through the bottom of the limb.
• Next make a second cut all the way
through the limb,
• Finish the pruning operation by using
an overcut so that the stump of the
limb protrudes1 to 2 inchesfrom the
trunkofthe tree.
one cut.
• Keep the treebetweenyou and the
chain.
• Removelarger,supportingbranches
with the 1/3,2/3cuttingtechniquesdescribed in the buckingsection.
• Alwaysuse an overcutto cut small
and freely hanginglimbs.Undercuttingcouldcauselimbstofall and
pinchthe saw.
PRUNING
WARNING: Limitpruningto limbs
shoulderheightor below.Do not cut if
"_
Firstcut
\_'_'_...J
1/3 of way
)V_,,,,\ _mdr_Utrtt
Intk°o2
itrnee
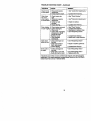
CUSTOMER RESPONSIBILITIES
Fill in datesas you complete
regular service
Before After Eve_ Every Yearly
Use Use 5 hrs._25 hrs
Service
Dates
Check for damaged/worn parts
CheCkfor loose fasteners/parts
_,
Check chaintension
ti
Check chainsharpness
ii
Check guidebar
Clean unit& labels
p,,
Cleanair filter
Clean/inspectsparkarrestor
screen& inspectmuffler
Replace spark plug
lI
...
GENERAL RECOMMENDATIONS
The warrantyon this unitdoes not cover itemsthat havebeen subjectedto
operatorabuse or negligence.To receivefull valuefrom thewarranty,the
operatormustmaintainunitas instructed in thismanual.Vadousadjustments
wilt need to be madeperiodicallyto
propedymaintain yourunit.
• Once a year, replace the spark plug,
air filter element,and check guide bar
and chainfor wear.A new sparkplug
and air filter element assures proper
air-fuel mixture and helps your engine
runbetter and lastlonger.
WARNING: Disconnectthe sparkplug
beforeperformingmaintenanceexcept
for carburetoradjustments.
LUBRICATION
I Sproc=Barket
2 BarOil
•
Fi,Cap"El_'_
1 Use_
2 UseCraftsman
chainsawbaroil
CHECK FOR DAMAGED OR
WORN PARTS
Replacement of damaged/worn parts
"shouldbe referred to your Sears Service Center.
NOTE: It is normal for a sma}l amount
of oil to appear under the'_sawafter engine stops. Do not confuse th_swith a
leaking oil tank.
• On/Stop Swifch - Ensure On/Stop
switch functions propedy by moving
the switch to the "Stop"position.
Make sure engine stops; then restart
engine and continue.
• Fuel Tank- Do not use saw if fuel
tank shows signs of damage or leaks.
• Oil Tank- Do not use saw if oil tank
shows signs of damage or leaks.
CHECK FOR LOOSE
FASTENERS
AND PARTS "
• Bar Clamp Nut
• Chain
• Muffler
• Cylinder Shield
° Air Filter
• Clutch Drum/Sprocket
• Handle Screws
• Vibration Mounts
• Starter Housing
• Handguard
CHECK CHAIN TENSION
• Use the screwdriver end of the bar
tool to move chain around guide bar
to ensure kinks do not exist. The
chain should rotate freely.
Bar Clamp Nuts
• Loosen bar clamp nuts until they are
linger tight against the bar damp.
• Turn adjusting screw clockwise until
chain barely touches the bottom of
guide bar.
_"
Ad}u.ng
/
AdjustingScrew- 1/4 Turn
* Lift up tip of guide bar to check for
sag. Release tip of guide bar, then
turn adjusting screw 1/4 turn clockwise. Repeat until sag does not exist.
* While lifting tip of guide bar, tighten
bar clam_ nuts with the bar tool.
Torque to 10-15 ft.lbs.
clamp
_
_'_
Nuts
• Use the screwdriver end of the bar
tool to move chain around guide bar.
° If chain does not rotate, it is too tight.
S_ighttyloosen bar clamp nuts and
turn adjusting screw 1/4 rum counterclockwise. Retighten bar clamp nuts.
° If chain is too loose, it will sag below
the guide bar. DO NOT operate the
saw if the chain is loose.
CHECK CHAIN SHARPNESS
A sharp chain makes wood chips. A
dull chain makes a sawdust powder
and cuts slowly.
CHAIN SHARPENING
Chain sharpening requires special
tools. You can purchase sharpening
tools at Sears or go to a professional
chain sharpener.
CHECK GUIDE BAR ....
• _
Conditions Which require guide bar
maintenance:
° Saw cuts to one side or at an angle.
* Saw has to be forced through the cut.
, Inadequate supply of oil to barlchain.
Check the condition of guide bar each
time chain is sharpened. A worn guide
bar will damage the chain and make
cutting difficult. To maintain guide bar:
* Move On/Stop switch to =Stop."
• Remove bar and chain from saw.
, Clean all sawdust and any other
debris from the guide bar groove and
sprocket hole after each use.
Remove SawdustFrom
iJ
_,_,
GuideBarGr__
V
• Using bar tool, tell chain around guide
bar to ensure all linksare in bar groove.
12
SprocketHole
• Addlubricant
to sprocket holeafter
each use.
• Burdng of guide bar railsis a normal
process of rail wear. Remove these
burrs w_h a fiat file.
• When rail top is uneven, use a flat file
to restore square edgesand sides.
INSPECT MUFFLER AND SPARK
ARRESTOR SCREEN
As the unitis used,carbondeposits
buitdupon the mufflerand spark
arrestorscreen,and mustbe removed
to avoid creatinga fire hazardor affectingengineperformance.
Replacethesparkarrestor screenif
breaksoccur.
File
sides
Edges
Square
and
Worn Groove
Correct Groove
MufflerDiffuser
Spaxk
Arrestor
Replace guide bar when the groove is
wom, the guide bar is bent or cracked,
or when excess heating or burringof
Muffler
the railsoccurs, if replacementis necCover
essary,use onlythe guidebar specified
for yoursaw inthe repairpads list or on
the decal located on thechainsaw.
CLEAN UNIT & LABELS
• Clean the unitusinga dampclothwith Body
MulflerCover
a milddetergent.
• Wipe offunitwitha clean dry cloth.
CLEAN AIR RLTER
A dirty air filterdecreases the life and
CLEANING THE SPARK
performance ofthe engine and increasesfuel consumption
and harmfu ARRESTOR SCREEN
Cleaningis requiredevery25 hoursof
emissions.Alwayscleanyoursir filter
operationor annually,..whichever_comes
after 15 tanksof fuel or 5 hoursof opfirst.
•:": _ : i !_"
eration,whichevercomesfirst.Clean
• Loosenand remove the 2 mufflercovmore frequently in dustyconditions.A
er screws,
used air filter cannever be completely
cleaned, it is advisable to replaceyour • Removethe mufflercover (cover
snapsoffmufflerbody).
air filter with a newone afterevery50
hoursofoperation,or annually,which- • Remove mufflerdiffuserand spark
evercomesfirst. To cleanfilter:.
arrestorscreenassembly.Noticethe
orientationof thesepartsfor reassem• Loosen3 screwson cylinder cover.
bling.
• Removecylindercover.
- Remove air filter,
• Clean thesparkarrestor screenwitha
wire brush.Replacescreenif breaks
• Cleanthe air filter usinghot soapy
are found.
water, Rinsewithcleancoolwater,
Air dry completelybefore reinstalling. • Replaceany brokenor crackedmuffler parts.
• Lightlyoil air fitter beforeinstalling to
improve the efficiencyof air filter. Use • Reinstalldiffuserand sparkarrestor
screen assemblywithroundholes
2-cycle engineoi! or motoroil (SAE
30). Squeezeexcess oil'from _iter.
facing up.
• Reinstallmufflercoverand 2 screws
• Reinstall air filter.
(7-8 ft-lbs),
• Reinstallcylinder coverand 8 screws
(15-20 in-lbs.).
REPLACE SPARK PLUG
Cylinder Cover
AirFitter
Screws
The sparkplugshouldbe replaced
,%
f
eachyear to ensurethe enginestarts
easier and runsbetter, gnitiont ruing is
fixed and nonadjustable.
Cylinder
• Loosen3 screwson cylindercover.
Cover
° Removethe cylindercover,
• Pulloffthe sparkplugboot. ...
• Removespark plugfromcylinder and
discard.
/
• Replace with Champion CJ7Y spark
plug and tighten with a 3/4 inch socket
wrench
(10-12
Spark plug gap
should be
.025 ff-ibs).
in.
• Reinstall the spark plug boot.
* Reinstall the cylinder cover and 3
screws (15-20 in-tbs). -
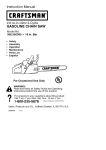
CHAIN REPLACEMENT
Cylinder
Cover
PlugBoot
Spark
Rug
Cutters
CAUTION: Wear protective groves
when handling chain. The chain is
sharp and can cut you even when it is
not moving,
It is normalfor a new chain to stretch during the first 15 minutes of operation.You
shouldrecheckyour chain tension frequently and adjustthe chain tension as
required.See Chain Tension section.
• Move On/Stop switch to the Stop
position.
• Replace the old chain when it becomes worn or damaged.
• Use only the Low-Kicl_ack replacement chain specified in the repair
parts list. The correct replacement bar
and chain is also specified on a decal
located on the chain saw.
• See your Sears Service Center to replace and sharpen individual cutters
on your chain.
• Remove bar clamp nuts.
• Remove bar clamp.
° Remove the old chain.
DepthGauge
DriveLinks
• Place chain over and behind clutch.
* Fit bottom of drive links between teeth
in sprocket nose.
° Fit chain drive links into bar groove.
• Pull guide bar forward until chain is
• snug in guide bar groove.
Now, install bar clamp making sure
the adjusting pin is positioned in the
lower ho_ein the guide bar.
Lower
Hole
Adjusting
Pin
Guide Bar
• Install bar clamp nuts and finger tighten only. Do not tighten any further at
this point,
Bar
Clamp Nuts
•Tum adjustingscrewby handcountemleckwise untiladjustingpinjust
touchesthe stop.
• Slideguidebar behindclutchdrum
untilguidebar stopsagainstclutch
drumsprocket.
• Carefullyremovenew chainfrom
package.Holdchainwith the ddve
links as shown.
CHAIN ADJUSTMENT
See "ChainTension"in Maintenance
section.
14
CLEAN FUEL FILTER
To clean fuel filter, drain your unit by
running dry of fuel, remove fuel cap/retainer assembly from tank. Pull filter
from tank and remove from line. Clean
with mild detergent and rinse. Dry thoroughly, reassemble.
CARBURETOR
ADJUSTMENT
WARNING: The chain will be moving
during most of this procedure. Wear
your protective equipment and observe
all safety precautions. During the low
speed mixture adjustment recheck idle
speed after each turn of the screw. The
chain must not move at idle speed.
Carburetor adjustment is critical and if
done improperly can permanently damage the engine as well as the carburetor. If you require further assistance or
are unsure about performing this procedure, call our customer assistance help
line at t-800-235-5878.
Old fuel, a dirty air filter, dirty fuel filter,
or flooding may give the impression of
an improperly adjusted carburetor.
Check these conditions before adjusting the carburetor.
The carburetor has been carefully set at
the factory. Adjustments may be necessary if you notice any of the following
conditions:
• Chain moves at idle. See "Idle Speed"
under adjusting procedure.
• Saw will not idle. See "Idle Speed"
and =Low Speed Mixture"under adjusting procedure.
• Engine dies or hesitates when it
should accelerate. See =Acceleration
Check" under adjusting procedure.
• Loss of cutting power. See "High
Speed Mixture H" under adjusting
procedure.
There are three adjustment screws on
the carburetor. They are labeled H, L,
and 1".They are IQcated in the'area just
above the primer bulb.
CARBURETOR
PRESET_
When making adjustments, do not force
the plastic limitor caps beyond the
stops or damage will occur.
if carburetor presets are not needed,
proceed to "ldte Speed-T."
• "rum both mixture screws counterclockwise until they stop.
• Turn the idle speed screw clockwise
until it stops. Now turn counterclockwise 4-I/2 full turns.
Start motor, let it run for 3 minutes, and
proceed to the adjustment section. If
engine does not start, refer to treubleshooting chart or call 1-800-235-5878.
If engine performance is acceptable at
the preset positions and there is no
chain movement at idle, no further adjustment is necessary.
ADJUSTING
PROCEDURE
Idle Speed-T
Allow engine to idle. Adjust speed until
engine runswithout chain movement or
stalling.
,
• Turn clockwise to increase engine
speed if engine stalls or dies.
• Turn counterclockwise to decrease
speed.
No further adjustments are necessary if
chain does not move at idle speed and
if performance is satisfactory.
Low Speed Mixture-L
Allow engine to idle. Then accelerate
the engine and note performance. If engine hesitates, bogs down, or smokes
during acceleration, turn mixture screw
clockwise in lt16-tum increments until
performance is satisfactory. Repeat this
procedure as necessary for proper adjustment. After completing adjustments,
check for acceleration and chain movement at idle. Reset if necessary.
High Speed Mixture-H
DO NOT operate engine at full throttle
for prolonged ped0ds while making adjustments. Damage to the engine can
occur. Make a test cut, Based on performance of the saw while cutting, adjust the high Speed mixture setting in
1/16-turn increments as follows:
• Clockwise untilsaw has good power in
the cut with no hesitation.Do not adjust
by soundor speed,but judgeby how
we_lthe saw performs in the cut.
• Counterclockwise if the saw has
speed, but dies in the cut or lacks
power in the cut.
After completing adjustments, check for
acceleration and chain movement at
idle. Reset if necessary.
Acceleration Check
if the engine d_esor hesitates instead of
accelerating, turn the low speed mixture
adjustment counterclockwiseuntil you
have smooth accelerationwith no chain
movement at idle. Recheck and adjust as
necessary for acceptable performance.
Prepare
yourunit for storage at the end
tive in minimizing the formation of fuel
of the season or if it will not be used for gum deposits during storage. Add stabi30 days or more.
lizer to the gasoline in the fuel tank or
fuel storage container. Follow the mix
WARNING:
instructionsfound on stabilizer contain• Allow the engine to cool, and secure
the unit before stodng or transporting. era. Run engine at least 5 minutes after
adding sta_,ilizer.
• Store chain saw and fuel in a well
CRAFTSMAN 40:1, 2-cycte engine oil
ventilated area where fuel vapors
cannot reach sparks or open flames
(air cooled) ls especially blended with
from water heaters, electric motors or fuel stabilizer. If you do not use this
Sears oil, you can add a fuel stabilizer
switches, fumeces, etc.
to your fuel tank.
* Store chain saw with all guards in
place and position chain saw so that
ENGINE
any sharp object cannot accidentally
• Remove spark plug and pour 1 tea.
cause injury.
spoon of 40:1, 2-cycle engine oil (air
. Store chain saw well out of the reach
cooled) through the spark plug openof children.
ing. Slowly pull the starter rope 8 to
t0 times to distdbute oil.
EXTERNAL SURFACES
• Replace spark plug with new one of
If your chain saw is to be stored for a
recommended type and heat range.
period of time, clean it thoroughly be*
• Clean air filter.
fore storage. Store in a clean dry area.
• Check entire unit for loose screws,
• Lightlyoil external metal surfaces and
nuts, and bolts. Replace any damguide bar.
aged, broken, or worn parts.
• Oil the chain and wrap it in heavy pa° At the beginning of the next season,
per or cloth.
use only fresh fuel having the proper
gasoline to oil ratio.
FUEL SYSTEM
Under FuelingEngineinthe Operating OTHER
Sectionofthis manual,see message
• Do not store gasoline from one season to another.
labeledIMPORTANT
regardingthe use
of gasoholin yourchainsaw.
• Replace your gasoline can if it starts
to rust.
Fuelstabilizer is an acceptablealtema-
16
TROUBLESHOOTING
CHART
TROUBI.E
CAUSE
REMEDY
Engine wiUnot
start or wiltrun
only a few
seconds after
starting.
• Ignition switch off.
Engine flooded.
: Fuel tank empty.
• Spark plug net firing.
• Fuel not reaching
carburetor.
° Move Ignition switch to ON.
• See "Starling Instructions."
• Fill tank with correct fuel mixture.
• Carburetor requires
adjustment.
• None of the above.
!Enginewitlnot • Idle speed set too high
or too low.
idlepropedy.
• Low Speed Mixture
requires adjustment.
• Crankshaft seals worn.
Compression low.
° None of the above.
Engine will not
accelerate,
lacks power,
or dies under
a load.
o Air filter dirty.
• Spark plug fouled.
• Carburetor requires
adjustment.
• Exhaust ports or muffler outlets plugged.
• Compression low.
• None of the above.
Engine smokes ° Chokepartially on.
• Fuel mixture incorrect,
excessively.
: Air filter dirty.
High Speed Mixture
requiresadjustment.
° Crankcaseleak,
Enoine
runs
hot.
• Fuel mixtureincorrect.
• Spark plug incorrect,
• High Speed Mixture
set too lean,
• Exhaustportsor muffler outletsplugged.
• Carbonbuild-upon
mufflerodtletscreen,
• Fan housing/cy{inder
fins dirty,t
• None ofthe above.
Oil inadequate • Oil tank empty.
for bar and
• Oit pump or oil filter
chain
clogged.
lubrication.
• Guide bar oil hole
blocked,
i : Install new spark plug.
Check for dirty fuel filter;, replace.
Check for kinked or split fuel line;
repair or replace.
iI • See =Carburetor Adjustments."
• Contact SearsService.
• See "CarburetorAdjustments."
• See =CarburetorAdjustments,"
•
•
•
•
•
Contact Sears Service.
Contact Sears Service.
Contact Sears Service.
Clean or replace air filter.
Clean or replace plug
and regap.
• See "Carburetor Adjustments."
• Contact Sears Service.
• Contact Sears Serv_e.
• Contact Sears Service.
° Adjust choke,
• Empty fuel tank and refill with
correct fuel mixture.
• Clean or replace air filter.
• See "Carburetor AdjustmentS,"
• Contact Sears Service.
• See "Fueling Your Unit."
• Replace with correct plug.
• See "Carburetor Adjustments,"
• Contact Sears Service.
• Clean sparkarrestorscreen.
• Clean area.
• ContactSearsService.
FiBoiltank.
ContactSears Service.
• Remove bar and clean.
TROUBLE
SHOOTING
CHART-Continued
TROUBLE
CAUSE
REMEDY
Chain moves
at idte speed.
• Idle speed requires
adjustment.
• Clutch requires repair.
• See "Carbureto/Adjustments."
Chain does
• tight.
Chain tension too
not move
when engine
• Carburetor requires
is accelerated.
adjustment.
, Guide bar rails
pinched.
• Clutch slipping.
• Contact Sears Service.
• See "Chain Tension."
• Soot"Carburetor Adjustments."
• Rep&ir or replace.
• Contact Sears Service.
Chain clatters • Chain tension incorrect.
or cutsroughly. • Cutters damaged.
• Chain worn.
• Cutters dull, impropedy
sharpened, or depth
gauges too high.
• Sprocket worn.
• Chain installed
backwards.
•
•
•
•
See "Chain Tension."
Contact Sears Service.
Resharpen or replace chain.
See =Sharpening Chain."
• Contact Sears Service.
• Install chain in right direction.
• Chain cutter topsnot
Chain stops
within the cut. j filed fiat.
• Guide bar burred or
bent; roils uneven.
• Clutch slipping
• See "Sharpening Chain."
Chain cuts at
an angle.
• See "Sharpe'ni'ng Chain."
° Repair or replace guide bar.
• Contact Sears Service.
;""Cutters damaged on
one side,
° Chain dull on one side,
• Guide bar bent or worn.
• See =Sharpening Chain."
• Replace guide bar.
Ifsituations occurwhichare not coveredinthis manual, usecare and good
judgement.If you need assistance,contactSears Serviceor theCUSTOMER
ASSISTANCE
HELPLINE
at 1-800-235-5878.
18