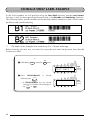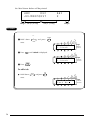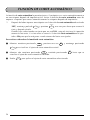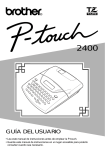
1
2400/2410
USER’S GUIDE
• Read this User’s Guide before you start using your P-touch.
• Keep this User’s Guide in a handy place for future reference.
INTRODUCTION
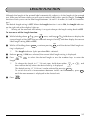
Thank you for purchasing the P-touch 2400/2410!
Your new P-touch will allow you to create labels and stamps for any need. Its versatility
enables you to design custom labels by choosing from a variety of frame designs and from
many characters sizes and styles. In addition, the five tape widths (1/4” (6 mm), 3/8” (9 mm),
1/2” (12 mm), 3/4” (18 mm), and 1” (24 mm)) and variety of tape colors allow you to print personalized labels, useful for color-coded filing. With the Stamp function, you can quickly and
easily make stamps for reusable pre-inked stamp holders.
You no longer have to worry about urgent tasks that require professional printing. In the office,
the factory, the lab, and the home, the quality and performance of the P-touch 2400/2410
make it an extremely practical machine.)
(The PT-2400 and the PT-2410 models are equipped with the same functions; however, only
the PT-2410 includes a carrying case and AC adaptor.)
FCC NOTICE
This equipment has been tested and found to comply with the limits for a Class B digital
device, pursuant to Part 15 of the FCC Rules. These limits are designed to provide reasonable protection against harmful interference in a residential installation. This equipment
generates, uses, and can radiate radio frequency energy and, if not installed and used in
accordance with the instructions, may cause harmful interference to radio communications. However, there is no guarantee that interference will not occur in a particular installation. If this equipment does cause harmful interference to radio or television reception,
which can be determined by turning the equipment off and on, the user is encouraged to
try to correct the interference by one or more of the following measures:
- Reorient or relocate the receiving antenna
- Increase the separation between the equipment and receiver.
- Connect the equipment into an outlet on a circuit different from that to which the receiver is connected.
- Consult the dealer or an experienced radio/television technician for help.
Patent numbers and patent publication numbers which are related to this product are as
below:
USP4839742
USP4983058
USP5120147
USP4927278
USP5009530
USP4976558
USP5069557
Use only the adaptor designed exclusively for this machine. See GENERAL PRECAUTIONS on
page 4.
CONTENTS
Getting Started
GENERAL DESCRIPTION .................................................................................... 2
GENERAL PRECAUTIONS................................................................................... 4
BATTERIES .......................................................................................................... 5
OPTIONAL AC ADAPTOR .................................................................................. 6
CONNECTING THE P-TOUCH TO A COMPUTER ............................................. 7
INSTALLING P-TOUCH EDITOR ........................................................................ 8
STARTING UP P-TOUCH EDITOR.................................................................... 15
DESIGNING AN AUTO FORMAT LAYOUT...................................................... 17
IMPORTING A GRAPHICS FILE ........................................................................ 20
READING THE USER’S GUIDE ......................................................................... 21
TAPE CASSETTE ................................................................................................ 23
ATTACHING LABELS ........................................................................................ 24
PRINT HEAD & ROLLERS ................................................................................. 25
Learning the Ropes
DOOR LABEL EXAMPLE ................................................................................... 28
ADDRESS LABEL EXAMPLE............................................................................... 32
STORAGE SHELF LABEL EXAMPLE ................................................................... 38
For Your Information
POWER KEY...................................................................................................... 46
CURSOR KEYS .................................................................................................. 47
CODE, ALT & SHIFT KEYS ................................................................................ 49
SPACE KEY ........................................................................................................ 52
RETURN KEY .................................................................................................... 53
NEW BLOCK FUNCTION ................................................................................. 54
TAB FUNCTION ............................................................................................... 55
DELETE KEY ...................................................................................................... 57
LINE OUT FUNCTION...................................................................................... 58
CLEAR FUNCTION ........................................................................................... 59
ACCENT FUNCTION ........................................................................................ 62
SYMBOL FUNCTION........................................................................................ 64
I
AUTO FORMAT FUNCTION ............................................................................ 66
STAMP FUNCTION .......................................................................................... 76
LOCAL FORMAT FUNCTION ........................................................................... 79
FONT FUNCTION ............................................................................................ 80
SIZE & WIDTH FUNCTIONS ............................................................................ 82
STYLE FUNCTION ............................................................................................ 86
UNDERLINE FUNCTION .................................................................................. 89
FRAME FUNCTION .......................................................................................... 90
TAPE MARGIN FUNCTION .............................................................................. 92
HORIZONTAL ALIGNMENT FUNCTION ......................................................... 93
MIRROR PRINTING FUNCTION ...................................................................... 94
LENGTH FUNCTION ........................................................................................ 95
BARCODE FUNCTION ..................................................................................... 97
AUTO CUT FUNCTION ................................................................................. 101
PRINT KEY AND FEED & CUT FUNCTION..................................................... 102
NUMBERING FUNCTION .............................................................................. 103
REPEAT PRINTING FUNCTION ...................................................................... 106
MEMORY FUNCTIONS .................................................................................. 108
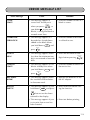
TROUBLESHOOTING .................................................................................... 112
ERROR MESSAGE LIST .................................................................................... 113
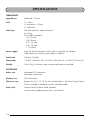
SPECIFICATIONS ............................................................................................ 118
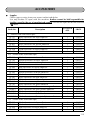
ACCESSORIES ................................................................................................. 119
II
Getting Started
1
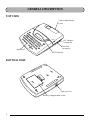
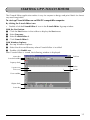
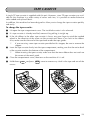
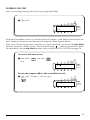
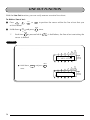
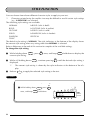
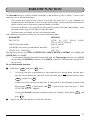
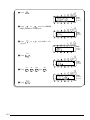
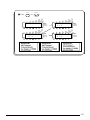
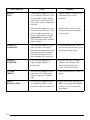
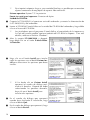
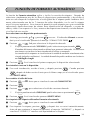
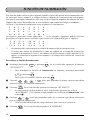
GENERAL DESCRIPTION
TOP VIEW
Tape compartment
cover
AC adaptor
connector
Keyboard
Interface
connector
LCD display
BOTTOM VIEW
Tape exit slot
Battery compartment cover
2
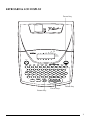
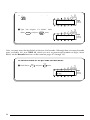
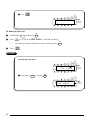
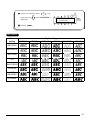
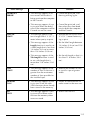
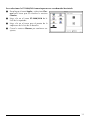
KEYBOARD & LCD DISPLAY
Power key
Length
Undl/Frm
A.Format
Width
Mirror
On
Off
Print
Memory
Font
Size
!
1 ¡
Width
Style
#
3
$
4
@
2
Tab Length
Tab
Q
Symbol
W
Accent
A
Alt
A.Cut
Shift
Z
%
5
Tape
Align
E
R
Store
Frame
¢
6
Length
T
Recall
&
7
A.Format
Y
M.Del
*8
Stamp
U
)
0
Barcode
I
ü
Line out
(
9
Repeat
O
í
Clear
Del
Number
P
ó
á
Local
S
Caps
Underline
D
F
H
J ¿
K
L
é
:
; "
ú
Interface
X
C
Feed&Cut
Code
G
Ç
Vç
New Block
B
N
Ñ
M
ñ
/
, -
?
.
'
Home
Space
End
Cursor keys
Delete key
Return key
3
GENERAL PRECAUTIONS
• Use only Brother TZ tapes with this machine. Do not use tapes that do not have the
mark.
• Do not pull on the tape being fed from the P-touch. This may damage the tape cassette.
• Do not use the machine in dusty places, and keep it out of both direct sunlight and rain.
• Do not expose the machine to high temperatures or high humidity. Never leave it on the
dashboard or in the back of your car.
• Do not leave any rubber or vinyl on the machine for an extended period of time. Doing so
may cause staining.
• Do not clean the machine with alcohol or other organic solvents. Use a soft, dry cloth only.
• Do not put any foreign objects into or anything on the machine.
• To avoid injuries, do not touch the cutter’s edge.
• Use only the AC adaptor (model AD-60) designed exclusively for this machine. Use of any
other adaptor will void the warranty.
• Do not try to disassemble the AC adaptor.
• When the machine is not being used for a long period of time and it is not necessary to
keep the text files stored in the memory, disconnect the AC adaptor, and remove the batteries to prevent them from leaking and damaging the machine.
• If the AC adaptor is unplugged and no batteries are installed, all text files in the memory
may be deleted.
• Use eight AA alkaline batteries in this machine.
4
BATTERIES
This lightweight and portable machine can be used anywhere by installing eight (8) AA alkaline batteries. When you change the batteries, always replace all eight at the same time.
To change the batteries:
1
2
3
4
Remove the battery compartment cover on the back of the machine.
If batteries are already installed, remove them.
Insert eight new AA alkaline batteries, making sure that they face the correct direction.
Attach the battery compartment cover.
☞ If alkaline batteries are not used, large fonts cannot be printed.
Be sure to insert the new batteries within five minutes of removing the old ones,
otherwise the text shown in the display and any text files stored in the memory will
be lost (unless the machine is plugged into an AC outlet with the AC adaptor).
Remove the batteries and disconnect the AC adaptor if you do not intend to use this
machine for an extended period of time. When the power is disconnected, all text
shown in the display and stored in the memory will be lost.
5
OPTIONAL AC ADAPTOR
The AC adaptor (model AD-60) allows you to use this machine wherever there is an electrical
outlet.
To connect the optional AC adaptor:
Insert the plug on the adaptor cord into the connector marked DC IN 9.5V on the right
side of the machine.
2 Insert the plug on the adaptor into the nearest standard electrical outlet.
☞ Remove the batteries and disconnect the AC adaptor if you do not intend to use this
machine for an extended period of time. When the power is disconnected, all text
shown in the display and stored in the memory will be lost.
If the AC adaptor is unplugged and no batteries are installed, all text files in the
memory may be deleted.
Only use the AC adaptor designed exclusively for this machine.
It is recommended that you use the AC adaptor when printing large fonts or barcodes on 3/4” (18-mm)- or 1” (24-mm)-wide tape since these operations can
quickly drain the batteries.
1
6
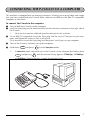
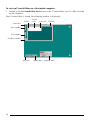
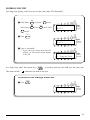
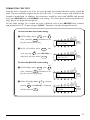
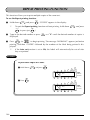
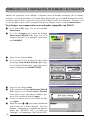
CONNECTING THE P-TOUCH TO A COMPUTER
This machine is equipped with an interface connector, allowing you to print labels and stamps
that you have created with the P-touch Editor software installed on your IBM PC-compatible
computer or Macintosh.
To connect the P-touch to the computer:
Turn off both the P-touch and the computer.
Insert the small plug on the interface cable into the interface connector on the right side of
the P-touch.
☞ Only use the interface cable designed exclusively for this machine.
3 On an IBM PC-compatible: Insert the 9-pin plug into the serial (COM) port of your computer and tighten the screws to lock it into place.
On a Macintosh: Insert the 8-pin plug into the printer (serial) port of your computer.
4 Turn on the P-touch, and then start up the computer.
1
2
5
Hold down
☞
Code
and press
Interface
?
.
'
to enter Interface mode.
In Interface mode, the baud rate of the P-touch can be changed by holding down
Code
and pressing
Style
$
4
until the desired setting appears (57600 bps, 115200 bps,
or 9600 bps). Release the keys to apply the desired setting.
7
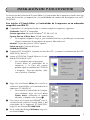
INSTALLING P-TOUCH EDITOR
Installing the P-touch Editor software and printer driver add even more illustration and layout
features to the label-making possibilities available with your PT-2400/2410.
To install P-touch Editor and the printer driver on an IBM PC-compatible computer:
Check that your system configuration meets the following requirements.
Computer: IBM PC or compatible
Operating system: Microsoft Windows® 95, 98 or NT 4.0
Hard disk free space: At least 20 MB
☞ A few hundred megabytes of additional free space may be needed when printing
long labels or large amounts of data.
Monitor: VGA or higher graphics card
Serial port: 9-pin connector jack
CD-ROM drive
2 Connect the PT-2400/2410 to the computer’s serial port and turn on both the PT2400/2410 and the computer.
3 Insert the P-touch Editor CD-ROM into the
computer’s CD-ROM drive.
☞ The installers for the P-touch Editor
program, printer driver and User’s
Guide can also be copied from the CDROM onto floppy disks. Refer to the
Readme file for more details.
1
Click the Editor button to install the P-touch
Editor software and the PT-2400/2410 printer
driver.
☞ To install only the printer driver, click
the Printer driver button, select the
desired model, and then skip to step
B.
5 Click the PT-2400/2410 button to start up the
InstallShield® Wizard for installing the P-touch
Editor software and the PT-2400/2410 printer
driver.
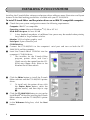
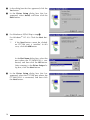
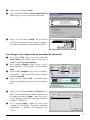
6 In the Welcome dialog box, click the Next
button.
4
8
7
In the User Information dialog box, type
your name and company’s name in the
appropriate boxes to personalize your copy
of P-touch Editor, and then click the Next
button.
In the Registration Confirmation dialog box,
click the Yes button to register the entered
information.
9 In the Setup Type dialog box, click Typical to
install all of the basic options, Compact to
install only the minimum options necessary,
or Custom to select the options to be
installed.
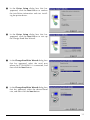
8
☞
0
If you chose Custom, click the Next
button. In the Option dialog box,
select which options will be installed.
If you choose to install the User’s
Guide onto your computer, it will
quickly be available for reference.
Click the Next button to install the P-touch
Editor software.
9
A
B
C
In the dialog box that has appeared, click the
Yes button.
In the Driver Setup dialog box that has
appeared, select Install, and then click the
Next button.
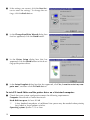
For Windows® 95/98: Skip to step D.
For Windows® NT 4.0: Click the Next button.
☞ If the Next button cannot be clicked,
no PTCOM port is installed. In this
case, click the Add button.
In the Port Name dialog box, select the
port where the PT-2400/2410 is connected, and then click the OK button.
After returning to the Driver Setup dialog box, click the Next button.
D
10
In the Driver Setup dialog box that has
appeared, select the PTCOM port where the
PT-2400/2410 is connected, and then click
the Next button.
E
In the Driver Setup dialog box that has
appeared, click the Next button to confirm
the installation information and start installing the printer driver.
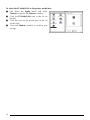
F
In the Driver Setup dialog box that has
appeared, click the Next button to start up
the Change Baud Rate Wizard.
G
In the Change Baud Rate Wizard dialog box
that has appeared, select the serial port
where the PT-2400/2410 is connected, and
then click the Next button.
H
In the Change Baud Rate Wizard dialog box
that has appeared, select the desired baud
rate, and then click the Next button.
11
I
If the settings are correct, click the Next button to enter the settings. To change the settings, click the Back button.
J
In the Change Baud Rate Wizard dialog box
that has appeared, click the Finish button.
K
In the Driver Setup dialog box that has
appeared, click the Finish button to finish setting up the printer driver.
L
In the Setup Complete dialog box that has appeared, click Yes, I want to restart my computer now., and then click the Finish button.
To install P-touch Editor and the printer driver on a Macintosh computer:
1
12
Check that your system configuration meets the following requirements.
Computer: Macintosh or Power Macintosh
Hard disk free space: At least 20 MB
☞ A few hundred megabytes of additional free space may be needed when printing
long labels or large amounts of data.
Operating system: System 7.5.3 or later
2
3
4
5
Printer (serial) port: 8-pin connector jack
CD-ROM drive
Connect the PT-2400/2410 to the computer’s printer port and turn on both the PT2400/2410 and the computer.
Insert the P-touch Editor CD-ROM into the computer’s CD-ROM drive and double-click
the CD-ROM icon.
☞ The installers for the P-touch Editor program and the User’s Guide can also be copied from the CD-ROM onto floppy disks. Refer to the Readme file for more details.
Open the PT-2400/2410 folder, and then
double-click the P-touch Editor 3.0 Installer
icon.
Click either the Install button to install all
options or the Custom Install button to select
which options to install.
☞
If you clicked the Custom Install button, the dialog box at the right is displayed. After selecting the desired
options, click the Install button to
install the selected options.
6 In the dialog box that appears when installation is completed, click the Quit button.
7 In the next dialog box that has appeared, click the Restart button.
13
To select the PT-2400/2410 as the printer on the Mac:
1 Pull down the Apple menu and select
Chooser to display the Chooser window.
2 Click the PT-2400/2410 icon in the list on
the left.
3 Click the icon for the printer port in the list
on the right.
4 Close the Chooser window to confirm your
settings.
14
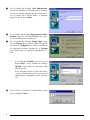
STARTING UP P-TOUCH EDITOR
The P-touch Editor application makes it easy for anyone to design and print labels for almost
any need imaginable.
To start up P-touch Editor on an IBM PC-compatible computer:
By clicking the P-touch Editor icon:
• Double-click the P-touch Editor 3 icon in the P-touch Editor 3 group window.
With the Start button:
1 Click the Start button in the taskbar to display the Start menu.
2 Select Programs.
3 Select P-touch Editor 3.
4 Click P-touch Editor 3.
With Windows Explorer:
1 Start up Windows Explorer.
2 Select the drive and directory where P-touch Editor is installed.
3 Double-click Ptedit3.exe.
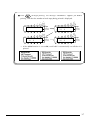
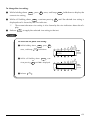
After P-touch Editor is started, the following window is displayed.
Menu bar
Standard toolbar
Title bar
Property dock
Layout area
Print area
Rulers
Cursor
Draw toolbar
Object dock
Status bar
15
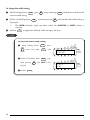
To start up P-touch Editor on a Macintosh computer:
• Double-click the P-touch Editor Ver3.0 icon in the “P-touch Editor Ver3.0” folder installed
on the computer.
After P-touch Editor is started, the following window is displayed.
Rulers
Layout
Area
Print area
Title bar
Menu bar
Draw toolbar
Print toolbar
Database toolbar
Status bar
16
Object dock
Property dock
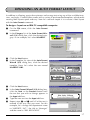
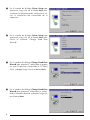
DESIGNING AN AUTO FORMAT LAYOUT
In addition to allowing you to draw pictures and arrange text using any of the available fonts,
sizes, and styles, P-touch Editor comes with a variety of pre-formatted templates, which make
creating label layouts quick and easy. Now let’s see how simple it is to create a label layout
with the Auto Format command.
To design a layout on an IBM PC-compatible computer:
1
2
On the File menu, click the Auto Format
command.
In the Category list of the Auto Format Wizard (1/4) dialog box, click the desired category. As an example, let’s select NAMEPLT.
3 Click the Next button.
4 In the Template list view of the Auto Format
Wizard (2/4) dialog box, click the desired
template. Here, let’s select the one named
NAMEPLT2.LBL.
5 Click the Next button.
6 In the Auto Format Wizard (3/4) dialog box,
click the Next or the Previous button until
the text that you wish to change appears in
the Input edit box.
7 Type the new text into the Input edit box.
8 Repeat steps 6 and 7 until all of the text is
entered in the way that you want. For this
example, let’s change the department name
to “IMPORTS, INC.”, the title to “Manager”
and the name to “BILL REYNOLDS”.
17
9 Click the Next button.
0 In the Auto Format Wizard (4/4) dialog box,
click the desired options.
A
Click the Finish button. A new layout document containing the pre-formatted text
appears in the layout area.
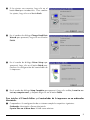
To design a layout on a Macintosh computer:
On the File menu, click Auto Format command to display the Auto Format dialog box.
2 In the Category box, click the desired category. For this example, let’s select shop.
3 In the Template box, click the desired template. Let’s select the one named shop3.lbl.
4 Click the OK button. The pre-formatted template appears in the layout area.
1
Click the Next or the Previous button until
the text that you wish to change appears in
the Input edit box. Here, the first line of text
that we wish to change, “CAMERA”, is
already displayed.
6 In the Input box, change the text so that the
desired text is entered. We can start by
changing the product name to “VCR”.
5
18
Repeat steps 5 and 6 to make the desired
changes to all of the text. Let’s finish editing
the text by changing the original price to
“$415.” and the sale price to “$215.”
8 Click the Close button. The new text appears
in the layout area.
7
19
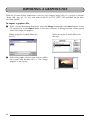
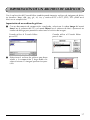
IMPORTING A GRAPHICS FILE
With the P-touch Editor application, you can also import image files in a variety of formats
(.bmp, .dib, .jpg, .gif, .tif, .ico, and .wmf on the PC or PICT, JPEG, TIFF and BMP on the Mac)
into your layout.
To import a graphics file:
1
With a layout document displayed, select the Image command in the Insert menu (in the
PC software) or in the Object menu (in the Mac software). A dialog box that allows you to
select the image file appears.
When using the P-touch Editor for
the PC:
2
20
Select the graphic file that you wish to add to
the layout and double-click it. The image
appears in the layout.
When using the P-touch Editor for
the Mac:
READING THE USER’S GUIDE
The P-touch Editor User’s Guide can be read either by inserting the CD-ROM into the drive
each time you wish to refer to it or by installing it onto your hard disk so that it is quickly available at any time. Since the User’s Guide is an HTML document, a browser is needed to read it.
The installer for the Internet Explorer 4.01 browser is also available on the CD-ROM.
☞ The P-touch Editor User’s Guide can be read using other browsers; however, some pages
may not be displayed correctly.
To install Internet Explorer 4.01 on an IBM PC-compatible computer:
1
2
Insert the P-touch Editor CD-ROM into the CD-ROM drive. A dialog box that allows you
to select what to install is displayed.
Click the bottom button to start up the Internet Explorer 4.01 Installer.
To install Internet Explorer 4.01 on a Macintosh computer:
1
2
Insert the P-touch Editor CD-ROM into the CD-ROM drive.
Double-click the Installer icon in the CD Distribution - ICP1 folder of the CD-ROM’s
P-touch folder.
To read the P-touch Editor User’s Guide on an IBM PC-compatible computer:
If the User’s Guide was not installed onto the computer’s hard disk, insert the P-touch Editor CD-ROM into the CD-ROM drive.
2 Start up the User’s Guide.
By clicking the P-touch Editor icon:
•
Double-click The User’s Guide PT-2400/2410 icon in the P-touch Editor 3 group
window.
With the Start button:
(a)
Click the Start button on the taskbar to display the Start menu.
(b)
Select Programs.
(c)
Select P-touch Editor 3.
(d)
Click The User’s Guide PT-2400/2410.
With Windows Explorer:
(a)
Start up Windows Explorer.
(b)
Select the CD-ROM drive (if the User’s Guide is not installed on the hard disk), or
select the drive and directory where P-touch Editor is installed (if the User’s Guide
is installed on the hard disk).
(c)
Double-click Main.htm in the Manual folder.
1
21
To read the P-touch Editor User’s Guide on a Macintosh computer:
1
2
22
If the User’s Guide was not installed onto the computer’s hard disk, insert the P-touch Editor CD-ROM into the CD-ROM drive.
Double-click Main.htm in the User’s Guide folder of the CD-ROM’s P-touch folder (if the
User’s Guide is not installed on the hard disk), or of the installed P-touch Editor Ver3.0
folder (if the User’s Guide is installed on the hard disk).
TAPE CASSETTE
A single TZ tape cassette is supplied with this unit. However, since TZ tape cassettes are available for this machine in a wide variety of colors and sizes, it is possible to make distinctive
color-coded and stylized labels.
In addition, this machine has been designed to allow you to change the tape cassettes quickly
and easily.
To change the tape cassette:
1
2
3
4
5
Lift open the tape compartment cover. The installed cassette is also released.
If a tape cassette is already installed, remove it by pulling it straight up.
If the ink ribbon in the other tape cassette is loose, use your finger to wind the toothed
wheel in the direction of the arrow on the cassette until there is no slack in the ribbon.
Also, make sure that the end of the tape feeds under the tape guides.
☞ If you are using a new tape cassette provided with a stopper, be sure to remove the
stopper.
Insert the tape cassette firmly into the tape compartment, making sure that the entire back
of the cassette touches the bottom of the compartment.
☞ When inserting the tape cassette, make sure that the inner ribbon does not catch on
the corner of the metal guide.
Close the compartment cover, then turn on the machine if it is off.
Feed&Cut
6
Hold down
excess.
Code
and press
Space
once to remove any slack in the tape and cut off the
23
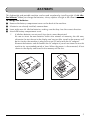
ATTACHING LABELS
LAMINATED TAPE
The enclosed stick enables you to easily remove the backing from labels printed on laminated
tapes.
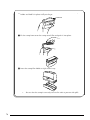
1 Hold the tape in your left hand, with the printed surface facing up, and hold the stick in
your right hand.
2 Pass the tape halfway through the long narrow hole in the stick.
3 Turn the stick three-quarters of a turn towards you and pull the stick away from you as
shown below.
4 Peel off the label backing.
F
GH
DE
C
AB
EF
CD
AB
FABRIC TAPE
Fabric tape is used to attach a piece of fabric printed with your text onto garments using an
iron. After printing the text onto fabric tape and cutting off the label using scissors, place the
label on an ironed garment at the location where you wish to attach it in such a way that the
printed text can be read correctly. Cover the label with another piece of cloth and use an iron
set to a medium-high temperature (320 to 356 ˚F (160 to 180 ˚C)) to press down firmly for 10
to 15 seconds. For more details, refer to the instructions included with the fabric tape cassette.
☞ The label will have a white background on colored cloth.
STAMP TAPE
Refer to pages 76 through 78 for a detailed explanation on using the stamp tape to make
stamps.
24
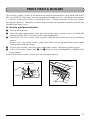
PRINT HEAD & ROLLERS
Occasionally, specks of dust or dirt become attached to the machine’s print head and rollers.
This is particularly likely when you are using the unit outdoors or in a very dusty environment.
If a section of the print head is covered with dust, a blank horizontal streak may appear
through the label text. Therefore, as with a tape recorder, the machine’s head may need to be
cleaned from time to time.
To clean the print head and rollers:
Turn off the machine.
Open the tape compartment cover, then remove the tape cassette if one is installed. The
print head and rollers are located in the tape compartment.
3 Print head: Use a dry cotton swab to gently wipe the print head with an up-and-down
motion.
Rollers: Use a dry cotton swab to wipe each roller with an up-and-down motion while
rotating them with your finger.
4 Install a tape cassette, close the tape compartment cover, and then try printing again.
5 If dust still remains, repeat steps 3 and 4 using a cotton swab dipped in isopropyl (rubbing) alcohol.
If none of the above works, contact your service representative.
1
2
Print head
Print head
Rollers
Cotton swab
25
26
Learning
the Ropes
27
DOOR LABEL EXAMPLE
After you have inserted the batteries and the enclosed tape cassette as explained in the Getting
Started chapter, let’s practice using some of the basic functions of your P-touch. We must first
begin by turning on the power to the machine.
To turn on the machine:
1 Press
On
Off
in the top right-hand corner
of the keyboard.
Alt
Caps
Length
Undl/Frm
A.Format
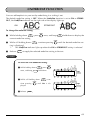
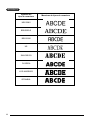
ABCDEFGHIJKL
1: _
Width
The underline in the LCD display is called the “cursor”. It is like a pointer which shows your
current position and lets you select characters in your text.
The text you create may sometimes be longer than the 11 characters that the LCD display can
show at one time. Therefore, the cursor can be moved to show other parts of the text. Pressing
the left cursor key (
) moves the cursor to the left so that the left side of the text can be
seen and pressing the right cursor key (
) moves the cursor to the right so that the right
side of the text can be seen.
Some format settings are shown by the triangular and square indicators around the edge of the
display. The default settings (the selected settings when the power is turned on for the very first
time) have been pre-programmed into the machine and represent the most common settings
for labels. However, you can design your own label to have any format that you wish. Detailed
explanations of the formats can be found on pages 82 through 96.
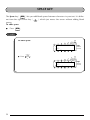
Now, let’s enter the text for our first example, the simple door label shown below.
☞
28
The label in this example was made using the enclosed 1/2” (12-mm)-wide tape.
ENTERING THE TEXT
Since all of the text will be in capital letters, we will use the Caps mode, which allows us to
Caps
type capital letters continuously without holding down
Shift
.
To enter Caps mode:
Caps
2 Hold down
and press
Code
Shift
once.
The Caps indicator on the left side of the
display lights up.
Alt
Caps
Length
Undl/Frm
A.Format
ABCDEFGHIJKL
1: _
Width
Then, let’s type in the text in the same way that you would type on a typewriter or a computer
keyboard.
To type in “MEETING”:
Tape
3 Press
M
once and
ñ
Length
press
T
E
twice, then
Barcode
,
I
í
,
N
Ñ
and
G
once
each.
☞ All letters are automatically entered as
capital letters.
Alt
Caps
Also like on a typewriter or computer keyboard, the Space key (
blank spaces to the text.
☞
The Space key (
Feed&Cut
Space
Length
Undl/Frm
A.Format
ABCDEFGHIJKL
1: M E E T I N G _
Width
Feed&Cut
Space
) is different from the right cursor key (
) allows you to add
), which moves the
cursor through the entered text without adding blank spaces.
29
To add a space:
4 Press
Feed&Cut
Space
.
Alt
Caps
Length
Undl/Frm
A.Format
ABCDEFGHIJKL
1: M E E T I N G _
Width
Type the second word, “ROOM”, to finish the text.
To type in “ROOM”:
Align
5 Press
R
Repeat
once,
O
ó
twice, then
M
ñ
once.
☞ Since the text is longer than the LCD
display, “ME” moves off the display to
the left.
Alt
Caps
Length
Undl/Frm
A.Format
ABCDEFGHIJKL
1: E T I N G R O O M _
Width
Now that we are finished entering capital letters, we can exit Caps mode.
To exit Caps mode:
Caps
6 Hold down
Code
and press
The Caps indicator goes off.
Shift
once.
Alt
Caps
Length
Undl/Frm
A.Format
ABCDEFGHIJKL
1: E T I N G R O O M _
Width
Once you have entered the text, you can easily edit it by correcting mistakes or simply adjusting it or its format. For more detailed explanations of text editing methods, see pages 57 and
58.
30
PRINTING THE TEXT
Several format settings are available, however, in this example we will use the default settings
pre-programmed into the machine and print out our label, which is then automatically cut off
after printing is finished.
To print the door label:
Mirror
7 Press
Print
once. The message “WORKING” appears just before printing, and
then “COPIES 1/ 1” is displayed while the label is being printed.
☞ If the A.Cut function is set to ON, the label is automatically cut off after it is
printed.
Alt
Length
Undl/Frm
A.Format
WORKING
Caps
Width
Alt
Caps
Length
Undl/Frm
A.Format
COPIES
1/ 1
Width
31
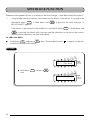
ADDRESS LABEL EXAMPLE
While making the multi-line address label in this example, we will learn how to create more
decorative labels using the various format settings.
☞
Five-line labels, such as this address label, can only be printed on either 3/4” (18-mm)or 1” (24-mm)-wide tape.
Before entering the new text, we must first erase the text shown in the display from the previous time that the machine was used. When clearing the display, we can choose whether to
erase all of the text and return all format functions (Font, Size, Width, Style, Underline, Frame,
Tape margin, Horizontal alignment, Tab Length, Mirror printing and Length) to their default
settings or just to erase the text.
To erase all of the text and reset the format functions:
Clear
1 Hold down
Code
and press
Del
once.
Alt
Caps
Length
Undl/Frm
A.Format
TEXT&FORMATS
TEXT ONLY
Width
2 Since
TEXT&FORMATS
selected, press
New Block
is
already
.
Alt
☞ If TEXT&FORMATS was not already
selected, it could be selected by pressing Home or End .
32
Caps
Length
Undl/Frm
A.Format
ABCDEFGHIJKL
1: _
Width
ENTERING THE TEXT
Let’s begin by typing in the first row of text, the name “Bill Reynolds”.
To type in “Bill Reynolds”:
Caps
3 Hold down
Shift
and press
Shift
once,
Barcode
Caps
then release
B
. Press
I
í
Alt
once, then
Caps
L
twice.
ú
4 Press
Length
Undl/Frm
A.Format
OK
TO
1: B i l l _
Width
Feed&Cut
Space
.
Alt
Caps
Length
Undl/Frm
A.Format
OK
TO
1: B i l l _
Width
5 Type in “Reynolds”.
☞ Again, the text is longer than the LCD
display. So “Bil” moves off the display
to the left.
Alt
Caps
Length
Undl/Frm
A.Format
OK
TO
1: l R e y n o l d s _
Width
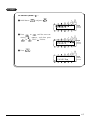
In a multi-line label, the return key (
The return mark (
New Block
) is used to end one line and start the next one.
) indicates the end of the line.
To end the first line and begin another one:
New Block
6 Press
.
Alt
Caps
Length
Undl/Frm
A.Format
1: B i l l R e y n o l
2: _
Width
33
Now, we can enter the company name, address, and telephone number: ABC Transport; 29
South Main St.; Los Angeles, CA 88888; 012-345-6789.
To type in the company name, address, and telephone number:
7 Type “ABC Transport”, and then press
New Block
.
Alt
Caps
2: A B C
3: _
Length
Undl/Frm
A.Format
Transpo
Width
8 Type “29 South Main St.”, and then press
New Block
.
Alt
Caps
3: 2 9
4: _
South
Length
Undl/Frm
A.Format
Ma
Width
9 Type “Los Angeles, CA 88888”, and then
New Block
press
.
Alt
Caps
4: L o s
5: _
Length
Undl/Frm
A.Format
Angeles
Width
0 Type “012-345-6789”.
Symbol
☞ To type “-”, hold down
Alt
and press
Alt
Symbol
/
, -
once, and then release
Alt
.
Caps
Length
Undl/Frm
A.Format
4: s A n g e l e s ,
5: 2 - 3 4 5 - 6 7 8 9 _
Width
34
FORMATTING THE TEXT
Now the text is entered as we wish. If it were printed, the standard default settings would be
used. The text would be aligned on the left side with 1” (25 mm) margins and would not be
framed or underlined. In addition, the characters would be auto-sized (AUTO) and printed
using the HELSINKI font and NORMAL style settings. For more details concerning format settings, please see pages 82 through 96.
For this label, though, let’s assume we want a different style of text: BRUSSELS font, framed,
and printed with 1/6” (4 mm) margins (NONE). Therefore, we must change the format.
To select the BRUSSELS font setting:
Font
A While holding down
once, and keep
Code
, press
!
1 ¡
held down to dis-
Code
Alt
play the current font setting.
Caps
Length
Undl/Frm
A.Format
FONT
HELSINKI
Width
B While still holding down
Code
, con-
Font
tinue pressing
!
1 ¡
until BRUSSELS is
Alt
displayed, and then release
Code
.
Caps
Length
Undl/Frm
A.Format
FONT
BRUSSELS
Width
To select the ROUND frame setting:
Frame
C While holding down
once, and keep
Code
, press
¢
6
held down to dis-
Code
play the current frame setting.
Alt
Caps
Length
Undl/Frm
A.Format
FRAME
OFF
Width
D While still holding down
Code
, continue
Frame
pressing
¢
6
until ROUND is displayed,
and then release
Code
.
Alt
Caps
Length
Undl/Frm
A.Format
FRAME
ROUND
Width
35
To select the NONE tape margin setting:
Tape
E While holding down
once, and keep
Code
Code
, press
E
held down to dis-
play the current tape margin setting.
Alt
Caps
Length
Undl/Frm
A.Format
FEED
FULL
Width
F While still holding down
, con-
Code
Tape
tinue pressing
E
until NONE is dis-
played, and then release
Code
.
Alt
Caps
Length
Undl/Frm
A.Format
FEED
NONE
Width
Different format settings can be chosen either before or after the text is entered. The procedure
shown above can also be used to change the other format settings.
PRINTING THE TEXT
Mirror
If we want only one copy of the text, we could just press
to print it. However, let’s
assume that we have three letters onto which we wish to attach address labels. Therefore, we
need to print three copies of the same text.
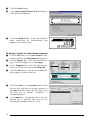
Print
To print three copies of the label:
Repeat
G Hold down
Code
and press
O
ó
once.
Alt
Caps
Length
Undl/Frm
A.Format
COPIES
1
Width
Width
H Press
#
3
once.
☞ The number can be entered either by
typing it in using the number keys or
by selecting it using Home and End .
Alt
Caps
Length
Undl/Frm
A.Format
COPIES
3
Width
36
New Block
I Press
to begin printing. The message “WORKING” appears just before
printing, and then the number of each copy being printed is displayed.
Alt
Length
Undl/Frm
A.Format
WORKING
Caps
Alt
Caps
Width
Alt
Caps
Width
Length
Undl/Frm
A.Format
COPIES
2/ 3
Width
Length
Undl/Frm
A.Format
COPIES
1/ 3
Alt
Caps
Length
Undl/Frm
A.Format
COPIES
3/ 3
Width
☞ If the A.Cut function is set to ON, each label is automatically cut off after it is
printed.
37
STORAGE SHELF LABEL EXAMPLE
In this final example, we will practice using the New block function and the Local format
function as well as more specialized features such as the Barcode and Numbering functions.
The following labels, which could be used to describe objects stored on a shelf, contain multiple blocks and mixed formatting.
☞
The labels in this example were made using 3/4” (18-mm)-wide tape.
Before entering our new text, we must first erase the text from the previous time that the
P-touch was used.
To clear the working area for a new label:
Clear
1 Hold down
Code
and press
Del
once.
Alt
Caps
Length
Undl/Frm
A.Format
TEXT&FORMATS
TEXT ONLY
Width
2 Since
TEXT&FORMATS
selected, press
New Block
is
already
.
Alt
☞ If TEXT&FORMATS was not already
selected, it could be selected by pressing Home or End .
38
Caps
Length
Undl/Frm
A.Format
ABCDEFGHIJKL
1: _
Width
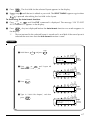
ENTERING THE TEXT
Now, we can begin entering the text for our storage shelf label.
To input the shelf number (the first block of text):
3 Type in “B1”.
Length
Undl/Frm
A.Format
Alt
Caps
1: B 1 _
Width
Each time the number of lines in a section of the text changes, a new block of text must be created. Therefore, the text for our label must be entered in three separate blocks.
Since we will now change from a one-line to a three-line block, we will use the New block
function instead of a normal return. The new block mark (
) indicates the end of a block.
For more details on the New block function, refer to NEW BLOCK FUNCTION on page 54.
To create a new block of text:
New Block
4 Hold down
Code
and press
once.
Alt
Caps
Length
Undl/Frm
A.Format
1: B 1
1: _
Width
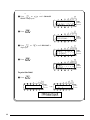
To enter the company address (the second block of text):
5 Type “ABC Transport”, and then press
New Block
.
Alt
Caps
1: A B C
2: _
Length
Undl/Frm
A.Format
Transpo
Width
39
6 Type “29 South Main St.”, then press
New Block
.
Alt
Caps
2: 2 9
3: _
South
Length
Undl/Frm
A.Format
Ma
Width
7 Type “Los Angeles, CA 88888”, hold
New Block
down
Code
and press
once.
Alt
Caps
3: L o s
1: _
Length
Undl/Frm
A.Format
Angeles
Width
Now, we must enter the third block of the text: the barcode. Although there are many barcode
types available, let’s use CODE 39, which can use an unrestricted number of digits. More
details on the Barcode function can be found on pages 97 through 100.
To add the barcode for the part code (the third block):
Barcode
8 Hold down
Code
and press
I
í
once.
Alt
CODE
Length
Undl/Frm
A.Format
39
Caps
Width
40
If we wished to use a different type or change any of the default barcode settings, we could
press Home , and then use the cursor keys to change the parameter settings. However, since we
will use the default settings for this example, we can immediately input our barcode data.
To enter the barcode data:
9 Type in “12345”.
Alt
Caps
Length
Undl/Frm
A.Format
CODE 39
12345
Width
New Block
0 Press
.
Alt
Caps
3: L o s
1:
_
Length
Undl/Frm
A.Format
Angeles
Width
FORMATTING THE TEXT
Now that we’ve entered all of the text, we can start formatting it. Next, let’s use the Local format function to change the style of the shelf number (B1) in order to emphasize it. The Local
format function is used to select a part of the text so that it can be formatted with a font, size,
width, style, underline or frame setting that is different from the rest of the text. Since only the
characters in the text block containing the cursor will have a different format, we must first
move the cursor to the first block.
To move the cursor to the first block:
A Hold down
Code
and press
Home
.
☞ The cursor can be moved quickly
from block to block by holding down
Shift
and pressing
or
.
Length
Undl/Frm
A.Format
Alt
Caps
Caps
1: B 1
Width
41
To select the SOLID style setting for the first block:
Local
B Hold down
Code
and press
once.
S
Alt
Caps
BLOCK
1: B 1
Length
Undl/Frm
A.Format
FORMAT
Width
Style
C Hold down
Code
and press
once.
$
4
Alt
Caps
Length
Undl/Frm
A.Format
STYLE
NORMAL
Width
D Keep
Code
held down and continue
Style
pressing
$
4
until SOLID is displayed,
Length
Undl/Frm
A.Format
Alt
and then release
Code
.
Caps
1: B 1
Width
PRINTING THE TEXT
Finally, let’s assume that we want to put labels on two different shelves (B1 and B2) while
keeping the same barcode. To do this, we can use the Numbering function to print two copies
of our text while automatically increasing the shelf number after each label is printed. For
more details on the Numbering function, refer to NUMBERING FUNCTION on pages 103
through 105.
To use the Numbering function:
Number
E Hold down
Code
and press
P
á
once.
Alt
Caps
SET
1: B 1
START
Length
Undl/Frm
A.Format
PT
Width
42
F Press
until “1” is flashing.
Alt
Caps
SET
1: B 1
START
Length
Undl/Frm
A.Format
PT
Width
New Block
G Press
.
Alt
Caps
SET
1: B 1
END
Length
Undl/Frm
A.Format
PT
Width
H Since we only want “1” in the numbering
New Block
field, press
again.
Alt
#
Caps
Length
Undl/Frm
A.Format
INCREASES
1
Width
Size
I Press
@
2
once.
☞ The number can be entered either by
typing it in using the number keys or
by selecting it using Home and
.
End
Alt
Caps
#
Length
Undl/Frm
A.Format
INCREASES
2
Width
43
New Block
J Press
to begin printing the labels.
☞ If the A.Cut function is set to ON, each label is automatically cut off after it is
printed.
Alt
Length
Undl/Frm
A.Format
WORKING
Caps
Alt
Length
Undl/Frm
A.Format
COPIES
1/ 2
Width
Width
Caps
Alt
Caps
Length
Undl/Frm
A.Format
COPIES
2/ 2
Width
With these examples, we have covered many of the basic features of your P-touch so that you
can begin creating your own customized labels. If you have any questions about any of the
functions or keys, refer to the appropriate explanation in the following section.
44
For Your
Information
45
POWER KEY
The power key (
On
Off
) is located in the top right-hand corner of the keyboard. If batteries
have been installed or the machine has been plugged in using the optional AC adaptor, the
previous session’s information is displayed when the machine is turned on. This feature allows
you to stop work on a label, turn off the machine, and return to it later without having to reenter the text.
The machine will automatically turn off if no key is pressed within 5 minutes. The machine’s
internal memory stores the current session’s information and displays it when you turn on the
machine again.
To turn on the machine:
●
Press
On
Off
. The previous session’s information appears in the LCD display.
To turn off the machine:
●
46
Press
On
Off
. The current session’s information is stored in the internal memory.
CURSOR KEYS
The machine’s LCD display shows two rows of 11 characters; however, the text that you enter
can be up to 255 characters long. You can review and edit your text by using the cursor keys
to move the cursor so that different parts are shown in the display.
LEFT CURSOR KEY
To move the cursor one character to the left:
●
Press
once.
☞
If the cursor is at the beginning of a line when this key is pressed, the cursor moves
to the end of the previous line.
To move the cursor several characters to the left:
●
Hold down
until the cursor moves to the desired position.
To move the cursor to the beginning of the current line:
●
Hold down
and press
Code
.
To move the cursor to the beginning of the current text block:
Caps
●
Hold down
☞
Shift
and press
.
If the cursor is already at the beginning of a text block when these keys are pressed,
the cursor moves to the beginning of the previous block.
RIGHT CURSOR KEY
To move the cursor one character to the right:
●
Press
once.
☞
If the cursor is at the end of a line when this key is pressed, the cursor moves to the
beginning of the next line.
To move the cursor several characters to the right:
● Hold down
until the cursor moves to the desired position.
To move the cursor to the end of the current line:
●
Hold down
Code
and press
.
To move the cursor to the beginning of the next text block:
Caps
●
Hold down
☞
Shift
and press
.
If the cursor is already at the beginning of the last text block when these keys are
pressed, the cursor moves to the end of the text.
47
UP CURSOR KEY
To move the cursor up to the previous line:
●
Press
Home
once.
☞ If the cursor is in the first line of text, it will move to the beginning of the line.
To move the cursor up several lines:
●
Hold down
Home
until the cursor moves to the desired position.
To move the cursor to the beginning of the entire text:
●
Hold down
Code
and press
Home
.
DOWN CURSOR KEY
To move the cursor down to the following line:
●
Press
End
once.
☞
If the cursor is in the last line of text, it will move to the end of the line.
To move the cursor down several lines:
●
Hold down
End
until the cursor moves to the desired position.
To move the cursor to the end of the entire text:
●
48
Hold down
Code
and press
End
.
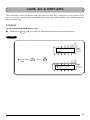
CODE, ALT & SHIFT KEYS
Most characters can be entered simply by pressing their keys. However, to use special functions or to enter capital letters, accented characters and some symbols, the following special
keys are necessary.
CODE KEY
To use a function printed above a key:
●
Hold down
Code
and press the key immediately below the desired function.
EXAMPLE
To start the Symbol function:
Alt
Caps
Length
Undl/Frm
A.Format
ABCDEFGHIJKL
1: A B C _
Width
Symbol
● Hold down
Code
and press
Alt
once.
T
M
Alt
Caps
Length
Undl/Frm
A.Format
1: A B C _
Width
49
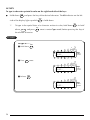
ALT KEY
To type in characters printed in color on the right-hand side of the keys:
Symbol
●
Hold down
Alt
and press the key of the desired character. The Alt indicator on the left
Symbol
side of the display lights up while
☞
Alt
is held down.
Caps
To type in the capital letter of a character written in color, hold down
Shift
(or hold
Caps
down
and press
Code
Shift
once to enter Caps mode) before pressing the key of
the desired character.
EXAMPLE
To type in “–”:
Symbol
1 Hold down
Alt
.
Alt
Caps
Length
Undl/Frm
A.Format
ABCDEFGHIJKL
1: 0 1 2 _
Width
2 Press
once.
/
, -
Alt
Caps
Length
Undl/Frm
A.Format
ABCDEFGHIJKL
1: 0 1 2 - _
Width
Symbol
3 Release
Alt
.
Alt
Caps
Length
Undl/Frm
A.Format
ABCDEFGHIJKL
1: 0 1 2 - _
Width
50
SHIFT KEY
To type in a capital letter or a symbol printed in the upper-left corner of a key:
Caps
●
Hold down
Shift
and press the key of the desired letter or symbol.
EXAMPLE
To type in “%”:
Alt
Caps
Length
Undl/Frm
A.Format
ABCDEFGHIJKL
1: 5 _
Width
Caps
● Hold down
Shift
Underline
and press
%
5
.
Alt
Caps
Length
Undl/Frm
A.Format
ABCDEFGHIJKL
1: 5 % _
Width
CAPS MODE
Caps
The Caps mode allows you to type capital letters continuously without holding down
Shift
.
To type in many capital letters:
Caps
1
Hold down
Code
and press
Shift
. The Caps indicator on the left side of the display lights
up.
Alt
Caps
Length
Undl/Frm
A.Format
ABCDEFGHIJKL
1: _
Width
2
3
Press the keys of the desired letters or symbols.
To exit Caps mode, hold down Code and press
Caps
Shift
. The Caps indicator goes off.
51
SPACE KEY
Feed&Cut
The Space key (
Space
) lets you add blank spaces between characters in your text. It is differ-
ent from the right cursor key (
spaces.
To add a space:
), which just moves the cursor without adding blank
Feed&Cut
●
Press
Space
.
EXAMPLE
To add a space:
Alt
Caps
Length
Undl/Frm
A.Format
ABCDEFGHIJKL
1: J . _
Width
Feed&Cut
● Press
Space
.
Alt
Caps
Length
Undl/Frm
A.Format
ABCDEFGHIJKL
1: J . _
Width
52
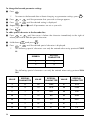
RETURN KEY
New Block
Like on a typewriter or word processor, this machine’s return key (
) is used to end a
line of text and start another one. When you have finished entering one line, press the return
key to make a new line and move the cursor to it.
New Block
☞
Each block can only contain a maximum of seven text lines. If you press
when
the cursor is located in the seventh line, the error message “7 LINE LIMIT!” will appear.
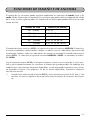
Tape widths
Maximum number of
lines that can be printed
1/4” (6 mm)
1
3/8” (9 mm)
2
1/2” (12 mm)
3
3/4” (18 mm)
5
1” (24 mm)
7
The return key can also be used to select an item from a list (e.g., add a symbol or accented
character to the text) or to apply a selected setting.
Some questions asking you to confirm a command may appear on the LCD display, especially
when the function that you have chosen will delete or affect files. In these cases, pressing
New Block
is like answering “yes”.
☞
Clear
To answer “no”, press
Del
. Refer to DELETE KEY on page 57.
To add a new line:
New Block
●
Press
. The return mark (
) appears in the text to indicate the end of the line.
To select an item from a list:
New Block
●
Press
.
To answer “yes”:
New Block
●
Press
.
53
NEW BLOCK FUNCTION
Whenever the number of lines in a section of the text changes, a new block must be created.
☞
A single label can only contain a maximum of five blocks. If the cursor is located in the
New Block
is pressed, the error message “5
fifth block when Code is held down and
BLOCK LIMIT!” appears.
If the cursor is positioned in the middle of a text block when
Code
is held down and
New Block
is pressed, the block splits into two and the character to the left of the cursor’s
current position becomes the end of the block.
To add a new block:
New Block
●
Hold down Code and press
to indicate the end of the block.
once. The new block mark (
) appears in the text
EXAMPLE
To add a new block:
Length
Undl/Frm
A.Format
Alt
Caps
1: K ’ s
Garden_
Width
New Block
● Hold down
Code
and press
once.
Alt
Caps
1: K ’ s
1: _
Length
Undl/Frm
A.Format
Garden
Width
54
TAB FUNCTION
This function allows you to separate sections of a line of text by adding tabs. This enables you
to create perfectly aligned columns without having to type in several spaces. All tabs have the
same length and are measured from either the beginning of the line or the previous tab if there
is more than one. The tab length can be set between 0.0 and 11.8 inches (0.0 and 30.0 centimeters).
☞
The text can contain no more than 50 tabs. If 50 tabs have already been added to the
Tab
text when
Q
is pressed, the error message “TAB LIMIT!” appears.
To set the tab length:
Tab Length
1
Hold down
2
Press
or End until the desired length is displayed or use the number keys to type in
the length.
☞ To switch the unit of measurement between inches and centimeters, press M ñ
until the measurement is displayed in the desired unit.
Feed&Cut
The default setting (2” (5.0 cm)) can be selected by pressing Space .
3
Press
Code
and press
W
once. The current tab length is displayed.
Home
New Block
.
To add a tab:
Tab
●
Hold down
Code
and press
Q
once. The tab mark (
) appears in the text to indi-
cate the position of the tab.
☞ If the text in front of a tab extends past the point where the next section of text
should start, the text will instead start at the following tab position.
For example, if the tab length is set to 2.0 inches (5.0 cm) and the following text is
typed in:
1: A B C D E F G H I
2: J K L M N O P Q R S T U
55
the label shown below will be printed.
ABC
DEF
JKLMNOPQRST
Margin Tab (2” (5 cm))
GHI
U
Tab (2” (5 cm))
Margin
EXAMPLE
To set the tab length:
Tab Length
1 Hold down
Code
and press
W
once.
Alt
Caps
Length
Undl/Frm
A.Format
TAB LENGTH
2.0inch
Width
2 Press
End
until 1.0inch is displayed.
Alt
Caps
New Block
3 Press
Length
Undl/Frm
A.Format
TAB LENGTH
1.0inch
Width
.
To add a tab:
Tab
● Hold down
Code
and press
Q
once.
Alt
Caps
Length
Undl/Frm
A.Format
ABCDEFGHIJKL
1: P a r t N o .
Width
56
DELETE KEY
Clear
The delete key (
Del
) allows you to remove characters to the left of the cursor’s current posi-
tion. It differs from the left cursor key (
), which only moves the cursor without deleting
any characters.
The delete key can also be used to quit most functions and return to the previous display without changing the text.
Some questions asking you to confirm a command may appear on the LCD display, especially
Clear
when the function that you have chosen will delete or affect files. In these cases, pressing
Del
is like answering “no”.
☞
New Block
To answer “yes”, press
. Refer to RETURN KEY on page 53.
To delete one character:
1
Press
,
, Home or End to position the cursor below the character immediately
to the right of the character that you wish to delete.
2
Press
Clear
once.
Del
To delete a sequence of characters:
1
Press
,
, Home or End to position the cursor below the character immediately
to the right of the last character that you wish to delete.
2
Hold down
Clear
Del
until all of the characters that you wish to delete are deleted.
To quit a function without changing your text:
Clear
●
Press
to return to your text.
Del
To answer “no”:
Clear
●
Press
Del
.
57
LINE OUT FUNCTION
With the Line Out function, you can easily remove an entire line of text.
To delete a line of text:
1
Press
,
wish to delete.
2
Hold down
,
Home
or
End
to position the cursor within the line of text that you
Line out
☞
and press
Code
)
0
once.
Line out
Each time
)
0
is pressed while
Code
is held down, the line of text containing the
cursor is deleted.
EXAMPLE
To delete “012-345-6789”:
Alt
Caps
Length
Undl/Frm
A.Format
1: s G a r d e n
2: 2 - 3 4 5 - 6 7 8 9 _
Width
Line out
● Hold down
Code
and press
)
0
once.
Alt
Caps
Length
Undl/Frm
A.Format
1: K ’ s G a r d e n
2: _
Width
58
CLEAR FUNCTION
When clearing the display before entering new text, the Clear function can be used to choose
whether all of the text is erased and all format functions (Font, Size, Width, Style, Underline,
Frame, Tape margin, Alignment, Tab length, Mirror printing, and Length) are returned to their
default settings, or whether just the text is erased.
To delete all of the text and return all formats to their default settings:
Clear
1
Hold down
2
Press
☞
Home
Code
or
and press
Del
.
until TEXT&FORMATS is selected (flashing).
End
Clear
To return to the text without erasing anything, press
Del
.
New Block
3
Press
.
EXAMPLE
To clear the text and formats:
Alt
Caps
Length
Undl/Frm
A.Format
1: s G a r d e n
2: 2 - 3 4 5 - 6 7 8 9 _
Width
Clear
1 Hold down
Code
and press
Del
.
Alt
Caps
Length
Undl/Frm
A.Format
TEXT&FORMATS
TEXT ONLY
Width
2 Press
Home
until TEXT&FORMATS is
flashing.
Alt
Caps
Length
Undl/Frm
A.Format
TEXT&FORMATS
TEXT ONLY
Width
59
New Block
3 Press
.
Length
Undl/Frm
A.Format
Alt
Caps
1: _
Width
To delete just the text:
Clear
1
Hold down
2
Press
☞
Home
Code
or
End
and press
Del
.
until TEXT ONLY is selected (flashing).
Clear
To return to the text without erasing anything, press
Del
.
New Block
3
Press
.
EXAMPLE
To clear just the text:
Alt
Caps
Length
Undl/Frm
A.Format
1: s G a r d e n
2: 2 - 3 4 5 - 6 7 8 9 _
Width
Clear
1 Hold down
Code
and press
Del
.
Alt
Caps
Length
Undl/Frm
A.Format
TEXT&FORMATS
TEXT ONLY
Width
60
2 Press
End
until TEXT ONLY is flashing.
Alt
Caps
Length
Undl/Frm
A.Format
TEXT&FORMATS
TEXT ONLY
Width
New Block
3 Press
.
Length
Undl/Frm
A.Format
Alt
Caps
1: _
Width
61
ACCENT FUNCTION
The Accent function can also be used to add accented characters to your text. Many of these
Symbol
characters can also be found on the keys and typed in using
Alt
(refer to page 50) or they can
be entered using the Symbol function (refer to pages 64 and 65).
The accented characters are grouped according to the capital or lowercase letter that they are
combined with. The following accented characters are available:
Letters
Accented characters
Letters
Accented characters
a
àáäâãæ
I
ÍÏÎ
A
ÀÁÄÂÃÆ
n
ñ
c
ç
N
Ñ
C
Ç
o
óöôõ
e
è é ë ê e˜
O
ÓÖÔÕ
E
È É Ë Ê E˜
u
ùúüû
i
íïî
U
ÙÚÜÛ
To type in an accented character:
Accent
1
Hold down
2
display.
Press the key of the letter in the desired accented character.
☞
Code
and press
A
. The message “ACCENT a – u / A – U?” appears on the
Caps
To type a capital letter, hold down
Shift
Caps
(or hold down
Code
and press
Shift
to
turn on Caps mode) before pressing the letter key.
3
Press
4
Press
or
until the desired accented character flashes.
New Block
☞
. The accented character is added to the text.
To type in a series of accented characters, hold down
Code
before pressing
New Block
. Then, continue adding accented characters by selecting them as explained
New Block
in steps 2 and 3, and holding down
Code
while pressing
New Block
after selecting the last character in the series.
62
. Press just
EXAMPLE
To add the accented character “É”:
Accent
1 Hold down
Code
and press
.
A
Alt
Caps
Length
Undl/Frm
A.Format
ACCENT
a-y/A-U?
Width
Tape
Caps
2 Hold down
Shift
and press
E
.
Alt
Caps
Length
Undl/Frm
A.Format
ÈÉËÊ
1: R E S U M _
Width
3 Press
until É flashes.
Alt
Caps
Length
Undl/Frm
A.Format
ÈÉËÊ
1: R E S U M _
Width
New Block
4 Press
.
Length
Undl/Frm
A.Format
Alt
Caps
1: R E S U M É _
Width
63
SYMBOL FUNCTION
In addition to the letters, symbols and numerals on the key tops, there are 67 additional marks
available with the Symbol function.
The following symbols are available:
Group
Symbol
1
Ü Æ æ Ã
2
+
×
÷
=
ã
E˜
e˜
§
2
3
☞ ☞
3
R
Õ
õ
2
3
°
4
[
TM
]
C
4
5
♥
★
6
☞
The use of certain symbols contained within this labelling machine may be governed by
local, national or European regulation. Therefore, the user should check that any symbol
printed conforms to these regulations before application.
To type in a symbol:
Symbol
1
Hold down
2
Press Home or End to display different rows of symbols and press
desired symbol flashes.
3
Press
Code
and press
Alt
. A row of symbols appear in the display.
or
until the
New Block
☞
. The symbol appears in the text.
New Block
To type in a series of symbols, hold down Code before pressing
. Then,
continue adding symbols by selecting them as explained in steps 2 and 3, and
New Block
holding down Code while pressing
last symbol in the series.
64
New Block
. Press just
after selecting the
EXAMPLE
To add the symbol “
”:
Symbol
1 Hold down
Code
and press
Alt
.
T
M
Alt
Caps
Length
Undl/Frm
A.Format
1: D A N G E R _
Width
2 Press
Home
taining “
or
or
End
until the row con-
” appears, and then press
until “ ” flashes.
Alt
Caps
R
Length
Undl/Frm
A.Format
C
1: D A N G E R _
Width
New Block
3 Press
.
Length
Undl/Frm
A.Format
Alt
Caps
1: D A N G E R _
Width
65
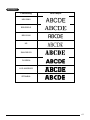
AUTO FORMAT FUNCTION
The Auto format function makes creating labels quick and easy. After simply selecting one of
the various pre-formatted layouts and typing text into each of its fields, the overall style of the
label can easily be changed by selecting one of the seven available style formats, and then the
label is ready to be printed. The many layouts available allow you to create labels for a variety
of needs—from addressing envelopes to identifying floppy disks or audio and video cassettes.
Refer to Reference at the end of this section for a list and samples of the available layouts.
To select a pre-formatted layout:
A.Format
1
Hold down
Code
and press
sage “FORMAT TYPE PRESS
2
Press
☞
Home
or
End
Y
once. The A.Format indicator lights up and the mes” appears in the display.
to select the desired layout.
The default setting (VCR VHS-1) can be selected by pressing
Feed&Cut
Space
.
The number of the layout that was last used appears underlined. Selecting this layout displays the text that was entered in it at that time.
The label sizes are displayed in the currently selected unit of measurement (inches
or millimeters). The unit of measurement can be changed with the Tab length or
Length functions.
New Block
3
Press
. The first field for the selected layout appears in the display.
To enter text in the layout:
New Block
New Block
For each field, type in the text, and then press
. When
is pressed after typing
in the text for the last field, the SELECT MENU appears in the display.
To change the style of the text:
4
5
Press
Home
or
End
until the CHANGE STYLE command is displayed.
End
to select the desired character style.
New Block
6
Press
7
Press
☞
.
Home
or
The default setting (ORIGINAL) can be selected by pressing
Feed&Cut
Space
.
New Block
8 Press
. The SELECT MENU appears in the display.
To print a label using the selected layout:
9
Press
Home
or
End
until the PRINT command is displayed.
New Block
Press
to print the label, and have machine automatically cut it off. The message
“WORKING” appears in the display just before printing begins, and then “COPIES 1/ 1” is
displayed while the label is being printed.
To change the text entered in the layout:
0
A
66
Press
Home
or
End
until the EDIT MORE command is displayed.
New Block
B
Press
. The first field for the selected layout appears in the display.
C
Repeat step 4 until the text is edited as you wish. The SELECT MENU appears again when
New Block
is pressed after editing the last field in the layout.
To finish using the Auto format function:
D
Press Home or End until the EXIT command is displayed. The message “OK TO EXIT
AUTO FORMAT?” appears in the display.
E
Press
. Any text displayed before the Auto format function was used reappears in
the display.
New Block
☞
The text entered in the selected layout is stored and is available if the same layout is
selected the next time that the Auto format function is used.
EXAMPLE
To create a short label for a file folder:
A.Format
1 Hold down
Code
and press
Y
.
Alt
Caps
FORMAT
PRESS
Length
Undl/Frm
A.Format
TYPE
Width
2 Press
Home
or End until layout 35
(FILE SHORT) is displayed.
Alt
Caps
Length
Undl/Frm
A.Format
35:1/2
2.9”
FILE SHORT
Width
New Block
3 Press
.
Alt
Caps
Length
Undl/Frm
A.Format
1TITLE?
_
Width
4 Type in “1999 Sales Report”, and then
New Block
press
.
Alt
Caps
SELECT
PRINT
Length
Undl/Frm
A.Format
MENU
Width
67
To change the character style of the label:
5 Press
Home
or End
STYLE is displayed.
until CHANGE
Alt
Caps
SELECT
CHNAGE
Length
Undl/Frm
A.Format
MENU
STYLE
Width
New Block
6 Press
.
Alt
Caps
Length
Undl/Frm
A.Format
CHAR. STYLE
ORIGINAL
Width
7 Press
Home
or
End
until ELEGANT is
displayed.
Alt
Caps
Length
Undl/Frm
A.Format
CHAR. STYLE
ELEGANT
Width
New Block
8 Press
.
Alt
Caps
Length
Undl/Frm
A.Format
MENU
PRINT
Width
To print the label:
New Block
9 Press
Alt
.
Length
Undl/Frm
A.Format
WORKING
Caps
Width
68
Alt
Caps
Length
Undl/Frm
A.Format
COPIES
1/ 1
Width
REFERENCE
No.
Layout name
1
VCR VHS-1
2
VCR VHS-2
3
VCR 8mm-1
4
VCR 8mm-2
5
VCR VHSC-1
6
VCR VHSC-2
7
AUDIO-1
8
AUDIO-2
9
10
AUDIO-3
11
12
DAT-1
13
DAT-2
14
MINI DISK-1
15
MINI DISK-2
16
NAME PLATE
17
Tape width ×
label length
Layout fields
11 SYMBOL?
3/4” × 5.5”
22 TITLE?
(18 mm × 140 mm)
33 SUBTITLE?
1” × 3.0”
11 TITLE?
(24 mm × 77 mm) 22 SUBTITLE?
11 SYMBOL?
3/8” × 2.9”
22 TITLE?
(9 mm × 73 mm)
33 SUBTITLE?
11 SYMBOL?
1/2” × 3.6”
22 TITLE?
(12 mm × 92 mm)
33 SUBTITLE?
1/2” × 1.7”
11 TITLE?
(12 mm × 42 mm)
11 SYMBOL?
3/4” × 3.2”
22 TITLE?
(18 mm × 81 mm)
33 SUBTITLE?
1/4” × 3.1”
11 SYMBOL?
(6 mm × 80 mm) 22 TITLE?
1/2” × 3.5”
(12 mm × 89 mm) 11 SYMBOL?
22 TITLE?
3/8” × 3.5”
(9 mm × 89 mm)
1/2” × 3.5”
(12 mm × 89 mm)
11 SYMBOL?
3/8” × 3.5”
(9 mm × 89 mm)
1/4” × 2.2”
11 TITLE?
(6 mm × 56 mm)
3/8” × 3.3”
11 SYMBOL?
(9 mm × 85 mm) 22 TITLE?
1/4” × 2.3”
11 TITLE?
(6 mm × 59 mm)
1” × 2.0”
11 TITLE?
(24 mm × 52 mm) 22 SUBTITLE?
1” × 3.0”
(24 mm × 76 mm)
11 NAME?
3/4” × 3.0”
(18 mm × 76 mm)
44 DURATION?
55 REC.MODE?
66 DATE?
33 DATE?
44 DATE?
55 REC.MODE?
44 DURATION?
55 REC.MODE?
66 DATE?
22 SUBTITLE?
44 DURATION?
55 REC.MODE?
66 DATE?
33 SUBTITLE?
33 SUBTITLE?
22 TITLE?
22 SUBTITLE?
33 SUBTITLE?
22 SUBTITLE?
33 DURATION?
44 DATE?
22 COMPANY?
69
No.
Layout name
18
ADDRESS
19
20
EQUIPMENT
21
22
SLIDE
23
PRICE
24
25
SALE PRICE
26
27
ORGANIZER L
28
ORGANIZER S
29
FILE LONG
30
31
FILE LONGV
32
33
34
FILE SHORT
35
36
70
Tape width ×
label length
1” × 3.1”
(24 mm × 80 mm)
3/4” × 3.1”
(18 mm × 80 mm)
1” × 3.1”
(24 mm × 79 mm)
3/4” × 3.1”
(18 mm × 79 mm)
1/2” × 1.7”
(12 mm × 42 mm)
1” × 2.2”
(24 mm × 57 mm)
3/4” × 2.2”
(18 mm × 57 mm)
1” × 3.6”
(24 mm × 92 mm)
3/4” × 3.6”
(18 mm × 92 mm)
Layout fields
11 NAME?
33 ADDRESS2?
22 ADDRESS1? 44 ADD.3/TEL?
11 TITLE?
22 NAME?
33 NUMBER?
11 TITLE?
22 DATE?
33 SUBTITLE?
11 NAME?
22 PRICE?
11 NAME?
33 NEW PRICE?
22 OLD PRICE?
11 NAME?
44 ADDRESS2?
1” × 3.2”
22 COMPANY? 55 ADD.3/TEL?
(24 mm × 82 mm)
33 ADDRESS1?
11 NAME?
44 ADDRESS2?
1” × 2.6”
22 COMPANY? 55 ADD.3/TEL?
(24 mm × 65 mm)
33 ADDRESS1?
1” × 7.2”
(24 mm × 183 mm)
11 TITLE?
3/4” × 7.2”
(18 mm × 183 mm)
1” × 7.2”
(24 mm × 183 mm)
11 TITLE?
3/4” × 7.2”
(18 mm × 183 mm)
1” × 3.7”
(24 mm × 94 mm)
3/4” × 3.7”
(18 mm × 94 mm)
11 TITLE?
1/2” × 2.9”
(12 mm × 74 mm)
3/8” × 2.9”
(9 mm × 74 mm)
No.
Layout name
37
3.5” FLOPPY
38
39
5” FLO PPY
40
Tape width ×
label length
1” × 2.7”
(24 mm × 69 mm)
3/4” × 2.7”
(18 mm × 69 mm)
1” × 3.1”
(24 mm × 79 mm)
3/4” × 3.1”
(18 mm × 79 mm)
Layout fields
11 TITLE?
33 NAME?
22 SUBTITLE?
11 TITLE?
33 NAME?
22 SUBTITLE?
1 VCR VHS-1
2 VCR VHS-2
3 VCR 8mm-1
4 VCR 8mm-2
5 VCR VHSC-1
6 VCR VHSC-2
7 AUDIO-1
8 AUDIO-2
71
9 AUDIO-2
10 AUDIO-3
11 AUDIO-3
12 DAT-1
13 DAT-2
14 MINI DISK-1
15 MINI DISK-2
16 NAME PLATE
17 NAME PLATE
18 ADDRESS
19 ADDRESS
20 EQUIPMENT
72
21 EQUIPMENT
22 SLIDE
23 PRICE
24 PRICE
25 SALE PRICE
26 SALE PRICE
27 ORGANIZER L
28 ORGANIZER S
29 FILE LONG
30 FILE LONG
73
31 FILE LONGV
32 FILE LONGV
33 FILE SHORT
34 FILE SHORT
35 FILE SHORT
36 FILE SHORT
37 3.5” FLOPPY
38 3.5” FLOPPY
39 5” FLOPPY
40 5” FLOPPY
74
REFERENCE
CHAR.
STYLE
Setting
ORIGINAL
Sample
Font Setting
Style Setting
Layout default
ITALIC
Layout default
ITALIC
DYNAMIC
ISTANBUL
SOLID
CUTE
FLORIDA
OUTLINE
FORMAL
BRUSSELS
ITALIC
ELEGANT
US
NORMAL
NATURAL
SAN DIEGO
NORMAL
75
STAMP FUNCTION
The Stamp function allows you to quickly and easily create your own stamp stencil films for
customized stamps. Select this function to automatically center the text and adjust the tape
length and margins to a perfect format for the pre-inked stamp film holders. Since the stamp
holder is reusable, just make a new stamp stencil film and replace the one in the holder.
To make a stamp:
1 Type in the text, and then insert a medium (3/4” (18-mm)-wide) or large (1” (24-mm)wide) stamp film cassette.
Stamp
2
Hold down
Code
and press
U
ü
once. The message “STAMP FORMAT?” appears in the
display.
New Block
3
Press
. The text is automatically formatted for the installed stamp: centered within
the preset message area with the tape length and margins automatically adjusted.
4
Press
5
After the stamp stencil film is cut off, remove the backing paper from the stamp stencil
film and affix it to the ink pad of a stamp film holder.
Mirror
Print
to engrave the stamp stencil film and automatically cut it off.
EXAMPLE
To cut a stamp:
1 Enter the text and insert a stamp film
cassette in the tape compartment.
Stamp
2 Hold down
Code
and press
U
ü
.
Alt
Caps
Length
Undl/Frm
A.Format
STAMP
FORMAT?
Width
New Block
3 Press
.
Alt
Caps
Length
Undl/Frm
A.Format
1: J . S m i t h
2: 1 2 3 4 M a i n S
_
Width
76
Mirror
4 Press
Alt
Print
to engrave the stamp stencil film, and then automatically cut off.
Length
Undl/Frm
A.Format
WORKING
Caps
Length
Undl/Frm
A.Format
COPIES
1/ 1
Alt
Caps
Width
Width
To affix a stamp:
5 Remove the stamp frame from around the stamp film holder ink pad, one side at a
time, then remove the protective seal covering the ink pad and the backing paper
from the stamp stencil film.
6 With the glossy side of the stamp stencil film upward, align one of its ends with the
slit on the side of the stamp film holder.
Glossy side
Tape end
Slit
7 Hold the end of the stamp stencil film in place with your thumb, then pass the tape
through the guides while pulling it tight.
Guides
77
8 Fold the other end of the stamp stencil film over the other side of the stamp film
holder and hold it in place with your finger.
Fold over
9 Fit the stamp frame over the stamp stencil film and push it into place.
0 Insert the stamp film holder straight into its cap.
☞
78
Be sure that the stamp is correctly covered in order to prevent ink spills.
LOCAL FORMAT FUNCTION
The Local format function allows you to emphasize a block of the text by printing it with a
font, size, width, style, underline or frame setting that is different from the rest of the text.
To use the Local format function:
1 Press
,
, Home or
to position the cursor in the block that will be given a
End
different format.
Local
2 Hold down Code and press S once. “BLOCK FORMAT” appears in the top row of the
display to indicate that the current text block will have the local format.
3 Select the desired font, size, width, style, underline or frame setting as described on
pages 82 to 91. The selected setting will only be applied to the text block containing the
cursor.
☞ Only the SQUARE and ROUND frame settings can be selected.
EXAMPLE
To select the SOLID style setting for part of the text:
1 Press
,
, Home or
to
End
position the cursor in the shelf number
block.
Length
Undl/Frm
A.Format
Alt
Caps
1: B 1
Width
Local
2 Hold down
Code
and press
S
once.
Alt
Caps
BLOCK
1: B 1
Width
Style
3 Hold down
Code
and press
$
4
Length
Undl/Frm
A.Format
FORMAT
once.
Alt
Caps
Length
Undl/Frm
A.Format
STYLE
NORMAL
Width
4 Keep
Code
held down and continue
Style
pressing
$
4
until the SOLID style set-
ting is displayed.
Alt
Caps
Length
Undl/Frm
A.Format
STYLE
SOLID
Width
5 Release
Code
.
79
FONT FUNCTION
With the Font function, you can choose one of eight fonts for your text.
The following font settings are available:
HELSINKI, BRUSSELS, BELGIUM, US, SAN DIEGO, FLORIDA, LOS ANGELES, and ISTANBUL
The default font setting is HELSINKI.
Refer to Reference at the end of this section for samples of the available settings.
To change the font setting:
Font
1
While holding down
, press
Code
!
1 ¡
once, and keep
Code
held down to display the
current font setting.
Font
2
While still holding down
Code
, continue pressing
!
1 ¡
until the desired font setting is
displayed.
3
Release
Code
to apply the selected font setting to the text.
EXAMPLE
To select the BRUSSELS font setting:
Font
1 While holding down
once, and keep
Code
Code
, press
!
1 ¡
held down.
Alt
Caps
Length
Undl/Frm
A.Format
FONT
HELSINKI
Width
2 While still holding down
Code
, con-
Font
tinue pressing
!
1 ¡
displayed.
until BRUSSELS is
Alt
Caps
Length
Undl/Frm
A.Format
FONT
BRUSSELS
Width
3 Release
80
Code
.
REFERENCE
Font setting
Font sample
HELSINKI
BRUSSELS
BELGIUM
US
SAN DIEGO
FLORIDA
LOS ANGELES
ISTANBUL
81
SIZE & WIDTH FUNCTIONS
The character size can be adjusted using both the Size and Width functions. Since the character size that can be used depends on the width of the tape, the following table shows the character sizes that can be used with each tape width.
Tape widths
Sizes (in points)
1/4” (6 mm)
6, 9, 12
3/8” (9 mm)
6, 9, 12, 18
1/2” (12 mm)
6, 9, 12, 18, 24
3/4” (18 mm)
6, 9, 12, 18, 24, 36
1” (24 mm)
6, 9, 12, 18, 24, 36, 48
The default size setting is AUTO and the default width setting is MEDIUM. The currently
selected size setting is always shown by the indicator above the display. In addition, all of the
size indicators light up when the AUTO setting is selected. When either the NARROW or
WIDE width setting is selected, the Width indicator lights up.
With the AUTO size setting, the machine compares your text with the width of the installed
tape and automatically adjusts the characters to the largest possible size. However, seven
other point sizes are also available and each can be printed in narrow or wide characters.
Refer to Reference at the end of this section for samples of the available settings.
☞ With the AUTO setting selected and 1” (24-mm)-wide tape installed, text consisting of
only capital letters will be printed with a character size of 60 point.
82
To change the size setting:
Size
1
While holding down
, press
Code
@
2
once, and keep
Code
held down to display the
current size setting.
Size
2
While still holding down
3
displayed and is shown by the size indicator.
☞ The current character size setting is also shown by the size indicators above the display.
Release Code to apply the selected size setting to the text.
Code
, continue pressing
@
2
until the desired size setting is
EXAMPLE
To select the 24 point size setting:
Size
1 While holding down
once, and keep
Code
Code
, press
@
2
held down.
Alt
Caps
Length
Undl/Frm
A.Format
SIZE
AUTO
Width
2 While still holding down
Code
, con-
Size
tinue pressing
@
2
until 24 is displayed.
Alt
Caps
Length
Undl/Frm
A.Format
SIZE
24
Width
3 Release
Code
.
83
To change the width setting:
Width
1
While holding down
, press
Code
#
3
once, and keep
Code
held down to display the
current width setting.
Width
2
While still holding down
3
displayed.
☞ The Width indicator lights up when either the NARROW or WIDE setting is
selected.
Release Code to apply the selected width setting to the text.
Code
, continue pressing
#
3
until the desired width setting is
EXAMPLE
To select the WIDE width setting:
1 While holding down
Code
, press
Width
#
3
once, and keep
Code
held
Alt
down.
Caps
Length
Undl/Frm
A.Format
WIDTH
MEDIUM
Width
2 While still holding down
Code
, con-
Width
tinue pressing
#
3
until WIDE is dis-
Alt
played.
Caps
Length
Undl/Frm
A.Format
WIDTH
WIDE
Width
3 Release
84
Code
.
REFERENCE
Size setting
(in pts)
Width
function
NARROW
Width function
MEDIUM
Width function WIDE
6
9
12
18
24
36
48
85
STYLE FUNCTION
You can choose from eleven different character styles to apply to your text.
☞ Characters printed using the smaller sizes may be difficult to read if certain style settings
(e.g., I+SHADOW) are selected.
The following style settings are available:
NORMAL
I+BOLD (italic & bold)
BOLD
I+OUTLINE (italic & outline)
OUTLINE
I+SOLID (italic & solid)
SOLID
I+SHADOW (italic & shadow)
SHADOW
VERTICAL
ITALIC
The default style setting is NORMAL. The style indicators at the bottom of the display shows
the current style setting when any setting other than NORMAL is selected.
Refer to Reference at the end of this section for samples of the available settings.
To change the style setting:
Style
1
While holding down
Code
, press
$
4
once, and keep
Code
held down to display the
current style setting.
Style
2
While still holding down
Code
, continue pressing
$
4
until the desired style setting is
displayed.
☞
3
The current style setting is shown by the style indicators at the bottom of the display.
Release
Code
to apply the selected style setting to the text.
EXAMPLE
To select the I+SHADOW style setting:
Style
1 While holding down
once, and keep
Code
Code
, press
$
4
held down.
Alt
Caps
Length
Undl/Frm
A.Format
STYLE
NORMAL
Width
86
2 While still holding down
Code
, con-
Style
tinue pressing
$
4
until I+SHADOW is
Alt
displayed.
Caps
Length
Undl/Frm
A.Format
STYLE
I+SHADOW
Width
3 Release
Code
.
REFERENCE
Font
setting
Style setting
NORMAL
BOLD
OUTLINE
SOLID
SHADOW
ITALIC
HELSINKI
BRUSSELS
BELGIUM
US
SAN DIEGO
FLORIDA
LOS
ANGELES
ISTANBUL
87
Font
setting
HELSINKI
BRUSSELS
BELGIUM
US
SAN DIEGO
FLORIDA
LOS
ANGELES
ISTANBUL
88
Style setting
I+BOLD
I+OUTLINE
I+SOLID
I+SHADOW
VERTICAL
UNDERLINE FUNCTION
You can add emphasis to your text by underlining it or striking it out.
The default underline setting is OFF. When the Underline function is set to ON or STRIKEOUT, the Undl/Frm indicator on the right side of the display lights up.
ON
STRIKEOUT
To change the underline setting:
Underline
1
While holding down
, press
Code
%
5
once, and keep
Code
held down to display the
current underline setting.
Underline
2
While still holding down
Code
, continue pressing
%
5
until the desired underline set-
ting is displayed.
The Undl/Frm indicator lights up when the ON or STRIKEOUT setting is selected.
☞
3
Release
Code
to apply the selected underline setting to the text.
EXAMPLE
To select the ON underline setting:
Underline
1 While holding down
once, and keep
Code
Code
, press
%
5
held down.
Alt
Caps
Length
Undl/Frm
A.Format
UNDERLINE
OFF
Width
2 While still holding down
Code
, con-
Underline
tinue pressing
%
5
until ON is dis-
Alt
played.
Caps
Length
Undl/Frm
A.Format
UNDERLINE
ON
Width
3 Release
Code
.
89
FRAME FUNCTION
With the Frame function, you can choose from various frames and highlights to make more
decorative or emphasized text.
The following frame settings are available:
OFF, SQUARE, ROUND, CANDY, POINTING, NAMEPLATE, DOG, MOVIE FILM, DINOSAUR, TELEPHONE, HANDS, WINDOW, BANNER, DOT, DIAMOND, and SLANT
The default frame setting is OFF; however, 15 other settings are also available. When any setting other than OFF is selected, the Undl/Frm indicator on the right side of the display lights
up.
Refer to Reference at the end of this section for samples of the available settings.
To change the frame setting:
Frame
1
While holding down
, press
Code
¢
6
once, and keep
Code
held down to display the
current frame setting.
Frame
2
While still holding down
, continue pressing
Code
¢
6
until the desired frame setting is
displayed.
☞ The Undl/Frm indicator lights up when any setting other than OFF is selected.
3
Release
Code
to apply the selected frame setting to the text.
EXAMPLE
To select the BANNER frame setting:
Frame
1 While holding down
once, and keep
Code
Code
, press
¢
6
held down.
Alt
Caps
Length
Undl/Frm
A.Format
FRAME
OFF
Width
2 While still holding down
Code
, con-
Frame
tinue pressing
¢
6
until BANNER is disAlt
played.
Caps
Length
Undl/Frm
A.Format
FRAME
BANNER
Width
3 Release
90
Code
.
REFERENCE
Frame
setting
Frame sample
Frame
setting
OFF
DINOSAUR
SQUARE
TELEPHONE
ROUND
HANDS
CANDY
WINDOW
POINTING
BANNER
NAMEPLATE
DOT
DOG
DIAMOND
MOVIE FILM
SLANT
Frame sample
91
TAPE MARGIN FUNCTION
The Tape margin function allows you to adjust the size of the margins on the left and right
sides of your text.
The default tape margin setting is FULL; however, three other settings are also available.
FULL (1” (25 mm) margins)
NONE (1/6” (4 mm) margins)
NARROW (1/3” (8 mm) margins)
MEDIUM (1/2” (12 mm) margins)
☞ When a setting other than FULL is selected, extra tape is fed out before printing starts.
The extra tape is cut off if the Auto cut function is set to ON so that the margins on each
side of the text are equal.
To change the tape margin setting:
Tape
1
While holding down
, press
Code
E
once, and keep
Code
held down to display the
current tape margin setting.
Tape
2
While still holding down
, continue pressing
Code
E
until the desired tape margin set-
ting is displayed.
3
Release
Code
to apply the selected tape margin setting to the entire text.
EXAMPLE
To select the MEDIUM tape margin setting:
Tape
1 While holding down
once, and keep
Code
Code
, press
E
held down.
Alt
Caps
Length
Undl/Frm
A.Format
FEED
FULL
Width
2 While still holding down
Code
, con-
Tape
tinue pressing
E
until MEDIUM is disAlt
played.
Caps
Length
Undl/Frm
A.Format
FEED
MEDIUM
Width
3 Release
92
Code
.
HORIZONTAL ALIGNMENT FUNCTION
You can choose to align lines of text in one of three ways. In addition, if the Length function
was used to set the length of the label, the text will align within the label according to the
selected horizontal alignment setting.
The default horizontal alignment setting is LEFT; however, two other settings are also available.
LEFT
CENTER
RIGHT
To change the horizontal alignment setting:
Align
1
While holding down
, press
Code
R
once, and keep
Code
held down to display the
current horizontal alignment setting.
Align
2
While still holding down
Code
, continue pressing
R
until the desired horizontal
alignment setting is displayed.
3
Release
Code
to apply the selected horizontal alignment setting to the entire text.
EXAMPLE
To select the RIGHT horizontal alignment setting:
Align
1 While holding down
once, and keep
Code
Code
, press
R
held down.
Alt
Caps
Length
Undl/Frm
A.Format
H.ALIGNMENT
LEFT
Width
2 While still holding down
Code
, con-
Align
tinue pressing
R
until RIGHT is disAlt
played.
Caps
Length
Undl/Frm
A.Format
H.ALIGNMENT
RIGHT
Width
3 Release
Code
.
93
MIRROR PRINTING FUNCTION
With this function, you can print your text so that the characters can be read from the adhesive
side of the tape. If mirror-printed labels are attached to glass or some other clear material, they
can be read correctly from the opposite side.
☞ When using the Mirror printing function, the text should be printed on clear tape.
The default mirror printing setting is OFF.
ON
To turn on or off the mirror printing setting:
Mirror
1
While holding down
, press
Code
Print
once, and keep
Code
held down to display
the current mirror printing setting.
Mirror
2
While still holding down
Code
, continue pressing
Print
until the desired mirror print-
ing setting is displayed.
3
Release
Code
to apply the selected mirror printing setting to the entire text.
EXAMPLE
To select the ON mirror printing setting:
1 While holding down
Code
, press
Mirror
Print
once, and keep
Code
held
down.
Alt
Caps
Length
Undl/Frm
A.Format
MIRROR
OFF
Width
2 While still holding down
Code
, con-
Mirror
tinue pressing
Print
played.
until ON is dis-
Alt
Caps
Length
Undl/Frm
A.Format
MIRROR
ON
Width
3 Release
94
Code
.
LENGTH FUNCTION
Although the length of the printed label automatically adjusts to fit the length of the entered
text, there may be times when you will want to make a label with a specific length. The Length
function allows you to set the label length between 1.6 and 11.8 inches (4.0 and 30.0 centimeters).
The default length setting is OFF. When the Length function is set to ON, the Length indicator
on the right side of the display lights up.
☞ Turning off the machine and turning it on again changes the length setting back to OFF.
To turn on or off the Length function:
Length
1
While holding down
Code
, press
T
once, and keep
Code
held down to display the
current length of the label (the text and both margins) briefly, and then display the current
label length setting (ON or OFF).
Length
2
While still holding down
Code
, continue pressing
T
until the desired label length set-
ting is displayed.
The Length indicator lights up when ON is selected.
☞
3
Release
4
Press Home or
length.
☞
Code
. If ON was selected, the current label length setting is displayed.
End
to select the desired length or use the number keys to enter the
To change the length in 1” (1.0-cm) steps, hold down either Home or End , and
then release the key when the desired setting is displayed.
Feed&Cut
The default setting (4” (10.0 cm)) can be selected by pressing Space .
To switch the unit of measurement between inches and centimeters, press M ñ
until the measurement is displayed in the desired unit.
New Block
5
Press
.
95
EXAMPLE
To select a label length of 6.0 inches:
Length
1 While holding down
Alt
Caps
Code
, press
T
Length
Undl/Frm
A.Format
LENGTH
3.1inch
once, and keep
Alt
Caps
Code
Code
Length
Undl/Frm
A.Format
LENGTH
OFF
Width
Width
2 While still holding down
held down.
, con-
Length
tinue pressing
T
until ON is disAlt
played.
Caps
Length
Undl/Frm
A.Format
LENGTH
ON
Width
3 Release
Code
.
Alt
Caps
Length
Undl/Frm
A.Format
LENGTH
4.0inch
Width
4 Press
Home
until 6.0 is displayed.
Alt
Caps
Length
Undl/Frm
A.Format
LENGTH
6.0inch
Width
New Block
5 Press
96
.
BARCODE FUNCTION
The Barcode function, which enables barcodes to be printed as part of labels, is one of this
machine’s most advanced features.
☞ This section will explain how to enter a barcode into your text. It is not intended as a
comprehensive introduction to the concept of barcoding. For more detailed information,
please consult one of the many reference books available.
Since this machine is not specifically designed for special barcode label-making, some
barcode readers may not be able to read the labels.
Print barcodes with black ink on a white background.
Four different parameters enable you to create custom barcodes.
PARAMETER
SETTINGS
PROTOCOL
CODE 39, I-2/5, EAN13, EAN8,
UPC-A, UPC-E, EAN128
WIDTH (barcode width)
LARGE, SMALL
UNDER#S (characters printed below barcode)
ON, OFF
CHECK DIG. (check digit)
OFF, ON
The default settings are CODE 39 PROTOCOL, LARGE WIDTH, UNDER#S set to ON, and
CHECK DIG. set to OFF.
☞ It is recommended that barcodes be printed with the Tape margin function set to FULL
and the barcode WIDTH parameter set to LARGE; otherwise, the barcodes may be difficult to read.
To use the Barcode function:
Barcode
1
Hold down
☞
Code
and press
I
í
once.
To change the data or parameters of a barcode that has already been created, position the cursor below the right half of the barcode mark ( ) before holding down
Barcode
and pressing
Code
I
í
.
A block can only contain one barcode. If a barcode has already been entered in the
Barcode
block when
Code
is held down and
I
í
is pressed, the error message “1 BAR-
CODE PER BLOCK!” appears.
To quit the Barcode function without making any changes, hold down
Code
and
Barcode
press
2
I
í
.
Type in the new barcode data or edit the old data.
97
To change the barcode parameter settings:
3
Press
☞
Home
.
Clear
To return to the barcode data without changing any parameter settings, press
4
Press
or
5
Press
6
Repeat steps 4 and 5 until all parameters are set as you wish.
7
Press
or
Home
Del
.
until the parameter that you wish to change appears.
until the desired setting is displayed.
End
New Block
.
To add a special character to the barcode data:
8
Press
or
until the cursor is below the character immediately to the right of
where you wish to add the special character.
9
Hold down
0
Press
Symbol
☞
Home
and press
Code
or
End
Alt
.
until the desired special character is displayed.
The following special characters can only be entered when using protocol CODE
39.
SYMBOL
SPECIAL
CHARACTER
1
+
2
$
The following special characters can only be entered when using protocol EAN
128.
98
VALUE
SPECIAL
CHARACTER
VALUE
SPECIAL
CHARACTER
VALUE
SPECIAL
CHARACTER
3
#
69
ENQ
87
ETB
4
$
70
ACK
88
CAN
11
+
71
BEL
89
EM
28
<
72
BS
90
SUB
29
=
73
HT
91
ESC
30
>
74
LF
91
{
32
@
75
VT
92
FS
VALUE
SPECIAL
CHARACTER
VALUE
SPECIAL
CHARACTER
VALUE
SPECIAL
CHARACTER
59
[
76
FF
92
|
60
\
77
CR
93
GS
61
]
78
SO
93
}
62
^
79
SI
94
RS
63
_
80
DLE
94
~
64
NUL
81
DC1
95
US
64
`
82
DC2
95
DEL
65
SOH
83
DC3
96
FNC 3
66
STX
84
DC4
97
FNC 2
67
ETX
85
NAK
100
FNC 4
68
EOT
86
SYN
102
FNC1
New Block
A
Press
to add the selected special character to the barcode data.
To add the barcode to your text:
New Block
B
Press
.
EXAMPLE
To add a barcode to the label:
Barcode
1 Hold down
Code
and press
I
í
once.
Alt
CODE
Length
Undl/Frm
A.Format
39
Caps
Width
99
2 Press
Home
.
Alt
Caps
Length
Undl/Frm
A.Format
PROTOCOL
CODE 39
Width
3 Press
or
until the CHECK
DIG. parameter is displayed.
Alt
Caps
CHECK
OFF
Length
Undl/Frm
A.Format
DIG.
Width
4 Press
Home
or
End
until ON is dis-
played.
Alt
Caps
CHECK
ON
Length
Undl/Frm
A.Format
DIG.
Width
New Block
5 Press
.
Alt
CODE
Length
Undl/Frm
A.Format
39
Caps
Width
Font
6 Press
!
1 ¡
Size
,
@
2
Width
,
#
3
Style
then
$
4
.
Alt
Caps
Width
New Block
7 Press
100
Length
Undl/Frm
A.Format
CODE 39
1234A
.
AUTO CUT FUNCTION
The Auto cut function allows you to set whether or not the machine will automatically cut off
each label after it is printed. Turn on the Auto cut function before starting to print in order to
cut off the labels automatically after printing them.
☞
After printing a label with the Auto cut function set to OFF, hold down
Code
and press
Feed&Cut
Space
once to feed the tape and cut it.
When a tape margin setting other than FULL is selected, extra tape is fed out before
printing starts. The extra tape is cut off if the Auto cut function is set to ON so that the
margins on each side of the text are equal.
To turn on or off the Auto cut function:
A.Cut
1
While holding down
, press
Code
Z
once, and keep
Code
held down to display the
current auto cut setting.
A.Cut
2
While still holding down
Code
, continue pressing
Z
until the desired auto cut setting
is displayed.
3
Release
Code
to apply the selected auto cut setting.
EXAMPLE
To turn on the Auto cut function:
A.Cut
1 While holding down
once, and keep
Code
Code
, press
Z
held down.
Alt
Caps
AUTO
OFF
Length
Undl/Frm
A.Format
CUT
Width
2 While still holding down
Code
, con-
A.Cut
tinue pressing
Z
until ON is disAlt
played.
Caps
AUTO
ON
Length
Undl/Frm
A.Format
CUT
Width
3 Release
Code
.
101
PRINT KEY AND FEED & CUT FUNCTION
After you have entered your text and chosen the desired format settings, you are ready to print
the label.
The Feed & Cut function is used to feed out 1” (25 mm) of tape and automatically cut it off, for
example after printing with the Auto cut function set to OFF or when printing has been interrupted.
To print a label:
Mirror
●
Press
Print
once. The message “WORKING” appears just before printing, and then
“COPIES 1/ 1” is displayed while the label is being printed.
☞ If the Auto cut function is set to ON, the label will automatically be cut off after it is
printed.
To feed and cut off 1” (25 mm) of tape:
●
Hold down
Code
and press
Feed&Cut
Space
once. The message “FEED” appears while 1” (25
mm) of tape is fed out, then automatically cut off.
EXAMPLE
To print a label and cut it off:
Mirror
● Press
Alt
Print
once.
Length
Undl/Frm
A.Format
WORKING
Caps
Width
102
Alt
Caps
Length
Undl/Frm
A.Format
COPIES
1/ 1
Width
NUMBERING FUNCTION
This function can be used to print many copies of the same text while increasing certain characters (letters, numbers or barcode data) after each label is printed. This type of automatic
incrementation is very useful when printing serial number labels, production control labels or
other labels requiring ascending codes.
Letters and numbers increase as shown below:
0
➔ 1
➔ ...9
➔ 0
➔ ...
A
➔ B
➔ ...Z
➔ A
➔ ...
a
➔ b
➔ ...z
➔ a
➔ ...
A0 ➔ A1 ➔ ...A9 ➔ B0 ➔ ...
Spaces (shown as underlines “_” in the examples below) can be used to adjust the space
between characters or to control the number of digits that are printed:
_9 ➔ 10 ➔ ...99 ➔ _0 ➔ ...
_Z ➔ AA ➔ ...ZZ ➔ _A ➔ ...
1_9 ➔ 2_0 ➔ ...9_9 ➔ __0 ➔ ...
☞ Only one numbering field can be selected from any text.
If you include a non-alphanumeric character such as a symbol in the numbering field,
only the letters and numbers in the numbering field will be increased when the labels
are printed, or just one label will be printed if the field only contains a non-alphanumeric character.
To use the Numbering function:
Number
1
Hold down
☞
Code
and press
P
á
. The message “SET START PT” appears in the display.
To quit the Numbering function without printing, hold down
Code
and press
Number
P
á
.
Clear
To return to the previous screen, press
2
Press
,
,
or
numbering field is flashing.
3
Press
Home
End
Del
.
until the first character that you wish to select for the
New Block
☞
. The message “SET END PT” appears in the display.
If a barcode was selected, “# INCREASES” appears in the display instead. Skip to
step 6 to continue printing with the Numbering function.
4
Press
or
until all of the characters that you wish to select for the numbering
field are flashing.
☞ A barcode cannot be selected together with other characters.
5
Press
6
Type in the desired number or press
displayed.
New Block
. “# INCREASES” appears in the display.
Home
or
End
until the desired number of copies is
103
Mirror
7
Press
Print
New Block
(or
) to begin printing. The message “WORKING” appears just before
printing, and then “COPIES” followed by the number of the label being printed is displayed.
☞ If the Auto cut function is set to ON, the labels will automatically be cut off after
they are printed.
EXAMPLE
To print three door labels for studios 1, 2 and 3:
Number
1 Hold down
Code
and press
P
á
.
Alt
Caps
SET START
1: S T U D I O 1
Length
Undl/Frm
A.Format
PT
Width
2 Press
until “1” is flashing.
Alt
Caps
SET START
1: S T U D I O 1
Length
Undl/Frm
A.Format
PT
Width
New Block
3 Press
.
Alt
Caps
SET END
1: S T U D I O
Length
Undl/Frm
A.Format
PT
1
Width
New Block
4 Press
.
Alt
#
Caps
Length
Undl/Frm
A.Format
INCREASES
1
Width
Width
5 Press
#
3
.
Alt
Caps
#
Length
Undl/Frm
A.Format
INCREASES
3
Width
104
Mirror
6 Press
Alt
Print
New Block
(or
).
Length
Undl/Frm
A.Format
WORKING
Caps
Alt
Caps
Width
Alt
Caps
Width
Length
Undl/Frm
A.Format
COPIES
2/ 3
Width
Length
Undl/Frm
A.Format
COPIES
1/ 3
Alt
Caps
Length
Undl/Frm
A.Format
COPIES
3/ 3
Width
105
REPEAT PRINTING FUNCTION
This function allows you to print multiple copies of the same text.
To use the Repeat printing function:
Repeat
1
Hold down
☞
Code
and press
O
ó
. “COPIES” appears in the display.
To quit the Repeat printing function without printing, hold down
O
(or press just
ó
Del
and press
).
2
Type in the desired number or press
displayed.
3
Press
Mirror
Print
Code
Clear
Repeat
or
Home
End
until the desired number of copies is
New Block
(or
) to begin printing. The message “WORKING” appears just before
printing, and then “COPIES” followed by the number of the label being printed is displayed.
☞ If the Auto cut function is set to ON, the labels will automatically be cut off after
they are printed.
EXAMPLE
To print three copies of a label:
Repeat
1 Hold down
Code
and press
O
ó
.
Alt
Caps
Length
Undl/Frm
A.Format
COPIES
1
Width
Width
2 Press
#
3
.
Alt
Caps
Length
Undl/Frm
A.Format
COPIES
3
Width
106
Mirror
3 Press
Alt
Print
New Block
(or
).
Length
Undl/Frm
A.Format
WORKING
Caps
Alt
Caps
Width
Alt
Caps
Width
Length
Undl/Frm
A.Format
COPIES
2/ 3
Width
Length
Undl/Frm
A.Format
COPIES
1/ 3
Alt
Caps
Length
Undl/Frm
A.Format
COPIES
3/ 3
Width
107
MEMORY FUNCTIONS
You can use the memory to store your most frequently used text files. The text remains in the
memory, even after all characters are removed from the display using the Clear function (see
page 59).
When each file is stored, it is given a number to make recalling it easier. Up to 100 text files or
about 2500 characters can be stored in the memory.
Since a copy of the stored text file is recalled when the Recall function is used, the text can be
edited or printed without changing the originally stored file. When a file is no longer needed or
more space is necessary, the Memory delete function can be used to delete it.
☞ When inserting new batteries, be sure to insert the new ones within five minutes of
removing the old ones, otherwise any text files stored in the memory will be lost (unless
the machine is plugged into an electrical outlet with the AC adaptor).
STORING TEXT
To store a text file:
Store
1
Hold down
☞
Code
and press
&
7
. “STORE” appears in the display.
If 2500 characters have already been stored, the error message “MEMORY FULL!”
appears in the display. If this occurs, an existing text file must be deleted before the
new one can be stored.
To quit the Store function without storing the text, hold down
Store
(or press just
&
7
2
Press
Code
and press
Clear
or
Home
End
Del
).
until the file number where you wish to store the text is displayed.
New Block
3
Press
. The text is stored under the selected file number and the text previously
shown in the display re-appears.
☞
If a file is already stored under the selected file number, the message “OVERWRITE?” appears in the display and you must decide whether or not to overwrite it
(delete it from the memory and store the new one).
To overwrite the stored file with the new one:
New Block
4
Press
number.
☞
to delete the previously stored file and store the new one under the selected
To go back and choose another file number without overwriting the text file, press
Clear
Del
108
, and then select a different file number.
RECALLING TEXT
To recall a text file:
Recall
1
Hold down
Code
and press
*8
. The file number and the beginning of the most
recently stored or recalled text are displayed.
☞
Recall
To quit the Recall function without recalling text, hold down
Code
and press
*8
Clear
(or press just
2
Press
☞
Home
or
End
Del
).
until the file number and text that you wish to recall are displayed.
To see other parts of the displayed text file, press
or
.
New Block
3
Press
. Any text previously entered in the display is erased and the text stored under
the selected file number is recalled into the display.
DELETING A FILE
To delete a text file:
M.Del
1
Hold down
Code
and press
(
9
. The file number and the beginning of the most
recently stored or recalled text are displayed.
☞
To quit the Memory delete function without deleting the text file, hold down
M.Del
and press
2
Press
☞
Home
or
(
9
End
Code
Clear
(or press just
Del
).
until the file number and text that you wish to delete are displayed.
To see other parts of the selected text file, press
or
.
New Block
3
Press
. The message “OK TO CLEAR?” is displayed.
New Block
4
Press
to delete the selected text file.
109
EXAMPLE
To store text under file number 8:
Store
1 Hold down
Code
and press
&
7
.
Alt
Caps
Length
Undl/Frm
A.Format
STORE
[0]
Width
2 Press
Home
or
End
until 8 is displayed.
Alt
Caps
New Block
3 Press
Length
Undl/Frm
A.Format
STORE
[8]
.
Width
To recall the text from file number 4:
Recall
1 Hold down
Code
and press *8
.
Alt
Caps
Length
Undl/Frm
A.Format
RECALL
[8]J. Smith
Width
2 Press
Home
or
End
until 4 is displayed.
Alt
Caps
Length
Undl/Frm
A.Format
RECALL
[4]NO SMOKIN
Width
New Block
3 Press
.
Length
Undl/Frm
A.Format
Alt
Caps
1: N
_O
SMOKING
Width
110
To delete the text stored under file number 8:
M.Del
1 Hold down
Code
and press
(
9
.
Alt
Caps
CLEAR
[4]NO
Length
Undl/Frm
A.Format
SMOKIN
Width
2 Press
Home
or
End
until 8 is displayed.
Alt
Caps
CLEAR
[8]J.
Length
Undl/Frm
A.Format
Smith
Width
New Block
3 Press
.
Alt
Caps
Length
Undl/Frm
A.Format
OK TO
CLEAR?
Width
New Block
4 Press
.
111
TROUBLESHOOTING
Problem
Solution
1. The display stays blank after you have
turned on the machine.
• Check that the AC adaptor is connected
correctly.
• If you are using alkaline batteries, check
that they are correctly inserted.
• If the batteries are low, replace them
with new ones.
2. The machine does not print or the printed
characters are blurred.
• Check that the tape cassette has been
inserted properly.
• If the tape cassette is empty, replace it
with a new one.
• Make sure that the tape compartment
cover has been closed.
• Ensure the correct Brother AC adapter is
used-other adapters cannot supply
enough current for printing.
3. The text files that you stored in the memory are no longer there.
• If the batteries are low, replace them
with new ones.
4. The printed characters are not formed
properly.
• If you are using alkaline batteries, they
may be low. Try using the AC adaptor or
replace the batteries with new ones.
• Ensure the correct Brother AC adapter is
used-other adapters cannot supply
enough current for printing.
5. A blank horizontal line appears through
the printed label.
• Clean the print head as explained on
page 25.
6. Striped tape appears.
• If you have reached the end of the tape,
replace the tape cassette with a new one.
7. The machine has “locked up” (i.e., nothing happens when a key is pressed).
• Turn off the machine, and then while
Align
holding down
Code
and
R
, turn the
machine back on. The text and formats
in the display and all text files stored in
the memory are erased.
112
ERROR MESSAGE LIST
Error Message
7 LINE
LIMIT!
Cause
Solution
• This message appears if
seven lines already exist
• Limit the number of lines in a
block to seven.
New Block
when you press
, or
you delete
to join two
blocks, causing the block to
exceed seven lines.
1 BARCODE
PER BLOCK!
• This message appears if a
barcode has already been
added to the block when
you hold down
Code
• Limit the number of barcodes
in a block to one.
and
Barcode
press
I
í
.
4 DIGIT
MIN.!
• This message appears when
less than the minimum four
digits are entered as barcode
data.
• Enter the minimum of four
5 BLOCK
LIMIT!
• This message appears if five
blocks already exist when
• Limit the number of blocks in
the text to five.
you hold down
Code
New Block
digits before pressing
.
and
New Block
press
.
BATTERIES
WEAK!
• This message appears when
the installed alkaline batteries become weak.
• Replace the batteries or use
the AC adaptor.
BUFFER
EMPTY!
• This message appears if you
• Enter some text before starting the function.
hold down
Code
and press
Length
T
, but no text has been
entered in the display.
• This message appears if you
try to print, but no text has
been entered.
• Enter text before printing.
113
Error Message
Cause
Solution
• This message appears if you
try to enter a character, symbol, barcode, space, return,
new block, or tab after 255
characters have already been
entered.
• Delete some existing text so
that more text can be
entered.
• This message appears if you
try to enter a character, symbol, barcode, or space in a
layout field while using the
Auto format function after
255 characters have already
been entered.
• Edit the text so that it only
contains the preset number
of characters.
CASSETTE
CHANGED!
• This message appears if the
tape cassette is changed
between the moment that the
data begins to be received
until the moment that the
print command is received.
• Cancel the print job, install
the correct tape cassette, and
then try printing again.
CHANGE
ADAPTOR!
• This message appears if a
high-voltage adaptor is
being used.
• Remove the high-voltage
adaptor and connect the
adaptor designed exclusively for this machine.
CUTTER
ERROR!
• This message appears if the
tape cutter is closed when
you try to print or feed the
tape.
• Turn the machine off, then on
again.
INPUT
WHOLE CODE!
• This message appears if the
set number of digits is not
entered in the barcode data.
• Input the correct number of
digits or change the number
of digits set in the barcode
parameters.
BUFFER
FULL!
114
Error Message
Cause
Solution
• This message appears if an
error occurs while data is
being sent from the computer
to the P-touch.
• Cancel the print job, and
then try printing again.
• This message appears if you
try to print when the baud
rates of the computer and the
P-touch are not the same.
• Cancel the print job, and
then select the same baud
rate for both the computer
and the P-touch.
• This message appears if the
text is longer than 3’ 3 1/3” (1
meter) when you try to print.
• Shorten the text to less than
3’ 3 1/3” (1 meter) before trying to print.
• This message appears if the
Length function is used to set
a label length that is less than
1.6 inches (4.0 cm) or more
than 11.8 inches (30.0 cm).
• Set the label length between
1.6 inches (4.0 cm) and 11.8
inches (30.0 cm).
• This message appears if the
Tab Length function is used
to set a tab length that is
more than 11.8 inches (30.0
cm).
• Set the tab length so that it is
less than 11.8 inches (30.0
cm).
LINE
LIMIT!
• This message appears if the
number of lines in the text is
greater than the maximum
number of lines possible for
the installed tape.
• Reduce the number of lines
or install a tape of greater
width.
MEMORY
FULL!
• This message appears if you
try to store a text file after
2500 characters have already
been stored in the memory.
• Delete an unwanted file to
make room for the new one.
NO
FILES!
• This message appears if you
try to recall or delete a text
file from the memory when
none are stored.
• Store a text file first.
INTERFACE
ERROR!
LENGTH
LIMIT!
115
Error Message
NO
TAPE!
Cause
Solution
• This message appears if you
hold down
Code
and press
• Install a tape cassette and try
again.
Length
T
or try to print a label or
feed the tape when no tape
cassette is installed.
REPLACE
BATTERIES!
• This message appears if the
installed alkaline batteries
are about to run out.
• Replace the batteries or use
the AC adaptor.
ROM
PROBLEM!
• This message appears if there
is a problem with the
machine’s read only memory.
• Contact your service representative.
SET 1” TAPE!
• This message appears if a 1”
(24-mm)-wide tape cassette
is not installed when a layout
for 1” (24-mm)-wide tape is
selected.
• Install a 1” (24-mm)-wide
tape cassette.
• This message appears if a
3/4” (18-mm)-wide tape cassette is not installed when a
layout for 3/4” (18-mm)-wide
tape is selected.
• Install a 3/4” (18-mm)-wide
tape cassette.
• This message appears if a
1/2” (12-mm)-wide tape cassette is not installed when a
layout for 1/2” (12-mm)-wide
tape is selected.
• Install a 1/2” (12-mm)-wide
tape cassette.
• This message appears if a
3/8” (9-mm)-wide tape cassette is not installed when a
layout for 3/8” (9-mm)-wide
tape is selected.
• Install a 3/8” (9-mm)-wide
tape cassette.
SET 24mm
TAPE!
SET 3/4”
TAPE!
SET 18mm
TAPE!
SET 1/2”
TAPE!
SET 12mm
TAPE!
SET 3/8”
TAPE!
SET 9mm
TAPE!
116
Error Message
Cause
Solution
• This message appears if a
1/4” (6-mm)-wide tape cassette is not installed when a
layout for 1/4” (6-mm)-wide
tape is selected.
• Install a 1/4” (6-mm)-wide
tape cassette.
SYSTEM
ERROR!
• This message appears if there
is a problem with the
machine’s software.
• Contact your service representative.
TAB
LIMIT!
• This message appears if 50
tabs have already been added
to the text when you hold
• Limit the number of tabs in
the text to 50.
SET 1/4”
TAPE!
SET 6mm
TAPE!
Tab
down
Code
and press
Q
.
TEXT
TOO HIGH!
• This message appears if the
size of the text is larger than
the width of the installed
tape.
• Reduce the size of the characters or install a wider tape.
TEXT
TOO LONG!
• This message appears if the
length of the text is longer
than the label length that has
been set using the Length
function.
• Delete some of the text,
reduce the character width,
or increase the set label
length.
• This message appears if you
try to enter text that is longer
than the preset length of a
layout field of the Auto format function.
• Delete some of the text.
<Service Center Locations>
* If you need a local service center, please call 1-800-284-HELP (4357) to locate the authorized service center closest to you.
<Operational Assistance>
* For technical and operational assistance, you may call Brother Customer Service at:
1-877-4-P-TOUCH (voice), or 1-901-379-1210 (fax).
117
SPECIFICATIONS
HARDWARE
Input device:
Keyboard - 51 keys
LCD:
7 × 5 dots
12 characters × 2 lines
17 indicators
Print tape:
Pressure-sensitive, adhesive-based
8-m long
Five widths available:
1/4” (6 mm)
3/8” (9 mm)
1/2” (12 mm)
3/4” (18 mm)
1” (24 mm)
Power supply:
Eight AA alkaline batteries (AM3, LR6) or optional AC adaptor
Auto power-off if no key is pressed for 5 minutes
Print head:
128 dot / 180 dpi
Dimensions:
7 25/64” (188 mm) (W) × 9 13/64” (234 mm) (D) × 2 35/64” (67 mm) (H)
Weight:
2 lbs (900 g) (without a tape cassette and batteries installed)
SOFTWARE
Buffer size:
Maximum 255 characters
Maximum seven lines
Memory size:
2500 characters
Character size:
Seven sizes (6, 9, 12, 18, 24, 36, and 48 points) + 60 point (Capital letters)
All are available in medium, narrow, and wide widths
Print styles:
Normal, Bold, Outline, Solid, Shadow
(each can be combined with Italic), and Vertical
118
ACCESSORIES
●
Supplies
Obtain tape cassettes from your nearest authorized dealer.
Use only Brother TZ tapes with this machine. Brother cannot be held responsible for
trouble caused by the use of unauthorized supplies. Do not use tapes that do not have the
mark.
Stock No.
Description
QTY/PACK
AGE
PRICE
1
1
1
1
1
1
1
$23.99
$23.99
$23.99
$23.99
$23.99
$26.99
$26.99
1
1
1
1
1
1
1
1
1
1
1
1
1
1
1
1
1
$20.99
$20.99
$20.99
$20.99
$20.99
$24.99
$23.99
$20.99
$20.99
$23.99
$20.99
$20.99
$24.99
$20.99
$23.99
$23.99
$23.99
1
1
1
1
$16.99
$17.99
$17.99
$20.99
1” (24mm)-wide laminated tapes
TZ-151
TZ-251
TZ-451
TZ-651
TZ-252
TZ-354
TZ-355
Black characters on clear adhesive
Black characters on white adhesive
Black characters on red adhesive
Black characters on yellow adhesive
Red characters on white adhesive
Gold characters on black adhesive
White characters on black adhesive
3/4” (18mm)-wide laminated tapes
TZ-141
TZ-145
TZ-241
TZ-242
TZ-243
TZ-344
TZ-345
TZ-441
TZ-541
TZ-545
TZ-641
TZ-741
TZ-B41
TZ-M41
TZ-WB41
TZ-WT41
TZ-WS41
Black characters on clear adhesive
White characters on clear adhesive
Black characters on white adhesive
Red characters on white adhesive
Blue characters on white adhesive
Gold characters on black adhesive
White characters on black adhesive
Black characters on red adhesive
Black characters on blue adhesive
White characters on blue adhesive
Black characters on yellow adhesive
Black characters on green adhesive
Black characters on fluorescent orange adhesive
Black characters on clear (matte) adhesive
Black characters on Bugs Bunny adhesive
Black characters on Taz adhesive
Black characters on Tweety & Sylvester adhesive
1/2” (12mm)-wide laminated tapes
TZ-131
TZ-231
TZ-232
TZ-335
Black characters on clear adhesive
Black characters on white adhesive
Red characters on white adhesive
White characters on black adhesive
119
Stock No.
Description
QTY/PACK
AGE
PRICE
1
1
1
1
$14.99
$16.99
$18.99
$16.99
1
1
1
$12.99
$14.99
$17.99
3/8” (9mm)-wide laminated tapes
TZ-121
TZ-221
TZ-325
TZ-421
Black characters on clear adhesive
Black characters on white adhesive
White characters on black adhesive
Black characters on red adhesive
1/4” (6mm)-wide laminated tapes
TZ-111
TZ-211
TZ-315
Black characters on clear adhesive
Black characters on white adhesive
White characters on black adhesive
Special tapes
Stock No.
Description
QTY/PACK
AGE
PRICE
TZ-SE4
TZ-FA3
Black characters on 3/4” (18 mm) security adhesive
Blue characters on 1/2” (12 mm) fabric adhesive
1
1
$29.99
$24.99
Stock No.
Description
QTY/PACK
AGE
PRICE
SK-LB
SK-MB
SH-LB
SH-MB
Stamp-making kit for Large stamp with black ink
Stamp-making kit for Medium stamp with black ink
Additional stamper for Large stamp with black ink
Additional stamper for Medium stamp with black ink
1
1
1
1
$39.99
$37.99
$27.99
$24.99
Stamp kit
Options
Stock No.
AD-60
6999
Description
QTY/PACK
AGE
PRICE
1
1
$24.99
$24.99
AC Adaptor
Protective carrying case
* For purchasing accessorises on the Internet, please visit our website:
http: //www.brothermall.com
120
P-TOUCH ACCESSORY ORDER FORM
Dear Customer:
This order form is provided for your convenience should your retailer not stock the item(s)
needed. To order by mail, send this completed form along with proper payment to the address
below OR credit card holders: Call toll-free 1-888-879-3232, fax completed order form to 1800-947-1445, or visit our web site at http://www.brothermall.com. Please refer to the Accessories listing in your User’s Guide for stock no. and price.
Stock No.
Description
Price
Quantity
Total
Subtotal
Name:
Accessory Subtotal:
Address:
AZ, CA, CO, CT, FL, GA, IL, LA,
MA, MD, MI, MN, MO, NC, NJ,
NV, NY, OH, PA, TN, TX, VA, WA
residents add applicable sales tax $
City:
State/Zip:
$
Daytime Phone:
Shipping/Handing Options
SEND ORDER FORM TO:
Please choose one:
Brother International Corp.
Attn: Consumer Accessory Div.
P.O. Box 341332
Bartlett, TN38184-1332
• Standard ($5.00)
• 2nd day air freight ($8.75) Mandatory for all
deliveries outside of the continental U.S.
(Alaska, Hawaii, Puerto Rico, Virgin Islands
& Canada)
• All other overseas orders ($25.00) $
TOTAL DUE (US dollars)
$
Method of payment (Check one)
(
) Visa (
) MasterCard (
) Discover (
) American Express (
) Check/Money Order
Account Number
✂
Expiration Date
Signature
* Prices subject to change without notice.
GUIA DE
INSTRUCCIONES
INTRODUCCIÓN
Gracias por adquirir el P-touch 2400/2410!
Su nuevo P-touch le permitirá diseñar y crear etiquetas y sellos para cualquier tipo de
aplicación. Su versatilidad le permitirá crear etiquetas personales seleccionando distintos
diseños de marcos y muchos tamaños y estilos de caracteres. Además, los cinco diferentes
anchos de cinta (1/4” (6 mm), 3/8” (9 mm), 1/2” (12 mm), 3/4” (18 mm) y 1” (24 mm)) y la
variedad de los colores de la cintas le hará posible imprimir etiquetas personales, útiles para
relleno con código de colores. Con la función de sellos, podrá hacer membretes con facilidad
y rapidez para soportes de membretes entintados reutilizables.
Ya no hay por qué preocuparse por tareas urgentes que requieren impresión profesional. En la
oficina, la fábrica, el laboratorio, o en casa, la calidad y el rendimiento de la P-touch
2400/2410 la convierten en una máquina muy práctica.
Para terminar, puesto que esta guía del usuario le será de gran utilidad, le aconsejamos que la
guarde en un lugar accesible para poder consultar en cualquier momento.
(Los modelos PT-2400 y PT-2410 disponen de las mismas funciones. Sin embargo, solamente
el modelo PT-2410 dispone de estuche de transporte y adaptador de CA.)
AVISO DE LA FCC
Este equipo ha sido probado y cumple con los límites de un aparato digital de la Clase B,
siguiendo el apartado 15 de las normas de la FCC. Estos límites están pensados para proporcionar una protección razonable contra interferencias nocivas dentro de una instalación residencial. Este equipo podría interferir de forma nociva con comunicaciones por
radio si no se instala y utiliza siguiendo las instrucciones. No obstante, no existe ninguna
garantía de que no vayan a suceder interferencias en una instalación concreta. Si este
equipo causara interferencias nocivas con la recepción de radio o televisión, lo cual
puede determinarse poniendo el equipo en ON u OFF, se recomienda que el usuario
intente corregir dichas interferencias mediante una de las siguientes medidas:
- Reoriente o ponga la antena receptora en otro lugar.
- Aumente la separación entre el equipo y el receptor.
- Conecte el equipo en una toma de un circuito diferente de la que esté conectada el
receptor.
- Consulte a su distribuidor o a un técnico experimentado de radio/televisión.
A continuación se indican los números de patente y de publicación de patente relacionados con este producto:
USP4839742
USP4927278
USP4976558
USP4983058
USP5009530
USP5069557
USP5120147
Use solamente el adaptador diseñado exclusivamente para esta máquina. Vea PRECAUCIONES
GENERALES en la página 1.
ÍNDICES
GUIA DE INSTRUCCIONES
PRECAUCIONES GENERALES ............................................................................. 1
PILAS .................................................................................................................. 2
ADAPTADOR DE CA OPCIONAL....................................................................... 3
CONEXIÓN DE LA P-TOUCH A UNA PC........................................................... 4
INSTALACIÓN DEL P-TOUCH EDITOR.............................................................. 5
UTILIZACIÓN DEL-P-TOUCH EDITOR ............................................................ 12
DISEÑO DE UNA COMPOSICIÓN DE FORMATO AUTOMÁTICO.................. 14
IMPORTACIÓN DE UN ARCHIVO DE GRÁFICOS ........................................... 17
LECTURA DE LA GUÍA DE USUARIO............................................................... 18
CASETES DE CINTA .......................................................................................... 20
COLOCACIÓN DE ETIQUETAS ........................................................................ 21
CABEZAL DE IMPRESIÓN Y RODILLOS ........................................................... 22
TECLA DEL CURSOR ........................................................................................ 23
TECLAS CODE, ALT Y SHIFT ............................................................................ 25
TECLA DE RETORNO ....................................................................................... 26
FUNCIÓN DE NUEVO BLOQUE ...................................................................... 27
TABULACIÓN................................................................................................... 28
TECLA DE BORRADO (DEL) ............................................................................. 29
FUNCIÓN DE BORRADO DE LÍNEA (LINE OUT) ............................................. 30
FUNCIÓN DE REPOSICIÓN (CLEAR)................................................................ 30
FUNCIÓN DE ACENTOS .................................................................................. 31
FUNCIÓN DE SÍMBOLOS ................................................................................ 32
FUNCIÓN DE FORMATO AUTOMÁTICO ....................................................... 33
FUNCIÓN DE CREACION DE SELLOS.............................................................. 38
FUNCIÓN DE FORMATO LOCAL .................................................................... 39
FUNCIÓN DEL TIPO DE CARACTERES ............................................................ 39
FUNCIONES DE TAMAÑO Y DE ANCHURA ................................................... 41
FUNCIÓN DE ESTILO ....................................................................................... 43
FUNCIÓN DE SUBRAYADO ............................................................................ 44
FUNCIÓN DE MARCOS ................................................................................... 45
FUNCIÓN DE MARGENES ............................................................................... 47
FUNCIÓN DE LA ALINEACIÓN HORIZONTAL ............................................... 48
FUNCIÓN DE IMPRESIÓN EN MODO ESPEJO................................................. 49
I
FUNCIÓN DE LONGITUD ............................................................................... 50
FUNCIÓN DE CÓDIGO DE BARRAS ............................................................... 51
FUNCIÓN DE CORTE AUTOMÁTICO.............................................................. 54
TECLA DE IMPRESIÓN & FUNCIÓN DE AVANCE Y CORTE ............................ 55
FUNCIÓN DE NUMERACIÓN .......................................................................... 56
FUNCIÓN DE IMPRESIÓN REPETIDA .............................................................. 57
FUNCIONES DE LA MEMORIA......................................................................... 58
SOLUCIÓN DE PROBLEMAS ............................................................................ 60
LISTA DE MENSAJES DE ERROR ....................................................................... 61
ESPECIFICACIONES .......................................................................................... 67
ACCESORIOS.................................................................................................... 68
II
PRECAUCIONES GENERALES
• Con esta máquina emplee sólo cintas TZ Brother. No emplee cintas que no tengan la
marca
.
• No tire de la cinta que se alimenta desde el P-touch. Podría dañar el casete de cinta.
• No utilice la máquina en lugares polvorientos, y manténgala alejada de la luz solar directa
y la lluvia.
• No exponga la máquina a altas temperaturas ni humedad. No la deje nunca en el tablero
de instrumentos ni en la parte trasera de su automóvil.
• No deje nada que sea de goma o vinilo encima de la máquina durante períodos prolongados. Podría producir manchas.
• No limpie la máquina con alcohol ni con otros solventes orgánicos. Emplee solamente un
paño suave y seco.
• No ponga ningún objeto encima ni dentro de la máquina.
• Para evitar daños, no toque el borde de la cuchilla.
• Emplee sólo el adaptador de CA (modelo AD-60) exclusivamente diseñado para esta
máquina. El empleo de otro cancelaría la garantía.
• No intente desmontar el adaptador de CA.
• Cuando la máquina no se utilice durante períodos prolongados de tiempo y no sea necesario conservar los archivos de texto en la memoria, desenchufe el adaptador de CA, y saque
las pilas para evitar fugas de las mismas que podrían ser causa de daños en la máquina.
• Si desenchufa el adaptador de CA y no hay baterías instaladas, es posible que se borren
todos los archivos de texto de la memoria.
• Este equipo utiliza ocho pibs ocho pilas alcalinas del tamaño AA.
1
PILAS
El rotulador electronico de Brother es ligero y portátil puede utilizarse en cualquier lugar instalando ocho (8) pilas alcalinas AA. Cuando cambie las pilas, reemplace siempre las ocho pilas
al mismo tiempo.
Para cambiar las pilas:
1 Extraiga la cubierta del compartimiento de las pilas de la parte posterior de la máquina.
2 Si ya hay pilas instaladas, extráigalas.
3 Inserte ocho pilas alcalinas AA nuevas, asegurándose de que quedan orientadas en la
dirección correcta.
4 Coloque la cubierta del compartimiento de las pilas.
☞ Si no se emplean pilas alcalinas, no podrán imprimirse tipos de caracteres grandes.
Asegúrese de insertar las pilas nuevas antes de que transcurran cinco minutos desde
que se extraen las pilas gastadas, porque de lo contrario el texto que se visualiza en
la pantalla y los archivos de texto almacenados en la memoria se perderían (a
menos que la máquina esté enchufada a una toma de CA con el adaptador de CA).
Extraiga las pilas y desconecte el adaptador de CA si no se propone utilizar el
equipo durante períodos de tiempo prolongados. Cuando se desconecta la alimentación, se pierden el texto que se muestra en la pantalla y el que está almacenado
en la memoria.
2
ADAPTADOR DE CA OPCIONAL
El adaptador de CA (modelo AD-60) le permite emplear esta máquina siempre que disponga
de una toma de corriente eléctrica.
Para conectar el adaptador de CA opcional:
Inserte la clavija del adaptador en el conector que tiene la marca DC IN 9.5V al lado
derecho de la máquina.
2 Inserte la clavija del adaptador de CA en la toma de corriente más cercana.
☞ Emplee sólo el adaptador de CA diseñado exclusivamente para este equipo.
Extraiga las pilas y desconecte el adaptador de CA si no se propone utilizar la
máquina durante períodos de tiempo prolongados. Cuando se desconecta la alimentación, se pierden el texto que se muestra en la pantalla y el que está almacenado en la memoria.
Si desenchufa el adaptador de CA y no hay baterías instaladas, es posible que se
borren todos los archivos de texto de la memoria.
Se recomienda emplear el adaptador de CA para imprimir tipos de caracteres grandes y códigos de barras con cintas de 3/4” (18 mm) o de 1” (24 mm) porque esta
operaciónes pueden gastar las pilas con rapidez.
1
3
CONEXIÓN DE LA P-TOUCH A UNA PC
Es equipo está equipada con un conector de interfase, que le permitirá imprimir las etiquetas y
sellos que haya creado con el software P-touch Editor instalado en su PC compatible con IBM
PC o Macintosh.
Para conectar la P-touch al a la PC:
Desconecte la alimentación tanto de la P-touch como la PC.
Inserte el conector pequeño del cable de interfaz en el conector de interfase de la parte
derecha del P-touch.
☞ Utilice sólo el cable de interfaz diseñado exclusivamente para esta máquina.
3 En un ordenador compatible con IBM: Inserte el conector de 9 pins en el puerto serial
(COM) de su PC y apriete los tornillos para asegurarlo en su lugar.
4 Conecte la alimentación del P-touch y después ponga en funcionamiento su PC.
1
2
5
Mantenga presionada
☞
Code
y pulse
Interface
?
.
'
para entrar en el modo de interfaz.
En el modo Interface, la velocidad en baudios de P-touch podrá cambiarse manteniendo prsionada
Code
y pulsando
Style
$
4
hasta que aparezca el valor deseado
(57600 bps, 115200 bps, o 9600 bps). Para aplicar el valor deseado, suelte las
teclas.
Conector
de 9 pins
Rotulador
PC
Conector
4
INSTALACIÓN DEL P-TOUCH EDITOR
La instalación del software de P-touch Editor y el controlador de la impresora añadirá más funciones de ilustración y composición a las posibilidades de confección de etiquetas con su PT2400/2410.
Para instalar el P-touch Editor y el controlador de la impresora en un ordenador
compatible con IBM PC:
Compruebe si la configuración de su sistema cumple los requisitos siguientes:
Ordenador: IBM PC o compatible
Sistema operativo: Microsoft Windows® 95, 98 o NT 4.0
Espacio libre en el disco duro: 20 MB como mínimo
☞ Para imprimir etiquetas largas o gran cantidad de datos, es posible que se necesiten
algunos centenares de megabytes de espacio libre adicional.
Monitor: Tarjeta de gráficos VGA o superior
Puerto en serie: Conector de 9 pins
Unidad de CD-ROM
2 Conecte el PT-2400/2410 al puerto en serie de la PC, y conecte la alimentación de la PT2400/2410 y de la PC.
3 Inserte el CD-ROM P-touch Editor en la unidad de CD-ROM de la PC.
☞ Los instaladores para el programa
P-touch Editor, el controlador de la
impresora, y la Guía del usuario
podrán copiarse también del CD-ROM
a disquetes. Para más detalles, refiérase al archivo “Readme”.
1
Haga clic en el botón Editor para instalar el
software P-touch Editor y el controlador de la
impresora PT-2400/2410.
☞ Para instalar el controlador de la impresora solamente, haga clic en el botón
Printer driver, seleccione el modelo
deseado, y después salte al paso B.
5 Para iniciar el asistente InstallShield® para la
instalación del software P-touch Editor y del
controlador de la impresora PT-2400/2410,
haga clic en el botón PT-2400/2410.
6 En el cuadro de diálogo Welcome, haga clic
en el botón Next.
4
5
7
En el cuadro de diálogo User Information,
escriba su nombre y el nombre de su compañía en los cuadros apropiados para personalizar su copia del P-touch Editor, y después
haga clic en el botón Next.
En el cuadro de diálogo Registration Confirmation, haga clic en el botón Yes para registrar la información introducida.
9 En el cuadro de diálogo Setup Type, haga
clic en Typical para instalar todas las opciones básicas, Compact para instalar solamente
las opciones mínima necesarias, o Custom
para seleccionar las opciones que desee instalar.
8
☞
0
6
Si ha elegido Custom, haga clic en el
botón Next. En el cuadro de diálogo
Option, seleccione las opciones que
desee instalar.
Si ha elegido instalar la Guía del usuario en su ordenador, ésta se encontrará
rápidamente disponible para referencia.
Para instalar el software P-touch Editor, haga
clic en el botón Next.
A
B
C
En el cuadro de diálogo que aparecerá, haga
clic en el botón Yes.
En el cuadro de diálogo Driver Setup que
aparecerá, seleccione Install y después haga
clic en el botón Next.
Para Windows® 95/98: Salte al paso D.
Para Windows® NT 4.0: Haga clic en el
botón Next.
☞ Si no hace clic enel botón Next, no se
instalará el puerto PTCOM. En este
caso, haga clic en el botón Add.
En el cuadro de diálogo Port Name,
seleccione el puerto al que haya
conectado la PT-2400/2410 y después
haga clic en el botón OK. Después de
haber vuelto al cuadro de diálogo Driver Setup, haga clic en el botón Next.
D
En el cuadro de diálogo Driver Setup que
aparecerá, seleccione el puerto PTCOM al
que haya conectado la PT-2400/2410 y después haga clic en el botón Next.
7
E
En el cuadro de diálogo Driver Setup que
aparecerá, haga clic en el botón Next para
confirmar la información de instalación e iniciar la instalación del controlador de la
impresora.
F
En el cuadro de diálogo Driver Setup que
aparecerá, haga clic en el botón Next para
iniciar el asistente “Change Baud Rate
Wizard”.
G
En el cuadro de diálogo Change Baud Rate
Wizard que aparecerá, seleccione el puerto
en serie al que haya conectado la PT-2400/
2410 y después haga clic en el botón Next.
H
En el cuadro de diálogo Change Baud Rate
Wizard que aparecerá, seleccione la velocidad en baudios deseada y después haga clic
en el botón Next.
8
I
Si los ajustes son correctos, haga clic en el
botón Next para introducirlos. Para cambiar
los ajustes, haga clic en el botón Back.
J
En el cuadro de diálogo Change Baud Rate
Wizard que aparecerá, haga clic en el botón
Finish.
K
En el cuadro de diálogo Driver Setup que
aparecerá, haga clic en el botón Finish para
finalizar la configuración del controlador de
la impresora.
L
En el cuadro de diálogo Setup Complete que aparecerá, haga clic en Yes, I want to restart my computer now., y después haga clic en el botón Finish.
Para instalar el P-touch Editor y el controlador de la impresora en un ordenador
Macintosh:
1
Compruebe si la configuración de su sistema cumple los requisitos siguientes:
Ordenador: Macintosh o Power Macintosh
Espacio libre en el disco duro: 20 MB como mínimo
9
☞
Para imprimir etiquetas largas o gran cantidad de datos, es posible que se necesiten
algunos centenares de megabytes de espacio libre adicional.
Sistema operativo: System 7.5.3 o posterior
Puerto (en serie) para impresora: Conector de 8 pins
Unidad de CD-ROM
2 Conecte la PT-2400/2410 al puerto en serie del ordenador y conecte la alimentación de
la PT-2400/2410 y del ordenador.
3 Inserte el CD-ROM P-touch Editor en la unidad de CD-ROM del ordenador y haga doble
clic en el icono del CD-ROM.
☞ Los instaladores para el programa P-touch Editor, el controlador de la impresora y
la Guía del usuario podrán copiarse también del CD-ROM a disquets. Para más
detalles, refiérase al archivo “Readme”.
4 Abra la carpeta PT-2400/2410, y después
haga doble clic en el icono P-touch Editor
3.0 Installer.
5
Haga clic en el botón Install para instalar
todas las opciones o en el botón Custom Install para seleccionar las opciones que desee
instalar.
☞
6
7
10
Si ha hecho clic en Custom Install,
aparecerá el cuadro de diálogo mostrado a la derecha. Después de haber
seleccionado las opciones deseadas,
haga clic en el botón Install para
instalar tales opciones.
En el cuadro de diálogo que aparecerá
cuando haya finalizado la instalación, haga
clic en el botón Quit.
En el cuadro de diálogo que aparecerá, haga
clic en el botón Restart.
Para seleccionar la PT-2400/2410 como impresora en su ordenador Macintosh:
1 Despliegue el menú Apple y seleccione Chooser para hacer que se visualice la ventana
Chooser.
2 Haga clic en el icono PT-2400/2410 de la
lista de la izquierda.
3 Haga clic en el icono para el puerto de la
impresora de la lista de la derecha.
4 Cierre la ventana Chooser par confirmar sus
ajustes.
11
UTILIZACIÓN DEL-P-TOUCH EDITOR
La aplicación P-touch Editor facilita a cualquier usuario el diseño y la impresión de etiquetas
para casi cualquier necesidad imaginable.
Activación del P-touch Editor en un ordenador compatible con PC de IBM:
Haga clic sobre el icono del P-touch Editor:
• Haga doble clic sobre el icono P-touch Editor 3 en la ventana del grupo P-touch Editor 3.
Con el botón de Inicio:
1 Haga clic sobre el botón de Start Inicio en la barra de tareas para visualizar el menú de
Inicio.
2 Seleccione Programs.
3 Seleccione P-touch Editor 3.
4 Haga clic sobre P-touch Editor 3.
Con el Explorador de Windows:
1 Active el Explorador de Windows.
2 Seleccione la unidad y el directorio donde haya instalado el P-touch Editor.
3 Haga doble clic sobre Ptedit3.exe.
Una vez iniciado el P-touch Editor, se visualizará la pantalla siguiente:
Barra de menús
Barra de herramientas estándar
Banco de propiedades
Área de composición
Área de impresión
Barra de herramientas de dibujo
Banco de objetos
Barra de estado
12
Barra de título
Reglas
Cursor
Activación del P-touch Editor en un ordenador Macintosh:
• Haga doble clic sobre el icono P-touch Editor Ver3.0 en la carpeta “P-touch Editor Ver3.0”
instalada en el ordenador.
Una vez iniciado el P-touch Editor, se visualizará la pantalla siguiente:
Reglas
Área de composición
Área de impresión
Barra de título
Barra de menús
Barra de herramientas de dibujo
Barra de herramientas
de impresión
Barra de herramientas
de la base de datos
Barra de estado
Banco de propiedades
Banco de objetos
13
DISEÑO DE UNA COMPOSICIÓN DE FORMATO AUTOMÁTICO
Además de permitirle trazar dibujos y disponer texto utilizando cualquiera de las fuentes,
tamaños, y estilos disponibles, el P-touch Editor dispone de gran variedad de plantillas preformateadas que facilitan y agilizan la creación de composiciones para etiquetas. Pasemos a ver
lo sencillo que resulta crear la composición de una etiqueta con el comando Auto Format.
Para designar una composición en un ordenador compatible con IBM PC:
En el menú File, haga clic en el comando
Auto Format.
2 En la lista Category del cuadro de diálogo
Auto Format Wizard (1/4), haga clic en la
categoría deseada. Por ejemplo, seleccionemos NAMEPLT.
1
3 Haga clic en el botón Next.
4 En la vista de la lista de plantillas del cuadro
de diálogo Auto Format Wizard (2/4), haga
clic en la plantilla deseada. Aquí seleccionaremos la denominada NAMEPLT2.LBL.
Haga clic en el botón Next.
En el cuadro de diálogo Auto Format Wizard
(3/4), haga clic en el botón Next o Previous
hasta que el texto que desee cambiar aparezca en el cuadro de edición Input.
7 Escriba el nuevo texto en el cuadro de edición Input.
8 Repita los pasos 6 y 7 hasta haber introducido
todo el texto en la forma deseada. Para este
ejemplo, cambiaremos el nombre de departamento por “IMPORTS, INC.”, el título por
“Manager”, y el nombre por “BILL REYNOLDS”.
14
5
6
9
0
Haga clic en el botón Next.
En el cuadro de diálogo Auto Format Wizard
(4/4), haga clic en las opciones deseadas.
A
Haga clic en el botón Finish. En el área de
visualización aparecerá una nueva composición que contendrá el texto preformateado.
Para designar una composición en un ordenador Macintosh:
En el menú File, haga clic en el comando
Auto Format para hacer que se visualice el
cuadro de diálogo Auto Format.
2 En el cuadro Category, haga clic en la categoría deseada. Por ejemplo, seleccionemos
shop.
3 En el cuadro Template, haga clic en la plantilla deseada. Aquí seleccionaremos la denominada shop3.lbl.
4 Haga clic en el botón OK. La plantilla preformateada aparecerá en el área de composición.
1
Haga clic en el botón Next o Previous hasta
que el texto que desee cambiar aparezca en
el cuadro de edición Input. Aquí se visualizará la primera línea del texto que deseamos
cambiar “CAMERA”.
6 En el cuadro Input, cambie el texto para
introducir el deseado. Podremos empezar
cambiando el nombre del producto por
“VCR”.
5
15
7
8
16
Repita los pasos 5 y 6 para realizar los
cambios deseados en todo el texto. Finalicemos la edición del texto cambiando el precio
original por “$415.”, y el precio de venta por
“$215.”.
Haga clic en el gotón Close. El nuevo texto
aparecerá en el área de visualización.
IMPORTACIÓN DE UN ARCHIVO DE GRÁFICOS
Con la aplicación del P-touch Editor también puede importar archivos de imágenes de distintos formatos (.bmp, .dib, .jpg, .gif, .tif, .ico, y .wmf en el PC o PICT, JPEG, TIFF y BMP en el
Mac) en su composición.
Importación de un archivo de gráficos:
1
Con un documento de composición visualizado, seleccione la orden Image del menú
Insert (en el software del PC) o el menú Object (en el software de Mac). Aparecerá un
cuadro de diálogo para permitirle seleccionar el archivo de imagen.
Cuando utilice el P-touch Editor
para el PC:
2
Cuando utilice el P-touch Editor
para el Mac:
Seleccione el archivo de gráficos que desee
añadir a la composición y haga doble clic
sobre el mismo. La imagen aparecerá en pantalla.
17
LECTURA DE LA GUÍA DE USUARIO
La Guía de Usuario del P-touch Editor puede leerse íntroduciendo el CD-ROM en su disquetera siempre que desee remitirse a la misma o instalándola en el disco duro de modo que
pueda acceder a ella rápidamente. Dado que la Guía de Usuario es un documento HTML, es
necesario un navegador para poder leerlo. En el CD-ROM también está disponible el instalador para el navegador Internet Explorer 4.01.
☞ La Guía de Usuario del P-touch Editor puede leerse utilizando otros navegadores, sin
embargo, puede que algunas páginas no se visualicen correctamente.
Instalación de Internet Explorer 4.01 en un ordenador compatible con PC de IBM:
1
2
Introduzca el CD P-touch Editor en la unidad de CD-ROM. Aparecerá un cuadro de diálogo que le permitirá seleccionar lo que desee instalar.
Haga clic sobre el botón inferior para iniciar el instalador de Internet Explorer 4.01.
Instalación de Internet Explorer 4.01 en un ordenador Macintosh:
1
2
Introduzca el CD P-touch Editor en la unidad de CD-ROM.
Haga doble clic en el icono Installer de la carpeta CD Distribution - ICP1 de la carpeta
P-touch del CD-ROM.
Lectura de la Guía de Usuario del P-touch Editor instalada en el disco duro en un
ordenador compatible con PC de IBM:
Si no se ha instalado la Guía del Usuario en el disco duro del ordenador, introduzca el
CD del P-touch Editor en la unidad de CD-ROM.
2 Inicie la Guía de Usuario.
Al hacer clic sobre el icono del P-touch Editor:
•
Haga doble clic sobre el icono de The User’s Guide PT-2400/2410 en la ventana
del grupo de P-touch Editor 3.
Con el botón de Start:
(a)
Haga clic sobre el botón de Start de la barra de tareas para visualizar el menú de
Start.
(b)
Seleccione Programs.
(c)
Seleccione P-touch Editor 3.
(d)
Haga clic sobre la The User’s Guide PT-2400/2410.
Con el Explorador de Windows:
(a)
Active el Explorador de Windows.
(b)
Seleccione la unidad del CD-ROM (si la Guía del Usuario no está instalada en el
disco duro) o seleccione la unidad y el directorio donde haya instalado el P-touch
Editor (si se ha instalado la Guía del Usuario en el disco duro).
(c)
Haga doble clic sobre Main.htm en la carpeta Manual.
1
18
Lectura de la Guía del P-touch Editor instalada en el disco duro en un ordenador
Macintosh:
Si la Guía del usuario no está instalada en el disco duro de su PC, inserte el CD-ROM
P-touch editor en la unidad de CD-ROM.
2 Haga doble clic sobre Main.htm en la carpeta de User’s Guide de la carpeta P-touch del
CD-ROM (si la Guía del Usuario no está instalada en el disco duro), o de la carpeta
P-touch Editor Ver3.0 (si la Guía del Usuario está instalada en el disco duro).
1
19
CASETES DE CINTA
Un casete de TZ se suministra con la unidad. Sin embargo, para este equipo hay disponibles
una amplia gama de casetes de cinta TZ de distintos colores y tamaños, es posible crear etiquetas diferentes codificadas por colores o tamaños.
Además, este equipo ha sido diseñada para permitirle cambiar los casetes de cinta rápida y
fácilmente.
Para cambiar el casete de cinta:
1
2
3
4
5
Levante la cubierta del compartimiento de la cinta para abrirla. Se libera también entonces el casete instalado.
Si ya hay un casete instalado, extráigalo tirando hacia arriba.
Si la cinta entintadora del otro casete se afloja, utilice un dedo para bobinar la rueda dentada en el sentido de la flecha de dicho casete hasta tensar la cinta. Además, cerciórese
de que el extremo de la cinta esté debajo de las guías de la misma.
☞ Si está utilizando un casete de cinta nuevo provisto de retén, cerciórese de extraer
éste.
Inserte firmemente el casete de cinta en el compartimiento de la cinta asegurándose de
que toda la parte posterior del casete está en contacto con la inferior del compartimiento.
☞ Cuando inserte el casete de cinta, asegúrese de que la cinta interior no esté enganchada en la esquina de la guía metálica.
Cierre la cubierta del compartimiento y conecte la alimentación de la máquina si estaba
desconectada.
Feed&Cut
6
20
Mantenga pulsada Code
con la tensión óptima.\
y presione
Space
una vez para que la cinta avance y así quede
COLOCACIÓN DE ETIQUETAS
CINTA LAMINADA
La varilla suministrada permite que, en las cintas laminadas, usted pueda extraer facilmente el
papel del dorso de la etiqueta.
1 Tome la cinta con la mano izquierda, con la superficie impresa arriba y tome la varilla
con la mano derecha.
2 Pase la mitad de la cinta por el orificio estrecho largo de la varilla.
3 Gire tres cuartos de vuelta la varilla hacia usted y separe la varilla de usted como se
muestra abajo.
4 Pele el papel del dorso de la etiqueta.
F
GH
DE
C
AB
EF
CD
AB
CINTAS DE TELA
La cinta de tela se emplea para adherir un trozo de tela impresa con el texto en prendar de
vestir empleando una plancha. Después de imprimir el texto en la cinta de tela y de haber
cortado la etiqueta empleando unas tijeras, coloque la etiqueta sobre una prenda planchada
en la posición el la que desee ponerla de modo que el texto impreso pueda leerse correctamente. Cubra la etiqueta con otra tela y emplee un ajuste de la plancha de temperatura
medio-alta (320 a 356 ˚F (160 a 180 ˚C)) para presionar con firmeza durante 10 a 15 segundos. Para más detalles, consulte las instrucciones suministradas con el casete de cinta de tela.
☞ La etiqueta tendrá un fondo blanco sobre tela de color.
CINTAS DE SELLOS
Consulte las páginas 38 para encontrar la explicación detallada sobre el empleo de cintas de
sellos para hacer sellos.
21
CABEZAL DE IMPRESIÓN Y RODILLOS
De vez en cuando, motas de polvo se adhieren al cabezal de impresión y a los rodillos de la
máquina. Suele suceder cuando se emplea la unidad en exteriores o en lugares con mucho
polvo. Si alguna parte del cabezal de impresión está cubierta de polvo, es posible que aparezca una franja horizontal blanca por el texto de la etiqueta.
Por lo tanto, al igual que con las grabadoras de cintas, el cabezal de la máquina deberá limpiarse de vez en cuando.
Para limpiar el cabezal de impresión y los rodillos:
Desconecte la alimentación de la máquina.
Abra la cubierta del compartimiento de la cinta, extraiga el casete, si está dentro. El cabezal de impresión y los rodillos están situados dentro del compartimiento de la cinta.
3 Cabezal de impresión: Emplee un palillo con punta de algodón seco para frotar con cuidado el cabezal de impresión con movimiento hacia arriba y abajo.
Rodillos: Emplee un palillo con punta de algodón seco para frotar cada rodillo con movimiento hacia arriba y abajo mientras los gira con el dedo.
4 Instale un casete de cinta, cierre la cubierta del compartimiento de la cinta y después
pruebe de nuevo la impresión.
5 Si todavía queda polvo, repita el paso 3 y 4 empleando un palillo con cabeza de algodón humedecido en alcohol isopropílico (limpieza).
Si no funciona nada de lo de arriba, póngase en contacto con el representante de servicio.
1
2
Cabezal de
impresión
Cabezal de impresión
Rodillos
Palillo de cabeza
de algodón
22
TECLA DEL CURSOR
El visualizador de LCD de esta máquina muestra dos filas de 11 caracteres; sin embargo, el
texto que usted cree puede tener hasta 255 caracteres de longitud. Podrá revisar y editar el
texto empleando las teclas del cursor para moverlo y que muestre las distintas partes en el
visualizador.
TECLA DEL CURSOR IZQUIERDA
Para mover el cursor un carácter hacia la izquierda:
● Presione
una vez.
☞ Si el cursor está al comienzo de una línea cuando presione esta tecla, dicho cursor
se moverá hasta el final de la línea anterior.
Para mover el cursor varios caracteres hacia la izquierda:
● Mantenga presionado
hasta que el cursor se mueva a la posición deseada.
Para mover el cursor al principio de la línea actual:
● Mantenga presionado
Code
y presione
.
Para mover el cursor hasta el comienzo del bloque actual:
● Mantenga presionado
☞
Caps
Shift
y presione
.
Si el cursor ya está al comienzo de un bloque de texto cuando presione estas teclas,
dicho cursor se moverá hasta el comienzo del bloque anterior.
TECLA DEL CURSOR DERECHA
Para mover el cursor un carácter hacia la derecha:
● Presione
una vez.
☞ Si el cursor está al final de una línea cuando presione esta tecla, dicho cursor se
moverá hasta el comienzo de la línea siguiente.
Para mover el cursor varios caracteres hacia la derecha:
● Mantenga presionado
hasta que el cursor se mueva a la posición deseada.
Para mover el cursor al final de la línea actual:
● Mantenga presionado
Code
y presione
.
Para mover el cursor hasta el comienzo del bloque de texto siguiente:
● Mantenga presionado
☞
Caps
Shift
y presione
.
Si el cursor ya está al comienzo del último bloque de texto cuando presione estas
teclas, dicho cursor se moverá hasta el final del texto.
23
TECLA DEL CURSOR HACIA ARRIBA
Para mover el cursor a la línea anterior:
● Presione
una vez.
☞ Si el cursor está en la primera línea del texto, se moverá al principio de la línea.
Home
Para mover el cursor varias líneas hacia arriba:
● Mantenga presionado
Home
hasta que el cursor se mueva a la posición deseada.
Para mover el cursor al principio de todo el texto:
● Mantenga presionado
Code
y presione
Home
.
TECLA DEL CURSOR HACIA ABAJO
Para mover el cursor a la línea siguiente:
● Presione
una vez.
☞ Si el cursor está en la última línea del texto, se moverá al final de la línea.
End
Para mover el cursor varias líneas hacia abajo:
● Mantenga presionado
End
hasta que el cursor se mueva a la posición deseada.
Para mover el cursor al final de todo el texto:
● Mantenga presionado
24
Code
y presione
End
.
TECLAS CODE, ALT Y SHIFT
La mayoría de los caracteres pueden introducirse simplemente presionando sus teclas. Sin
embargo, para emplear funciones especiales o para introducir letras en mayúsculas, caracteres
acentuados y algunos símbolos, se requieren las siguientes teclas especiales.
TECLA CODE
Para emplear una función impresa encima de la tecla:
● Mantenga presionado
Code
y presione la tecla que está inmediatamente debajo de la
función deseada.
TECLA ALT
Para escribir los caracteres impresos en color del lado derecho de las teclas:
● Mantenga presionada
Symbol
Alt
y pulse la tecla correspondiente al carácter deseado. El indi-
cador Alt de la parte izquierda del visualizador permanecerá encendido mientras manSymbol
tenga presionada
☞
Alt
.
Para escribir una letra mayúscula de un carácter escrito en color, mantenga presioCaps
Caps
nada Shift =(o mantenga presionada Code y pulse Shift una vez para entrar en el
modo Caps) antes de pulsar la tecla correspondiente al carácter deseado.
TECLA SHIFT
Para escribir una letra mayúscula o un símbolo impreso en la esquina superior izquierda de
la tecla:
● Mantenga presionado
Caps
Shift
y presione la tecla de la letra o símbolo deseado.
MODO CAPS
Caps
El modo Caps (mayúsculas) es similar a mantener presionada
Shift
. Le permite escribir letras
mayúsculas continuamente.
Para escribir muchas letras mayúsculas:
Caps
1 Mantenga presionado Code y presione Shift . El indicador de Caps, de la izquierda del
visualizador, se encenderá.
2 Presione las teclas de las letras o símbolos deseados.
Caps
3 Para salir del modo Caps, mantenga presionado Code y presione Shift . Se apagará el
indicador de Caps.
25
TECLA DE RETORNO
New Block
Al igual que en una máquina de escribir o procesador de texto, la tecla de retorno (
)
de esta máquina se emplea para poner fin a una línea de texto y empezar otra. Cuando haya
terminado de introducir una línea, presione la tecla de retorno para hacer una línea nueva y
mover al cursor a la misma.
☞
Coda bloque sólo puede contener un máximo de siete líneas de texto. Si presiona
New Block
cuando el cursor está situado en la séptima línea, aparecerá el mensaje de error
“7LINE LIMIT!”.
Anchuras de cinta
Número máximo de
líneas que pueden imprimirse
1/4” (6 mm)
1
3/8”
(9 mm)
2
1/2”
(12 mm)
3
3/4”
(18 mm)
5
1”
(24 mm)
7
La tecla de retorno también podrá utilizarse para seleccionar un ítem de una lista (p. ej., añadir
un símbolo o un carácter acentuado al texto) o para aplicar un ajuste seleccionado.
Es posible que aparezcan en el visualizador de LCD algunas preguntas para que confirme un
comando, especialmente cuando la función que usted ha seleccionado es para borrar o afecNew Block
tar archivos. En estos casos, si presiona
☞
Clear
Para contestar “no”, presione
(DEL) de la page 29.
26
es como si respondiera “sí”.
Del
. Consulte la descripción de la TECLA DE BORRADO
FUNCIÓN DE NUEVO BLOQUE
Cuando cambie el número de líneas de una sección del texto, tendrá que crear un nuevo bloque.
☞
Una etiqueta solamente podrá contener un máximo de cinco bloques. Si el cursor se
New Block
,
encuentra en el quinto bloque cuando mantenga presionado Code y presione
aparecerá el mensaje de error “5 BLOCK LIMIT!”.
Si el cursor se encuentra en medio de un bloque de texto cuando mantenga presionado
New Block
y presione
, el bloque se dividirá en dos y el carácter situado a la
izquierda de la posición actual del bloque pasará a ser el final del bloque.
Para añadir un nuevo bloque:
Code
● Mantenga presionado
bloque (
New Block
Code
y presione una vez
. Aparecerá la marca de nuevo
) para indicar el final del bloque.
27
TABULACIÓN
Esta función le permitirá separar secciones de una línea de texto añadiendo tabulaciones. Esto
le permitirá crear columnas perfectamente alineadas sin tener que introducir varios espacios.
Todas las tabulaciones tendrán la misma longitud y se medirán desde el comienzo de la línea,
o de la tabulación anterior, si es que existe. La longitud de las tabulaciones podrá ajustarse
entre 0,0” y 11,8” (0,0 y 30,0 cm).
☞
El texto no podrá contener más de 50 tabulaciones. Si ya ha añadido 50 tabulaciones al
Tab
texto, cuando presione
Q
y aparecerá el mensaje de error “TAB LIMIT!”.
Para ajustar la longitud de las tabulaciones:
Tab Length
1
2
☞
Mantenga pulsada
Code
y presione
W
una vez. Se visualizará la longitud de tabula-
ción actual.
Presione Home o End hasta que se visualice la longitud deseada, o utilice las teclas
numéricas para introducir la longitud.
Para cambiar la unidad de medición entre pulgadas y centímetros, pulse M ñ hasta que
la medición se visualice en la unidad deseada.
Feed&Cut
El ajuste predeterminado (2” (5,0 cm)) podrá seleccionarse pulsando Space .
New Block
3
Presione
.
Para añadir una tabulación:
● Mantenga pulsada
Tab
y presione una vez Q . La marca de tabulación (
) aparecerá en el texto para indicar la posición de la tabulación.
☞ Si el texto delante de una tabulación sobrepasa el punto en el que tiene que
comenzar la sección siguiente de texto, tal texto comenzará en la siguiente posición de tabulación. Por ejemplo, si la longitud está ajustada a 2,0” (5 cm) y escribe
el texto siguiente:
Code
1: A B C D E F G H I
2: J K L M N O P Q R S T U
Se imprimirá la etiqueta mostrada a continuación.
ABC
DEF
JKLMNOPQRST
Margin Tab (2” (5 cm))
28
Tab (2” (5 cm))
GHI
U
Margin
TECLA DE BORRADO (DEL)
Clear
La tecla de borrado (
Del
) le permite eliminar caracteres situados a la izquierda de la posi-
ción actual del cursor. Se diferencia de la tecla del cursor izquierda (
) que sólo mueve el
cursor sin borrar ningún carácter.
La tecla de borrado también puede utilizarse para abandonar la mayor parte de funciones y
volver a la visualización anterior sin cambiar el texto.
Es posible que aparezcan en el visualizador de LCD algunas preguntas para que confirme un
comando, especialmente cuando la función que usted ha seleccionado es para borrar o afecClear
tar archivos. En estos casos, si presiona
☞
Del
es como si respondiera “no”.
New Block
Para contestar “sí”, presione
de la page 26.
. Consulte la descripción de la TECLA DE RETORNO
Para borrar un carácter:
1
Presione
,
, Home o End para situar el cursor debajo del carácter que está
inmediatamente a la derecha del último carácter que usted desea borrar.
2
Presione
Clear
Del
.
Para borrar una secuencia de caracteres:
1
Presione
,
, Home o End para situar el cursor debajo del carácter que está
inmediatamente a la derecha del último carácter que usted desea borrar.
2
Mantenga presionado
Clear
Del
hasta que se hayan borrado todos los caracteres que usted
deseaba borrar.
29
FUNCIÓN DE BORRADO DE LÍNEA (LINE OUT)
Con la función de borrado de línea, podrá sacar con facilidad una línea entera de texto.
Para borrar una línea de texto:
1
Presione
,
,
usted desee borrar.
2
Mantenga presionado
Home
o
para situar el cursor dentro de la línea del texto que
End
Line out
☞
Code
y presione
)
0
una vez.
Line out
Cada vez que se presione
)
0
mientras se tiene presionado
Code
se borrará la
línea de texto en la que se encuentre el cursor.
FUNCIÓN DE REPOSICIÓN (CLEAR)
Si borra la visualización antes de introducir nuevo texto, la función reposición podrá utilizarse
para elegir si se desea borrar todo el texto, y todas las funciones de formato ( tipo de caracteres, tamaño, ancho, estilo, subrayado, marco, margen de la cinta, alineación, longitud de la
tabulación, impresión en modo espejo y longitud) volverán a sus ajustes iniciales, o borrar
solamente texto.
Para borrar todo el texto y reponer todos los formatos a sus ajustes iniciales:
Clear
1
Mantenga presionado
2
Presione
☞
Home
o
30
y presione
Del
.
hasta que se seleccione TEXT&FORMATS (parpadeando).
Clear
Para volver al texto sin borrar nada, presione
New Block
3
End
Code
Presione
.
Del
.
FUNCIÓN DE ACENTOS
La función de Acentos también puede utilizarse para añadir caracteres acentuados a su texto.
Muchos de estos caracteres también pueden encontrarse en las teclas, y escribirse utilizando
Symbol
Alt
(consulte la page 25), o podrán introducirse utilizando la función de símbolos (consulte
las páginas 32).
Los caracteres acentuados se agrupan de acuerdo con la letra mayúscula o minúscula con la
que se combinan. Hay disponibles los siguientes caracteres acentuados:
Letras
Caracteres
acentuados
Letras
Caracteres
acentuados
a
àáäâãæ
I
ÍÏÎ
A
ÀÁÄÂÃÆ
n
ñ
c
ç
N
Ñ
C
Ç
o
óöôõ
e
è é ë ê e˜
O
ÓÖÔÕ
E
È É Ë Ê E˜
u
ùúüû
i
íïî
U
ÙÚÜÛ
Para escribir un carácter acentuado:
Accent
1
Mantenga presionado
2
en el visualizador.
Presione la tecla de la letra acentuada deseada.
☞
Code
y presione
. Aparecerá el mensaje “ACCENT a-u/A-U?”
A
Caps
Para escribir una letra mayúscula, mantenga pulsada
Shift
(o mantenga pulsada
Caps
Code
y presione
Shift
para pasar al modo de mayúsculas) antes de pulsar la tecla
de la letra.
3
Presione
o
hasta que parpadee el carácter acentuado.
New Block
4
Presione
☞
. La letra y el acento parpadearán alternadamente en el texto.
Para escribir una secuencia de caracteres acentuados, mantenga presionada
Code
New Block
antes de pulsar
. Después continúe añadiendo caracteres acentuados seleccionándolos como se ha explicado en los pasos 2 y 3, manteniendo pulsada
New Block
Code
y presionando
. Después de haber seleccionado el último carácter de
New Block
la serie, presione simplemente
.
31
FUNCIÓN DE SÍMBOLOS
Además de letras, de los símbolos y los números de las teclas, hay 67 marcas adicionales con
la función de símbolos.
Los siguientes símbolos están disponibles:
Grupo
Símbolos
1
Ü Æ æ Ã
2
+
×
÷
=
ã
E˜
e˜
§
2
3
☞ ☞
3
R
Õ
õ
2
3
°
4
[
TM
]
C
4
5
♥
★
6
☞
La utilización de ciertos símbolos contenidos en esta máquina etiquetadora puede estar
regulada por las normas locales, nacionales, o europeas. Por lo tanto, el usuario, antes
de utilizar los símbolos deberá comprobar si están de acuerdo con estas normas.
Para escribir un símbolo:
Symbol
1
Mantenga presionado
Code
y presione
Alt
. Aparecerá una fila símbolos en el visuali-
zador.
2
Presione Home o End para visualizar distintas filas de símbolos y presione
hasta que parpadee el símbolo deseado.
3
Presione
o
New Block
☞
. El símbolo aparecerá en el texto.
Para escribir una secuencia de símbolos, mantenga presionada
Code
antes de pul-
New Block
sar
. Después continúe añadiendo símbolos seleccionándolos como se ha
New Block
explicado en los pasos 2 y 3, manteniendo pulsada Code y presionando
.
Después de haber seleccionado el último símbolo de la serie, presione simpleNew Block
mente
32
.
FUNCIÓN DE FORMATO AUTOMÁTICO
La función de Formato automático agiliza y facilita la creación de etiquetas. Después de
seleccionar simplemente una de las diversas disposiciones preformateadas y de escribir el
texto en cada campo de la disposición, el estilo global de la etiqueta podrá cambiarse fácilmente seleccionando uno de los 7 formatos de estilos disponibles, tras lo cual la etiqueta
estará lista para imprimirse. Estos formato le permitirán crear etiquetas para gran variedad de
aplicaciones, desde direcciones de sobares hasta identificación de disquetes, o casetes de
audio y vídeo. Con respecto a la lista y muestras de disposiciones formatos, consulte Referencia al final de esta sección.
Para seleccionar una disposición preformateada:
A.Format
1
Mantenga presionado
Code
y presione
Y
una vez. El indicador A.Format se encen-
derá y en el visualizador aparecerá el mensaje “FORMAT TYPE PRESS
2
Presione
☞
Home
o
End
”.
End para seleccionar la disposición deseada.
Feed&Cut
El ajuste predeterminado (VCR VHS-1) podrá seleccionarse presionando Space .
El nombre del formato seleccionado en último lugar aparecerá subrayado. Al seleccionar
este formato se visualizará el texto introducido en ella en su momento.
Los tamaños de las etiquetas se visualizarán en la unidad de medición actualmente seleccionada (pulgadas o milímetros). La unidad de medición podrá cambiarse con las funciones Tab length o Length.
New Block
3
Presione
. En el visualizará el primer campo para la disposición seleccionada.
Para introducir texto en la disposición:
New Block
4
Para cada introducción, escriba el texto, y después presione
. Cuando presione
New Block
después de haber escrito el texto para el último campo, en el visualizador aparecerá SELECT MENU.
Para cambiar el estilo del texto:
5
Presione
Home
o
End
hasta que se visualice el comando CHANGE STYLE.
End
para seleccionar el estilo de caracteres deseado.
New Block
6
Presione
7
Presione
☞
.
Home
o
El ajuste predeterminado (ORIGINAL) podrá seleccionarse presionando
Feed&Cut
Space
.
New Block
8
Presione
. En el visualizador aparecerá SELECT MENU.
Para imprimir una etiqueta utilizando el formato seleccionada:
9
Presione
0
Para imprimir la etiqueta, presione
y después ésta se cortará automáticamente.
Antes de que comience la impresión aparecerá el mensaje “WORKING”, y después se
visualizará “COPIES 1/1” mientras esté imprimiéndose la etiqueta.
33
Home
o
End
hasta que se visualice el comando PRINT.
New Block
Para cambiar el texto introducido en la disposición:
A
Presione
Home
o
End
hasta que se visualice el comando EDIT MORE.
New Block
B
Presione
.
En el visualizador aparecerá el primer campo para la disposición seleccionada.
New Block
Repita el paso 4 hasta editar el texto en la forma deseada. Cuando presione
después de haber editado el último campo de la disposición, volverá a aparecer SELECT
MENU.
Para finalizar la utilización de la función de Formato automático:
C
D
Presione Home o End hasta que se visualice el comando EXIT. En el visualizador aparecerá el mensaje “OK TO EXIT AUTO FORMAT?”
E
Presione
. En el visualizador reaparecerá cualquier texto visualizado antes de
haber utilizado la función de Formato automático.
☞ El texto introducido en la disposición seleccionada se almacenará y estará disponible si selecciona la misma disposición la próxima vez que utilice la función de Formato automático.
New Block
34
REFERENCIA
No.
Nombre del
formato
1
VCR VHS-1
2
VCR VHS-2
3
VCR 8mm-1
4
VCR 8mm-2
5
VCR VHSC-1
6
VCR VHSC-2
7
AUDIO-1
8
AUDIO-2
9
10
AUDIO-3
11
12
DAT-1
13
DAT-2
14
MINI DISK-1
15
MINI DISK-2
16
NAME PLATE
17
Anchura de cinta ×
longitud de etiqueta
Campos de distribución
11 SYMBOL?
3/4” × 5.5”
22 TITLE?
(18 mm × 140 mm)
33 SUBTITLE?
1” × 3.0”
11 TITLE?
(24 mm × 77 mm) 22 SUBTITLE?
11 SYMBOL?
3/8” × 2.9”
22 TITLE?
(9 mm × 73 mm)
33 SUBTITLE?
11 SYMBOL?
1/2” × 3.6”
22 TITLE?
(12 mm × 92 mm)
33 SUBTITLE?
1/2” × 1.7”
11 TITLE?
(12 mm × 42 mm)
11 SYMBOL?
3/4” × 3.2”
22 TITLE?
(18 mm × 81 mm)
33 SUBTITLE?
1/4” × 3.1”
11 SYMBOL?
(6 mm × 80 mm) 22 TITLE?
1/2” × 3.5”
(12 mm × 89 mm) 11 SYMBOL?
22 TITLE?
3/8” × 3.5”
(9 mm × 89 mm)
1/2” × 3.5”
(12 mm × 89 mm)
11 SYMBOL?
3/8” × 3.5”
(9 mm × 89 mm)
1/4” × 2.2”
11 TITLE?
(6 mm × 56 mm)
3/8” × 3.3”
11 SYMBOL?
(9 mm × 85 mm) 22 TITLE?
1/4” × 2.3”
11 TITLE?
(6 mm × 59 mm)
1” × 2.0”
11 TITLE?
(24 mm × 52 mm) 22 SUBTITLE?
1” × 3.0”
(24 mm × 76 mm)
11 NAME?
3/4” × 3.0”
(18 mm × 76 mm)
44 DURATION?
55 REC.MODE?
66 DATE?
33 DATE?
44 DATE?
55 REC.MODE?
44 DURATION?
55 REC.MODE?
66 DATE?
22 SUBTITLE?
44 DURATION?
55 REC.MODE?
66 DATE?
33 SUBTITLE?
33 SUBTITLE?
22 TITLE?
22 SUBTITLE?
33 SUBTITLE?
22 SUBTITLE?
33 DURATION?
44 DATE?
22 COMPANY?
35
No.
Nombre del
formato
18
ADDRESS
19
20
EQUIPMENT
21
22
SLIDE
23
PRICE
24
25
SALE PRICE
26
27
ORGANIZER L
28
ORGANIZER S
29
FILE LONG
30
31
FILE LONGV
32
33
34
FILE SHORT
35
36
36
Anchura de cinta ×
longitud de etiqueta
1” × 3.1”
(24 mm × 80 mm)
3/4” × 3.1”
(18 mm × 80 mm)
1” × 3.1”
(24 mm × 79 mm)
3/4” × 3.1”
(18 mm × 79 mm)
1/2” × 1.7”
(12 mm × 42 mm)
1” × 2.2”
(24 mm × 57 mm)
3/4” × 2.2”
(18 mm × 57 mm)
1” × 3.6”
(24 mm × 92 mm)
3/4” × 3.6”
(18 mm × 92 mm)
Campos de distribución
11 NAME?
33 ADDRESS2?
22 ADDRESS1? 44 ADD.3/TEL?
11 TITLE?
22 NAME?
33 NUMBER?
11 TITLE?
22 DATE?
33 SUBTITLE?
11 NAME?
22 PRICE?
11 NAME?
33 NEW PRICE?
22 OLD PRICE?
11 NAME?
44 ADDRESS2?
1” × 3.2”
22 COMPANY? 55 ADD.3/TEL?
(24 mm × 82 mm)
33 ADDRESS1?
11 NAME?
44 ADDRESS2?
1” × 2.6”
22 COMPANY? 55 ADD.3/TEL?
(24 mm × 65 mm)
33 ADDRESS1?
1” × 7.2”
(24 mm × 183 mm)
11 TITLE?
3/4” × 7.2”
(18 mm × 183 mm)
1” × 7.2”
(24 mm × 183 mm)
11 TITLE?
3/4” × 7.2”
(18 mm × 183 mm)
1” × 3.7”
(24 mm × 94 mm)
3/4” × 3.7”
(18 mm × 94 mm)
11 TITLE?
1/2” × 2.9”
(12 mm × 74 mm)
3/8” × 2.9”
(9 mm × 74 mm)
No.
Nombre del
formato
37
3.5” FLOPPY
38
39
5” FLO PPY
40
Anchura de cinta ×
longitud de etiqueta
1” × 2.7”
(24 mm × 69 mm)
3/4” × 2.7”
(18 mm × 69 mm)
1” × 3.1”
(24 mm × 79 mm)
3/4” × 3.1”
(18 mm × 79 mm)
Campos de distribución
11 TITLE?
33 NAME?
22 SUBTITLE?
11 TITLE?
33 NAME?
22 SUBTITLE?
37
FUNCIÓN DE CREACION DE SELLOS
La función de sellos le permite crear con rapidez y facilidad sus propios clichés para sellos
personalizados. Seleccione esta función para centrar automáticamente el texto y ajustar la longitud de la cinta y los márgenes a un formato perfecto para los soportes de películas de sellos
entintados. Puesto que el soporte del sellos es reutilizable, haga un nuevo cliché de sellos y
reemplácelo por el que hay en el soporte de películas.
Para hacer un sello:
1 Escriba el texto, y después inserte un casete de película de sellos de tamaño medio (3/4”
(18 mm de anchura)) o grande (1” (24 mm de anchura)).
Stamp
2
Mantenga presionado
Code
y presione
U
ü
una vez. Aparecerá el mensaje “STAMP
FORMAT?” en el visualizador.
New Block
3
Presione
. El texto se formateará automaticamente para el sello instalado:
centrado dentro del área preajustada del mensaje, con la longitud y los márgenes de la
cinta automáticamente ajustados.
4
Presione
5
Después de haber cortado la película matriz de sellos, extraiga el papel del dorso del cliché del membrete y adhiéralo al tampón de tinta o soporte de películas.
Mirror
Print
para separar el texto del cliché de sellos.
Para adherir un sello:
1 Extraiga el marco del sellos de entorno al lado al tampón de tinta del soporte de
2
3
4
5
6
38
películas de una vez, y saque entonces el sello protector que cubre el tampón de
tinta y el papel del dorso del cliché del sellos.
Con el lado brillante del cliché del sellos encarado hacia arriba, alinee uno de sus
extremos con la ranura del lado del soporte de películas de sellos.
Retenga el extremo del cliché del sellos en su lugar con el dedo pulgar, y pase la
cinta por las guías mientras la tensa bien.
Pliegue el otro extremo del cliché del sellos por en otro lado del soporte de películas de sellos y reténgalo en su lugar con el dedo.
Adapte el marco del sellos encima del cliché del sellos y presiónelo a su lugar.
Inserte el soporte de películas de sellos recto en su tapa.
☞ Asegúrese de que el sellos quede correctamente cubierto para evitar derrames de tinta.
FUNCIÓN DE FORMATO LOCAL
La función de Formato local le permitirá hacer destacar un bloque de texto con un ajuste de
tipo de caracteres, tamaño, anchura, estilo, subrayado, o recuadro diferente al resto del texto.
Para utilizar la función de formato local:
1
Presione
,
, Home o
car un formato diferente.
para colocar el cursor en el bloque al que desee apli-
End
Local
2
3
☞
Mantenga presionado
Code
y presione
S
una vez. En la fila superior del visualizador
aparecerá “BLOCK FORMAT” para indicar que el bloque de texto actual que tendrá el
formato local.
Seleccione el ajuste de tipo de caracteres, tamaño, anchura, estilo, subrayado, o enmarcado como se describe en las páginas 41 y 46. El ajuste seleccionado solamente se aplicará al bloque de texto que contenga el cursor.
Solamente podrán seleccionarse los ajustes de marco SQUARE y ROUND.
FUNCIÓN DEL TIPO DE CARACTERES
Con la función del tipo de caracteres podrá seleccionar uno de ocho tipos de caracteres para
su texto.
Los ajustes de tipos de caracteres siguientes están disponibles:
HELSINKI, BRUSSELS, BELGIUM, US, SAN DIEGO, FLORIDA, LOS ANGELES, y ISTANBUL
El ajuste inicial del tipo de caracteres es HELSINKI.
Consulte el apartado de Referencia, al final de esta sección, para ver muestras de los ajustes
disponibles.
Para cambiar el ajuste del tipo de caracteres:
Font
1
Manteniendo presionada
Code
, pulse una vez
!
1 ¡
, y mantenga presionada
Code
para hacer que se visualice el tipo de caracteres actualmente ajustado.
Font
2
Se sigue presionando
Code
,y
!
1 ¡
hasta que se visualice el tipo de caracteres actual-
mente ajustado.
3
Para aplicar el ajuste de subrayado seleccionado a todo el texto, suelte
Code
.
39
REFERENCIA
Ajustes del
tipo de caracters
HELSINKI
BRUSSELS
BELGIUM
US
SAN DIEGO
FLORIDA
LOS ANGELES
ISTANBUL
40
Muestras de tipos de caracters
FUNCIONES DE TAMAÑO Y DE ANCHURA
El tamaño de los caracteres puede ajustarse empleando las funciones de tamaño (Size) y de
ancho (Wide). Puesto que el tamaño de los caracteres que puede utilizarse depende del ancho
de la cinta, la tabla siguiente indica los tamaños de caracteres que pueden utilizarse con cada
ancho de cinta.
Anchos de cinta
Tamaños (en puntos)
1/4” (6 mm)
6, 9, 12
3/8”
(9 mm)
6, 9, 12, 18
1/2”
(12 mm)
6, 9, 12, 18, 24
3/4”
(18 mm)
6, 9, 12, 18, 24, 36
1”
(24 mm)
6, 9, 12, 18, 24, 36, 48
El tamaño de ajuste inicial es AUTO y el ajuste inicial para el ancho es MEDIUM. El tamaño y
el ancho actualmente seleccionados siempre se indican con los indicadores de encima del
visualizador. Además, todos los indicadores de tamaño se encenderán cuando seleccione el
ajuste AUTO. Si selecciona el ajuste de anchura NARROW o WIDE, se encenderá el indicador Width.
Con el ajuste de tamaño AUTO, la máquina compara su texto con el ancho de la cinta instalada y ajusta automáticamente los caracteres al tamaño más grande posible. Sin embargo, hay
también otros siete tamaños de puntos disponibles y cada uno puede imprimirse con caracteres estrechos o anchos. Con respecto a las de los ajustes disponibles, consulte la referencia
final de esta sección.
☞ Cuando haya seleccionado el ajuste AUTO y haya instalado una cinta de 24 mm (1”) de
anchura, el texto se imprimirá en mayúsculas con un tamaño de caracteres de 60 puntos.
41
Para cambiar el ajuste del tamaño:
Size
1
Manteniendo presionada
Code
, pulse una vez
@
2
y mantenga presionada
Code
para
hacer que se visualice el tamaño actualmente ajustado.
Size
2
Manteniendo presionada
Code
,y
hasta que visualice el tamaño actualmente ajus-
@
2
tado mediante el indicador del mismo.
☞ El ajuste del tamaño actual también se mostrará en el indicador de tamaño situado
sobre el visualizador.
3
Para aplicar el ajuste de tamaño seleccionado a todo el texto, suelte
.
Code
Para activar o desactivar la función de anchura:
Width
1
Manteniendo presionada
Code
, pulse una vez
#
3
y mantenga presionada
Code
para
hacer que se visualice el ancho actualmente ajustado.
Width
2
Manteniendo presionada
Code
, y
#
3
hasta que se visualice el ancho actualmente
ajustado.
☞ Si selecciona el ajuste de anchura NARROW o WIDE, se encenderá el indicador
Width.
3
42
Para aplicar el ajuste de ancho seleccionado a todo el texto, suelte
Code
.
FUNCIÓN DE ESTILO
Podrá seleccionar entre 11 estilos de caracteres distintos que podrá aplicar a su texto.
☞ Los caracteres que se imprimen utilizando los tamaños más pequeños pueden resultar
difíciles de leer si se seleccionan ciertos ajustes de estilos (por ejemplo, I+SHADOW).
Hay disponibles los siguientes ajustes de estilos:
NORMAL
I+BOLD (cursiva y negrilla)
BOLD
I+OUTLINE (cursiva y perfilado)
OUTLINE
I+SOLID (cursiva y sólido)
SOLID
I+SHADOW (cursiva y sombreado)
SHADOW
VERTICAL
ITALIC
El ajuste de estilo predeterminado es NORMAL. El indicador de estilo de la parte inferior del
visualizador mostrará el ajuste del estilo actual cuando seleccione un estilo que no sea NORMAL.
Consulte el apartado, al final de esta sección, para ver muestras de los ajustes disponibles.
Para cambiar el ajuste del estilo:
Style
1
Manteniendo presionada
Code
, pulse una vez
$
4
y mantenga presionada
Code
para
hacer que se visualice el estilo actualmente ajustado.
Style
2
Mantenga presionado
Code
, continúe presionando
$
4
hasta que se visualice el estilo
actualmente ajustado mediante el indicador del mismo.
☞ El ajuste de estilo actual se mostrará en el indicador de estilo de la esquina inferior
del visualizador.
3
Para aplicar el ajuste de estilo seleccionado a todo el texto, suelte
Code
.
43
FUNCIÓN DE SUBRAYADO
Podrá acentuar el texto tachándolo o subrayándolo.
El ajuste de subrayado predeterminado es OFF. Cuando haya ajustado la función de subrayado a ON o STRIKEOUT, el indicador Undl/Frm de la parte derecha del visualizador se
encenderá.
ON
STRIKEOUT
Para cambiar el ajuste del subrayado:
Underline
1
Manteniendo presionada
Code
, pulse una vez
%
5
y mantenga presionada
Code
para
hacer que se visualice el subrayado actualmente ajustado.
Underline
2
Mantenga presionado
Code
, y
%
5
hasta que se visualice el subrayado actualmente
ajustado mediante el indicador del mismo.
☞ Cuando seleccione el ajuste ON o STRIKEOUT, el indicador Undl/Frm se en
encenderá.
3
44
Para aplicar el ajuste de subrayado seleccionado a todo el texto, suelte
Code
.
FUNCIÓN DE MARCOS
Con la función de marcos, podrá seleccionar diversos marcos y funciones destacadas para
hacer un diseño más decorativo o una etiqueta con más énfasis.
Los marcos disponibles son:
OFF, SQUARE, ROUND, CANDY, POINTING, NAMEPLATE, DOG, MOVIE FILM,
DINOSAUR, TELEPHONE, HANDS, WINDOW, BANNER, DOT, DIAMOND y SLANT
El ajuste inicial de marco es OFF (normal), aunque hay también otros 15 marcos disponibles.
Si se selecciona cualquier ajuste que no sea OFF, se encenderá el indicador Undl/Frm, situado
a la derecha del visualizador.
Consulte el apartado, al final de esta sección, para ver muestras de los ajustes disponibles.
Para cambiar el ajuste del marco:
Frame
1
Manteniendo presionada
Code
, pulse una vez
¢
6
y mantenga presionada
Code
para
hacer que se visualice el marco actualmente ajustado.
Frame
2
Mantenga presionado
Code
,y
¢
6
hasta que se visualice el marco actualmente ajus-
tado mediante el indicador del mismo.
☞ El indicator UndI/Frm se enciende si se selectiona un ajuste que no sea OFF.
3
Para aplicar el ajuste de marco seleccionado a todo el texto, suelte
Code
.
45
REFERENCIA
Ajustes
del marco
Muestras de marco
Ajustes
del marco
OFF
(normal)
DINOSAUR
SQUARE
TELEPHONE
ROUND
HANDS
CANDY
WINDOW
POINTING
BANNER
NAMEPLATE
DOT
DOG
DIAMOND
MOVIE FILM
SLANT
46
Muestras de marco
FUNCIÓN DE MARGENES
La función de margenes le permite ajustar el tamaño de los márgenes de los lados izquierdo y
derecho del texto.
El ajuste inicial de margen cinta es FULL, aunque hay también disponibles otros tres ajustes.
FULL (márgenes de 1” (25 mm))
NONE (márgenes de 1/6” (4 mm))
NARROW (márgenes de 1/3” (8 mm))
MEDIUM (márgenes de 1/2” (12 mm))
☞ Cuando haya seleccionado un ajuste que no sea FULL, antes de iniciarse la impresión
avanzará cinta extra. La cinta extra se cortará si la función Corte automático está ajustada a ON para que los márgenes a cada extremo del texto sean iguales.
Para cambiar el ajuste de la cinta:
Tape
1
Manteniendo presionada
Code
, pulse una vez
E
y mantenga presionada
Code
para
hacer que se visualice la cinta actualmente ajustado.
Tape
2
Mantenga presionado
3
Para aplicar el ajuste de la cinta seleccionado a todo el texto, suelte
Code
,y
E
hasta que se visualice la cinta actualmente ajustado.
Code
.
47
FUNCIÓN DE LA ALINEACIÓN HORIZONTAL
Podrá elegir alinear texto en una de las tres formas disponibles. Además, si utilizó la función
de longitud para ajustar la longitud de la etiqueta, los texto se alinearán dentro de la etiqueta
de acuerdo con el ajuste de alineación horizontal seleccionado.
El ajuste inicial de la alineación horizontal es LEFT (izquierda), aunque también están disponibles otros dos ajustes.
LEFT
CENTER
RIGHT
Para cambiar el ajuste de la alineación horizontal:
Align
1
Manteniendo presionada
Code
, pulse una vez
R
y mantenga presionada
Code
para
hacer que se visualice la alineación horizontal actualmente ajustado.
Align
2
Mantenga presionado
Code
, continúe presionando
R
hasta que se visualice la alinea-
ción horizontal actualmente ajustado.
3
48
Para aplicar el ajuste de la alineación seleccionado a todo el texto, suelte
Code
.
FUNCIÓN DE IMPRESIÓN EN MODO ESPEJO
Con esta función, podrá imprimir el texto de modo que los caracteres puedan leerse desde el
lado del adhesivo de la cinta. Si se adhieren etiquetas con impresión en modo espejo a un
vidrio, o en otro material transparente, podrán leerse correctamente desde el lado opuesto.
☞ Cuando emplee la función de impresión en modo espejo, el texto se imprimirá en cinta
transparente. El ajuste inicial para la impresión en modo espejo es OFF.
ON
Para activar o desactivar la impresión en modo espejo:
Mirror
1
Manteniendo presionada
Code
, pulse una vez
Print
y mantenga presionada
Code
para hacer que se visualice la impresión en modo espejo actualmente ajustado.
Mirror
2
Mantenga presionado
3
impresión en modo espejo actualmente ajustado.
Para aplicar el ajuste de la impresión en modo espejo seleccionado a todo el texto, suelte
Code
Code
, continúe presionando
Print
hasta que se visualice la
.
49
FUNCIÓN DE LONGITUD
Aunque la longitud de la etiqueta impresa ajusta automáticamente dicha longitud de acuerdo
con el texto introducido, es posible que usted desee hacer una etiqueta con una longitud específica. La función de longitud le permitirá ajustar la longitud de la etiqueta entre 1,6” y 11,8”
(4,0 cm y 30,0 cm).
El ajuste predeterminado de longitud es OFF. Cuando ponga la función de longitud en ON, se
encenderá el indicador de longitud de la parte derecha del visualizador.
☞ Si desconecta y vuelve a conectar la alimentación de la máquina, el ajuste de longitud
volverá a OFF.
Para activar y desactivar la función de longitud:
Length
1
Manteniendo presionada
Code
, presione una vez
T
y mantenga presionada
Code
hasta que se visualice brevemente la longitud actual de la etiqueta (texto y ambos márgenes) y después haga que se visualice el ajuste de longitud de etiqueta actual (ON u OFF).
Length
2
Mantenga presionado
Code
, continúe presionando
T
hasta que se visualice el ajuste
de longitud de etiqueta deseado.
☞ Cuando seleccione ON, se encenderá el indicador de longitud.
3
Suelte
4
Presione Home o End para seleccionar la longitud deseada, o utilice las teclas numéricas
para introducir la longitud.
☞
Code
. Si había seleccionado ON, se visualizará la longitud actual de la etiqueta.
Para cambiar la longitud en pasos de 1” (1,0 cm), mantenga pulsada
después presione la tecla cuando se visualice el ajuste deseado.
Home
o
End
Feed&Cut
El ajuste predeterminado (4” (10,0 cm)) podrá seleccionarse pulsando
New Block
5
50
Presione
.
Space
.
y
FUNCIÓN DE CÓDIGO DE BARRAS
La función de Código de barras, que permite imprimir códigos de barras como parte de las etiquetas, es una de las características más avanzadas de la máquina.
☞
En esta sección explicaremos cómo introducir un código de barras en su texto. No tiene
el propósito de ser una introducción amplia al concepto de los códigos de barras. Para
encontrar información más detallada al respecto, consulte uno de los muchos libros disponibles en el mercado.
Como esta máquina no ha sido específicamente diseñada para hacer etiquetas de códigos de barras, es posible que algunos lectores de códigos de barras no puedan leer las
etiquetas.
Imprima los códigos de barras con tinta negra sobre fondo blanco.
Cuatro parámetros distintos le permitirán crear códigos de barras personalizados.
PARÁMETRO
AJUSTES
PROTOCOL
CODE 39, I-2/5, EAN13, EAN8,
UPC-A, UPC-E, EAN128
WIDTH (anchura del código de barras)
LARGE, SMALL
UNDER#S (caracteres impresos debajo
ON, OFF
del código de barras)
CHECK DIG. (dígito de comprobación)
OFF, ON
Los ajustes predeterminados son CODE 39 PROTOCOL, LARGE WIDTH, UNDER#S, ajustado
a ON, y CHECK DIG. ajustado a OFF.
☞ Se recomienda imprimir los códigos de barras con la función de Margen de cinta ajustada a FULL y el parámetro WIDTH del código de barras ajustado a LARGE, porque de
lo contrario los códigos de barras pueden resultar difíciles de leer.
Para utilizar la función de código de barras:
Barcode
1
Mantenga presionado
☞
Code
y presione
I
una vez.
í
Para cambiar los datos o parámetros de un código de barras que ya había sido
creado, coloque el cursor debajo de la mitad derecha de la marca de código de
Barcode
barras (
) antes de mantener presionado
Code
y presionar
I
í
.
Un bloque solamente puede contener un código de barras. Si ya había introducido
un código de barras en el bloque cuando mantenga presionado
Code
y presionar
Barcode
I
í
aparecerá el mensaje de error “1 BARCODE PER BLOCK!”.
Para abandonar la función de Código de barras sin realizar ningún cambio, manBarcode
tenga presionado
2
Code
y presione
I
í
.
Escriba los datos del nuevo código de barras o edite el antiguo.
51
Para cambiar los ajustes de los parámetros del código de barras:
3
Presione
☞
Home
.
Para volver a los datos del código de barras sin cambiar ningún ajuste de parámeClear
tro, presione
Del
o
.
4
Presione
5
Presione
6
Repita los pasos 4 y 5 hasta haber ajustado todos los parámetros que desee.
7
Presione
Home
o
hasta que aparezca el parámetro que desee cambiar.
End
hasta que se visualice el ajuste deseado.
New Block
.
Para añadir un carácter especial a los datos del código de barras:
8
Presione
o
hasta que el cursor se coloque debajo del carácter situado a la
derecha de donde desee añadir el carácter especial.
9
Mantenga presionado
0
Presione
Symbol
☞
Home
o
End
Code
y presione
Alt
.
hasta que se visualice el carácter especial.
Cuando utilice los tipos CODE 39 solamente podrá introducir los caracteres especiales siguientes.
SÍMBOLO
CARÁCTER
1
+
2
$
Cuando utilice los tipos EAN128 solamente podrá introducir los caracteres especiales siguientes.
52
VALOR
CARÁCTER
VALOR
CARÁCTER
VALOR
CARÁCTER
3
#
69
ENQ
87
ETB
4
$
70
ACK
88
CAN
11
+
71
BEL
89
EM
28
<
72
BS
90
SUB
29
=
73
HT
91
ESC
30
>
74
LF
91
{
32
@
75
VT
92
FS
59
[
76
FF
92
|
VALOR
CARÁCTER
VALOR
CARÁCTER
VALOR
CARÁCTER
60
\
77
CR
93
GS
61
]
78
SO
93
}
62
^
79
SI
94
RS
63
_
80
DLE
94
~
64
NUL
81
DC1
95
US
64
`
82
DC2
95
DEL
65
SOH
83
DC3
96
FNC 3
66
STX
84
DC4
97
FNC 2
67
ETX
85
NAK
100
FNC 4
68
EOT
86
SYN
102
FNC1
New Block
A
Presione
para añadir el carácter especial seleccionado al código de barras.
Para añadir el código de barras a su texto:
New Block
B
Presione
.
53
FUNCIÓN DE CORTE AUTOMÁTICO
La función de corte automático le permite ajustar si la máquina va a cortar automáticamente o
no una etiqueta después de imprimirse ésta. Active la función de corte automático antes de
empezar a imprimir para cortar automáticamente las etiquetas después de imprimirlas.
☞
Después de haber impreso una etiqueta con la función de corte automático desactivada
Feed&Cut
(OFF), mantenga pulsada Code y presione Space una vez para hacer que avance la
cinta, y después córtela.
Cuando haya seleccionado un ajuste que no sea FULL, antes de iniciarse la impresión
avanzará cinta extra. La cinta extra se cortará si la función Corte automático está ajustada a ON para que los márgenes a cada extremo del texto sean iguales.
Para activar o desactivar la función de corte automático:
A.Cut
1
Mientras mantiene presionada
Code
Code
, presione una vez
Z
y mantenga presionada
para visualizar al ajuste de corte automático actual.
A.Cut
2
Mientras aún mantiene presionada
Code
, continúe presionando
visualice el ajuste de corte automático deseado.
3
54
Suelte
Code
para aplicar el ajuste de corte automático seleccionado.
Z
hasta que se
TECLA DE IMPRESIÓN & FUNCIÓN DE AVANCE Y CORTE
Después de haber introducido su texto y de haber elegidos los ajustes de formato deseados,
podrá imprimir.
La función de avance y corte se utiliza para hacer que la cinta avance 1” (25 mm) y se corte
automáticamente, por ejemplo después de haber impreso con la función de corte automático
desactivada (OFF) o cuando se haya interrumpido la impresión.
Para imprimir una etiqueta:
Mirror
● Presione
Print
una vez. Antes de que comience la impresión aparecerá el mensaje
“WORKING”, y después se visualizará “COPIES 1/1” mientras esté imprimiéndose la etiqueta.
☞ Si la función de corte automático está activada (ON), la etiqueta se cortará automáticamente después de haberse impreso.
Para hacer que la cinta avance 1” (25 mm):
● Mantenga pulsada
Code
y presione
Feed&Cut
Space
. El mensaje “FEED” aparecerá mientras esté
saliendo cinta de 1” (25 mm), y después ésta se cortará automáticamente.
55
FUNCIÓN DE NUMERACIÓN
Esta función podrá utilizarse para imprimir muchas copias del mismo texto aumentando ciertos caracteres (letras, números, o códigos de barras) después de la impresión de cada etiqueta.
Este tipo de incremento automático será muy útil para imprimir etiquetas de números en serie,
etiquetas de control de producción, u otras etiquetas que requieran códigos ascendentes.
Las letras y los números aumentarán como se muestra a continuación:
0
➔ 1
➔ ...9
➔ 0
➔ ...
A
➔ B
➔ ...Z
➔ A
➔ ...
a
➔ b
➔ ...z
➔ a
➔ ...
A0 ➔ A1 ➔ ...A9 ➔ B0 ➔ ...
Los espacios (mostrados como subrayados “_” en los ejemplos siguientes) podrán utilizarse
para ajustar el espacio entre caracteres o par controlar el número de dígitos a imprimir:
_9 ➔ 10 ➔ ...99 ➔ _0 ➔ ...
_Z ➔ AA ➔ ...ZZ ➔ _A ➔ ...
1_9 ➔ 2_0 ➔ ...9_9 ➔ __0 ➔ ...
☞ Solamente podrá seleccionarse un campo de numeración de cualquier texto.
Si incluye un carácter no alfanumérico, como un símbolo, en el campo de numeración,
solamente aumentarán las letras y los números de dicho campo cuando imprima las etiquetas, o solamente se imprimirá una etiqueta si el campo sólo contiene un carácter no
alfanumérico.
Para utilizar la función de numeración:
Number
1
Mantenga presionado
y presione
Code
P
á
. En el visualizador aparecerá el mensaje
“SET START PT”.
☞
Para abandonar la función de Numeración sin imprimir, mantenga presionado
Number
Code
y presione
P
á
.
Clear
Para volver a la pantalla anterior, presione
Del
.
2
Presione
,
,
, o End hasta que parpadee el primer carácter que desee
seleccionar para el campo de numeración.
3
Presione
Home
New Block
☞
. En el visualizador aparecerá el mensaje “SET END PT”.
Si seleccionó un código de barras, en el visualizador aparecerá en su lugar
“# INCREASES”. Para continuar imprimiendo con la función de Numeración, salte
al paso 6.
4
Presione
o
hasta que parpadeen todos los caracteres que desee seleccionar
para el campo de numeración.
☞ No es posible seleccionar un código de barras junto con otros caracteres.
5
Presione
New Block
56
. En el visualizador parpadeará “# INCREASES”.
6
Escriba el número deseado o presione
copias deseado.
7
Para iniciar la impresión, presione
o
Home
Mirror
End
hasta que se visualice el número de
New Block
(o
Print
). Antes de que comience la impre-
sión aparecerá el mensaje “WORKING” y después se visualizará “COPIES” seguido por el
número de la copia que esté imprimiéndose.
☞ Si la función A.Cut está ajustada a ON, cada etiqueta se cortará automáticamente
después de haberse impreso.
FUNCIÓN DE IMPRESIÓN REPETIDA
Esta función le permite imprimir múltiples copias del mismo texto.
Para emplear la función de impresión repetida:
Repeat
1
Mantenga presionado
Code
y presione
O
ó
. Aparecerá el mensaje “COPIES ” en el
visualizador.
☞
Para abandonar la función de impresión repetida sin imprimir, mantenga pulsada
Clear
Repeat
Code
y después presione
O
ó
(o presione simplemente
2
Escriba el número deseado o presione
deseado de copias.
3
Para iniciar la impresión, presione
Home
Mirror
Print
o
End
Del
).
hasta que se visualice el número
New Block
(o
). Antes de que comience la impre-
sión aparecerá el mensaje “WORKING” y después se visualizará “COPIES” seguido por el
número de la copia que esté imprimiéndose.
☞ Si la función A.Cut está ajustada a ON, cada etiqueta se cortará automáticamente
después de haberse impreso.
57
FUNCIONES DE LA MEMORIA
Usted podrá utilizar la memoria para almacenar sus archivos de texto más frecuentemente utilizados. El texto permanecerá en la memoria, incluso después de haber eliminado todos los
caracteres del visualizador utilizando la función de Borrado (consulte la page 29).
Cuando se almacene cada archivo, a éste se le asignará un número para poder invocarlo fácilmente. En la memoria podrán almacenarse hasta 100 archivos de texto o aproximadamente
2500 caracteres.
Como se invoca una copia del archivo de texto almacenado cuando se utiliza la función de
Invocación, el texto podrá editar o imprimirse sin cambiar el archivo originalmente almacenado. Cuando ya no necesite un archivo o necesite más espacio, podrá utilizar la función
Borrado de la memoria para borrarlo.
☞ Cundo tenga que insertar nuevas pilas, hágalo antes de 5 minutos de haber extraído las
viejas, ya que de lo contrario los archivos de texto almacenados en la memoria se perderían (a menos que la máquina esté enchufada en un tomacorriente de la red con el
adaptador de CA).
ALMACENAMIENTO DE TEXTO
Para almacenar un archivo de texto:
Store
1
Mantenga presionado
☞
Code
y presione
&
7
. En el visualizador aparecerá “STORE”.
Si ya hay 2500 caracteres almacenados, en el visualizador aparecerá el mensaje
“MEMORY FULL!”. Cuando ocurra esto, habrá que borrar un archivo de texto existente antes de poder almacenar otro.
Para abandonar la función de Almacenamiento sin almacenar el texto, mantenga
Store
presionado
2
Presione Home o
cenar el texto.
Code
End
y presione
&
7
Clear
(o simplemente presione
Del
).
hasta que se visualice el número de archivo en el que desee alma-
New Block
Presione
. El texto almacenado en el número de archivo seleccionado y el texto
previamente mostrado en el visualizador reaparecerán.
☞ Si ya hay un archivo almacenado con el número de archivo seleccionado, en el
visualizador aparecerá el mensaje “OVERWRITE?” y usted deberá decidir si desea
reescribirlo (borrarlo de la memoria y almacenar el nuevo).
Para reescribir el archivo almacenado por el nuevo:
3
New Block
4
Presione
para borrar el archivo previamente almacenado y almacenar el nuevo en
el número seleccionado.
☞
Para retroceder y elegir otro número de archivo sin reescribir el archivo de texto,
Clear
presione
58
Del
, y después seleccione un número de archivo diferente.
INVOCACIÓN DE TEXTO
Para invocar un archivo de texto:
Recall
1
Mantenga presionado
Code
y presione
*8
. Se visualizarán el número de archivo y el
comienzo del texto más recientemente almacenado o invocado.
☞
Para abandonar la función de Invocación sin almacenar el texto, mantenga presioRecall
nado
2
Presione
invocar.
☞
Code
Home
o
y presione
End
*8
Clear
(o simplemente presione
Del
).
hasta que se visualice el número de archivo y el texto que desee
Para ver otras partes del archivo de texto visualizado, presione
o
.
New Block
3
Presione
. Cualquier texto previamente introducido en el visualizador se borrará y
el texto almacenado en el número de archivo seleccionado se invocará en el visualizador.
BORRADO DE UN ARCHIVO
Para borrar un archivo de texto:
M.Del
1
Mantenga presionado
Code
y presione
(
9
. Se visualizarán el número de archivo y el
comienzo del texto más recientemente almacenado o invocado.
☞
Para abandonar la función de Borrado de la memoria sin borrar el texto, mantenga
M.Del
presionado
2
Presione
borrar.
☞
Home
o
Code
End
y presione
(
9
Clear
(o simplemente presione
Del
).
hasta que se visualice el número de archivo y el texto que desee
Para ver otras partes del archivo de texto visualizado, presione
o
.
New Block
3
Presione
. Se visualizará el mensaje “OK TO CLEAR?”.
4
Para borrar el archivo de texto seleccionado, presione
New Block
.
59
SOLUCIÓN DE PROBLEMAS
Problema
Remedio
1. El visualizador se queda en blanco
después de haber conectado la alimentación de la máquina.
• Compruebe que el adaptador de CA esté
correctamente enchufado.
• Si está empleando pilas alcalinas, compruebe
que estén correctamente insertadas.
• Si las pilas están gastadas, reemplácelas por
otro nuevo.
2. La máquina no imprime o los caracteres impresos quedan borrosos.
• Compruebe que el casete de cinta se haya
insertado correctamente.
• Si el casete de cinta está vacío, reemplácelo
por otro nuevo.
• Asegúrese de que la cubierta del casete de
cinta se haya cerrado.
• Cerciórese de utilizar el adaptador de CA Brother correcto. Otros adaptadores podría no
suministrar corriente suficiente para impresión.
3. Los archivos de texto almacenados en
la memoria ya no están ella.
• Si las pilas están gastadas, reemplácelas por
otro nuevo.
4. Los caracteres impresos no se forman
correctamente.
• Si está empleando pilas alcalinas, quizás estén
gastadas. Pruebe utilizando el adaptador de
CA o reemplace las pilas por otras nuevas.
• Cerciórese de utilizar el adaptador de CA
Brother correcto. Otros adaptadores podría
no suministrar corriente suficiente para
impresión.
5. Aparece una línea horizontal en
blanco a través de la etiqueta impresa.
• Limpie el cabezal de impresión como se ha
explicado en la page 22.
6. Aparecen franjas.
• Se ha terminado la cinta. Reemplace el
casete de cinta por otro nuevo
7. La máquina se ha “bloqueado” (es
decir, no responde cuando se presiona una tecla).
• Desconecte la alimentación de la máquina,
y entonces, mientras mantiene presionado
Align
Code
y
R
, vuelva a conectar la alimen-
tación. El texto y los formatos del visualizador y todos los archivos de texto
almacenados en la memoria quedan borrados.
60
LISTA DE MENSAJES DE ERROR
Mensaje de error
7 LINE
LIMIT!
Causa
Remedio
• Este mensaje aparecerá si ya
existen siete líneas cuando
• Limite el número de líneas
de un bloque a siete.
New Block
presione
, o si borra
para unir dos bloques,
haciendo que el bloque
sobrepase siete líneas.
1 BARCODE
PER BLOCK!
• Este mensaje aparecerá si ya
se había un código de barras
al bloque cuando mantenga
presionado
• Limite el número de códigos
de barras de un bloque a
uno.
y presione
Code
Barcode
I
4 DIGIT
MIN.!
5 BLOCK
LIMIT!
í
.
• Este mensaje aparecerá
cuando como datos de
código de barras haya introducido menos del mínimo de
cuatro dígitos.
• Introduzca el mínimo de
cuatro dígitos antes de pre-
• Este mensaje aparecerá si ya
existen cinco bloques cuando
• Limite el número de bloques
del texto a cinco.
mantenga presionado
New Block
sionar
.
Code
New Block
y presione
.
BATTERIES
WEAK!
• Este mensaje aparece cuando
las pilas alcalinas instaladas
están gastadas.
• Reemplace las pilas o
emplee el adaptador de CA.
BUFFER
EMPTY!
• Este mensaje aparece si man- • Introduzca algo de texto
antes de iniciar la función.
tiene pulsada Code y
Length
presiona
T
, pero sin haber
introducido texto en el visualizador.
• Este mensaje aparece si
intenta imprimir, pero sin
haber introducido texto.
• Introduzca texto antes de la
impresión.
61
Mensaje de error
Causa
Remedio
• Este mensaje aparecerá si
trata de introducir un carácter, símbolo, código de
barras, espacio, retorno,
nuevo bloque, o tabulación
después de haber introducido ya 255 caracteres.
• Borre parte del texto existente para poder introducir
nuevo texto.
• Este mensaje aparecerá si
trata de introducir un carácter, un símbolo, un código de
barras, o un espacio en un
campo de disposición
cuando esté utilizando la
función de Formato automático después de haber introducido ya 225 caracteres.
• Edite el texto de forma que
contenga solamente el
número preajustado de
caracteres.
CASETTE
CHANGED!
• Este mensaje aparecerá si ha
cambiado el casete de cinta
entre el momento en el que
comienza la recepción de
datos hasta que se recibe el
comando de impresión.
• Cancele la tarea de impresión, instale el casete de
cinta correcto, y vuelva a
imprimir.
CHANGE
ADAPTOR!
• Este mensaje aparece si se
está empleando un adaptador de alta tensión.
• Desconecte el adaptador de
alta tensión y conecte el
adaptador diseñado exclusivamente para esta máquina.
CUTTER
ERROR!
• Este mensaje aparecerá si el
cortador de la cinta está
cerrado cuando intente
imprimir o hacer avanzar la
cinta.
• Desconecte y vuelva a
conectar la alimentación de
la P-touch.
INPUT
WHOLE CODE!
• Este mensaje aparecerá si el
número ajustado de dígitos
no se ha introducido en los
datos del código de barras.
• Introduzca el número
correcto de dígitos o cambie
el número de dígitos ajustado en los parámetros del
código de barras.
BUFFER
FULL!
62
Mensaje de error
INTERFACE
ERROR!
LENGTH
LIMIT!
Causa
Remedio
• Este mensaje aparecerá si
ocurre un error durante la
transmisión de datos del
ordenador a la P-touch.
• Cancele la tarea de impresión, y después trate de
imprimir de nuevo.
• Este mensaje aparecerá si
trata de imprimir cuando la
velocidad en baudios del
ordenador es diferente a la
de la P-touch.
• Cancele la tarea de impresión y seleccione la misma
velocidad en baudios para el
ordenador y la P-touch.
• Este mensaje aparece si el
texto es más largo de 3’ 3 1/3”
(1 metro) cuando trate de
imprimirlo.
• Acorte el texto a menos de
3’3 1/3” (1 metro) antes de
tratar imprimir.
• Este mensaje aparecerá si uti- • Ajuste la longitud de la etiqueta entre 1,6” (4,0 cm) y
lizó la función de longitud
11,8” (30,0 cm).
para ajustar una longitud
inferior a 1,6” (4,0 cm) o más
de 11,8” (30,0 cm).
• Este mensaje aparecerá si uti- • Ajuste la longitud de las
tabulaciones de forma que
lizó la función de longitud
sea inferior a 11,8” (30,0
de tabulaciones para ajustar
cm).
una longitud superior a 11,8”
(30,0 cm).
LINE
LIMIT!
• Este mensaje aparece si el
número de líneas del texto es
mayor que el número
máximo de líneas posible
para la cinta instalada.
• Reduzca el número de líneas
o instale una cinta más
ancha.
MEMORY
FULL!
• Este mensaje aparecerá si
intenta almacenar un archivo
de texto después de haber
almacenado ya 2500 caracteres en la memoria.
• Borre un archivo que no
desee para dejar espacio
para el nuevo.
NO
FILES!
• Este mensaje aparece si
intenta llamar o borrar un
archivo de texto de la memoria cuando realmente no hay
ninguno almacenado.
• Almacene primero un
archivo de texto.
63
Mensaje de error
NO
TAPE!
Causa
Remedio
• Este mensaje aparecerá si
mantiene presionado
Code
• Instale un casete de cinta y
pruebe de nuevo.
Length
y presiona
T
o si intenta
imprimir una etiqueta o alimentar cinta cuando haya
casete de cinta instalado.
REPLACE
BATTERIES!
• Este mensaje aparece cuando
las pilas alcalinas instaladas
están casi gastadas.
• Reemplace las pilas o
emplee el adaptador de CA.
ROM
PROBLEM!
• Este mensaje aparece si hay
algún problema con la
memoria de acceso aleatorio de la máquina.
• Póngase en contacto con su
representante de servicio.
SET 1” TAPE!
• Este mensaje aparecerá si no
hay un casete de cinta de 1”
(24 mm) de anchura instalado cuando haya seleccionado una disposición para
cinta de 1” (24 mm) de
anchura.
• Instale un casete de cinta de
1” (24 mm) de anchura.
SET 24 mm
TAPE
SET 3/4” TAPE!
SET 18 mm
TAPE
SET 1/2” TAPE!
SET 12 mm
TAPE
64
• Este mensaje aparecerá si no • Instale un casete de cinta de
3/4” (18 mm) de anchura.
hay un casete de cinta de 3/
4” (18 mm) de anchura instalado cuando haya seleccionado una disposición para
cinta de 3/4” (18 mm) de
anchura.
• Este mensaje aparecerá si no • Instale un casete de cinta de
1/2” (12 mm) de anchura.
hay un casete de cinta de 1/
2” (12 mm) de anchura instalado cuando haya seleccionado una disposición para
cinta de 1/2” (12 mm) de
anchura.
Mensaje de error
Causa
Remedio
• Este mensaje aparecerá si no
hay un casete de cinta de 3/
8”(9 mm) de anchura instalado cuando haya seleccionado una disposición para
cinta de 3/8” (9 mm) de
anchura.
• Instale un casete de cinta de
3/8” (9 mm) de anchura.
• Este mensaje aparecerá si no
hay un casete de cinta de 1/
4” (6 mm) de anchura instalado cuando haya seleccionado una disposición para
cinta de 1/4” (6 mm) de
anchura.
• Instale un casete de cinta de
1/4” (6 mm) de anchura.
SYSTEM
ERROR!
• Este mensaje aparece si hay
algún problema con el software de la máquina.
• Póngase en contacto con su
representante de servicio.
TAB
LIMIT!
• Este mensaje aparecerá si ya
ha ajustado 50 tabulaciones
en el texto cuando mantenga
• Limite el número de tabulaciones del texto a 50.
SET 3/8” TAPE!
SET 9 mm
TAPE
SET 1/4” TAPE!
SET 6 mm
TAPE
presionado
Code
y presione
Tab
Q
TEXT
TOO HIGH!
.
• Este mensaje aparece si el
tamaño del texto es más
grande que el ancho de la
cinta instalada.
• Reduzca el tamaño de los
caracteres o instale una cinta
más ancha.
65
Mensaje de error
TEXT
TOO LONG!
Causa
Remedio
• Este mensaje aparece si la
longitud del texto es mayor
que la longitud que se ha
ajustado para la etiqueta utilizando la función de longitud.
• Borre algo de texto, reduzca
el ancho de los caracteres o
incremente la longitud ajustada de la etiqueta.
• Este mensaje aparecerá si
intenta introducir texto más
largo que el de la longitud
preajustada de un campo de
plantilla de la función Formato automático.
• Borre parte del texto.
<Localización de Centro de servicio>
* Si necesita un centro de servicio local, le rogamos que llame al 1-800-284-HELP (4357)
para localizar el centro de servicio más cercano a usted.
<Asistencia operacional>
* Para asistencia técnica y operacional puede llamar al Servicio al cliente Brother:
1-877-4-P-TOUCH (voz), o 1-901-379-1210 (fax).
66
ESPECIFICACIONES
HARDWARE
Dispositivo de
entrada:
LCD:
Teclado de 51 teclas
Cinta de
impresión:
Sensible a la presión, base adhesiva, 8 m de longitud
Cinco anchos disponibles:
1/4” (6 mm)
3/8” (9 mm)
1/2” (12 mm)
3/4” (18 mm)
1”
(24 mm)
Alimentación:
8 pilas alcalinas AA (AM3, LR6) o adaptador de CA opcional
Desconexión automática de la alimentación si no se pulsa ninguna tecla
durante 5 minutos
Cabezal de
impresión:
Dimensiones:
128 puntos / 180 dpi
Peso:
2lbs (900 g) (sin casete de cinta ni pilas instalados)
7 × 5 puntos
12 caracteres × 2 líneas
17 indicadores
7 25/64” (188 (An)) × 9 13/64” (234 (Prf)) × 2 35/64” (67 (Al)) mm
SOFTWARE
Tamaño de la
memoria
intermedia:
Tamaño de la
memoria:
Tamaño de
caracteres:
Máximo de 255 caracteres
Máximo de siete líneas
Estilos de
impresión:
Normal, Bold, Outline, Solid, Shadow (todos pueden combinarse con
cursiva), y Vertical
2500 caracteres
Siete tamaños (6, 9, 12, 18, 24, 36 y 48 puntos) + 60 puntos (Mayúsculas solamente)
Todos disponibles en el modo normal y ancho (wide)
67
ACCESORIOS
● Accesorios de consumo
Adquiera los casetes de cinta en el distribuidor autorizado que le quede más cerca.
Emplee sólo cintas Brother TZ con esta máquina. Brother no puede hacerse responsable
por los problemas causados por el empleo de accesorios de consumo no autorizados. No
emplee cintas que no tengan la marca
.
N.º de
producto
Descripción
CANT./
PAQUETE
PRECIO
1
1
1
1
1
1
1
$23.99
$23.99
$23.99
$23.99
$23.99
$26.99
$26.99
1
1
1
1
1
1
1
1
1
1
1
1
1
1
1
1
1
$20.99
$20.99
$20.99
$20.99
$20.99
$24.99
$23.99
$20.99
$20.99
$23.99
$20.99
$20.99
$24.99
$20.99
$23.99
$23.99
$23.99
1
1
1
1
$16.99
$17.99
$17.99
$20.99
Cintas laminadas de 1” (24 mm)
TZ-151
TZ-251
TZ-451
TZ-651
TZ-252
TZ-354
TZ-355
Caracteres negros sobre fondo transparente
Caracteres negros sobre fondo blanco
Caracteres negros sobre fondo rojo
Caracteres negros sobre fondo amarillo
Caracteres rojos sobre fondo blanco
Caracteres dorados sobre fondo negro
Caracteres blancos sobre fondo negro
Cintas laminadas de 3/4” (18 mm)
TZ-141
TZ-145
TZ-241
TZ-242
TZ-243
TZ-344
TZ-345
TZ-441
TZ-541
TZ-545
TZ-641
TZ-741
TZ-B41
TZ-M41
TZ-WB41
TZ-WT41
TZ-WS41
Caracteres negros sobre fondo transparente
Caracteres blancos sobre fondo transparente
Caracteres negros sobre fondo blanco
Caracteres rojos sobre fondo blanco
Caracteres azules sobre fondo blanco
Caracteres dorados sobre fondo negro
Caracteres blancos sobre fondo negro
Caracteres negros sobre fondo rojo
Caracteres negros sobre fondo azul
Caracteres blancos sobre fondo azul
Caracteres negros sobre fondo amarillo
Caracteres negros sobre fondo verde
Caracteres negros sobre fondo naranja fluorescente
Caracteres negros sobre fondo claro (MATE)
Caracteres negros sobre fondo Bugs Bunny
Caracteres negros sobre fondo Taz
Caracteres negros sobre fondo Tweety & Sylvester
Cintas laminadas de 1/2” (12 mm)
TZ-131
TZ-231
TZ-232
TZ-335
68
Caracteres negros sobre fondo transparente
Caracteres negros sobre fondo blanco
Caracteres rojos sobre fondo blanco
Caracteres blancos sobre fondo negro
N.º de
producto
Descripción
CANT./
PAQUETE
PRECIO
1
1
1
1
$14.99
$16.99
$18.99
$16.99
1
1
1
$12.99
$14.99
$17.99
CANT./
PAQUETE
PRECIO
1
$29.99
1
$24.99
CANT./
PAQUETE
PRECIO
1
$39.99
1
$37.99
1
$27.99
1
$24.99
CANT./
PAQUETE
PRECIO
1
1
$24.99
$24.99
Cintas laminadas de 3/8” (9 mm)
TZ-121
TZ-221
TZ-325
TZ-421
Caracteres negros sobre fondo transparente
Caracteres negros sobre fondo blanco
Caracteres blancos sobre fondo negro
Caracteres negros sobre fondo rojo
Cintas laminadas de 1/4” (6 mm)
TZ-111
TZ-211
TZ-315
Caracteres negros sobre fondo transparente
Caracteres negros sobre fondo blanco
Caracteres blancos sobre fondo negro
Cintas especiales
N.º de
producto
TZ-SE4
TZ-FA3
Descripción
Caracteres negros sobre cinta de seguridad de
3/4” (18 mm)
Caracteres azulese sobre cinta de tela de
1/2” (12 mm)
Juego de membretes
N.º de
producto
SK-LB
SK-MB
SH-LB
SH-MB
Descripción
Juego para hacer sellos para sello con tinta
grande
Juego para hacer sellos para sello con tinta
medio
Estampador adicional para sello con tinta
grande
Estampador adicional para sello con tinta
medio
negra
negra
negra
negra
Opcións
N.º de
producto
AD-60
6999
Descripción
Adaptador de CA
Caja de transporte protectora
* Para adquirir accesorios vía Internet, le rogamos que visite el sitio Web:
http://www.brothermall.com
69
Printed in China
LA0986001A