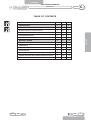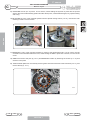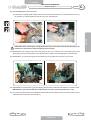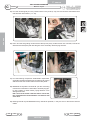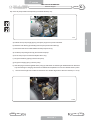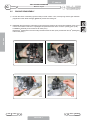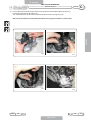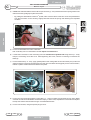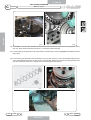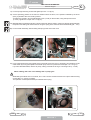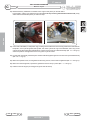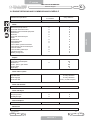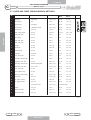
1
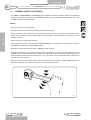
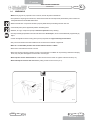
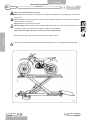
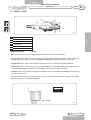
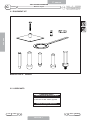
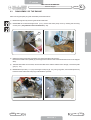
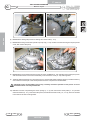
C TWO-STROKE ENGINE AM6 2T XTM - XSM POWER UP 2007 WORKSHOP MANUALS C - ENGINE TWO-STROKE ENGINE AM6 Introduction CHAPTER C TABLE OF CONTENTS 08.06 S Pr P INTRODUCTION 1 1 4 MANUAL UPDATES 1 1.1 4 NOTES FOR EASY CONSULTATION 1 1.2 5 GENERAL WORK PROCEDURES 1 1.3 8 RECOMMENDATIONS 1 1.4 9 SPARK PLUGS 1 1.5 11 MINARELLI ENGINE 2 2 13 EQUIPMENT KIT 2 2.1 14 LUBRICANTS 2 2.2 14 ENGINE DISASSEMBLY 2 2.3 15 MAINTENANCE 2 2.4 22 ENGINE ASSEMBLY 2 2.5 26 ENGINE SERVICING AND COMMISSIONING SCHEDULE 2 2.6 33 PARTS AND THEIR TORQUE WRENCH SETTINGS 2 2.7 34 ISSUE ENGLISH SECTION 3 PAGE SECTION 1 3 C - ENGINE C TWO-STROKE ENGINE AM6 CHAPTER 1 Introduction INTRODUCTION • All checks, maintenance, repairs or replacements, etc. on the vehicles manufactured by Malaguti are to be performed by skilled and expert technical personnel with specific experience in state-of-the-art technology and full knowledge of the quickest and most rational procedures, technical characteristics, setting values and tightening torques, which may only be properly and exhaustively provided by the manufacturer. • This set of WORKSHOP MANUALS provides technicians of the sector (Authorised Service Centres, etc.), the essential information for operating in accordance with the latest good working practices and work safety regulations. • These publications provide all necessary information for routine procedures on all the MALAGUTI motor vehicles currently in production at the date of issue. The information provided deals with the motor vehicle ENGINES. Some basic technical information has been intentionally omitted as it is considered to be common knowledge. ENGLISH • Additional information is available in the SPARE PARTS CATALOGUES of each model. • It is important that before referring to the manual, the information given in this general section be carefully read as it provides all the essential hints and guidelines for best consulting the various topics and main technical subjects. Note: These manuals provide the necessary information and instructions for routine maintenance and servicing. MALAGUTI reserves the right to make any changes and modifications hereto it deems necessary without prior notice. For further information and details, please contact the MALAGUTI Service Division. 1.1 MANUAL UPDATES • Updates of this publication will be delivered by us in a reasonable time. The superseded sheets should be saved in the manual as they remain applicable to the servicing of pre-modified engines. • The table of contents will be duly updated in the event that new pages are inserted, which render the consultation of the manual difficult. • IMPORTANT! The Workshop Manuals are to be considered as essential tools to be properly kept up-to-date so as to maintain their “validity” over time. 4 PAGE SECTION 1 ISSUE 08.06 C - ENGINE TWO-STROKE ENGINE AM6 Introduction CHAPTER C 1.2 NOTES FOR EASY CONSULTATION PAGE LAYOUT Chapter Engine model W Page n° Z Date of issue X Y ENGLISH Y X Z W (RH PAGE) MODIFIED PAGES • Modified pages shall bear the same number as those in the previous edition/pre-modified ones, followed by the letter M, with the date of issue appearing in the appropriate box. • Modified pages may contain new illustrations; in this case, the added illustration (or illustrations) will bear the number of the illustration on the former page, followed by a letter. ADDITIONAL PAGES • Any additional pages shall bear the last number of the section to which they belong, followed by the letter A and the date of issue. EDITING SYMBOLS • Symbols have been provided for quick and easy reference (see page 6), identifying situations requiring utmost attention or providing practical suggestions or simple information. • These symbols may appear next to a text (in which case they refer solely to the text itself), next to a figure (in which case they refer to the topic illustrated in the figure and to the relative text), or at the top of the page (in which case they refer to all the topics dealt with in the page). Note: The meaning of the symbols should be duly memorised as their scope is to avoid having to repeat basic technical concepts or safety recommendations. They are therefore to be considered as veritable “memory tags”. In case of any doubt as to their meaning, consult the page in which they are fully described. 08.06 ISSUE PAGE SECTION 1 5 C - ENGINE TWO-STROKE ENGINE AM6 C CHAPTER Introduction EDITING SYMBOLS A) CAUTION! Recommendations and precautions regarding rider safety and motor vehicle integrity. B) WARNING! Situations entailing the risk of personal injury to maintenance or repair mechanics, other workshop personnel or third parties, or damage to environment, vehicle or equipment. C) B ENGLISH FIRE HAZARD Indicates operations which may constitute a fire hazard. C RISK OF EXPLOSION Indicates operations which may constitute a risk of explosion. D E) TOXIC FUMES Indicates a possibility of intoxication or inflammation of the upper respiratory tract. E F) MECHANICAL MAINTENANCE Operations to be performed only by an expert mechanic. F G) ELECTRICAL MAINTENANCE Operations be performed only by an expert electrical/ electronic technician. G H) NO! Operations to be absolutely avoided. I) ENGINE SERVICE MANUAL Indicates information which may be obtained by referring to said manual. I SPARE PARTS CATALOGUE Indicates information which may be obtained by referring to said catalogue. L D) L) 6 A PAGE SECTION 1 H M R ISSUE 08.06 C - ENGINE TWO-STROKE ENGINE AM6 Introduction CHAPTER C ABBREVIATIONS F Cs P Pr S Sc T V Figure Tightening torque Page Paragraph Section Diagram Table Screw ENGLISH Note: the letter V in the illustrations refers to retaining or adjusting screws. The number following this letter refers to the number of the same type of screw in the unit or component described and illustrated. Letters not followed by a number indicate a single screw. In case of different screws being referred to in the illustration, the letter V is followed by a number and a small letter, for instance: (V4a). Unless otherwise specified, units and components are reassembled by proceeding in the reverse order of removal. OPERATIONAL SYMBOLS L) LOCTITE L O) Oil lubrication O G) Greasing G 08.06 ISSUE PAGE SECTION 1 7 C - ENGINE C TWO-STROKE ENGINE AM6 CHAPTER 1.3 Introduction GENERAL WORK PROCEDURES • The advice, recommendations and warnings given hereafter are aimed at ensuring maximum work safety as well as at considerably reducing the risk of accidents, personal injury, equipment damage and idle times. They should therefore be strictly adhered to. ADVICE: • Only use quality tools and equipment. • Only use equipment conforming to EU Directives for lifting the vehicle. • During operations, always keep tools and equipment at hand, possibly laying them out according to the sequence in which they are to be used. Absolutely avoid putting them on the vehicle itself, out-of-sight or in poorly accessible places. ENGLISH • Always keep the work area clean and tidy. • When tightening screws or nuts, start with the larger diameter or inner fasteners, and tighten them in progressive “pulls” in accordance to a “criss-cross” pattern. • Preferably use open-end box wrenches by “pulling” and not “pushing”. • Adjustable wrenches (F. 1) should only be used in case of emergency, i.e. when a properly sized wrench is not available. They should preferably not be used as the movable jaw tends to open thus risking damaging or not properly tightening the bolt to the correct torque. In any case, when using an adjustable wrench, take care to proceed as shown in Figure 1. • Except for occasional customers, always make out and deliver to the customer a work sheet specifying the operations performed, with notes as to any future checks eventually required. F. 1 8 PAGE SECTION 1 ISSUE 08.06 C - ENGINE TWO-STROKE ENGINE AM6 Introduction 1.4 CHAPTER C WARNINGS • Before carrying out any operation on the vehicle, wait for all parts to cool down. • For operations requiring two mechanics, make sure that the various steps to be performed by each of them are clearly defined and coordinated beforehand. • Make sure that each component has been properly fitted before proceeding with the next one. • Lubricate all parts (where applicable) before reinstalling them. • Gaskets, O-rings, circlips and split pins must be replaced at every refitting. • The torque settings specified in the manuals refer to the “final torque”, which must be attained progressively by steps. ENGLISH • Loosen and tighten aluminium alloy parts (covers) only after the engine has fully cooled down. • Only use screwdrivers with sizes suitable to the screws to be loosened or tightened. • Work in a comfortable position and ensure that the vehicle is stable. • Never use a screwdriver as a lever or chisel. • Never use pincers to loosen or tighten screws or nuts because, in addition to not providing a sufficient clamping force, they may also damage the screw head or nut hexagon. • Never tap the wrench with a hammer or other similar tools to loosen or tighten screws and nuts (F. 2). • Never attempt to increase the lever arm by fitting a tube into the wrench (F. 3). F. 2 08.06 ISSUE F. 3 PAGE SECTION 1 9 C - ENGINE C TWO-STROKE ENGINE AM6 Introduction CHAPTER Never use open flames for any reason. Never leave open containers or containers not suitable for holding fuel in passageways, close to heat sources, etc Never use petrol to clean the vehicle or the floor of the workshop. Always use low flash point solvents to clean the vehicle components. Never suck from or blow into the fuel pipe. When welding, make sure that there are no flammable liquids in the vicinity. Always remove the tank, even if completely empty, and disconnect the negative cable (-) from the battery. Never leave the engine running in closed or poorly ventilated areas. Before any servicing, make sure that the motorbike is perfectly stable. ENGLISH The front wheel should preferably be anchored to the equipment (A - F 4) integral with the lifting board. A F. 4 10 PAGE SECTION 1 ISSUE 08.06 C - ENGINE TWO-STROKE ENGINE AM6 Introduction CHAPTER C 1.5 SPARK PLUGS 1 2 Insulator Body 3 Gasket 4 5 6 Electrode Earth electrode Threads SPARK PLUG CHECK ENGLISH F. 5 1,000 km • Remove the spark plug while the engine is hot (taking utmost care to avoid scalding!). • The carbon deposits and the colour of the insulator (around the central electrode) provide good information as to the heat range of the spark plug and to carburetion, lubrication and general condition of the engine. • A light brown colour of the insulator indicates that engine working conditions are generally correct. • Sooty black deposits, that are dry (to the touch) and opaque, are a sign that working temperature is too low, i.e. that the heat range of the spark plug is too high, mixture too rich or ignition defective. • A whitish colour of the insulator is indicative of too lean a mixture or of too low a heat range of the spark plug (i.e. spark plug too “hot”). • Check electrode gap (F.6) (even if the spark plug is new) by means of a calibrated thickness gauge. If necessary, adjust by acting only on the earth electrode. Cs - Nm 20 - 25 0,6 - 0,7 mm F. 6 08.06 ISSUE PAGE SECTION 1 11 C - ENGINE C TWO-STROKE ENGINE AM6 Introduction CHAPTER SPARK PLUG MAINTENANCE • Spark plug maintenance consists essentially of a periodical visual inspection. Remove the spark plug and check for proper condition and gap. • Clean the electrodes and the insulator thoroughly by means of a wire brush. • Remove any residual dirt with a strong jet of compressed air. • Lubricate spark plug thread with engine oil or graphitised grease, and install it by hand until finger tight. Tighten to the specified torque with a spark plug wrench (see F.6). It is imperative that any spark plug exhibiting cracks on the insulator or corroded electrodes be replaced. ENGLISH SPARK PLUG REPLACEMENT 6,000 - 7,000 km • Upon prescribed mileage being reached, always replace the spark plug. Use MALAGUTI recommended spark plugs. • When replacing exhausted spark plugs, visually inspect spark plug condition as described above to ascertain whether or not the engine is running properly. ENGINE REMOVAL • For removal of the engine from the chassis, refer to the “Chassis” Workshop Manual, which lists all the operations required. ENGINE DISASSEMBLY The manufacturer declines all responsibility for damage of any kind caused by disassembly and reassembly of the engine and its parts if unsuitable tools are used. Use only ORIGINAL MALAGUTI SPARE PARTS. 12 PAGE SECTION 1 ISSUE 08.06 CHAPTER SECTION 2 Minarelli Engine WORKSHOP MANUALS ISSUE 08.06 C C - ENGINE C TWO-STROKE ENGINE AM6 CHAPTER Minarelli Engine 2.1 EQUIPMENT KIT ENGLISH Minarelli code n° 9920200 2.2 LUBRICANTS LUBRICANTS TABLE LUBRICANTS FOR TWO-STROKE ENGINES 1) Synthetic mix oil 2) Gearbox oil SAE 10W30, type SE GENERAL PURPOSE LUBRICANTS 3) Grease for moving parts 14 PAGE ISSUE SECTION 2 08.06 C - ENGINE TWO-STROKE ENGINE AM6 Minarelli Engine 2.3 CHAPTER C DISASSEMBLY OF THE ENGINE After removing the spark-plug and carburettor proceed as follows: 1) DRAIN the engine oil by removing the relevant drain bolt. 2) UNSCREW the coolant drainage screw (1-F1); remove the water pump cover by undoing the two fixing screws (2-F1). Pay attention to the dowel bolts (1-F2). 2 F. 1 ENGLISH 1 1 F.2 3) UNDO the fixing screws of the flywheel cover (left hand side) and remove it. Remove the starter motor (if fitted) by removing the two screws on the crankcase and the screw on the support strap. 4) Take the carburettor out of its seat; remove the intake union and the relative clutch “bridge”; remove the plate group (1 - F.3). 5) REMOVE the sprocket (1 - F.4) by removing the snap ring (2 - F.4); using ring pliers, remove the sprocket by hand and remove the other snap ring underneath the sprocket. 1 1 F. 3 08.06 2 F.4 ISSUE PAGE SECTION 2 SECTION 3 15 C - ENGINE C TWO-STROKE ENGINE AM6 Minarelli Engine CHAPTER 3 1 1 2 F.5 F.6 ENGLISH 6) REMOVE the sliding stop screw for starting from clutch side (1 - F.5). 7) REMOVE the fixing screws of the plastic oil pump cap (1 - F.6). Undo the screws securing the oil pump to the cover; then remove the pump. 2 1 3 2 1 3 F.7 F.8 8) REMOVE the cover/crankcase fixing screws (of which one M6x55 (2 - F.6), that secure the water pump cover and the relative clutch cover to the crankcase); now remove the cover (3 - F.6) and its gasket. 9) TAKE the starter assembly OUT of its seat (only for versions with starter pedals), bearing in mind that the any shim washers must be put in the same position when the component is reassembled. CAUTION: when disassembling this group, carefully check the position of the pieces so as to reassemble them correctly afterwards. 10) UNDO the screws compressing the clutch springs (1 - F.7); then remove the clutch plate (2 - F.7) and the entire set of discs (3 - F.7); remove the disc pusher, the ball and the clutch rod (1, 2, 3 - F.8), which are housed in the centre hole of the change shaft. 16 PAGE ISSUE SECTION 2 08.06 C - ENGINE TWO-STROKE ENGINE AM6 Minarelli Engine CHAPTER C 1 1 2 F.10 ENGLISH F.9 11) DISENGAGE the nut from its fixing tab (1 - F.9); using the appropriate wrench (1 - F.10), unscrew and remove the fixing nut (2 - F.10) of the clutch boss. 12) REMOVE the following pieces in this order: clutch boss (1-F.11), spacer (2-F.11), clutch gear (3-F.11), shim washer (1-F.12), tapered washer (2-F.12), paying attention to the direction in which they are assembled so as to reassemble them correctly afterwards. 1 2 2 1 3 F.11 F.12 13) USING the magneto flywheel locking wrench (1-F.13), lock the flywheel and slacken the retaining nut of the gear on the countershaft with the wrench (1-F.14). 14) REMOVE the gear on the countershaft (1 - F.14) and the key. 1 2 1 F.13 08.06 F.14 ISSUE PAGE SECTION 2 SECTION 3 17 C - ENGINE C TWO-STROKE ENGINE AM6 Minarelli Engine CHAPTER 15) UNSCREW the nut (2-F.14) with a 19 mm wrench, whilst holding the flywheel in place with the special wrench; then remove the following parts in this order: drive pinion, countershaft drive gear, key, spacer bushing and O-ring. 16) BLOCKING the rotor of the magneto flywheel with the special locking wrench (1-F.15), unscrew the rotor retaining nut with a 15 mm wrench. 1 ENGLISH 1 F.15 F.16 17) REMOVE the rotor of the magneto flywheel by means of the appropriate puller (1-F.16), which must be screwed into the threaded seat of the rotor; whilst holding the latter in place with a wrench, turn the centre screw. 18) UNDO the screw of the pick up (1-F.17) and REMOVE the stator by loosening the screws (2 - F.17) that secure it to the plate. 19) TAKE the stator plate OUT of its seat by removing the 3 screws that secure it to the crankcase (3- F.17), and remove the key (4 - F.17). 2 3 3 1 4 3 18 PAGE F.17 2 ISSUE SECTION 2 08.06 C - ENGINE TWO-STROKE ENGINE AM6 Minarelli Engine CHAPTER C 20) DISASSEMBLING the thermal section: F.18 ENGLISH a) unscrew the 4 cylinder head holding nuts and remove the relevant washers; remove the head, its O-ring, the cylinder, the cylinder gasket and the four O-ring on the stud bolts. F.19 CAUTION: before removing the circlips of the piston pin, put a clean cloth into the opening on the crankcase, to prevent the circlips dropping into the engine. 21) REMOVE the two circlips (F.18), remove the piston pin and, if you intend to use a 2-diameter plug, knock gently taking care to hold the piston on the opposite side in order to avoid damaging the connecting rod. 22) REMOVE the 13 screws joining the two crankcases (F.19) and take the clutch pin out of its seat. 1 F.20 F.21 23) SEPARATE the 2 crankcases by gentling tapping the secondary shaft and shift shaft with a wooden mallet. IMPORTANT: if you need to take the crankshaft out of its seat, use the special tool (1- F.20). 24) Once the crankcases have been separated, CHECK that the shim washers are on the shafts and not on the crankcase that has just been removed (F.21). 08.06 ISSUE PAGE SECTION 2 SECTION 3 19 C - ENGINE C TWO-STROKE ENGINE AM6 CHAPTER Minarelli Engine 25) PUT the neutral signal pin in the position shown in the photo (F. 22), hence remove the shift shaft and its relevant lower shim washer (1 - F. 23). 1 ENGLISH F.22 F.23 26) PULL OUT the fork guiding rod and remove the top fork (F.24); to take the fork out of its seat, remove the desmodronic shaft (F.25) and raise the gear on the secondary shaft carrying the forks. F.24 F.25 27) PUT the following components TOGETHER: output shaft, secondary shaft and remaining fork and raise (F.26), paying attention to the shim washer under the secondary shaft. 28) REMOVE the equaliser countershaft: pull the connecting rod from the crankcase on clutch side; if necessary tap gently with a plastic or rubber mallet, paying attention not to damage the thread. N.B.: as far as the clutch crankcase side is concerned, the crankshaft and countershaft do not interfere with each other. F.26 29) Bearings should only be REMOVED if they need to be replaced, i.e. they are worn or their service life has ended. 20 PAGE ISSUE SECTION 2 08.06 C - ENGINE TWO-STROKE ENGINE AM6 Minarelli Engine CHAPTER C 30) IF the oil pump needs to be replaced, proceed as follows (F.27): 1 4 2 4 5 3 ENGLISH F.27 a) Detach the oil pump supply pipe (1) and put a plug into it to prevent oil leaks. b) Detach the oil delivery pipe leading from the pump to the carburettor (2). c) Disconnect the control cable fastened to the pump’s lever (3). d) Undo the pump fixing screws (4) and remove the pump. e) Fit the new pump in its seat and replace the O-ring. f) Plug the oil delivery pipe (2) into the new pump. g) Plug the oil supply pipe (1) into the pump. h) Take the purge screw and gasket off the pump (5) and let the oil containing air bubbles leak out. Wait until only oil is leaking out. Purging can thus be considered accomplished. You can now refit the screw in place. i) The minimum length of the cable must be such as to enable alignment of the two notches (6 - F. 27a). 6 F.27a 08.06 ISSUE PAGE SECTION 2 SECTION 3 21 C - ENGINE C TWO-STROKE ENGINE AM6 CHAPTER Minarelli Engine 2.4 MAINTENANCE GENERAL WARNINGS Before reassembling the engine either totally or partially, thoroughly clean the parts by washing them with petrol, drying them with compressed air and making sure that they are sufficiently oiled and in perfect working order. It is always advisable to replace the gaskets because old ones may be leaky. We recommend you always replace the engine oil seals: they may have been damaged during disassembly and this could adversely affect engine operation. Always use the special plugs to ensure correct assembly of the oil seals. A) Secondary gear shaft oil seal: - Secondary gear shaft oil seal assembly plug. ENGLISH B) Connecting rod oil seal: - Connecting rod oil seal assembly plug, clutch side. - Connecting rod oil seal assembly plug, flywheel side. C) Clutch lever oil seal: - Clutch lever oil seal assembly plug. D) Shift shaft oil seal: - Shift shaft oil seal assembly plug. E) Water pump oil seal: - Water pump oil seal assembly plug. Check carefully that the pieces are whole and arrange all the various groups of gears in such a way that assembly may be carried out correctly. 22 PAGE ISSUE SECTION 2 08.06 C - ENGINE TWO-STROKE ENGINE AM6 Minarelli Engine CHAPTER C PREVENTIVE CARE 1) WASH the two crankcases and the bearings with petrol and blow them with compressed air, checking that the bearings run freely and noiselessly. 2) MAKE SURE the connecting rod is in perfect working order and check for faults, especially in the bearing seats. Make sure assembly on flywheel side has been properly accomplished. Using a comparator, check the eccentricity of the two connecting rod axle shafts. The maximum eccentricity value must not exceed 0.04 mm. On the contrary, centre accordingly. Make sure the connecting rod is perpendicular. 3) MAKE SURE the transmission is in perfect working order and fit the shim washers in the right positions. If you have replaced components, make sure that they are put in the same positions as the parts removed and that the end float does not exceed 0.1 mm. To obtain this condition, measure the distance of the shim washers on the crankcase and components, and fill any gaps with other shim washers, as shown in the photo (F.28). 4) CHECK the distance of the shim washer of the desmodronic shaft both on the crankcase and on the part, and fill any gaps with other shim washers, as shown in the photo (F.29). The end float must be less than 0.1 mm. Th. 0.6 ENGLISH CAUTION: if it should be necessary to replace a bearing, the seat must be heated before installing the new bearing. Th. 0.6 R Th. 0.6 F.28 5) F.29 CHECK the distance of the shim washers of the shift shaft both on the crankcase and on the part, and fill any gaps with other shim washers, as shown in the photo (F.30). The end float must be less than 0.1 mm. Th. 0,6 Th. 0,6 F.30 08.06 F.31 ISSUE PAGE SECTION 2 SECTION 3 23 C - ENGINE C TWO-STROKE ENGINE AM6 CHAPTER Minarelli Engine 6) ENSURE that the clutch assembly is in working order. To do so, ensure that the iron discs are in good condition, that the notches on the cork discs are not too deformed and that their coating is not burnt. Check that the grooves on the clutch boss are not too deeply marked; perform the same check on the slots of the clutch housing. Also check that the clutch springs are not shorter than the permissible threshold of 29.5 mm (F.31); if they are shorter replace them. 7) CAREFULLY clean the carbon crust from the piston top by means of a common scraper, taking care not to damage the piston itself. Check the piston skirt for streaks or seizing. Check that it is firmly mated to the lubricated piston pin, the surface of which must be in perfect condition. Make sure that the piston pin can be fitted by manual pressure and that it does not yield under its own weight. 8) CHECK the piston rings for faults of any type and make sure that the clearance between the two ends is within the values shown in the chart. PISTON RING DISTANCE ENGLISH RINGS New DISTANCE 0.15 0.30 mm Used up to 1.0 mm The checks must be carried out using a feeler gauge. The piston ring must be placed in the cylinder in a horizontal position (F.32). 9) CHECK that the cylinder water jacket does not have seizing notches or wear and that there is no scoring of any kind. By means of a bore gauge, check the cylinder bore in two directions at 90° the one from the other (one parallel and the other perpendicular to the axis of the piston pin) (F.33). The maximum permissible ovalisation is 0.03 mm, exceeding which the cylinder must be replaced. F.32 24 PAGE F.33 ISSUE SECTION 2 08.06 C - ENGINE TWO-STROKE ENGINE AM6 Minarelli Engine CHAPTER C Repeat the measurements in several positions along the cylinder jacket, between the top face of the cylinder and the exhaust gap (F.34). Then check the diameter of the piston and compare it with that of the cylinder (F.33). POSITION THE THERMOSTAT HOLE, AS SHOWN ENGLISH 10 mm F.34 The maximum end float is 0.10 mm, exceeding which, the piston should be replaced. See the chart below. COUPLING CHART ENGINE TYPE AM 50 (WATER COOLED) MIN./MAX. PLAY TOLE.PISTON 0.049 000000 TOLE. CYLINDER SELECTION –0.063 –0.057 –0.007 –0.002 Y piston code 62.0412.0 –0.056 –0-050 –0.001 +0.006 Z (CILINDRO IN GHISA) 000000 –0.049 –0.043 +0.007 +0.012 V (CAST IRON CYLINDER) 000000 0.062 Important: maintain the same identification letters on the cylinder and piston. The cylinder identification letter can be found on the flat surface of the oiler. 10) WATER PUMP a) Place the clutch crankcase (right hand side) on a flat surface. b) Fit the oil seal in the right direction, as shown (F.35). c) Fit the impeller, gasket, dowels and water pump cover. F.35 08.06 ISSUE PAGE SECTION 2 SECTION 3 25 C - ENGINE C TWO-STROKE ENGINE AM6 CHAPTER 2.5 Minarelli Engine ENGINE REASSEMBLY 1) PLACE the clutch crankcase (right hand side) on a flat surface. Then, fit the spring and the gear selection poppet ball in their seats and apply grease to prevent them falling out. 2) PREPARE the transmission assembly (primary/secondary) keeping all components together (F.36). Put a 0.6 mm shim washer under the 1st speed gear and position the fork in the 3rd and 4th primary gear (F.36). LOWER the assembly thus formed into its seats (F.37). Raise the 5th speed gear on the secondary shaft and insert the fork (F.38). Fit the other fork (6th speed gear) into its seat (F.39). ENGLISH 26 F.36 F.37 F.38 F.39 PAGE ISSUE SECTION 2 08.06 C - ENGINE TWO-STROKE ENGINE AM6 Minarelli Engine 3) CHAPTER C FIT the desmodronic shaft (F.40). Insert the fork guide pins into the desmodronic shaft (F.41). Fit the fork guide rod into its seat (F.42). Turn the desmodronic shaft until it reaches the position shown in the figure (F.43). ENGLISH N.B.: these operations must be effected without forcing (with a hammer or other tools). 08.06 F.40 F.41 F.42 F.43 ISSUE PAGE SECTION 2 SECTION 3 27 C - ENGINE C TWO-STROKE ENGINE AM6 Minarelli Engine CHAPTER 4) INSERT the shift shaft with the lower washers (0.6 mm thick) (1- F.44) and insert the return spring hooks in the relevant anchoring bridge (F.45) then check that: - By putting the desmodronic shaft in 3rd speed, make sure the rollers of the cam are at an equal distance from the fork hooks. On the contrary, slightly bend the ends of the spring until obtaining the requested condition. 1 ENGLISH F.44 F.45 5) FIT the countershaft in the clutch crankcase. N.B.: assembly of the countershaft in its seat implies no interference. 6) If it has been removed, FIT the connecting rod in the crankcase on flywheel side using the tool (1 - F.46); keep the connecting rod at the T.D.C. whilst tightening the screw, until the connecting rod touches the bearings. 7) FIT the dowel bolts (1-2 - F.47), apply gasket paste on the mating sides of the crankcases (F.47) and oil all shafts. Place the crankcase (flywheel side) over the other crankcase and tap gently all over with a wooden, leather or plastic mallet until the crankcases are joined. 2 1 1 F.46 28 F.47 8) FIT the 13 fixing screws and tighten in place (Cs 1.0 ÷ 1.2 kg*m). Make sure all shafts can turn freely. Make sure that none of the shafts feature excessive end play, in which case, separate the crankcases and replace the top shim washer with another having a more suitable thickness. 9) FIT the new oil seals, using the specific plug for each. PAGE ISSUE SECTION 2 08.06 C - ENGINE TWO-STROKE ENGINE AM6 Minarelli Engine CHAPTER C 10) FIT the key for the magneto flywheel; put the stator in its seat and fasten in place with the fixing screws (Cs 0.25 ÷ 0.3 kg*m). Fit the rotor and tighten the nut (Cs 4.3 ÷ 4.5 kg*m), using the usual wrench (F48). 11) Fit the sprocket: snap ring (1-F49) - sprocket (2) - snap ring (1) - fit the clutch control pin (3- F49) with its return spring (4-F49). F.43 3 4 1 ENGLISH 2 F.48 F.49 12) CHECK operation of the sprocket and gear wheel pair. If any of the gears needs to be replaced, it is recommended to replace the pair since this will ensure smoother and quieter operation. 13) FIT the crankshaft (clutch side) in the following order: 1) The overturned oil seal (1 - F.50), using the special plug (2 - F.50) 2) The O-ring (1 - F.51) 3) The spacer (2 - F.51), with the bevelled side facing the crankshaft. Push in place until it stops. Now fit the key (1 - F.52), the countershaft drive gear (2 - F.52), the drive sprocket and the nut (Cs 6.7 ÷ 7.5 kg*m). Fit the key and driven gear on the countershaft (2-F.53), making sure that the reference notches on the two gears match (F.53). Tighten the nut (Cs 4.5 ÷ 5.0 kg*m) (apply Loctite 242). 1 2 1 2 F.50 F.51 08.06 ISSUE PAGE SECTION 2 SECTION 3 29 C - ENGINE C TWO-STROKE ENGINE AM6 Minarelli Engine CHAPTER 2 1 2 ENGLISH F.52 F.53 14) PROCEED in reverse order. Refit the clutch assembly and remember to replace the nut fixing washer with a new one; fit the clutch boss fixing nut (Cs 5.5 ÷ 6.0 kg*m) and bend the tab. 15) FIT the following components on the output shaft, in the order given: clutch rod (grease beforehand), ball and disc pusher. 16) FIT the clutch disc assembly in the order shown in (F.54); the iron discs (1-2-3 F.54) should be fitted with the notch, highlighted by the arrows, at 120° the one from the other, starting from the notch facing upwards on the first disc. Fit the last clutch disc, making sure it is timed with the boss (F54b). F.54 F.54b F.55 30 PAGE ISSUE SECTION 2 08.06 C - ENGINE TWO-STROKE ENGINE AM6 Minarelli Engine CHAPTER C 17) FIT the springs and fixing screws and tighten (Cs 0.3 ÷ 0.5 kg*m). 18) Correct operating position of the clutch is obtained when the lever, in the position indicated by the arrow (F.55), is parallel to the cover resting surface. To obtain this condition, turn the adjustment screw (1-F.56) on the last disc, using the special wrench (2- F.56). Tighten the nut (Cs 2.6 ÷ 2.8 kg*m) . 19) BEFORE fitting the starter assembly (version without an electric starter), make sure that the phase between the pawl on the sliding rod and the hole for fixing the spring is the same as before disassembly (90° - F.57). ENGLISH 20) FIT the starter assembly, whilst hooking the spring to the hub on the cover. 2 1 90° F.56 F.57 21) FIT: the dowel bolts and a new gasket on the crankcase; the clutch cover; if necessary, this operation can be made easier by turning the impeller of the water pump. Secure in place with screws (Cs 1.0 ÷ 1.2 kg*m). If you have disassembled it, refit the oil pump, making sure that the O-ring is in working order (1 - F.58a). When refitting, take care not to damage the oil pump gear. Whilst fitting the starter lever on its shaft, turn it 180° counter-clockwise and secure in place with the fixing screws (Cs 2.9 ÷ 3.0 kg*m) (F.58b). This operation must be performed to pre-load the return spring. 1 F. 58a 08.06 F.58b ISSUE PAGE SECTION 2 SECTION 3 31 C - ENGINE C TWO-STROKE ENGINE AM6 CHAPTER Minarelli Engine 22) Before assembly, CHECK the condition of the cage on the piston pin and its rollers. Fit the piston, making sure that the arrow marked on the top is facing towards the exhaust side (F.59), and therefore towards the piston pin and its circlips. ENGLISH F. 59 F.60 23) In the order indicated, FIT the piston rings, making sure that the ends are correctly positioned in the seats on the piston; a new cylinder gasket; the cylinder; the centre cylinder O-ring in the stud bolts; the O-ring on the cylinder head; the head (clean beforehand). Tighten the nuts evenly and diametrically (Cs 1.4 ÷ 1.6 kg*m); check the position and tightness of the O-ring on the cylinder head. 24) FIT the reed valve (F.60), followed by the exhaust manifold, tightening the four screws evenly and diametrically (Cs 0.9 ÷ 1.1 kg*m). 25) REFIT the flywheel cover, a new gasket and its fixing screws, which must be tightened (Cs 0.1 ÷ 0.2 kg*m). 26) REFIT the oil drainage bolt, replace the gasket and secure firmly in place (Cs 1.7 ÷ 1.8 kg*m). 27) POUR oil into the engine (0.750 kg) through the hole at the top. 32 PAGE ISSUE SECTION 2 08.06 C - ENGINE TWO-STROKE ENGINE AM6 Minarelli Engine CHAPTER C 2.6 ENGINE SERVICING AND COMMISSIONING SCHEDULE Check Adjustment of engine idling speed Gas and oil pump control Front and rear brake control Operation of the electrical equipment Petrol ducts Oil ducts Front and rear brake liquid ducts Coolant duct Fuel heating duct Tire pressure Tire condition, pressure and wear Level of front and rear brake liquid Level of coolant Level of battery electrolyte Tightness of bolts Battery charge level Replace Air filter filtering element Front and rear brake pads Gearbox oil Chain - pinion - gear wheel Clutch disks Spart plug after 500 km or 3 months every 6000 km X X X X X X X X X X X X X X X X X X X X X X X X ENGLISH Maintenance operations X X X X X X X #X X #X #X X Check and/or replace Piston Cylinder head Discharge gap Solenoid filter # every 10000 km # every 10000 km # every 10000 km # Every 10,000 km/year Check and lubricate Chain tightness and condition X X X X X X X X Check and adjust Clutch control Oil pump control Headlight height Clean and adjust Carburettor Vehicle test Road test X X # if necessary 08.06 X T.1 ISSUE PAGE SECTION 2 SECTION 3 33 C - ENGINE C TWO-STROKE ENGINE AM6 Minarelli Engine CHAPTER 2.7 PARTS AND THEIR TORQUE WRENCH SETTINGS ENGLISH N° PART POSITION PART NAME SCREWS TORQUE W. SETTING N*m Kg*m QTY 1 Spark plug Spark plug M14 x 1.25 20÷25 2 ÷ 2.5 1 2 Cylinder head Nut M7 x 1 14÷16 1.4 ÷ 1.6 4 3 Cylinder head Pipe fitting M8 x 1.25 24÷26 2.4 ÷ 2.6 1 4 Cylinder head Temperature probe M14 x 1.25 16÷20 1.6 ÷ 2.0 1 5 Countershaft Hex. nut M12 x 1 45÷50 4.5 ÷ 5.0 1 6 Water cooling (head) Screw M4 x 0.7 2.5÷3.5 0.25 ÷ 0.35 2 7 Water pump body Screw M6 x 1 4÷6 0.4 ÷ 0.6 1 8 Pipe coupling Screw M6 x 1 4÷6 0.4 ÷ 0.6 1 9 Water pump body Screw M6 x 1 4÷6 0.4 ÷ 0.6 1 10 Water pump body Screw M6 x 1 4÷6 0.4 ÷ 0.6 1 11 Oil pump Screw M5 x 0.8 6÷8 0.6 ÷ 0.8 2 12 Oil pump lid Screw M5 x 0.8 3÷4 0.3 ÷ 0.4 2 13 Intake manifold Screw M6 x 1 9÷11 0.9 ÷ 1.1 4 14 Crankcase Stud bolt M7 x 1 10÷12 1.0 ÷ 1.2 4 15 Cover, clutch side Screw M6 x 1 2÷4 0.2 ÷ 0.4 1 16 Crankcase, flywheel side Side M6 x 1 10÷12 1.0 ÷ 1.2 13 17 Crankcase, clutch side Screw M8 x 1.25 17÷18 1.7 ÷ 1.8 1 18 Crankcase, flywheel side Neutral indicator light M10 x 1.25 1÷2 0.1 ÷ 0.2 1 20 Crankcase, clutch side Hex. screw M12 x 1.25 24÷26 2.4 ÷ 2.6 1 21 Cover, clutch side Screw M6 x 1 10÷12 1.0 ÷ 1.2 7 22 Cover, flywheel side Screw M5 x 0.8 1÷2 0.1 ÷ 0.2 5 23 Primary gear (Clutch side) Nut M12 x 1.25 65÷75 6.5 ÷ 7.5 1 24 Clutch boss Hex. nut M12 x 1.25 55÷60 5.5 ÷ 6.6 1 25 Disc pusher (clutch) Screw M5 x 0.8 3÷5 0.3 ÷ 0.5 4 26 Disc pusher (Clutch) Hex. nut M14 x 1.25 26÷28 2.6 ÷ 2.8 1 Clutch adj. screw M14 x 1.25 turn until it stops 1 27 28 Selector Hex. nut M7 x 1 14÷16 1.4 ÷ 1.6 1 29 Magneto flywheel Screw M4 x 0.7 3÷4 0.3 ÷ 0.4 3 30 Magneto flywheel Hex. nut M10 x 1.25 43÷45 4.3 ÷ 4.5 1 O O O L T.2 34 PAGE ISSUE SECTION 2 08.06 C - ENGINE TWO-STROKE ENGINE AM6 CHAPTER C PAGE 35 ENGLISH Minarelli Engine 08.06 ISSUE SECTION 2 SECTION 3 C - ENGINE C TWO-STROKE ENGINE AM6 CHAPTER Minarelli Engine 2.8 EXPLODED VIEW OF THE ENGINE R ENGLISH 36 PAGE ISSUE SECTION 2 08.06