1
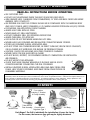
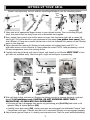
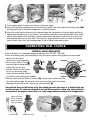
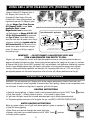
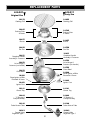
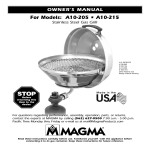
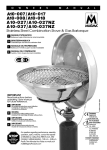
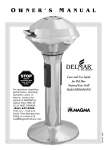
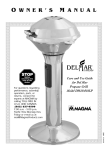
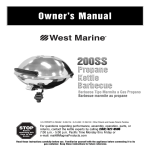
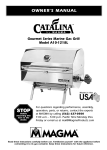
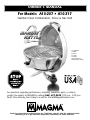
OWNER’S MANUAL
For Models: A10-207 • A10-217
Stainless Steel Combination, Stove & Gas Grill
®
U.S. PATENTS
4,788,962
5,330,154
5,414,090
D 292,163
Other Patents and
Design Patents Pending
For questions regarding performance, assembly, operation, parts, or returns,
contact the experts at MAGMA by calling (562) 627-0500 7:00 a.m. - 5:00 p.m.
Pacific Time Monday thru Friday or e-mail us at [email protected]
Read these instructions carefully before use. Familiarize yourself with the appliance before
connecting it to its gas container. Keep these instructions for future reference.
IMPORTANT SAFETY WARNINGS
READ ALL INSTRUCTIONS BEFORE OPERATING.
• USE OUTDOORS ONLY.
• DO NOT USE THIS APPLIANCE INSIDE THE BOAT OR ANY ENCLOSED SPACE.
• GRILLS RADIATE HEAT. CLEARANCE FROM COMBUSTIBLES, 24” SIDES AND BACK. NEVER USE UNDER
AWNINGS, PATIO COVERS, ETC.
• USE PROPANE GAS ONLY. FUEL STORAGE SHOULD BE IN COMPLIANCE WITH THE AMERICAN BOAT
AND YACHT COUNCIL (ABYC) STANDARDS A-1 (9), MARINE LIQUIFIED PETROLEUM GAS (LPG) SYSTEMS.
• FOR NATURAL GAS APPLICATION CONTACT MAGMA.
• ALWAYS LIGHT GRILL WITH LID OPEN.
• NEVER LEAVE HOT GRILL UNATTENDED.
• DO NOT OVERHEAT GRILL, SEE OPERATING INSTRUCTIONS
• ALWAYS TURN GRILL OFF AFTER USE.
• USE GLOVE OR HOT PAD WHEN HANDLING HOT GRILL.
• NEVER LEAVE GAS CYLINDERS AND REGULATOR CONNECTED WHEN STOWED.
• STORE GAS CYLINDERS IN WELL VENTILATED AREA.
• DO NOT STORE GAS CYLINDERS INDOORS, IN DIRECT SUNLIGHT, BELOW DECKS ON BOATS,
OR IN LOCKERS NOT APPROVED FOR BUTANE OR PROPANE STORAGE.
• CAUTION: CHECK FOR GAS LEAKS EACH TIME CYLINDER IS CHANGED.
• NEVER CHECK FOR GAS LEAKS WITH A FLAME!
• DO NOT BLOCK, RESTRICT, OR OTHERWISE OBSTRUCT COMBUSTION OR VENTILATION
AIR OPENINGS.
• DO NOT MODIFY THIS APPLIANCE.
A
• CHECK THAT VALVE SEALING WASHER (A) IS IN PLACE AND IN GOOD
CONDITION BEFORE CONNECTING THE GAS CONTAINER.
• INSTALL CANISTERS IN WELL VENTILLATED AREA AND AWAY FROM OPEN
FLAME, HEAT SOURCE OR SPARKS. KEEP AWAY FROM OTHER PEOPLE OR
FLAMMABLE MATERIALS.
CALIFORNIA PROPOSITION 65 – WARNING – The burning of gas cooking fuel generates some by-products, which are on the list of
substances, which are known by the State of California to cause cancer or reproductive harm. California law requires businesses to
warn customers of potential exposure to such substances. To minimize exposure to these substances, always operate this unit
according to the use and care manual, ensuring you provide good ventilation when cooking with gas.
CONTENTS
Tool
Needed
Cast stainless
Indexing “L” Bracket
& Clamp Assembly
Dome
Grill Grate
Radiant Plate
Turbo Venturi
Tube Assembly
Control Valve/
Regulator--Type 1
Grill Body
Each Magma® Gas Grill is individually fire tested before it leaves the factory.
For this reason, the burner on your grill may be slightly discolored.
2
9/16”
Wrench
not included
SETTING UP YOUR GRILL
Mounts sold separately. See our website www.MagmaProducts.com for mounting options.
Level
Flat
Surface
2
1
4
3
1 Select and install appropriate Magma mount in your desired location. Prior to installing the grill,
check that mount does not easily move with a reasonable force applied.
2 Next, decide if gas control valve will be easier to access from the center right side or center left
side of grill. This will be based on your placement of the mount (see picture front cover). Now,
slide L-Bracket & Clamp on to mount knurled rod so that the threaded flat L-portion of the L-Bracket
points in that direction.
3 Adjust threaded flat surface of L-Bracket to level position and tighten firmly with 9/16" or
adjustable wrench so that L-Bracket & Clamp cannot be moved. NOTE: Level positioning is critical
for even temperatures across the cooking surface.
4 Carefully hold the grill body, with the lid closed, and thread on to L-Bracket VERY TIGHT so that
grill does not unthread easily. Check that grill is tight and level prior to proceeding.
Grease Tray Pins
5a
5
5c
Electrode
Grease Tray
5b
Threaded Burner Pipe
Burner Ground Strap
5d
Electrode
6
5 With grill body tightly attached to L-Bracket and taking care not to damage electrode, unthread
burner 3 full revolutions only. CAUTION: DO NOT UNTHREAD MORE THEN 3
REVOLUTIONS, AS GRILL MAY FALL OVERBOARD.
• Lift entire grill up to disengage from grease tray positioning pins (5a & 5b) and rotate so lid
operates freely in desired position (5a).
• Carefully lower back down (5d), making sure pins are re-engaged and rethreaded “burner” back
3 revolutions until tight. If burner does not turn 3 revolutions the pins are not engaged properly.
6 Adjust burner ground strap so it is directly over electrode wire. Check for spark before proceeding.
3
9
8a
8
7
7 Install radiant plate & dome over burner on fire pan ridge.
8 Install grill grate by rotating grate so that both grill grate tabs slide under the holding clips (8a),
locking grate and all internal components in correct position.
9 Insert the turbo venturi tube into the threaded pipe on the bottom of the grill body and firmly
tighten the threaded nut so nut doesn't turn while rotating the turbo venturi tube. Note: turbo
venturi tube should still rotate freely. Venturi tube should be stowed with valve in a clean dry
environment when not in use. (See "Stowing Tips" page 6) Before each use, prior to inserting
venturi tube, check that the threaded pipe is free of spider web obstructions.
CONNECTING FUEL SOURCE
CONTROL VALVE REGULATOR
•Uses standard 1-lb. disposable propane canisters (DOT-39 NRC 228/286).
•Prior to installing valve, become familiar with the valve function and graphics on valve knob.
Never force the knob.
Always turn or push gently.
Lock
Indicator
OFF/
ON
•Turn control valve to “lock ”
Lock
Off
and install gas canister being
careful not to cross the
threads. Check for leaks prior
High
to use, by brushing soapy
Low
water solution around threads
Unlock
and orifice hole checking for bubbles.
Medium
•Position valve with gas bottle as shown (A). Gently insert valve stem into
the turbo venturi tube. Rotate until valve stem key aligns with lock detent
allowing valve to fully insert. Rotate gas canister down (B).
Valve will feel loose and will rotate easily. Even though the valve feels loose, it is designed that way
and will not leak. The valve was designed to be loose fitting in order to allow safe, easy installation
and removal of the propane canister and so it easily swings without resistance to fit all applications.
Align valve stem
key to valve lock
detent in venturi
tube and rotate.
A
Lock Detent
B
Valve Stem Key
4
USING GRILL WITH ON-BOARD LPG (PROPANE) SYSTEMS
• Magma On-Board LPG (Propane) Valves &
LPG (Propane) Low Pressure Gas Grill
Connection Kit allow Magma Grills to be
installed within a boats existing on-board, preregulated low pressure LPG (Propane) system.
• Use only Magma Type 3 Low Pressure
LPG (Propane) Valves. See our Valve
Gently insert valve stem into venturi tube upside down until fully inserted & rotate as shown.
Application Guide at www.
MagmaProducts.com for correct valve.
Typical Boat and R.V. Application
• In North America use Magma A10-225 LPG
Cylinder Valve
10' Gas Grill Connection Kit in conjunction
Solenoid
Gauge
Type 3
with Type 3 Valve. Outside North America
Gas grill
Valve
check your local dealer for proper hose & fittings.
• A primary shutoff valve (supplied with Gas
Shut off
To other LPG
Grill Connection Kit) must be used with this
valve
Gas
appliance
Propane (LPG)
Regulator
or use cap
control valve at point of connection into your
A10-225 LPG (Propane)
system. This allows shut off of gas supply to
10' Gas Grill Conversion Kit
hose leading to grill.
IMPORTANT!! • DO NOT CONNECT A HIGH-PRESSURE SUPPLY HOSE
FROM A NON-REGULATED TANK DIRECTLY TO GRILL.
Magma's grills are designed for use with small disposable propane canisters or with pre-regulated low-pressure
propane and optional low-pressure valves. Running high-pressure propane fuel supply lines on a boat is in violation
of American Boat & Yacht Council (ABYC) guidelines and is not considered a safe application. Additionally, impurities
found in larger refillable propane tanks may clog the small orifices in the high-pressure control valve/ regulator
causing it to lose performance capabilities and eventually fail. Regulating these tanks to 1/2 PSI and using this
pre-regulated propane with the correct low-pressure valve will insure safe, efficient performance of the grill.
OPERATING PROCEDURES
WARNING: Do not overheat grill. Magma grills do not require pre-heating. Stainless Steel loses anticorrosive characteristics when subjected to extreme heat. Most grilling is done on low temperature with
the lid closed. If medium or high heat is required, grill with lid open.
LIGHTING INSTRUCTIONS
• Open lid during lighting. • Depress knob & rotate counter-clockwise to the “HIGH” flame
position.
• Push Piezo Igniter. • Visually confirm ignition. • Turn knob to adjust flame.
• If grill does not light, insure that a burner electrode spark cap is directly above electrode.
• If the piezo ignition continues to fail to ignite the gas, see MATCH LIGHTING INSTRUCTIONS.
MATCH LIGHTING INSTRUCTIONS
(Back up system allows use of grill until piezo ignition system is repaired.)
• Open lid during lighting.
• Place flame up to burner through the match light hole.
• Depress valve and turn counter-clockwise to the “HIGH” flame
position.
• Visually confirm ignition.
5
Match Light Hole
• Trim excess fats from meat.
• Use non-oil based marinades.
TO REDUCE FLARE-UP
• Reduce heat.
• Use water spray directly on flare-ups.
To help create your own Magma gourmet experience every time you grill,
please check these important critical points prior to lighting your grill.
•
•
•
•
•
•
•
•
•
•
•
•
•
•
•
•
•
Mount is secure and grill does not move.
Grease tray & fire pan are clean from excess drippings to reduce flare up & ensure even air flow.
Lid is correctly positioned to operate freely and is in best position for blocking the wind.
Venturi tube, burner, threaded burner pipe and valve orifice are free of obstructions, such as
spider webs.
Electrode is clean and has a spark.
Radiant plate & dome are positioned correctly.
Grill grate is in locked position under holding clips.
Venturi tube holding nut is tight and doesn't turn when rotating valve position.
Valve is installed and locked into venturi tube properly.
Sufficient fuel is available.
Cooking Tips
The most common mistake when grilling is using too high of a heat setting. Grills become hotter
as you cook, so use moderate heat settings when cooking with lid closed.
Always keep a water spray bottle handy for flare ups and quick cooling if grill overheats.
Coat the grill grate with vegetable or olive oil to prevent food from sticking.
Stowing Tips
Always disconnect the fuel canister from the valve prior to stowing.
Stow the valve and venturi tube in a clean, dry area to protect from corrosion to valve and
spider web obstructions in venturi tube.
Always stow by unthreading the entire grill from the L-Bracket. Do not remove the L-Bracket &
Clamp unless repositioning is necessary.
Always store propane in a sealed propane storage locker that allows leakage to vent overboard
or use Magma A10-210 Propane Storage Tote. Never stow below decks.
USING THE MARINE KETTLE AS A STOVE
Magma’s patented, unique design of the Marine Kettle allows it to be used as a conventional
stove. This permits you to fry, saute, boil, wok, etc. • Remove the grill grate. • Remove the
radiant dome • Adjust flame to proper cooking temperature.
• For smaller pots and pans, place the cookware directly on the three tongs of the radiant plate.
• For larger pots and pans, including woks, invert the radiant plate and place the cookware
directly on the radiant plate.
6
MAINTENANCE
Complete Disassembly for Cleaning (or access to Piezo Igniter)
1 - Remove entire grill body from L-Bracket of Mount.
2 - Unthread and remove burner, fire pan and grease pan from outer bowl.
3 - To inspect piezo igniter, remove single screw from inside of outer bowl to release igniter box
and carefully inspect for corrosion or loose wire connection.
4 - To reassemble, reverse above steps and steps 6 through 9 from page 3 “Setting Up Your Grill”.
Stainless Steel, contrary to popular belief, can rust. Most commonly, deposits on the surface of the
product will trap moisture. It is this moisture that robs the stainless steel of oxygen. Oxygen is the
element that reacts with the stainless steel to form a protective layer of chrome oxide. Robbed of
oxygen this reaction does not take place and “crevice corrosion”, or “surface rusting”, occurs. To
minimize this effect, thoroughly clean your grill with soap and water, rinse with fresh water and dry.
Avoid using products designed to clean stainless steel as most leave a residue that may discolor when
the grill is heated.
Additionally, stainless steel that is exposed to high heat will change in color and texture over time.
This “bluing” and later “browning” of the internal components is not a failure of the stainless steel and
will not affect the product operation. However, prolonged exposure to extreme high heat will cause
the chromium and nickel to “burn out” of the stainless steel. At this point the stainless steel will
become more susceptible to corrosion and will start to deteriorate. We recommend that you replace
these internal components if they become seriously deteriorated.
We recommend thorough cleaning of all internal parts after each outing. It is important to
disassemble the interior components and remove any food residue. A soft “Scothbrite” pad or similar
product may be used in this process. For heavier burned-on stains we recommend “Easy-Off Oven &
Grill Cleaner” followed by thorough washing with soap and water, rinse with fresh water and dry.
AVOID CONTACT OF OVEN CLEANER WITH CONTROL VALVE, IGNITER ELECTRODE & WIRE, AND
BOAT SURFACES. CAUTION: DO NOT USE ANY TYPE OF ABRASIVE PAD ON THE EXTERIOR MIRROR
FINISH AS IT WILL SCRATCH THE SURFACE. USE ONLY A SOFT COTTON CLOTH. We recommend
covering the grill between uses. Grill covers are available at Magma retailers or directly from Magma.
See our website, www.MagmaProducts.com.
Grill Grates
Clean with brass wire brush while grill is warm. Use Oven & Grill cleaner for burnt-on residue. Wash
with soapy water and dry prior to storage.
Ceramic Electrode
Located just beside the burner, it should be kept clean of grease and debris. Burner ground strap
must be directly over the electrode for proper operation, be careful not to damage the ceramic
insulation or the wire.
Control Valve
All valves are set and tested at our factory. Do not attempt to adjust or disassemble the valve. Call
Magma if you suspect it is not adjusted properly. Clean valve with a cloth and remove any debris
obstructing the orifice.
Repair/Replacement Parts
All replacement parts are readily available at your Magma Retailers or directly from Magma. For a
complete list of replacement parts, see page 8, or visit our website www.MagmaProducts.com.
7
REPLACEMENT PARTS
A10-207
A10-217
Original Size
Party Size
10-153
Cooking Grill
10-453
Cooking Grill
10-665
Radiant Plate
& Dome
10-765
Radiant Plate
& Dome
10-657
Burner
10-657
Burner
10-658
Fire Pan
10-758
Fire Pan
10-651
Complete Handle
Assembly & Fasteners
10-651
Complete Handle
Assembly & Fasteners
10-752
Lid w/hinge &
fasteners (no handle)
10-652
Lid w/hinge &
fasteners (no handle)
10-759
Outer Bowl
10-659
Outer Bowl
10-960
Piezo Igniter w/Wire
Electrode & Screw
10-960
Piezo Igniter w/Wire
Electrode & Screw
10-662
Igniter Case
10-662
Igniter Case
10-161
Grease Tray
10-161
Grease Tray
10-664
“L” Bracket &
Clamp Assembly
10-664
“L” Bracket &
Clamp Assembly
10-160
Turbo Venturi Tube
10-160
Turbo Venturi Tube
10-263
Control Valve
Regulator--Type 1
10-263
Control Valve
Regulator--Type 1
8
TROUBLE SHOOTING GUIDE
Problem
Possible Cause
Possible Solution
Burner will not
light with igniter
Electrode covered with grease
or residue
Clean electrode
Electrode not directly under
burner ground strap
Adjust burner so burner ground strap is
directly above electrode
Electrode wire loose,
disconnected, or corroded
Clean, adjust & reconnect wire between
igniter & electrode, see “Complete
Disassembly” (page 7)
Wire is shorted causing spark
from wire before electrode
Replace Igniter, Electrode & Wire
See page 8 for part number
No spark being generated
Replace Igniter, Electrode & Wire
See page 8 for part number
No gas flow
Check fuel level, replace canister or refill
cylinder
Obstructed gas flow
Clean burner, turbo venturi tube, and
valve orifice. Remove debris/spider webs
Excessive cooking temperature
Operate only on low when lid is closed
Reduce flame level
Leave lid open
Use water spray to cool
Grease and/or residue build-up
Clean components
Burner will not
light even with
match
Flare-up
Excessive fat in meats
Trim fat from cuts of meat before grilling
Excessive oils in marinades
Use non-oil based marinades
Yellow sooty flame
Obstructed gas flow
Clean burner, turbo venturi tube, and
valve orifice. Remove debris/spider webs
Blow-out
Flame too low
Increase flame
Wind directly on burner
Block wind with lid. See page 3
Obstructed gas flow
Clean burner, turbo venturi tube, and
valve orifice. Remove debris/spider webs
Grill not level
Level Grill. See page 3
Grease or residue build-up
Clean components
Excessive fat in meats
Trim fat from cuts of meat before grilling
Excessive oil in marinades
Use non-oil based marinades
Hot Spots
9
ACCESSORIES
Magma®
Marine Kettle®
Grill Cover/Tote Bag
10 Piece Stainless Steel Gourmet
“Nesting” Cookware
Magma Magic Grill Restorer
Removes amber color from
all Magma Grills - USA only
LPG (Propane) Low Pressure
Gas Grill Connection Kit
for on-board LPG (Propane) systems
North America Only
Fish & Veggie Grill Tray
Stainless Steel Finish or
Coated with Teflon® Select
Non-Stick Coatings
Stores in less than
1/2 cubic foot
10 Piece Stainless Steel Gourmet
“Nesting” Cookware Coated with
Teflon® Select Non-Stick Coatings
Professional Grill Utensils
Grill Brush, Tongs & Spatula
Low Pressure Control Valves
for on-board LPG (Propane) or
CNG (Natural Gas) gas systems
Propane/Butane Canister
Storage Locker/Tote Bag
100% All 18-8
Stainless Steel Wok
16-1/2” diameter
“Marine Cuisine”®
Grill Guide & Cookbook
See our website www.MagmaProducts.com for a complete list of accessories
LIMITED WARRANTY
Magma Products, Inc. guarantees this product to be free from defects in materials or workmanship to the original consumer. This guarantee is for the periods herein specified when
used under normal and reasonable conditions, one (l) year from the date of original purchase. This warranty does not include the cost of property damage or any inconvenience due to the
failure of the product. Nor does it cover damage due to misuse, abuse, accident, or damage resulting from transportation of the product. Nor does it include damage resulting from the
commercial use of this product. Nor does it include, on stainless steel products, "Surface Rust'; Excessive Corrosion due to exposure to salt water; or Discoloration or Corrosion caused by
exposure to excessive heat or failure to properly clean and care for the stainless steel surfaces. If the product fails to operate due to a defect in materials or workmanship during the
warranty period, the defective part will be repaired or replaced at Magma's option. If you wish to obtain performance under this limited warranty, you should contact Magma's Customer
Service Department via telephone at (562) 627-0500, or via e-mail at [email protected], or via U.S. Postal Service mail at "Magma Products, Inc., Attention Customer Service, 3940
Pixie Ave. Lakewood, CA, 90712". The defective part, along with proof of purchase, must be returned postage prepaid to Magma Products, Inc. We suggest that you keep your purchase
receipt as we may require reasonable proof of purchase.
In the state of California only, if refinishing or replacement of the product is not commercially practicable, the retailer selling the product, or Magma Products, Inc., will refund the
purchase price paid for the product, less the amount directly attributable to use by the original consumer prior to the discovery of the nonconformity. In addition, in the state of California
only, you may take the product to the retail establishment from which it was purchased or to any retail establishment selling this product in order to obtain performance under this
warranty. All implied warranties, including the implied warranties of merchantability and fitness for a particular purpose, are limited in duration to the express warranty periods specified
herein for the parts described herein. Some states do not allow limitations on how long an implied warranty lasts, so the above limitation may not apply to you. Neither Magma dealers, nor
the retail establishment selling this product has any authority to make any warranties or to promise remedies in addition to or inconsistent with those stated above. Magma's maximum
liability shall not exceed the purchase price of the product paid by the original consumer. Some states do not allow the exclusion or limitation of incidental or consequential damages, so the
above limitation orexclusions may not apply to you. The warranty gives you specific legal rights and you may also have other rights which vary from state to state.
Magma Products, Inc.
3940 Pixie Avenue, Lakewood, CA 90712 • USA
Phone (562) 627-0500 • e-mail: [email protected]
www.MagmaProducts.com
83-207 0510
MAGMA and the Magma logo are registered trademarks of Magma Products, Inc.
Marine Kettle 2 is a trademark of Magma Products, Inc.
Patent pending.