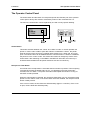
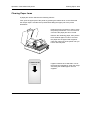
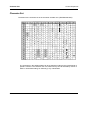
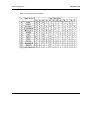
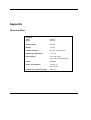
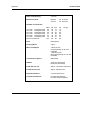
1
ND69
ND69
Modular POS Printer
User Guide
ND69
Modular POS Printer
User Guide
Edition July 2000
BEETLE ® is a registered trademark of the Wincor Nixdorf GmbH & Co. KG (WN).
MS-DOS ® and Microsoft ® are registered trademarks of the Microsoft Corporation.
SINIX ® is a registered trademark of the Wincor Nixdorf GmbH & Co. KG .
UNIX ® is a registered trademark of the X/Open Company Ltd.
Copyright © Wincor Nixdorf GmbH & Co. KG, 2000
The reproduction, transmission or use of this document or its contents is not permitted
without express authority.
Offenders will be liable for damages.
All rights, including rights created by patent grant or registration of a utility model or design, are reserved.
Delivery subject to availability; technical modifications possible.
Contents
Manufacturer’s Certification..............................................................................................1
General Licence ...................................................................................................................1
FCC-Class A Declaration .....................................................................................................1
Tested Safety .......................................................................................................................1
Important Notes....................................................................................................................2
Introduction ........................................................................................................................3
About this manual ................................................................................................................3
Care of the ND69 .................................................................................................................3
Recycling the ND69 POS Printer .........................................................................................4
Installation ..........................................................................................................................5
Before Switching On ............................................................................................................5
Unpacking and Checking the Scope of Supply ...............................................................5
Setting up the Device ......................................................................................................5
Cabling of the ND69........................................................................................................5
Securing the Data Communication Cable .......................................................................6
Connecting to the Mains Power Supply ..........................................................................6
Disconnecting Cables .....................................................................................................7
Connecting to the POS System ...........................................................................................8
DIP Switches........................................................................................................................8
Compatibility.......................................................................................................................10
Data Retention and Loss When Opening Cover ...........................................................11
Data Retention and Loss at Paper End ........................................................................11
Connecting Peripherals ......................................................................................................11
Cash Drawer (CASHDRW) ...........................................................................................11
Customer Display .........................................................................................................12
The Operator Control Panel ...............................................................................................13
Online Button ................................................................................................................13
Receipt Line Feed Button..............................................................................................13
Journal Line Feed Button ..............................................................................................14
LEDs .............................................................................................................................14
Self Test .............................................................................................................................15
Hexadecimal Dump Function .............................................................................................18
Operation of the ND69 POS printer ............................................................................... 19
Inserting the Spacers ........................................................................................................ 20
Document Processing ....................................................................................................... 21
Changing the Receipt and Journal Paper ......................................................................... 22
Green Paper Feed Button ............................................................................................ 23
Changing the Receipt Roll................................................................................................. 23
Remove the remaining receipt paper ........................................................................... 24
Inserting the Receipt Roll ............................................................................................. 25
Changing the Journal Roll ................................................................................................. 27
Removing the Journal Paper........................................................................................ 27
Inserting the Journal Paper .......................................................................................... 29
Changing the Ribbon Cassette ......................................................................................... 32
Clearing Paper Jams......................................................................................................... 35
Replacing the Print Head .................................................................................................. 37
Control Sequences of the ND69 Printer ........................................................................ 39
Notation of the Command Description .............................................................................. 41
Description of the Control Characters and Sequences ..................................................... 42
Character Set .................................................................................................................... 78
Appendix .......................................................................................................................... 80
Technical Data .................................................................................................................. 80
Paper Specifications.......................................................................................................... 82
Receipt/Journal paper (single-ply)................................................................................ 82
Document Paper .......................................................................................................... 82
Useable Surface........................................................................................................... 83
Print range (backside Receipt/Journal) ........................................................................ 84
Interfaces........................................................................................................................... 85
Parallel Interface to the System ................................................................................... 85
Serial Interface to the System ...................................................................................... 88
Connecting Cable......................................................................................................... 89
Serial Interface to the Customer Display...................................................................... 90
Cash Drawer Connection ............................................................................................. 92
DIP Switches ..................................................................................................................... 92
Possible Problems ............................................................................................................ 94
Cleaning Instructions......................................................................................................... 96
Cleaning the Transport Axles of the Print Head ........................................................... 96
Cleaning the Printing Mechanism ................................................................................ 96
Glossary ............................................................................................................................ 97
Manufacturer’s Certification
General Licence
The device complies with the requirements of the EEC directives
89/336/EEC with regard to “Electromagnetic compatibility” and
73/23/EEC “Low Voltage Directive”. Therefore, you will find the
CE mark on the device or packaging.
FCC-Class A Declaration
This equipment has been tested and found to comply with the limits for a Class A digital
device, pursuant to part 15 of the FCC Rules. These limits are designed to provide
reasonable protection against harmful interference when the equipment is operated in a
commercial environment. This equipment generates, uses, and can radiate radio
frequency energy and, if not installed and used in accordance with the instruction manual,
may cause harmful interference to radio communications.
Operation of this equipment in a residential area is likely to cause harmful interference in
which case the user will be required to correct the interference at his own expense.
Le présent appareil numérique ne génère pas de bruits radioélectriques dépassant les
limites applicable aux appareils numériques de la “Class A” prescrites dans le Règlement
sur le brouillage radioélectrique édicté par le ministère des Communications du Canada.
Tested Safety
The ND69 has been provided with the symbol for
“Tested Safety”. In addition, the ND69 has received the
cUL symbol, the UL/CSA symbol and the CE symbol.
GB - 1
Important Notes
Manufacturer’s Certification
Important Notes
Manufacturer’s Certification
Important Notes
The modular ND69 POS Printer complies with the relevant safety regulations for dataprocessing equipment, including electronic office machines, for use in the office
environment. Should you have any doubts about the permissibility of installation in a
certain environment, please contact Wincor Nixdorf Customer Service.
If the device is brought into the room of operation from a cold environment, dewfall
(condensation) can occur. Before starting up, the device must be completely dry; it is
therefore necessary to observe an acclimatization period of at least two hours.
This device is equipped with a safety-tested power cable and may be connected only
to a grounded plug socket.
When setting up the device, ensure that there is easy access to the power socket on
the device and/or to the grounded-contact mains socket.
Position the leads and cables so that no one steps on or trips over them.
To disconnect the device from the supply voltage completely, switch off the device
and disconnect the power plug.
Make sure that no objects (for example, paper clips) or liquids get into the inside of
the device. Electric shocks or short circuits can be caused in this way.
Never plug or unplug data communication lines during thunderstorms.
Protect the ND69 from vibrations, dust, moisture and heat.
The device should only be transported in its original packing (protection against
knocks and bumps).
In emergencies (e.g. damaged housing or power cable, entry of liquid or foreign bodies), the device must be switched off and unplugged immediately, and Wincor Nixdorf Customer Service should be called.
Always dispose of used parts, such as printer ribbons, in an environmentally safe
manner.
The device may be repaired by authorized qualified personnel only. Unauthorized
opening of the device and inexpertly carried out repairs will not only seriously
jeopardize the safety of the user, but also lead to cancellation of all warranty and
liability agreements.
GB - 2
Introduction
The modular ND69 Pin Printer is a high-performance and economical POS system printer
of receipts, journals and documents, which is easy to install (plug-in-system), easy to use,
and which requires a minimum of space. The integrated autoranging means that the
printer requires no special alterations for use in specific countries. The ND69 has no
trouble even with large receipts; it can print receipts of up to A4 in size - quickly and
easily.
The printer is equipped with connections for a customer display and a cash drawer, which
means that the number of interfaces on the system unit of your POS can be reduced.
Because the industrial standards have been employed - system interfaces V.24 and
Centronics - the investment you have made is protected even when you make use of a
different POS system. With its performance, the ND69 is an essential supplement to your
entire point of sale system!
About this manual
About this manual
This manual provides you with all the information you require to ensure that your ND69
Printer operates without a single hitch. It tells you everything you need to do before
switching on the printer, how to connect additional devices, and which adjustments might
be necessary from time to time to ensure that your ND69 operates reliably. We therefore
ask you to read the appropriate sections of this manual before making use of your printer.
Care of the ND69
Clean your printer at regular intervals with a suitable surface cleaner. Make sure that the
power plug is disconnected and that no moisture finds its way into the device.
Before cleaning the printer, read the notes on cleaning in the appendix.
GB - 3
Recycling
Introduction
Recycling the ND69 POS Printer
Introduction
Recycling
Environmental protection does not begin
when it is time to dispose of the technical
device; it begins during the manufacturing
process.
Your ND69 Printer has been manufactured
without the use of CFCs and CCHs, and
produced mainly from reusable components and materials. The processed
plastics can, for the most part, be recycled.
Even the precious metals can be
recovered, thus saving energy and
valuable raw materials.
At this time, there are still some parts that are not reusable. Wincor Nixdorf GmbH & Co.
KG guarantees the environmentally safe disposal of these parts in a Recycling Center,
which is certified according to ISO 9001.
So don’t just throw your ND69 on the scrap heap when it has served its time. Make use of
our environmentally sound and up-to-date recycling methods!
The operation of your printer also generates waste material that should be disposed of in
an ecologically sound manner. Wincor Nixdorf (WN) provides a recycling box that you can
place on your company premises. The low price you pay for the box also includes
collection and complete recycling of the ribbons. For more information, please contact the
branch office responsible for your area.
Should you have any questions regarding WN environmental protection please contact
under Fax: +49 05251 8 26309.
GB - 4
Installation
Before Switching On
Unpacking and Checking the Scope of Supply
Unpack the parts and check whether the scope of supply matches the particulars on the
delivery note.
If any damage has occurred in transit, or if there is any discrepancy between the package
contents and the delivery note, please inform your Wincor-Nixdorf outlet immediately.
We recommend that you keep the original packing in case you need to transport the
device in the future (protection against knocks and bumps).
Setting up the Device
Set up the ND69 system where it will not be exposed to extreme environmental
conditions. Protect the device against vibrations, dust, moisture, heat and strong
magnetic fields.
Cabling of the ND69
The devices should be installed in the following order:
Make sure that the power switch on the back of the housing is set at the “off”
position.
Plug the power cable into the power cord receptacle on the printer.
Plug the power cable into the mains socket.
Plug in and secure the data communication cable.
GB - 5
Mains Power Supply
Installation
Securing the Data Communication Cable
Installation
The interface connectors can be secured
with the knurled screws manually.
The interface connectors with standard
screws can be secured with a screwdriver.
Connecting to the Mains Power Supply
Mains Power Supply
All devices belonging to the ND69 system that have a separate power cable must be
connected to the same electric circuit.
Ensure that the power switch on the POS terminal housing is switched off.
Make sure that all data cables on the system unit and all the peripherals are connected correctly.
Plug all the power cables from the peripherals into the grounded-contact mains
supply sockets.
The settings require no additional alteration on the part of the user as the adapter on the
printer adapts automatically to the local mains voltage.
You can now switch on the ND69 by means of the switch on the back of the housing.
GB - 6
Installation
POS System
On/Off switch
Disconnecting Cables
POS System
Never unplug a cable by pulling at the cable itself; always take hold of the actual plug
body. Follow the procedure described below when disconnecting cables:
Switch off all power and device switches.
Unplug all data communication cables from the sockets of the data networks.
Unplug all power plugs from the grounded-contact mains power sockets.
Unplug all cables from the devices.
GB - 7
DIP Switches
Installation
Connecting to the POS System
The terminalstrip is located
on the underside of the
ND69
1 23 4
The ND69 can be connected either to the Centronics socket (parallel interface) or to the
V.24 interface (serial interface) on the POS system. The printer automatically recognizes
which possibility for connection you have selected.
Centronics socket
V.24 interface
DIP Switches
DIP Switches
The DIP switches make it possible for the ND69 to be operated in the ND69 mode or to
be compatible with other printers so that existing application software can be used.
The DIP switches are located on the terminal strip on the underside of the ND69, on the
right, beside the V.24 interface.
GB - 8
Installation
DIP Switches
OFF
ON
4
1 2 3
Default setting
DIP Switch 1:
Meaning of the parallel interface SELECT signal.
Switch on
SELECT represents the COVER SWITCH, i.e.
SELECT = “HIGH” -> cover closed
SELECT = “LOW” -> cover open
Switch off
SELECT indicates whether the parallel or the V.24 interface
is active
SELECT = “HIGH” -> parallel interface is active
SELECT = “LOW” -> serial interface is active
DIP Switch 2 and
DIP Switch 3
These two switches serve to select the compatibility and set the
effects of control commands between the operating modes
ND69 mode
BEETLE/60 mode or
EPSON-TM930 mode
Moreover, the switches are used to execute an AUTOFEED,
i.e. an automatic line feed with the control character CR.
Switch 2 off and
Switch 3 off
The ND69 is in the ND69 mode and CR is executed without a
line feed
Switch 2 on and
Switch 3 off
The ND69 is in the BEETLE/60 mode and CR is executed
without a line feed
Switch 2 off and
Switch 3 on
The ND69 is in the EPSON-TM930 mode and CR is
executed without a line feed
Switch 2 on and
Switch 3 on
1.
The ND69 is in the EPSON-TM930 mode and the parallel
interface is active.
GB - 9
Compatibility
Installation
The parallel interface signal AUTOFEED/N
determines whether CR executes an automatic
line feed.
AUTOFEED/N = “HIGH” - CR without line feed
AUTOFEED/N = “LOW” - CR with line feed
2.
The ND69 is in the EPSON-TM930 mode and the V.24
interface is active:
CR is executed with a line feed.
DIP Switch 4:
Selection of DTR/DSR or XON/XOFF control
Switch on
XON/XOFF control is switched on
Switch off
DTR/DSR control is switched on
Default setting:
DIP 1
ON
DIP 2
OFF
DIP 3
OFF
DIP 4
OFF
Compatibility
Compatibility
The combined controller is executed in such a way that the ND69 - depending on the
position of two DIP switches (see Chapter DIP Switches) - either works in the ND69
mode, is compatible with the BEETLE/60 printer or with the EPSON-TM930 printer and
thus understands the control characters and sequences that apply in each case. More
details on the individual commands in various modes is provided in the chapter on
control sequences. Please note that the Centronics-Interface is not supported by the
BEETLE /60 mode.
GB - 10
Installation
Peripherals
Data Retention and Loss When Opening Cover
In BEETLE/60 mode, opening the cover during printing leads to a device fault. The printer
is then blocked and remains so until it is re-initialized. Prior to the new initialization, all
data which are in the reception buffer or are received by the printer are lost.
When the cover is opened during printing in ND69 mode and in EPSON-TM930 mode,
the current printing is interrupted at the end of a line. Subsequent data and commands
remain stored in the reception buffer. As soon as the printer is closed and is ‘on-line’
again, the printing that was interrupted restarts.
Data Retention and Loss at Paper End
In BEETLE/60 mode, when the print stop sensors have been set, a check is carried out
as to whether paper is present at the selected station prior to every line feed and/or
printing operation. If there is no paper there, a user error is issued. All further data and
commands are ignored until the error message is queried (see control sequence
ESC + 1 and ESC v).
In ND69 mode and in EPSON-TM930 mode, paper end is reported when there is no
paper present at the selected station. All subsequent data and commands remain stored
in the reception buffer. As soon as paper is present and the printer is ‘on-line’ again, the
printer runs from the point where the printing operation was interrupted. No data are lost.
Connecting Peripherals
Cash Drawer (CASHDRW)
Peripherals
The ND69 has a 6-pin mini-DIN jack for connecting a cash drawer. To prevent
malfunctions, make sure that the connector is plugged firmly into the socket. Power is
supplied to the cash drawer via this socket.
GB - 11
Peripherals
Installation
The cable remains connected until it is
released.
Use your thumb to remove the plastic
cover from the connection socket. The
locking mechanism is released.
The metal part of the connector is
visible. Now remove the cable from the
connection socket.
Customer Display
The customer display is connected to the serial interface. The interface connection on the
ND69 is a 9-pin D-sub connector.
To prevent possible malfunctions, make sure that the connector for the customer display
is plugged firmly into the socket. The power is supplied via this jack.
GB - 12
Installation
The Operator Control Panel
The Operator Control Panel
The Operator Control Panel
The online button and the button for receipt and journal line feed are part of the operator
control panel. All keys are locked or released by means of the command ESC c 5.
The foil on the online button can be replaced by one with country-specific lettering.
Online Button
This button switches between the “online” and “offline” modes. In normal operation the
printer is “online” and it is able to print data. When it is switched to “offline”, the printer
stops at the end of the current line. Possbile offline modes: error, paper end, and cover
open. The online button can be disabled with the command ESC c 6. When it is disabled,
the printer is in the “online” mode. This mode cannot then be changed by means of the
online button. After switching on the ND69 in the BEETLE /60 mode, the online key is
locked because the BEETLE /60 printer itself does not have an online key.
Receipt Line Feed Button
A line feed at the receipt station is executed when this button is pressed. The line spacing
corresponds to either the default value of 1/6", or it depends on the last command it
received, ESC 2 or ESC 3. The printer executes uninterrupted line feeds for as long as
the button remains pressed.
When the online button is released, the receipt line feed button can only be pressed if the
printer is in the “offline” mode. If the online button has been disabled, the receipt line feed
button is always active.
If the cover is closed, the line feeds are effected slowly (approx. 7 lines/sec). If the cover
is open, the line feeds are effected quickly.
GB - 13
The Operator Control Panel
Installation
Journal Line Feed Button
A line feed at the journal station is executed when this button is pressed. The line spacing
corresponds to either the default value of 1/6", or it depends on the last command it
received, ESC 2 or ESC 3. After pressing the foil button continuously for approx. 2
seconds, the printer carries out a continuous line feed for as long as the foil button
remains pressed.
When the online button is released, the journal line feed button can only be pressed if the
printer is in the “offline” mode. If the online button has been disabled, the receipt line feed
button is always active.
If the cover is closed, the line feeds are effected slowly (approx. 7 lines/sec). If the cover
is open, the line feeds are effected quickly.
LEDs
GB - 14
Green LED “on”
This LED is connected to the mains supply and it lights up when
the printer is switched on.
Green LED “online”
This LED lights up when the printer is in the “online” mode and
is off in the “offline” mode.
Red LED “error”
This LED lights up when the cover is open. It flashes when a
device error has occured. During normal operation, it is off.
Red LED “paper end”
This LED lights up, when either the receipt or the journal station
has recognized “paper end” and the corresponding paper sensor
is selected (see ESC c4n, page GB-60).
Yellow LED “document”
This LED flashes while the printer is waiting for a document to
be inserted; it lights up continuously while the document is in the
printer; and it goes out when the document leaves the printer.
This LED is off when the document station has not been
activated.
Installation
Self Test
Self Test
Self Test
The printer executes a self test if either the receipt or journal line feed button is pressed
while the device is being switched on. Depending on the pressed button the following
printout is produced either at the journal station or the receipt station.
The power-up diagnosis is started. The result of the hardware
check is clearly printed at the receipt and/or journal station.
The device configuration is printed.
Firmware version, in this example: Promversion 03,
Plug-in place 01 and sub-version 44
Circulation number
PCB-Version (Printed Circuit Board Version), i.e. 1 stands for
PCB-Version 1, >=2 stands for PCB-Version 2 or higher
Default paper width setting
The status of all the sensors and the cover switch are checked
and printed.
DIP switches (see also page 8 onwards)
Default:
1
ON
2
OFF
3
OFF
4
OFF
A 24V measurement is carried out, and the result is printed
(max. deviation: ± 10%).
GB - 15
Self Test
Installation
Self Test
Character set
Complete character set, normal width
Installation
Complete character set, double width
Cash drawer 1 is open.
Cash drawer 2 is closed or not installed.
The configuration and parameters for the customer display are
printed. The following appears on the customer display:
** ND69 SELF TEST **
*******************************
Following this, a document is requested (see example on
following page).
At the end of the self test, the printer switches into the normal mode
and the customer display is extinguished.
GB - 16
Installation
Self Test
After the print-out of the self test on receipt or journal paper, the following A4 print-out is
produced; this print-out can take place on either an A4 sheet or is printed in lettersizeformat.
GB - 17
Hexadecimal Dump Function
Installation
Hexadecimal Dump Function
The printer has the Hex-Dump function. This prints the data received from the host on the
receipt in hexadecimal form in the corresponding ASCII characters. This function has the
following features:
Hex-Dump is activated by switching on the printer and, at the same time, holding
down the on-line key. As soon as the ND69 is in the Hex-Dump mode, it prints
out a heading on the receipt.
Characters below 20 Hex are represented in the ASCII field as decimal points.
While Hex-Dump is active, all commands - with the exception of GS ENQ - are
ignored.
The command RESET (ESC @) is also disabled.
The international set of characters used is the US character set.
The receipt roll used must have a minimum width of 76 mm.
Switch off the printer to exit from Hex-Dump.
Hexadecimal Dump Function
GB - 18
Operation of the ND69 POS printer
The ND69 POS Printer has 9-dot matrix printing mechanism which serves the three
printing stations for receipts, journals and documents. The resolution of the characters is
in 9 * 9 dot matrix or 7 * 9 dot matrix, depending on the character types selected in your
application software.
The ND69 provides you with the possibility of controlling the line feed of the receipt and
journal paper via two buttons on the front cover of the printer. There is a green line feed
button inside the housing for changing the receipt and journal paper.
For reasons of safety, the printing and cutting devices are shut down as soon an the
printer cover is opened.
Inserting the receipt and journal paper is made easier by a semi-automatic paper feed.
An individual company logo can be created by means of a block print which is produced
with graphic print quality. The logo is produced in your application software and loaded
into the printer memory.
Further device features are the high print speed and the simple operation.
All consumables for the printer, such as receipt and journal paper or ribbon cassettes can
be ordered from WN services.
For the sake of the environment, always dispose of used materials properly (see chapter
on Recycling).
GB - 19
Inserting the Spacers
Operation of the ND69 POS printer
Operation of the ND69 POS printerInserting the Spacers
The ribbon in your printer has not been inserted in the document plate prior to delivery.
For further information, read the chapter on “Changing the Ribbon Cassette”.
As the ND69 allows different paper widths for receipt and journal paper, it might be
necessary to reduce the size of the paper reception compartments so that they can
accommodate narrower rolls of paper. This is done by means of the enclosed spacers,
and is described in the following chapter “Inserting the Spacers”.
Inserting the Spacers
There are two spacers and two adapters
for the division of the receipt or journal
compartments in the additional package.
The larger spacers are suitable for both
compartments.
The long adapters are different for receipt
and journal (mirror images)!
When fitting these parts, ensure that the flat surfaces face the separating wall between
the receipt and journal compartments.
GB - 20
Operation of the ND69 POS printer
Document Processing
Both paper compartments have five possible positions for the spacers/adapters.
Depending on the paper width, insert the
spacers into the appropriate grooves in the
paper compartment.
Then, as can be seen in the illustration, the
appropriate adapter is inserted in the paper
feed magazine.
Document Processing
Document Processing
The ND69 prints documents up to a size of DIN A4. Consult the appendix for the print
area and the paper specifications.
GB - 21
Changing the Receipt and Journal Paper
Operation of the ND69 POS printer
When the yellow LED flashes, place the
document to the right of the guide edge of
the document plate.
This applies particularly to documents
which are narrower than DIN A4 so that
the document sensors can recognize the
paper and draw it in correctly.
Then push the document towards the document infeed until the paper is gripped by
the transport rollers (start of transport motors).
Always insert the paper in such a way that the side to be printed on is facing downwards.
After processing, the document is transported out of the printer and it can be removed.
If the document sensors recognize a document end during document processing,
although print data are still located in the print controller, this will lead to a printing stop. In
ND69 and EPSON-TM930 modes, take out the document and insert a second document
sheet if the yellow LED flashes. The printing can now be continued or completed, as the
case may be. In the BEETLE /60 mode, the application program regulates the paper
outfeed and the request for a new document (yellow LED flashes).
Changing the Receipt and Journal Paper
Changing the Receipt and Journal Paper
The following are detailed descriptions of the individual steps for changing the paper. A
simplified version of the steps involved, in the form of pictograms, is on the underside of
the printer cover.
If neither receipt nor journal paper are in place - particularly important for first operation the receipt paper must be fitted into the paper feed first. Only then can the journal paper
be fitted.
GB - 22
Operation of the ND69 POS printer
Changing the Receipt and Journal Paper
Green Paper Feed Button
When the cover of the printer is open, the green paper feed button for the receipt and
journal stations can be used. This button makes the inserting of a new roll of paper much
easier in that it changes the location of the feed rolls mechanically - in addition to the
electrically induced line feeds.
If you press the switch after the cover has been opened, paper will only be fed at the
station where the paper end sensor issues the message “paper present”. If there is paper
at both stations, it will be fed at both stations simultaneously.
If there is no paper present at one printing station, the feed motor at this station switches
on after the cover has been opened; it thus removes paper that might be left over.
If paper is inserted at a printing station after the cover has been opened, the feed motor
of this station switches on at a lower speed.
If the paper end sensor of a printing station issues the messsage “paper present” after the
paper is inserted, pressing the paper line feed button will produce a line feed at this
station only.
If paper is inserted at the receipt station, the paper is automatically fed further forward,
and thus tensioned, when the cover is closed; it is subsequently cut in order to have an
evenly cut edge.
The paper line feed button is only active when the cover switch issues the message
“cover open”.
Changing the Receipt Roll
If a red stripe appears on the printed receipt, or the “paper end” LED lights up on the
control panel, a new receipt roll should be inserted. Change the receipt roll as follows:
GB - 23
Changing the Receipt and Journal Paper
Operation of the ND69 POS printer
Remove the remaining receipt paper
Pictograms for handling
Paper line feed button
Lift up the paper compartment cover to
gain access to the paper roll. You can remove the remaining paper by means of the
line feed button.
Then, take out the empty paper roll. Continue with “Inserting the Receipt Roll”.
If there is still unused receipt paper on the receipt roll, remove it as follows:
Take the receipt roll out of the compartment and cut the receipt roll so that an evenly cut
edge is created. Now you can remove the remaining paper with the help of the paper line
feed button.
Do not tear the remaining receipt paper in such a way that you leave it too short! If it is
not possible to remove the paper by means of the paper line feed, it is quite easy to
remove manually.
If it is not possible to take out the receipt paper by means of the paper line feed, it can be
taken out as follows:
Open the upper part of the printer by lifting
it backwards while pressing the release button.
GB - 24
Operation of the ND69 POS printer
Changing the Receipt and Journal Paper
Draw the green lever backwards to raise
the printing mechanism.
Now pull the receipt paper straight upwards and out of the paper magazine.
Do not pull the remaining paper out of the paper magazine while it is still fitted in the
paper guide! The printing mechanism must be in the raised position.
Set the lever forwards to lower the printing mechanism. Close the upper part of the
printer; you should hear it click into place.
Inserting the Receipt Roll
Open the cover of the paper compartment.
Make sure that the paper on the new receipt roll is evenly cut. Insert the new receipt roll in the paper compartment as
shown in the illustration.
Only use paper which is intended to be used for your purpose, and which is acceptable
for your printer. The spacers and adapters might have to be inserted (see “Inserting the
Spacers”).
GB - 25
Changing the Receipt and Journal Paper
Operation of the ND69 POS printer
Next, place the end of the paper on the guide in the paper feed magazine. The correct
position has been reached when the paper
feed motor goes on for a short time.
The receipt paper is automatically drawn in
when the green button is pressed.
Press the button until the paper has been
tensioned and there is no more slack on
the paper.
Check whether the paper is straight, then close the paper compartment cover. After
closing it, some paper will be automatically advanced and cut off. Press the online button
and your printer is again ready for operation.
Always complete the paper change at one station at a time as the paper feed only
functions at one printing station at a time! It is therefore not possible to change paper at
the receipt and journal stations at the same time.
GB - 26
Operation of the ND69 POS printer
Changing the Receipt and Journal Paper
Changing the Journal Roll
From time to time, carry out checks as to whether there is sufficient journal paper in the
paper compartment.
If you see a red stripe on the journal paper through the journal window on the printer, or if
the “paper end” LED lights up, it is time to insert a new journal roll. To do so, proceed as
described in “Removing the Journal Paper” and “Inserting the Journal Paper”.
Removing the Journal Paper
If the “paper end” LED on the control panel lights up, there are only a few centimetres of
journal paper left in the paper compartment. Lift the paper compartment cover up to gain
access to the paper roll.
Remove the remaining journal paper by pressing the green button until the paper has
come out of the paper guide completely.
Do not tear the remaining journal paper in such a way that you leave it too short! If it is
not possible to remove the paper by means of the paper line feed, it is quite easy to
remove manually.
Then take the journal paper from the reception spool and remove the empty paper roll
from the journal compartment. Continue with “Inserting the Journal Roll”.
GB - 27
Changing the Receipt and Journal Paper
Operation of the ND69 POS printer
A further possibility is to remove the still unused journal paper without the automatic
paper feed.
Open the upper part of the printer by lifting
it backwards while pressing the release button.
Take the reception spool with the printed
journal out of the paper compartment, cut
the journal and remove it from the reception spool. Draw back the green lever to raise the printing mechanism (see illustration). You may now pull the remaining journal paper upwards and out of the paper
magazine.
GB - 28
Operation of the ND69 POS printer
Changing the Receipt and Journal Paper
Do not pull the remaining paper out of the paper magazine while it is still fitted in the
paper guide! The printing mechanism must be in the raised position.
Set the green lever forwards to lower the printing mechanism. Then close the upper part
of the printer; you should hear it click into place.
Inserting the Journal Paper
Open the cover of the paper compartment.
Make sure that the paper on the new journal roll is evenly cut. Insert the new journal
roll in the paper compartment as shown in
the illustration.
Only use paper which is intended to be used for your purpose, and which is acceptable
for your printer. The spacers and adapters might have to be inserted (see “Inserting the
Spacers”).
Next, place the end of the paper on the guide in the paper feed magazine. The correct
position has been reached when the paper
feed motor goes on for a short time.
GB - 29
Changing the Receipt and Journal Paper
Operation of the ND69 POS printer
The journal paper is drawn in when the
green button is pressed.
Keep the button pressed until the paper
protrudes sufficiently from the journal
opening to allow it to be threaded into the
spool.
Fold the paper over approx. 2 cm and
thread it under the black rod on the spool.
GB - 30
Operation of the ND69 POS printer
Changing the Receipt and Journal Paper
Rotate the spool backwards several times
in order to ensure a secure seating.
Then place the spool in its reception slot
and press the green button again until the
journal paper is tensioned and there is no
more paper slack.
Close the paper compartment cover. Press the online button and your printer is again
ready for operation.
Always finish the paper change at one printing station at a time as the paper feed only
functions at one station at a time! It is not possible to change paper at the receipt and
journal stations at the same time.
GB - 31
Changing the Ribbon Cassette
Operation of the ND69 POS printer
Changing the Ribbon Cassette
Changing the Ribbon Cassette
Open the upper part of the printer by lifting
it backwards while pressing the release button.
Document plate with
integrated ribbon
Draw back the green lever to raise the printing mechanism (see illustration). You now
have access to the document plate.
Holding the dark grey document plate on
the right and left by the thumb and index
finger, lift it gently and remove it in a forward direction from the printer housing.
GB - 32
Operation of the ND69 POS printer
Changing the Ribbon Cassette
The ribbon cassette is located on the underside of the document plate.
Now remove the ribbon cassette.
For the sake of the environment, ensure that the ribbon cassettes are disposed of in an
ecologically sound manner!
Take the new ribbon cassette out of the pack and insert it into the underside of the
document plate. You will hear the cassette click into place on the document plate. Before
re-inserting the cassette in the printer housing, tension the ribbon by means of the wheel
on the side.
GB - 33
Changing the Ribbon Cassette
Operation of the ND69 POS printer
Replace the document plate in the printer
housing.
Ensure that the guide pins are correctly in
place.
Press the document plate gently until it
clicks into place.
Now lower the printing station again by drawing the green release lever forwards. Close
the housing until you hear it click into place. Press the online button and your printer is
again ready for operation.
GB - 34
Operation of the ND69 POS printer
Clearing Paper Jams
Clearing Paper Jams
Clearing Paper Jams
A paper jam can be cleared in the following manner:
First, open the upper part of the printer by pressing the release lever on the left beside
the receipt output. Hold this lever pressed while lifting the upper part of the printer
backwards.
Draw the green lever back in order to raise
the printing mechanism. You can now find
out where the paper jam has occurred.
Remove the remaining paper, then pull the
lever forwards again in order to re-insert
the paper into the paper feed magazine.
Close the upper part of the printer until you
hear it click into place.
CLEANING SLIDE
55242.00.4.20
If paper residues have collected in one of
the paper feed magazines, clean the magazine using the residual paper remover
supplied.
GB - 35
Clearing Paper Jams
Operation of the ND69 POS printer
First, place an A4 sheet under the printer
mechanism; in this way, you protect the ribbon cassette against paper dust.
Insert the residual paper remover into the
paper feed magazine until the paper residues fall out.
GB - 36
Operation of the ND69 POS printer
Replacing the Print Head
Replacing the Print Head
Replacing the Print Head
The print head can be replaced as follows:
First, switch off the power switch at the back of the printer housing and unplug the device
from the mains supply. Then open the upper part of the printer by pressing the release
lever on the left beside the receipt output. Hold this lever pressed while lifting the upper
part of the printer backwards.
Draw the green lever back in order to raise
the printing mechanism.
Now remove the document plate.
GB - 37
Replacing the Print Head
Operation of the ND69 POS printer
Caution! The print head could be hot! Leave it to cool for a while before touching it.
Ein
Fehler
Papierende
Online
Position the print head directly in front of
the gap in the metal plate.
Beleg
In order to remove the print head from its
bracket, the holding clips have to be opened.
Press the clips to the left or right, as the
case may be. The print head is now loose
and can be removed easily.
Then unplug the flexible cable in a downward direction.
To insert the new print head, follow the same procedure in reverse order.
Observe the cleaning instructions for the printing mechanism which appear in the
appendix.
GB - 38
Control Sequences
Control Sequences of the ND69 Printer
With the aid of a control sequence, i.e. a series of characters, a printing station, for example, the document printing, can receive direct communications. The standard setting is
thus overridden, which means that you are able to set many print functions individually if
the standard values do not correspond to your requirements. Possible changes are,
among others, the selection of a different set of characters, the printing of graphics (logos), and the individualized activation of the various printing stations. You will see that it
is very simple to control the printer according to your own personal requirements. However, a precondition for proper use is the correct installation and/or configuration of the system. In addition, you should be familiar with the operating system.
In the case of the bi-directional V.24 interface, all the status information can be called up
using the hardware and software protocols in the form of control commands (as with the
BEETLE/60 Compact POS System). Via this V.24 interface, it is possible to synchronize
the user software and the printing properties. This occurs with the aid of the ESC v control command.
The command set of the ND69 represents an upper quantity limit of command sets of the
BEETLE /60 and of the EPSON-TM930. The individual modes (BEETLE /60, ND69 and
EPSON- TM930) provide more ESC sequences than the individual printers permit, for example, ESC c 6.
If the printer is operated via the Centronics interface (standard PC interface), only the
ESC sequences that expect no reply from the printer can be used. The error reports use
the signal connections: paper end, select and error connections. Please note that the
BEETLE /60 mode is not supported in connection with the Centronics-Interface.
The control sequences of the printer controller are based on the ESC/POS standard.
A table shows which of the available sequences are implemented in the ND69.
Control Sequences
Code
Function
Page
LF
Print and Line Feed
42
FF
Print and Document Transport
42
CR
Print and Carriage Return
43
HT
Horizontal Tabulating
44
Mode
BEN
GB - 39
Control Sequences
GB - 40
Code
Function
Page
Mode
RS
Journal Tab
44
ESC SP
Select Character Spacing
44
ESC !
Select Print Mode (All Stations)
45
BEN
ESC Y 1
Select Print Mode (Individual Station)
46
BEN
ESC *
Activate Graphic Printing
46
ESC 2
Set 1/6" Line Spacing
48
ESC 3
Set Line Spacing in Microsteps
48
ESC <
Move Print Head to Home Position
48
ESC @
Initialize Printer
49
ESC C
Select Document Output Length
50
ESC D
Set Horizontal Tabs
51
ESC J
Print and Line Feed in Microsteps
52
ESC K
Print and Reverse Line Feed in Microsteps
52
ESC R
Select International Character Set
53
ESC %
Activate User-Defined Character Set
54
ESC X 3
Copy Character Set into RAM
54
ESC &
<02>H
Load User-Defined Characters
55
ESC U
Unidirectional Print on/off
56
ESC c 0
Select Printing Station
57
ESC c 1
Select Station (Set Line Spacing)
58
ESC X 4
Set Paper Width
58
ESC c 3
Select Paper End Signal for Parallel Interface
59
ESC c 4
Select Paper Sensors for Print Stop
60
ESC c 5
Enable/Disable All Control Keys
61
ESC c 6
Enable/Disable of ONLINE Button
61
ESC d
Print and Execute n Line Feeds
62
ESC e
Print and Execute n Reverse Line Feeds
62
ESC f
Define Document Waiting Time
63
ESC i
Cut Off Receipt
63
ESC m
Cut Receipt
64
ESC o
Print Logo
64
BEN
Control Sequences
Notation
Code
Function
Page
Mode
ESC &
<03>H
Load Logo
64
ESC #
Transmit Data to Sub-device (Customer Display)
66
ESC p
Open Cash Drawer
66
ESC t
Select Character Set Page
67
ESC u
Transmit Cash Drawer Status *
67
ESC v
Transmit Printer Status *
68
BEN
ESC +
Demand Data
69
BEN
ESC z
Switch On/Off Parallel Print on Receipt + Journal
76
GS ENQ
Status Enquiry *
76
BEN
The ESC sequences marked with * only apply for the V.24 interfaces.
The Mode column provides information on how a control command operates in the two
compatibility modes:
no entry
BEN
Control Sequences
-> the control command is compatible (but must not necessarily be available
in the BEETLE /60!),
-> the control command is not compatible,
“B”, “E” and “N” stand for BEETLE/60, EPSON-TM930 and ND69
compatibility.
Notation of the Command Description
XXX
Command Character or Command Sequence
Function:
Name of the command
Code:
Code Sequence (Notation)
Hexadecimal
=
Decimal
=
Repeat bracket contents =
Notation
<>H
<>
()k Format
Range:
Describes the permitted range of values.
Description:
Describes the function of the command.
Remarks:
Provides important information on settings.
GB - 41
Description
Control Sequences
Default:
Describes the standard values.
Example:
Examples of the command in use.
Description of the Control Characters and Sequences
LF
Description
Function:
Print and Line Feed
Code:
<0A> H
Description:
Prints the data located in the buffer and executes a line feed.
This command sets the next printing position on the left edge of the
selected printing station.
Remarks:
The command LF should only be used for a line feed of one line. For
reasons of speed, the command ESC d should be used for line feeds
of more than one line.
The line spacing of one line feed can be set with the commands
ESC c1, ESC 2 and ESC 3.
Default:
1/6"
FF
Function:
Print and Document Transport
Code:
<0C> H
Description:
Prints the data located in the buffer and then transports a document
which was previously inserted.
Remarks:
The command only functions when the document station has been
activated; otherwise, it is ignored.
ND69 Mode and EPSON-TM930 Mode
If no control command ESC C n or one with n=0 has been received, the
document is only transported out. Depending on the set compatibility,
the station is changed:
GB - 42
Control Sequences
Description
ND69 Mode
receipt station
EPSON-TM930 Mode
receipt and journal station
If a control command ESC C n or one with n>0 has been received, the
document is transported out by the number of lines indicated. After the
transport, the station remains selected.
If the set document output length, which was set using ESC C n, is
larger than the distance for the first line, the document is transported
out and the station is changed in the manner described above. The
yellow LED “Document” is switched off.
BEETLE/60 Mode
If no control command ESC C n or one with n = 0 has been received
beforehand, the document is transported out as far as the paper edge.
The transport rolls, however, continue to grip the document.
The document station remains selected. The yellow LED “Document”
remains switched on. If the document is pulled out of the printer from
this position, a user error is reported when a V.24 interface is connected.
If a Centronics interface is connected, the paper end signal appears.
If a control command ESC C n with n>0 has been received beforehand,
the document is transported out by the specified number of lines.
The document station remains selected after the transport. If the output
length specified by ESC C n is greater than the distance to the first line,
the document is transported out to the paper edge. The document
station remains selected. The yellow LED remains switched on.
CR
Function:
Print and Carriage Return
Code:
<0D> H
Description:
Prints the data located in the buffer and sets the next printing position
on the left edge of the selected printing station.
If AUTOFEED is switched on by means of DIP switch 2, a line feed is
executed, possibly dependent on the interface signal AUTOFEED/N of
the parallel interface.
GB - 43
Description
Control Sequences
HT
Function:
Horizontal Tabulating
Code:
<09> H
Description:
Addresses the next horizontal tab.
Remarks:
This command is only executed if the next tab position is actually set.
Tab positions can be set with the control sequence ESC D.
RS
Function:
Journal Tab
Code:
<1E> H
Description:
Sets the next printing position at the beginning of the journal.
Remarks:
The command only functions if the receipt + journal station is selected
and parallel printing is not switched on (by means of ESC z).
ESC SPn
GB - 44
Function:
Select Character Spacing
Code:
<1B> <20> H <n>
Range:
1 ≤ n ≤ 32
Description:
Sets the distance between consecutive characters as the number of
half dots indicated by n.
Remarks:
The space for characters of double width is double the value of n.
The setting is valid for the current print station.
Default:
Dependent on the selected character density:
10 cpi
5 half dots
11.7 cpi
3 half dots
14 cpi
3 half dots
15.6 cpi
2 half dots
Control Sequences
Description
ESC ! n
Function:
Select Print Mode
Code:
<1B> H <21> H <n> H
Description:
Bit
Function
Character
Density :
0..2
Value
(BEETLE /60, ND69)
10 cpi
11.7 cpi
14 cpi
15.6 cpi
unchanged
0
1
2
3
4,5,6,7
Value
(EPSON-TM930)
0, 2, 4, 6
1, 3, 5, 7
3
undefined
-
-
4
undefined
-
-
5
wide print
6
undefined
-
-
7
undefined
-
-
0:off— 1:on
0:off— 1:on
The same mode is set for all stations.
In the case of BEETLE/60 or ND69 mode, if the value of the
lower 3 bits for n>3, only the wide print is switched off/on.
e. g. n = <24>H
n =<04> H
Default:
switch on wide print (character density unchanged)
switch off wide print (character density unchanged)
no wide print. In addition:
in BEETLE/60 or ND69 mode, all stations 14 cpi,
in EPSON-TM930 mode, all stations 11.7 cpi.
GB - 45
Description
Control Sequences
ESC Y 1 m n a
Function:
Select Print Mode
Code:
<1B> H < 59> H <31> H <m> < n> <a>
Description:
This command allows each station to be provided with a character
density. Bytes n, m and a are constructed in the following manner:
Bit
Function
Character
Density :
0..2
10 cpi
11.7 cpi
14 cpi
15.6 cpi
undefined
Value
(BEETLE, ND69)
Value
(EPSON-TM930)
0
1
2
3
4,5,6,7
0, 2, 4, 6
1, 3, 5, 7
3
undefined
-
-
4
undefined
-
-
5
undefined
-
-
6
undefined
-
-
7
undefined
-
-
Remarks:
Byte m is for the journal station, n for the receipt station and a for the
document printing. If the receipt and journal station is selected, the
character density for the receipt station will be used.
Default:
in BEETLE/60 or ND69 mode, all stations 14 cpi,
in EPSON-TM930 mode, all stations 11.7 cpi.
ESC * m n1 n2 data
GB - 46
Function:
Activate Graphic Printing
Code:
<1B> H < 2A> H <m> < n1> < n2> (<data>)k
Range:
m
= 0 or 1
0 ≤ n1 ≤
255
0 ≤ n2 ≤
4
k
= n1 +256 * n2
Control Sequences
Description
1 ≤ k ≤ 1117
0
≤ data≤ 255
Description:
Activates the graphic printing ( 8 pins ) and prints a graphic line in the
resolution specified by m.
m determines the resolution of the graphic printing:
m = 0-> simple graphic density ( 70 dpi, corresponds to full dot )
m = 1-> double graphic density ( 140 dpi, corresponds to half dot )
The number of columns to be printed, and thus the number of data
bytes following n2 that are part of this control command, is the result
of k= n1 + (n2*256). n1 is therefore the low part, n2 the high part of the
data field length.
If the number of columns determined in this way is larger than the
printing area of the selected printing station, the extra data bytes have
no effect.
When m=0, the maximum number of columns is exactly half of this
amount, when m=1, it is exactly this amount.
After the graphic has been printed, the printer returns to the text mode;
text can be printed directly after the graphic.
The following illustration shows the relationship between the data bit
and the matrix point of the print head:
Graphic data
Print head
Remarks:
Graphic lines with double density are printed at half the normal printing
speed as dots cannot follow one another at full printing speed in the
half-dot matrix.
No line feed is executed. The command ESC J with n=16, for example,
must be used for the line feed between graphic lines which are to be
joined close together.
GB - 47
Description
Control Sequences
ESC 2
Function:
Set 1/6" Line Spacing
Code:
<1B> H <32> H
Description:
The line spacing for the subsequent line feeds and for the automatic
line break of lines which are too long is set at 1/6".
Remarks:
The line spacing is only set for the station(s) previously selected with
the control command ESC c 1.
ESC 3 n
Function:
Set Line Spacing in n Microsteps
Code:
<1B> H <33> H <n>
Range:
1≤ n≤ 255
Description:
The line spacing in the subsequent line feeds and for the automatic line
break of lines which are too long is set in n microsteps.
Remarks:
The line spacing is only set for the station(s) previously selected with
the control command ESC c 1.
Default:
n=24 (1/6")
ESC <
GB - 48
Function:
Move Print Head to Home Position
Code:
<1B> H <3C> H
Description:
The print head is moved from whatever position it is in to the furthest
left printing position, i.e. the half dot position 0. The data in the buffer
are printed!
Control Sequences
Remarks:
Description
The furthest left printing position is determined by a home sensor signal.
This applies to this control command only, which thus also norms the
location between the print head position and the half dot position in the
line buffer. Otherwise, every position is determined by counting the
carrier pulses depending on direction.
Owing to the norming of the carrier position, shifts in the location of
lines can occur.
ESC @
Function:
Initialize Printer
Code:
<1B> H < 40> H
Description:
Resets the adjustable printer parameters to the standard values
(default setting; corresponds to the state after switching on the printer)
and norms the printer.
Print station :
Receipt
ND69 mode
receipt
BEETLE/60 mode
receipt and journal
EPSON-TM930 mode
Character
14 cpi
ND69 mode
density :
14 cpi
BEETLE/60 mode
11.7 cpi
EPSON-TM930 mode
Character set :
Integrated (Standard)
Int. character set : Germany
ND69 mode
Germany
BEETLE/60 mode
USA
EPSON-TM930 mode
Wide print :
No
Unidirect. print : No
Waiting time
m= 1
ND69 mode
Document :
m= 1
BEETLE/60 mode
Time for inserting a document: 1 minute or
m=0
EPSON-TM930 mode
Time for inserting a document: unlimited
n = 10
Waiting time after recognition of document:
1 second
Print stop
Receipt end, journal end sensors (BEETLE/60 mode)
Sensors:
Receipt end, journal end and document end
sensors (ND69- and EPSON-TM930-mode)
GB - 49
Description
Control Sequences
Tab positions :
Paper widths :
Logo:
On-line key:
Paper end:
signal, parallel
interface:
Remarks:
Interval of 8 characters (character no. 8, 16, 24...)
With default character density 14 cpi in the ND69
mode and BEETLE/60 mode, and 11.7 cpi in the
EPSON-TM930 mode.
Receipt and Journal 76mm, Document 210mm
no logo loaded
disabled
in BEETLE/60 mode
enabled
in ND69 mode
enabled
in EPSON-TM930 mode
receipt-journal-document end in BEETLE/60
and ND69 mode
receipt-journal end
in EPSON-TM930
mode
The default values depend on the positions of DIP switches 2 and 3
(BEETLE/60 mode, ND69 mode or EPSON-TM930 mode)
This command - in that it bypasses the reception buffer - is executed
immediately following reception.
Any data in the reception buffer that have not yet been processed are
erased. If the document station was selected beforehand, this command
advances the document and switches off the yellow “document” LED.
The print head returns to the home position.
ESC C n
GB - 50
Function:
Select Document Output Length
Code:
<1B> H <43> H <n>
Range:
0 ≤ n ≤ 127
Description:
The number of lines by which the document is transported at the
document station by the command FF is set.
No output length is determined with n=0; the document is transported
out of the printer. The output of the document from the printer depends
on the compatibility mode (see control sequence FF):
ND69 mode, EPSON-TM930 The document is transported out
mode
BEETLE/60 mode
The document is transported out to the
paper edge. The transport rollers, however, continue to grip the document.
Control Sequences
Remarks:
Description
If the line spacing is altered after the output length has been set, the
output length (number of microsteps) remains unchanged.
ESC D (n)k NUL
Function:
Set Tabs
Code:
<1B> H <44> H <n1> H (<n>)k <0>
Range:
1 ≤ n ≤ 123
1 ≤ k ≤ 32
Description:
Sets up to 32 horizontal tabs, which are entered as n1, n2, n3 etc.
between 1 and 123 in a rising sequence with 0 at the end.
All horizontal tabs can be erased with ESC D 0. Any subsequent HT
command is ignored. When switching on the printer, or after entering
ESC @, tabs are set at intervals of 8 characters (11.7 cpi in EpsonTM930 mode, 14 cpi in BEETLE/60 and ND69 mode).
The positions are shown as number of characters (with current character density) between the beginning of a print line and the tab position.
However, they are stored as absolute half-dot values, which means
that they are preserved even if the character density is altered later.
If the receipt + journal station (without parallel printing) is selected, the
tab positions apply from the beginning of the receipt. In the character
count, the gap between receipt and journal is bypassed, and the first
character position on the journal is always the beginning of the journal,
even when the length of the receipt printing area (in half dots) is more
than a complete multiple of the amount of receipt characters.
“n” specifies the character number of the tab position. (The 1. character
of the print line has the no. 0.)
“k” specifies the amount of tab positions (max 32)
If the final 0 is not present after 32 positions, the control command
ends after the 32nd position value and the subsequent values are
regarded as print characters or new control commands.
If a value defined as nk is equal to or less than the previously transmitted value nk-1, or greater than 123, the control sequence is
GB - 51
Description
Control Sequences
regarded as finished and the nk value and the subsequent characters
are interpreted as print characters or new control commands.
Tab positions that lie outside the printing field are regarded as lying
directly behind the last character of the printing field, which means that
a compulsory line break is executed when a print character follows the
corresponding HT.
Default:
Tabs at intervals of 8 characters (14 cpi), i.e. character no. 8, 16, 24
etc.
Example:
Set 2 tabs on characters no. 10 and 15:
<1B> H <44> H <0A> H <0F> H <0> H
ESC J n
Function:
Print and Line Feed in Microsteps (n/144")
Code:
<1B> H <4A> < n>
Range:
0 ≤ n ≤ 255
Description:
The contents of the data buffer are printed, and the paper is line fed by
the amount of microsteps specified by n. This command sets the next
print position on the left edge of the selected print station. The line
spacing set with ESC 2 or ESC 3 is not influenced by this control
sequence.
ESC K n
GB - 52
Function:
Print and Reverse Line Feed in Microsteps (n/144")
Code:
< 1B> H <4B >H <n>
Range:
0≤ n ≤ 255
Description:
The contents of the data buffer are printed, and the paper is line fed in
reverse by the amount of microsteps specified by n.
Following this command, the left edge of the station is the next print
position.
Control Sequences
Remarks:
Description
This command only applies when the document station is selected.
If the sensors relevant to this station are activated with ESC c4, they
must issue the message “paper available” so that the command can
be executed and/or completely processed. The line spacing set with
ESC 2 or ESC 3 is not influenced by this control sequence.
ESC R n
Function:
Select International Character Set
Code:
<1B> H <52> H <n>
Range:
0≤
Description:
By means of the variable n, one of the following sets of characters can
be selected :
Standard Value:
n
≤12
n
Set of Characters
0
USA
1
France
2
Germany
3
Great Britain
4
Denmark I
5
Sweden
6
Italy
7
Spain I
8
Japan
9
Norway
10
Denmark II
11
Spain II
12
Latin America
n = 2 Germany (compatible with BEETLE/60 printer and ND69 printer)
or
n = 0 USA (compatible with EPSON-TM930 printer)
GB - 53
Description
Control Sequences
ESC % n
Function:
Activate User-Defined Character Set
Code:
<1B> H <25> H <n>
Range:
0≤ n ≤ 255
Description:
This command selects either the internal set of characters or the set of
characters defined by the user.
Using ESC &, the user can define a set of characters. While switching
on the printer, the internally stored chracter set (ROM) is copied into the
loadable range for character sets (RAM).
Only bit 0 of n is relevant; bits 1 ...7 can have arbitrary values.
Bit 0 = 1:
selects the user-defined set of characters
Bit 0 = 0: selects the standard set of characters
Remarks:
As with the standard set of characters, a switch to country-specific
characters can be made by means of ESC R n insofar as they have
not been written over with the “load user-defined characters” sequence
(ESC & 2 m n data).
Default:
n=0
ESC X 3 n
GB - 54
Function:
Copy Character Sets
Code:
<1B> H <58> H <33>H <n>
Range:
1 ≤ n ≤ 3
Description:
The internally stored character sets (ROM) are copied into the loadable
range for character sets (RAM).
n determines which set of characters is copied:
n = 1 character set 9 *9 is copied
n = 2 character set 9 *7 is copied
n = 3 both character sets are copied
Remarks:
The country variation which was previously set using ESC R n is copied.
Control Sequences
Description
ESC & 02 m n data
Function:
Load User-Defined Characters
Code:
<1B> H <26> H <02> H <m> <n> (<a> (<p> )k1)k2
Range:
21H ≤ m ≤ n ≤ FFH
a = 7 or a = 9
k1 = 2*a
k2 = n - m +1
0 ≤ p ≤ 255
Description:
Self-defined characters can be loaded with this command.
“m” is the character code of the 1st character to be loaded, and “n” is
the code of the last character. If, for example, only one character needs
to be newly defined, n=m.
This produces the number of characters for k2 = n - m +1.
“a” is the character width in half dots. This value has to be passed on
for each character; however, it must not change during loading.
Character sets which are loaded with a = 7 can be printed with a
character density of 14 or 15.6 cpi.
Character sets which are loaded with a = 9 can be printed with a
character density of 10 or 11.7 cpi.
“p” is the user data (pin information). The amount of user data (bytes)
to be bypassed is k1 = 2 * a.
The following illustration shows the relationship between the data bit
and the matrix point of a 9-pin print head:
User data
Print head
GB - 55
Description
Control Sequences
Remarks:
The character representation must be selected in such a way that no
two horizontally consecutive dots are set. If this rule is breached, the
printer will remove every second dot to avoid mechanical malfunctions.
ESC U n
Function:
Unidirectional Print ON/OFF
Code:
<1B> H <55> H <n>
Range:
0 ≤ n≤ 255
Description:
With this command, it is decided whether the print head should print in
only one or in both directions.
Only bit 0 of n is relevant; bits 1 ... 7 can have arbitrary values.
Bit 0 = 0:
Bit 0 = 1:
GB - 56
Unidirectional Print off
Unidirectional Print on
Remarks:
With Unidirectional Print ON, printing occurs from left to right.
Default:
n=0
Control Sequences
Description
ESC c 0 n
Function:
Select Printing Station
Code:
<1B> H <63> H <30> H <n>
Description:
Selects the printing station described by n.
Bit
Function
0
Value
0
1
Journal
off
on
1
Receipt
off
on
2
Document
off
on
3
undefined
-
-
4
undefined
-
-
5
undefined
-
-
6
undefined
-
-
7
undefined
-
-
Remarks:
Only one station can be selected at one time.
Exception: it is possible to select the receipt and journal station at the
same time. This station is then assigned the character density and set
of characters set at the receipt station.
If the document station is selected, the document can be inserted in the
time specified by ESC f. During this period, the yellow LED “document”
flashes. If no document is inserted within the specified time a user error
message is issued and the receipt station is selected. If the document
is inserted within the specified time, the yellow LED lights up continuously and printing takes place.
The wait for a document (yellow LED flashing) can be interrupted by
the command “initialize printer” (ESC @).
If a switch is made from the document station to the receipt, journal or
receipt/journal stations, the printer transports out any document present
at the station and switches the yellow LED off.
Default:
n = 2 Receipt (compatible with BEETLE/60 printer and ND69 printer)
n = 3 Receipt and Journal (compatible with EPSON-TM930 printer)
GB - 57
Description
Control Sequences
ESC c 1 n
Function:
Select Station to Set Line Spacing
Code:
<1B> H <63> H <31> H <n >
Range:
1≤ n ≤7
Description:
Selects the station(s) for placement of the next sequence (ESC 2 ,
ESC 3) - setting the line spacing. At least one station has to be selected.
Bit
Function
0
Value
0
1
Journal
off
on
1
Receipt
off
on
2
Document
off
on
3
undefined
-
-
4
undefined
-
-
5
undefined
-
-
6
undefined
-
-
7
undefined
-
-
ESC X 4 m n a
GB - 58
Function:
Set Paper Width of the 3 Stations
Code:
<1B> H <58> H <34> H <m> <n> <a>
Description:
This command sets the paper widths to be used.
The values are in millimetres. The following values are permissible:
Control Sequences
Description
Byte
Station
Range
m
Journal
40, 45, 58, 64, 69, 76mm
n
Receipt
40, 45, 58, 64, 69, 76mm
a
Document
50...216mm
Default:
m=76, n=76, a=210
ESC c 3 n
Function:
Select Paper End Signal for Parallel Interface
Code:
<1B> H <63> H <33 >H <n >
Range:
0≤
Description:
This command selects the paper sensors which activate the PE
message of the parallel interface. The PE message is active, i.e. issues
the message “no paper”, when at least one of the sensors with the
switching signal “on” issues the message “no paper”.
n ≤ 255
Bit
Function
0
Value
0
1
Journal End
off
on
1
Receipt End
off
on
2
undefined
-
-
3
undefined
-
-
4
Document End
off
on
5
undefined
-
-
6
undefined
-
-
7
undefined
-
-
Remarks:
The sensors are selected when the command is executed.
A delay can therefore occur between transmission of the command
and selection of the sensors; the extent of this delay depends on how
full the reception buffer is.
To select the document paper end, you need only set bit 4 or bit 5 to 1.
Default:
n = 13 H
Journal end, receipt end, document end (compatible with
ND69 printer)
GB - 59
Description
Control Sequences
n = 03 H
Journal end, receipt end (compatible with EPSON-TM930
printer)
ESC c 4 n
Function:
Select Paper Sensors for Print Stop
Code:
<1B> H <63> H <34 >H <n >
Range:
0≤
Description:
This command selects the sensor which produces a print stop.
Bit
Function
0
Value
0
1
Journal End
off
on
1
Receipt End
off
on
2
undefined
-
-
3
undefined
-
-
4
Document End
off
on
5
undefined
-
-
6
undefined
-
-
7
undefined
-
-
Remarks:
GB - 60
n ≤ 255
The printing and/or line feed is always halted when the sensor
belonging to the station is activated and it issues the message
“no paper”. It is possible to select more than one sensor at a time.
The printing is only stopped when the end of a line has been reached
and a line feed has been executed.
If a paper end has been found at the receipt or journal station, the
printer goes into the offline mode after the printing has been halted.
Two sensors are present at the document station (document beginning
and document end); however, this command regards them as one
sensor, which is observed or not observed. Independent of the selection of the document station, the sensors must always issue the
message “paper available” before a document is confirmed to be
properly inserted (see ESC v and/or ESC +4).
To select the document paper end, you need only set bit 4 or bit 5 to 1.
Control Sequences
Description
Note
It is advisable not to switch off the print stop of the document end as
the paper is to be gripped by the transport rollers.
Default:
n = 13 H
n = 11 H
Document end, journal end, receipt end (compatible with
ND69 and EPSON-TM930 printer).
Document end, Journal end (compatible with BEETLE /60
printer).
ESC c 5 n
Function:
Enable / Disable All Control Keys
Code:
<1B>H <63>H <35>H <n>
Range:
0 ≤ n ≤ 255
Description:
This command executes a common enable or disable for all control
keys (ONLINE, line feed journal, line feed receipt).
Only bit 0 of n is relevant; bits 1 ... 7 can have arbitrary values.
Bit 0 = 1: all control keys disabled
Bit 0 = 0: all control keys enabled.
In the BEETLE /60 mode this command has no influence upon the
ONLINE button
n=0
Remarks:
Default:
ESC c 6 n
Function:
Code:
Enable / Disable of ONLINE Button
<1B>H <63>H <36>H <n>
Range:
0 ≤ n ≤ 255
Description:
This command enables or disables the ONLINE button.
Only bit 0 of n is relevant; bits 1 ... 7 can have arbitrary values.
Bit 0 = 1: ONLINE button disabled
Bit 0 = 0: ONLINE button enabled.
When the ONLINE button is disabled, it is no longer possible to switch
between online and offline by means of the button.
The printer is then in the online mode; however, the line feed buttons
for receipt and journal can be used. This command does not work in
the BEETLE /60 mode!
n=0
Remarks:
Default:
GB - 61
Description
Control Sequences
ESC d n
Function:
Print and Execute n Line Feeds
Code:
<1B> H <64> H <n>
Range:
0 ≤ n ≤ 255
Description:
Prints the contents of the data buffer, then executes n line feeds. This
command sets the next printing position at the left edge of the selected
printing station.
The line spacing of one line feed can be set using the commands
ESC 2 and ESC 3.
Default:
1/6" line spacing
ESC e n
GB - 62
Function:
Print and Execute n Reverse Line Feeds
Code:
< 1B >H <65> H <n>
Range:
0 ≤ n ≤ 255
Description:
Prints the contents of the data buffer, then executes n reverse line
feeds at the document station. This command sets the next printing
position at the left edge of the selected printing station.
Remarks:
This command only applies when the document station has been
selected.
If the appropriate sensors for the station have been activated with
ESC c4, they must issue the message “paper available”, so that the
command can be executed and/or completely processed. The line
spacing of one reverse line feed can be set using the commands
ESC 2 and ESC 3.
Default:
1/6" line spacing
Control Sequences
Description
ESC f m n
Function:
Define Document Waiting Time
Code:
<1B>H <66>H <m > <n>
Range:
0 ≤ m ≤15
0 ≤ n ≤ 64
Description:
Specifies the waiting time for insertion of a document, and the time
interval from insertion until the processing of subsequent commands
begins.
m determines the waiting time for the insertion of documents in
minutes.
If m is given the value 0, the printer waits for the insertion of a document without interruption.
Further functions of the printer start after after a delay of n * 100ms
following insertion of a document.
Default:
m = 1, n = 10 (compatible with BEETLE/60 printer
and ND69 printer)
or
m = 0, n = 10 (compatible with EPSON-TM930
printer)
ESC i
Function:
Cut Off Receipt
Code:
<1B>H <69>H
Description:
The command means that the receipt is cut off.
Remarks:
The command only applies at the beginning of a line.
The command only applies when the receipt station has been selected.
In BEETLE /60 mode the command applies for every station.
GB - 63
Description
Control Sequences
ESC m
Function:
Cut Receipt
Code:
<1B>H <6D>H
Description:
The command means that the receipt is cut.
Remarks:
The command only applies at the beginning of a line.
The command only applies when the receipt station has been selected.
In BEETLE /60 mode the command applies for every station.
ESC o
Function:
Print Logo
Code:
<1B>H <6F>H
Description:
The logo that has been loaded is printed by the previously selected
printing station, but only at the receipt or document station.
If the journal station has been selected, or if no logo has been loaded,
the control command has no effect.
Remarks:
The command only applies at the beginning of a line.
See ESC & 3 to load the logo.
ESC & 03 m n1 n2 data
GB - 64
Function:
Load Logo
Code:
<1B> H <26> H <03> H <m> <n1> <n2> (<p>)k
Range:
<0> ≤ m≤ 18 and m = 255
n1 = 0
0 ≤ n2 ≤ 200
k = n2 + 256*n1
0 ≤ p ≤ 255
Description:
A logo is a series of graphic lines that are stored in the printer RAM.
Printing takes place by means of the control command ESC o at the
selected print station, but only at the receipt or document station.
Control Sequences
Description
A certain format must be adhered to when loading a logo.
A logo consists of a maximum of 18 lines, each with a maximum of
200 data bytes, and its horizontal position can be varied. It is printed
with 8 pins per line, whereby a dot that is to be printed is marked by
setting the corresponding bit to “1". The relationship between the
data bit and the printer head pins is defined in the control command
ESC * print graphic.
A sequence with a maximum of 18 control commands with line
numbers from 1 upwards, as well as the data bytes for each line, defines
the logo. A control command with the line number 0 is placed in front
of this sequence as a start command, and a command with the line
number 255 is placed after the sequence as a stop command.
The start command passes on a data byte which determines the horizontal position of the logo. ND69 mode/EPSON mode: The contents of
this data byte determine the column number of the first column of the
logo in the printing area, beginning with 1. BEETLE/60 mode: The
contents of this data byte moves the start position of the logo a whole
character. If the data byte equals <01>H, then the start position is not
being moved. If moved too far over, it is possible in certain circumstances that the logo can no longer be printed in its entirety. The excess
data bytes are then ignored.
Missing lines in the control command sequence are left empty in the logo.
If a control command with line 0 is transmitted during a transmission
already taking place, the logo memory is erased and transmission is
restarted from the beginning. When line 0 and then line 255 are transmitted, only the erasure of the logo takes place.
Logos are always defined in full-dot graphics, i.e. two consecutive
graphic columns are separated by an empty column.
(as for graphics of simple density, see ESC * with m = 0)
Remarks:
Here, in contrast to ESC/POSTM standard (e.g. ESC *), the data field
length is indicated with the high byte n1 first, followed by the low byte n2.
Example:
for one-line logo:
start command (line 0 shift position = 01)
ESC & 03 00 00 01 01
< 1B 26 03 00 00 01 01>H
data transmission command (line 1)
ESC & 03 01 00 8C data
< 1B 26 03 01 00 8C Data> H
stop command (line 255)
ESC & 03 FF 00 00
<1B 26 03 FF 00 00> H
GB - 65
Description
Control Sequences
ESC # m n data
Function:
Transmit Data to Sub-device (Customer Display)
Code:
<1B>H <23>H <m> <n> (<p>)n
Range:
m=0
0 ≤ n ≤ 255
0 ≤ p ≤ 255
Description:
With this command, the following n bytes are transmitted to the subchannel. The ND69 has only the sub-channel 0, which is the V.24
interface for connection to the customer display.
The data transmission is transparent, i.e. the n bytes can have arbitrary
values, which means they may also contain control commands (for the
customer display).
Remarks:
No data are transmitted from the customer display to the host
computer. After switching on, the customer display transmits data (ID).
These can be printed during the self test.
ESC p m n1 n2
Function:
Open Cash Drawer Cover
Code:
<1B>H <70>H <m> <n1> <n2>
Range:
m = 0 or 1
0 ≤ n1 ≤ 255
0 ≤ n2 ≤ 255
Description:
The opening impulse defined by n1 and n2 is transmitted to the
selected cash drawer.
m = 0:
m = 1:
n1 * 10ms
n2 * 10ms
Open first cash drawer,
Open second cash drawer.
is the duration of the opening impulse;
is the minimum period between two impulses to the same
cash drawer.
n1 = 5 and n2 = 255 are required for WN cash drawers.
GB - 66
Control Sequences
Description
ESC t n
Function:
Select Character Set Page
Code:
<1B>H <74>H <n>
Range:
Currently, only n = 0.
Description:
The command selects page n of the character set.
Only page 0 of the character set is implemented.
Default:
n=0
ESC u n
Function:
Transmit Cash Drawer Status
Code:
<1B>H <75>H <n>
Range:
n=0
Description:
The status of the cash drawer(s) connected to the system is transmitted to the system via the V.24 interface.
The status byte has the configuration:
Bit
Value
Meaning
0
1
0
Cash drawer 1
open
closed
1
Cash drawer 2
open
closed
2
not used
-
fixed 1
3
not used
-
fixed 1
4
not used
-
fixed 1
5
not used
-
fixed 1
6
not used
-
fixed 1
7
not used
fixed 0
-
GB - 67
Description
Control Sequences
Remarks:
This command only applies when the serial interface has been selected.
With the parallel interface, it is ignored.
If no cash drawer is connected, the bit in question has the value “1" in
the status byte.
The status is transmitted back when the command is executed.
A delay can therefore occur between transmission of the command and
reception of the status byte; the extent of this delay depends on how
full the reception buffer is.
ESC v
Function:
Transmit Printer Status
Code:
<1B>H <76>
Description:
The ESC v command is used for synchronization between host software and printer. The reply to this command is only transmitted when
all previous job prints have been carried out.
This command only applies when the serial interface has been
selected. In the case of the parallel interface, it is ignored.
This command induces the controller to transmit the current status via
the V.24 interface. After the system has indicated that it is able to
receive, the printer transmits a byte (status byte).
Depending on the position of DIP switches 2 and 3, which determine
the compatibility of the ND69, the status byte contains the following:
Bit
Meaning (BEETLE /60 mode, ND69 mode)
0
1
2
3
4
5
6
7
Front document sensor
Back document sensor
Receipt
Journal
Not used
Cover
Error
Not used
Remarks:
GB - 68
Value
0
no paper
no paper
no paper
no paper
fixed 0
closed
no
fixed 0
1
paper available
paper available
paper available
paper available
open
yes
-
Bit 6 “error” is an or-connection of the error bits from ESC +1 and is
automatically deleted when ESC + 1 or ESC v has been executed. The
error can be more clearly specified and removed by means of the
extended error message (ESC +1). In the BEETLE/60 mode Bit 6 is set
Control Sequences
Description
Remarks:
every time an ESC sequence is received (if at this time an error bit of the
extended error message (ESC + <01>H) is set). Bit 0, “Begin of Document”, remains to be set in the BEETLE /60 mode after inserting the
paper as long as another station is selected. Bit 1, “End of Document”,
is set in the BEETLE /60 mode as soon as the document is inserted.
This bit will be deleted when the document has left the printing station.
Bit
Meaning ( EPSON-TM930 mode)
0
1
2
3
4
5
6
7
Journal
Receipt
not used
not used
not used
Document
not used
not used
Remarks:
Value
0
1
paper available
no paper
paper available
no paper
fixed 1
fixed 1
fixed 0
paper available
no paper
fixed 0
fixed 0
The status is transmitted back when the command is executed.
A delay can therefore occur between transmission of the command
and reception of the status bytes; the extent of this delay depends on
how full the reception buffer is (applies to both cases).
ESC + m
Function:
Demand Data
Code:
<1B>H <2B>H <m>
Description:
In response to this command, the printer controller transmits a message
sequence which - dependent on m - contains the following data:
0
device configuration
1
extended error message
2
-
3
read printer parameters
4
switches and sensors
128
power-up error
GB - 69
Description
Control Sequences
Commands with m = 2 and m = 5 ... 127 are ignored.
The message sequence has the following configuration:
ESc r n1 n2 data
<1B>H <72>H <n1> <n2> (<p>)k
This command only applies when the serial interface has been
selected. In the case of the parallel interface, it is ignored.
Range:
n1 = 0
1≤ n2 ≤ 24
k = n2 + 256 * n1
Remarks:
In contrast to ESC/POSTM standard (e.g. ESC *), the data field length
is indicated with the high byte n1 first, followed by the low byte n2.
ESC + 0
With the device configuration, the printer controller supplies a statement about the configuration (the expansion stage) and the program
version in use.
The information is transmitted by means of n2 = 24. All the information
is coded in ASCII, which means it can be read as text.
The device configuration is as follows (see next page):
GB - 70
Control Sequences
Byte No.
Description
Number of
Bytes
Content
Text
HEX
ESC[?
1B,5B,3F
Description
1, 2, 3
3
Start sequence
4, 5
2
B5
42, 35
Ident.No. for ND69
6
1
;
3B
Separator
7, 8
2
9
1
10, 11
2
12
1
13, 14
2
15
1
16,17
2
18
1
19, 20, 21
3
22
1
;
3B
Separator
23
1
1
0
30
31
cutter available
cutter not available
24
1
c
63
configuration end
Program version
,
2C
Separator
Program sub-version
;
3B
Separator
Characters/line of the selected
paper width and character density
,
2C
Separator
...on Receipt
,
2C
Separator
...on Document. In two-digit
values byte 19 is replaced by a
blank <20>H
The data field “program version” provides the version number of the
firmware used by the controller. The program sub-version is a version
of the software used internally. The numbers of characters per printing
station represent the current value that results either when the printer
is switched on (default value) or when the control command ESC X 4 is
received.
ESC +1
In the case of an error message following the command ESC v, bit 6,
“error”, the error is described in more detail by the extended error
message.
A data byte (n2 = 1) with the following configuration is transmitted :
GB - 71
Description
Control Sequences
Bit
Functions
0="1"
device error
1="1"
cover error
(only BEETLE /60, otherwise = 0)
2="1"
user error
3="1"
memory error
4="1"
power-up error
5="1"
logo format error
6="1"
job loss error
(only BEETLE /60, otherwise = 1)
7="1"
not used
After transmission, all error bits are removed - with the exception of
device errors. Device errors have to be removed by means of the
ESC @ control command, by activating the init-signal of the Centronics
interface, or by switching the printer off and on.
Remarks:
GB - 72
Bit 0,
device error
Device errors are reported when mechanical malfunctions in the printer
occur, which are recognized by the microprogram to have exceeded
the timeouts. Possible device errors are:
Interference in carrier movement, recognized by timeout of consecutive carrier pulses.
Interference in cutter movement, recognized by timeout of the
cutter disc revolutions and/or a change of signal at its home
sensor.
Device error message in BEETLE/60 mode occurs only when a cut
command was sent to the printer.
Bit 1,
cover error
In the EPSON-TM930 and ND69 modes, Bit 1 always equals 0. A cover
error is reported when a print job cannot be carried out with open cover.
Bit 2,
user error
User error is reported when no document has been inserted within the
time specified by ESC f. User errors are reported in the BEETLE/60 mode
when there is no paper on a station (printstop sensor active) and when
a line feed on the receipt station shall be executed after an interference
on the cutter has occured.
Bit 3
memory error
Memory error is reported when an error occurs during the memory test
(RAM and ROM).
Control Sequences
Description
Bit 4
power-up error
Power-up error is reported when a hardware error is recognized while
the printer is being switched on.
Bit 5
logo format error
Logo format error is reported when a format error is recognized while a
logo is being loaded (ESC & 3).
Bit 6
job loss error
In the EPSON-TM930 and ND69 operating modes, bit 6 is always
equal to 1. In BEETLE/60 mode, job loss error is reported when the ND69
receives printing data in the following states:
in all off-line states (e.g. device fault, open cover);
at paper end on one of the three stations, when print stop is
switched on.
In this mode bit 6 is set at each received control sequence when one of
the other error bits (0 to 5) is set at the same time.
Remarks:
Unlike the BEETLE/60 printer, all jobs that do not lead to printing or
line feed are correctly executed (e.g. setting line space).
ESC + 3
The set printer parameters can be read. A data field of 6 bytes (n2 = 6)
with the following meaning is transmitted:
Byte 1
Parameter
Bit
Value
Explanation
1, 0
00
01
10
11
10 cpi
11.7 cpi
14 cpi
15.6 cpi
3, 2
00
01
10
11
10 cpi
11.7 cpi
14 cpi
15.6 cpi
Character density
Document
5, 4
00
01
10
11
10 cpi
11.7 cpi
14 cpi
15.6 cpi
-
7, 6
fixed 11
not used
Character density
Journal
Character density
Receipt
GB - 73
Description
Control Sequences
Byte 2
Parameter
Bit
Value
Explanation
Wide print
0
0
1
switched off
switched on
-
1
Unidirectional printing
2
0
1
switched off
switched on
selected
station
4, 3
00
01
10
11
Journal
Receipt & Journal
Receipt
Document
-
7, 6, 5
fixed 111
not used
undefined
Byte No.: 3 Bit 0-3 : international character set
Bit 4-7 : not used, fixed 0000
Byte No.: 4 Print stop sensors
Byte No.: 5 Waiting time for document insertion
Byte No.: 6 Waiting time for restart
(see ESC R)
(see ESC c4)
(see ESC f)
(see ESC f)
ESC + 4
The set printer parameters can be read. A data field of 7 bytes (n2 = 7)
with the following meaning is transmitted:
Byte No.: 1 Sensors
GB - 74
Bit
Function
0="1"
Document at start position
1="0"
Document at end position
2="0"
Receipt end
3="0"
Journal end paper roll
4="1"
not used
5="1"
not used
6="1"
not used
7="1"
Unidirectional printing
Control Sequences
Description
Byte No.: 2 Switches
Bit
Function
0="0"
Carrier in home position
1="0"
Cutter in home position
2="0"
Cover open
3="1"
DIP1 on
4="1"
DIP2 on
5="1"
DIP3 on
6="1"
DIP4 on
7="1"
not used
Byte No.: 3 to 7
not used, fixed 0
ESC + 5
A power failure can be detected. A data field of 1 byte (n2 = 1) is transmitted, where bit 0 = 1 means “power failure”. The bits 1 to 7 equal 0
and are not used. The bit “power failure” is transmitted after switching on
the ND 69. After transmission of the command ESC + 5 it will be deleted.
ESC + 128
When the status byte reports a power-up error, a more detailed
description of the cause of the error is provided by this enquiry. A data
field of 2 bytes (n2 = 2) with the following meaning is transmitted:
Byte 1
Contents
Error Messages
= 66H
No Error
= 01H
CPU Error (commands)
= 02H
CPU Error (internal RAM)
= 20H
External RAM Error
= 30H
EPROM Error
Byte No.: 2 not used, fixed 0
GB - 75
Description
Control Sequences
ESC z n
Function:
Switch On/Off Parallel Print on Receipt + Journal
Code:
<1B>H <7A>H <n>
Range:
0 ≤ n ≤ 255
Description:
This command switches the parallel printing (printing of the same data)
on the receipt and journal on or off.
Only Bit 0 of n is relevant; Bits 1 ... 7 can have arbitrary values.
Bit 0 = 0: Parallel printing is switched off;
Bit 0 = 1: Parallel printing is switched on.
Remarks:
This command only applies at the beginning of a print line, and only
when (with ESC c 0) the receipt+journal is selected as one printing
station.
With parallel printing OFF, receipt+journal are interpreted together as
one printing station with one print line that covers both stations.
With parallel printing ON, receipt+journal are two separate printing
stations at which the same text is printed.
Default:
n=0
GS ENQ
GB - 76
Function:
Status Enquiry
Code:
<1D>H <05>H
Description:
The current printer status is transmitted as a status byte via the V.24
interface as soon as the controller receives this sequence of control
characters.
Control Sequences
Description
Value
Bit
Meaning
0
Journal End
paper available
no paper
1
Receipt End
paper available
no paper
2
Cover
closed
open
3
On Line/Off Line
On Line
Off Line
4
Cash drawer
1 or 2 open
both closed
5
Document End
paper available
no paper
6
Device Error
no error
error
7
not used
-
fixed 1
Remarks:
0
1
This command only applies when the V.24 interface and the data
transmission control are selected with DTR/DSR. In addition, either
the EPSON-TM930 or the ND69 mode is to be set. When the parallel
interface or the XON/XOFF control for V.24 interface or BEETLE /60
mode are selected, this command is ignored.
This command is also executed when the printer is in the offline mode,
when the reception buffer is full, or when a device error has occurred.
Attention! The controller transmits the status byte even when it finds
the sequence <1D>H <05>H in the data of another control command.
Bit 6,
device error
Device errors are reported when mechanical malfunctions in the printer
occur, which are recognized by the microprogram to have exceeded
the timeouts. Possible device errors are:
-
Interference in carrier movement, recognized by timeout of consecutive carrier pulses.
Interference in cutter movement, recognized by timeout of the
cutter disc revolutions and/or a change of signal at its home
sensor.
GB - 77
Character Set
Control Sequences
Character Set
Control SequencesCharacter Set
The basis for the character set is the character set table 437 (USA/IBM standard)
The characters in the halftone fields can be changed according to the requirements of
specific countries. The character set of a certain country can be selected by means of
ESC R. The default setting, for Germany (n=2), is illustrated.
GB - 78
Control Sequences
Character Set
Store of country-specific characters
GB - 79
Appendix
Technical Data
GB - 80
Footprint
Width
Depth
280 mm
367 mm
Overall Height
222 mm
Weight
13.5 kg
Climatic Category
IEC 721-3-3 Class 3K3
Operating Temperature
5 - 40 ° C
Input Voltage
88 - 132 V and
176 - 264 V AC autoranging
Power
80 Watts
Power Consumption
1.6 / 0.8 A
max. 3/ 1.5 A
Frequency of System Voltage
50/60 Hz
Appendix
Technical Data
AppendixTechnical Data
Basic Line Spacing
4.23 mm
Blank Line Feed
Receipt
Journal
30 lines/sec.
30 lines/sec.
Number of Characters
15.6 14 11.7
40.0 mm Receipt/Journal 20
18 15
45.0 mm Receipt/Journal 23
20 17
58.0 mm Receipt/Journal 32
28 24
64.0 mm Receipt/Journal 34
31 26
69.0 mm Receipt/Journal 37
34 28
76.2 mm Receipt/Journal 42
38 31
DIN A4 Document
124 112 93
10
13
15
20
22
24
27
80
[in cpi]
Print
bidirectional
Printing Basis
9 pins
Max. Print Speed
4 lines per sec.
(receipt printing on 76.2mm
roll width)
1.8 lines per sec.
(document printing on 210 mm
roll width)
Transmission Speed
9600 Baud
Ribbon
violet (9m characters)
black (5m characters)
Head Service Life
approx. 100 million characters
Cutter Service Life
approx. 500,000 cuts
System Interfaces
V.24 and Centronics
Peripheral Interfaces
For WN cash drawers
For WN customer display
GB - 81
Paper Specifications
Appendix
Paper Specifications
Receipt/Journal paper (single-ply)
Paper Specifications
Outside Roll Diameter
max. 100 mm (Journal max. 80mm)
Cover Diameter
12 mm (+ 0 mm;- 2 mm)
Roll Width
40 mm +- 1 mm
(min. edge spacing left/right) 45 mm +- 1 mm
WN Paper
58 mm +0 mm; -1 mm
58 mm +- 1 mm
64 mm +- 1 mm
69 mm +- 1 mm
76 mm +- 1 mm
(2,22 ± 1mm)
(2,33 ± 1mm)
(1,36 ± 1mm)
(2,28 ± 1mm)
(2,38 ± 1mm)
(2,12 ± 1mm)
Basis Weight
60 g/m2 +- 4 %
Paper Thickness
max. 0.1 mm
min. 0.075 mm
Usable Length
approx. 90 m (Journal approx. 60m)
red warning strips at paper end;
paper end not glued to cover
Document Paper
Dimensions, single-ply paper
Length
max.
300
min.
70
Width
max.
218
min.
50
Thickness
max.
0.5
min.
0.08
Basis Weight
60 - 300 g/m2
Dimensions, multi-ply paper
Length
min.
Width
Thickness
max.
GB - 82
70
150
0.2
mm
mm
mm
mm
mm
mm
mm
mm mm
218mm
Appendix
Paper Specifications
Useable Surface
The minimum edge spacing is 0,7mm
3,8 ± 1,8
3,7 ± 0,7
202,4
4,2 ± 0,3
1st line
Print range DIN A4 document
4±2
68
4±2
Receipt 76mm wide
4±2
68
4±2
Journal 76mm wide
GB - 83
Paper Specifications
Appendix
Print range (backside Receipt/Journal)
If you intend to use the backside of the receipt and journal paper for advertising purposes,
please note that the marked area (11 mm) must not be printed on!
24
11 20
Receipt
GB - 84
11
Journal
Appendix
Interfaces
Interfaces
AppendixInterfaces
Standard PC cables can be used for the connections.
Parallel Interface to the System
The parallel interface to the system is a Centronics interface; it corresponds to the unidirectional LPT interfaces of PCs, i.e. the printer does not transmit replies.
Technical Data :
Data Transmission:
Synchronization:
Handshaking:
Signal Level:
Connector Type:
8 bit parallel, unidirectional
STROBE/N impulse, generated by the system
ACKNLG/N and BUSY
All interface signals are TTL compatible
26-pin Centronics connector
Allocation of Connectors and Description of Signals
Pin
Name
of Signal
Direction
Description
1
STROBE/N
Input
Strobe impulse for reading in data. In the idle state,
the signal is “high”. Immediately after the change to
“low”, the data are read by the printer. The impulse
length must be at least 0.5µs at the printer.
2
DATA0
Input
These signals are the 8 parallel data bits.
3
DATA1
Input
“High” corresponds to bit value “1",
4
DATA2
Input
“Low” corresponds to bit value “0".
5
DATA3
Input
6
DATA4
Input
7
DATA5
Input
8
DATA6
Input
9
DATA7
Input
GB - 85
Interfaces
Appendix
Pin
Name
of Signal
Direction
Description
10
ACKNLG/N
Output
This signal indicates that the printer is ready to
receive data. Under normal conditions, it is “high”
and goes to"low" for about 10us.
11
BUSY
Output
This signal indicates whether the printer can receive
data or not. BUSY = “high” indicates that the printer
cannot receive any data.
BUSY = “low” indicates that the printer is ready to
receive data.
12
PE
Output
This signal indicates whether paper is available or
not. “High” indicates the paper end; “Low” indicates
that paper is available.
13
SELECT
Output
If DIP switch 1 is “on”, this signal indicates whether
the cover is open.
“High” means that the cover is closed; “Low”, that
the cover is open.
If DIP switch 1 is “off”, this signal indicates which
interface to the system is active.
“HIGH” indicates that the parallel interface is active;
“LOW” indicates that the serial interface is active.
14
AUTOFEED/N Input
If this signal is at “Low”, an automatic line feed is
executed in conjunction with the command CR, but
only when DIP switch 2 is “on”.
15
NC
not used
16
GND
Signal Ground
17
CHASSIS-GND
Chassis earth connection, only to the printer
housing, not connected to the signal ground
18
NC
not used
19-30 GND
GB - 86
Signal Ground
Appendix
Interfaces
Pin
Name
of Signal
Direction
Description
31
INIT/N
Input
This is the reset signal for the combination controller.
The printer is normed (as after the power supply is
switched on when it receives an INIT/N “Low”
impulse lasting at least 50us).
32
ERROR/N
Output
This signal indicates whether the printer is in an error
state or not. It is at “Low” in the following cases:
during the switch-on norming;
during the self-test printing;
in the “Off Line” mode;
when a device error has been recognized.
33
GND
Signal Ground
34
NC
not used
35
+5 V
36
SELECTIN/N Input
Output
This signal indicates whether the printer is switched
on or not. “High” means that the power supply is
switched on.
This signal is set at “High” by the controller.
All signal names with the ending “/N” are “Low” active; all others are “High” active.
Note:
The connection cable to the system must be screened off and contain twisted
wire pairs for each signal. The second wire of each pair is to be connected to
the signal ground. The screening must be connected to the system housing.
Data must not be transmitted unless ACKNLG/N or BUSY have been
checked beforehand. Data may only be transmitted to the printer when it has
been ascertained beforehand that an ACKNLG/N impulse appeared or
BUSY = “Low”.
Please note that the BEETLE /60 mode is not supported in connection with
the Centronics interface!
GB - 87
Interfaces
Appendix
Serial Interface to the System
The serial interface to the system is a V.24 (RS-232C) interface. It corresponds to the
COM interfaces on PCs.
Technical Data :
Data Transmission:
Synchronization:
Handshaking:
serial, full duplex
synchronous
DTR / DSR or XON / XOFF control
(can be selected by DIP switch 4)
Neither DTR / DSR nor XON/XOFF handshaking have effect
on the data transmission from the printer to the system. The
system must have a sufficiently large reception buffer
(e.g. 64 bytes) for reception data.
9600
odd or none
automatic parity check: the type of parity check (odd or no
parity) is detected and set automatically when the signals
<0D>H, <80>H, <80>H, <80>H, <0D>H are received. To alter
the parity, these signals must be received as the first signals
after switching on the printer. If these signals are not detected,
the default value - odd parity - remains switched on. These
signals will not be printed.
8
1
MARK = logical “1": -3V to -15V
SPACE = logical ”0": +3V to
+15V
25-pin D-sub connector
Baud Rate:
Parity:
Data Bits:
Stop Bit:
Signal Level:
Connector Type:
Allocation of Connectors and Description of Signals:
GB - 88
Pin
Name
of Signal
Direction
Description
1
FG
-
Frame Ground
2
TXD
Output
Transmission Data
3
RXD
Input
Reception Data
Appendix
Interfaces
Pin
Name
of Signal
Direction
Description
6
DSR
Input
This signal indicates whether the system can receive
data or not.
DSR = “0" indicates that the system can receive
data; otherwise, DSR = ”1"
If the DTR / DTS control has been selected, the
printer only transmits when DSR = “0" (except when
it transmits data in reply to GS ENQ ).
7
SG
-
Signal Ground
20
DTR
Output
This signal indicates whether the system can receive
data or not.
If the DTR / DTS control has been switched on,
DTR = “0" indicates that the printer can receive data;
otherwise, DTR = ”1".
DTR = “1" is switched in the following cases:
during switch-on norming;
during the self-test printing;
when the reception buffer is full.
If the XON / XOFF control is switched on, DTR is
always ”0", except in the following cases:
during switch-on norming;
during the self-test printing;
when a device error has been recognized.
Connecting Cable
A standard cable for connecting printers to the serial interface is used to connect the
ND69 to a PC or PC-compatible unit (e.g. BEETLE).
In the case of the connection to a BEETLE /60 with voltage-supplied COM interface, your
local branch office can supply the appropriate cable. Gender-changers must not be used.
At the printer end, this cable has a 25-pin D-sub connector, and at the systems end it has
a 9-pin D-sub connector. The following illustration shows the connector point allocation
and connection of the cable.
GB - 89
Interfaces
Appendix
System
Printer
GND5
TXD 3
RXD 2
CTS 8
RTS 7
DSR 6
DTR 4
7 GND
2 TXD
3 RXD
5 CTS
4 RTS
6 DSR
20 DTR
The data transmission lines are crossed as in a null modem cable. The control lines are
connected in such a way that the system treats the printer as if a CTS/RTS handshaking
were implemented. This corresponds to the PC standard for printers, although the printer,
which also corresponds to the standard, is equipped with DTR/DSR handshaking.
No handshaking is effective for the data transmission from the printer to the system when
using this cable; the system must have a sufficiently large reception buffer for reception
data (e.g. for 64 bytes).
Serial Interface to the Customer Display
The serial interface for connecting a Wincor Nixdorf customer display (e.g. BA 63) is a
V.24 (RS-232C) interface.
Technical Data :
Data Transmission:
Synchronization:
Handshaking:
Baud Rate:
Parity:
Data Bits:
Stop Bit:
Signal Level:
Connector Type:
GB - 90
serial, full duplex
asynchronous
CTS / RTS control
9600
odd
8
1
MARK = logical “1": -3V to
SPACE = logical ”0": +3V to
9-pin D-sub connector
-15V
+15V
Appendix
Interfaces
Allocation of Connectors and Description of Signals:
Pin
Name
of Signal
Direction
Description
1
+12 V
Output
supply voltage, max. 500 mA
2
RXD
Input
reception data
3
TXD
Output
transmission data
5
SG
-
signal ground
7
RTS
Input
This signal indicates whether the customer display
data can be received or not.
RTS = “0" indicates that the system can receive
data; otherwise, RTS = ”1".
The printer only transmits when RTS = “0".
8
CTS
4,6, 9 NC
Output
This signal is always switched at “0"; it is only at ”1"
during the switch-on norming and during the
self-test printing.
-
not connected
GB - 91
DIP Switches
Appendix
Cash Drawer Connection
The combination controller has a 6-pin mini-DIN connector for connecting the WN cash
drawer ( e.g. KA16 ). The mini-DIN connector has the following signal allocation:
Pin
Description
1
Opening impulse for cash drawer 1
2
Status cash drawer 1
3
Ground
4
Opening impulse for cash drawer 2
5
Status cash drawer 2
6
+12V
DIP Switches
DIP Switches
The DIP switches make it possible for the ND69 to be operated in the ND69 mode or to
be compatible with other printers so that existing application software can be used.
The DIP switches are located on the terminal strip on the underside of the ND69, on the
right, beside the V.24 interface.
OFF
ON
Default setting
GB - 92
4
1 2 3
Appendix
DIP Switches
DIP Switch 1:
Switch on
Switch off
Meaning of the parallel interface SELECT signal.
SELECT represents the COVER SWITCH, i.e.
SELECT = “HIGH”-> cover closed
SELECT = “LOW” -> cover open
SELECT indicates whether the parallel or the V.24 interface
is active
SELECT = “HIGH” -> parallel interface is active
SELECT = “LOW” -> serial interface is active
DIP Switch 2 and
DIP Switch 3
These two switches serve to select the compatibility and set the
effects of control commands between the operating modes
ND69 mode
BEETLE/60 mode or
EPSON-TM930 mode
Moreover, the switches are used to execute an AUTOFEED,
i.e. an automatic line feed with the control character CR.
Switch 2 off and
Switch 3 off
The ND69 is in the ND69 mode and CR is executed without a
line feed
Switch 2 on and
Switch 3 off
The ND69 is in the BEETLE/60 mode and CR is executed
without a line feed
Switch 2 off and
Switch 3 on
The ND69 is in the EPSON-TM930 mode and CR is
executed without a line feed
Switch 2 on and
Switch 3 on
1.
2.
DIP Switch 4:
Switch on
Switch off
The ND69 is in the EPSON-TM930 mode and the
parallel interface is active.
The parallel interface signal AUTOFEED/N
determines whether CR executes an automatic
line feed.
AUTOFEED/N = “HIGH” - CR without line feed
AUTOFEED/N = “LOW” - CR with line feed
The ND69 is in the EPSON-TM930 mode and the V.24
interface is active:
CR is executed with a line feed.
Selection of DTR/DSR or XON/XOFF control
XON/XOFF control is switched on
DTR/DSR control is switched on
GB - 93
Possible Problems
Appendix
Possible Problems ...
Possible Problems
Problem
Description
The printer does
not switch on.
The ON lamp does not light up.
Recommended Action
Ensure that the power cable is connected
to the mains and to the printer.
Make sure that the printer power switch is
on.
Make sure that there is power at the socket
where the printer is connected.
The printer does
not carry out a self
test.
The printer does not produce a
self test print out.
Check whether the cover of the printer is
closed.
Check that there is no paper jam in the
printer.
Check whether the selected printing station
(receipt or journal station) contains paper.
If the error lamp does not ligth up, but the
printer self test still does not produce a
print-out, then contact customer service.
Red error lamp
lights up.
The cover is open.
Red error lamp
flashes when
printer is switched
on.
Although the cover is closed,
the error lamp flashes.
GB - 94
Ensure that the cover is closed and press
the ONLINE button.
An error in the printing electronics has
occured. Contact customer service.
Appendix
Possible Problems
Problem
Description
Recommended Action
Red error lamp
flashes.
The cutter does not cut, or the
print head does not move.
Remove the paper jam (see Page 35).
Red error lamp
lights up.
The receipt or journal roll is
used up.
Change the receipt or journal roll (see
Page 22).
Poor printing
quality.
The printed image is poor. The
paper is printed unevenly.
Change the ribbon cassette (see Page 32).
Check whether the recommended type and
quality of paper have been used.
Check whether the print head is used up. If
so, change the print head (see Page 37).
The printing is
slowed down.
Printer does not
print.
Receipt-/Journal
paper can not be
inserted
Check whether the transport rolls of the
print head require cleaning.
The data from the host
computer are not being
transmitted.
Carry out the self test (see Page 15). If the
printer function is not disrupted, check all
the cable connections.
Clean the paper magazine with the residual
paper remover (see Page 35).
Possible Problems
GB - 95
Possible Problems
Appendix
Cleaning Instructions
Cleaning the Transport Axles of the Print Head
In order to prevent a transport fault of the print head, the transport axles should be
cleaned from time to time.
Switch the device off and disconnect it from the mains supply.
Use a clean, soft, lint-free cloth to clean the transport axles; the transport axles remain fitted.
Never use cleaning agents such as spirits, as the impregnation of the bearing can be
negatively affected. Do not grease or oil the transport axles after cleaning.
Cleaning the Printing Mechanism
Other sections of the printing mechanism can also be cleaned in this way:
Use a clean, soft, lint-free cloth to clean the document transport and press rollers,
as well as the receipt/journal drive rollers.
The whole document section can be cleaned in the same way. A brush or a QTip cotton bud can be used to clean inaccessible points.
The document sensor housing and the reflector positioned opposite should be
cleaned using a clean cloth without cleaning solution.
GB - 96
Appendix
Glossary
Glossary
Glossary
ASCII Code
ASCII is the abbreviation for American Standard Code for
Information Interchange. It is used to code letters and symbols.
Baud Rate
This concerns the speed of data transmission between the
printer and the computer. One Baud equals one Bit/s. The Baud
rate for the ND69 is 9600 Baud.
Bidirectional Printing
During this printing process, the print head prints from left to
right and from right to left in turn. This method of printing
accelerates the process to a considerable extent. See also Unidirectional Printing.
Binary
The binary counting system is based on the unit two. The
digits 0 and 1 are permissible.
Bit
A bit is a binary digit (0 or 1). It is the smallest unit used in data
processing.
Decimal System
The decimal system is based on the unit 10. The digits 0 - 9 are
permissible.
DIP Switch
Dual In Line Package Switch,
DTR/DSR
Data Terminal Ready/ Data Set Ready
ESC Sequence
A series of ASCII characters for appropriate activation of the
printer, and which begins with the command ESCAPE(ESC), is
described as an ESC sequence.
Handshaking
Expression for a process of data transmission between devices
which use a receipt system.
Hexadecimal System
This numerical system is based on the unit 16. The digits 0 - 9
and the letters A, B, C, D, E and F are used for the coding. Any
decimal number from 0 - 255 can be represented with the aid
of a two-figure hexadecimal number.
LED
Light Emitting Diode
POS
Point of Sale
GB - 97
Glossary
Appendix
Reset
With the aid of a reset, the printer is returned to its standard
values. This occurs by means of a command.
Interface
Serial
A serial interface transmits the information elements
(bits) serially, i.e. one after the other, via a single
channel. On the ND69, this takes place
asynchronously, i.e. by transmitting a start and
stop bit at the beginning or end of a data word.
Parallel A parallel interface transmits the information elements
simultaneously, and via several channels.
V.24
Serial interface corresponding to CCITT norms.
Unidirectional Printing During this printing process, the print head always prints from
left to right. The printing speed is considerably lower than with
bidirectional printing, but the vertical positioning of the print
image is more precise. With your ND69 you can print graphics
and logos both using the unidirectional and the bidirectional
printing process.
XON/XOFF
GB - 98
Transmit ON/OFF, software flow regulation for serial interfaces.