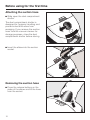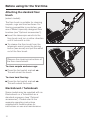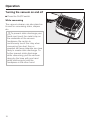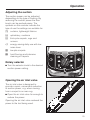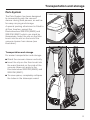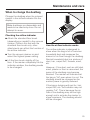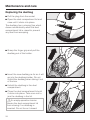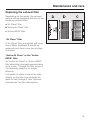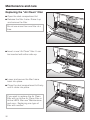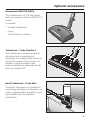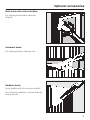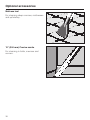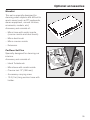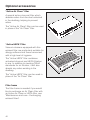
1
Operating Instructions
Vacuum Cleaner
S 700 - S 768
To prevent accidents
and appliance damage,
read these instructions
before
installation or use.
en - US, CA
M.-Nr. 07 703 000
2
Contents
IMPORTANT SAFETY INSTRUCTIONS. . . . . . . . . . . . . . . . . . . . . . . . . . . . . . . . . 4
Guide to the vacuum cleaner . . . . . . . . . . . . . . . . . . . . . . . . . . . . . . . . . . . . . . . . 8
Before using for the first time. . . . . . . . . . . . . . . . . . . . . . . . . . . . . . . . . . . . . . . 10
Included accessories. . . . . . . . . . . . . . . . . . . . . . . . . . . . . . . . . . . . . . . . . . . . . . 13
Using the included accessories . . . . . . . . . . . . . . . . . . . . . . . . . . . . . . . . . . . . . 15
Crevice nozzle . . . . . . . . . . . . . . . . . . . . . . . . . . . . . . . . . . . . . . . . . . . . . . . . . . . . 16
Dusting brush . . . . . . . . . . . . . . . . . . . . . . . . . . . . . . . . . . . . . . . . . . . . . . . . . . . . 16
Upholstery nozzle . . . . . . . . . . . . . . . . . . . . . . . . . . . . . . . . . . . . . . . . . . . . . . . . . 16
Operation . . . . . . . . . . . . . . . . . . . . . . . . . . . . . . . . . . . . . . . . . . . . . . . . . . . . . . . 17
Power cord. . . . . . . . . . . . . . . . . . . . . . . . . . . . . . . . . . . . . . . . . . . . . . . . . . . . . . . 17
Turning the vacuum on and off . . . . . . . . . . . . . . . . . . . . . . . . . . . . . . . . . . . . . . . 18
Adjusting the suction . . . . . . . . . . . . . . . . . . . . . . . . . . . . . . . . . . . . . . . . . . . . . . . 19
Blower connection socket . . . . . . . . . . . . . . . . . . . . . . . . . . . . . . . . . . . . . . . . . . . 20
Transportation and storage . . . . . . . . . . . . . . . . . . . . . . . . . . . . . . . . . . . . . . . . 21
Maintenance and care . . . . . . . . . . . . . . . . . . . . . . . . . . . . . . . . . . . . . . . . . . . . . 22
Purchasing new dustbags and filters . . . . . . . . . . . . . . . . . . . . . . . . . . . . . . . . . . 22
Which dustbags and filters are the right ones? . . . . . . . . . . . . . . . . . . . . . . . . . . . 22
When to change the dustbag . . . . . . . . . . . . . . . . . . . . . . . . . . . . . . . . . . . . . . . . 23
Replacing the dustbag . . . . . . . . . . . . . . . . . . . . . . . . . . . . . . . . . . . . . . . . . . . . . 24
Replacing the exhaust filter . . . . . . . . . . . . . . . . . . . . . . . . . . . . . . . . . . . . . . . . . . 25
Replacing the "Air Clean" filter . . . . . . . . . . . . . . . . . . . . . . . . . . . . . . . . . . . . . . . . 26
Replacing the "Active Air Clean" filter and the "Active HEPA" filter . . . . . . . . . . . . 27
Replacing one type of filter with another . . . . . . . . . . . . . . . . . . . . . . . . . . . . . . . . 28
When to change the dust compartment filter (motor protection). . . . . . . . . . . . . . 29
Replacing the dust compartment filter (motor protection). . . . . . . . . . . . . . . . . . . 29
When to change the thread catcher pads on the standard floor brush . . . . . . . . 30
Cleaning and care . . . . . . . . . . . . . . . . . . . . . . . . . . . . . . . . . . . . . . . . . . . . . . . . 31
Frequently asked questions . . . . . . . . . . . . . . . . . . . . . . . . . . . . . . . . . . . . . . . . 32
Technical Service. . . . . . . . . . . . . . . . . . . . . . . . . . . . . . . . . . . . . . . . . . . . . . . . . 33
Optional accessories . . . . . . . . . . . . . . . . . . . . . . . . . . . . . . . . . . . . . . . . . . . . . . 34
Caring for the environment . . . . . . . . . . . . . . . . . . . . . . . . . . . . . . . . . . . . . . . . . 41
3
IMPORTANT SAFETY INSTRUCTIONS
When using an electrical appliance, basic precautions should always be followed,
including the following:
READ ALL INSTRUCTIONS BEFORE
USING THIS APPLIANCE
Keep these operating instructions in a safe place and pass them on to any
future user.
WARNINGTo reduce the risk of fire, electric
shock or injury:
Before using
~ Check the voltage rating of the
vacuum cleaner before connecting the
power cord to an electrical outlet. Your
power source should correspond with
the voltage rating plate located on the
underside of the vacuum. Use only
household AC outlets. Never use DC
power sources. If you are not sure of
your home’s voltage supply, consult a
qualified electrician. Connecting the
vacuum cleaner to a higher voltage
than indicated in these instructions may
result in damage to the vacuum cleaner
or injury.
~ To reduce the risk of electric shock,
this appliance has a polarized plug
(one blade is wider than the other.) This
plug will fit in a polarized outlet only one
way. If the plug does not fit fully in the
outlet, reverse the plug. If it still does
not fit, contact a qualified electrician to
install the proper outlet. Do not alter the
plug in any way.
~ A damaged vacuum cleaner can be
dangerous. Check the packaging,
vacuum cleaner and accessories for
any signs of damage. Do not use a
damaged appliance.
~ Do not use with a damaged cord or
plug. If the appliance is not working as
it should, has been dropped, damaged,
left outdoors or submerged in water,
bring it to a service center.
~ The electrical outlet must be fitted
with a 15 A fuse.
4
IMPORTANT SAFETY INSTRUCTIONS
Use
~ Do not use on people or animals.
~ Do not use outdoors or on wet
surfaces. Only dry surfaces should be
vacuumed.
~ Use only as described in this
manual. Use only Miele recommended
accessories.
~ Do not alter or modify the vacuum
cleaner.
~ This appliance is intended for
household use only.
~ Unwind the cord completely to aid
the vacuum cleaner in dissipating heat.
~ This vacuum should not be used to
entrap or retain any hazardous
materials.
~ Do not use the vacuum cleaner to
pick up liquids or damp dirt. This could
impair the electrical safety of the
vacuum cleaner. Wait for freshly
shampooed carpets to dry.
~ Do not vacuum anything that is
burning or smoking such as cigarettes,
matches or hot ashes. The vacuum
cleaner could catch fire.
~ Do not allow the vacuum cleaner to
be used as a toy. Close attention is
necessary when used near children.
~ Do not vacuum toner dust. Toner,
~ Never use the vacuum cleaner
without the dustbag or filters in place.
Otherwise it could be damaged.
~ Do not use to pick up any flammable
~ If a dustbag is not inserted, the dust
compartment lid will not close. Do not
force it shut.
such as that used in printers and
photocopiers can conduct electricity.
or combustible liquids, such as
gasoline, or use in areas where they
may be present. The vacuum cleaner
could explode.
~ Do not leave the vacuum plugged
~ Do not vacuum up items which are
~ On the underside of the vacuum
handpiece is a metal insert designed to
absorb static electricity. Please make
certain that your hand remains around
this metal insert when vacuuming.
~ Do not pull or carry by the cord, use
in. Unplug it from the outlet when not in
use and before servicing.
~ Persons which lack physical,
sensory or mental abilities or
experience with the machine should not
use it without supervision or instruction
by a responsible person.
heavy, hard or have sharp edges. They
could cause a blockage and damage
the appliance.
the cord as a handle, close a door on
the cord, or pull the cord around sharp
edges or corners. Do not run the
appliance over the cord. Keep the cord
away from heated surfaces.
5
IMPORTANT SAFETY INSTRUCTIONS
~ Do not unplug by pulling on the
cord. To unplug, grasp the plug, not the
cord.
~ Do not handle the plug or vacuum
with wet hands.
~ Keep the power cord, hair, loose
clothing, fingers and all parts of the
body away from openings and moving
parts.
Using accessories
~ The hose and the telescopic wand
contain electrical wires. Do not use the
vacuum cleaner if these parts are
damaged, cut or punctured. Avoid
picking up sharp objects. Danger of
electric shock!
~ Unplug the vacuum when changing
accessories, especially the Hose,
Telescopic wand, Turbobrush and
Powerbrush.
~ Do not place anything into the
openings of the vacuum cleaner. Do
not use if any openings are blocked;
keep them free of dust, lint, hair, or
anything that may reduce air flow.
~ To avoid the risk of injury when
~ This appliance is equipped with a
power cord reel. Hold plug when
rewinding onto cord reel. Do not allow
plug to whip when rewinding.
~ The socket on the vacuum cleaner
~ Turn off all controls before
unplugging.
~ Use extra care when cleaning on
stairs.
~ Floor attachments, accessories and
wands must not be used at head level
to avoid injury to eyes and ears.
~ Monitor the dustbag change
indicator and inspect all filters regularly.
For best performance, the dustbag
and filters should be replaced when
necessary. A full bag or blocked filter
will reduce the vacuum cleaner’s
suction power. A temperature limiter
automatically switches the vacuum
cleaner off if it gets too hot, see
"Frequently asked questions".
vacuuming with a Miele Power or
Turbobrush do not touch the rotating
roller brush. Danger of injury.
(depending on model) must only be
used for the Miele Powerbrush
specified for use with this appliance.
~ Danger of injury. The Miele
Powerbrush is a motor driven
accessory for use only with Miele
vacuum cleaners. The vacuum cleaner
must not be used with another
manufacturer’s powerbrush.
~ Do not use the vacuum cleaner
without an accessory attached. The rim
could be damaged and injuries could
result from sharp edges.
~ Miele dustbags are disposable and
intended to be used only once. Do not
attempt to reuse. An over stuffed
dustbag will reduce the efficiency of the
vacuum cleaner.
~ Only use genuine Miele dustbags
with the Miele quality signet and
original Miele filters and accessories.
Only then will the manufacturer
guarantee its safety.
6
IMPORTANT SAFETY INSTRUCTIONS
Cleaning, maintenance and
repairs
~ Turn the vacuum cleaner off after
each use and before every cleaning /
maintenance. Pull the plug from the
outlet.
~ Never submerge the vacuum
cleaner in water. Clean only with a dry
cloth or slightly damp cloth when
disconnected from the mains supply. If
moisture gets into the appliance there
is a risk of electric shock.
~ The electro-suction hose and the
Disposing of an old appliance
~ Before discarding an old vacuum
cleaner, please cut off the power cord
and render the plug useless. Ensure
the appliance presents no danger to
children while being stored for
disposal.
SAVE THESE
INSTRUCTIONS
telescopic wand contain electrical
wires. The plug connectors must not
come in contact with water. These
items may only be cleaned with a dry
cloth, no moisture can touch them.
Danger of electric shock.
~ Repairs must only be performed by
an authorized service agent in
accordance with national and local
safety regulations. Unauthorized repairs
could cause injury or machine damage.
~ If the power cord is damaged it
should be replaced along with a new
cable reel by Miele Technical Service.
7
Guide to the vacuum cleaner
8
Guide to the vacuum cleaner
1
Handpiece *
2
Air inlet valve *
3
Locking button
4
Telescopic wand *
5
Telescopic wand release button *
6
Electrobrush socket*
7
Dust compartment lid release
8
Dust compartment filter
(motor protection)
9
Dustbag
10
Floor brush*
11
Carrying handle
12
Park-system
13
Exhaust filter*
14
Power cord
15
Cord rewind switch
16
Suction power selector
17
Park-System
18
On / Off switch
19
Accessory compartment
20
Airflow indicator
21
Accessory compartment
lid release
22
Elbow *
23
Suction hose *
The illustration shows the maximum
number of features available in this
series of Miele vacuum cleaners.
Those features marked * depend on the
model and may vary or not be available
on your model.
Some models are supplied with a Miele
Electrobrush or Turbobrush as
standard (not illustrated). Separate
operating and maintenance instructions
are supplied with these brushes.
9
Before using for the first time
Attaching the suction hose
^ Slide open the dust compartment
shutter.
The dust compartment shutter is
designed for hygienic handling and
prevents dust and odors from
escaping. If you remove the suction
hose from the vacuum cleaner for
storage purposes, close the dust
compartment shutter before storing.
^ Insert the elbow into the suction
socket.
Removing the suction hose
^ Press the release buttons on the
sides of the elbow and lift the hose
from the socket.
10
Before using for the first time
Connecting the suction hose
and the telescopic wand
^ Using the inlet guides, fit the
handpiece of the suction hose firmly
into the wand until they lock with a
click.
^ To release the handpiece from the
telescopic wand, press the locking
button (see arrow) and pull apart.
Adjusting the telescopic wand
One section of the telescopic wand is
located inside the other and can be
adjusted to your height for comfortable
vacuum cleaning.
^ Press the telescopic wand release
button (see arrow) to release the
tubes and adjust to the required
height.
11
Before using for the first time
Attaching the standard floor
brush
(select models)
The floor brush is suitable for cleaning
carpets, rugs and hard surfaces. For
flooring susceptible to scratches, use
one of Miele’s specially designed floor
brushes (see "Optional accessories").
^ Insert the telescopic wand into the
floor brush and turn in either direction
until it locks with a click.
^ To release the floor brush from the
telescopic wand, press the locking
button (see arrow) and pull the wand
out of the floor brush.
Observe the cleaning instructions of
the floor manufacturer.
To clean carpets and area rugs:
^ Press the foot switch marked ö .
This will retract the brush.
To clean hard flooring:
^ Press the foot switch marked ä.
This will extend the brush.
Electrobrush / Turbobrush
Some models may be supplied with an
Electrobrush or a Turbobrush as a
standard accessory (see "Optional
accessories"). Please refer to the
separate operating instructions
supplied with these brushes for
instructions on use and maintenance.
12
Included accessories
Accessory tools for cleaning difficult to
reach areas are located in the
accessory compartment.
a Crevice nozzle
b Dust brush
c Upholstery nozzle
d Blower connection socket (not
illustrated; see "Operation - Blower
connection socket")
13
Included accessories
Taking the accessories out
^ Press the release button to open the
accessory compartment lid.
^ Take out the accessory needed.
^ Close the lid securely.
14
Using the included accessories
The accessory tools can either be fitted
to the handpiece or to the suction
wand.
Standard floor brush
(select models)
The floor brush can be used for normal
cleaning of carpets, rugs, stairs and
hard surfaces.
For safety when vacuuming stairs it
is best to start at the bottom of the
stairs and move upwards.
Floor brush - Parquet-3
(select models)
Special brush with natural bristles
intended for cleaning parquet and
laminate floors, especially those
susceptible to scratching.
The parquet floor brush can be cleaned
with the vacuum cleaner using the
crevice nozzle if necessary.
15
Using the included accessories
Crevice nozzle
For cleaning in folds, crevices and
corners.
Dusting brush
For cleaning moldings, ornate or
carved articles, etc.
The head of the dusting brush can be
turned to attain the best cleaning
position.
Upholstery nozzle
For cleaning upholstery, mattresses,
cushions, curtains, covers, etc.
16
Operation
Power cord
,Unwind the cable completely to
aid the vacuum in dissipating heat.
Unwinding
^ Hold the plug and pull out the power
cord to its full length.
,To reduce the risk of electric
shock, the vacuum has a polarized
plug (one blade is wider than the
other). This plug will fit in a polarized
outlet only one way. If the plug does
not fit fully in the outlet, reverse the
plug. If it still does not fit, contact a
qualified electrician. Do not alter the
plug in any way.
Danger of overheating and damage.
Rewinding
^ Unplug the vacuum from the outlet.
^ Press the rewind button. The power
cord will rewind automatically.
17
Operation
Turning the vacuum on and off
^ Press the On/Off switch.
While vacuuming
The vacuum cleaner can also stand on
its end for vacuuming stairs, drapes
etc.
,To prevent static discharge your
hand must touch the metal inlay on
the underside of the vacuum
handpiece. Be certain to
continuously touch this inlay when
vacuuming fine dust, flour or
sawdust as these materials are more
likely to create static discharge. To
further prevent static discharge
while vacuuming, pull the vacuum
along by the hose with one hand
while continuing to hold the
handpiece in the other hand.
18
Operation
Adjusting the suction
The suction power can be adjusted
depending on the type of flooring. By
reducing the suction power the floor
brush can be pushed easier. The
symbols on the controls indicate the
type of use the settings are suitable for:
#
curtains, lightweight fabrics
$
upholstery, cushions
%
thick pile carpets, rugs and
runners
*
energy-saving daily use with low
noise lever
(
low pile carpets
)
hard flooring and intensive
cleaning of carpets
Rotary selector
^ Turn the selector knob to the desired
suction power setting.
Opening the air inlet valve
The air inlet valve is designed to
provide a quick, convenient reduction
of suction power, e.g. when moving
from a carpet to an area rug.
^ Open the air inlet valve far enough to
reduce the power.
Opening the air inlet valve reduced the
power to the tool being used.
19
Operation
Blower connection socket
The blower connection socket can be
used to connect the suction hose to the
blower outlet of the vacuum cleaner.
This is useful for dusting off radiators
and blowing dust out of inaccessible
corners so that it can be vacuumed up.
It can also be used to clean the suction
hose if it should ever become blocked.
^ Ensure that the vacuum cleaner is
turned off.
^ Press the release button for the dust
compartment lid and raise the lid so
that it clicks into place.
^ Take out the exhaust filter or the filter
frame if present and replace with the
blower connection socket.
^ Close the dust compartment lid.
^ Open the accessory compartment
and insert the elbow of the suction
tube into the blower connection
socket.
^ Turn the vacuum cleaner on.
20
Transportation and storage
Park-System
The Park-System has been designed
to conveniently park the vacuum
cleaner during brief pauses, as well as
for easy carrying and storage.
A special parking attachment is fitted to
all floor brushes, except the
Electrobrushes SEB 228 (EB03) and
SEB 236 (EB01) which can stand by
themselves. Insert the clip on the floor
brush into the slot on the end of the
vacuum cleaner from above (see
illustration).
Transportation and storage
For easier transportation and storage:
^ Stand the vacuum cleaner vertically.
^ Insert the clip on the floor brush into
the wand bracket on the side of the
vacuum (does not apply to the
Electrobrushes SEB 228 (EB03) and
SEB 236 (EB01) .
^ To save space, completely collapse
the tubes in the telescopic wand.
21
Maintenance and care
,Turn off and unplug the vacuum
Purchasing new dustbags and
filters
The Miele filter system consists of the
following three components.
Original Miele dustbags and filters can
be purchased from an authorized Miele
vacuum dealer or by visiting the Miele
store at http://store.miele.com.
cleaner before performing any
maintenance work.
– Dustbag
– Exhaust filter
– Dust compartment filter
Each of these components must be
changed periodically to maintain the
vacuum cleaner’s efficiency.
Which dustbags and filters are
the right ones?
This vacuum cleaner uses Original
Miele dustbags Type F/J/M and an
Original Miele filters, the "Original Miele"
Logo will appear on the packaging or
directly on the dustbag.
Only use Miele dustbags, filters and
accessories with the "Original Miele"
logo. Only then can the suction
power of the vacuum cleaner reach
its optimum potential creating the
best possible cleaning results.
,The use of dustbags made of
paper or a similar material, or
dustbags with a cardboard retaining
plate can lead to serious damage to
the vacuum cleaner and possibly
voiding the warranty, just as with the
use of dustbags without the "Original
Miele" logo.
An "Air clean" exhaust filter and a dust
compartment filter are supplied with
every box of Miele dustbags.
If you would like to purchase additional
Miele filters separately, contact your
vacuum dealer or Miele, please quote
the model number of your Miele
vacuum cleaner to ensure correct parts
are ordered. These parts are also
available to order from the online Miele
store.
The exhaust filter supplied with the
vacuum cleaner can be exchanged
with another type of Original Miele filter
(see "Exchanging exhaust filters").
22
Maintenance and care
When to change the dustbag
Change the dustbag when the colored
marker in the airflow indicator fills the
display.
Miele dustbags are disposable and
made to be used only once. Do not
attempt to reuse.
Checking the airflow indicator
^ Attach the standard floor brush
(depending on model) to the vacuum
cleaner. Perform this test with the
standard floor brush only, other
attachments can affect the function of
the airflow indicator.
^ Turn the vacuum cleaner on and
select the highest power setting.
^ Lift the floor brush slightly off the
floor. If the marker completely fills the
indicator window, the dustbag needs
to be changed.
How the airflow indicator works
The airflow indicator is designed to
show when the bag is full of common
household dust and measures the
amount of air flow through the dustbag.
Normal household dust is a mixture of
dust, hair, carpet fluff, threads, sand,
etc.
However, if fine dust, such as drill dust,
sand, plaster or flour is vacuumed, the
pores of the dustbag may become
blocked. The marker will indicate that
the bag is "full" even when it is not. The
dustbag should be changed as the
suction power is greatly reduced.
If the bag is bulging with pet fur, hair,
carpet fluff, etc. the indicator may not
register "full". This is because the air
flow of the dustbag may still be high
enough not to activate the marker to
show maximum. The dustbag should
still be changed.
23
Maintenance and care
Replacing the dustbag
^ Pull the plug from the socket
^ Open the dust compartment lid and
raise until it clicks into place.
The dustbag has a closing flap which
closes automatically when the dust
compartment lid is raised to prevent
any dust from escaping.
^ Grasp the finger grip and pull the
dustbag out of the holder.
^ Insert the new dustbag as far as it will
go into the dustbag holder. Do not
unfold the dustbag when taking it out
of the box.
^ Unfold the dustbag in the dust
compartment.
^ Close the dust compartment lid until
it clicks into place. Take care not to
jam the dustbag in the lid.
,An empty-operation-barrier
blocks the dust compartment lid
from closing if no dustbag is
inserted. Do not force it closed.
24
Maintenance and care
Replacing the exhaust filter
Depending on the model, the vacuum
cleaner will be equipped with one of the
following exhaust filters:
a "Air Clean" filter
b "Active Air Clean" filter
c "Active HEPA" filter
"Air Clean" filter
A "Air Clean" filter is supplied with every
box of Miele dustbags. It should be
replaced each time a new box of bags
is started.
"Active Air Clean" or the "Active
HEPA" filter
An "Active Air Clean" or "Active HEPA"
filter should be changed approximately
once a year. Change the filter sooner if
it is obviously soiled or no longer
effective.
It is helpful to make a note of the date
directly on the filter as a reminder for
when to next change it. See "Optional
Accessories" for filter descriptions.
25
Maintenance and care
Replacing the "Air Clean" filter
^ Open the dust compartment lid.
^ Release the filter frame. Raise it up
and remove the filter.
Do not use more than one filter at a
time.
^ Insert a new "Air Clean" filter. It can
be inserted with either side up.
^ Lower and secure the filter frame
back into place.
^ Close the dust compartment lid firmly
until it clicks into place.
If you wish to replace the Air Clean
filter with an Active Air Clean filter or
Active HEPA filter see "Maintenance
and care - Replacing one type of
filter with another".
26
Maintenance and care
Replacing the "Active Air
Clean" filter and the "Active
HEPA" filter
^ Open the dust compartment lid.
^ Release the catch and remove the
filter.
Do not use more than one filter at a
time.
^ Insert the new filter so that it engages
at the back, then close the catch.
^ Close the dust compartment lid firmly
until it clicks into place.
If you wish to replace the Active Air
Clean filter or Active HEPA filter with
an Air Clean filter see "Maintenance
and care - Replacing one type of
filter with another".
27
Maintenance and care
Replacing one type of filter
with another
Depending on the model, the vacuum
cleaner is fitted with one of the following
exhaust filters:
a "Air Clean"
b "Active Air Clean"
c "Active HEPA"
Please note
1. If you wish to replace the a "Air
Clean" filter with the b "Active Air Clean"
filter or the c "Active HEPA" filter, you
must remove the filter frame before
inserting the new type of filter.
2. If you use the exhaust filter a you
have to insert it in a filter frame *.
* Filter frame - see "Optional
accessories"
Do not use more than one filter at a
time.
28
Maintenance and care
When to change the dust
compartment filter (motor
protection)
Replace the dust compartment filter
every time you start a new box of
dustbags.
A dust compartment filter is supplied
inside each box of Miele dustbags.
Replacing the dust
compartment filter (motor
protection)
^ Open the dust compartment lid.
^ Open the filter frame, remove the old
filter and replace with a new one.
^ Close the filter frame.
29
Maintenance and care
When to change the thread
catcher pads on the standard
floor brush
(depending on model)
Check the thread catchers on the
bottom of the standard floor brush and
the upholstery nozzle, from time to time.
Replace the thread catchers if the pile
is worn.
Replacing the thread catchers on the
standard floor brush (depending on
model)
^ Use a knife or similar object to
remove the thread catchers from the
slots.
^ Insert the new thread catchers.
Servicing the floor roller on the
standard floor brush (depending on
model)
^ Use a coin to release the roller pin
and pull it out.
^ Push and take out the roller axle.
^ Take out the roller.
^ Remove all threads, hair, etc. and
reassemble the parts.
Spare parts are available from your
Miele vacuum dealer or Miele.
30
Cleaning and care
,Turn off the vacuum and unplug
it from the outlet before performing
any maintenance work.
Vacuum cleaner and accessories
External surfaces of the vacuum
cleaner and accessories can be
cleaned with a slightly damp cloth or
with a cleaner specifically for plastics.
,Do not use abrasive, glass or allpurpose cleaners! They will damage
the surface.
Dust compartment
The dust compartment can, if
necessary, be cleaned using another
vacuum, a dry cloth or brush.
Monitor the dustbag change indicator
and inspect all filters regularly. Clean or
replace them when necessary
according to the Operating Instructions.
,Do not submerge the vacuum
cleaner in water! If moisture gets
into the appliance, there is the risk of
an electric shock.
31
Frequently asked questions
,Turn off and unplug the vacuum
cleaner before performing any
maintenance work.
What if the vacuum turns off
automatically?
The vacuum has overheated. The
temperature limiter automatically turns
the vacuum off.
This can occur if, for instance, large
articles block the suction tube or when
the filter bag is full or contains particles
of fine dust. A heavily soiled exhaust or
dust compartment filter can also be the
cause of overheating. Turn the vacuum
off and pull the plug from the outlet.
Check for any blockages and allow the
vacuum to cool for 30 minutes.
32
Technical Service
In the event of a fault which you cannot
fix yourself please contact the Miele
Service Department at the phone
number on the back of this booklet.
^ Please quote the model type of your
appliance.
This can be found on the data plate on
the bottom of the vacuum.
33
Optional accessories
Each model may be accessorized with
one or more of the following tools.
Observe the cleaning instructions of
the floor manufacturer.
A Powerbrush can only be used with
models containing a Powerbrush
socket, see "Guide to the vacuum
cleaner"
To use a powerbrush the SES 118
electrical hose and SET 210 or SET 220
electric wand must be obtained.
Powerbrush SEB 217-3 (EB02)
The Powerbrush is intended for
intensive cleaning and restoration of
robust carpeting. It is particularly
suitable for cleaning and restoring
crushed carpet pile of floor coverings
subject to hard wear, especially in high
traffic areas.
Powerbrush SEB 228 (EB03)
The Powerbrush is particularly suitable
for cleaning and restoring crushed
carpet pile of wall to wall carpeting and
floor coverings subject to hard wear,
especially in high traffic areas. The
Powerbrush can also be used on
smooth floor surfaces.
34
Optional accessories
Powerbrush SEB 236 (EB01)
This Powerbrush is 3" (60 mm) wider
and more powerful than the SEB 217-3
model.
It includes:
– a height adjustment
– a light
– a multifunction indicator.
Turbobrush - Turbo Comfort-3
The turbobrush is recommended for
cleaning short to medium pile
carpeting. It is mechanically driven by
the suction power of the vacuum. In
addition to dust particles it also
removes stubbornly adhered threads,
hairs and carpet fluff.
Hand Turbobrush - Turbo Mini
The Hand Turbobrush is intended for
vacuuming upholstery, mattresses, car
seats, carpeted stairs and other areas
inaccessible with the standard
Turbobrush.
35
Optional accessories
Floor brush - Hardfloor-3
To vacuum sturdy hard floors, e.g. tiles
and stone floors.
Floor brush - Parquet-3
Special brush with natural bristles
intended for cleaning parquet and
laminate floors, especially those
susceptible to scratching.
The parquet floor brush can be cleaned
with the vacuum cleaner using the
crevice nozzle if necessary.
Floor brush - Parquet Twister with
swiveling head
For cleaning all hard flooring,
e.g. parquet and tiles. Especially
suitable for vacuuming niches and tight
spaces.
Floor brush - Parquet Twister XL with
swiveling head
Similar to the Parquet Twister except it
is 3 9/16" (90 mm) wide, making it ideal
for cleaning large spaces.
36
Optional accessories
Dust brush with natural bristles
For dusting particularly delicate
objects.
Universal brush
For dusting books, shelves, etc.
Radiator brush
(only usable with the crevice nozzle)
For cleaning radiators, narrow shelves
and crevices.
37
Optional accessories
Mattress tool
For cleaning deep crevices, mattresses
and upholstery.
12" (300 mm) Crevice nozzle
For cleaning in folds, crevices and
corners.
38
Optional accessories
MicroSet
This set is specially designed for
cleaning small objects and difficult to
reach areas (such as PC keyboards,
stereo equipment, carved furniture,
ornaments, models, etc).
Accessory set consists of:
– Micro hose with combi nozzle
(crevice nozzle and dust brush)
– Micro dust brush
– Micro crevice nozzle
– Extension
CarClean Set Plus
Specially designed for cleaning car
interiors.
Accessory set consists of:
– Hand Turbobrush
– Microhose with combi nozzle
– Crevice tool 12" (300 mm)
– Accessory carrying case
– 10 ft (3 m) long suction hose with
holder.
39
Optional accessories
"Active Air Clean" filter
A special active charcoal filter which
absorbs odors from the dust collected
in the dustbag, helping to prevent
odors.
The "Active Air Clean" filter can be used
in place of the "Air Clean" filter.
"Active HEPA"Filter
Vacuum cleaners equipped with this
exhaust filter are particularly suitable for
allergy sufferers and those concerned
with a high level of hygiene.
The "Active HEPA" filter combines
activated charcoal and HEPA filtration
in one. In addition to meeting OSHA
standards for air filtration, it will also
absorb any odors existing in the
dustbag.
The "Active HEPA" filter can be used in
place of the "Air Clean" filter.
Filter frame
The filter frame is needed if you would
like to exchange an Air Clean filter with
an Active Air Clean or HEPA filter, see
"Maintenance and care - Exchanging
exhaust filters".
40
Caring for the environment
Disposal of packing materials
The cardboard box and packing
materials protect the appliance during
shipping.
Ensure that any plastic wrappings,
bags, etc. are disposed of safely and
kept out of the reach of children. These
items pose a danger of suffocation.
Disposing of the dustbag and
filters
These are made from environmentally
friendly materials and can be placed in
the regular household garbage.
However, if the dustbag contains
prohibited waste, contact your local
waste collection center for disposal
instructions.
41
42
43
Alteration rights reserved / 2311
M.-Nr. 07 703 000 / 02
INFORMATION IS SUBJECT TO CHANGE. PLEASE REFER TO OUR WEBSITE TO OBTAIN THE MOST
CURRENT PRODUCT SPECIFICATIONS, TECHNICAL & WARRANTY INFORMATION.