1
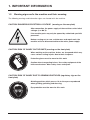
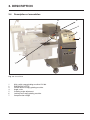
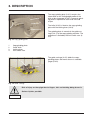
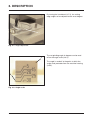
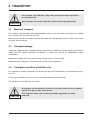
OPERATING INSTRUCTIONS
translation
Copying grinding machine
HV 208
Knecht Maschinenbau GmbH • 88368 Bergatreute
Witschwender Straße 26 • Tel. +49 7527-928-0 • Fax +49 7527-928-32
EC Declaration of Conformity
in accordance with the EC Directive 98/37/EC, Appendix II A
• Machinery 98/37/EC
• Electromagnetic Compatibility 89/336/EEC
• Low Voltage 73/23/EEC
We hereby declare that the machine described in the following complies with the above-mentioned relevant basic health and safety requirements of the corresponding EC directives in terms of its design
and construction and in the version placed into the stream of commerce by us.
In the event of a modification of the machine not agreed with us, this declaration is no longer valid.
Designation of the machine:
copy grinding machine
Type designation:
HV 208
Applicable harmonised standards,
in particular:
Manufacturer:
EN ISO
DIN EN
DIN EN
DIN EN
12100-1 and EN ISO 12100-2
294
349
60204-1
Knecht Maschinenbau GmbH
Witschwender Straße 26
D-88368 Bergatreute
Complete technical documentation is available.
The operating instructions belonging to the machine is available in its original version and in the native
language of the user.
Bergatreute, 10 November 2005
...........................................
..........................................
Managing Director
.................................
Place, date
Signature
Details of signatory
2
Manufacturer
Knecht Maschinenbau GmbH
Witschwender Str. 26
D-88368 Bergatreute
Telephone + 4 9 75 27-9 28-0
Fax
+ 4 9 75 27-9 28-32
E-mail
[email protected]
Documents for the owner of the machine
Operating Instructions
Date of Issue of the Operating Instructions
10 November 2005
Copyright
These operating instructions and the operating documents remain the copyrighted property of
Knecht Maschinenbau GmbH. They are only supplied to our customers and owners of our products
and belong to the machine.
These documents may not be reproduced or made accessible to third parties, in particular
competitive companies, without our express permission.
3
TABLE OF CONTENTS
Page
1. IMPORTANT INFORMATION . . . . . . . . . . . . . . . . . . . . . . . . . . . . . . . . . . . . . . . . 6
1.1
1.2
1.3
1.4
1.5
Foreword to the operating instructions . . . . . . . . . . . . . . . . . . . . . . . .
Warnings and symbols in the operating instructions . . . . . . . . . . . .
Warning signs on / in the grinding machine and their meaning . . . .
Type plate and machine number . . . . . . . . . . . . . . . . . . . . . . . . . . . . .
Diagram and item numbers in the operating instructions . . . . . . . . .
6
6
7
8
8
2. SAFETY . . . . . . . . . . . . . . . . . . . . . . . . . . . . . . . . . . . . . . . . . . . . . . . . . . . . . . . . 9
2.1
Basic safety information . . . . . . . . . . . . . . . . . . . . . . . . . . . . . . . . . . . . 9
2.1.1
2.1.2
2.1.3
2.1.4
2.1.5
Observe information in the operating instructions . . . . . . . . . . . . . . . . . . . . . . .
Obligation of the owner . . . . . . . . . . . . . . . . . . . . . . . . . . . . . . . . . . . . . . . . . . . .
Obligation of the personnel . . . . . . . . . . . . . . . . . . . . . . . . . . . . . . . . . . . . . . . . .
Dangers involved in working with the machine . . . . . . . . . . . . . . . . . . . . . . . . . .
Faults . . . . . . . . . . . . . . . . . . . . . . . . . . . . . . . . . . . . . . . . . . . . . . . . . . . . . . . . .
9
9
9
9
9
2.2
2.3
2.4
Designated use . . . . . . . . . . . . . . . . . . . . . . . . . . . . . . . . . . . . . . . . . . . . 9
Warranty and liability . . . . . . . . . . . . . . . . . . . . . . . . . . . . . . . . . . . . . . . 9
Safety regulations . . . . . . . . . . . . . . . . . . . . . . . . . . . . . . . . . . . . . . . . . 9
2.4.1
2.4.2
2.4.3
2.4.4
2.4.5
2.4.6
2.4.7
2.4.8
2.4.9
2.4.10
2.4.11
2.4.12
2.4.13
Organisational measures . . . . . . . . . . . . . . . . . . . . . . . . . . . . . . . . . . . . . . . . . . 9
Safety equipment . . . . . . . . . . . . . . . . . . . . . . . . . . . . . . . . . . . . . . . . . . . . . . . . 9
Informal safety measures . . . . . . . . . . . . . . . . . . . . . . . . . . . . . . . . . . . . . . . . . . 9
Personnel selection, personnel qualification . . . . . . . . . . . . . . . . . . . . . . . . . . . 10
Machine control . . . . . . . . . . . . . . . . . . . . . . . . . . . . . . . . . . . . . . . . . . . . . . . . . 10
Safety measures during normal operation . . . . . . . . . . . . . . . . . . . . . . . . . . . . 10
Dangers from electrical power sources . . . . . . . . . . . . . . . . . . . . . . . . . . . . . . 10
Special areas of danger . . . . . . . . . . . . . . . . . . . . . . . . . . . . . . . . . . . . . . . . . . 10
Upkeep (maintenance, repair), troubleshooting . . . . . . . . . . . . . . . . . . . . . . . . 10
Structural modifications to the machine . . . . . . . . . . . . . . . . . . . . . . . . . . . . . . 10
Cleaning the machine . . . . . . . . . . . . . . . . . . . . . . . . . . . . . . . . . . . . . . . . . . . . 10
Oils and greases . . . . . . . . . . . . . . . . . . . . . . . . . . . . . . . . . . . . . . . . . . . . . . . . 10
Moving the machine . . . . . . . . . . . . . . . . . . . . . . . . . . . . . . . . . . . . . . . . . . . . . 10
3. DESCRIPTION . . . . . . . . . . . . . . . . . . . . . . . . . . . . . . . . . . . . . . . . . . . . . . . . . . 11
3.1
Intended use . . . . . . . . . . . . . . . . . . . . . . . . . . . . . . . . . . . . . . . . . . . . . 11
3.2
Technical specifications . . . . . . . . . . . . . . . . . . . . . . . . . . . . . . . . . . . 11
3.3
Description of functions . . . . . . . . . . . . . . . . . . . . . . . . . . . . . . . . . . . 12
3.4
Description of assemblies . . . . . . . . . . . . . . . . . . . . . . . . . . . . . . . . . . 13
4. TRANSPORT . . . . . . . . . . . . . . . . . . . . . . . . . . . . . . . . . . . . . . . . . . . . . . . . . . . 18
4.1
Means of transport . . . . . . . . . . . . . . . . . . . . . . . . . . . . . . . . . . . . . . . .18
4.2
Transport damage . . . . . . . . . . . . . . . . . . . . . . . . . . . . . . . . . . . . . . . . 18
4.3
Transport to another installation site . . . . . . . . . . . . . . . . . . . . . . . . . 18
5. ASSEMBLY . . . . . . . . . . . . . . . . . . . . . . . . . . . . . . . . . . . . . . . . . . . . . . . . . . . . 19
5.1
Selection of qualified personnel . . . . . . . . . . . . . . . . . . . . . . . . . . . . . 19
5.2
Installation site . . . . . . . . . . . . . . . . . . . . . . . . . . . . . . . . . . . . . . . . . . . 19
Supply connections . . . . . . . . . . . . . . . . . . . . . . . . . . . . . . . . . . . . . . . 19
5.3
5.4
Settings . . . . . . . . . . . . . . . . . . . . . . . . . . . . . . . . . . . . . . . . . . . . . . . . .19
5.5
Assembling the copy grinding machine . . . . . . . . . . . . . . . . . . . . . . 20
5.6
Calibrate angle scale . . . . . . . . . . . . . . . . . . . . . . . . . . . . . . . . . . . . . . .21
4
Table of contents
6. COMMISSIONING
. . . . . . . . . . . . . . . . . . . . . . . . . . . . . . . . . . . . . . . . . . . . . . . 22
7. CONTROL . . . . . . . . . . . . . . . . . . . . . . . . . . . . . . . . . . . . . . . . . . . . . . . . . . . . . 23
7.1
Using the control panel . . . . . . . . . . . . . . . . . . . . . . . . . . . . . . . . . . . . 23
7.1.1
7.1.2
7.1.3
Control panel . . . . . . . . . . . . . . . . . . . . . . . . . . . . . . . . . . . . . . . . . . . . . . . . . . . 23
Changing parameters . . . . . . . . . . . . . . . . . . . . . . . . . . . . . . . . . . . . . . . . . . . . .24
Parameters . . . . . . . . . . . . . . . . . . . . . . . . . . . . . . . . . . . . . . . . . . . . . . . . . . . . .24
7.2
7.3
Program selection . . . . . . . . . . . . . . . . . . . . . . . . . . . . . . . . . . . . . . . . 30
Manual mode . . . . . . . . . . . . . . . . . . . . . . . . . . . . . . . . . . . . . . . . . . . . . 30
7.3.1
Changing the copy clamping plate . . . . . . . . . . . . . . . . . . . . . . . . . . . . . . . . . . .30
7.4
Automatic mode . . . . . . . . . . . . . . . . . . . . . . . . . . . . . . . . . . . . . . . . . . 31
7.4.1
7.4.2
Stopping the automatic process . . . . . . . . . . . . . . . . . . . . . . . . . . . . . . . . . . . . .31
Starting the automatic process . . . . . . . . . . . . . . . . . . . . . . . . . . . . . . . . . . . . . .32
7.5
7.6
Cleaning the copying grinding machine . . . . . . . . . . . . . . . . . . . . . . 32
Fault and status messages . . . . . . . . . . . . . . . . . . . . . . . . . . . . . . . . . 33
8. OPERATION . . . . . . . . . . . . . . . . . . . . . . . . . . . . . . . . . . . . . . . . . . . . . . . . . . . . .35
8.1
General principles of grinding technology . . . . . . . . . . . . . . . . . . . . . 35
8.2
Switching the machine on . . . . . . . . . . . . . . . . . . . . . . . . . . . . . . . . . . .37
8.3
Clamping the knife . . . . . . . . . . . . . . . . . . . . . . . . . . . . . . . . . . . . . . . . .37
8.4
Setting the compensation weight . . . . . . . . . . . . . . . . . . . . . . . . . . . . .40
8.5
Setting the cutting edge angle . . . . . . . . . . . . . . . . . . . . . . . . . . . . . . .41
8.6
Starting the grinding process . . . . . . . . . . . . . . . . . . . . . . . . . . . . . . . .41
9. MAINTENANCE AND CARE . . . . . . . . . . . . . . . . . . . . . . . . . . . . . . . . . . . . . . . 42
9.1
Cleaning . . . . . . . . . . . . . . . . . . . . . . . . . . . . . . . . . . . . . . . . . . . . . . . . 42
9.2
Lubrication . . . . . . . . . . . . . . . . . . . . . . . . . . . . . . . . . . . . . . . . . . . . . . 42
10. MALFUNCTIONS . . . . . . . . . . . . . . . . . . . . . . . . . . . . . . . . . . . . . . . . . . . . . . . 43
11. DISASSEMBLY AND DISPOSAL . . . . . . . . . . . . . . . . . . . . . . . . . . . . . . . . . . . 44
11.1
Disassembling the machine . . . . . . . . . . . . . . . . . . . . . . . . . . . . . . . . .44
11.2
Disposal . . . . . . . . . . . . . . . . . . . . . . . . . . . . . . . . . . . . . . . . . . . . . . . . . .44
12. SERVICE, SPARE PARTS, ACCESSORIES . . . . . . . . . . . . . . . . . . . . . . . . . . 45
12.1
Postal address . . . . . . . . . . . . . . . . . . . . . . . . . . . . . . . . . . . . . . . . . . . .45
12.2
Service . . . . . . . . . . . . . . . . . . . . . . . . . . . . . . . . . . . . . . . . . . . . . . . . . . .45
12.3
Spare parts . . . . . . . . . . . . . . . . . . . . . . . . . . . . . . . . . . . . . . . . . . . . . . .45
12.44 Accessories . . . . . . . . . . . . . . . . . . . . . . . . . . . . . . . . . . . . . . . . . . . . . .46
5
1. IMPORTANT INFORMATION
1.1
Foreword to the operating instructions
These operating instructions are intended to familiarise you with the machine and use it for its designated purpose.
The operating instructions contain important information on how to operate the machine safely, correctly and cost-effectively. Observing this information helps to avoid dangers, repair costs and downtimes and increase the reliability and service life of the machine.
The operating instructions must be permanently available at the place of use of the machine.
The operating instructions are to be read and observed by all persons entrusted with work on the
machine, e.g.
- transport, assembly, commissioning
- operation, including troubleshooting in the work process and
- upkeep (maintenance, repair).
In addition to the operating instructions and the statutory regulations on accident prevention valid in
the country of use and at the place of use, the recognised technical rules for safe working practices
are to be observed.
1.2
Warnings and symbols in the operating instructions
The following symbols and signs are used in the operating instructions and must always be
observed:
This symbol CAUTION is present as a work safety warning denoting all
work involving a danger to the life and limb of persons.
In this case, work must be carried out with particular care and attention.
CAUTION
IMPORTANT
NOTE
This sign ATTENTION denotes points which must be observed in order to
prevent damage and or destruction of the machine or its surrounding area.
This sign NOTE denotes application tips and particularly useful
information.
6
1. IMPORTANT INFORMATION
1.3
Warning signs on/in the machine and their meaning
The following warnings and information signs are situated on/in the machine.
CAUTION! DANGEROUS ELECTRICAL VOLTAGE (warning on the rear plate)
After connection, the power supply of the machine carries lethal
voltages (3 x 400 V).
Live machine parts may only be opened by authorised specialist
personnel.
Before carrying out or care, maintenance and repair work, the
machine must be disconnected from the mains power supply.
CAUTION! RISK OF INJURY ON THE KNIFE (warning on the front plate)
When working on the machine, knives are sharpened which may
cause serious cutting injuries due to their sharpness.
Protective gloves must be worn for this work.
Caution when transporting knives. Use safety equipment of the
knife manufacturer. Wear safety shoes and apron.
CAUTION! RISK OF INJURY DUE TO GRINDING PARTICLES (regulatory sign on the
front plate)
Grinding particles which pose a risk to the eyes are produced
when grinding, polishing and dressing.
Eye protection must be worn for this work.
7
1. IMPORTANT INFORMATION
1.4
Rating plate and machine serial number
The type plate is located on the front right-hand
side of the machine.
Example of a type plate:
The machine number is located on the type plate
and on the right-hand side of the machine (see
arrow).
1.5
Diagram and item numbers in the operating instructions
If a part in a diagram is referred to in the text, the diagram number and item number are given in
brackets.
For example: (3-8/1) means Fig. 3-8/ item 1.
1
The set grinding angle in degrees can be read
off on the angle scale (3-8/1).
The angle is read off at the point at which the
angle scale protrudes from the machine housing
(3-8/2).
2
Fig. 3-8 Angle scale
8
2. SAFETY
2.1 Basic safety information
2.1.1 Observe information in the operating instructions
The basic condition for safe handling and trouble-free operation of this machine is knowledge of the basic safety instructions and safety regulations.
• The operating instructions contain important information on how to operate the machine safely
• These operating instructions, in particular the safety instructions, are to be observed by all persons
who work on the machine.
• In addition, the rules and regulations on accident prevention valid for the place of use are to be
observed.
2.1.2 Obligation of the owner
The owner undertakes only to allow persons to work on the machine who
• are familiar with the basic regulations on work safety and accident prevention and have been
instructed in handling the machine,
• who have read and understood the operating instructions, and in particular the "Safety" section and
the warning information and who have confirmed this with their signature.
Safe working practices of the personnel are checked at regular intervals.
2.1.3 Obligation of the personnel
Before beginning work, all persons entrusted with work on the machine undertake
• to observe the basic regulations on work safety and accident prevention,
• to read the operating instructions, and in particular the "Safety" section and the warning
information and confirm that they have understood these with their signature.
2.1.4 Dangers involved with operating the machine
The machine is built according to the latest technical standards and the recognised safety rules. Nevertheless, its use may involve dangers to the life and limb
of the user or third parties or damage to the machine or other property. The machine is only to be used:
• for its designated purpose and
• in perfect, safe working order.
Faults which may impair safety are to be eliminated immediately.
2.1.5 Faults
If safety-related faults occur on the machine, or if its operating behaviour indicate such faults, the machine is to be shut down immediately and not started up
again until the fault has been located and eliminated.
Faults may only be rectified by authorised specialist personnel.
2.2 Use as intended
The machine is only intended for grinding linear and sickle-shaped flat knives.
All knives must be clamped to suitable copy-grinding plates. Grinding is only permitted in combination the Knecht grinding machine USK 230.
Before working on a flat knife, it must first be checked whether the knife fits on the copy-grinding plate. Only then may the blade be mounted on the copy
clamping plate.
Any other use does not constitute use as intended. Knecht Maschinenbau GmbH does not accept liability for any damage resulting from such improper use.
The risk is borne solely by the user.
Use as intended also includes observation of all information in the operating instructions.
Improper use of the machine includes:
• operating the machine on its own without the USK 230,
• not correctly attaching the machine to the USK 230.
2.3 Warranty and liability
Our "General Terms and Conditions of Sale and Supply" apply. These are available to the owner at the latest on conclusion of the contract. Warranty and liability claims in the event of personal injury or damage to property are excluded in so far as they can be traced to one or more of the following causes:
• improper use of the machine,
• incorrect transportation, commissioning, operation and maintenance of the machine,
• operation of the machine with defective safety equipment or incorrectly installed
or non-operational safety and protective equipment,
• failure to observe information in the operating instructions with regard to transportation,
commissioning, operation, maintenance and repair of the machine,
• unauthorised structural modifications to the machine,
• unauthorised changes, for example, to drive ratios (output and speed) and
• inadequate monitoring of machine parts subject to wear.
• use of unauthorised replacement and wear parts
Only use original replacement and wear parts. If non-OEM parts are used, it is not ensured that they are designed and produced to the necessary load and
safety requirements.
2.4. Safety regulations
2.4.1 Organisational measures
All available safety equipment is to be inspected regularly.
Observe intervals for regular maintenance work specified or given in the operating instructions.
2.4.2 Safety equipment
Before starting the machine each time, all safety equipment must be correctly installed and operational.
Safety equipment may only be removed when the machine is at a standstill and secured against being started up again.
In the case of delivery of sub-components, the safety equipment is to be correctly installed by the owner in accordance with the regulations.
2.4.3 Informal safety measures
The operating instructions must be permanently available at the place of use of the machine.
In addition to the operating instructions, the generally applicable and local regulations for accident prevention are to be provided and observed.
All safety and hazard warnings on the machine must be complete and in legible condition.
9
2. SAFETY
2.4.4 Personnel selection, personnel qualification
Only trained and instructed personnel may work on the machine. Observe minimum legal age.
Responsibilities of the personnel are to be clearly defined for commissioning, operation, maintenance and repair.
Personnel still in the training or instruction phase may only be allowed to work on the machine under the permanent supervision of an experienced person.
2.4.5 Machine control
Only trained and instructed personnel are permitted to switch on the machine.
2.4.6 Safety measures during normal operation
Any method of working which may pose a risk to safety is to be avoided.
Only operate the machine if all safety equipment is installed and fully operational.
Check the machine for external signs of damage and correct operation of the safety equipment at least once per shift.
Notify the responsible department/person immediately of any changes which may have occurred (including operational behaviour). If necessary, shut the
machine down immediately and secure.
Before switching the machine on, ensure that nobody may be endangered by the machine starting up.
In the case of operational faults, shut the machine down immediately and secure. Eliminate faults immediately.
2.4.7 Dangers due to electrical power sources
Work on electrical systems or operating materials may only be carried out by a qualified electrician in accordance with the electrical rules.
Defects such as defective cables, cable connections etc.must be rectified immediately by an authorised specialist.
2.4.8 Particular danger zones
Danger of crushing and clothing, fingers, hair etc. being drawn in in the area of the abrasive belt and sprocket.
2.4.9 Upkeep (maintenance, repair), troubleshooting
Repair work is to be carried out on schedule by qualified personnel.
Inform operating personnel before beginning repair work. The responsible supervisor is to be named.
For all upkeep work, the machine is to be disconnected from the power supply and secured against being switched on again unexpectedly. Disconnect mains
plug.
Seal off repair area where necessary.
After completing maintenance work and troubleshooting, re-install all safety equipment and check that it is operational.
2.4.10 Structural modifications to the machine
Do not carry out modifications, additions or conversions to the machine without the permission of the manufacturer.
This also applies to the installation and adjustment of safety equipment.
No conversion work may be carried out without the prior written consent of Messrs. Knecht Maschinenbau GmbH.
Immediately replace machine parts which are not in perfect condition.
Only use original replacement and wear parts. If non-OEM parts are used, it is not ensured that they are designed and produced to the necessary load and
safety requirements.
2.4.11 Cleaning the machine
Cleaning agents and materials used must be handled correctly and disposed of in an environmentally friendly way.
Ensure safe, environmentally friendly disposal of wear and replacement parts.
2.4.12 Oils and greases
When handling oils and greases, observe the valid safety regulations for the product. Observe special regulations for the food industry.
2.4.13 Moving the machine
Even when moving the machine short distances, disconnect the machine from all external power supplies. Before starting the machine up again, correctly
connect to the power supply.
When loading and unloading, only use hoisting and load-bearing equipment with sufficient load-bearing capacity.
Appoint qualified instructors for the hoisting process.
No persons other than those entrusted with this work may be present in the loading and installation area.
Only hoist the machine correctly with hoisting equipment in accordance with the information in the operating instructions (attachment points for load-bearing
equipment etc.),
Only use suitable transport vehicle with sufficient load-bearing capacity.
Attach load safely. Use suitable attachment points.
When starting up again, proceed only in accordance with the operating instructions.
10
3. DESCRIPTION
3.1
Intended use
The copy-grinding machine HV 208 is suitable for the automatic grinding of cutter knives and slicer
knives up to a maximum size of 450 mm.
3.2
Height
Technical specifications
. . . . . . . . . . . . . . . . . . . . . . . . . . . . . . . . . . . . . . . . . . . . . . . . . . . . . . . 1305 mm
Width . . . . . . . . . . . . . . . . . . . . . . . . . . . . . . . . . . . . . . . . . . . . . . . . . . . . . . . . . 945 mm
Depth . . . . . . . . . . . . . . . . . . . . . . . . . . . . . . . . . . . . . . . . . . . . . . . . . . . . . . . .1270 mm
Weight . . . . . . . . . . . . . . . . . . . . . . . . . . . . . . . . . . . . . . . . . . . . . . . . . . . . . . . . . .170 kg
Power supply * . . . . . . . . . . . . . . . . . . . . . . . . . . . . . . . . . . . . . . . . . . . . . . . . 3 x 400 V
Mains frequency * . . . . . . . . . . . . . . . . . . . . . . . . . . . . . . . . . . . . . . . . . . . . . . . . . 50 Hz
Power rating * . . . . . . . . . . . . . . . . . . . . . . . . . . . . . . . . . . . . . . . . . . . . . . . . . . . 0.18 kW
Power input * . . . . . . . . . . . . . . . . . . . . . . . . . . . . . . . . . . . . . . . . . . . . . . . . . . . 0,35 kW
Current consumption * . . . . . . . . . . . . . . . . . . . . . . . . . . . . . . . . . . . . . . . . . . . . . . 0.5 A
Pre-fusing . . . . . . . . . . . . . . . . . . . . . . . . . . . . . . . . . . . . . . . . . . . . . . . . . . . . . . . . .10 A
Compressed air supply . . . . . . . . . . . . . . . . . . . . . . . . . . . . . . . . . . . . . . . . . . . . . .6 bar
Air consumption . . . . . . . . . . . . . . . . . . . . . . . . . . . . . . . . . . . . . . . . . . . . . . . .< 50 l/min
*) These values may vary depending on the electrical power supply.
11
1305 mm
3. DESCRIPTION
1270 mm
945 mm
Fig. 3-1 Dimensions in mm
3.3
Description of functions
With the automatic copy-grinding machine HV 208, linear and sickle-shaped knives can be sharpened in combination with the Knecht grinding machine USK 230. The knives are clamped to copygrinding plates and sharpened on the abrasive belt with the automatic copy-grinding
machine HV 208.
The grinding angle can be set steplessly on the copy-grinding machine.
Linear and sickle-shaped machine knives are automatically sharpened on the abrasive belt. The
knives are deburred and polished on the polishing brush of the Knecht grinding machine USK 230.
12
3. DESCRIPTION
3.4
Description of assemblies
6
5
4
3
2
1
7
Fig. 3-2 Overall view
1
2
3
4
5
6
7
Main switch copy-grinding machine HV 208
EMERGENCY-STOP
Control terminal copy-grinding machine
Angle scale
Grinding angle adjustment
Locking lever copy-grinding machine
Compensation weight
13
3. DESCRIPTION
1
2
The copy-grinding plate (3-3/1) contains the
information on the cutting edge profile of the
knife to be sharpened (3-3/2). A separate grinding plate is required for each knife size and
shape.
The knife (3-3/2) is fixed on the copy-grinding
plate with the locking lever (3-3/3).
4
3
The grinding plate is moved via the guide carriage (3-4-1) of the copy-grinding machine. The
movement is limited by the limit switch cam (33/4).
Fig. 3-3 Copy-grinding plate
1
2
3
4
Copy-grinding plate
Cutter knife
Locking lever
Limit switch cam
The guide carriage (3-4/1) holds the copygrinding plates and moves them via a double
spigot (3-4/2).
2
1
Fig. 3-4 Guide carriage
Risk of injury on the spigot due to fingers, hair and clothing being drawn in.
Serious injuries possible.
CAUTION
14
3. DESCRIPTION
1
The drive unit (3-5/1) with the guide carriage can
be swivelled to insert the copy-grinding plate.
Fig. 3-5 Drive unit
With the compensation weight, the aggressiveness of the abrasive belt which decreases until
worn can be compensated for by increasing the
grinding pressure.
2
The further the compensation weight is moved
away from the abrasive belt, the lower the grinding pressure.
The nearer the compensation weight is moved
towards the abrasive belt, the higher the grinding
pressure.
3
1
The compensation weight (3-6/1) is clamped on
the guide rod (3-6/3) with a clamping lever (36/2).
Fig. 3-6 Compensation weight
15
3. DESCRIPTION
By turning the handwheel (3-7/1), the cutting
edge angle can be adjusted to the exact degree.
1
Fig. 3-7 Angle adjustment
1
The set grinding angle in degrees can be read
off on the angle scale (3-8/1).
The angle is read off at the point at which the
angle scale protrudes from the machine housing
(3-8/2).
2
Fig. 3-8 Angle scale
16
3. DESCRIPTION
2
3
4
The following controls are located on the local
terminal:
Individual parameters of the selected grinding
program are displayed and changed via the control terminal (3-9/1) of the SPS control.
1
7
9
Fig. 3-9 Operating terminal
6
8
5
The required operating mode is selected with the
selection switch "Manual Automatic“ for manual
or automatic mode (3-9/7).
The various grinding programs can be stored
and selected with the selection switch for grinding programs "Program I II III"(3-9/2).
The button "Control On" (3-9/5) activates the
machine control.
The "Start" button (3-9/9) starts the selected
grinding program.
With the buttons "Knife feed forward" (3-9/3) and "Knife feed back"
2 (3-9/6) the knife is moved towards or away from the abrasive belt. this is necessary to adjust the
machine to different widths of knives, e.g. in the case of different knives or degree of wear.
To insert and remove the copy-grinding plate, the copy-grinding plate drive can be manually operated with the button "Replace copy-grinding plate" (3-9/4).
To stop the machine, the EMERGENCY-STOP switch (3-9/8) is pressed.
17
4. TRANSPORT
For transport, the valid local safety and accident prevention regulations
must be observed.
Only transport the machine with the machine feet facing downwards.
CAUTION
4.1
Means of transport
For transport and installation of the copy-grinding machine, only use means of transport of a suitable
size, e.g. lorry, fork-lift, hydraulic lift truck.
When using a fork-lift or lift truck, move the fork under the copy-grinding machine; observe the centre
of gravity of the machine.
4.2
Transport damage
If damage is detected after unloading during acceptance of the delivery, inform Knecht Maschinenbau
GmbH and the freight forwarder immediately. If necessary, consult an independent expert
immediately.
Remove packaging and fixing straps. Remove fixing straps on the machine.
Dispose of the packaging in accordance with environmental regulations.
4.3
Transport to another installation site
For transport to another installation site, ensure that the space requirements are observed (see section 3.2).
At the new installation site, there must be an authorised electrical connection.
The machine must stand firmly and safely.
Installations on the electrical system may only be carried out by a qualified
specialist or by our after-sales service.
CAUTION
The valid local safety and accident prevention regulations are to be
observed.
18
5. INSTALLATION
5.1
Selection of qualified personnel
We recommend that the assembly work on the copy-grinding machine be
carried out by trained Knecht personnel. We do not accept liability damage
as a result of incorrect assembly.
CAUTION
5.2
Installation site
When defining the installation site, observe the necessary space requirements for assembly, maintenance and repair work on the machine (see section 3.2).
5.3
Supply connections
The machine is delivered ready for connection with the relevant connection cables for electrics and
compressed air.
Ensure correct connection of the power supply. The connection is provided
on the grinding machine USK 230.
CAUTION
NOTE
5.4
The compressed air supply must be provided by the customer. Please observe the
information given in section 3.2.
Settings
IMPORTANT
The various components and the electrics are adjusted by Knecht Maschinenbau
GmbH before delivery.
Unauthorised changes to the set values are not permitted and may damage the copy-grinding
machine.
19
5. INSTALLATION
5.5
Assembly of copy-grinding machine
Install copy-grinding machine on a level surface.
Plug in the plug of the grinding machine USK 230.
Completely instal and check the safety equipment before commissioning.
All guards must be installed and tested for proper operation by a qualified
specialist before the machine is started.
CAUTION
The copy-grinding machine HV 208 must be fitted
to a prepared Knecht grinding machine. For this,
fix the spacer block (5-1/1) to the grinding
machine with an Allen key. Then fix the fixing arm
(5-1/2) of the HV 208 to the spacer block with the
star handles (5-1/3).
1
3
2
Fig. 5-1 Assembly on grinding machine
20
5. INSTALLATION
5.6 Calibrate angle scale
6 mm
To calibrate the angle scale, a copy-grinding plate
is inserted in the machine with the relevant knife.
Set the selection switch "Manual / Automatic" to
Automatic and press the "Start" button. Check the
distance between the abrasive belt and the copy
plate. For a grinding angle of 25°, the distance
must be 6 mm.
Fig. 5-2 Distance
After pre-adjusting to approx. 6 mm, set the selection switch to "Manual" and fit a new abrasive belt
on the machine USK 230. On the control panel,
set the number of cycles for the 0 feed to 10 and
the number of feeds to 0. Set switch "Manual /
Automatic" to Automatic and press "Start" button.
Now a bevel is cut on the knife. At the end of the
program, unclamp the knife and measure the
angle cut with the angle gauge provided.
Set the measured angle on the angle scale. For
this, release the clamping lever (5-3/1) and push
the angle scale up until the measured angle is set
(see Fig. 3-8). Tighten clamping lever (5-3/1).
Then set the required angle with the handwheel of
the grinding angle adjustment. Sharpen the knife
again and check the angle. Readjust the scale if
necessary.
1
Fig. 5-3 Clamping lever angle scale
21
6. COMMISSIONING
All work may only be carried out by authorised specialist personnel.
The valid local safety and accident prevention regulations are to be
observed.
CAUTION
CAUTION
Risk of hands, hair and
items of clothing being
pulled into the grinding
machine when it is switched
on.
Serious injuries
are possible.
Fig. 6-1 HV 208
Connect the power plug (CEE plug) to the customer's socket on the USK 230 (3x400V, 16A).
22
7. CONTROL
Switching-on sequence: • Switch on main switch (4-2/1)
• Unlock "EMERGENCY OFF" button (4-3/10)
• Wait for initialisation
• Push "CONTROL ON" button, "Control On" lights up,
EMERGENCY - OFF switch is activated.
7.1
Using the control panel
IMPORTANT
The parameters may only be altered by suitably qualified personnel.
This personnel must be familiar with the machine functions and the
meaning of the parameters. Otherwise, damage to the machine may
occur.
7.1.1 Control panel
2
1
3
7
4
6
5
Fig. 7-1 Operating terminal
•
•
•
•
•
•
•
Back to main menu(7-1/1)
Select submenu(7-1/2)
Back to superordinate menu (7-1/3)
Number block (7-1/4)
Cursor block (7-1/5)
Enter (7-1/6)
Back one line (7-1/7)
23
7. CONTROL
7.1.2 Changing parameters
We will describe how to change parameters using the example "NUMBER OF FEEDS"
Press button "Feed" (7-2/1)
Copy grinding mach.
HV208
Lang. Par. Stat. Diag
1
Figure 7-2
No.pos.ops.
Grinding cycles 1
Grinding cycles 2
Grinding cycles 3
3
2
1
1
1
Move the cursor to the number next to
"NUMBER OF FEEDS" (7-3/1).
Enter new value and confirm with "ENTER"
(7-3/2).
2
Figure 7-3
For final saving, turn the "PROGRAM SELECTION SWITCH" to a different program and back
again.
Changing the control panel language
Copy grinding mach.
HV208
To access the Language submenu, press
the button 7-4/1 under "LANG" (Language).
Lang. Par. Stat. Diag
1
Figure 7-4 Display after switching on the machine
24
7. CONTROL
Language switching
0 = German
1 = English
2 = Spanish
0
1
Move the cursor (7-5/2) to the Language selection number (7-5/1) and enter the number
for the language you want.
Confirm with "ENTER" (7-5/3).
3
2
Figure 7-5
7.1.3 Parameters
To
access
the
submenu
"PAR."
(Parameters), press the button 7-6/1.
In this submenu you will find all the adjustable parameters of the machine, e.g. "FEED
TIME"
Copy grinding mach.
HV208
Lang. Par. Stat. Diag
1
Figure 7-6
No. pos. ops.
Grinding cycles
c.pl.
0
0
cyc.
The most important parameters are displayed in the top 2 lines.
During automatic mode, the current number
of each cycle is displayed.
If 0 and 0 are displayed (as shown here), the
copying grinding machine is at a standstill.
Figure 7-7
• "NUMBER OF FEEDS" : current number of feeds on the knife
• "GRINDING CYCLES" : current number of grinding cycles
25
7. CONTROL
Parameters in the submenu
No. pos. ops.
Grinding cycles
c.pl.
1: Segment gr. act.
2: Copy cl.plate le.
3: Copy cl.plate ri.
4: Lower copy.pl.
5: Lift c.cl.pl.re
6: Copy cl.pl. l/r
0
0
cyc.
1: No.pos.ops.
2: Grinding cycles 1
3: Grinding cycles 2
4: Grinding cycles 3
5: Grinding cycles 4
6: Grinding cycles 5
7: Grinding cycles 6
8: Grinding cycles 7
9: Grinding cycles 8
10: Grinding cycles 9
11: Grinding cycles 10
12: 1st posit. time
13: Grind. pos. time
14: Cor. v. ret. gr.
Figure 7-8
26
7. CONTROL
No. pos. ops.
Grinding cycles
c.pl.
0
0
cyc.
Figure 7-9
"Segment gr. on"
Segment grinding selected
The machine processes knives with several segments one segment after the other.When
"Segment grinding on" is set to 0, all segments are ground in one go.
“Copy clamping pl. l.”
Copy clamping plate left
Dwell time of the copy clamping plate on the left until top/bottom change of the polishing units,
reverse motion takes place during polishing the knife backs or during grinding.
IMPORTANT
For segment grinding, the time lag must be set to 0.
“Copy clamping pl. r.”
Copy clamping plate right
Dwell time of the copy clamping plate on the right until top/bottom change of the polishing
units, reverse motion takes place during polishing the knife backs or during grinding.
IMPORTANT
For segment grinding, the time lag must be set to 0.
“Low. copy clamping plate.”
Lower copy clamping plate
Dwell time for lowering the copy clamping plate before the start of the copy cycles on the knife
back.
27
7. CONTROL
“C/pl. raise”
Raise copy clamping plate
On the cam plate there are pairs of cams, and at the end a cam is mounted to raise the copy
clamping plate at the knife corners or at the end. This parameter is changed to reset the raising time when the final position is reached.
“Copy pl. l/r”
Limit switch monitoring time
If, in automatic mode, the copy clamping plate remains at the limit switch for longer than the
time set (due to a defective limit switch) the machine switches off.
28
7. CONTROL
No. pos. ops.
Grinding cycles
c.pl.
0
0
cyc.
Figure 7-10
“No. pos. ops.”
Number of knife feeds
This parameter determines the number of feed cycles.
“Grinding cycle 1”...”Grinding cycle 10”
The number of grinding cyles is shown in ascending order for each knife processing. The grinding cycles are only valid when the corresponding number of feeds is entered.
“1st posit. time”
Feed time for first feed
“Grind. pos. time”
Feed time for the 2nd to 10th feeds
“Cor. v. ret. gr.”
Correction return grinding.
The feed time of the grinding cycles is added up and forms the basis for the return time. To
compensate for inaccuracies, a correction value is entered for the return time for a segment
change. This correction value is added to the total preparation time.
29
7. CONTROL
7.2
Program selection
Program selection switch (3-9/2)
You can use the program selection switch (3-9/2) to select three different programs. 20 data
registers are allocated to each switch setting. When you change the switch setting, first the
allocation of the old switch position is saved, then the new one is loaded. For each program,
the variables are entered in the same data register.
7.3 Manual mode
Preconditions for manual mode:
• Main switch On
• Control On
• Protection hood closed
7.3.1 Replacing the copy clamping plate
The copy clamping plate can be replaced when the protection hood is open and the key-operated switch is at position 1.
Sequence for replacing the copying plate:
Remove the limit switch cam for the copy clamping plate.
Press the "REPLACE COPY CLAMPING PLATE" button (3-9/4) and hold it down until the
copy clamping plate has moved out completely.
First, the copy clamping plate moves up to the left limit switch, changes direction and then
moves endlessly to the right. After the copy clamping plate has moved out completely, you can
release the button, and the drive stops immediately.
Place the other copy clamping plate onto the drive pinion, and press the "REPLACE COPY
CLAMPING PLATE" (3-9/4) button, holding it down until the copy clamping plate is roughly in
the centre.
Re-fix the copy clamping plate limit stop on the right.
The copy clamping plate replacement operation is now complete. It is not necessary to move
the plate to a defined position for the start of automatic mode.
30
7. CONTROL
If you release the button during copy clamping plate replacement and then press it again, the
copy clamping plate replacement cycle starts again with the movement to the left.
If the limit stop of the copy clamping plate on the right is fixed, you can move the copy clamping plate to the left and right by hand when the button is pushed. The first direction of movement after you press the button is always to the left.
7.4
Automatic mode
If the automatic cycle is interrupted by opening the protection hood, pressing the
"EMERGENCY - OFF" button, switching over the operating mode, or switching the main
switch to "Off", the operator must make sure the knife feed is moved back before a restart.
Otherwise the machine can be damaged.
7.4.1 Stopping automatic operation
Stopping by opening the protection hood
The cycle stops if the protection hood is opened, unless it has already been stopped with the
stop button. All units move back to their start positions, except for the knife feed.
If the knife feed has already moved to the front in automatic mode, it automatically moves
back by the time set in parameter D229 after the protection hood is closed.
Stopping by changing from automatic to manual mode
The cycle stops in the same way as by opening the protection hood, but the knife feed stays
in the current position.A re-start is only possible after the knife feed has been manually moved,
or after switching to automatic mode after the knife feed has moved back to the rear end position.The fault message 907 appears on the control panel until the knife feed is manually or
automatically moved back.
Stopping with EMERGENCY - OFF
After this kind of stoppage, you must first switch on the control system. Then the knife feed
moves back automatically as long as automatic mode is still set. Otherwise, the sequence is
the same as for changing modes.
Stopping with main switch off
After this kind of stoppage, all information and displays are deleted.The operator himself must
prepare the machine for a new automatic cycle.
31
7. CONTROL
7.4.2 Starting automatic sequence
•
•
•
•
Prepare the machine (see Section 6. Assembly)
Select Automatic mode
Close protection hood if not already closed
Push start button
Now the cycle runs automatically according to the program selected.
Automatic cycle
1. The grinding unit moves forward and applies the set pressure when coolant
monitoring
is
not
selected.
If
coolant
monitoring
is
selected,
the grinding unit is only applied when the coolant flow control is activated.
Simultaneously, the copy clamping plate moves to the left if it is not already on the left.
2. The waiting times run for grinding unit to the front (D206) and copy clamping
plate
to
the
right
(D215).
After the waiting times, the grinding cycles run. For this, the knife feed moves forward until
the approach check registers. If the grinding belt becomes free during the first grinding
cycle, the knife feed is applied again until the approach check registers again. If the limit
switch cams are set to "Raise grinding unit", the grinding unit lifts up when it reaches the
cam.
3. According to the parameters entered, the knife feed moves forward after the grinding
cycles have run and the copy clamping plate on the right has been reached. For this, the
grinding unit is raised.
4. After the knife feed, the next number of grinding cycles runs.
5. Numbers 2. - 4. repeat themselves until the set number of knife feeds (D224) is
completed.
6. After the final feed and the completion of the grinding cycles, the grinding unit is
moved back and the knife feed moved into the start position.
7.5
Cleaning the copying grinding machine
For cleaning, the copy clamping plate can be moved manually to the left and right. Then you
can easily rinse off the grinding sludge in the water trough.
32
7. CONTROL
7.6Fault and status messages
To read fault messages, press the “DIAG” (7-11/1) button
Copy grinding mach.
HV208
Lang. Par. Stat. Diag
1
Figure 7-11
Diagnosis
Control On
I/O
1
Figure 7-12
Blade pos.
rear
front
Copy clamp. plate
left
right
lift
Figure 7-13
33
7. CONTROL
Meaning of the fault messages
Only qualified personnel may rectify the causes of system faults that require work on
the control system.
They must observe the instructions given in the operating instructions for personal,
equipment and machine protection during checking of drive components.
34
8. OPERATION
8.1
General principles of grinding technology
Material must be removed in order to resharpen a blunt cutting edge. A sharp cutting edge can be
obtained only if the knife/blade is sharpened right to the front of the cutting edge.
The only way it is possible to check whether the cutting edge has actually been ground is by the burr.
If a burr has occurred at the cutting edge, the grinding operation can be completed at the cutting edge.
A blade/knife with a burr on the cutting edge is, however, not yet really sharp. The cutting edge
achieves its final sharpness only after the burr has been removed.
The polishing brush is used to remove the burr.
However, not only sharp cutting edges but also long service lives are required.
The service life of a cutting edge is influenced chiefly by the cutting edge angle. The smaller the cutting edge angle, the longer the service life will be theoretically. However, in practice, it is the case that
the cutting edge will break off and thus no longer be sharp if the cutting edge angle is too small.
The cutting edge angles are therefore between 15° and 35°. With cutting edge angles of less than 15°,
the cutting edge becomes so unstable that it breaks with minimum resistance. If the cutting edge angle
is
greater
than
35˚,
the
cutting
edge
is,
admittedly,
extremely stable but the service life will not be as long.
One other criterion for the properties of the cutting edge is the cutting edge profile. There are three different ground profiles:
Tapered grinding
Convex grinding
Concave grinding
Convex ground surfaces can generally be found on cutter blades and hand knives. Tapered and convex ground surfaces can predominantly be found on circular knives and blades.
The following always applies:
The profile and the cutting edge angle specified by the manufacturer must be complied with.
35
8. OPERATION
Function
Setting
range
Factory
setting
By setting the number of
feeds, the cutting edge profile can be adapted to the
relevant requirements.
Feed
Feed
Feed
Feed
Feed
Feed
Feed
Feed
Number of
knife feeds
Fig. 8-1 Cutting edge profile
36
For all work on/with the machine, the valid local safety and accident prevention regulations and sections "Safety" and "Important information" in the
operating instructions must be observed.
CAUTION
Fig. 8-2 Swivel drive unit
8. OPERATION
2
1
Insert the copy-grinding plate (8-3/1) by pushing
it over the guide carriage (8-3/2). Ensure that the
copy-grinding plate (8-3/1) is suitable for the
knife to be ground. The knife type (8-3/4) is
engraved on the copy-grinding plate under the
locking lever (8-3/3).
3
4
Risk of injury on the spigot
due to fingers, hair and
clothing being drawn in.
CAUTION
Serious injuries
possible.
Fig. 8-3 Insert copy-grinding plate
Switch the control to manual mode with the
switch "Manual / Automatic mode" (8-4/1). Press
the key "Replace copy-grinding plate" (8-4/2)
until the copy-grinding plate (8-4/3) has moved
over the guide carriage (8-3/2).
3
2
1
Fig. 8-4 Insert copy-grinding plate
38
8. OPERATION
Attach the cam for the limit position to the copygrinding plate as shown in Fig. 8-5.
The cam defines the end of travel and triggers
the movement in the opposite direction.
IMPORTANT
If the cam for the limit
position is not attached,
the copy-grinding plate is
moved down from the
guide carriage and may
fall and be damaged.
Fig. 8-5 Cam for limit position
Insert the knife in the copy-grinding plate and
lock the knife with the lever.
1
Sharp knife edge. Serious
injuries are possible.
2
3
CAUTION
Fig. 8-6 Clamp knife
39
8. OPERATION
Swivel the drive unit (8-7/1) into working position
and lock the locking lever (8-7/2) of the copygrinding machine.
1
2
Fig. 8-7 Working position
8.4 Setting the compensation weight
With the compensation weight, the aggressiveness of the abrasive belt which decreases until
worn can be compensated for by increasing the
grinding pressure.
2
3
The further the compensation weight is moved
away from the abrasive belt, the lower the grinding pressure.
The nearer the compensation weight is moved
towards the abrasive belt, the higher the grinding
pressure.
1
The compensation weight (8-8/1) is clamped on
the guide rod (8-8/3 with a clamping lever (38/2).
Fig. 8-8 Compensation weight
40
8. OPERATION
8.5 Setting the cutting edge angle
By turning the handwheel (8-9/1), the cutting
edge angle can be adjusted to the exact degree.
2
The set grinding angle in degrees can be read
off on the angle scale (8-9/2).
3
The angle is read off at the point at which the
angle scale protrudes from the machine housing
(8-9/3).
1
Fig. 8-9 Angle adjustment
8.6 Starting the grinding process
2
4
1
The grinding process can now be started. Switch
the control to automatic mode with the switch
"Manual / Automatic mode" (8-10/1). Select the
required grinding program (8-10/2) and press the
"Start" key (8-10/3). Press key "Knife feed forwards" (8-10/4) until a grinding noise can be
heard. The knife is now automatically ground.
At the end of the grinding process, remove the
knife and polish and deburr it with the appropriate Knecht machine. Observe the operating
instructions of the individual machine.
3
8-10 Starting the grinding process -10
Sharp knife edge. Serious injuries are possible.
CAUTION
41
9. MAINTENANCE & CARE
For all work on the copy-grinding machine, the valid local safety and accident prevention regulations and sections "Safety" and "Important information" in the operating instructions must be observed.
CAUTION
Only use original replacement and wear parts. If non-OEM parts are used,
it is not ensured that they are designed and produced to the necessary
load and safety requirements.
9.1 Cleaning
The copy-grinding machine must be cleaned after every grinding process, as otherwise the grinding
slurry dries and is difficult to remove.
Smear the machine lightly with acid-free oil after cleaning (see also Lubrication schedule).
9.2 Lubrication
Lubrication schedule and lubricant table
Lubrication work
Interval
OEST
SHELL
ESSO
Lubricate the
4 weeks
threads of star
handles and clamping levers
GOC 180
Alvania R2
Beacon EP2 Dolon E2
Oil the
machine parts
after cleaning
Light liquid
paraffin
Ondina 1727 Marcol80
after every
grinding
process
DEA
Merkur White
Oil
Pharma 40
42
10. OPERATIONAL FAULTS
Operational fault
Fault
Remedy
The knife does not
have a burr
Abrasive belt is worn
fit new belt
Grinding angle is incorrectly set
adjust angle or scale
(Ch. 5.6)
Grinding cycles 1 too low
too flat
Cutting edge angle on knife
extremely steep
select higher number
(Ch.. 7)
use new belt
Grinding pressure too low
move weight
forwards
no coolant applied
to the abrasive belt
Fill up/clean coolant supply
of the grinding machine
abrasive belt too coarse
fit finer
abrasive belt
Fixture does not move down
onto the abrasive belt after
switching on.
compressed air not connected
connect
Compressed air set too low
set pressure reducer to
6.5 bar
Fixture "whistles" during operation
Limit switch cams rub
on the metal guard
grease limit switch cam
or metal guard
Fixture rocks up and down
very fast
Shock absorbers defective
replace
The knife burns
43
11. Disassembly and disposal
11.1 Disassembling the machine
11.2 Disposal
After the end of its service life, the machine must be disposed of by a qualified, specialist disposal
company. In exceptional cases and after agreement with Knecht Maschinenbau GmbH, you may be
able to return it to us.
Operating means (e.g. whetstones, grinding belts, coolants) must also be expertly disposed of.
43
12. Service, spare parts, accessories
12.1 Postal address
Knecht Maschinenbau GmbH
Witschwender Straße 26
D88368 Bergatreute
Phone:
Fax:
0 73 27 / 9 28 – 0
0 73 27 / 9 28 – 32
[email protected]
www.knecht.eu
12.2 Service
Service Department:
See postal address
[email protected]
12.3 Spare parts
If you need spare parts, please use the spare parts list supplied with the machine and order the
parts you need as detailed below:
When you order, please always state:
Machine type
Machine number
Assembly designation
Part designation
Item number
Drawing No.
Quantity
(Example)
(HV 208)
(see rating plate)
(Gearbox housing_2PO)
(Drive shaft _ bottom)
(19)
(2000135-11969)
(1 pce)
Should you have any questions, please contact us.
44
12. Service, spare parts, accessories
12.4 Accessories
If you need grinding plates, other accessories or parts subject to wear such as grinding belts etc.,
please contact our sales staff, our sales partners, or Knecht Maschinenbau GmbH directly.
Thank you for buying this machine.
45