1
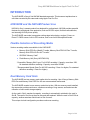
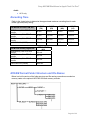
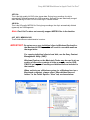
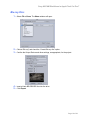
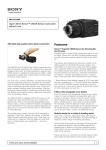
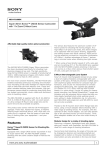
Sony NXCAM Product Workflows
in
Apple Final Cut Pro 7
Table of Contents
INTRODUCTION ..........................................................................................................................1
HXR-NX5E and the NXCAM Product Line .....................................................................1
Flexible Selection of Recording Media .........................................................................1
Dual Memory Card Slots.................................................................................................1
HYBRID Recording with the Sony HXR-FMU128..........................................................2
Flexible Recording Format Selection ............................................................................3
Recording Time ...............................................................................................................4
NXCAM Format Folder Structure and File Names........................................................4
Archiving Original NXCAM Media..................................................................................6
Archiving Example...................................................................................................6
KEY WORKFLOW FEATURES IN FINAL CUT PRO 7 ...............................................................7
Supported NXCAM Recording Modes ...........................................................................7
System Requirements ....................................................................................................7
Connections ....................................................................................................................7
Workflow Overview .........................................................................................................8
Creating a Final Cut Pro Project .............................................................................8
Log and Transfer Overview.....................................................................................9
Importing AVCHD Data Files Using Log and Transfer .......................................12
Sequence Preparation ...........................................................................................14
Adding Clips to the Timeline........................................................................................16
PROJECT OUTPUT ...................................................................................................................17
Blu-ray Disc ...................................................................................................................18
High Quality Movie File Export ....................................................................................19
HDV Video Tape Export ................................................................................................20
Output to an HD Recorder via HD-SDI ........................................................................21
NOTES........................................................................................................................................22
Sony NXCAM Workflows in Apple Final Cut Pro 7
INTRODUCTION
The HXR-NX5E is Sony’s first NXCAM branded camcorder. This document explains how to
edit video recorded by this camcorder using Apple Final Cut Pro.
HXR-NX5E and the NXCAM Product Line
NXCAM is Sony’s newest product line designed for professionals. NXCAM provides powerful
features for professional video production, such as HD-SDI output, flexible media selection,
and stunning AVCHD picture quality.
The HXR-NX5E camcorder incorporates cutting-edge technologies, such as G Lens, an
Exmor™ CMOS sensor, built-in GPS receiver, and a new Active SteadyShot® mode.
Flexible Selection of Recording Media
Various recording media are available in the HXR-NX5E:
♦ Memory Stick PRO Duo (Mark2)™ media, Memory Stick PRO-HG Duo™ media,
Memory Stick PRO-HG Duo HX™ media*
♦ SD/SDHC Memory Card**
♦ Flash Memory Unit (Sony HXR-FMU128)
*Compatible "Memory Stick" type: For AVCHD recording / Capacity: more than 1GB,
for standard definition recording / Capacity: more than 512MB
**Recommended Speed Class For AVCHD recording / Class 4 or higher, For standard
definition recording / Class 2 or higher)
Dual Memory Card Slots
The HXR-NX5E has two memory card media slots for recording. Use of Sony‚s Memory Stick
PRO Duo and Memory Stick PRO Duo HG are recommended media cards.
The HXR-NX5E records to one memory card slot at a time. With two memory cards installed,
the camcorder provides continuous, seamless recording of long scenes, and maximises the
utilisation of each card’s storage capacity.
As the card in Slot A reaches its capacity, recording is automatically switched to the card in
Slot B. The card in Slot A may then be removed and replaced. When the card in Slot B fills to
capacity, another seamless switch back to Slot A occurs.
This unique dual slot configuration provides continuous recording.
Page 1 of 22
Sony NXCAM Workflows in Apple Final Cut Pro 7
HYBRID Recording with the Sony HXR-FMU128
The Sony HXR-FMU128, an optional flash memory recording unit specially designed for the
HXR-NX5E, mounts to the camcorder without the need for any external cabling. Built around a
128 GB solid state flash memory drive, the HXR-FMU128 offers significantly longer recording
time than a single memory card.
When the HXR-FMU128 is used in conjunction with memory cards, Sony’s unique HYBRID
recording capability is enabled, allowing a combination of HD and SD resolutions to be
recorded simultaneously. The operator is free to choose which resolution is recorded on each
media type, and may even set the camcorder to record to both media types simultaneously.
There are many benefits to HYBRID recording, including:
♦ Edit system ingest time for HD files stored on the HXR-FMU128 is typically faster
than from memory cards.
♦ HD files simultaneously recorded on memory cards provide a time and costeffective method of archiving.
♦ SD files may be used for quick preview on a laptop or for SD deliverables, such as
web-based movies.
NOTE: Recording SD simultaneously to both media types is not supported.
IMPORTANT: The filenames of corresponding HD and SD clips are different.
Page 2 of 22
Sony NXCAM Workflows in Apple Final Cut Pro 7
Flexible Recording Format Selection
HD (AVCHD)
Video Compression
♦ FX mode (1920x1080 or 1280x720, 21 Mbps*)
♦ FH mode (1920x1080 or 1280x720, 16 Mbps)
♦ HQ mode (1440x1080 or 1280x720, 9 Mbps)
♦ LP mode (1440x1080 or 1280x720, 5 Mbps)
*Including audio and ancillary data the total data rate is 24Mbps
Frame Rate, 50i models
♦ 1080/50i
♦ 1080/25p
♦ 720/50p
Frame Rate, 60i models
♦ 1080/60i (59.94i)
♦ 1080/30p (29.97p)
♦ 1080/24p (23.98p)
♦ 720/60p (59.94p)
Audio
♦ Linear PCM (uncompressed)
♦ AC-3 (compressed)
SD (MPEG2) Currently not supported in Final Cut Pro or QuickTime®
Video Compression
♦ MPEG2 Program Stream, approx. 9Mbps
♦ PAL (720x576) or NTSC (720x480)
♦ 4:3 or 16:9 selectable
Frame Rate, 50i models
♦ 576/50i
♦ 576/25p scan: 25p scanned image is recorded as 50i
Frame Rate, 60i models
♦ 480/60i (59.94i)
♦ 480/30p scan: 30p scanned image is recorded as 60i
♦ 480/24p scan: 24p scanned image is recorded as 60i with 2-3 pulldown.
Page 3 of 22
Sony NXCAM Workflows in Apple Final Cut Pro 7
Audio
♦ AC-3 only
Recording Time
Refer to the charts below to determine the approximate maximum recording time for each
media type and quality setting.
HD MOVIE w/Linear PCM 2ch
8GB Memory Stick PRO Duo
media
16GB Memory Stick PRO Duo
media
32GB Memory Stick PRO Duo
media
HXR-FMU128 (128GB)
SD MOVIE w/Dolby Digital 2ch
8GB Memory Stick PRO Duo
media
16GB Memory Stick PRO Duo
media
32GB Memory Stick PRO Duo
media
HXR-FMU128 (128GB)
AVCHD
(FX)
AVCHD
(FH)
AVCHD
(HQ)
AVCHD
(LP)
40 min
55 min
95 min
150 min
85 min
110 min
190 min
300 min
170 min
225 min
385 min
605 min
700 min
930 min
1570 min
2490 min
MPEG2-SD 9M
(HQ)
115 min
235 min
475 min
1960 min
NXCAM Format Folder Structure and File Names
Below is a brief overview of the folder structure and file naming conventions recorded on
memory cards or the optional HXR-FMU128 flash memory recorder.
Page 4 of 22
Sony NXCAM Workflows in Apple Final Cut Pro 7
.MTS file
This is the high quality AVCHD video stream data. During long recordings, the clip is
automatically divided (spanned) into 2GB segments. Spanned files are seamlessly merged
while transferring to Final Cut Pro via the Log & Transfer window.
.MPG file
This is the SD quality MPEG2 file. During long recordings, the clip is automatically divided
(spanned) into 2GB segments.
Note: Final Cut Pro does not currently support MPEG2 files in the timeline.
AVF_INFO, MEMSICK.IND
These folders/files are administrative in nature.
IMPORTANT: Do not move or copy individual clips via Windows Explorer® or
the Macintosh® Finder, as this will result in unusable media on
the target drive.
For copying individual clips to hard disk, use the Sony Content
Management Utility (CMU).
Windows Explorer or the Macintosh Finder may be used to do an
archive of the entire contents of either a memory card or HXRFMU128, as long as all ancillary and hidden files are included in
the transfer.
When archiving on a Windows system (or a Windows boot on a
Macintosh computer), always select “Show hidden files and
folders” in the Folder Options “View” tab, as shown below.
Page 5 of 22
Sony NXCAM Workflows in Apple Final Cut Pro 7
Archiving Original NXCAM Media
Final Cut Pro 7 imports clips from either memory card or HXR-FMU128 via the integrated Log
and Transfer utility. Upon ingest, the camera-native AVCHD clips are automatically converted
to a user-selectable Apple ProRes422 format, and spanned clips are seamlessly joined.
Performing an archive of all camera-original material is highly recommended.
Copying individual clips via Windows Explorer or the Macintosh Finder will result in
unusable media on the target drive. When archiving the contents of either a memory
card or HXR-FMU128, always copy the entire contents of the volume, including all
ancillary files, as outlined below.
Archiving Example
When working with multiple memory cards and/or cameras, an organised archival workflow
should be employed. Below is a typical workflow for archiving NXCAM media:
1-
After shooting with a memory card, provide a unique physical label, such as “091231CAM1-1”, which is the date, camera number, and card number.
23-
Load the memory card in a card reader connected to your computer.
4-
Make a new folder in the storage drive. Rename the folder to match the project name,
such as “Holiday Event.”
5-
Inside the above folder, create a child folder. Rename that folder to match the label on
the memory card, in this example: “091231-CAM1-1”.
67-
Copy all data including the hidden folders/files from the memory card to the child folder.
When using the Windows OS, always choose the “Show hidden files and folders”
option located in the Folder Options pane ( Start > Control Panel > Folder Options >
View ).
Repeat the above for all subsequent cards (omit Step 4), providing unique label/folder
names for each memory card. For example, the second card from the same camera
could be labeled “091231-CAM1-2”.
NOTE: The same procedure should be followed when using the HXR-FMU128
Page 6 of 22
Sony NXCAM Workflows in Apple Final Cut Pro 7
KEY WORKFLOW FEATURES IN FINAL CUT PRO 7
Supported NXCAM Recording Modes
The following NXCAM recording modes are supported:
♦ AVCHD: 1080 50i/60i/24p/25p/30p, 720 50p/60p
System Requirements
♦ Apple OS X 10.5.6+
♦ Apple Final Cut Pro 7 (included in Final Cut Studio 3.0 package)
For more details about Final Cut Pro, please visit the Apple website.
♦ USB 2.0 connection
♦ NXCAM compatible memory cards
♦ HXR-FMU128 (optional)
Connections
♦ When using memory cards, connect a generic USB 2.0 memory card reader to your
computer. The file transfer speed may vary based on the card reader’s
specifications and connection method. A direct connection (not through a USB hub)
is recommended.
♦ When using the Sony HXR-FMU128, connect via a USB 2.0 compatible cable. As
with the memory card reader, a direct connection to the computer is recommended.
Page 7 of 22
Sony NXCAM Workflows in Apple Final Cut Pro 7
Workflow Overview
Creating a Final Cut Pro Project
12-
Launch the Final Cut Pro application.
3-
Save the Project to the computer hard drive. The standard location for this is in the
/Users/username/Documents/Final Cut Pro Documents/ folder.
During the Save process, change “Untitled Project” to something meaningful.
4-
Verify the FCP Scratch Disk location and set according to your preference. Press Shift
+ Q to access this menu.
If not adding any video material to an existing FCP Project, create a new Project by
simultaneously pressing ⌘ + Shift + N. Alternatively, use the mouse to select
File > New Project. This will create a new project initially entitled “Untitled Project”.
NOTE: The previous step is not an essential part of AVCHD import, but is
recommended as a “best practice” of media management.
Page 8 of 22
Sony NXCAM Workflows in Apple Final Cut Pro 7
Log and Transfer Overview
Final Cut Pro requires that AVCHD clips be converted to ProRes422 QuickTime Movie files
and copied (typically) to the designated Capture Scratch location. This is accomplished with
Final Cut Pro’s integrated Log and Transfer tool. A brief overview of the interface is below.
Log and Transfer provides native support for AVCHD without the need for any additional
plugin software.
Log and Transfer automatically scans for connected media, and displays clips in the Clip List.
Alternatively, archived NXCAM media folders may be mounted by clicking the “Add Volume”
button, located at the top left corner of the window.
Prior to transfer, additional logging information may be entered for a clip, along with
preferences for Video and Audio import. The Preview Window is also available to set IN/OUT
points for partial clip transfer.
Page 9 of 22
Sony NXCAM Workflows in Apple Final Cut Pro 7
As part of the transfer operation, Final Cut Pro 7 can use the embedded clip metadata to
create custom file names. Custom names are typically more recognisable to the user than the
NXCAM-generated file names.
Custom names are set and/or selected via the Logging pane’s Name Preset drop list.
Select a Preset from the list, or choose “Edit” or “New” to create a custom setting. The
Naming Presets window will open.
Page 10 of 22
Sony NXCAM Workflows in Apple Final Cut Pro 7
To create a custom preset, drag metadata labels from the “Include:” pane to the “Format” line.
If the camera-original NXCAM file contains the corresponding metadata, the file name of the
converted ProRes clip will be set to match.
For more detailed information, please consult the Final Cut Pro 7 Operations Guide
Page 11 of 22
Sony NXCAM Workflows in Apple Final Cut Pro 7
Importing AVCHD Data Files Using Log and Transfer
Log and Transfer automatically scans for the presence of mounted card media (or the HXRFMU128), and displays clips in the Clip List. Additional AVCHD media folders (such as those
created when archiving from card to hard disc) may be added to the Clip List by selecting the
Add Folder button, located in the top left corner of the window.
Prior to transfer, logging data may be entered for a clip, along with preferences for Video and
Audio import.
Upon transfer, the clips are automatically rewrapped as QuickTime.
1-
Select Log and Transfer from Final Cut Pro’s File drop menu, or by pressing + Shift +
8.
2-
To import a clip(s), select and drag either to:
♦ The Import Queue below, which registers the clips in the selected Logging Bin of
the Final Cut Pro project.
♦ Directly to a specific Bin.
Page 12 of 22
Sony NXCAM Workflows in Apple Final Cut Pro 7
To create and import a subclip, do the following:
1234-
Select a clip from the Clip List.
Navigate the clip in the Preview Window.
Set In and Out points.
Click the Add Clip to Queue button.
Page 13 of 22
Sony NXCAM Workflows in Apple Final Cut Pro 7
Sequence Preparation
Although not mandatory, it is typically best to set the FCP Sequence Settings to match the clip
settings associated with the majority of your media; putting less demand on the computer’s
CPU and reducing rendering time. As mentioned in the previous section, NXCAM-native
AVCHD files are converted to a user-defined Apple ProRes format during import.
To verify/alter Final Cut Pro’s Sequence Settings, do the following:
1-
From within the Final Cut Pro Browser, select the default Sequence (Sequence 1), or
create a new Sequence by pressing + N.
2-
From the Sequence drop menu, select Settings.
3-
Adjust the settings for Frame Size, Pixel Aspect, Compressor, etc. to match the
majority of the project’s media. Typical settings for NXCAM media are as follows:
For 1080/60i media:
Page 14 of 22
Sony NXCAM Workflows in Apple Final Cut Pro 7
For 1080/24p media:
For 1080/30p media:
For 720/60p media:
4-
If unsure of the proper settings to use, FCP will configure the Sequence automatically.
For empty Sequences only, FCP analyzes the first clip that is entered in the Timeline
and compares it against the current Sequence Settings. If there is a mismatch, the
following will be displayed:
In most cases, select Yes.
Page 15 of 22
Sony NXCAM Workflows in Apple Final Cut Pro 7
Adding Clips to the Timeline
There are a variety of methods for placing clips in the Timeline. For purposes of illustration,
below are just a few methodologies:
To add a clip to a Sequence without trimming, simply drag the clip from the Bin to the Timeline.
To trim a clip prior to adding it to the Sequence:
123-
Double-click on a clip in the Browser. This will load the media into the Viewer window.
4-
Select the yellow Viewer Playhead and scrub to an exact Outpoint. Press O to mark the
Outpoint.
5-
Click and drag the image in the Viewer over to the Canvas window. (Notice that a
thumbnail image appears under the cursor) An Edit Overlay will appear in the Canvas.
6-
Continue dragging the thumbnail onto the red “Overwrite” section of the overlay, then
release. The clip will be added to the Timeline.
Play the clip by pressing either the spacebar or the L key.
Select the yellow Viewer Playhead and scrub to an exact In point. Press I to mark the
In point.
For more detailed information, please consult the Final Cut Pro 7 Operations Guide
Page 16 of 22
Sony NXCAM Workflows in Apple Final Cut Pro 7
PROJECT OUTPUT
The finished project may be output in a variety of ways.
♦ To Blu-ray™ Disc
♦ To a high quality movie file
♦ To an HDV video tape
♦ To an HD recorder via HD-SDI
A general overview of the output process for each of the above follows on the next few pages.
For more detailed information, please refer to the Final Cut Pro 7 Operations Guide and/or the
Operations Guide for the specific output device or interface.
Page 17 of 22
Sony NXCAM Workflows in Apple Final Cut Pro 7
Blu-ray Disc
1-
Select File > Share. The Share window will open.
23-
Choose “Blu-ray” and check the “Create Blu-ray disc” option.
45-
Insert a blank BD-R/BD-RE disc into the drive.
Confirm the Output Device and other settings, as appropriate, for the project.
Click Export.
Page 18 of 22
Sony NXCAM Workflows in Apple Final Cut Pro 7
High Quality Movie File Export
Final Cut Pro supports the creation of high quality movie files in QuickTime format, as well as
movies compatible with the iPod and YouTube.
1-
Select File > Share. The Share window will open.
2-
Choose “Other” from the drop-down list. The Setting window will open.
3456-
Select an appropriate preset, then click OK.
If the selected preset includes any options, set the check boxes as required.
Select a destination for the file(s).
Click Export.
Page 19 of 22
Sony NXCAM Workflows in Apple Final Cut Pro 7
HDV Video Tape Export
12345678-
Connect an HDV deck to the computer with an i.LINK® cable.
Select File > Export > QuickTime Movie.
Choose an HDV preset from the Setting drop-down list.
Specify the destination folder and output file name.
Click Save. A Final Cut Pro movie file will be created in the HDV format.
Create a new sequence in the current project.
Import the created movie file to the project.
Drag the movie file to the timeline. Final Cut Pro may prompt with the following
message:
9 - Click Yes.
10 - Select File > Print to Video.
11 - Choose options to suite the particular project.
12 - Click OK.
Page 20 of 22
Sony NXCAM Workflows in Apple Final Cut Pro 7
Output to an HD Recorder via HD-SDI
Final Cut Pro is compatible with several series of HD-SDI card interface cards, supporting
high quality output of the project timeline to an HD deck, such as XDCAM HD®, HDCAM® etc.
The procedures for output vary with the specific interface product installed. Please refer to the
operations guides of the specific interface product and/or the Final Cut Pro Operations Guide
for detailed setup and operational procedures.
Page 21 of 22
Sony NXCAM Workflows in Apple Final Cut Pro 7
NOTES
© 2009 Sony Electronics Inc. All rights reserved. Reproduction in whole or in part without
written permission is prohibited. Sony, NXCAM, DVCAM, XDCAM HD, HDCAM, Memory
Stick PRO Duo, Memory Stick PRO DUO HG, Blu-ray and i.LINK are trademarks of Sony.
HDV and the HDV logo are trademarks of Sony Corporation and the Victor Company of Japan.
CompactFlash is a trademark of the CompactFlash Association. Apple, Macintosh,
QuickTime and Final Cut Pro are trademarks of Apple. Windows Explorer is a trademark of
Microsoft Corporation.
Page 22 of 22