1
MODEL: MX-FXX1
FACSIMILE EXPANSION KIT
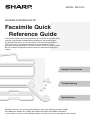
Facsimile
Facsimile Quick
Qui k
Reference
Re erence Guide
This manual explains the basic procedures for using the fax function of the
machine, and provides troubleshooting procedures and specifications.
For detailed information on the fax function, see the Facsimile Guide in
PDF format that is stored on the hard drive in the machine. For the
procedure for downloading the Facsimile Guide, see the Quick Start Guide.
Be sure to keep all operation manuals handy for reference including this
manual.
Using the fax function
Troubleshooting
Specifications
Read this manual if you are using the module on one of the following machine models.
MX-1800N, MX-2300N, MX-2700N, MX-3500N, MX-3501N, MX-4500N, MX-4501N
If your model is not one of the indicated models, read the manual that accompanies the machine.
00-0_Quick(cover2).fm
1 ページ
2005年10月20日 木曜日 午後3時31分
FAX interface cable and Line cable:
These special accessories must be used with the device.
Notice for Users in Europe
This equipment complies with the requirements of Directive 1999/5/EC.
Dieses Gerät entspricht den Anforderungen der EU-Richtlinie 1999/5/EG.
Cet appareil est conforme aux exigences de la directive 1999/5/CE.
Este aparato satisface las exigencias de las Directiva 1999/5/CE.
Quest'apparecchio è conforme ai requisiti delle direttiva 1999/5/CE.
Dit apparaat voldoet aan de eisen van de richtlijn 1999/5/EG.
Este equipamento obedece às exigências da directiva 1999/5/CE.
Denna utrustning uppfyller kraven enligt direktiv 1999/5/EC.
Dette udstyr overholder kravene i direktiv 1999/5/EF.
Dette produktet oppfyller kravene i direktiv 1999/5/EC.
Tämä laite täyttää direktiivi 1999/5/EY.
This equipment has been designed to work on the British analogue public switched telephone network.
This equipment has been tested according to the pan-European TS103 021 regulation.
It will operate on all analogue telephone networks which comply with the TS103 021.
Please contact your dealer or network operator, if you are not sure whether your network operates according to
TS103 021.
The Declaration of Conformity can be viewed at the following URL address.
http://www.sharp.de/doc/MX-FXX1.pdf
mx2700_gb_fqr.book
2 ページ
2005年10月10日 月曜日 午後1時50分
Note:
• Considerable care has been taken in preparing this manual. If you have any comments or concerns about the manual,
please contact your dealer or nearest authorised service representative.
• This product has undergone strict quality control and inspection procedures. In the unlikely event that a defect or other
problem is discovered, please contact your dealer or nearest authorised service representative.
• Aside from instances provided for by law, SHARP is not responsible for failures occurring during use of the product or its
options, or failures due to incorrect operation of the product and its options, or other failures, or for any damage that
occurs due to use of the product.
The display screens, messages, and key names shown in the manual may differ from those on the actual machine due to
product improvements and modifications.
Important Notice for New Zealand Users
General
"The grant of a Telepermit for any item of terminal equipment indicates only that Telecom has accepted that the
item complies with minimum conditions for connection to its network. It indicates no endorsement of the product
by Telecom, nor does it provide any sort of warranty. Above all, it provides no assurance that any item will work
correctly in all respects with another item of Telepermitted equipment of a different make or model, nor does it
imply that any product is compatible with all of Telecom's network services."
This equipment is not capable, under all operating conditions, of correct operation at the higher speeds for which
it is designed. Telecom will accept no responsibility should difficulties arise in these circumstances. This condition
typically applies to 56 kbit/s modems.
This equipment shall not be set up to make automatic calls to Telecom's 111 Emergency Service.
This equipment should not be used under any circumstances that may constitute a nuisance to other Telecom
customers.
This equipment may not provide for the effective hand-over of a call to another device connected to the same line.
In order to operate within the limits for compliance with Telecom's specifications, the associated equipment shall
be set to ensure that automatic calls to different numbers are spaced such that there is not less than 5 seconds
between the end of one call attempt and the beginning of another.
mx2700_gb_fqr.book
3 ページ
2005年10月10日 月曜日 午後1時50分
mx2700_gb_fqr.book
3 ページ
2005年10月10日 月曜日 午後1時50分
Using the fax function
This section explains the basic procedures for using the fax function. In
addition, special modes for fax are introduced.
X SENDING A FAX . . . . . . . . . . . . . . . . . . . . . . . . . . . . . . . 4
X SELECTING THE RESOLUTION AND EXPOSURE. . . . 5
X CHANGING THE SIZE OF THE ORIGINAL . . . . . . . . . . 7
X STORING A FAX NUMBER . . . . . . . . . . . . . . . . . . . . . . . 8
X SENDING THE SAME FAX TO MULTIPLE
DESTINATIONS (Broadcast Transmission) . . . . . . . . 12
X FORWARDING RECEIVED FAXES (Fax Data
Forward). . . . . . . . . . . . . . . . . . . . . . . . . . . . . . . . . . . . . 14
X CONVENIENT DIALLING METHODS . . . . . . . . . . . . . . 15
X SPECIAL FAX MODES . . . . . . . . . . . . . . . . . . . . . . . . . 17
X SELECTING A SPECIAL MODE FOR FAX. . . . . . . . . . 18
X CONVENIENT FAX FUNCTIONS . . . . . . . . . . . . . . . . . 19
3
mx2700_gb_fqr.book
4 ページ
2005年10月10日 月曜日 午後1時50分
SENDING A FAX
The basic procedure for sending faxes is explained below.
In fax mode, colour originals are sent as black and white images.
Transmission
Original
DOCUMENT
FILING
IMAGE SEND
COPY
Transmission result
1
PRINT
READY
DATA
Press the [IMAGE SEND] key.
LINE
DATA
SYSTEM
JOB STATUS SETTINGS
LOGOUT
Ready to send.
Speaker
Resend
Fax
Mode Switch
Address Book
Image
Settings
Sub Address
Memory TX
Special Modes
Direct TX
File
Auto Reception
Fax Memory:100%
The side to be scanned must be face up!
The base screen of fax mode appears.
(When the fax function is not installed, the base
screen of scan mode appears.)
Quick File
2
Place the original.
When using the document glass, place the original
with the side to be scanned face down.
3
Enter the fax number of the receiving fax
machine and press the [BLACK & WHITE
START] key.
In fax mode, the [COLOUR START] key cannot be
used to send a fax.
Correct a mistake
4
Cancel scanning
mx2700_gb_fqr.book
5 ページ
2005年10月10日 月曜日 午後1時50分
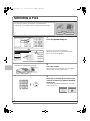
SELECTING THE RESOLUTION AND
EXPOSURE
The resolution and exposure can be selected to match the characteristics of the original, such as text or photo,
the size of the text, and the darkness of the image.
When sending originals with small text or light colours, adjust the resolution and exposure.
Changing the resolution
The following example explains how to set the resolution to [Fine] and [Half Tone] when sending an original with
small text.
1
The side to be scanned must be face up!
Place the original.
When using the document glass, place the original
with the side to be scanned face down.
2
Select the resolution in the touch panel.
Fax
Mode Switch
Image
Settings
(1)
Memory TX
Direct TX
Auto Reception
Fax Memory:100%
Fax
Resolution
Auto
Exposure
Standard
Resolution
(2)
Auto
A4
Original
Address Book
(1) Touch the [Image Settings] key.
Sub Address
(2) Touch the [Resolution] key.
Special Modes
File
Special Modes
Quick File
(3) Touch the [Fine] key.
The resolution increases in the following order:
[Standard], [Fine], [Super Fine], [Ultra Fine].
OK
Standard
(5)
(4) Touch the [Half Tone] key.
Fine
Super Fine
(3)
Half Tone
Ultra Fine
(4)
Select [Half Tone] for a photo or illustration with
shading to further improve the image.
[Half Tone] cannot be selected when [Standard]
is selected.
(5) Touch the [OK] key.
3
Enter the fax number of the receiving fax
machine and press the [BLACK & WHITE
START] key.
Correct a mistake
Cancel scanning
5
mx2700_gb_fqr.book
6 ページ
2005年10月10日 月曜日 午後1時50分
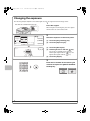
Changing the exposure
The following example explains how to darken light colours in an original to make the image clearer.
1
The side to be scanned must be face up!
Place the original.
When using the document glass, place the original
with the side to be scanned face down.
Fax
Mode Switch
Image
Settings
(1)
Memory TX
Direct TX
Auto Reception
Fax Memory:100%
Auto
Exposure
(2)
Standard
Resolution
Auto
A4
Original
Address Book
2
Sub Address
Select the exposure in the touch panel.
Special Modes
Special Modes
File
(1) Touch the [Image Settings] key.
(2) Touch the [Exposure] key.
Quick File
Fax
Exposure
OK
(5)
Auto
(3)
1
(3) Touch the [Manual] key.
(4) Darken light colours with the
Manual
3
5
(4)
key.
Five levels are available for the exposure.
Darken light originals with the
key, and
lighten dark originals with the
key.
(5) Touch the [OK] key.
3
Enter the fax number of the receiving fax
machine and press the [BLACK & WHITE
START] key.
Correct a mistake
6
Cancel scanning
mx2700_gb_fqr.book
7 ページ
2005年10月10日 月曜日 午後1時50分
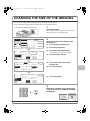
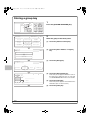
CHANGING THE SIZE OF THE ORIGINAL
The size of the original and the paper size can be specified before transmission.
The procedure below explains how to fax both sides of a A4 original at A3 size.
1
The side to be scanned must be face up!
Place the original.
When using the document glass, place the original
with the side to be scanned face down.
Fax
Mode Switch
Image
Settings
Sub Address
Standard
Resolution
(1)
Memory TX
Direct TX
Auto Reception
Fax Memory:100%
Fax
Original
Address Book
Auto
Exposure
Auto
A4
Original
Special Modes
File
Special Modes
Quick File
(2)
Scan Size
Auto
A4
100%
Send Size
Auto
OK
Select the original size settings in the
touch panel.
(1) Touch the [Image Settings] key.
(2) Touch the [Original] key.
(3) Touch the [2-Sided Booklet] key.
Touch this key to send a 2-sided original.
(4) Touch the [Send Size] key.
(4)
2-Sided
Booklet
2
Image Orientation
(3)
2-Sided
Tablet
Fax
Original
AB
OK
Inch
Auto
A5
B5R
B4
Manual
A5R
A4
A3
B5
A4R
(5)
A4
Fax
Original
Scan Size
Auto
2-Sided
Booklet
129%
A4
Send Size
A3
(6)
(5) Touch the desired send size key
(example: A3).
(6) Touch the [OK] key.
OK
(7)
(7) Touch the [OK] key.
Image Orientation
2-Sided
Tablet
3
Enter the fax number of the receiving fax
machine and press the [BLACK & WHITE
START] key.
Correct a mistake
Cancel scanning
7
mx2700_gb_fqr.book
8 ページ
2005年10月10日 月曜日 午後1時50分
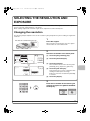
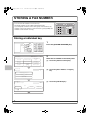
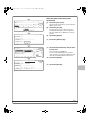
STORING A FAX NUMBER
You can store fax numbers in one-touch keys.
Stored fax numbers can be called up quickly and easily.
If you frequently send faxes to the same group of fax machines, the
numbers of those fax machines can be stored as a group (multiple fax
numbers can be stored in one key).
One-touch
Group key
A Corp.
Storing a individual key
Press the [SYSTEM SETTINGS] key.
LINE
DATA
IMAGE SEND
COPY
1
PRINT
READY
DATA
DOCUMENT
FILING
SYSTEM
JOB STATUS SETTINGS
LOGOUT
System Settings
Admin Password
Exit
Total Count
Default Settings
List Print
(User)
Paper Tray
Settings
Address Control
Fax Data
Receive/Forward
Printer Condition
Settings
Document Filing
Control
(1)
USB-Device Check
Store the fax number in the touch panel.
(1) Touch the [Address Control] key.
System Settings
OK
Address Control
2
(2) Touch the [Direct Address / Program]
key.
Direct Address / Program
(2)
F-Code Memory Box
Custom Index
System Settings
OK
Direct Address / Program
Store
Individual
(3)
8
Group
Program
Amend/Delete
(3) Touch the [Individual] key.
mx2700_gb_fqr.book
9 ページ
2005年10月10日 月曜日 午後1時50分
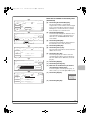
Next
Direct Address / Individual
(4)
E-mail
Search Number
Internet Fax
Exit
(4) Touch the [Search Number] key.
Fax
001
(5)
Name
1/2
AAA AAA
Initial
Index
A
(6)
(7)
Fax No.
Store the fax number in the touch panel.
(Continued)
The "Search Number" is automatically
assigned. The search number can be changed
in the screen that appears when the [Search
Number] key is touched. However, a number
that is already in use cannot be used.
(5) Touch the [Name] key.
Next
Direct Address / Individual
Exit
No.001
OK
Index
Select the custom index where You register this address.
User 1
User 2
User 3
User 4
(10)
User 5
User 6
(8)
(6) Touch the [Initial] key.
Do you register this address at the [Frequent Use], too?
A software keyboard appears. Enter initials for
the destination (max. of 10 characters).
No
Yes
A software keyboard appears. Enter the name
of the destination (max. of 36 characters). To
enter text, see "6. ENTERING TEXT" in the
User's Guide.
(9)
(7) Touch the [Index] key.
Next
Direct Address / Individual
E-mail
Search Number
Name
Internet Fax
Exit
Fax
The user index selected here can be used in the
address book screen.
001
1/2
AAA AAA
Initial
(9) Touch the [Yes] key.
Index
A
User 1
Touch the [Yes] key if you wish to have the
stored destination appear on the frequent use
tab of the address book. Otherwise, touch the
[No] key.
Fax No.
(11)
Direct Address / Individual
Next
Exit
Cancel
OK
(10) Touch the [OK] key.
No.001
Fax No.
Enter the Fax No. via the 10-Key pad, then press [OK].
(12)
(13)
Sub Address
Next
E-mail
Search Number
Internet Fax
001
Fax
A
Fax No.
0120000000
To enter a hyphen, touch the [Pause] key. To
enter a slash ("/"), touch the [Sub Address] key.
Exit
(13) Touch the [OK] key.
(14)
Correct a mistake
Registration is completed.
1/2
AAA AAA
Initial
(11) Touch the [Fax No.] key.
(12) Enter the fax number that you wish to
store with the numeric keys.
Pause
0120000000
Direct Address / Individual
Name
(8) Touch the [User 1] key.
Index
User 1
(14) Touch the [Exit] key.
9
mx2700_gb_fqr.book
10 ページ
2005年10月10日 月曜日 午後1時50分
Storing a group key
Press the [SYSTEM SETTINGS] key.
LINE
DATA
IMAGE SEND
COPY
1
PRINT
READY
DATA
DOCUMENT
FILING
SYSTEM
JOB STATUS SETTINGS
LOGOUT
System Settings
Admin Password
Exit
Total Count
Default Settings
List Print
(User)
Paper Tray
Settings
Address Control
Fax Data
Receive/Forward
Printer Condition
Settings
Document Filing
Control
(1)
USB-Device Check
Store the group in the touch panel.
(1) Touch the [Address Control] key.
System Settings
OK
Address Control
2
(2) Touch the [Direct Address / Program]
key.
Direct Address / Program
(2)
F-Code Memory Box
Custom Index
(3) Touch the [Group] key.
System Settings
OK
Direct Address / Program
Store
Individual
Group
Program
Amend/Delete
(3)
Next
Direct Address / Group
Search Number
(4)
004
Group Name
DDD DDD
Initial
(6)
Key Name
Address
(5)
(4) Touch the [Group Name] key.
A text entry screen appears. Enter the name of
the group (max. of 36 characters). To enter text,
see "6. ENTERING TEXT" in the User's Guide.
D
Index
Exit
(5) Touch the [Initial] key.
A text entry screen appears. Enter initials for the
destination (max. of 10 characters).
(6) Touch the [Index] key.
10
mx2700_gb_fqr.book
11 ページ
2005年10月10日 月曜日 午後1時50分
Next
Direct Address / Group
Exit
(7) Touch the [User 1] key.
No.004
OK
Index
Select the custom index where you register this address.
User 1
User 2
User 3
User 4
User 5
(9)
User 6
(7)
Touch the [Yes] key if you wish to have the
stored destination appear on the frequent use
tab of the address book. Otherwise, touch the
[No] key.
No
Yes
(8)
Next
Direct Address / Group
Search Number
Initial
Index
The user index selected here can be used in the
address book screen.
(8) Touch the [Yes] key.
Do you register this address at the [Frequent Use], too?
Group Name
Store the group in the touch panel.
(Continued)
Exit
(9) Touch the [OK] key.
004
DDD DDD
(10) Touch the [Address] key.
D
Address
User 1
(10)
Key Name
Direct Address / Group
OK
Select address.
1/1
BBB BBB
AAA AAA
(11)
CCC CCC
(12)
Direct Entry
Address Review
2
ABCD
Frequent Use
EFGHI
JKLMN
OPQRST
UVWXYZ
Sort Address
(11) Touch the destination key that you want
to store next.
The selected key is highlighted.
To store a fax number that is not stored in a
one-touch key, touch the [Direct Entry] key and
enter the fax number with the numeric keys.
(12) Touch the [OK] key.
Next
Direct Address / Group
Search Number
Group Name
Initial
004
Registration is completed.
DDD DDD
Exit
(13)
(13) Touch the [Exit] key.
D
Index
User 1
Key Name
DDD DDD
Address
2 Addresses
11
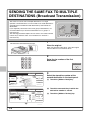
SENDING THE SAME FAX TO MULTIPLE
DESTINATIONS (Broadcast Transmission)
The same fax can be sent to multiple destinations in a single
operation. The destinations can also include scan mode destinations
(excluding Scan to Network Folder destinations) and Internet fax
destinations.
If you frequently send faxes to the same group of destinations, it is
recommended that you store those destinations as a group in a
one-touch key.
The following procedure explains how to enter a fax number with the
numeric keys and then select a fax number that is stored in a
one-touch key.
Transmission
Original
Broadcast
1
The side to be scanned must be face up!
Place the original.
When using the document glass, place the original
with the side to be scanned face down.
2
Enter the fax number of the first
destination.
Correct a mistake
Pause
0120000001
Fax
Mode Switch
Scan
Send
Next Address
Address Book
Auto
A4
(1)
Image
Settings
Sub Address
Memory TX
Special Modes
Direct TX
File
Auto Reception
Fax Memory:100%
Pause
Next Address
Condition
Settings
Cc
1/1
AAA AAA
BBB BBB
Memory
CCC CCCTX
DDD DDD
Global
FFF FFF
Sub Address
EEE EEE
(2)
Frequent Use
12
Select the stored fax number of the
second destination in the touch panel.
(1) Touch the [Address Book] key.
Quick File
CCC CCC
0120000000
To
3
ABCD
EFGHI
Address Review
(3)
JKLMN
OPQRST UVWXYZ
Sort Address
(2) Touch the one-touch key in which the
desired fax number is stored.
(3) Touch the [Address Review] key.
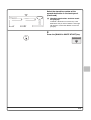
Select the stored fax number of the
second destination in the touch panel.
(Continued)
OK
Address Review
001 0120000001
To
002 CCC CCC
(4)
1/1
(4) Check the destinations and then touch
the [OK] key.
To delete a destination, touch the key of the
destination that you wish to delete. A message
will appear to confirm the deletion. Touch the
[Yes] key.
Cc
4
Press the [BLACK & WHITE START] key.
Cancel scanning
13
mx2700_gb_fqr.book
14 ページ
2005年10月10日 月曜日 午後1時50分
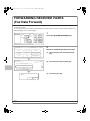
FORWARDING RECEIVED FAXES
(Fax Data Forward)
When the machine cannot print because it is out of paper or out of toner, received faxes can be forwarded to
another fax machine.
To use this function, the fax number of the destination machine must be stored in "Set the Telephone Number for
Data Forwarding" in the system settings.
Press the [SYSTEM SETTINGS] key.
LINE
DATA
IMAGE SEND
COPY
1
PRINT
READY
DATA
DOCUMENT
FILING
SYSTEM
JOB STATUS SETTINGS
LOGOUT
System Settings
Admin Password
Total Count
Default Settings
List Print
(User)
Paper Tray
Settings
Address Control
Fax Data
Receive/Forward
Printer Condition
Settings
Document Filing
Control
USB-Device Check
Exit
2
Select fax forwarding in the touch panel.
(1) Touch the [Fax Data Receive/Forward]
key.
(1)
System Settings
OK
Fax Data Receive/Forward
(2) Touch the [Fax Data Forward] key.
1/2
Fax Receive Settings
Fax Data Forward
(2)
Internet Fax Manual Reception
(3) Touch the [Yes] key.
Transfer the received data to another
device?
No
Yes
(3)
14
01-1_Quick(Quick).fm
15 ページ
2005年10月13日 木曜日 午後2時7分
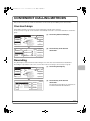
CONVENIENT DIALLING METHODS
Easy to dial one-touch keys and the resend function can be used to prevent dialling errors and save time.
One-touch keys
A fax number stored in a one-touch key can be called up by a simple touch of the key.
A one-touch key for a group can be selected to automatically send a fax to each of the destinations stored in the
group.
Ready to send.
Speaker
Scan
Fax
Mode Switch
(1) Touch the [Address Book] key.
Resend
Send
Address Book
Auto
A4
Image
Settings
Sub Address
Memory TX
Special Modes
Direct TX
File
(1)
Auto Reception
Fax Memory:100%
Quick File
Condition
Settings
Cc
To
1/1
AAA AAA
BBB BBB
Address Review
CCC CCC
DDD DDD
Global
FFF FFF
Sub Address
(2)
EEE EEE
Frequent Use
ABCD
EFGHI
JKLMN
OPQRST UVWXYZ
(2) Touch the key of the desired
destination.
Sort Address
Resending
The [Resend] key can be touched to send an image to one of the most recent 8 transmission destinations.
Resending is not possible in some cases, such as when a fax is sent using a one-touch key for a group.
Ready to send.
Fax
Mode Switch
Scan
A4
Speaker
(1) Touch the [Resend] key.
Resend
(1)
Send
Address Book
Auto
Image
Settings
Sub Address
Memory TX
Special Modes
Direct TX
File
Auto Reception
Fax Memory:100%
Quick File
Cancel
No.01
AAAAAA
AAA
AAAAAA
AAA
No.02
EEE EEE
No.03
BBB BBB
(2)
No.04
FFF FFF
No.05
CCC CCC
No.06
GGG GGG
DDD DDD
No.08
HHH HHH
No.07
(2) Touch the key of the desired
destination.
The destinations that appear also include Scan
to E-mail and Internet fax destinations.
15
mx2700_gb_fqr.book
16 ページ
2005年10月10日 月曜日 午後1時50分
Speed dialling
When you store an individual key or a group key, a 3-digit number is assigned.
You can dial using the
key and the 3-digit search number.
To check a search number, print the appropriate list in the sending address list menu in the system settings.
Ready to send.
Fax
Mode Switch
Scan
A4
Speaker
Send
(1) Touch the
Address Book
Auto
(1)
Image
Settings
Sub Address
Memory TX
Special Modes
Direct TX
File
Auto Reception
Fax Memory:100%
Quick File
(2) Enter the 3-digit search number with the
numeric keys.
Enter search number.(001-999)
Fax
Mode Switch
(2)
Scan
A4
key.
Resend
Send
Address Book
Auto
Image
Settings
Sub Address
Memory TX
Special Modes
Direct TX
File
Auto Reception
Fax Memory:100%
Quick File
Dialling using the speaker
When the speaker is used to dial, the fax is sent after the number is dialled and the connection is made. If a
person answers, you will be able to hear his or her voice, but you will not be able to speak.
Ready to send.
Fax
Mode Switch
Scan
A4
Speaker
Resend
Send
Address Book
Auto
Image
Settings
Sub Address
Memory TX
Special Modes
Direct TX
File
Auto Reception
Fax Memory:100%
Scan
A4
Speaker
Send
Resend
Address Book
Auto
Image
Settings
Fax Receive
Special Modes
Speaker Volume
File
Fax Memory:100%
Quick File
16
You will hear the dial tone through the machine's
speaker.
Quick File
Telephone mode.
Fax
Mode Switch
Touch the [Speaker] key.
Dial the fax number of the destination with the numeric
keys or with the [Address Book] key.
When the connection is made, press the [BLACK &
WHITE START] key to send the fax.
mx2700_gb_fqr.book
17 ページ
2005年10月10日 月曜日 午後1時50分
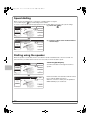
SPECIAL FAX MODES
The special modes make it possible to perform a variety of fax transmissions for specific purposes.
The following pages show the types of fax transmissions that can be performed. (The procedures for using each
special mode are not explained.)
Each special mode has its own settings and procedures, however, the basic procedure is the same for all modes.
The basic procedure for selecting a special mode is explained on the next page using "Erase" as an example.
For the specific procedures for using the special modes, see "7. CONVENIENT FUNCTIONS" in the
Facsimile Guide.
Special modes
Ready to send.
Fax
Mode Switch
Scan
A4
Speaker
Send
Resend
Address Book
Auto
Image
Settings
Sub Address
Memory TX
Special Modes
Direct TX
File
Auto Reception
Fax Memory:100%
Quick File
1st screen
To use a special mode, open the special modes
menu and touch the key of mode that you wish to
use. The menu consists of three screens. Use the
keys to switch through the screens.
Touch the [Special Modes] key in the base screen to
open the special modes menu. You can also open
the special modes menu by touching the [Special
Modes] key that appears after the [Image Settings]
key is touched.
2nd screen
Fax
Special Modes
Fax
Special Modes
OK
OK
1/3
Program
Timer
Erase
2in1
Dual Page
Scan
2/3
Own Name
Select
Transaction
Report
Polling
Card Shot
Memory Box
3rd screen
Fax
Special Modes
Job
Build
File
OK
3/3
Mixed Size
Original
Slow Scan
Mode
Quick File
When a special mode key encircled by
is touched, the key is highlighted and the setting is completed.
When any other special mode key is touched, a setting screen appears to let you select settings for that mode.
The keys that appear vary by country and region and the peripheral devices that are installed.
17
mx2700_gb_fqr.book
18 ページ
2005年10月10日 月曜日 午後1時50分
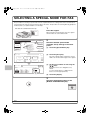
SELECTING A SPECIAL MODE FOR FAX
The procedure for selecting a special mode for fax is explained below. The settings that can be selected vary for
each special mode, however, the general procedure is the same. The procedure for selecting "Erasing peripheral
shadows (Erase)" is explained below as an example.
1
The side to be scanned must be face up!
Place the original.
When using the document glass, place the original
with the side to be scanned face down.
Ready to send.
Fax
Mode Switch
Scan
A4
Speaker
Resend
Send
Address Book
Auto
Image
Settings
Sub Address
Memory TX
Special Modes
Direct TX
File
(1)
Auto Reception
Fax Memory:100%
OK
Timer
Erase
(2)
2in1
Dual Page
Scan
(4)
OK
Cancel
Edge+Centre
Erase
(2) Touch the [Erase] key.
The erase settings will be configured to erase a
width of 15 mm around the edges of the original.
1/3
OK
Centre
Erase
(1) Touch the [Special Modes] key.
Card Shot
Special Modes
Erase
Edge
Erase
Select the desired special mode
(example: erase) settings in the touch
panel.
Quick File
Fax
Special Modes
Program
2
(3) Set the erase width to 15 mm using the
keys.
The erase area is set to "Edge Erase" by
default.
To select "Centre Erase" or "Edge+Centre
Erase", touch the appropriate key.
Edge
15
(3)
(0~20)
mm
(4) Touch the [OK] key.
3
Select the destination and press the
[BLACK & WHITE START] key.
Cancel scanning
18
mx2700_gb_fqr.book
19 ページ
2005年10月10日 月曜日 午後1時50分
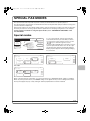
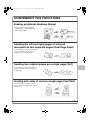
CONVENIENT FAX FUNCTIONS
Erasing peripheral shadows (Erase)
Use this function to erase peripheral
shadows that occur when faxing books
and other thick originals.
Without erase
Transmission
Transmission
With erase
Sending the left and right pages of a bound
document as two separate pages (Dual Page Scan)
Use this function to send the left and right
pages of a pamphlet or other bound
document as two separate pages.
Transmission
Sending two original pages as a single page (2in1)
Use this function to reduce two original
pages to half their size and send them as
a single page.
12
34
Transmission
1 234
Sending both sides of card as a single page (Card Shot)
Use this function to send the front and
back of a card as a single page in a single
transmission.
Front
Transmission
Transmission
Back
19
01-1_Quick(Quick).fm
20 ページ
2006年2月23日 木曜日 午後3時27分
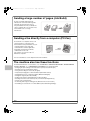
Sending a large number of pages (Job Build)
A stack of originals higher than the
indicator line cannot be fed through the
automatic document feeder at once.
The job build function lets you divide the
stack of originals into sets, feed each set,
and send the sets as a single
transmission.
Transmission
Sending a fax directly from a computer (PC-Fax)
A document on a computer can be sent
via the machine as a fax. Select the
PC-Fax driver as the printer driver for your
computer and then select the print
command in the software application.
Image data for transmission will be
created and sent as a fax.
This function can only be used on a
Windows® computer.
Transmission
For more information, see the Help file for the PC-Fax driver.
The machine also has these functions
For detailed information on each function, see "6. PRINTING A TRANSACTION REPORT / IMAGE SENDING
ACTIVITY REPORT" or "7. CONVENIENT FUNCTIONS" in the Facsimile Guide.
• Changing the print settings for the transaction report (Transaction Report)
• Sending a fax at a specified time (Timer)
• Using stored settings to send a fax (Program)
• Temporarily changing the sender information (Own Name Select)
• Faxing different sizes of originals together (Mixed Size Original)
• Faxing thin originals (Slow Scan Mode)
• Calling a fax machine and initiating fax reception (Polling)
• Sending a fax when a fax machine polls your machine (Polling Memory)
• Using F-code communication
• Connecting and using an existing phone (Extension Phone Connection)
• Forwarding a received fax to an e-mail address (Inbound Routing Settings)
20
mx2700_gb_fqr.book
21 ページ
2005年10月10日 月曜日 午後1時50分
Troubleshooting
This section provides solutions to common faxing problems.
X TABLE OF CONTENTS FOR TROUBLESHOOTING . . 22
X PROBLEMS RELATED TO TRANSMISSION . . . . . . . . 23
X PROBLEMS RELATED TO RECEPTION . . . . . . . . . . . 25
X PROBLEMS RELATED TO AUDIBLE SIGNALS . . . . . 26
X PROBLEMS RELATED TO ONE-TOUCH INDIVIDUAL
KEYS / GROUP KEYS . . . . . . . . . . . . . . . . . . . . . . . . . . 27
21
mx2700_gb_fqr.book
22 ページ
2005年10月10日 月曜日 午後1時50分
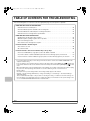
TABLE OF CONTENTS FOR TROUBLESHOOTING
See the following table of contents to locate the appropriate page for your question or problem.
PROBLEMS RELATED TO TRANSMISSION
• Transmission does not take place. . . . . . . . . . . . . . . . . . . . . . . . . . . . . . . . . . . . . . . . . . . . . . . . . . . . 23
• The transmitted fax prints out blank at the receiving side. . . . . . . . . . . . . . . . . . . . . . . . . . . . . . . . . . . 24
• The transmitted fax is reduced by the receiving fax machine. . . . . . . . . . . . . . . . . . . . . . . . . . . . . . . . 24
• Transmission does not begin at the specified time. . . . . . . . . . . . . . . . . . . . . . . . . . . . . . . . . . . . . . . . 24
PROBLEMS RELATED TO RECEPTION
• Printing does not take place after reception. . . . . . . . . . . . . . . . . . . . . . . . . . . . . . . . . . . . . . . . . . . . . 25
• Manual reception / polling reception are not possible. . . . . . . . . . . . . . . . . . . . . . . . . . . . . . . . . . . . . . 25
• The received image is faint. . . . . . . . . . . . . . . . . . . . . . . . . . . . . . . . . . . . . . . . . . . . . . . . . . . . . . . . . . 25
• The machine does not begin fax reception. . . . . . . . . . . . . . . . . . . . . . . . . . . . . . . . . . . . . . . . . . . . . . 25
Problems Related to Audible Signals
• The volume is too low. . . . . . . . . . . . . . . . . . . . . . . . . . . . . . . . . . . . . . . . . . . . . . . . . . . . . . . . . . . . . . 26
• No sound is heard. . . . . . . . . . . . . . . . . . . . . . . . . . . . . . . . . . . . . . . . . . . . . . . . . . . . . . . . . . . . . . . . . 26
Problems Related to One-Touch Individual Keys / Group Keys
• A one-touch individual key or group key cannot be edited or deleted. . . . . . . . . . . . . . . . . . . . . . . . . 27
• You wish to delete or edit an individual key but do not know which group key it is stored in. . . . . . . . 27
• You wish to delete or edit an individual or group key but do not know which program key it is stored in. . . . 27
• If you cannot find the item that you are looking for in the above table of contents, See "OTHER PROBLEMS" in the
separate Troubleshooting.
• If you are unable to solve a problem using the solutions in this guide, switch off the [POWER] key (
) and the main
power switch. Wait at least 10 seconds, and then switch on the main power switch and the [POWER] key (
) in that
order.
* When the LINE indicator is lit or the DATA indicator is lit or blinking, do not switch off the main power switch or unplug
the power cord. This may damage the hard drive or cause the data being stored or received to be lost.
• System settings
Descriptions of the system settings similar to the following example appear in this manual.
Example: ➞ System Settings (Administrator) > "Image Send Settings" > "Fax Settings" > "Fax Default Settings" >
"Dial Mode Setting"
This is an abbreviated description of the procedure for selecting the setting. ">" indicates a level in the settings. Use
these descriptions as a quick guide to help you configure the settings. For information on the system settings for fax,
see "11. SYSTEM SETTINGS FOR FAX" in the Facsimile Guide.
22
mx2700_gb_fqr.book
23 ページ
2005年10月10日 月曜日 午後1時50分
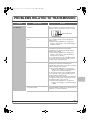
PROBLEMS RELATED TO TRANSMISSION
Problem
Transmission does
not take place.
Point to check
Is the telephone line connected
securely?
Solution
Check the telephone line jack at the back of the right
side of the machine, the wall jack, and any extension
adapters to make sure that all connections are secure.
Telephone line socket
Is the correct dial mode set for your
line?
Ask your administrator to verify that "Dial Mode Setting"
is set correctly for the line you are using. (Default
setting: "Tone")
➞ System Settings (Administrator) > "Image Send
Settings" > "Fax Settings" > "Fax Default Settings" >
"Dial Mode Setting"
Is a busy signal received?
If a busy signal is received, the transmission is
temporarily cancelled and then automatically
re-attempted after a brief interval. (Default setting: 2
attempts, 3 min. intervals)
➞ System Settings (Administrator) > "Image Send
Settings" > "Fax Settings" > "Fax Send Settings" >
"Recall in Case of Line Busy"
To cancel the transmission, press the [JOB STATUS]
key, touch the key of the job that you wish to cancel,
and then touch the [Stop/Delete] key.
Did a communication error occur?
If an error occurs that prevents transmission, the
transmission is temporarily cancelled and then
automatically re-attempted after a brief interval. (Default
setting: 2 attempts, 3 min. intervals)
➞ System Settings (Administrator) > "Image Send
Settings" > "Fax Settings" > "Fax Send Settings" >
"Recall in Case of Communication Error"
To cancel the transmission, press the [JOB STATUS]
key, touch the key of the job that you wish to cancel,
and then touch the [Stop/Delete] key.
The machine supports error correction mode (ECM) and
is configured to automatically resend any part of a fax
that is distorted due to noise on the line.
➞ System Settings (Administrator) > "Image Send
Settings" > "Fax Settings" > "Fax Default Settings"
> "ECM"
Does a message appear indicating that
the memory is full?
If the memory becomes full, the transmission will be
cancelled. Divide the originals into sets and fax each set
separately, or use direct transmission.
23
mx2700_gb_fqr.book
24 ページ
2005年10月10日 月曜日 午後1時50分
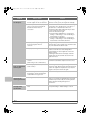
Problem
Transmission does
not take place.
Point to check
Solution
Does a message appear notifying you
that the original size was not detected?
Place the original again. If the original size is still not
detected correctly, specify the original size manually.
Does the job status screen (completed
jobs) or a transaction report indicate
that the transmission was not
successful?
If the transmission is still not successful after recalling is
performed as set in "Recall in Case of Line Busy" or
"Recall in Case of Communication Error", the
transmission failure will be indicated in the job status
screen and the transaction report.
Perform the transmission again.
➞ System Settings (Administrator) > "Image Send
Settings" > "Fax Settings" > "Fax Send Settings" >
"Recall in Case of Line Busy"
➞ System Settings (Administrator) > "Image Send
Settings" > "Fax Settings" > "Fax Send Settings" >
"Recall in Case of Communication Error"
Did you place a long size original on
the document glass when it is
scanned?
A long size original cannot be scanned from the
document glass. Place originals in the document feeder
tray of the automatic document feeder.
Did you place an original that is folded?
If a folded original is placed in the automatic document
feeder, an error will occur and scanning will be
cancelled when the actual original size is detected
during scanning.
Following the instructions in the display, unfold the
original, place it in the automatic document feeder
again, and rescan.
Are the sub-address and passcode
correct?
(When using F-code communication)
Check with the operator of the other machine to make
sure that the sub-address and passcode are correct.
Is the original placed face up or face
down correctly?
When using the document glass, the original must be
placed face down. When using the automatic document
feeder, the original must be placed face up. Place the
original correctly and send the fax again.
If the receiving machine is using
thermal paper, was the thermal paper
loaded with the wrong side out?
Check with the operator of the other machine.
The transmitted fax is
reduced by the
receiving fax machine.
Has image rotation been enabled?
When "Rotation Sending Setting" is not enabled (the
image is not rotated), an original placed in the vertical
orientation may be reduced by the receiving machine.
Enable "Rotation Sending Settings" before
transmission.
Transmission does
not begin at the
specified time.
Is the machine's clock set to the correct
time?
Set the clock to the correct time.
➞ System Settings > "Default Settings" > "Clock"
The transmitted fax
prints out blank at the
receiving side.
24
mx2700_gb_fqr.book
25 ページ
2005年10月10日 月曜日 午後1時50分
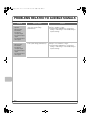
PROBLEMS RELATED TO RECEPTION
Problem
Point to check
Solution
Printing does not take
place after reception.
Does a message appear in the display
instructing you to add toner or paper?
(Printing is not possible when this
screen appears.)
Restore printing capability as instructed by the
message.
Does a password entry screen appear?
"Hold Setting for Received Data Print" is enabled. Enter
the correct password with the numeric keys.
If you do not know the password, check with your
administrator.
Has cut-off printing been disabled in
the system settings (administrator)?
If "Print Actual Size Cut off Disabled" is enabled in "Print
Style Setting" in the system settings (administrator) and
a fax is received that is larger than any paper that is
loaded, the fax will be received to memory without being
printed. (However, when a fax longer than A3 (11" x
17") size is received, it will be printed using multiple
sheets of paper.)
Load the same size of paper as the received fax.
➞ System Settings (Administrator) > "Image Send
Settings" > "Fax Settings" > "Fax Receive Settings" >
"Print Style Setting"
Is forwarding (Inbound Routing
function) selected in the Web page for
a received fax?
When the Inbound Routing function is enabled in the
Web pages, received faxes are automatically forwarded
to a specified E-mail address. If "Print at Error" is
selected when Inbound Routing is enabled, received
faxes will only be printed when an error occurs. If you
need to print a received fax, ask your administrator.
Manual reception /
polling reception are
not possible.
Is little free memory remaining?
Try the operation again after currently stored jobs have
been completed.
The received image is
faint.
Is the original that was faxed also faint?
Ask the other party to send the fax again using a
suitable (darker) exposure setting.
The machine does not
begin fax reception.
Has the reception mode been set to
"Manual Reception" in the system
settings (administrator)?
When the reception mode is set to "Manual Reception",
the machine will not receive faxes automatically. To
have the machine receive faxes automatically, set the
reception mode to "Auto Reception".
➞ System Settings > "Fax Data Receive/Forward" >
"Fax Receive Settings"
25
mx2700_gb_fqr.book
26 ページ
2005年10月10日 月曜日 午後1時50分
PROBLEMS RELATED TO AUDIBLE SIGNALS
Problem
The volume is too low.
• Speaker
• Ringer Volume
Point to check
Solution
Has the volume setting been set to
"Low" in the system settings
(administrator)?
Ask your administrator to set the volumes in "Speaker
Settings" to "Medium" or "High".
➞ System Settings (Administrator) > "Image Send
Settings" > "Fax Settings" > "Fax Default Settings" >
"Speaker Settings"
Has the ringer volume been turned off
in the system settings (administrator)?
Ask your administrator to set the volumes in "Speaker
Settings" to "Low", "Medium", or "High".
➞ System Settings (Administrator) > "Image Send
Settings" > "Fax Settings" > "Fax Default Settings" >
"Speaker Settings"
• Line Monitor
• Fax Receive
Complete Signal
• Fax Send Complete
Signal
• Fax Communication
Error Signal
No sound is heard.
• Ringer Volume
• Line Monitor
• Fax Receive
Complete Signal
• Fax Send Complete
Signal
• Fax Communication
Error Signal
26
mx2700_gb_fqr.book
27 ページ
2005年10月10日 月曜日 午後1時50分
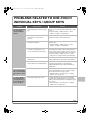
PROBLEMS RELATED TO ONE-TOUCH
INDIVIDUAL KEYS / GROUP KEYS
Problem
Point to check
Solution
A one-touch individual
key or group key
cannot be edited or
deleted.
Is the individual key included in a group
key?
Remove the key from the group and then edit or delete
the key.
➞ System Settings > "Address Control" > "Direct
Address / Program" > "Amend/Delete"
Is the key being used in a reserved
transmission or a transmission in
progress?
Wait until the transmission is finished or cancel the
transmission and then edit or delete the key.
Is the key that you wish to edit or delete
included in a program?
Remove the key from the program and then edit or
delete the key.
➞ System Settings > "Address Control" > "Direct
Address / Program" > "Amend/Delete"
Is the key that you wish to edit or delete
stored as a relay destination of an
F-code relay broadcast transmission?
An individual or group one-touch key that is stored as a
relay destination cannot be edited or deleted. Remove
the key from the relay destinations of the F-code relay
broadcast transmission and then edit or delete the key.
➞ System Settings > "Address Control" > "F-Code
Memory Box" > "Relay Broadcast" (Amend/Delete)
Have functions been disabled by the
administrator?
Some functions may have been disabled in the system
settings (administrator). Check with your administrator.
Has your administrator enabled a
function that prevents editing/deleting?
If your administrator has enabled settings such as
"Inbound Routing Settings" (in the Web pages),
editing/deleting will not be possible. Check with your
administrator.
You wish to delete or
edit an individual key
but do not know which
group key it is stored
in.
Are multiple group keys stored?
If multiple group keys have been stored, print the Group
List in "Sending Address List" in the system settings.
The list will show where the key is stored.
➞ System Settings > "List Print (User)" > "Sending
Address List" > "Group List"
You wish to delete or
edit an individual or
group key but do not
know which program
key it is stored in.
Are multiple program keys stored?
If multiple program keys have been stored, print the
Program List in "Sending Address List" in the system
settings. The list will show where the individual or group
key is stored.
➞ System Settings > "List Print (User)" > "Sending
Address List" > "Program List"
27
mx2700_gb_fqr.book
28 ページ
2005年10月10日 月曜日 午後1時50分
mx2700_gb_fqr.book
29 ページ
2005年10月10日 月曜日 午後1時50分
Specifications
X SPECIFICATIONS . . . . . . . . . . . . . . . . . . . . . . . . . . . . . 30
X FOR THE USERS OF THE FAX FUNCTION. . . . . . . . . 31
29
mx2700_gb_fqr.book
30 ページ
2005年10月10日 月曜日 午後1時50分
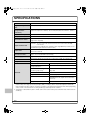
SPECIFICATIONS
Model
MX-FXX1
Applicable telephone
line
Public switched telephone network, PBX
Scanning resolution
(supports ITU-T
standards)
8 x 3.85 lines/mm (Standard), 8 x 7.7 lines/mm (Fine, Fine-Halftone), 8 x 15.4 lines/mm
(Super Fine, Super Fine - Halftone), 16 x 15.4 lines/mm (Ultra Fine, Ultra Fine - Halftone)
Transmission speed
33.6 kbps down to 2.4 kbps Automatic fallback
Compression method
MH / MR / MMR / JBIG
Transmission modes
Super G3, G3 (the machine can only send faxes to and receive faxes from machines that
support G3 or Super G3)
Input document size
AB sizes: A3, B4, A4, A4R, 8-1/2" x 11", 8-1/2" x 11"R, B5, B5R, A5
Inch sizes: 11" x 17", 8-1/2" x 14", 8-1/2" x 13", 8-1/2" x 11", 8-1/2" x 11"R, A4, A4R,
5-1/2" x 8-1/2"
Long originals (max. width 297 mm (11-45/64") x max. length 800 mm (31-31/64") can be
transmitted using the automatic document feeder.)
Paper sizes
A3, B4, A4, A4R, B5, B5R, A5R (11" x 17", 8-1/2" x 14", 8-1/2" x 13", 8-1/2" x 11", 8-1/2" x
11"R, 5-1/2" x 8-1/2"R)
Transmission time *1
Approx. 2 seconds (Super G3 mode/33.6 kbps, JBIG)
Approx. 6 seconds (G3 ECM mode/14.4 kbps)
Power supply
Supplied from the machine
Dimensions
285 mm (W) x 66 mm (D) x 213 mm (H) (11-7/32" (W) x 2-39/64" (D) x 8-25/64" (H))
Weight
Approx. 1.6 kg (3.5 lbs.)
Remarks
Extension telephone connection
Possible (1 telephone)
Number of one-touch keys for
storing destinations*2
Maximum number of keys: 999
Number of destinations that can be
stored in a group (1 key)*2
Maximum number of destinations in one group (1
key): 500
Timer transmission
Yes
Program function
Yes (48 programs)
F-code transmission
Supported (SUB/SEP (sub-address) and
SID/PWD (passcode) signals can be transmitted /
received)
Image memory
8 MB standard
*1 Transmission speed is for an A4 or 8-1/2" x 11" document with approximately 700 characters at standard resolution (8 x
3.85 lines/mm) sent in high speed mode (33.6 kbps (JBIG) or 14.4 kbps). This is only the time required to transmit the
image information; the time required to send protocol signals is not included. Actual transmission times will vary depending
on the contents of the document, the receiving machine type, and telephone line conditions.
*2 Total number of all destinations (Scan to E-mail, Scan to FTP, Scan to Desktop, Scan to Network folder, Internet Fax, Fax
and Group)
30
mx2700_gb_fqr.book
31 ページ
2005年10月10日 月曜日 午後1時50分
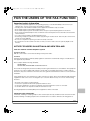
FOR THE USERS OF THE FAX FUNCTION
Important safety information
• If any of your telephone equipment is not operating properly, you should immediately remove it from your
telephone line, as it may cause harm to the telephone network.
• The AC power outlet shall be installed near the equipment and shall be easily accessible.
• Never install telephone wiring during a lightning storm.
• Never install telephone jacks in wet locations unless the jack is specifically designed for wet locations.
• Never touch uninsulated telephone wires or terminals unless the telephone line has been disconnected at the
network interface.
• Use caution when installing or modifying telephone lines.
• Avoid using a telephone (other than a cordless type) during an electrical storm. There may be a remote risk of
electric shock from lightning.
• Do not use a telephone to report a gas leak in the vicinity of the leak.
• Do not install or use the machine near water, or when you are wet. Take care not to spill any liquids on the
machine.
NOTICE FOR USERS IN AUSTRALIA AND NEW ZEALAND
Your fax machine and the telephone system
WARNING NOTICE:
NO calls can be made to or from this fax during a mains power failure.
WARNING
Australian Communications Authority (ACA) regulations state that no unauthorized changes or modifications to
this equipment are permitted.
Note: Complies with the following standards,
AS/NZS 60950
AS/ACIF S002, NZ TELECOM and AS/NZS CISPR 22
These limits are designed to provide reasonable protection against interference in an installation. This equipment
generates, uses and can radiate radio frequency energy and, if not installed and used in accordance with the
instructions, may cause interference. However, there is no guarantee that interference will not occur in a particular
installation.
If this equipment does cause interference to radio or television reception, which can be determined by turning the
equipment off and on, the user is encouraged to try to correct the interference by one or more of the following
measures:
• Reorient or relocate the receiving antenna.
• Increase the separation between the equipment and the receiver.
• Connect the equipment to an outlet on a different circuit to that which the receiver is connected.
• Consult the dealer or an experienced radio/TV technician for help.
The Ringer Equivalence Number (REN) for this equipment is written on the label.
Important safety information
In Australia, installing or modifying telephone lines should only be done by an ACA licensed serviceman. In New
Zealand, installing or modifying telephone lines should be done in accordance with Telecom wiring practices.
31
mx2700_gb_fqr.book
32 ページ
2005年10月10日 月曜日 午後1時50分
SHARP ELECTRONICS (Europe) GmbH
Sonninstraße 3, D-20097 Hamburg
Facsimile Quick Reference Guide
MODEL: MX-FXX1
PRINTED IN FRANCE
TINSE3060GHZ1