1
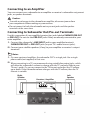
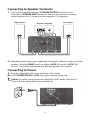
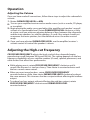
100W Powered Subwoofer
SUB-80
User’s Guide
Please read this user’s guide before using your new subwoofer.
Contents
Important Safety Instructions ........................................................................................................................................... 3
Package Contents ................................................................................................................................................................. 6
Features .................................................................................................................................................................................... 6
Setup ......................................................................................................................................................................................... 6
Choosing a Location ..................................................................................................................................................... 6
Connecting to an Amplifier ...................................................................................................................................... 10
Connecting to Subwoofer Out/Pre-out Terminals ........................................................................................... 10
Connecting to Speaker Terminals .......................................................................................................................... 12
Connecting to Power .................................................................................................................................................. 13
Operation .............................................................................................................................................................................. 14
Adjusting the Volume ................................................................................................................................................. 14
Adjusting the High-cut Frequency ......................................................................................................................... 15
Replacing the Fuse ....................................................................................................................................................... 16
Adjusting the Height ................................................................................................................................................... 16
Additional Information ..................................................................................................................................................... 17
Care .................................................................................................................................................................................... 17
Specifications ................................................................................................................................................................. 17
Limited Warranty........................................................................................................................................................... 18
CAUTION
WARNING: To reduce the risk
of fire or shock hazard, do not
expose this product to rain or
moisture.
RISK OF ELECTRIC SHOCK
DO NOT OPEN
CAUTION: TO REDUCE THE RISK OF ELECTRIC SHOCK, DO NOT REMOVE THE COVER
OR BACK. NO USER-SERVICEABLE PARTS INSIDE. REFER SERVICING TO QUALIFIED
PERSONNEL.
The lightning symbol is intended to alert you to the presence of
uninsulated, dangerous voltage within this product’s enclosure
that might be of sufficient magnitude to constitute a risk of electric
shock. Do not open the product’s case.
!
The exclamation symbol is intended to inform you that important
operating and maintenance instructions are included in the literature
accompanying this product.
Important Safety Instructions
1.
2.
3.
4.
5.
Read these instructions.
Keep these instructions.
Heed all warnings.
Follow all instructions.
Unplug this product from the wall outlet before cleaning. Do not liquid cleaners or aerosol cleaners.
Clean only with dry cloth.
1
6.
Do not use this product near water.
7.
Use only with the cart, stand, tripod, bracket, or table specified by the manufacturer or sold with
the apparatus. When a cart is used, use caution when moving the cart/apparatus combination to
avoid injury from tip-over.
Exercise caution when moving any product and cart combination. Quick stops, excessive force,
and uneven surfaces may cause the appliance and cart combination to overturn.
8.
9.
Slots and openings in the cabinet are provided for ventilation and to ensure reliable operation of
the product and to protect if from overheating. Do not block any ventilation openings. Install in
accordance with the manufacturer’s instructions.
10. Use only the type of power source indicated on the label. If you are not sure of the type of power
supply to your home, consult your product dealer or local power company. For products intended
to operate on battery power, or other sources, refer to the operating instructions.
11. This speaker is equipped with a polarized AC line plug (a plug having one blade wider than the
other). This plug will fit in the power outlet only one way. This is a safety feature. If you cannot
insert the plug fully into the outlet, try reversing the plug. If the plug still doesn’t fit, contact your
electrician to replace your obsolete outlet. Do not defeat the safety purpose of the polarized plug.
If you need an extension cord, use a polarized cord.
12. Protect the power cord from being walked on or pinched particularly at plugs, convenience
receptacles, and the point where they exit from the apparatus.
13. Unplug this apparatus during lightning storms or when unused for long periods of time.
14. Do not overload wall outlets, extension cords, or integral convenience receptacles as this can
result in a risk of fire or electric shock.
15. Never push objects of any kind into this product through openings as they may touch dangerous
voltage points or short-out parts that could result in a fire or electric shock. Never spill liquid of any
kind on the product.
16. Do not attempt to service this product yourself as opening or removing covers may expose you to
dangerous voltage or other hazards. Refer all servicing to qualified service personnel.
17. Unplug this product from the wall outlet and refer servicing to qualified service personnel under
the following conditions:
a)
b)
c)
d)
When the power-supply cord or plug is damaged.
If liquid has been spilled, or objects have fallen into the product.
If the product has been exposed to rain or water.
If the product does not operate normally by following the operating instructions. Adjust only those
controls that are covered by the operating instructions as an improper adjustment of other controls
may result in damage and will often require extensive work by a qualified technician to restore the
product to its normal operation.
e ) If the product has been dropped or damaged in any way.
f ) When the product exhibits a distinct change in performance – this indicates a need for service.
18. Replacement Parts: When replacement parts are required, be sure the service technician has used
replacement parts specified by the manufacturer or have the same characteristics as the original
part. Unauthorized substitutions may result in fire, electric shock, or other hazards.
19. Upon completion of any service or repairs to this product, ask the service technician to perform safety
checks to determine that the product is in proper operating condition.
20. Do not install near any heat sources such as radiators, heat registers, stoves, or other apparatus
(including amplifiers) that produce heat.
21.
The apparatus is classified as class II apparatus.
2
Package Contents
• Subwoofer
• User’s G Guide
Features
Adjustable high-cut filter plus high and low level inputs.
Crossover frequency can be modified for optimal integration with the other
speakers in your system.
Setup
Choosing a Location
The metal control panel on the back of the subwoofer acts as the heat sink
for the subwoofer’s internal amplifier. Therefore, place the subwoofer at least
4 inches (10 cm) away from a wall, and do not let anything come into contact
with this panel.
Do not place the subwoofer with its metal plate against the floor.
The position of your subwoofer greatly affects its bass response. Adjust the
subwoofer’s volume control in relation to the left and right speakers, and adjust
the subwoofer’s high-cut filter to obtain optimum overall sound.
Although low frequencies are nondirectional, factors such as room reflection,
standing waves, resonance and absorption strongly affect your subwoofer’s
performance. For maximum bass output, place your subwoofer in a corner. To
reduce output, move it away from corners and back walls. Even slightly moving
the subwoofer can have a major effect on bass response.
Test the subwoofer in different locations to determine where the best balance
is between your satellite speakers (if used) and subwoofer.
Place the subwoofer at least 2-3 feet away from your television or computer
disk drive system. The subwoofer’s magnet could distort the colors of your TV
picture or erase your disks.
Placing the subwoofer on the same stand or shelf as your turntable can result
in a low frequency rumble or acoustic feedback.
To prevent the cabinet from warping or discoloring, do not place the subwoofer
in a place where it is exposed to direct sunlight or excessive humidity.
Do not place the subwoofer where it might be knocked over or exposed to
falling objects.
3
1
5
2
3
6
4
POWER
ON/OFF
FUSE
1 Subwoofer Level (Volume) – Match the
subwoofer’s output level to your satellite
speakers’ output (if used).
2
Power indicator – Lights when the
subwoofer is powered.
3
Phase (Polarity) Switch – Inverts the
subwoofer’s output polarity so you can
set it to match the main speakers.
4
Speaker Input – Connect to the speaker
outputs of an amplifier or receiver.
Speaker Output – Connect between an
amplifier or receiver (without Line Out
terminals) and other speakers.
5
Crossover Frequency – Controls the
high frequency cutoff point. Rotated fully
clockwise, it cuts high frequencies above
200 Hz. Rotated fully counterclockwise, it
cuts high frequencies above 50 Hz.
6
Line Input – Connect to an amplifier’s or
receiver’s subwoofer out or pre-out jacks.
These inputs automatically sum left and
right channel information.
4
To AC outlet
Connecting to an Amplifier
You can connect your subwoofer to an amplifier or receiver’s subwoofer out, preout
jacks, or speaker terminals.
Caution:
To avoid any damage to the subwoofer or amplifier, disconnect power from
your components before making any connections.
Do not connect to both the subwoofer out or pre-out jacks and the speaker
terminals at the same time.
Connecting to Subwoofer Out/Pre-out Terminals
Use this connection if your amplifier/receiver has jacks labeled SUBWOOFER OUT
or PRE-OUT. Do not use the PRE-OUT jacks if they are already connected to your
main amplifier.
1. Connect the subwoofer’s LINE INPUT jack to your amplifier/receiver’s
SUBWOOFER OUT or PRE-OUT jacks (or your TV’s audio line out jacks).
2. Connect your satellite speakers (if any) to your amplifier or receiver’s output
terminals.
Notes:
1. On some receivers/amplifiers, the subwoofer OUT is a single jack. Use a single
phono cable (not supplied) in that case.
2. When connecting to a TV, we recommend using variable line output jacks, which
will allow the subwoofer’s volume to change with the TV’s volume. Refer to your
TV user’s guide. Or, you can connect to the TV line out and adjust the TV volume
up or down. If the subwoofer volume changes with the TV volume, then the TV
line out is variable.
Right
Speaker
Receiver / Amplifier
Subwoofer Out
5
Left
Speaker
Connecting to Speaker Terminals
1. Connect the amplifier/receiver’s SPEAKER OUTPUT terminals to the
subwoofer’s SPEAKER INPUT terminals. Connect the terminals in phase,
connecting positive (+) to positive and negative (–) to negative.
Right Speaker
Receiver / Amplifier
Left Speaker
2. Depending upon where your subwoofer is located in relation to the rest of your
speakers, slide the PHASE switch to either to NOR (0, normal) or REV (180,
reverse). Choose the setting that provides the greatest bass output.
Connecting to Power
1. Plug the subwoofer’s AC power cord into an AC outlet.
2. Switch POWER ON/OFF to ON. The power indicator lights red.
Notes: For safety, unplug the power cable from the AC outlet if you do not
plan to use the subwoofer for an extended time.
6
Operation
Adjusting the Volume
Once you have made all connections, follow these steps to adjust the subwoofer’s
volume.
1. Rotate SUBWOOFER LEVEL to MIN.
2. Turn on your amplifier/receiver and an audio source (such as a radio, CD player,
or turntable).
3. Begin playing the audio source and adjust the amplifier and speaker’s overall
volume to a comfortable level. Rotate SUBWOOFER LEVEL clockwise, a little
at a time, until you achieve a pleasing balance of bass between the subwoofer
and the main speakers (or satellite speakers, if used). Bass output should not
overpower the main speakers, but should blend across the entire musical
range.
4. Once you have adjusted SUBWOOFER LEVEL, use the amplifier/receiver’s
volume control to control the speakers’ volume.
Adjusting the High-cut Frequency
CROSSOVER FREQUENCY adjusts the level at which the subwoofer begins
reproducing sound (between 50 Hz and 200 Hz). The setting depends on the low
frequency capabilities of your satellite speakers (if used), speaker placement, and
other factors that affect bass performance.
While playing music, rotate CROSSOVER FREQUENCY clockwise until it
sounds like the music is too bass-heavy. Then rotate it counterclockwise until
the bass sounds more natural.
When you want more low bass, rotate CROSSOVER FREQUENCY
counterclockwise a little, then rotate SUBWOOFER LEVEL clockwise by about
the same amount. This increases low bass output without affecting the midbass
output.
To reduce low bass output without affecting the mid-bass output, rotate
CROSSOVER FREQUENCY clockwise and SUBWOOFER LEVEL
counterclockwise.
7
Replacing the Fuse
If your subwoofer stops operating properly,
you might need to replace the fuse with a slow
operating, type 2A / 250V fuse.
Caution:
Before replacing the fuse, disconnect the
subwoofer’s AC plug and turn off the amplifier/receiver.
Do not use a fuse with ratings other than those specified.
To replace the fuse, use a screwdriver to turn the fuse holder (located on the back
of the subwoofer) counterclockwise.
Adjusting the Height
Slightly screw the feet at the bottom of your subwoofer
clockwise or counterclockwise to adjust the height so that your
subwoofer stands level.
Caution: Do not over-tighten.
Additional Information
Care
Keep the speaker dry; if it gets wet, wipe it dry immediately. Use and store the
speaker only in room temperature environments. Handle the speaker carefully; do
not drop it. Keep the speaker away from dust and dirt, and wipe it with a dry cloth
occasionally to keep it looking new.
Caution: Cleaning with a vacuum cleaner could permanently damage your
speaker. Use a feather duster or a soft loose cloth instead.
Specifications
Amplifier Output ............................................................ 100W RMS (4 Ohms @ 10% THD)
Crossover ................................................................................................. 40-200 Hz Adjustable
Frequency Response ............................................................................................... 40 - 200 Hz
Power Voltage ....................................................................................................AC 220 V/50 Hz
Dimensions (HWD) ........................................................................................10.6 x 10.6 x 11in
...................................................................................................................... (270 x 270 x 279 mm)
Weight ................................................................................................................ 22.3 lbs (10.1 kg)
Specifications are subject to change and improvement without notice. Actual
product may vary from the images found herein.
8
UMA0460A