1
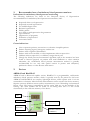
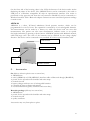
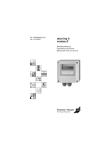
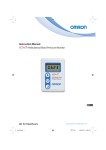
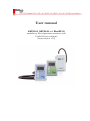
User manual
ABPM-05, ABPM-04 and BlueBP-05
ambulatory blood pressure monitors with
CardioVisions software
(from version 1.18)
Table of contents
1.Recommended use of ambulatory blood pressure monitors ............................................... 5
2.Devices .............................................................................................................................. 5
ABPM-05 and BlueBP-05 ................................................................................................. 5
ABPM-04 .......................................................................................................................... 6
3.Accessories ........................................................................................................................ 6
4.Using the buttons ............................................................................................................... 7
Bluetooth functions .......................................................................................................... 8
5.Display ............................................................................................................................... 8
6.Technical parameters........................................................................................................ 11
7.Care and maintenance ...................................................................................................... 12
Protection and cleaning ................................................................................................... 12
Regular checks, warranty, service..................................................................................... 12
Roll-out ........................................................................................................................... 12
8.Safety concerns ................................................................................................................ 13
Electric shock hazard protection ..................................................................................... 13
Biocompatibility .............................................................................................................. 13
Hazardous materials ........................................................................................................ 13
Risk of incorrect diagnosis .............................................................................................. 13
9.The use of the monitors ................................................................................................... 13
Connecting the recorders to the PC ................................................................................ 13
BlueBP-05: wireless Bluetooth communication ............................................................... 14
Monitoring step by step................................................................................................... 15
Programming options.................................................................................................. 16
Measurement timing.................................................................................................... 16
Manual programming step by step............................................................................... 16
LCD displays for manual programming....................................................................... 16
10. Batteries ........................................................................................................................ 18
11.Cuffs and their application.............................................................................................. 19
12.Using CardioVisions software......................................................................................... 20
CardioVisions editions and system requirements ............................................................. 20
ABPM installation and first start ..................................................................................... 21
Installing CardioVisions Personal Edition ................................................................... 21
Installing CardioVisions Network Edition ................................................................... 24
Backup ............................................................................................................................ 25
Archiving ........................................................................................................................ 25
15. EMC information .......................................................................................................... 31
Electromagnetic emission................................................................................................ 31
Electromagnetic immunity .............................................................................................. 32
Recommended separation distance .................................................................................. 34
2
Important information on ABPM-05, ABPM-04 and BlueBP-05 systems. Read carefully,
please.
This symbol on a Meditech recorder is a warning that you should read
the accompanying documentation (this manual).
ABPM-05, ABPM-04 and BlueBP-05 ambulatory blood pressure monitors
and CardioVisions software are manufactured and developed by Meditech
Ltd. All title and copyrights in and to the CardioVisions software, the
accompanying electronic and printed materials and any copies of the
CardioVisions software are owned by Meditech Ltd. The CardioVisions
software is protected by copyright laws and international treaty provisions.
For details please read the software license agreement.
Contact details:
Meditech Ltd.
1184 Budapest, Mikszáth Kálmán utca 24., Hungary
Tel.: (1) 280 8232, (1) 280 8233
Fax: (1) 282 9388
Mail: [email protected]
Web: www.meditech.eu
Contact us for further product and service information. Meditech
Ltd. maintains a quality assurance system certified according to MSZ
EN ISO 9001:2008 and MSZ EN ISO 13485:2003.
Notified body: SGS Yarsley
Unit 202b, Worle Parkway, Weston-super-Mare, BS22 0WA
Fax: +44 1934 522 137
Web: www.sgs.com
!
model
BP5, BP4 or BB5
MDD IIa
MDR II
YYYY/nnnnnn
Always consult a physician for the interpretation of the blood pressure
measurements. Note that any blood pressure recording may be affected by
the body position, the physiological condition of the patient, and other
factors.
Device type. (BP5= ABPM-05, BP4= ABPM-04, BB5= BlueBP-05)
Each device complies with the requirements of the EU Medical Devices
Directive. 0120 is the identifier of Notified Body (SGS Yarsley).
MDD classification IIa. EMC class B. EMC group 1.
According to Canadian regulations the device classification is MDR II.
(Medical Device Regulation of Canada, Rule 10.1 of MDR (SOR/98282:13Mar2007)).
The monitors are internally powered type CF devices. Protection vs. ingress
of water: none. Mode of operation: continuous. The devices are not
protected against defibrillators or other high frequency surgical equipments.
The first four digits of the serial number of a recorder show the year of
production. The rest is the serial number. For example: 2007/123456
This symbol shows that according to regulations the monitors should be
handled as electronic waste during rollout.
The device communicates
V2.0+EDR, class2)
via
Bluetooth
connection.
(Bluetooth
3
Blood pressure measurements determined with the algorithm of an ABPM05, ABPM-04 or a BlueBP-05 recorder on adults are equivalent to those
obtained by a trained observer using the cuff/stethoscope auscultation
method Korotkoff phase V, within the limits prescribed by the American
National Standard for Electronic or Automated Sphygmomanometers. The
algorithm used in the ABPM-05, ABPM-04 and BlueBP-05 also fulfills the
requirements of the British Hypertension Society Validation Protocol for
Automated Blood Pressure Measuring Devices.
!
No user serviceable parts inside. Meditech recorders contain high
complexity electronic and fine mechanical components. If you have any
problems, please refer your recorder to qualified service personnel.
ID: BP4BP5BB5a20120419_cv_uk
4
Recommended use of ambulatory blood pressure monitors
1.
Indications for ambulatory blood pressure monitoring
The following indications are listed in the European Society of Hypertension
recommendations for ambulatory blood pressure measurement, 2003.
Suspected white-coat hypertension
Suspected noctural hypertension
To establish dipper status
Resistant hypertension
Elderly patient
As a guide to antihypertensive drug treatment
Type 1 diabetes
Hypertension of pregnancy
Evaluation of hypotension
Autonomic failure
Contraindications
Non-cooperative patients, unconscious or otherwise incapable patients
Patients requiring urgency/emergency cardiac care
Patients with coagulation disturbances
Patients with serious mobility or other impairments without supervision
Children without supervision, or children younger than 8 years
Though the blood pressure measurement algorithm used in the monitors has been
found to function properly on patients with atrial fibrillation or other common
arrhytmias, the oscillometric blood pressure measurement method is generally
recommended for use only with special caution in patiens with arrhytmias,
parkinson’s disease or other diseases with tremor.
Devices
2.
ABPM-05 and BlueBP-05
ABPM-05 and its Bluetooth-capable version, BlueBP-05 is a programmable, oscilloemtric
ambulatory blood pressure monitor, which is typically worn by the patient for 24 hours.
ABPM-05 and BlueBP-05 are compact, lightweight devices, which operate with 2 AA size
accumulators or batteries. More than 600 measurements can be stored in the device memory.
Stepwise pressure deflation ensures quality measurements, even if disturbing environmental
factors occur. The battery compartment and the rating label are on the backside of the
housing. The serial number can be found on the rating label and it is also stored
electronically in the solid state memory of the device.
LCD
Start button
Event button
Cuff
connection
Interface connection
(ABPM-05)
Day/night button
5
On the front side of the housing, there is the LCD, the buttons of the device and a sticker
displaying the name of the device. The ABPM-05 device can be connected to the serial or
USB port of a Windows compatible PC with an optoelectronic interface. The socket is
positioned on the opposite side from the cuff connector. BlueBP-05 can be connected to a
Windows based PC with a Bluetooth adapter. Patients can start extra blood pressure readings
or mark events.
ABPM-04
ABPM-04 is a silent, PC-based ambulatory blood pressure monitor, which can be
programmed for even 51 hours. The operation is ensured by 4 AA rechargeable batteries.
300 measurements can be made by a battery set, while the device itself can store 600
measurements. The patient can start extra measurement, indicate events or set special
day/night indication by pressing a device button. ABPM-04 operates with Meditech normal,
small and large cuffs. The state of the batteries can be checked by the voltage display
function. The device can be connected to any standard PC with its optical interface cable.
.
Cuff connector
Event button
LCD
Start
button
Interface connector
3.
Accessories
Set (delivery either in plastic case or carton box)
1* ABPM device
1* serial (ABPM-04) or USB (ABPM-05) interface cable or Bluetooth dongle (BlueBP-05)
1* pouch for the recorder with shoulder and waist straps
1* normal size cuff
1* battery charger with two sets of rechargeable batteries
1* CD with the latest software and manual
1* user documentation (quality certificate and event diary)
Recorder package (delivery in a carton box)
1* ABPM device
1* pouch for the recorder with shoulder and waist straps
1* normal size cuff
1* quality certificate
Accessories may vary from place to place.
6
4.
Using the buttons
On the front side of ABPM-05 and BlueBP-05, below the LCD, you can find three buttons:
START button is marked by a triangle, EVENT button is marked by a heart and
DAY/NIGHT button, which is marked by a crescent moon. If the device operates, each
button press is accompanied by a short beeping sound.
On the front side of ABPM-04 there is the unmarked START and the EVENT button,
which is marked by a circle. Each button press is accompanied by a short beeping sound.
The following functions relate to all devices – otherwise it is clearly indicated.
Cancel a blood pressure measurement
The patient can interrupt a blood pressure measurement by pressing a button at any time
while the cuff is inflated. This will result in immediate fast cuff deflation.
Manual blood pressure measurement
If it seems necessary, the patient can start an additional, manual blood pressure measurement
by pressing the START button shortly (less than 5 seconds). Results with a manual
measurement marker will be stored in the memory of the device. Typical causes for this use:
dizzines, pain (angina pectoris or headache), palpitation.
Switching the device off
Press and hold the START button for more than 10 seconds, then release it when two
horizontal segments appear on the LCD. If the device is switched off, it can be switched on
again manually. While the recorder is switched off normal functions are not available, even
prescheduled measurements will not be triggered. Therefore switching off the device is only
justified in case of valid reasons.
Switching the device on
The device can be switched on by pressing and holding the START button for more than 3
seconds. If the device is switched off, no other functions are available.
LCD check
Press and hold the START button to light up all segments of the LCD to check if they all
work correctly.
Battery voltage check
Press and hold the START button for more than 5 seconds, but less than 10 seconds to
display voltage on the LCD (e.g. 2_64 is equal to 2,64V). After checking the voltage, release
the button. The unit will then return to display time. The voltage for fully charged
accumulators should be over 2,5V in case of ABPM-05and BlueBP-05 and 5,37V in case of
ABPM-04.
Set a patient event marker
The patient can mark any event without starting a manual blood pressure measurement by
pressing the EVENT button briefly. Typical cause for this use is taking medicine. The
patient should be instructed to record the reason for setting an event marker in a diary.
7
Marking the time of going to bed and rising from bed – ABPM-05and BlueBP-05 only
If the DAY/NIGHT shift function is disabled during programming, the patient can press
the DAY/NIGHT button to mark the time of going to bed (in the evening) and rising from
bed (in the morning).
Manual DAY/NIGHT shift – ABPM-05 and BlueBP-05 only
If this function is enabled during the programming, the patient can manually shift the
measurement frequency period (day or night) by pressing the DAY/NIGHT button. The
switch is available in the two hour period before the prescheduled shift.
Bluetooth functions
You can initiate the Bluetooth mode by pressing the START and the EVENT buttons
simultaneously.
Switching to Bluetooth discoverable mode
The device switches to discoverable mode, making it connectable to all Bluetooth devices, by
pressing the two buttons simultaneously for longer than three seconds and then releasing
them. In this state the PC will connect to the device and you can read out the recorder data
of the last measurement or you can also programme the device for the next monitoring
session. After reading out or programming the Bluetooth connection is automatically ceased.
Switching off Bluetooth discoverable mode
You can switch off the Bluetooth mode by pressing the START and the EVENT buttons
simultaneously. The discoverable mode is automatically ceased if the connection fails to be
established in one minute.
5.
Display
ABPM shows important status information, the processes and the results of individual
readings on its LCD. The most important displays are listed here, in addtion to these, a lot of
extraordinary situations and errors have their own code displayed on the LCD. These codes,
stored together with recorded data, will be listed in the device memory and can be displayed
by the software. Information displayed on each device:
Normal status: time is
displayed.
Pulse rate value of just
completed
measurements
(beats/minute)
Blood pressure
measurement initiated
(mmHg)
Event marker set
during a button push
Pumping for
measurement, current
pressure is displayed
(mmHg)
Deflation during
measurement, current
pressure is displayed
(mmHg)
Error code display
The device is switched
off.
8
Systolic value of just
completed
measurement (mmHg)
The blood pressure
measurement is
cancelled by pressing a
button.
Diastolic value of just
completed
measurement (mmHg)
Information displayed on ABPM-05 LCD screen only:
Communication with
a personal computer
Blood pressure
measurement initiated
(kPa)
Pumping for
measurement, current
pressure is displayed
(kPa)
LCD check: all
segments are
displayed
Deflation during
measurement, current
pressure displayed (kPa)
Systolic value of a just
completed
measurement (19,2
kPa)
Diastolic value of a just
completed measurement
(kPa)
Heart symbol blinking:
measurement in progress
(kPa)
Information displayed on both ABPM-05 and BlueBP-05
Heart symbol blinking:
measurement in
progress (mmHg)
Night mode: time is
displayed, moon sign is
lit.
Battery voltage display
(2,37V)
The crossed battery
symbol warns of low
battery
Information displayed on BlueBP-05 only:
The device is in Bluetooth discoverable mode
9
Information displayed on ABPM-04 LCD screen only:
Rectangle blinking:
measurement is
progress (mmHg)
Battery voltage display
(5,37V)
Communication with a
personal computer
LCD check: all
segments are displayed
Low battery voltage
(three dots below)
10
6.
Technical parameters
Technical parameters
ABPM-05
BlueBP-05
Power supply
2 AA rechargeable NiCd or NiMH batteries or 2 AA alkaine
batteries
ABPM-04
4 AA rechargeable Nicd or
NiMH batteries or 4 AA
alkaine batteries
Display
liquid-crystal
Data storage
internal solid state memory
Data transmission
serial or USB cable
serial Bluetooth transfer
serial or USB cable
Operating environment
temperature
10-45 °C
humidity (non condensing)
10-95%
10-80%
10-95%
atmospheric pressure
70-106 kPa
83-103 kPa
Storage conditions
temeprature
-20 - 50 °C
humidity (non condensing)
10-95%
10-80%
10-95%
Size
70*99*30 mm
82*124*33,5 mm
Weight (batteries included)
240g
330g
Blood pressure measurement method
oscillometric
Blood pressure maximum stirage
over 600 measurements
Measurement range
blood pressure: 30-260 mmHg (4-35 kPa)
pulse: 40-200 beat/minute
Passive accuracy
+/- 3mmHg (0,4 kPa) or +/- 2% of measured value (stability: 2 years)
Blood pressure measurement accuracy
measuring algorithm validated to BHS and AAMI protocol
Pressure senzor
stepwise deflation
Inflation
automatically controlled pump
Safety
maximum inflation 300 mmHg (40 kPa), independent safety release valve
Deflation and rapid air release
automatic pressure release value
11
Please note that the device may not meet its performance specifications if stored or used
outside the specified environmental conditions. Both measuring and LCD display in kPa is
available in ABPM-05 device only. This is an option which can be selected in the software.
The unit of measurement can be changed later in the database.
7.
Care and maintenance
Protection and cleaning
The Meditech ambulatory blood pressure monitors are not specially protected against spills
or ingression of water or other liquids. Do not immerse the recorder in water or any cleaning
fluid and protect it from spills and splashes. Do not expose it to heavy rain or steam and do
not wear it in wet environment e.g: shower, bath or swimming pool. In case of minor effects
of wet environment, wipe off water drops with a dry cloth. Keep the recorder in a normal
dry room for at least one hour before use if condensation is suspected. In case of ingress of
water in the recorder, remove batteries from the unit, and refer the unit to authorized
service. Never place a recorder unit in a disinfecting or sterilizing machine! A recommended
means of cleaning is to wipe the recorder with a disinfectant cleaning tissue. Alternatively,
wipe with a slightly damp cloth then dry it with an antistatic tissue. Do not expose recorders
to extreme heat or radiation, including long exposure to direct strong sunlight. To wash the
cuff please do the following:
1. Remove the bladder.
2. Wash by hand the sleeve with lukewarm water and regular washing
liquid suitable for black material. Rinse well.
3. If required, wipe the bladder with a mild cleaning tissue.
4. Allow both bladder and sleeve to air dry.
5. Replace bladder in the sleeve.
Regular checks, warranty, service
Verification of the pressure measurement accuracy is recommended biannually. All the
devices are covered by a two-year warranty under general warranty conditions of Meditech
Ltd, see relevant topic. This warranty does not cover any malfunction or defects arising from
improper use, the use of inadequate accessories, accident, theft, or use of the device outside
operating environmental specifications or intended measurement range. Removing the
closing label from the back side of the device voids this warranty. There are no user
serviceable parts inside Meditech recorders; they contain high complexity electronic and fine
mechanical components. If you have any problems, please refer the recorder to qualified
service personnel. All consequances of improper servicing are the sole responsibility of the
user. Contact Meditech or your distributor for more service information.
Roll-out
Each ABPM recorder include an internal NiCd coin cell which falls under the category of
hazardous waste and should be disposed with proper care. The other parts of the device
should be handled as normal electronic waste at roll-out.
12
8.
Safety concerns
Electric shock hazard protection
Each ABPM recorder meets the relevant shock hazard protection standards. ABPM-05 and
BlueBP-05 operates with two 1.5V AA batteries or two 1.2V AA rechargeable batteries,
while ABPM-04 uses four 1.5V AA batteries or four 1.2V rechargeable batteries. This
excludes all electric shock hazards, even in the unlikely case of multiple device errors.
Many personal computers do not meet shock hazard protection standards or strict safety
regulations applicable to medical devices. Therefore, during the computer-based use of
Meditech recorders, keep at least a 2 meter distance between the patient and the computer.
This is the required minimum safety distance. ABPM-05 and ABPM-04 communicate using a
plastic optical cable, whose 4 m standard length allows for the required safety distance. The
plastic optical cable ensures perfect electric separation and reduces the effects of external
electric noise. It does not conduct electricity. BlueBP-05 recorders communicate via
radiofrequency transmission (Bluetooth). This ensures the perfect electronic seperation from
the PC.
Biocompatibility
To avoid infection risks, and for general hygienic reasons, the device, cuff and tubing should
never contact the patient's skin directly.
Hazardous materials
Used batteries qualify as hazardous waste and should be disposed with care. Meditech
recorders do not contain any materials qualified as pharmaceutical substance or tissue of
animal origin. They emit no material hazardous to humans.
Risk of incorrect diagnosis
The basic intended use of Meditech recorders is to record blood pressure and pulse rate
values. Patients should be informed about rules of cooperative behaviour, proper handling of
the recorder used, and expected results of monitoring in advance. The recorders only provide
data to support diagnostic decisions of a qualified physician, they do not automatically
provide a diagnosis of any kind. During the evaluation of recorded blood pressure values,
possible artefacts due to external disturbances, motion artefacts, and electrical noise should
be observed and handled with caution.
9.
The use of the monitors
The recorders can be programmed by CardioVisions software installed on a personal
computer. Once the preprogrammed time is reached, the recorder starts operating
automatically by taking blood pressure measurements according to the monitoring plan.
Connecting the recorders to the PC
You can connect Meditech recorders depending on the recorder type to your computer in
several ways. ABPM-05 and ABPM-04 are equipped with a connector slot for a special
optoelectronic communication cable – with these recorders, the computer-end of the
interface cable has to be properly plugged into a corresponding socket on the computer
before inserting its small recorder-end plug into the socket on the recorder for
communication between the CardioVisions software and the recorder.
13
BlueBP-05 is capable of wireless communication with the computer using Bluetooth
technology. For successful communication, you need a properly connected and installed
Bluetooth adapter.
ABPM-05, ABPM-04: communication with an optical interface cable
Steps to follow for the first connection:
- Locate a free 9-pin serial port (also called RS232) or USB port (often labelled
) on your computer.
- Take the optoelectronic interface unit with the optical cable out of package.
- Connect the interface unit to the port.
If you have a serial RS232 port on your computer, just plug in the serial
optoelectronic interface. If you have a USB port on your computer but you have a
serial optoelectronic interface, use a USB-to-serial converter. If you have a USB port
on your computer then connect the USB-type optoelectronic interface from
Meditech.
-
Connect the recorder to the optical cable.
Connect the small optical plug at the free end of the optical cable into the socket on the the
device matching the red mark on the cable to the red mark on the recorder labels. Insert and
push it gently until it clicks in place. Simply pull to remove. Do not pull the cable itself,
always handle the plug.
A recorder so connected is ready for communication with the CardioVisions software.
The interface unit converts optical signals to electric ones and vice versa. The twin optical
cable transfers optical signals between the interface unit and the recorder. The cable is
flexible, but it is sensitive to overfolding and to cutting forces. If you fold the optical cable in
too small radius, or if a strong cutting force (e.g. by the edge of a drawer) is applied to it, the
optical cable may become optically distorted, which might result in communication errors.
In the CardioVisions software, click the Tools menu, then the Options command, and in
the appearing Options dialog, select Communication on the left. On the right panel, select
the required recorder type, then select the Meditech USB or the Serial port option as
appropriate for the interface unit you have connected to the computer. To check
communication, connect the recorder (with batteries in it and switched on) to the recorderend of the optical cable, select the required port or enable the Auto search com port
checkbox, and click the Test button.
BlueBP-05: wireless Bluetooth communication
BlueBP-05 is an ambulatory blood pressure monitor with wireless communication. Most upto-date computers today come with in-built Bluetooth capability, or are easily extendible
using a small USB Bluetooth dongle. Bluetooth functionality works seamlessly in Windows
XP Service Pack 2 or newer releases, but it can be usually added to older Windows versions
as well. Windows XP Help, as well as the documentation of Bluetooth dongles, contain
detailed information how wireless devices can be used, and this is described in detail in
CardioVisions Help as well. However, if you use the above mentioned devices, you may need
the following information during the first startup procedure after the installation of
CardioVisions.
14
If you wish to use a BlueBP-05 with Bluetooth under Windows XP SP 2, follow the steps
below. With other Windows versions, please refer to the documentation of the Bluetooth
device used in your computer.
a) Open the Tools - Options dialog of CardioVisions and select the Communication
category. Select the type of the recorder, then click on the appearing Bluetooth settings
button. In the appearing dialog, click on the Connect setup button to go to the next step.
b) In the appearing dialog you can see Meditech recorders which have already been added to
your computer. Place fresh batteries into the new BlueBP-05 recorder and make it
Bluetooth discoverable.
For this, in case of BlueBP-05, press the START and the EVENT button simultaneously for
longer than 3 seconds, then release them. The LCD displays the PC-- marking, indicating
the recorder is discoverable. The recorders remain discoverable for a minute then switches
back to stand by mode. If a recorder switches back to standby mode, make it discoverable
again. After you have made a recorder discoverable, click on the Add button.
c) If there is a moving torch on the screen, the PC searches for Bluetooth devices. Should a
recorder switch back to stand by mode due to a timeout, make it discoverable again then
click on the Add button.
After the search the found devices are listed. The name of the recorder in case of BlueBP-05
is BB5_xxxx, where xxxx is the last four digits of the serial number found on the back of
the recorder. After selecting the appropriate recorder, the OK button becomes active, please
click on it.
d) As authentication key (PIN), please enter the last four digits of the serial number. After
entering the PIN, click on the Finish button.
e) Wait until the system installs and configures the new Bluetooth device.
By clicking on the Test button you can check the communication. Make the recorder
discoverable before the test as described above.
Monitoring step by step
Before you begin, you should have the CardioVisions software properly installed and
configured on your computer, and the recorder correctly connected. To program your
ABPM-05 or ABPM-04 recorder, you will need a Meditech optical interface cable properly
connected to your computer's serial or USB port and the communication port correctly
selected in the CardioVisions software. To program BlueBP-05, you will need a properly
installed and connected Bluetooth dongle, and the communication correctly set in the
CardioVisions software.
Programming by using a PC
1. Inform your patient about the monitoring rules well in advance.
2. Programming:
Start the CardioVisions programme and select either ABPM-05, ABPM-04 or BlueBP-05
from the device types. Click on Device/Programming device.
3. Enter new patient data or select patient from the database.
4. Create monitoring plan adjusted to the patient’s daily routine.
5. Insert two (in case of ABPM-05 and BlueBP-05) or four (in case of ABPM-04) fully
charged, AA size batteries into the battery compartment and check their voltage.
6. Connect the recorder to the computer.
7. Send the monitoring plan from the computer to the recorder unit.
15
8. Apply the cuff to the patient with the device placed in the pouch.
9. Give the patient diary to the patient along with detailed instructions about the rules and
the use of the device.
Manual programming (ABPM-05 only)
ABPM-05 can be programmed without a PC by using the device buttons.
Programming options
Plans are stored in the inbuilt memory of the device and they cannot be changed. The
following three measurement plans can be selected during the programming of the device:
- First plan: measurements every 15 minutes at day and every 30 minutes at night.
- Second plan: periods with 20 minutes at day and 40 minutes at night.
- Third plan: 30-minute periods indepentent of day or night time.
Other settings are the same in all the three plans: undecided cuff size, 300 mmHg pressure
limit, LCD display enabled, manual day/night shift disabled. Daytime starts at 6:00, while
nighttime starts at 22:00, special session is disabled. Patient data can be selected or created
later in CardioVisions database.
Measurement timing
The first measurement has a controlling purpose and it starts in the second minute after
programming, then other measurements cannot be started in the next five minutes. The rest
of the measurements are taken at specific 15/20/30/40 minute intervals and there are
measurements at the 6:00 and 22:00 hour shifts. The last measurement is exactly 24 hours
after the second measurement.
Manual programming step by step
- Press and hold START and DAY/NIGHT button at the same time continuously.
Measurement frequency of the measurement plans will be displayed after 10 seconds for 3-3
seconds.
- In order to choose the measurement plan, you should release the buttons while the specific
plan is displayed. You will hear two beeps and the LCD will display four blinking „o” letters,
which indicates that programming the device is in progress. After a successful programming
you can hear 5 beeps, and the selected plan can be seen again. If programming fails for some
reason, the E90 error code will be displayed on the LCD.
In case of manual programming there is no time setting. If the time setting is imprecise, the
time of measurements may be false. If you want to use the manual programming function,
do not leave the device without batteries for a longer period. If it happens so, insert batteries
again into the device, set the inner clock by programming the device by a PC and leave the
batteries in the device.
Software
The devices programmed manually can be used by CardioVisions software version 1.13 or
later versions.
LCD displays for manual programming
Normal status: time is
displayed.
2. measurement plan:
20/40 minute
day/night intervals
16
10 second delay state
3. measurement plan:
30/30 minute
day/night intervals
1. measurement plan:
15/30 minute
day/night intervals
Programming is in
progress: blinking
signal
Rules of monitoring
- Inform the patient about the goal and expected results of the monitoring.
Provide an event diary and inform him about the rules to observe.
-
Put the device into the pouch. The patient should fit the adjustable straps of
the pouch.
-
Wearing a thin shirt under the cuff is recommended. It does not influence the
accuracy of the blood pressure measurement, but it prevents problems caused
by long-time wear of the cuff (sweat, itching, soreness, etc.)
-
The cuff should be properly placed on and connected.
-
Patients should avoid excess movement during blood pressure measurements.
They should hold their arm loose, slightly away from their chest.
-
Should the blood pressure measurements cause bloodshots, torpidity or pain
in the hand, the cuff should be removed from the arm immediately and
disconnected from the recorder. Such occurance should be reported to the
physician latest after the monitoring session.
-
The patient should not remove the recorder even at night. By loosening the
straps, they can avoid problems when turning in their sleep. The recorder
does not disturb most patient at night.
-
The patient can initiate extra blood pressure measurements with the START
button of the recorder (marked by a triangle in case of ABPM-05 and
BlueBP-05 and unmarked in case of ABPM-04). By pressing the EVENT
button the patient can mark events, e.g. taking medication etc. In case of
ABPM-05 and BlueBP-05 only, the time of going to bed and rising from bed
can be marked by the DAY/NIGHT button (moon symbol). If necessary,
any blood pressure measurement can be interrupted by pressing any of the
device buttons.
-
Should the batteries run down during a monitoring session, they can be
simply replaced. Monitoring will continue and data will not be lost.
-
The patient should never measure anybody else’s blood pressure with the
recorder during an ambulatory blood pressure monitoring session.
Monitoring session (tipically 24 hours)
17
10. Remove the unit and the cuff from the returned patient.
11. Ask for the patient diary and ask the patient for any events, symptoms, observations or
complaints.
12. Start the software and select the proper recorder type.
13. Connect the device to the PC and transfer the collected data from the recorder to your
database.
In CardioVisions software select ABPM-05, ABPM-04 or BlueBP-05 from the device types
and click on Device/Read data from xxx, where xxx indicates the name of the selected
device.
If you have selected manual programming or the device was programmed from another
database, record patient information into the database after reading in data.
14. Analyze the blood pressure profile.
15. Create and print the report.
10. Batteries
The Meditech ambulatory blood pressure monitors operate either with normal batteries or
with AA rechargeable batteries. (ABPM-05/BlueBP-05: two 1.5V AA batteries or two 1.2V
AA rechargeable batteries, ABPM-04: four 1.5V AA batteries or four 1.2V AA rechargeable
batteries.) Use only standard long-life (alkaline) batteries, or standard NiCd or NiMH
rechargeable batteries of the proper size. Do not use lithium batteries. Do not mix different
battery types, do not mix new and old batteries. Never use batteries of low or unknown
quality or pre-used batteries, as they may not cover the power needs of the recorder, and they
may damage the recorder, or they may contain acidic electrolytes which may leak and corrode
electronic components. Never use batteries damaged in any way. Should the batteries run
down during a monitoring session, they can be replaced. Monitoring will continue and data
will not be lost. If you do not use the recorder, it is advisable to remove batteries since they
may run down due to the constant small power consumption of the integrated circuits of the
device. Data in the recorder are not lost even if batteries run down or are removed. Used
batteries may fall under the category of hazardous waste and should be disposed of properly.
Important! It is strongly recommended to use freshly charged accumulators or new batteries
with each patient so that batteries do not run down during monitoring, even in case of very
high blood pressure values and/or a long monitoring session. After inserting batteries in
Meditech ambulatory blood pressure monitors, it is advised to check their voltage before
programming them. Do not start a new monitoring session with low batteries. The typical
voltage for fully charged rechargeable batteries should be over 2,5 V (ABPM-05/BlueBP-05)
or 5,2V (ABPM-04), and for fresh alkaline batteries, over 3 V (ABPM-05/BlueBP-05) or 6V
(ABPM-04). It is possible to check battery voltage with the START button. (Please check the
Using the buttons topic for more details.)
Important! If a recorder is not used for a long period, the in-built backup cell, ensuring the
operation of the internal clock, may get discharged. In this case keep freshly charged batteries
in the recorder for at least one day; this will recharge the backup cell. It is possible to use the
recorder afterwards. If the backup cell is not properly charged, the internal clock may work
incorrectly, and the recorder may not start measurements in due time.
Two sets of rechargeable batteries and a charger are by default included in the complete set.
A set of properly charged, high capacity batteries will enable both recorders to perform 250
blood pressure measurements during a 24-48 hour long monitoring session. If you use
alkaline batteries, choose high capacity, long-life products to enable reliable operation.
18
In order to change batteries, take the recorder out of the holder pouch and remove the
battery compartment cover on the back-side. Place two/four properly charged, high capacity
AA rechargeable or two/four new, long-life AA alkaline batteries into the compartment as,
then close the compartment.
11.
Cuffs and their application
It is advisable to wear a thin shirt or blouse under the cuff. This does not influence the
accuracy of the blood pressure measurements but it prevents possible problems caused by
long-time wear (sweating, itching, etc.). Place the cuff on the upper arm so that the rubber
tube points towards the patient’s shoulder and the bladder is placed above the brachial artery,
if possible. Contrary to the usual placement with the tube pointing downwards, the
advantage is that the patient can wear a loose jacket over the cuff. Connect the air connector
of the cuff into the air connector socket of the device, which you can find on the long edge
closer to the buttons of the ABPM-05/BlueBP-05 recorder or on the top of the ABPM-04
recorder. Connect the cuff turning it clockwise with slight pressure.
Note: The cuff should be applied as tightly as comfortable for the patient. A too loose
application may result in longer or aborted measurements, because the device has to pump
even to reach the proper tightness. Longer measurements may cause inconvenience for the
patient, and aborted measurements result in less data for evaluation. If the patient removes
the cuff for a period during the monitoring session, it should be reapplied with appropriate
tightness, with help from another person, if necessary.
Should blood pressure measurements cause bloodshots, torpidity or pain in the hand, the
cuff should be removed from the arm and disconnected from the recorder. Such occurrence
should be reported to the physician at once but latest after the monitoring session.
The monitors recognize three different cuff sizes. The size to be used should be set during
programming of the device. Attention, inappropriate setting of the cuff size may lead to
device malfunctioning, which is inconvenient for the patient and may lead to an unsuccessful
measurement.
Name
Normal adult
Small adult
Large adult
Bladder
dimensions
12 x 25 cm
9 x 18 cm
15 x 33 cm
Sleeve
dimensions
15 x 56 cm
11 x 32 cm
17 x 77 cm
Arm circumference
range1
29-38 cm
max 32 cm
35-46 cm
Take care to avoid blocking the air flow in the tube of the cuff and twisting the tube. Make
sure the cuff and its tubing do not cause strangulation or a circulation problem. Should the
patient experience arm numbness or pain remaining after any blood pressure reading is
completed, the cuff should be removed to avoid permanent vascular or neural injury.
The cuff is the component which, by definition of the relevant standard, is protected against
a defibrillator discharge. The substitution of a cuff different from that supplied by Meditech
might result in measurement error and/or in certain cases it causes damage to the main
recorder unit.
1
When properly applied, the end of the sleeve (the one closer to the tube) should fall in the indicated range.
19
12.
Using CardioVisions software
The CardioVisions software package provides means to handle Meditech ambulatory blood
pressure and ECG recorders. With CardioVisions it is possible to initialize (programme) a
recorder, check ECG signal quality of an ECG recorder applied to a patient in real time
mode, and transfer (read) collected data from a recorder to your computer. CardioVisions
stores data transferred to the computer in its database for easy future access. The database
offers user access control, organizing patient data in folders similar in appearance to those
used for normal document storage, but with a high degree of safety for sensitive medical
data. It also offers a comfortable archive-and-restore feature for a safe backup of large size
recordings. Please create safety backups of your files and folders regularly, because this is the
only way to restore data with this feature. CardioVisions provides detailed graphical and
tabular displays of recorded data, a comprehensive set of editing features and full statistical
analysis, all in a highly customizable user interface. Its efficient report generator and editor
can create standard reports automatically, but also allows for free editing of any report
component like a word processor. In summary, CardioVisions lets you:
- manage (select, initialize and read data from) recorders
- browse patients and results of monitoring sessions in database
- view, edit and analyze data in a recording
- create, save and print a freely editable report.
Caution! Certain antivirus software programs can severly slow down CardioVisions. This can
be avoided by adding the CardioVisions file formats as exceptions in the antivirus software.
E.g: *.ff2 and *.sm0 files.
CardioVisions editions and system requirements
Personal and Network Edition
CardioVisions comes in two different editions.
CardioVisions Personal Edition can be installed on a single computer and used only by one
user at a time. The use of ABPM devices is possible without registration with an unlimited
number of recorders from CardioVisions 1.10.
Multiple users can work with one database in a computer network at the same time using
CardioVisions Network Edition. This edition has to be installed on a server computer in a
network, where users have access to CardioVisions over the network from the workstations.
The use of the Network Edition requires registration.
Using Personal Edition for personal purposes
Demo data in CardioVisions Personal Edition are specifically included so that all features
which would otherwise require registration will still work in an unregistered installation.
There is no demo feature of CardioVisions Network Edition.
Computer requirements
CardioVisions can be installed on most Windows-based personal computers, but check
before installation whether your computer meets the following requirements.
Minimum
CPU: 350 MHz Pentium II
RAM: 64 MB
VGA: 800*600 @ 16 bit color
LAN: 10Mbit/s
20
Suggested
CPU: 2 GHz P4 or equivalent
RAM: 512 MB
VGA: 1024x768 @ 16 bit color
LAN: 100 Mbit/s
HDD: about 40 MB for the software + disk space for database2
Operating system: Windows 98 SE / Me / 2000 / XP/ Windows 7
Please note that certain features of CardioVisions require a lot of calculations, so the faster
your computer is, the shorter time you will need to get a 24-hour ECG recording analyzed.
ABPM installation and first start
There are two very common errors that occur installing CardioVisions software.
- The default user is admin and this account is created with the installation. In order to use
the device you must create a ’user’ account. The Admin cannot access the recorder or patient
data.
- Registration does not apply to ABP monitors. This process is for other products only.
Installing CardioVisions Personal Edition
CardioVisions Personal Edition should be installed if you want to use the software on one
PC or if you need demo data only. You need to go through the following steps:
- Select your preferred language
- Read and accept the License Agreement
- Choose components to install
Here the installation of the USB driver is strongly advised.
- Choose recorder types you want to use
- Select the target folder of the installation
- Choose a Start menu folder for usual shortcuts.
After finishing the installation, CardioVisions setup creates a startup icon on your desktop.
First start
You can start CardioVisions with the created shortcut on your desktop. At first you will be
logged in as a system administrator (admin) who can start a registration, add new users or
change data access levels. After the first start you will see the following screens:
2
The disk space necessary for the database depends on recorder type, number of patients and number of
examinations. Typically, it takes 75 MB to store 1000 ABPM recordings without reports. ABPM recordings are
small. The installation of demo data requires about 200 MB, too.
21
- Welcome screen
- System Administrator settings
Your default login name and password is admin/admin. Default settings can be
modified here. Reminder: the system administrator cannot see medical data, as it is only
the user who has access to measurements.
- Add a CardioVisions user
22
Here you are required to create a user account by filling in the empty spaces, but at least
the bold entries. Creating a user is necessary to see medical data.
-
Modify the default report header
In this screen you can change the report header data, which can be seen on the top of all
printed report pages.
- Registration
Registration is not necessary for ABP monitors. This function is for other devices only.
You can quit by 'Finish' button.
If you want to make recordings, login as a User into the software.
23
Installing CardioVisions Network Edition
If you wish to access CardioVisions functions from several workstations in a computer
network, you have to install CardioVisions Network Edition. The installation procedure
looks quite similar to that of the Personal Edition (see above), but the result is quite
different. While Personal Edition setup installs a typical program where you have a single
executable file to start and then you can access all functions, the Network Edition setup will
install two separate applications, two executable files: one for the networked CardioVisions
database engine application (also called the database server), and another for the so-called
CardioVisions client application, i.e., the user-end of the program to ask for data over the
network from the database engine on any workstation. Therefore, the Network Edition has
to be installed on a properly configured server computer. After the installation, the
CardioVisions database engine will be automatically started by default whenever the server
computer is started. The Network Edition has to be installed on the server computer, on the
individual workstations only a shortcut has to be created. Then, as a result, the database
engine will run on the server computer continuously, and the CardioVisions client can be
started on any workstation with a proper shortcut (startup icon). For all normal user
purposes, the CardioVisions client of the Network Edition is indistinguishable from the
program used in the Personal Edition. There is one important difference in behaviour,
however: if you use the Network Edition and the server computer is shut down, it will not be
possible to start CardioVisions from the workstations. Similarly, even if the server computer
is switched on, but the CardioVisions database engine is not running (it is stopped, shut
down or not started at all), it will be impossible to use CardioVisions.
Compared to the installation of CardioVisions Personal Edition, there is one additional step
to take during the installation of the Network Edition. After you have choosen the recorder
type(s) to use, you are asked to select an IP-address (a network property) through which the
database engine can communicate with the client(s) running on any workstation. This is a
question only if the server has multiple network adaptors, either for intra- or extranet
purposes, or because of different physical subnets.
To complete your CardioVisions Network Edition installation, you have to manually share
the “CLIENT” folder of your installation with read-only access from all workstations and
you have to create a shortcut on each workstation pointing to the CardioVisions client
application executable file in this folder (its name is CV001.EXE). This is best done manually
as automatic sharing is either impossible or can have serious security risks, and once the
shortcut is created, you can simply “copy-paste” it to all workstations where you want to use
CardioVisions. If you have any doubt, consult your computer network administrator.
It is possible to configure your own CardioVisions database engine application to use
different options in the unlikely case of networking problems. Since database engine is an
auto-configuring application, change a working configuration only if it is absolutely necessary
and always with the close assistance of an experienced network specialist. To change
database engine configuration, first request all users to log out from CardioVisions and close
all CardioVisions clients on all workstations, then bring up the database engine application
from the system tray on the server computer by double-clicking its icon, then choose Server
– Stop, then select the required command of the Config menu. After your changes, choose
Server – Start to make the CardioVisions database engine services available to users again.
24
Backup
Creating a backup from CardioVisions database is strongly recommended to prevent data
loss. It is advised to create a backup often, monthly, weekly or even daily depending on the
frequency of the software usage.
The function is available both for the User (Tools/Backup) and for the System
Administrator (Tools/System administrator tools/Backup and restore). While the former can
create backups only manually, the latter has the possibility to create backups both manually
and automatically according to preset intervals.
The User’s backups, from which only the last two can be stored, are saved into
C:\Meditech\CV\Backup_U, while the System Administrator’s backups, the number of
which is unlimited, are saved into C:\Meditech\CV\Backup_A.
Automatic backup can be made weekly, fortnightly or monthly. If the function is selected the
backup will automatically be done compared to the last backup in the preset schedule.
Archiving
CardioVisions data archiving refers to the long-term storage of the large-size recordings in
order to free up space in the database. Archiving can be done either by the User or the
system administrator. The process is the following:
1.) Enter the software and go to the Database screen.
2.) Create a new folder into which you can collect the selected examinations which have to
be archived.
25
3.) After clicking ’Tools/Archive examinations from the selected folder’, a new panel will
appear on your screen, which will inform you about the number and the size of the
measurements in the folder and the size of your destination drive.
Select the folder in the destination directory in which you want the examinations to be saved.
You should type in or select the name of the destination directory to archive to the hard disc.
4.) If you have made sure that the size of the data to be archived does not exceed the size of
the free space on the destination drive you can start the process. The speed and the duration
of the process depends on the size of the recordings.
5.) When the process is completed, a message window will notify you about it. Click the
’Close’ button to exit the window. The archived examinations will be coloured purple in your
26
database. To open the examination like this, the program will ask the destination route of the
archived data. If you have saved the data on the hard disc, just simply select the source file.
After archiving your files to a PC, you can copy data to a CD or DVD as well. If you choose
this solution, write the name of the disc into the ’Label’ field in order you can open the
archived files easily later. If you want to have access to your archived files, place the disc in
the drive with the appropriate label then select the source file.
6.) If you have started archiving to free up space in your database, enter the software as a
system administrator and click ’Tools/ System administrator’s tools/Maintenance’. Using
this command will compress your database. Put a tickmark next to ’Integrity’ to make sure
that your database does not contain any injured data. Put a tickmark next to ’Packing’ to
create a smaller database. Note, please, that the process will require at least as much free
space as the size of your database.
27
13.
Meditech product warranty information
(a) RECORDER WARRANTY. The main recorder unit will be free from defects in
materials and workmanship under normal use and service for a period of two (2) years
from the date of receipt. This warranty covers the recorder unit only. This warranty does
not cover any accessories that might come with the recorder unit.
(b) ACCESSORIES WARRANTY. The non-disposable accessories delivered with the
recorder unit will be free from defects in materials and workmanship under normal use
and service for a period of one (1) year from the date of receipt. This warranty does not
cover disposable accessories, packaging materials, accumulators and batteries, cuffs, or
any of their components.
(c) CUFF WARRANTY. The cuff(s) - if delivered with a recorder unit - will be free from
defects in materials and workmanship under normal use and service for a period of six
(6) months from the date of receipt. This warranty covers the cuff(s) delivered with a
recorder unit exclusively.
(d) SOFTWARE WARRANTY. The CardioVisions software under normal use will perform
substantially in accordance with the accompanying written/electronic documents for a
period of ninety (90) days from the date of receipt.
This warranty is valid at the representative address of Meditech Ltd. unless otherwise
displayed upon a commercial invoice or any other valid business document duly signed by
the supplier and the recipient of the Meditech product. If such business document displaying
a certain site for warranty validity cannot be presented, this warranty is valid at Meditech HQ
office in Budapest, Hungary. This warranty does not cover any malfunction or defects of the
recorder unit or any of its accessories arising from improper use, the use of inadequate
accessories, accident, theft, or use of the recorder unit outside its operating environmental
specifications and intended measurement range. Warranty conditions do not apply to
putative defects that are considered to be defects by the Partner due to inadequate
knowledge or improper use of the products. Products returned with such putative defects are
subject to service checkup charge. Removing the closing label from the back side of the
recorder unit, or opening the unit any other way voids this warranty.
Exclusion of biohazard. Meditech will not accept for repair potentially infectious products or
accessories, especially pouches and cuffs, that might have been in direct contact with the
patient, and could not be, or (potentially) were not, properly disinfected, even within the
warranty period. If a problem occurs within the warranty period, such accessories will be
replaced without any physical inspection, reserving the rights to hold an inspection when
found necessary.
No other warranties. Meditech disclaims all other warranties, either expressed or implied,
including, but not limited to, implied warranties of merchantability and fitness for a particular
purpose, with regard to the recorder unit, any accessory or other accompanying hardware,
and the software.
No liability for consequental damages. In no event shall Meditech be liable for any special,
incidental, indirect, or consequential damages whatsoever (including, without limitation,
damages for loss of business profits, business interruption, loss of business information, loss
of data, or any other pecuniary loss) arising out of the use of or inability to use the recorder
unit, its accessories and/or the CardioVisions software, even if Meditech has been advised of
the possibility of such damages.
28
14.
CardioVisions software license agreement
Important – read carefully: This License Agreement is a legal agreement between you
(either an individual or a single legal entity) and Meditech Ltd. for the CardioVisions
software, which includes computer software (SOFTWARE) and may contain accompanying
data carrier, printed material and 'on-line' or electronic documentation. By installing, copying,
or otherwise using the SOFTWARE, you agree to be bound by the terms and all the
information and conditions described in this Agreement. If you do not agree to the terms of
this Agreement, promptly return the unused SOFTWARE to the place from which you
obtained it.
Software license: The SOFTWARE is protected by copyright laws and international
copyright treaties, as well as other intellectual property laws and treaties. The SOFTWARE is
licensed, not sold.
Grant of license: This Agreement grants you the following rights:
Software: You may install and use one copy of the SOFTWARE only on one computer.
Storage/Network Use: You may also store or install a copy of the SOFTWARE on a
storage device, such as a network server, used only to install or run the SOFTWARE on your
other computers over an internal network.
Description of other rights and limitations
Limitations on Reverse Engineering, Decompilation, and Disassembly: You may not
reverse engineer, decompile, or disassemble the SOFTWARE.
Separation of Components: The SOFTWARE is licensed as a single product. Its
component parts may not be separated for any purposes.
Rental: You may not rent or lease the SOFTWARE from anyone except from Meditech or
an authorized representative of Meditech.
Demonstration: You may only demonstrate SOFTWARE if all the information described in
this Agreement is disclosed to third parties.
Software Transfer: You may not transfer any of your rights under this Agreement, to any
other party, without the prior written consent of Meditech Ltd.
Termination: Without prejudice to any other rights, Meditech may terminate this
Agreement if you fail to comply with the terms and conditions of this Agreement. If such
event occurs, you must destroy all copies of the SOFTWARE and all of its components.
Copyright
All title and copyrights in and to the SOFTWARE, the accompanying electronic and printed
materials, and any copies of the SOFTWARE are owned by Meditech Ltd. The
SOFTWARE is protected by copyright laws and international treaty provisions, therefore,
you must treat the SOFTWARE like any other copyrighted material, except that you are
allowed to make a copy of the software only for control and evaluation purposes. You may
not copy the printed materials accompanying the SOFTWARE.
29
Miscallaneous
This Agreement is governed by the laws of Hungary. Should you have any questions
concerning this Agreement, please contact Meditech Ltd.
Limited warranty
Meditech Ltd. guarantees, that (a) the SOFTWARE under normal use will perform
substantially in accordance with the accompanying written/electronic documents for a
period of ninety (90) days, and all supplementary hardware will be free from defects in
materials and workmanship under normal use for one (1) year from the date of receipt.
No other warranties. Meditech disclaims all other warranties, either expressed or implified,
including, but not limited to, implied warranties of merchantability and fitnedd for a
particular purpose, with regard to the recorder unit, any accessory or other accompanying
hardware and the CardioVisions software.
No liability for consequential damages. In no event shall Meditech be liable for any special,
incidental, indirect, or consequential damages whatsoever (including, without limitation,
damages for loss of business profits, business interruption, loss of business information, loss
of data, or any other pecuniary loss) arising out of the use, or inability to use this product,
even if Meditech has been advised of the possibility of such damages.
30
15.
EMC information
Medical electrical equipment should be used with precautions according to EMC, and must
be installed according to the EMC notices disclosed in this manual as mobile RF transceivers
could adversely affect it.
Electromagnetic emission
Meditech ambulatory blood pressure monitors are suitable for use in the specified
electromagnetic environment. The purchaser or user of the device should assure that they are
used in an electromagnetic environment as described below.
Monitor
ABPM05
ABPM04
BlueBP05
Emission test
Radiated and conducted RF
emission
CISPR
11
Compliance
Group 1
Radiated and conducted RF
emission
CISPR 11
Class B
ABPM-05/ABPM-04/BlueBP05 is suitable for use in domestic
establishments and in
establishments directly
connected to the low voltage
power supply network which
supplies buildings used for
domestic use.
Harmonic emission
IEC61000-3-2
Not applicable
---
Complies
ABPM-05/ABPM-04 is suitable
for use in establishments directly
connected to a public low
voltage mains network.
Not applicable
---
BlueBP05
ABPM04
BlueBP05
ABPM-05/ABPM-04/BlueBP05 uses RF energy only for their
internal function. Therefore, the
emission is very low and it is not
likely to cause any interference in
neraby electronic equipment.
Except for Bluetooth
communication usage. 3
ABPM05
ABPM04
ABPM05
ABPM04
BlueBP05
ABPM05
Electromagnetic
environment
Voltage fluctuations/ Flickers
IEC61000-3-3
3
The Bluetooth radiofrequency communication is carried out at the 2.4GHz frequency.
(class2, Bluetooth 2.0+EDR)
31
Electromagnetic immunity
Meditech ambulatory blood pressure monitors are suitable for use in the specified
electromagnetic environment. The purchaser or user of Meditech products should assure
that they are used in an electromagnetic environment as described below.
Monitor
Immunity test
IEC60601 test
level
ABPM-05
ABPM-04
BlueBP-05
ABPM-05
ABPM-04
BlueBP-05
+ 8 KV air
Electrostatic
discharge (ESD)
IEC 61000-4-2
+ 6KV contact
+ 8 KV air
Electrical fast
transient/burst
IEC 61000-4-4
+ 2KV for power
supply
+ 1KV
input/output lines
Surge
IEC 61000-4-5
+ 1KV differential
mode
+ 2KV common
mode
ABPM-05
ABPM-04
BlueBP-05
Compliance level
+ 6KV contact
+ 8 KV air
Floors are wood,
concrete or ceramic
tile, or floors are
covered with
synthetic material
and the relative
humidity is at least
30 percent.
Not applicable
Mains power
quality is that of a
typical commercial
and/or hospital
environment.
Not applicable
Mains power
quality is that of a
typical commercial
and/or hospital
environment.
Not applicable
Mains power
quality is that of a
typical commercial
and/or hospital
environment. If the
user of Meditech
ambulatory blood
pressure monitors
requires
CLINICAL
UTILITY during
power mains
interruptions, it is
recommended that
parts of the
Meditech ABPM
system where
applicable be
powered from an
uninterruptible
power supply.
ABPM-05
ABPM-04
<5% UT (>95%
dip) for 0.5 cycle;
Voltage dips, short
40% UT (60% dip)
interruptions and
for 5 cycles;
voltage variations on
70% UT (30% dip)
power supply input
for 25 cycles;
BlueBP-05
lines
<5% UT (>95%
IEC 61000-4-11
dip) for 5 sec.
Electromagnetic
environment
32
ABPM-05
ABPM-04
BlueBP-05
Power frequency
(50/60Hz) magnetic
field
IEC 61000-4-8
3A/m
3A/m
Power frequency
magnetic fields are at
levels characteristic
of a typical location
in a typical
commercial and/or
hospital
environment.
Note: UT is the nominal voltage of mains.
Monitors
Immunity
test
IEC60601 test
level
Compliance
level
ABPM-05
Not applicable
ABPM-04
Conducted RF
3V eff
IEC 6100-4-6 150KHz-80MHz
BlueBP-05
3V eff
ABPM-05
Radiated RF
ABPM-04
IEC 61000-43
3V/m
80MHz-2,5GHz
3V/m
Electromagnetic
environment
Portable and mobile RF
communications equipment are
used no closer to any part of
Meditech ABPM-05/ABPM-04,
including cables, than the
Recommended Separation
Distance calculated the formula
written below.
Recommended Separation
distance:
d=[3,5/V1]√P
Portable and mobile RF
communications equipment are
used no closer to any part of
Meditech BlueBP-05, including
cables, than the Recommended
Separation Distance calculated
the formula written below.
d=[3,5/3V/m]√P;
(80MHz – 800MHz)
d=[7/3V/m]√P;
(800MHz – 2,5GHz)
where:
P is the highest radiated power
disclosed by the manufacturer of
transmitter [W];
d is the recommended
separation distance [m].
33
Radiated RF
BlueBP-05
IEC 61000-4-3
3V/m
80MHz-2,5GHz
3V/m
Recommended Separation distance:
d=[3,5/V1]√P
d=[3,5/3V/m]√P (80MHz –
800MHz)
d=[7/3V/m]√P (800MHz –
2,5GHz)
where:
P is the highest radiated power
disclosed by the manufacturer of
transmitter [W] and d is the
recommended separation distance
[m].
You may observe disturbance
nearby any of those equipment
which has the following indication:
f) Note: in case of frequency 80MHz or 800 Mhz, the formula for the higher range is
applicanle.
g) Note: these are guidelines. Actual conditions may vary.
Recommended separation distance
Meditech ambulatory blood pressure monitors are intended to be used in electromagnetic
environment with controlled RF disturbances. The purchaser or user of the devices may help
to reduce electromagnetic disturbances by defining the separation distance between the
transportable or mobile RF telecommunication equipment (transmitters) and the device,
depending on the highest output power of the telecommunication equipment.
Separation distance in function of the frequency of the transmitter (m)
The highest output power
of the transmitter (W)
150KHz-80MHz
d=(3,5/V1)√P
80MHz-800MHz
d=(3,5/E1)√P
800MHz-2,5GHz
d=(7/E1)√P
0,01
Not applicable
0,12
0,23
0,1
Not applicable
0,38
0,73
1
Not applicable
1,2
2,3
10
Not applicable
3,8
7,3
100
Not applicable
12
23
If this table does not contain the highest output power of the transmitter, the d separation
distance [m] can be calculated by the formula, depending on the frequency of the transmitter,
where P is the rated highest output power of the transmitter [W].
1. Note: in case of frequency 80MHz or 800 MHz, the formula for the higher range is
applicable.
2. Note: These are guidelines. Actual conditions may vary.
34