1
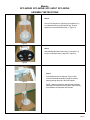
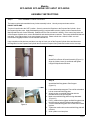
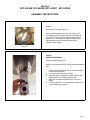
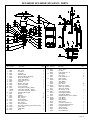
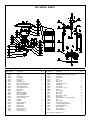
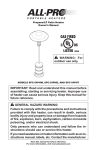
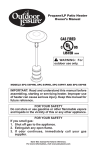
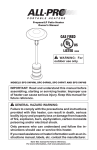
OWNERS MANUAL
PROPANE PATIO HEATERS
Models
SPC-54PHW,SPC-54PHB,SPC-54PHT SPC-55PHS
QUESTIONS?
MISSING / DAMAGED PARTS
STOP
Please do not return this product to the store.
If a part is damaged or missing, simply e-mail us
at [email protected], or visit our website at
http://allpro-heaters.com, or call our Customer
Service Department at (888) 619-7060.
We will be happy to assist you!
You can register your heater on line at
http://allpro-heaters.com/warranty.
TABLE OF CONTENTS
HEATER SPECIFICATIONS................................................................................................................ 2
WARNINGS .................................................................................................................................. 2
SAFETY PRECAUTIONS .................................................................................................................... 3
OPERATING PRECAUTIONS ............................................................................................................. 3
ODOR FADE WARNING ...................................................................................................................... 4
ASSEMBLY INSTRUCTIONS ............................................................................................................. 5
OPERATING INSTRUCTIONS .......................................................................................................... 10
SERVICING ....................................................................................................................................... 10
SPC-54PHW /SPC-54PHB/SPC-54PHT- PARTS .............................................................................. 11
SPC-55PHS - PARTS ........................................................................................................................ 12
WARRANTY ....................................................................................................................................... 13
SERVICE CENTERS .......................................................................................................................... 13
INSTRUCTIONS FOR ORDERING PARTS ....................................................................................... 13
WARRANTY REGISTRATION ........................................................................................................... 15
RETAIN THESE INSTRUCTIONS FOR FUTURE REFERENCE
© 2002 Scheu Products Company
Models
SPC-54PHW SPC-54PHB SPC-54PHT SPC-55PHS
HEATER SPECIFICATIONS
Type of Gas:
For use with Propane Only
Gas Supply Pressure
to regulator
regulator out
Maximum: 150 psig (1034.2 kPa)
11" W.C. (2.74 kPa)
Ignition:
Piezoelectric Pilot Ignitor
Flame Safety:
Thermocouple Operated Gas Valve
Model:
Rating:
SPC-54PHW /SPC-54PHB/SPC-54PHT
40,000 BTU/hr (11.7 kW)
Consumption:
1.86 lbs./hr (.84 kg/hr)
Minimum: 5 psig (34.5 kPa)
SPC-55PHS
40,000 BTU/hr (11.7 kW)
1.86 lbs./hr (.84 kg/hr)
WARNINGS
YOUR SAFETY IS IMPORTANT TO YOU AND TO OTHERS, SO PLEASE
READ THESE INSTRUCTIONS BEFORE YOU OPERATE THIS HEATER.
GENERAL HAZARD WARNING:
FAILURE TO COMPLY WITH THE PRECAUTIONS AND INSTRUCTIONS PROVIDED WITH THIS HEATER, CAN
RESULT IN DEATH, SERIOUS BODILY INJURY AND PROPERTY LOSS OR DAMAGE FROM HAZARDS OF FIRE,
EXPLOSION, BURN, ASPHYXIATION, CARBON MONOXIDE POISONING, AND/OR ELECTRICAL SHOCK.
ONLY PERSONS WHO CAN UNDERSTAND AND FOLLOW THE INSTRUCTIONS SHOULD USE OR SERVICE THIS
HEATER.
IF YOU NEED ASSISTANCE OR HEATER INFORMATION SUCH AS AN INSTRUCTIONS MANUAL, LABELS, ETC. CONTACT
THE MANUFACTURER.
WARNING: NOT FOR HOME OR RECREATIONAL VEHICLE USE
WARNING: FIRE, BURN, INHALATION, AND EXPLOSION HAZARD. KEEP SOLID COMBUSTIBLES, SUCH AS
BUILDING MATERIALS, PAPER OR CARDBOARD, A SAFE DISTANCE AWAY FROM THE HEATER AS RECOMMENDED
BY THE INSTRUCTIONS NEVER USE THE HEATER IN SPACES WHICH DO OR MAY CONTAIN VOLATILE OR
AIRBORNE COMBUSTIBLES, OR PRODUCTS SUCH AS GASOLINE, SOLVENTS, PAINT THINNER, DUST PARTICLES
OR UNKNOWN CHEMICALS.
Scheu Products Company, Incorporated
Mail: P.O. Box 250, Upland, CA 91785
Plant: 8855 Baker Ave., Rancho Cucamonga, CA 91730
Telephone: 800-325-7057
www.scheuco.com
[email protected]
8764
September 2003
Page -2-
Models
SPC-54PHW SPC-54PHB SPC-54PHT SPC-55PHS
OPERATING PRECAUTIONS
8. If at any time gas odor is detected, IMMEDIATELY
DISCONTINUE operation until the source of gas has been
This is a propane, direct-fired heater.
located and corrected. Read enclosed Odor Fade and
Propane Sheet for additional information about detecting
Propane is heavier than air. If propane leaks from a connection
propane leaks.
or fitting, it sinks to the floor, collecting there with the
9. Install the heater such that it is not directly exposed to water
surrounding air, forming a potentially explosive mixture.
spray, rain and/or dripping water.
Obviously, propane leaks should be avoided, so set up the
10. Maintain minimum clearance to people or normal
propane supply with utmost care. Read enclosed Odor Fade
combustible material (like paper) of 3.6 ft. (1100mm) from top
and Propane Sheet for additional information about detecting
and 2 ft. (609mm) from the reflector.
propane leaks. Leak check new connections or reconnections
11. Due to the high surface and exhaust temperatures, adults
with a soap and water solution and follow all connection
and children must observe clearances to avoid burns or
instructions herein. Also, ask your propane dealer for advice on
clothing ignition.
the propane application and supply installation and ask him to
12. Operate only on a stable, level surface.
check it if there are any questions.
13. Do not hang or attach clothing or any other combustible
materials from, on or near the heater.
Direct-Fired means that all of the combustion products enter the
14. Do not spray aerosols near the heater during use or shortly
heated space. Even though this heater operates very close to
thereafter.
100 percent combustion efficiency, it still produces small
15. Do not clean heater with combustible or corrosive cleaners.
amounts of carbon monoxide. Carbon monoxide (called CO) is
Use warm, soapy water.
toxic. We can tolerate small amounts but not a lot. CO can build
16. Check control compartment burners and circulation air
up in a heated space and failure to provide adequate ventilation
passageways for free air passage, make sure that there are
could result in death. The symptoms of inadequate ventilation
no obstructions. These areas are a common location for
are:
spider webs, which can present a dangerous condition,
headache
dizziness
damage the heater and render it unsafe for use. The heater
burning eyes and nose
nausea
must be checked if any of the following conditions exist:
dry mouth or sore throat
a) Gas smell along with predominate yellow tipping of the
So, be sure to follow advice about ventilation in these operating
burner.
instructions.
b) Heater does not reach temperature.
c)
Uneven burner glow.
d) Burner makes popping noises during normal use,
When the heater is to be operated in the presence of other
other than during shutdown.
people the user is responsible for properly acquainting
17. Use only soapy water (1-part liquid dishwashing detergent to
those present with the safety precautions and instructions,
3-parts water) to conduct Leak Tests whenever a propane
and of the hazards involved.
cylinder is connected. Bubbles indicate a leak.
18. Do not adjust gas regulator. If you are unsure of your
appliances gas type or pressure, call out a gas fitter or
SAFETY PRECAUTIONS
plumber.
1. Check the heater thoroughly for damage. DO NOT operate 19. Place the control knob on "OFF" position when heater is not in
a damaged heater.
use.
2.DO NOT modify the heater or operate a heater which has
20. Always disconnect the gas supply after the heater is turned
been modified from its original condition.
"OFF".
3.Use only propane gas.
21. Care must be taken for the supervision of children and
4.Use only VAPOR WITHDRAWAL propane supply. The
animals in the vicinity of an operating heater.
propane cylinder must be arranged for vapor-withdrawal,
22. Do not move, handle or service while hot or burning.
in accordance with the Compress Gas Associations,
23. Allow 45 minutes to cool down after use before attempting to
Small Propane Bottle Assembly. If there is any question
move heater.
about vapor withdrawal, ask your propane dealer.
24. Do not operate this appliance in windy conditions. Maximum
5.Never use the heater if the ballast weight is not assembled
allowable wind speed is 10MPH (16Km/h).
onto the base. The base must be weighted to avoid
25. Do not operate this appliance in temperature conditions
tipping.
below 40°F (5°C).
6.IMPORTANT. Use only the hose and regulator assembly
26. Keep heater away from areas where flammable liquids,
provided with the heater. Match the color stripe on the
vapors or solids are stored or used.
hangtag attached to the hose assembly with the color on
27. If operated in salt air environments, the unit will require more
the label located near the propane inlet fitting on the
frequent cleaning; otherwise, the longevity of the unit will
heater. Inspect hose assembly before each use of the
deteriorate rapidly. Use warm soapy water to clean the unit.
heater. If there is excessive abrasion or wear, or hose is
28. Items or material, when stored under the heater, will be
cut, replace with hose assembly listed on parts list before
subjected to radiant heat and could be seriously damaged.
using heater.
29. Use only in accordance with local codes, or in the absence of
7.This heater is for OUTDOOR USE ONLY, even so, make
local codes, with the National Fuel Gas Code ANSI Z223.1.
sure that there is ample fresh air ventilation. Do not use in
buildings, garages or other enclosed spaces.
Warning: For Outdoor Use Only
Page -3-
Models
SPC-54PHW SPC-54PHB SPC-54PHT SPC-55PHS
ODOR FADE WARNING
WARNING
Asphyxiation Hazard
• Do not use this heater for heating human living quarters.
• Do not use in unventilated areas.
• The flow of combustion and ventilation air must not be
obstructed.
• Proper ventilation air must be provided to support the
combustion air requirements of the heater being used.
• Refer to the specification section of the heater’s manual,
heater dataplate, or contact the Scheu Products Company to
determine combustion air ventilation requirements of the
heater.
• Lack of proper ventilation air will lead to improper
combustion.
• Improper combustion can lead to carbon monoxide
poisoning leading to serious injury or death. Symptom of
carbon monoxide poisoning can include headaches
dizziness and difficulty in breathing.
FUEL GAS ODOR
LP gas and natural gas have man-made odorants added specifically for detection of fuel gas leaks.
If a gas leak occurs you should be able to smell the fuel gas. Since Propane (LP) is heavier than air you should smell for
the gas odor low to the floor. ANY GAS ODOR IS YOUR SIGNAL TO GO INTO IMMEDIATE ACTION!
• Do not take any action that could ignite the fuel gas. Do not
operate any electrical switches. Do not pull any power
supply or extension cords. Do not light matches or any other
source of flame. Do not use your telephone.
• Get everyone out of the building and away from the area
immediately.
• Close all propane (LP) gas tank or cylinder fuel supply
valves, or the main fuel supply valve located at the meter if
you use natural gas.
• Propane (LP) gas is heavier than air and may settle in low
ODOR FADING - NO ODOR DETECTED
• Some people cannot smell well. Some people cannot smell
the odor of the man-made chemical added to propane (LP)
or natural gas. You must determine if you can smell the
odorant in these fuel gases.
• Learn to recognize the odor of propane (LP) gas and natural
gas. Local propane (LP) gas dealers will be more than happy
to give you a scratch and sniff pamphlet. Use it to become
familiar with the fuel gas odor.
• Smoking can decrease your ability to smell. Being around an
odor for a period of time can affect your sensitivity to that
particular odor. Odors present in animal confinement
buildings can mask fuel gas odor.
ATTENTION - CRITICAL POINTS TO REMEMBER!
• Propane (LP) gas has a distinctive odor. Learn to recognize
these odors. (Reference Fuel Gas Odor and Odor Fading
sections above.
• Even If you are not property trained in the service and repair
of the heater, ALWAYS be consciously aware of the odors of
propane (LP) gas and natural gas.
• If you have not been properly trained in repair and service of
propane (LP) gas then do not attempt to light heater,
perform service or repairs, or make any adjustments to the
heater on the propane (LP) gas fuel system.
areas. When you have reason to suspect a propane leak,
keep out of all low areas.
• Use your neighbor’s phone and call your fuel gas supplier
and your fire department. Do not re-enter the building or
area.
• Stay out of the building and away from the area until
declared safe by the firefighters and your fuel gas supplier.
• FINALLY, let the fuel gas service person and the firefighters
check for escaped gas. Have them air out the building and
area before you return. Properly trained service people must
repair any leaks, check for further leakages, and then relight
the appliance for you.
• The odorant in propane (LP) gas and natural gas is
colorless and the intensity of its odor can fade under
some circumstances.
• If there is an underground leak, the movement of gas
through the soil can filter the odorant.
• Propane (LP) gas odor may differ in intensity at different
levels. Since Propane (LP) gas is heavier than air, there may
be more odor at lower levels.
• Always be sensitive to the slightest gas odor. If you
continue to detect any gas odor, no matter how small, treat it
as a serious leak. Immediately go into action as discussed
previously.
• A periodic sniff test around the heater or at the heater’s
joints; i.e. hose, connections, etc., is a good safety practice
under any conditions. If you smell even a small amount of
gas, CONTACT YOUR FUEL GAS SUPPLIER
IMMEDIATELY. DO NOT WAIT!
Page -4-
Models
SPC-54PHW SPC-54PHB SPC-54PHT SPC-55PHS
ASSEMBLY INSTRUCTIONS
Components are packed in two cartons. Following is
listing of packaged components:
TOOLS REQUIRED:
#2 Philips Head Screwdriver
Crescent Wrench
1
2
BOX 1 OF 2
Burner and Control Assembly
Base w/wheel kit ass'y
Legs
Pole Support
LP Cylinder Cover
Ballast Weight
Hardware Bag
Battery (for SPC-55PHS only)
Owners Manual
1
1
3
1
1
1
1
1
1
BOX 2 OF 2
Dome
Pole
Manifold Ass'y
Figure 1
Figure 1
1
1
1
Hardware Bag consists of the following: (Figure 1)
Large Bolts
Large Nuts
Lock Washers
Cap Nuts
Small Bolts
Manifold Fixing Plate
Medium Bolts
Long Bolt
Large Lock Washer
Large Nut
Hex Allen Wrench
12
12
12
3
3
1
1
1
1
1
1
Step 1
Attach legs to base using (2) Large Bolts, (2)
Lock Washers and (2) Large Nuts per leg. Finger tight
only. Do not fully tighten until Step 2.
Figure 2
Figure 2
Page -5-
Models
SPC-54PHW SPC-54PHB SPC-54PHT SPC-55PHS
ASSEMBLY INSTRUCTIONS
Step 2
Secure Pole Support to Legs using (6) Large Bolts. (6)
Lock Washers and (6) Large Nuts per leg. Wrench
tighten the nuts and bolts from Step 1. (Figure 3)
Figure 3
Step 3
Attach Ballast Weight to Base using (1) Long Bolt, (1)
Large Lock Washer and (1) Large Nut. (Figure 4)
Figure 4
Step 4
Figure 5
Insert Manifold into Pole Support (Figure 5 & 6).
Insert the Manifold Assembly through the Post by
passing through the hole in the Post Support.
NOTE: Make sure the hose and regulator assembly
attached to the manifold is never bent or kinked during
the installation and operation of the heater.
Figure 6
Page -6-
Models
SPC-54PHW SPC-54PHB SPC-54PHT SPC-55PHS
ASSEMBLY INSTRUCTIONS
Step 5
Attach Pole to Pole Support (Figure 7 & 8). Place
Pole into the Pole Support center connector. Then
tighten (6) Set Screws with Hex Allen wrench supplied
with heater.
Figure 7
NOTE: (6) set screws are threaded inside post support.
Figure 8
Step 6
Put LP Cylinder Cover on Base Assembly
(Figure 9). Slide LP Cylinder Cover over Pole and
Pole Support. Be sure that the LP Cylinder Cover
rests level on the base.
Figure 9
Step 7
Attach Manifold to Burner & Control Assembly
(Figure 10). The connection between the fuel line to the
burner is a quick connect connection type. Follow these
steps to assemble:
Figure 10
1. Pull the manifold out of the top end of the pole.
2. Slide/move the quick connect collar of the manifold to
the back.
3. Attach the manifold to the burner and control assembly
by pushing the burner and control assembly connection
all the way through the manifold.
4. Make sure the manifold and burner assembly snap in
properly.
5. Release the quick connect collar of the manifold that
was slid to the back in step (2).
6. Place the burner and control assembly onto the pole.
Page -7-
Models
SPC-54PHW SPC-54PHB SPC-54PHT SPC-55PHS
ASSEMBLY INSTRUCTIONS
Step 9
FIRST ASSEMBLY CHECK FOR LEAKS
The heater must be leak tested before any further assembly is done. Use only a soap and water solution.
DO NOT USE FLAME.
Turn the Control Knob to the "OFF" position. Securely connect the Regulator to the Propane Gas Cylinder. Open
the Propane Cylinder valve. Apply a dishwashing soap (1-part) and water solution (3-parts) to the connection at the
Manifold and Burner & Control Assembly. Bubbles will form if the connection is leaking. In the case of any leaks, turn
off the Propane Cylinder valve, remove the Manifold, and check and clean connection. Reconnect the Manifold and leak
test again. If the leak persists, do not return heater to the store. Please call toll-free 1-888-619-7060 or e-mail
[email protected] for assistance and advice.
Upon completion of the leak test, and there is no sign of a leak, turn off the Propane Cylinder Valve and disconnect
the Regulator from the Propane Gas Cylinder then remove the Propane Gas Cylinder and continue to the next step.
Step 9
Attach Pole to Burner & Control Assembly (Figure 11).
Align the 3 holes; insert (3) small bolts and tighten
using #2 Philips head screwdriver.
Figure 11
Step 10
Attach Manifold fixing plate to Pole Support
(Figure 12).
Figure 12
1. Look underneath post support. There will be a threaded
hole to mount manifold fixing plate.
2. Align the holes on manifold fixing plate with the
threaded holes on the pole support.
3. Make sure manifold fixing plate is facing downward.
(Figure 12).
4. Use (1) medium bolt to tighten manifold fixing plate with
the post support using #2 Philips head screwdriver.
5. Turn the manifold fixing plate so it will hold the manifold
in place.
6. Tighten the medium bolt so the manifold fixing plate will
not move.
7. Slide cylinder cover into place.
Page -8-
Models
SPC-54PHW SPC-54PHB SPC-54PHT SPC-55PHS
ASSEMBLY INSTRUCTIONS
Step 11
Attach Dome to Emitter (Figure 13 ).
Gently lay Heater Assembly on its side using one of
the shipping styrofoam inserts to prop up the top half of
the heater. Align holes in Dome with threaded studs in
Emitter Cover. Secure Dome to Emitter using (3) Cap
Nuts and tighten them with an adjustable wrench.
Stand the heater upright.
Figure 13
Step 12
FOR SPC-55PHS ONLY
Battery installation (Figure 14)
Battery is only provided for SPC-55PHS inside the hardware
bag.
1. Look at the front panel of the burner/control assembly
and locate the red button.
2. Turn the red button counter clockwise.
3. Install the battery in the burner/control assembly with
the flat surface of the battery inside the unit.
4. Install the red button and make sure it is mounted
tightly.
5. Push the red button. You should hear a ticking sound.
If not, repeat step 1 through 4.
Figure 14
Page -9-
Models
SPC-54PHW SPC-54PHB SPC-54PHT SPC-55PHS
WARNING: FOR YOUR SAFETY
If you smell gas*:
1. Shut off gas to the appliance.
2. Extinguish any open flames.
3. If odor continues, immediately call your gas
supplier.
*See fuel safety precautions on page 2 of this
manual for more information.
OPERATING INSTRUCTIONS
PREPARING FOR OPERATION
1.Check the heater for possible shipping damage. If any is
found, immediately notify the factory.
2.Follow all of the "Precautions".
3.Check and assure the control knob is on "OFF" position.
4. Place the gas cylinder inside the Cylinder Base, and
securely connect the regulator to the propane gas cylinder.
5.Turn the cylinder valve on. Apply a dishwashing soap
(1 part) and water (3 parts) solution to the connection at the
regulator and cylinder. Bubbles will form if the connection is
leaking.
6.In case of any leaks, turn off the propane cylinder valve,
undo the leaking connection and check & clean the
connection. Reconnect the regulator and leak test again. If
the leak persists, do not return heater to the store. Please
call toll-free 1-888-619-7060 or e-mail
[email protected] for assistance and
advice.
START
1.To light the pilot, the first step is to purge the gas line
leading to the pilot assembly. Press and turn the control
knob to "HIGH" position and keep it depressed in for 1 to 2
minutes. NOTE: When a new or refilled gas cylinder is
installed, the heater will need to be purged again.
2.To light the pilot:
a) Press the control knob and turn to the "PILOT" position.
b) Hold the control knob in and press the ignition button
until the pilot lights.
c)
Keep the control knob depressed for 30 seconds to
heat the thermocouple.
d) Release the control knob and the pilot should stay lit.
Note: To visually check the ignition of the pilot, slide
the viewing hole cover to either side.
e) Once the pilot flame stays on, close the viewing hole
cover. CAUTION: Do not attempt to slide the viewing
hole cover when the main burner is lighting, operating
or hot.
3. Set the heat level.
a) Press and turn the control knob to "HIGH" position, the
burner will light immediately.
b) Press and turn the control knob to the desired heat
level. Note: While in use, the burner flame should be
mainly blue in appearance with a small amount of
yellow.
Smoke and odor (not a gas odor) emission may occur in the
first 15 minutes of use. Run heater at high setting for at
least 15 minutes to eliminate this problem.
WARNING: If you smell gas while in use, immediately
press and turn the control knob to "OFF" position to
shutdown the heater.
STOP
1.Press and turn the control knob to "PILOT" position, the
burner will extinguish but the pilot will stay on.
2.To extinguish the pilot, press and turn the control knob to
"OFF" position.
3.Turn off gas supply.
4.Do not attempt to relight the heater for 5 minutes after the
LP cylinder valve has been closed.
RESTART AFTER SAFETY SHUTDOWN
1.Turn the gas control knob to "OFF" position.
2.Wait 5 minutes.
3.Restart following "Start" procedure.
STORAGE
1.Allow at least 45 minutes for the heater to cool down after
using.
2.Store the heater upright in a sheltered area away from
inclement weather and dust.
3.If desired, cover the heater after the heater has cooled.
4.If the heater is not to be used for an extended period of time,
disconnect and remove the Propane Gas Cylinder and store
in accordance with the "Standard for Storage and Handling
of Liquefied Petroleum Gases", ANSI/INFPA 58.
SERVICING
To assure safety, proper function and longevity of the heater,
regular maintenance is required. The frequency of maintenance
will depend on the usage of the unit. Review the following
concerning the criteria for a properly functioning heater. Failing
to follow proper, regular maintenance will void warranty.
A hazardous condition may result if a heater is used that has
been modified or is not functioning properly. When the heater is
working properly:
* The flame is contained within the heater.
* The flame is essentially blue with perhaps some yellow
tipping.
* There is no strong disagreeable odor, eye burning or other
physical discomfort.
* There is no smoke or soot internal or external to the heater.
* There are no unplanned or unexplained shut downs of the
heater.
The parts lists and wiring diagram show the heater as it was
constructed. Do not use a heater which is different from that
shown. In this regard, use only the hose, regulator and cylinder
connection fitting (called a POL fitting) supplied with the heater.
IMPORTANT Match the color stripe on the hangtag attached to
the hose assembly with the color on the label located near the
propane inlet fitting on the heater. Do not use alternates. For
this heater, the regulator must be set as shown in
"specifications". If there is any uncertainty about the regulator
setting, have it checked.A heater which is not working right must
be repaired, but only by a trained, experienced service person.
To find the service center closest to you, visit our website at
www.scheuco.com.or call (888) 619-7060. You may also obtain
in-warranty or out-of-warranty service by taking the product to
your local service center. In-warranty products will be repaired
with no charge for either parts or labor. Please include a brief
statement indicating date, place of purchase, the nature of the
problem and proof of purchase. Out-of-warranty products will be
repaired with a charge for parts and labor.
Page -10-
SPC-54PHW SPC-54PHB SPC-54PHT-- PARTS
Item Part No.
1
*
3
4
5
6
7
8
9
10
11
12
13
14
15
*
17
*
*
21
22
*
24
25
26
27
28
8603
8604
8605
8607
8608
8708
8616
8611
8602
8600
8599
8598
8597
2209
2209B
2209T
8705
8567
8617
8618
8601
2241
8573
8574
8575
8576
6473**
8578
8579
Description
Valve
Bolt, 1/8-40
Tip Switch
Fuel Tube
Adiabatic Plate
Mushroom Burner Assembly
Burner Cover Bottom
Orifice, Main Burner
Valve Housing Cover
Pilot Tube
Bracket, Valve Mtg
Valve Cover Base
Fuel Line Adaptor
Tank Cover Assembly (White)
Tank Cover Assembly (Black)
Tank Cover Assembly (Bronze)
Guards, Rubber Handle
Nut, M8
Reflector
Bolt, Bi-Convex
Bolt, 3/16-24
Emitter Assemly
Front Cover Panel
Bolt, 3/16-24
Shield, Pilot Wind
Pilot Ass'y (electrode, pilot, thermocouple)
Ignitor, piezo
Ignition Wire
Knob
Qty.
1
2
1
1
1
1
1
1
1
1
1
1
1
1
1
6
1
3
23
1
1
2
1
1
1
1
1
Item
29
*
*
32
*
*
35
*
*
38
39
40
41
42
*
*
*
*
*
*
*
Part No.
8580
8583
8584
8585
8586
8587
8625
8625T
8587
8589
8590
8690
8690T
8591
8592
8691
8691T
8593
2242
8626
8626B
8626T
8596
8764
8630
8628
8627
8692
8698
Description
Nut - 1, G1/4
Nut, M10
Lock Washer, Ø = 10
Ballast Plate
Nut, 1/4-20
Lock Washer, Ø = 6
Base (White)
Base (Bronze)
Base (Black)
Carriage Bolt
Bolt, 1/4-20
Base Legs (White)
Base Legs (Bronze)
Base Legs (Black)
Set Screws, 1/4-20
Pole Support (White)
Pole Support (Bronze)
Pole Support (Black)
Manifold (fuel line), hose, regulator
Pole (White)
Pole (Black)
Pole (Bronze)
Bolt, 3/16-24
Instructions & Parts List
Label, Operating Instruction
Label, Model SPC-54
Label, Warning
Wheel Assembly
Nut and Bolt Pack
Qty.
1
1
1
12
12
1
1
12
3
6
1
1
1
3
1
1
1
1
1
1
*Items not shown in exploded view
Page -11-
SPC-55PHS - PARTS
Item Part No.
1
*
3
*
5
6
7
8
9
10
*
12
13
14
15
16
17
*
19
20
21
*
23
24
*
26
8603
8604
8605
8606
8607
8608
8609
8610
8611
8602
8601
8600
8599
8598
8597
8705
2208
8567
8617
8569
8570
8571
2244
8572
8574
8575
Description
Valve
Bolt, 1/8-40
Tip Switch
Nut, 1/8-40
Fuel Tube
Adiabatic Plate
Mushroom Burner Ass'y
Burner Cover Bottom
Orifice, Main Burner
Valve Housing Cover
Bolt, 3/16-24
Pilot Tube
Bracket, Valve Mtg
Valve Cover Base
Fuel Line Adaptor
Guards, Rubber Handle
Tank Cover Ass'y
Nut, M8
Reflector
Reflector Support
Heat Insulator
Bolt, 5/32-32
Emitter Ass'y
Front Cover Panel
Bolt, 3/16-24
Shield, Pilot Wind
Qty.
1
2
1
2
1
1
1
1
1
1
6
1
1
1
1
1
1
6
1
3
1
6
1
1
2
1
Item Part No.
Description
Qty.
27
28
29
30
*
*
*
34
*
*
37
*
*
40
41
42
43
44
*
*
*
*
*
*
*
Pilot (electrode, pilot, thermocouple)
Pulse Ignitor
Ignition Wire
Knob
Nut - 1, G1/4
Nut, M10
Lock Washer, Ø = 10
Ballast Plate
Nut, 1/4-20
Lock Washer, Ø = 6
Base
Carriage Bolt
Bolt, 1/4-20
Base Legs
Set Screws, 1/4-20
Pole Support
Manifold (fuel line, hose, regulator)
Pole
Bolt, 3/16-24
Instructions & Parts List
Label, Operating Instruction
Label, Model SPC-55
Label, Warning
Wheel Ass'y
Nut and Bolt Pack
1
1
1
1
1
1
1
1
12
12
1
1
12
3
6
1
1
1
3
1
1
1
1
1
1
8576
8577
8578
8579
8580
8583
8584
8585
8586
8587
8588
8589
8590
8591
8592
8593
2243
8595
8596
8764
8628
8631
8627
8693
8699
*Items not shown in exploded view
Models
SPC-54PHW SPC-54PHB SPC-54PHT SPC-55PHS
WARRANTY
We are pleased that you have selected our product and take
this opportunity to assure you that qualified service facilities are
available if required. With the cooperation of independent
dealers, a nationwide network of authorized servicing dealers is
available for your servicing requirements.
Should your product require servicing, read the section of the
manual entitled “Servicing”.
Who gets the warranty? The warranty is limited to the consumer
who originally purchases the product.
What is covered? This limited warranty covers all imperfections
in workmanship and material.
What is not covered? This limited warranty does not cover
damage resulting from accident, misuse or abuse, lack of proper
maintenance, affixing of any attachments not provided with the
products, or loss of parts. IN NO EVENT SHALL SCHEU
PRODUCTS COMPANY BE LIABLE FOR ANY SPECIAL,
INCIDENTAL OR CONSEQUENTIAL DAMAGES NOR FOR
ANY DAMAGES RESULTING FROM MISUSE OR
MODIFICATION OF THIS PRODUCT.
Registering this heater within 10 days of date of purchase
ensures the buyer the protection as stated on our limited
warranty form.
LIMITED WARRANTY
The company warrants this product to be free from
imperfections in material or workmanship, under normal and
proper use in accordance with instructions of the operation
manual, for a period of ONE YEAR FOR RESIDENTIAL HOME
OWNER USAGE or 90 DAYS FOR COMMERCIAL/INDUSTRIAL
USAGE from the date of delivery to the buyer. The Company, at
its option, will repair or replace (f.o.b. factory, California)
products returned by the buyer to the California factory,
transportation prepaid within said one year period for
residential home owner usage or 90 days period for
commerical/industrial usage and found by the Company to have
imperfections in material or workmanship.
any nature incurred without its written consent. The cost of
repair or replacement shall be the exclusive remedy for any
breach of warranty. There is no warranty against infringement of
the like and no implied warranty arising from course of dealing
or usage of trade. This warranty will not apply to any product
which has been repaired or altered outside of the California
factory in any respect which in our judgment affects its condition
or operation.
Some states do not allow the exclusion or limitation of incidental
or consequential damages, so the above limitation or exclusion
may not apply to you. This Warranty gives you specific legal
rights, and you may have other rights which vary from state to
state.
SERVICE CENTERS
Scheu Products Company has over 1,000 service centers
throughout North America. Call (888) 619-7060 or e-mail
[email protected] to request the service center nearest you.
Include the Make and model of your heater in any e-mails.
INSTRUCTIONS FOR ORDERING
PARTS
We recommend that only parts supplied by the manufacturer be
used on this unit. A locally purchased part may appear to be
identical, although in reality it might endanger the heater or the
persons operating the heater.
The heater should be serviced only by a trained, experienced
service person.
Read the section on "Servicing" before ordering parts.
For parts orders, call 888-619-7060 or e-mail us at
[email protected]. Please have the model number of your
heater and the replacement part number when placing your
order.
If a part is damaged or missing, simply e-mail us at
[email protected], visit our website at scheuco.com, or call
our Technical Support Department at (888) 619-7060.
Address any Warranty Claims to the Customer Service
Department, Scheu Products Company, Incorporated, P.O. Box
250, Upland, California 91785, or e-mail us at
[email protected]. Include your name, address and telephone
number and include details concerning the claim. Also, supply
us with the purchase date and the name and address of the
dealer from whom you purchased our product.
The foregoing is the full extent of the responsibility of the
Company. There are no other warranties, express or implied.
Specifically there is no warranty of fitness for a particular
purpose and there is no warranty of merchantability. In no event
shall the Company be liable for delay caused by imperfections,
for consequential damages, or for any charges of the expense of
Page -13-
Hand print only. Use black or blue ink pen to fill in this form. Cross or check inside the circle.
WARRANTY REGISTRATION
Warranty
Registration
Your Information
First Name
Last name
Mailing Address
State
City
Postal code
E-mail Address
Annual house hold income before tax
Age of Purchaser
<$9,999
<20 years
$10,000 to $19,999
20-29 years
30-39 years
$20,000 to $34,999
40-49 years
$20,000 to $34,999
50-59 years
>$50,000
>60 years
Fold Here
Your Preferences
In choosing your heater the following categories
were:
Who selected the heater?
Male
Heater will be used by?
Individual
Business
How did you learn
about our heater?
Advertising
Relative/friend
Features
Store display
Previously owned heater
Portability
Female
Both
Somewhat
Important
Sudden cold weather
Emergency backup heat
Quality
Replaces old model
Hard to heat location
Heat Output
Heater on sale
Other
Warranty
Construction project
Where will you use the
heater?
Very
Important
Price
Other
What prompted you to
buy your heater?
Important
Serviceability
Construction site
Warehouse
Fuel economy
Shop
Patio
Ease of use
Size
Other
Fold Here
Product Information
/
-
/
Date of Purchase (MM/DD/YY)
Brand Name
Cost of Heater ($)
S/N (Located on a silver label on heater)
All Pro
Universal
Model Number (Located on a black and white label on heater)
National Riverside
Store Information where heater was purchased
Store Name
Type of Store
State
City
Hardware
Home Center
Warehouse Retailer
Discount Store
Farm Supply
Contractor’s Supply
Registering this heater within 10 days of purchase ensures the buyer the protection as stated on our limited warranty form.
Other
SCHEU PRODUCTS COMPANY, INC
ATTN: MARKETING DEPARTMENT
8855 BAKER AVENUE
RANCHO CUCAMONGA, CA 91730
Visit our website for product information, technical support, customer service, and warranty registration at:
WWW.ALLPRO-HEATERS.COM for All-Pro products or WWW.UNVERISAL-HEATERS.COM for Universal
products.