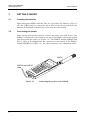
1
USER'S GUIDE Vaisala HUMICAP® Indicator HMI41 and Probes HMP41/45/46 M210316EN-A PUBLISHED BY Vaisala Oyj P.O. Box 26 FIN-00421 Helsinki Finland Phone (int.): +358 9 8949 1 Fax: +358 9 8949 2227 Visit our Internet pages at http://www.vaisala.com/ © Vaisala 2006 No part of this manual may be reproduced in any form or by any means, electronic or mechanical (including photocopying), nor may its contents be communicated to a third party without prior written permission of the copyright holder. The contents are subject to change without prior notice. Please observe that this manual does not create any legally binding obligations for Vaisala towards the customer or end user. All legally binding commitments and agreements are included exclusively in the applicable supply contract or Conditions of Sale. HMI41 AND PROBES Operating Manual M210316EN-A Contents 1. THE HMI41 INDICATOR AND PROBES............................................................................... 1 2. TO BE NOTED IN THE MEASUREMENT OF HUMIDITY ..................................................... 3 3. GETTING STARTED ............................................................................................................ 4 4. 5. 6. 7. 8. 9. 3.1 Inserting the batteries............................................................................................. 4 3.2 Connecting the probes ........................................................................................... 4 TAKING MEASUREMENTS ................................................................................................. 5 4.2 Starting the measurements .................................................................................... 5 4.2 Measurement readings on display ......................................................................... 6 4.3 HOLD-mode ............................................................................................................. 7 CALIBRATION ..................................................................................................................... 8 5.1 Calibration with trimmer potentiometers ............................................................... 8 5.2 Calibration with HMI41 software commands ....................................................... 10 HMI41 AND DATA COLLECTING ...................................................................................... 20 6.1 Entering the data collecting mode ....................................................................... 20 6.2 Manual data collecting.......................................................................................... 21 6.3 Setting the measurement duration....................................................................... 22 6.4 Setting the measurement interval ........................................................................ 22 6.5 Reading the measurement results ....................................................................... 23 TRANSFERRING THE STORED READINGS TO A PC ...................................................... 26 7.1 Giving the communication parameters ................................................................ 26 7.2 Transferring the data ............................................................................................ 29 CHANGING THE SETTINGS.............................................................................................. 33 8.1 Entering the setup mode ...................................................................................... 33 8.2 Selecting the display units ................................................................................... 34 8.3 Setting the automatic power-off function ............................................................ 34 8.4 Selecting the display quantities ........................................................................... 35 8.5 Setting the pressure for mixing ratio and wet bulb temperature calculations . 35 8.6 Selecting the probe type....................................................................................... 36 MAINTENANCE ................................................................................................................. 37 9.1 Changing the HUMICAP180 humidity sensor..................................................... 37 9.2 Chemical tolerances of the HUMICAP180 sensor .............................................. 37 9.3 Using the HMP46 in high temperatures ............................................................... 37 9.4 Spare parts and accessories ................................................................................ 38 i HMI41 AND PROBES Operating Manual M210316EN-A 10. IN CASE OF ERROR .......................................................................................................... 39 10.1 Trouble shooting ................................................................................................... 39 10.2 Checking the settings ........................................................................................... 40 11. TECHNICAL DATA............................................................................................................. 41 11.1 HMI41 indicator...................................................................................................... 41 11.2 HMP41and HMP45 probes ..................................................................................... 42 11.3 HMP46 probe.......................................................................................................... 43 11.4 Accuracy of the calculated quantities .................................................................. 44 11.5 Electromagnetic compatibility .............................................................................. 47 APPENDIX 1 QUICK REFERENCE GUIDE ................................................................................ 48 WARRANTY............................................................................................................................... 65 ii HMI41 AND PROBES Operating Manual M210316EN-A 1. THE HMI41 INDICATOR AND PROBES The HMI41 is an easy-to-use portable humidity and temperature indicator for a variety of applications, including such as industrial monitoring and inspections, occupational health and safety, laboratory and research use, spot checking etc. When equipped with optional calibration cables, the HMI41 can also be used as a field calibrator for most Vaisala transmitters. There are six different probe types that can be used with the HMI41 indicator. The indicator recognizes the probe type automatically, so there is no need to change settings each time the probe is changed. However, please, note that this feature is active only in indicators and probes with letters ID in the instrument label. For previous versions, the probe type has to be set manually. The HMP44/L is an exception, as indicators marked with ID recognize automatically all versions of this probe. All probe types are optimized for different applications: • HMP41 probe can be used for measuring humidity and temperature in various applications, for example in spot checks. • HMP42 probe head has a diameter of only 4 mm and is 23.5 cm long. This probe structure is specially indicated for measurements in very tight places, e.g. in joint spaces between tiles or in air conditioning channels as well as for measuring the equilibrium humidity of e.g. timber (separate manual). • HMP44 and HMP44L are used for measuring humidity in concrete and other structures (separate manual). • HMP45 probe is indicated for measurements in channels and other places that are difficult to reach and therefore require a probe head with cable. • HMP46 consists of a 32 cm long probe head of stainless steel; the HMP46 is optimized for measurements in relatively high temperatures (up to +100°C, temporarily even +180 °C), in dirty processes and in general in applications that require a robust probe structure. 1 HMI41 AND PROBES Operating Manual M210316EN-A The HMI41 indicator displays relative humidity, temperature and dewpoint temperature readings. In addition to these, one of the following quantities can also be chosen: absolute humidity, wet bulb temperature or mixing ratio. The indicator also features an automatic power-off function which can be disabled, and a continuously updated display. The display can also be frozen to show the current readings, and it can be used for checking the minimum and maximum readings measured during data collecting. The automatic power-off function is not active during data collecting even if it was previously selected. The versatile HMI41 indicator also includes a data collecting feature. Data collecting can be either automatic or manual, and it can be optimized for each application: both the measurement interval and duration can be set by the user. During automatic data collecting, the probe takes measurements only just before storing each measurement. In order to minimize the consumption and to maximize the battery life, the power is automatically turned off for the measurement interval and the display is dim except when the readings on the display are updated (once a minute). If required, the collected data can be transferred to a PC; an optional serial interface cable is available for this purpose (order code 19446ZZ). The humidity measurement range is 0...100 %RH. The temperature measurement range depends on the probe used. Relative humidity is measured with the accurate and stable HUMICAP180 humidity sensor which uses an operating principle based on the changes in the capacitance of the sensor as its thin polymer film absorbs water molecules. 2 HMI41 AND PROBES Operating Manual M210316EN-A TO BE NOTED IN THE MEASUREMENT OF HUMIDITY In the measurement of humidity and especially in calibration it is essential that temperature equilibrium is reached. Even a small difference in temperature between the measured object and the sensor causes an error. If the temperature is +20 °C (+68 °F) and the relative humidity is 50 %RH, a difference of +1 °C between the measured object and the sensor causes an error of +3 %RH. When the humidity is 90 %RH, the corresponding error is + 5.4 %RH. The error is at its greatest when the sensor is colder or warmer than the surroundings and the humidity is high. Although the humidity sensor reacts rapidly to changes in the amount of water vapour in the air, the probe temperature changes more slowly. To avoid errors caused by temperature differences the probe must always be left to stabilize to ambient temperature before starting measurements: the bigger the temperature difference, the longer the stabilization time. Indoors relative humidity should be measured in a place where the temperature is as close to the average temperature of the room as possible. Measurements taken close to heat sources will not give a true picture of the relative humidity in the whole room. 10 9 8 7 dRH (%RH) 2. 6 5 4 3 2 1 0 -40 -20 0 20 40 60 80 100 Temperature (°C) Figure 2.1 Measurement error at 100 %RH when the difference between the ambient and the sensor temperature is 1 °C 3 HMI41 AND PROBES Operating Manual M210316EN-A 3. GETTING STARTED 3.1 Inserting the batteries When taking the HMI41 indicator into use, first insert the batteries (4 pcs of size AA [LR6] batteries). Open the lid on back of the device and insert the batteries as indicated in the housing. Then close the lid carefully. 3.2 Connecting the probes After having inserted the batteries, connect the probe you wish to use. The HMP41 is connected to the connector on top of the HMI41: remove the plastic plug and mount the probe (see Figure 3.2). The HMP45 and the HMP46 both have a cable to be plugged into the connector at the bottom of the HMI41, marked PROBE (see Figure 3.2). The other connector is for calibration cables. HMP41 HMP45 and HMP46 cable Figure 3.2 4 Connecting the probes to the HMI41 HMI41 AND PROBES Operating Manual M210316EN-A 4. TAKING MEASUREMENTS 4.2 Starting the measurements Before starting the measurements with the HMI41 and appropriate probe, remember to allow enough time for stabilization. Turn the power on with the ON/OFF button and the following appears: RH % Td °C °F T °C °F P set min max g/m hPa hyst hold Lo bat Hi Within a couple of seconds, the display changes to show the software version and then the probe type indication (41.45 or 42.46): NOTE: if the following appears, check that the probe is correctly connected: If the software version does not appear, it is smaller than 1.02 and the indicator cannot be used with the HMP46 probe. If the probe type does not appear, the indicator or the probe is of a previous version and the automatic recognition is not possible; give the setting manually (see Chapter 8). After a couple of seconds, the battery voltage appears on the display with an indication of the battery charge (high or low): bat Hi If the battery voltage is higher than 4.75 V, the text on the lower righthand corner is “bat HI” and after a few seconds, the HMI41 automatically displays the RH and T readings. If the voltage is 4.65...4.75 V, the text is “Lo bat” and the batteries should be replaced (see Chapter 3.1). If the voltage is lower than 5 HMI41 AND PROBES Operating Manual M210316EN-A 4.65 V, the indicator turns itself off to prevent erroneous measurements and readings. Should this happen, replace the batteries. 4.2 Measurement readings on display Relative humidity and temperature readings appear automatically after the battery charge indication: RH % T °C If MODE is pressed, dewpoint temperature (Td) reading is displayed: Td T °C °C When MODE is pressed again, one of the following is displayed or the HMI41 returns to showing the RH and T readings according to what has been chosen for the measurement quantities (see Chapter 8.4): T °C abs g/m T °C Temperature and absolute humidity °C Temperature and wet bulb temperature; the arrow in the lower righthand corner indicates that wet bulb temperature has been chosen T °C Temperature and mixing ratio; the arrow in the lower righthand corner indicates that mixing ratio has been chosen (the unit is g/kg or gr/lb). 6 HMI41 AND PROBES Operating Manual M210316EN-A 4.3 HOLD-mode In any of the previously mentioned measurement reading displays, the button HOLD freezes the display to show the current readings, e.g. RH & T readings: RH % T °C hold With MODE or ENTER, the display returns to the normal display mode. If the indicator turns itself off with the automatic power-off function during the HOLD-mode, it wakes up in the same mode when turned on again. The 'hold'-text is blinking and the indicator can be returned to the normal display mode with any button except ON/OFF. 4.3.1 MIN-mode If you wish to know the minimum readings that have been measured after power up, press HOLD when the indicator is in the HOLD-mode. The minimum readings of the currently displayed quantities are shown (if the ‘hold’-text is blinking, the HMI41 must first be returned to the normal display mode in order to activate the MIN-mode; see Chapter 4.3): RH % T min °C With MODE or ENTER, the indicator returns to the normal display mode. 4.3.2 MAX-mode If you wish to know the maximum readings that have been measured after power up, press HOLD when the indicator is in the MIN-mode. The maximum readings of the currently displayed quantities appear: RH % T °C max The indicator returns to the normal display mode with any button except ON/OFF. 7 HMI41 AND PROBES Operating Manual 5. M210316EN-A CALIBRATION The HMI41 indicator and probes are fully calibrated at the factory, so there should be no immediate need for recalibration. Calibration is recommended once in a year and always when there is a reason to believe that the adjustments have changed. 5.1 Calibration with trimmer potentiometers 5.1.1 Humidity calibration Humidity calibration of the probes is preferably done by adjusting the trimmer potentiometers. The potentiometers are located under a protective plug. The potentiometer marked T (temperature) is for factory use only; DO NOT make any adjustments. To make sure that this potentiometer is not accidentally touched when adjusting the other two, turn the plastic plug aside without removing it completely (see Figure 5.1.1). For adjusting the potentiometers, use a trimming wrench provided with the probe, or some other suitable tool, e.g. a ceramic 1.5 mm slot screwdriver. HMP41 & HMP45 HMP46 T W D wet dry wet W W D D dry Figure 5.1.1 Location of trimmer potentiometers A two point calibration is performed with the HMK15 calibrator or the probe can be sent to Vaisala. The probes must always be recalibrated when the sensor is changed. 8 HMI41 AND PROBES Operating Manual M210316EN-A The calibration procedure is as follows (see also the calibrator manual): • Leave the calibrator and the probe at the calibration site for at least 30 minutes before starting the calibration in order to let the probe temperature stabilize to the room temperature. Unscrew the plastic grid (HMP41 and HMP45) or the sintered filter (HMP46) of the probe. • Insert the probe into a measurement hole of the LiCl salt chamber in the humidity calibrator. • Wait until the humidity reading stabilizes (approx. 30 minutes). Check the temperature and read the closest humidity value in the calibration table. Adjust the dry end reading with the potentiometer D (dry) in the probe body to correspond to the value given in the calibration table; use a suitable trimming screw wrench (see Figure 5.1.1). • Insert the thermometer into the 13.5 mm hole of the NaCl salt chamber and the probe into another hole of the NaCl chamber. NOTE When calibrating probes that are being used for long term measurements (over 1 hour) in high humidities (90 - 100 %RH), use the K2SO4 salt as the high end reference. • Wait until the humidity reading stabilizes. Read the salt chamber temperature from the thermometer and then the closest humidity value from the calibration table. Adjust the wet end reading with the potentiometer W (wet) to correspond to the value given in the calibration table. Table 5.1 Greenspan’s calibration table °C 0 5 10 15 20 25 30 35 40 45 50 * LiCl * * * * 11.3 11.3 11.3 11.3 11.2 11.2 11.1 NaCl 75.5 75.7 75.7 75.6 75.5 75.3 75.1 74.9 74.7 74.5 74.4 K2SO4 98.8 98.5 98.2 97.9 97.6 97.3 97.0 96.7 96.4 96.1 95.8 If the LiCl solution is used or stored in temperatures below +18°C, its equilibrium humidity changes permanently 9 HMI41 AND PROBES Operating Manual M210316EN-A As the D (dry) and W (wet) adjustments may affect each other, check again the humidity reading in the LiCl salt chamber: insert the probe into the calibration hole and wait until the reading stabilizes. If necessary, repeat the adjustments in both the LiCl and the NaCl (K2SO4) salt chambers until the reading is correct. 5.2 Calibration with HMI41 software commands Calibration can also be done with the HMI41 software commands. When calibration is done with software commands, the corrections are entered in the indicator memory with pushbuttons. If only one probe is being used, the HMI41 software calibration is useful. However, when several probes are in use, calibration should be done by adjusting the probe potentiometers. Note that when the sensor is changed, calibration must always be done by adjusting the potentiometers and it is recommended that the HMI41 is reverted to factory settings by selecting default calibration. NOTE If the factory calibration of the HMI41 is changed, the correction data refers to the calibrated probe only. Therefore, if you change the probe, always revert this data to factory settings by selecting default calibration, or perform a new calibration with the new probe. The calibration procedure is included in the HMI41 setup mode. Enter the setup mode by pressing the ON/OFF button. The following appears: RH % Td °C °F T °C °F P set min max g/m hPa hyst hold Lo bat Hi Then release the ON/OFF button and press within 1 - 2 seconds both ENTER and MODE buttons until the following text appears on the display: After a few seconds, the text changes automatically to show the following: °C set 10 HMI41 AND PROBES Operating Manual M210316EN-A Press ENTER eight times until the following text appears: set This indicates that no calibration has been selected. In addition to this, there are five calibration types available. The desired type is selected with buttons ▲ or ▼. All selections are acknowledged with ENTER. In the following, you will find a list of these calibration options. RH T Default calibration restores the factory settings of the humidity and temperature calibrations. set RH One point humidity calibration; select this for performing humidity calibration at one point. See Chapter 5.2.1 for further details. set RH Two point humidity calibration; select this for performing humidity calibration at two points. See Chapter 5.2.2 for further details. set T One point temperature calibration; select this for performing temperature calibration at one point. See Chapter 5.2.3 for further details. set T Two point temperature calibration; select this for performing temperature calibration at two points. See Chapter 5.2.4 for further details. set 5.2.1 One point humidity calibration In one point humidity calibration, one accurate humidity reference is sufficient. However, note that after one point calibration, the humidity reading is most accurate near the reference value. For a better accuracy over the whole range, perform a two point calibration if possible. Leave the reference instrument (HMK15) and the probe at the calibration site at least 30 minutes so that the probe temperature stabilizes to the room temperature. Start the calibration by inserting the probe to the reference humidity. 11 HMI41 AND PROBES Operating Manual M210316EN-A In setup mode, press ENTER repeatedly until the following is displayed: set Then press MODE twice, and the following appears: RH set Press ENTER to activate the one point calibration mode. A message similar to the following appears with the first line blinking: RH % set The blinking number indicates the humidity reference value in the HMI41 memory. Check the salt chamber temperature, read the closest humidity value in the calibration table and adjust the display with buttons ▲ and ▼ to correspond to the value given in the table. For example, if the temperature in the calibrator's NaCl salt chamber is 20.5 °C, adjust the value to 75.5 %RH: RH % set Each time the button is pressed, the value changes with 0.1 %. If you keep the button pressed, the value changes in a faster mode. Press ENTER and the HMI41 indicator shows the value that the probe is currently measuring, displaying a message similar to the following: RH % Wait at least ten minutes for the reading to stabilize and press ENTER to acknowledge the value. Press ENTER again to conclude the one point 12 HMI41 AND PROBES Operating Manual M210316EN-A calibration. If the calibration has been successful, the following message appears: The correction data has now been calculated and stored in the HMI41 memory. The HMI41 returns automatically to the selection of display units, and can be turned off. When the indicator is used as a standard indicator and the correction data differs from the factory settings, an arrow in the upper righthand corner is displayed: RH % T °C If the message “cal pass” does not appear (instead, some other text may appear, e.g. “too close”, “err offst” or “err gain”), the correction has not been stored in the memory. The error may be due to an incorrect reference value or to measured values that are out of the range. 5.2.2 Two point humidity calibration In two point humidity calibration, two accurate references (e.g. the HMK15 Calibrator) are needed. Leave the reference instrument and the probe at the calibration site for at least 30 minutes so that the probe temperature stabilizes to the room temperature. Start the calibration by inserting the probe to the lower reference humidity. In setup mode press ENTER repeatedly until the following is displayed: set Then press MODE three times, and the following appears: RH set 13 HMI41 AND PROBES Operating Manual M210316EN-A Press ENTER to activate the two point humidity calibration mode. A message similar to the following appears with the first line blinking: RH set % Lo The blinking number indicates the value of the lower humidity reference stored in the HMI41 memory. Check the salt chamber temperature, read the closest humidity value in the calibration table and adjust the display with buttons ▲ and ▼ to correspond to the value given in the table. For example, if the temperature of the LiCl salt chamber is 22 °C, adjust the value to 11.3 %RH: RH set % Lo Press ENTER, and the HMI41 shows the value that the probe is currently measuring, displaying a message similar to the following: RH % Lo Wait at least ten minutes for the reading to stabilize and press ENTER to acknowledge the value. Press ENTER again to conclude the lower point calibration. A message similar to the following appears with the first line blinking: RH set % Hi The blinking number indicates the value of the higher humidity reference stored in the HMI41 memory. Insert the probe to the higher reference humidity. Check the salt chamber temperature, read the closest humidity value in the calibration table and adjust the display with buttons ▲ and ▼ to correspond to the value given in the table. For example, if the temperature in the calibrator's NaCl salt chamber is 20.5 °C, adjust the value to 75.5 %RH: 14 HMI41 AND PROBES Operating Manual M210316EN-A RH % set Press ENTER and the HMI41 indicator shows the value that the probe is currently measuring, displaying a message similar to the following: RH % Hi Wait at least ten minutes for the reading to stabilize and press ENTER to acknowledge the value. Press ENTER again to conclude the calibration. If the calibration has been successful, the following message appears: The correction data has now been calculated and stored in the HMI41 memory. The HMI41 returns automatically to the selection of the display units, and can be turned off. When the indicator is used as a standard indicator and the correction data differs from the factory settings, an arrow in the upper righthand corner is displayed: RH % T °C If the message “cal pass” does not appear (instead, some other text may appear, e.g. “too close”, “err offst” or “err gain”), the correction has not been stored in the memory. The error may be due to an incorrect reference value or to measured values that are out of the range. 5.2.3 One point temperature calibration In one point temperature calibration, one accurate temperature reference is sufficient. Start the calibration by inserting the probe to the reference temperature. In setup mode, press ENTER repeatedly until the following is displayed: 15 HMI41 AND PROBES Operating Manual M210316EN-A set Then press MODE four times, and the following appears: T set Press ENTER to activate the one point temperature calibration mode. A message similar to the following appears with the first line blinking: T °C set The blinking number indicates the temperature reference value stored in the HMI41 memory. Check the actual temperature reference and change the display with buttons ▲ and ▼ to correspond to the accurate value, for example: T °C set Press ENTER and the HMI41 indicator shows the value that the probe is currently measuring, displaying a message similar to the following: T °C Wait at least ten minutes for the reading to stabilize and press ENTER to acknowledge the value. Press ENTER again to conclude the calibration. If the calibration has been succesful, the following message appears: 16 HMI41 AND PROBES Operating Manual M210316EN-A The correction data has now been calculated and stored in the HMI41 memory. The HMI41 returns automatically to the selection of the display units, and can be turned off. When the indicator is used as a standard indicator and the correction data differs from the factory settings, an arrow in the upper righthand corner is displayed: RH % T °C If the message “cal pass” does not appear (instead, some other text may appear, e.g. “too close”, “err offst” or “err gain”), the correction has not been stored in the memory. The error may be due to an incorrect reference value or to measured values that are out of the range. 5.2.4 Two point temperature calibration In two point temperature calibration, two accurate temperature references are needed. Note that you must allow enough time for all instruments to stabilize to the temperature equilibrium. Start the calibration by inserting the probe to the lower reference temperature. In setup mode, press ENTER repeatedly until the following is displayed: set Then press MODE five times, and the following appears: T set Press ENTER to activate the two point temperature calibration mode. A message similar to the following appears with the first line blinking: 17 HMI41 AND PROBES Operating Manual T set M210316EN-A °C Lo The blinking number indicates the value of the lower temperature reference stored in the HMI41 memory. Insert the probe to the lower reference temperature. Check the reference temperature and change the display with buttons ▲ and ▼ to correspond to the accurate value, for example: T set °C Lo Press ENTER and the HMI41 shows the value that the probe is currently measuring, displaying a message similar to the following: T °C Lo Wait at least ten minutes for the reading to stabilize and press ENTER to acknowledge the value. Press ENTER again to conclude the lower point calibration. A message similar to the following appears with the first line blinking: T set °C Hi The blinking number indicates the value of the higher temperature reference stored in the HMI41 memory. Insert the probe to the higher reference temperature. Check the reference temperature and change the display with buttons ▲ and ▼ to correspond to the accurate value, for example: T set °C Hi Press ENTER and the HMI41 shows the value that the probe is currently measuring, displaying a message similar to the following: 18 HMI41 AND PROBES Operating Manual M210316EN-A T °C Hi Wait at least ten minutes for the reading to stabilize and press ENTER to acknowledge the value. Press ENTER again to conclude the calibration. If the calibration has been successful, the following message appears: The correction data has now been calculated and stored in the HMI41 memory. The HMI41 returns automatically to the selection of the display units, and can be turned off. When the indicator is used as a standard indicator and the correction data differs from the factory settings, an arrow in the upper righthand corner is displayed: RH % T °C If the message “cal pass” does not appear (instead, some other text may appear, e.g. “too close”, “err offst” or “err gain”), the correction has not been stored in the memory. The error may be due to an incorrect reference value or to measured values that are out of the range. 19 HMI41 AND PROBES Operating Manual 6. M210316EN-A HMI41 AND DATA COLLECTING The HMI41 indicator can also be used for collecting the measurement data. The data is stored in the indicator's non-volatile memory which means that it is not lost when the indicator is turned off. Please, note also that the automatic power-off function is not active during data collecting even if previously selected (see Chapter 8.3). When the data collecting has ended, the automatic power-off function becomes active again. 6.1 Entering the data collecting mode Enter the data collecting mode by turning the indicator on with the ON/OFF button. The following appears for a couple of seconds: RH % Td °C °F T °C °F P set min max g/m hPa hyst hold Lo bat Hi Release the ON/OFF button and press immediately the button HOLD. The software version and the probe type indication appear, after which the display changes automatically to show the battery charge: bat Hi Within a couple of seconds the text the HOLD button. REC AUTO appears on the display; release This is the main display of the data collecting mode. With the button MODE you can enter the REC CATCH mode (manual data collecting, see Chapter 6.2) and by pressing MODE again, the REC READ mode (reading the measurement results, see Chapter 6.5). By pressing ENTER, you can set the measurement duration and by pressing ENTER again, the measurement interval (Chapters 6.3 and 6.4). By pressing HOLD, you can always return to the previous display. 20 HMI41 AND PROBES Operating Manual M210316EN-A 6.2 Manual data collecting For manual data collecting, press the button MODE and the following appears: Press ENTER and a text similar to the following appears: RH % T set °C The probe is now taking measurements and you can store the readings at appropriate intervals by pressing the button HOLD. Each time you store a reading, its sequence number in the indicator memory appears for a couple of seconds: The indicator returns automatically to show the readings. You can store 199 measurement readings in the indicator memory (numbers 1 - 199). In automatic data collecting, you can store 200 readings (0 - 199). End data collecting by turning the indicator off. You can read the readings in the REC READ mode (see Chapter 6.5). 21 HMI41 AND PROBES Operating Manual 6.3 M210316EN-A Setting the measurement duration Turn the indicator on with the ON/OFF button, press immediately the button HOLD and keep it pressed until the text REC AUTO appears on the display. Press ENTER and a text similar to the following appears on the display: bat (previously set duration) In this mode, you can set the time between the first and the last measurement stored, e.g. 30 minutes or 3 days. When entering this mode, previously set duration time appears on the display. If the previously set duration time is too long for the current battery charge, the longest calculated duration time possible appears instead. This is also indicated with the text 'MAX'. The duration of the measurement can be set from 15 minutes to 7 days. The batteries last for 7 days during data collecting provided that they are of the same type as those delivered with the indicator. Set the duration with buttons ▲ and ▼. The duration time can be selected in steps according to the following: • • • • 15 min; 30 min 1 - 6 h: each pressing = 1 h 12 h 1 - 7 d: each pressing = 1 d If the duration selected is too long for the current battery charge, the text 'BAT' appears. Select a shorter duration time. Press ENTER to set the measurement interval. 6.4 Setting the measurement interval min (previously set interval) In this mode, you can set the time between two measurements stored, e.g. 5 minutes or 2 hours. When entering this mode, previously set interval appears on the display. If the previously set measurement interval is too short for the current memory capacity of the indicator, the shortest calculated measurement interval appears instead. This is also indicated with the text 'MIN'. 22 HMI41 AND PROBES Operating Manual M210316EN-A Select the interval with buttons ▲ and ▼. The measurement interval can be selected in steps according to the following: • • • • 1 - 5 min: each pressing = 1 minute 10 min; 15 min; 30 min 1 - 6 h: each pressing = 1 hour 12 h The text 'LO' on the display indicates that there is not enough memory for the chosen interval; select a longer interval. When you press ENTER, a text similar to the following appears: RH % T set °C This is the measurement mode with the data collecting feature activated. It can be distinguished from the normal measurement mode by the text 'SET' on the lower lefthand corner of the display. The readings on the display are updated once a minute, and the display is dim except during this updating in order to minimize the consumption. If the indicator is turned off, the measurements stored so far remain in the memory and they can be read by turning the indicator on in the REC READ mode (see section 6.5). You can end the data collecting by pressing ON/OFF. 6.5 Reading the measurement results The measurement results can be read in the REC READ mode. This mode can be entered from the REC AUTO mode by pressing twice the button MODE. The following appears: Press ENTER, and a text similar to the following appears on the display: RH % T °C Numbers on the first line indicate the reading of the quantity in question (in this example, RH). The number on the left on the second line (in this example number 0.) is the sequence number of the measurement. This number helps to 23 HMI41 AND PROBES Operating Manual M210316EN-A estimate the time of the measurement stored during automatic data collecting provided that the starting time and the measurement interval are known. Numbers on the right on the second line indicate the temperature reading measured simultaneously with the reading on the first line; if you wish to see the decimals, press ENTER. The reading appears on the display with one decimal: RH % T °C In a couple of seconds the indicator returns to the previous display. Press MODE to change the quantity on the first line: Td T °C °C If you press ENTER (with any quantity on the first line), an arrow appears on the higher right hand corner of the display: RH % T °C Press HOLD while the arrow is displayed to scroll the measurement results (note that the sequence number changes): RH % T °C HOLD: RH % T °C etc. If the button HOLD is pressed continuously, numbers change in a faster rate. 24 HMI41 AND PROBES Operating Manual M210316EN-A 6.5.1 MIN and MAX in data collecting REC READ mode When the data collecting REC READ mode has been activated, the HOLD button brings four different modes on the display: MIN HI, MAX HI, MIN LO and MAX LO. These modes indicate the maximum and minimum readings measured for the quantities on the display. HI and LO tell you whether the reading observed is the one on the first line (HI) or the one on the second line (LO). MIN and MAX indicate whether the reading on the display is the minimum or the maximum value. In other words, if the text is MIN HI it means that you are now observing the minimum reading of the quantity on the first line. By pressing HOLD repeatedly you can change from one display mode to another, and by pressing MODE you can change the quantity on the first line. In all these modes, the decimals of the second line reading are shown by pressing the button ENTER. Examples: RH % RH % T °C ENTER T °C Hi min returns automatically (minimum reading of the 1st line quantity) min Hi (decimals of the 2nd line) HOLD RH % T °C RH % T °C ENTER max Hi returns automatically (maximum reading of the 1st line quantity) Hi max (decimals of the 2nd line) HOLD RH % T °C RH % ENTER min T returns automatically Lo (minimum reading of the 2nd line quantity) °C min Lo (decimals of the 2nd line) HOLD RH % RH % ENTER T °C max Lo T returns automatically (maximum reading of the 2nd line reading) °C max Lo (decimals of the 2nd line) 25 HMI41 AND PROBES Operating Manual 7. M210316EN-A TRANSFERRING THE STORED READINGS TO A PC The readings that have been stored in the HMI41 memory manually or automatically in the data collecting mode, can be transferred to a computer and then printed if desired. In order to do this, connect a serial connection cable (order code 19446ZZ) to the appropriate connectors on your PC and in the HMI41: connect the serial cable to the EXT connector Figure 7.1 7.1 Connecting the cable Giving the communication parameters Give the communication parameters when using this terminal session for the first time; save them for future use. See instructions in the following tables. Table 7.1.1 Giving parameters in Windows 3.1 MENU DESCRIPTION PROGRAM MANAGER ò ACCESSORIES ò double click TERMINAL ò Settings ò double click Communications ò File ò Save as click click and select parameters (see figure 7.1.1 next page); click OK move the cursor to: click click and save settings: type the name of the file (e.g. HMI41) and click OK Turn the HMI41 on and follow the instructions in Ch. 7.2 26 HMI41 AND PROBES Operating Manual M210316EN-A NOTE: select the connector according to your computer. Select the connector first and give then other parameters Figure 7.1.1 Giving the communication parameters in Windows 3.1 27 HMI41 AND PROBES Operating Manual M210316EN-A Table 7.1.2 Giving parameters in Windows 95 and Windows NT WINDOWS 95 MENU Start ò Programs ò Accessories ò HyperTerminal ò Hypertrm ò Connection Description WHAT TO DO move the cursor to: move the cursor to: move the cursor to: click move the cursor to: double click type the name of the connection (e.g. HMI41) in the appropriate field and select an icon if available; click OK. WINDOWS NT MENU Start ò Programs ò Accessories ò HyperTerminal ò Hyperterminal ò Connection Description WHAT TO DO move the cursor to: move the cursor to: move the cursor to: move the cursor to: click type the name of the connection (e.g. HMI41) in the appropriate field and select an icon if available; click OK. ò Phone Number move the cursor to the field CONNECT USING and select 'direct to COM x' (x = serial port available); click OK ò COM x properties Connect to move the cursor to the field CONNECT USING and select 'COM x' (x = serial port available); click OK ò select parameters according to the screen in figure 7.1.2; click OK COM x properties select parameters according to the screen in figure 7.1.2; click OK Turn the HMI41 on and follow the instructions in Chapter 7.2 28 HMI41 AND PROBES Operating Manual M210316EN-A Figure 7.1.2 7.2 Selecting the parameters in Windows 95 and NT Transferring the data When you have given the communication parameters, you can start transferring the data from the HMI41. Note that communication parameters can be stored in the computer for future use. To start transferring the data, make sure that the HMI41 is connected to a serial port of your computer and that the terminal session is open. Turn the HMI41 on with the ON/OFF button. A text similar to the following should now appear on your computer display: HMI41 / 2.01 > 29 HMI41 AND PROBES Operating Manual 7.2.1 M210316EN-A PLAY Transferring the data To transfer the data on your PC, type outputting automatically stored data: PLAY and press ENTER. An example of >play Reading Log... OK data 0 1 2 3 4 5 6 > hh:mm:ss 00:00:00 00:01:00 00:02:00 00:03:00 00:04:00 00:05:00 00:06:00 RH 12.54 12.10 12.18 12.12 12.16 12.09 12.09 T 21.53 21.23 21.18 21.15 21.14 21.12 21.09 Td -8.48 -9.16 -9.12 -9.21 -9.18 -9.27 -9.28 An example of outputting manually stored data: >play Reading Log... OK data 1 2 3 4 5 6 RH 12.10 12.18 12.12 12.16 12.09 12.09 T Td 21.23 21.18 21.15 21.14 21.12 21.09 -9.16 -9.12 -9.21 -9.18 -9.27 -9.28 > If you know the starting time of the automatic data collecting, you can enter it with the command and get an output showing the actual time of measurement. For example: >play 15:05 Reading Log... OK data 0 1 2 3 4 5 6 7 > hh:mm:ss 15:05:00 15:06:00 15:07:00 15:08:00 15:09:00 15:10:00 15:11:00 15:12:00 7.2.2 CPLAY RH 8.52 9.58 9.60 9.61 9.65 11.22 9.93 9.92 T 23.69 23.66 23.50 23.30 23.25 23.41 23.30 23.22 Td -11.70 -10.26 -10.35 -10.48 -10.47 -8.44 -10.08 -10.15 Setting characters between decimals and fields With the CPLAY command, you can select what you want to appear between decimals and various fields. An example: >cplay Desimal separator : . Field separator : TAB example: 1 01:00:00 30 38.72 21.61 7.01 HMI41 AND PROBES Operating Manual M210316EN-A > To change the output, type CPLAY, then the character you wish to appear between decimals, then the character you wish to use between fields and then <cr>. An example: >cplay , <cr> Desimal separator : , Field separator : TAB example: 1 01:00:00 > 7.2.3 HELP 38,72 21,61 7,01 Outputting available commands and their contents If you wish to see which commands are available, type HELP and press ENTER. The following list appears: >help Available commands : HELP ? PLAY CPLAY Type HELP <command_name> for more help > To see the contents of each command, type HELP, command name (e.g. PLAY) and press ENTER; this brings an explanation of the command and its usage on the display: >help play Command : PLAY Purpose : Send recordings from memory to serial port Usage : PLAY hh:mm <cr>, hh:mm = rec starting time (optional) if command is used without parameters it uses default setting > 7.3.4 ? Outputting the HMI41 settings If you need to know which parameters and settings are currently stored in your HMI41 indicator, type ? and press ENTER: >? HMI41 / 2.01 Serial number Output units Baud P D S Pressure Auto Off Probe Start-up mode 4.th variable > : A0000000 : metric : 4800 E 7 1 FDX : 1013.25 : 5 : 2 : 1 : none 31 HMI41 AND PROBES Operating Manual M210316EN-A To exit the terminal session, go to FILE menu and select EXIT. Confirm that you wish to quit and then select whether you wish to store the parameters of this session for future use or not (SAVE - YES/NO). 32 HMI41 AND PROBES Operating Manual M210316EN-A 8. CHANGING THE SETTINGS The HMI41 settings can be changed in the SETUP mode. It is necessary to give the probe type setting manually if the factory settings of the indicator have been changed or if the indicator or the probe do not have letters ID in the instrument label. The factory settings of the HMI41 are the following: • display units: 0 (metric) • automatic power-off: 5 minutes • display quantities: 0 (= RH, T, Td) • pressure: 1013.25 hPa (1 hPa = 1 mbar) (for wet bulb temperature and mixing ratio calculations) • probe type AUT • start 1 (or 1, see below) (all/or HMP41/45) (HMP41/42/45/46) Indicators marked with letters ID have the automatic probe recognition as default (AUT PROBE) and previous versions the probe type 1. If the indicator does not recognize the probe type automatically, set the type manually to 2 when using the HMP46. Note also that the HMP46 probe cannot be used with the HMI41 unless the software version is 1.02 or more. To check the version, turn the HMI41 on with the ON/OFF button. The version appears on the display in a couple of seconds if it is 1.02 or greater. If it does not appear, contact Vaisala or a Vaisala representative for further information. 8.1 Entering the setup mode Enter the setup mode by pressing the ON/OFF button. The following appears: RH % Td °C °F T °C °F P set min max g/m hPa hyst hold Lo bat Hi Then release the ON/OFF button and within 1 - 2 seconds press simultaneously both ENTER and MODE buttons until the following text appears on the display: After a few seconds, the text changes automatically to show the following: 33 HMI41 AND PROBES Operating Manual M210316EN-A °C set You can scroll the setup menu by pressing ENTER. 8.2 Selecting the display units °C set You can now select the display units with buttons ▲ or ▼. Choose 0 for metric units or 1 for non-metric units (see Table 8.2). The temperature unit on the display changes accordingly. If you do not wish to change any other settings, press the ON/OFF button. If you wish to change some other settings, press ENTER; the display changes to show the setting of the automatic poweroff function. Table 8.2 Metric and non-metric units quantity RH T Td a x Tw 8.3 metric %RH °C °C g/m3 g/kg °C non-metric %RH °F °F gr/ft3 gr/lb °F Setting the automatic power-off function set The number (or text NO) on the first line of the display indicates in minutes (1...60) the time that the HMI41 stays on before it automatically turns itself off if no buttons are pressed. The number is changed with buttons ▲ and ▼. If NO is chosen, the automatic power-off function is not activated. If you do not wish to change any other settings, press the ON/OFF button. If you wish to change some other settings, press ENTER; the display changes to show the selection of the display quantities. 34 HMI41 AND PROBES Operating Manual M210316EN-A 8.4 Selecting the display quantities set The HMI41 displays relative humidity, temperature and dewpoint temperature readings. In addition to these, one of the following quantities can be chosen: absolute humidity, wet bulb temperature and mixing ratio. The number on the display indicates the following quantities: 0 = RH, T, Td 1 = RH, T, Td, abs 2 = RH, T, Td, Tw 3 = RH, T, Td, x The number is changed with buttons ▲ and ▼. If you do not wish to change other settings, press the ON/OFF button. If you wish to change other settings, press ENTER; the display changes to show the setting of the pressure for mixing ratio and wet bulb temperature calculations. 8.5 Setting the pressure for mixing ratio and wet bulb temperature calculations P set h Pa The pressure is changed (in steps of 0.25 hPa) with buttons ▲ (number up) and ▼ (number down). Acknowledge the pressure setting with ENTER and a text similar to the following appears: set or set Indicators marked with letters ID have the automatic probe recognition as default (AUT PROBE) and previous versions the probe type 1. If the indicator does not recognize the probe type automatically, set the type manually to 2 when using the HMP46. If the probe type does not have to be changed (with probes HMP41/45), turn the indicator off. 35 HMI41 AND PROBES Operating Manual 8.6 M210316EN-A Selecting the probe type set If necessary, change the setting with buttons ▲ and ▼. You have now completed the setup procedure; turn your indicator off. NOTE The HMI41 setup contains further settings (start, baud, seri and calib) that appear after probe type setting when pressing ENTER. Start setting is changed only when using the HMP44/44L probes (START 5, see the HM44 Operating Manual). For calib, see Chapter 5. Other settings are meant for the HMI41 used as a field calibrator for other Vaisala humidity transmitters. It is recommended that these settings are not changed. 36 HMI41 AND PROBES Operating Manual M210316EN-A 9. MAINTENANCE 9.1 Changing the HUMICAP180 humidity sensor Unscrew the plastic grid (HMP41&45) or the sintered filter (HMP46). Remove the damaged sensor and mount a new HUMICAP®180 humidity sensor in its place. Handle the sensor with care. Calibrate the probe using a two-point calibration procedure (see section 5.2.4). 9.2 Chemical tolerances of the HUMICAP180 sensor Long-term exposure of the HUMICAP sensor to certain chemicals and gases may affect the characteristics of the sensor and shorten its life. The following table gives the recommended maximum ambient concentrations of some chemicals: Organic solvents Aggressive chemicals (e.g. strong acids such as SO2, H2SO4, H2S, HCl, Cl2, etc.) Weak acids Bases ppm (typ.) 1000...10 000 1...10 100...1000 10 000...100 000 If necessary, request detailed information on allowed concentrations from Vaisala representatives. 9.3 Using the HMP46 in high temperatures The HMP46 probe can be temporarily used in high temperatures. For example, the probe can be installed in +180 °C for 30 minutes provided that the probe handle and 10 cm of the metal tube are at room temperature. When the HMP46 probe is used in high temperatures, it warms up. Take necessary precautions before touching it! 37 HMI41 AND PROBES Operating Manual 9.4 Spare parts and accessories Order code HMP41 HMP42 HMP45 HMP46 HUMICAP180 18921 0195 2787HM 6221 6597 10159HM HM46717 HM26849 HM36736 HM27104 HM36939 19446ZZ 19116ZZ 19164ZZ 19165ZZ HMK15 38 M210316EN-A Description RH & T probe; for fixed mounting RH & T probe; for tight spaces RH & T probe; cable model RH & T probe; cable model, for dirty or hot processes Humidity sensor Temperature sensor Pt 1000 (IEC 751 1/3 Class B) Sintered filter for HMP46 Membrane filter for HMP41 and HMP45 Plastic grid for HMP46 Membrane filter 0.2µm Membrane filter for HMP46 Plastic grid for HMP41 and HMP45 Carrying case (HMI41, HMP46; HMP44/L and accessories) Carrying case (HMI41,HMP41 and HMP45) Carrying case (HMI41 and HMP42) Probe holder for HMP46 (used in the calibration of Vaisala’s duct mounted transmitters) Serial interface cable for HMI41 Calibration cable (for HMD/W60/70, HMP140 series) Calibration cable (for HMP230 series) Calibration cable (for HMD/W20/30, HMP130 series) Humidity Calibrator HMI41 AND PROBES Operating Manual M210316EN-A 10. IN CASE OF ERROR The HMI41 goes through a continuous self-diagnostic procedure. If any problems occur, it displays the corresponding error message: where nn = the number indicating the error Whenever you come across an error message or your indicator does not function as it should, first check that the probe is correctly connected. Then check that the filter and grid are clean. 10.1 Trouble shooting In the following, a short list for trouble shooting: PROBLEM: WHAT TO DO: the display is blank - check the batteries (see Chapters 3.1 and 9.1) - if the batteries are ok, contact Vaisala or a Vaisala representative the display is dim the readings seem to be wrong you have accidentally changed some settings - during automatic data collecting, the display is dim except when the readings are updated (once a minute) - allow enough time for the probe to stabilize to the ambient temperature - check that the probe is correctly connected to the indicator - check that the grid and filter are clean - make sure that the measurement point is clean and that there is no condensated water - check that the settings are correct (see Chapter 10.2) - enter the setup mode, select the setting with ENTER and change it with buttons ▲ or ▼ (see table on previous page). The pressure setting has to be acknowledged with ENTER. 39 HMI41 AND PROBES Operating Manual 10.2 M210316EN-A Checking the settings Turn the HMI41 on and enter the setup mode (see Chapter 8). Make sure that the following settings are correct: setting probe start (*) baud seri calib correct value AUT (all probes) or 1 (with HMP41/45) or 2 (with HMP46) 1 4.8 E.7.1 def (**) (*) values 2, 3 and 4 are for calibration cables (**) when the calib setting is entered, the value is always “no”; factory settings for calibration correction data can be returned by selecting “def” If the settings are not correct, change them: in the setup mode, select the setting with ENTER, change it with buttons ▲ or ▼ and acknowledge with ENTER. If the error message still appears, write it down and contact Vaisala or a Vaisala representative for further instructions. 40 HMI41 AND PROBES Operating Manual M210316EN-A 11. TECHNICAL DATA 11.1 HMI41 indicator Maximum measurement error caused by the indicator at 20 °C (for system accuracy, see probes’ technical specifications) humidity +0.1 %RH temperature +0.1 °C Calculated variables dewpoint temperature, absolute humidity, wet bulb temperature, mixing ratio Resolution 0.1 %RH; 0.1 °C Power supply 4 batteries, type AA (IEC LR6) Battery operation time 72 h continuous use Operating humidity range 0...100 %RH non-condensing Operating temperature -20...+60 °C Storage temperature -40...+70 °C Display two line LCD Housing material ABS plastic Housing classification IP 53 (with connectors blocked) Connector type modular connector Weight (incl. batteries) 300 g Dimensions with probes: 30 38 80 320 30 30 37 38 118 88 440 HMP41 HOLD E NTE R 13 Ø 18.5 Ø 21 ¢13 ON / OF F 125 200 106 M I N /M A X 106 MODE 237 318 Ø 18.5 75 HMI41 HMP46 HMP45 41 HMI41 AND PROBES Operating Manual 11.2 M210316EN-A HMP41and HMP45 probes 11.2.1 Relative humidity Measurement range 0...100 %RH non-condensing Accuracy (at +20 °C) when calibrated against salt solutions (ASTM E104-85): ±2 %RH (0...90 %RH) ±3 %RH (90...100 %RH) Temperature dependence of electronics ±0.05 %RH/ °C Typical long-term stability better than 1 %RH per year Response time (90%) at 20 °C in still air with sintered filter 15 s Humidity sensor HUMICAP® 180 11.2.2 Temperature Measurement range (for which accuracy is specified): Temperature sensor Accuracy: °C 0.4 0.3 0.2 0.1 0 -0.1 -0.2 -0.3 -0.4 -20 -10 0 10 20 30 -20...+60 °C Pt 1000 (IEC 751 1/3 Class B) 40 50 60 °C 11.2.3 General Typical ranges of calculated variables dewpoint temperature absolute humidity wet bulb temperature mixing ratio Cable length (HMP45) Connector type (HMP45) Operating temperature range Storage temperature range Housing material Housing classification (electronics) Sensor protection Weight: HMP41 HMP45 42 -40...+60 °C 0...160 g/m3 0...+60 °C 0...160 g/kg d.a. 1500 mm; extended spiral cable modular connector -40...+60 °C -40...+70 °C ABS plastic IP65 (NEMA 4) plastic grid, part no. HM46717 30 g 160 g HMI41 AND PROBES Operating Manual M210316EN-A 11.3 HMP46 probe 11.3.1 Relative humidity Measurement range 0...100 %RH non-condensing Accuracy (at +20 °C); maximum achievable accuracy when calibrated against high quality, certified humidity standards ±1 %RH (0...90 %RH) ±2 %RH (90...100 %RH) when calibrated against salt solutions (ASTM E104-85): ±2 %RH (0...90 %RH) ±3 %RH (90...100 %RH) Temperature dependence: error %RH 2 1.5 1 0.5 0 -0.5 -1 -1.5 -2 -40 for temporary use only -20 0 20 40 60 80 100 120 140 160 180 T/°C Typical long-term stability Response time (90%) at 20 °C in still air with sintered filter Humidity sensor 11.3.2 better than 1 %RH/ year 15 s HUMICAP®180 Temperature Measurement range (sensor head) Temperature sensor Accuracy at +20°C -40...+100 °C (temporarily +180 °C) Pt100 IEC 751 1/3 Class B ±0.2 °C Accuracy over the whole temperature range: °C 0.6 0.4 0.2 0 -0.2 -0.4 -0.6 -40 -20 0 20 40 60 80 100 120 140 160 180 T/°C Temperature dependence of electronics 0.005 °C/ °C 43 HMI41 AND PROBES Operating Manual M210316EN-A 11.3.3 General -20...+60 °C -40...+100 °C (temporarily + 180 °C) -40...+80 °C Operating temperature range sensor head Storage temperature range Material: handle pipe cable Housing classification (electronics) Weight 11.4 ABS plastic stainless steel PVC spiral cable IP65 (NEMA 4) 450 g (incl. package) Accuracy of the calculated quantities Dewpoint temperature, mixing ratio, absolute humidity and wet bulb temperature are calculated from the measured relative humidity and temperature values. The accuracy of the calculated quantities depends on the calibration of the probe and on performing the measurement correctly. In tables below the accuracies of the measured values are ±2 %RH and ±0.2°C. 11.4.1 Accuracies in metric units Accuracy of dewpoint temperature (°C) T/°C 44 -40 -20 0 20 40 60 80 100 120 140 160 RH/% 10 1.82 2.09 2.51 2.87 3.24 3.60 4.01 4.42 4.86 5.31 5.80 20 1.00 1.14 1.37 1.56 1.76 1.96 2.18 2.41 2.66 2.91 3.18 30 0.74 0.83 1.00 1.13 1.27 1.42 1.58 1.74 1.92 2.10 2.30 40 0.61 0.68 0.81 0.92 1.03 1.14 1.27 1.40 1.54 1.69 1.85 50 0.53 0.59 0.70 0.79 0.88 0.97 1.08 1.19 1.31 1.44 1.57 60 0.48 0.53 0.63 0.70 0.78 0.86 0.95 1.05 1.16 1.27 1.38 70 0.44 0.49 0.57 0.64 0.71 0.78 0.86 0.95 1.04 1.14 1.24 80 0.42 0.45 0.53 0.59 0.65 0.72 0.79 0.87 0.96 1.05 1.14 90 0.50 0.55 0.61 0.67 0.74 0.81 0.89 0.97 1.06 100 0.48 0.53 0.58 0.64 0.70 0.76 0.84 0.91 0.99 HMI41 AND PROBES Operating Manual M210316EN-A T/°C Accuracy of mixing ratio (g/kg) with ambient pressure of 1013.25 mbar RH/% 10 20 30 40 50 60 70 80 0.002 0.002 0.002 0.002 0.003 0.003 0.003 0.003 -40 0.014 0.015 0.017 0.018 0.019 0.020 0.022 0.023 -20 0.08 0.09 0.09 0.10 0.10 0.11 0.12 0.12 0 0.31 0.33 0.35 0.37 0.39 0.41 0.43 0.45 20 0.97 1.03 1.10 1.17 1.24 1.31 1.38 1.46 40 2.70 2.94 3.46 3.76 3.72 4.08 4.42 4.79 60 6.78 7.80 9.00 10. 4 12.2 14.3 16.9 20.2 80 16.4 21.6 29.2 41.3 62.0 101 190 462 100 41.2 75.7 176 120 140 160 90 0.13 0.47 1.54 5.19 24.4 - 100 0.13 0.49 1.62 5.63 29.7 - 90 100 0.17 0.55 1.54 3.74 8.05 15.7 28.4 47.9 76.4 Accuracy of absolute humidity (g/m3 ) T/°C -40 -20 0 20 40 60 80 100 120 140 160 RH/% 10 20 30 40 50 60 70 80 0.003 0.003 0.003 0.003 0.004 0.004 0.004 0.005 0.020 0.021 0.023 0.025 0.026 0.028 0.029 0.031 0.10 0.11 0.12 0.13 0.13 0.14 0.15 0.15 0.37 0.39 0.41 0.43 0.45 0.47 0.49 0.51 1.08 1.13 1.18 1.24 1.29 1.34 1.39 1.44 2.73 2.84 2.95 3.07 3.18 3.29 3.40 3.52 6.08 6.30 6.51 6.73 6.95 7.17 7.39 7.61 12.2 12.6 13.0 13.4 13.8 14.2 14.6 15.0 22.6 23.3 23.9 24.6 25.2 25.8 26.5 27.1 39.1 40.0 41.0 42.0 43.0 44.0 45.0 45.9 63.5 64.9 66.4 67.8 69.2 70.7 72.1 73.5 0.16 0.53 1.49 3.63 7.83 15.3 27.8 46.9 75.0 Accuracy of wet bulb temperature (°C) T/°C -40 -20 0 20 40 60 80 100 120 140 160 RH/% 10 20 30 40 50 60 70 80 90 100 0.20 0.20 0.20 0.20 0.20 0.20 0.20 0.20 0.21 0.21 0.21 0.21 0.22 0.22 0.22 0.22 0.27 0.28 0.28 0.29 0.29 0.29 0.30 0.30 0.31 0.31 0.45 0.45 0.45 0.44 0.44 0.44 0.43 0.43 0.42 0.42 0.84 0.77 0.72 0.67 0.64 0.61 0.58 0.56 0.54 0.52 1.45 1.20 1.03 0.91 0.83 0.76 0.71 0.67 0.63 0.61 2.24 1.64 1.32 1.13 0.99 0.90 0.82 0.76 0.72 0.68 3.06 2.04 1.58 1.31 1.14 1.01 0.92 0.85 0.80 0.75 3.86 2.41 1.81 1.48 1.28 1.13 1.03 0.95 0.88 0.83 4.57 2.73 2.03 1.65 1.41 1.25 1.13 1.04 0.97 0.91 5.23 3.04 2.24 1.81 1.55 1.36 1.23 1.13 1.05 0.98 45 HMI41 AND PROBES Operating Manual 11.4.2 M210316EN-A Accuracies in non-metric units Accuracy of dewpoint temperature (°F) T/°F -40 -4 32 68 104 140 176 212 248 284 320 RH/% 10 3.28 3.76 4.52 5.16 5.83 6.48 7.22 7.95 8.75 9.56 10.4 20 1.80 2.05 2.47 2.81 3.16 3.53 3.93 4.34 4.78 5.24 5.73 30 1.33 1.50 1.80 2.04 2.29 2.55 2.84 3.13 3.45 3.78 4.14 40 1.10 1.22 1.46 1.65 1.85 2.05 2.28 2.52 2.77 3.04 3.33 50 0.96 1.06 1.26 1.42 1.58 1.75 1.95 2.15 2.36 2.59 2.83 60 0.86 0.95 1.13 1.26 1.40 1.55 1.72 1.89 2.08 2.28 2.49 70 0.80 0.88 1.03 1.15 1.27 1.41 1.55 1.71 1.88 2.05 2.24 80 0.75 0.82 0.96 1.06 1.18 1.30 1.43 1.57 1.72 1.88 2.05 90 0.90 1.00 1.10 1.21 1.33 1.46 1.60 1.75 1.90 100 0.86 0.95 1.04 1.14 1.26 1.38 1.50 1.64 1.79 30 40 50 60 70 80 0.015 0.016 0.018 0.019 0.020 0.021 0.116 0.125 0.134 0.142 0.151 0.159 0.65 0.69 0.73 0.77 0.81 0.85 2.44 2.58 2.72 2.87 3.01 3.15 7.77 8.25 8.74 9.25 9.77 10.3 22.3 24.2 26.3 28.5 30.9 33.5 63.0 73.1 85.2 100 118 141 205 289 434 709 1329 3237 1235 - 90 0.89 3.30 10.9 36.4 170 - 100 0.93 3.44 11.4 39.4 208 - Accuracy of mixing ratio (gr/lb) T/°F T/°F 46 with ambient pressure RH/% 10 20 0.013 0.014 -40 0.099 0.108 -4 0.57 0.61 32 2.17 2.31 68 6.85 7.31 104 18.9 20.6 140 47.5 54.6 176 115 151 212 288 530 248 284 320 of 1013.25 mbar Accuracy of absolute humidity (gr/ft3 ) RH/% 10 20 30 40 50 60 70 80 90 100 0.001 0.001 0.001 0.002 0.002 0.002 0.002 0.002 -40 0.009 0.009 0.010 0.011 0.011 0.012 0.013 0.014 -4 0.046 0.049 0.052 0.055 0.058 0.060 0.063 0.066 0.069 0.072 32 0.16 0.17 0.18 0.19 0.20 0.21 0.21 0.22 0.23 0.24 68 0.47 0.49 0.52 0.54 0.56 0.58 0.61 0.63 0.65 0.67 104 1.19 1.24 1.29 1.34 1.39 1.43 1.48 1.53 1.58 1.63 140 2.65 2.74 2.84 2.94 3.03 3.13 3.22 3.32 3.41 3.51 176 5.33 5.50 5.67 5.84 6.01 6.18 6.35 6.52 6.69 6.86 212 9.87 10.2 10.4 10.7 11.0 11.3 11.5 11.8 12.1 12.4 248 17.0 17.5 17.9 18.3 18.7 19.2 19.6 20.0 20.5 20.9 284 27.7 28.3 28.9 29.6 30.2 30.8 31.4 32.1 32.7 33.3 320 HMI41 AND PROBES Operating Manual M210316EN-A Accuracy of wet bulb temperature (°F) T/°F 11.5 -40 -4 32 68 104 140 176 212 248 284 320 RH/% 10 0.36 0.37 0.49 0.82 1.51 2.62 4.03 5.52 6.94 8.23 9.41 20 0.36 0.38 0.50 0.81 1.39 2.16 2.96 3.68 4.33 4.92 5.48 30 0.36 0.38 0.51 0.81 1.29 1.86 2.38 2.84 3.26 3.65 4.03 40 0.36 0.38 0.51 0.80 1.21 1.64 2.03 2.36 2.67 2.97 3.26 50 0.36 0.39 0.52 0.79 1.15 1.49 1.79 2.05 2.30 2.54 2.78 60 0.36 0.39 0.53 0.78 1.09 1.37 1.61 1.83 2.04 2.25 2.45 70 0.36 0.40 0.54 0.78 1.05 1.28 1.48 1.66 1.85 2.03 2.21 80 0.37 0.40 0.55 0.77 1.00 1.20 1.38 1.54 1.70 1.87 2.03 90 0.55 0.76 0.97 1.14 1.29 1.44 1.59 1.74 1.89 100 0.56 0.76 0.94 1.09 1.22 1.36 1.49 1.63 1.77 Electromagnetic compatibility Complies with the following standard: EN 61326-1:1997 +Am 1:1998, Electrical equipment for measurement, control and laboratory use - EMC requirements: Light environment. 47 HMI41 AND PROBES Operating Manual M210316EN-A APPENDIX 1: QUICK REFERENCE TO COMMANDS 1. DISPLAY TEXTS AND OPERATING COMMANDS ................................................................ 49 2. CALIBRATION WITH THE HMI41 SOFTWARE ..................................................................... 51 2.1 One-point humidity calibration............................................................................ 51 2.2 Two-point humidity calibration............................................................................ 52 2.3 One-point temperature calibration...................................................................... 53 2.4 Two-point temperature calibration...................................................................... 54 3. DATA COLLECTING MODE .................................................................................................. 55 3.1 Manual data collecting................................................................................................ 55 3.2 Setting the measurement duration for automatic data collecting ............................ 56 3.3 Setting the measurement interval for automatic data collecting.............................. 56 3.4 Reading the measurement results ............................................................................. 57 3.4.1 MIN and MAX in the data collecting mode ...................................................... 58 4. TRANSFERRING THE MEASURED DATA TO A PC.............................................................. 59 4.2 Using the serial commands ........................................................................................ 61 4.2.1 PLAY Transferring the data............................................................................ 61 4.2.2 CPLAY Setting characters between decimals and fields................................. 61 4.2.3 HELP Outputting available commands and their contents .......................... 62 4.3.4 ? Outputting the HMI41 settings ..................................................................... 62 5. CHANGING THE SETTINGS .................................................................................................. 63 48 HMI41 AND PROBES Operating Manual M210316EN-A 1. DISPLAY TEXTS AND OPERATING COMMANDS The HMI41 is used by simply turning it on with the ON/OFF button. In the following, you will find a summary of the display texts with explanations and the operating commands. ON/OFF: the HMI41 is turned ON or OFF DISPLAY RH % Td °C°F T Pabs set min max DESCRIPTION The HMI41 has been turned on. °C°F g/m Pa hyst hold Lo bat Hi ’ The HMI41 software version and probe type indication. If the software version does not appear, it is less than 1.02 and the HMI41 cannot be used with the HMP46; contact Vaisala or a Vaisala representative. If the probe type indication (41.45 or 42.46) does not appear, the indicator does not recognize the probe type automatically; give the setting manually (see Chapter 4 of this appendix). If the probe type indication is replaced with text NO PRB, check that the probe is correctly connected. Indication of the battery voltage. bat Hi RH % T °C Relative humidity and temperature readings are output. 49 HMI41 AND PROBES Operating Manual M210316EN-A MODE: outputting of the selected quantities RH % T °C Td T °C °C T °C abs g/m °C T °C °C T Relative humidity and temperature readings are output (automatically after power-up). PRESS MODE (the following appears): Dewpoint temperature and temperature readings are output. PRESS MODE (return to the normal RH&T display or one of the following appears): Absolute humidity and temperature readings are output if absolute humidity has been selected during the setup procedure. PRESS MODE (return to the RH&T display) Wet bulb temperature and temperature readings are output if wet bulb temperature has been selected during the setup procedure. PRESS MODE (return to the RH&T display) Mixing ratio and temperature readings are output if mixing ratio has been selected during the setup procedure. PRESS MODE (return to the RH&T display) HOLD: freezes the display to show the current readings or outputs the minimum or maximum values measured after power-up. RH % T °C RH % °C T hold RH % T min °C % RH °C T max 50 Relative humidity and temperature readings are output in the normal display mode. PRESS HOLD (the following appears): The display is frozen to show the current readings. This mode is available for all quantities. PRESS HOLD for the second time: The minimum readings after power-up are output. This mode is available for all quantities. PRESS HOLD for the third time: The maximum readings after power-up are output. This mode is available for all quantities. Return to the normal RH&T display mode with any button except ON/OFF. HMI41 AND PROBES Operating Manual M210316EN-A 2. CALIBRATION WITH THE HMI41 SOFTWARE This quick reference is meant for those users who already know how to use the HMI41 indicator. The operating manual gives more detailed instructions. NOTE: it is recommended that the calibration is done with trimmer potentiometers of the probe. However, if only one probe is being used, the calibration can also be done according to the following instructions. 2.1 One-point humidity calibration RH % Td °C °F T P set min max °C °F g/m hPa hyst hold Lo bat Hi Turn the HMI41 indicator on. Within 1-2 seconds press simultaneously buttons MODE and HOLD until the text SEtUP appears. Wait a few seconds. Press ENTER eight times. °C set Press MODE twice. set Press ENTER to activate one point humidity calibration. RH set RH % set RH % The reference humidity reading stored in the HMI41 memory is blinking. Change it to the correct value (see calibration table) with buttons ▲ or ▼. The reading changes in steps of 0,1 %. Press ENTER. The indicator shows the value that the probe is measuring. Wait at least 10 minutes for the reading to stabilize and acknowledge it by pressing ENTER. Press ENTER again to conclude the calibration. Calibration was successful. If it was not succesful, some other text appears on the display (e.g. too close, err offst or err gain). Perform the calibration again. 51 HMI41 AND PROBES Operating Manual M210316EN-A 2.2 Two-point humidity calibration RH % Td °C °F T P set min max °C °F g/m hPa hyst hold Lo bat Hi Turn the HMI41 indicator on. Within 1-2 seconds press simultaneously buttons MODE and HOLD until the text SEtUP appears. Wait a few seconds. Press ENTER eight times. °C set Press MODE three times. set RH Press ENTER to activate two point humidity calibration. set RH set RH % Lo % Lo RH % set RH Hi % Hi 52 The lower reference reading stored in the HMI41 memory is blinking. Change it to the correct value (see calibration table) with buttons ▲ or ▼. Press ENTER. The indicator shows the value that the probe is currently measuring. Wait at least10 minutes for the reading to stabilize and acknowledge it with ENTER. Press ENTER again to conclude the lower point calibration. The higher reference reading stored in the HMI41 memory is blinking. Change it to the correct value (see calibration table) with buttons ▲ or ▼. Press ENTER. The indicator shows the value that the probe is currently measuring. Wait at least 10 minutes for the reading to stabilize and acknowledge it with ENTER. Press ENTER again to conclude the calibration. Calibration was successful. If it was not succesful, some other text appears on the display (e.g. too close, err offst or err gain). Perform the calibration again. HMI41 AND PROBES Operating Manual M210316EN-A 2.3 One-point temperature calibration RH % Td °C °F T P set min max °C °F g/m hPa hyst hold Lo bat Hi Turn the HMI41 indicator on. Within 1-2 seconds press simultaneously buttons MODE and HOLD until the text SEtUP appears. Wait a few seconds. Press ENTER eight times. °C set Press MODE four times. set Press ENTER to activate one point temperature calibration. T set T °C The reference reading stored in the HMI41 memory is blinking. Change it to the correct value with buttons ▲ or ▼. Press ENTER. set T °C The indicator shows the value that the probe is currently measuring. Wait at least 10 minutes for the reading to stabilize and acknowledge it with ENTER. Press ENTER again to conclude the calibration. Calibration was successful. If it was not succesful, some other text appears on the display (e.g. too close, err offst or err gain). Perform the calibration again. 53 HMI41 AND PROBES Operating Manual M210316EN-A 2.4 Two-point temperature calibration RH % Td °C °F T P set min max °C °F g/m hPa hyst hold Lo bat Hi Turn the HMI41 indicator on. Within 1-2 seconds press simultaneously buttons MODE and HOLD until the text SEtUP appears. Wait a few seconds. Press ENTER eight times. °C set Press MODE five times. set Press ENTER to activate two-point temperature calibration. T set T set T The lower reference reading stored in the HMI41 memory is blinking. Change it to the correct value with buttons ▲ or ▼. Press ENTER. °C Lo The indicator shows the value that the probe is currently measuring. Wait at least 10 minutes for the reading to stabilize and acknowledge it with ENTER. Press ENTER again to conclude the lower point calibration. The higher reference reading stored in the HMI41 memory is blinking. Change it to the correct value with buttons ▲ or ▼. Press ENTER. °C Lo T °C Hi set T °C Hi 54 The indicator shows the value that the probe is currently measuring. Wait at least 10 minutes for the reading to stabilize and acknowledge it with ENTER. Press ENTER again to conclude the calibration. Calibration was successful. If it was not succesful, some other text appears on the display (e.g. too close, err offst or err gain). Perform the calibration again. HMI41 AND PROBES Operating Manual M210316EN-A 3. DATA COLLECTING MODE 3.1 Manual data collecting RH % Td °C°F T Pabs set min max °C°F g/m Pa hyst hold Lo bat Hi Turn the indicator on. Within 1 - 2 seconds press the button HOLD until the text REC AUTO appears, then release the button. Press the button MODE to enter the manual data collecting. Press ENTER to start the measurements. RH % T set °C The probe is now taking measurements. You can store the readings at appropriate intervals by pressing the button HOLD. This brings the sequence number of the reading in the indicator's memory on the display for a couple of seconds: The indicator returns automatically to the previous display. The readings can be read in the REC READ mode (see chapter 3.4 of this appendix). You can store max. 199 readings in the indicator memory. Stop the data collecting by turning the indicator off. 55 HMI41 AND PROBES Operating Manual 3.2 M210316EN-A Setting the measurement duration for automatic data collecting RH % Td °C°F T °C°F Pabs set min max g/m Pa hyst hold Lo bat Hi Turn the indicator on. Within 1 - 2 seconds press the button HOLD until the text REC AUTO appears, then release the button. Press ENTER when the text REC AUTO is displayed. Previously set duration time appears. If the previously set duration is too long for the current battery charge, the calculated longest duration time possible for the current battery charge appears instead; this is also indicated with the text MAX. max Set the duration time with buttons ▲ or ▼. The duration time can be set from 15 minutes to 7 days. Text BAT on the display indicates that the battery charge is not sufficient for the duration time selected; select a shorter duration time. Turn the indicator off or press ENTER for setting the measurement interval. bat 3.3 Setting the measurement interval for automatic data collecting Previously set measurement interval appears. If the previously set interval is too long for the indicator's current memory capacity, the calculated shortest possible interval appears instead; this is also indicated with the text MIN. Select the interval with buttons ▲ or ▼. Text LO on the display indicates that there is not enough memory left for the chosen interval; select a longer interval. Press ENTER to activate the measurements in the automatic data collecting mode. min 56 RH % T set °C Press ON/OFF if you wish to stop the automatic data collecting. HMI41 AND PROBES Operating Manual M210316EN-A 3.4 Reading the measurement results RH % Td °C°F T Pabs set min max °C°F g/m Pa hyst hold Lo bat Hi Turn the indicator on. Within 1 - 2 seconds press the button HOLD until the text REC AUTO appears, then release the button. Press twice the button MODE. Press ENTER. RH % T °C RH % T °C Td T °C °C RH % T °C Numbers on the first line indicate the stored reading of the quantity shown; numbers on the left of the second line indicate the sequence number of the stored reading in the indicator memory. Numbers on the right of the second line indicate the temperature measured simultaneously with the first line reading. The decimals of the T reading can be seen by pressing the button ENTER: The display returns to the previous display after a couple of seconds. You can change the quantity on the first line by pressing MODE. To scroll all measurement results, press ENTER. An arrow is displayed on the higher righthand corner. Press HOLD while the arrow is displayed. Note that the sequence number changes. 57 HMI41 AND PROBES Operating Manual 3.4.1 MIN and MAX in the data collecting mode RH % min °C Hi RH % T °C Hi max RH T min RH T max 58 M210316EN-A % °C Lo % °C Lo In this example, the minimum value of the first line reading is being observed (MIN = minimum, HI = the first line reading); press ENTER to see the T reading with decimals. In this example, the maximum value of the first line reading is being observed (MAX = maximum, HI = the first line reading); press ENTER to see the T reading with decimals. In this example, the minimum value of the second line reading is being observed (MIN = minimum, LO = the 2nd line reading); press ENTER to see the T reading with decimals. In this example, the maximum value of the second line reading is being observed (MAX = maximum, LO = the 2nd line reading); press ENTER to see the T reading with decimals. HMI41 AND PROBES Operating Manual M210316EN-A 4. TRANSFERRING THE MEASURED DATA TO A PC Give the communication parameters when using this terminal session for the first time; save them for future use. See instructions in the following tables. Table 4.1 Giving parameters in Windows 3.1 MENU DESCRIPTION PROGRAM MANAGER ò ACCESSORIES ò double click TERMINAL ò Settings ò double click Communications ò File ò Save as click click and select parameters (see list below); click OK move the cursor to: click click and save settings: type the name of the file (e.g. HMI41) and click OK Turn the HMI41 on and follow the instructions in Ch. 4.2 The communication parameters are: • connector according to your computer • baud rate 4800 • data bits 7 • stop bits 1 • parity even • flow control none 59 HMI41 AND PROBES Operating Manual M210316EN-A Table 4.2 Giving parameters in Windows 95 and Windows NT WINDOWS 95 MENU Start ò Programs ò Accessories ò HyperTerminal ò Hypertrm ò Connection Description WHAT TO DO move the cursor to: move the cursor to: move the cursor to: click move the cursor to: double click type the name of the connection (e.g. HMI41) in the appropriate field and select an icon if available; click OK. WINDOWS NT MENU Start ò Programs ò Accessories ò HyperTerminal ò Hyperterminal ò Connection Description WHAT TO DO move the cursor to: move the cursor to: move the cursor to: move the cursor to: click type the name of the connection (e.g. HMI41) in the appropriate field and select an icon if available; click OK. ò Phone Number move the cursor to the field CONNECT USING and select 'direct to COM x' (x = serial port available); click OK ò COM x properties Connect to move the cursor to the field CONNECT USING and select 'COM x' (x = serial port available); click OK ò select parameters according to the list on previous page; click OK COM x properties select parameters according to the list on previous page; click OK Turn the HMI41 on and follow the instructions in Chapter 4.2 60 HMI41 AND PROBES Operating Manual M210316EN-A 4.2 Using the serial commands 4.2.1 PLAY Transferring the data To output the stored readings on your computer, turn the HMI41 on, type PLAY and press ENTER. An example of outputting automatically stored readings: >play Reading Log... OK data 0 1 2 3 4 5 6 > hh:mm:ss 00:00:00 00:01:00 00:02:00 00:03:00 00:04:00 00:05:00 00:06:00 RH 12.54 12.10 12.18 12.12 12.16 12.09 12.09 T 21.53 21.23 21.18 21.15 21.14 21.12 21.09 Td -8.48 -9.16 -9.12 -9.21 -9.18 -9.27 -9.28 An example of outputting manually stored readings: >play Reading Log... OK data 1 2 3 4 5 6 RH 12.10 12.18 12.12 12.16 12.09 12.09 T 21.23 21.18 21.15 21.14 21.12 21.09 Td -9.16 -9.12 -9.21 -9.18 -9.27 -9.28 > If you know the starting time of the automatic data collecting, type it with the command; for example: >play 15:05 Reading Log... OK data 0 1 2 3 4 5 6 7 > hh:mm:ss 15:05:00 15:06:00 15:07:00 15:08:00 15:09:00 15:10:00 15:11:00 15:12:00 4.2.2 CPLAY RH 8.52 9.58 9.60 9.61 9.65 11.22 9.93 9.92 T 23.69 23.66 23.50 23.30 23.25 23.41 23.30 23.22 Td -11.70 -10.26 -10.35 -10.48 -10.47 -8.44 -10.08 -10.15 Setting characters between decimals and fields Type CPLAY and press ENTER to see the characters between decimals and fields. An example: >cplay Desimal separator : . Field separator : TAB example: 1 01:00:00 > 38.72 21.61 7.01 61 HMI41 AND PROBES Operating Manual M210316EN-A To change the output, type CPLAY, the character you wish to appear between decimals, the character you wish to use between fields and then <cr>. An example: >cplay , <cr> Desimal separator : , Field separator : TAB example: 1 01:00:00 > 4.2.3 HELP 38,72 21,61 7,01 Outputting available commands and their contents Type HELP and press ENTER: >help Available commands : HELP ? PLAY CPLAY Type HELP <command_name> for more help > To see the contents of each command, type and press ENTER: HELP, command name (e.g. PLAY) >help play Command : PLAY Purpose : Send recordings from memory to serial port Usage : PLAY hh:mm <cr>, hh:mm = rec starting time (optional) if command is used without parameters it uses default setting > 4.3.4 ? Outputting the HMI41 settings Type ? and press ENTER: >? HMI41 / 2.01 Serial number Output units Baud P D S Pressure Auto Off Probe Start-up mode 4.th variable > : A0000000 : metric : 4800 E 7 1 FDX : 1013.25 : 5 : 2 : 1 : none To exit the terminal session, go to FILE menu and select EXIT. Confirm that you wish to quit and then select whether you wish to store the parameters of this session for future use or not (SAVE - YES/NO). 62 HMI41 AND PROBES Operating Manual M210316EN-A 5. CHANGING THE SETTINGS The HMI41 factory settings are the following: - display units: - automatic power-off: - display quantities: - pressure: - probe type: - start: 0 5 0 1013.25 hPa AUT (metric) (minutes) (RH, T and Td) (1 hPa = 1 mbar) (or 1, see below) 1 Indicators marked with letters ID have the automatic probe recognition (AUT PROBE) as default, previous versions the probe type 1. With previous versions, set the probe type setting manually to PROBE TYPE 2 when using the HMP46. To change the setting, press ON/OFF until you can see some text on the display. Release the ON/OFF button and press within 1-2 seconds simultaneously both ENTER and MODE buttons until the text "SEtUP" appears on the display: DISPLAY WHAT TO DO PRESS: Wait for a few seconds. Select the display units: 0 = metric units 1 = non-metric units °C set Set the time for the automatic power-off in minutes (NO,1...60); if NO is chosen, the power-off function is not activated set Select the display quantities: 0 = RH, T, Td 1 = RH, T, Td, abs 2 = RH, T, Td, Tw 3 = RH, T, Td, x set Set the pressure for mixing ratio and wet bulb temperature calculations. P set h Pa Select the correct probe type: 1 = HMP41,HMP45 (HMP44/44L) 2 = HMP42, HMP46 set ▲ (number up) or ▼ (number down) ENTER(to scroll the menu) or ON/OFF (to exit the setup mode) ▲ (up) or ▼ (down) ENTER (to scroll the menu) or ON/OFF (to exit the setup mode) ▲ (up) or ▼ (down) ENTER(to scroll the menu) or ON/OFF (to exit the setup mode) ▲ (0.25 hPas up) or ▼ (0.25 hPas down) ENTER (to acknowledge the setting) ON/OFF (to exit the setup mode) ▲ (up) or ▼ (down) ON/OFF (to exit the setup mode) 63 HMI41 AND PROBES Operating Manual M210316EN-A NOTE The HMI41 setup contains further settings (start, baud, seri and calib) that appear after probe type setting when pressing ENTER. Start setting is changed only when using the HMP44/L probes (START 5, see the HM44 Operating Manual). For calib, see the operating manual. Other settings are meant for the HMI41 used as a field calibrator for Vaisala humidity transmitters. Do not change them. Press ON/OFF after probe type setting. 64 Warranty Vaisala hereby represents and warrants all Products manufactured by Vaisala and sold hereunder to be free from defects in workmanship or material during a period of twelve (12) months from the date of delivery save for products for which a special warranty is given. If any Product proves however to be defective in workmanship or material within the period herein provided Vaisala undertakes to the exclusion of any other remedy to repair or at its own option replace the defective Product or part thereof free of charge and otherwise on the same conditions as for the original Product or part without extension to original warranty time. Defective parts replaced in accordance with this clause shall be placed at the disposal of Vaisala. Vaisala also warrants the quality of all repair and service works performed by its employees to products sold by it. In case the repair or service works should appear inadequate or faulty and should this cause malfunction or nonfunction of the product to which the service was performed Vaisala shall at its free option either repair or have repaired or replace the product in question. The working hours used by employees of Vaisala for such repair or replacement shall be free of charge to the client. This service warranty shall be valid for a period of six (6) months from the date the service measures were completed. This warranty is however subject to following conditions: a) A substantiated written claim as to any alleged defects shall have been received by Vaisala within thirty (30) days after the defect or fault became known or occurred, and b) The allegedly defective Product or part shall, should Vaisala so require, be sent to the works of Vaisala or to such other place as Vaisala may indicate in writing, freight and insurance prepaid and properly packed and labelled, unless Vaisala agrees to inspect and repair the Product or replace it on site. This warranty does not however apply when the defect has been caused through a) normal wear and tear or accident; b) misuse or other unsuitable or unauthorized use of the Product or negligence or error in storing, maintaining or in handling the Product or any equipment thereof; c) wrong installation or assembly or failure to service the Product or otherwise follow Vaisala's service instructions including any repairs or installation or assembly or service made by unauthorized personnel not approved by Vaisala or replacements with parts not manufactured or supplied by Vaisala; d) modifications or changes of the Product as well as any adding to it without Vaisala's prior authorization; e) other factors depending on the Customer or a third party. Notwithstanding the aforesaid Vaisala's liability under this clause shall not apply to any defects arising out of materials, designs or instructions provided by the Customer. This warranty is expressly in lieu of and excludes all other conditions, warranties and liabilities, express or implied, whether under law, statute or otherwise, including without limitation any implied warranties of merchantability or fitness for a particular purpose and all other obligations and liabilities of Vaisala or its representatives with respect to any defect or deficiency applicable to or resulting directly or indirectly from the Products supplied hereunder, which obligations and liabilities are hereby expressly cancelled and waived. Vaisala's liability shall under no circumstances exceed the invoice price of any Product for which a warranty claim is made, nor shall Vaisala in any circumstances be liable for lost profits or other consequential loss whether direct or indirect or for special damages. www.vaisala.com *M210316EN*