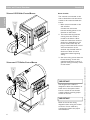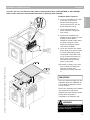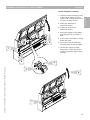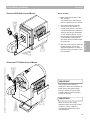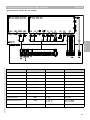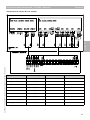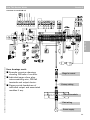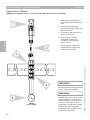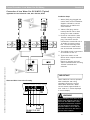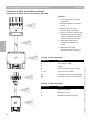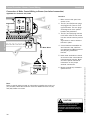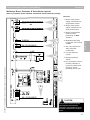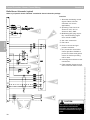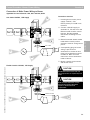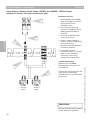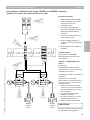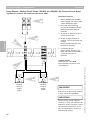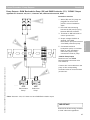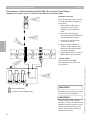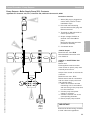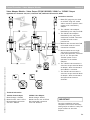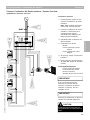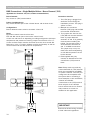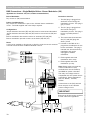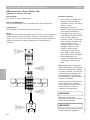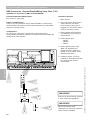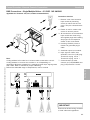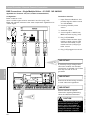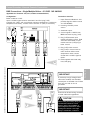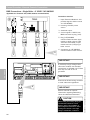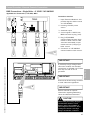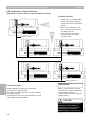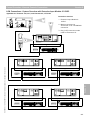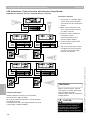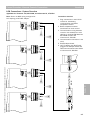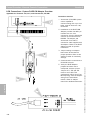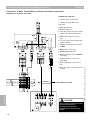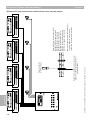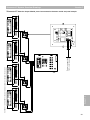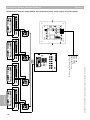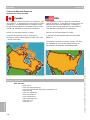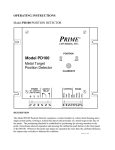
1
Commercial Vitotronic
Wiring Guide Overview
For use by licensed heating contractor
For use with:
Vitotronic 100, GC1
Vitotronic 300, GW2
Vitocontrol-S/C, VD2/CT3/RS/VB2
KK10LON
Safety and Installation Requirements
Please ensure that these instructions are read and understood before commencing installation. Failure to comply with
instructions listed below can cause product/property damage, severe personal injury, and/or loss of life. Ensure all
requirements are understood and fulfilled (including detailed information found in manual subsections).
Working on the equipment
The installation, adjustment, service
and maintenance of this product must
be done by a licensed professional
heating contractor who is qualified and
experienced in the installation, service
and maintenance of hot-water boilers.
There are no user-serviceable parts on
the boiler, burner or control.
Ensure main power supply to
equipment, the heating system and all
external controls have been
deactivated. Close main oil or gas
supply valve. Take precautions in both
instances to avoid accidental activation
of power during service work.
Ensure that the installation literature of
other components is referred to.
Vitotronic controls and their
respective accessories.
Viessmann Manufacturing Company
Inc. assumes no responsibility for
damage(s) of any kind caused by
inappropriate use or application of
this wiring guide and/or failure to
read the supporting technical
literature referred to.
IMPORTANT
This Commercial Vitotronic Wiring
Guide Overview is designed and laid
out to familiarize a licensed
professional heating contractor with
the GENERAL installation and wiring
of the commercial line of Vitotronic
boiler controls. It is NOT intended
or to be regarded as a substitute for
the CSA certified technical support
literature that is supplied with each
of the respective commercial
The technical support literature of
each of the aforementioned
products contain the necessary
safety and national/local code
requirements which if not followed
exactly may lead to property
damage, personal injury and/or loss
of life.
Please see Appendix
IMPORTANT
Read and save these instructions
for future reference
5346540 v1.0 09/2006
Table of Contents
Caution, Warning Trademark Information
Section 1
Control Mounting and Installation
Section 2
Boiler and control overview
Control mounting terminology
Vitorond VD2 (490-1096MBH or 144-321KW)
Vitotronic 100, GC1, Vitotronic 300, GW2
Vitorond VD2 (1255-4387MBH or 368-1285KW)
Vitotronic 100, GC1 and Vitotronic 300, GW2
Vitocrossal CT3 (CT3-17 to CT3-89 models)
Vitotronic 100, GC1 and Vitotronic 300, GW2
Installation of Vitocontrol-S, VD2/CT3-MW1
Boiler Control Wiring Overview
Section 3
External Control Connections
Section 4
Demand Inputs
Vitotronic 100, GC1
Vitotronic 100, GW2
Vitocontrol-S, MW1 (CT3/VD2/RS/VB2)
Extension Input Module 0-10VDC
Communications
Section 5
LON® Card Installation Overview
Output Module Communications
System Overviews
Diagnostic Drawings
Section 6
Control Burner Circuit Information
Miscellaneous Drawings
Section 7
Miscellaneous Vitocontrol-C Drawings
Appendix
Section 8
Codes and Related Information
Associated Manuals
2
5346540 v1.0 09/2006 Technical information subject to change without notice
Control Wiring Overview
Vitotronic 100, GC1 Overview
Vitotronic 300, GW2 Overview
Vitocontrol-S, MW1 (CT3/VD2/RS/VB2) Overview
Control Connections
Power
LWCO
Burner and Blower Motor
Weishaupt burner schematic (typical)
Riello burner schematic (typical)
Control Outputs
About these instructions
Take note of all symbols and notations intended to draw attention to potential hazards or important product
information. These include “WARNING”, “CAUTION” and “IMPORTANT”. See below.
!
WARNING
Indicates an imminently hazardous
situation which, if not avoided, could
result in death, serious injury or
substantial product/property damage.
!
CAUTION
Indicates an imminently hazardous
situation which, if not avoided, may
result in minor injury or
product/property damage.
IMPORTANT
CAUTION
→ Warnings draw your attention to
the presence of potential hazards or
important product information.
→ Cautions draw your attention to the
presence of potential hazards or
important product information.
→ Helpful hints for installation,
operation or maintenance which
pertains to the product.
→ Cautions draw your attention to the
presence of potential hazards or
important product information.
5346540 v1.0 09/2006 Technical information subject to change without notice
Static sensitive components may be
damaged by improper handling or
work within the control. Ensure all
possible measures are taken to
eliminate build-up of static electricity.
Section 1.0
!
Section 1
3
Section 1.0
Codes
The installation of this unit must be in
accordance with local codes.
All electrical wiring is to be done in
accordance with the latest edition of
CSA C22,1 Part 1 and/or local codes. In
the U.S., please use the National
Electrical Code ANSI/MFPA 70.
The heating contractor must comply
with the Standard of Controls and
Safety Devices for automatically fired
boilers, ANSI/ASME CSD-1 where
required by the authority having
jurisdiction.
Working on the equipment
The installation, adjustment, service and
maintenance of this unit must be done
by a licensed professional heating
contractor who is qualified and
experienced in the installation, service,
and maintenance of hot-water heating
boilers. There are no user-serviceable
parts on the boilers or control.
Section 1
→ Please read this manual carefully
prior to attempting installation, Any
warranty is null and void if these
instructions are not followed.
For information regarding other
Viessmann System Technology
components, please refer to the
documentation of the particular
product.
We offer frequent installation and
service seminars to familiarize our
partners with our products. Please
contact Viessmann directly.
→ The comprehensiveness and
functionality of field supplied
electrical controls and components
must be verified by the heating
contractor. These include lowwater cut-offs, flow switches (if
used), staging controls, pumps,
motorized valves, air vents,
thermostats, etc.
Power supply
Install power supply in accordance with
the regulation of the authorities having
jurisdiction or, in absence of such
requirements, in accordance with
National Codes. Viessmann
recommends the installation of a
disconnect switch to control the
120VAC power supply from outside of
the boiler room.
Purpose of Wiring Guide Overview
The purpose of this document is to
provide a wiring guide overview for the
Viessmann product line-up for
commercial boiler controls.
It must be understood that this
document is not a substitute for the
CSA certified manuals which are
shipped with their respective controls.
Depending on the system and system
specific criteria, diagrams/drawings
included in this document may not meet
your specific installation needs.
Trademark Information
Echelon®, LON®, LONWORKS®, i.LON®,
LNS®, LONMARK®, Neuron®, and the
LonUsers logo are trademarks of
Echelon Corporation registered in the
United States and other countries.
4
5346540 v1.0 09/2006 Technical information subject to change without notice
Important Regulatory and Installation Requirements
Control Installation
Section 2
Section 2.0
Vitorond VD2 (490-1096MBH or 144-321KW)
Vitotronic 100, GC1
Vitotronic 300, GW2
Section 2.1
Vitorond VD2 (1255-4387MBH or 368-1285KW)
Vitotronic 100, GC1
Vitotronic 300, GW2
Section 2.2
Vitocrossal CT3 (CT3-17 to CT3-89 models)
Vitotronic 100, GC1
Vitotronic 300, GW2
Section 2.3
Installation of Vitocontrol-S, VD2/CT3/RS/VB2
Mounting Information
Section 2.4
5346540 v1.0 09/2006 Technical information subject to change without notice
General Information
Boiler and control overview drawings
Terminology of control mounting and wiring assembly
5
Section 2.0
Boiler Control Installation Information
Boiler and Control Overview
Section 2
Vitorond VD2 Boiler/Control/Burner
Burner Conduit
3
1 Boiler control mounted on the
side of boiler.
Conduit from the burner
harness housing points in the
direction of the burner.
1
2
2 The interconnecting harness
coming from the control is
routed to the burner. Wires
inside the conduit are wired to
the burner. Depending on the
burner model, there may be
plug-in interconnections or hard
wired connections to the
terminal strip located inside of
the burner. Refer to burner
schematics before beginning
wiring.
3 Gas train wiring comes from the
burner housing. Check with
supplied equipment to verify if
gas train wiring is factory wired
or field wired.
Vitocrossal CT3 Boiler/Control/Burner
3
IMPORTANT
The length of the conduit is
designed to allow for the burner or
boiler door to be opened when
burner is wired. Do not shorten
conduit without ensuring proper
access for service.
IMPORTANT
1
2
6
Refer to the correct wiring
diagrams when wiring the control
to burner. Do not make any
connections without the proper
documentation.
5346540 v1.0 09/2006 Technical information subject to change without notice
Section 2.0
The controls are mounted on the
side of the boilers with the burner
conduit to be routed towards the
burner.
Terminology
Section 2
Control Mounting and Wiring Assembly
Section 2.0
Applicable for Vitotronic 100, GC1, Vitotronic 300, GW2 and Vitocontrol-S, MW1
Control Harness
5346540 v1.0 09/2006 Technical information subject to change without notice
Access Hole Cover
Burner Harness
Name
Notes
Control
Harness
•
•
•
•
Cover
Burner
Harness
Junction Box Cover
Mounts to the side of the boiler with respect to the Vitotronic 100/300 boiler control.
Wall mounting bracket for Vitocontrol-S, VD2/CT3/RS/VB2.
The DIN rail is part of this piece for termination of all wiring connections.
Control hangs on two tabs located at top of harness bracket.
• This piece is only used in conjunction with Vitocontrol-S.
• Covers holes in the control harness or wall mounting bracket.
• The burner harness provides the necessary wiring and conduit to the burner.
• The Vitocontrol-S units do not require the conduit.
• This part can be flipped to suit the side of the boiler control is mounted on.
Junction Box • When the control harness is combined with the burner harness a junction box is created.
Cover
• This covers junction box and held in place with screw at one end.
7
Installation of Boiler Controls
Section 2
Vitotronic 100, GC1 and Vitotronic 300, GW2 on Vitorond VD2 boilers (490-1096MBH or 144-321KW)
Refer to boiler manual for more detailed instructions on the boiler jacket assembly
Installation Steps
Section 2.1
1 Holes for fastening control to
control harness (control
mounting bracket) to side of
boiler jacket. Four holes needed
to properly fasten harness
(bracket) to jacket with supplied
screws.
Drill four 1/8” holes to allow for
screws to be fastened.
1
2
2 Make 7/8” hole to feed limit
capillaries as well as boiler
temperature sensor into boiler
jacketing. The limits and sensor
are to be drawn to rear of boiler.
Note: Grommet/Bushing for 7/8”
hole supplied with boiler control
in accessory bag.
3 Control harness (mounting
bracket) is held onto boiler jacket
with four screws.
5 Install cover with two screws at
front of boiler jacket.
3
4
5
8
5346540 v1.0 09/2006 Technical information subject to change without notice
Measurements shown in Imperial and Metric units
4 Install burner harness onto
control harness by guiding
behind DIN rail. Fasten with two
screws at either end of burner
harness.
Installation of Boiler Controls
Section 2
Vitotronic 100, GC1 and Vitotronic 300, GW2 on Vitorond VD2 boilers (490-1096MBH or 144-321KW)
Refer to boiler manual for more detailed instructions on the boiler jacket assembly
6 Control is installed on two tabs
at the top of the control harness
(mounting plate). Control pivots
down into the burner harness
housing.
8
7 Control fastened down to burner
harness housing with two
screws.
8 Control limit capillaries fed
though newly created hole with
bushing in boiler jacket.
Capillaries should remain above
the boiler insulation. Insert limits
into multi-point sensor well at
back of boiler.
9
9 Cover top of boiler with jacket
panel. Slide panel forward to
ensure panel being locked into
position. Insert two screws on
rear back lip and fasten top panel
to rear panel.
6
5346540 v1.0 09/2006 Technical information subject to change without notice
10 Pressure fit display cover onto
front of boiler by sliding left edge
into position first, followed by
pushing right side in.
10
7
IMPORTANT
Insert and feed fixed high limit and
adjustable high limit capillaries, as
well as boiler temperature sensor
to rear of boiler.
Ensure limit capillaries are installed
into temperature well before
installing top panel of boiler jacket.
Ensure limits are pushed
completely into individual well.
!
WARNING
Ensure limit capillaries are not kinked
or bent. This will adversely affect the
operation of the limit.
9
Section 2.1
Installation Steps Continued
Installation of Boiler Controls
Section 2
Vitotronic 100, GC1 and Vitotronic 300, GW2 on Vitorond VD2 boilers (1255-4387MBH or 368-1285KW)
Refer to boiler manual for more detailed instructions on the boiler jacket assembly
Section 2.2
Installation Steps
1 Holes for fastening control to
control harness (control mounting bracket) to side of boiler
jacket. Four holes needed to
properly fasten harness (bracket)
to jacket with supplied screws.
Drill four 1/8” holes to allow for
screws to be fastened.
1
2 Make 7/8” hole to feed limit capillaries as well as boiler temperature sensor into boiler jacketing.
The limits and sensor are to be
drawn to rear of boiler.
Note: Grommet/Bushing for 7/8”
hole supplied with boiler control
in accessory bag.
2
3 Control harness (mounting
bracket) is held onto boiler jacket
with four screws.
Measurements shown in Metric and Imperial units
5 Install cover with two screws at
front of boiler jacket.
3
5
4
IMPORTANT
The boiler control will cover the
first side-panel and a portion of
the second.
10
5346540 v1.0 09/2006 Technical information subject to change without notice
4 Install burner harness onto control harness by guiding behind
DIN rail. Fasten with two screws
at either end of burner harness.
Installation of Boiler Controls
Section 2
Vitotronic 100, GC1 and Vitotronic 300, GW2 on Vitorond VD2 boilers (1255-4387MBH or 368-1285KW)
Refer to boiler manual for more detailed instructions on the boiler jacket assembly
6 Control is installed on two tabs
at the top of the control
harness (mounting plate).
Control pivots down into the
burner harness housing.
8
7 Control fastened down to
burner harness housing with
two screws.
6
8 Control limit capillaries fed
though newly created hole with
bushing in boiler jacket.
Capillaries should remain above
the boiler insulation. Insert
limits into multi-point sensor
well at back of boiler.
5346540 v1.0 09/2006 Technical information subject to change without notice
7
9
9
9 Cover top of boiler with jacket
panel. Slide front panel forward
to ensure panel being locked
into position. Place rear panel
on top of boiler and slide into
place. Insert two screws on
rear back lip and fasten top
panel to rear panel.
10 Pressure fit display cover onto
front of boiler by sliding left
edge into position first,
followed by pushing right side
in.
IMPORTANT
Insert and feed fixed high limit and
adjustable high limit capillaries, as
well as boiler temperature sensor
to rear of boiler.
Ensure limit capillaries are installed
into temperature well before
installing top panel of boiler jacket.
10
Ensure limits are pushed
completely into individual well.
!
WARNING
Ensure limit capillaries are not kinked
or bent. This will adversely affect the
operation of the limit.
11
Section 2.2
Installation Steps Continued
Installation of Boiler Controls
Section 2
Vitotronic 100, GC1 and Vitotronic 300, GW2 on Vitocrossal CT3 boilers (CT3-17 to CT3-89 models)
Refer to boiler manual for more detailed instructions on the boiler jacket assembly
Installation Steps
Section 2.3
1 Side panel on Vitocrossal CT3
boiler is designed for mounting
control harness without the
need for drilling holes.
2 Control harness is fastened to
the side of the boiler using the
four supplied screws.
3 Burner harness is installed onto
the control harness. Position
behind DIN rail and fasten
screws at either end to secure.
4
IMPORTANT
Route and insert fixed high limit,
adjustable high limit capillaries as
well as boiler temperature sensor
to rear of boiler before installing
boiler jacket and/or cover
Install limit capillaries into correct
wells and ensure pushed in all the
way.
2
3
12
!
WARNING
Ensure limit capillaries are not kinked
or bent. This will adversely effect the
operation of the limit.
5346540 v1.0 09/2006 Technical information subject to change without notice
1
4 Control is installed on two tabs
at the top of the control
harness (mounting plate).
Control pivots down into the
burner harness housing.
Control fastened down to
burner harness housing with
two screws.
Control limit capillaries fed
though rectangular access holes
in boiler jacket.
Insert limits into multi-point
sensor well at back of boiler.
Installation of Vitocontrol-S, VD2/CT3-MW1
Section 2
1 Control harness (mounting
bracket) is fastened to wall in
similar manner as control on side
of boiler. Use four screws to
support bracket
273mm (10 3/4”)
500mm (19 11/16”)
2 Cover access holes with supplied
blank and fasten to control
harness along with junction box
in step 4.
Boiler Room Wall or
Adjacent Boiler
3 The housing similar to that used
on individual boiler control
provides enclosure for DIN rail
and terminal strip.
4 Fasten metal housing along with
cover for backplate using two
screws. Use one screw at either
end.
IMPORTANT
Control harness for all commercial
Vitotronic controls same
dimensions. Mark the
measurements required to mount
the harness on a mounting surface
such as side of boiler or boiler room
wall.
5346540 v1.0 09/2006 Technical information subject to change without notice
1
2
The Vitocontrol-S, CT3/VD2/MW1
can be mounted on boiler room wall
or convenient flat surface near
boilers. Refrain from mounting in
any location where water may
cause damage.
3
4
13
Section 2.4
Installation Steps
Installation of Vitocontrol-S, VD2/CT3-MW1
Section 2
Control Installation Continued
1
2 Allow control to pivot
downwards and fasten control to
control harness using supplied
screws.
3 Install the front of the control
onto the rear housing. Press
downwards to ‘Click’ the front
cover and rear housing together.
When installed properly, the
front will be allowed to pivot
upwards without separating from
rear of control.
IMPORTANT
2
“Click”
3
14
Plug in quick-connect plugs into
sockets with corresponding
numbering. To avoid any miswiring
of control, refer to electrical section
of this wiring overview.
5346540 v1.0 09/2006 Technical information subject to change without notice
Section 2.4
1 Control mounts to tabs at top of
control harness. Hang control on
tabs upper edge.
Installation of Vitocontrol-S, VD2/CT3-MW1
Section 2
1 The front control housing is held
in place by a support rod. The
support rod is swung down from
the front housing section.
2 Insert plug X20 into its
respective socket.
3 Insert plug X10 into its
respective socket.
4 Swing the support rod upwards
by lifting rod from its locating
hole.
5 Front cover is now able to swing
down and close.
5
6 The control can be opened by
swinging front section upwards.
7 Unclick the support rod and
swing down. Insert into hole in
control to properly support front
housing.
1
5346540 v1.0 09/2006 Technical information subject to change without notice
4
3
2
6
7
15
Section 2.4
Control Installation Continued
Installation of Vitocontrol-S, VD2/CT3-MW1
Section 2
Control Installation Continued
Section 2.4
1
1 When the control is ready to be
closed, the front housing can be
fastened down with three
screws (supplied). Ensure there
are no pinched wires between
the rear portion of the control.
2 The junction box cover is used to
protect and enclose the control
harness DIN rail.
Weave front cover edge between
tabs on junction box.
Pivot the cover closed and
securely tighten the holding
screw.
5346540 v1.0 09/2006 Technical information subject to change without notice
2
16
Control Wiring Installation
Section 3
5346540 v1.0 09/2006 Technical information subject to change without notice
General Information
Installation Steps Quick Overview
Boiler and control overview drawings
Section 3.0
Vitotronic 100, GC1
Summary of Control Outputs
Control Voltage Plug Overview
Electrical Overview
Section 3.1
Vitotronic 300, GW2
Summary of Control Outputs
Control Voltage Plug Overview
Electrical Overview 1
Electrical Overview 2
Section 3.2
Vitocontrol-S, MW1 (CT3/VD2/RS/VB2)
Summary of Control Outputs
Electrical Overview
Section 3.3
Control Connections (Where Applicable)
Power Control 120VAC
LWCO Connections
Burner Connections
Plug-in connections 41 and 90
Vitotronic 100, GC1
Plug-in connections 41 and 90
Hard-wired connections
Vitotronic 300, GW2
Plug-in connections 41 and 90
Hard-wired connections
Burner Sample Drawings
Weishaupt burner
Riello burner
Blower Motor Power
120VAC, 1PH Soft Cable connection
120VAC, 1PH Flexible Conduit connection
240VAC, 1PH Flexible Conduit connection
208/460/575, 3PH Flexible Conduit connection
Section 3.4
Control Outputs
Heat Circuit Pump [20][M2]
Heat Circuit Pump [20][M3]
DHW Recirculation Pump [28]
DHW Production Pump [21]
Boiler/Shunt Pump [29]
Compiled Alarm Output [50]
120VAC/24VAC Valve Adaptor Module
Combustion Air Device Adaptor Module
Common Combustion Air Device Adaptor
Section 3.5
17
Section 3.0
Boiler Control Wiring Overview
Control Wiring Installation
Section 3
Installation Steps Quick Overview
STEP 1
Review information associated with boiler and boiler control drawings
STEP 2
Install boiler control onto side of boiler and plug in sensors and
120VAC plugs into control from control harness
STEP 3
Supply 120VAC to control
Section 3.0
STEP 4
Wire LWCO
STEP 5
Wire burner
• Control connections 41 & 90
• Burner power connections 120/240/208VAC
Control Module Installation
• Valve Module 24VAC/120VAC (Mixing and Isolation)
• Combustion Air Device Adaptor
• Common Combustion Air Device Adaptor
• Output Module
• Any required control outputs
STEP 7
Vitocontrol-S
• Supply 120VAC
• Control Module Installation
• Communications
STEP 8
BMS Control Connections
• Enable/disable
• Burner modulation
• Extension input module 0-10VDC
18
5346540 v1.0 09/2006 Technical information subject to change without notice
STEP 6
Control Wiring Installation
Section 3
Vitorond VD2 Boiler/Control/Burner
Burner Conduit
3
2 The interconnecting harness
coming from the control is
routed to the burner. The wires
contained inside the conduit are
wired to the burner. Depending
on the model of burner, there
may be plug-in interconnections
or hard-wired connections to
the terminal strip located inside
of the burner.
1
2
3 Gas train wiring comes from the
burner housing. Check with
supplied equipment to verify if
gas train wiring is factory wired
or field wired.
5346540 v1.0 09/2006 Technical information subject to change without notice
Vitocrossal CT3 Boiler/Control/Burner
3
IMPORTANT
The length of the conduit is
designed to allow for the burner or
boiler door to be opened when
burner is wired. Do not shorten
conduit without ensuring proper
access for service.
IMPORTANT
1
2
Refer to the correct wiring
diagrams when wiring the control
to burner. Do not make any
connections without the proper
documentation.
19
Section 3.0
1 Boiler control mounted on the
side of boiler.
The conduit from the housing
points in direction of the burner.
Control Overview Vitotronic 100, GC1—Electrical
Section 3
Standard Control Junction Box (no modules)
DIN Rail Terminal
Cable Connection
[21]
4
BK4
[20]A1
5
BK5
Shunt Pump/Boiler Pump
[29]
6
BK6
Alarm
[50]
7
BK7
[156]
8/9/10
BK8
[40]
11/G/N
BK1/G/N
DHW Pump
Control Output
Module Power Supply
Incoming Power
Vitotronic Plug
External Safety Devices
[150]
12 and 15
16 and 17
BK1 and BK3
BK 4 and BK5
Emergency Shut Off
[151]
19 and 20
BK1 and BK2
20
5346540 v1.0 09/2006 Technical information subject to change without notice
Section 3.1
Field Connection
Control Overview Vitotronic 100, GC1—Boiler/Burner
Section 3
5346540 v1.0 09/2006 Technical information subject to change without notice
Section 3.1
Plugs for control voltage for Vitotronic 100, GC1
21
Control Overview Vitotronic 100, GC1—Electrical
Section 3
Overview drawing for Vitotronic 100, GC1
5346540 v1.0 09/2006 Technical information subject to change without notice
Section 3.1
22
Control Overview Vitotronic 300, GW2—Electrical
Section 3
5346540 v1.0 09/2006 Technical information subject to change without notice
Section 3.2
Standard Control Junction Box (no modules)
Field Connection
Vitotronic Plug
DIN Rail Terminal
Cable Connection
Heating Circuit Pump
[20]M2
1
BK1
Heating Circuit Pump
[20]M3
2
BK2
DHW Recirculation Pump
[28]
3
BK3
DHW Pump
[21]
4
BK4
[20]A1
5
BK5
Shunt Pump/Boiler Pump
[29]
6
BK6
Alarm
[50]
7
BK7
[156]
8/9/10
BK8
[40]
11/G/N
BK1/G/N
Control Output
Module Power Supply
Incoming Power
External Safety Devices
[150]
12 and 15
16 and 17
BK1 and BK3
BK 4 and BK5
Emergency Shut Off
[151]
19 and 20
BK1 and BK2
23
Control Overview Vitotronic 300, GW2—Electrical
Section 3
Plugs for control voltage and sensors for Vitotronic 300, GW2
5346540 v1.0 09/2006 Technical information subject to change without notice
Section 3.2
24
Control Overview Vitotronic 300, GW2—Electrical
Section 3
5346540 v1.0 09/2006 Technical information subject to change without notice
Section 3.2
Plugs for control voltage and sensors for Vitotronic 300, GW2
25
Control Overview Vitotronic 300, GW2—Electrical
Section 3
Plugs for control voltage and sensors for Vitotronic 300, GW2
5346540 v1.0 09/2006 Technical information subject to change without notice
Section 3.2
26
Control Overview Vitocontrol-S, CT3/VD2—Electrical
Section 3
5346540 v1.0 09/2006 Technical information subject to change without notice
Section 3.3
Standard Control Junction Box (no modules)
Field Connection
Vitotronic Plug
DIN Rail Terminal
Cable Connection
Heating Circuit Pump
[20]M2
1
BK1
Heating Circuit Pump
[20]M3
2
BK2
DHW Recirculation Pump
[28]
3
BK3
DHW Pump
[21]
4
BK4
[20]A1
5
BK5
Shunt Pump/Boiler Pump
[29]
6
BK6
Alarm
[50]
7
BK7
[156]
8/9/10
BK8
[40]
11/G/N
BK1/G/N
Control Output
Module Power Supply
Incoming Power
27
Control Overview Vitocontrol-S, MW1 (CT3/VD2)—Electrical
Section 3
Plugs for control voltage and sensors for Vitocontrol-S, CT3/VD2
5346540 v1.0 09/2006 Technical information subject to change without notice
Section 3.3
28
How This Section Works
Section 3
5346540 v1.0 09/2006 Technical information subject to change without notice
Section 3.4
Overview of control DIN rail
How drawings work:
Example overview drawings
showing DIN rails of controls.
Individual pages show plug,
interconnecting wire, DIN rail
terminals and output device.
Pages provide breakdown of
individual output and associated
modules if any.
Plugs in control
Factory wiring
DIN rail terminals
Field wiring
Power supply
29
Control Overview—Power Supply Wiring
Section 3
Power Control—120VAC
Applicable for Vitotronic 100, GC1, Vitotronic 300, GW2 and Vitocontrol-S, CT3/VD2
1 Green [40] plug plugged into
control from control installation
steps.
1
2 Pre-wired interconnecting
harness between [40] plug and
DIN rail terminals.
3 Terminals on DIN rail inside of
control junction box.
Section 3.4
4 Supply voltage 120VAC
terminated at terminal 11.
Connection of neutral and
ground as well.
2
5 Incoming power supply from
local disconnect powered by
remote electrical panel.
4
IMPORTANT
Ensure that all field wiring conforms
to local codes and regulations.
IMPORTANT
5
120VAC
Power Supply
30
Depending how the various control
power supplies are wired by the
installer/electrician, a single power
source for each boiler controls is
suggested. This will allow a single
boiler control to be shut down
while leaving the remaining units
to operate as necessary.
5346540 v1.0 09/2006 Technical information subject to change without notice
3
Control Overview—Low Water Cut Off Wiring
Section 3
Connection of Low Water Cut Off (LWCO) (Typical)
Applicable for both Vitotronic 100, GC1 and 300, GW2
Installation Steps
1 White [156] plug plugged into
control from control installation.
Supplies 120VAC to control
devices such as LWCO and
valve modules.
1
2
3 Power for the LWCO is from
120VAC coming from [156]
plug. The LWCO must be
connected to terminal 8 or 9 or
10 inside of control junction
box. The neutral and ground
connections are made within
one of the N and G terminals.
4
5346540 v1.0 09/2006 Technical information subject to change without notice
3
4 The LWCO switch is connected
to terminals 12 and 15.
5 Typical low water cut off
device which requires external
power source.
Ensure no jumpers are used
within LWCO between incoming
120VAC terminals and
switches.
5
IMPORTANT
Alternate LWCO Connection Drawing
Check LWCO for correct operation
after installation and wiring
completed. Ensure the control
shuts down the burner. When
control senses tripped LWCO an
error code of C1 will be displayed
in control display.
!
WARNING
When terminating a low water cut off
device to the Vitotronic 100, GC1 or
Vitotronic 300, GW2 boiler control,
the jumper found between terminals
12 and 15 must be removed and
discarded. Failure to do so will not
allow the control to be shut down a
true low water condition.
31
Section 3.4
2 Yellow [150] plug used to
interrupt burner call for heat
during low water condition.
Control Overview—Control/Burner Interconnections
Section 3
Connection of Boiler Control Wiring to Burner
Applicable for Vitotronic 100, GC1 and Vitotronic 300, GW2
Overview
1 Control plug end [41]. Plugs
into control.
2 Harness between control and
burner.
1
3 Burner end of [41] plug
harness. Plugs into burner.
4 Plug-in connection for [90] plug.
modulation function of control.
Socket for [90] plug located in
control connection enclosure.
5 Cabling between control
connection enclosure and
burner.
Section 3.4
2
6 Modulation [90] plug.
Connection made in burner to
allow modulation of burner.
4
[41] Plug Terminal Identification
Terminal ID
Function
L1
Line voltage via FHL
°
Ground
N
Neutral Connection to the burner
T1, T2
Control Circuit via AHL
S3
Connection for burner fault indicator
B4
Connection for burner hour counter
[90] Plug Terminal Identification
5
6
32
Terminal ID
Function
1
Signal from burner
2
Modulation down
3
Modulation up/2nd stage ON
5346540 v1.0 09/2006 Technical information subject to change without notice
3
Control Overview—Burner Control Wiring
Section 3
Connection of Boiler Control Wiring to Burner (plug-in connection)
Applicable for Vitotronic 100, GC1
Overview
1
1 Boiler control with open front
access cover.
3
See Note Below
4
5346540 v1.0 09/2006 Technical information subject to change without notice
5
6
3 The [41] and [90] plug harness
is fed from inside of the control
into the control harness junction
box.
A grommet is used to hold the
harness in place.
4 The [90] plug harness is
interrupted by terminal blocks
that allow building management
or control systems to provide
remote burner modulation.
Ensure that the DIN rail
mounted plug is plugged in for
proper operation.
5 Burner plugs are found at end
of burner harness to allow the
control to be interfaced with
the burner by plugging in
corresponding [41] and [90]
plugs.
6 Corresponding burner plugs
found in burner to mate with
[41] and [90] plugs from
control.
Note:
Refer to specific boiler manual for information regarding the routing of
[41] and [90] cables. Burner/boiler model will determine how the [41]
and [90] cables are routed.
Please note that some control harnesses may have a single [41] plug for
burner operation and powering of burner blower motor. Other harnesses
may have [41] and [90] for both burner and modulation operation.
!
CAUTION
Refer to burner manual for proper
control/burner interconnection
information. All terminations should
be double-checked before turning on
power.
33
Section 3.4
2
2 The [41] and [90] burner plugs
are plugged into control at far
right hand side. The two plugs
are designed for their specific
location and placement.
Control Overview—Burner Control Wiring
Section 3
Connection of Boiler Control Wiring to Burner (hard-wired connection)
Applicable for Vitotronic 100, GC1
Overview
1
1 Boiler control with open front
access cover.
3
Section 3.4
See Note Below
4
5
6
3 The [41] and [90] plug harness
is fed from inside of the control
into the control harness junction
box.
A grommet is used to hold the
harness in place.
4 Control harness assemblies for
the Vitotronic 300, GW2 are
not equipped for BMS access to
the [90] plug modulation
harness.
5 Hard wired terminals are found
at the end of the control/burner
interconnection harness. Refer
to burner specific manual for
information on the proper
terminal connections.
6 Burner terminal strip located in
specific burner.
Note:
Refer to specific boiler manual for information regarding the routing of
[41] and [90] cables. Burner/boiler model will determine how the [41]
and [90] cables are routed.
!
CAUTION
Refer to burner manual for proper
control/burner interconnection
information. All terminations should
be double-checked before turning on
power.
34
5346540 v1.0 09/2006 Technical information subject to change without notice
2
2 The [41] and [90] burner plugs
are plugged into control at far
right hand side. The two plugs
are designed for their specific
location and placement.
Control Overview—Burner Control Wiring
Section 3
Connection of Boiler Control Wiring to Burner (plug-in connection)
Applicable for Vitotronic 300, GW2
Overview
1
1 Boiler control with open front
access cover.
3
See Note Below
4
5346540 v1.0 09/2006 Technical information subject to change without notice
5
6
3 The [41] and [90] plug harness
is fed from inside of the control
into the control harness junction
box.
A grommet is used to hold the
harness in place.
4 The [90] plug harness is
interrupted by terminal blocks
that allow building management
or control systems to provide
remote burner modulation.
Ensure that the DIN rail
mounted plug is plugged in for
proper operation.
5 Burner plugs are found at end
of burner harness to allow the
control to be interfaced with
the burner by plugging in
corresponding [41] and [90]
plugs.
6 Corresponding burner plugs
found in burner to mate with
[41] and [90] plugs from
control.
Note:
Refer to specific boiler manual for information regarding the routing of
[41] and [90] cables. Burner/boiler model will determine how the [41]
and [90] cables are routed.
Please note that some control harnesses may have a single [41] plug for
burner operation and powering of burner blower motor. Other harnesses
may have [41] and [90] for both burner and modulation operation..
!
CAUTION
Refer to burner manual for proper
control/burner interconnection
information. All terminations should
be double-checked before turning on
power.
35
Section 3.4
2
2 The [41] and [90] burner plugs
are plugged into control at far
right hand side. The two plugs
are designed for their specific
location and placement.
Control Overview—Burner Control Wiring
Section 3
Connection of Boiler Control Wiring to Burner (hard-wired connection)
Applicable for Vitotronic 300, GW2
Overview
1
1 Boiler control with open front
access cover.
3
Section 3.4
See Note Below
4
5
6
3 The [41] and [90] plug harness
is fed from inside of the control
into the control harness junction
box.
A grommet is used to hold the
harness in place.
4 Control harness assemblies for
the Vitotronic 300, GW2 are
not equipped for BMS access to
the [90] plug modulation
harness.
5 Hard wired terminals are found
at the end of the control/burner
interconnection harness. Refer
to burner specific manual for
information on the proper
terminal connections.
6 Burner terminal strip located in
specific burner.
Note:
Refer to specific boiler manual for information regarding the routing of
[41] and [90] cables. Burner/boiler model will determine how the [41]
and [90] cables are routed.
!
CAUTION
Refer to burner manual for proper
control/burner interconnection
information. All terminations should
be double-checked before turning on
power.
36
5346540 v1.0 09/2006 Technical information subject to change without notice
2
2 The [41] and [90] burner plugs
are plugged into control at far
right hand side. The two plugs
are designed for their specific
location and placement.
Control Overview—Burner Control Wiring
Section 3
Weishaupt Burner Schematic G Series Burner (typical)
Refer to job specific burner schematic contained in burner information package
Overview
1 Burner motor power
supply connections for
single phase motors.
1
-weishaupt-
2 Burner motor power
supply connections for
three phase motors.
2
3 Burner potentiometer
used for burner
positioning for BMS
systems.
3
4 Modulation [90] plug
connection from control
or BMS.
4
5 Gas valve connection
along with POC
connections.
6 Low gas pressure
switch.
5346540 v1.0 09/2006 Technical information subject to change without notice
5
7 High gas pressure
switch.
8 [41] from boiler control
provides 120VAC to
power LFL (flame safeguard) as well as
providing call for heat.
6
7
8
!
CAUTION
Refer to burner manual for proper
control/burner interconnection
information. All terminations should
be double-checked before turning on
power.
37
Section 3.4
OR
Control Overview—Burner Control Wiring
Section 3
Riello Burner Schematic (typical)
Refer to job specific burner schematic contained in burner information package
Overview
1 Alternate modulating control
signals. Refer to burner
schematic for correct
applicability.
1
2 Operating control such as
Vitotronic 100, GC1 or
Vitotronic 300, GW2.
2
3 Modulating [90] plug output.
Dry contact floating signal
from control or BMS.
4 Gas valve connection.
Section 3.4
5 Pilot valve.
3
6 Proof of closure and gas
pressure switches.
7 [41] connection from boiler
control provides 120VAC to
power LFL (flame safe-guard)
control as well as providing
call for heat.
4
8 Incoming burner blower motor
connections.
5
6
7
8
!
9
38
9
CAUTION
Refer to burner manual for proper
control/burner interconnection
information. All terminations should
be double-checked before turning on
power.
5346540 v1.0 09/2006 Technical information subject to change without notice
9 Field supplied disconnect and
fuses for burner blower motor.
Control Overview—Burner Power Wiring
Section 3
Connection of Boiler Power Wiring to Burner
Applicable for both Vitotronic 100, GC1 and 300, GW2
Soft Cable 120VAC, 1PH Supply
Connection Overview
3
1 Incoming burner motor power
supply 120VAC, 1PH.
Ensure polarity of L/G/N is not
reversed.
2
4
Soft cable
3 DIN rail mounted female socket
inside boiler control junction
enclosure used for wiring burner
power.
4 Corresponding plug for burner
wiring is pre-wired for
termination in the burner and
plugs into receptacle mounted
on DIN rail. Refer to burner
manual for correct termination
inside of burner.
1
5
5 Burner contains motor starter
and blower motor.
5346540 v1.0 09/2006 Technical information subject to change without notice
Flexible Conduit 120VAC, 1PH Supply
3
!
CAUTION
Provide disconnect means and over
current protection as required by local
codes
!
2
4
CAUTION
Refer to burner manual for correct
fuse and wire gauge sizing with
respect to burner electrical
requirements.
Flexible Conduit
1
5
39
Section 3.4
2 Connect 120VAC supply to
terminals 21, 22 and 23 on the
DIN rail inside of boiler control
harness. Provide fuseable
disconnect according to local
codes.
Control Overview—Burner Power Wiring
Section 3
Connection of Boiler Power Wiring to Burner (hard wired connection)
Applicable for both Vitotronic 100, GC1 and 300, GW2
Connection Overview
Flexible Conduit 240VAC, 1PH Supply
1 Incoming burner motor power
supply 240VAC, 1PH.
3
2 Connect 240VAC power to
terminals 21, 22 and 23 on the
DIN rail inside of boiler control
connection enclosure. Provide
fuseable disconnect according
to local codes.
4
Flexible Conduit
1
5
4 Corresponding plug for burner
wiring is pre-wired for
termination in the burner and
plugs into receptacle mounted
on DIN rail. Refer to burner
manual for correct termination
inside of burner.
5 Burner contains motor starter
and blower motor.
!
CAUTION
Refer to burner manual for correct
fuse and wire gauge sizing with
respect to burner electrical
requirements.
!
CAUTION
Provide disconnect means and over
current protection as required by local
codes
40
5346540 v1.0 09/2006 Technical information subject to change without notice
Section 3.4
2
3 DIN rail mounted female socket
inside boiler control junction
enclosure used for wiring burner
power.
Control Overview—Burner Power Wiring
Section 3
Connection of Boiler Power Wiring to Burner (hardwired connection)
Applicable for both Vitotronic 100, GC1 and 300, GW2
Connection Overview
Flexible Conduit 208/460/575VAC, 3PH Supply
1 Incoming burner motor power
supply 208/460/575VAC, 3PH.
3
2 Connect 208/460/575VAC,
3PH power to terminals 21, 22
and 23 on DIN rail inside of
burner harness connection
enclosure.
4
2
Flexible Conduit
1
5346540 v1.0 09/2006 Technical information subject to change without notice
5
4 Corresponding plug for burner
wiring is pre-wired for
termination in the burner and
plugs into receptacle mounted
on DIN rail. Refer to burner
manual for correct termination
inside of burner.
5 Burner contains motor starter
and blower motor.
!
CAUTION
Provide disconnect means and over
current protection as required by local
codes
!
CAUTION
Refer to burner manual for correct
fuse and wire gauge sizing with
respect to burner electrical
requirements.
!
CAUTION
During start-up, check for correct
motor rotation. If motor rotates in the
opposite direction than indicated on
the burner, disconnect power supply
and reverse wires BK1 and BK2 on
the burner terminals.
Ensure work is carried out by only
qualified personnel.
41
Section 3.4
3 DIN rail mounted female socket
inside boiler control junction
enclosure used for wiring burner
power.
Section 3.4
5346540 v1.0 09/2006 Technical information subject to change without notice
Notes
42
Section 3
This page is intentionally left blank
Control Overview
Section 3.5
Control Output Drawings
Section 3.5.1
Output [20][M2] and [M3]
Heat Circuit Pump [20][M2] and [20][M3]: 120VAC Output
Heat Circuit Pump [20][M2] and [20][M3]: Contactor
Heat Circuit Pump [20][M2] and [20][M3]: Dry Contact Control Signal
Section 3.5.2
Output [28] and [21]
DHW Recirculation [28] and DHW Pump [21]: 120VAC Output
DHW Recirculation [28] and DHW Pump [21]: Contactor
DHW Recirculation [28] and DHW Pump [21]: Dry Contact Control Signal
Section 3.5.3
Output [29]
Section 3.5.4
5346540 v1.0 09/2006 Technical information subject to change without notice
Output [50]
Shunt Pump [29]: 120VAC Output
Shunt Pump [29]: Contactor
Shunt Pump [29]: Dry Contact Control Signal
Boiler Pump [29]: 120VAC Output
Boiler Pump [29]: Contactor
Boiler Pump [29]: Dry Contact Control Signal
Compiled Alarm Output [50]: 120VAC Output
Compiled Alarm Output [50]: Dry Contact Control Signal
Section 3.5
Output [20][A1]/[M1]
Switched Output [20][A1]/[M1]: Dry Contact Control Signal
Section 3.5.5
Section 3.5.6
Adapter Modules
Valve Adapter Module—24VAC/120VAC
Combustion Air Device Adapter Module—Blower/Fan Single Boiler
Combustion Air Device Adaptor Module—Damper (spring close) Single
Boiler
Combustion Air Device Adaptor Module—Damper (power open/close) Single
Boiler
Common Combustion Air Device Interface—System Overview
Common Combustion Air Device Interface—System Boiler Connections
Common Combustion Air Device Interface—Overview
Common Combustion Air Device Interface—System Blower/Damper
Common Combustion Air Device Interface—Damper Power Open/Close
43
Control Overview—Pump Outputs
Section 3
Pump Outputs—Heating Circuit Pumps [20][M2] and [20][M3]: 120VAC Output
Applicable for Vitotronic 300, GW2 and Vitocontrol-S, MW1
Connection Overview
1 White [20][M2] and [20][M3]
plugs are plugged into control
from previous control
installation steps.
1
2 Pre-wired interconnecting
harness for [20][M2] and [20]
[M3] plug between DIN rail
terminals.
3 Terminals on DIN rail inside
control junction box.
2
4 Output voltage 120VAC at
terminal 1 and 2 on DIN rail for
both pump outputs.
Neutral and Ground terminals
provided if necessary.
Section 3.5.1
3
120VAC Pump Output
Rated current: max 2FLA
Recommended connection wire
size: AWG 14
4
5
Heating
Circuit 3
Pump
Connect the 3-wire cable from the
pump to the corresponding
terminals inside of control harness
junction box.
Heating
Circuit 2
Pump
IMPORTANT
Ensure that all field wiring conforms
to local codes and regulations.
44
5346540 v1.0 09/2006 Technical information subject to change without notice
5 Connected fractional
horsepower pump or circulator.
Refer to pump installation
manual for proper wiring
connections inside of pump.
Control Overview—Pump Outputs
Section 3
Pump Outputs—Heating Circuit Pumps [20][M2] and [20][M3]: Contactor
Applicable for Vitotronic 300, GW2 and Vitocontrol-S, MW1
Connection Overview
1 White [20][M2] and [20][M3]
plugs are plugged into control
from previous control
installation steps.
1
2 Pre-wired interconnecting
harness for [20][M2] and [20]
[M3] plug between DIN rail
terminals.
2
4 Output voltage 120VAC at
terminal 1 and 2 for both pump
outputs.
3
5 Field supplied motor starter or
contactor.
120VAC Output
Rated Current: max 2FLA
Recommended connection wire
size: AWG 14
240VAC or 208/575VAC 3PH
Pumps
Please note:
Field supplied contactor and/or
motor starter to power pump from
external power source.
5346540 v1.0 09/2006 Technical information subject to change without notice
4
R
R
5
5
Heating
Circuit 3
Pump
Output from control to activate the
contactor:
Rated current: max. 2FLA
Please ensure all connections and
wire sizes comply with local and
national codes.
1 Select the contactor and the
connecting wire in accordance
with the rating of the pump to
be connected.
2 Connect pump and power
supply to contactor.
3 Connect contactor coil to the
corresponding terminals.
4 Ensure proper pump rotation.
Heating
Circuit 2
Pump
IMPORTANT
Ensure that all field wiring conforms
to local codes and regulations.
45
Section 3.5.1
3 Terminals on DIN rail inside of
control junction box.
Control Overview—Pump Outputs
Section 3
Pump Outputs—Heating Circuit Pumps [20][M2] and [20][M3]: Dry Contact Control Signal
Applicable for Vitotronic 300, GW2 and Vitocontrol-S, MW1
Connection Overview
1 White [20][M2] and [20][M3]
plugs plugged into control from
control installation steps.
1
2 Pre-wired interconnecting
harness for [20][M2] and [20]
[M3] plug between DIN rail
terminals.
3 Terminals on DIN rail inside of
control junction box.
2
4 Output voltage 120VAC at
terminal 1 and 2 for both pump
outputs.
Neutral and Ground terminals
provided if necessary.
Section 3.5.1
3
5 Connected devices.
Field supplied 120VAC relay.
Relay can either be mounted in
control junction box or
remotely.
4
R
Heating
Circuit 3
Output
Signal
5
R
Heating
Circuit 2
Output
Signal
5
IMPORTANT
Ensure that all field wiring conforms
to local codes and regulations.
IMPORTANT
Contact rating of field supplied
contactor or relay will determine the
loads that can be switched. Consult
contact rating information on the
side of relay/contactor housing or
manufacturer directly
46
5346540 v1.0 09/2006 Technical information subject to change without notice
120VAC Output
Rated Current: max 2FLA
Recommended connection wire
size: AWG 14.
Control Overview—Pump Outputs
Section 3
Pump Outputs—DHW Recirculation Pump [28] and DHW Production [21]: 120VAC Output
Applicable for Vitotronic 100, GC1*, Vitotronic 300, GW2 and Vitocontrol-S, MW1
Connection Overview
1 White [28] and [21] plugs are
plugged into control from
previous control installation
steps.
1
2 Pre-wired interconnecting
harness for [28] and [21] plug
between DIN rail terminals.
2
4 Output voltage 120VAC at
terminal 3 for DHW
Recirculation pump and terminal
4 for DHW production pump.
3
5 Connected fractional
horsepower pump or circulator.
Refer to pump installation
manual for proper wiring
connections inside of pump.
120VAC Pump Output
Rated current: max 2FLA
Recommended connection wire
size: AWG 14
5346540 v1.0 09/2006 Technical information subject to change without notice
4
5
DHW
Recirculation
Pump*
Connect the 3-wire cable from the
pump to the corresponding
terminals inside of control harness
junction box.
DHW
Production
Pump
*Note: Vitotronic 100, GC1 does not have DHW Recirculation output
IMPORTANT
Ensure that all field wiring conforms
to local codes and regulations.
47
Section 3.5.2
3 Terminals on DIN rail inside of
control junction box.
Control Overview—Pump Outputs
Section 3
Pump Outputs—DHW Recirculation Pump [28] and DHW Production Pump [21]: Contactor
Applicable for Vitotronic 100, GC1*, Vitotronic 300, GW2 and Vitocontrol-S, MW1
Connection Overview
1 White [28] and [21] plugs are
plugged into control from
previous control installation
steps.
1
2 Pre-wired interconnecting
harness for [28] and [21] plug
between DIN rail terminals.
3 Terminals on DIN rail inside of
control junction box.
2
4 Output voltage 120VAC at
terminal 3 for DHW
Recirculation pump and terminal
4 for DHW production pump.
Section 3.5.2
3
5 Connected device
240VAC or 208/575VAC 3PH
Pumps
Please note:
Field supplied contactor and/or
motor starter to power pump from
external power source.
4
R
R
5
5
DHW
Recirculation
Pump
Output from control to activate the
contactor:
Rated current: max. 2FLA
Please ensure all connections and
wire sizes comply with local and
national codes.
1 Select the contactor and the
connecting wire in accordance
with the rating of the pump to
be connected.
2 Connect pump and power
supply to contactor.
3 Connect contactor coil to the
corresponding terminals.
4 Ensure proper pump rotation.
DHW
Production
Pump
*Note: Vitotronic 100, GC1 does not have DHW Recirculation pump output.
48
IMPORTANT
Ensure that all field wiring conforms
to local codes and regulations.
5346540 v1.0 09/2006 Technical information subject to change without notice
120VAC Output
Rated Current: max 2FLA
Recommended connection wire
size: AWG 14
Control Overview—Pump Outputs
Section 3
Pump Outputs—DHW Recirculation [28] and DHW Pump [21]: Dry Contact Control Signal
Applicable for Vitotronic 100, GC1*, Vitotronic 300, GW2 and Vitocontrol-S, MW1
Connection Overview
1 White [28] and [21] plugs are
plugged into control from
previous control installation
steps.
1
2 Pre-wired interconnecting
harness for [28] and [21] plug
between DIN rail terminals.
2
4 Output voltage 120VAC at
terminal 3 for DHW
Recirculation pump and terminal
4 for DHW production pump.
3
5 Connected device.
Field supplied 120VAC relay.
Relay can either be mounted in
control junction box or
remotely.
120VAC Pump Output
Rated current: max 2FLA
Recommended connection wire
size: AWG 14
5346540 v1.0 09/2006 Technical information subject to change without notice
4
R
DHW
Recirculation
Pump Output
Signal
5
R
DHW
Production
Pump Output
Signal
*Note: Vitotronic 100, GC1 does not have DHW Recirculation pump output.
5
IMPORTANT
Ensure that all field wiring conforms
to local codes and regulations.
IMPORTANT
Contact rating of field supplied
contactor or relay will determine the
loads that can be switched. Consult
contact rating information on the
side of relay/contactor housing or
manufacturer directly
49
Section 3.5.2
3 Terminals on DIN rail inside of
control junction box.
Control Overview—Pump Outputs
Section 3
Pump Outputs—Switched Output [20][A1]/[M1]: Dry Contact Control Signal
Applicable for Vitotronic 100, GC1, Vitotronic 300, GW2 and Vitocontrol-S, MW1
Connection Overview
1
Refer to applicable control manual
for coding information regarding
this output.
1 White [20][A1]/[M1] plug is
plugged into control from
previous control installation
steps.
2 Pre-wired interconnecting
harness between [20][A1]/[M1]
plug and DIN rail terminals.
2
Section 3.5.3
3
3 Terminals on DIN rail inside
control junction box.
4 Output voltage 120VAC at
terminal 5 field supplied relay.
Neutral and Ground terminals
provided if necessary.
5 Field supplied relay for signal to
BMS or other control devices.
4
5
A
Field supplied relay
B
Contacts of field supplied relay
IMPORTANT
Ensure that all field wiring conforms
to local codes and regulations.
IMPORTANT
Contact rating of field supplied
contactor or relay will determine the
loads that can be switched. Consult
contact rating information on the
side of relay/contactor housing or
manufacturer directly
50
5346540 v1.0 09/2006 Technical information subject to change without notice
120VAC Output
Rated Current: max 2FLA
Recommended connection wire
size: AWG 14.
Control Overview—Pump Outputs
Section 3
Pump Outputs—Shunt Pump [29]: 120VAC Output
Applicable for Vitotronic 100, GC1, Vitotronic 300, GW2 and Vitocontrol-S, MW1
Connection Overview
1
1 White [29] plug is plugged into
control from previous control
installation steps.
2 Pre-wired interconnecting
harness between [29] plug and
DIN rail terminals.
3 Terminals on DIN rail inside
control junction box.
5 Connected fractional
horsepower pump or circulator.
Refer to pump installation
manual for proper wiring
connections inside of pump.
3
120VAC Pump Output
Rated Current: max 2FLA
Recommended connection wire
size: AWG 14
5346540 v1.0 09/2006 Technical information subject to change without notice
Connect the 3-wire cable from the
pump to the corresponding
terminals.
4
5
Shunt
Pump
IMPORTANT
Ensure that all field wiring conforms
to local codes and regulations.
51
Section 3.5.4
4 Output voltage 120VAC at
terminal 6 for Shunt pump.
2
Control Overview—Pump Outputs
Section 3
Pump Outputs—Shunt Pump [29]: Contactor
Applicable for Vitotronic 100, GC1, Vitotronic 300, GW2 and Vitocontrol-S, MW1
Connection Overview
1
1 White [29] plug is plugged into
control from previous control
installation steps.
2 Pre-wired interconnecting
harness between [29] plug and
DIN rail terminals.
3 Terminals on DIN rail inside of
control junction box.
4 Output voltage 120VAC at
terminal 6 for Shunt pump.
2
Section 3.5.4
5 Connected device.
3
120VAC Output
Rated Current: max 2FLA
Recommended connection wire
size: AWG 14
Output from control to activate the
contactor:
Rated current: max. 2FLA
Please ensure all connections and
wire sizes comply with local and
national codes.
1 Select the contactor and the
connecting wire in accordance
with the rating of the pump to
be connected.
2 Connect pump and power
supply to contactor.
3 Connect contactor coil to the
corresponding terminals.
4 Ensure proper pump rotation.
4
R
5
Shunt
Pump
IMPORTANT
Ensure that all field wiring conforms
to local codes and regulations.
52
5346540 v1.0 09/2006 Technical information subject to change without notice
240VAC or 208/575VAC 3PH
Pumps
Please note:
Field supplied contactor and/or
motor starter to power pump from
external power source.
Control Overview—Pump Outputs
Section 3
Pump Outputs—Shunt Pump [29]: Dry Contact Control Signal
Applicable for Vitotronic 100, GC1, Vitotronic 300, GW2 and Vitocontrol-S, MW1
Connection Overview
1
1 White [29] plug is plugged into
control from previous control
installation steps.
2 Pre-wired interconnecting
harness between [29] plug and
DIN rail terminals.
4 Output voltage 120VAC at
terminal 6 for Shunt/Boiler
pump.
Neutral and Ground terminals
provided if necessary.
2
3
5 Connected device
Field supplied 120VAC relay.
Relay can either be mounted in
control junction box or
remotely.
5346540 v1.0 09/2006 Technical information subject to change without notice
120VAC Output
Rated Current: max 2FLA
Recommended connection wire
size: AWG 14.
4
R
Shunt
Pump Signal
5
IMPORTANT
Ensure that all field wiring conforms
to local codes and regulations.
IMPORTANT
Contact rating of field supplied
contactor or relay will determine the
loads that can be switched. Consult
contact rating information on the
side of relay/contactor housing or
manufacturer directly
53
Section 3.5.4
3 Terminals on DIN rail inside of
control junction box.
Control Overview—Pump Outputs
Section 3
Pump Outputs—Boiler Supply Pump [29]: 120VAC Output
Applicable for Vitotronic 100, GC1, Vitotronic 300, GW2 and Vitocontrol-S, MW1
Connection Overview
1
1 White [29] plug is plugged into
control from previous control
installation steps.
2 Pre-wired interconnecting
harness between [29] plug and
DIN rail terminals.
3 Terminals on DIN rail inside of
control junction box.
4 Output voltage 120VAC at
terminal 6 for Shunt/Boiler
pump.
Neutral and Ground terminals
provided if necessary.
2
Section 3.5.4
3
5 Connected fractional
horsepower pump or circulator.
Refer to pump installation
manual for proper wiring
connections inside of pump.
Connect the 3-wire cable from the
pump to the corresponding
terminals.
4
5
Boiler
Supply
Pump
IMPORTANT
Ensure that all field wiring conforms
to local codes and regulations.
54
5346540 v1.0 09/2006 Technical information subject to change without notice
120VAC Pump Output
Rated Current: max 2FLA
Recommended connection wire
size: AWG 14
Control Overview—Pump Outputs
Section 3
Pump Outputs—Boiler Supply Pump [29]: Contactor
Applicable for Vitotronic 100, GC1, Vitotronic 300, GW2 and Vitocontrol-S, MW1
Connection Overview
1
1 White [29] plug is plugged into
control from previous control
installation steps.
2 Pre-wired interconnecting
harness between [29] plug and
DIN rail terminals.
3 Terminals on DIN rail inside of
control junction box.
3
Section 3.5.4
4 Output voltage 120VAC at
terminal 6 for Shunt/Boiler
pump.
Neutral and Ground terminals
provided if necessary.
2
5 Connected device.
5346540 v1.0 09/2006 Technical information subject to change without notice
120VAC Output
Rated Current: max 2FLA
Recommended connection wire
size: AWG 14
240VAC or 208/575VAC 3PH
Pumps
Please note:
Field supplied contactor and/or
motor starter to power pump from
external power source.
4
Output from control to activate the
contactor:
Rated current: max. 2FLA
Please ensure that all connections
and wire sizes comply with local
and national codes.
1 Select the contactor and the
connecting wire in accordance
with the rating of the pump that
is to be connected
2 Connect pump and power
supply to contactor.
3 Connect contactor coil to the
corresponding terminals.
4 Ensure proper pump rotation.
R
5
Boiler
Supply
Pump
IMPORTANT
Ensure that all field wiring conforms
to local codes and regulations.
55
Control Overview—Pump Outputs
Section 3
Pump Outputs—Boiler Supply Pump [29]: Dry Contact Control Signal
Applicable for Vitotronic 100, GC1, Vitotronic 300, GW2 and Vitocontrol-S, MW1
Connection Overview
1
1 White [29] plug is plugged into
control from previous control
installation steps.
2 Pre-wired interconnecting
harness between [29] plug and
DIN rail terminals.
3 Terminals on DIN rail inside of
control junction box.
4 Output voltage 120VAC at
terminal 6 for Shunt/Boiler
pump.
Neutral and Ground terminals
provided if necessary.
2
Section 3.5.4
3
5 Connected device
Field supplied 120VAC relay.
Relay can either be mounted in
control junction box or
remotely.
4
R
Boiler
Supply
Pump Signal
5
IMPORTANT
Ensure that all field wiring conforms
to local codes and regulations.
IMPORTANT
Contact rating of field supplied
contactor or relay will determine the
loads that can be switched. Consult
contact rating information on the
side of relay/contactor housing or
manufacturer directly
56
5346540 v1.0 09/2006 Technical information subject to change without notice
120VAC Output
Rated Current: max 2FLA
Recommended connection wire
size: AWG 14.
Control Overview—Alarm Output
Section 3
Alarm Output—Compiled Alarm [50]]: 120VAC Output
Applicable for Vitotronic 100, GC1, Vitotronic 300, GW2 and Vitocontrol-S, MW1
Connection Overview
1 Red [50] plug is plugged into
control from previous control
installation steps.
1
2 Pre-wired interconnecting
harness between [50] plug and
DIN rail terminals.
2
3
4 Output voltage 120VAC at
terminal 7. Connection of
Neutral and Ground as well can
be used when powering light or
buzzer..
5 Connected device to indicate
alarm status.
120VAC Output
Rated Current: max 2FLA
Recommended connection wire
size: AWG 14
Connect the 3-wire cable from the
alarm device to the corresponding
output terminals.
5346540 v1.0 09/2006 Technical information subject to change without notice
4
5
or
IMPORTANT
Follow instructions supplied with
alarm output device.
IMPORTANT
Ensure that all field wiring conforms
to local codes and regulations.
57
Section 3.5.5
3 Terminals on DIN rail inside of
control junction box.
Control Overview—Alarm Output
Section 3
Alarm Output—Compiled Alarm [50]: Dry Contact Control Signal
Applicable for Vitotronic 100, GC1, Vitotronic 300, GW2 and Vitocontrol-S, MW1
Connection Overview
1 Red [50] plug is plugged into
control from control installation
steps.
1
2 Pre-wired interconnecting
harness between [50] plug and
DIN rail terminals.
3 Terminals on DIN rail inside of
control junction box.
2
3
4 Output voltage 120VAC at
terminal 7.
Section 3.5.5
5 Connected device to indicate
alarm status.
Field supplied 120VAC relay.
Relay can either be mounted in
control junction box or
remotely.
4
120VAC Output
Rated Current: max 2FLA
Recommended connection wire
size: AWG 14
5
R
IMPORTANT
Ensure that all field wiring conforms
to local codes and regulations.
6
58
IMPORTANT
Contact rating of field supplied
contactor or relay will determine the
loads that can be switched. Consult
contact rating information on the
side of relay/contactor housing or
manufacturer directly
5346540 v1.0 09/2006 Technical information subject to change without notice
6 Relay contacts provide alarm
status condition. Connection to
relay dry contact terminals is a
function of type of alarm output
required. Dry contacts can
either be normally open or
normally closed contact.
Control Overview—Valve Adapter Module
Section 3
Valve Adapter Module—Valve Output [52][A1/M2/M3]: 24VAC or 120VAC Output
Applicable for Vitotronic 100, GC1, Vitotronic 300, GW2 and Vitocontrol-S, MW1
Connection Overview
1
1 Black [52] plugs are pre-wired
to modules. Plug into socket
within control for specific valve
output to be controlled by
adaptor.
1
3 The 24VAC valve adaptor
identified by two relays and
transformer on PCB. Terminals
on DIN rail inside control
junction box.
2
4 Modules are mounted onto DIN
rail located inside of control
connection enclosure.
3
6
4
7
5346540 v1.0 09/2006 Technical information subject to change without notice
5
5 Both modules have a single
wire which is terminated in
[156] terminal blocks, terminals
8, 9 or 10. This provides
120VAC power for the
operation of the module
adaptors.
6 The 120VAC valve actuator is
wired into output terminal block
of adapter. Wires connected to
the G/N/L2/L1 terminals.
7 The 24VAC valve actuator is
wired into output terminal block
of adaptor. Wires connected to
the Open/Close/Common
terminals.
Technical Information
120VAC Valve Adaptor
Rated Voltage: 120VAC
Rated Current: max 0.1FLA
Recommended connection
wire size: AWG14
24VAC Valve Adaptor
Rated Voltage: 24VAC
Rated Current: max 0.15FLA
Recommended connection
wire size: AWG14
IMPORTANT
Once the installation has been
completed, ensure that necessary
testing steps are taken to verify the
proper rotation of the valve
actuator.
59
Section 3.5.6
2 The 120VAC valve adaptor
identified by two relays on PCB.
Control Overview—Combustion Air Control
Section 3
Combustion Air Device Adapter Module—Blower/Fan Single Boiler
Applicable for Vitotronic 100, GC1 and Vitotronic 300, GW2
Connection Overview
1 The combustion air device
adaptor module is mounted
onto the DIN rail inside of the
control harness connection
enclosure.
2
1
2 Wire the interconnection cabling
between the adaptor and
control.
Section 3.5.6
3 Connect the harness from the
module to the [150] terminal
blocks. Remove jumper
between terminals 16 and 17.
4 Field supplied equipment:
Power supply for damper
Local device disconnect
Device protection.
3
4
Blower or Fan
6 Connection of normally open
proving switch. Closes on
damper opening or blower air
movement.
Proving switch terminated at
NO/NO terminals of adapter.
Combustion air device
connected to terminals L/L on
adaptor module.
IMPORTANT
Wire BK2 must be connected to
terminal 16 and BK3 to terminal 17.
DO NOT REVERSE. Failure to ensure
this will affect the operation of the
connected device.
5
Technical Information
Combustion Air Device Adaptor
Rated Voltage: 120VAC
Rated Current: max 5FLA
Recommended connection wire size: AWG 14
IMPORTANT
Ensure combustion air device is
suitable for intended application.
60
!
CAUTION
Provide disconnect means and over
current protection as required by local
codes.
Failure to remove jumper between
terminals 16 and 17 will not shut
down the burner regardless of the
state of the air proving switch.
!
CAUTION
When making connections with
individual boiler interface adaptors,
ensure the power is turned off at the
boiler control.
5346540 v1.0 09/2006 Technical information subject to change without notice
5 Drive motor for damper or
blower.
6
Control Overview—Combustion Air Control
Section 3
Combustion Air Device Adaptor Module—Damper (spring close) Single Boiler
Applicable for Vitotronic 100, GC1 and Vitotronic 300, GW2
Connection Overview
1 The combustion air device
adaptor module is mounted
onto the DIN rail inside of the
control harness connection
enclosure.
2
1
2 Wire the interconnection cabling
between the adaptor and
control.
Section 3.5.6
3 Connect the harness from the
module to the [150] terminal
blocks. Remove jumper
between terminals 16 and 17.
4 Field supplied equipment:
Power supply for damper
Local device disconnect
Device protection.
5 Drive motor for damper or
blower.
6
3
5346540 v1.0 09/2006 Technical information subject to change without notice
4
6 Connection of normally open
proving switch. Closes on
damper opening or blower air
movement.
Proving switch terminated at
NO/NO terminals of adapter.
Combustion air device
connected to terminals L/L on
adaptor module.
IMPORTANT
Wire BK2 must be connected to
terminal 16 and BK3 to terminal 17.
DO NOT REVERSE. Failure to ensure
this will affect the operation of the
connected device.
5
Technical Information
Combustion Air Device Adaptor
Rated Voltage: 120VAC
Rated Current: max 5FLA
Recommended connection wire size: AWG 14
IMPORTANT
Ensure combustion air device is
suitable for intended application.
!
CAUTION
Provide disconnect means and over
current protection as required by local
codes.
Failure to remove jumper between
terminals 16 and 17 will not shut
down the burner regardless of the
state of the air proving switch.
!
CAUTION
When making connections with
individual boiler interface adaptors,
ensure the power is turned off at the
boiler control.
61
Control Overview—Combustion Air Control
Section 3
Combustion Air Device Adaptor Module—Damper (power open/close) Single Boiler
Applicable for Vitotronic 100, GC1 and Vitotronic 300, GW2
Connection Overview
1 The combustion air device
adaptor module is mounted
onto the DIN rail inside of the
control harness connection
enclosure.
2
1
2 Wire the interconnection cabling
between the adaptor and
control.
Section 3.5.6
3 Connect the harness from the
module to the [150] terminal
blocks. Remove jumper
between terminals 16 and 17.
4 Field supplied equipment:
Power supply for damper
Local device disconnect
Device protection (fuse)
Switching relay
3
4
5
5 Drive motor for damper or
blower.
6 Connection of normally open
proving switch. Closes on
damper opening or blower air
movement.
Proving switch terminated at
NO/NO terminals of adapter.
Combustion air device
connected to terminals L/L on
adaptor module.
IMPORTANT
Wire BK2 must be connected to
terminal 16 and BK3 to terminal 17.
DO NOT REVERSE. Failure to ensure
this will affect the operation of the
connected device.
Technical Information
Combustion Air Device Adaptor
Rated Voltage: 120VAC
Rated Current: max 5FLA
Recommended connection wire size: AWG 14
IMPORTANT
Ensure combustion air device is
suitable for intended application.
62
!
CAUTION
Provide disconnect means and over
current protection as required by local
codes.
Failure to remove jumper between
terminals 16 and 17 will not shut
down the burner regardless of the
state of the air proving switch.
!
CAUTION
When making connections with
individual boiler interface adaptors,
ensure the power is turned off at the
boiler control.
5346540 v1.0 09/2006 Technical information subject to change without notice
6
Control Overview—Combustion Air Control
Section 3
Common Combustion Air Device Interface—System Overview
Applicable for Vitotronic 100, GC1
Connection Overview
1 Incoming power supply to the
common combustion air device
Interface.
Note: Field supplied disconnect
switch and circuit protection.
1
3
3 Individual boiler combustion air
device adaptor.
2
4 Combustion air device:
Blower
Power open/spring close
damper
Power open/power close
damper
4
5 Air proving switch connected to
interface.
5346540 v1.0 09/2006 Technical information subject to change without notice
6 Interconnection wiring between
all applicable boilers to interface
module.
Field supplied equipment:
Power supply for damper
Local device disconnect
Device protection
Damper device with P switch
IMPORTANT
A four-wire interconnection
between each boiler and the
common combustion air device
interface is required. This is a
120VAC circuit.
5
IMPORTANT
Ensure that combustion air device is
suitable for intended application.
6
!
CAUTION
Provide disconnect means and over
current protection as required by local
codes.
63
Section 3.5.6
2 Common combustion air device
interface. Connections from
incoming power supply,
individual boiler adaptors and
damper/blower assembly.
Control Overview—Combustion Air Control
Section 3
Common Combustion Air Device Interface—System Boiler Connections
Applicable for Vitotronic 100, GC1
Connection Overview
1
3
2
1 Call for heat demands from
individual boiler combustion
modules.
Note: All demand connections
are paralleled together
terminated in common
combustion air device interface.
Section 3.5.6
2 Individual proving switch
signals provide damper/blower
status.
All individual connections come
from common combustion air
device interface.
3 Individual boiler combustion air
device adaptor. Mounted on
each boiler control DIN rail.
L
Proving Dry Contact
Switch Activation
4
5
5 Terminals which provide call for
combustion air device demand.
IMPORTANT
A four-wire interconnection
between each boiler and the
common combustion air device
interface is required. This is a
120VAC circuit.
IMPORTANT
Ensure that combustion air device is
suitable for intended application.
!
CAUTION
When making connections with
individual boiler interface adaptors,
ensure the power is turned off at the
boiler control.
!
CAUTION
Provide disconnect means and over
current protection as required by local
codes.
64
5346540 v1.0 09/2006 Technical information subject to change without notice
NO NO L
4 Air proving switch terminals on
each adaptor module. The
marking NO refers to Normally
Open.
Control Overview—Combustion Air Control
Section 3
Common Combustion Air Device Interface—Overview
Applicable for Vitotronic 100, GC1
Connection Overview
2
1 Common combustion air device
interface.
2 Incoming power supply for
operation of blower or damper.
Note:
Power supply rated for
120VAC.
3 Boiler connection terminals from
LL of combustion air device
modules.
Power Supply
120VAC
L
G
N
4 Air proving switch terminals on
each adaptor module. The
marking NO refers to Normally
Open.
L
L NO NO NO NO NO NO NO NO NO NO L G N
Boiler 4 Boiler 3 Boiler 2 Boiler 1 Proving
Power
FRESH AIR DEVICE ADAPTORS Switch 120VAC
Boiler
1-4
5346540 v1.0 09/2006 Technical information subject to change without notice
3
4
5
5 Connections for combustion air
device (blower or damper) and
air proving switch.
Note: 120VAC 5FLA.
IMPORTANT
A four-wire interconnection
between each boiler and the
common combustion air device
interface is required. This is a
120VAC circuit.
IMPORTANT
Ensure that combustion air device is
suitable for intended application.
!
CAUTION
Provide disconnect means and over
current protection as required by local
codes.
!
CAUTION
When making connections with
individual boiler interface adaptors,
ensure the power is turned off at the
boiler control.
65
Section 3.5.6
1
Control Overview—Combustion Air Control
Section 3
Common Combustion Air Device Interface—System: Blower/Damper
Applicable for Vitotronic 100, GC1
Connection Overview
1 Incoming power supply to
power combustion air device.
Note:
120VAC supply required
1
2 Field supplied local disconnect
and circuit protection.
3 Common combustion air device
interface.
2
Section 3.5.6
3
4 Terminals on circuit board to
terminate air proving switch
from air device and terminals to
power device.
Note:
120VAC 5FLA maximum
5 Field supplied wire for
interconnection between
interface and combustion air
device.
6 Field supplied wire for
interconnection of air proving
switch and interface.
4
5
6
NOTE: This drawing is applicable
for blower or damper. Suitable for
power open/spring close damper
only.
IMPORTANT
Ensure that combustion air device is
suitable for intended application.
7
!
CAUTION
Provide disconnect means and over
current protection as required by local
codes
66
5346540 v1.0 09/2006 Technical information subject to change without notice
7 Combustion air device such as
damper or blower.
Control Overview—Combustion Air Control
Section 3
Common Combustion Air Device Interface—Damper Power Open/Close
Applicable for Vitotronic 100, GC1
Connection Overview
1
1 Incoming power supply to
power combustion air device.
Note:
120VAC supply required
2 Field supplied local disconnect
and circuit protection.
2
4 Terminals on circuit board to
terminate air proving switch
from air device and terminals to
power device.
Note:
120VAC 5FLA maximum
3
5 Field supplied and wired
120VAC relay for operation of
power open/power close
damper.
Note:
120VAC bypass around
interface to normally closed
contact of relay.
5346540 v1.0 09/2006 Technical information subject to change without notice
4
6 Field supplied wire for
interconnection between
interface and combustion air
device.
7 Field supplied wire for
interconnection of air proving
switch and interface.
7
5
8 Combustion air device such as
damper.
6
NOTE:
This drawing is suitable for power
open/close damper only.
IMPORTANT
Ensure that combustion air device is
suitable for intended application.
!
8
CAUTION
Provide disconnect means and over
current protection as required by local
codes
67
Section 3.5.6
3 Common combustion air device
interface.
Section 3.4
5346540 v1.0 09/2006 Technical information subject to change without notice
Notes
68
Section 3
This page is intentionally left blank
External Control Connections
Section 4
Overview of Considerations and Connections
BMS Control Interface Considerations
Control Demand Connections Overview
Section 4.0
Vitotronic 100, GC1
Plug [143] Burner demand (01:01 coded)
Plug [143] Burner demand (01:03 coded)
Plug [146] Burner demand (01:01 coded)
Terminal connection [150] demand
Plug [146] Burner disable
Terminal connection [150] burner disable
Terminal connection [151] burner/control disable
Terminal connection [90] BMS modulation control
Plug [146] stage/modulation changeover
Section 4.1
Vitotronic 300, GW2
Plug [146] Burner demand
Plug [143] External change of heating program/open valves
Plug [143] External disable/close mixing valves
Terminal connection [150] burner demand
Terminal connection [150] burner disable
Terminal connection [151] burner/control disable
Plug [146] stage/modulation changeover
Section 4.2
Vitocontrol-S, MW1 (CT3/VD2/RS/VB2
(In Conjunction with Vitotronic 100, GC1)
Plug [143] external change of heating program/open valves
Plug [143] external disable/close mixing valves
Plug [146] external demand
Section 4.3
Vitotronic 100, GC1 when used in conjunction
Plug [143] boiler disable
Plug [143] switch in boiler as last in boiler sequence
Plug [146] external switching of staged/modulating burner
0-10VDC Extension Input Module
Module Overview
Vitotronic 100, GC1 (Coded for single boiler)
Vitotronic 100, GC1 (Coded for multiple boilers)
Vitotronic 300, GW2
Vitocontrol-S, MW1 (CT3/VD2/RS/VB2)
Section 4.1
5346540 v1.0 09/2006 Technical information subject to change without notice
Control Demand Connections
Section 4.4
69
External Control Connections
Section 4
Control Demand Connections Overview & BMS Control Interface Considerations
BMS Control Interface Considerations
How to Demand Burner?
How to Modulate Burner?
Control Burner Demand Considerations
143 Demand Dry-contact
146 Demand Dry-contact
150 Demand Dry-contact
143/146 Demand Dry-contact
0-10VDC Demand signal
Burner Modulation Considerations
0-10VDC signal direct to burner
Modulation by control
90 terminal connections for BMS
Section 4.0
Connections and
terminations
Vitotronic 100, GC1
Vitotronic 100, GC1 Vitocontrol-S, VD2/
w/Vitotronic 333
CT3
Vitotronic 333
Vitotronic 300
Plug [143]
Terminals 1 and 2
Stage 1 demand (Coding 01:01)
Stage 1 demand (Coding 01:03)
Boiler Disable
Operating program
change/Mixing valve
“open”
Operating program
change/Mixing valve
“open”
Plug [143]
Terminals 2 and 3
Stage 2 demand (Coding 01:01)
Stage 2 demand (Coding 01:03)
Switch in boiler as last in
sequence
Remote disable/mixing
valve “close”
Remote disable/mixing
valve “close”
Plug [146]
Terminals 1 and 2
Change-over demand from
modulation to staging
Change-over demand
from modulation to staging
N/A
Change-over demand
from modulation to
staging
Plug [146]
Terminals 2 and 3
External demand (Coding 01:01)
Boiler Enable (Coding 01:03)
N/A
External heat demand
External heat demand
[150]Terminal block
Terminals 16 and 18
Burner demand
Burner demand
N/A
Burner demand
[150] Terminal block
Terminals 16 and 17
Burner disable
Burner disable
N/A
Burner disable
[151] Terminal block
Terminals 19 and 20
Burner/Control disable
Burner/Control disable
N/A
Burner/Control disable
Notes:
Refer to manual for specific coding changes. Functions of Vitotronic 100, GC1 change when communicating to Vitocontrol-S, VD2/CT3/VB2/RS/GS.
Coding 01:01 allows boiler to maintain minimum boiler water temperature independent of external control.
Coding 01:03 allows boiler not to maintain minimum boiler water temperature. When call for heat takes place, minimum temperature must be satisfied.
Coding 01:03 does not allow boiler to maintain minimum boiler water temperature unless terminals 2 and 3 of Plug [146] are closed.
Dry contact to Plug [143] terminals 1 and 2 as well as 2 and 3 for low/high fire respectively.
When using Plug [146] in BMS applications, contact closure is required to demand burner.
When jumper between 16 and 17 is not present either through control disable from BMS or other device, the control override function will not provide a call for heat to burner.
External demand control set point for Plug [146] (terminals 2 and 3) is adjustable at address 9b for Vitotronic 100, GC1 standalone or Vitocontrol-S, CT3/VD2 control.
!
CAUTION
Ensure that all connections and
functions are understood to achieve
the desired response and result of
burner control and modulation.
70
5346540 v1.0 09/2006 Technical information subject to change without notice
Control Demand Connections Overview
Control Overview—External Controls Connections
Section 4
BMS Connections—Single/Multiple Boilers—Burner Demand
Applicable for Vitotronic 100, GC1 (without communication)
Burner Demand:
1st stage: dry contact to [143] plug
2nd stage: dry contact to [143] plug
Connection Overview
1 Boiler control.
Primary Consideration(s):
Boiler maintains constant minimum boiler water temperature based on
coding card with or without demand signal.
Adjustable high limit or electronic maximum will limit operation of burner
call-for-heat.
Configurations:
1st stage demand dry contact wired to Plug [143] terminals 1 and 2.
2nd stage demand dry contact wired to Plug [143] terminals 2 and 3.
Boiler coded for 01:01.
Boiler maximum temperature limit address 06.
2 Plug [143] used to interconnect
control devices with boiler
control. Ensure [143] plug is
plugged into the correct socket
found in the boiler control.
3 Field supplied interconnection
wire between [143] plug and
control device.
4 Field supplied relay:
24VAC
120VAC
24VDC
5 First stage demand relay (field
supplied). When coil energized,
dry contact switch is made and
control fires first stage of
burner.
5346540 v1.0 09/2006 Technical information subject to change without notice
143 146
7 Instead of relays, it may be
possible to use simple switches
to control burner low and high
fire demands.
143
1
2
1 2 3
IMPORTANT
Ensure that all field wiring conforms
to local codes and regulations.
3
R
IMPORTANT
Record all coding changes for future
reference.
Ensure only knowledgeable coding
changes are made.
4
R
OR
SW
5
SW
7
6
71
Section 4.1
6 Second stage demand relay
(field supplied). When coil is
energized, dry contact switch is
made and control drives burner
to second stage.
Control Overview—External Controls Connections
Section 4
BMS Connections—Single/Multiple Boilers—Burner Demand
Applicable for Vitotronic 100, GC1 (without communications)
Burner Demand:
1st stage: dry contact to 143 plug
2nd stage: dry contact to 143 plug
Connection Overview
1 Boiler control.
Primary Consideration(s):
Boiler will not maintain minimum boiler water temperature as long as
contact at [146] plug is open.
Burner will fire when control detects demand signal at [146] plug.
Control will provide call for heat to burner until boiler reaches minimum
boiler water temperature based on coding card.
Configurations:
1st stage demand dry contact wired to Plug 143 terminals 1 and 2.
2nd stage demand wired to Plug 143 terminals 2 and 3.
Dry contact “enable” wired to Plug 146 terminals 2 and 3.
Boiler coded for 01:03.
Boiler maximum temperature limit address 06.
2 Field supplied relay and wiring
interconnections to call burner
onto low fire.
3 Field supplied relay and wiring
interconnections to call burner
onto high fire.
4 Field supplied relay and wiring
interconnections to provide
operation demand when contact
is closed between terminals 2
and 3.
Note: Relays used to provide dry
contact demands to plugs [143]/
[146] are controlled by local BMS
or system controller. The relay coil
voltage must be compatible with
the system that is controlling it.
Some examples of this are 24VAC,
120VAC and 24VDC.
Section 4.1
1
143
146
1 2 3
1 2 3
IMPORTANT
R
R
R
Record all coding changes for future
reference.
Ensure only knowledgeable coding
changes are made.
IMPORTANT
2
72
3
4
Ensure that all field wiring conforms
to local codes and regulations.
5346540 v1.0 09/2006 Technical information subject to change without notice
143 146
Control Overview—External Controls Connections
Section 4
BMS Connections—Single/Multiple Boilers—Burner Demand [146]
Applicable for Vitotronic 100, GC1 (without communications)
Burner Disable:
Dry contact to [146] plug
Connection Overview
Primary Consideration(s):
Boiler maintains minimum boiler water temperature.
Burner operation can be started with override switch.
2 Plug [146] used to interface
demand signal to control via
terminals 2 and 3.
Closed contact demands burner
if boiler water temperature
below 9b setting.
1 Boiler control.
Notes:
Minimum boiler water temperature maintained when contact open.
Boiler temperature set point can be adjusted on the user interface.
Demand contact closure causes boiler temperature set point to be based
on address 9b.
Boiler switch-off differential address 13.
Boiler maximum temperature limit address 06.
5346540 v1.0 09/2006 Technical information subject to change without notice
2
4 Field supplied relay to provide
burner demand when contact is
closed between terminals
2 and 3.
Field supplied relay
24VAC
120VAC
24VDC
Note: Relays used to provide dry
contact disable to plug 146 is
controlled by local BMS or system
controller. The relay coil voltage
must be compatible with the
system that is controlling it. Some
examples of this are 24VAC,
120VAC and 24VDC.
143 146
1
3 Field supplied relay and wiring
interconnections.
146
1 2 3
3
IMPORTANT
R
Ensure that all field wiring conforms
to local codes and regulations.
IMPORTANT
4
No minimum boiler water
temperature or freeze-up protection
when control is disabled.
73
Section 4.1
Configurations:
Burner demand dry contact wired to Plug 146 terminals 2 and 3.
Boiler coded for 01:01.
Control Overview—External Controls Connections
Section 4
BMS Connections—Single/Multiple Boilers—Burner Demand [150]
Applicable for Vitotronic 100, GC1 (without communications)
Burner Demand:
Dry contact to [150] terminal block
Connection Overview
Primary Consideration(s):
Dry contact demand part of the 120VAC burner call-for-heat circuit.
Configurations:
Burner demand contact wired to terminals 16 and 18
Notes:
By-passes controls internal call for heat.
FHL and AHL remain part of the burner control circuit.
Control can call burner on depending on coding/configuration (minimum
temperature) and presence of factory jumper from terminals 16 to 17.
Control override switch remains functional (low fire) when turned ON.
Removal of 16 to 17 jumper, disables override functionality as well as
control internal call for heat (minimum temperature).
1
1 The [150] plug is plugged into
the boiler control during the
installation process. This plug is
yellow in colour.
2 Multiple wire conductor
between [150] plug and the DIN
rail mounted terminal block.
3 Two jumpers are found on the
[150] DIN rail mounted terminal
block. A jumper between
terminals 12 and 15 is generally
removed when installing the
LWCO. The second jumper is
found between terminals 16
and 17 for BMS connections.
This jumper may or may not
need to be removed depending
on the desired operation of the
burner demand.
2
Section 4.1
3
4
74
Note: Relays used to provide dry
contact demands to [150] terminal
block are controlled by local BMS
or system controller. The relay coil
voltage must be compatible with
the system that is controlling it.
Some examples of this are 24VAC,
120VAC and 24VDC.
Connections to the [150] terminal
block are part of the 120VAC
burner call-for-heat circuit. Ensure
relay contacts or switch are
suitable for this application.
IMPORTANT
R
Ensure that all field wiring conforms
to local codes and regulations.
5346540 v1.0 09/2006 Technical information subject to change without notice
4 Field supplied relay (dry
contact) to demand burner ON
connected to [150] terminal
block.
Control Overview—External Controls Connections
Section 4
BMS Connections—Single/Multiple Boilers—Burner Disable [146]
Applicable for Vitotronic 100, GC1 (without communications)
Burner Disable:
Dry contact to [146] plug
Connection Overview
Primary Consideration(s):
Boiler does not maintain minimum boiler water temperature.
Burner operation can be started with override switch
2 Plug [146] used to interface
disable signal to control via
terminals 2 and 3.
Open contact disables burner.
1 Boiler control.
Configurations:
Burner disable dry contact wired to Plug 146 terminals 2 and 3
Boiler coded for 01:03
Notes:
Minimum boiler water temperature is not maintained when contact open.
Boiler temperature set point cannot be adjusted on the user interface.
Boilers which require minimum temperature protection will operate until
minimum temperature is satisfied upon receiving a demand signal.
3 Field supplied relay and wiring
interconnections.
4 Field supplied relay to provide
burner disable when contact is
open between terminals 2 and
3.
Note: Relays used to provide dry
contact disable to plug 146 is
controlled by local BMS or system
controller. The relay coil voltage
must be compatible with the
system that is controlling it. Some
examples of this are 24VAC,
120VAC and 24VDC.
1
2
Section 4.1
5346540 v1.0 09/2006 Technical information subject to change without notice
143 146
146
1 2 3
3
IMPORTANT
R
Ensure that all field wiring conforms
to local codes and regulations.
IMPORTANT
4
No minimum boiler water
temperature or freeze-up protection
when control is disabled.
75
Control Overview—External Controls Connections
Section 4
BMS Connections—Single/Multiple Boilers—Burner Disable [150]
Applicable for Vitotronic 100, GC1 (without communications)
Burner Disable:
Dry contact to [150] terminal block
Connection Overview
Primary Consideration(s):
Dry contact disable part of the 120VAC burner call-for-heat circuit.
1 The [150] plug is plugged into
the boiler control during the
installation process. This plug is
yellow in colour.
Configurations:
Burner disable contact wired to terminals 16 and 17 with jumper
removed.
2 Multiple wire conductor
between the [150] plug and the
DIN rail mounted terminal block.
Notes:
Depending on how the field supplied relay is wired, it may be possible to
disable the burner when the relay is powered or not powered. When
jumper 16 to 17 is removed, the control does not have the capability to
maintain minimum boiler water temperature or provide freeze up
protection. Override functionality does not occur when 16 and 17 open.
1
3 Two jumpers are found on the
[150] DIN rail mounted terminal
block. A jumper between
terminals 12 and 15 is generally
removed when installing the
LWCO. The second jumper is
found between terminals 16
and 17 for BMS connections.
This jumper may or may not
need to be removed depending
on the desired functionality.
2
Section 4.1
Note: Relays used to provide dry
contact demands to [150] terminal
block are controlled by local BMS
or system controller. The relay coil
voltage must be compatible with
the system that is controlling it.
Some examples of this are 24VAC,
120VAC and 24VDC.
Connections to the [150] terminal
block are part of the 120VAC
burner call for heat circuit. Ensure
relay contacts or switch are
suitable for this application.
3
IMPORTANT
No minimum boiler water
temperature or freeze-up protection
when control is disabled.
4
76
IMPORTANT
R
Ensure that all field wiring conforms
to local codes and regulations.
5346540 v1.0 09/2006 Technical information subject to change without notice
4 Field supplied relay (dry
contact) to demand burner ON
connected to [150] terminal
block.
Control Overview—External Controls Connections
Section 4
BMS Connections—Single/Multiple Boilers—Burner/Control Disable [151]
Applicable for Vitotronic 100, GC1 (without communications)
Burner Disable:
Dry contact to [151] terminal block.
Connection Overview
Configurations:
Burner disable contact wired to terminals 19 and 20.
Notes:
Depending on how the field supplied relay is wired, it may be possible to
disable the burner when the relay is powered or not powered. When
jumper 19 to 20 is removed or disabled, the control does not have the
capability to maintain minimum boiler water temperature or provide
freeze-up protection.
5346540 v1.0 09/2006 Technical information subject to change without notice
1
2
3
4
2 Two wire conductor between
[151] plug and the DIN rail
mounted terminal block.
3 The [151] terminal blocks are
mounted on the DIN rail.
4 There is one jumper found on
the [151] DIN rail mounted
terminal block. A jumper
between terminals 19 and 20 is
generally removed when
installing an emergency
shutdown device.
5 Field supplied relay (dry
contact) to disable burner/
control connected to [151]
terminal block.
Note: Relays used to provide dry
contact disable to [151] terminal
block are controlled by local BMS
or system controller. The relay coil
voltage must be compatible with
the system that is controlling it.
Some examples of this are 24VAC,
120VAC and 24VDC.
Connections to the [151] terminal
block are part of the 120VAC
control voltage. When open, the
control will experience a complete
control shutdown. Ensure relay
contacts or switches are suitable
for this application.
IMPORTANT
No minimum boiler water
temperature or freeze-up protection
when control is disabled.
IMPORTANT
R
Ensure that all field wiring conforms
to local codes and regulations.
77
Section 4.1
Primary Consideration(s):
Dry contact disable part of the 120VAC burner call-for-heat circuit.
Opening of the [151] junction will disable the entire control providing a
complete control shutdown of burner and pumps.
1 The [151] plug is plugged into
the boiler control during the
installation process. This plug is
opaque in colour.
Control Overview—External Controls Connections
Section 4
BMS Connections—Single/Multiple Boilers—Burner Modulation [90]
Applicable for Vitotronic 100, GC1 (without communications)
Burner Modulation:
Dry contact to [90] terminal block.
Connection Overview
1 The [90] plug is plugged into
the boiler control during the
installation process. This plug is
grey in colour.
Primary Consideration(s):
Dry contact for modulation is part of the 120VAC burner modulation
circuit. Two field supplied and wired relays required.
Configurations:
Jumper between terminals [25] and [26] must be removed and discarded.
Jumper between terminals [29] and [30] must be moved across [28] and
[29].
Burner modulation downwards connect to terminals [25] and [26].
Burner modulation upwards connect to terminals [26] and [27].
2 The [41] plug is plugged into
the control during the
installation process. This plug is
brown or possibly black in
colour.
3 The interconnections between
the [41] and [90] plugs are
factory wired.
Notes:
It will not be possible to drive burner to high fire with the control mounted 4 Located on the DIN rail is a
plug/socket combination for the
override switch because of BMS modulation control.
burner modulation. The plug is
inserted into the socket during
installation and can be
unplugged to disable
1
modulation.
3
5 Field supplied and wired
modulation down relay.
3
6 Field supplied and wired
modulation up relay.
Section 4.1
Note: Relays used to provide dry
contact modulation to [90]
terminal block are controlled by
local BMS or system controller.
The relay coil voltage must be
compatible with the system that is
controlling it. Some examples of
this are: 24VAC, 120VAC,
24VDC.
Connections to the [90] terminal
block are part of the 120VAC
control voltage circuit.
4
IMPORTANT
Ensure that all field wiring conforms
to local codes and regulations.
5
78
R
R
6
5346540 v1.0 09/2006 Technical information subject to change without notice
2
Control Overview—External Controls Connections
Section 4
BMS Connections—External Changeover of Modulation to Staging [146]
Applicable for Vitotronic 100, GC1 (without communications)
External Changeover of Staged to Modulating Burner:
Dry contact to [146] plug.
Connection Overview
Primary Consideration(s):
Dual fuel equipped systems.
2 Plug [146] used to interface
demand signal to control via
terminals 1 and 2. Open
contact removes staging burner
demand.
1 Boiler control.
Configurations:
Dry contact to [146] plug onto terminals 1 and 2.
Boiler coding 02:2 for modulating burner.
Contact open: Modulating operation.
Contact closed: Two stage operation.
Burner must be set to modulating.
3 Field supplied relay and wiring
interconnections.
5346540 v1.0 09/2006 Technical information subject to change without notice
143 146
1
2
Note: Relays used to provide dry
contact demand to plug [146] is
controlled by local BMS or system
controller. The relay coil voltage
must be compatible with the
system that is controlling it. Some
examples of this are 24VAC,
120VAC and 24VDC.
Section 4.1
Notes:
When burner type is scanned in the control, modulation appears.
This function is generally used in conjunction with a manufacturer
supplied burner panel which provides the switch over contact. Refer to
wiring schematic of panel for specific information regarding burner.
4 Field supplied relay to provide
burner changeover from
modulation to staged operation
when contact is closed
between terminals 1 and 2.
146
1 2 3
3
R
IMPORTANT
4
Ensure that all field wiring conforms
to local codes and regulations.
79
Control Overview—External Controls Connections
Section 4
BMS Connections—Burner Demand [146]
Applicable for Vitotronic 300, GW2
Burner Demand:
Dry contact to 146 plug terminals 2 and 3
Connection Overview
Primary Consideration(s):
Burner operation can be started with override switch
Adjustable high limit and electronic limit settings will limit operation of
boiler/burner.
2 Plug [146] used to interface
demand signal to control via
terminals 2 and 3. Open
contact removes burner
demand.
1 Boiler control.
Notes:
External demand only overrides outdoor reset calculation. Once the
contact at plug [146] is opened, the calculated boiler water temperature
will return to calculation from outdoor reset or DHW demand.
143 146
Section 4.2
1
2
3 Field supplied relay and wiring
interconnections.
4 Field supplied relay to provide
burner demand when contact is
open between terminals 2 and
3.
Note: Relays used to provide dry
contact demand to plug [146[ is
controlled by local BMS or system
controller. The relay coil voltage
must be compatible with the
system that is controlling it. Some
examples of this are 24VAC,
120VAC and 24VDC.
146
1 2 3
3
R
IMPORTANT
4
80
Ensure that all field wiring conforms
to local codes and regulations.
5346540 v1.0 09/2006 Technical information subject to change without notice
Configurations:
Boiler water temperature set point is determined by address 9b when
contact is closed on plug [146].
Electronic high limit is adjusted at address 06.
Burner switch-off differential adjusted at address 13.
Control Overview—External Controls Connections
Section 4
BMS Connections—External Change of Heating Program/Mixing Valve Open [143]
Applicable for Vitotronic 300, GW2
External Change of Heating Program OR Open Valves Demand:
Dry contact to [143] plug.
Connection Overview
Primary Consideration(s):
Only one selection allowed either External Change of Heating Program or
Open Valves demand.
Select which valves are affected by the change of heating program or
open mixing valve demand.
2 Plug [143] used to interconnect
control devices with boiler
control. Ensure Plug [143] is
plugged into the correct socket
found in the boiler control.
Configurations:
External change of heating program Plug [143] terminals 1 and 2.
Open mixing valves demand Plug 143 terminals 1 and 2.
Address 91 change required for Change of Heating Program demand.
Address 9A change required for Open Valves demand.
1 Boiler control.
3 Field supplied interconnection
wire between Plug [143] and
control device.
4 Field supplied relay:
24VAC
120VAC
24VDC
5 Field supplied control relay.
When coil energized, dry
contact switch is made and
change over or mixing valve
demand takes place.
6 Instead of relays, it may be
possible to use simple switches
to provide similar control
functionality.
Section 4.2
5346540 v1.0 09/2006 Technical information subject to change without notice
143 146
1
143
2
1 2 3
3
4
R
OR
IMPORTANT
SW
5
6
Ensure that all field wiring conforms
to local codes and regulations.
81
Control Overview—External Controls Connections
Section 4
BMS Connections—External Disable/Mixing Valve Close [143]
Applicable for Vitotronic 300, GW2
External Disable/Close Mixing Valves:
Dry contact to [143] plug.
Connection Overview
Primary Consideration(s):
There is no frost protection during external disable or close mixing
valves demand. No minimum boiler water temperature is maintained
during the contact closure.
2 Plug [143] used to interconnect
control devices with boiler
control. Ensure plug [143] is
plugged into the correct socket
found in the boiler control.
1 Boiler control.
Configurations:
Dry contact to [143] plug is connected to terminals 2 and 3.
Coding address 99 allows selection of operation between disable and
mixing valve close demand.
3 Field supplied interconnection
wire between plug [143] and
control device.
4 Field supplied relay:
24VAC
120VAC
24VDC
5 Field supplied control relay.
When coil energized, dry
contact switch is made and
disable or close mixing valves
demand takes place.
143 146
Section 4.2
1
143
2
1 2 3
3
IMPORTANT
4
R
Ensure that all field wiring conforms
to local codes and regulations.
OR
IMPORTANT
SW
5
82
6
No minimum boiler water
temperature or freeze-up protection
when control is disabled.
5346540 v1.0 09/2006 Technical information subject to change without notice
6 Instead of relays, it may be
possible to use simple switches
to provide similar control
functionality.
Control Overview—External Controls Connections
Section 4
BMS Connections—Burner Demand [150]
Applicable for Vitotronic 300, GW2)
Burner Demand:
Dry contact to 150 terminal block.
Connection Overview
Primary Consideration(s):
Dry contact demand part of the 120VAC burner call-for-heat circuit.
Configurations:
Burner demand contact wired to terminals 16 and 18
Notes:
By-passes controls internal call for heat.
FHL and AHL still part of the burner control circuit.
Control can call burner on depending on coding/configuration (minimum
temperature).
Control override switch remains functional (low fire) when switched.
Removal of 16 to 17 jumper, override not functional and inactive.
1
1 The [150] plug is plugged into
the boiler control during the
installation process. This plug is
yellow in colour.
2 Multiple wire conductor
between [150] plug and the DIN
rail mounted terminal block.
3 Two jumpers are found on the
[150] DIN rail mounted terminal
block. A jumper between
terminals 12 and 15 is generally
removed when installing the
LWCO. The second jumper is
found between terminals 16
and 17 for BMS connections.
This jumper may or may not
need to be removed depending
on the desired control
functionality.
2
3
4
Note: Relays used to provide dry
contact demands to [150] terminal
block are controlled by local BMS
or system controller. The relay coil
voltage must be compatible with
the system that is controlling it.
Some examples of this are 24VAC,
120VAC and 24VDC.
Connections to the [150] terminal
block are part of the 120VAC
burner call-for-heat circuit. Ensure
relay contacts or switch are
suitable for this application.
IMPORTANT
R
Ensure that all field wiring conforms
to local codes and regulations.
83
Section 4.2
5346540 v1.0 09/2006 Technical information subject to change without notice
4 Field supplied relay (dry
contact) to demand burner ON
connected to [150] terminal
block.
Control Overview—External Controls Connections
Section 4
BMS Connections—Burner Disable [150]
Applicable for Vitotronic 300, GW2
Burner Disable:
Dry contact to [150] terminal block
Connection Overview
Primary Consideration(s):
Dry contact disable part of the 120VAC burner call-for-heat circuit.
Configurations:
Burner disable contact wired to terminals 16 and 17.
Notes:
Depending on how the field supplied relay is wired, it may be possible to
disable the burner when the relay is powered or not powered. When
jumper 16 to 17 is removed, the control does not have the capability to
maintain minimum boiler water temperature or provide freeze-up
protection.
1
1 The [150] plug is plugged into
the boiler control during the
installation process. This plug is
yellow in colour.
2 Multiple wire conductor
between [150] plug and the DIN
rail mounted terminal block.
3 Two jumpers are found on the
[150] DIN rail mounted terminal
block. A jumper between
terminals 12 and 15 is removed
when installing the LWCO. The
second jumper is found
between terminals 16 and 17
for BMS connections. This
jumper is removed when
connecting external control
relay. Open contact does not
allow burner call for heat signal.
2
Section 4.2
Note: Relays used to provide dry
contact demands to [150] terminal
block are controlled by local BMS
or system controller. The relay coil
voltage must be compatible with
the system that is controlling it.
Some examples of this are 24VAC,
120VAC and 24VDC.
Connections to the [150] terminal
block are part of the 120VAC
burner call-for-heat circuit. Ensure
relay contacts or switch are
suitable for this application.
3
IMPORTANT
No minimum boiler water
temperature or freeze-up protection
when control is disabled.
4
84
IMPORTANT
R
Ensure that all field wiring conforms
to local codes and regulations.
5346540 v1.0 09/2006 Technical information subject to change without notice
4 Field supplied relay (dry
contact) to demand burner ON
connected to [150] terminal
block.
Control Overview—External Controls Connections
Section 4
BMS Connections—Burner/Control Disable [151]
Applicable for Vitotronic 300, GW2
Burner Disable:
Dry contact to 151 terminal block.
Connection Overview
Configurations:
Burner disable contact wired to terminals 19 and 20.
Notes:
Depending on how the field supplied relay is wired, it may be possible to
disable the burner when the relay is powered or not powered. When
jumper 19 to 20 is removed or disabled, the control does not have the
capability to maintain minimum boiler water temperature or provide
freeze up protection.
5346540 v1.0 09/2006 Technical information subject to change without notice
1
2
3
4
2 Two wire conductor between
[151] plug and the DIN rail
mounted terminal block.
3 The [151] terminal blocks are
mounted on the DIN rail
4 One jumper found on the [151]
DIN rail mounted terminal block.
A jumper between terminals 19
and 20 is removed when
installing an emergency
shutdown device.
5 Field supplied relay (dry
contact) to disable burner/
control connected to [151]
terminal block.
Note: Relays used to provide dry
contact disable to [151] terminal
block are controlled by local BMS
or system controller. The relay coil
voltage must be compatible with
the system that is controlling it.
Some examples of this are:
24VAC, 120VAC, 24VDC.
Connections to the [151] terminal
block are part of the 120VAC
control voltage. When open, the
control will experience a complete
control shutdown. Ensure relay
contacts or switch are suitable for
this application.
IMPORTANT
Ensure that all field wiring conforms
to local codes and regulations.
IMPORTANT
R
No minimum boiler water
temperature or freeze-up protection
when control is disabled.
85
Section 4.2
Primary Consideration(s):
Dry contact disable part of the 120VAC burner call-for-heat circuit.
Opening of the [151] junction will disable the entire control providing a
complete control shutdown.
1 The [151] plug is plugged into
the boiler control during the
installation process. This plug is
opaque in colour.
Control Overview—External Controls Connections
Section 4
BMS Connections—External Changeover of Modulation to Staging [146]
Applicable for Vitotronic 300, GW2 (without communications)
External Changeover of Staged to Modulating Burner:
Dry contact to [146] plug.
Connection Overview
Primary Consideration(s):
Dual fuel equipped systems.
2 Plug [146] used to interface
demand signal to control via
terminals 2 and 3. Open
contact removes staging burner
demand.
1 Boiler control.
Configurations:
Dry contact to [146] plug onto terminals 2 and 3.
Boiler coding 02:2 for modulating burner.
Contact open: Modulating operation.
Contact closed: Two stage operation.
Burner must be set to modulating.
3 Field supplied relay and wiring
interconnections.
143 146
Section 4.2
1
2
Note: Relays used to provide dry
contact demand to plug [146] is
controlled by local BMS or system
controller. The relay coil voltage
must be compatible with the
system that is controlling it. Some
examples of this are 24VAC,
120VAC and 24VDC.
146
1 2 3
3
R
IMPORTANT
4
86
Ensure that all field wiring conforms
to local codes and regulations.
5346540 v1.0 09/2006 Technical information subject to change without notice
Notes:
When burner type is scanned in the control, modulation appears.
This function is generally used in conjunction with a manufacturer
supplied burner panel which provides the switch over contact. Refer to
wiring schematic of panel for specific information regarding burner.
4 Field supplied relay to provide
burner changeover from
modulation to staged operation
when contact is closed
between terminals 2 and 3.
Control Overview—External Controls Connections
Section 4
BMS Connections—External Change of Heating Program/Mixing Valve Open [143]
Applicable for Vitocontrol-S, MW1 (CT3/VD2/RS/VB2)
External Change of Heating Program OR Open Valves Demand:
Dry contact to [143] plug.
Connection Overview
Primary Consideration(s):
Only one selection allowed either External Change of Heating Program or
Open Valves demand.
Select which valves are affected by the change of heating program or
open mixing valve demand.
2 Plug [143] used to interconnect
control devices with boiler
control. Ensure Plug [143] is
plugged into the correct socket
found in the boiler control.
Configurations:
External change of heating program Plug 143 terminals 1 and 2.
Open mixing valves demand Plug 143 terminals 1 and 2.
Address 91 change required for Change of Heating Program demand.
Address 9A change required for Open Valves demand.
1 Boiler control.
3 Field supplied interconnection
wire between Plug [143] and
control device.
4 Field supplied relay:
24VAC
120VAC
24VDC
5 Field supplied control relay.
When coil energized, dry
contact switch is made and
change over or mixing valve
demand takes place.
6 Instead of relays, it may be
possible to use simple switches
to provide similar control
functionality.
Section 4.3
5346540 v1.0 09/2006 Technical information subject to change without notice
143 146
1
143
2
1 2 3
3
4
R
OR
IMPORTANT
SW
5
6
Ensure that all field wiring conforms
to local codes and regulations.
87
Control Overview—External Controls Connections
Section 4
BMS Connections—External Disable/Mixing Valve Close [143]
Applicable for Vitocontrol-S, MW1 (CT3/VD2/RS/VB2)
External Disable/Close Mixing Valves:
Dry contact to [143] plug.
Connection Overview
Primary Consideration(s):
There is no frost protection during external disable or close mixing
valves demand. No minimum boiler water temperature is maintained
during the contact closure.
2 Plug 143 used to interconnect
control devices with boiler
control. Ensure plug [143] is
plugged into the correct socket
found in the boiler control.
1 Boiler control.
Configurations:
Dry contact to [143] plug is connected to terminals 2 and 3.
Coding address 99 allows selection of operation between disable and
mixing valve close demand.
3 Field supplied interconnection
wire between plug [143] and
control device.
4 Field supplied relay:
24VAC
120VAC
24VDC
5 Field supplied control relay.
When coil energized, dry
contact switch is made and
disable or close mixing valves
demand takes place.
143 146
Section 4.3
1
143
2
1 2 3
3
IMPORTANT
4
R
Ensure that all field wiring conforms
to local codes and regulations.
OR
IMPORTANT
SW
5
88
6
No minimum boiler water
temperature or freeze-up protection
when control is disabled.
5346540 v1.0 09/2006 Technical information subject to change without notice
6 Instead of relays, it may be
possible to use simple switches
to provide similar control
functionality.
Control Overview—External Controls Connections
Section 4
BMS Connections—External Demand [146]
Applicable for Vitocontrol-S, MW1 (CT3/VD2/RS/VB2)
External Demand:
Dry contact to [146] plug
Connection Overview
Primary Consideration(s):
The external demand input allows a dry contact to elevate the common
supply/LLH above the calculated outdoor reset value.
2 Plug [146] used to interface
demand signal to control via
terminals 2 and 3. Open
contact removes demand.
1 Boiler control.
Configurations:
Dry contact terminated at terminals 2 and 3
Common supply water temperature set point is determined by address
9b when contact is closed on plug [146].
Coding address 36 limits minimum supply temperature.
Coding address 37 limits maximum supply temperature calculated.
Coding address 47 determines the switch-off differential.
Notes:
Scan 8 in the diagnosis screen displays calculated set point
temperature.
3 Field supplied relay and wiring
interconnections.
4 Field supplied relay to provide
external demand when contact
is closed between terminals 2
and 3.
Note: Relays used to provide dry
contact demand to plug [146] is
controlled by local BMS or system
controller. The relay coil voltage
must be compatible with the
system that is controlling it. Some
examples of this are 24VAC,
120VAC and 24VDC.
1
2
Section 4.3
5346540 v1.0 09/2006 Technical information subject to change without notice
143 146
146
1 2 3
3
R
IMPORTANT
4
Ensure that all field wiring conforms
to local codes and regulations.
89
Control Overview—External Controls Connections
Section 4
BMS Connections—Boiler Disable [143]
Applicable for Vitotronic 100, GC1 in conjunction with Vitocontrol-S, MW1 (CT3/VD2)
Boiler Disable:
Dry contact to 143 plug to terminals 1 and 2.
Connection Overview
Primary Consideration(s):
To be able to disable a boiler from a sequence. The boiler/shunt pump as
well as the return elevation valve are tuned off/closed. If all the boilers
are disabled, the system will not maintain minimum boiler water
temperature and frost protection is not possible.
2 Plug [143] used to interconnect
control devices with boiler
control. Ensure plug [143] is
plugged into the correct socket
in the boiler control.
Configurations:
Boiler disable terminated to plug [143] terminals 1 and 2.
3 Field supplied interconnection
wire between Plug 143 and
control device.
Notes:
Opening the contact will put the boiler back in the current boiler
sequence.
4 Field supplied relay:
24VAC
120VAC
24VDC
1 Boiler control.
5 Field supplied control relay.
When coil energized, dry
contact switch is made and the
boiler is taken out of the current
sequence.
143 146
Section 4.3
1
143
2
1 2 3
3
4
R
OR
IMPORTANT
SW
5
90
6
Ensure that all field wiring conforms
to local codes and regulations.
5346540 v1.0 09/2006 Technical information subject to change without notice
6 Instead of relays, it may be
possible to use simple switches
to provide similar control
functionality.
Control Overview—External Controls Connections
Section 4
BMS Connections—Switch in Boiler as Last in Sequence [143]
Applicable for Vitotronic 100, GC1 in conjunction with Vitocontrol-S, MW1 (CT3/VD2)
Switch in boiler as last in sequence:
Dry contact to [143 plug].
Connection Overview
Primary Consideration(s):
Changes rotation of current boiler sequence.
2 Plug [143] used to interconnect
control devices with boiler
control. Ensure plug [143] is
plugged into the correct socket
in the boiler control.
1 Boiler control.
Configurations:
Dry contact to 143 plug is connected to terminals 2 and 3.
Closed contact switches boiler to last in burner sequence.
Notes:
Function used if a particular boiler is to be used for a specific period of
time.
3 Field supplied interconnection
wire between plug [143] and
control device.
4 Field supplied relay:
24VAC
120VAC
24VDC
5 Field supplied control relay.
When coil energized, dry
contact switch is made and
boiler is placed at end of the
rotation cycle.
6 Instead of relays, it may be
possible to use simple switches
to provide similar control
functionality.
Section 4.3
5346540 v1.0 09/2006 Technical information subject to change without notice
143 146
1
143
2
1 2 3
3
4
R
OR
SW
5
6
IMPORTANT
Ensure that all field wiring conforms
to local codes and regulations.
91
Control Overview—External Controls Connections
Section 4
BMS Connections—External Changeover of Modulation to Staging [146]
Applicable for Vitotronic 100, GC1 in conjunction with Vitocontrol-S, MW1 (CT3/VD2)
External Changeover of Staged to Modulating Burner:
Dry contact to [146] plug.
Connection Overview
Primary Consideration(s):
Dual fuel equipped systems.
2 Plug [146] used to interface
demand signal to control via
terminals 1 and 2. Open
contact removes staging burner
demand.
1 Boiler control.
Configurations:
Dry contact to [146] plug onto terminals 1 and 2.
Boiler coding 02:2 for modulating burner.
Contact open: Modulating operation.
Contact closed: Two stage operation.
Burner must be set to modulating.
3 Field supplied relay and wiring
interconnections.
143 146
Section 4.3
1
2
Note: Relays used to provide dry
contact demand to plug [146] is
controlled by local BMS or system
controller. The relay coil voltage
must be compatible with the
system that is controlling it. Some
examples of this are 24VAC,
120VAC and 24VDC.
146
1 2 3
3
R
IMPORTANT
4
92
Ensure that all field wiring conforms
to local codes and regulations.
5346540 v1.0 09/2006 Technical information subject to change without notice
Notes:
When burner type is scanned in the control, modulation appears.
This function is generally used in conjunction with a manufacturer
supplied burner panel which provides the switch over contact. Refer to
wiring schematic of panel for specific information regarding burner.
4 Field supplied relay to provide
burner changeover from
modulation to staged operation
when contact is closed
between terminals 1 and 2.
Control Overview—External Controls Connections
Section 4
BMS Connections—Single/Multiple Boilers—0-10VDC 145 KM-BUS
Applicable for Vitotronic 100, GC1 (without communications)
2
Connection Overview
1 Remove cover from extension
input module by loosening
screws on either side of front
cover. They are a slotted screw
head.
2 Fasten to wall or surface with
screws to securely mount.
3 All connections to the extension
input module are made using
the supplied plugs and installing
the plugs into the respective
socket on the circuit board.
1
4 Incoming 120VAC power to
module via grounded plug-in
cable.
5 Switched output from module.
Note:
Coding address 9d is coded to 01 when module connected to control.
Coding address 01 must be set to either 01 or 03 depending on
application. Minimum temperature is maintained when input signal greater
than 1VDC. Refer to manual for proper addressing.
DIP switch selectable range of temperatures, refer to manual
6 Input signal 0-10VDC onto
terminals 2 and 3 of [144] plug.
Terminal 2 of plug 144 is —
Terminal 3 of plug 144 is +
7 Communication to boiler
controls via [145] KM-BUS onto
plug [145] terminals 1 and 2.
Section 4.4
5346540 v1.0 09/2006 Technical information subject to change without notice
3
4
IMPORTANT
5
6
7
Ensure that all field wiring conforms
to local codes and regulations.
93
Control Overview—External Controls Connections
Section 4
BMS Connections—Single/Multiple Boilers—0-10VDC 145 KM-BUS
Applicable for Vitotronic 100, GC1 (without communications)
Configuration:
Boiler coded for 01:01
Input 0-10VDC signal wired to terminals 2 and 3 of plug [144]
Boiler will maintain minimum boiler water temperature regardless of 010VDC signal.
Connection Overview
1 Input Extension Module 0-10V
provides signal to boiler control
via 145 KM-BUS.
2 Incoming 120VAC power
source.
1
3 Switched output.
4 Control signal 0-10VDC from
BMS connected to plug [144].
157
144
145
1 2 3
1 2 3
1 2 3
2
3
4
6 Plug [145] plugged into control.
5
IMPORTANT
Section 4.4
If proximity to high voltage wires
cannot be avoided, use stranded,
twisted pair or shielded wire. Ensure
that only one end of wire is
grounded.
IMPORTANT
Ensure that all field wiring conforms
to local codes and regulations.
145
IMPORTANT
Review manuals for specific
information regarding addressing,
values and detailed information.
145
1 2 3
94
6
!
CAUTION
When routing and running wiring for
communication between control
devices, there is the possibility of
electromagnetic interference. Avoid
running wires beside or near high
voltage 120/240VAC conductors.
5346540 v1.0 09/2006 Technical information subject to change without notice
40
L G N
5 Plug [145] KM-BUS
communication between input
module to boiler control. Field
wired and terminated in input
module and into [145] plug in
boiler control.
Control Overview—External Controls Connections
Section 4
BMS Connections—Single/Multiple Boilers—0-10VDC 145 KM-BUS
Applicable for Vitotronic 100, GC1 (without communications)
Configuration:
Boiler coded for 01:03.
Input 0-10VDC signal wired to terminals 2 and 3 of plug [144].
A signal of 0-1VDC, will not maintain minimum temperature. If minimum
temperature necessary, contact closure 2 and 4 on [144] is necessary.
Connection Overview
1 Input Extension Module 0-10V
provides signal to boiler control
via 145 KM-BUS.
2 Incoming 120VAC power
source.
1
3 Switched output.
4 Control signal 0-10VDC from
BMS connected to plug [144].
5 Plug [145] between input
module and boiler control. Field
wired and terminated in input
module and into [145] plug in
boiler control.
40
157
144
145
6 Plug [145] within control.
L G N
1 2 3
1 2 3
1 2 3
7 Plug [146] in control used to
main minimum boiler water
temperature when contact
closed and 0-10VDC signal at
0VDC.
3
5
4
IMPORTANT
145
If proximity to high voltage wires
cannot be avoided, use stranded,
twisted pair or shielded wire. Ensure
that only one end of wire is
grounded.
146
IMPORTANT
8
6
145
1 2 3
Ensure that all field wiring conforms
to local codes and regulations.
!
146
1 2 3
7
R
CAUTION
When routing and running wiring for
communication between control
devices, there is the possibility of
electromagnetic interference. Avoid
running wires beside or near high
voltage 120/240VAC conductors.
95
Section 4.4
5346540 v1.0 09/2006 Technical information subject to change without notice
2
8 Field supplied and wired relay
into [146] plug.
Control Overview—External Controls Connections
Section 4
BMS Connections—Single Boiler—0-10VDC 145 KM-BUS
Applicable for Vitotronic 300, GW2 (without communications)
Connection Overview
1
1 Input Extension Module 0-10V
provides signal to boiler control
via 145 KM-BUS.
2 Incoming 120VAC power
source.
3 Switched output.
4 Control signal 0-10VDC from
BMS connected to plug [144].
40
157
144
145
L G N
1 2 3
1 2 3
1 2 3
2
3
4
5 Plug [145] KM-BUS
communication between input
module to boiler control. Field
wired and terminated in input
module and into [145] plug in
boiler control.
5
6 Connection of 145 KM BUS
communications within control.
Section 4.4
If proximity to high voltage wires
cannot be avoided, use stranded,
twisted pair or shielded wire. Ensure
that only one end of wire is
grounded.
145
IMPORTANT
Ensure that all field wiring conforms
to local codes and regulations.
145
1 2 3
6
IMPORTANT
Review manuals for specific
information regarding addressing,
values and detailed information.
!
CAUTION
When routing and running wiring for
communication between control
devices, there is the possibility of
electromagnetic interference. Avoid
running wires beside or near high
voltage 120/240VAC conductors.
96
5346540 v1.0 09/2006 Technical information subject to change without notice
IMPORTANT
Control Overview—External Controls Connections
Section 4
BMS Connections—Single Boiler—0-10VDC 145 KM-BUS
Applicable for Vitocontrol-S, CT3/VD2, MW1
Connection Overview
1
1 Input Extension Module 0-10V
provides signal to boiler control
via 145 KM-BUS
2 Incoming 120VAC power
source.
3 Switched output
4 Control signal 0-10VDC from
BMS connected to plug [144].
40
157
144
145
L G N
1 2 3
1 2 3
1 2 3
2
3
4
5 Plug [145] KM-BUS
communication between input
module to boiler control. Field
wired and terminated in input
module and into [145] plug in
boiler control.
5
6 Connection of 145 KM BUS
communications within control.
If proximity to high voltage wires
cannot be avoided, use stranded,
twisted pair or shielded wire. Ensure
that only one end of wire is
grounded.
145
IMPORTANT
Ensure that all field wiring conforms
to local codes and regulations.
145
1 2 3
6
IMPORTANT
Review manuals for specific
information regarding addressing,
values and detailed information.
!
CAUTION
When routing and running wiring for
communication between control
devices, there is the possibility of
electromagnetic interference. Avoid
running wires beside or near high
voltage 120/240VAC conductors.
97
Section 4.4
5346540 v1.0 09/2006 Technical information subject to change without notice
IMPORTANT
Section 4
5346540 v1.0 09/2006 Technical information subject to change without notice
Notes
98
Section 4
This page is intentionally left blank
Communications
Section 5
Communication Interconnection Information
General Information
Communication card installation overview
Section 5.0
Section 5.0
5346540 v1.0 09/2006 Technical information subject to change without notice
Section 5.1
Extension Output Module
Module overview
Vitotronic 100, GC1 and Vitotronic 300, GW2
Vitotronic 100, GC1 and Vitocontrol-S, MW1 overview with 0-10VDC
Vitotronic 100, GC1 and Vitocontrol-S, MW1 overview with output
extension module
KK10LON system overview
RJ45LON Adaptor overview
KK10LON with Vitocontrol-S, MW1 BUS Topology (configured as Free
topology)
KK10LON with Vitocontrol-S, MW1 Free Topology (configured as Free
topology)
Alternative RJ45LON Adapter overview
99
Control Overview—External Controls Connections
Section 5
LON Connections—General Installation of LON Communication Card
Applicable for Vitotronic 100, GC1, Vitotronic 300, GW2 and Vitocontrol-S, CT3/VD2/RS/VB2, MW1
Connection Overview
Refer to manual specific to control.
Detailed information regarding
coding and set up to be referenced
within.
1 Open control showing location
of LON card and its location
within.
2 The LON card is plugged into
main motherboard. Install LON
card with two RJ45 sockets
facing downwards.
1
2
4 Communication cable shown
with control front closed in
relation to the junction box with
DIN rail below.
3
4
5 Installed LON card.
Section 5.0
IMPORTANT
5
Refer to control specific manual
with respect to proper addressing
when installing the LON
communication card for single and
multiple boilers.
CAUTION
Static sensitive components may be
damaged by improper handling or
work within the control. Ensure all
possible measures are taken to
eliminate build-up of static electricity.
100
5346540 v1.0 09/2006 Technical information subject to change without notice
3 Drawing showing two RJ45
sockets from the bottom of the
LON card. The communication
cable is plugged into either of
these receptacles. For
continuous communications,
the remaining socket is used for
the outgoing communication
cable. Where the control is at
the end of a communication
BUS, an-end-of-line termination
resistor is installed.
Control Overview—Extension Output Module
Section 5
LON Connections—Extension Output Module (Optional)
Applicable for Vitotronic 100, GC1, Vitotronic 300, GW2
Connection Overview
Refer to manual specific to control.
Detailed information regarding the
Extension Output Module
connections, coding and set-up to
be referenced within.
1
1 Control showing location of
LON card and its location
within.
2 A CAT-5 cable is supplied with
the output module. The RJ45 is
plugged into the control and
terminates into the output
module.
2
3 Output Module housing.
3
4 Indication LED’s within output
module. The LED status is
visible with cover on through
the label.
5
5 Second RJ45 socket for
termination resistor or
continuation of LON
communication to successive
boiler control.
6 The LON communication cable
from the control is plugged into
the Output Module.
7 Field-wired incoming power
supply for the output module. It
requires 120VAC for its
operation.
6
8
7
8 Lid of output module.
Technical Information
Section 5.1
5346540 v1.0 09/2006 Technical information subject to change without notice
4
Power supply:
120VAC
Output Contact Rating
Maximum 30VAC/VDC
Maximum 0.5FLA
Call
Burner LWCO FHL
Status Alarm Alarm Alarm
CAUTION
Static sensitive components may be
damaged by improper handling or
work within the control. Ensure all
possible measures are taken to
eliminate build-up of static electricity.
101
Control Overview—External Controls Connections
Section 5
LON Connections—System Overview
Applicable for Vitotronic 100, GC1, and Vitocontrol-S, CT3/VD2
Connection Overview
1 Vitocontrol-S, CT3/VD2, MW1
control with communications
card and end of line termination
resistor.
2
Termination Resistor
2 Boiler control Vitotronic 100,
GC1. Communication with up
to 4 boiler controls.
Interconnected with CAT-5
communication with RJ45
connector ends.
Termination Resistor
Section 5.1
Technical Information
Distance between controls with Viessmann
communication cable 7m/23Ft.
Up to three extensions between controls totalling
21m/69Ft in length.
Communication with up to 99 participants on with
a total length of 900m/3000Ft.
IMPORTANT
Refer to control specific manual
with respect to proper addressing
when installing the LON
communication card for single and
multiple boilers.
CAUTION
Static sensitive components may be
damaged by improper handling or
work within the control. Ensure all
possible measures are taken to
eliminate build-up of static electricity.
102
5346540 v1.0 09/2006 Technical information subject to change without notice
1
Control Overview—External Controls Connections
Section 5
LON Connections—System Overview with Extension Input Module 0-10VDC
Applicable for Vitotronic 100, GC1, and Vitocontrol-S, CT3/VD2
Connection Overview
1
145
1 Extension Input Module 010VDC.
2
2 Module connected to
Vitocontrol-S via 145 KM-BUS
connection.
3 Plug [145] connection made
inside of Vitocontrol-S.
145
3
Section 5.1
5346540 v1.0 09/2006 Technical information subject to change without notice
1 2 3
103
Control Overview—External Controls Connections
Section 5
LON Connections—System Overview with Extension Output Module
Applicable for Vitotronic 100, GC1, and Vitocontrol-S, CT3/VD2
Connection Overview
1
1 Vitocontrol-S, CT3/VD2, MW1
control with communications
card and end-of-line termination
resistor.
2
2 Boiler control Vitotronic 100,
GC1. Communication with up
to 4 boiler controls.
3 Extension output module for
each boiler control
interconnected by CAT-5
communication cabling.
4 Communication cable CAT-5
between devices.
5 End-of-line termination resistor
is plugged into the last device
on the communication BUS
between the devices.
3
5
Section 5.1
IMPORTANT
Technical Information
Distance between controls with Viessmann
communication cable 7m/23Ft.
Up to three extensions between controls totalling
21m/69Ft in length.
Communication with up to 99 participants on with
a total length of 900m/3000Ft.
104
Refer to control specific manual
with respect to proper addressing
when installing the LON
communication card for single and
multiple boilers.
CAUTION
Static sensitive components may be
damaged by improper handling or
work within the control. Ensure all
possible measures are taken to
eliminate build-up of static electricity.
5346540 v1.0 09/2006 Technical information subject to change without notice
4
Control Overview—External Controls Connections
Section 5
LON Connections—System Overview
Applicable for Vitotronic 100, KK10LON, and Vitocontrol-S, CT3/VD2
Note: Shown as BUS wiring configured as
free topology with RJ45 adapter.
Connection Overview
1
2
3
1
3
1
6
2
3
Section 5.1
5346540 v1.0 09/2006 Technical information subject to change without notice
2
1 Plug connections in each KK10
control for terminating
communication and boiler
temperature sensor.
2 Boiler temperature sensor
termination for each control.
3 Communication wiring between
controls. Use shielded two wire
cabling to minimize EMI between
KK10LON controls and
Vitocontrol-S, RS/VB2.
4 Communication connection is not
used.
5 RJ45 Adapter board.
6 CAT-5 cabling with RJ45 ends
plugged into Adapter board and
LON communication board inside
of Vitocontrol-S, RS/VB2.
4
1
2
105
Control Overview—External Controls Connections
Section 5
LON Connections—System RJ45LON Adapter Overview
Applicable for Vitotronic 100, GC1, and Vitocontrol-S, RS/VB2
Connection Overview
1
1 Vitocontrol-S, RS/VB2 system
control capable of
communicating with up to four
boiler controls Vitotronic 100,
KK10LON.
2 Installation of the RJ45 LON
Adaptor provides the ability to
interface the two wire
connection from the KK10LON
controls to the Vitocontrol-S,
RS/VB2. The adaptor and
Vitocontrol-S use CAT-5
connection cable supplied with
the adaptor. Refer to the RJ45
adaptor manual for specific
information.
2
3
3 Jumper settings on adaptor
board must be checked for
proper operation. Refer to the
specific manual for necessary
settings.
5 Verify the RJ45 Adaptor
jumpers have been set to
correspond with the system.
Jumpers JP1, JP2 and JP3
must be set to ON. This
configuration allows for a Free
BUS Topology with the adaptor
acting as the termination
resistor. Refer to adaptor
manual for detailed information.
4
Section 5.1
5
106
5346540 v1.0 09/2006 Technical information subject to change without notice
4 Communication connections to
KK10LON controls.
Control Overview—LON Communications
Section 5
LON Connections—System Overview BUS Topology Example
Applicable for Vitotronic 100, KK10LON, and Vitocontrol-S, RS/VB2
Note: Shown as BUS wiring
configured as free topology with
RJ45 adapter.
System Overview
1 The Vitocontrol-S unit for
operation with KK10LON boiler
controls.
2
2 The KK10LON boiler control is
equipped with a communication
board which allows it to
communicate to the VitocontrolS, RS/VB2.
1
3 The RJ45LON adapter which
provides conversion from CAT5
communications to two wire.
As well, the RJ45LON adapter
can be configured for either Free
Topology or BUS Topology.
Technical Information
Distance between controls with
Viessmann communication cable
7m/23Ft.
Up to three extensions between
controls totalling 21m/69Ft in
length.
Communication with up to 99
participants on with a total length
of 900m/3000Ft.
IMPORTANT
Ensure that all field wiring conforms
to local codes and regulations.
107
Section 5.1
5346540 v1.0 09/2006 Technical information subject to change without notice
3
Note:
Review manual for Vitotronic 100,
KK10 with respect to DIP switch
settings as well as other
information.
Control Overview—LON Communications
Section 5
LON Connections—System Overview Free Topology Example
Applicable for Vitotronic 100, KK10LON, and Vitocontrol-S, RS/VB2
System Overview
Note: Shown as Star/Home run
wiring configured as free
topology with RJ45 adapter.
1
2
1 The Vitocontrol-S unit for
operation with KK10LON boiler
controls.
2 The KK10LON boiler control is
equipped with a communication
board which allows it to
communicate to the VitocontrolS, RS/VB2.
3 The RJ45LON adapter which
provides conversion from CAT5
communications to two wire.
As well, the RJ45LON adapter
can be configured for either Free
Topology or BUS Topology.
3
Note:
Review manual for Vitotronic 100,
KK10 with respect to DIP switch
settings as well as other
information.
Distance between controls with
Viessmann communication cable
7m/23Ft.
Up to three extensions between
controls totalling 21m/69Ft in
length.
Communication with up to 99
participants on with a total length
of 900m/3000Ft.
Section 5.1
IMPORTANT
Ensure that all field wiring conforms
to local codes and regulations.
108
5346540 v1.0 09/2006 Technical information subject to change without notice
Technical Information
Control Overview—External Controls Connections
Section 5
LON Connections—System Alternative RJ45LON Adaptor Overview
Applicable for Vitotronic 100, GC1, and Vitocontrol-S, CT3/VD2
Connection Overview
1 Vitotronic 100, GC1 control
with communications card and
end-of-line termination resistor.
1
2 Vitocontrol-S, CT3/VD2, MW1
control with communications
card and end-of-line termination
resistor.
3 CAT-5 Communication wire
between controls,
4 Two wire cable between
RJ45LON adaptors.
3
2
5 Install RJ45LON adaptor onto
DIN rail of control.
Jumpers JP1 and JP2 must be
in the OFF position. The
RJ45LON adapter is then used
as a wiring converter between
CAT-5 and two wire.
6 Communication from control.
7 RJ45LON adaptor.
8 2-wire communications cable
between controls.
6
3
7
Section 5.1
5346540 v1.0 09/2006 Technical information subject to change without notice
3
X2
4
5
8
109
Section 5
5346540 v1.0 09/2006 Technical information subject to change without notice
Notes
110
Section 5
This page is intentionally left blank
Control Information
Section 6
Basic Diagnostic Plug [41] Drawings
Section 6.0
Vitotronic 100, GC1—Soft Cable and Flexible Conduit
Plug-in Connections
Hard-wire Connections
Section 6.1
Vitotronic 300, GW2—Soft Cable and Flexible Conduit
Plug-in Connections
Hard-wire Connections
Section 6.2
Section 6.0
5346540 v1.0 09/2006 Technical information subject to change without notice
General Overview
111
Control Overview—Burner Control Wiring Diagnosis
Section 6
Connection of Boiler Control Wiring to Burner
BK
Black
BN
Brown
BU
Blue
GNYE Green/Yellow
F6
Fixed High Limit
S1
Power Switch
F2
Fuse 2
TR
Adjustable High Limit
K1
Call for heat relay
Section 6.0
A
Control Unit
[40]
Power supply connection of control 120VAC
B
2nd stage or modulating connection
[41]
Burner, 1st Stage
C
Hour counter connection
[90]
Burner, 2nd Stage/Modulation
D
Burner fault connection
[150] Plugs for external equipment
E
Basic control/burner circuit connections
[151] Safety circuit. Emergency shut-off
F
Burner
112
5346540 v1.0 09/2006 Technical information subject to change without notice
General Overview
Control Overview—Burner Control Wiring Diagnosis
Section 6
Connection of Boiler Control Wiring to Burner (plug-in connection)
Applicable for Vitotronic 100, GC1
120VAC Path Overview
• 120VAC on L of [40] plug.
• 120VAC through S1 switch.
• F2 fuse.
• [151] plug jumper.
• F6 Fixed high limit.
• [150] plug terminal jumper across
12 and 15 (LWCO connection).
• STB of 150 plug to L of [41]
plug.
• L of [41] plug powers flame safe
guard of burner.
• 120VAC returns back to control
on BK3.
• BK3 to T1 of [41] plug.
• TR adjustable high limit.
• K1 call-for-heat relay to TR/ON of
[150] plug.
• Jumper across 17 and 16 of
[150] plug.
• T2 of [41] plug to burner and callfor-heat.
Control Harness Conduit
!
CAUTION
This is a generic drawing only! Follow
the burner manufacturer’s
interconnection drawings for
interfacing burner with Viessmann
controls.
113
Section 6.1
5346540 v1.0 09/2006 Technical information subject to change without notice
• TR of [150] plug to T2 of [41]
plug.
Control Overview—Burner Control Wiring Diagnosis
Section 6
Connection of Boiler Control Wiring to Burner (hard-wired connection)
Applicable for Vitotronic 100, GC1
120VAC Path Overview
• 120VAC on L of [40] plug.
• 120VAC through S1 switch.
• F2 fuse.
• [151] plug jumper.
• F6 Fixed high limit.
• [150] plug terminal jumper across
12 and 15 (LWCO connection).
• STB of 150 plug to L of [41]
plug.
• L of [41] plug powers flame safe
guard of burner.
• 120VAC returns back to control
on BK3.
• BK3 to T1 of [41] plug.
• TR adjustable high limit.
• K1 call-for-heat relay to TR/ON of
[150] plug.
• Jumper across 17 and 16 of
[150] plug.
• T2 of [41] plug to burner and callfor-heat.
Control Harness Conduit
Section 6.1
!
CAUTION
This is a generic drawing only! Follow
the burner manufacturer’s
interconnection drawings for
interfacing burner with Viessmann
controls.
114
5346540 v1.0 09/2006 Technical information subject to change without notice
• TR of [150] plug to T2 of [41]
plug.
Control Overview—Burner Control Wiring
Section 6
Connection of Boiler Control Wiring to Burner (plug-in connection)
Applicable for Vitotronic 300, GW2
120VAC Path Overview
• 120VAC on L of [40] plug.
• 120VAC through S1 switch.
• F2 fuse.
• [151] plug jumper.
• F6 Fixed high limit.
• [150] plug terminal jumper across
12 and 15 (LWCO connection).
• STB of 150 plug to L of [41]
plug.
• L of [41] plug powers flame safe
guard of burner.
• 120VAC returns back to control
on BK3.
• BK3 to T1 of [41] plug.
• TR adjustable high limit.
• K1 call-for-heat relay to TR/ON of
[150] plug.
• Jumper across 17 and 16 of
[150] plug.
• T2 of [41] plug to burner and callfor-heat.
Soft Cable
!
CAUTION
This is a generic drawing only! Follow
the burner manufacturer’s
interconnection drawings for
interfacing burner with Viessmann
controls.
115
Section 6.2
5346540 v1.0 09/2006 Technical information subject to change without notice
• TR of [150] plug to T2 of [41]
plug.
Control Overview—Burner Control Wiring Diagnosis
Section 6
Connection of Boiler Control Wiring to Burner (hard-wired connection)
Applicable for Vitotronic 300, GW2
120VAC Path Overview
• 120VAC on L of [40] plug.
• 120VAC through S1 switch.
• F2 fuse.
• [151] plug jumper.
• F6 Fixed high limit.
• [150] plug terminal jumper across
12 and 15 (LWCO connection).
• STB of 150 plug to L of [41]
plug.
• L of [41] plug powers flame safe
guard of burner.
• 120VAC returns back to control
on BK3.
• BK3 to T1 of [41] plug.
• TR adjustable high limit.
• K1 call-for-heat relay to TR/ON of
[150] plug.
• Jumper across 17 and 16 of
[150] plug.
• T2 of [41] plug to burner and callfor-heat.
Control Harness Conduit
Section 6.2
!
CAUTION
This is a generic drawing only! Follow
the burner manufacturer’s
interconnection drawings for
interfacing burner with Viessmann
controls.
116
5346540 v1.0 09/2006 Technical information subject to change without notice
• TR of [150] plug to T2 of [41]
plug.
Vitocontrol-C System Overview Drawings
Section 7
Vitocontrol-C Drawings
Section 7.0
General Information
Boiler control power from Vitocontrol-C
Burner/Blower power from Vitocontrol-C
Pump interconnections between boiler control and Vitocontrol-C
[20][A1] Signal output
[20][M2] Heating circuit pump
[20][M3] Heating circuit pump
[21] DHW production pump
[28] DHW recirculation pump
[29] Boiler/shunt pump
Control and output extension module power interconnections
Control and output extension module output interconnections
Section 7.1
Section 7.0
5346540 v1.0 09/2006 Technical information subject to change without notice
Example Drawing
System example drawing of Vitotronic GC1 and panel.
117
5346540 v1.0 09/2006 Technical information subject to change without notice
Section 7.0
118
Control voltage from control panel
Plug connection
within control
Refer to drawings supplied with control
Three wire connection Line/Ground/Neutral
to be run from panel to boiler control
junction box.
Control Voltage:
Boiler control voltage can come from
custom control panel when so equipped.
Vitocontrol-C System Overview Drawings
Section 7
Vitocontrol-C Boiler control power interconnections from panel to control example
119
Section 7.0
Burner blower motor power
interconnections from control panel
Single phase 120VAC
Single phase 240VAC
Three phase 208/460/575VAC
5346540 v1.0 09/2006 Technical information subject to change without notice
Vitocontrol-C System Overview Drawings
Section 7
Vitocontrol-C Burner/Blower power interconnections example
5346540 v1.0 09/2006 Technical information subject to change without notice
Section 7.0
120
Output from boiler control to control
panel. Provides signal demand for
pump operation
Plug connection
within control
Not all connections are available on all
controls. Refer to control panel
schematic for detailed information.
Example Pump Interconnections*:
[20][A1]/[M1] Signal demand
[20][M2] Heat circuit pump
[20][M3] Heat circuit pump
[21] DHW production pump
[28] DHW re-circulation pump
[29] Boiler supply/shunt pump
Vitocontrol-C System Overview Drawings
Section 7
Vitocontrol-C Pump interconnections between boiler control and panel example
Vitocontrol-C System Overview Drawings
Section 7
Section 7.0
Power connections
from control panel
5346540 v1.0 09/2006 Technical information subject to change without notice
Vitocontrol-C Extension Output Module power interconnections between module and panel example
121
Section 7.0
122
5346540 v1.0 09/2006 Technical information subject to change without notice
Dry Contact Outputs to Panel:
Call for heat status
Burner alarm
LWCO alarm
FHL alarm
Vitocontrol-C System Overview Drawings
Section 7
Vitocontrol-C Extension Output Module interconnections between module outputs and panel example
Appendix
Section 8
Related Information
Section 8.0
Section 8.0
5346540 v1.0 09/2006 Technical information subject to change without notice
General Information
Code information
Related manual information
123
Appendix
Section 8
Codes and Alternate Resources
Applicable for Canada and USA
USA
The installation of this unit shall be in accordance with
local codes or, in the absence of local codes use CAN/
CSA-B149.1 or CAN/CSA-B149.2 installation codes
for gas burning appliances for Canada. Refer to code
CSA B-139 Standard for oil burning installations.
The installation of this unit shall be in accordance
with local codes or, in the absence of local codes use
National Fuel Gas Code ANSI Z223.1 installation
codes for gas burning appliances for USA. Refer to
code NFPA 31 Standard for oil installations.
Always use the latest editions of codes.
Always use the latest editions of codes.
In Canada all electrical wiring is to be done in
accordance with the latest edition of CSA C22.1 Part
1 and/or local codes.
In the USA use the National Electrical Code ANSI/
NFPA 70.
The heating contractors must also comply with both
the Standard for Controls and Safety Devices for
Automatically Fired Boilers, ANSI/ASME CSD-1.
Alternate Resources
Section 8.0
Web Site Links
www.csa.ca
www.csa-international.org
www.csa-international.org/testing_certification_us/
www.ansi.org
www.ansi.org/library/
www.viessmann.ca
www.viessmann.us
www.viessmann.com
www.ciph.com
www.hrai.ca
124
5346540 v1.0 09/2006 Technical information subject to change without notice
Canada
Appendix
Section 8
Related Manuals
Applicable for Canada and USA
Line
Manual
Viessmann Number
Version
Date
1
Vitorond 200, VD2 (small) TDM
5285 661
v1.3
05/2006
2
Vitorond 200, VD2 (small) Installation Instructions
5285 663
v1.1
07/2006
3
Vitorond 200, VD2 (small) Service Instructions
5285 664
v1.2
06/2006
4
Vitorond 200, VD2 (large) TDM
5285 428
v1.3
07/2006
5
Vitorond 200, VD2 (large) Installation Instructions
5285 429
v1.4
07/2006
6
Vitorond 200, VD2 (large) Service Instructions
5285 431
v1.4
06/2006
7
Vitorond 200, VD2 Operating Instructions
5285 432
v1.1
05/2004
8
Vitocrossal 300, CT3 TDM
5285 871
v1.1
06/2006
9
Vitocrossal 300, CT3 Installation Instructions
5285 873
v1.1
06/2006
10
Vitocrossal 300, CT3 Service Instructions
5285 875
v1.0
06/2005
11
Vitocrossal 300, CT3 Operating Instructions
5285 874
v1.0
06/2005
12
Door Safety Switch Install. Instructions Supp.
5265 700
v1.6
03/2005
13
Vitotronic 050, HK1M Install. and Service Instructions
5285 967
v1.0
11/2005
14
Vitotronic 050, HK1M Operating Instructions
5285 968
v1.0
11/2005
15
Vitotronic 050, HK1S and HK3S Install. Instructions
xxxx xxx
v1.0
08/2006
16
Vitotronic 050, HK1S and HK3S Operating Instructions
xxxx xxx
v1.0
08/2006
17
Vitotronic 100, GC1 Install. and Service Instructions
5285 938
v1.3
09/2005
18
Vitotronic 100, GC1 Operating Instructions
5285 939
v1.1
09/2005
19
Vitotronic 300, GW2 Install. and Service Instr
5285 941
v1.2
11/2005
20
Vitotronic 300, GW2 Operating Instructions
5285 942
v1.2
11/2005
21
Vitocontrol-S, MW1 for VD2&CT3 Install./Service Instructions
5285 944
v1.2
07/2006
22
Vitocontrol-S for VD2&CT3 Operating Instructions
5285 945
v1.2
07/2006
23
Extension Input Module, 0-10V Installation Instructions
5285 999
v1.0
09/2005
24
Combustion Air Device Adaptor Install. & Operating Instructions
5285 972
v1.0
06/2005
25
Common Combustion Air Device Interface Install. & Operating Instructions
5285 973
v1.0
06/2005
26
Extension Output Module Install. & Operating Instructions
5285 971
v1.0
06/2005
27
Valve Adaptor Module, 24VAC
5285 969
v1.0
06/2005
28
Valve Adaptor Module, 120VAC
5285 970
v1.0
06/2005
Note:
Information regarding the KK10LON, please refer to the supplement manual. The supplement manual is
applicable for installations using the KK10LON boiler control as well as Vitocontrol-C panels with the
communication cards installed inside.
Section 8.0
5346540 v1.0 09/2006 Technical information subject to change without notice
Important
Manual revision occurs without notice. Please consult with Viessmann or Viessmann sales representative for
most current manual version.
125
Viessmann Manufacturing Company Inc.
750 McMurray Road
Waterloo, Ontario • N2V 2G5 • Canada
Tel: (519) 885-6300 • Fax (519) 885-0887
www.viessmann.ca • [email protected]
5346540 v1.0 09/2006 Technical information subject to change without notice
Viessmann Manufacturing Company (U.S.) Inc.
45 Access Road
Warwick, Rhode Island • 02886 • USA
Tel: (401) 732-0667 • Fax (401) 732-0590
www.viessmann-us.com • [email protected]