1
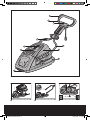
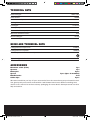
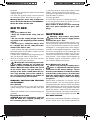
WG701E
WG701E-M-060818.indd 1
2007-3-28 17:19:20
WG701E-M-060818.indd 2
2007-3-28 17:19:20
�
�
�
�
�
�
�
�
�
��
��
�
A
WG701E-M-060818.indd 3
B
C
2007-3-28 17:19:28
��
��
��
��
D
E
F
��
��
��
��
G
H
H.1
��
��
H.2
I
J
K
L
M
N
WG701E-M-060818.indd 4
2007-3-28 17:19:45
1.
SWITCH LEVER
2.
UPPER HANDLE
3.
SAFETY BUTTON
4.
CABLE CLIPS
5.
LOWER HANDLE
6.
GRASSBOX HANDLE
7.
GRASSBOX RELEASE BUTTON
8.
GRASSBOX
9.
DECK
10. PIVOT PIN (See C)
11. UPPER HANDLE KNOB (See E)
12. UPPER HANDLE KNOB WASHER (See E)
13. UPPER HANDLE KNOB JOINT (See E)
14. SPANNER (See I)
15. BLADE BOLT (See H)
16. BLADE (See H)
17. BLADE SPACER (See H)
18. FAN (See H)
19. ROLLER
20. INSPECT WINDOW (See J)
21. COVER (See E)
Hover Mower
WG701E-M-060818.indd 5
WG701E
2007-3-28 17:20:00
TECHNICAL DATA
Rated Voltages:
Rated Power:
Rated No-load Speed:
Cutting diameter:
Cut height:
Cut depth adjustment :
230V~50Hz
1600W
4500min-1
38cm
12-33mm
4
Grass collection capacity:
38L
Moisture resistance Class:
IPX4
Machine Weight:
15.3Kg
NOISE AND TECHNICAL DATA
A weighted sound pressure
83dB(A)
A weighted sound power
96dB(A)
Wear ear protection when sound pressure is over
85dB(A)
Typical weighted vibration
5.0m/s2
ACCESSORIES
Extension cable (15m)
Spanner
Pivot pins
Spacer
Handle knobs
Cable clips
1pc
1pc
2pcs
3pcs (2pcs in machine)
1set
2pcs
We recommend that you buy all your accessories from the store where you purchased the tool.
Use good quality accessories marked with a well-known brand name. Refer to working hints
section in this manual or to the accessory packaging for more details. Store personnel can also
help and advise.
WG701E-M-060818.indd 6
2007-3-28 17:20:00
SAFETY INSTRUCTIONS
WARNING! Read all instructions
Failure to follow all instructions listed below may result in electric shock, fire
and/or serious injury.
SAVE THE INSTRUCTION FOR FUTURE USE
If not used properly this lawnmower
can be dangerous! This lawnmower
can cause serious injury to the operator
and others, the warning and safety instruction must be followed to ensure reasonable safety and efficiency in using this
lawnmower.
The operator is responsible for following the warning and safety instruction in
this manual and on the lawnmower. Never
use the mower unless the grassbox or
guards.
TRAINING
1. Read the instructions carefully. Be familiar
with the controls and the proper use of the
appliance.
2. Never allow children or people unfamiliar
with these instructions to use the appliance.
Local regulations may restrict the age of the
operator.
3. Never mow while people, especially children, or pets are nearby.
4. The operator or user is responsible for accidents or hazards occurring to other people
or their property.
PREPARATION
1. Only use this Lawn Mower when a Residual
Current Device (RCD) with a tripping current
of not more than 30mA is in the circuit.
2. While mowing, always wear substantial
footwear and long trousers.
3. Do not operate the appliance when barefoot
or wearing open sandals.
4. Thoroughly inspect the area where the appliance is to be used and remove all stones,
sticks, wires, bones, and other foreign objects.
5. Before using, always visually inspect to see
that the blades, blade bolts and cutter assembly are not worn or damaged. Replace
worn or damaged blades and bolts in sets to
preserve balance.
OPERATION
1. Mow only in daylight or in good artificial
light.
Hover Mower
WG701E-M-060818.indd 7
2. Avoid operating the appliance in wet grass,
where feasible.
3. Always be sure of your footing on slopes.
4. Do not walk backwards whilst operating your
product ,you could trip - Walk ,never ,run.
5. Mow across the face of slopes, never up and
down.
6. Exercise extreme caution when changing direction on slopes.
7. Do not mow excessively steep slopes.
8. Use extreme caution when reversing or pulling the appliance towards you.
9. Stop the blade(s) if the appliance has to be
tilted for transportation when crossing surfaces other than grass, and when transporting the appliance to and from the area to be
mowed.
10. Never operate the appliance with defective
guards or shields, or without safety devices,
for example deflectors and/or grass catchers, in place.
11. Switch on the motor according to instructions and with feet well away from the
blade(s).
12. Do not tilt appliance when switching on
the motor, except if the appliance has to be
tilted for starting. In this case, do not tilt it
more than absolutely necessary and lift only
the part which is away from the operator.
Always ensure that both hands are in the
operating position before returning the appliance to the ground.
13. Do not put hands or feet near or under rotating parts. For rotary mowers, keep clear of
the discharge opening at all times.
14. Never pick up or carry an appliance while
the motor is running.
15. Remove the plug from the mains:
• Whenever you leave the machine;
• Before clearing a blockage;
• Before checking, cleaning or working on
the appliance;
• After striking a foreign object. Inspect the
appliance for damage and make repairs as
necessary;
• If the appliance starts to vibrate abnormally (check immediately). Excessive vibration
can cause injury.
MAINTENANCE AND STORAGE
1. Keep all nuts, bolts, and screws tight to be
sure the appliance is in safe working condition.
2. Check the grass catcher frequently for wear
or deterioration.
WG701E
2007-3-28 17:20:01
3. Replace worn or damaged parts for safety.
4. Do not try to repair the machine or access internal parts. Use authorized service centers
only.
5. Only use the replacement blade, blade bolt,
spacer and impeller specified for this product.
6. Be careful during adjustment of the lawnmower to prevent entrapment of the fingers
between moving blades and fixed parts of
the machine.
7. If an extension cord is used make sure it is
for outdoor use and marked as such. The
recommended size of extension cord is not
lighter than 1.0mm2 and a maximum of 10
meters in length.
8. All electric power tools should be properly
insulated and any extension cable should be
orange so it will stand out when laid around
the garden
9. When using a hand controlled electric tool,
feed the cable over your shoulder, this
should prevent you cutting through it.
SYMBOL DESCRIPTION
Warning.
Read the user instruction carefully and make sure you understand all the controls and what
they do.
Always keep the lawnmower on
the ground when mowing. Tilting or lifting the lawnmower
may cause stones to be thrown
out.
Keep bystanders away. Do not
mow whilst people especially
children or pets are in the mowing area.
Beware of severing toes or
hands. Do not put hands or feet
near a rotating blade.
Switch off! Remove plug from
mains before adjusting, cleaning or if cable is entangled or
damaged. Keep the cable away
for the blade.
Blade continues to rotate after
the machine is switched off.
Wait until all machines components have completely stopped
before touching them.
Do not mow in the rain or leave
the lawnmower outdoors while
raining.
WG701E-M-060818.indd 8
2007-3-28 17:20:01
ASSEMBLY
IMPORTANT! Before you assemble the
hover mower, check the accessories according above information, make sure the accessories are completed.
FITTING THE LOWER HANDLE.
Note: The cable can move through the
cover(21), adjust it to help you fit the
lower handle easily.
1. Remove the grassbox (8) from the deck (See A).
This can help you to assemble the lower handle
(5) on deck (9) easily.
2. Insert the lower handle into the handle slot of
the deck (See B).
Note: Make sure that the screws on the
centre cover -item 21 are facing down ,towards the deck.
Ensure the lower handle hole is aligned with the
deck hole, insert the pivot pin (10), Check that the
pivot pin is firmly secure (See C).
Put the grassbox (8) on deck (9). Make sure there
is no abnormal gap between them.
FITTING THE UPPER HANDLE (See D&E)
Lift the Upper handle into position as shown D.
Align the holes in the upper and lower handles
and secure with part (11),(12),(13) , tighten upper
handle knob (11) clockwise (See E). Check that the
upper and lower handles are firmly secure. Ensure the cables do not become stuck when folding/unfolding Lower Handle.
FIT THE CABLE CLIPS
Fit the cable clips (4) as shown F. Ensure that
the cable clips (4) are used to fix the cable to the
Lower handle (5). Attach the cable clips and make
sure there is enough cable slack.
OPERATION
STARTING AND STOPPING (See G)
STARTING
Connect the female extension cable connector
to the pigtail (See G). Connect the plug to the
mains a switch ON.
THE SWITCHBOX IS PROVIDED WITH A
Hover Mower
WG701E-M-060818.indd 9
SAFETY BUTTON TO PREVENT ACCIDENTAL STARTING.
With one hand press and hold the safety button (3), with the other hand squeeze the switch
lever (1) towards the handle, and release the
safety button. The machine is now started, wait
until the product is at full speed before cutting
the grass.
Then use both your hands to hold the switch
lever to keep it running.
STOPPING
Release the switch lever (1)
ADJUSTING THE CUTTING HEIGHT (See
H)
Warning : Before adjusting the mower height, wait for the mower to
completely stop. Mower blades continue
to rotate after the machine is switched off
and a rotating blade can cause injury. Wait
until all machine components have completely stopped before touching them.
1. Turn the mower on its side.
2. Put on a pair of sturdy gloves to protect your
hands.
3. Hold the fan(18) firmly and use the spanner(14) to unscrew the blade bolt15) in an anticlockwise direction (view from underneath).
4. Remove the blade bolt(15), blade (16), and
blade spacers (17).
5. Use below chart to see how to adjust the
blade spacers to get the desired cutting height
of the grass.
No. of blade spacers
between fan and blade
Cutting height
(approx.)
0
33mm
1
26mm
2
19mm
3
12mm
6. Place the spacers onto the fan ensuring the
pegs have located into the holes (See H.1)
Place the blade onto the spacers ensuring the
pegs have located into the holes on the blade
(See H.2)
Place the blade bolt through the centre hole of
WG701E
2007-3-28 17:20:02
the blade .
Tighten down and please check that the blade
is firmly secured.
7. To store the spanner insert it into the rear of
the switchbox (See I). Do not put it in grass.
Warning! Spacers must only be fitted between the blade and the fan and NEVER between the blade and the bolt.
HOW TO MOW
NOTE:
• Cut grass when it is dry.
• Keep the mower blade sharp and balanced.
• Do not set the cutting height too low,
especially at the beginning of the mowing
season.
• For best grass collection always mow
in a straight line, do not swing the lawnmower from side to side.
1. Start mowing the edge of the lawn nearest to
the power point so the cable is laid out on the
lawn you have already cut.
2. Mow twice a week during the growing season, you lawn will suffer if more than a
third of its length is cut at one time and this
may also result in poor collection.
Warning: Do not overload your mower. When mowing do not allow the
motor to labour particularly in heavy conditions. When the motor labours the speed
of the motor drops and you will hear a
change in the motor sound, when this occurs stop mowing, release the switch lever and raise the height of cut. Failure to
do so could damage the machine.
REMOVING, EMPTYING AND REFITTING
THE GRASSBOX
Grassbox full
• As the grassbox fills up, grass will be clearly
visible through the inspect window (20) (See
J).
• When the window is full, its time to empty the
grassbox.
Emptying the Grassbox
CAUTION: Stop the lawnmower and wait
until the blade has stopped rotating, before removing the grassbox.
WG701E-M-060818.indd 10
1. Use one hand to hold the grassbox handle
(See K), lift and remove from the mower.
2.To open the grassbox first press the grassbox
release button (7) (See L).
3. Empty grassbox.
4. Lift the flap up until it is locked into place.
5. Put the grass box back and make sure it be
put in correct position on deck (9).
Note: Failure to fit the grassbox correctly
will cause poor collection of grass clippings.
MAINTENANCE
Warning: Stop mower and remove
plug from the power supply before
removing the grass box.
Note: To ensure long and reliable service, carry
out the following maintenance procedures regularly. Check for obvious defects such as a loose,
dislodged or a damaged blade, loose fittings,
and worn or damaged components. Check that
the covers and guards are all undamaged and
are correctly attached to mower. Carry out any
necessary maintenance or repairs before operating mower. If the mower should happen to
fail despite regular maintenance, please call
our customer helpline for advice.
Blade Maintenance (See H)
Never carry out any assembly operations or adjustments with the power
connected to the mower. Always ensure
that the power button is in the off position
and that the power plug is disconnected
from the supply. Always handle the blade
with care-sharp edges could cause injury
use gloves.
Follow these procedures to remove and replace the blade. You will need garden gloves
(not provided) and a spanner (14) to remove the
blade. Hold the fan (18) and unscrew the blade
bolt (15)anti clockwise using spanner. Remove
blade and attach a new one to the blade bolt.
Ensure that the blade is properly positioned as
seen in Fig.H, then firmly tighten the bolt. DO
NOT OVER TIGHTEN.
Renew your metal blade after 50hrs mowing or
2 years ,which ever is the sooner-regardless of
2007-3-28 17:20:02
condition.
If the blade is cracked or damaged replace it
with a new one.
Storage:
Rotate the Upper Handle knob to release
the upper and lower handle
Clean the exterior of the machine thoroughly
using a soft brush and cloth. Do not use water,
solvents or polishes. Remove all grass and debris, especially from the ventilation slots.
Turn the machine on its side and clean the
blade area. If grass cuttings are compacted in
the blade area, remove with a wooden or plastic implement.
Store the machine in a dry place. Do not place
other objects on top of the machine.
Rotate the Upper Handle knob (12) to release
the handle joint ,it can be folded (See M). The
mower may be transported on its roller (19)
(See N).
Ensure cables are not stuck or entangled when
folding or unfolding top handles. Do not drop
the handles.
PLUG REPLACEMENT (UK &
IRELAND ONLY)
If you need to replace the fitted plug then
follow the instructions below.
IMPORTANT
The wires in the mains lead are colored in
accordance with the following code:
BLUE =NEUTRAL
Brown = Live
As the colors of the wires in the mains lead of
this appliance may not correspond with the
colored markings identifying the terminals
in your plug, proceed as follows. The wire
which is colored blue must be connected to
the terminal which is marked with N. The wire
which is colored brown must be connected to
the terminal which is marked with L.
Warning: Never connect live or neutral wires
to the earth terminal of the plug. Only fit an
approved 13ABS1363/A plug and the correct
rated fuse.
Note: If a moulded plug is fitted and has to
be removed take great care in disposing of the
plug and severed cable, it must be destroyed
to prevent engaging into a socket.
13 Amp fuse approved
to BS1362
ENVIRONMENTAL
PROTECTION
Connect
Blue to N
(neutral)
Waste electrical products must not be disposed of with household waste. Please
recycle where facilities exist. Check with
your local authorities or retailer for recycling
advice.
Outer sleeve
firmly clamped
Hover Mower
WG701E-M-060818.indd 11
Brown L (live)
Cable grip
WG701E
2007-3-28 17:20:03
DECLARATION OF CONFORMITY
We,
POSITEC Power Tools (Suzhou) Co., Ltd.
No. 11 Yangqing Road, Loufeng Area, Suzhou
Industrial Park, Jiangsu 215021, P. R. China
Declare that the product,
Description
WORX Hover
Type WG701E
Complies with the essential health and safety
requirements of the following directives:
- EMC Directive. 89/336 EEC.
- Low Voltage Directive. 73/23 EEC.
- CE Marking Directive 93/68 EEC.
- Machinery Directive 98/37 EC
- Noise emission in the environment by equipment for use outdoors Directive. 2000/14/EC
- Conformity assessment procedure as per AnnexVI.
- Measured Sound Power Level
92dB(A)
- Declared Guaranteed Sound Power Level
96dB(A)
Standards and technical specifications referred
to:
EN60335-1:
EN60335-2-77
EN 55014-1
EN 55014-2
EN 50366
EN61000-3-3
EN61000-3-2
ISO11094
EN ISO 3744
10/01/2006
Jacky Zhou
POSITEC Quality Manager
WG701E-M-060818.indd 12
2007-3-28 17:20:03
WG701E-M-060818.indd 13
2007-3-28 17:20:03
WG701E-M-060818.indd 14
2007-3-28 17:20:03
WG701E-M-060818.indd 15
2007-3-28 17:20:03
WG701E-M-060818.indd 16
2007-3-28 17:20:03