1
PUBDIM-519
CallOll
Digital
Video
Instruction
Camescope
Manuel
Camcorder
Manual
video
Videoc_mara
Manual
70
Mini]r_
_
Digi_l
Video
C_s_,ett e
This instruction
illustrations
digital
de Instrucciones
65
60
JEt
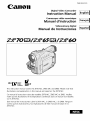
manual covers the ZR70 MC, ZR65 MC and ZR60
and explanation
num_rique
d'instruction
in this manual
Please note that
are based on the ZRTO MC.
Ce manuel d'instruction
traite des modules ZR70 MC, ZR65 MC et ZR60. Veuillez
noter que les illustrations et les explications contenues dans ce manuel sont bas_es
sur le ZR70 MC
Este manual de instrucdones cubre la ZR70 MC, la ZR65 MC, y la ZR60 Tenga en
cuenta que las ilustraciones y las explicaciones de este manual se basan en la
ZR70 MC
Important
F
Usage
Instructions
WARNING:
TO REDUCE THE RISK OF FIRE OR ELECTRIC SHOCK, DO NOT EXPOSE THIS
PRODUCT TO RAIN OR MOISTURE.
WARNING:
TO REDUCE THE RISK OF ELECTRIC SHOCK AND TO REDUCE ANNOYING
INTERFERENCE, USE THE RECOMMENDED ACCESSORIES ONLY.
COPYRIGHTcopyright
WARNING:
Unauthorized
recording
copyrighted
materialslaws.
may infringe on the rights of
owners
and beofcontrary
to copyright
Digital Vdeo
D
Camcorder, ZR70 MC/ZR65 MC/ZR60 systems
This device compiles with Part 15 of the FCC Rules Operation is subject to the following two conditions: (1)
This device may not cause harmful inter felence, and (2) this device must accept any interference received,
including interferel_ce that may cause undes red operation
Note: This equipment has been tested al_d found to comply with the limits for class S digital device, pursuant to
Part 15 of the FCC Rules These limts are desiglled to prtlv_de reasonable protection against harmful
inte ference in a lesidential installation This equipment generates, uses and can radiate ladio frequency energy
and, if not installed and use in accordance with the instruct on% may cause harmful intelference to radio
communications
However, there is no gualantee thaf interference will not occur in a part cular installation If
this equipment does cause harmful inter felence to radio or te]evis on reception, whid'_ can be determined by
turning the equipment off and on, the user is encouraged to try to correct the inter felence by one or more of
the following
measures:
•
•
•
•
Reorient or _elocate t_e receiving antenna
_ncrease the separation between the equipment and receiver
Connect the equipment into an outlet on a circuit different flora that to which the leceiver is connected
Consult the dealer or an experiel_ced radio/TV technician for help
Use of shie ded cable is required to comply with class B limits in Subpalt B of Part 15 of FCC Rules
DO not make al_y changes or modifications to the equipment ul_less otherwise specified in the manual
If such changes or modifirations
should be made, you could be required to stop operation of the equipment
Canol_ USA
Inc
One Canon Plaza, Lake Success, NY 11042, U S A
Tel No (516)328-5600
TO PREVENT ELECTRIC SHOCK, MATCH WIDE BLADE OF PLUG TO WIDE SLOT, FULLY
CAUTION:
INSERT.
Impo_antWarning
The lightning flash with arrowhead
symbol, wit hJn an equi atelal triang e, is
intended to alelt the usel to the presence
of uninsulated "dangerous voFtage" within
the product_ enclosure, that may he of
sufficient magnitude to constitute a risk of
electric shock to persons
TO REDUCE THE RISK OF ELECTRIC
CAUTION:DO NOT REMOVE COVER (OR
SHOCK,
|BACK). NO USER-SERVICEABLE PARTS
|INSIDE. REFER SERVICING TO QUALIFIED
LSERVICEF'ERSON NEE
The exdamat on point, within an
equilateral t Jangle, is intended to alert the
user to the presence of impor tarlt
operating and maintenance (se/vicing)
instructions in the litelature accompanying
the product¸
In these safety instructions the word "product"
refers to the Canon Digital Video Camco_der
ZR70 MC/ZR6R MC/ZR60 A and all its
accessol_es
1
Read Instructions-All the safety and
operating instructions should be _ead
before the p_duct is operated¸
2
Retain Instructions -- The safety and
operating instructions should be retained
for future reference
3
Heed Warnings -- All warnings on the
p_)duct and in the operating instructions
should be adhered to
4
Follow Instructions-All operating and
maintenance instructions should be
followed¸
5
Cleaning -- Unplug this product from the
wall outlet before cleaning Do not use
liquid or aerosol cleaners The product
should be cleaned only as recommended in
this manual
6
Accessories-- DO not use accessories not
recommended in this manual as they may
be hazardous
7
Avoid
use the
portable
magnetic
camera
or electric
fields
--
DO not
close to TV transmitters,
communication
devices
or other
sources of electric or magnetic
radiation¸
They may cause picture
interference,
or
permanently
damage
the
camera¸
8
Water and Moisture -- Hazard of electric
shock -- DO not use this product near
water or in rainy/moist situations
9
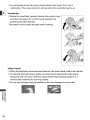
Placing or Moving -- DO not place on an
unstable cart, stand, tripod, bracket or
table The product may fall, causing serious
injury to a child or adult,
and serious damage to the
product
A product and cart
combination should be
moved with care Quick
stops, excessive force, and uneven surfaces
may cause the product and cart
combination to overturn
10 Power Sources -- The CA-570 Compact
Power Adapter should be operated only
from the type of power source indicated on
the marking label If you are not sure of the
type of power supply to your home, consult
your product dealer or local power
compen_ Regarding other power sources
such as battery power; refer to instructions
in this manual
11 Polarization -- The CA-570 Compact Power
Adapter is equipped with a polarized 2prong plug (a plug having one blade wider
than the other)
The 2^prong polarized plug will fit into the
power outlet only one way This is a safety
feature If you are unable to insert the plug
fully into the outlet, try reversing the plug
If the plug still fails to fit, contact your
electrician to replace your obsolete outlet
Do not defeat the safety purpose of the
polarized plug
12 Power Cord P_Dtection -- Power cords
should be routed so that they are not likely
to be walked on or pinched by items placed
upon or against them Pay perticular
attention to plugs and the point from
which the cords exit the product
13 Outdoor Antenna Grounding -- If an
outside antenna is connected to the
product, be sure the antenna is g_)unded
so as to provide some protection against
voltage surges and built-up static charges
Section 810 of the National Electdcal Code.
ANSI / NFPA NO 70--1984_ provides
information with respect to proper
grounding of the mast and supporting
structure, grounding of the lead in wire to
an antenna discharge unit, size of
grounding conductors, location of antenna
discharge unit, connection to grounding
electrodes, and requirements for the
grounding electrode See figure 1
-_.
_,
_"
18 Damage Requiring Service -- Disconnect
Fig, 1
_
_I_"__I,'_"_ _
this product flom the wall outlet and all
power sources including battery, and refer
servicing to qualified service personnel
under the following conditions:
a When the powe_supply cord or plug is
damaged
b If any liquid has been spilled onto, or
objects have fallen into, the product
c If the product has been exposed to rain
or water
d If the product does not operate normally
even if you follow the operating
instructions Adjust only those controls
that are cove_d by the operation
instructions Improper adjustment of
other controls may result in damage and
will often require extensive work by a
qualified technician to restore the
product to its normal operation
e If the product has been dropped or the
cabinet has been damaged
f When the product exhibits a distinct
change in performance This indicates a
need for service
F
o=
14. Lightning -- For added protection of this
product during a lightning storm, or when
it is left unattended and unused for long
periods of time, disconnect it from the wall
outlet and disconnect the antenna This will
prevent damage to the product due to
lightning and power-line surges
,o
t5
Overloading -- Do not overload wall outlets
and extension cords as this can result in a
risk of fire or electro shock
16 Objects and Liquid Entry -- Never push
objects of any kind into tHs product
through openings as they may touch
dangerous voltage points or short out parts
that could result in a fire or electric shock
Be careful not to spill liquid of any kind
onto the product
17. Servicing -- Do not attempt to service this
product yourself as opening or removing
covers may expose you to dangerous
voltage or other hazards Refer all servicing
to qualified service personnel
19 Replacement Pads--When
replacement
parts are _quk_d, be sure the service
technician has used _placement parts that
are specified by Canon or that have the
same characteristics as the oRginal part¸
Unauthorized substitutions may result in
fire, electric shock or other hazards¸
20
Safety Check -- Upon completion of any
service or repairs to this product, ask the
service technician to perform safety checks
to determine that the p_)duct is in safe
operating order
When replacement of power supply is required, please return it to the
responsible nearest Canon Service Center and please replace it with the same
type number CA-570.
The Adapter can be used with a power supply between 100 and 240 V AC.
For areas where 120 V AC power is not used, you will need a special plug
adapter. Contact your nearest Canon Service Center for further information.
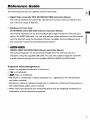
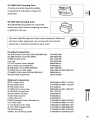
Reference
The following
Guide
4
manuals are supplied with the camcorder:
O Digital Video Camcorder ZR7O MC/ZR65 MC/ZR60 Instruction Manual
This manual explains the camcorder operations from basic video recording to the
use of the full range of features
O Windows XP Users Only
DV NETWORK SOLUTION DISK So_Nare Instruction Manual
This manual explains how to download/upload
images from/to the memory card
using a DV (IEEE1394) cable. You can also perform videoconference
D
and file transfer
over the Intemet using the provided software. Available functions depend upon
the camcorder model and networking
environment,
DIGITAL VIDEO SOLUTION DISK Software Instruction Manual
This manual explains how to download images from the memory card to a
computer using the supplied US8 cable. You can add sample images for Card Mix
and My Camera settings from the supplied DIGITAL VIDEO SOLUTION DISK_
Trademark
Acknowledgements
• Canon is a registered trademark of Canon inc.
• M_,
• _'_
is a trademark.
logo is a trademark_
• Macintosh is a trademark of Apple Computer Inc, registered in the United States
and other countries_
• Windows _ is either a registered trademark or trademark of Microsoft Corporation in
the United States and/or other countries_
• Other names and products not mentioned
trademarks of their respective companies_
above may be registered trademarks or
o-_
Table
of Contents
Introduction
Reference Guide ...................................................................................
5
Thank You for Choosing a Canon .............................................................
9
introducing the ZR70 MCFZR65MOZR60 ..................................................................10
Components Guide ......................................................................................................11
Mastering
the Basics
Preparations
Using a Household Power Source ...........................................................
15
Attaching and Charging the Battery Pack ................................................................16
installing the Backup Battery ......................................................................................19
o=
Preparing the Camcorder ............................................................................................20
Loading a Cassette ........................................................................................................22
-o
Using the Wireless Controller ......................................................................................24
Setting the Time Zone, Date and Time ......................................................................25
BasicRecording
Recording Movies on a Tape ......................................................................................28
Zooming ........................................................................................................................30
Using the LCD Screen....................................................................................................32
Searching and Reviewing when Recording ..............................................................35
Tips for Making Better Videos ....................................................................................36
Basic Playback
Playing Back a Tape ......................................................................................................37
Playing Back on a TV Screen ........................................................................................41
Using the Full Range of Features
General
Menus and Settings ...............................................................................
44
Changing the Remote Sensor Mode .....................................................
49
Customizing the Camcorder ........................................................................................50
Setting the Light-up Buttons ........................................................................51
Other Camcorder Settings ..........................................................................................52
Recording
Changing the Recording Mode (SP/LP)....................................................
54
Recording Still Images on a Tape ................................................................................55
Using the Recording Programs ....................................................................................57
Using Digital Effects......................................................................................................61
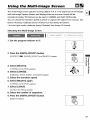
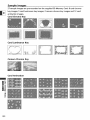
Using the Multi-Image Screen ....................................................................................67
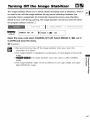
Turning Off the image Stabilizer ................................................................................69
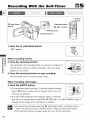
Recording With the Self-Timer ....................................................................................70
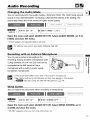
Audio Recording ..........................................................................................................71
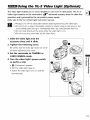
Using the VL-3 Video Light (Optional) ........................................................73
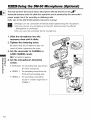
Using the DM-50 Microphone (Optional) ....................................................74
Manual Adjustments
Adjusting the FocusManually ....................................................................................75
Adjusting
theAEShift
77
Setting
theShutter
Speed
78
Setting
theWhite
Balance
80
Playback
Magnifying
theImage
82
Displaying
theData
Code
...................................................................
83
Photo
Search/Date
Search
...................................................................
85
Returning
toaPre-marked
Position
........................................................
86
4
Editing
Recording to a VCR or Digital Video Device ..............................................
87
Recording from Analog Video Devices (VCR, TV or Camcorder) ..........................89
Recording from Digital Video Devices (DV Dubbing) ..............................................90
Converting Analog Signals into Digital Signals (Analog-Digital Converter) ...-...92
Replacing Existing Scenes (AV Insert) ........................................................................94
Audio Dubbing ..............................................................................................................96
Connecting to a Computer Using a DV (IEEE1394) Cable ......................................99
_
Using
a Memory
Card
Inserting and Removing the Memory Card .............................................
100
Selecting the Image Quality/Size ..............................................................................101
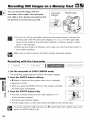
Recording Still Images on a Memory Card ..............................................................104
Recording Panoramic Images (Stitch Assist Mode) ................................................107
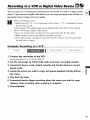
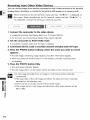
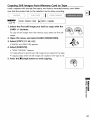
Recording Motion JPEG Movies on a Memory Card ................................109
Playing Back a Memory Card ....................................................................................111
Protecting Images ......................................................................................................114
Erasing Images ............................................................................................................115
Selecting Still Images for Printing (Print Order) ....................................................116
Printing with the Direct Print Function ....................................................................118
Combining Images (Card Mix) ..................................................................................122
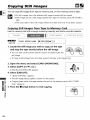
Copying Still Images ....................................................................................................126
Formatting a Memory Card ......................................................................................128
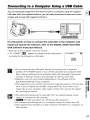
Connecting to a Computer Using a USB Cable ......................................................129
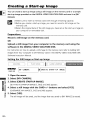
Creating a Start-up Image ........................................................................................130
Memory Card Information ........................................................................................131
Additional
Information
C
o
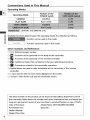
Con_n_iQos Used in _hi_ Manu_!
Operating
Modes
•
Operating Mode
_i_are_
o_
Position of the
POWER Switch
CAMERA
CAMERA
PLAY (VCR)
PLAY (VCR)
: ZR70 MC and ZR65 MC only,
Available functions depend upon the operating mode. It is indicated asfollows:
: Function can be used in this mode.
.............
: Function cannot be used in this mode.
e .............................................................
O [_
:Reference page number.
O []
:Functionsto be operated on the body of the camcorder
O []
: Functions to be operated on the wireless controller,
O _
: Additional
O _
: Precautions related to the camcorder operation.
topics that complement the basic operating procedures.
O Capital letters are used to refer to buttons on the camcorder or the wireless
controller
O [ ] are used to refer to menu items displayed on the screen.
O "Screen" refers to the LCD and the viewfinder screen.
The serial number of this product can be found at the battery attachment
unit of
the camcorder. Write down the number and other information here and retain this
book as a permanent record of your purchase to aid identification
in case of theft.
Date of Purchase:
Model Name: ZR70 MC/ZR65 MC/ZR60
Purchased From:
Serial No.:
Dealer Address:
Dealer Phone No.:
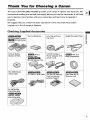
Thank
The Canon
recommend
You for Choosing
ZR70 MC/ZR65
reading
you to become
MC/ZR60
this manual
more
familiar
with
provides
thoroughly
your
a Canon
a full range
before
camcorder,
of options
and functions
you use the camcorder.
We
It will help
and learn how to operate
L%m
it
properly.
We suggest
moving
that you master
on to its full
range
the basic operations
of the camcorder
first,
before
of features.
Checking 5 uppli_d Ac_o_i_
D
Two AA Batteries
Lens Cap and Lens
Cap Cord
SS-800 Shoulder Strap
BP-512
Battery Pack,
_
BP-50BBattery Pack
CA-570Compact
Power Adapter (incl.
_ower cord)
WA-30.5
Wide Attachment
WL-D79_reless Controtter,
WDDS0Wireless
Controller
Lithium Button
Battery CR1616
STV-250N Stereo
Video Cable
DV NETWORK
SOLUTION DISK
_
_r_r_
DIGITAL VIDEO
SOLUTION DISK
_mm
_a_ra pz_ra
IFC-3OOPCUUSB CabSe SDC_SM SD Memory
Card (containing
sample images)
Hard Case for SD
Memory Card
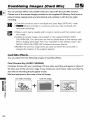
Introducing
the ZR70
MC/ZR65
MC/ZR60
F
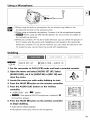
Simply slide Carton's DM-5O Directional
Stereo Microphone
or VL-3 Video Light
into the accessory shoe; the camcorder
will automatically
connections.
g
provide power and
Show your creativity by using the special
effects and faders. The multi-image
Stabilizes your recordings even in long
telephoto shots (in Camera mode)
screen captures moving subjects in 4, 9 or
16 sequences of still images.
Allows recording even in dark places.
The Night mode adjusts automatically
to
the optimum shutter speed.
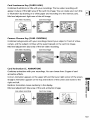
You can record images on a SD Memory
Card or MultiMediaCard. Images
recorded in Stitch Assist mode can be
merged into one panoramic scene with
the supplied software.
With the ZR7O MC's Super Night mode
(in Camera mode) and Low Light Plus
mode (in Card Camera mode), you can
keep on shooting without turning the
You can print still images by connecting
to a Canon Bubble Jet Printer with Direct
Print function.
lights on. The assist lamp (White LED)
lights up to illuminate the subject.
Allows transfer of memory card data to a
Just press the photo button to capture
still images like photographs,
You can personalize your camcorder by
customizing the start-up image and
camcorder sounds.
computer with built-in US8 port. You can
organize and edit images on your
computer using the supplied software.
The DV terminal allows high-quality
transfer with virtually no deterioration
quality of images. You can edit images
by connecting the camcorder to a PC
with IEEE1394terminal. Windows XP
Users can use the supplied software to
perform videoconference and file
transfer over the Internet.
10
in
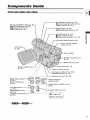
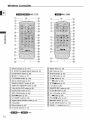
Components
ZRIO M_ZR65
Guide
MQ'ZR_Q
[_
REC SEARCH + button (p. 35) /
(fast forward)
button (p 37) /
CARD ÷ button*
(p 111)
REC(record) SEARCH-- button
[_ Record review button (p. 35) /
_1_1 (_ewind) button (p g7)/
CARD - button* (p 11t)
(p. 75)/
Iplll(play/pause)button(p.
•
(stop) button
[]
(index
37)
IP 77) /
(p. 37) I
screen)
button*
(p
112)
(p32)
c
_
o
_release)
button(p16)
(p.32)
attachment unit
(piG)
button
DCINterminal(p
Backu
(plg)
Selector
dial
y card slot*
(p. 70)/
DATACODEbutton
button
(p. Rg)
(p
(p 104) /
16)
(p
1go)
EFFECTS
(p 61)
-- Digital effects ON/OFFbutton
(p6_)
(p. 124) /
SLIDE SHOW button*
(p. I12)/
E_I (stitch assist) button
(p. _07)
*I_r_r_
15)
(p. 40, 44)
CHARGE indicator
DATA DIGITAL
]
_/CODE EFFECTS ONJOFF -- DIGITAL
(p 44)
and _
MIX/
O_
SHowSL_DE
- Program
_
selector
(p 57)
/
only¸
11
F
-o
O CAMER
PLAY(VCR)
*_r_l
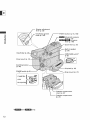
12
and_
only
Cassette
cover(p
compartment
22)
Cassette
(p22)
compartment
4
D
C
--
&
Termina_ cover
o
(p
_
59)
_
Remote
sensor
_
Stereo microphone
(p. 24)
_
Terminal
(p 7_)
cover
SwideoIN/OUT
_
termlnaI
(p 41)
MICterminal
AV IN/OUT
terminal
--
(p. 41 ) / _ (phones)
terminal (p 39)
OPEN/EJECT switch
(p 22)
(p129)
j
Tripod
socket (p 36)
*_and_r_lonly
13
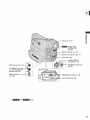
Wire|ess C.ontmlle_
F
WL-D80
o=
__
PHOTO
(DigitaJ effects) button
{_
START/STOP
(_
_ SELF T bu_ton (p 70)
TV SCREEN
{_
_7_ SEARCH
SELECT
12bit AUDIO
(p. 85)
FF I_
@
÷/lllbbutton
button
(p 86)
bu_ton (p. 37)
(p 38)
STOP II button
@
(p 98)
(p. 37}
× 2 bu_ton (p 38)
REMOTE
SET button (p 49)
(p 97)
@
SLOW
_)
REC PAUSE button (p 89)
@
AV _ DV button (p 93)
@
RE_
button (p 37}
@ AV INSERT
@
button
I_-button (p 38)
/'411 button (p 38)
(p 95}
DigiteJ effects ON/OFF
button (p. 61 }
PAUSE
@ _'_tNDEX
II bu*ton (p 38)
button*
@ Transmitter
@
SLIDE SHOW
Zoom
@
CARD
buttons (£. 30}
@ Controller
buttons
(p 44)
* l_'_l;_rr,1and _lir,,_l[_.l only
14
(p. 44}
buttons
@
button (p 85)
OUT button
button (p 44)
SET button
PLAY I_ bu*ton (p. 37)
(p 83)
DUB button
MENU
Search
button (p 134)
SET MEMORY
AUDIO
(p 61)
bu*ton (p. 28)
DATA CODE button
_8_ ZERO
@
button (p 55, t04)
D EFFECTS
(p 112}
button"
/+buttons*
(p. 112)
(p. 1tl)
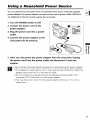
Using
a Household
Power
Source
You can operate the camcorder from a household power source using the suppEed
power adapter The power adapter converts current from a power outlet (100-240 V
4
AC, 50/60 Hz) to the DC current used by the camcorder.
1. Turn the POWER switch to OFE
2. Connect the power cord to the
power adapter.
3. Plug the power cord into a power
outlet.
4, Connect the power adapter to the
camcorder's DC IN terminal,
m
m
5, After
use, disconnect
the power
the power
cord from the power
adapter
outlet
from the camcorder,
and disconnect
Unplug
it from the
adapter.
H
0 Turn off the camcorder before connecting or disconnecting the power adapter.
0 If the adapter is used close to a T_, it may cause picture interference Move the
adapter away from the TV or the antenna cable
0 Do not connect any products that are not expressly recommended to the
camcorder's DC IN terminal or to the power adapter
0 You may hear some noise from the power adapter during use This is not a
malfunction
15
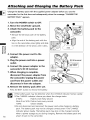
Attaching
F
and Charging
the Battery
Pack
Charge the battery pack with the supplied power adapter before you use the
camcorder for the first time and subsequently when the message "CHANGE THE
BATFERY PACK" appears,
1. Turn the POWER switch to OFE
2. Move the viewfinder
3. Attach
the battery
upward.
pack to the
camcorder.
• Remove the termh_al cover of the battery
pack.
• Align the end of the battery pack with the
line on the camcorder, press lightly and slide
m
it in the direction of the arrow until it clicks
4. Connect the power cord to the
adapter.
5. Plug the power cord into a power
outlet.
DC IN terminal
6. Connect the power adapter to the
camcorder's DC IN terminal.
7. When charging is complete,
disconnect the power adapter from
the camcorder. Unplug the power
cord from the power outlet and
disconnect it from the adapter.
CHARGEindicator
8. Remove the battery pack after use.
Pressthe BATTbutton to removethe battery
O The battery pack may be defective when the CHARGE indicator flashes rapidly
O The CHARGE indicator informs you about the charge status.
0-50%:
Flashesonce every second
More than 50%: Flashestwice every second
t00%:
Glows steadily
0 Do not disconnect and reconnect the power cord while charging a battery
pack. The battery pack may not be charged correctly even if the CHARGE
16
indicator glows steady. The battery pack may also not be charged correctly
when a power outage occurs during charging Remove the battery pack and
attach it back to the camcorder.
Below times
playback
Charging
Battery
are approximate
and vary according
to the charging,
recording
or
conditions,
Time
Pack
Charging
Time
BP÷508 (ZR65 MC/ZR60)
110 mlm
BP÷512 (ZR70 MC/optlonal)
120 mlm
BP÷511 (Optional)
120 mlm
BP÷522 (Optional)
210 mlm
BP÷535 (Optional)
310 mlm
• Charge the battery pack in temperatures between 4t ° F and 104° F (5° C and 40° C)
• A lithium ion battery pack can be charged at any charge state Unlike conventional
batter,/packs, you do not need to completely use or discharge it before charging
m
Recording
Battery
Time
Pack
Maximum
Recording
Time
UsingtheViewfincler Using the LCD
Typical
Recording
Time*
00
Pa
m
UsingtheViewfinder Using the LCD
BP_5O8
ZR65 MC/ZR60)
100 rain.
75 rain.
55 mln,
40 rain.
BP-512
(ZR70 MC/optlonal)
180 min.
140 mln,
95 mln,
75 min.
BP÷511 (Optional)
180 rain.
140 rain.
95 rain.
75 rain.
BP÷522 (Optional)
370 rain.
295 rain.
195 min.
155 rain.
BP÷535 (Optional)
590 min.
470 rain,
315 min.
250 rain.
* Approximate times for recording with repeated operations such as start/stop, zooming,
power on/off. Actual time may be shorter
• We recommend that you prepare batter,/packs 2 to 3 times longer than you think you
might need
• To conserve battery charge, turn off the camcorder instead of leaving it in record pause
mode
Playback Time
Battery Pack
Playback Time
BP÷508 (ZR65 MC/ZR60)
Using the LCD
70 min.
BP÷512 (ZR70 MC/optional)
125 min.
BP÷511 (Optional)
125 min.
BP÷522 (Optional)
250 min.
BP÷535 (Optional)
400 min.
17
The battery symbols indicate the charge status of the battery
F
pack.
When the battery pack is empty, "CHANGE THE 8ATI-ERY PACK"
appears for 4 seconds and 4--
starts flashing
The battery charge indicators are not constant - they vary
according to the condition under which battery pack and
camcorder are used.
8_e_
Pack H_ndli_g _¢¢_utiQns
DANGER!
Treat the battery
m
pack with care.
• Keep it away from fire (or it might explode.)
• Do not expose the battery pack to temperature
higher than 140° F (60° C). Do
not leave it near a heater or inside a car in hot weather.
• Do not try to disassemble or modify it.
• Do not drop or knock it.
• Do not get it wet.
O Charged battery packscontinue to discharge naturally. Therefore, charge them on
the day of use, or the day before, to ensure a full charge
O Attach the terminal cover whenever a battery pack is not in use. Contact to metallic
objects
may cause a short circuit and damage
the battery
pack.
O Dirty terminals may cause a poor contact between the battery pack and the
camcorder. Wipe the terminals with a soft cloth
C) Since storing a charged battery pack for a long time (about 1 year) can shorten its
lifecyde or affect performance, we recommend to discharge the battery pack fully
and to store it in a dry place at temperatures
no higher than 86 ° F (30 ° C). If you do
not use the battery pack for long periods, charge and discharge it fully at least once
a year. If you have more than 1 battery
pack, perform
these precautions
at the
same time for all battery packs.
O Although
the battery pack's operating temperature
range is from 32 ° F to 104_ F
(0 ° C to 40° C), the optimal range is from 50° F to 86° F (10_ C to 30_C) At cold
temperatures,
use.
performance
will temporarily
decline
Warm it in your pocket before
O Replace the battery pack if the usable time after full charge diminishes substantially
at normal temperatures.
18
Installing
the
Backup
Battery
The backup battery allows the camcorder to retain date, time and other camcorder
settings while the power source is disconnected
Power the camcorder from a
4
household power source or with a battery pack when replacing the backup battery.
1. Open the backup battery cover.
2. Insert the lithium battery with the
+ side facing outward.
'o
0
@
3. Close the cover.
+@@@m
WARNING!
• The battery used in this device may present a fire or chemical burn hazard if
mistreated. Do not recharge, disassemble, heat above 212 ° F (100 ° C) or
incinerate the battery.
• Replace the battery with a CR1616 made by Panasonic, Hitachi Maxell, Sony,
Toshiba, Varta or Renata Use of other batteries may present a risk of fire or
explosion
H
O Do not pick up the battery using tweezers or other metal tools as this will
cause a short circuit
O Wipe the battery with a clean dry cloth to ensure proper contact
O Keep the battery out of reach of children. If it is swallowed, seek medical
assistance immediately The battery case may break and the battery fluids may
damage stomach and intestines.
O Do not disassemble, heat or _mmerse the battery in water to avoid the risk of
explosion
The backup battery has a life span of about a year ¢v flashes to inform you that
it needs to be replaced
19
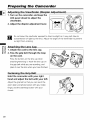
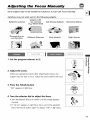
Preparing
_
Adjusting
the Camcorder
the Vi_wfind_[
1. Turn on the camcorder
(DiQp_[
Adjustment)
and keep the
viewfinder.
2. Adjust
H
the diopter
adjustment
lever.
Do
not leave the
viewfinder
to direct
may melt (due
to
concentration
of light
by the exposed
lens) Adiust
the sunlight
angle of as
theit viewfinder
to prevent
sunlight from entering,
=_._
=
1. Attach
the cord to the lens cap.
Pressthe buttons on the lens cap when
attaching/removing it Hook the lens cap on
the grip belt while you are recording, and
place it over the lens when you have finished
Faste nin g_the G[ip_Be!_
Hold the camcorder
with
your right
hand and adjust the belt with
your left.
Adjust the grip belt so that you can reach the
zoom lever and photo button with your index
finger; and the start/stop button with your
thumb
2O
Attach!rig _h_ 5h_uld_ Strap
For extra security and portability,
attach the shoulder strap before using the
camcorder.
Pass the ends through
the strap
and adjust
of the strap.
the length
mount
4
m
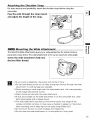
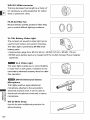
JEWel Moun_ing the _id_ A_hmen_
_ _,
The WA-3O.5 Wide Attachment gives you a wide perspective for indoor shots or
panoramic views (0.6×). The wide attachment is for use at maximum wide-angle.
_"_=
Screw the wide
the lens filter
H
attachment
fully
into
thread.
O If you zoom to telephoto, the picture will not be in focus
O Do not look directly at the sun or other strong light sources through the wide
attachment. It could damage your eyesight.
O When recording in wide angle with the wide attachment, the outer periphery
of the image may become curved
O Filters cannot be used with the wide attachment
O If dust accumulates on the wide attachment or on the camcorder lens, clean
both lenses gently with a blower brush.
O The wide attachment may obstruct the remote sensor (the range of the
wireless controller narrows), or may cause a shadow to appear on the picture
when recording with a video light or the assist lamp (White LED)
O Do not touch the lens to avoid smudges and fingerprints
O Do not store the wide attachment in a humid place as it may mold.
21
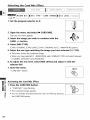
Loading
a Cassette
Use only videocassettes marked with the M_,_ logo,
Loading and UnA_ading ......................................................................................
1. Slide and hold the OPEN/EJECT
switch
and open the cassette
compartment
cover.
Tape
protection tab
The cassette compartment opens
automatically
2. Load/unload
the cassette.
• Load the cassette with the window facing
the grip belt and the REC/SAVEtab faring
upward
m
==._
• Unload the cassette by pulling it straight
out
3. Press the _
compartment
mark on the cassette
until it clicks.
Wait for the cassette compartment to retract
automatically
4. Close the cassette compartment
cover.
H
0 Do not interfere with the cassette compartment while it is opening or closing
automatically or attempt to close the cover until the cassette compartment has
fully retracted
0 Be careful not to get your fingers caught in the cassette compartment cover
0 If the camcorder is connected to a power souree, cassettes can be
loaded/unloaded even if the POWERswitch is set to OFE
0 Eq_flashes if no cassette is inserted when turning on the power (in CAMERA
and PLAY(VCR) mode)
0 With some types of tapes, the remaining tape display may not be accurate
22
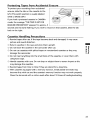
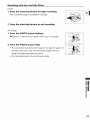
_[Qte¢/;ing ;rape_ frQm Accident!
E_sur_
To protect your recordings from accidental
4
erasure, slide the tab on the cassette to the
left. (This switch position is usually labeled
SAVE or ERASEOFR)
If you load a protected cassette in CAMERA
mode, the message "THE TAPE IS SETFOR
ERASUREPREVENTION" appears for approx. 4
seconds and _
starts flashing. If you wish to record on that cassette, slide the tab
back to the right
C) Rewind tapes after use. If the tape becomes slack and damaged, it may cause
picture and sound distortion.
m
C) Return cassettes in the case and store them upright.
C) Do not leave the cassette in the camcorder after use.
m
C) Do not use cassettes with spliced tapes or nonstandard
cassettes asthey may
damage the camcorder,
C) Do not insert anything into the small holes of the cassette, or cover them with
cellophane tape.
C) Handle cassettes with care. Do not drop or subject them to severe impact as this
may damage the cassettes.
C) Rewind tapes from time to time if they are stored for a long time.
C) With cassettes equipped with a memory function, metal plated terminals may
become dirty with use and the cassette's memory function may not work properly,
Clean the terminals with a cotton swab after about 10 times of loading/unloading.
23
Using
F
the
Wireless
Controller
You can operate the camcorder with the
supplied wireless controller from a distance of
up to 16 feet (5 m). Point it at the camcorder's
remote sensor when you press the buttons.
Following functions cannot be operated
without the wireless controller:
• Some special playback modes ([_] 38)
• Photo/date search ([Z[_85)
• Zero set memory ([_1 86)
• Analog line-in ([_L389)
• DV dubbing ([_] 90)
• AV Insert ([_] 94)
•-_
=_
• Audio dubbing ([_[_196)
0 The wireless controller may not work properly in bright places, such as
outdoors under direct sunflght, or when used too close to the camcorder
0 The operable range of the wireless controller may shorten when the
camcorder's remote sensor is exposed to strong light.
0 When the batteries run out, replace both at the same time
The wireless controller
operates with two AA batteries.
WL-D79
1. Open
the battery
2. Insert the batteries
3. Close the battery
24
WL-D_
cover.
following
cover.
the + and - markings.
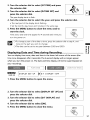
Setting
the Time Zone, Date and Time [] []
Set the time zone, date and time when you first start using your camcorder. Install the
backup battery before you begin ([_rl 19).
Setting the Time Zone!Day!ight
S_ing
L_m
_ime
ESYSTI IT,zO"E/0ST'''",Y
0
1. Press the MENU button
to open the menu.
MENU
m
2, Turn the selector dial to select [SYSTEM] and press
_
the selector dial.
m
_
3. Turn the selector dial to select [T.ZONE/DST]
and
press the selector dial.
• The time zone setting appears
• The default setting is New York Select your time zone and daylight saving time (DST)
setting if necessary
4, Turn the selector dial to select the setting
option that represents
your
time zone.
To adjust for daylight saving time, select the time zone with the _'( next to the area
5, Press the MENU button
to close the menu.
MENU
25
F
m
=_.__
No
Time zone
NO
Time zone
[]
LONDON
[]
WELLGTN
[]
PARIS
[]
SAMOA
[]
CAIRO
[]
HONOLU
(Honolulu)
[]
MOSCOW
[]
ANCHOR
(Anchorage)
[]
[]
DUBAI
KARACHI
[]
[]
LA (LosAngeles)
DENVER
[]
DACCA
[]
CHICAGO
[]
BANGKOK
[]
NY. (New York)
[]
H KONG (Honq Kong)
[]
CARACAS
[]
TOKYO
[]
RIO (Rio de JaJleko)
[]
SYDNEY
[]
FERNAN.
[]
SOLOMON
[]
AZORES
(Wellington)
(Femandode
Noronha)
0 Once you have set time zone, date and time, you do not need to reset the
dock each time you travel to another time zone Just set the time zone to the
one of your destination, and the camcorder automatically adjusts the clock
0 Days per month and leap years will be automatically adjusted
5eStiNg _h_ Date _Nd Iime
SET.,
MENU([_3
44)
[SYSTEM
1. Press the MENU button
I'l
D/TIME
.JAN,
12:00
1,2003
PM
I
to open the menu.
MENU
2&
2. Turn the selector dial to select [SYSTEM] and press
the selector dial.
3. Turn the selector dial to select [D/TIME
4
SET] and
press the selector dial.
The year display starts to flash.
4. Turn the selector dial to select the year, and press the selector dial.
• The next part of the display starts flashing.
• Set the month, day, hours and minutes in the same way.
5. Press the MENU button
to close the menu and to
MENU
start the clock.
Time zone, date and time appear for 4 seconds each time you
turn the power on
0 To change a part of the date or time, press the selector dial at step 4, and
move to the part you wish to change
O The date can be set to any year between 2003 and 2030.
_ at
m
DisplayjngDateand
Timeduring
Recording ........................
__
You can display time zone, date and time in the lower left corner of the screen (the
time zone disappears after 4 seconds).The 4-second display will no longer appear
when you turn the power on, The date and time display will nor be superimposed on
your recordings.
1. Press the MENU button
to open the menu.
MENU
2. Turn the selector dial to select [DISPLAYSET UP] and
press the selector dial.
3. Turn the selector dial to select [D/T DISPLAY]and
press the selector dial.
4. Turn the selector dial to select [ON].
5. Pressthe MENU button to close the menu.
MENU
27
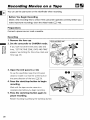
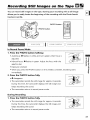
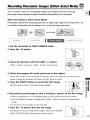
Recording
F
Movies
on a Tape
You can use the LCD screen or the vie_inder
[]
[]
when recording,
Before You Begin Recording
Make a test recording first to check if the camcorder operates correctly. Before you
make important
recordings, clean the video heads (_[_ 142).
Preparations
Connect a power source Load a cassette.
1. Remove the lens cap.
2. Set the camcorder
=_._
ZRTOMC/ZR65MC
to CAMERA
mode.
If you have not set the time zone, date and
_
time, "SET THE TIME ZONE, DATEAND TIME"
_
appears SeeSetting the Time Zone, Date and
Time([_] 25).
3. Open
the LCD panel (_
32).
To use the viewfinder, keep the LCD panel
closed or rotate it so that the screen faces in
the same direction of the lens ([Zl 33)
4. Press the start/stop
button
to begin
recording.
Wait until the tape counter came to a
complete stop before you begin recording
5. Press the start/stop
button
again to
pause recording.
Restart recording by pressing the start!stop button
28
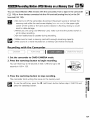
1. Turn the POWER switch to OFE
4
2. Close the LCD panel.
3. Replace the lens cap.
4. Unload
the cassette.
5. Disconnect
H
the power
source.
When recording outdoors or through a window, do not leave LCD screen,
viewfinder or lens exposed to direct sunlight as it may cause damage
O Turn the power off if you do not intend to use the camcorder for a longer
time,
O The camcorder will shut off after 5 minutes when left in record pause mode to
protect tape and video heads, To continue recording, turn the POWERswitch
to OFFand then back to CAMERA,
O For when to use the EL1(Easy Recording) or _ (program AE) mode, see Using
the Recording Programs (_3 57)
O When you do not remove the cassette, you can record the next scene without
m
producing any noise or blank sections between the recordings even if you turn
the camcorder off
O About the built-in microphone: When recording near loud sounds (such as
fireworks, drums or concerts), sound may become distorted or may be
recorded not in the actual sound level
O For extra recording time, see Changing the Recording Mode ([Z] 54),
29
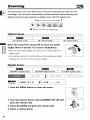
Zooming
F
[] []
The camcorder's zoom lens allows you to choose the best picture angle for your
recordings. The camcorder automatically
switches between optical zooming and
digital zooming, Image resolution is slightly lower with the digital zoom,
Zoomin
W
' T
i
Zoom out
Qp_i¢_! Za_m
| _',I;T._O
22× optical
Move
=_.-_ angle).
zoom
20× optical
the zoom lever toward
Move
it toward
zoom
18x optical
zoom
W to zoom out (wide-
T to zoom in (telephoto).
_ • Pressthe zoom lever slightly for a slow zoom Pressharder for a
=_
faster zoom
• You can also use the T and W buttons on the wireless controller
Howeve+;you cannot control the zoom speed
_ig_|
Zoom
88xj440×
digital
zoom
80x/400x
digital
zoom
72x/360x
digital
zoom
i0,°,,,s,,
+ l+[0.z00°
........
80x
1. Press the MENU button
to open the menu.
MENU
2. Turn the selector
dial to select [CAMERA SET UP] and
press the selector dial.
3. Select [D.ZOOM]
and press the selector dial.
4. Select a setting option.
3O
&+
5. Press the MENU button
to close the menu.
MENU
4
O Keep at least 328 ft. (lm) to the subject At wide-angle, you can focus on a
subject as close as 039 in. (Icm)
O A zoom indicator appears for 4 seconds It extends in light blue when the
digital zoom is set to 88x/80x/72x, and extends further in dark blue when set
to 440x/400x/360×.
O Digital zoom cannot be used in the Night mode and Super Night/ZR70 MC)
mode.
O Digital zoom cannot be used when the multiqmage screen is selected
O I_F_t_l_ _rff&_l Because the image stabilizer cannot be used in CARD
CAMERA mode, we recommend mounting the camcorder on a tripod at large
magnifications
m
31
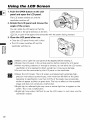
Using
F
the
LCD Screen
1. Push the OPEN button
at the LCD
panel and open the LCD panel.
The LCD screen switches on and tile
viewfinder switches off
2. Rotate the LCD panel and choose the
angle of the screen.
You can rotate the LCD panel so that tile
screen faces in the same direction as the lens
([_] 33), or push it flat against the camcorder with the screen facing outward
3. Close the LCD panel after use.
• Close the LCD panel firmly until it clicks
• The LCD screen switches off and the
m
=_.__
viewfinder switches on.
O Make sure to open the LCD panel at 90 degrees before rotating it.
O Rotate the LCD panel in the vertical position before closing the LCD panel
O When recording outdoors or through a window, do not leave the LCD screen,
viewfinder or lens exposed to direct sunlight as it may cause damage
O Do not hold the camcorder by the LCD panel or the viewflnder
H
O About the LCD Screen: The LCD screen is produced with extremely highprecision manufacturing techniques, with more than 9999% of the pixels
operating to specification Lessthan 001% of the pixels may occasionally
misfire or appear as black or green dots. This has no effect on the recorded
image and does not constitute a malfunction
O Bright light or reflected light may cause a vertical light bar to appear on the
screen This is not a malfunction
O Bright light may make it difficult to use the LCD screen In such case, use the
wewfinder instead
32
4
1. Press the MENU button
to open the menu.
MENU
2. Turn the selector dial to select [DISPLAY SET UP] and
press the selector dial.
t
J_/
3. Turn the selector dial to select [BRIGHTNESS]
press the selector dial.
and
_
_
m
4. Turn the selector dial and adjust the level.
Turn the selector dial up to make the screen brighter and down to make it darke_:
5. Press the MENU button
m
to close the menu.
MENU
Changing the brightness of the LCD screen does not affect that of the viewfinder
or the recordings
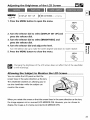
A!Jowi_g t_h_5_bj_c_ to M_0jto[
the LeD Screen
You can rotate the LCD panel so that the
screen faces in the same direction asthe lens.
The viewfinder
switches on allowing you to
use the viewfinder while the subject can
monitor the screen.
When you rotate the screen so that the screen faces in the same direction as the lens,
the image appears mirror reversed (LCD MIRROR ON). However, you can choose to
display the image as it is being recorded (LCD MIRROR OFF)
33
iii /_._i_'i_ i_!,_"
MENU(_
44)
IOlSPLAY SET UP
/_!i.,l_
ii
I)_ILCDMIR_OR..0N
1. Pressthe MENU button to open the menu.
2. Turn the selector dial to select ]DISPLAYSETUP] and pressthe selector
dial.
3. Turn the selector dial to select [LCD MIRROR] and press the selector dial.
4. Turn the selector dial to select [OFF].
5. Pressthe MENU button to close the menu.
When [LCD MIRROR] is set to [ON], most screen displays appear mirror reversed
m
34
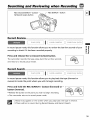
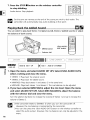
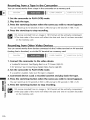
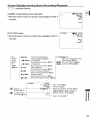
Searching
and Reviewing
when Recording
REC(record) SEARCH- button/
Recordreview button
_:_
[]
RECSEARCH+ button
4
D
RecoEd R_ie_
m
In record pause mode, this function allows you to review the last few seconds of your
recording to check if it has been recorded properly_
Press and release the _
(record review)
button.
The camcorder rewinds the tape, plays back the last few seconds,
and returns to record _ausemode
In record pause mode, this function allows you to play back the tape (forward or
reverse) to locate the point where you wish to begin recording.
Press and hold the REC SEARCH + button
button
(forward)
or -
(reverse).
• Releasethe button at the point you wish to begin recording
• The camcorder returns to record pause mode
O Noise may appear on the screen when you play back the tape in reverse
O There will be no sound during Record Review and Record Search
35
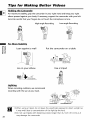
Tips for Making
F
Better
Videos
For maximum stability, grip the camcorder in your right hand and keep your right
elbow pressed against your body If necessary, support the camcorder with your left
hand Be careful that your fingers do not touch the microphone or lens,
High-angle Recording
Low-angle Recording
Eo_ M_mS_abilit_
"= _
Lean against
a wall
Put the camcorder on a table
f
Lie on your elbow
Use a tripod
_gh_i_g
When recording outdoors, we recommend
recording with the sun at your back,
H
36
O When using a tripod, do not leave the viewfinder exposed to direct sunlight as
it may melt (due to concentration of the light by the lens)
O Do not use tripods with fastening screws longer than 02 inch (5.5 mm) as it
may damage the camcorder
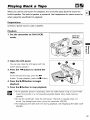
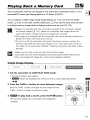
Playing
Back
a Tape
[] []
When you use the LCD screen for playback, the camcorder plays back the sound via
built-in speaker_ The built-in speaker is monaural
Use headphones for stereo sound or
4
when using the viewfinder for playback.
Connect a power source. Load a cassette.
1. Set the camcorder
to PLAY (VCR)
ZR70MC/
zR65MC
mode.
m
00
m
2. Open the LCD panel.
You can also close the LCD panel with the
.....
screen facing outward
3. Press the 4_1 button
to rewind
the
tape.
TOfast forwad the tape, press the I_1_
button To stop playback, press the • button.
4. Press the I_/11 button
to begin
playback.
5. Press the • button
to stop playback.
O If the playback picture is distorted, clean the video heads using a Canon Head
Cleaning Cassette or a commercially available digital video head-cleaning
cassette
O To use the viewfinder, close the LCD panel. The built-in speaker does not
sound Use headphones when using the viewfinder ([:.]::139)
O For displaying the date and time during playback, see Displaying the Data Code
(_3 83).
37
Sg_¢_al _!_yback M_d_
Special playback modes (except of playback pause and fast/rewind
playback) can only
be operated with the wireless controller.
b/ll
(Playback
Pause)
To pause playback, pressthe •/11 button. Pressthe •/11 button to resume playback.
The camcorder goes into stop mode after 5 minutes in playback pause mode
8.__
=
••
(Fast Forward
Playback)
/ _
(Rewind
Playback)
=_ Plays back the tape at 9.5 times normal speed (forward
or reverse). Press and hold the
button during normal playback or fast forward.
+/lll_
(Frame Advance)
Plays back frame-by-frame.
/ -/_111
(Frame
Reverse)
Press the button repeatedly during playback pause Press
and hold it to play back continuous frame advance/frame reverse.
SLOW Ib (Slow
Forward)/(Slow
Reverse)
Plays back at about 1/3 normal speed. For slow forward playback, pressthe SLOW I_
button. For slow reverse playback, press the -/41
button followed
by the SLOW I_
button. Pressthe • (play) button to return to normal playback.
-/411
(Reverse
Playback)
Plays back in reverse at normal speed. Pressthe button during normal playback. Press
the • (play) button return to normal playback. The camcorder goes into stop mode
after 5 minutes in reverse playback pause.
× 2 (Forwardx
2 Playback)/(Reverse
2x Playback)
Plays back at 2 times normal speed Pressthe button during normal or reverse
playback. Pressthe • (play) button return to normal playback.
O There is no sound during special playback
O The picture may become distorted during some special playback modes.
38
_M
4
_ (phones)terminal
L<
ENUbutton
Selector dial .....
H
When
built-in
makemake
sure that
"_" "_"
is notisdisplayed
the
screen using
Whenthe
using
the speaker;
headphones,
sure that
displayed on
Change
the setting as necessary following the procedure below
MENU([_
44)
[VCR SET UP
I)_IAV/PHONES.,,AV
_'_
1. Pressthe MENU button to open the menu.
MENU
2. Turn the selector dial to select [VCR SET UP] and
press the selector dial.
3. Turn the selector dial to select [AV/PHONES]
and
press the selector dial.
4. Turn the selector dial to select [AV] or [PHONES _].
5. Press the MENU button
to close the menu.
MENU
H
O The built-in speaker does not sound when "_" is displayed
O Do not connect headphones unless "_" is displayed as it produces noise
O The built-in speaker is monaural Use headphones for stereo sound
O The built-in speaker turns off when the camcorder is set to a mode other than
the PLAY (VCR) mode or when you use the headphones
39
F
*Headphone
volume only.
Turn the selector
down to lower
dial up to increase the volume,
and
the volume.
_..
• A volume bar appears for 4 seconds
• You can turn off the volume completely by turning the selector
dial down until OFFappears Turn the selector dial up to increasethe volume again
0 Sound may become distorted when the volume is turned up too high.
0 The headphone volume can be adjusted in all operating modes.
0 The camcorder retains the setting even if you turn it off (separately for
headphones and builtdn speaker)
m
4O
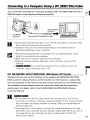
Playing
Back
on a TV Screen
You can connect the camcorder to a TV or VCRto play back your recordings on a "R/
screen,
H
O Make sure that "O" is not displayed on the screen If "O" is displayed, change
the setting ([_[_ 39)
O When you use the TV as a monitor during recording, keep the TV volume
turned down as long as the camcorder's audio terminals are connected. An
unpleasant high-pitched squeal, called feedback, may be produced if sound
from the TV speakers is picked up by the microphone
O For high picture quality, we recommend using a TV with an S ($1) terminal
O TVs with Sl-terminal or Video ID-1 system: Recordings made in the 16:9 mode
([_3 52) will be automatically played back in wide screen mode
m
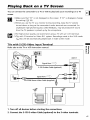
I_, _i_h 5 (51) _ideQ ]npu_Te_mina!
Refer also to the TV or VCR instruction manual.
m
INPUT
STV-250NStereoVideo Cable (supplied) A
1. Turn off all devices before starting
I
the connections.
2. Connect the S-150 S-video Cable (optional)
to the S-video terminals.
41
3. Connect the STV-2SON Stereo Video Cable to the camcorder's
terminal
F
and the audio terminals
AV
of the TV/VCR.
Connect the white plug to the white AUDIO terminal L (left), and the red plug to the
red AUDIO terminal R (right) Do not connect the yellow plug
4. If connecting
to a "iV, set the input selector to VIDEO.
If connecting
to a
VCR, set the input selector to LINE.
_.S_vJt h_Au_ ia/_ide_ XermJna
Refer also to the TV or VCR instruction manual,
m
==.__
,,_
_'J
Signalflow E_
__
STV-250NStereoVideo Cable (supplied)
1, Turn off all devices before
starting
I
I
the connections.
2, Connect the STV-2SON Stereo Video Cable to the camcorder's
terminal
and the audio/video
terminals
AV
on the TV/VCR,
Connect the white plug to the white audio terminal L (left), tile red plug to the red
audio terminal R (right) and the yellow plug to the yellow video terminal VIDEO.
3. If connecting
to a "iV, set the input
VCR, set the input selector to LINE.
42
selector to VIDEO.
If connecting
to a
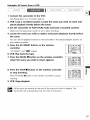
You can select the output channels when playing back a tape with audio recorded on
4
two channels,
MENU(_I
44)
[AUDtO
SETUP
1. Press the MENU button
I_IOUTPIJTCH*_*_./R
to open the menu.
2. Turn the selector dial to select [AUDIO
MENU
SET UP] and
press the selector dial.
m
3. Turn the selector dial to select [OUTPUT CH] and
press the selector dial.
4. Turn the selector dial to select a setting
option.
• L/R:Stereo: L+R channels, Bilingual: Main+Sub.
• L/L: Stereo: L channel, Bilingual: Main.
• R/R:Stereo: R channel, Bilingual: Sub
5. Press the MENU button
to close the menu.
MENU
The setting resets to the L/R setting when you turn the camcorder off
43
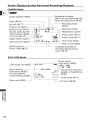
Menus
F
and Settings
[] []
Many of the camcorder's advanced functions are selected from menus that appear on
the screen,
Selecting
Menus and 5e_ings
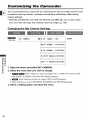
1. Set the camcorder
to the correct operating
mode.
ZR70MC/ZR65MC:
2. Press the MENU button
to open the menu.
MENU
m
_
=_
= "5
3. Turn the selector
and press
the selector dial.
4. Turn the selector
=_
dial to select a submenu
dial to select a menu item and
press the selector dial.
5. Turn the selector
dial to select a setting
6. Press the MENU button
option.
to close the menu.
When setting the white balance or shutter speed, press the
MENU
selector dial first before pressing the MENU button.
0 Pressing the MENU button at any time doses the menu.
0 Selecting [_, RETURN]takes you back one level.
0 Items that are not available appear in purple
0 You may find it more convenient to use the wireless controller to operate the
menu. Press the MENU button on the wireless controller to open or close the
menu. Use the arrow keys in place of the selector dial and press the SETbutton
in place of pressing the selector dial.
44
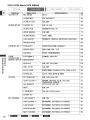
M_nu _nd D_fau!_ 5_,ti_g_
Default
CAMERA
settings
Menu
Submenu
=_ CARD MiX *2
are shown
(CAM.
in boldface.
MENU)
Menu Item
MIX TYPE
ANIMAT.
Setting Options
CARD CHROMA, CARD LUMI.,
CAM. CHROMA, C. ANIMATION
CORNER, STRAIGHT, RANDOM
TYPE
123
MIX LEVEL
CAMERA SET UP
122
SHUTTER
AUTO, I16_ I1100, I125_ I1500, I11000,
112000
zRTo
MC
VCR SET UP
AUDIO SET UP
DISPLAY SET UP
;YSTEM
ZR6SMC
78
30
IMAGE S. (_a})
ON, OFF
16:9
WHITE 8AL.
ON_ OFF
AUTO, SET _,,
REC MODE
SP, LP
54
AV/PHONES
AV, PHONES_
39
WIND SCREEN
ON, OFF
71
AUDIO MODE
16bit, 12bit
71
69
INDOOR ;_', OUTDOOR
52
80
33
BRIGHTNESS
LCD MIRROR
ON, OFF
"iV SCREEN
ON, OFF
134
D/T DISPLAY
ON, OFF
27
DEMO MODE
ON, OFF
53
ON, PUSH ON, OFF
51
GREEN, ORANGE, BLUE, YELLOW,
TURQUOISE, PURPLE
_31, _32, OFF (L(_
51
WL. REMOTE
8EEP
ON, OFF
52
T.ZONE/DST
See list of time zones
25
8UTTONUGHT
.1
LIGHT COLOR -1
D/TIME SET
MY CAMERA
ZR60
FE,. ,4°0xIoEE,
80x,°00xIoFE,,Z
D. ZOOM
o_,,_
_"
49
26
S-UP IMAGE *3
ON, OFF
50
SHTR SOUND *2
PATTERN1, PATTERN2, PATTERN3
SO
S-UP SOUND
PATTERN1, PATTERN2, PATTERN3
SO
S/STOP SOUND
PATTERN1, PATTERN2, PATTERN3
SO
SELF-T SOUND
PATTERN1, PATTERN2, PATTERN3
SO
45
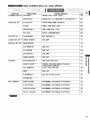
PLAY (VCR)
F
Menu
Submenu
VCR SET UP
AUDIO SET UP
(VCR
MENU)
Menu Item
REC MODE
SP, LP
Setting Options
[_3
54
AV/PHONES
AV, PHONES _
39
AV =_ DV OUT
ON, OFF
93
OUTPUT CH
L/R, L/L, R/R
43
AUDIO DUB.
AUDIO IN, MIC. IN
97
WIND SCREEN
ON, OFF
71
AUDIO MODE
16bit, 12bit
12bit AUDIO
STEREO1, STEREO2, MIX/FIXED,
71
MIX/VARL
MIX BALANCE
CARD SET UP *2
m
CARD
OPERATIONS *2
DISPLAY SET UP
=_
.,=_
c
SYSTEM
98
SI QUALITY
SUPER FINE, FINE, NORMAL
101
MOVIE SIZE *_
320 x 240_ 160 × 120
102
FILE NOS.
RESET,CONTINUOUS
103
COPY _[_
CANCEL, EXECUTE
126
BRIGHTNESS
33
DISPLAYS
ON, OFF <PLAYBK>
134
6SEC. DATE
ON, OFF
84
DATA CODE
DATE/TIME,
D/TIME SEL.
DATE, TIME, DATE & TIME
84
BUTTONLIGHT .1
ON, PUSH ON, OFF
51
LIGHT COLOR *_
51
WL. REMOTE
GREEN, ORANGE, BLUE, YELLOW,
TURQUOISE, PURPLE
_31, _32, OFF (L(_3
49
BEEP
ON, OFF
52
T.ZONE/DST
See list of time zones
25
CAMERA DATA, CAM. & D/T
D/TIME SET
MY CAMERA
46
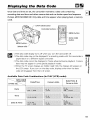
.1 _'_r¢l,
.2 _
98
84
26
S-UP IMAGE*3
ON, OFF
S0
SHTR SOUND *2
PATTERN1, PATTERN2, PATTERN3
50
S-UP SOUND
PATTERN1, PATTERN2, PATTERN3
50
S/STOP SOUND
PATTERN1, PATTERN2, PATTERN3
S0
SELF-T SOUND
PATTERN1, PATTERN2, PATTERN3
S0
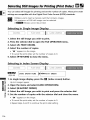
and _,
*3
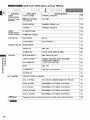
_CARD
CAMERA
Menu (C. CAM.
MENU)
............................................................
...................
Submenu
CAMERA SET UP
CARD SET UP
VCR SET UP
Menu Item
SHUTTER
Setting Options
AUTO, 1/60, I/I00, 1/250
78
WHITE BAL.
AUTO, SET _,
80
SI QUALITY
SUPER FINE, FINE, NORMAL
101
SI SIZE
1024 × 768, 640 x 480
101
MOVIE S_ZE*_
320 x 240, 160 × 120
102
FILE NOS.
RESET,CONTINUOUS
103
AV/PHONES
AV, PHONES {,_
39
ON, OFF
71
AUDIO SET UP *_ WIND SCREEN
DISPLAY SET UP
iYSTEM
INDOOR _', OUTDOOR
BRIGHTNESS
33
LCD MFRROR
ON, OFF
34
TV SCREEN
ON, OFF
134
D/T DISPLAY
ON, OFF
27
DEMO MODE
ON, OFF
53
8UTTONUGHT
.1
ON, PUSH ON, OFF
GREEN, ORANGE, BLUE, YELLOW_
TURQUOISE, PURPLE
_31, _32, OFF _(_J
5_
WL. REMOTE
SEEP
ON, OFF
52
T.ZONE/DST
See list of time zones
25
LIGHT COLOR *_
D/TIME SET
MY CAMERA
_ g
49
_
26
SHTR SOUND
PATTERN1, PATTERN2, PATTERN3
5O
S-UP SOUND
PATTERN1, PATTERN2, PATTERN3
5O
S/STOP SOUND
PATTERN1, PATTERN2, PATTERN3
5O
SELF-T. SOUND
PATTERN1, PATTERN2, PATTERN3
50
,t7
_CARD
PLAY (VCR)
Menu
(C.PLAY
MENU)
m
F
I
Submenu
CARD
OPERATIONS
Sin le Image
Setting
CANCEL, EXECUTE
_PRINT ORDERS
ALL ERASE
YES, NO
117
iMAGE ERASE
CANCEl-, SINGLE, ALL
115
FORMAT
CANCEl-, EXECUTE
128
Options
114
CARD
OPERATIONS
index Screen)
_PRINT
VCR SET UP
REC MODE
SP, LP
54
AV/PHONES
AV, PHONES
39
DISPLAY SET UP
m
Menu item
COPY_
SYSTEM
PROTECT O'.i
ORDER
116
33
BRIGHTNESS
DISPLAYS
ON, OFF
134
D/TIME SEL
DATE, TIME, DATE & TIME
BUTTONLIGHT *$
ON, PUSH ON, OFF
51
LIGHT COLOR .1
GREEN, ORANGE, BLUE, YELLOW,
TURQUOISE, PURPLE
51
WL REMOTE
c
49
BEEP
ON, OFF
52
T.ZONE/DST
See list of time zones
25
D/TIME SET
_Y CAMERA
_PRINT
48
26
_3o
CREATE START-UP iMAGE
SEL S-UP IMG
NO iMAGE, CANON LOGO, MY iMAGE
5O
SHTR SOUND
PATTERN1, PATTERN2, PATTERN3
50
S-UP SOUND
PATTERN1, PATTERN2, PATTERN3
50
S/STOP SOUND
PATTERN1, PATTERN2, PATTERN3
50
SELF-T SOUND
PATTERN1, PATTERN2, PATTERN3
Appears
when connecting
a printer
with direct
print function.
50
118
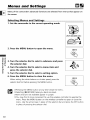
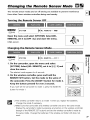
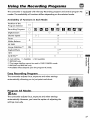
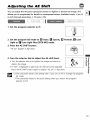
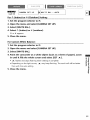
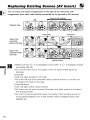
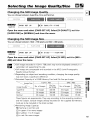
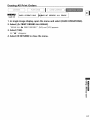
Changing
the Remote
Sensor
Mode
[] []
Two remote sensor modes and an off setting are available to prevent interference
from other Canon wireless controllers being used nearby.
Turning the Remote 5_ns_ Qff
,,,u EsysT ° 0 °oTE...,Ol
(_[344)
Open the menu and select [SYSTEM].
Select [WL
REMOTE], set it to [OFF (l_(_] and close the menu.
[(I,(_]] appears
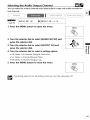
Changing
th_ RemQt_ 5_
sYsT ° 0 °oTE...
0Ol
_
MENU
M_d_
r
]1
1. On the camcorder,
[SYSTEM].
open the menu and select
Select [WL REMOTE], set it to [(_(Z) 2] and
m
c
close the menu.
The selected mode appears for 4 seconds.
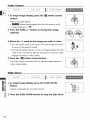
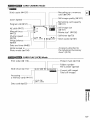
2. On the wireless controller, press and hold the
REMOTE SET button. Set the mode to the same of
the camcorder.
Keep the button
Press the ZOOM
T button
for mode 2.
pressed for over 2 seconds.
If you have set the camcorder to mode 1, press the ZOOM W
button for mode 1
0 The wireless controller returns to mode t when you replace the batteries
Change the mode if necessary
0 Make sure that camcorder and wireless controller are set to the same mode
Display the camcorder's mode by pressing any button on the wireless controller
(except of the REMOTE SETbutton) and set the wireless controller's mode to
the same mode Change the batteries if the wireless controller still does not
work.
49
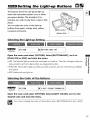
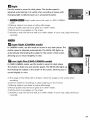
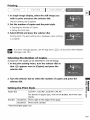
Customizing
F
the
Camcorder
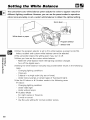
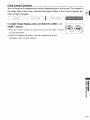
You can personalize your camcorder by customizing the start-up image and the sound
it makes for start-up, shutter*, start/stop and self-timer (collectively called the My
Camera settings).
* ZR70 MC and ZR65 MC only. With the ZR70 MC and ZR65 MC, you can also create
your own start-up image. See Creating a 5tart-up Image (_[_ 130).
MENU
(_3 44)
CAMERA
J_IS-UP
IMAGE. • ,ON
(ZR60)
SHTR SOUND, • .PATTERN1
S-UP
m
=_
1. Open
S/STOP
SOUND,PATTERN1
SELF-T
SOUND,PATTERN1
the menu and select [MY CAMERA].
2. Select the menu
• _
SOUND, • ,PATTERN1
_
item you wish to change.
When selecting a start-up image (only in CARD PLAY(VCR) mode):
INO IMAGE], ]CANON LOGO] and [MY IMAGE] appears
• _
When selecting a start-up image: IOFF]and ION] appears
• When selecting a sound: [PATTERN1],[PATTERN2]and [PATTERN3]appear
3, Select a setting option
50
and close the menu.
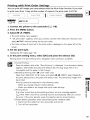
_Setting
the Light.up
Buttons
[] []
4
The buttons above the LCD panel light up
when the camcorder's power is on, or when
you press a button. This is helpful if, for
example, you wish to play back a tape in dark
places.
You can select the color of the light-up
buttons from green, orange, blue, yellow,
MENU button
turquoise and purple.
Selector dial
S_l_cting _
Light-up
Setting
Open the menu and select [SYSTEM].
Select [BUTTONLIGHT],
set it to
[PUSH ON] or [OFF] and close the menu.
o
• ON: The buttons light up while the camcorder is turned on The color cl_angeswhen you
_"
press a button and turns back when you release the button
• PUSHON: The buttons light up when you press a button and turn off when you release
_
m
_f_
=
the button.
• OFF:Buttons do not light up
Se!_cting the _!_
_of_th_Bu_tt_o_
Open the menu and select [SYSTEM].
desired
Select [LIGHT COLOR], set it to the
color and close the menu.
You cannot change the color of the buttons when [BUTFONLIGHT] is set to [OFF]
51
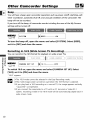
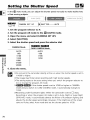
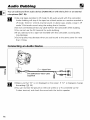
Other
F
Camcorder
Settings
[]
[]
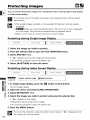
You will hear a beep upon camcorder operations such as power on/off, start/stop, selftimer countdown,
automatic shut-off, and unusual conditions of the camcorder. The
beep will not be recorded.
If you turn off the beep, all camcorder sounds including the ones of the My Camera
settings will be turned off.
TO turn the beep off, open the menu and select [SYSTEM].
Select [BEEP],
set it to [OFF[ and close the menu.
You can record in the 16:9 format for playback on wide screen TVs.
......................
i ......................
[o,o,,,s,tup
I EI,
........
Oo,,
TO switch
16:9 on, open the menu and select [CAMERA
SET UP]. Select
[16:9], set it to [ON] and close the menu.
"16:9" appears
O The t6:9 mode cannot be selected in the Easy Recording mode
O The multi-image screen cannot be used when the 16:9 format ls selected
C) If you play back a 16:9 recording on a normal T_, the image appears vertically
"squashed" (compressed)
C) If you connect the camcorder to a TV with an $1 terminal or Video ID-1
system, recordings made in the 16:9 mode will be automatically played back ._
wide screen mode
52
The demonstration
automatically
mode displays the camcorder's main features
when you leave the camcorder turned on without
(ZR70 MC/ZR65 MC: and without
inserting a memory card) for more than 5 minutes.
You can also start the demonstration
......?
MENU(c3
44)
With
menu
101spLAy SET UP
no cassette
It starts
loading a cassette
4
mode through the menu,
.....
I'>10EMO aODE..*0N
(ZR70 MC/ZR65
MC: and memory
and select [DISPLAY SET UP]. Select [DEMO
card) inserted,
MODE],
open the
set it to [OFF]
and close the menu.
To cancel the demo mode, press any button, turn off the camcorder, load a cassette
(ZR70 MC/ZR65 MC: or insert a memory card).
o_
m
c
53
Changing
the Recording
Mode (SP/LP) [] []
You can choose from SP(standard play) and LP (long play). LP extends the tape usage
by 15 times,
H
O Tapesrecorded
insert ([._1 94). in LP mode cannot be used for audio dubbing ([:]_196) or AV
O Depending on the nature and usage condition of the tape, picture and sound
recorded in LP mode may be distorted We recommend using the SP mode for
important recordings
0 We recommend recording in SPmode if you plan to transfer the images to a
computer.
0 If you record in both SPand LP modes on the same tape, the playback picture
may become distorted and the time code may not be written correctly
0 If you play back a tape that has been recorded in LP mode with another digital
device on this camcorder, or wce versa, picture and sound may become
distorted
MENU
(_ 44)
m
t
IL
TO change to LP mode, open the menu
=_
.,=_
C
54
[REC MODE],
and select [VCR SET UP]. Select
set it to [LP] and close the menu.
Recording
Still
Images
on the Tape [] []
You can record still images on the tape, Starting your recording with a still image
allows you to easily locate the beginning of the recording with the Photo Search
function ([_] 85)
PHOTO
buttonPHOTO
bud°n-"
In Record Pause Mode
1, Press the PHOTO
button
halfway.
• Autofocus: 0 flashes in white and turns green when focus is
adjusted
• Manual focus: 0 flashes in green Adjust the focus with the
selector dial
• Exposure is locked
C
• When you press the PHOTObutton on the wireless controllers recording starts
immediatel_z
2, Press the PHOTO
button
a
fully.
• 0 disappears
_J_/
• The
camcorder
the still image
for the
approx
6 seconds
During
this time,records
the camcorder
displays
still image
and
_._"
keeps recording the sound
• The camcorder returns to record pause mode
_ff.,.!_..R
_o..,_.!_
........................................................................
1, Press the PHOTO
button
fully.
• The camcorder records the still image for approx 6 seconds
During this time, the camcorder displays the still image and
keeps recording the sound
_/
_(_3_i"
• The camcorder returns to record pause mode
55
0 When you turn the POWERswitch to OFFwhile the camcorder is recording the
F
m
=_
.,=._
C
56
still image, it will not turn off until recording is complete
0 Record still images under suffident lighting condition (in which you can identify
the subject on the screen).
0 If a subject is unsuitable for autofocus, 0 continues to flash Keep the PHOTO
button pressed halfway and adiust the focus with the selector dial
Using
the Recording
The camcorder
modes.
is equipped
The availability
with
Programs
the Easy Recording
of functions
differs
depending
program
[]
and several
on the selected
program
AE
mode
Availability of Functions in Each Mode:
Position
of the
Program
Selector
C_
ecordiogPro0ram
o IsloI I Io
Digital
Zoom
Shutter
O
Speed
O
O
I
A
Focus
O
A
White
Balance
O
©
AE Shift
Image
Stabilizer
Digital
Effects
.2
ON
©
×
16:9
×
Card Mix *_
×
I
×
I
×
O .4
©
O
I
A: Auto setting
"I
*2
*3
*4
O: Available
x: Not available
ZR70 MC only.
The image stabilizer cannot be used in CARD CAMERA mode.
ZR70 MC and ZR65 MC only.
Available effects depend upon the program AE mode.
E_y
C
R_¢ordJ_g P_og_m
The camcorder
automatically,
adjusts
allowing
focus, exposure
and other
you to just point
settings
and shoot.
The camcorder adjusts focus, exposure and other settings
automatically.
However, you have the option of adjusting the
settings manually,
57
Use this mode to record sports scenes (such astennis or golf),
moving objects (such as roller coasters) or when recording from a
moving car.
O This mode is set at a high shutter speed and should therefore be used in suffident
fight
O This mode is mainly intended for frame-by-frame or slow playback. The picture may
not appear smooth when played back in normal speed
Use this mode to give accent to your subject by blurring the
background or foreground.
O The blur effect increases the more you zoom to telephoto.
O This mode is set at a higher shutter speed The picture may not
appear smooth when played back
_ _p_Uight
_
Use this mode to record spotlit scenes such as shows, recitals or
fireworks
Use this mode in bright places such as a sunny beach or ski resort. It
prevents the subject from being underexposed
O The subject may become overexposed in dark surroundings Check
the image on the screen.
O This mode is set at a higher shutter speed The picture may not appear smooth when
played back.
Use this mode to record in dimly lit places. The shutter is fixed at a
slow shutter speed.
O Moving subiects may leave a trailing afterimage
O Picture quality may not be as good as in other modes
O The camcorder may have difficulty to focus automatically
58
Usethis mode to record in dark places. The shutter speed is
adjusted automatically.
It is useful when recording in places with
changing light conditions (such as in amusement parks)
C) _
mode
_
4
Night mode cannot be used in CARD CAMERA
C) Moving subjects may leave a trailing afterimage
O Picture quality may not be as good as in other modes
O White points may appear on the screen
O Autofocus may not work as well as in other modes. In such case, adjust the focus
manually
In CAMERA mode, use this mode to record in very dark places. The
shutter speed is adjusted automatically. The White LED lights up
automatically
illuminating
the subject in the center of the screen,
allowing you to record brightly in color.
In CARD CAMERA mode, use this mode to record in dark places.
=__
The shutter is fixed at a slow shutter speed. The White LED lights up
illuminating
the subject in the center of the screen, allowing you to
record brightly in color.
O The range of the White LED is limited Check the image on the screen when
recording.
O Use this mode for recordings at close range (up to 66 ft (2m))
O Moving subjects may leave a trailing afterimage
O Picture quality may not be as good as in other modes
O White points may appear on the screen
O Autofocus may not work as well as in other modes. In such case, adjust the focus
manually.
59
_l_rtinn
F
th_
Prnnr_m
1. Slide the program
AF
Mnrl_
selector to _ (program
AE).
2. Pressthe selector dial.
A list of the programAE modesappears
3. Select a mode and press the selector dial.
The symbol of the mode appears on the upper left corner of the
screen _
(Auto) disappeals after 4 seconds
0 Do not change the mode during recording as the brightness of the _magemay
change ab_uptly
0 The setting resets to the Auto mode when you switch the program selector to
D
m
=_
C
6O
0 Bright light in a dark scene may cause a vertical light bar to appear This is not
a malfunction
Using
Digital
Effects
[] []
4
You can use the digital effects during recording and playback,
Faders ([_I 62): Begin or end scenes with a fade to or from black,
Effects ([1_.]65): Add flavor to your recordings
Multi-image screen (_[:l 67)
Availability of Digital Effects by Operating
CAMERA
FLAY (VCR)
Modes:
ZR70 MOZR6S MC: ZR70MC/ZR65
MC:
CARD CAMERA
CARDPLAY(VCB)
Movles
Still Images
Faders
O
X
O
X
X
Effects
0
0
0
O.1
X
Multi*image
screen
0. 2
0* 2
0
X
X
O: Available X: Not available
"1: Black and White only
*2: Cannot be used in Night and Super Night (ZR70 MC) mode
O Turn off the digital effect when you do not use it
Pressthe DIGITAL EFFECTSbutton to open the menu Select [D EFFECTS_]
and press the ON/OFF button.
O The camcorder retains the setting even if you turn it off or change the program
AE mode
Q The digital effect turns off if you switch the program selector to CZ]
0 Digital effects can be selected but not activated on a blank blue screen
B
C
=
_
(appears in PLAY (VCR) mode).
Q Digital effects activated during playback do not change the recording.
() Digital effects cannot be used during DV dubbing and photo/date search
0 Digital effects can also be set with the wireless controller
61
The image gradually fades in
The image gradually fades out
The image begins as a vertical
line in the center and
expands sideways until
it fills the whole screen.
The image is wiped off from the
sides of the screen.
The image appears from the
corners until it fills the
_
whole screen.
=_
The image is wiped off from the
corners.
J_
_I_mp_(JUMP)
A small image appears from
the left, jumps into the
center and enlarges
until it fills the whole
screen.
The image shrinks, jumps from
the center to the left and
disappears.
The image flips into the screen.
The image flips out of the screen.
62
The image appears in 16 pieces.
The pieces move
around until the
4
puzzle is solved.
__::
The image is divided into 16
pieces. The pieces move around
and disappear,
The image
appears
from the top
screen,
in zigzag
of the
Black stripes appear in zigzag
from the bottom of the screen
until they cover the whole image,
_m_!_)
The screen turns yellow, forms
a beam that becomes
thinner and the image
appears,
A yellow beam appears in the
center of the screen and expands
until it covers the whole image
Tide_(TID£)
The image appearsfrom
both sideslike tides.
__::
The image disappears from both
sides like tides
63
F
1. In CAMERA mode,
set the program
selector to _.
2. Press the DIGITAL EFFECTS button.
[D.EFFECTS_],
@
DIGI_L
EFFE_
[FADER],[EFFECT]and [MULTI=S]appear
3. Select [FADER].
4. Select the fader option.
5. Press the DIGITAL EFFECTS button.
The name of the seEectedfader flashes
CAMERA mode:
=_ 6. Fade in: In record pause mode, press the ON/OFF
_
button and begin recording by pressing the
_
start/stop
O_OFF
button.
Fade out: During
recording,
and pause recording
press the ON/OFF button
by pressing the start/stop
button.
The fader can be activated/deactivated by pressing the ON/OFFbutton
PLAY(VCR)mode:
6. Fade in: In playback pause mode, press the ON/OFF
button and begin playback by pressing the II_/ll
button.
ON/OFF
Fade out: During playback, press the ON/OFF button
and pause playback by pressing the I_/11 button.
The fadercanbe activated/deactivated
by pressingthe ON/OFFbutton
_
64
Faders cannot be selected when Card Mix is activated.
Theimage
becomes
likeapaint
(soladzation),
Theimage
becomes
black
andwhite,
Theimage
becomes
monochrome
withabrownish
tint
Theimage
isblurred
through
enlarging
thesize
ofsome
pixels
Theimage
becomes
likeaball.
Theimage
becomes
acube
androtates.
@°i
m
-m
c
Wave_WAV_)
Both ends of the image sway in waves.
C_!or,Ma_ki_g (CQLORM,)
The image becomes a rhombus surrounded by a masking frame that
changes the colors,
Creates a symmetrical image as if there would be a mirror in the
center of the screen.
_
Only Black and White can be used in CARD CAMERA mode
65
F
1, Press the DIGITAL EFFECTS button.
[D.EFFECTSOFF], [FADER],[EFFECT]and [MULTI-S] appear
DIGITAL
EFFECTS
2, Select [EFFECT],
3, Select the effect.
4. Press the DIGITAL EFFECTS button.
The name of the seEectedeffect flashes
DIGITAL
EFFECTS
5. Press the ON/OFF button.
0N/OFF
• The name of the seEectedeffect stops flashing
• The effect can be actwated/deactivated by pressing the ON/OFF
_
=_
.,=
button
._.._z_.'._.__.:'.t_..._.'.'...._.
':._.._.v__
'.._t..._.e,_:._..-.e..,.:_'_.__
...........................
1. PreSS the DIGITAL EFFECTS button.
"BLK&WHT" flashes.
DIGITAL
EFFECTS
2. Press the ON/OFF button.
• "£LK&WHT" stops flashing
• The effect can be activated/deactivated by pressing the ON/OFF
button
6&
ON/OFF
Using
the Multi.Image
Screen
[] []
The multi-image screen captures moving subjects in 4, 9 or 16 sequences of still images
with the Image Capture feature and displays them at one time. Sound will be
[_
recorded normally. This feature can be used in CAMERA and PLAY (VCR) mode.
You can choose the transition speed at which to capture the subject from manual, fast
(every 4 frames), moderate (every 6 frames*) or slow (every 8 frames*).
* In Low Light mode: moderate (every 8 frames), slow (every 12 frames)
1. Set the program
selector
to [_.
2. Press the DIGITAL EFFECTS button.
ID EFFECTS_],
[FADER],[EFFECT]and IMULTt-S] appear
_T_
DIGITAL
EFFEC3S
3. Select [MULTI-S].
m
IS SPEED]and [S SPLIT]appears.
4. Select IS.SPEED].
IMANUAL], [FAST],IMOD.] and ISLOW] appear
5. Select the transition
speed.
6. Select [MULTI-S] again.
IS SPEED]and [S SPLIT]appears.
7. Select IS.SPLIT].
[4], [9], [16] settings appear
8. Select the number
of sequences.
9. Press the DIGITAL EFFECTS button.
[MULTI-S[ flashes.
DIGITAL
EFFEC3S
67
wt
c
lO.Press the ON/OFF button.
F
• MANUAL: Images will be captured each time you press the ON/OFFbutton The blue
frame indicating the next sequence disappears after the last image. To cancel the last
captured image, press and hold the ON/OFFbutton To cancel the multiqmage screen,
press and release the ON/OFFbutton
• FAST,MODERATE,SLOW:The set number of images will be captured at the set speed.
TOcancel the multi-image screen, press the ON/OFFbutton
11.Press the start/stop
button
begin recording.
The multidmage screen is recorded on the tape
C) The multi-image screen cannot be operated in Night and Super Night (ZR70
MC) mode.
C) You can operate the multi-image screen only in the following playback modes:
- When IS SPEED]is set to [MANUAL]: Playback pause, slow foi_vard/reverse
playback
- When IS SPEED]is set to [FAST], [MOD] or [SLOW]: Playback pause
O The multi-image screen can be operated in record or record pause mode
C) _
_
The multidmage screen cannot be selected when Card Mix is
activated.
m
C) In PLAY (VCR) mode: Pressing any tape operation button (such as play or
pause), or performing date/photo search cancels the multi-image screen.
=_
,,=.a
C
68
Turning
Off the
Image
Stabilizer
[] []
The image stabilizer allows you to obtain steady recordings even at telephoto. There is
no need to turn off the image stabilizer during normal recording. However, the
camcorder tries to compensate for horizontal
movements and you may therefore
decide to turn it off during panning. The image stabilizer cannot be turned off when
the program selector is set to C3.
,17!!117 i
Open the menu and select [CAMERA
SET UP]. Select [IMAGE
S, ((1))], set it
to [OFF] and close the menu.
((ll))disappears
0 We recommend turning off the image stabiNzer when you mount the
camcorder on a tdped.
0 The image stabiNzer is designed to compensate a normal degree of camcorder
shake.
0 _
mode.
1_
The image stabilizer cannot be used in CARD CAMERA
0 The image stabiNzer might not be as effective in Low Light, Night and Super
Night (ZR70 MC) mode.
C
69
Recording
With the
Self.Timer
[] []
PHOTO
: button
_
(self-tirne,)-
-_
_
_
_
When
Start/stop
Start/::::::o_
1. Press the ® (self-timer)
"_ " appears
= ._
"= "5
_
recording
button
....
utt°°
button.
_/co_'<
_T_
movies
2. Press the start/stop button.
The camcorder starts recording after a lO-second countdown (2
_
seconds when using the wireless controller) The count down
=_
appears on the screen
3. Press the start/stop
button
to stop recording.
The camcorder returns to recordpause mode
..W.he.n....re
c.o.rd!ng..s..t.i/!.!.ma.g.e.s.
...............................................................................................
2. Press the PHOTO button.
• The camcorder adiusts the focus 2 seconds before recording
begins 0 are
flashes
in white and turns green when focus and
exposure
adjusted
___C<_
/
_:_
_i_
• The camcorder records the still image for approx 6 seconds
and returns to record pause mode (ZR7OMC/ZR65 MC: In CARD CAMERA mode, it
displays the still image when recording is complete)
0 To cancel the self-time_; press the _
(self-timer) button, start]stop button
(when recording movies) or PHOTO button (when recording still images).
0 The self-timer will be canceled when you turn off the camcorder.
7O
Audio
Recording
Cb_ngJng,_
[] []
Audi_ Mod_
You can record sound in two audio modes--16-bit
and 12-bit. The 12-bit mode records
sound on two channels (stereo 1), leaving 2 channels free (stereo 2) for adding new
sound later. Select the 16-bit mode for higher sound quality.
.................................
,
Open
[16bit]
the
menu
and
select
[AUDIO
SET UP]. Select
.¢
[AUDIO
/
MODE], set
it to
and close the menu.
"16 bW' appears for approximately 4 seconds.
For adding new sound, seeAudio Dubbing (k]_ 96)
Recording witbanE_na!
MicmphQne
You can use an external microphone for
recording. Almost all stereo microphones with
a plug diameter of 0.14 inch (3.5 ram) can be
connected to the MIC terminal
Use a
C
microphone with a built-in power supply
(condenser microphone)
0 The audio level differs from that of the built-in microphone
0 Be careful with long microphones as they may appear in the picture
0 _
See also Using the DM-50 Microphone (_ 74)
_ind
5€_n
.....
You can reduce the wind noise when recording in windy places.
Open the menu and select [AUDIO
SET UP]. Select [WIND
SCREEN], set it
to [ON] and close the menu.
"WS ON" appears when you turn the wind screen on.
71
O Low sound may be reduced together with the wind noise We recommend
F
turning off the wind screen for normal recordings
O The wind screen function cannot be turned on/off during recording
O The wind screen function can also be used for audio dubbing (when [AUDIO
DUB.] is set to [MIC. IN] in the [AUDIO SETUP] submenu)
O The wind screen function cannot be used when an external microphone is
connected to the MIC terminal (ZR70 MC: or when the DM-50 Microphone _s
attached to the advanced accessory shoe)
m
.,=._
C
72
Using the VL.3 Video Light (Optional)
This video light enables you to record brightJy in color even in dark places. This VL-3
Video Light attaches to the camcorder's _
advanced accessory shoe for cable-free
4
operation and is powered by the camcorder's power supply.
Refer also to the VL-3 Video Light instruction
H
manual
0
turn offorthe
camcorder
before
attact_ing/removing
tt_e
video
0 Always
Do not touch
place
flammable
material
or plastic close to
the
lamplight
or the
surrounding parts during or immediately after use; they become very hot
0 Do not look directly at the lamp while the video light is on.
0 Do not carry the camcorder by the video light
1. Slide the video light
into the
accessory shoe until
it clicks.
2. Tighten
the fastening
screw.
Be careful that the video light does not come
off when tightening the screw.
3. Set the camcorder to CAMERA
CARD CAMERA
or
mode.
4. Turn the video light's power
switch
to AUTO or ON.
• []
(Connection)appears.
C
• ON: The video light stays on.
• AUTO: The video light turns on and off
automatically
73
Using the DM.50 Microphone (Optional)
F
The high sensitive Directional Stereo Microphone DM-5O attaches to the_"
advanced accessory shoe for cable-free operation and is powered by the camcorder's
power supply. Use it for recording or dubbing audio
Refer also to the DM-50 Microphone
H
instruction manua?
O
the any
camcorder
off before
O Always
Do not turn
connect
microphone
to theattaching/removing
MIC terminal whenthe
themicrophone
DM-50
Microphone is connected,
O Do not carry the camcorder by the microphone
1. Slide the microphone
accessory shoe until
2. Tighten
into the
it clicks.
the fastening
screw.
Be careful that the mic_phone does not
come off when tightening the screw
3. Set the camcorder to CAMERA or
CARD CAMERA mode.
[] (Connection) appears
_
_
4. Set the microphone's
directivity
switch.
• SHOTGUN: For recording dear sound from
the front (monauraO
• STEREOt:
For recording sound from the
front and surrounding area
• STEREO2:
For recording surrounding
sound in a wider range than in
STEREO1.
74
d
Adjusting
the
Focus
Manually
[]
4
Some subjects may not be suitable for autofocus, in such case, focus manually,
Autofocus
Reflective
may not work
surfaces
Through dirty or
wet windows
well on the following
Subjects with
Eow contrast
(e_g. White Wall)
Different
Distances
subjects:
Fast Moving
Subjects
Dark Subjects
Horizontal
Night
Stripes
Scenes
....................
1. Set the program selector to [_.
@
m
2. Adjust the zoom.
When you operate the zoom after adjusting the focus, the
subject may not stay in focus Adjust the zoom before the focus
3. Press the FOCUS button.
"MF" appears in light blue
4. Turn the selector dial to adjust
the focus.
• Turn the selector dial up or down until the image appears
focused.
• If "AE ±0" appears in light blue, focus cannot be adjusted
Pressthe FOCUSbutton again to display "MF" in light blue.
75
**1_
c
5. Press the FOCUS button
to return to autofocus.
F
The setting resets to autofocus when you switch the program selector to
Infinltv
Fnrllc
Use this function when you wish to focus on faraway subjects such as mountains or
fireworks
Press the focus button
more than 3 seconds in step 3.
"MF _" appears When you operate the zoom or turn the selector dial when "MF _" is
displayed in light blue, "_"
m
C
76
disappears and the camcorder changes to manual focus
Adjusting
the AE Shift
[]
You can adjust the AE (auto exposure) function to lighten or darken the image, This
allows you to compensate for backlit or overexposed scenes, Available Levels: -2 to +_
4
in 0.25 intervals (excluding -1,75 and +1.75).
1. Set the program selector to [_.
2. Set the program AE mode to _ Auto, _ Sports, _
Light or _ Low Light Plus (ZR70 MC) mode.
@
Portrait, _
Low
3. Pressthe AE SHIFT button.
"AE ±0" appears in light blue
4. Turn the selector dial to adjust the AE shift level.
• Turn the selector dial up to lighten the image and down to
darken the image
• If "MF" is displayed in light blue, AE shift cannot be adiusted
C
Pressthe AE SHIFTbutton again to display "AE ±0" in light blue
O The camcorder retains the setting even if you turn it off or change the program
AE mode
O The camcorder resets to the auto setting when you switch the program
selector to D
77
Setting
F
In the _
the Shutter
Speed
[] []
Auto mode, you can adjust the shutter speed manually to make stable shots
of fast moving subjects.
1. Set the program
selector to [_.
2. Set the program
AE mode to the _
3. Open
(AUTO)
mode.
the menu and select [CAMERA SET UP].
4. Select [SHUTTER].
5. Select the shutter
m
#.'4
speed and press the selector dial.
CAMERA Mode
_'_r_r_,
CARD CAMERA Mode
AUTO
1/60
1/100
1/250
1/500
1/1000
1/2000
AUTO
1/60
1/100
1/250
6. Close the menu.
C
O Do not point the camcorder directly at the sun when the shutter speed is set to
t/1000 or higher.
O The image may flicker when recording with high shutter speeds
O The setting resets to the auto setting when you switch the program selector to
C3, or change the program AE mode
O _
_
If the shutter speed is set to 1/500 or higher in CAMERA
mode and you switch to CARD CAMERA mode, it automatically changes to
t/250
O Recording under fluorescent lights: When the camcorder is set to [Z} (Easy
Recording) or when the program AE mode is set to Auto, Night or Super Night
(ZR70 MC) mode, it automatically detects the flicker of fluorescent lighting and
adjusts the shutter speed accordingly However; if the brightness of the screen
starts to flicker; select Auto mode and set the shutter speed to 1/100
78
0 Guidelines for Recording with High Shutter Speeds:
- Outdoor sports such as golf or tennis: t/2000
4
- Moving objects such as cars or roller coasters: t/t000,
1/500 or 1/250
- Indoor sports such as basketball: t/t00
C
79
Setting
the
White
Balance
[] []
The camcorder's auto white balance system adjusts the colors to appear natural for
different lighting conditions. However, you can use the preset modes to reproduce
colors more accurately, or set a custom white balance to obtain the optimal setting.
White sheet or paper
Program selector
C) When the program selector is set to C3, white balance is preset to [AUTO]
Indoor, outdoor and custom white balance cannot be selected
0 The camcorder retains the setting even if you turn it off
m
=_
C) When you have set the custom white balance:
- Reset the white balance when the lighting condition changes
- Turn off the digital zoom.
C) Setting the white balance manually may provide better results in the following
cases
- Changing lighting conditions
C
- Close-ups
- Subjects in a single color (sky, sea or forest)
- Under mercury lamps or certain types of fluorescent lights
0 Use the @ Indoor or ;_ Outdoor mode in the following cases:
_: Indoor:
- Changing lighting condition
- Under video light
- Under sodium lamps
;_ Outdoor Mode
- For night scenes or fireworks
- Sunrise or sunset
* Use the auto setting for normal outdoor scenes.
8O
IoAoERA
SETI Iw,,
.L...AOTO
E
4
Pr.2L(.L"d°°r.)...°L_L!°_°°_.)...s_tt!
."._._
....................................................
1. Set the program
selector
to (_.
2. Open the menu and select [CAMERA SET UP].
3. Select [WHITE
BAL[.
4. Select _-._:
(indoor)
or _÷_(outdoor).
8 or _÷:appears
5. Close the menu.
For Custom White
Balance:
1. Set the program
selector
to (_.
2. Open the menu and select [CAMERA SET UP[.
3. Select [WHITE
BAL].
4. Point the camcorder
at a white
in until it fills the whole
object (such as a sheet of paper), zoom
screen and select [SET ,_._ ].
o
• ,=_, flashes and stops flashing when settings is complete
_ _"
• Depending on the light source, _._ may keep flashing The resuk will still be better
than with the auto setting
_
5. Close the menu.
81
Magnifying
the
Image
The playback image can be magnified
1. Move the zoom
lever toward
by 2 times.
3".
• The image is magnified by 2 times
• A frame appears indicatingthe position of the enlarged part.
2. Move the image.
• Turn the selector dial to move the image to the right and left,
or up and down Pressing the selector dial switches between
the directions.
• To cancel the magnification, move the zoom lever toward W
H
m
=_
C
82
_
Movies played back from a memory card cannot be magnified
[]
[]
Displaying
the Data
Code
[] []
Once date and time are set, the camcorder maintains a data code containing
recording date and time and other camera data such as shutter speed and exposure
4
(f-stop) (ZR70 MC/ZR65 MC: Only date and time appear when playing back a memory
card)
s
DATA CODE
button
Controller
buttons
....
'
MENU button
DATA CODE
button
MENU
button
......
y
Selector
dial -J
0 The data code display turns off when you turn the camcorder off
0 The data code may not be displayed if a recording made with this camcorder is
played back on a different digital camcorder
_
0 The data code cannot be displayed in frame advanceJreverse playback Camera
_ _"
data may not appear in some spedal playback modes
O When the TV screen displays are hidden ([._] 134), the displays still appear on
_
_
the LCD screen If you turn on the data code, displays other than the data
code will disappear from the LCD screen
Available
_ape
Data
Code
DATA CODE
only)
D/TIME SEL_
Combinations
Date/Time
(in PLAY
Camera
(VCR)
data
mode):
Date/Time
Camera
&
data
Date
Time
Date & Time
83
5_lect ng t_h_Da_/Time,D_sPlay ¢_mbinati_n
F
Open the menu and select [DISPLAY SET UP]. Select [D/TIME
SELl, set it to
[DATE] or [TIME] and close the menu.
_ll_U_([
_
44)
I _IS_LAY
SET
U_
I_
ATA
_0DE'_'DATE/T_ME
Open the menu and select [DISPLAY SET UP]. Select [DATA CODE], set it to
[DATE/TIME],
=_
"= _
[CAMERA
DATA] or [CAM. & D/T] and close the menu.
Press the DATA CODE button.
Only date and time appear in CARD PLAY(VC R)mode.
C
Date and time appear for 6 seconds when you begin playback, or to indicate that date
or time zone has changed.
MENU([_ 44)
[ _ISPLAY
SET
UP
I_LSSEC.DATE_,,OFF
Open the menu and select [DISPLAY SET UP]. Select [6SEC.DATE],
[ON] and close the menu.
84
set it to
Photo
Search/Date
Search
[]
You can search for a still image recorded
.......SEARCH SELECT button
anywhere on the tape with the photo search
function, or locate the change of the
date/time zone with the date search function,
4
..... Search buttons
.......STOP • button
2. Press the _
• Pressthe _
or I<< button
to begin searching.
button to search forwa_ and the _
button to
search backward
• Pressmore than once to search for further still images or date
changes (up to 10 times)
• Pressthe _
or _
C
button to change the search direction
• Pressthe • (stop) button stop searching
O Photo search: A still image recorded very close to the point you start the search
may not be detected.
O Date search: A recording of longer than a minute per date/area is required
O Date search: Playback may start slightly before or after the date change
O Date search may not function if the data code is not correctly displayed.
85
Returning
to a Pre-marked
Position
If you wish to return to a particular scene
later, mark the point with the zero set
/
[]
REW _41 button
memory and the tape will stop at that point
.....PLAY I_ button
when you rewind/fast forward the tape,
.....FF_I_ button
ZERO SET
MEMORY
button
1. Press the ZERO SET MEMORY
button
.....STOP • button
at the point
you wish to return to later.
• "0:00:00 I_1" appears
• To cancel, press the ZEROSETMEMORY button again.
2, When
m
rewind
you have finished
playback,
fast forward
or
the tape.
• "RTN I_1_" or "_1, RTN" appears
=_
• The tape stops automatically at "0:00:00"
"='8
• The tape counter changes to time code
==
O Time code and tape counter display may not match accurately.
O The zero set memory may not function correctly when blank sections exist on
the tape.
O If you remove the tape, the zero set memory is canceled and the counter
display shows the time code.
8&
Recording to a VCR or Digital Video Device [] []
You can copy your recordings by connecting the camcorder to a VCR or a digital video
device. If you connect a digital video device, you can copy recordings with virtually no
generation
H
4
loss in image and sound quality.
When
connecting
O Make
sure that a
"_"VCR:
is not displayed on the screen If "_"
is displayed, change
the setting ([_[_ 39)
O The quality of the edited tape will be slightly lower than that of the original
When connecting a digital video device:
O You can connect only one device to the camcorder with the DV cable
O Blank sections may be recorded as anomalous picture
O If the picture does not appear, reconnect the DV cable or turn the camcorder
off and back on again
F_m_l_-
R_ _,_;_Ntn _ VCR
1, Connect the camcorder
to the VCR.
See Playing Back on a TV Screen ([_
2, Set the camcorder
3, Connected
...................
4 I).
to PLAY (VCR) mode and load a recorded
cassette,
device: Load a blank cassette and set the device to record
m
pause mode.
4, Locate the scene you wish to copy and pause playback
shortly
before
the scene.
u_
5, Play back the tape,
6, Connected
appears,
device: Begin recording
Stop recording
when
when
copying
the scene you wish to copy
is complete.
7, Stop playback.
87
Refer also to the instruction manual of the digital video device.
F
ide with an arrow
Signal flow
Commercially
m
.$
88
available DV cable
Recording
fromAnalogVideoDevices
(VCR,TVorCamcorder)
[]
You can record videos or TV programs from a VCR or analog camcorder on the tape in
the camcorder.
H
4
O Anomalous signals sent from the connected device may be recorded as
anomalous picture (although it may not appear so on the screen), or it may not
be recorded at all
O You cannot record from tapes with copyright protective signals
O Headphones cannot be used dunng analog line-in recording If the
AV/headphones terminal set to [PHONES_], it will automatically switch to {AV],
/::
!
:
_1
:A
1. Connect the camcorder
_
4
to the analog video device.
See Playing Back on a TV Screen ([:_1 4 I).
2. Set the camcorder
3. Connected
to PLAY (VCR) mode and load a blank cassette.
device: Load the recorded
4. Press the REC PAUSE button
cassette.
on the wireless
controller.
In record pause mode and during recording, you can check the
picture on the screen
5. Connected
device: Play back the tape.
6. Press the PAUSE II button
when
on the wireless
m
controller
E
the scene you wish to record appears.
u_
7. Press the STOP •
button
on the wireless
controller
to
stop recording.
• Pressthe PAUSEII button on the wireless controller to pause
recording
• Pressthe PAUSEII button again to restart recording.
8. Connected
device: Stop playback.
89
Recordingfrom Digital Video Devices(DV Dubbing) []
F
You can record from other digital video devices equipped with a DV terminal with
virtually no loss in picture and sound quality.
H
C) When
recordh]g
digital
video DV"
devices,
make sure
that "AV,_
DV" is not
displayed
on the from
screen.
If "AV,_
is displayed,
change
the setting
([_] 93)
O Anomalous signaB sent from the connected device may be recorded as
anomalous picture (akhough it may not appear so on the screen), or it may not
be recorded at all
O Copyright protected signals cannot be recorded
O Blank sections may be recorded as anomalous picture
O If the picture does not appear, reconnect the DV cable or turn the camcorder
off and back on again
O You can connect only one device with the DV cable
O You can use the camcorder for playback and recording without reconnecting
the DV cable
1. Connect the camcorder
to the digital
See Connect,rig
a Digita!
VideoDevice(_
2. Set the camcorder
m
video device.
_
88)
_
to PLAY (VCR) mode and load a
5_
_./e_
....................
blank cassette.
:_
"DV IN" appears.
3. Connected
device: Load the recorded
4. Press the REC PAUSE button
cassette.
on the wireless
controller.
In record pause mode and during recording, you can check the picture on the screen
5. Connected
Device: Play back the tape.
6. Press the PAUSE II button
when
on the wireless controller
the scene you wish to record appears.
7. Press the STOP •
button
on the wireless controller
to
stop recording.
• Pressthe PAUSEII button on the wireless controller to pause
recording
• Pressthe PAUSEII button again to restart recording
8. Connected
9O
Device: Stop playback.
CQpyrightSigna!
Certain software tapes are copyright protected. If you attempt to play back such tape,
"COPYRIGHT PROTECTEDPLAYBACK IS RESTRICTED"appears and you will not be able
to view the contents of the tape
terminal,
If you attempt to record from such tape via the DV
4
"COPYRIGHT PROTECTEDDUBBING RESTRICTED"appears and you will not
be able to record the contents of the tape.
m
u_
9]
Converting
Signals
_]
Analog Signals into Digital
(Analog.Digital
[] []
Converter)
By connecting the camcorder to a VCR or 8mm video camcorder, you can convert
analog video/audio
terminal
H
signals to digital signals and output the digital signals via the DV
The DV terminal serves asoutput terminal only.
() Headphones
cannot
used
during analog-digital conversion.
0
Unload the tape
frombethe
camcorder
0 Turn off all devices before starting the connections.
0 Depending on the signal sent from the connected device, the conversion from
analog to digital signals might not work properly (e.g, signals that include
copyright protective signals or anomalous signals such as ghost signals, etc)
We recommend powering the camcorder from a household power source
Connecting _he D,_ice_
This illustration shows how to connect using a S-video cable You can also connect the
yellow plug of the stereo video cable to the VIDEO terminal. Refer also to the
instruction manual of the connected device.
OUTPUT
<_
Signalflow
@
"IF.:_:SlSl_VIDEO
S-150S-videoCable (optional)
(_
VIDEO
L
<_
Signalflow
STV-250NStereo Video
Cable (supplied)
sig_
flow
Commercially
available
DV cable
92
J_l
Tu_jng
On _theAnalog-Diglt_a_
Press the AV ,_ DV button
C,onverter
on the wireless
_
......................................
controller.
OR
.,NU(_3
44)
I VCR SET UP
Open the menu
I_LAV=FDV OUT,.OFF
and select [VCR SET UP]. Select [AV ..F DV OUT], set it to
[ON] and close the menu.
H
O For normal use, set [AV ._ DV OUT] to [OFF] (so that "AV _ DV" does not
appear on the screen) If it is set to [ON], digital signaEscannot be input via the
camcorder's DV terminal
O Depending on the software and the specifications of your computer, you may
not be able to transfer converted signaEsvia the DV terminal.
m
93
Replacing
Existing
Scenes
(AV Insert)
[]
You can insert and replace images/audio on the tape of the camcorder with
images/audio from other video devices connected via AV terminal or DV terminal.
Sceneto be inserted
Playback tape
Insert
start
Insert
end
Tape in the
camcorder
before inserting
Tape in the
camcorderafter
inse_ing
Inserted scene
mU,
.$
O Make sure that "_"
is not displayed on the screen If "_"
is displayed, change
the setting ([_ 39)
O You cannot insert from a TV program when the synchronized signals are
distorted
Camcorder:
O Use only tapes recorded in SPmode.
O AV insert will stop if the camcorder detects a blank section or a section not
recorded in SP mode on the tape
Connected device:
O Use only tapes without blank sections
O AV insert may not work correctly if the tape has a blank section or changes ,]
the recording mode.
O AV insert cannot be performed when the quality of the recording _spoor. or
during special playback such as fast forward, rewind, playback pause, slow
playback etc
94
Example:
AV Insert from
....................
_,I¸-_'¸_¸I¸¸I¸'_¸¸¸.....................
_i_
_x_%
i_!
a VCR
_
I
1. Connect the camcorder
pause playback
cassette.
shortly
3. Set the camcorder
_
[i
4
to the VCR.
See Playing Back on a TV Screen (_
2. VCR: Load a recorded
i¸
4 t).
Locate the scene you wish to insert and
before the scene.
to PLAY (VCR) mode and load a recorded
cassette.
Make sure the tape-protect switch is set to allow recording
4. Locate the scene you wish to replace
and pause playback
shortly before
the scene.
You can use the playback buttons on the camcorder or the spedd playback buttons on
the wireJesscontroller
5. Press the AV INSERT button
on the wireless
controller.
"AV INSERT" and "t11"
appear
6. VCR: Play back the tape.
7. Press the PAUSE II button
when
on the wireless
controller
the scene you wish to insert appears.
m
8. Press the STOP •
button
on the wireless
controller
to stop inserting.
u_
Pressthe PAUSEII button on the wireless controller to pause
_nserting
9. VCR: Stop playback,
Set the zero set memory at the end of the scene you wish to replace The
camcorder will automatically stop AV insert at that point
95
Audio
F
Dubbing
[]
You can add sound from audio devices (AUDIO iN) or with the built-in or an external
microphone (MIC. IN)
H
C) Use
only
tapes recorded
SPmode
12-bk
audiosection
sound orwith
this camcorder
Audio
dubbing
will stop in
if the
tape has
a blank
a section
recorded in
LP mode, 16-bit or 12-bit 4-channel sound In above case, create a copy in SP
mode 12-bit audio sound using the analog linedn function
O Do not connect/dBconnect any cable to/from the camcorder while dubbing
O You cannot use the DV terminal for audio dubbing
O If you add sound to a tape not recorded with this camcorder, sound quality
may decrease.
O Sound quality may decrease when you add sound to the same scene for more
than 3 times
_ n__ct_ng _ Au di
H
96
O Make sure that "_"
De_ice
is not displayed on the screen if "_"
is displayed, change
the setting ([:[_ 39)
O You can monitor the picture on the LCD screen or a TV connected via the
S-video terminal, and check the sound with the built-in speaker
UsiBg_ Microphone
4
O When using the built-in microphone: do not connect any cables to the
microphone terminal or the accessory shoe,
O When using an external microphone: Connect it to the microphone terminal,
O _
When using the DM-50 Microphone: Do not connect any cables to
the microphone terminal
O When you connect a TV via the S-video terminal, you can check the picture on
the TV screen and the sound with headphones connected to the camcorder
When you connect a TV via the AV terminal, you can check the picture on the
TV screen but you cannot check the sound with headphones,
Dubbing
E
Au0,o
s.0pi, lA00,o
000..A00,o
,.
1. Set the camcorder
to PLAY (VCR) mode and load a recorded
2. Open the menu and select [AUDIO
[AUDIO
DUB.], set itto
[AUDIO
cassette.
m
P_
SET UP]. Select
IN] or [MIC. IN] and
close the menu.
3. Locate the scene you wish audio dubbing
to start.
4. Press the PAUSE II button
controller.
5. Press the AUDIO
on the wireless
DUB. button
on the wireless
controller.
• "AUDIO DUB." and "II1"
• _
appear
If the optional DM-50 microphone is attached, []
(Connection) appears
6. Press the PAUSE II button
on the wireless
controller
to begin dubbing.
• Audio device: Begin playback
• Microphone: Direct your voice to the microphone.
97
7. Press the STOP •
button
on the wireless controller
to stop dubbing.
F
Audio device: Stop playback
Set the zero set memory at the end of the scene you wish to dub audio. The
camcorder will automatically stop audio dubbing at that point
You can select to play back Stereo 1 (original sound), Stereo 2 (added sound), or adjust
the balance of both sounds,
12bit AUDIO
OUT button
.... [,00,0
s,, I l,,0,t
,00,o..,,,o,
(L[344)
:_
1. Open
the menu and select [AUDIO
select a setting
SET UP[. Select [12bit
AUDIO OUT],
and close the menu.
• STEREOt: Playsback the original sound.
• STEREO2: Playsback the added sound.
• MIX/FIXED: Playsback stereo 1 and stereo 2 in the same level
• MIX/VARt : Playsback stereo 1 and stereo 2. The mix balance can be adjusted
2. If yOU have selected [MIX/VARI.],
and select [AUDIO
with
adjust the mix level: Open the menu
SET UP]. Select [MIX BALANCE], adjust the balance
the selector dial and close the menu.
Turn the selector dial down to increasethe volume of Stereo 1 and up to increasethe
volume of Stereo 2
O The camcorder resets to [STEREO1] when you turn the camcorder off
However; the mix balance is memorized by the camcorder
O You can also press the t 2bit AUDIO OUT button on the wireless controller to
select the audio output. However; the mix balance can only be adjusted in the
menu.
98
Connectingto a ComputerUsinga DV (IEEE1394)Cable
You can transfer recordings to a computer equipped with a DV (IEEE1394) terminal or
IEEE1394capture board (optional software required).
__
IEEE1394(DV)
terminal
H
4
Commerciallyavailable DV cable
O data
Do not
disconnect
the DVtocable,
or turn off the camcorder or computer while
is being
transferred
the computer
O Operation may not work correctly depending on the software and the
specifications!settings of your computer
O We recommend powering the camcorder from a household power source
while it is connected to the computer
O Refer also to the instruction manual of the computer
O Optional software required Refer also to the instruction manual of the
software.
O _
_
For transferbng recordings from a memory card to the
computer using a USBcable, see p 129.
m
Windows XP users can use the software on the supplied DV NETWORK SOLUTION
DISKto perform videoconference
and file transfer over the Internet, or upload files
from the computer to the memory card and use the camcorder as card reader_vriter.
The available functions depend upon the camcorder model and the networking
environment. For details, refer to the DV NETWORK SOLUTION DISK Software
Instruction Manual.
H
!_!
_amma
O Do not disconnect the DV cable, remove the memory card or turn off the
camcorder or computer while data is being transferred to the computer (while
the camcorder's card access indicator is flashing) Doing so may damage the
memory card's data
O The image flies on your memory card and the image flies saved on the hard
disk drive of your computer are your valuable, original data flies. If you wish to
use _magefiles on your computer, be sure to make copies of them first,
retaining the original
99
Inserting
and Removing
The chapter Using a Memory Card ( _
and ZR65 MC only.
You can use _
the Memory
Card
100-133) refers to functions of the ZR70 MC
SD Memory Cards or a
commercially available MultiMediaCards
Terminals
with
this camcorder. The SD Memory Card has a
protect switch for prevent accidental erasure.
H
O This camcorder is compatible with SD Memory Cards or MultiMediaCards only
Do not use any other types of memory cards
O Turn off the camcorder before inserting or remowng the memory card
Otherwise it may result in data damage
O Do not touch the memory card terminals
O If you use memory cards other than the suppEied one, make sure to format
them with the camcorder ([:_] 128).
O For instructions on how to connect the camcorder to the computer, see
Connecting to a Computer using a USB Cable (L[3 129).
1, Turn off the camcorder.
2, Open
the cover,
3, Insert the memory
into the memory
card all the way
card slot.
4, Close the cover.
DOnot close tile cover forcefully without
m
having the card correctly inserted
RemQ_ing th_,C_rd
Do not forcefully remove the memory card without first pushing it in,
1, Turn off the camcorder.
._=
Make sure that the card access indicator is not
flashing.
2, Open
the cover,
3, Push the memory
card to release it.
Remove the memory
4, Close the cover.
card,
Selecting
the
Image
Quality/Size
[][]
You can choose between Superfine, Fine and Normal.
m°( [0,R0
44)
s, i,s,100,L,,,..,,,E
Open the menu and select [CARD SET UP]. Select [SI QUALITY],
[SUPER FINE] or [NORMAL]
set it to
and close the menu.
Changing th_ 5ti!! Image 5i_e
You can choose between 1024 × 768 pixels and 640 × 480 pixels.
(_[344)
F
I
L
II
Open the menu
I
and select [CARD SET UP]. Select [SI SIZE[, set it to [640 ×
480] and close the menu.
O Still images recorded in t024 x 768 pixels may not be displayed correctly in a
camcorder not supporting this size,
O Still images are compressed and recorded in the JPEG (Joint Photographic
Experts Group) format
O Depending on subject and recording condition, changing the image quality
may not show a significant difference
O Estimated Capacity of a 8 MB Memory Card and File Size per Image:
1024 x 768
m
640 x 480
age Size
NO oflmages
File Size
perlmage
No of Images
File Size
per Image
Superfine
14images
440 KB
35 images
t75 KB
Fine
20images
300 KB
52 images
t20 KB
Normal
3gimages
160 KB
86 images
65 KB
image Quali_
°m
o
These figures are approximate. They vary according to the recording condition
and the subject Sample images already recorded on the supplied SD Memory
Card are to be included in the total number
O Remaining image Capacity:
flashing in red: No card
Q in green: 6 or more images
G3 in yellow: 1 to 5 images
G3 in red: No more images
101
O The indication may not decrease even though a recording has been made, or
may decrease by 2 images at once.
0 All indicators are displayed in green when a memory card is played back.
0 _
The remaining image capacity indicates the number of still _mages,
even when movies are recorded
F
I_!_Ch
anging the MovieSize
You can choose between 320 x 240 pixels and 160 x 120 pixels.
Open the menu and select [CARD SET UP]. Select [MOVIE
SIZE], set it to
[160 x 120] and close the menu.
O Movies are recorded
O Maximum
Image
continuous
Size
in the Motion
recording
JPEG format
time:
Max. Continuous
Recording
Time
320 xx 240
160
120
10 sec.
sec.
30
File NumberL
File Size
2.7 M8
M8
2.7
/ File Size per Second
[
270
KB/sec.
90 KB/sec.
_ _,_..............
Images are automatically
folders containing
Total
assigned file numbers from 0101 to 9900 and stored in
up to 100 images. Folders are assigned numbers from 101 to 998.
(The sample images on the supplied memory card are saved in the [100canon] folder.)
You can choose to use consecutive file numbers (CONTINUOUS) or to reset the file
number each time a different memory card is inserted (RESET).We recommend setting
_ _
the file numbers to CONTINUOUS.
_
CONTINUOUS
The
camcorder memorizes the file number of the last image and assigns the
•_
consecutive file number to the next image, even when a new memory card is inserted
(If a higher file number already exists on the memory card, the consecutive number
will be assigned.) There will be no duplication
of file numbers. This is useful for
organizing images on a computer,
RESET
The file number will be reset each time a new memory card is inserted, starting with
101-0101, If the memory card already contains image files, the consecutive file number
will be assigned.
When
you
record
3images
onthesupplied
memory
card.
4
_
Wlaer_Ya°Udrreep_ar:
:lneimmagm¢l rY
_
101-0104
101_0101
..............................................
........
_,_,
_ _1_
_¸,
....................
,:_,_,_,,,_,,,,
_M_'_([,,_ 44)
I C_RD
S_T
TO change the setting,
UP
I_IFIL_
NOS
....
CONTINUOUS
I
open the menu and select [CARD SET UP]. Select
[FILE NOS.], set it to [RESET] and close the menu.
m
103
Recording Still Images on a Memory Card [] []
F
You can record
camcorder,
([_
still images
from
105), or from
DV terminal
H
a tape
with
the
Card access
PHOTO button
in the camcorder
devices connected
or AV terminal
([._
via the
106).
0 Do not turn off the camcorder, disconnect the power source or remove the
memory card while the card access display (<<< or >>>) in the upper right
corner of the screen or the card access indicator is flashing Doing so could
resuk in data damage
0 When you are using a SD Memory Card, make sure that the protect switch is
set to allow recording.
Make sure to insert a memory card with enough remaining capacity
1. Set the camcorder
to CARD CAMERA
mode.
The remaining image capacity and other information appear
2. Press the PHOTO button
m
halfway.
• 0 flashes in white and turns green when focus is adjusted
• Exposure is locked
• When you press the PHOTO button on the wireless controller,
recording starts immediately.
3. Press the PHOTO button
.$
fully.
• YOUhear a shutter sound, and the screen appears as if a
shutter has been released
• The card access indicator flashes
• The still image shown on the screen will be recorded on the memory card.
TOuse the self-timer ([-[_170), press the _
press the PHOTO button fully
(self-timer) button before step 2 and
R_rdi_g
_mm _ Tag_ in _he CamCQrder
You can record images from a tape in the camcorder as still images on a memory card.
4
1. Set the camcorder
to PLAY (VCR) mode.
2. Play back the tape.
3. Press the PHOTO
button
halfway
when
the scene you wish to record
appears.
• The camcorder pauses playback The remaining image capacity and other information
appear
• When you press the PHOTObutton on the wireless controlle_; recording starts
immediately
4. Press the PHOTO
button
fully.
• The card access indicator flashes
• The still image shown on the screen will be recorded on the memory card.
• You can also record a still image by pressing the PHOTO button fully when the tape is
in playback pause mode
0 A still _mage recorded from an _magein 16:9 format will be vertically
compressed
0 The data code of the still image will reflect the date and time it has been
recorded on the memory card
0 There will be no shutter sound in PLAY (VCR) mode.
0 The image size of a still image recorded from a tape in the camcorder will be
640 x 480
m
105
You can record images from devices connected via the S-video terminal
(analog line-in function),
H
or AV terminal
or via the DV terminal as still images on a memory card.
When
recording
the AV terminal,
make
sure that
DV" "AV,_
is dBplayed
on
the screen
Whenvia
recording
via the DV
terminal,
make"AV,_
sure that
DV" is
not displayed Change the setting as necessary ([_:_ 93)
2
IIL
1. Connect the camcorder
to the video device.
• S-video/AV terminak SeePlaying Back on a TVScreen (_
• DV terminal: See Connecting a Digital Video Device (_
2. Set the camcorder
41)
88).
to PLAY (VCR) mode.
If a cassette is loaded, make sure the tape is stopped
3. Connected
device: Load a recorded
4, Press the PHOTO button
halfway
cassette and play back the tape.
when
the scene you wish to record
appears.
• The still image, remaining _magecapacity and other information appear.
• When you press the PHOTO button on the wireless controller, recording starts
immediately
5. Press the PHOTO button
fully.
• The card access indicatorflashes
• The still image shown on the screen will be recorded on the memory card
O A still _mage recorded
from
an image
in 16:9 format
will be vertically
compressed
m
O The data code of the still image will reflect
recorded
on the memory
O There will be no shutter
sound
in PLAY (VCR) mode
O The image size of a still image recorded
640 x 480
.E
106
the date and time it has been
card
from
other
video devices will be
RecordingPanoramicImages (Stitch Assist Mode) []
4
You can shoot a series of overlapping images and merge them into one large
panoramic scene using the supplied software (PhotoStitch) on a computer,
When
Recording
in Stitch Assist Mode:
PhotoStitch detects the overlapping portion of adjoining images and merges them. Try
to include a distinctive item (landmark, etc.) in the overlapping portion.
I
1. Set the camcorder
2. Press the
_
to CARD CAMERA
mode.
button.
Ml_
SHow
3. Select the direction
with the CARD +/- button.
CARD + button: clockwise CARD - button: anticlockwise.
4. Select the program
AE mode and zoom on the subject.
Adjust focus and AE shift manually as necessar_zOnce the sequence has started, you
m
cannot changethe program AE mode, AE shift, zoom or focus.
5. Press the PHOTO
button
to record the first image.
Direction and number of recorded images appear.
_---_
_
°m
T_I_.,
o
6. Record the second image so that it overlaps
a portion
of the first
image.
• Minor discrepancies in the overlapped area can be corrected with the software,
@"
a.
• You can retake an image by pressing the CARD - button to return to the prewous
_mage.
• A maximum of 26 images can be recorded.
7. Press the
_
button
after the last image.
For details on how to merge these images, refer to the DIGITAL
VIDEO SOLUTIONDISKSoftware Instruction Manual
_:<-x
M_
SHOW
107
O Compose each image so that it overlaps 30 to 50% of the adjoining image Try
F
m
108
to keep the vertical misalignment within 10%
O Do not include moving subject in the overlapping portion
O Do not try to stitch images that include both distant and close subjects. They
may appear warped or doubled up
_n'_rdRecordingMotion
JPEGMovies
ona Memory
Card[] []
You can record Motion JPEG movies with the camcorder, from a tape in the camcorder
([Z[]3110), or from devices connected via the AV terminal (analog line-in) or the DV
terminal(L_
H
110).
O Do not turn off the camcorder, disconnect the power source or remove the
memory card while the card access display (<<< or >>>) in the upper right
corner of the screen or the card access indicator is flashing Doing so could
result in data damage
O When you are using a SD Memory Card, make sure that the protect switch _s
set to allow recording.
O Do not load/unload a cassette during recording
O Make sure to insert a memory card with enough remaining capacity
O The sound of a movie recorded on a memory card will be monaural
Recording _ith the Cam_;_rd_r
;
?
1. Set the camcorder
2. Press the start/stop
a
a
_
to CARD CAMERA
button
mode.
to begin recording.
YOUcan _cord up to 10 seconds in 320 x 240 and up to 30
seconds in 160 x t20
3. Press the start/stop
button
to stop recording.
The camcorder starts writing the movie on the memory card
To use the self-timel; press the _
press the start/stop button
(self-timer) button before step 2 ([.]3 70) and
m
°m
o
&
]09
R_r_rrlinn
frnm
_ T_n_
in
th_
('_mr_rrl_r
You can record movies from a tape in the camcorder on a memory card,
F
1. Set the camcorder
to PLAY (VCR) mode.
2. Play back the tape.
3. Press the start/stop
button
when
the scene you wish to record
appears.
You can record u _to 10 seconds in 320 x 240 and up to 30 seconds in t60 x 120
4. Press the start/stop
to stop recording.
O A movie recorded from an image in 16:9 format will be vertically compressed
O The data code of the movie will reflect the date and time it has been recorded
on the memory card
R_¢ording from Q_h_ _Vid_ De,vices
You can record movies from devices connected via the S-video terminal or AV terminal
(analog line-in function),
or via the DV terminal on a memory card,
1. Connect the camcorder
to the video device.
• S-video/AV terminak SeePlaying Back on a TVScreen (_
41)
• DV terminal: See Connecting a Digital Video Device ([ZJ 88).
2. Set the camcorder
to PLAY (VCR) mode.
If a cassette is loaded, make sure the tape is stopped
3. Connected
device: Load a recorded
4. Press the start/stop
button
when
cassette and play back the tape.
the scene you wish to record
appears.
You can record up to 10 seconds in 320 x 240 and up to 30 seconds in t60 x 120
5. Press the start/stop
button
to stop recording.
O A movie recorded from an image in 16:9 format will be vertically compressed
O The data code of the movie will reflect the date and time it has been recorded
on the memory card
Playing
Back
a Memory
Card
You can play back memory card images on the LCD screen, viewfinder
connected _
screen (see Playing Back on a TV Screen (_
[] []
screen, or on a
41) )
4
You can display a single image (single image display [[]3 111), 6 at one time (index
screen _
112), or one after another (slide show _
112). Use the Card Jump function
to quickly locate an image without displaying them one by one ([_1 113)
H
O the
Images
not images
recorded[_3
with
thisedited
camcorder,
uploaded and
from images
a computer
sample
132),
on a computer
whose(except
file
names have been changed may not be played back correctly
O Still images not recorded with this camcorder may not be printed correctly on a
Rubble Jet Printer with direct print function.
O Do not turn off the camcorder, disconnect the power source or remove the
memory card while the card access display (<<<) in the upper right corner of
the screen or the card access indicator is flashing Doing so could result in data
damage
O Make sure to insert a memory card that contains images.
O Only date and time will be displayed when pressing the DATA CODE button
O You can enlarge still images by 2 times during playback ([_3 82)
Si_g!_ Jm_g_ Dis_!_y,
1. Set the camcorder
to CARD PlAY (VCR) mode.
• The last recorded image appears
• _
Movies are displayed with the first scene as a still image indicated by
"l_fl I"
2. Press the CARD+/-
button
to move between
images.
m
°m
Pressthe CARD + button to display the next image and the
CARD - button to display the previous _mage.
3. _
To play back a movie,
press the I_/11 button.
o
a.
The last scene appears as a still image when playback is
complete.
111
Index Semen
F
1. In single image display, press the []
(index screen)
[]
button.
• Up to 6 images appear
• _
Movies are displayed with the first scene as a still
image indicated by "_
"
2. Press the CARD +/- button
to change the image
selection.
3. Move the G_ mark to the image you wish to view.
• Turn the selector dial up to move to the next image and down
to move to the prewous image
• Turning the selector dial up on the last image displays the next
index screen. Turning the selector dial down on the first image
displays the previous index screen
4. PreSS the
[]
(index screen) button.
[]
The index screen is canceled and the selected image appears _n
single image display
S!ida _bo_
m
.............
_
1. In single image
button.
_
.....
display, press the SLIDE SHOW
Images are played back one after another.
._
112
M_X/
SNOW
t¢
2. Press the SLIDE SHOW
button
to stop the slide show.
C_d Jump Euncti_n_
You can locate still images/movies without displaying them one by one. The number in
the upper right of the screen indicates the image number of the current image by the
total number of images,
4
In single image display, press and hold the CARD + or
CARD - button.
• Pressthe CARD + button to jump forward and the CARD - button
to jump backward.
• When you releasethe button, the still image/movie of the
displayed image number appears
m
&
113
Protecting
F
Images
[]
[]
You can protect important images from accidental erasure during single image display
or index screen display,
H
if a memory card is formatted, all images, even protected ones, will be erased
permanently.
0 The sample images recorded on the supplied SD Memory Card are already
protected
0 I_Movies
can only be protected when the first or last scene is displayed
as a still image. They cannot be )rotected during playback pause
0 Make sure to insert a memory card that contains _mages
Protecting dur_ing 5i_g!_ lm_g_Displ_y
1. Select the image you wish to protect.
2. Press the selector dial to open the FILE OPERATION
menu.
3. Select [PROTECT o_].
• "_1"
appears and now the image cannot be erased
• To cancel the protection, press the selector dial
4. Select [€= RETURN] to close the menu.
_rQtacting
I_ll
MENU(c[3
44)
_
Q_
d_ing
Index, Scr_e¢_Disp!_
[CARO
OPE"AT_O"SI)_I_PROTECT°_
1. In single image
display, press the
[]
(index
screen) button.
Up tO 6the
images
appear
2. Open
menu
and select [CARD OPERATIONS].
3. Select [=_ PROTECT o_].
4. Select the image you wish to protect
• "0-."
and press the selector dial.
appears on the image.
• Repeat this step to protect more _mages
• TOcancel the protection, press the selector dial
5. Press the MENU button.
To cancel the protection, press the selector dial in step 4 "o-."
the image can now be erased.
disappears and
Erasing
Images
[] []
4
You can erase images singly or all at once,
H
Be careful when erasing images. Erased images cannot be recovered.
Q Protected images cannot be erased
O _
Movies can only be erased when the first or last scene is displayed as
a still image They cannot be erased in playback pause mode
O Make sure to insert a memory card that contains images.
Fra_inn
a _innl_
Im_n_
1, Select the image
you wish to erase,
2, Press the selector dial to open the FILE OPERATION
3, Select [IMAGE
menu.
ERASE].
• "ERASETHIS IMAGE?", ]NO] and [YES]appears
• If an image is protected, [YES] appears in purple
4. Select [YES].
The image is erased and tile prewous image appears
5. Select [_
RETURN[ to close the menu.
Er_asJng_ SingleJm_age/A!|
.................................................
J
...........................................
l
.............................................
m
°m
1, Open the menu and select [CARD OPERATIONS].
2, Select [IMAGE ERASE].
3, Select [SINGLE] or [ALL[.
IlL
ii_/
&
• When erasing a single image: "ERASETHIS IMAGE?" [NO] and
o
&
]YES] appears if an image is protected, [YES] appears in purple.
• When erasing all images: "ERASE ALL IMAGES? ]EXCEPTFOR O_ IMAGES]", ]NO]
and [YES]appears.
4, Select [YES] and close the menu.
• When erasing a single image: The image is erased and the prewous image appears To
erase another image, select the image with the CARD +/- button and select [YES]
• When erasing all images: All images with exception of the protected images are erased.
115
Selecting Still Images for Printing (Print Order) [] []
F
You can select still images for printing
and set the number of copies These print order
settings are compatible with the Digital Print Order Format (DPOF) standards.
H
O
sure toofinsert
memory
contains _mages
O Make
A maximum
200 astill
imagescard
can that
be selected
O _
Movies cannot be printed
r
1. Select the still image you wish to print.
2. Press the selector dial to open the FILE OPERATION
3. Select [i_
PRINT ORDER].
4. Select the number
• "i_
menu.
of copies.
" appears on the image.
• To cancel the print order; set the number of copies to 0
5. Select [4= RETURN] to close the menu.
Se e¢_ og io l_d_¢_en_J_101_y
................................................
1. In single image
_
I
display, press the []
.....
(index screen) button.
p to 6the
images
appear
2. Open
menu
and select [CARD OPERATIONS].
_
3. Select [=€ _ PRINT ORDER].
4. Select the still image you wish to print and press the selector dial.
._
5. Set the number
• "i_
of copies with
the selector
dial and close the menu.
" appears on the image
• To cancel the print order, set the number of copies to 0
• Repeat steps 4 and 5 to continue the print order setting
E_iBg
A!! _[i_
Qrd_[_
....,_
_ _A00
oPE°A.,oNs
I_loP0,..
ORO_OS
A._°AOE 4
1. In single image display, open the menu
2. Select [_
and select ]CARD OPERATIONS].
PRINT ORDERS ALL ERASE].
"ERASEALL i_ PRINTORDERS?", [NO] and [YES]appears
3. Select [YES].
All " i_ " disappear.
4. Select [4= RETURN] to close the menu.
m
g
117
Printing
F
with the Direct Print Function
[] []
You can print still images by connecting the camcorder to a Canon Bubble Jet Printer
with Direct Print function
The Direct Print function can a?so be used with the print
order settings ([_] 116).
H
O Observe
the following
be performed
correctly precautions during printing, otherwise printing may not
- Do not turn off the camcorder or the printer
- Do not change the position of the TAPE/CARD switch
- Do not detach the cable.
- Do not remove the memory card
O Canon Bubble Jet Printers with Direct Print function (as of January 2003):
$830D, $820D, $530D
O We recommend powering the camcorder from a household power source
O Refer also to the instruction manual of the respective printen
%
m
Canon Bubble Jet Printer with direct
_!
1. Turn off the camcorder
._
2. Connect a power
3. Set the camcorder
I_ print functi°n
and insert a memory card that contains
images.
source to the printer and turn on the printer.
to CARD PLAY (VCR) mode.
Wait until the ca_ accessindicator stops flashing
4. Connect
_i
the camcorder
to the printer
using the cable.
appears when the printer is properly connected to the camcorder. (Does not
appear with movies, or still images that cannot be played back with the camcordeQ
1. In single image
display, select the still image
you
4
wish to print and press the selector dial.
The print setting menu appears.
2. Set the number
of copies and the print style.
• Selecting the Number of Copies
• Setting the PrintStyle
3. Select [Print] and press the selector dial.
Printing starts The print setting menu disappears when printing
is complete.
if an error message appears, see Printing Errors ([_
Messages ([_ t40)
121) and Direct Print Related
Sel e¢:l;Jng
A maximum of 9 copies can be selected for one still image.
1. In the print setting
that
_
appears
menu, turn the selector dial so
next to [Copies] and press the
selector dial.
2. Turn the selector dial to select the number
of copies and press the
selector dial.
Paper Size
Borders
_
Guide.Card
#1", Card
#2", Card
For details
on paper
type, #3",
referLTR,A4
to the Rubble Jet Printer User
_.
Borderless I Prints
Pdnts with
right atoborder
the edges of the page
Bordered
* Recommended paper size
119
1. In the print setting menu, turn the selector dial to
select [Style] and pressthe selector dial.
2. Make sure that D is selected and press the selector
dial.
3. Turn the selector dial to select the paper size and pressthe selector dial.
4. Pressthe MENU button.
Youreturn to the print setting menu
_!_i_g
th_ _ord_rs;
1. In the print setting
menu, turn the selector dial to
select [Style] and press the selector dial.
2. Select _ and press the selector dial.
m
3. Select a setting option
and press the selector
dial.
4. Press the MENU button.
You return to the print setting menu
0 Bordered: The image area remains relatively unchanged from the recorded
image when it is printed.
0 Borderless: The center portion of the recorded image is printed at an enlarged
size. The image's top, bottom and sides may be cropped slightly
120
_rinting
with Pdnt-Orde_$_ttings
You can print still images you have selected with the Print Order function. If you wish
to print more than 1 copy, set the number of copies in the print order ([_] 116).
4
..............................................
.................................................................
I ...................................
..................................
MENU([El
44)
[,,k_ PRINT
1. Connect the printer to the camcorder
([:[:3 118).
2. Press the MENU button.
3. Select [=d__
PRINT].
• The print setting menu appears
• "Set print order" appears, when you connect a printer with direct print function and
select ._ PRINTwithout having set the print order
• The total number of prints set in the print order is displayed on the upper left of the
screen
4. Set the print style.
Setting the Print Style ([_3 119)
5. In the print setting
menu, select [OK] and press the selector
dial.
Printing starts The print setting menu disappears when printing is complete.
0 Cancel Printing
Pressthe selector dial while "Now Printing" is displayed. A confirmation dialog
appears. Select [OK] and press the selector dial. Printing stops even if it is
incomplete and the paper is fed through
0 Restarting Printing (with i_ print order only)
Open the CARD PLAY (VCR) menu and select ]_
i_ PRINT]. Select [Restart] in
the print setting menu and press the selector dial. The remaining images will
be printed
Printing cannot be restarted in the following cases:
m
- When you change the print order settings
- When you delete a still image with print order settings
0 Printing Errors
If an error occurs during the printing process, an error message appears
([._ 140). With most errors, printing resumes automatically after you correct
the error If the error persists, press the selector dial to cancel printing
0 Follow below procedure when disconnecting the interface cable:
1 Disconnect the cable from the camcorder and printer
2 Turn off the camcorder.
121
Combining
F
Images
(Card
Mix)
[]
[]
You can produce effects not possible with just a tape with the Card Mix function.
Choose one of the sample images provided on the supplied SD Memory Card (such as
picture frames, backgrounds and animations) and combine it with the live video
recording.
H
C)
Mix Movies
cannot be
used inonthe
Night and
Super
Night
MC) mode.
O Card
_
recorded
a memory
card
cannot
be (ZR7O
combined
with
camcorder recordff_gs
O Make sure to load a cassette and to ff_serta memory card that contains card
mix images
O Additional sample images are provided on the supplied DIGITAL VIDEO
SOLUTION DISK For instructions on how to upload them to the memory card,
refer to Adding Still Images from Your Computer to the Memory Card in the
DIGITAL VIDEO SOLUTION DISKSoftware Instruction Manual
O Reselect the card mix image when you have turned off the camcorder or
changed the position of the program selector
You can select from the following 4 types of Card Mix effects:
Card Chroma
Key (CARD CHROMA)
Combines frames with your recordings. The live video recording will appear in place of
the blue area of the card mix image If you create your own frame, make sure that the
area the live recording should appear is blue.
Mix level adjustment: blue area of the still image
m
Live video recording
.$
Card mix image
Card Luminance
Key (CARD LUML)
Combines illustrations or title with your recordings. The live video recording will
appear in place of the light area of the card mix image. You can create your own title
or illustration
by drawing on a white paper and recording it to the memory card.
4
Mix level adjustment: light area of the still image.
Livevideo recording
Camera
Combines
curtain,
Chroma
Key (CAM.
backgrounds
with
and the subject
Mix level adjustment:
Card mix image
CHROMA)
your recordings,
Record
not blue will be superimposed
blue area of the live video
Live video recording
your subject
in front
of a blue
on the card mix image.
recording,
Card mix image
-I-
Card Animation
(C. ANIMATION)
Combines animations with your recordings. You can choose from 3 types of card
animation effects,
Corner: Animation
Straight: Animation
appears on the upper left and the lower right corner of the screen.
appears on the top and bottom of the screen and moves to the
m
right and left,
Random: Animation
moves randomly in the display.
Mix level adjustment: blue area of the card animation
Livevideo recording
image.
Card mix image
-I-
123
5electing _h_ Card Mix Effect
(_44
1. Set the program
2. Open
selector to [_.
_[_
the menu and select [=_ CARD MIX].
The card mix menu appears
3. Select the image you wish to combine
II.
_\_.
with the
CARD +/- button.
4. Select [MIX TYPE].
[CARD CHROMA], [CARD LUMI ], ]CAM CHROMA] and ]C. ANiMATiON] appears
5. Select the mix type matching
the image you have selected ([22 132).
• The screen shows the combined image
• When you have selected [C ANIMATION], select ]ANIMAT TYPE] and select between
]CORNER],[STRAIGHT]and [RANDOM].
6. TO adjust the mix
selector
level, select [MIX
LEVEL] and adjust it with the
dial.
7. Close the menu.
MENU
%
"CARD MIX" flashes.
m
_
A'c't'!vat'!n'g"the'_ard"M!'x"Eff"e'
"ctl.Press the CARD MIX button.
..........................................................................................
E_
• The combined image appears
=
.E
• You can activate and deactivate the card mix effect by pressing
the CARD MiX button
_
SHOW
Movie:
1. Press the start/stop
button
to begin recording.
The combined image is recorded on the tape
2. Press the start/stop
button
4
to end recording.
Still image:
1. Press the PHOTO
button
halfway.
0 flashes in white and turns green when focus is adjusted
2. Press the PHOTO
button
fully,
• The camcorder records the still image on the tape for approx 6
seconds During this time, the camcorder displays the still
image and keeps recording the sound
• The camcorder returns to record pause mode
m
125
Copying
F
Still
Images
[]
[]
You can copy still images from tape to memory card, or from memory card to tape.
O All still images from the selected still image onward will be copied
O The image size of a still image copied from tape to memory card will be 640 x
48O
O The data code of the still image reflects the date and time it has been copied
Cnnvinn
_till
Im_n_frnm
T_n_
tn M_mnrvC_rd
Insert a memory card with enough remaining capacity, and load a recorded cassette.
1. Locate the still image you wish to copy on the tape
and stop the tape shortly before the still image.
• You can also use the photo search function to easily locate the
still image.
• To copy all still images from the tape, rewind the tape to the beginning
2. Open
the menu and select [CARD OPERATIONS[.
3. Select [COPY [_
=d_1:=3
[ ].
[CANCEL] and [EXECUTE]appears
4. Select [EXECUTE[.
• "NOW COPYING" appears
m
• The still image being copied is shown on the screen
• Copying stops when the tape reaches the end or the memory card is full ("CARD
FULL" appears)
m"
S. Press the • (stop) button
.$
to end copying.
¢_pying 5_i!1!magus from M_mo_ Card _ Tap_
Load a cassette with enough free space, and insert a recorded memory card. Make
4
sure that the protect tab on the cassette is set to allow recordin
..............................................
.................................................................
I ...................................
..................................
1. Select the first still image you wish
to copy with
the
CARD +/- buttons.
TOcopy all still images from the memory card, select the first still
image.
2. Open the menu and select [CARD OPERATIONS[.
11.
3, Select [COPY [r_ ,,,1._] ].
[CANCEL] and [EXECUTE]appears
4. Select [EXECUTE].
I_E_I
_
<.
• "NOW COPYING" appears
• It takes about 6 seconds per still image to be copied to the tape
• Copying stops when all still images are copied or the tape is full
5, Press the •
(stop) button
to end copying.
m
127
Formatting
a Memory
Card
[]
[]
Format new memory cards, or when you get the message "CARD ERROR". You can
also format a memory card to erase all images recorded on it.
The camcorder formats memory cards in the Design rule for Camera File system (DCF)
standard.
H
0 Formatting a memory card erases all data, including protected images
0 Images erased by formatting cannot be recovered
0 If you use a memory card other than the supplied one, format it with the
camcorder
0 Makes sure to insert the memory card you wish to format into the camcorder
[0AR0
0.s
I EFOR°,,
1. Open
the menu and select [CARD OPERATIONS[.
2. Select [FORMAT].
[CANCEL] and [EXECUTE]appears
3. Select [EXECUTE].
[FORMATTHIS CARD?], ]NO] and [YES]appears.
4. Select [YES] and close the menu.
• Formatting starts
• Selecting [NO] brings you back to step 3
m
t¢
.$
Connecting to a Computer Using a USB Cable
You can download
images from the memory card to a computer using the supplied
USBcable, With the supplied software, you can easily download,
browse and archive
4
images, and arrange still images for printout,
For instructions
on how to connect
install and operate
DISK Software
the software,
Instruction
the camcorder
to the computer,
and
refer to the DIGITAL VIDEO SOLUTION
Manual.
• Refer also to the computer instruction manual
• "PC CONNECT _
" appears to indicate that the camcorder is
connected to the computer via USBcable
0 Do not disconnect the USB cable, remove the memory card, change the
position of the POWERswitch or turn off the camcorder and computer while
data is being transferred to the computer (while the camcorder's card access
indicator is flashing) Doing so may damage the memory card's data
0 Operation may not work correctly depending on the software and the
specifications/settings of your computer
O The image file on your memory card and the image files saved on the hard disk
drive of your computer are valuable, original data files if you wish to use
image flies on your computer; make copies of them first, and use the copied
._. m
,_ Pa
_ _1
U
file, retaining the original
O We recommend powering the camcorder from a household power source
while it is connected to the computer
O _
&
The light-up buttons turn off during USBconnection
O For transferring recordings from to a computer using a DV cable, see p. 99.
O Still images/movies recorded on a tape cannot be transferred to a computer wa
USBinterface.
129
Creating
F
a Start.up
Image
You can create a start-up image using a still image on the memory card or a sample
start-up image provided on the DiGiTAL VIDEO SOLUTION DISK and save it as [MY
IMAGE]
O Make sure to insert a memory card with enough remaining capacity
O Before you create a start-up image, you need to record a still image on the
memory card
O Retain the original data of the still image you have set as the start-up _mage on
your computer or removable disk.
...................................................................................
Record a still image on the memory
card.
OR
Upload a still image from your computer to the memory
software in the DIGITAL VIDEO SOLUTION DISK.
card using the
For instruction on how to upload a still image to the memory card, refer to Adding Still
Images from Your Computer to the Memory Card in the DIGITALVIDEO SOLUTIONDISK
Software Instruction Manual
..............................................
1. Open
the menu.
2. Select [MY CAMERA].
_
3. Select
[CREATE
START-UP
IMAGE].
[SETTHIS
AS START-UP
iMAGE?],
[YES]and [NO] appears
_
4. Select a still image with the CARD +1- buttons
and select [YES].
[OVERWRITEMY IMAGE?],IYES] and [NO] appears.
t¢
._
5. Select [YES].
The still image will be saved, and the image that was saved to [MY iMAGE] is erased
Memory
Card
Information
tmages recorded on a memory card with this camcorder can be transferred
computer using the following
PCCard Adapter:
to a
products for SD Memory Cards or MuitiMediaCards:
An adapter to insert a memory card into the card slot on the
computer.
USBReaderNVriter: Connects to the USBport of a computer for direct accessto the
memory card.
FD Adapter:
An adapter to insert a memory card into the floppy disk drive on
the computer.
Memory
Cards that are confirmed
(as of January
to operate
with
this camcorder
2003):
SD Memory Card: Panasonic: 16 MS, 32 MB, 64 MB, 128 MB, 256 MB, 512 MB
SanDisk: 16 MB, 32 MB, 64 MB
MultiMediaCard:
SanDisk: 16 MB, 32 MB, 64 MB
However, we cannot guarantee that all of these memory cards work properly.
M_m_ry
¢_rd Handling Rre_;_i_ns
O Format new memory cards with the camcorder. Memory cards formatted
..............
with
other devices such as a computer may not operate correctty.
C) We recommend saving backups of memory card images on your computer's hard
drive or other external memory device, tmage data may be corrupted or lost due to
memory card defects or exposure to static electridty. Canon Inc. makes no
warranties for corrupted or lost data.
O Do not turn off the camcorder, disconnect the power source or remove the memory
card while the card access indicator is flashing.
O Do not use memory cards in places subject to strong magnetic fields.
O Do not leave memory cards in places subject to high humidity and high
temperature
_
O DO not disassemble memory cards,
O Do not bend, drop, or subject memory cards to shocks and do not expose them to
__I_
g
o
water,
O Moving a memory card rapidly between hot and cold temperatures may cause
condensation to form on its external and internal surfaces If condensation forms
U
_,
a.
on the card, put it aside until the droplets have evaporated completely.
O Do not touch or expose the terminals to dust or dirt.
O Store and carry memory cards in the supplied case to protect the terminals.
O Check the direction before inserting the memory card. Forcing a memory card
backwards into the slot may damage the memory card or the camcorder,
O Do not remove the label from the memory card, or affix other labels on the
memory card. if you wish to add labels, affix them to the case.
] 3]
F
_amgle
Images .......
27 sample images are pre-recorded on the supplied SD Memory Card: 8 card chroma
key images, 5 card luminance key images, 2 camera chroma key images and 12 card
animation images.
Card Chroma
Key
Card Luminance Key
Camera
Chroma
Card Animation
Key
H
The sample images recorded on the supplied SD Memory Card are intended only
for the personal use with this camcorder Do not use these sample images for
other purposes
if you have mistakenly erased the Card Mix sample images on the supplied SD
Memory Card, they can be downloaded from the homepage
http://www cano ndv.com
4
For details on how to add the downloaded images to the memory card, refer to
Adding Still Images from Your Computer to the Memory Card in the DIGITAL
VIDEO SOLUTION DISK Software Instruction Manual
if you cannot use the USBcable to connect the camcorder to a computer, you will
need a PC Card Adapter to upload the images to a memory card
PhotoEssentiaB - Royalty Free Stock Photography
The PhotoEssentials suite of royalty-fl_e images on CD-ROM features premium quality assignment
photography and is ideally suited for use in advertising, brochures, reports, multimedia, webs_tes,
books, packaging and mo_
for more information,
please visit their website tMww photoessentials corn
m
q
133
Screen
F
Displays
[]
LCD Screen DLsplay_
You can hide the displays on the LCD screen to have a clear screen for playback.
Open the menu and select [DISPLAY SET UP]. Select [DISPLAYS],
set it to
[OFF <PLAYBK>] and close the menu.
• The LCD screen will become completely blank (also the %/screen if connected)
• Warning messages still appea_ and the data code appears if turned on
• Tape operation displays appear for 2 seconds.
• _1"_'7_!__l'_r_!_
Displays cannot be hidden on the index screen
S_m_nD_p!_y_
When you connect a 1_/for recording/playback,
screen. For connecting
you can hide the displays on the TV
instructions, see Playing Back on a TV Screen (_
• When the POWERswitch is set to CAMERA: The displays
disappear from the TV screen and appear when you press the
button again.
41).
I........
_]
[_
_
'_
• When the POWERswitch is set to PLAY (VCR):The displays appear on the connected TV
screen and disappear when you press the button again The setting resets to the OFF
setting when you turn the camcorder off
When the TV screen displays are hidden, the displays still appear on the LCD screen If
you turn on the data code, displays other than the data code will disappear from the LCD
screen
o _
You can also change the setting in the menu during recording:
< __
.................
Open the menu and select [DISPLAY SET UP]. Select [TV SCREEN], set it to
[OFF] and close the menu.
5cm_n Displays dud_g BasicRe¢_rding_/ayb_¢k
_
indicates flashing.
CAMERA
mode (battery
• Remote
sensor mode
pack attached):
and audio
mode
0:Q0_90
disappear
after
[_
4
seconds,
_¢_ 1
12bit
Oil__ PAUSE
PLAY (VCR) mode:
O:O0:O0_O0
_:] 5rain
• Remote sensor mode and vo]ume bar disappear after 4
seconds,
STERE01
REC
PAUSE
STOP
EJECT
FFI,_
<< REW
_J_]
STO Z
RTN I_/<1_1 RTN
: Fast forward playback/
: Zero set memory (for_va_d
rewind playback/l:_ 38)
and leverse) (C_86)
x21_/_lx2:x2
playback
(forward and revelse) (1_38)
01011: AM insert editing (ED94)
xll_/4xl
: xl playback
=/€11: Audio dubbing (1:D96)
(forward and revelse) (1_38)
I_141
: Slow playback
(forward and revelse) (1_38)
I1_/_111
: F_ameadvance playback/
frame reverse playback (ED38)
!_11/1141 : Playback pause
(forward and revelse) (ED38)
I_ / N4
: Date searclVphoto search (ED85]
/_
m
135
CAMERA Mode
............................................................................................
"
_69 ...................................
_ .........
Recording reminder/
Image stablhzer {
)
Self4imer countdown (_] 705/
.....................................................................................
Photo recording timer (_ 55)
Z_°_,;_(;07)7)
]
........................
Recording mode
As,
........................................................
Program AE (_ 57) ............................
.¢_ __i_
_1¢_
--- Self4imer (m 70)
,
_,
Shutter speed [_/b/_°°°
I AE +0
_s0
,F
Card mix ( _122 5_ - ./-CAaD_BX
_ADE_
' '
S Q36
Dlg_ta_effect (
)_ _ _!t2 0_ P_
Date
and
/
.
Heaup
O
.....................................
jI
......
,
'
_St@ J Audomode
m71)
12_1t!
_g_g ' 16-9 mode (_ 525
....................
mode
" ' in
...................................
_L .........................
Accessory attached to
AFIAE iocKeu ........................
the Advanced Accessory
Photo mode (_ 55)
shoe* (_ 735
pLAY (VCR) Mode
...............................................................................
...............
Photo search/
_
Date search (m855
12bit audio out (_ 98) °°°i_'x'wR'.
[- ,_ C ,_
S[ARC. _1,_
! t° Volume Ievel of buittqn
Photosearch/
PHOTO -._,_¢_*{3 speaker or headphones
Date
search (_................................................
85)/
I(.......................
AV insert (c_94)/
_li_o_
av/_[
Audio dubbing (_965
,_oo_
l,_,t_ Audio
(_405 mode (_ /_.._)
Data code (_835 .....................
f
136
[.............
DV input (_u90)
._
_
CARD CAMERA Mode
...............................................
St tch assist (D3107 ............................................................................................
Recording on a memory
card (ra 04)
......
....................
Still image quality (= 101)
Loom _uJ_u) .....................................................................
Rema n ng card capac ty
(=101)
Program AE (= 57)__
_. _........
m
_'P_>>>>G_0]I Still image size
A_
SMITI tLM//)
.................................
iAE ±0
........................
i_F
(_ 101_
_3
\
Manual focus .......................00
Move s ze* (= 102)
{_nu_._.er
7ps_)ee,.1...................I
.....................................
Self4imer
(m70
L
(= 78)
.......
,_o_,_o3
White balance ................t___
• [] E_CtO_
Stitch assist (= 107)
(=8o)
Date and time (= 83)
AF/AE locked in ...................................................................................
............................................
Accessory attached to
Photo mode (_3104)
the Advanced Accessory
shoe* (m 73)
._.._...C.Ap.._Y..!VC._.)...M....o...d._
.....................................................
Print order (_ 116) .............................................................
I /.................................................
Protect mark (= 114)
............................
Folder numberFile number {= 102)
<'4
h wfEa112_ ...............
_,'_--_/
_l_e s o ,
" ..........................................................
<<<_Current
still image/
I
Accessing.........................................
amemorycard(_3111)
_ _ _ P_
........jAH._,2003
Data code (= 83) .............
/ I
"-"
I
Total still images
/
/
m
137
List
F
of Messages
Message
SET THE TIME ZONE,
DATE AND TiME
Explanation
You have not set the time zone, date and time, This message
appears each time you turn the power on until you set the
time zone, date and time_
_[_
25
CHANGE THE
BATTERY PACK
Battery
pack_
16
THE TAPE IS SET FOR
ERASURE PREVENTION
Cassette is protected. Replace the cassette or change the
_osition of the protect switch_
23
REMOVE THE
CASSETTE
Camcorder
and reload
22
CHECK THE DV INPUT
DV cable is not connected,
turned off_
CONDENSATION HAS
BEEN DETECTED
Condensation
TAPE END
Tape reached the end_ Rewind the tape or replace the
cassette_
22
CHECK THE CASSETTE
[REC MODE]
You attempted
tape recorded
54
CHECK THE CASSETTE
[AUDIO MODE]
You attempted
to perform audio dubbing on a tape
recorded in 16-bit or 12-bit 4_channel sound.
96
CHECK THE CASSETTE
[BLANK]
You attempted
to perform
tape with a b_ank sectiom
94
pack is exhausted_ Replace or charge the battery
stopped operating
the cassette_
COPYRIGHTPROTECTED You attempted
PLAYBACK ISRESTRICTED
COPYRIGHT
PROTECTED DUBBING
RESTRICTED
m
<=
138
to protect
the tape. Unload
or the connected
has been detected
digital
device is
in the camcorder_
143
to perform audio dubbing or AV insert on a
in a mode other than the SP mode.
audio dubbing
to play back a copyright
or AV insert on a
protected
go
tape.
You attempted
to dub a copyright protected tape, May also
appear when an anomalous signal is received during analog
line-in recording, or during analog-digital
conversion of a
copyright protected tape,
91
91
_
Memory
Card Related Messages
Message
NO CARD
Memory
THE TAPE IS SET FOR
ERASURE PREVENTION
SD Memory Card is set for erasure prevention. Replace the
card or change the position of the protect switch.
100
NO iMAGES
No images are recorded
111
CARD ERROR
A memory card error occurred. The camcorder cannot record
or play hack the image.
The error may be temporary. If the message disappears after
4 seconds and _flashes
red, turn the camcorder off, remove
the card and reinsert the card. Ift_ changes to green, you
can continue recording/playback.
100
CARD FULL
NO remaining capacity on the memory card. Replace with
another card or erase images.
File or folder number has reached the maximum value.
115
image is recorded in a not compatible JPEG format or
another format not compatible with the camcorder, or the
image file is corrupted.
111
NAMING
ERROR
UNIDENTIFIABLE
IMAGE
_PRINT
Explanation
card not is inserted into the camcorder.
ORDER ERROR YOU attempted
order.
THIS IMAGE CANNOT
BE RECORDED
on the memory
card.
to set more than 200 still images in the print
Some analog images cannot be recorded
card depending on the signal.
on the memory
100
4
102
116
106
m
139
F
Message
No Paper
Explanation
Paper cassette is not correctly inserted or is out of paper.
Paper Jam
The paper jammed
No ink
The ink cartridge
Communication
m
140
Error
during
printing.
is not inserted or is out of ink.
The printer is experiencing
a data transmission
error.
Could not print X
images
You attempted
to use the print order settings to print X images
that were made with another camcorder, have a different format
or were edited on a computer.
Cannot Print_
You attempted
to print an image that was made with another
camcorder, has a different format, or was edited on a computer.
Set print order
You attempted
to print an image from the Card Play menu
I,_ PRINT] without having set the print order.
Printer
in use
The printer is printing from a computer or a memory card inserted
into the printer. It automatically
starts printing from the
camcorder when current prints are complete.
Printer
warming
Up
Printer is warming
when it is ready.
up. The printer
No printhead
No print head is installed
Printer
Printer
cover open
automatically
starts printing
in the printer.
cover is open. Close the printer
cover securely.
Media type error
Wrong paper. Cancel printing
print settings menu.
Paper lever error
Paper lever error occurred.
proper position.
Low ink level
The ink tank needs to be replaced soon. Prepare a new ink tank. If
rou select [Continue] in the error screen, you can restart printing.
Waste tank full
Waste tank is full. You can restart printing
RESUME/CANCEL button on the Bubble Jet
replacement of the waste tank at the shop
the printer or the nearest Canon customer
the Bubble Jet Quick Start Guide.
Printer
Turn off the printer and turn it back on. If the error persists,
consult the nearest Canon customer support center listed in the
Bubble Jet Quick Start Guide.
error
and set the paper you chose in the
Adjust the paper selection
lever to the
by pressing the
Printer. Request
where you purchased
support center listed in
Maintenance
O Do not carry the camcorder by the LCD panel or viewfindeL
O Do not leave the camcorder in places subject to high temperatures, such as a sunheated car, and high humidity.
O Do not use the camcorder in places subject to magnetic or electric fields such as
near the TV transmitters or portable communication
O Do not point the lens or viewfinder
devices.
at strong light sources. Do not leave the
camcorder pointed at a bright subject.
O Do not use the camcorder in dusty or sandy places. Dust or sand getting inside the
cassette or camcorder may cause damage. Dust and sand can also damage the lens.
Attach the lens cap after use.
O The camcorder is not waterproof.
Water, mud or salt getting inside the cassette or
camcorder may cause damage.
O Be careful of heat generated by lighting equipment.
O Do not disassemble the camcorder. If the camcorder does not function properly,
consult qualified service personnel
O Handle the camcorder with care. Do not subject the camcorder to shocks or
vibration as this may cause damage.
O Avoid sudden changes in temperature.
and cold temperatures
([_
Moving the camcorder rapidly between hot
may cause condensation to form on its internal surfaces.
143)
O If you do not intend to use the camcorder for a long time, store it in a place free of
dust, in low humidity, and at temperatures
not higher than 86_F(30°C)
O After storage, check the functions of your camcorder to make sure that the
camcorder is still working properly.
Cleaoing
Camcorder Body and Lens
O Use a soft, dry cloth to clean the camcorder body and lens. Never use chemically
treated cloth or volatile solvents such as paint thinner.
_
_ -_:
O
_* _
LCD Screen
O Clean the LCD screen using a commercially available cleaning cloth for glasses.
O Condensation may form on the surface of the screen when the temperature
changes suddenly. Wipe it with a soft dry cloth.
lal
m
O At cold temperatures, the screen may be darker than usual. This is not a
malfunction.
The screen returns to normal when the camcorder warms up.
Viewfinder
C) Rotate the viewfinder upward. Remove the protect cover
and clean the glass with a cotton swab. Reattach the
protect cover when finished.
C) Be careful not to scratch the glass when cleaning.
Video Heads
O When the playback picture becomes distorted, the video heads need to be cleaned.
C) To maintain the best picture quality, we recommend cleaning the video heads
frequently
with the Canon DVM-CL Digital Video Head Cleaning Cassette or a
commercially available dry cleaning cassette
C) Do not use wet type cleaning cassettes as this may damage the camcorder,
Moving the camcorder rapidly between hot and cold temperature
condensation
may cause
(water droplets) to form on its internal surfaces Stop using the
camcorder if condensation
Condensation
may form
is detected. Continued use may damage the camcorder,
in the following
cases:
When the camcorder is moved from an
When the camcorder is moved from a
air-conditioned
cold place to a warm room
room to a warm. humid
4
place
When
the camcorder
is left in a humid
When a cold room is heated rapidly
room
HOW to avoid
condensation:
c) Unload the cassette, place the camcorder in an airtight plastic bag and let it adjust
to temperature
When
changes slowly before removing it from the bag.
condensation
is detected:
0 The camcorder stops operating and the warning message "CONDENSATION HAS
BEEN DETECTED" appears for approx. 4 seconds and • starts flashing.
C) If a cassette is loaded, the warning message "REMOVE THE CASSEI-i-E" appears and
_
starts flashing. Remove the cassette immediately and leave the cassette
compartment
C) A cassette cannot be loaded when condensation
Resuming
m
open. Leaving the cassette in the camcorder may damage the tape.
is detected.
o
use:
C) It takes about 1 hour until the water droplets evaporate. After the condensation
warning stops flashing, wait for 1 more hour before resuming use.
143
Power Sources
You
can packs
use the
power
operate
the camcorder
andV to
charge
battery
in compact
any country
with adapter
power to
supply
between
100 and 240
AC,
50/60 Hz.
Consult the Canon Service Center for information
Playback
on plug adapters for overseas use.
on a TV Screen
You can only play back your recordings on TVs with NTSCsystem. The NTSC system is
used in the following
countries/areas:
American Samoa, Antigua, Aruba, Bahamas, Barbados, Bermuda, Bolivia, Canada,
Chile, Columbia, Costa Rica, Cuba, Ecuador, El Salvador, Guam, Guatemala, Greenland,
Haiti, Honduras, Jamaica, Japan, Korea, Mexico, Micronesia, Myanmar, Nicaragua,
Panama, Peru, Philippines, Puerto Rico, Saint Kitts and Nevis, Saint Lucia, Saint Vincent
and the Grenadines, Surinam, Taiwan, Trinidad and Tobago, USA, Venezuela, Virgin
Eslands.
m
144
Troubleshooting
If you have a problem
or a Canon
with
Service Center
your
camcorder,
if the problem
refer to this checklist.
Consult
your
dealer
[_
persists.
Power Source
Problem
Camcorder
will
Solution
Cause
not
turn
Battery
pack
Replace or charge the
battery pack.
is exhausted,
on,
The camcorder
off by itself.
switches
Cassette compartment
will not open,
16
Battery pack is not correctly
attached.
Attach the battery
correctly.
Battery pack is exhausted.
Replace or charge the
battery pack.
Turn on the camcorder.
16
Battery pack is exhausted.
Replace or charge the
battery pack.
16
Cassette compartment
is not fully open.
Open the cassette
compartment
cover fully.
22
16
Power save function
been activated.
has
cover
pack
_3
16
28
Cassette compartment
stopped during loading/
unloading,
Battery pack is exhausted,
Replace or charge the
battery pack.
The camcorder
malfunctions.
Consult
Center.
LCD/viewfinder
on and off.
Battery pack is exhausted.
Replace or charge the
battery pack.
16
Turn on the camcorder.
28
Load a cassette.
22
16
switches
a Canon Service
Recording/Playback
Buttons
will not work,
Camcorder is not turned
Cassette is not loaded.
on.
<%3flashes on the
screen.
[] flashes on the screen.
Battery pack is exhausted.
Replace or charge the
battery pack.
Condensation
See reference
"Remove the cassette"
appears on the screen.
Camcorder stopped
operating to protect
tape.
The wireless controller
will not work.
Camcorder and wireless
controller are not set to the
same remote sensor mode.
is detected.
the
Batteries of the wireless
controller are exhausted.
143
page.
Unload and reload the
cassette.
22
Change the remote
modes.
49
Replace the batteries.
sensor
m
24
145
F
Recording
Problem
Cause
Solution
Set the camcorder to
CAMERA mode.
[_
Time zone, date and time
are not set. or the backup
battery is exhausted.
Set the time zone, date and
time, or replace the backup
battery and reset the date
and time.
25
Camcorder
Turn on the power.
Load a cassette.
28
Image will not appear
on the screen.
Camcorder is not set to
:AMERA mode.
"Set the time zone. date
and time" appears on
the screen,
Pressing the start/stop
button will not start
recording.
Camcorder
focus.
will not
is turned
off.
Cassette is not loaded.
22
Cassette is protected (_
flashes on the screen).
Replace the tape or change
the position of the protect
switch.
23
Camcorder is set to a mode
other than the CAMERA mode.
Set the camcorder
CAMERA mode.
28
Autofocus
Focus manually.
75
Adjust the viewfinder with
the diopter adjustment lever.
20
does not work on
Lens is dirty.
to
141
Clean the lens.
A vertical light bar
appears on the screen.
Bright light in a dark scene
may cause a vertical light
bar (smear) to appear. This is
not a malfunction.
Sound is distorted or
recorded in a lower
volume than the actual
volume.
When recording near loud
sound (such as fireworks.
drums or concerts), sound
may become distorted or
may not be recorded in the
actual sound level. This is
not a malfunction.
Viewfinder
blurred,
Viewfinder
is
22
Tape reached the end (_3 END Rewind the tape or replace
flashes on the screen).
the cassette.
that subject.
Viewfinder is not adjusted.
picture
28
is not adjusted.
- - -
Adjust the viewfinder with
the diopter adjustment lever.
20
Playback
Pressing the playback
button does not _art
playback.
m
Image wiIInot
appear
on the TV screen.
Tape is running, but
image will not appear
on the TV screen.
No sound from the builtinspeaker,
Camcorder is turned off, or is Set the camcorder
not set to PLAY (VCR) mode.
(VCR) mode.
Cassette is not loaded.
Load a cassette.
to PLAY
37
22
Tape reached the end (_3 E#n Rewind the tape.
flashes on the screen).
37
lAY/PHONES] is set to
[PHONES_-_] in the menu.
Set [AV/PHONES] to [AV] in
the menu.
39
_V
[ON].
Set [AV
93
DV OUT] is set to
DV OUT] to [OFF].
42
TVNIDEO selector on the TV
is not set to VIDEO.
Set the selector
Video heads are dirty.
Clean the video heads.
You attempted
to play back
or dub copyright protected
tape.
Stop playbackldubbing,
91
Speaker volume
off.
Adjust the volume
selectordiaL
40
is turned
to VIDEO.
with the
142
¢r_;31E4Memo_
Card Operatiom
Problem
Memory
card was not
the correct
direction.
Memory card cannot be
recorded.
Memory
Memory card cannot be
played back.
card
CD
1oo
Solution
Cause
Memory card cannot be
inserted,
facing
is full.
Turn the memory
and reinsert
it.
Replace
erase
the
card
memory
over
card
or
115
images.
Memory card is not
formatted.
Format
card.
128
Memory card is not inserted.
File number reached
maximum value.
inserta memory card,
Set {FILE NUMBERS] to
{RESET] and insert a new
memory card.
1oo
1o2
SD Memory
protected.
Change the position of the
_rotect switch.
Set the camcorder to CARD
PLAY (VCR) mode.
100
Insert a memory
IO0
Card is
Camcorder is not set to
CARD PLAY (VCR) mode.
Memory
card is not inserted.
4
the
memory
card,
111
Image cannot be erased.
Image is protected.
Cancel the protection.
114
Change
_rotect
Turn off
Remove
memory
memory
IO0
_:_ flashes red+
SD memory card is
protected.
Card error occurred.
the position of the
switch.
the camcorder.
and reinsert the
card, Format the
card if flashing
128
3ersists.
m
Z>=
m
0
E m_
147
System
Diagram
(Availability
differs
from area to area)
WS-20 Wrist Strap
_ide
SS-800 Shoulder Strap
D
WD-30.5 Wideconverter
e,
WL=D79 W+re+ess
Controt+er
1_1'_"9Jll W L=De0
Wire+ess Contrcker
D
Battery
Charger
C8=570
MiniDV
TL-30.5 Teieconverter
Car Battery
Cassette
Video
00
CA-570
7
Power
Cable
Compact
Adapter
FS-30.5U
Filter Set
_
Battery Pack
BP-500Serios
E_
S-150
Swideo
Cable
•
D
_
STV-250N
Stereo Video
TV
Cable
VCR
DM-50 Directlo+_a[
Steleo Microphone
Commercia++y
DV Cable
BP-900
Series
VL-10Li
Battery
Pack*
Battery
Video Light
available
Digital
Stereo Microphone
(commercially
avattab[e)
m
I
SC-1000
Carrying
I
Soft
Case
SC-A50
Carrying
Soft
Case
* Charging with the CA-920 Compact Power Adapter or CH-910 Dual Battery
Charger/Holder
148
(both optional)
Device
Optional
Accessories
Call or visit your local retailer/dealer
for genuine Canon video accessories, You can also
obtain genuine accessories for your Canon camcorder by calling: 1-800-828-4040,
Canon U.S.A. information Center
BP-500 Series Battery Packs
When you need extra battery packs, select from
the following:
CG-570
BP-512
BP-535
BP-511, BP-512, BP-522 or BP-535.
Battery
©
Charger
The battery charger can be used with the
supplied CA-570 Compact Power Adapter or the
optional C8-570 Car Battery Cable to charge BP500 series battery packs
Battery
8P-522
4
Pack
Charging
Time
BP÷508 (ZR65 MC/ZR60)
55 rain.
BP÷512 (ZR70 MC/Optional)
95 rain.
BP÷511 (Optional)
95 rain.
BP÷522 (Optional)
140 min.
BP÷535 (Optional)
205 min.
CB-570 Car Battery
Cable
Usethe car battery cable with the CG-570
Battery Charger to charge battery packs on the
move, The car battery cable plugs into your
car's cigarette lighter and runs off a 12-24 V DC
negative ground battery.
TL-30.5 Tele-converter
This tele-converter
m
lens increases the focal
length of the camcorder lens by a factor of 1.9
o
• The image stabilizer is not as effective when
the tele-converter
is attached.
• The image quality may be degraded at the telephoto
side,
• The minimum focusing distance with the Tele-converter is 131 ft (4 m); 16 in, (4 cm)
on maximum wide angle,
149
WD-30.S
Wide-converter
This lens decreases focal length by a factor of
0.7, giving you a wide perspective for indoor
shots or panoramic views.
FS-30.SU
Filter Set
Neutral density and MC protector filters help
you to control difficult lighting conditions.
VL-10Li Battery Video
Light
This compact yet powerful video light can be
used for both indoor and outdoor shooting.
The video light is powered by BP-900 series
battery packs.
• Approximate
usage time: BP-915:60 min. BP-930:120 min. BP-945:170 min.
• BP-90Oseries battery packs are charged with the CA-920 Compact Power Adapter
(optional)
VL-3 Video Light
This video light enables you to record brightly
in color even in dark places. It attaches to the
camcorder's advanced accessory shoe for cablefree operation.
DM-50
Directional
Stereo
Microphone
This highly sensitive, super-directional
microphone attaches to the camcorder's
advanced accessory shoe. It can be used as
.o
_
_i
directional
microphone (monaural) or stereo
microphone.
-
WS-20 Wrist
Strap
Use this for extra additional
active shooting.
protection for
@
SC-1000
Soft Carrying
Case
A handy camcorder bag with padded
compartments
accessories.
SC-A50
Soft Carrying
This lightweight
within
4
and plenty of space for
Case
bag keeps the camcorder
easy reach without weighing
you down
or getting in the way.
This mark identifies genuine Canon video accessories. When you
use Canon video equipment, we recommend Canon-brand
÷o_ G_
o_o'_w'_'_
accessories or products bearing the same mark.
Provided
WbD79
WbD8O
Accessories:
Wlreless Controller
Wireless Controller
SS-800 Shoulder
(ZR70 MC/ZR65 MC)
(ZR60)
D83_0622_000
D83_0652_000
D81-1430_000
Strap
Lens Cap
CA-570 Compact Power Adapter
BP-512 Battery Pack {ZR70 MC)
D52_0220_000
8468A002AA
6760A002AA
BP*508 Battery Pack (ZR6S MC/ZR60)
STV*250N Stereo Video Cable
D85_1360_000
IFC_300PCU USB Cable (ZR70 MC/ZR6S MC)
WA*30.5 Wide Attachment
Optional
Accessories:
BP*511 Battery Pack
BP_522 BatteryPack
BF535 BatteryPack
SC_IOOO Soft CarryingCase
3067A002AA
(D82_0590-201 )
6906A001AA
D55_0170_000
30S5A002AA
3174A002AA
6741A002AA
(D85_1112_201)
(D85_1122_201 )
SC_ASO Soft Carrying Case
WD-30,S Wide_conver ter
3083A002AA
(D81-1200_201)
D81_1302_201
6739A002AA
TL_30,5 Tele-conver ter
F÷30,5U Filter Set
6740A002AA
6738A002AA
DM*50 Directional
3176A002AA
(D84_0120_201)
3175A002AA
3140A002AA
(D86_0121-201)
(D86_9081-201)
3141A002AA
3118A002AA
(D86_9090_201}
(D81 _0190-202)
3134A002AA
(D36_9032_201)
Vb3
Stereo Microphone
Video Light
Vbl0U
Battery Video Light
JR 7.2V 10WF Halogen Bulb
WS_20 Wrist Strap
DVM*CL DV Cleaning
Cassette
m
o
{a
O
151
Specifications
_
ZR_Q M_ZR65
MC/ZR_Q
Power supply (rated):
74 V DC
Power consumption
(AF turned on):
29 W (Using viewflnde0,
Television system:
EIA standa;d (525 lines, 60 fields) NTSC color signal
Video recording system:
2 _otary heads, helical scanning DV system (Consumel digital VCR
SD system); Digital component recording
Audio recording system:
PCM digital sound: 16 bit (48 kHz22 oh); 12 bit (32 kHz24 oh)
Image sensor:
1/6" CCD (cha_ge coupled device), approx 680,000 pixels
(Effective pixels: tape: applox 340_000 pixels, ca_d*h approx
447,000 pixels)
Tape format:
Videocassettes beadng the "MiniDV"
Tape speed:
SP:0 74 ips (1881
Maximum recording time
(80 rain. cassette):
SP: 80 rain, LP: 120 rain
Fast forward/rewind
App_ox 2 min 20 sec (with a 60 rain cassette)
time:
Lens:
ZR70 MC: F1 6-36,
ZR65 MC: F1 6-32,
ZR60 MC: F1 6-29,
38 W (Using LCD scleen)
mark
ram/s), LP: 049 ips (12 56 mm/s)
22x power zoom, f=2 8-61 6 ram;
20x power zoom, f=2 8-56 ram;
18x power zoom, f=2 8-50 4 mm
Focusing system:
TTL autofocus, manual focusing possible
Minimum
focusing distance:
33ft
Maximum
shutter speed:
1/2,000 sec (1/250 sec when using a memory card)
(1 m),039in
(1 cm)onmaximumwideangle
Minimum illumination:
Recommended illumination:
16 Ix (using the Night mode in CAMERA mode)
More than I00 Ix
Filter diameter:
30 S mm
Viewfinder:
033 in, TFT colol LCD, applox
LCD screen:
2 5 in, TET color, approx
Microphone:
Stereo electret condenser miQophone
Recording media*_:
Numberofrecording
113,000 pixels
112,000 pixels
SD Memory Card, Mu]tiMediaCard
pixels*_:
Stillimage: 1024x768,640x480pixels
Movie*S: 320 x 240 pixels (approx 10 sec), 160 x 120 pixels
(approx 30 sec ), 15 frames/see
The figures in b_ackets represent the maximum length of one
movie dip
Estimated SD Memory Card
SDC-8M capacities* _:
m
_ o
<_=
1024 x 768: Superfine: 14 images/Fine: 20 images/Normal 39
images;
640 x 480: Superfine: 35 images/Fine 52 images/Normal 86 images
The actual number varies according to the images Sample images recorded on the supplied SD
Memory Card are to be included in the total number
File format*_:
Design rule for Camera File system (DCF), Exif 22 compliant,
Digital Print Order Format (DPOF)compliant (still images only)
This camco_der supports Exif 22 (also called "Exif Print") Exif P_int is a standard for enhancing the
communication between camco_ders and printers 8y connecting to an Exif Print compliant pdnter,
the camcorderrs image data at the time of shooting is used and optimized, yielding extremely high
quality p_in%
Image format*_:
1._2 -1 ZR70 MC/ZR65 MC only
Still image: JPEG(Complession mode: Superfine, Fine, Nolmal),
Movie: Motion JPEG
*2 ZR70 MC only
USB terrninal*_:
mini-B
DV terminal
input/output:
Special 4-pin connector (IEEE1394 compliant)
AV terminal
input/output:
_35 mm miniiack
Audio input: -10 dSV/40 kohms or more
Audio output: -10 dBV (47 kohm Eoad)/3 kohms or less
Video:
1 Vp-p/75 ohms unbalanced
S-video terminal
input/output:
1 Vp-p/75 ohms (Y signal)_ 0¸286 Vp-p/75 ohms (C signal)
MIC terminal input:
_35 mm stereo mini-jack
-57 dBV (with 600 ohm mic)/5 kohms or more
Headphone
_35 mm stereo miniiack
terminal:
Operatin 9 temperatures:
32 - 104_F(0 - 40_C)
Dimensions:
41 ×23
Weight:
ZRTO MC: 12 Ib (525 g), ZR65 MC/ZR60:1 2 Ib (520 g)
"1 ZR70 MC/ZR65
4
x 58 in (103 × 58 × 147 mm)
MC only
Power supply:
100 - 240 V AC, 50/60 Hz
Power consumption:
17 W
Rated output:
84 V DC, 1 5 A
Operating
32 - 104_F(0 - 40_C)
temperature:
Dimensions:
21×35x
Weight:
48 oz (135 g)
11 in (52×90×29mm)
Battery type:
RechargeabEe Lithium Ion Batten!
Rated voltage:
74 V DC
Operating temperature:
32 - 104"F (0 - 40_C)
Battery capacity:
Dimensions:
BP-512:1100 mAh, BP-508:800 mAh
15 x083 × 22 in (38× 21 × 55 ram)
Weight:
BP-512:25
oz (70g), BP-508:2 3 oz (65g)
SD¢ 8M SD M_m_Card
Capacity:
8 MB
Interface:
Operating
SD Memon! Card standard
temperature:
Dimensions:
Weight:
32 - 104_F(0 - 40_C)
13 x094×008in
007 oz (2 g)
Weight
and dimensions
change
without
notice,
are approximate.
(32 x24×
21 ram)
Errors and omissions
excepted.
_
o
Subject to
= o
=
153
Index
12bitaudio....16..9
wide
screen " .........98
6-second auto date .........
52
84
Digital zoom .................
Direct print function *2 ........
DV dubbing ..................
DV terminal ...............
30
118
90
88, 99
D
Abroad, using the camcorder
Accessories. ...........
Accessory shoe ...........
Advanced accessory shoe ,I
Analog line-in ..............
Analog-digital
converter. .....
Assist lamp ,I ..............
Audio dubbing ...........
Audio mode .............
Auto ...................
Autofocus ...............
AV insert ................
AV -DV .................
.. 144
9, 149
150
. 73
89
92
59
96
71
57
75
94
92
AVlheadphones
39, 41
terminal
....
Easy recording ................
Effects ......................
Erasing still images *2 .........
Exposure ....................
19
149
16
52
33
r,l
Card animation *2 .........
Card mix *2 ............
Computer ...............
Condensation
...............
Connections - TV ..............
Connections - VCR.............
Copyright signals. .............
Copying still images .2 .........
123
122
99, 129
143
41
41
91
126
115
77
IJ
Faders ......................
Fast forward .................
File numbers *2 ..............
62
37
103
Focusing ....................
Formatting *2 ...............
75
128
rel
Grip belt ....................
Backup battery ...........
Battery charger ..........
Battery pack .................
Beep .......................
Brightness ...................
57
65
20
I,'1
Headphones
.................
39
Ill
Image quality *2 .............
Image stabilizer ...............
Index screen *2 ..............
101
69
112
ill
LCD mirror mode .............
LCD screen. ..................
33
32
Lens cap
Light-up
Low light
Low light
LP mode
....................
buttons ,I ............
mode. ..............
plus mode -1 .........
....................
20
51
58
59
54
Data code ..............
Date and time ...........
Date search ..................
Demo mode .................
83
25
85
53
m
Magnifying the image .........
Maintenance ................
Manual focus ................
82
141
75
Digital
61
Memory card *2 .........
101
effects ................
Menus
.................
Microphone
.............
MICterminal
............
Movie
size.1 ............
MultiMediaCard
*2 ........
Multi-image screen ........
My Camera settings ........
44
71
71
102
101
67
50
12]
Night mode ..................
59
Output channel ...............
43
Search select .............
Self-timer ................
Shutter sound *2 .............
85
70
105
Shutter speed ................
Slide show *2 ................
SP mode ....................
Speaker .....................
Sports mode .................
Spotlight mode ...............
Still image quality *2 ..........
Still image size *2 ............
Stitch Assist mode *2 ..........
78
112
54
39
58
58
101
101
107
Super Night mode .1 ..........
S-video/S1 -video ..............
59
41
4
w
Photo search ..............
85
IDI
Playback - Memory card *2 ....
Playback - Tape .............
Playback pause .............
Portrait mode ..............
111
37
38
58
Tape protection ...............
Telephoto ...................
Time code ...................
Time zone ...................
23
30
86
25
Power adapter .........
print order *2 ..........
Protect *2 ................
15
116
114
Tripod ......................
Troubleshooting
.............
TV Screen ................
36
145
41, 134
m
Irl
Recording to a VCR .........
Record pause mode ........
Record review ................
Record search ................
Recording
Recording
(memory
Recording
87
29
35
35
Movies (tape) ........
28
Movies
card) .1 ...........
109
Still Images (tape) .... 55
Recording Still Images
(memory card) *2 ...........
Recording programs ...........
Remote sensor ................
Rewind .....................
104
57
24
37
US8 terminal
*2 ..............
129
_rj
Video .......................
Video heads .................
Video I1:)-1system .............
Video light ...............
Videocassettes ................
Viewfinder
..................
41
142
41
73, 150
22
20
m
White balance ................
Wide screen ..................
Wireless controller
............
80
52
24
o
$1 video terminal
.........
41
Sample images *2 ............
Sand & Snow mode ............
132
58
Screen displays .........
SD Memory Card *2 ........
134
101
n
Zero set memory ..............
Zooming ....................
86
30
155
[ U.S.A. ]
CANON
_ ZR70 MC/ZR65
WARRANTY
MC/ZR60
DIGITAL VIDEO CAMCORDER
LIMITED
The Jimited walranty se_furth below is 9iven by Canon USA, Inc ("CUSA") with respect to each Canon ZR70 MC/
ZR65 MC/ZR60 Digital Video Camcorder (_DV Camcordei") pier(based and used in the United States
Each Canon DV Camcorde£ when delivered to yell in new condition in its original containe£ iS wallanted against defective
mat erial or workmanship as follows: lot a period of one (1/yeal llom the date of oliginal purchase (three (3) months in the
ca_ of the video head par[), delective parts el DV Camcorde_ returned to a CUSA fac_ry service center ("CUSA Center")
or an authorized DV Camcorder selvice lacility ("Service Facility"_ and proven to be de_ctive upon inspection, will be
repaired el exchanged _i new el cornparable lebui_t parts el DV Camcolders _e walrarlty peliod for repaired or
replacernent parts or DV Camcorders shal_begin _pon shipment of the same, but shall in no event exceed the original
walranty period of t_e de_ctive parL or DV Camcorde_
Non-Canon brand peripheral equipment and software which may be dlstrlbuted with CanOn DV CamcordeTs are
SOld"AS IS", without warranty Of any kind by CUSA, including any implied warranty regarding me_hantability
or fitness for a particular purpose, The sole warranty with respect to such non-Canon b_nd items is given by
the manufi_lctul_r or producer thereof,
CUSA Shall have no responsibility under this limited walranty for _se of Canon DV Camcolders in conjunction w_th
incompatible periphelal equipment and incompatible Soltware
In order to obtain warlanty _rvi_, contact the a_t horized Canon retail dealer from whom you pulchased the DV
Camco_er or call the CANON _NFORMATIONCENTERAT 1-800-828-4040 (which is open from 9:00 am _ 5:00 p m
(E S _), Monday through Fiida_ excluding hohdays) Have your unit selia_ number and youl data of pulchase available
when you make the ¢a_1to expedite _rqce _neithel case you wi_ _e directed _ sh_pthe DV Camcolde£ postage prepaid,
to the CUSA Center or Semite Facility hearst to you YOUmu_ include a copy of the proof of purchase (bin of sa_e)and a
complete explanation el the prol_em DV Camco_ers cove_d by this Jimi_d warranty wi_ _e repaired and ratumed _ you
without charge by the CUSA Centel or the Selvice Facility Repails not under warranty will be at such Cost as the CUSA
Center Oi Service Facility may from time to time generally estab_ish
This _imited wallanty covers all defects encountered in normal _se of the DV Carncorde_ and does not apply in the
fo_owing cases:
(a) LO_ of or damage to the DV Camcorder due to abuse, mishandling, imp_per packaging by you, alteration, accident,
leaking batteries, exteriol nicks, scrat¢hes or dents, electrical cur_nt fl_ct uations, fai_ie to lollow operating
instructions, maintenance and environmentaJ instructions presclibed in CUSA'Sinst r_ction manual, or servi_ performed
by Other than a CUSA Centel or Semite Facility
(_) USe of palts or supplies (other than those sold by CUSA) w_ch cau_
abnormally fleq_ent service calls Oi service problems
damage to the DV CamCorder or cause
(c) If any DV Camcorder has had its serial numbel or dating alte_d or removed¸
This _imited wallanty does not apply to ac_ssolies or consuma_31esfor the DV Camcolde_ which are so_d r'AS IS,,` witho[_t
warranty of any kind by CUSA
NO IMPUED WARRANTY, INCLUDING ANY IMFLIED WARRANTY OF MERCHANTABIUTY OR FITNESS FOR A
PARTICULAR PURPOSE, APPUES TO THE DV CAMCORDER A_fER THE APPI-IO_,BI_ PERIOD OF EXPRESS
WARRANTY STATED ABOVE, AND NO OTHER EXPRESSWARRANTY OR GUARANTY, EXCEPT AS MENTIONED
ABOVE, GIVEN BY ANY PERSON, FIRM OR CORPORATION WITH RESPECTTO THE DV CAMCORDER SHALL BIND
CUSA* (SOME STATESDO NOT ALLOW LIMITATIONS ON HOW LONG AN IMPLIED WARRANTY LASTS, SO THE
ABOVE U MITATION MAY NOT AppLY TO YOU) CIJSA SHALL NOT BE UABI_ fOR LOSS OF REVENUES OR PROFITS,
EXPENSE FOR SUBSTITUTE EQUIPMENT OR SERVICE, STORAGE CHARGES, LOSS OF DATA, OR ANY OTHER
SPEaAl-, INCIDENTAL OR CONSEQUENTIAL DAMAGES CAUSED BY THE USE, MISUSE OR INABILITY TO USE THE
DV O_MCORDER, REGARDLESS OF THE I_GA I- THEORY ON WHICH THE CLAIM IS BASED, AND EVEN IF CUSA HAS
SEEN ADVISED OF THE POSSIBILITY OF SUCH DAMAGE& NOR SHALL RECOVERY OF ANY KIND AGAINST CUSA
8E GREATER IN AMOUNT THAN TilE PURCHASE PRICE OF THE DV CAMCORDER SOLD BY CUSA AND CAUSING
m
-,_
_
O
O
"_
THE ALLEGED DAMAGE. WITHOUT LIMIIlNG THE FOREGOING, YOU ASSUME ALL RISK AND UABIUTY fOr LOSS,
DAMAGE OR INJURY TO YOU AND YOUR PROPERTY AND TO OTHERS AND THEIR PROPERTY ARISING OUT OF
USE, MISUSE OR INABILITy TO USE TilE DV O_,MCORDER NOT CAUSED DIRECTLY BY THE NEGLIGENCE OF CUSA.
_
'_
_
_
--
(S_ME
SO THESTATES
ABOVE D_
LIMITATION
N_T ALL__
MAYTHE
NOT
EXCLUS__N
APPLY TO YOU_)
_R _-_MITATI_N
THIS LIMITED
_F _NC_D_NTA_WARRANTY_RSHALL
C_NSEQUENT_A_NOT EXTENDDAMAGES_
TO
ANYONE OTHER THAN THE ORIGINA I- PURCHASER OF ANY DV _MCORDER,
OR THE PERSON FOR WHOM IT
WAS PURCHASED AS A GIFt, AND STATES YOUR £XCI-US_E R£MED_
This _imited warlanl_ _ives yo_ specific lega_ rig_lts, and you may a_so have other rights which vary from state to state
Canon U_S.A., Inc.
One Canon
Plaza
Lake Success,
156
New York 11042
LCANADA J
CANON
CONSUMER
DIGITAL VIDEO
EQUIPMENT
LIMITED
WARRANTY
Jhe irr_i_ed warranty set forh below _sgven by Canon ana_a
In (anon
and_a ) witl- espec{ tv Canon d gi_al vdeo equipment purchased
in Canada
lhi_ limited Wd_lanty s only eff_ tire u_on presentation
of a _ill of sale or other p_oof of pUlChaSe for this Canon digital video
equipment
to a Canon %rvce FacJlJt y when repallS are requJl_l
Canon consumer vi_leo dig ta_ e_u pment is wan anted under normal non commer_ al per ,ona[ use aga r_t d_tiw
materials Ol work nanship
P_rb
De_ctive parb w II be exd anged mr new par s o_ a_ Canon Car,ada s option comparab e rebuill _a_ts t_l a penod of one yea_ kern the
date of ong na[ pumb_se excep_ dee
Heads Whch will _e e×cb_nge_ tot a period of 3 montqs from the d_e of _urchase
Labour FO_ a _Jod
of one year from the date ol od_Jnal purchase
abOUl wJ be p_ovJ_e_ free of charge _y our (anon Service _acJl ties n
Can_d_
1his lira ted W_lanty covers all d_cts
e×ept where
{a} 1he o_ or _amage _o the produc_ _esults from
i}
ace der,t natulal disaste_ m shingling
abuse r,egle_t un_thor
zed produ¢_ nol_J f_catJon Ol talure o _oow inst, uc_ on_ conta ned n
the nstluction
nanu_l:
ii)
the use of acc_,ories
atlacN nents pro_lucb
s_pp i_ _r_s or d_vices wth tis Car,on pr_uct
tha_ do not con_Ulm to anon
specJlJcatJons ar t_/at cause abnorm_ y frequent ser v_ce prob elnsi
iii)
lepairs or se_ice_ perful ned by any _arty other than a Car,on Ser_ce Facility:
iv) defective batteries Ol any e×_osu,e tu wate_ sand or dirt:
v)
sh pping (clam m_5_ be p_esented tu te s ippel}:
/ol Any seria number on the video e_uipmer t is altered o_ lemoved
(_) 1he digital video equiprr'_nt S used for _oir, r_r_ al protess on_ or _ndus,da_ pUlpo_es
1his limited Wdrlant_ does not <over the cabinet (extel or f_nJsn) O_ tqe digital vdeo eq_iprr'_n
vi_leo cassette tapes head leanings nol does it
apply to digital vi_leo equipmen
pulchase_
outside Canada
TO OBTAIN WARRANTy S_IIVICE
S_/ip you_ C_non dgita v'deo equipment in _t_ el gina carton box or equiva ent proper y packed fully nsuled wt_/shipping
charges _re_aid
together _th a copy of yOUl _i_ o_ sale or otbe_ proof o_ _urchase and a deSCl_ption o_ t_/e problem _o any o_ t_/e Capon Service Faa_ties _n
Cane, de
U MI'_A_IONS
Excep_ as otherwise required by ap_ cable egis a{ion th_s _drranty is in lieu of all othe_ wan anties conditions guarantees o_ re_resentatlon_
express or _mp_ie_l s_atutory or othe_se
_e_at_ to t_/is Canon _odu_t
_ndU_il_g implied warranties
or _nd_tions
o_ i_rd/_ ntabi_ty Ol fitness
fo_ a I_a_cu_a r purpose
Canon Canada assum_
no I_ b_i_ _1 s_e_ial consequential
Ol _nadenta_ damage, or Ic_,s_hat may arise¸ _/ether
on account of negligence or
ot_/e_wise from tile u_
misuse o_ inability to _se this Canon _roduct (including loss o_ p_f_t revenue
v_deo tap_ or enjoyment) o_ from _ai_ure
to conform to any express o_ implied wa_lal_tles _ondition_
g_a_an_es
or l eplasentations
Any recovery under _h_s _mited warranty shall not
exceed the pu_d/ase pri_ of the pro_luct CaPon C_na_la 4o_s not assuro_ Ol authorize any o_her person to assu_ne for Canon Canada any other
liability with _spec_ _ this C_non p_o_luct
This warlanty
does not extend to any person other t_/an the original purchaser of this Canon pr_uct
Ol the person _r whom _t was purchase_ as
a gi_ and states your eXClusive _me_y
_ you plan to take _9oltant
b_o_
using _
NOTICE TO CONSUM£R
videos o_ il t_/e product has not been use_ tor some tree
please d/e_k
a fbl_Ct ons _th
the _nst,uct on bOOk
m
o
_
157
CANON INC.
U.S.A.
CANON U,S.A.,
100 Jamesburg
INC, NEW JERSEY OFFICE
Road, Jamesburg, NJ 08831
CANON U.S.A.,
100 Park Bird,
USA
INC. CHICAGO OFFICE
Itasca, IL 60143
CANON U.S.A.,
USA
INC. LOS ANGELES OFFICE
15955 AIto_ Parkwa_
Irvine, CA 92618 USA
CANON U.S.A., INC. HONOLULU OFRCE
210 Ward Avenue, Suite 200, Honolulu, HI 96814
USA
• if you have any questions, call the Canon U.S.A. information
Center toll-free at 1-800-828-4040 (U.S.A. only).
CANADA
CANON CANADA
INC. NATIONAL
HEADQUARTERS
6390 Dixie R_ad, Mississauga, Ontario
CANON CANADA
2828, 16th Street, NE
CANON CANADA
LST 1P7
INC. CALGARY
Calgar_ Alberta
T2E 7K7
INC_ MONTREAL
5990 Cbte de Ues_e, Quebec H4T 1V7
• if you have any questions, call the Canon Canada Information
Center toll-free at 1-800-828-4040. (Canada only)
• Si vous avez des questions, veuillez telephoner
Canada 1-800_828-4040. (Canada seulement)
MEXICO
sans frais au
CANON MEXICANA, S. DE R.L DE C.V.
Periferico Sur No 4124 Col Ex-Rancbo de Anzaldo CR 01900
M_xicoj
DF, M_xlco
CENTRO Y
SURAMERICA
CANON LATIN AMERICA,
703 Waterford
ASIA
CANON HONGKONG
9/F, The Hong
INC,
Way Suite 400 Miami,
COMPANY
FL 33126 USA
lTD.
Kong Club Building, 3A Chater Road, Central, Hong Kong
Printed on 100% reused papen
Document r_aEis_ avec du papier recyd_ _ 100%
EEpape{ aqui utilizado es t00% reddado
PUB DIM-519
O000/VASO 0
© CANON {NC 2003
DY8-9120-360-000
PRINTED IN JAPAN
{MPRIM[ AU JAPON
{MPRESO EN JAPON