1
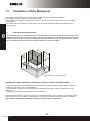
GB
-28Z1209004.5 GB
GB
Whirlpool Electronic LCD user handbook
Installation and Operations Manual RIHO baths (whirlpools)
Chapter Description
Page.
1.0
Installation of RIHO baths (whirlpools)
1.1
Safety regulations for bathrooms.
1.2
Whirlpool installation
1.3
Delivery
1.4
Pre-installation actions
1.5
Bath installation
1.5.1
Ventilation grid
1.5.2
Inspection hatch(es)
1.5.3
Panels
1.5.4
Hot and cold water supply
1.5.5
Water drain
1.5.6
Electrical connection
1.5.7
Potential difference equaliser
.30
.30
.31
.31
.31
.32
.35
.35
.35
.36
.36
.36
.36
2.0
RIHO acrylic baths (Whirlpools)
.37
3.0
Maintenance
.37
4.0
Operation
4.1
4.2
5.0
4.0.1
Display indicators
Basic functions
4.1.1
Hydro system
4.1.2
Ground system
4.1.3
Pulsation positions
4.1.4
Diverse options
4.1.5
Heating option
4.1.6
Cleanpool option
4.1.7
CLeanpool and run dry.
Menu functions
4.2.1
Short menu (select menu options)
4.2.2
Extended menu (user programmer options)
Whirlpool jets
5.1
Aero jets
5.2
Hydro jets
5.2.1
5.2.2
5.2.3
5.2.4
Hydro back- and side jet
Hydro Super jet
Thermae Powerpool rotation jet
Thermae Powerpool jet
.38
.39
.40
.40
.40
.40
.41
.41
.42
.43
.43
.43
.45
.49
.49
.49
.49
.49
.49
.49
6.0
Protection system
6.1
Normal temperature of bath water
6.2
Disinfection and cleaning
6.3
Tips for Users
.50
.50
.50
.51
7.0
Exceptional maintenance
.51
8.0
Service Request Form
.52
9.0
Guarantee Terms and Conditions
.54
10.0
Technical data
10.1
Main power connections 3-motor system with or without heater (Thermae)
Main power connections 2-motor system with heater + LCD (Riho Line)
10.2
Whirlpool connections
10.3
Radio (optional)
10.4
Dipswitches
10.5
Error codes
-29Enjoy the RIHO life-style
GB
Contents
1.0
Installation of Riho Whirlpools
The Whirlpool baths are fully in conformity with the applicable EN and national guidelines.
The installation must be fitted by a recognised installer.
The assembly and installation of the whirlpool must be done in accordance with the instructions described
in this manual.
The installer will be responsible to check that the civil, electrical and water-related pre-installation work
is done properly.
1.1
Safety regulations for bathrooms.
60
cm
24
Zon
e
Zon
e
0c
1
Zone 2
Zon
e
m
Zone 3
GB
Electrical sockets, lamps, switches and/or other electrical equipment should be installed outside the danger zones
indicated in the national guidelines and standards. Above all, the regulations prohibit the presence of any electrical
installation within 60 cm around the bath, and less than 225 cm above it (see Fig.1). The switch and other electrical
devices should be installed so as to be inaccessible to the person using the whirlpool.
2
3
Diagram fig. 1 Safety distances.
THE MANUFACTURER REFUSES TO ACCEPT ANY LIABILITY IN THE FOLLOWING CASES:
- the national guidelines and standards that apply to earthing, potential difference equalising and electrical
installations in the bathroom are not adhered to.
- the description contained in the national laws and standards that apply to safety in bathrooms are not
adhered to.
- the instructions described in this manual are not adhered to.
Parts are dismantled after inspection in the factory to facilitate transport and to enable it to be carried into the
room in which it is to be installed. It is advisable to check all the components of the bath before installation.
Any damage claimed after installation will not be covered under the guarantee.
-30Z1209004.5 GB
GB
Whirlpool Electronic LCD user handbook
1.2
Whirlpool installation
All Riho Whirlpool baths are made of acrylic (see description: acrylic baths) and equipped with a Whirlpool bath as per
customer's choice.
Please refer to the Riho price lists for details of all options.
1.3
Delivery:
Generally, all whirlpool systems are fully installed, functionally tested and packed.
! ATTENTION! Before installation, check the bath for damage, as well as material and/or manufacturing defects. For
this remove, the cardboard packaging. In order to prevent damage during installation, allow the foil to remain as long
as possible and remove it only at the last moment. After installation, Riho can only give a guarantee on hidden material
defects. Check the foil for scratches and damage if any. If these are present, check the bath itself to see whether it is
damaged. For this, remove as little foil as necessary in order to protect the bath as properly as possible during
installation. In case of doubt, consult a plumbing specialist.
!
WARNING; make sure chrome parts don't come into contact with materials or water used to remove building materials,
such as mortar, grout or tile adhesive because of possible chemical components in the composition which can damage
the chrome surface.
1.4
Pre-installation actions
The installer must ensure the presence of the following structural facilities among other things:
- Ventilation grid for the motor(s) of at least 100cm².
- A 2nd ventilation grid for natural ventilation (to the extent possible, they should be placed as far apart as
possible).
- Inspection hatch(es) of at least 40 x 50cm for service access (at least to the motors). Riho recommends
that an inspection hatch should be placed near the overflow opening.
- Hot and cold water supply.
- Water drain
- Electrical connection, one or two groups of 230V/50Hz 16Amp with earth leakage switch, dependent
on your options (option heater). Also see chapter 1.5.6
- Potential difference equalisation 6 mm² earth connection to whirlpool frame.
- Splash-proof rim around the whirlpool.
The installer should pay special attention to the following points before installing the bath:
- Check the bath and the whirlpool for possible defects before installation. No dismantling costs will be
paid in the case of defects found after installation. After installation, Riho can only give a guarantee on
hidden defects.
- When transporting and installing the bath, do not hold it by the pipes, hoses and jets.
- Check the whirlpool for leaks before installation.
- The whirlpool bath must be clear of the wall, so that unavoidable vibrations caused by the motor are not
transferred to it. The use of bath insulation tape between the bath rim and walls is recommended this will
reduce the noise level.
- If plastic panels are installed, pay attention to the height of the panel with respect to the bottom edge of
the bath. The panel should be at least 5mm from the floor, for ventilation purposes.
In case of doubt, consult a plumbing specialist.
-31Enjoy the RIHO life-style
GB
All Whirlpool baths are supplied with a flexible PU drain-overflow, which in some cases is not fitted when delivered.
1.5
Bath installation:
- A metal support frame with 4 or more adjustable legs will be supplied with the bath. The adjustable legs will be
provided separately, depending on the packing method. If necessary the legs must be installed (see fig.2, leg
installation diagram). With the adjustable legs, ensure that the bath is properly levelled and at the right height and do
not forget to tighten the lock nuts afterwards. Check to ensure that all the legs are resting properly on the floor.
A
GB
A
Diagram fig. 2
- If necessary, install the overflow-drain combination in the bath. Check whether all the components are properly
mounted according to the attached installation specifications of the manufacturer.
- The bath may be fixed on the wall with a wooden lath (see Fig. 3 wall mounting) or using the clips provided
(alternative) that are fixed to the wall as shown on the next page. This mounting method is valid for installing the bath
against tiles It is not advisable to have the tile edge on the bath as this could make access to installed mechanical and
electrical components difficult.
- Level the bath properly.
- Connect the bath to the drain pipeline.
Diagram fig. 3
-32Z1209004.5 GB
GB
Whirlpool Electronic LCD user handbook
1
GB
2
3
O
H
IR
I
O
O
/
H
IR
I
O
/
3
-33Enjoy the RIHO life-style
GB
-34Z1209004.5 GB
GB
Whirlpool Electronic LCD user handbook
- Fill half the bath with water and check whether the bath is still horizontal. This is necessary. Use the adjustable legs
for correction. Check whether the drain pipeline connection is watertight and then top up the bath up to the overflow
outlet. Allow the same to overflow and check the sealing and proper drainage of water via the overflow connection.
- The open sides of the bath may be finished with plastic panels or with a tile wall. This may be done for the entire rim,
or only in certain sections.
- The bath may be placed in several ways:
- The bath may be placed against the tiles of the wall. Apply silicon sealant all around the rim to absorb the
movements of the bath if any. This 4 to 5 mm a space is required to absorb the torsional forces acting on
the rim of the bath.
- When the bath is finished with a wall on the underside instead of a plastic panel, there should be a joint
between the top of the wall or row of tiles and the bottom of the bath of 4-5mm.
This joint must also be sealed.
The silicon sealant provides a good watertight finishing join and allows the bath to expand to some extent. It is also
necessary to fill the bath with water up to the overflow rim and to ensure that the bath is resting properly on all its legs
before you start sealing.
In case of doubt, consult a plumbing specialist.
1.5.1
Ventilation grid.
In order to ensure optimum operation of the motor(s), it is necessary to install a ventilation grid in the edge or in the
wall under the bath. This grid must be splash-proof and placed so that splashing water does not find its way under the
bath. The minimum effective flow surface of the grid must be 100cm², and should not vent in places where the
temperature is less than +15°C and more than +35°C. (See Fig. 4:
In case of doubt, consult a plumbing specialist.
I/ O
O
IH
R
Figure 4 Ventilation grid.
1.5.2
Inspection hatch(es).
To enable maintenance the tub panel or wall must be fitted with a splash-proof hatch with a size of at least 40x50cm.
To be able to service the motors, it is necessary to fit a hatch for each separate motor. See figure 5. You can order
Riho magnet tile inspection hatch sets from your dealer, Riho part no. ZA 110000000005. The Riho maintenance
service cannot service the motors if there are no inspection hatches or if the hatches are too small. For the best
accessibility to the system Riho advices you use synthetic front panels (if available for the bath type).
If in doubt, contact a specialist.
1.5.3
Panels
Where panels are used, do not seal them. They must be removable.
-35Enjoy the RIHO life-style
GB
- For sealing the bath joints, only use acid-free silicon sealant suitable for plumbing applications.
O
IH
R
I/ O
O
IH
R
Elektrická
skříňka
Elektrická
skříňka
I/ O
GB
Figure 5 Inspection hatch(es).
1.5.4
Hot and cold water supply.
The supply pipelines may be installed on the rim of the bath or on the wall for connection to the bath tap. A drainage
overflow installation with water supply can also be supplied. Ask your dealer for Riho overflow-drain combinations with
water supply in the bath. Maximum allowable water temperature is 60°C
In case of installation of a drainage overflow installation with water supply in the bath, an aerator water supply should
be installed in the supply line. This is to prevent dirty water from flowing back into the supply pipeline.
In case of doubt, consult a plumbing specialist.
1.5.5
Water drain
Connect the drain pipeline with siphon to the bathroom drain pipeline (min 40 mm). The bathroom drain pipeline must
be positioned at around 25-35 cm from the centre line of the bath's drain, and should have sufficient drainage so that
adequate drainage is ensured (see fig. 6). In case of doubt, consult a plumbing specialist.
25
10
1.5.6
Fig. 6:
Electrical connection
The electrical supply for the installation should be provided with suitable cable using a fixed junction box suitable for
environment. For this purpose, the whirlpool is delivered with a 3x1.5mm² or 5x2.5mm² cable with a red warning label
(5x2,5mm² if with heater or Thermae line).
Connection of the whirlpool should be made to one group of 230V/50HZ in case of cable 3x1.5mm² or two groups
(combined on-off) of 230V/50Hz in case of cable 5x2.5mm². Each cable must be secured by a suitable circuit breaker
10A (cable 3x1.5mm² ) or 16A (cable 5x2.5mm²) normally with characteristic C.
An earth leakage circuit breaker of 30mA as well as a potential difference equilisation 4-6mm² on whirlpool frame are
obligatory part of the installation. The local electricity rules and regulations must be met. In case of doubt, consult your
plumbing specialist.
1.5.7
Potential difference equaliser
The metal frame of the whirlpool must have a potential difference connection. For this purpose a special metal
connector suitable for an earth cable of 2.5 mm² to 6mm² is fitted to the frame.
-36Z1209004.5 GB
GB
2.0
Whirlpool Electronic LCD user handbook
Riho Acrylic (PMMA) baths (Whirlpools)
All Riho baths are made of acrylic (polymethyl methacrylic) and supported in the bottom with chipboard and reinforced
with glass fibre polyester.
Acrylic is a plastic and coloured all the way through.
The properties of acrylic provide the user with the maximum bathing comfort, provided the appropriate installation and
maintenance instructions are duly followed.
3.0
Maintenance
- The repair of small cracks and similar damage to the bath.
If you want to repair minor damage, due care is recommended. You may proceed as follows:
If there are fine scratches, it will be adequate to use a chrome and lacquer polisher (solvent and abrasive free). If the
result of this is not satisfactory, you may sand off the damage with waterproof sandpaper no. 600 and then with
waterproof sandpaper no.1000. Reprocess with a chrome and lacquer polisher for a perfect end-result and your bath
will be as good as new.
A complete set may be obtained from Riho International bv (Article no.: REP400).
You may repair your bath yourself at your own risk.
- Major damage, deep scratches, holes and even cracks may be repaired and can almost be made to disappear. It is
recommended that these should be repaired by specialised technicians.
-37Enjoy the RIHO life-style
GB
- Thanks to the non-porous, smooth surface of the material, dirt will not or will hardly stick to the material.
Maintenance can be limited by cleaning the bath after use with a wet sponge or cloth and a liquid cleaner (without
abrasive material).
4.0
Operation
19°C
12:10
OK
GB
Do not touch, handle or use electrical devices when using the whirlpool. This is extremely dangerous to the user.
When at rest the LCD screen must show the RIHO logo. After 30 minutes without use the background lighting will
switch off.
19°C
12:10
Before starting the Whirlpool bath, fill the bath to 5 cm above the highest jet (hydro-system) and to about 15 cm below
the rim (aero-system). The bath indication will then show full.
As a protection, the system will switch off automatically after 20 minutes, unless the system is switched off manually in
advance.
Bath empty indication
Bath full indication
12:10
-38Z1209004.5 GB
GB
4.0.1
Whirlpool Electronic LCD user handbook
Display indicators.
19°C
time indication
CD
AM
FM 12:10
GB
1
2
audio indication
Light\colour therapy
level indication
User selection
Water temperature
The first row of the display shows the indicators. The various indicators on the display depend on the options and
system that you have purchased.
45°C
In addition to the programming mode the other part of the display gives information on the status of your ground and
hydro system, see example below.
When both the ground and hydro system are active the status of the ground and hydro system are displayed
alternately. If neither of the two systems is active the Riho logo is displayed. The precise display depends on the
system you have chosen.
12:10
Hydro-system.
12:10
Ground system.
There are two ways of operating the whirlpool system.
- Operation with personal preference settings. There are a maximum of 6 preferences to select and program. All
options of the whirlpool such as light on/off, hydro on/off, pulsation position and duration of pulse can be set as
required. By calling up your personal preferences the system will start operating with the preferred settings. Calling up
can be by keeping or pressed down, or via short on menu. Switching off can be achieved in the same way by
keeping or pressed down or by selecting menu button and then . When the system is in operation you can
always manually change, switch on or switch off functions.
- Manual operation of whirlpool system and options. This is achieved by the basic functions buttons and via the button
options menu, e.g. heating. It is possible to switch off all functions via the menu and then .
-39Enjoy the RIHO life-style
4.1
4.1.1
Basic functions
Hydro-system.
This pushbutton is used to switch the hydro system on and off.
- Short press, switch system on/off.
- Long press, see user options
In the case of the hydro-whirlpool system with back and foot jets that are separately connected by a
valve, or are controlled by a pump, the button can be used to move through the various
combinations one after the other.
19°C
12:10
19°C
12:10
GB
4.1.2
Ground system.
This pushbutton is used to switch the ground system on and off.
- Short press, switch system on/off.
- Long press, see user options.
19°C
4.1.3
12:10
Pulsation positions.
This pushbutton is used to adjust the speed of the motor for a pulsation effect. The display shows when the
pulsation starts. The display has two of these buttons. The pulsation button operates the system to the left of
this button.
The following description applies to both buttons, which can be operated independently.
- First push, the system automatically pulses water between 35% and 100% for a period of about 8 seconds.
The display shows pulsating waves.
- Second push, the system operates automatically at the speed at the moment when the button is pushed.
- Third push, the system automatically returns to 100% operation and begins to pulse automatically again.
See first push.
- Switch off the pulsation position by pressing and holding down the pulsation button.
If you start with this button instead of
or
, the system will then start pulsating directly.
If you require both pulsations to be on, this is then possible. The pulsation effects of each system run
synchronously with each other for maximum effect.
19°C
12:10
Pulsation position
-40Z1209004.5 GB
GB
4.1.4
Whirlpool Electronic LCD user handbook
Diverse options
- Light function option.
Switch on only if there is sufficient water (bath full indication
).
The light will switch on after pressing the light pushbutton once. The light function will switch off after 20 minutes.
If the light function is on and the water level drops (2 seconds), the light function will switch off.
If the light function is switched on and the whirlpool motor is started, the time for the light function will be set at
the running time of the motor + 5 minutes. In other words, after the running of the whirlpool motor is
completed, the light will remain on for another 5 minutes. If the motor is switched off between times, the light
function will switch off 5 minutes later.
The light will switch off after pressing the light button briefly.
- Colour therapy option
Switch on only if there is sufficient water (bath full indication
).
When the light button is held down colour therapy switches on. Colour therapy will switch off after 20 minutes.
If you press the light button during colour therapy the colour changing stops. If you press the button again
colour changing restarts. If you wish to stop the function earlier then hold down the light button and the colour
therapy will be turned off.
If the colour therapy is on and the water level drops (2 seconds), the colour therapy will switch off.
If the colour therapy is switched on and the whirlpool motor is started, the time for the colour therapy will be set
at the running time + 5 minutes. In other words, after the running of the whirlpool motor is completed, the light
will remain on for another 5 minutes. If the motor is switched off between times, the colour therapy will switch
off 5 minutes later.
Technical info: The color therapy exists of LED lights. LED lights have a very long lifecycle and therefore don't
have to be replaced. In case the color therapy is malfunctioning, it can only be replaced or repaired by a
certified installer.
light indication
colour therapy indication
12:10
4.1.5
Heating option
If the whirlpool system is fitted with heating a heating unit is installed in the suction pipe of the Ist hydromoter.
This unit can only provide heat if water is actually flowing through it. The 1st hydro system must therefore be
switched on. When you have switched on the heating unit, this is displayed on the screen (for hydro function)
by the symbol 45°C. This symbol also indicates the required temperature that is set. As soon as the required
water temperature (see water temperature indication) is reached the heating switches off automatically.
If the temperature drops, the heater will automatically go back on. To measure the temperature of the water a
temperature sensor is located near the heating unit.
The heater option is designed to heat the water to maintain temperature and not to bring cold water, for
example 19 °C to 45 °C.
Water temperature indication
19°C
12:10
45°C
heating indication
-41Enjoy the RIHO life-style
GB
Technical info: The light exists of LED lights. LED lights have a very long lifecycle and therefore don't have to
be replaced. In case the color therapy is malfunctioning, it can only be replaced or repaired by a certified
installer.
4.1.6
Cleanpool option.
GB
If both buttons are pressed simultaneously for two seconds the cleanpool function starts, provided that the
level indication shows full and there is sufficient liquid in the reservoir and no other function is active (no light).
All jets must be completely under water.
1: Display shows clean function and countdown timer.
2: After 8 seconds all motors and valves are switched on.
The motor of the aero-system on the other hand switches alternately on and off (20 seconds.
This is to achieve a cleaning process in the aerojet housing.
3: After 7 seconds the cleanpool switches on for 3 seconds.
4: The motors stop after 1½ minutes with circulation pumping prior to a pause of 30 seconds
5: The motors are restarted for 1½ minutes. The motor of the aero system should then start
switching off and on alternatively again
6: End of cleaning function, system returns to rest.
7: The display shows that your bath needs to be evacuated and that the water contains cleaning
material and is therefore not suitable for bathing.
Note:
If the water level drops the cleaning cycle stops.
If you wish to end the cleanpool function earlier press once on one of the two buttons
12:10
12:10
or .
12:10
178 sec
Display clean function
with countdown timer
Display bath evacuation.
You will not be able to
use any function until the
system is evacuated.
-42Z1209004.5 GB
Warning
No cleaning fluid
present
GB
4.1.7
Whirlpool Electronic LCD user handbook
Run dry function
If both buttons are pressed down simultaneously for 2 seconds the run dry function starts if there is “no” water
in the bath (bath empty indication
).
The following occurs automatically:
- The display shows the run-dry function.
- The shut off valve opens after 5 seconds
- The hydro motors will be switched on for a few seconds.
- The aero-motor will be switched on for 45 seconds.
- The motors then stop and the display shows RIHO again.
GB
12:10
Manual
run-dry
function
20 sec
Automatic run-dry function:
If you take a bath and the level sensor is covered with water for 5 minutes (bath full indication
), the
automatic run-dry function (8minutes) will start after the bath is emptied. During the 8 minute waiting period the
LCD screen will display the countdown time. The run-dry function will then start.
Attention: This function may be switched off by a dipswitch at the time of installation.
4.2
12:10
12:10
Automatic
run-dry
function
20 sec
480 sec
Menu functions
Beneath this button there are extra functions for switching on and off. This depends to a great extent on the
system that you have bought and the options associated with it. This section describes all the possibilities, but
if you don't have the options that are discussed then the option functions will not appear on the screen.
ATTENTION: The button has several functions. If you press and hold down this button you access
a programmer menu that will be discussed later.
4.2.1
Short menu (select menu options).
If you press this button briefly the following screen appears:
19°C
Short
12:10
ok
OK
-43Enjoy the RIHO life-style
Stop all functions
User selection
Audio FM/AM/CD
heating
T Turbo
O
Exit (close menu)
With the or button you can select another function. As soon as the correct setting is shown you
can select this function with the button.
OK
OK
GB
Stop all functions:
Hydro, ground system and light etc switch off.
User selection (user1 to 6):
This function is used to select pre-programmed system settings. You can, for example, set your own
personal pulsation position, set light selection, etc. User programming is carried out in the extended
menu, see extended menu section.
On selection the user's choice will be indicated
12:10
3
You can also choose a user by holding down
The user can switch off by holding down
or .
or . Or by selecting short
on the menu.
Set audio FM/AM/CD (option):
Select audio symbol ( ) and confirm with button. Then set your station and volume by selecting with
the scroll buttons
and confirming with .
If you want audio on select and confirm with . Switch off audio by selecting the symbol and then
confirming with .
OK
OK
OK
OK
OK
OK
OK
OK
12:10
ok
FM 12:10
OK
87 mhz
Vol
2
FM
Stop audio
Vol volume
FM FM band
AM AM band
CD CD input
Leave audio menu (audio on)
-44Z1209004.5 GB
ok
12:10
OK
OK
2
Vol
ok
OK
OK
GB
Whirlpool Electronic LCD user handbook
Heating:
If your system has a heating unit then the water temperature is displayed in the upper left corner or the
LCD screen. It is not possible to switch the heating unit on without the first hydro pump running.
19°C
12:10
19°C
ok OK
12:10
19°C
12:10
ok OK
35 C
35 C
OK
ok OK
T
GB
exit heating menu (heating on)
set temperature
exit heating menu (heating off)
Exit (close menu)
4.2.2
Extended menu (user programmer options).
If you press and hold down this button (3 seconds) you can do the following:
19°C
12:10
Long
ok
OK
Program user
Set time
Exit (close menu)
Set time:
If there is a power cut then you will have to re-set the time.
19°C
12:10
ok OK
19°C
12:10
12:10
ok
19°C
OK
11:10
11:10
ok
OK
-45Enjoy the RIHO life-style
Set user:
If you program a user then only the programmable/settable functions will be part of your system For
example, if you have no radio, then this will not be displayed on the LCD screen. The system allows
you to program 6 users.
19°C
12:10
19°C
12:10
2
3 ok
4
ok OK
GB
The following maximum number of settings are possible for each user.
Exit user menu (settings will be saved)
Reset
Reset user to factory settings
Switch halogeen lighting on/off
Switch colour therapy on/off
Audio
heating
T
Pulsation duration hydro + ground system together
Mini jets (foot + back) of hydro system
Foot jets of hydro system
Back jets of hydro system
Hydro
Aero (ground system)
Exit user menu (settings will not be saved)
Exit user menu (settings will be saved).
Reset
Reset user to factory settings.
19°C
2
2
19°C
12:10
RESET
ok
12:10
Reset
OK
-46Z1209004.5 GB
2
2
ok
OK
GB
Whirlpool Electronic LCD user handbook
Switch halogen lighting on/off
If you are on the required selection you can switch the option on or off by pressing the
symbol changes to . ( -off, -on)
19°C
2
12:10
Reset
ok
19°C
2
OK
button. The
12:10
RESET
OK
ok
Switch colour therapy on/off.
2
12:10
2
19°C
12:10
ok OK
GB
19°C
ok
Set audio (see also short menu).
12:10
ok
FM 12:10
87 mhz
OK
Vol
2
ok
12:10
OK
OK
2
Vol
ok
OK
OK
FM
Set heating (see also short menu).
19°C
12:10
ok OK
T
T
Set pulsation duration (default 8 sec).
19°C
2
T=8sec
12:10
T
ok OK
19°C
2
T=8sec
12:10
T
OK
ok OK
maximum 25 and minimum 8
seconds
-47Enjoy the RIHO life-style
Your whirlpool can be supplied with valve functions in the hydro system or with pump-controlled
outputs. Depending on the system chosen.
Valve control
Switch minijets on/off (valve function)
Valve controlled jet outputs
Switch foot jets on/off (valve function)
Switch back jets on/off (valve function)
Set your preference, e.g.
GB
19°C
12:10
19°C
12:10
T
T
ok OK
ok
Pump-controlled
Set minijets
Set foot jets
Pump-controlled hydro functions
Set backjets
Set hydro
Set aero
Pump-controlled floor functions
For each pump the output can be set as constant or pulsing. Depending on requirements the power
per motor can be limited to 70% for pulsation and 50% at constant output.
19°C
2
12:10
19°C
2
19°C
12:10
2
12:10
T
70%
ok OK
OK
ok
-48Z1209004.5 GB
OK
OK
70%
M
ok
GB
Whirlpool Jets
5.1
Aero jet
The aero jet has a chrome surface finish. To clean the jet, the inner part can be taken out with a small
screwdriver.
As the word Aero already indicates, this is a jet for air flow. The air swirls through the water, which gives a
relaxing effect. The air from the aero jet opening enters the bath with a certain speed. This may be
perceived as cold. The jet house itself becomes somewhat hot.
BE AWARE: Be very careful not to damage the chrome surface.
After cleaning the jet house, the inner part can be pushed back. The inner part is clamped by an O-ring.
5.2
Hydro jets
Hydro jets have a mixed flow of water and air. This results in a powerful ray with a massaging effect. The
RIHO whirlpools and thermae whirlpools are equipped with different types of hydro jets. The type of jets
depends on the choice of the system. The functioning of all hydro jets will be described below.
ATTENTION: Because some type of jets can be closed by turning, it is possible to close the jets while the
motor is running. Don't do this and make sure at least one closable jet is open at all times. Otherwise the
motor can get overheated because of too much pressure. Lisa, Lisette and Dana have two separate
controlled systems. The remark is valid for both systems.
5.2.1
Hydro back- and side jet
Hydro jets have a complete chrome surface finish. The flow can be set, by pointing the opening in the
middle of the jet in the desired direction. This movement is quite heavy. Otherwise the opening would
easily turn back in its straight position, as a result of the water- and air pressure. The back and the sides
of the whirlpool have the same type of jets. The jets in the back are smaller than the ones on the side.
5.2.2
Hydro Super jet
The Hydro Super jet has a complete chrome surface finish. The flow through the jet can be directed
stronger or softer. By turning the inner part of the jet by hand the flow can be adjusted. When the inner
part is turned clock wise, the flow will be less heavy.
5.2.3
Thermae Powerpool rotation jet
The outer ring of the jet has a chrome surface finish, the inside of the jet is made of white plastic. This jet
is only used in some whirlpools of Thermae line. By turning the outer ring of the jet the power of the flow
can be determined. The inner part rotates automatically, which results in a massaging effect.
5.2.4
Thermae Powerpool jet
The outer ring of the jet has a chrome surface finish, the inside is made of white plastic. This jet is only
used in some whirlpools of Thermae line. By turning the outer ring of the jet the power of the flow can be
determined. This jet produces a straight massive ray of water.
-49Enjoy the RIHO life-style
GB
5.0
Whirlpool Electronic LCD user handbook
6.0
Protection system
If there is insufficient water in the bath, the system will not switch on in order to prevent the pumps running dry. In
addition all motors are fitted with a thermal switch. These will switch off the motors in the event of problems.
6.1
Normal temperature of bath water.
The recommended normal temperature of bath water is 38°C.
6.2
Disinfection and cleaning.
Application of (Riho) Cleaning products; Cleaning liquid, Cleaning/disinfect tablets and Soda
Whirlpool Cleaning Products are for cleaning/disinfecting the Hydro System. An Aero system blows air only and
can't/doesn't need to be cleaned with a special product.
GB
Two products;
1. Riho Cleaning Liquid
2. Riho Cleaning/disinfect Tablets (not available in Belgium)
3. Soda
The RIHO cleaning products are mild in composition and ideal to use in our RIHO whirlpools.
During normal use of the whirlpool it is advisable to clean it every 4 to 5 whirlpool turns, interspersed with cleaning
liquid and tablets. By little use of the whirlpool, it is advisable to clean the bath in advance, so that the system is clean
before using.
1. Clean Liquid / Cleaning Fluid (part number REDIS002)
This is for the cleaning of the hydro system. You fill the tub to just above the upper jets.
Fill the clean-tank with clean liquid. The whole bottle fits in the tank and lasts for 5 cycles.
Press the 2 outer drops on the keyboard simultaneously and keep them for a few seconds. The clean system
automatically turns on. After that, the whirlpool can be drained.
2. Cleaning Tablets (item number REDIS001)
Cleaning Tablets are to disinfect the Hydro System. You fill the tub to just above the upper jets. The first time you use
the Clean Tablets, add 5 tablets to the water (For subsequent sessions two / three tablets each time are sufficient).
Turn the Hydro system manually on and off (1 ½ to 2 minutes each time, repeat this 4-5 times for good flushing of all
tubes and hoses). After that, the whirlpool can be drained.
3. Major cleaning cycle with Soda
When you see black flakes in the water during the use of the whirlpool system we recommend cleaning with soda. Fill
the whirlpool just above the upper jet. Add a bag of soda to the water and make sure it is resolved because otherwise
it can cause scratches. Turn the Hydro system manually on and off (1 ½ to 2 minutes each time, repeat this 4-5 times
for good flushing of all tubes and hoses). This bath water can soak overnight so that it loosens stubborn dirt.
In the morning you repeat the process and you can empty the dirty water from your whirlpool.
For stubborn stains, the procedure may be repeated two or more times. The black flakes would be less at every turn
and eventually disappear.
Warning: The following points are essential when using Riho Clean/Disinfection tablets and Riho Clean Plus liquid:
- Keep the products out of reach of children.
- Avoid contact with the eyes and face.
- Not for internal use.
- In the case of skin contact, wash with water.
- Do not inhale.
- Do not sit in the bath after these products have been added.
-50Z1209004.5 GB
GB
6.3
Whirlpool Electronic LCD user handbook
Tips for users
- In case of health problems: Consult your doctor before using the whirlpool system.
- The maximum recommended duration for using the whirlpool is 10 minutes.
- The whirlpool system should not be used immediately after a meal.
- Bath foam (bubble bath), shampoos or soap should only be used after using the whirlpool system. If these media are
used prior to operation or when the Whirlpool bath is in operation, a great deal of foam will be generated.
7.0
Exceptional maintenance
The whirlpool service department cannot provide a service if there are no inspection hatches or the inspection hatches
are too small.
ATTENTION:
Always switch off the power supply before carrying out any maintenance or other work.
For extraordinary maintenance, please approach the authorised Service Centres. The guarantee will become void if
the product is used improperly by unauthorised personnel, and the manufacturer's liability for the safety of the product
will be cancelled immediately. If any parts fail, only use original and approved spares, otherwise the guarantee will
become void and the liability of the manufacturer for the safety of the product will be cancelled immediately.
Detecting and resolving problems.
Problem 1.
The whirlpool does not work when the on/off switch is pressed.
Cause 1:
Is the power supply to the whirlpool switched on?
Solution 1:
Is the whirlpool properly connected?
Check the fuses.
Is the power supply switched on?
Cause 2:
Is the water level high enough (bath full indication
)?
The electronically controlled whirlpools are equipped with a level switch that only allows the system to operate if the
water level is high enough.
If sufficient water is available, check whether the water level switch has come loose during transport or installation
work.
Solution 2:
Top up the water if there is insufficient water.
If the level switch is not working, contact the Riho Service department.
Problem 2.
Not all hydrojets or floor jets have a powerful flow.
Cause 1:
In some electronically operated whirlpools the various jets can be switched on and off separately whilst the remaining
hydro jets are functioning.
Solution 1:
See basic function operation. With the
or
button the diverse combinations can be run through one after the other.
Solution 2:
Switch off the power, wait for a minute, then switch it on again, whereby the electronic system will be reset. If the
problem persists ring the service department.
-51Enjoy the RIHO life-style
GB
Attention: Always switch off the power supply before carrying out any maintenance
or other work.
Problem 3.
The cleanpool system does not work.
Cause 1:
No cleanpool fluid in the reservoir.
Solution 1:
Top up cleaning fluid
Cause 2:
No cleaning fluid is retained in the reservoir because the reservoir shut off valve is open.
Solution 2:
Check lower magnetic valve on the cleanpool tank and fit new valve if necessary. If fitting new valve ring the service
department.
GB
Problem 4.
Light or colour therapy does not work.
Cause:
Water level not high enough (bath full indication
)?
Solution:
Top up water.
Problem 5.
The whirlpool does not function.
Cause:
The electronic system may malfunction due to pressing down the control keys several times, whether accidentally or
otherwise.
Solution:
Switch off the power, wait for a minute, then switch it on again, whereby the electronic system will be reset. If the
problem persists, call the Service department.
Problem 6.
Heating does not work.
Cause:
Heating is connected to the primary operating hydro system
Solution:
Does the first hydro system start? If not, switch this on first and then the heating.
If the problem persists, call the Service department.
Problem 7.
The system does not start.
Cause:
The hydro or aeromotor is equipped with a thermal safety switch as a protection. In case of overheating, the motor will
switch off. A possible cause may be that the motor is blocked.
8.0
Service Request Form
For direct service requests, please refer to the back page for a list of the Service Centres nearest to you.
For a ”Riho service query” see Fig.7.
Attention: According to the Installation instructions, it is necessary to have an inspection hatch of at least
40 (b) x 50 (h) cm in the case of a walled-in type of installation.
The room must be free of obstacles, so that work can be carried out.
In the case of a plastic panel sealed with sealant, you are requested to remove the sealant before our service
technician arrives.
-52Z1209004.5 GB
GB
Whirlpool Electronic LCD user handbook
Fig. 7
RIHO International b.v.
Hermesstraat 10
5047 TS Tilburg Holland
Postbox 4149
5004 JC Tilburg Holland
Tel:
Fax:
+31 (0) 13 5728728
+31 (0) 13 5720262
ABN-AMRO bank Tilburg 52.25.29.054
Giro No. of ABN-AMRO bank 1091055
Chamber of Commerce No. 1802298 Tilburg
RIHO SERVICE REQUEST
GB
Wholesale/Retail:
Company:
Contact person:
_
Place:
Telephone number:
_
Fax number:
Your Reference:
_
Company:
Place:
_
Fax number:
Telephone number:
_
E-mail:
_
Fitter/Installer:
End user:
Commission:
Address:
_
Post Code:
Place of Residence:
_
Telephone (Home):
Telephone (Office):
_
Fax:
E-mail:
_
Product:
Bath – Panel bath – Whirlpool – Shower Tray – Panel shower tray – Steam Cubicle – SAUNA – GLASS Panels
Name/Type:
Serial number:
_
Colour:
Date of purchase:
_
Invoice number/Reference (for Riho Int. BV) on which product was delivered:
_
Whirlpool:
Steam Cabin:
System:
Execution:
¦
hydro electronic
¦
hydro mechanical
¦
basic
¦
hydro/aero electronic
¦
spydro mechanical
¦
professional
¦
hydro/spydro mechanical aero electronic
Is there a service hatch? YES/NO
with a dimension of at least 40x50 cm
Reason for service request:
_
_
_
Yours sincerely,
All agreements entered into with us are subject to our general conditions of payment and delivery, deposited with the clerk of the court at Breda on
5 January 1994 under number 3/94.
-53Enjoy the RIHO life-style
9.0
Terms and Conditions of Guarantee
1
We provide a guarantee for the good construction and the material of the goods supplied by us, subject to
the condition that we shall replace all components free of cost, which develop defects within three years of
delivery due to inadequate construction and/or defective materials. The components in question should be
sent to us free of cost for this purpose. We shall not bear the cost of dismantling or installing these
components.
Riho products made of acrylic are subject to a guarantee for colour and form consistency for a period of
five years.
Cleaning of Riho products should be done with products prescribed by Riho.
For wood, wash basins and treated materials there is a warranty period of 1 year. Conditions are that the
space is well-ventilated (larger than 10 times the room volume per hour) and compliance with the
maintenance regulations.
The guarantee shall never cover faults that arise due to normal wear and tear, improper handling or
incorrect maintenance or due to changes or repairs by or on behalf of the customer and/or the purchaser
or by third parties.
The guarantee shall apply only and to the extent that the customer and/or purchaser has fully fulfilled his
obligations toward us.
No guarantee shall be provided for components within the broadest meaning of the term, that have not
been supplied or installed by us.
The guarantee shall in no case apply to anything more than the free supply of new components. We shall
never be liable for any other damage by whatever name called, which may be suffered by the customer
and/or the purchaser.
If we replace components in fulfilment of the guarantee obligations, the components that have been
replaced become our property.
If the customer and/or purchaser lay down the condition that certain specific materials or components
should be supplied by manufacturers or suppliers specified by name, the responsibility and/or guarantee
period accepted by us will not exceed the responsibility and/or guarantee period given to us by the
manufacturer or supplier of these specified components or materials.
Complaints about defects in materials supplied and/or work done should be notified to us in writing within 7
days of the discovery of the same.
We do not accept any liability whatsoever for an design developed by the customer and/or purchaser or by
third parties acting on behalf of the customer and/or purchaser, nor for the material specifications or
calculations if any relating to such design.
We shall never be bound to compensate direct or indirect damage suffered, no matter by what name
known. We are also not liable for damage that may be caused to the properties of the customer/purchaser
or of third parties by or during the installation of the goods delivered.
We shall never be liable to compensate loss of business and profits or consequential damages no matter
by what name known, arising due to any cause whatsoever, including delay in the delivery of the goods
sold and/or installation.
The guarantee of the Riho product shall lapse if the product is used outside the country of purchase.
1a
1b
1c.
2
GB
3
4
5
6
7
8
9
10
11
12
-54Z1209004.5 GB
Whirlpool Electronic LCD user handbook
GB
GB
-55Enjoy the RIHO life-style