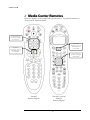
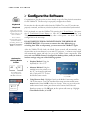
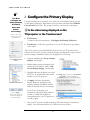
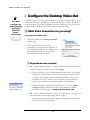
1
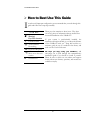
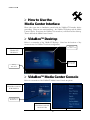
MODEL
MAGNUM
Software
Configuration Guide
VIDABOX™ - MAGNUM™
Software Configuration Guide
© VidaBox LLC
100 Shames Drive • Suite 3 • Westbury, NY 11590
Support: http://www.vidabox.com/support
Table of Contents
Introduction
4
CHAPTE R 1
OVERVIE W
How to Best Use This Guide
5
How to Use the Media Center Interface
6
VidaBox™ Desktop
6
VidaBox™ Media Center Console
6
Media Center Remotes
7
CHAPTE R 2
CONFIGU RE
Media Center Setup Walkthrough
18
Required Setup Section
18
Optional Setup Section
19
Configure tuners,
19
TV Signal, & Guide
Optimize how Media Center looks
22
on Your Display
Set up your speakers
23
CHAPTE R 3
FINE TUNE
CONFIGU RATION
SOFT WARE
Configure the Software
8
PVR Configuration
24
Configure the Primary Display
9
Closed Captions Configuration
24
Configure the Desktop Video-Out
10
Remote Recording Configuration
25
Connecting via a VGA Cable
10
Pictures Configuration
25
Connecting via DVI/HDMI/Component/
11
DVD Configuration
25
S-VIdeo Cables
11
Were the video settings saved after 12
reboot?
Configure the Cloned Video-Out
13
Configure the Cloned Resolution
14
Configure the Audio Output
15
Setup in Sound Driver Menu
15
Configure the Wireless Connection
17
Configure Media Center Console
18
CHAPTE R 4
POST CO NFIGURA TION
You are Finished!
26
CHAPTE R 5
SERVICE INFORMATION
Service Information
Contact your Dealer/Place of Purchase 27
Contact VidaBox LLC
27
I N T R O D U C T I O N
Introduction
A
fter setting up the physical connections necessary for the VidaBox™, it’s now
time to configure the software properly for optimal performance. Please take
some time to review this guide thoroughly, as improper installation may not
yield the optimal audio and visual experience.
be sure to check out our website and support forum, where
new features, questions, and answers are available everyday. As always, every new
VidaBox™ comes with our all inclusive warranty. Feel free to give us a call if you ever
need installation assistance.
If you ever need help,
Enjoy your VidaBox™ and have a great entertainment experience!
Sincerely,
Steven W. Cheung
Owner
Sergio DeAlbuquerque
Owner
4
I N T R O D U C T I O N
How to Best Use This Guide
I
n order avoid improper configuration, we recommend that you read through this
guide and follow the setup steps carefully.
I C O N
K E Y
Warning!
Pay Close Attention
Checklist Items
Answer Before
Proceeding
Keyboard Required
Move on to the next
section
New Section
Please pay close attention to these icons. They alert
you to key pieces of information that are needed for a
successful installation of the VidaBox™.
If your system is professionally installed, the
installation technician should go over the main features
of the VidaBox™ with you. Keep this booklet as a
reference guide in case it is needed in the future, and
read over the User's Guide next.
and
encourage you to read through this comprehensive
installation guide if you decide to install it yourself.
Please be sure to check out our website and support
forum, where new features, questions, and answers are
available everyday.
We hope you enjoy using your VidaBox™,
5
O V E R V I E W
How to Use the
Media Center Interface
Please take some time to familiarize yourself with the VidaBox’s™ Interface before
proceeding. There are two main interfaces – the VidaBox™ Desktop and the Media
Center Console. Every time the VidaBox™ is turned on, it will first load the desktop.
Then it will load the Media Center Console.
VidaBox™ Desktop
Below is a screenshot of the VidaBox™ Desktop. Noted are the locations of key
icons necessary for VidaBox™ software configuration.
‘X’ Icon to
Close Media Center
FIGURE 1 –
VIDABOX™
DESKTOP
Mouse on Blank
Area of Desktop
Desktop
‘Start’ Button
VidaBox™ Media Center Console
Below is a screenshot of the VidaBox™ Media Center Console & options.
FIGURE 2 – MEDIA
CENTER CONSOLE
SCREENSHOT
Select Tasks for the
Shut Down Icon
FIGURE 3 – MEDIA
CENTER CONSOLE
OPTION LIST
6
O V E R V I E W
Media Center Remotes
Below are diagrams of the standard and optional remotes. Pay particular attention to
the key buttons which are labeled.
Navigation Buttons:
Up, Down, Left, Right,
& OK buttons
Start Button:
Press this to get to the
Main Media Center
Console Menu
Start Button:
Press this to get to the
Main Media Center
Console Menu
Navigation Buttons:
Up, Down, Left, Right,
& OK buttons
Standard
Remote Diagram
Optional Logitech®
Harmony
Remote Diagram
7
C O N F I G U R E
S O F T W A R E
Configure the Software
Congratulations! By this point you have already set up all of the physical connections
for the VidaBox™! The next step is to properly configure the software.
Keyboard
Required
You’ll need to have the
supplied keyboard ready
to finish setting up your
audio connection.
If it is a wireless
keyboard, make sure it is
synchronized before
proceeding. Refer to the
Hardware Installation
Guide for instructions.
Options for
Closing Media
Center
Close Media Center
using the Keyboard
Alt+F4 Combination
Click on the
X to Close
Media Center
Be sure that the video & audio cables from the VidaBox™ to your TV/monitor are
properly connected, and that any wireless keyboards are connected and synchronized.
If it’s not already on, start the VidaBox™ by pressing the F Power Button. Also press
the G Touchscreen Power Button to turn the touchscreen on. Either your
TV/projector or touchscreen will display video at this point – not both! We will
configure this in the next steps.
DO NOT SWITCH VIDEO CONNECTIONS IN THE MIDDLE OF
CONFIGURATION – If you want to connect the video differently (e.g.
switching from VGA to component), you must restart the VidaBox™ again.
After the VidaBox™ fully loads, the Media Center console will automatically start,
shown either on the touchscreen or your main TV/projector. A software setup wizard
will automatically appear and help you set up the Media Center components. For
now, exit out of Media Center to configure the desktop video, audio, & wireless
internet settings using one of the following options:
Simplest Method: Using the
keyboard, hit “Alt + F4”.
Alternate Method: Using the
trackball, move the pointer over
the “X” on the upper-right hand
side. Click on the “X” to close
the Media Center console.
Select the Close Media Center
icon, click OK
Using Remote Only: Highlight Cancel on the Media Center setup and hit
OK on the remote. Leave the checkbox Run setup next time media center
starts checked, then hit OK to close out of setup. Now you are on the main
media center console menu, press down on the remote until Tasks and
Shutdown comes up. Hit OK again, & five options will come up. Highlight
Close Media Center, & hit OK.
Shut Down showing
current time
8
C O N F I G U R E
S O F T W A R E
You Must
Configure the
Primary Display
& Desktop
Video-Out
Before
Proceeding!
Failure to do so may
result in severe video
problems later.
Configure the Primary Display
Using the trackball, move the cursor to any open area on the desktop (where you only
see the desktop wallpaper). Right-click to open up a menu, and then select NVIDIA
Control Panel (shown left). The prompt, as shown on the lower left, will appear.
Is the video being displayed on the
TV/projector or the Touchscreen?
•
•
TV/Projector:
Continue in the next section titled
Configure the Desktop Video-Out
Touchscreen – Follow the steps below to set your TV/Projector as the primary
video output
Tip: For this section, if your MAGNUM is far away from your TV/projector, have
someone look at the TV/projector while the changes are being made so that you don’t
miss the settings confirmation window (it only appears for 15 seconds).
Desktop options menu –
select NVIDIA Control
Panel
1. Using the trackball, select Set up multiple
displays (shown right).
2. Multiple display options will appear in the
center part of the window. Select “Only
use one display (Single)” (shown right)
3. Highlight and select the display you would
like to use. It should be the name/model
number of your TV/projector.
NVIDIA Control Panel
4. Hit Apply to activate your primary
display. Make sure the display works
properly, and then click Yes to confirm
within 15 seconds and save your changes.
Click on Apply to
activate your changes, &
observe the changes on
the TV/Projector.
If you do not see anything, your
touchscreen will function again within 15
seconds. Confirm that all cables are
connected properly, your TV/projector is
on, and try again.
Select Set up multiple displays
Select Single display, & choose your TV/Projector
from the list. In this example below,
the LVM-42w2 will be set as the primary display.
5. Only your TV/projector should be showing video after setting it as the primary
display. Your touchscreen will be off. Continue to the next section.
9
C O N F I G U R E
S O F T W A R E
Configure the Desktop Video-Out
You Must
Configure the
Primary Display
& Desktop
Video-Out
Before
Proceeding!
Failure to do so may
result in severe video
problems later.
On the projector or TV that you are connected to, look up its native resolution. It can
usually be found in its User’s Manual, or on the manufacturer’s website. We will first
set up the primary TV/projector, and then clone these settings onto the touchscreen.
Continue in the NVIDIA Control Panel, and follow the steps below.
What Video Connection are you using?
Connecting via a DVI/VGA Cable:
1. Using the trackball, select Change resolution
(shown right).
2. On the projector or TV that you are
connecting to, look up its native resolution. It
can usually be found in its User’s Manual, or on
the manufacturer’s website. Proceed below
after finding the native resolution.
Change Display Resolution
Did you find the native resolution?
a. Yes – under “Display Resolution,” move the slider bar to the native resolution
of the TV/monitor, as shown above , and hit Apply.
If you see nothing, or if you are dissatisfied with the result – do not panic!
Wait about 15 seconds and the screen will revert back to the last effective
resolution. Be sure that you have found and selected the correct native
resolution for your TV/monitor. Go to step b if you cannot find the
correct native resolution, or if the picture quality is unsatisfactory.
Apply Changes Prompt
If the image appears clearly and is satisfactory, hit “Yes” on the Apply
Changes prompt (as shown on the left) to stay with this resolution.
Proceed to the next section: Configure the Cloned Video-Out.
b. No - under “Screen Resolution,” move the slider bar to the right, one
step/increment (as shown upper right), and hit “Apply.”
1. Wait a moment, and a preview will appear showing what the desktop will
look like under the new resolution.
10
C O N F I G U R E
S O F T W A R E
2. If you see nothing, or if you are dissatisfied with the result – do not panic!
Wait about 15 seconds and the screen will revert back to the last effective
resolution.
Display Resolution
Slider
Apply Changes Prompt
Preferred Resolution:
Write down the
preferred resolution here
for later reference
3. Repeat the first step, but move the slider bar to the next increment now.
It will take several tries at different resolutions until the optimal desktop
resolution is found.
4. Once you’ve found a resolution you are happy with, hit “Yes” on the
Apply Changes prompt to stay with this resolution. Take note of this
resolution, as you will need it again later. (Hint: write it down on the left)
Proceed to the next section: Configure the Cloned Video-Out.
Connecting via HDMI/Component/S-Video Cables:
1. Under the Video & Television category,
select Change the signal or HD
format.
2. Select the connector you would like
to use, if it is not already selected by
default. Options for your appropriate
connection (DVI/HDMI, Component,
or S-Video) will appear.
Apply Changes Prompt
Preferred Signal
Format:
Write down the
preferred signal format
here for later reference
3. Next, Select the signal format you
would like to use. Common highdefinition formats are 720p, 1080i, &
1080p. S-Video connections are 480i.
Hit Apply. If satisfied with the changes,
hit Yes on the Apply Changes prompt
(shown left). Take note of this
resolution, as you will need it again later.
(Hint: write it down on the left)
Selection options for HDMI/DVI,
Component, & S-Video Outputs
Can you turn off overscan on your TV or projector?
a. Yes – Do so, and your screen should appear
perfectly matched with the VidaBox’s output
resolution. Proceed to: Were the Video
Settings Saved After Reboot?
b. No – Under Video & Television, click on
Resize HDTV desktop (shown right)
11
C O N F I G U R E
S O F T W A R E
1. Click on the Resize My Desktop radio button (shown left), and click on
the Resize Desktop button. Using the Overscan slider bars, move them
to match the top, bottom, left, and right limits of your television screen.
Resize Desktop
buttons
2. After optimizing the over/underscan, apply to save your changes, then
restart the VidaBox™. Make sure the video settings are preserved. Go to:
Were the Video Settings Saved After Reboot? below.
Were the Video Settings Saved After Reboot? (Desktop)
Close the Media Center Console to see the desktop, as described on page 8.
Overscan slider bars
for resizing the desktop
a. Yes – The desktop appears crisp and clear. You’ve finished the video
configuration! Go to: Configure the Cloned Video-Out
b. No – The desktop has reverted back to an unsatisfactory resolution/picture
quality. Some TV models are not auto-detected by internal hardware, so the
Force TV Detection setting must be enabled. Follow these steps to do so:
Enabling the Force TV Detection setting
1. Repeat the configuration procedure, but
skip step 9 and do not reboot.
Hit the Home icon to go
back to the Start Page.
Change display
configuration option
2. Under Display > Set up Multiple Displays, click on My Display is not
shown in the list… option (shown below).
3. In the Detect Missing Display
window, the Force television
detection checkbox should be
checked, as shown on right. Hit
OK.
4. Restart the VidaBox now. The
VidaBox will force detect your TV
upon restart and save your new video
configuration
5. Proceed to:
Configure the Cloned Video-Out
Note: Before the VidaBox™ is connected to a different TV, you must uncheck
the Force TV Detection setting beforehand – the Force TV Detection setting
saves the video settings for the previously configured TV. Do not enable the
option if your TV is Auto-detected – it will minimize any portability problems in
the future.
12
C O N F I G U R E
S O F T W A R E
You Must
Configure the
Cloned VideoOut Before
Proceeding!
Failure to do so may
result in severe video
problems later.
Select Set up
multiple displays
Configure the Cloned Video-Out
Now that the proper settings for the primary display are made, it’s time to clone
your outputs so that your touchscreen will work! Stay in the NVIDIA control
panel, and follow the steps below.
1. Using the trackball, select Set up
multiple displays (shown left).
2. Multiple display options will appear
in the center part of the window.
Select “The same on both
displays (Clone)” (shown right)
3. Highlight and select the display set
with your TV/projector first, plus
the Analog Display (touchscreen).
would like to use.
Select Clone display, & choose your
TV/Projector first plus your
Touchscreen/Analog Display from the list.
In the example, the TV/projector is called LVM-42w2.
Thus, the correct choice will be:
RIGHT:
LVM-42w2 + Analog Display
WRONG:
Analog Display + LVM-42w2
4. Hit Apply to activate your touchscreen. Make sure the touchscreen displays
and clones your TV properly, and then click OK to confirm and save your
changes. The resolution may be off, which we will correct next.
If you do not see anything, your touchscreen will function again within 15
seconds. Confirm that all cables are connected properly, your touchscreen is
on, and try again.
13
C O N F I G U R E
S O F T W A R E
Configure the Cloned Resolution
With cloning activated, we now take the final step of setting the native resolution &
finishing the video configuration. Proceed & follow the steps below.
What Video Connection are you using?
Connecting via a DVI/VGA Cable:
Change Resolution
Option
1. Using the trackball, select Change resolution (shown left). Find the preferred
resolution that you found under Configure the Desktop Video-Out on pg 11.
2. On the “Display Resolution” slider bar, move it to the preferred resolution of the
TV/monitor, as shown on the left , and click Apply.
Display Resolution
Slider
3. Check and see if you’re satisfied with the TV/projector. If so, hit Yes on the
Apply Changes prompt to confirm your choice. Proceed to the next section:
Configure the Audio Output.
Connecting via HDMI/Component/S-Video Cables:
Apply Changes Prompt
1. Under the Video & Television category,
select Change the signal or HD format.
2. Select the connector you would
like to use - use the same options
that you’ve set before on page 11.
3. Next, Select the signal format
you would like to use with the
same settings previously used on
page 11, then hit Apply. Be sure
you are satisfied with the changes,
and then hit Yes on the Apply
Changes prompt (shown left).
Proceed to the next section:
Configure the Audio Output.
Selection options for different Outputs
Use the same settings that you chose from page 11.
You have finished the Desktop Video-out configuration!
14
C O N F I G U R E
S O F T W A R E
Configure the Audio Output
Want the best
sound quality?
Use the digital SPDIFout whenever possible,
especially when
connecting to a receiver.
To complete the desktop audio output configuration, the steps required will depend on
the audio connection used, as detailed below.
What Audio Connection are you using?
Digital Sound – Optical or coaxial output sound
The Media Center console will configure your audio settings – go to the next section.
Analog Sound – 2.0 Stereo, 5.1 or 7.1 surround sound
The VidaBox™ will need Setup in Sound Driver Menu, as noted below.
Setup in Sound Driver Menu
Audio
Configuration
Icon
The icon is on the
taskbar, in the lower-right
hand side of the desktop.
It may appear slightly
different, depending on
your particular
VidaBox™ model.
1. Using the trackball, move the cursor over and double-click on the Audio
Configuration icon, as shown on the left
2. The Audio Configuration Panel will appear, as shown below. Select the “Audio
I/O” button, as highlighted. Choose the number of speakers you have for your
audio setup.
Note: Your panel may appear slightly different than as shown, depending on your
VidaBox™ model.
Analog Speaker Configuration
Choose Number of Speakers
Optional: Swap
Center &
Subwoofer
Outputs
If available on your
model, you can swap
center & subwoofer
audio outputs by clicking
on the wrench icon as
shown. The appropriate
options will appear.
Play Button –
Analog Speaker Test
Speaker Fill, Swap center &
Subwoofer, & Bass
Management Option
3. Using 3.5mm to RCA adapters, connect only one speaker pair into the I 7.1
Surround Sound Output of the VidaBox™, using the colors shown on the next
page as a guide.
15
C O N F I G U R E
S O F T W A R E
Blue – Analog Line In¹
Green – Front Left/Right* ¹
Pink – Mic In** ¹
L/R RCA audio cables
Orange – Center / Subwoofer Out
Black – Surround Left/Right
Gray – Surround Back Left/ Right
* - For stereo 2.0 /front speakers-only output (either via L/R RCA or direct 3.5mm
cable), you only need to connect to this green jack and you’re done!
** - Connect the microphone amplifier’s output into this jack
3.5mm to RCA converter
3.5mm 2.0 stereo cable
4. Once the first speaker pair is connected, a prompt will appear, asking Which
device did you plug in? Checkmark the device you connected, as shown above.
Hit OK to confirm. Repeat this step until all speaker pairs are connected.
Note: ¹ - The prompt will not appear for the green, blue or pink connections.
5. When all speakers are connected, hit the “Play” button. Sounds will play from
each of your speakers – listen to each one to confirm they are working properly.
If you do not hear sounds from each of your speakers, go back and verify your
physical speaker connections. Something may be disconnected or improperly
connected. If you’ve verified your speaker connections, but the sounds still do not
play properly, please feel free to ask for assistance. See Service Information in
Chapter 4 for more details.
You have completed the Desktop Audio-out Configuration!
16
C O N F I G U R E
S O F T W A R E
Configure the Wireless Connection
Are You Connecting to the Internet Wirelessly?
1. If not, skip this section and proceed to the next section –
Center Console.
Configure Media
2. If so, be sure that your wireless network is already installed and is
ready to accept a new connection. Then, look on the lower-right
hand corner of your desktop for the Wireless Networking icon, as
shown on the left.
Which Icon Do You See?
a. If you see icon A, your wireless connection was automatically configured and
is now connected! No further configuration is required.
Wireless Network
Icon A – Connected!
Wireless Network
Icon B – Not Connected
Wireless Network
Connection window
b. If you see icon B, use the trackball, move the cursor over and double-click on
the icon. The Wireless Network Connection window will appear, as shown
on the left. Choose your wireless network by double-clicking on it.
i. If the wireless network has no passkey or encryption, it will automatically
connect, and you will see icon A on the taskbar in the lower-right hand
corner.
ii. If the below Network Key
prompt appears, type it in
twice and hit Connect.
Note: You will need to
contact your network
installer/administrator for
this information – neither
your dealer, place of purchase, nor VidaBox will know your private
Network Key.
After hitting Connect, you should be able to connect to the network, and
icon A will appear in the lower right hand corner of the taskbar. If it
doesn’t connect, contact your network installer/administrator for assistance
– special tweaks and/or settings might be required for your network.
You have configured your wireless connection!
17
C O N F I G U R E
S O F T W A R E
Configure Media Center Console
The Start Button –
Microsoft Remote
Once the desktop video, audio, and wireless connections have been set up, we can
now proceed and configure the Media Center Console. Start Media Center by hitting
the Start Button on the remote, and then simply follow the on-screen instructions.
Media Center Setup Walkthrough
The Start Button –
Harmony Remote
Required Setup Section:
1. After loading Media Center, the Welcome screen for the Media Center setup
wizard will show.
Hit Next.
Did You
Configure the
Desktop VideoOut Yet?
If not, go back to page 9
– failure to do so will
result in severe video
clarity problems later.
2. The Media Center Setup page now describes the two setup sections:
Required Setup – These elements are required for the VidaBox™
Internet Connectivity
Test “Always On” connection: Verifies that the internet is always available.
Enhanced Playback: Get music information & cover art for albums from
the internet.
Join a Wireless Network
If your home has a wireless network, you can use this utility to set up your
wireless connection. Be sure to have any network keys or passwords ready
if needed.
Optional Setup – Even though these are described as optional, you must
configure these properly to get the most out of the VidaBox™.
Hit Next.
3. The Media Center Privacy Policy page describes how your privacy may be
impacted when you use Media Center to connect to the internet. Click on the
Privacy Policy if you wish to learn more.
Hit Next.
18
C O N F I G U R E
S O F T W A R E
4. Help Improve Media Center asks you to join the Customer Experience
Improvement Program. You can click on Learn more about this setting for
details.
You may simply click on No thank you and hit Next.
5. Get the Most from Media Center asks for permission to connect to the internet
to get cover art for albums, movie information, etc.
We recommend that you click on Yes and hit Next for an optimal experience.
6. Join a Wireless Network helps you set up your wireless connection through the
Media Center Console. We have already configured the wireless adapter earlier, so
there’s no need to set it up again.
Click No and select Next.
7. “Always On” Internet Connection now appears. This prompt is to check to see
if your internet connection is always available. An “Always On” connection is
highly recommended for VidaBox™ operation. Select the appropriate option –
Yes or No - and hit Next.
8. Required components have been set up screen appears. This confirms that the
first section of the Media Center configuration has been completed successfully.
Optional Setup Section:
The Optional Setup now appears. Despite its name, Optional setup is required to get
the most out of the VidaBox™. Start with Configure tuners, TV signal, and
Guide. Select that option, and hit Next.
Configure tuners, TV Signal, and Guide:
1. The Confirm Your Region prompt appears. Make sure that your current region
is set properly.
Is the Current Region Correct?
a. If so, click Yes and hit Next.
b. If not, select No and hit Next. A list of countries & regions will appear –
select the correct one, and hit Next.
19
C O N F I G U R E
S O F T W A R E
2. Automatic TV Signal Setup now appears. You can choose to manually
configure the TV signal, but we recommend that you let Media Center
automatically configure your connection. If you have set-top boxes, turn them
on now. Select Configure my TV signal automatically and hit Next. Media
Center will now be Examining your TV Signal Setup.
3. Next, if you have the optional HDTV tuners installed, the Connect Your Digital
TV Antenna will appear. If not, skip to step 4.
Is your Digital TV Antenna connected?
a. Be sure that your digital TV/HDTV antenna is connected and proceed
b. On the next screen, it will ask Which Tuners Do You Want to Configure?
Both HDTV tuners should have a checkmark next to them. If not, make sure
the blank boxes are checked. After both boxes are checked, select Next.
4. After a few moments, the TV Signal Configuration Results will appear on the
screen.
Are the TV Signal Configuration Results Right?
a. If the results are correct, select Yes and hit Next.
b. If the results are not right, choose one of the two No options and proceed. If
your hardware setup was correct, the VidaBox™ will automatically configure
itself. Go back into the Hardware Installation Guide and make sure all the
TV connections are set up properly.
Are You Using a Set-top Box (STB)?
a. If not, move on to Step 7 – Guide Privacy.
b. If so, the Select Your Set-top Box Signal screen will appear. Select either
cable or satellite, depending on your connection. Hit Next.
c. The Set-top Box Remote prompt now comes up. This portion of the wizard
will configure and allow you to control your set-top box using the media
center remote.
20
C O N F I G U R E
S O F T W A R E
Do You Have a Set-top Box (STB) Remote?
a. If you do not have the remote, select No and hit Next. You will need to
know the Brand of your set-top box. Follow the instructions on the screen,
and select the proper responses. Media Center will then be configured to
control your STB.
b. If you have a set-top box remote, have it ready, and then select Yes and hit
Next. Follow the on-screen instructions, and Media Center will then be
configured to control your STB.
5. The Test Channel Changing screen will appear next to test and see if the settings
were configured properly. Use your Media Center Remote or Keyboard and enter
a channel number that you know you can receive.
Did the STB Change the Channel?
a. If yes, then select The set-top box changed the channel correctly and
hit Next.
b. If not, then select The set-top box did not change the channel
correctly and hit Next. Follow the instructions on the screen and repeat
the process until the proper working remote control code is found.
6. Next, use the channel up or channel down button to test IR signal speed. In other
words, hit the channel up key – at least six times – and see if the channels change
properly.
Do the Channel Up/ Down buttons work?
a. If yes, select The channel changed correctly, and hit Next.
b. If not, select The channel did not change correctly, and hit Next. The
IR speed will be reduced, and try step 5 again. Repeat until the Media
Center Wizard automatically configures the IR speed.
7. The Guide Privacy screen now appears. We highly recommend use of the guide
for the best interactive VidaBox™ experience. Select Yes and hit Next.
8. Now, the Guide Terms of Service prompt appears. You must read and agree to
the terms to use the Guide. After reading, click on I agree and hit Next.
21
C O N F I G U R E
S O F T W A R E
9. Please Enter Your ZIP Code, so your local programming guide can be found.
Hit Next when ready.
10. The Download Provider Information page now appears. Be patient as the
download is completed. When it’s done, hit Next.
11. Select TV Signal Provider, and then hit Next. Call the customer service line for
your TV provider if you have a question regarding which option to choose.
12. Download TV Program Guide Information will begin. After the download is
complete, hit Next.
13. Next, if you have the optional HDTV tuners installed, the Digital TV Antenna
Signal Strength wizard will appear. If not, skip to step 14.
a. The Adjust Digital TV Antenna and Choose Channels screen will now
appear. Follow the on-screen instructions. Once you’ve finished selecting the
appropriate channels, select Next to finish.
14. The Configure Tuners, TV Signal, and Guide section is now complete.
Using USB
HDTV tuners?
If so, the results from the
Digital TV Antenna
Signal Strength test is
irrelevant. Simply hit
Next on the screen and
go to the next step.
.
Optimize how Media Center looks on your display:
1. After completing the Configure Tuners, TV Signal, and Guide section, select
Optimize how Media Center looks on your display, and hit Next.
2. On Display Configuration, click on Watch Video to learn how Media Center
will help you best configure your video feed. After it is finished, click Next.
3. Identify Your Display Type, and pick the proper selection. Hit Next.
4. Pick your Connect Type, and hit Next.
5. The VidaBox™ will now try to Optimize Media Center for your Display. You
can Preview Automatic Adjustments, or Keep my current Settings and
Continue using the default settings. Compare the automatic adjustments against
your current settings, and select the one that looks best.
6. Next, the Adjust Your Display Settings wizard appears. Select Adjust Display
Controls, and hit Next.
7. The Display Calibration pages will now show. Hit Next. A number of display
characteristics will be displayed. Go through them one at a time, starting with
Onscreen centering and sizing. Follow the onscreen instructions and adjust
these controls on your TV.
22
C O N F I G U R E
S O F T W A R E
8. After you’ve used all of the Display Calibration tools, hit Next. You’ve now
Optimized how Media Center looks on your Display.
Set up your speakers
1. In this final section, we’ll set up and test your speakers in the Media Center
Console. Select Set up your speakers and hit Next.
2. The Welcome to Speaker Setup wizard now appears. You will specify how
many speakers you have, and then Media Center will proceed to test them. Hit
Next.
3. First, Choose number of Speakers. In general, most TVs have 2 speakers built
in. Surround sound systems will have 5 or 7 speakers, plus 1 subwoofer.
4. Then, pick the Speaker Connection Type. Choose the cable type you used
during the hardware installation.
5. Next, Test Your Speakers. Hit the Test button, and sounds will play from your
front speakers.
Note: If you have surround sound speakers, only your front stereo speakers may
be working during the next step. If that is the case, select I did not hear sound
from all of my speakers and skip to step c to complete surround sound
configuration.
Do Sounds Play from Each of Your Speakers?
a. Yes – if so, select I heard sound from all of my speakers, and hit Next.
You’ve finished the Media Center Console configuration! Go to the next
section: PVR Configuration
b. No – if not, select I did not hear sound from all of my speakers, and hit
Next. Before proceeding further, Troubleshoot Your Speakers and verify
all of your speaker connections. If all of your cables are connected properly,
re-test and hit Back.
c. Hit Finish when the audio is completely setup, and go to the next section:
PVR Configuration
If the speakers still do not work properly, please feel free to seek further
assistance. See Service Information in Chapter 4 for more details.
You have completed Media Center Console configuration!
23
F I N E - T U N E
C O N F I G U R A T I O N
At this point, the required elements have been configured. The next few steps will
cover fine-tuning the setup a bit further, so that you can have the optimal experience.
PVR Configuration
The personal video recorder, by default, is set to record about 40 hours of television
at the Best quality setting. Depending on your viewing habits and performance needs,
you can change it to record more or less television and/or at a different quality setting.
Warning!
DO NOT change the
Record on Drive
Setting! Your recorded
TV function may stop
functioning properly if
it’s changed to
a different drive.
1. Go to Settings, then select TV, then Recorder, and finally Recorder Storage.
DO NOT CHANGE THE RECORD ON DRIVE SETTING!
2. Take a look at the recorder storage screen. You can change the Maximum TV
limit and the Recording Quality. Increasing the Maximum TV limit will allow
you to record more hours of television, but will use up more disk space. You can
help offset this by lowering the Recording Quality, which reduces disk space usage,
but the quality of the recorded TV show will be lowered.
In general, we recommend a Better or Best quality mode. For fast-motion
recordings, such as action-oriented shows, visual artifacts may appear in Good or
Fair quality mode. However, the Good and Fair quality modes use significantly
less disk space, so you may record many more hours of television.
Please experiment with all of these settings and choose the one you find most
acceptable.
DO NOT CHANGE THE RECORD ON DRIVE SETTING!
Closed Captions Configuration
There are two ways to change the TV closed captions options.
1. Using the Media Center Start Menu, go to Settings, then select TV, and finally
Captions. If desired, change the Caption Display to be On, Off, or On when
Muted. If applicable, change the Captioning for Analog Channels.
2. While watching TV (either Live or Recorded TV), hit the More key on the remote,
and then select Settings. Select TV, and finally Captions. If desired, change the
Caption Display to be On, Off, or On when Muted. If applicable, change the
Captioning for Analog Channels.
24
F I N E - T U N E
C O N F I G U R A T I O N
Remote Recording Configuration
Why isn’t this
installed
already?
The remote recording
service is uniquely
connected to your MSN
passport, making it easy
to manage with a single
login. Thus, you would
need to input your
personal passport
information in order to
use this service.
Remote Recording is a unique feature that allows you to remotely change the television
recordings on your VidaBox™ from any computer connected to the internet. You
may wish to enable this service if you like to have control over scheduled TV
recordings without needing to be physically at the VidaBox.
1. Close your Media Center Console,
and open Internet Explorer.
2. Using your keyboard, go to:
http://tv.msn.com/tv/rr/rrsetup.aspx
3. Click on the Install Remote
Record button to install the
software. Follow the on-screen
instructions to install this service.
Install Now Button
Pictures Configuration
Note indicating
successful registration
From the Media Center Start Menu, go to Settings, and then select Pictures. In the
pictures settings page, you can change the way pictures are displayed, how song
information is displayed during slideshows, slideshow Transition time, and the
Slideshow background color.
DVD Configuration
From the Media Center Start Menu, go to Settings, and then select DVD. Here, you
can choose and change the default DVD language, audio, closed captioning, and
remote control options.
25
P O S T
C O N F I G U R A T I O N
☺
You’ve Finished
the Software
Configuration!
After configuring the
software properly, you
can use the VidaBox™!
Please take some time to
familiarize yourself with
the interface by referring
to the User’s Guide.
You are Finished!
Congratulations! You’ve set up the VidaBox™! Your Home Entertainment System is
ready to go!
If you find that you are having trouble using the VidaBox™ or are experiencing
unexpected difficulties, it may be due to improper physical connections or improper
software configuration. You may want to go back and review all of the installation
steps to be sure no mistakes were made, and you can also use the included
Troubleshooting Guide to help diagnose your problem.
If all else fails, you can seek further assistance as denoted in our
section on the next page.
26
Service Information
Service Information
Sometimes, there are problems that need further assistance to resolve.
VidaBox™ stands behind all of its products with its all-inclusive warranty with
the purchase of every VidaBox™.
Contact Your Dealer/Place of Purchase:
•
If you find that you are having trouble installing or setting up the
VidaBox™, please contact your dealer or place of purchase.
•
If you need additional assistance that your dealer cannot provide, if you
purchased a service protection plan, or if you purchased your VidaBox™
directly from us, you can contact us using one of the following ways:
1. VidaBox™ Online Support – Our forums are full of common tips and
troubleshooting knowledge. Feel free to search your answer. If you
can’t find your answer, register for free and post your question. The
forums are constantly monitored, and one of our community members
will be able to help you in no time.
2. Phone-based Support – Please see our website for business hours. Live
phone support is available for free for all new VidaBox™ owners for a
limited-time, as part of our warranty policy. An extended support plan is
also available as an upgrade option when you purchase the VidaBox™.
After the warranty period expires, you can get support on a fee-based
basis.
Contact VidaBox LLC:
Whenever you need support – VidaBox™ will be there. That’s our guarantee.
Contact Information:
Website:
www.vidabox.com
Online support:
www.vidabox.com/support
Phone-based support: See website for support contact number
27
Copyright ©2007 VidaBox LLC.
VidaBox™, and its model names ROOMMATE™, SLIM™, LUX™, MAGNUM™, & VAULT™ are registered trademarks or
trademarks of VidaBox LLC. All other company, product, and trademark names mentioned herein are for identification
purposes only and are the sole property of their respective owners. This document is accurate as of September 2007.
However, VidaBox LLC reserves the right to make modifications or changes to the document without further notice. This
document is not intended to obligate VidaBox LLC or any other entity to any functionality and technology, but to merely
inform the audience. VidaBox LLC makes no warranties, expressed or implied in or by this document and specifically
disclaims any implied warranty of merchantability or fitness for a particular purpose.
Version 2.1c