1
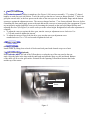
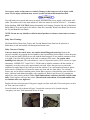
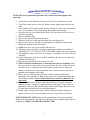
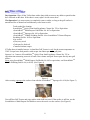
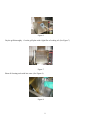
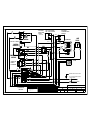
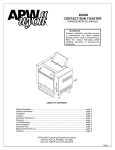
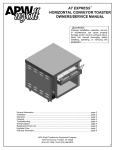
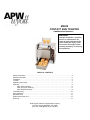
M2000
CONTACT BUN TOASTER
OWNERS/SERVICE MANUAL
WARNING:
Improper installation, operation,
service or maintenance can
cause property damage and/or
result in personal injury. Read
this manual thoroughly before
installing operating, or servicing
this equipment.
TABLE OF CONTENTS
Safety Precautions ........................................................................................................ 2
General Information ..................................................................................................... 2
Installation ................................................................................................................... 2
Location ....................................................................................................................... 3
Operating Instructions ................................................................................................... 5
Cleaning ...................................................................................................................... 5
Daily Parts Cleaning............................................................................................ 6
Daily Conveyor Cleaning ..................................................................................... 6
Daily Griddle Cleaning......................................................................................... 8
Troubleshooting...........................................................................................................10
Wiring Diagram............................................................................................................11
Exploded View.............................................................................................................12
Replacement Parts List ...............................................................................................13
Warranty .....................................................................................................................14
APW Wyott Foodservice Equipment Company
729 Third Avenue ? Dallas, TX 75226
(214) 421-7366 ? FAX (214) 565-0976
SAFETY PRECAUTIONS
APW Wyott toasters are designed, built, and sold for commercial use and should be operated by trained personnel
only. Clearly post all CAUTIONS, WARNINGS and operating instructions near each unit to insure proper
operation and to reduce the chance of personal injury and/or equipment damage.
Always disconnect power before cleaning or servicing the toaster. Surfaces will remain hot after power has been
turned off, allow unit to cool before cleaning or servicing. Never clean the toaster by immersing it in water. The
toaster is not protected against water jets; DO NOT CLEAN TOASTER WITH A WATER JET. Always clean
equipment before first use.
Operating toaster without legs will void the warranty. Insure all accessories and exterior panels are properly
installed and adjusted before applying power and operating.
GENERAL INFORMATION
Check the rating label for your model designation and electrical rating. Rating Label is located on the bottom front
of the control panel.
Overall dimensions with feeder: 23.5"(59.7cm) W x 25.9"(65.8cm) H x 17.5"(44.5cm) D
Electrical ratings:
M2KA: 208VAC, 2880W, 13.8A 60Hz
M2KH: 240VAC, 3840W, 16A 60Hz
Cordset Configuration:
208/250V: NEMA 6-20P Plug, 4 foot, 3 wire grounded cord.
If the supply cord is damaged, the manufacturer or an authorized service agent or a similarly qualified person must
replace it to avoid a hazard or warranty.
Shipping Weight:
94 lbs (42.7 Kg)
INSTALLATION
1. Examine carton for damage. The freight carrier has assumed responsibility for its safe transit and delivery. If
equipment is received damaged, either apparent or concealed, a claim must be made with delivering carrier.
a. Apparent damage or loss must be noted on the freight bill at the time of delivery. The carrier
representative (Driver) must sign the freight bill. If this is not done, the carrier may refuse the claim.
The carrier can supply the necessary forms.
b. Concealed damage or loss if not apparent until after the toaster is removed from carton, a request
for inspection must be made to the carrier within 15 days. The carrier should arrange an inspection. Be
sure to save all contents and packaging material.
2. Verify Parts
After removing unit from the shipping carton, unwrapping loose parts and remove any packing tape, plastic wrap
and nylon tie-down. Verify the following parts:
2
Item
Legs
Feeder/Bun Chute
Conveyor
Instruction Manual
Teflon Sheet Kit (optional)
Packaging
Qty
In plastic bag
Wrapped, loose in top of carton
In individual carton
Loose in carton
Loose in carton
4
1
1
1
Optional
NOTE: PRIOR TO INITIAL START-UP, ALL REMOVABLE PARTS AND THE GRILL SURFACE SHOULD
BE CLEANED WITH WARM SOAPY WATER TO REMOVE MANUFACTURING OILS, THEN RINSED
AND DRIED THOROUGHLY. Apply oil (vegetable oil) to the conveyor chain after washing. (Bun oil can be used
if it contains no animal fats, salts or dairy products.)
3. Assemble Legs
Lay the toaster on its back and install the four adjustable legs into the threaded holes on the bottom of the toaster
sides. Hand tighten the legs by gripping the black shank and turning until it is seated firmly against the bottom of
the toaster. Set the toaster upright on a flat surface. Unscrewing the lower, chrome insert of each leg levels the unit.
Flats are provided on two sides of the insert to allow use of a wrench. “Precise” leveling is not required for proper
operation.
??
??
Figure 1. M2000 Assembly Drawing
3
4. Conveyor Installation
Remove the front panel by lifting it straight up. (See Figure 1) Lift conveyor assembly ? by using “U” shaped
handles on each conveyor side bracket. Lower the conveyor into the two conveyor hanger brackets ? above the
grill plate on each side, so the four spacers on the sides of the conveyor rest on the bottom flange and the bottom
spacers are against the adjustment screws. The conveyor hanger brackets ? are factory adjusted. However, before
reinstalling the front panels apply power to the unit and run the conveyor to insure proper gear engagement. If gears
are not properly engaged adjust the conveyor by loosening the jam nuts on the conveyor hanger brackets and
adjusting the screw (see Figure 2) to set the conveyor to the correct height. Retighten lock nuts after adjustment is
complete.
a. To adjust the conveyor up into the drive gear, turn the conveyor adjustment screw clockwise. Use
a 7/16-end wrench to tighten the jam nut.
b. To adjust the conveyor away from the drive gear, turn the conveyor adjustment screw
counterclockwise. Use a 7/16-end wrench to tighten the lock nut.
5. Replace front panel.
6. Feeder Assembly
Install Feeder by fitting slots on back of feeder onto back panel studs located at top rear of unit.
7. Install Teflon Sheet (Optional)
Remove Feeder. Allow one end of the Teflon sheet to overlap the top of the rear panel to the rear
studs. Align the holes in the sheet with the stud heads and push the sheet over the stud heads. Balance
of the sheet will fit over the grill surface. Reinstall Feeder capturing Teflon Sheet between the feeder
and the top of the toaster.
Jam nut
Screw
Figure 2.
4
LOCATION
Place the toaster on a flat surface. This toaster is tested and approved for zero clearances against
non-heated surfaces. Locate the toaster near a wall receptacle of the proper configuration. DO NOT
USE AN EXTENSION CORD. Plug the power cord into an outlet (receptacle) of the specified
voltage on the rating label. Outlets must be properly grounded.
OPERATING INSTRUCTIONS
Choose Dry or Wet operation.
1. Dry operation. (no oil) Insure Teflon sheet, 86298 is properly installed.
a. Turn Main Power Switch on. Set Temperature Control knob to desired temperature.
Allow Pilot Light to cycle at least two times (on/off). When the light is on, the grill is
heating. Heat up time is about 15-20 minutes.
b. Turn on motor switch. Conveyor should start to turn.
c. Place bun halves on feeder cut side down (facing grill surface). Toast time is
approximately 22 sec. depending on bun height and diameter. Increase or decrease
temperature setting to achieve desired brownness and temperature.
2. Wet operation. (using oil) Apply a light coating of oil to grill surface. (Fry oil can be used)
When toasting using oil, any high-quality cooking oil may be used with this toaster (do not use
oils that contain dairy products such as butter). The Teflon sheet may be used, but it is not
required. Fill the Butter Pan 2/3 full of warmed cooking oil. The oil should spread evenly over
the surface of the roller.
a. Turn Main Power Switch on. Set Temperature Control knob to desired temperature.
Allow Pilot Light to cycle at least two times (on/off). When the light is on, the grill is
heating. Heat up time is about 15-20 minutes.
b. Turn on motor switch. Conveyor should start to turn.
c. Holding the bun half in the palm of the hand, slap the face (cut side) of the bun on the
turning Butter Roller surface.
d. Place bun halves on feeder cut side down (facing grill surface). Try several buns to
determine the correct pressure and time to achieve the desired browning and temperature
of bun. Using too little oil will cause the bun surface to be cool and uneven in color. It
will also cause the bun to stick to the grill. Using too much oil will give the bun a yellow
un-toasted look. Toast time is approximately 22 sec. depending on bun height and
diameter. Increase or decrease the temperature setting to achieve desired brownness and
temperature.
NOTE: Should the temperature setting be changed, allow several cycles for the grill plate to
adjust. Once the desired setting has been achieved, note the temperature and keep it set there.
CLEANING
WARNING: Make sure the toaster is in the off position and has been off at least 15 – 30
minutes. Do not attempt this cleaning procedure if the toaster components are too hot to touch.
5
Never spray water on the toaster or controls. Damage to the toaster as well as injury could
occur. Severe injury and burns may occur if you do not follow this instruction sheet.
DISASSEMBLY
Turn off main power switch and conveyor switch. Disconnect the power supply cord from the wall
outlet. The toaster will be hot when turned off. Allow the toaster to cool for at least 15 – 30 minutes
before handling. USE CAUTION during disassembly and cleaning. Grasp the left side of the Butter
Roller Shaft. Lift up and to the left to remove from drive assembly. Remove the Butter Pan. Remove
the Top and Bottom Front Panels.
NOTE: Do not use any chloride or chlorine -based products to clean or rinse toaster or toaster
parts.
Daily Parts Cleaning:
The Butter Roller, Butter Pan, Feeder, and Top and Bottom Front Panel can be placed in a
dishwasher or sink and washed with detergent and warm water.
Daily Conveyor Cleaning:
Conveyor may be hot and is heavy, use caution when lifting and removing. Remove the
conveyor assembly by gripping the two handles at the top and lifting forward until it clears the gears.
Lift it up and out gently placing it in a sink with the drain stopped, or in a suitable container to soak
over night. Conveyor can be placed in the sink or container while warm. Use caution when
handling a hot conveyor. The soak solution is a mix of 10 parts hot water (120ºF or more) to 1 part
(minimum) “INSIDE OUT” brand 3-IN-1. Fill the sink or suitable container with the solution, to
completely cover the conveyor by approximately one inch. Allow the conveyor to soak in the
solution over night. Remove the conveyor from the solution. Use a stiff non- metal brush or plastic
pad to remove residual bun oil. Insure the chains are clean and free from debris. Use a brush to
remove any soil or debris remaining on the chain. Rinse conveyor with plain hot water and allow to
drain. Lubricate both chains thoroughly with vegetable oil. Bun oil may be used if it contains no
animal fats, salts or dairy products. Note: Chain Lubrication is critical to chain life. Oil the chain
daily. Gently replace conveyor into toaster. Discard used soak solution. Clean and sanitize sink
or container after over night use!
Replace all removed toaster parts. Plug power supply cord into wall outlet. Turn main power switch
on. Turn conveyor switch on.
Severely baked on oils as shown in Figure 3 require the conveyor to be cleaned using the
‘emergency one-time’ boil instructions below to clean.
Figure 3
6
ONE-TIME BOIL OUT OF CONVEYOR
NOTE: This is for experienced operators only, and in stores that approve this
operation.
1. Turn off power and drain the oil from one of the Fryers, and allow it to cool.
2. Turn Toaster main power switch off. Remove power supply plug from the wall
outlet.
3. Some surfaces will remain hot after toaster is turned off. Allow time for toaster to
cool. (15-30 minutes) Use caution during disassembly and cleaning.
4. Grasp the left side of the Butter Roller shaft. Lift it up and to the left to remove
from drive assembly.
5. Remove the Butter Pan.
6. Remove the Top and Bottom Front Panels.
7. When the fryer has cooled and has drained, close the drain valve.
8. Remove the Conveyor assembly by grasping the two handles at the top, and
lifting forward until it clears the gears.
9. Gently place the Conveyor Assembly into the Fryer.
10. Add water to the cooled Fryer leaving enough room to add two (2) gallons of
“INSIDE OUT” 3 IN 1 HEAVY DUTY CLEANER and the Conveyor Assembly.
11. Add additional water to the Fryer, if necessary, to completely cover the Conveyor
Assembly.
12. Set the temperature of the Fryer to 200ºF, and allow the conveyor to soak in the
solution for 60 minutes.
13. Shut off the Fryer and allow the conveyor to cool.
14. NOTE: Drain the solution prior to removing the Conveyor Assembly. After
the conveyor has cooled, remove the conveyor from the Fryer. If there are areas
with bun oil, use a stiff non-metal brush or plastic pad to remove. Insure the
chains are clean and free from impediment. Use a brush to remove any soil or
impediment remaining on the chain.
15. Rinse conveyor with hot water and allow to drain. Lubricate both chains
thoroughly with vegetable oil. Bun oil may be used if it contains no animal fats,
salts or dairy products. Note: Chain Lubrication is critical to chain life. Oil
chain daily.
16. Before assembly of the conveyor check the Following: Conveyor Assembly
hardware to insure fasteners are tight and there are no signs of wear, Gears are
tight on the Conveyor shaft and the Motor Shaft and the Hanger Bracket screws
are tight and the brackets have not shifted during use.
17. Gently replace conveyor into toaster. Replace all removed parts. Plug power
supply cord into wall. Turn main power switch on. Turn conveyor switch on.
LAST IMPORTANT NOTE: Daily-cleaning instructions of conveyor should be
followed after this boil out. The conveyor must stay clean to optimize speed and bun
temperature. KEEP CONVEYOR LOOKING NEW.
7
Daily Griddle Cleaning:
Dry Operation: Wipe off the Teflon sheet with a damp cloth to remove any debris or particles that
have collected on the sheet. If the sheet is worn, replace it with a new sheet.
Wet Operation: It is not necessary to completely remove residue, as long as the grill surface is
smooth and free of burned on bread that may cause buns to stick.
Tools needed for cleaning:
TM
Scotch-Brite Quick Clean Small Appliance Cleaner No. 702 or Equivalent
TM
•Scotch-Brite Multi-Purpose Pad Holder No. 405 or Equivalent
TM
•Scotch-Brite Squeegee No. 410 or Equivalent
TM
•Scotch-Brite Griddle Polishing Pad No. 46 or Scotch-Brite™ General Purpose
Scrubbing Pad No. 9650 or Equivalent
Also needed:
•(Wet) terry towel
•Catch pan for food soil
•Common kitchen scraper
If Teflon sheet is installed remove it when Bun Grill Toaster is cool. Set the toaster temperature to
350°F. Scrape loose food particles with scraper into Butter pan under grill plate.
TM
Squeeze 1 to 2 ounces of Scotch-Brite Quick Clean Small Appliance Cleaner No. 702 or
equivalent into measuring reservoir of bottle. Pour cleaner onto pad. Do not pour directly onto grill
surface.
TM
TM
Scour using Scotch-Brite Multi-Purpose Pad Holder No. 405 or equivalent, and Scotch-Brite
Griddle Polishing Pad No. 46 (or 9650). (See Figure 4)
Figure 4
TM
After scouring, squeegee the surface clean with the Scotch-Brite Squeegee No. 410 (See Figure 5)
Figure 5
Turn off Bun Grill Toaster and wipe surface with clean wet towel. If the surface is still hot, use the
Scotch-BriteT M Multi-Purpose Pad Holder to move the towel over the surface. (See Figure 6)
8
Figure 6.
Dry the grill thoroughly. Coat the grill plate with a light film of cooking oil. (See Figure 7)
Figure 7.
Rinse all cleaning tools with hot water. (See Figure 8)
Figure 8.
9
Wipe down all external stainless steel surfaces with a damp cloth.
RE-ASSEMBLY
Before assembling the conveyor check the following: Fasteners on the Conveyor Assembly
hardware should be tight with no signs of wear. Conveyor shaft gear and the Motor Shaft gear are
tight. Hanger Bracket screws are tight and the brackets have not shifted during use.
TROUBLESHOOTING GUIDE
Always ask and check the following:
1. Is the unit connected to a live power source of the proper voltage?
2. Check the circuit breaker.
3. Is power switch “ON” and pilot light glowing?
4. Check the rating label. Is the unit connected to the correct power source?
If the above checks out, and you still have problems, call an APW Wyott
authorized service agent. APW SERVICE HOT LINE 1-800-733-2203
PROBLEM
Buns won’t toast
Buns toast unevenly
Buns stick to grill
No power
Conveyor will not turn (Motor
turns)
CAUSE
SOLUTION
Wrong temperature setting
Increase temperature setting
and allow two cycles to warm
up.
Excessive cupping of bun
surface
Excessive cupping of bun
surface
Conveyor pressure too light
Teflon sheet worn.
Buns are stale, use fresher
buns
Buns are stale, use fresher
buns
Adjust conveyor tension
Replace Teflon sheet
Doughy buns or excessive
sugar and moisture, plus grill
temperature too high.
Reduce grill temperature
Allow buns to age.
Build up on Grill Surface
No power at the wall
receptacle
Power cord disconnected
Main switch
Clean Grill per instructions
Check circuit breaker or fuse
Check plug at receptacle
Check that switch is “ON” and
operative
Drive gears not engaged
Check gear alignment and
engagement
Check screws and tighten if
required
Gear set screws not tight
10
3
2
19
1
18
OPTIONAL
BLK
SWITCH
MOTOR
CONTROL
BLK
LIMIT
SW N.C.
ELEMENT
23
BLK
SSR
4 1
BLK
IN
RED
3 2
SENSOR
YELLOW
BLK
OUT
CONTROL
RHEOSTAT
3
TEMPERATURE
CONTROL
MOTOR
CONVEYOR
DRIVE
BLK
PILOT LIGHT
+
240V 50HZ ORANGE
208-240V 60HZ RED
MOTOR
BUTTER
ROLL
BLK
17
21
22
22
21
RED
25
2
1
COM.
115V
230V
SENSOR
20
24
13
SWITCH
MAIN
POWER
COOLING
FAN
BLK
BLK
14
16
15
15
19
BLK
24
20
18
BLK
16
BLK
BLK
17
BLK
GREEN WIRE FROM CORD
25
23
13
BLACK OR BROWN WIRE
FROM CORD
14
WHITE OR BLUE WIRE
FROM CORD
RED OR ORANGE
AMERICAN PERMANENT WARE, INC
729 T H IRD AV E ., DAL LA S, T EXAS 7522 6
TERMINAL
BLOCK
T OL E R A N C E S :
UNLE SS O T HER W ISE SP ECIF IED
4 PLC S. D ECI M A L ± .01 0
3 PLC S. D ECI M A L ± .02 0
2 PLC S. D ECI M A L ± .03 0
FRAC T IO NAL ± 1/32
AN G ULAR ± 1/2°
I
6/26/01 CHANGE SSR GRAPHICS FOR BETTER CLARITY
H
G
5/16/01 SWAP RED & BLACK WIRES TO SSR
12/19/00 ADD SOLID-STATE RELAY (SSR)
REV.
DATE
DESCRIPTION
REVISIONS
M AT ER I AL:
WIRING DIAGRAM M2000
N/A
B L A N K S I ZE
S H E A R S IZ E
D R AW N BY
RKE
DA TE
APP R OV ED
11/30/99
SC A LE
W E IG H T
P L A S T IC
G R A IN
DA TE
D R A W IN G NO .
NTS
A
86272
R E V.
H
PAGE 12
23
13
16
9
1
44
6
66
8
65
2 25
25
10
62
32
4
65
19
52
39
51
66
12
53
38
18
72
22
7
11
45
3
33
26
69
68
30
21
24
17
29
34
61
20
31
36
35
15
5
14
37
60
27
28
70
63
56
ITEM# PART#
1
86235
2
86219P
3
86204
4*
86234
5
86206
6
86207
7
86231
8
86230
9
86233
10
84159
11
83733
12
86261
13
86260
14
86259
15
86243
16
86210
17
86211
18
85046
19
85047
20
84153
21
84195
22
84179
23
86265
24
83050
25
26
86221P
84109
27
28
29
30
31
32
33
34
35
36
37
85197
85108
89408
63012
89406
86295
34236
34237
86208
86281
86477
38
69147
DESCRIPTION
QTY
W/ASS'Y, LEFT SIDE PANEL
1
ELEMENT, GRILL 208/240V
1
PLATE, MOTOR MOUNTING
1
W/ASS'Y, RIGHT SIDE PANEL
1
PANEL, BOTTOM
1
PANEL, BACK
1
SUPPORT, RIGHT SIDE CONVEYOR
1
SUPPORT, LEFT SIDE CONVEYOR
1
ANGLE, GRILL PLATE
2
SUPPORT, LEFT SIDE SHAFT
1
ROD, FRONT AND TOP
1
PANEL, BOTTOM FRONT
1
PANEL, TOP FRONT
1
SHIELD, FRONT GRILL
1
PANEL, POLY
1
PANEL, LEFT SIDE OUTER
1
PANEL, RIGHT SIDE OUTER
1
GEAR, 11 TOOTH 3/8 BORE
1
GEAR, 21 TOOTH 1/2 BORE
1
PLATE, MOTOR MOUNTING
1
S/ASS'Y, BUTTER ROLL SHAFT
1
PAN, BUTTER W/NOTCH
1
W/ASS'Y, SUPER FEEDER
1
S/ASS'Y, BUTTER ROLLER DRIVE
1
COUPLING
ELEMENT, GRILL 120V
1
MOTOR, 208/230V 60HZ 4.6 RPM
1
CONVYR
MOTOR, 208/240V 60 HZ 25 RPM B/R 1
BLADE, FAN
1
SWITCH, LIGHTED ROCKER
1
S/A, PILOT LIGHT AMBER
1
SWITCH, LIGHTED ROCKER
1
LEG, 4"-BLACK
4
TERMINAL BLOCK END MTG
1
TERMINAL BLOCK (6) .250 MALE
5
PANEL, CONTROL
1
RHEOSTAT 1K OHM
1
BRACKET, PANEL MOUNTING CONTROL 1
BOARD
PAD, THERMAL FOR SSR 69146 (TEXT) 1
ITEM#
39
PART#
69146
44
45
51
52
53
86202
85173
89111
60113
85640
56
60
85284
86279
61
62
63
65
66*
68
69
70*
72
88705
86280
85285
86268
86267
86253
86255
86282
86256
DESCRIPTION
QTY
RELAY,SLD ST 50A 280V
1
OUT,3-32VDC IN (TEXT)
COVER, INSULATION
1
CYLINDER, BUTTER ROLLER
1
BUSHING, STRAIN RELIEF SR-7W-2
1
INSULATION, 21X19X1
1
CORDSET, 14/3 600V .440 HSJO
1
620P
FAN, COOLING 4.5" 105CFM 208/230V 1
CONTROL, SOLID STATE 115/230V,
1
150°-550°F
KNOB 039-266 8A BLACK
1
PROBE, "K" THERMOCOUPLE
1
ASSY, FAN CORD(FAN CORD 85283)
1
S/ASS'Y, INNER CONVEYOR FRAME
1
S/ASS'Y, CHAIN WEIGHT
1
RACK, BOTTOM WIRE
1
BRACKET, FIXED THERMOSTAT MTG.
1
THERMOSTAT, FIXED HI-LIMIT
1
BRACKET, CAPILARY
1
* - ALTERNATE PART 86285 - THERMOSTAT, HI-LIMIT
- ALTERNATE PART 84127 - S/A CONVEYOR
*
PAGE 13
Warranty Policy
APW Wyott warrants to the original owner/user that all commercial cooking
equipment shall be free of defects in material and workmanship under normal use and
service for a period of one year from the original date of purchase. Warranty service
will be provided on the customer’s premises for APW Wyott equipment. This
warranty includes parts, standard straight time labor charges, approved travel time
charges and approved mileage, and excludes all other charges. This warranty does
not cover any cost associated with installation or calibration, or any damages
resulting from accident, alteration, misuse, abuse, negligence, wrong voltage, flood,
fire, acts of God, improper installation, fa ilure to properly maintain or failure to
operate strictly in accordance with instructions and does not apply if the serial
number or model number has been removed or altered. This warranty is valid only
when (1) the equipment is purchased and retained for use within the United States or
Canada; (2) the repair of defects is performed by APW Wyott or by an APW Wyott
authorized service agency; and (3) all replacement parts are approved APW Wyott
parts. This is the only warranty made in connection with the sale of the equipment as
specified above and all other expressed, statutory and implied warranties, including
without limitation, all implied warranties of merchantability are expressly denied. In
no event shall the user be entitled to recover incidental or consequential damages,
including but not limited to, damages for inconvenience, rental or replacement
equipment, loss of profits, or other commercial loss (all to the extent permitted by
law).
WARRANTY PROCEDURE
If warranty service is needed on your APW Wyott equipment, follow these steps:
1. Secure the model and serial number from the rating label on your toaster.
2. Consult the enclosed directory, find the service agency nearest you, and call the
number listed or the 24- hour toll free service hot line, 1-800-733-2203. If there is not
a service agency listed for your area, the parts distributor will provide service for your
toaster.
3. To order parts, consult the enclosed directory. The parts distributor is listed at the
beginning of each state listing. The parts distributors have a complete stock of parts
for your toaster.
24 Hour Toll Free Service Hot Line
1-800-733-2203
www.APWwyott.com
14