1
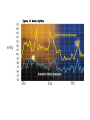
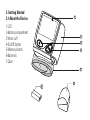
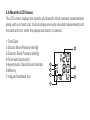
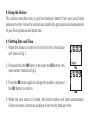
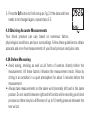
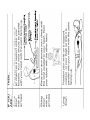
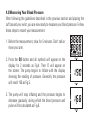
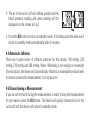
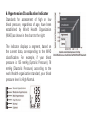
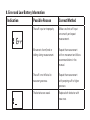
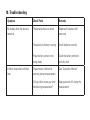
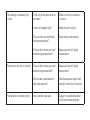
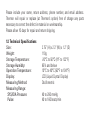
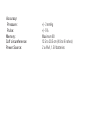
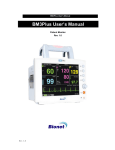
AUTOMATIC
WRIST Blood Pressure Monitor
Instruction
manual
Automatic Wrist Blood Pressure Monitor
Instruction Manual
Table of Contents
1. Introduction
1.1 Features
1.2 Important Information
1.2A Safety Information
2. About Blood Pressure
2.1 Normal Blood Pressure Values
2.2 Common Blood Pressure Questions and Answers
3. Getting Started
3.1 About the Device
3.2 About the LCD Screen
3.3 Inserting the Batteries
RX803
4. Using the Device
4.1 Setting Date and Time
4.2 Obtaining Accurate Measurements
4.2A Before Measuring
4.2B Fitting the Wrist
4.2C Choose your Measurement Position
4.3 Measuring Your Blood Pressure
4.4 Automatic Inflation
4.5 Discontinuing a Measurement
5. Viewing Previously Recorded Measurements
5.1 Clearing All Values
6. Hypertension Classification Indicator
7. Irregular Heartbeat Detector
8. Error and Low Battery Information
9. Care, Storing, Repair and Recycling
10. Troubleshooting
11. Lifetime Guarantee
12. Technical Specifications
1. Introduction
Thank you for purchasing the Be Better Automatic Wrist Blood Pressure Monitor.
Designed for convenient and easy operation, this device provides a simple, yet
accurate method to measure your blood pressure.
Your blood pressure is an important parameter that can be used to monitor your
health. This device enables you to monitor your blood pressure regularly, and
maintain a record of your blood pressure measurements. You can then use this
record to assist your physician in diagnosing and maintaining a healthy blood
pressure level.
1.1 Features
This device uses oscillometric technology to measure the arterial blood pressure
and pulse rate. The cuff is wrapped around the wrist and is automatically inflated
by the air pump. The sensor in the device senses weak fluctuation of the pressure
in the cuff produced by extension and contraction of the artery of the wrist in
response to each heartbeat. The amplitude of the pressure waves is measured,
converted to millimeters of the mercury column, and is shown on the display.
• Memory Features 1 user, 90 blood pressure readings with time and date
• Hypertension Classification Indicator displays the range between
which your blood pressure values lie, according to the WHO (World Health
Organization).
• Averages last 3 readings
• Time and date
• Detects irregular heartbeat
Before using this device, read this instruction manual carefully and keep it in a
safe place.
1.2 Important Information
Refer to the following sections to learn about important safety instructions and
how to take care of the Be Better Automatic Wrist Blood Pressure Monitor.
1.2A Safety Information
• Self-measurement means control, not diagnosis or treatment. Your values must
always be discussed with your doctor or a physician who is familiar with your
family history.
• If you are undergoing medical treatment and receiving medication, consult your
doctor to determine the most appropriate time to measure your blood pressure.
Never alter the dosages of any medication without direction from your doctor.
• Your blood pressure depends on several factors, such as age, gender, weight,
and physical condition. It also depends on the environment and your state of
mind at the time of measurement. In general, your blood pressure is lower
when you are asleep and higher when you are active. Your blood pressure
may be higher when recorded at a hospital or a clinic and may be lower when
measured in the relaxing comfort of your home. Due to these variations, we
recommend that you record your blood pressure regularly at home as well as at
your doctor’s clinic.
• Try to record your blood pressure regularly at the same time of the day and
under the same conditions. This will help your physician detect any extreme
variations in your blood pressure and thus treat you accordingly.
• Morning Hypertension (>135/85 mmHg): Recently, several studies have
identified elevated cardiovascular risks (heart failure, stroke, angina) associated
with “morning hypertension”. There is a typical rise in blood pressure during
the physiological changes from sleep to arising for the day.
• The ideal time to measure your blood pressure is in the morning just after you
wake up, before breakfast and any physical activity, and in the absence of the
urge to urinate. If this is not possible, try to take the measurements later in the
morning, before you start any physical activity. Relax for a few minutes before
you record your blood pressure.
• The pulse display is not suitable for checking the frequency of heart pacemakers.
• If you have been diagnosed with a severe arrhythmia or irregular heartbeat,
vascular constriction, liver disorders, or diabetes, have a cardiac pacemaker,
or are pregnant, measurements made with this instrument should only be
evaluated after consultation with your doctor.
• Take care while handling the batteries in the device. Incorrect usage may
cause battery fluid leakage. To prevent such accidents, refer to the following
instructions:
· Insert batteries with the correct polarity.
· Turn off power after use. Remove and store the batteries if you are not planning
to use the device for an extended period of time.
· Do not mix different types, brands, or size of batteries. This may cause damage
to the product.
· Do not mix old and new batteries.
· Remove batteries and dispose of them according to the proper regulations in
your area.
· Do not disassemble batteries or expose them to heat or fire.
· Do not short-circuit the batteries.
· Do not use rechargeable batteries.
2. About Blood Pressure
Your blood pressure level is determined in the circulatory center of your brain.
Your nervous system allows your body to adapt or alter blood pressure in response
to different situations. Your body alters your pulse or heart rate and the width of
blood vessels through changes in muscles in the walls of blood vessels.
Your blood pressure reading is highest when your heart pumps or ejects blood.
This stage is called your systolic blood pressure.
Your blood pressure is lowest when the heart rests (in-between beats). This is
called your diastolic blood pressure.
It is critical to maintain blood pressure values within a “normal” range in order
to prevent cardiovascular diseases. Increased blood pressure values (various
forms of hypertension) have associated long and medium term health risks.
These risks concern the arterial blood vessels of your body, which are endangered
due to constriction caused by deposits in the vessel walls (arteriosclerosis). A
deficient supply of blood to important organs (heart, brain, muscles) can be the
result. Furthermore, with long-term increased blood pressure values, the heart will
become structurally damaged.
There are many different causes of the appearance of high blood pressure. We
differentiate between common primary (essential) hypertension, and secondary
hypertension. The latter group can be ascribed to specific organic malfunctions.
Please consult your doctor for information about the possible origins of your own
increased blood pressure values.
2.1 Normal Blood Pressure Values
Blood pressure is too high when, at rest, the diastolic pressure is above 90 mmHg
or the systolic blood pressure is over 140 mmHg.
If you obtain readings in this range, consult your doctor immediately. High blood
pressure values over time can damage blood vessels, vital organs such as the
kidney, and your heart.
Should the systolic blood pressure values lie between 140 mmHg and 160 mmHg
or the diastolic blood pressure values lie between 90 mmHg and 95 mmHg, consult
your doctor. Regular self-checks will be necessary.
With blood pressure values that are too low (i.e., systolic values under 105 mmHg
or diastolic values under 60 mmHg), consult with your doctor.
Even with normal blood pressure values, a regular self-check with your blood
pressure monitor is recommended. This way you can detect possible changes in
your values early and react appropriately.
Refer to the following table for classifying blood pressure values (units: mmHg)
according to the World Health Organization (WHO):
Category
Systolic Blood Pressure
Diastolic Blood Pressure
Optimal
<120
<80
Normal
<130
<85
High Normal
130-139
85-89
Hypertension
• Stage 1: Mild
• Stage 2: Moderate
• Stage 3: Severe
140-159
160-179
>180
90-99
100-109
>110
>140
<90
Isolated Systolic
Hypertension
Further information
If your values are mostly “normal” under resting conditions but exceptionally high
under conditions of physical or psychological stress, it is possible that you are
suffering from so-called “labile hypertension”. In any case, please discuss the
values with your doctor.
Correctly measured diastolic blood-pressure values above 120 mmHg require
immediate medical treatment.
2.2 Common Blood Pressure Questions and Answers
a) Why is my blood pressure reading always different?
Your blood pressure changes constantly. It is quite normal for blood pressure to
fluctuate significantly (50 mmHg to 60 mmHg) throughout the day. Blood pressure
is normally lowest at night, but increases during waking hours when the stress
and activities of everyday life are highest.
mmHg
AM
Time
PM
Your blood pressure increases or decreases under the following circumstances:
Blood pressure is higher than normal:
· when you are excited, nervous, or tense
· while taking a bath
· during and after exercise or strenuous physical activity
· when it is cold
· within one hour after meals
· after drinking tea, coffee, or other caffeinated drinks
· after smoking tobacco
· when your bladder is full
Blood pressure is lower than normal:
· after consuming alcohol
· after taking a bath
b) Why is the doctor’s reading different from the reading taken at home?
Your blood pressure can vary due to the environment (temperature, nervous
condition). When measuring blood pressure at the doctor’s office, it is possible for
blood pressure to increase due to anxiety and tension.
c) Why should I monitor blood pressure at home?
One or two readings will not provide a true indication of your normal blood
pressure. It is important to take regular, daily measurements and to keep records
over a period of time. This information can be used to assist your physician in
diagnosing and preventing potential health problems.
3. Getting Started
3.1 About the Device
1-LCD
2-Battery compartment
3-Wrist cuff
4-On/Off button
5-Memory button
6-Batteries
7-Case
1
2
5
4
3
3.2 About the LCD Screen
The LCD screen displays the systolic and diastolic blood pressure measurements
along with your heart rate. It also displays previously recorded measurements and
the date and time, when the appropriate button is pressed.
1-Time/Date
2-Systolic Blood Pressure (mmHg)
3-Diastolic Blood Pressure (mmHg)
4-Pulse Rate (beats/min)
5-Hypertension Classification Indicator
6-Memory
7-Irregular Heartbeat Icon
2
6
5
7
1
3
4
3.3 Inserting the Batteries
Follow these steps to insert the two “AAA” batteries in
the device.
1.Open the battery compartment cover in the direction
shown.
2. Insert the two “AAA” batteries with the correct polarity as indicated.
3. Replace the battery compartment cover.
NOTE:Replace the batteries whenever the weak battery icon shows “
”, the
display is dim, or the display does not illuminate when the power is on.
Replace all the batteries at the same time - it is dangerous to mix old and
new batteries.
• If the blood pressure monitor is left unused for long periods, please remove the
batteries from the device.
• Do not mix old and new batteries. Do not mix alkaline, standard (carbon-zinc) or
rechargeable batteries.
4. Using the Device
This section describes how to get the maximum benefit from your wrist blood
pressure monitor. Follow the instructions carefully to get an accurate measurement
of your blood pressure and pulse rate.
4.1 Setting Date and Time
1. When the device is turned on for the first time, the display
will show as Fig. 1.
2. Press and hold the M button, then press the O/I button, the
year number flashes as Fig.2.
3. Press the M button again to change the number, and press
the O/I button to confirm.
4.When the year setup is finished, the month number will flash automatically.
Follow the same instruction as above to set month, date and time.
5. Press the O/I button to finish setup as Fig.3. If the date and time
needs to be changed again, repeat steps 2-5.
4.2 Obtaining Accurate Measurements
Your blood pressure can vary based on numerous factors,
physiological conditions, and your surroundings. Follow these guidelines to obtain
accurate and error-free measurements of your blood pressure and pulse rate.
4.2A Before Measuring
• Avoid eating, smoking as well as all forms of exertion directly before the
measurement. All these factors influence the measurement result. Relax by
sitting in an armchair in a quiet atmosphere for about 5 minutes before the
measurement
• Always take measurements on the same wrist (normally left) and in the same
posture. Do not switch between right and left wrists while recording your blood
pressure as there may be a difference of up to 10 mmHg pressure between the
two wrists.
• Attempt to carry out the measurements regularly at the same time of day, since
blood pressure changes during the course of the day. The ideal time to measure
your blood pressure is in the morning after you wake up, before breakfast and
physical activity, and in the absence of the urge to urinate.
• Rest for 5 minutes sitting quietly and release all the tension in your body
especially the arm muscles before beginning with the measurement. Remain
calm and quiet when the measurement is in process. Do not speak or move
your arm (as well as other body) muscles during the process.
• With repeated measurements, blood accumulates in the arm, which can lead
to false results. Consecutive blood pressure measurements should be repeated
after at least a 15 second pause or after the arm has been held up in order to
allow the accumulated blood to flow away.
• Do not lean backward or bend your wrist inward while taking a measurement.
4.2B Fitting the Wrist
a)Remove all accessories (watch, bracelet, etc.) from your left wrist. If your
physician has diagnosed you with poor circulation in your left arm, use your
right wrist.
b) Roll or push up your sleeve to expose the skin.
c) Apply the cuff to your left wrist with your palm facing up and the LCD display
facing you.
d) Position the edge of the cuff about 1-2cm from the bottom
of your palm.
e)Fasten the wrist cuff around your wrist, leaving no extra
room between the cuff and your skin. If the cuff is too
loose, the measurement will not be accurate.
4.2C Choose your Measurement Position
1. Choose the position from which you wish to measure - sitting or lying down.
2. Position your body so that your wrist is parallel with your heart, using the chart
and illustrations below as a guide.
4.3 Measuring Your Blood Pressure
After following the guidelines described in the previous section and placing the
cuff around your wrist, you are now ready to measure your blood pressure. Follow
these steps to record your measurement.
1.Before the measurement, relax for 5 minutes. Don’t talk or
move your arm.
2.Press the O/I button and all symbols will appear on the
display for 2 seconds as Fig.4. Then ‘0’ will appear on
the screen. The pump begins to inflate with the display
showing the reading of pressure. Generally the pressure
will reach 190 as Fig.5.
3.The pump will stop inflating and the pressure begins to
decrease gradually, during which the blood pressure and
pulse will be calculated as Fig.6.
4. The air in the wrist cuff will deflate quickly and the
blood pressure reading and pulse reading will be
displayed on the screen as Fig.7.
5. Press the O/I button to return to standby mode. If not being used the device will
return to standby mode automatically after 3 minutes.
4.4 Automatic Inflation
There are 4 given levels of inflation pressure for this device: 190 mmHg, 230
mmHg, 270 mmHg and 300 mmHg. When 190mmHg is not enough or movement
of wrist occurs, the device will automatically inflate to a reasonable pressure level
to ensure a successful measurement. It is not an error.
4.5 Discontinuing a Measurement
If you do not feel well during the measurement or want to stop the measurement
for any reason, press the O/I button. The device will quickly release the air in the
wrist cuff and the device will return to standby mode.
5. Viewing Previously Recorded Measurements
1.The device can store 90 sets of readings and will automatically calculate the
average value of the last 3 readings taken. When the memory is full (90 sets
of readings are stored), the oldest reading will be replaced by the new one.
Memory will not clear away even if power supply is removed.
2.After a measurement is finished or when the device is in standby mode, press
the M button to recall memory. The display will show the average value of the
last 3 readings taken as Fig. 8.
3. Press the M button again, the display will show ‘01’, which
means the last reading taken, then turns to another screen
to show readings as Fig.9.
4. Press the M button again, the display will show ‘02’, which means the second
to the last reading taken. Continue to press the M button to view all stored
measurements.
5.1 Clearing All Values
After a measurement is finished or when the device is in
standby mode, press and hold down the M button for at least
5 seconds. The display will show ‘CLR’ which means the stored
readings have been removed as Fig.10.
6. Hypertension Classification Indicator
Standards for assessment of high or low
blood pressure, regardless of age, have been
established by World Health Organization
(WHO) as shown in the chart to the right:
The indicator displays a segment, based on
the current data, corresponding to the WHO
classification. For example, if your blood
pressure is 135 mmHg (Systolic Pressure), 78
mmHg (Diastolic Pressure), according to the
world health organization standard, your blood
pressure level is High Normal.
Note:
1.If the systolic blood pressure and diastolic blood pressure fall into different
categories, the higher value should be taken for classification.
2.The WHO blood pressure classification indication in the device is only a
reminder, it can not be regarded as the final diagnosis.
7. Irregular Heartbeat Detector
This device provides a blood pressure and pulse rate measurement even when an
irregular heartbeat occurs. When the device detects an irregular heartbeat, or any
excessive body movement during the measurement, the
icon will appear and
flash. It is important that you are relaxed, remain still and do not talk during the
measurement. If the
symbol appears frequently (e.g. several times a week),
it may be an indication of a more serious heart problem, and you should consult
your doctor.
8. Error and Low Battery Information
Indication
Possible Reason
Correct Method
The cuff is put on improperly.
Make sure that cuff is put
on correctly and repeat
measurement.
Movement of arm/hand or
talking during measurement.
Repeat the measurement
with no movement and follow
recommendations in the
manual.
The cuff is not inflated to
necessary pressure.
Repeat the measurement
with pumping cuff to higher
pressure.
The batteries are weak.
Replace both batteries with
new ones.
9. Care, Storing, Repair and Recycling
1.It is necessary to protect this device against high moisture, direct sunlight,
shock, solvent, alcohol and gasoline.
2.Remove the batteries if the device is to be stored for a long time, and keep the
batteries away from children.
3.Keep the cuff from sharp objects and don’t extend or twist the cuff.
4.Use only soft and dry cloths to clean the device.
5.Since neither the device nor batteries are household waste, follow your local
recycling rules and dispose of them at appropriate collection sites.
6.Do not open the device. It has delicate electrical components and an intricate
air unit that could be damaged.
7.It is generally recommended to have the monitor inspected every 2 years, to
ensure proper functioning and accuracy and safety. Please contact your dealer
for maintenance.
WARNING: Do not modify the equipment without authorization of the
manufacturer.
10. Troubleshooting
Symptom
Check Point
Remedy
No display when the device is
turned on.
The batteries have run down.
Replace all batteries with
new ones.
The polarity of battery is wrong.
Install batteries correctly.
Proper battery contact is not
being made.
Clean the battery terminals
with dry cloth.
The automatic inflation for
ensuring correct measurement.
See “Automatic Inflation”
Did you talk or move your arm/
hand during measurement?
Keep quiet and still during the
measurement
Inflation stops and re-inflates
later.
The reading is extremely high
or low.
Pulse rate is too low or too high
The batteries run down quickly.
Is the cuff at the same level as
the heart?
Make sure that your posture
is correct.
Is the cuff wrapped right?
Wrap the cuff correctly.
Did you strain your arm/hand
during measurement?
Relax during measurement.
Did you talk or move your arm/
hand during measurement?
Keep quiet and still during
measurement.
Did you talk or move your arm/
hand during measurement?
Keep quiet and still during
measurement.
Did you take a measurement
right after exercise?
Take measurement again after
resting for more than 5 minutes.
Faulty batteries are used.
Suggest to use alkaline batteries of known manufacturers.
11. Lifetime Guarantee
Be Better™ wrist blood pressure monitor has a lifetime warranty to be free of
manufacturing defects for the life of the original owner. This warranty does not
include the inflation system including the cuff and inflation bladder. The cuff is
warranted for two years. The warranty does not cover damage from misuse or
tampering.
If you have questions regarding the operation of your monitor call the Blood
Pressure Hotline: 1-866-536-2289
Should repair be necessary, return the unit with all component pieces. Enclose
proof of purchase and $5.00 for return shipping and insurance. Ship the unit
prepaid and insured (at owners option) to:
Thermor Ltd.
Repair Department
16975 Leslie Street
Newmarket, ON L3Y 9A1
Please include your name, return address, phone number, and email address.
Thermor will repair or replace (at Thermor’s option) free of charge any parts
necessary to correct the defect in material or workmanship.
Please allow 10 days for repair and return shipping.
12. Technical Specifications
2.75” (H) x 2.3” (W) x 1.2” (D)
Size:
Weight:110g
-20°C to 50°C (4°F to 122°F)
Storage Temperature:
Storage Humidity:
85% and below
Operation Temperature:
10°C to 40°C (50°F to 104°F)
Display:
LCD (Liquid Crystal Display)
Oscillometric
Measuring Method:
Measuring Range:
40 to 260 mmHg
SYS/DIA Pressure:
40 to 160 beats/min
Pulse:
Accuracy:
Pressure:
Pulse:
Memory:
Cuff circumference:
Power Source: +/- 3 mmHg
+/- 5%
Maximum 90
12.5 to 20.5 cm (4.9 to 8 inches)
2 x AAA, 1.5V batteries