1
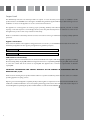
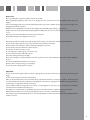
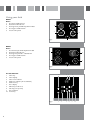
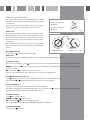
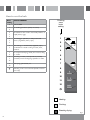
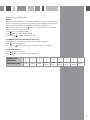
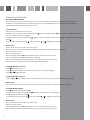
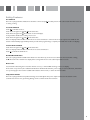
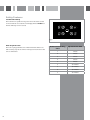
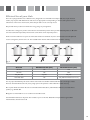
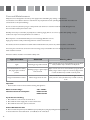
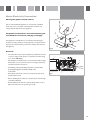
HVC65 / 75 Ceramic Hobs
Manual for Installation, Use and Maintenance
Passionate about style
Customer Care Department • The
Group Ltd. • Harby Road • Langar • Nottinghamshire • NG13 9HY
T : 01949 862 012 F : 01949 862 003 E : [email protected] W : www.cda.eu
Important
The CDA Group Ltd cannot be held responsible for injuries or losses caused by incorrect use or installation of this
product. Please note that CDA reserve the right to invalidate the guarantee supplied with this product following incorrect
installation or misuse of the appliance or use in a commercial environment.
This appliance is not designed to be used by people (including children) with reduced physical, sensorial or mental
capacity, or who lack experience or knowledge about it, unless they have had supervision or instructions on how to use
the appliance by someone who is responsible for their safety.
Under no circumstances should any external covers be removed for servicing or maintenance except by suitably qualified
personnel.
Appliance information:
Please enter the details on the appliance rating plate below for reference, to assist CDA Customer Care in the event of a
fault with your appliance and to register your appliance for guarantee purposes.
Appliance Model
Serial Number
CE Declarations of Conformity:
This appliance has been manufactured to the strictest standards and complies with all applicable legislation, including
Electrical safety (LVD) 72/23/EEC and Electromagnetic interference compatibility (EMC) 289/336/EEC. Parts intended
to come into contact with food conform to 89/109/EC. This appliance also conforms to requirements of directive
93/68/EEC.
IMPORTANT INFORMATION FOR CORRECT DISPOSAL OF THE PRODUCT IN ACCORDANCE WITH EC
DIRECTIVE 2002/96/EC.
At the end of its working life, the product must be taken to a special local authority waste collection centre or to a dealer
providing appliance recycling services.
Disposing of a household appliance separately avoids possible negative consequences for the environment and health. It also
enables the constituent materials to be recovered, saving both energy and resources. As a reminder of the need to dispose of
household appliances separately, the product is marked with a crossed-out wheeled dustbin.
1
Please note:
Before operating this hob, please read the instructions carefully
After unpacking the appliance, make sure it is not damaged. In case of doubt, do not use the appliance and contact your
supplier.
Remove all packaging and do not leave the packing materials in easy reach of children as they may cause serious injury. The
packaging materials are recyclable.
Always disconnect the appliance from the power supply before undertaking any cleaning or maintenance.
Ceramic hobs become hot and remain hot during and immediately after use. Do not touch the hob until it has been allowed
to cool.
After use, please ensure that all the zones have been switched off.
Keep children away from the appliance when in use.
Pan handles should never stand out beyond the edge of the worktop. This will ensure children cannot reach them.
Do not use pans with rough bases (e.g. cast iron) as these may scratch the hob surface.
Ensure the base of the saucepan is clean and dry before placing it on the zone.
Do not switch on the zones without cookware in place.
Do not lean over the hob when it is in use.
Do not drop heavy or sharp objects on to the hob top.
Do not scratch the hob top with sharp objects.
Follow the cleaning instructions carefully.
Never put cooking foil or plastic materials on the hob top when it is hot. These materials could melt and cause damage to
the hob.
Do not leave inflammable materials on the hob top.
Never use the hob top for storage or as a worktop.
Do not leave wet or damp pan lids on the hob.
Important
Do not use the hob if the glass surface is cracked or damaged to prevent risk of electric shock, Disconnect it from the power
supply.
Do not use the hob if the electrical cord is damaged.
When correctly installed, this hob meets all the safety requirements laid down for this type of product. However, special
care should be taken around the underneath of the appliance as this area is not designed or intended to be touched and may
contain sharp or rough edges, that may cause injury.
This hob (Class 3) has been designed for use only as a cooking appliance. Any other use (e.g. heating rooms) should be
considered incorrect and therefore dangerous.
This appliance is not intended to be operated by any means of an external timer or separate remote control system.
Make sure that electrical cords connecting other appliance do not come into contact with the hob top.
Before disposing of an unwanted appliance, it is recommended that it is made inoperative and that all potentially hazardous
parts are removed.
2
Using your hob
HVC65
Zones:
1. Front left 1.8 kW 180 mm
2. Rear left 1.2 kW 140 mm
3. Rear right 0.75/2.2 kW 120/210 mm dual
4. Front right 1.2 kW 140 mm
5. Touch control panel
3
2
1
4
Fig.1
HVC75
Zones:
1. Front left 0.75/2.2 kW 120/210 mm dual
2. Rear left 1.2 kW 140 mm
3. Rear right 0.8/2.2 kW – 180x260 mm
4. Front right 1.2 kW 140 mm
5. Touch control panel
5
2
3
1
4
5
Fig.2
The Touch Control
1 Timer key
2 Timer display
3 Timer zone indicator
4 Dual zone indicator (where available)
5 Dual zone key
6 Zone display
7 Minus key for all zones
8 Plus key (zone specific)
9 Zone indicator
10 Power key
1
Fig.3
3
5
6
2
3
7
8
4
9
10
How to use the hob
The ceramic surface of the hob allows fast transmission of heat
vertically from the heating elements under the glass to the pans
on the hob top.
The heat does not spread horizontally, so the hob top remains
relatively cool only a few centimetres from the zone in use.
Hi-light cooking zone
Ø 140mm
Hi-light cooking zone
Ø 180mm
Please note:
The heating elements are equipped with a temperature limiter
that will switch the element off to prevent damage to the hob.
The temperature limiter may also operate when incorrect pans
are used or pans are poorly positioned. This will affect cooking
performance.
The temperature limiter can be seen in the zone as the straight
line out from the centre of the element. This is not a fault with
the hob.
fig. 4
Second element
Hi-light double zone
To switch the hob on
Touch and hold until the zone displays show 0.
Please note:
If a zone is not selected or the timer set within 20 seconds, the hob will automatically switch off.
Hi-light oval
double zone
fig. 5
To switch on a zone
Once the hob is switched on, touch for the zone required. The zone indicator will switch on to confirm the zone is active.
EITHER Touch and hold to select the power level from 1 (minimum) to 9 (maximum). The power level selected will show
on the zone display.
OR Touch and hold to select the power level from 9 to 1.
The zone will remain active for approximately ten seconds to allow for adjustment.
To adjust the power level once set
Touch for the zone required. The zone indicator will switch on to confirm the zone is active.
Touch and hold or until the required power level shows on the zone display.
To use the dual zone
The dual zones are formed of two separate coils of resistant material.
The dual zone will switch on automatically when the zone is selected. Touch
The dual zone indicator will switch on when the dual zone is on.
at any time to switch the dual zone on or off.
To switch off a zone
Touch for the zone required.
EITHER Touch and at the same time.
OR Touch and hold until the zone display shows 0.
The zone display will alternate between 0 and H to indicate the residual heat.
To switch the hob off
Touch and hold at any time.
.
4
How to use the hob
Knob
setting
TYPE OF COOKING
Cooking
zone
knob
setting
0
Switched OFF
1
2
For melting operations (butter, chocolate).
2
3
4
To maintain food hot and to heat small quantities of
liquid (sauces, eggs).
4
5
6
To heat bigger quantities; to whip creams and
sauces. (vegetables, fruits, soups).
6
7
Slow boiling, i.e.: boiled meats, spaghetti, soups,
continuations of steam cooking of roasts, stews,
potatoes.
7
8
For every kind of frying, cutlets, uncovered cooking,
i.e.: risotto.
8
9
10
Browning of meats, roasted potatoes, fried fish,
omelettes, and for boiling large quantities of water.
6
11
12
Fast frying, grilled steaks, etc.
7
Switching on the second element (Double and oval
ones only)
1
2
3
4
5
8
9
10
11
12
Heating
Cooking
Roasting-frying
5
fig.6
How to use the hob
Booster
The hob is equipped with a booster function, which allows a zone to run at maximum
power for a preset period of time before returning to the required power level. These
times are shown in the table. To set the booster, follow the steps below.
Once the hob is switched on, touch for the zone required. The zone indicator will
switch on to confirm the zone is active.
Touch so the zone display shows 9.
Touch again so the zone display shows A.
Touch and hold to set the required power level.
To adjust the power level when the booster is set
During the booster, you can increase the power level, but not reduce it.
Touch for the zone required.
Touch and hold until the required power level shows on the zone display.
To cancel the booster
Touch for the zone required.
Touch . A will no longer show on the zone display.
Cooking zone
power level
Fast heating time
1
2
3
4
5
6
7
8
9
1 min.
3 min.
5 min.
6min.
30sec.
8 min.
30sec.
3 min.
30 sec.
3 min.
30 sec.
4 min.
30 sec.
10 sec.
6
How to use the hob
The Timer/ Minute Minder
The timer allows you to preset the length of time any of the zones will be on, between a minimum of one minute and
a maximum of 60 minutes. The timer can be used on each zone separately and can also be used as a minute minder, to
countdown the time without using any of the zones.
To set the timer
Switch on the zone and set the power level .
Whilst the dot is showing on the zone display, touch . The timer display will show 00 and the timer zone indicator will switch
on to show which zone timer is being set.
To set the time from zero, touch and hold until the required cooking time shows on the display. To adjust the number down,
touch .
To go straight to 60 minutes, touch . Then touch either or to adjust the time further.
Please note:
The timer will start as soon as the time has been set.
If more than one zone timer is set, the timer display will show the countdown for the last timer set.
At the end of the set time:
The zone will switch off
The timer display will show 00, then will switch off if no other timers have been set
The zone display will show H to indicate the residual heat.
The hob will beep for approximately 2 minutes. To switch off the beep, touch any key.
If no other zones are in use, then the hob will switch off automatically.
To change the timer once set
Touch for the required zone.
Touch . The remaining time for the active zone will show on the timer display.
Touch or to adjust the time.
To cancel the timer once set
Touch the or keys simultaneously or reduce the time required using the key until the zone display shows 0.
Please note:
If you cancel the timer, the zone will continue at the set power level until it is switched off as described above.
To set the minute minder
Touch . The timer display will show 00.
To set the time from zero, touch and hold until the required time shows on the display.
To adjust the number down, touch .
To go straight to 60 minutes, touch . Then touch either or to adjust the time further.
Please note:
The timer will start as soon as the time has been set.
At the end of the set time:
The timer display will show 00, then will switch off if no other timers have been set
The hob will beep for approximately 2 minutes. To switch off the beep, touch any key.
7
Safety Features
The childlock
The hob is equipped with a childlock to lock all the controls except
or during cooking.
, for safety reasons. This can be used when the hob is off
To set the childlock
Touch to switch the hob on.
Touch the front right zone and at the same time.
Touch the front right zone . L will show on all zone displays.
To suspend the childlock for cooking once it is set
Touch the front right zone and at the same time.
The zone displays will show 0 to confirm the zones can be switched on. Then set the zones as required. The childlock will
switch on automatically approximately twenty seconds after programming is complete, and L will show on all zone displays.
To turn off the childlock
Touch the front right zone and at the same time.
The zone displays will show 0 to confirm the zones can be switched on.
Touch to switch the childlock off.
Residual Heat Indicators
The hob is equipped with residual heat indicators to warn when any of the zones are still hot to the touch after cooking.
An H will show in the relevant zone display after cooking until the zone is at a safe temperature to touch.
Please note:
You should avoid touching the zones when the hob is in use, or when an H is showing on the zone display.
In the event of a power cut, the residual heat indicators will illuminate after the power supply is restored. However, when there
is no power supply to the hob the residual heat indicators will not work, so extra care must be taken.
Temperature Limiter
The hob is equipped with a temperature limiting sensor that adjusts the power output of the hob if the bottom of the
cookware becomes too hot, preventing damage to the cookware and to the hob itself.
8
Safety Features
Touch Control Safety
The hob will not operate if an object is left on the touch control
for more than ten seconds. The zone display will show Er03 and
the hob will beep for ten seconds.
Fig.7
Auto-stop Protection
The hob is equipped with a sensor that will switch off the zone
after a factory set period of time if not keys are touched once the
zone is switched on.
9
Power level of Cooking
zones
Operation time limit
1
6 hours
2
6 hours
3
5 hours
4
5 hours
5
4 hours
6
90 minutes
7
90 minutes
8
90 minutes
9
90 minutes
Efficient Use of your Hob
The hob is equipped with zones of different sizes, designed to accommodate most shapes and sizes of pan. For best
results, only use pans with flat bottoms and choose an appropriate zone depending on the size of the pan. The most
efficient use of the hob is shown below, where the pan and zone are correctly chosen.
Use pan lids where possible to minimize the energy usage of your appliance.
To reduce the cooking time, set the control knob to its maximum position when you first switch the plate on. Once the
zone has reached its temperature, then turn the control knob to the required position.
As the zone will remain hot for a period of time after it has been switched off, five to ten minutes before the planned
end of cooking time, turn the zone off. The residual heat in the hob will be sufficient to finish the cooking.
Fig.9
Zone Size
Minimum Pan Size (mm)
140 mm
110
Maximum Pan Size (mm)
160
180 mm
150
200
120/210 dual
90/180
140/230
180 x 260 dual
150
160 (280 when dual zone in use)
It is very important that the pans used on the hob are made of a suitable material and have the correct type of base.
The base should be flat and smooth, as any rough part on the pan base could scratch the ceramic hob top.
Choose pans which are between the sizes recommended in the table above, and with bases that are as non-reflective as
possible, e.g. dull and dark.
Only pans recommended for use on ceramic hobs should be used.
Pans with aluminium bases may leave silver streaks or spots on the hob. Glassware and pans with rough circulare
machined bases should not be used
10
Care and Maintenance
Always disconnect the appliance from the power supply before undertaking any cleaning or maintenance.
You should use a non-abrasive cleaner to clean the hob top. Any abrasive cleaner (including Cif) will scratch the surface and
could erase the control panel markings.
Do not use steel wool, abrasive sponges or sharp utensils such as knives to clean the hob as these could damage the hob.
The hob surface and the pans must be clean.
Carefully remove any food remains (especially those containing sugar), dirt etc. as soon as is possible after spillage - using a
ceramic hob scraper if necessary whilst the zone is still hot.
Once they have cooled and hardened they become increasingly difficult to remove.
Sugar/syrup mixtures could permanently pit the hob surface if left to burn on.
The stainless steel trims should be rinsed with water and dried with a soft, clean cloth, a chamois leather or an E-Cloth.
If necessary, the control knobs can be removed for cleaning, but you should take care not to damage the seal nor to allow
water inside the hob itself.
All cleaner residues should be removed with a damp cloth.
Types of residues
Clean with
Cleaning advice
Light
Cleaning sponge and soft cloth
Wipe over the zone to be cleaned with a sponge and hot
water, and then wipe off with a soft dry cloth.
Accumulated baked-on stains/
dirt, sugar spills or melted
plastics
Rings and hard water residues
Wipe over the zone to be cleaned with a sponge and hot
Cleaning sponge or glass scraper
water, using a ceramic scraper to remove any large marks
and soft cloth
or stains and then wipe off with a soft dry cloth.
White vinegar and soft cloth
Pour a small amount of warm white vinegar onto the
stain, leave it to stand, and then wipe off with a soft dry
cloth.
Important:
• Steam cleaners must not be used when cleaning this appliance.
Mains electrical voltage: 230 – 240Vac
Total rated electrical consumption: HVC65 6.4 kW
HVC75 6.8 kW
If your Hob is not working:
1. Check that the control knobs are switched on.
2. Check that the mains supply has not been switched off.
3. Check that the fuse in the spur has not blown.
Contact CDA Customer Care
A : Customer Care Department, The CDA Group Ltd, Harby Road, Langar, Nottinghamshire, NG13 9HY
T : 01949 862 012 F : 01949 862 003 E : [email protected] W : www.cda.eu
11
Mains Electricity Connection
Warning! this appliance must be earthed
We recommend that the appliance is connected by a qualified
electrician, who is a member of the N.I.C.E.I.C. and who will
comply with the I.E.E. and local regulations.
C
This appliance is intended to be connected to fixed wiring and
is not suitable for connection to a 13A plug or 13A supply.
A
B
This appliance is intended to be connected to fixed wiring by a
double pole switch, having a contact separation of at least 3mm in
all poles. The switch must be positioned no further than 2m from
the appliance.
B
Fig.10
Please note:
C
G
2
4
• The mains cable must only be replaced by a qualified electrician or service engineer and must be of equivalent or better rating (i.e. 2.5 mm² HO5RR-F,).
• This appliance is intended to be connected to the mains supply with a cable of cross section area 2.5 mm². A larger cable may not fit the terminal connections.
Fig.11
5
1
E
L
• The marking of the current rating of the fuse or circuit breaker protecting this appliance should be marked on the socket outlet.
• Assembly and electrical connection should be carried out by specialised personnel.
3
E
F
N
D
• When installing this product we recommend you seek the help of another individual.
• Ensure that the brass links are securely fitted. Failure to do so will prevent the hob from operating correctly.
12
Fitting the Hob
Unpacking the hob:• Take care not to lose or mishandle any parts.
Fitting position of the hob:
This appliance must be installed a minimum of 50mm from any back wall and a minimum of 190mm away from any adjacent vertical surfaces, e.g. a tall cupboard end panel. This may be reduced to 100mm if the adjacent surface is resistant to fire (tiles or steel, for example). These dimensions are shown in Fig.12.
If fitting a cooker hood above the hob:
If a cooker hood is to be installed above the hob, the height of the hood above the hob must be at least 600mm (650mm is
recommended) (Fig.13). If the instructions supplied with the hood dictate that the hood must be installed at a height greater
than 600mm, then that height is the minimum required.
Wall furniture requirements:
The minimum height of any cabinet immediately above the hob is 900mm. The minimum height of any adjacent units
(including light pelmets) is 400mm, unless they are manufactured from a material resistant to fire (steel, for example)
Notes:
• Do not position this appliance above a refrigeration unit. The heat generated may cause the refrigeration unit to fail.
• This appliance is designed to be installed into cabinet units capable of withstanding temperatures of 65°C or greater above ambient temperature.
• If there is no oven to be built in below the hob, an isolation shelf should be fitted to protect the user from high temperatures. If the hob is to be installed above a working drawer, then a partition should be fitted to protect the contents and user from the heat generated during use. This should be fitted 100mm below the hob.
• Never place perishable foods in the cupboard below the appliance.
13
How to Install the Hob
How to install the hob:
Overall dimensions of the hob: HVC65 width 590mm depth 510mm
HVC75 width 770mm depth 510mm
Worktop cut-out dimensions: HVC65 width 560mm depth 490mm
HVC75 width 740mm depth 490mm
1. Make the required hole in the worktop. Before doing this, you must check the instructions supplied with any cooker hood to ensure that you will have the required clearance. The cut-out (Fig.12) shows a 60mm gap from the wall to the
cut-out edge. The distance from the hob, when fitted, to the back wall is 50mm. If a splashback/worktop upstand is to
be fitted, take this into account when cutting the hole. The minimum distance that the hob should be positioned away from the rear wall or splashback is 50mm.
2. Position the hob seal, as shown in (Fig.14), ensuring that the ends meet without overlapping. Do not use silicone type sealant.
3. Secure the hob to the worktop using the fixing brackets and screws supplied, as shown in (Fig.15). Remove any excess sealant after tightening the brackets. Do not over-tighten the fixing brackets.
400mm
480mm
470mm
650mm
60mm
65mm
560mm
550mm
740mm
150mm
185mm
190mm
150mm
185mm
190mm
Fig.12
Fig.13
3cm
Fig.14
4cm
Fig.15
14
To contact our Customer Care Department, or for Service,
please contact us on the details below.
Passionate about style
Customer Care Department • The
Group Ltd. • Harby Road • Langar • Nottinghamshire • NG13 9HY
T : 01949 862 012 F : 01949 862 003 E : [email protected] W : www.cda.eu