1
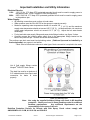
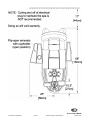
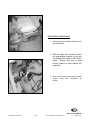
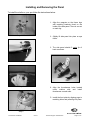
Document ID: 30080003
Rev: B
Technical Support: 800-626-6912
Page 1 of 12
European Touch - Limited Warranty
EUROPEAN TOUCH manufactures the Rinato® Whirlpool Pedicure Spa with the highest standards for
quality materials and workmanship. EUROPEAN TOUCH expressly warrants its products as follows:
To the original owner (herein called “owner”) of the Rinato Whirlpool Pedicure Spa (herein called
“pedicure spa”): EUROPEAN TOUCH may repair or replace, at its option, any pedicure spa found to be
defective in material or workmanship upon inspection by an authorized representative of EUROPEAN
TOUCH. This limited warranty covers the following components for the following time periods:
• All components: 12 months from date of shipment from manufacturer’s facility.
The exchange of a pedicure spa is limited to supplying a replacement pedicure spa of comparable style
and size. EUROPEAN TOUCH may, at its own discretion, use refurbished parts or pedicure spas for
replacement purposes. The owner must pay all labor and shipping charges necessary to repair or replace
the product. NO CONSEQUENTIAL, INCIDENTAL, CONTINGENT, COMPENSATORY, INDIRECT,
SPECIAL, OR OTHER DAMAGES WILL BE ALLOWED. This limited warranty is null and void if the
pedicure spa is removed from its place of initial installation, or is not installed in accordance with the
specifications of European Touch or federal, state or local codes and ordinances. Furthermore, this warranty
does not apply if the pedicure spa has been subject to misapplication, improper installation or maintenance,
negligence, improper cleaning or other circumstances beyond EUROPEAN TOUCH’s control.
NOT COVERED:
1. Damage to pump parts and/or motor parts due to obstruction in plumbing lines, etc.
2. Staining, fading or discoloration of plastic surfaces due to exposure and/or the use of harmful cleaning
agents or chemicals.
3. Staining, fading or discoloration caused by improper or poor water additives not related to
maintenance of water are not covered by this warranty.
4. Malfunctions or damage caused by improper installation; including, but not limited to, failure to meet
local and state plumbing, electrical, and building codes.
5. Staining, fading or discoloration of the vinyl seat, armrests, or footrests.
6. Damage resulting from standing in the basin.
7. Freight damage, misuse, modification, neglect, accident, natural disaster, and abuse.
8. Unauthorized repairs.
9. Damage while in possession of any party other than European Touch.
Should service be required due to a defect or malfunction during the warranty period, please contact:
EUROPEAN TOUCH
Technical Support
Toll-Free: 1-800-626-6912
Phone: 1-414-357-7016
Fax: 1-414-357-6360
[email protected]
http://www.europeantouch.com
The owner agrees by using this pedicure spa (a) that the obligation of EUROPEAN TOUCH shall not
extend to indirect or contingent damages, or injury, which may result from such use and (b) that the
obligations of EUROPEAN TOUCH are limited to those set forth herein. This limited warranty is the
exclusive remedy and is in lieu of all other warranties express or limited, including, but not limited to, any
implied warranty of merchantability or fitness for a particular purpose. No dealer or other person has any
authority to bind EUROPEAN TOUCH to changes or additions to this warranty or its products. Accordingly,
EUROPEAN TOUCH is not responsible for any such warranties or representations.
OTHER PROVISIONS:
• This warranty is limited to the original owner/end-user and is not transferable.
• European Touch shall not be liable for any other obligations or liabilities, including, but not limited to,
obligations or liabilities arising out of breach of contract or warranty, negligence, or other tort or any
theory of strict liability with respect to the pedicure spa or the acts or omissions of European Touch.
• Any assistance European Touch provides to the original owner outside the terms, limitations or
exclusions of this limited warranty will not constitute a waiver of search terms, limitations or exclusions,
nor will such assistance extend or revive the warranty.
Document ID: 30080003
Rev: B
Technical Support: 800-626-6912
Page 2 of 12
Table of Contents
European Touch - Limited Warranty ...................................................................................... 2
Installation Specifications Summary ..................................................................................... 4
Location and Support.............................................................................................................. 4
Important Installation and Utility Information ....................................................................... 5
Attaching the Seat Back and Seat Bottom Cushion ............................................................. 7
Seat Back Attachment...........................................................................................................7
Seat Movement Attachment ..................................................................................................7
Seat Bottom Attachment .......................................................................................................8
Installing and Removing the Panel ........................................................................................ 9
Installing the floor Mounting Brackets ................................................................................ 10
GROUNDING INSTRUCTIONS .............................................................................................. 11
DANGER.............................................................................................................................11
Document ID: 30080003
Rev: B
Technical Support: 800-626-6912
Page 3 of 12
Installation Specifications Summary
Note: Failure to comply with federal, state or local codes and ordinances will result in warranty
being null and void.
This pedicure spa installation must comply with all applicable plumbing and electrical codes. A licensed
plumber and licensed electrician must make the utility connections to this spa.
WARNING: Front plate and side covers MUST be removed prior to moving and installing the
Rinato Spa.
Spa shipping configuration removal
Appearance when set into place
Location and Support
Select a level floor location for installation. The floor structure beneath the pedicure spa must be
capable of supporting the occupied unit. For the seat back to fully recline, the spa base must be
mounted at least 17 inches from the wall as shown below:
Document ID: 30080003
Rev: B
Technical Support: 800-626-6912
Page 4 of 12
Important Installation and Utility Information
Electrical Service:
110V:
220V:
110V, 60 Hz, 2.75 Amp GFCI protected grounded circuit must be used to supply power to
the pedicure spa. (220V if ordered in 220V configuration)
220V, 50/60 Hz, 2.75 Amp GFCI protected grounded circuit must be used to supply power
to the pedicure spa.
Water Supply:
•
•
•
•
•
All plumbing connections must conform to local codes.
Water pressure must be 30 to 80 PSI for the sprayer to operate correctly.
Maximum operating water temperature should not exceed 105° F (41° C) and the maximum
supply water temperature should not exceed 150° F (65° C). (In Massachusetts, the maximum
supply water temperature should not exceed 130° F (54° C)). Adjust the hot water heater
accordingly.
For hot and cold water supply fittings and power drain fittings location, see figure 1 below.
Carefully connect the incoming water supply lines to the appropriate fittings located on the
back of the pedicure spa. Shut-off valves are recommended.
The pedicure spa drain must meet local plumbing codes. (Pedicure Spa must be installed by a
licensed plumber) see pages six and eleven.
**Note: See local and state codes as to what type of drain connection is required to be made.
Hot & Cold supply fittings contain
Neoperl® DW15GF check valves.
The drain line must be a minimum of
3/4” inside diameter from Spa to wall
connection for basin to drain
properly.
Back of Pedicure Spa
Note:
Not using the supplied bulkhead fittings will result in NO backflow
protection. Check your Local & State plumbing codes for additional
backflow requirements.
Any additional requirements are the
responsibility of the owner of the unit.
Backflow Protection Devices for Faucets with Side Spray: Check valves comply with
ANSI/ASME A112.18.3M, A112.18.1M, and CSA B12
Document ID: 30080003
Rev: B
Technical Support: 800-626-6912
Page 5 of 12
Document ID: 30080003
Rev: B
Technical Support: 800-626-6912
Page 6 of 12
Attaching the Seat Back and Seat Bottom Cushion
Make sure all parts are removed from box before discarding. If any parts are missing, contact
EUROPEAN TOUCH within 30 days of delivery date for replacement at 1-800-626-6912.
This pedicure spa shipped with the seat back attached and with the seat bottom cushion in the spa
shipping box. Follow these instructions to connect the seat back and the seat bottom to the pedicure
spa:
Note: 2 people are required to perform the following instructions.
Seat Back Attachment
1. Lift seat back vertically and lower into
position.
2. Align seat back bracket holes and insert
clevis pin from front.
3. Push hitch pin into the clevis pin as
shown.
Note: Repeat steps 2 and 3 for other side.
Clevis Pin
Hitch Pin
Seat Movement Attachment
4. Remove the linear drive hitch and
clevis pins located on the seat back
mounting bracket on the back of the
chair.
5. Slide the seat bracket, insert attached,
into the black end on the linear
actuator and line up the holes. Slide
the clevis pin through the holes and
secure by inserting the hitch pin
through the small hole on the clevis
pin.
Document ID: 30080003
Rev: B
Technical Support: 800-626-6912
Page 7 of 12
Seat Bottom Attachment
1. Remove the seat bottom cushion from
top of spa basin.
2. With the chair fully reclined, attach
the seat bottom cushion to the spa
by aligning the cushion with Velcro
strips. Ensure that rear of seat
bottom cushion is tight against the
seat back.
3. Move seat forward and attach bottom
cushion heat wire connectors as
shown.
Document ID: 30080003
Rev: B
Technical Support: 800-626-6912
Page 8 of 12
Installing and Removing the Panel
To install the shells on your spa follow the instructions below:
1. Align the magnets on the frame legs
with matching brackets found on the
inside of the side panel. There is one set
on each leg.
Steps 1 & 2
2. Slightly lift side panel into place on spa
frame.
3. The side panel should fit under lip of
basin as shown.
Step 3
Step 4
4. Align the thumbscrew holes located
under cushion skirt and
thumbscrew on each side.
install
5. Install the front plate by aligning pegs to
matching holes and pressing into place.
Step 5
Document ID: 30080003
Rev: B
Technical Support: 800-626-6912
Page 9 of 12
Installing the floor Mounting Brackets
All Rinato Spas installed with gravity drain and / or hard piped to hot and cold supply lines
MUST be anchored to the floor.
Note: Moving spa with flexible hose connected may cause strain and cause leaks.
1. Adjust all 4 leveling feet until unit is
stable and level.
2. Place the floor mounting brackets on
one of the front feet and on the rear
foot of the opposite side.
3. Mark and drill hole in floor for each
bracket and install 3/8” floor anchor
in each hole.
Document ID: 30080003
Rev: B
Technical Support: 800-626-6912
Page 10 of 12
GROUNDING INSTRUCTIONS
WARNING – When using electrical products, basic precautions should always be followed,
including the following:
1.
DANGER: RISK OF ELECTRIC SHOCK. Connect only to a circuit protected by a
ground-fault circuit interrupter.
2.
Grounding is required.
The unit should be installed by a qualified service
representative and grounded.
This product must be grounded. If it should malfunction or break down, grounding provides a
path of least resistance for electric current to reduce the risk of electric shock. This product is
equipped with a cord having an equipment-grounding conductor and a grounding plug. The
plug must be plugged into an appropriate outlet that is properly installed and grounded in
accordance with all local codes and ordinances.
DANGER
Improper connection of the equipment-grounding conductor can result in a risk of electric
shock. Check with a qualified electrician or serviceman if you are in doubt as to whether the
product is properly grounded. Do not modify the plug provided with the product – if it will not fit
the outlet, have a proper outlet installed by a qualified electrician.
This product is for use on a nominal 120-V circuit and has a grounding plug that looks like the
plug illustrated in the sketch below. Make sure that the product is connected to an outlet
having the same configuration as the plug. No adapter should be used with this product
Document ID: 30080003
Rev: A
Technical Support: 800-626-6912
Page 11 of 12
EUROPEAN TOUCH
8301 W. Parkland Court
Milwaukee, WI 53223
Phone Number:
Toll Free:
Fax:
Web Site:
Email:
Document ID: 30080003
Rev: A
414-357-7016
800-626-6912
414-357-6360
www.europeantouch.com
[email protected]
Technical Support: 800-626-6912
Page 12 of 12