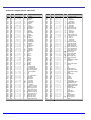
1
Papenmeier part n°: 0090.391.00
Rev. 1.5 / March 2005
BRAILLEX® ELba
The EL Braille Assistant
User's Manual
Table of Contents
INTRODUCTION.................................................................... I
CE Medical Devices Directive........................................... II
FCC Radio Frequency Interference Statement................. II
CHAPTER 1 – GETTING TO KNOW BRAILLEX ELBA................1
1.1 – Physical Description.................................................1
Keyboard Layout (PC keyboard version)........................ 2
Braille Key Assignment (Braille keyboard version) .......... 2
Braille-Emulation of PC-Shift, Alt, Ctrl........................... 3
Special Screen Reader Functions.................................. 4
1.2 – The BRAILLEX ELba Battery .....................................6
1.3 – Transport .................................................................6
1.4 – Service and Maintenance .........................................7
1.5 – Safety Advice ...........................................................7
CHAPTER 2 – GETTING STARTED ..........................................8
2.1 – Switching On BRAILLEX ELba...................................8
Switching on BRAILLEX Elba via the battery charger ....... 8
2.2 – The BRAILLEX ELba Control Center ..........................8
2.3 – Working With the Braille Display ...........................10
Using the Easy Access Bar ........................................ 10
The Easy Access Bar in Navigation Mode ..................... 10
The Easy Access Bar in Interaction Mode..................... 11
The Easy Access Bar in Combined Mode ...................... 11
Further Braille Management Commands ...................... 11
Braille Management Keys.......................................... 12
Cursor Routing ........................................................ 12
2.4 – Managing the Speech Output .................................13
Speech synthesizer management keys........................ 13
Screen reader management keys ............................... 13
Screen reader management keys in Virtual Cursor
Mode ..................................................................... 13
2.5 – Power saving: Sleep Mode .....................................15
2.6 – Switching Off BRAILLEX ELba ................................15
CHAPTER 3 – WORKING WITH BRAILLEX ELBA ..................17
3.1 – The BRAILLEX ELba Control Center ........................17
Launching Applications From the Control Center........... 17
Switching Applications.............................................. 18
Killing an Application that Hangs ................................ 18
3.2 – Word Processing ....................................................19
Launching the word processor ................................... 19
Open a document to edit .......................................... 19
Create a new document............................................ 19
Computer Braille and Grade 2 Braille .......................... 20
Saving a document .................................................. 20
Quit Word Processing ............................................... 20
Loading or inserting a document ................................ 21
Mark text ............................................................... 21
Cut text ................................................................. 21
Paste text............................................................... 21
3.3 –
3.4 –
3.5 –
3.6 –
3.7 –
3.8 –
Search and Replace ................................................. 21
Insert and Overwrite Mode........................................ 24
Spell checker .......................................................... 24
Formatting Text ...................................................... 25
Printing a Text ........................................................ 27
Document Reader ..................................................29
Launching the Document Reader................................ 29
File Manager ..........................................................30
Launching the File Manager....................................... 30
Files And Directories ................................................ 30
Navigating Through Your Files And Directories ............. 30
Create a New Folder ................................................ 31
Rename a folder ...................................................... 31
Delete a Folder........................................................ 32
Create a new file ..................................................... 32
Rename a file.......................................................... 32
Copy a File ............................................................. 32
Delete a file ............................................................ 32
Edit a Text.............................................................. 33
File conversion, Grade 2 back and forward translation... 33
Convert a WinWord File for editing ............................. 33
Checking Text Files With the File Viewer ..................... 33
Options Within the File Viewer ................................... 34
Exiting the File Manager ........................................... 35
Internet Browser ...................................................36
Before You Start the Browser .................................... 36
Exiting the Internet Browser ..................................... 36
Navigating hypertext documents with Lynx ................. 36
Going to a New Web page......................................... 37
Printing, Mailing, and Saving rendered files to disk. ...... 38
Reloading files and refreshing the display.................... 38
Lynx searching commands ........................................ 38
Lynx bookmarks ...................................................... 38
Lynx and HTML Forms .............................................. 39
The Email Program.................................................40
Introduction............................................................ 40
Before You Start Pine ............................................... 40
Starting the Email Program ....................................... 40
Writing a Message in Pine ......................................... 41
Listing, Viewing, Replying to, and Forwarding Messages 44
Pine Folders ............................................................ 45
Deleting a Folder ..................................................... 47
Using the Address Book ............................................ 48
Printing Messages.................................................... 51
Pine Can Do More .................................................... 51
Guidelines for Using Email ........................................ 52
Quitting Pine and Logging Out ................................... 52
The Address Book ..................................................53
The Day Planner.....................................................54
Saving an Appointment ............................................ 55
Recurrent Appointments ........................................... 56
Viewing an Appointment ........................................... 56
Modifying an Appointment ........................................ 56
Deleting an Appointment .......................................... 57
Printing an Appointment ........................................... 57
Changing the Calendar View...................................... 57
Setting Up the Day Planner ....................................... 58
Startup settings ...................................................... 58
Announcement settings ............................................ 58
Exiting the Day Planner ............................................ 59
3.9 – The Spreadsheet ....................................................60
Starting the Spreadsheet .......................................... 60
First Steps With a Simple Spreadsheet........................ 60
Cursor Control Commands ........................................ 63
Cell Entry and Editing Commands .............................. 63
Numeric Expressions ................................................ 64
Numeric Functions ................................................... 64
Row and Column Commands ..................................... 65
Range Functions ...................................................... 66
Range Commands.................................................... 67
Note Commands...................................................... 67
File Commands ....................................................... 67
Miscellaneous Commands ......................................... 68
3.10 – The MP3 Player ....................................................69
Starting the MP3 Player ............................................ 69
Playing a Song ........................................................ 69
Exiting the MP3 Player.............................................. 69
3.11 – Calculator.............................................................70
Doing Simple Arithmetic Operations: .......................... 70
Using the clipboard With the Calculator....................... 70
Calculator Help........................................................ 71
Exiting the Scientific Calculator.................................. 71
Calculator Functions................................................. 71
3.12 – Voice Recorder .....................................................77
Launching the Voice Recorder.................................... 77
Recording Information.............................................. 78
Listening to a Recording ........................................... 78
Editing a Recording .................................................. 78
Activating Voice Recorder Functions With Hotkeys ........ 78
Exiting the Voice Recorder ........................................ 79
3.13 – Tools ....................................................................80
PC-card.................................................................. 80
Communication ....................................................... 82
Converter ............................................................... 84
Converters that do not appear in the Converter menu:
Bookshare decoder and Game interpreter ................... 85
Visualization ........................................................... 86
System Tools .......................................................... 87
Enable remote access............................................... 88
Linux Shell ............................................................. 89
3.14 – Online Help ..........................................................90
3.15 – File Transfer From And To A PC ............................90
Data exchange via external storage media .................. 90
Data exchange via network ....................................... 90
Synchronizing Address Book And Appointments With
Outlook: The ElbaSync Program................................. 91
Data exchange via Serial port.................................... 93
3.16 – System Maintenance: Upgrading ELba With
New System Software ..........................................93
3.17 – Screen Access To Windows Based PCs .................95
Activating and Ending the BRAILLEX EL Emulation ........ 95
BRAILLEX ELba Used With the JAWS for Windows......... 95
Combined Mode ...................................................... 96
BRAILLEX ELba Used With Other Screen Readers ......... 98
3.18 – Sleep Mode ..........................................................99
3.19 – Power down .........................................................99
Emergency Power Down ........................................... 99
CHAPTER 4 – ELBA SETUP ................................................101
4.1
4.2
4.3
4.4
–
–
–
–
4.5
4.6
4.7
4.8
–
–
–
–
The Setup Menu ...................................................101
Volume Setup.......................................................101
Date and Time Setup............................................102
Network Setup .....................................................102
Device Identification .............................................. 102
Ethernet............................................................... 103
Wireless LAN......................................................... 104
USB-Network ........................................................ 106
Email account ....................................................... 110
Internet home page ............................................... 111
Dial-up................................................................. 111
Access to shared PC files ........................................ 112
Network access to ELba files ................................... 115
Power Management Setup ...................................116
Braille Setup ........................................................116
Speech Setup .......................................................117
Saving Setup Values ............................................117
CHAPTER 5 – TABLES .......................................................119
5.1 – Quick Reference ...................................................119
Braille-Emulation of the PC-Special keys ................... 119
Braille-Emulation of PC-Shift, Alt, Ctrl....................... 119
Braille-Emulation of EL-keys and switches ................. 120
Easy Access Bar Functions ...................................... 120
Screen reader management keys in Virtual Cursor
Mode ................................................................... 123
Key Assignment in BRAILLEX ELba applications.......... 124
5.2 – Installing the Winshare Connection via Network .132
BRAILLEX ELba - Windows 98 / 98SE / ME PC............ 132
BRAILLEX ELba - Windows 2000 PC.......................... 134
BRAILLEX ELba - Windows XP PC ............................. 136
5.3 – Installing the Winshare Connection via Serial
Port....................................................................139
BRAILLEX ELba - Windows 98 / 98SE / ME PC............ 139
BRAILLEX ELba - Windows 2000 PC.......................... 141
BRAILLEX ELba - Windows XP PC ............................. 143
5.4 – Braille Tables .......................................................147
American Computer Braille, 8-Dot Code .................... 147
British Computer Braille, 8 Dot Code ........................ 149
CHAPTER 6 – IMPORTANT ADVICE ...................................151
6.1
6.2
6.3
6.4
6.5
–
–
–
–
–
Purpose of the Device ..........................................151
Safety Advice .......................................................151
General Precautions.............................................151
CE-Marking — Technical Specifications ................152
EC and FCC Declarations of Conformity ................152
INDEX ..............................................................................155
Introduction
Introduction
BRAILLEX® EL Braille Assistant (ELba)
Papenmeier, the German Braille specialist presents a new generation of notetakers:
BRAILLEX ELba.
A universal communications tool and a state-of-the-art Braille display for other
computers, BRAILLEX ELba is the most versatile portable Braille device around. Send
and receive email or surf the web, make notes or organize your day, share information
with other devices or access your Windows based PC. BRAILLEX ELba offers this with
quality refreshable Braille and easily understood speech — in many different languages.
Full Internet and email access
With BRAILLEX ELba, you don't need a computer to send or receive messages or to surf
the web. The built-in modem and friendly yet powerful software make sure that you will
be connected.
Superior hardware with extra-large memory
BRAILLEX ELba features a state-of-the-art CPU designed for portable use with plenty of
computing power and advanced power management. The 16 MB of non-volatile flash
memory and 32 MB RAM can store thousands of documents.
Rock-solid Linux-based software
BRAILLEX ELba is based on the Linux operating system. Most users will never "see" the
operating system, they will still take advantage of its advanced networking capability
and its rock-solid applications.
Users of all levels will find the menu-driven control center easy to learn and navigate.
Those familiar with Windows commands will find most of the shortcut keys they are used
to.
Ergonomic keyboards and Easy Access Bar
BRAILLEX ELba is available with either Braille or a QWERTY type keyboard.
The mechanics of the Braille keyboard were inspired by the technology used for piano
keyboards. You will feel the difference when it comes to writing long texts.
Another highlight of BRAILLEX ELba is the patented Easy Access Bar, a long key situated
on the front of the device. This joystick-like control moves the display up, down, back
and forth in a very fast and intuitive way. You issue commands without ever taking your
hands off the Braille display.
Complete Productivity Suite
BRAILLEX ELba comes with a complete selection of productivity tools: From the control
center, choose between the word processor, File Manager, Email, Internet browser,
scientific calculator, spreadsheet, data base, day-planner, address book, MP3 player.
Easy file transfer to and from a PC is a must. BRAILLEX ELba can also do file conversion
(read and write Word files) and keep your data files updated with its automatic
synchronization utility.
Braille Access to Windows based computers
Connect your BRAILLEX ELba to your computer, run your favorite screen reader, and you
have a Braille terminal to your computer — an award-winning refreshable Braille display.
All in one
BRAILLEX ELba combines all of your communications and Braille requirements into one
compact and easy to use device.
I
CE Medical Devices Directive
BRAILLEX ELba complies with the requirements of the European Union Medical Devices
Directive, as an active class I medical product intended to be used for the purpose of
compensation for a handicap.
This product may only be used in home or office environments. In medical facilities, this
product may only be used in office rooms.
Please read this manual and the information on medical devices carefully.
This device manual describes the installation and the use of BRAILLEX ELba.
FCC Radio Frequency Interference Statement
BRAILLEX ELba has been tested and found to comply with the limits for a Class B digital
device, pursuant to part 15 of the FCC (Federal Communications Commission) rules.
These limits are designed to provide reasonable protection against harmful interference
in a residential installation. This equipment generates, uses and can radiate radio
frequency energy and, if not installed and used in accordance with the instructions, may
cause harmful interference to radio communications. However, there is no guarantee
that interference will not occur in a particular installation. If this equipment does cause
harmful interference to radio or television reception, which can be determined by turning
the equipment off and on, the user is encouraged to try to correct the interference by
one or more of the following measures:
• Reorient or relocate the receiving antenna.
• Increase the separation between the equipment and receiver.
• Connect the equipment into an outlet on a different circuit from that to which the
receiver is connected.
• Consult the dealer or an experienced radio/TV technician for help.
Caution:
Papenmeier is not responsible for any radio or TV interference caused by unauthorized
modifications of this equipment or the substitution or attachment of connecting cables
other than those specified by Papenmeier. Such unauthorized modifications,
substitutions, or attachments may void the user's authority to operate the equipment.
The correction of interferences caused by such unauthorized modifications, substitutions,
or attachments will be the responsibility of the user.
Use only shielded interface cabled to ensure compliance.
F.H. Papenmeier reserves the right to modify the devices described in this manual
without notice.
August 2003
F. H. Papenmeier GmbH & Co KG
Reha Division
P.O. Box 16 20
D-58211 Schwerte, Germany
Phone:
+49-2304-946 0
Fax:
+49-2304-946 246
Email:
[email protected]
II
Chapter 1 – Getting to Know BRAILLEX ELba
Chapter 1 – Getting to Know BRAILLEX ELba
1.1 – Physical Description
The device description is based on the assumption that you have the BRAILLEX ELba in
front of you, in working position.
Front panel
In the rounded front you will find the integrated Easy Access Bar. Along this bar are
rubber nubs or bumps to allow the user a better grip.
Back panel
On the back panel you will find the connectors. When you sit in front of the device in
working position, on the backside of the device you will find, from left to right:
The on/off switch,
a jack for the external power supply/ battery charger;
the standard 25 pin parallel port connector;
the PS2 type external keyboard connector,
the modem connector (RJ-11) ,
the USB connector (USB client),
the standard 9 pin serial port,
a jack for an external speaker or headphones,
above the modem, USB and serial connectors you find the PCMCIA (or card bus) slot
for memory cards, a hard disk drive or for other external peripherals such as disk
drives, CD-ROM drives, etc. ,
to the right of the PC-card slot, you find the Ethernet connector (RJ-45) .
Top
The 20 or 32 cell Braille display is placed along the front line, behind the Easy Access
Bar. Every Braille cell has an integrated cursor routing key.
On the right side of the Braille display, you will feel an array of small holes in the
housing; This is the built-in speaker. To the left of the Braille display, you will find a
small microphone.
Above the Braille display, you have the 8-dot Braille keyboard or the PC type QWERTY
keyboard.
1
Keyboard Layout (PC keyboard version)
The QWERTY type keyboard layout corresponds in substance to the layout of regular
notebook keyboards.
In the following, we will describe the position of the most important function keys:
Function key layout of the PC type keyboard
Enter
Escape
Up arrow
Down arrow
Left arrow
Right arrow
FN (Function key)
Page up
Page down
Home
End
Backspace
TAB
Ctrl
Alt
Left Shift
Right Shift
Left Window-key
Right Window-key
Context menu key
Third row from the top, far right
Top row, far left
Second row from the bottom, second from the right
First row from the bottom, second from the right
Bottom row, third from the right
Bottom row, far right
Bottom row, far left
FN + up arrow
FN + down arrow
FN + left arrow
FN + right arrow
Second row from the top, far right
Third row from the top, far left
Bottom row, second from the left
Bottom row, fourth from the left (next to the space bar)
Second row from the bottom, second from the left
Second row from the bottom, third from the right
Bottom row, third from the left
Bottom row, second right to the space bar
Bottom row, right of right Window-key, or fifth from the right
Braille Key Assignment (Braille keyboard version)
The Braille keyboard consists of the regular 6 Braille keys, plus dot 7 (left to dot 3) and
dot 8 (right to dot 6). From left to right, the Braille keys are named as follows:
7, 3, 2, 1, 4, 5, 6, 8.
Below the Braille keys, you have a long horizontal key in the center, the space key. Left
and right of the space key, you have two more thumb keys that help emulating PC
function keys, or have screen reader functions, mostly in conjunction with the Braille
keys.
In the following, you will learn how to give PC function key instructions via the Braille
keyboard.
2
Chapter 1 – Getting to Know BRAILLEX ELba
PC keystrokes with the Braille keyboard
Enter
Escape
Left arrow
Right arrow
Up arrow
Down arrow
Page up
Page down
Home
End
Insert
Del
Tab
Backspace
F1-F12
NumPad 1-0
NumPad-operators
NumPad Enter
NumPad NumLock
Ctrl+Esc
Space + dot 8)
Space + dot 7)
Space + dot 1
Space + dot 4
Space + dot 2
Space + dot 5
Space + dot 3
Space + dot 6
Space + dots 1+2
Space + dots 4+5
Space + dots 2+3
Space + dots 5+6
Space + dots 3+7
Space + dots 6+8
Right thumb + letters a-l
Right thumb + numbers 1-0 (computer Braille!)
Right thumb + "+", "-", "*", "/" (computer Braille!)
Right thumb + dot 8
Right thumb + letter "n"
Space + dots 1,2,3,4,5,6
Braille-Emulation of PC-Shift, Alt, Ctrl
A special problem when emulating a full PC keyboard is the fact that you can combine
just about any key with Ctrl, Alt or Shift. Computer Braille typically gives the possibility
to write capitalized characters, such as "A" (typically dot 1+7), but there is no generally
accepted code for Ctrl-Esc, for example, or Shift-F1.
The Braille keyboard of BRAILLEX ELba enables you to write just about any PC key
combination, especially with these keys (and with Insert, which is commonly used in
combination with other keys in a popular screen reader program).
Rather than defining a key combination (for example with combinations of thumb keys,
space and Braille) for all these key combination, BRAILLEX ELba makes the key modifiers
Shift, Alt, Ctrl and Insert available in the way of "sticky keys", as a prefix for
combinations with other keys.
So if you want to write a key combination with Shift for example, you write the "Shift"
code first, and the other key afterwards. In case you type one of these prefixes by
mistake, you can also disable it again.
3
Braille keyboard emulation of Shift, Alt, Ctrl, Ins
Shift
Ctrl
Alt
Shift + Ctrl
Alt + Shift
Alt + Ctrl
Shift + Alt + Ctrl
Insert (as key prefix)
Disable prefix
Left
Left
Left
Left
Left
Left
Left
Left
Left
thumb
thumb
thumb
thumb
thumb
thumb
thumb
thumb
thumb
+
+
+
+
+
+
+
+
+
dot 1
dot 2
dot 3
dots 1+2
dots 1+3
dots 2+3
dots 1+2+3
dots 3+7
dot 7
Special Screen Reader Functions
Access Bar Basics
The Easy Access Bar integrated in the font of all BRAILLEX EL devices (and thus also
BRAILLEX ELba) allows fast and easy navigation across the screen.
You can push the Easy Access Bar in all four directions, in two steps each. When you sit
in front of the device and read the Braille display, your thumbs are naturally located in
front of the Easy Access Bar.
You push the bar with your thumb. When you release it after a movement, it will jump
back to the initial position.
When moving the Easy Access Bar up or down, you turn it around its own axle. Left or
right movements shift it on the horizontal axle. In all four directions there are two keys
integrated in the Easy Access Bar. The bumpy front of the bar gives your thumb enough
grip to activate these keys. You feel a light resistance and hear a click when you have
activated a key. Its function is generally executed only after you have released the Easy
Access Bar. Only the keys with repeat function make exception.
In every direction you can access two functions. After you release it, the Easy Access Bar
returns to its home position. In its home position it has no function.
The screen reader software adapted for the BRAILLEX EL products obviously allow more
functions than the 8 described above. Therefore, Papenmeier added two three-way
toggle switches and two keys to the left and to the right of the Braille display.
The eight possible positions of the Easy Access Bar change their meaning when you
modify the position of the switches, and they also change when you press one of the
keys while you activate the Easy Access Bar. The switches generally shift the meaning
of the bar, while the keys both execute functions on their own and act together with the
Easy Access Bar.
BRAILLEX ELba does not have any physical switches or keys, but it can emulate them in
order to allow all of the functionality of the dedicated EL Braille displays. You will learn
more about this later in this manual, and specifically in the chapter describing the screen
access to Windows based PCs.
4
Chapter 1 – Getting to Know BRAILLEX ELba
EL Switches and Keys
The EL switches currently do not have any functions assigned when it comes to
accessing the BRAILLEX ELba screen. Some of the EL keys do, however.
For the devices with Braille keyboard, the thumb keys in the bottom row of the Braille
keyboard (right and left thumb, space) are used to emulate the keys of the EL displays.
I.e. you press and release one of the thumb keys and then push the Easy Access Bar
into the desired direction. A timeout function switches back to the "normal" function of
the Easy Access Bar if the command is not entered within 5 seconds after you pressed
the thumb key.
For devices with QWERTY keyboard, the thumb keys have the following analogies:
Thumb Key Analogies For Devices With QWERTY Keyboard
Braille Keyboard
QWERTY Keyboard
Left thumb key
Left Windows key
Right thumb key
Right Windows key
Space
Context Menu key
Please note that there is a difference in handling between the devices with
Braille keyboard and with QWERTY keyboard:
• For thumb key – EAB combinations on devices with Braille keyboard, you
PRESS AND RELEASE the thumb key and then press the EAB within the
following 5 seconds.
• For thumb key – EAB combinations on devices with QWERTY keyboard, you
press and HOLD the thumb key while you press the EAB.
5
1.2 – The BRAILLEX ELba Battery
BRAILLEX ELba is equipped with a built-in Lithium-Ion battery allowing you to use the
display without connecting it to a power outlet.
The autonomy is 10 hours minimum with typical use; the recharging occurs overnight
(effective charging time: max 6 hours if you don't work with it). As soon as you connect
the power supply / battery charger, the battery is recharged. Even if BRAILLEX ELba is
switched off when you connect the charger, it will give you a spoken message "Battery
charger active" (it will automatically power up for this purpose, but will switch off again
after one minute if you don't press any key in the meantime. If you disconnect the
charger (or unplug the charger from the power outlet), you will also get a message:
"Battery charger unplugged".
If the battery is completely drained when you connect the charger, the charging power
might not suffice to start the talking. Instead of the message, you will only hear a short
scratching noise from the speaker, and the device will switch off immediately. Keep it
plugged in then, it will charge anyway.
Even if you work while recharging the drained battery, the actual recharging time will not
exceed 10 hours.
Even though a permanent connection to the charger will not damage the battery — it is
protected both against overheating and deep discharge — you should disconnect the
charger if you don't intend to use the device for a certain time. If not used for a longer
period, the battery will discharge automatically. So make sure you charge it again before
reusing it. Luckily, Lithium-Ion batteries don't present the so-called memory effect
known from Ni-Cad batteries, so you can recharge them any time.
The battery can be replaced by a Papenmeier service center. Do not remove the battery
yourself! Please also know that in some countries, special regulations might apply for the
disposal of used batteries.
Do not store the battery in hot environments (over 60° C / 120° F). Do not use any
charger other than the one provided by Papenmeier.
1.3 – Transport
You may carry BRAILLEX ELba in the supplied bag. Before transport, remove all cables
from the unit to protect the connectors.
Both the carrying pouch and the device bottom plate have Velcro strips. When you put
your device into the pouch, make sure to lift it on the front side in order to avoid the
bottom of the device sticking to the Velcro in the wrong place. When the device back has
reached the back end of the pouch, lower the device and make sure that the Velcro
sticks. When you remove the device from the pouch, make sure that you don't detach
the Velcro from the bottom of the device.
BRAILLEX ELba is secured in the pouch with a slim ribbon sewed to the pouch, and with
a Velcro patch on the right side. Pull it tight towards the right – it goes vertically behind
the Braille cells – and fix the patch on the Velcro on the side of the pouch.
Please note that the device may fall off the pouch if you don't follow these instructions!
6
Chapter 1 – Getting to Know BRAILLEX ELba
1.4 – Service and Maintenance
Avoid touching the device with dirty hands. You may clean the surface of the device
(NOT the Braille cells) with a soft, damp cloth. Do not use any aggressive detergent or
soap.
In case of any defect of the Braille display unit, please contact an authorized Papenmeier
service center. If you are in doubt about the service center responsible for your area,
please contact Papenmeier:
Phone:
Fax:
Email:
+49-2304-9460
+49-2304-946 246
[email protected]
If possible give a short description of the kind of disturbance.
1.5 – Safety Advice
Please read the information in this manual carefully, so you will be able to avoid
problems.
Use BRAILLEX ELba and its power supply in a dry environment only. Even if the device is
not connected to a power outlet, it must not get wet. Otherwise, your health might
suffer from electrical strokes.
Never place any heavy objects on the device.
Only use the supplied power supply with the unit.
Do not expose the power supply to heavy shocks. Do not drop it.
7
Chapter 2 – Getting Started
2.1 – Switching On BRAILLEX ELba
Press the on/off switch on the left side of the back panel (seen in working position). On
the Braille display, you will see a start message:
"BRAILLEX ELBA Rev 123)".
A few seconds later, the start message on the Braille display will be replaced by a short
message with the software release version "Elba 1.3 ready", which is also spoken,
followed by the first control center prompt:
"[ ] e Editor"
and you will hear the message: "e for Editor".
Switching on BRAILLEX Elba via the battery charger
If BRAILLEX ELba is powered down, you can switch it on by connecting the battery
charger (if that one is connected to a power outlet).
ELba will then automatically switch on and give you a spoken message "Battery charger
active". If you press any of the BRAILLEX ELba keys within 60 seconds after hearing the
message, you can continue working without having used the on/off switch. Otherwise,
BRAILLEX ELba will automatically switch off again after 1 minute
2.2 – The BRAILLEX ELba Control Center
The Control center is the first application running when you switch on the device, and as
its name says, it controls all other applications. It looks like a menu containing all
BRAILLEX ELba applications. If you are familiar with Windows, you can compare it with
the Windows start menu.
Like the Windows start menu, you can also reach the control center from any
application, pressing Ctrl + Esc -- or Space + dots 1,2,3,4,5,6 on the Braille keyboard;
see also the chapter Braille Key Assignment (Braille keyboard version). As Linux is a
multi-tasking environment, opening the control center, you don't terminate your current
application: you can have several applications running simultaneously. The complete
control center looks like this:
ELba
[ ]
[ ]
[ ]
[ ]
[ ]
[ ]
[ ]
[ ]
[ ]
[ ]
[ ]
[ ]
[ ]
Control Center V0.59 2003/02/14
e editor
r document reader
f file manager
i internet browser
m email
d day planner
a spreadsheet
c calculator
p mp3 player
t tools...
F1 online help
sleep mode
power down
From the menu based control center you launch the BRAILLEX ELba applications. For
example, after powering up the device, you read
"[ ] e Editor".
8
Chapter 2 – Getting Started
The space between the square brackets indicates that the application is not active, the
"e" gives a hint regarding the hotkey that can be used to open the application (see
below), and finally, the word "Editor" names the application itself.
You navigate through the control center with the arrow keys or the Easy Access Bar
(EAB).
Once you see the name of the application you want to launch on the Braille display, you
can select it by
hitting <Enter> (space + dot 8 on the Braille display), or
pressing the Easy Access Bar 2 steps down.
From within the control center, you can also directly select an application by writing the
hotkey you find in front of the application name.
Note:
All the applications in the control center can also be reached from outside the control
center. For this purpose, press Ctrl + Shift + the letter indicated above. This means,
from the editor for example, you can reach the email program by pressing Ctrl + Shift +
m.
If you work within an application and want to activate another one without however
terminating the first one, you have two options:
Press Ctrl + Shift + the hotkey letter (on the Braille keyboard, this is a sequence of
two key combinations: Left thumb + dots 1,2 for "Ctrl + Shift, plus the actual letter
following), or
Hit Ctrl + Esc (space + dots 1,2,3,4,5,6 on the Braille keyboard) to get back to the
control panel and select the new application from there.
In order to switch back and forth between several open applications, you can also
press Alt + left arrow (Left thumb + dot 3, then Space + dot 1 on the Braille
keyboard) or Alt + right arrow (Left thumb + dot 3, then Space + dot 4 in Braille).
If you browse the control center menu, you recognize an open application by a star
between the square brackets in front of the application name (if the application is not
active, there is a space instead).
Example: "[*] i Internet Browser“
In case the application is active, you also get the spoken message "is running" after the
application name.
Some applications can be opened several times, the editor for example. You recognize
an open editor task by a star between parenthesis "(*)". In that case you also see the
name of the file that is currently edited (or "no name" if no file name has been specified.
In order to end an application you might have to use different commands depending on
the applications; for most of them, it will be Ctrl +Q.
9
2.3 – Working With the Braille Display
Even though BRAILLEX ELba is considered a note taker, it uses a screen, like a computer
does. Similar to a DOS screen, it is 80 columns wide, but 33 lines high (instead of
typically 25 in DOS).
In most cases, the first screen line contains status information (like the title bar in
Windows). In many applications, the commands available for the particular situation
shown on the screen are displayed in the last two screen lines. There you find the key
name in a short form (i.e. "^Q" for "Ctrl +Q") and a short command summary (in this
case: "Quit").
The fact that BRAILLEX ELba uses a computer like screen also means that internally, it
uses a screen reader (by the way: it is a professional Linux screen reader called
UXDots). And this also means that you have the possibility (and sometimes, the
necessity) to use function keys to read the screen.. BRAILLEX ELba offers for screen
reading its patented Easy Access Bar.
Using the Easy Access Bar
BRAILLEX ELba's Easy Access Bar has been used for several years in the outstanding
Papenmeier line of EL Braille displays, and has found thousands of enthusiastic users
around the world.
The concept of the Easy Access Bar (EAB) is very simple: it works like a joystick, and is
thus very easy to learn and operate. And the most important thing about it is that you
can leave your hands in the reading position whatever action you want to do with the
Braille display.
BRAILLEX ELba's Access bar is programmable, so the meaning of a command (for
example pushing the EAB two steps down) might vary from one application to next.
Depending on the applications, the EAB either has screen navigation functions, or
emulates specific keyboard keys to navigate through the options of an application. Once
in the application, you can switch the functionality of the EAB with a keystroke.
We distinguish between three working modes:
• Navigation mode
• Interaction mode
• Combined mode
The Easy Access Bar in Navigation Mode
Navigation Mode Keys
Function
EAB keystroke
Read backwards
EAB 1 step left
Line up (maintain column)
EAB 1 step up
Read forwards
EAB 1 step right
Line down (maintain column)
EAB 1 step down
Display to start of text line
EAB 2 steps left
Line to first screen line
EAB 2 steps up
Display to end of text line
EAB 2 steps right
Line to last screen line
EAB 2 steps down
Navigation Mode is the Access Bar setting of choice for text environments. Please note
that the cursor is NOT moved when you navigate around the screen in navigation mode.
10
Chapter 2 – Getting Started
The Easy Access Bar in Interaction Mode
In menus such as the Control center, the EAB typically emulates keyboard commands
allowing you to navigate through the menu interactively.
Interaction Mode Keys
Function
EAB keystroke
Read backwards
Up arrow (previous menu item)
Read forwards
Down arrow (next menu item)
Home (first menu item)
Escape (in some menus: previous level)
End (in some menus: go to last item)
Enter (select item)
EAB
EAB
EAB
EAB
EAB
EAB
EAB
EAB
1
1
1
1
2
2
2
2
step left
step up
step right
step down
steps left
steps up
steps right
steps down
The Easy Access Bar in Combined Mode
Combined mode, as its name says, is a works similar to navigation mode. The basic
difference is that when you reach a new line while reading a document, the cursor is
moved as well. Like that you can continuously read a document without having to think
about using page down, etc. Once you have reached the bottom of the screen, every
new line you reach will make the screen scroll.
Combined Mode Keys
Function
EAB keystroke
Read backwards / move cursor when
changing line
Up arrow
Read forwards / move cursor when
changing line
Down arrow
Display to start of text line
Page up
Display to end of text line
Page down
EAB 1 step left
EAB 1 step up
EAB 1 step right
EAB
EAB
EAB
EAB
EAB
1
2
2
2
2
step down
steps left
steps up
steps right
steps down
Further Braille Management Commands
In conjunction with the tree base line keys (the left and right thumb key and the space
bar), the Easy Access Bar gets new functions.
For the devices with Braille keyboard, the thumb keys in the bottom row of the Braille
keyboard (right and left thumb, space) are used to modify the meaning of the EAB. In
principle, the functions are identical for the devices with Braille and with QWERTY
keyboards. For devices with QWERTY keyboard, the thumb keys have the following
analogies:
11
Thumb Key Analogies For Devices With QWERTY Keyboard
Braille Keyboard
QWERTY Keyboard
Left thumb key
Right thumb key
Space
Left Windows key
Right Windows key
Context Menu key
Please note that there is a difference in handling between the devices with
Braille keyboard and those with QWERTY keyboard:
• For thumb key – EAB combinations on devices with Braille keyboard, you
PRESS AND RELEASE the thumb key and then press the EAB within the
following 5 seconds.
• For thumb key – EAB combinations on devices with QWERTY keyboard, you
press and HOLD the thumb key while you press the EAB.
Here is a summary of the commands:
Braille Management Keys
Further Braille Management Commands
Function
BRAILLEX ELba key combination
Cursor tracking on/search cursor
Cursor tracking off
Attribute underlining on/off
Toggle computer Braille / grade 2
Change cursor shape (toggle)
Cursor sign on/off
Compressed mode on/off
6 / 8 dot Braille (toggle)
Left
Left
Left
Left
Left
Left
Left
Left
thumb
thumb
thumb
thumb
thumb
thumb
thumb
thumb
+
+
+
+
+
+
+
+
EAB
EAB
EAB
EAB
EAB
EAB
EAB
EAB
1
1
2
2
1
1
2
2
step right
step left
steps right
steps left
steps up
step down
steps up
steps down
Some of the functions require some explanation:
Cursor tracking: If cursor tracking is enabled, the Braille display will automatically
follow whatever movement of the cursor on the screen. You can disable it if you want
the display to stay at a specific location even though the cursor might move around.
Attribute underlining: ELba can underline text with dots 7 and 8 to show you which
portions are highlighted. Handy if you want to mark text for editing, for example. You
can disable the underlining function with a keystroke.
ELba has different ways to present the cursor sign. You can modify its shape (the
options are: solid 8 dot cursor, dots 7+8, blinking 8 dot cursor, and blinking dots
7+8), and you can also take the cursor symbol completely away (to see the Braille
character that might be hidden by the cursor sign).
In compressed reading mode, the display skips all empty spaces on the screen thus
speeding up the reading.
Cursor Routing
Every BRAILLEX ELba Braille cell has a cursor routing key integrated. You use it to route
the cursor to the corresponding place, to select menu items, or – when you use
BRAILLEX ELba as a terminal to a Windows PC – for mouse functions.
12
Chapter 2 – Getting Started
2.4 – Managing the Speech Output
Speech synthesizer management keys
Speech Synthesizer Management Keys
Function
BRAILLEX ELba key combination
Speed up
Speed down
Volume up
Volume down
Speak punctuation marks: off / some / all
Speech off / on (toggle)
Key echo: off / character / word (toggle)
Cursor echo: off / on (toggle)
Shut up
Left thumb + Space + EAB 1 step right
Left thumb + Space + EAB 1 step left
Left thumb + Space + EAB 1 step up
Left thumb + Space + EAB 1 step down
Left thumb + Space + EAB 2 steps right
Left thumb + Space + EAB 2 steps left
Left thumb + Space + EAB 2 steps up
Left thumb + Space + EAB 2 steps down
Left + right thumb key + space
(QWERTY keyboard: left Ctrl)
You will find more synthesizer settings in the setup program described below.
Screen reader management keys
General screen reader management keys
Function
BRAILLEX ELba key combination
Read next word moving cursor
Right thumb + EAB 1 step right
(Corresponds to Ctrl + right arrow)
Right thumb + EAB 1 step left
(Corresponds to Ctrl + left arrow)
Right thumb + EAB 2 steps up
Right thumb + EAB 2 steps down
Right thumb + EAB 2 steps right
Right thumb + EAB 2 steps left
Right thumb + EAB 1 step up
(Corresponds to Up arrow)
Right thumb + EAB 1 step down
(Corresponds to Down arrow)
Left + right thumb key + space
(QWERTY keyboard: left Ctrl)
Read previous word moving cursor
Read
Read
Read
Read
Read
from top of screen to cursor position
from cursor position to end of file
line from cursor position
line to cursor position
previous line moving cursor
Read next line moving cursor
Shut up
Screen reader management keys in Virtual Cursor Mode
In addition to the regular cursor (hard cursor), BRAILLEX ELba knows a virtual cursor
used for screen reading purposes. You activate this virtual cursor pressing the right
thumb key + space, and afterwards pushing the EAB 1 step left.
Once you have activated the virtual cursor, it will have the same position as the hard
cursor. You can move it across the screen using the arrow keys or the equivalent Access
Bar keystrokes. The Braille display will follow the cursor movement as long as cursor
tracking is activated, just as it would for the regular hard cursor.
The routing keys work: if you press a routing key, the corresponding word will be
spoken.
13
A double click on a routing key will move the hard cursor to the virtual cursor position
and end the virtual cursor mode. You can also end the virtual cursor pressing the right
thumb key + space, and afterwards pushing the EAB 1 step left.
Screen reader management keys in Virtual Cursor Mode
14
Function
BRAILLEX ELba key combination
Virtual Cursor Mode on / off (toggle)
Previous word (Ctrl +left arrow)
Next word (Ctrl right arrow)
Read previous line (up arrow)
Read next line (down arrow)
Read line to cursor position
Read line from cursor position
Read from top of screen to cursor pos.
Read from cursor position to end of screen
Shut up
Right thumb + space + EAB 1 step left
EAB 1 step left
EAB 1 step right
EAB 1 step up
EAB 1 step down
EAB 2 steps left
EAB 2 steps right
EAB 2 steps up
EAB 2 steps down
Left + right thumb key + space
(QWERTY keyboard: left Ctrl)
Chapter 2 – Getting Started
2.5 – Power saving: Sleep Mode
During a normal working day, you will typically not switch off BRAILLEX ELba. Its
advanced power saving features allow to leave it switched on without draining too much
battery power. If you don't use the device for a set time (to be defined in the setup
program, see below), it will automatically go into sleep mode. You can also activate
sleep mode or suspend mode without waiting for BRAILLEX ELba to go to sleep
automatically.
In the control center, select the last before the last menu item, "Sleep mode" (press l
when you are in the control center, or Ctrl + Shift + l when you are in another
application) and hit <Enter>. You will feel the Braille dots fade away: sleep mode is
activated. In sleep mode, all applications can stay open, when you activate BRAILLEX
ELba again, you will get back to the place where you left it when it went to sleep.
Please note that if you have connected BRAILLEX ELba to a PC, if you are in an Internet
session, sleep mode will not be activated.
You wake up BRAILLEX ELba by pressing the on/off switch shortly.
2.6 – Switching Off BRAILLEX ELba
In order to switch off BRAILLEX ELba, select the last menu item of the control center,
"Power down" (shortcut: Ctrl+Shift+u) and hit <Enter>. You will get a message: "are
you sure (y/n)?". If you are sure that you have saved all of your work, you type "y" to
confirm. No <Enter> required. You will feel the Braille dots fade away, and after a couple
of seconds you might hear a light click: Elba is switched off.
You can also use the on/off switch to switch the device off. You keep the on/off switch
pressed until you first hear intermittent beeps and then a longer, higher tone. As soon as
you hear the latter one, you can release the button. The same click as described above
confirms that BRAILLEX ELba is switched off.
Emergency Power Down
In case of a major problem, you can also switch BRAILLEX ELba off as follows:
Press the on/off switch and keep it pressed for about 15 seconds. In a quiet
environment, you will hear a slight click indicating that the device has been switched off.
Please note that Papenmeier strongly suggests to use the power down feature in the
control center. As its name indicates, the emergency power down is thought to be used
only in case of a problem.
15
Chapter 3 – Working With BRAILLEX ELba
Chapter 3 – Working With BRAILLEX ELba
3.1 – The BRAILLEX ELba Control Center
The Control center is the BRAILLEX ELba main menu. It is the first application running
when you switch on the device, and as its name says, it controls all other applications. If
you are familiar with Windows, you can compare it with the Windows start menu.
Like the Windows start menu, you can also reach the control center from any
application, pressing Ctrl + Esc -- or Space + dots 1,2,3,4,5,6 on the Braille keyboard;
see also the chapter Braille Key Assignment (Braille keyboard version). As Linux is a
multi-tasking environment, opening the control center, you don't terminate your current
application: you can have several applications running simultaneously.
Launching Applications From the Control Center
After powering up the device, you read
"[ ] e Editor".
Using the arrow keys (or the Easy Access Bar, EAB), you navigate through the control
center. With the right and down arrow (or EAB one step right or down), you reach the
next menu item. As the menu is organized in a continuous loop, you can also go
"backwards", even from the top position, reaching in this case the last menu item, with
the left or up arrow (EAB 1 step left or up). Or otherwise, once you have reached the last
item, with the right or down arrow, you get to the first one again.
You can directly reach the first menu item (using the Home key (FN + left arrow on
BRAILLEX ELba with QWERTY keyboard; Space + dots 1+2 on BRAILLEX ELba with
Braille keyboard -- or EAB 2 steps to the left) and the last item with the End key (FN +
right arrow and or Space + dots 4+5 respectively -- or EAB 2 steps to the right).
Once you see the name of the application you want to launch, you can select it by
hitting <Enter> (space + dot 8 on the Braille display), or
pressing the Easy Access Bar 2 steps down.
From within the control center, you can also select an application by writing the hotkey
you find in front of the application name:
Applications in the control center and their hotkeys
Application
Editor
Document Reader
File Manager
Internet Browser
Email
Day planner
Spreadsheet
Calculator
MP3-Player
Tools
Online help
Sleep Mode
Power down
Hotkey
e
r
f
i
m
d
a
c
p
t
F1
--Left Ctrl + left Shift + u (Braille keyboard:
Left thumb key + dots 1 + 2, then letter u)
17
Note:
All the applications in the control center can also be reached from outside the control
center. For this purpose, press Ctrl + Shift + the letter indicated above. This means,
from the editor for example, you can reach the email program by pressing Ctrl + Shift +
m.
Switching Applications
If you work within an application and want to activate another one without however
terminating the first one, you have two options:
Press Ctrl + Shift + the hotkey letter (on the Braille keyboard, this is a sequence of
two key combinations: Left thumb + dots 1,2 for "Ctrl + Shift", plus the actual letter
following), or
Hit Ctrl + Esc (space + dots 1,2,3,4,5,6 on the Braille keyboard) to get back to the
control panel and select the new application from there.
In order to switch back and forth between several open applications, you can also
press Alt + left arrow (Left thumb + dot 3, then Space + dot 1 on the Braille
keyboard) or Alt + right arrow (Left thumb + dot 3, then Space + dot 4 in Braille).
If you browse the control center menu, you recognize an open application by a star
between the square brackets in front of the application name (if the application is not
active, there is a space instead).
Example: "[*] i Internet Browser“
In case the application is active, you also get the spoken message "is running" after the
application name.
Some applications can be opened several times, the editor for example. You recognize
an open editor task by a star between parenthesis "(*)". In that case you also see the
name of the file that is currently edited (or "no name" if no file name has been specified.
Some applications are typically launched from a sub-menu
is part of the Tools menu), but have a shortcut in the
example, you can start the setup program pressing Ctrl +
do not have a menu entry, but can be launched with a
Control Center programs:
(like the setup program that
Control center as well. For
Shift + s. Some applications
hotkey at any time, like all
Hidden applications in the control center and their hotkeys
Application
Hotkey
Setup
Left Ctrl + left Shift + s
(Braille keyboard: Left thumb key + dots 1
+ 2, then letter s)
Left Ctrl + left Shift + Pause
(Braille keyboard: space + dots 7+8)
Left Ctrl + F1 (Braille: left thumb + dot 2,
then right thumb + dot 1)
Left Ctrl + F12
Left Ctrl + left Shift + 2 (only when
previously enabled in setup)
Toggle PC screen reader emulation /
standalone mode
Show battery and connection status
Announce date and time
Disable / enable Braille backtranslation
Killing an Application that Hangs
Even in the stable Linux environment it can happen: an application hangs. You can kill
such an application by pressing ctrl-alt-del. You will be prompted to kill the application.
18
Chapter 3 – Working With BRAILLEX ELba
3.2 – Word Processing
Launching the word processor
In the control center, select "Editor" and hit <Enter> or push the EAB two steps down.
You will get into a file manager window the files and directories in your user directory.
The window looks like follows:
UW PICO(tm) 4.0
..
mail
text
BROWSER
Dir: /mnt/flash/elba
(parent dir)
(dir)
(dir)
^g Get Help Esc Exit Brws
a Associate Ret [Select] ^f Find
d Delete
r Rename
c Copy
n New
If you want to edit a file that is already existing, use the up and down arrow keys to
browse your user directories and once you find the file you want to edit, hit <Enter>.
If you opened the editor by mistake, you can exit it — even at the file manager level —
by hitting Ctrl+Q (Braille keyboard: either a "q" with dots 7 and 8, or left thumb + dot 2
followed by the letter "q").
Open a document to edit
If you know the filename of the document you want to open and you want to enter it
right away, hit ESC (Braille keyboard: Space + dot 7). You then get a prompt:
"File to open: "
followed by the cursor sign. Write the file name and hit <Enter> (Braille keyboard:
Space + dot 8). If the document you want to write is a Braille document, add the
extension ".brl". Braille files are handled in a special way when it comes to Braille
translation and to Braille embossing.
If you have organized your files in subdirectories, you can specify those as well. Please
bear in mind though that the separator between directories and filenames is NOT the
backslash but a forward slash. For example, if you want to edit a file named TEST.TXT in
the TEXT subdirectory of your user directory, write:
TEXT/TEST.TXT <Enter>.
If you want to open an existing file, (i.e. "MyOldDocument.txt"), you can start typing the
name (i.e. MyO") and hit the TAB key (Braille keyboard: Space + dots 3,7). TAB
completes the file name. If there is more than one file starting with the same letters,
TAB will complete the file name up to the point where all characters are identical for the
different filenames. Then you add the character that makes the difference and hit TAB
again.
Create a new document
If you want to create a new document, you can do this directly from the file manager
level. Instead of navigating through the user directory with the arrow keys, write "n" and
you get the prompt:
"Name of file/folder to add: "
19
followed by the cursor sign. Enter the file name and hit <Enter> (Braille keyboard:
Space + dot 8).
In this case, as you specified that you wanted to create a new document, you cannot use
the TAB key to complete the filename. If the document you want to write is a Braille
document, add the extension ".brl". Braille files are handled in a special way when it
comes to Braille translation and to Braille embossing.
You can also create a new document without specifying a file name up front. After
launching the word processor from the control center, hit ESC twice and you will end on
a blank page of the editor.
Computer Braille and Grade 2 Braille
While editing or reading your documents, you can switch between computer Braille and
grade 2 Braille presentation on the Braille display.
Press the left thumb key and push the Easy Access Bar 2 steps to the left (devices with
QWERTY keyboard: Left Windows key and EAB 2 steps left). This command toggles
between computer Braille and grade 2 presentation.
If your ELba has a Braille keyboard, you can also have ELba back translate grade 2
Braille on the fly while you write. For this purpose, press "t" for "tools" and "b" for
"Braille back translator". You get a speech prompt ("back translation on"). The same
command will switch it off again. You can also generally enable back translation at
startup (see Tools/Setup/Braille).
Please note that back translation will not work in the Control Center, but only in edit
areas (Editor and Email). You can disable back translation for 1 character by pressing
dots 7 and 8 before writing the actual character that shall not be back translated.
You can also use a quick command to disable back translation for the rest of the current
session by pressing left Shift + left Control + 2. The same command will also enable
back translation again.
Please note that after enabling the back translation again, you have to do a task switch
(go to the Control Center and back to your application, or hit Alt+left arrow and Alt-right
arrow) before the back translation actually starts again.
Saving a document
Once you are done with writing your document, you save it by hitting Ctrl+S (Braille
keyboard: either an "s" with dots 7 and 8, or left thumb + dot 2 followed by the letter
"s"). You get the screen prompt:
"Save as: " followed by the file name you specified when you opened the file and the
cursor sign.
Hit <Enter> if you want to maintain the file name (by just hitting <Enter>) or change it
and hit <Enter> afterwards. You can abort saving by hitting ESC.
Quit Word Processing
If you want to exit the editor, press Ctrl+Q (Braille keyboard: either an "q" with dots 7
and 8, or left thumb + dot 2 followed by the letter "q").
If you have modified the file since you opened it or last saved it, you will be prompted:
"Save modified file ? "
Type "y" co confirm (in that case, the system will offer the file name you first selected)
or "n" to exit without saving. You will get back to the control center.
20
Chapter 3 – Working With BRAILLEX ELba
Loading or inserting a document
Once you are in the word processor and want to load a file or insert an existing file into
the one you are editing, type Ctrl+O (Braille keyboard: either an "o" with dots 7 and 8,
or left thumb + dot 2 followed by the letter "o"). You will get the prompt "File to open: ".
Insert the file name and hit <Enter>, or open the file manager by typing Ctrl+E (Braille
keyboard: either an "e" with dots 7 and 8, or left thumb + dot 2 followed by the letter
"e"). The procedure follows the same rules as the open file command when you first
launch the word processor.
The file will be inserted at the cursor position. Afterwards, the cursor will be at the end of
the inserted file.
Mark text
If you want to mark a portion of text (for cutting and pasting, deleting, etc.), please
proceed as follows:
Bring the cursor to the start of the text you want to mark.
Press Ctrl+T (Braille keyboard: either a "t" with dots 7 and 8, or left thumb + dot 2
followed by the letter "t").
Move the display to the end of text to be marked and get the cursor to that place. You
may use the cursor routing key to get the cursor to the place. You will see the marked
portion of text underlined with dots 7 and 8 (if not, please reactivate attribute display
pressing the left thumb -- keyboard version: left Windows key -- and pushing the Easy
Access Bar 2 steps to the right).
You can now cut the marked text. You can also disable marking by pressing Ctrl+T
again.
Cut text
In order to cut a text area, mark it first (see previous chapter). Now press Ctrl+X (Braille
keyboard: either an "x" with dots 7 and 8, or left thumb + dot 2 followed by the letter
"x"). The previously marked text has disappeared.
If you didn't have any text marked before cutting it out, Ctrl+X will cut the current line.
Paste text
You have cut a portion of text and want to insert it (either at the place where you cut it
in order to undo the last command, or elsewhere), move the cursor to the place where
you want to insert it and press Ctrl+V (Braille keyboard: either a "v" with dots 7 and 8,
or left thumb + dot 2 followed by the letter "v"). The text will be inserted at the cursor
position and you will find the cursor behind the inserted text.
Search and Replace
In order to search for a specific place within a document, press Ctrl+F (Braille keyboard:
either an "f" with dots 7 and 8, or left thumb + dot 2 followed by the letter "f"). On the
Braille display, you will see:
"Search: "
21
UW PICO(tm) 4.0
New File
Modified
AI
This is a test
SEARCH:
^g Get Help ^s FirstLine ^r Replace
Esc Cancel
^e LastLine ^n Line no.
Up StartPar
Dn EndPar
^c match case
^d backward
You now have a number of options:
1)
2)
3)
4)
5)
6)
7)
Search for a word
Replace a word with another one
Move the cursor to the first line of the current file
Move the cursor to the last line of the file
Move the cursor to a specific line number
Move the cursor to the beginning of the paragraph
Move the cursor to the end of the paragraph
Move the cursor to the start of file
After having initiated the search command pressing Ctrl+F (Braille keyboard: either an
"f" with dots 7 and 8, or left thumb + dot 2 followed by the letter "f"), press Ctrl+S
(Braille keyboard: either an "s" with dots 7 and 8, or left thumb + dot 2, then the letter
"s")
Move the cursor to the last line of the file
After having initiated the search command pressing Ctrl+F (Braille keyboard: either an
"f" with dots 7 and 8, or left thumb + dot 2 followed by the letter "f"), press Ctrl+E
(Braille keyboard: either an "e" with dots 7 and 8, or left thumb + dot 2 , then the letter
"e")
Move the cursor to a specific line number
After having initiated the search command pressing Ctrl+F (Braille keyboard: either an
"f" with dots 7 and 8, or left thumb + dot 2 followed by the letter "f"), press Ctrl+N
(Braille keyboard: either an "n" with dots 7 and 8, or left thumb + dot 2, then the letter
"n")
Move the cursor to the beginning of the current paragraph
If you want to move the cursor to the start of the current paragraph, initiate the search
command pressing Ctrl+F (Braille keyboard: either an "f" with dots 7 and 8, or left
thumb + dot 2, then the letter "f"), and then press the up arrow key (Braille keyboard:
Space plus dot 2). You will then find the cursor on the first character of the current
paragraph.
Move the cursor to the end of the current paragraph
If you want to move the cursor to the start of the current paragraph, initiate the search
command pressing Ctrl+F (Braille keyboard: either an "f" with dots 7 and 8, or left
thumb + dot 2, then the letter "f"), and then press the down arrow key (Braille
22
Chapter 3 – Working With BRAILLEX ELba
keyboard: Space plus dot 5). You will then find the cursor on the blank line behind the
current paragraph.
Search for a word
After having initiated the search procedure with Ctrl+F, write the word you want to
search for and hit <Enter>. You will find the cursor on the first character of the word you
searched for.
If you want to search for the same word again, press Ctrl+F again and hit <Enter>. The
search word will remain active until you change it or exit the word processor.
If you start the search somewhere in the middle of the document, once the search has
reached the end of the document, it will automatically continue the search at the start of
the document, In this case, you will get the message "search wrapped".
Searching options
After having initiated the search procedure with Ctrl+F, you can define a number of
searching options:
• Case sensitive search:
Press Ctrl+C to switch from case insensitive search (default) to case sensitive search,
or back again.
• Backward search:
Press Ctrl+D to switch from forward search (default) to backward search, or back
again. Once backward search is activated, you see this from the search prompt.
Please note that unlike in the forward search, backward search stops at the
beginning of the document.
Please note that you can activate these options both after starting the search process
and after having specified the word you search for.
Replace a word
In order to replace a word (or a suite of words) with another one, after having initiated
the search command pressing Ctrl+F (Braille keyboard: either an "f" with dots 7 and 8,
or left thumb + dot 2 followed by the letter "f"), press Ctrl+R (Braille keyboard: either
an "r" with dots 7 and 8, or left thumb + dot 2 followed by the letter "r"). On the Braille
display, you will see the message:
“Search and replace:”
The complete screen then looks like this:
UW PICO(tm) 4.0
New File
Modified
WI
This is a test.
SEARCH and replace:
^g Get Help ^s FirstLine ^r NoReplace ^d backward
Esc Cancel
^e LastLine ^c match case
Write the word you want to replace and hit <Enter>. You will then get the message:
“Replace "test" with : “ followed by the cursor sign.
23
You can now enter the replacement word(s). In our case, we want to replace “test” with
“first test”. We therefore type in “first test” and hit <Enter>. You will find the cursor
behind the replaced word. As in our case, the cursor was behind the word when we
started the search, we will also hear the message “Replacement wrapped” indicating that
the search has gone from the cursor position to the end of the document and has started
again at the start of the document.
You can also select searching options like "case sensitive search" (pressing Ctrl+C) or
"backward search" (pressing Ctrl+D).
Repeated replace / global replace
UW PICO(tm) 4.0
New File
Modified
WI
This is a test.
Replace "test" with [first test] :
^g Get Help ^x Repl All
Esc Cancel
Once you have started the replacement procedure and have entered the word you want
to replace and the replacement one, hit Ctrl+X instead of the Enter key, and you can
repeat the replacement or replace all occurrences of the word you search for.
After having pressed Ctrl+x, you get the message " Replace every "test" with [first
test]:". Hit Enter, and the first occurrence of the word you search for will be replaced. In
order to continue the procedure, you have 3 possibilities:
•
•
•
Hit "y" or Enter to continue the search and replace procedure. Every time you hit one
of those keys, one occurrence will be replaced.
Hit "a" to replace all of the occurrences. You will hear the message "No more
matches for 'test'" when the procedure is finished.
Hit Escape to cancel the operation. You will get the message "Replace All cancelled
after xx changes", "xx" standing for the number of replacements accomplished.
Aborting search
You can abort the search function at any time pressing Escape. You will then hear the
message “Search Cancelled“ and get back to the document.
Insert and Overwrite Mode
By default, the ELba editor is set to Insert Mode, which means that if you write a
character at the cursor position, it is inserted in front of the eventually existing following
characters.
If you wish, you may also switch the device to "overwrite mode", i.e. newly inserted
characters will overwrite the following characters.
You switch modes by pressing the Insert key (Braille keyboard: Space + dots 2+3). You
will get a spoken message "overwrite mode on" or "insert mode on". On the right side of
the top line of the screen, you will see "I" or "O" depending on what mode is active.
Spell checker
In the editor (and in the email program) you can use F7 to activate a spell checker. You
will be shown misspelled words so that you can correct them (not available for all
languages).
24
Chapter 3 – Working With BRAILLEX ELba
Formatting Text
BRAILLEX ELba offers a number of text formatting options. You access those options
when you press Ctrl+j. You see the options on the 2 bottom lines of the screen:
UW PICO(tm) 4.0
File: /elba/text/elbaman.txt
Modified
WI
This is a first test.
Format options:
^j justify ^a indent
Esc cancel
^b bold
^w char/line ^l left
^i italic
^u underline
^c center
^h heading
^r right
^s subhead
Line Length
By default, the line length is set to 74 characters per line. You can change this value at
any time:
•
•
•
Press Ctrl+j to get to the format options.
Press Ctrl+w. You get the message "Enter characters per line: 74".
Use backspace to delete the old number and type in the new number. From there on,
all new lines will get an automatic line break before the first word that does not fit
into the newly defined line.
Note: If you do NOT wish any automatically inserted line breaks into your text (if you are
writing a program, for example), enter "0" as the line length value.
Text Alignment
One group of formatting options concerns the text alignment: you can choose whether
your text shall be centered, left or right aligned.
•
•
•
Press Ctrl+j, then Ctrl+c to automatically center the current line of text or the
marked area.
Press Ctrl+j, then Ctrl+l to have the current line of text or the marked area left
aligned.
Press Ctrl+j, then Ctrl+r to have the current line of text or the marked area right
aligned.
Please note that these format options only refer to existing text. They will be visible
immediately after you execute the command. You also get a spoken message confirming
the action.
Automatic Indent
If you want to emphasize one or more paragraphs by an indention, press Ctrl+j followed
by Ctrl+a. You will get the spoken message "indention on".
In a new line, use the space bar to insert a number of blanks corresponding to the indent
you wish and start writing. After a line break (automatic or manual), the editor will
automatically insert the corresponding number of blanks in the beginning of the new
line.
Every time you reach a new line, you can increase the indent using the space bar, or
reduce it using the backspace key.
25
You exit the auto-indent function repeating the initial command Ctrl+J followed by
Ctrl+A. You will then get the spoken message "indention off".
Defining Heading Lines and Formatting Characters
The BRAILLEX ELba editor offers the possibility to format your documents. If you want to
print them out or convert them to RFT, you can define heading lines, and format the
characters in your document.
The procedure is quite easy. You typically format a document once the text is ready.
In order to format your document, mark the text you want to format and use one of the
commands below. All formatting commands are introduced by Ctrl+j, then follows the
formatting specific command:
Text Formatting Commands
Key combination
Ctrl+j, then Ctrl+h
Ctrl+j, then Ctrl+b
Ctrl+j, then Ctrl+I
Ctrl+j, then Ctrl+u
Ctrl+j, then Ctrl+s
Meaning
Format marked
Format marked
Format marked
Format marked
Format marked
text
text
text
text
text
or
or
or
or
or
new
new
new
new
new
text
text
text
text
text
as
as
as
as
as
"heading"
"bold"
"italics"
"underline"
"subheading"
The visible result of the formatting is a set of tags that surround the formatted area, and
which look similar to tags in an HTML document. You will find some examples in the
screen shot below:
UW PICO(tm) 4.0
File: test.txt
Modified
I
<h>BRAILLEX ELba formatting test</h>
<b>This is
<i>This is
<u>This is
<b><i>This
bold text.</b>
italics.</i>
underline.</u>
is bold and italics.</i></b>
^g Get Help ^s Save
^q Quit
^j Format
^o Open File ^p Print
^f Find
^c Copy
^x Cut Text
^u Cur Pos
^v Paste Text F7 Spellcheck
As you see, you can also combine different formatting patterns.
You can also format text while you type a document. In this case, you type in the
formatting sequence (Ctrl+j, followed by the formatting specific command). You will see
the tags as above, and the cursor is located between the tags. Enter the text you wish to
be formatted in the way you specified. Do not forget to move the cursor behind the
formatting tag once all text that shall have the specified formatting is finished. The
easiest way to do this is using the cursor routing keys.
26
Chapter 3 – Working With BRAILLEX ELba
Printing a Text
In order to print a text, press Ctrl+P. You get the following message:
UW PICO(tm) 4.0
New File
Modified
This is a first test.
Select Printer [Default]:
^g Get Help B Braille
T Text
Esc Cancel
R Remote
Ret [Default]
Press "T" for "text" if you want to print on an ink print printer, or "B" for "Braille" if you
want to print it on a Braille embosser. BRAILLEX ELba will then print the file according to
the settings specified in the BRAILLEX ELba setup (setup / printer).
Getting Help
You can ask for help at any time using Ctrl+G (Braille keyboard: either a "g" with dots 7
and 8, or left thumb + dot 2 followed by the letter "g") With Page Down (Braille
keyboard: Space + dots 4+5) and Page Up (Braille keyboard: Space + dots 1+2), you
can navigate through the help document. You exit help pressing Escape (Braille
keyboard: Space + dot 7).
Finding Out About the cursor location
You can find out about the current cursor location within the document you edit pressing
Ctrl+P (Braille keyboard: either a "p" with dots 7 and 8, or left thumb + dot 2 followed
by the letter "p").
UW PICO(tm) 4.0
File: /mnt/flash/elba/text/elba.txt
BRAILLEX EL Braille Assistant (ELba)
A Braille notetaker that works
Global access and connectivity the easy way
The BRAILLEX EL Braille Assistant is a universal communications tool
and a state-of-the-art Braille display for other computers, it is the
most versatile portable Braille device around. Send and receive email
or surf the web, make notes or organize your day, share information
with other devices or access your Windows based PC. BRAILLEX ELba
offers this with quality refreshable Braille and easily understood
speech -- in many different languages.
^g Get Help
^q Quit
[ line 6 of 13 (46%), character 139 of 565 (24%) ]
^s Save
^o Open File
^x Cut Text ^p Cur Pos
^j Format
^f Find
^v Paste Text
You will hear a spoken message like this: “line 6 of 13 (46%), character 139 of 565
(24%)” (see also screen shot above). The message you get also tells you about the
overall size of the document in terms of lines and in terms of numbers of characters.
Note:
While navigating around the editor screen with the Easy Access Bar, you can use the
jump function EAB 2 steps up to get to the top of the screen and EAB 2 steps down to
get to the bottom of the screen. These functions bring you to the first and the last TEXT
line of the screen, however, not to the overall top and bottom lines of the screen. If you
27
want to read the title bar, you thus need to read one line up from the top line. After
pushing the EAB 2 steps up, you need to push it one step up again.
For getting to the message line (the third last on the screen), you read down once after
having moved the display to the last text line.
28
Chapter 3 – Working With BRAILLEX ELba
3.3 – Document Reader
The document reader helps you to read long documents and books.
Launching the Document Reader
Within the control center, move the display to the menu item "r Document Reader" and
hit <Enter>. the first time you open the document reader you will see a file manager
screen enabling you to select a file you want to read. Otherwise, will see a message like
this:
Resume reading of (/mnt/flash/elba/test.txt) ?
Answer with "y" for "yes" if you want to continue reading where you last stopped.
Answering with "n" for "no" or "Esc" will open a file manager enabling you to select a
document to read.
The navigation within the document is identical to the editor described above. By default,
compressed reading is activated (i.e. you will skip blank portions of the screen); you
might also consider setting more defaults (i.e. grade 2 presentation, and the like) if you
wish.
Once you have exited the document reader, you will get back to the control center.
Bookmarks
Once you have read a portion of the document and you want to interrupt reading, move
the cursor to the place where you want to stop and press Ctrl+Q. You will be prompted:
"Save bookmark?". Answer with "y" if you want to set a bookmark at the current cursor
location, allowing you to resume reading the document at that place the next time you
open the document reader. If you answer with "n" you will be prompted: "Delete
bookmark?". Answer with "y" if you want to delete the last bookmark you set in the
current document, or with "n" if you want to maintain the old bookmark.
Please note that the document reader can handle up to 10 bookmarks, one per file. If
you open a file that has a bookmark, the document reader will automatically jump to
that bookmark when you open the file.
If you define a bookmark for an eleventh file, the eldest bookmark (the one you have set
first) will be deleted.
29
3.4 – File Manager
The file manager helps you to organize and process your folders and your data.
The file manager program is used by various ELba applications, such as the editor (see
above), or the MP3 player, for example. But you can also use it alone.
Launching the File Manager
Within the control center, move the display to the menu item “f File Manager“ and hit
<Enter>. You will see a screen like this:
UW PILOT 2.0
Dir: /mnt/flash/elba
..
(parent dir)
mail
(dir)
text
(dir)
start.html
235 B
^g Get Help
g Goto
^q Quit
Ret [View]
l Launch
^f Find
d Delete
r Rename
c Copy
e Edit
You are in your user directory (called “/mnt/flash/elba”).
The Braille display is located on a line saying “mail
(dir)”.
Files And Directories
When you move across the screen with the arrow keys or with the Easy Access Bar, you
read a list of your files and folders (or directories). You recognize a directory from the
fact that from column 18 on, you find the word “(dir)” in the corresponding line.
File names show the size of the file at the same position instead. The size of small files is
stated in numbers of characters (or “bytes” – abbreviation “b”). Files of more than 1000
characters are measured in kilobytes (“KB”), and the size of very large files of over one
million characters is expressed in megabytes (“MB”).
Navigating Through Your Files And Directories
Move through your files and directories using the arrow keys or the Easy Access Bar. You
will notice that the cursor will follow your movements. For your convenience, the cursor
sign is located in front of the first character of the file or directory name.
Your files and folders are organized in a tree structure. From your main directory, which
can be composed of various directories and files, you can go into sub-directories, which
can contain sub-directories and more files again. This way you can organize your data
and keep it easy to find files again, even if you created those files a long time ago.
If you want to look into a directory, hit <Enter> when its name is displayed — or press
the Easy Access Bar two steps down. On the Braille display, you will see "..
(parent
dir)": this is the path to get back to the previous "upper" directory if you hit <Enter>
30
Chapter 3 – Working With BRAILLEX ELba
again. If the directory is not empty, you will be able to see the list of files of this
directory when you cursor down (or use the Easy Access Bar accordingly).
Within a given directory, you can also search for files. Press Ctrl+F (Braille keyboard:
either an "f" with dots 7 and 8, or left thumb + dot 2 followed by the letter "f"). Then
type the first characters of the file name you look for and press <Enter>. The cursor
(and the Braille display) will move to the first file or folder the name of which starts with
the characters you typed in.
There is a shortcut to change into a sub-directory of the current directory:
Press "g". You will get the message:
"Directory to go to: "
Write the (full!) name of the directory and hit <Enter>. Write to periods ".." to get to the
parent directory. ELba's file manager will go to the directory you specified.
Please note that the search commands described above only consider files and folders in
the current directory. The search does NOT include any sub-directories.
If you want to go from one sub-directory to another, also press "g". Upon the message
"Directory to go to: " specify a full path (i.e. "mnt/flash/elba/mail" if you want to move
into ELba's mail directory).
Like in DOS, you can also start the path statement with "../" to designate the parent
directory, or "./" to designate the current directory.
So if you want to change from "mnt/flash/elba/mail" to "mnt/flash/elba/text", you can
also write "../mail". That saves you writing the full path.
Assuming that in the text directory you have a subdirectory called "elbadocs" you want
to go to (complete path: "mnt/flash/elba/text/elbadocs", and you are currently in
"mnt/flash/elba/" after typing the "g" to launch the go to command, write
"./text/elbadocs".
Note:
Path names in the ELba file manager are very similar to the ones in DOS. Please make
sure though that you use the forward slash instead of the backslash to separate
directory and file names.
Please mind small and capitalized letters when you specify file and folder names, as
Linux names are case sensitive!
Create a New Folder
If you want to create a new folder, write "n". You will see the message:
"Name of file/folder to add: "
Write the name of your new folder (i.e. "books") followed by a forward slash. In our
case, write "books/" and hit <Enter>. The forward slash makes the difference between a
new file and a new folder.
After you pressed the <Enter> key, you will see the newly created directory. The cursor
is positioned in front of it.
Rename a folder
If you want to rename a folder (i.e. our "books"), move the cursor to the name you
want to change and press "r". You will get the message:
"Rename file to: books"
31
Delete the name letter by letter using backspace or delete it altogether using Ctrl+X,
write the new name (i.e. "mybooks") and hit <Enter>. The cursor will be positioned on
the renamed directory.
Delete a Folder
In case you want to delete the new folder "mybooks" again, get the cursor to the
directory and press "d". You will get the message:
"Really delete folder "mybooks" ?"
Press "y" to confirm, or "n" or "Escape" to cancel.
Note:
Please note that you can only delete a directory that is empty. If you try to delete a
folder that contains files or other folders, you will hear the message "Folder NOT empty".
Create a new file
In order to create a new file, go to the directory where you want to create this file. Then
press "n".
Upon the message "Name of file/folder to add:", write the new file name, i.e.
"mynewdoc.txt" and hit <Enter>. The file manager will create a new (empty) file.
Rename a file
In order to rename an existing file, move the cursor to the corresponding file name and
press "r". You get the message:
"Rename file to: mynewdoc.txt".
Delete the name letter by letter using backspace or delete it altogether using Ctrl+X,
write the new name (i.e. "mydoc.txt") and hit <Enter>. The cursor will be positioned on
the renamed file.
If you change your mind and want to keep the old name, press Escape. You will hear the
message "Rename canceled".
Copy a File
In order to make a copy of a file, move the cursor to the corresponding file name and
press "c". You get the message:
"Name of new copy: "
Insert the name of the copy and press <Enter>.
In case you want to copy the file to another directory, write the file name including the
full path name. "../" and "./" are obviously allowed to save you some work (see above,
chapter Navigating Through Your Files And Directories).
Delete a file
In order to delete a file, move the cursor to the corresponding file name and press "d".
You get the message:
"Delete file "/mnt/flash/elba/mynewdoc.txt" ?"
In case you confirm with "y", you get the message:
"File CANNOT be UNdeleted! Really delete ?"
In order to delete the file, you have to re-confirm pressing "y".
Answering "n" to any of the two questions or hitting Escape cancels the delete action.
32
Chapter 3 – Working With BRAILLEX ELba
Edit a Text
From the file manager, you can also launch the word processor. Move the cursor to a
text file and press "e". ELba will open the editor and you find the cursor on the first
character of the file you want to edit.
You continue your work as described in the chapter 3.2 – Word Processing.
In case the file you selected is not a text file, you will get the message:
"Can't edit non-text file. Try Launch."
This can happen for example, if you find a WinWord file. How you get to work on such a
file will be described below.
File conversion, Grade 2 back and forward translation
In the file manager, move the cursor to the corresponding file and press "a" (for
"associate"). ELba will prompt you for the kind of conversion you like.
•
•
•
Press e for editing the file.
Press p for printing the file.
Press c for converting the file.
If you select "c" to convert, you get another menu:
File Conversion Commands
Shortcut Menu item
a
convert Word to ASCII
r
convert ASCII to RTF
b
g
f
convert ASCII to BRAILLE
convert BRAILLE to ASCII
fold long lines
p
m
convert PDI BrailleNote files
convert Blazie files (^M)
Meaning
Convert a Winword file to text format
Convert a text file to RTF format that will be
automatically read by Winword
convert a text file to a grade 2 Braille file
convert a grade 2 Braille file to a text file
Break lines that are longer than 80 characters
so you can easily read them in the ELba editor
Convert BrailleNote files to text files
Convert Braille 'n Speak files to text files
For the major conversions (Winword, Braille), ELba will create a new file with a different
extension. You will find this file by pressing the up arrow key or by pushing the Easy
Access Bar one step up. You can now edit the newly created file using the "e" command
(see previous chapter).
Convert a WinWord File for editing
Assuming you have downloaded a WinWord file from your computer and want to edit this
file, you first will have to convert it. In the file manager, move the cursor to the
corresponding file and press "a" (for "associate"). Without prompting, ELba will create a
new file — with the same name, but with the extension ".asc" instead of ".doc". You will
find this file by pressing the up arrow key or by pushing the Easy Access Bar one step
up. You can now edit the newly created file using the "e" command (see previous
chapter).
Checking Text Files With the File Viewer
If your Braille display is positioned on a file name (and this file is a text file), you can
have a look into this document by pressing <Enter> or by pushing the EAB two steps
down.
33
UW PILOT 2.0
Dir: /mnt/flash/elba/text
..
(parent dir)
•elba.txt
3.4 KB
^g Get Help
g Goto
^q Quit
Ret [View]
l Launch
^f Find
d Delete
r Rename
c Copy
e Edit
You then get into a file preview program that allows you to verify its contents. The
cursor is located on the first character of the file.
PINE 4.33
FILE VIEW
File: /mnt/flash/elba/text/elba.txt
No Msgs
•BRAILLEX EL Braille Assistant (ELba)
A Braille notetaker that works
Global access and connectivity the easy way
The BRAILLEX EL Braille Assistant is a universal communications tool
and a state-of-the-art Braille display for other computers, it is the
most versatile portable Braille device around. Send and receive email
or surf the web, make notes or organize your day, share information
with other devices or access your Windows based PC. BRAILLEX ELba
offers this with quality refreshable Braille and easily understood speech - in many different languages.
^g Get Help Esc Quit Viewer
p Print
^f find
w fWd Email
s Save
You can now read the file using the Easy Access Bar — at least the first screen page. You
can to some extent scroll the text on the screen using the up and down arrow keys.
You exit the File Viewer pressing Escape (Braille keyboard: space + dot 7). That way,
you get back to But before you do that, check on the other options within the file viewer
that will be described in the next paragraphs.
Options Within the File Viewer
Once the file reader is active, you get a number of additional commands:
Searching Within the File in View
If you are not sure from the first lines of text whether the document you see is the one
you had in mind, you can also look for some specific places within the document:
Press "Ctrl+F" to start the search routine. You now have three options:
• Write a search word and hit <Enter>. The cursor will be moved to the first
occurrence of the word you typed in.
• Press Page Down to get to the last line of text within the document.
• Press Page Up to get to the first line of text within the document.
34
Chapter 3 – Working With BRAILLEX ELba
Printing the File You Have in View
Press "p" within the File Viewer. You get the message:
"Print file using "attached-to-ansi" ?"
Press "y" to confirm, or "n" or "Escape" to cancel.
Saving (Exporting) the File You Have in View
Press "s" within the File Viewer. You get the message:
"EXPORT: Copy text to file in home directory: "
Write a file name ant hit <Enter> if you want to save the text of the file in view to the
home directory, or specify the file name with a full path statement (i.e.
"/mnt/flash/elba/text/test.txt" if you want to save it to the text subdirectory, or hit
Escape to cancel.
Sending the File As an Attachment of an Email Message
Press "w" within the File Viewer. Elba will then open the email program. You will be
prompted to enter the address of the recipient. The text you had in view can then be
found at the bottom of your email message, as "included text".
PINE 4.33 SEND MESSAGE Folder: /mnt/flash/elba/text/elba.txt
No Msgs
To
:
Cc
:
Attchmnt:
Subject :
----- Message Text ----ELba
----- Included text ----BRAILLEX EL Braille Assistant (ELba)
A Braille notetaker that works
Global access and connectivity the easy way
The BRAILLEX EL Braille Assistant is a universal communications tool
and a state-of-the-art Braille display for other computers, it is the
most versatile portable Braille device around. Send and receive email
or surf the web, make notes or organize your day, share information
with other devices or access your Windows based PC. BRAILLEX ELba
offers this with quality refreshable Braille and easily understood speech - in many different languages.
^g Get Help ^q Send
^r Rich Hdr
^x Cut Line ^s Postpone
Esc Cancel
^e Attach
^v Paste Line^T To AddrBk
For more details on how to further handle the email message, see chapter 3.6 – The
Email Program below.
Exiting the File Manager
If you want to exit the file manager, press "q" or "Ctrl+Q". (Braille keyboard: either a
"q" with dots 7 and 8, or left thumb + dot 2 followed by the letter "q"). You will get back
to the control center.
35
3.5 – Internet Browser
The program used for browsing the Internet is called Lynx. You start it up by selecting
Internet from the Control center. The Hotkey is I.
Before You Start the Browser
Before you start the Internet browser, you need to start a dial-up connection or activate
the network and log in. For details, see the Setup and Tools chapters below.
Exiting the Internet Browser
To exit Lynx use the 'q' command. You will be asked whether you really want to quit.
Answering 'y' will exit and 'n' will return you to the current document. Use 'Q' or ControlD to quit without verification.
After having left Lynx you might also want to terminate the dial-up connection.
Exiting the Internet Browser
Hotkey
q
Q / Ctrl-D
Meaning
Quit (with verification)
Quick quit (without verification)
Navigating hypertext documents with Lynx
Web pages are so-called hypertext documents (or HTML files). These documents
typically contain references to other pages – or other places within the same web page,
the so-called links.
When Lynx displays an HTML file, it shows links as "bold face" text, except for one link,
which is shown as "highlighted" text. In the ELba default settings, all links are numbered
with numbers in square brackets.
The one link displayed as "highlighted" text is the currently "selected" link (this is where
you find the cursor, typically). Lynx will display the file associated with the selected link
when a right-arrow or a Return key is pressed. To select a particular link, press the uparrow or down-arrow keys until the desired link becomes "highlighted," and then press
the right-arrow or Return key to view the linked information.
The process of moving within a hypertext web, selecting and displaying links is known as
"navigation. " With Lynx almost all navigation can be accomplished with the arrow keys
and the numeric keypad.
Movement Keys
Movement Keys
Keys or key combinations
Down arrow
Up arrow
Right arrow, Return, Enter
Left arrow
36
Meaning
Select next link
Select previous link
Follow selected link
Return to previous topic
Chapter 3 – Working With BRAILLEX ELba
Scrolling Keys
Scrolling Keys
Keys or key combinations
+ / PgDn / Space
- / PgUp / CTRL-B
Home / CTRL-A
End / CTRL-E
Del / CTRL-N
Ins / CTRL-P
)
(
^
$
<
>
#
Meaning
Scroll down to next page (Page-Down)
Scroll up to previous page (Page-Up)
Go to first page of the current document (Home)
Go to last page of the current document (End)
Go forward two lines in the current document
Go back two lines in the current document
Go forward half a page in the current document
Go back half a page in the current document
Go to the first link on the current line
Go to the last link on the current line
Go to the previous link in the current column
Go to the next link in the current column
Go to Toolbar or Banner in the current document
There are also a few other keyboard commands to aid in navigation. Some additional
commands depend on the fact that Lynx keeps a list of each link you visited to reach the
current document, called the History Page, and a list of all links visited during the
current Lynx session, called the Visited Links Page.
• Backspace show you the History Page of links leading to your access of the current
document. Selecting them from the history screen may revisit any of the previous
documents shown in the list. Uppercase 'V', will show the Visited Links Page, and you
similarly can select links in that list.
• 'm' and 'M', will take you back to the starting document.
• 'l' will create a compact lists of all the links in the current document, and they can be
selected via those lists.
Jumping to Previously Visited Places
Keys or key combinations
[backspace]
m
V
l
numbers
Meaning
Go to the History Page
Return to main screen
Go to the Visited Links Page
List references (links) in current document
Follow link (or go to link) number:
Going to a New Web page
The easiest way to have a web page displayed on your machine is to write its address
right away. Press "g". At the prompt
URL to open:
write the address (i.e. www.sighted.com) and hit <Enter>. After a short while you will
see the start page of the US distributor and Service Center of BRAILLEX ELba, Sighted
Electronics.
Jumping to New Places
Keys or key combinations
g
G
Meaning
Goto a user specified URL or file
Edit the current document's address and use that as a
go to URL.
37
Printing, Mailing, and Saving rendered files to disk.
HTML documents and plain text files may be printed using the 'p' command while
viewing the document. After pressing the 'p' key a menu of Print Options will be
displayed.
Reloading files and refreshing the display
The RELOAD command (Control-R) will reload and re-render the file that you are
currently viewing. The REFRESH (Control-L or Control-W) command will refresh or wipe
the screen to remove or correct any errors that may be caused by operating system or
other messages.
Refreshing the Screen
Keys or key combinations
z
=
\
CTRL-R
CTRL-L
Meaning
Cancel transfer in progress
Show info about current document, URL and link
Toggle document source/rendered view
Reload current file and refresh the screen
Refresh the screen
Lynx searching commands
The command '/' activates searching in Lynx. While viewing a normal document use the
'/' command to find a word or phrase within the current document.
All search words or strings which you have entered during a Lynx session are saved in a
circular buffer, and can be retrieved for re-use by pressing the up-arrow or down-arrow
keys at the prompt for a search word or string. Also, you can use the 'next' command
(n) to repeat a search with the last-entered search word or phrase, starting from the
current position in the document. The word or phrase matches will be highlighted
throughout the document, but such highlighting will not persist for new documents, or if
the current document is reloaded. The search cycles to the top of the document if the
word or phrase is not located below your current position.
Searching the Web page
Keys or key combinations
/
n
N
Meaning
Search for a string within the current document
Go to the next search string
Go to the previous search string
Lynx bookmarks
Bookmarks are entries in your bookmark file, which record the URL of a document you
may want to return to easily, with a name of your choice to identify the document.
To save a bookmark to the document you wish to place in the bookmark file press the 'a'
key and you will be asked:
Save D)ocument or L)ink to bookmark file or C)ancel? (d,l,c):
Answer 'd' to save a link to the document you are currently viewing or 'l' to save the link
that is currently selected on the page. Selecting 'c' will cancel without saving anything to
your bookmark file.
A bookmark file will be created in conjunction with acting on the 'add' command ('a') if it
does not already exist.
38
Chapter 3 – Working With BRAILLEX ELba
Use the 'v' command to view the list of bookmarks you have saved. While viewing the
bookmark list you may select a bookmark as you would any other link.
You can remove a link from the bookmark list by pressing the 'r' key when positioned on
that link.
Bookmarks
Keys or key combinations
v
a
Meaning
View a bookmark file
Add the current link to a bookmark file
Lynx and HTML Forms
This section describes the Lynx Forms Interface. HTML gives document providers the
ability to create on-line forms that may be filled out when the document is viewed. When
a form is submitted the information on the form can be used to search a database or
complete a survey.
An HTML Form provides for the use of buttons to perform an action (such as submit),
checkboxes, radio buttons or popups to select options from a list, and fields for entering
text.
Form filling Buttons
Button Type
Buttons:
Checkboxes and Radio buttons
Selection Fields
Text Entry Fields
Meaning
Buttons are displayed in the same way that Lynx
displays links in a document. To "push" the button
press the right-arrow or Return key.
Checkboxes are displayed as square brackets: [ ] and
radio buttons are displayed as parenthesis: ( ). When a
box is checked or a button selected, an x appears in
the brackets: [x] or an asterisk appears within the
parenthesis: (*). To check a box or select a radio
button press the right-arrow or Return key.
Selection fields are displayed as brackets with the
default option displayed between them: [default__]. To
select an option press the right-arrow or Return key. A
box with a border of asterisks (or line-drawing
characters) will pop up with the list of possible options
listed within the box. Use the up-arrow, down-arrow,
page-up, page-down, and other navigation keys to
move the cursor among options, and the right-arrow or
Return key to select an option. You also can use the '/'
and 'n' searching commands for navigating to options
which contain particular strings.
Text entry (INPUT) fields are displayed as a row of
underscores the length of the entry field: _______. You
may enter text directly by typing at the keyboard. Use
the Line Editor keys to correct errors. If you try to input
more text than the field can hold, the line editor will
not accept the additional characters. If you fill a text
field the cursor will not move off the field but remain at
the last field position. Use the up-arrow, and downarrow, TAB or Return keys to move up, or down from
the text entry field. NOTE, however, that Return also
will submit the form if the text entry field is the only
non-hidden field in the form.
39
3.6 – The Email Program
Introduction
The program BRAILLEX ELba uses for handling electronic mail (email) is called Pine. Pine
is a sophisticated, easy-to-use email program that was created at the University of
Washington.
The text that follows does not document every Pine feature; it summarizes main options
and basic guidelines. The best way to learn more about Pine is to explore it on your own.
On-screen information and online help show you what to do. Try the different options
and - most of all - have fun experimenting!
Before You Start Pine
Before you start Pine, you need to get an email account and log in. For details, see the
Setup and Tools chapters below.
Starting the Email Program
From the Control Center, select "m Email" and hit <Enter> or push the EAB two steps
down.
After starting Pine, the Main Menu screen appears. Each Pine screen has a similar layout:
the top line tells you the screen name and additional useful information, below that is
the work area (on the Main Menu screen, the work area is a menu of options), then the
message/prompt line, and finally the menu of commands.
On the Braille display, you find "f Folder List" – and if you push the Easy Access Bar one
step to the right, you will also find a short explanation of the menu item: "Select a folder
to view". The complete start screen of the Email program looks like this:
To quit: When you want to leave Pine, press Q (Quit). For details, see "Quitting Pine and
Logging Out."
The Main Menu
The Main Menu lists Pine's main options (see below). The key or keys you must type to
enter your choice are to the left of each option or command name. You can usually type
either uppercase or lowercase letters, and you do not need to press <Enter>.
From the Main Menu you can choose to read online help, write (compose) and send a
message, look at an index of your mail messages, open or maintain your mail folders,
update your address book, configure Pine, and quit Pine. There are additional options
listed at the bottom of the screen as well.
40
Chapter 3 – Working With BRAILLEX ELba
PINE 4.33
MAIN MENU
^g
m
i
•f
a
s
q
Folder: INBOX
Help
Compose Message
Message Index
Folder List
Address Book
Setup
Quit
-
No Messages
Get help using e-mail
Compose and send a message
View messages in current folder
Select a folder to view
Update address book
Configure e-mail Options
Leave the e-mail program
Copyright 1989-2001 PINE is a trademark of the University of Washington
[Folder "INBOX" opened with 0 messages]
^g Get Help
r ReleaseNotes
o other Cmds > [Folders]
Now that you know how to start Pine, you can explore on your own, or you can browse
the rest of this document for a summary of Pine's main features.
Getting Help in Pine
To read the online help, use the Help command at the bottom of each screen. For
example, at the Main Menu screen, press Ctrl+G (Get help). The help text is contextsensitive, meaning that you see only the help that relates to the Pine feature you are
using. To exit the online help, press Esc.
Writing a Message in Pine
To write a message, press M (compose message). You see the Compose Message
screen.
PINE 4.33
Messages
COMPOSE MESSAGE
Folder: INBOX
No
To
:
Cc
:
Attchmnt:
Subject :
----- Message Text ----ELba
^g Get Help ^q Send
Esc Cancel
^r Rich Hdr
^e Attach
^x Cut Line ^s Postpone
^v Paste Line^T To AddrBk
In the command menu on the bottom of the screen, different commands are available to
you when your cursor is in different fields on this screen. To see additional commands
available when your cursor is in the Message Text field, type Ctrl+G (Get Help). For
example, to move around, use the arrow keys; to correct typing errors, use
<Backspace> or <Delete>.
You might start experimenting in Pine by sending yourself a message. The following
section shows you how.
41
Writing and Sending a Test Message to Yourself
To write and send a test message to yourself:
1.
2.
3.
4.
5.
6.
Press m (compose message). You see the Compose Message screen.
In the To field, type your email address and press <Enter>.
In the Cc field, press <Enter>.
In the Attachment field, press <Enter>.
In the Subject field, type Test and press <Enter>.
Below the Message Text line, type This is a test.
The completed screen would look like the following example:
PINE 4.33
Messages
COMPOSE MESSAGE
Folder: INBOX
No
To
: [email protected]
Cc
:
Attchmnt:
Subject : Test
----- Message Text ----this is a test.
ELba
^g Get Help ^q Send
Esc Cancel
^j Format
^o Open File
^f Find
^x Cut Text ^s Postpone
^v Paste Text
7. To send your message, type Ctrl+Q (Send).
You are asked:
Send message?
8. Press y (yes) or press <Enter>.
The message is sent and a copy is saved to your sent-mail folder. (If you press n (no)
the message is not sent, and you can continue to work on it.)
You have just sent a basic message. There are, of course, other options you can use as
you compose a message. A few are summarized in the next section, and complete
information about options for the Compose Message screen is available in Pine's online
help. As you compose a message, you can type Ctrl+G (Get Help) at any time to see
details about your current task.
42
Chapter 3 – Working With BRAILLEX ELba
Hints for Writing a Message
Label
To:
Cc:
Attchmnt:
Subject:
Message
Text:
Remarks
In this field, type the email addresses of your recipients. Separate the
addresses with commas. When you are finished, press <Enter>. Always
check the addresses in both the To and the Cc fields for accuracy and
completeness before you send a message.
Finding and Formatting Addresses. The best way to get a person's email
address is to ask him or her for it. For more information on finding and
formatting email addresses on local and remote computers, type Ctrl+G
(Get Help) while your cursor is in the To field.
Using the Pine Address Book. In both the To and the Cc fields, you can
enter a person's email address as shown above, or you can use an entry
from your Pine address book.
In this field, type the email addresses of the persons to whom you want to
send copies. Separate their addresses with commas. When you are
finished, or if you do not want to send any copies, press <Enter>.
This is an advanced Pine feature that allows you to attach files, including
word processing documents, spreadsheets, or images that exist on the
same computer where you are running Pine. If you do not want to attach a
file to your message, press <Enter>. For more information, place your
cursor in the Attchmnt field, then type Ctrl+G (Get Help).
In this field, enter a one-line description of your message. Recipients
appreciate a short, pertinent description, since this is what they see when
they scan their index of messages. When finished, press <Enter>.
Type your message. To move around, use the arrow keys. To delete a
character, press <Backspace> or <Delete>. To delete a line, type Ctrl+X.
To immediately undelete a line, type Ctrl+V. To see other editing
commands, type Ctrl+G (Get Help).
Hints for Sending a Message
Sending a Message.
After your message is composed, type Ctrl+Q, and then press y or press <Enter>. Your
message is sent and a copy is saved to the sent-mail folder. If a message cannot be
delivered, it eventually is returned to you. If you want to re-send a message, you can
use the F (Forward) command.
Changing Your Mind.
If you change your mind after typing Ctrl+Q to send a message, press n instead of y to
continue to work on your message. While you are writing your message, you can type
Ctrl+S (Postpone) to hold your message so you can work on it later, or you can type Esc
(Cancel) to delete your message entirely. You are asked to confirm whether or not you
want to cancel a message.
Sending a Message With Attachments
You can attach one or more files to your email message. For this purpose, when
completing the email header, press Ctrl+E. You get the message:
File to attach:
You then either type in the name of the file you want to attach, or you press Ctrl+E once
again to open the file manager.
Browse the directory to find the file you want to attach and hit <Enter> to select it.
Either way: you then get prompted to write a comment to the attachment:
Attachment comment:
43
You can either fill in a comment or leave the field blank and hit <Enter>. You get back to
your email header and see the name of the file you attached.
You can repeat this procedure to attach further files to your email message.
Listing, Viewing, Replying to, and Forwarding Messages
Pine stores messages that are sent to you in your EMAIL folder. Messages remain in your
EMAIL until you delete them or save them in other folders. (You will learn more about
the EMAIL and other folders in "Pine Folders".)
1. In order to read an email message you have got, from the Pine Main Menu, select "f
Folder List" and hit <Enter>.
2. Select "Incoming-Folders" hitting <Enter>.
3. Use the down arrow to select "EMAIL" and hit <Enter> again.
4. The first time you do this after you started the email program, you are prompted to
type in you user password, with a message like this:
HOST: pop3
USER: elba
ENTER PASSWORD:
5. Enter your user password and hit <Enter>.
6. Once your password has been accepted, you get a list of the messages in your inbox.
PINE 4.33
MESSAGE INDEX
N
+ N
+ N
3 Mail System Intern
9 To: elba@papenmeie
9 Hans W. Ring
1 Dec
1 Apr
2 Apr
^g Get Help
Esc FolderList
o other Cmds Ret [ViewMsg]
<Incoming-Folders> EMAIL
Msg 4 of 4
(526) DON'T DELETE THIS MESSAGE
(601) Test
(1,080) New Test
d Delete
u Undelete
r Reply
w Forward
7. Use the arrow keys to highlight the message you want to view.
8. Press <Enter> to read the highlighted message. New unread messages are marked
with an "N" before the message date.
9. To see the next message, press the down arrow.
10. To see the previous message, press the up arrow.
11. To return from your message to the Message Index, press I (Index).
12. To get back to the main menu, hit Escape.
Replying to a Message
To reply to a message that you have selected at the Message Index screen or that you
are viewing:
Press R (Reply).
You are asked whether you want to include the original message in your reply. Also, if
the original message was sent to more than one person, you are asked if you want to
reply to all recipients. Think carefully before you answer - it may be that you want your
reply to be sent only to the author of the message. Warning: It is always a good idea to
check the list of addresses in the To and Cc fields before you send a message to see who
will receive it.
Forwarding a Message
To forward a message that you have selected at the Message Index screen or that you
are viewing:
44
Chapter 3 – Working With BRAILLEX ELba
1. Press W (Forward). A copy of the message opens and the To field is highlighted.
2. Enter the address of your recipient and send the message as usual. Note that you
can modify the original message if you wish, for example, to forward only a portion
of it or to add a message or notes of your own.
About Your Message Index Screen
The selected message is highlighted. The first column on the left is blank, or shows a "+"
if the message was sent directly to you (i.e., it is not a copy or from a list). The second
column may be blank, or it may contain:
"N" if the message is new (unread),
"A" if you have answered the message (using the Reply command),
"D" if you have marked the message for deletion. [Note: If you answer a message as
well as mark it deleted (in either order), you only see the "D".]
The rest of the columns in the message line show you the message number, date sent,
sender, size, and subject. For details, press Ctrl+G (Get Help).
Most of the commands you need to handle your messages are visible at the bottom of
the screen, and you can press O (OTHER CMDS) to see additional commands that are
available. You do not need to see these "other commands" on the screen to use them.
That is, you never need to press O as a prefix for any other command.
Pine Folders
Messages can quickly accumulate in your INBOX folder. If you use email often, you soon
could have hundreds. You need to delete messages you do not want, and you can use
folders to organize messages you wish to save. A folder is a collection of one or more
messages that are stored (just like the messages in your INBOX) so you can access and
manage them.
Organizing Messages With Folders
You can organize your email messages into different folders by topic, correspondent,
date, or any other category that is meaningful to you. You can create your own folders,
and Pine automatically provides three:
• The EMAIL folder - messages sent to you are listed in this folder. When you first start
Pine and go to the Message Index screen, you are looking at the list of messages in
your EMAIL folder. Every incoming message remains in your EMAIL until you delete it
or save it in another folder.
• The saved-messages folder - copies of messages you save are stored in this folder
unless you save them to other folders you create yourself. See "Saving a Message".
• The sent-mail folder - copies of messages you send are stored in this folder. This is
convenient if you cannot remember whether you actually sent a message and want
to check, or if you want to send a message again.
Keeping Folders Clean
Messages - whether they are in your EMAIL or your other Pine folders - occupy storage
space, and your storage space is limited.
• Check your email frequently to see if you have new messages. Do not keep too many
messages in your EMAIL folder. A large EMAIL reduces performance: it takes longer
to display large lists of messages when you start Pine, and it requires more time to
move between messages. Delete your incoming messages right away if you do not
want them, or save them to other folders if you do. See "Saving a Message".
• Routinely delete obsolete messages from all of your Pine folders.
• You will get a message via Pine at the end of each month asking you about your
sent-mail folders. First it asks you if you want to rename (and thus save) your
current sent-mail folder. Then it asks if you want to delete any sent-mail folders (and
45
all the messages they contain) from previous months and the current month. To
conserve space, it is a good idea to delete any sent-mail folders you do not want.
Moving Between Folders
From almost anywhere in Pine, you can press F to see a group list of your folders. Of
course, the folder you are most often interested in is your EMAIL folder, the folder that
contains your new email messages. When you start Pine and press I (Index) at the Main
Menu, you see a list of messages in your EMAIL folder. If you want to see the messages
in another folder, you need to go to that folder. The following text shows you two ways
to go to another folder from nearly anywhere in Pine. To access your folders and the
messages that are stored in them:
1. Press F (Folders). You see the Group List screen with collections of folders. Typically
each group is shown in a way similar to the example below.
PINE 4.33
GROUP LIST
<Incoming-Folders> EMAIL
2 Msgs
Incoming-Folders
Incoming Message Folders
Mail
Local folders in mail/
^g Get Help
Esc Main Menu
o other Cmds Ret [View Grp]
^f find
2. If it is not already highlighted, use the arrow keys to highlight the Mail line and press
<Enter>. You see an expanded list of folders, similar to the following, in which your
current folder is highlighted.
PINE 4.33
FOLDER LIST
<Incoming-Folders> EMAIL
2 Msgs
Local folders in mail/
------------------------------------------------------------------sent-mail
postponed-msgs
[ALL of folder list]
^g Get Help
Esc GroupList
o other Cmds Ret [View Fldr]
a Add
d Delete
r Rename
^f find
3. Use the arrow keys or highlight another folder.
4. To see an index of the messages in that folder, press <Enter>.
[Note: This method of accessing folders uses the Folder List screen, which has a menu of
commands that enable you to add, delete, rename folders, etc. If you simply want to
move to and list the messages in another folder, try the method below.]
To move most quickly to the index of another folder:
1. From almost anywhere in Pine, press G (GotoFldr).
You are prompted for the name of a folder.
46
Chapter 3 – Working With BRAILLEX ELba
[Note: If you have more than one folder group defined, observe the prompt to make
sure it is set for the desired group (shown in brackets in the prompt). If the prompt
is not set for the desired group, type down arrow (Next Group) or up arrow (Prev
Group) to select the desired group.]
2. Type the folder name and press <Enter>, or simply press <Enter> to choose the
default folder shown in brackets in the prompt. If you are a beginner with Pine, you
probably have not created additional folders yet. You will learn how in "Saving a
Message to a Folder You Specify."
3. You see the list of messages in that folder.
Adding a Folder
1. Press F. You see the Group List screen. Highlight the group you want and press
<Enter>. You see a list of folders.
2. To add a folder, press A. You are prompted for the name of a folder.
3. Type the folder name and press <Enter>. Your folder name appears. You might want
to add a couple of test folders so you can practice deleting folders.
Deleting a Folder
To delete a folder and all of the messages it contains:
1. Press F (Folders). You see the Group List screen.
2. Highlight the group you want and press <Enter>. You see an expanded list of your
folders in which your current folder is highlighted. (When you start Pine, the current
folder is your EMAIL. You cannot delete your EMAIL.)
3. Use the arrow keys highlight the folder you wish to delete.
4. To delete the entire folder of messages, press D (Delete). You are asked:
Delete "folder"?
5. Press y (yes) if you want to delete the folder and all of its messages. The folder
disappears.
[Warning: There is no way in Pine to undelete a deleted folder.]
Saving a Message
When you save a message to another folder, you are given a choice: you can store it in
the saved-messages folder, or you can specify another folder. Once you save a message,
the copy in your EMAIL folder automatically is marked for deletion so that you only will
have one copy. When you quit Pine, you are asked to confirm whether or not you want
to expunge the copy from the EMAIL folder. To conserve space, it is a good idea to do
this.
Saving a Message to the Saved-Messages Folder
To save a message to your saved-messages folder:
1. At the Message Index screen, use the arrow keys to highlight the message you want
to save, or, at the Message Text screen as you view a message, press S (Save). You
are asked if you want to save the message to the saved-messages folder or to
another folder:
SAVE to folder in <Mail...> [saved-messages]:
2. Press <Enter> to choose the default folder: [saved-messages]. Pine saves your
message, and you see the following:
[Message # copied to "saved-messgs" in <Mail...> and deleted]
Saving a Message to a Folder You Specify
You will find it useful to create additional folders for storing messages on particular
subjects. To save a message to a folder you specify:
1. At the Message Index screen, use the arrow keys to highlight the message you want
to save, or, at the Message Text screen as you view a message, press S (Save) to
47
save a message. You are asked if you want to save it to the saved-messages folder
or to another folder:
SAVE to folder in <Mail...> [saved-messages]:
2. Type a folder name and press <Enter>. For example, to save a message to a folder
named "papers" type papers and press <Enter>. If this is the first time you have
named this folder, you see the message:
Folder "papers" in <Mail> doesn't exist. Create?
Press y or press <Enter> to create the folder. Once you have created the folder, or
whenever you type the name of a folder that already exists, you see a message like
this one:
[Message # copied to "papers" in <Mail...> and deleted]
Deleting a Message
You keep your Pine folders clean by routinely deleting messages you do not want. There
are two steps to deleting a message: marking it for deletion and then expunging it. To
mark a message you do not want for deletion:
1. Select and open the folder that contains the message you wish to mark for deletion.
If you are a Pine beginner, this message is probably in your EMAIL folder. If the
message you want to mark for deletion is in a folder other than your EMAIL, see
"Moving Between Folders".
2. At the Message Index screen, select the message you want to mark for deletion, or
simply view the message.
3. Press D (Delete).
If you are looking at the Message Index screen when you mark a message for
deletion, a "D" appears in the left column of the message line, and the next message,
if there is one, is selected. If you are looking at the Message Text screen when you
mark a message for deletion, a "DEL" briefly appears in the upper right corner of
your screen, you get an on-screen message that the message has been deleted, and
the next message, if there is one, appears.
Repeat this process to mark additional messages for deletion.
Undeleting a Message
If you change your mind about a message you have marked for deletion, use the U
(Undelete) command to remove the deletion mark any time before you expunge a
message. Remember: After you expunge a message, Pine cannot get it back.
Expunging a Message
A message that is marked for deletion remains in Pine until you expunge it. You can
expunge a message that is marked for deletion at any time, or you can wait until you
quit Pine. Once you have a few messages marked for deletion, you may want to expunge
them before you continue to work, because it is easier to look through an index that
contains fewer messages. To expunge a message:
[Warning: Once you expunge a message, it is gone. Pine cannot get it back.]
1. At the Message Index screen, press X (eXpunge). You are asked:
Expunge # message(s) from "foldername"?
2. Press y (yes) or press <Enter>. Messages marked for deletion disappear.
[Note: You will be asked whether you want to expunge messages that are marked for
deletion whenever you leave a folder (other than the EMAIL) that contains messages
marked for deletion, or when you quit your Pine session]
Using the Address Book
As you use email, you can build a list of your regular email correspondents in your Pine
address book. At the Pine Main Menu, press A. You see the Address Book List screen.
Your personal address book, .addressbook, will be highlighted. Press <Enter>. You can
48
Chapter 3 – Working With BRAILLEX ELba
use the address book to store email addresses for individuals or groups, to create easily
remembered "nicknames" for these addresses, and to quickly retrieve an email address
when you are composing a message. Here is a sample page from an address book:
PINE 4.33
papenmeier
sighted
ADDRESS BOOK <.addressbook>
F. H. Papenmeier
Sighted Electronics, Inc
^g Get Help
< AddressBkList
o other Cmds > [View/Update]
<Mail> sent-mail
2 Msgs
[email protected]
[email protected]
A NewAddr
D Delete
T MessageTo
^f find
There are two ways to add addresses to your address book: you can add them manually
or take them from messages. With either method, you specify nicknames for your
correspondents. A single address book entry (or nickname) can point to just one email
address, or, it can point to more than one. When it points to more than one, it is called a
distribution list. Each distribution list has a nickname, a full name, and a list of
addresses. These addresses may be actual addresses, other nicknames in your address
book, or other distribution lists.
Adding Single Addresses or Distribution Lists Manually
To add single addresses or distribution lists manually:
1. Have ready the address or addresses you want to add.
2. At the Pine Main Menu, press A (AddrBook). You see the Address Book List screen,
with .addressbook highlighted.
3. Press <Enter>.
4. Press A (AddNew) and follow the instructions. (Type Ctrl+G if you need help adding a
new address.)
49
PINE 4.33
Nickname
Firstname
Lastname
Company
Address1
Address2
City
State
ZIP
Country
Phone
Phone2
Fax
Mobile
Comment
Fcc
Email
ADDRESS BOOK (Add)
Folder: (CLOSED)
No Messages
:
:
:
:
:
:
:
:
:
:
:
:
:
:
:
:
:
Fill in the fields. It is ok to leave fields blank.
To form a list, just enter multiple comma-separated addresses.
Press "^q" to save the entry, "Esc" to cancel, "^g" for help.
If you want to use quotation marks inside the Lastname field, it is best
to use single quotation marks; for example: George 'Husky' Washington.
^g Get Help ^q Quit/Save ^r RichView
Esc Cancel
^T To AddrBk
Taking Single Addresses
To take a single address from a message you are viewing or have selected in the index:
1. At the Message Text or the Message Index screen, press T.
[Note: The T command is not visible on your screen unless you press O (OTHER
CMDS), but you need not see this command to use it.]
You see the Take Address screen. If there is more than one address to take, you see
this message:
Single mode: Use the arrow keys to select desired address
Use the up and down arrow keys to select the address you want, and press T
(Take). At this point, or, if there is only one address to take, you see this message:
Enter new or existing nickname (one word and easy to remember):
2. Enter a nickname for your correspondent and press <Enter>.
3. Follow the instructions. (Type Ctrl+G if you need help.)
Taking Multiple Addresses to Build a Distribution List
To take multiple addresses from a message you are viewing or have selected in the
index:
1. Press T (TakeAddr).
[Note: The T command is not visible on your screen unless you press O (OTHER
CMDS), but you need not see this command to use it.]
You see the Take Address screen and the following message:
Single mode: Use the arrow keys to select desired address
2. Press L (ListMode).
3. For each address you want to take, use the up and down arrow keys to select it,
and then press the space bar (Set/Unset) in the box to its left.
4. Press T (Take). You see the following message:
5. Enter new or existing nickname (one word and easy to remember):
6. Enter a nickname for your list of correspondents and press <Enter>.
7. Follow the instructions. (Type Ctrl+G if you need help.)
50
Chapter 3 – Working With BRAILLEX ELba
Changing a Single Address or a Distribution List
To change a single address or a distribution list:
1. At the Pine Main Menu, press A (Address Book) and then press <Enter>. You see
your personal Address Book screen.
2. Use the arrow keys to select the single address or distribution list you want to
change.
3. Press <Enter> (View/Update).
4. Press U (Update), then use arrow keys to get to the field where you want to make a
change. Follow the instructions. (Type Ctrl+G if you need help.)
Using Address Book Entries When Composing Email
When composing a message, at the To or the Cc (Carbon Copy) fields you can enter an
email address in any of the following ways:
• Type the entire email address.
• Type a nickname you have set up in the address book.
For example, if your address book looked like the one in shown above, you could
type the following nickname in the To field:
sighted
After you pressed <Enter>, Pine would provide the full address for Sighted from the
address book as follows:
To : Sighted Electronics Inc <[email protected]>
•
Select a name (or names) from the address book as you compose a message.
To send a message to one person:
1. Place your cursor in the To or Cc field and then type Ctrl+T (To AddrBk).
2. Use the arrow keys to highlight the name you want.
3. Press <Enter>.
To
4.
5.
6.
7.
send a message to several people:
Place your cursor in the To or Cc field and then type Ctrl+ T (To AddrBk).
Type L (List Mode).
Using the arrow keys, place an x before each name you want.
Press <Enter>.
Printing Messages
Pine provides three options for printing (the one you use depends on the computer and
printer you are using), which are explained later in this section. First, see if you can print
a message using the following method. If your message prints, you may not need to
read about Pine's other printing options.
Printing an Email Message
To print a message:
1. From either the Message Index screen or the Message Text screen, press p (Print).
You are asked to confirm your choice.
2. Follow the instructions. Type Ctrl+G if you still need help.
Pine Can Do More
Pine has other useful features that have not been covered in this introductory document.
Although originally designed for novice email users, Pine has evolved to support many
advanced features. It has become an easy-to-use program for sending, receiving, and
filing Internet electronic mail messages and bulletin board (USENET) messages including
multimedia attachments. Pine is designed for use with IMAP mail servers (see
http://www.imap.org/). If you would like to learn more about Pine:
• Try all of the commands at the bottom of each Pine screen, including the ones that
appear when you press O (OTHER CMDS).
51
•
•
Read Pine's online help. It contains tips to help you at every stage of learning Pine.
Read about different functions, even those you do not use yet.
For advanced information, see the online Unix Manual entries for Pine and Pico. In
addition, at the Pine Main Menu, press R (RelNotes) to see Pine's release notes.
Guidelines for Using Email
Electronic mail is a unique medium of communication. Messages can be replied to or
forwarded with speed and ease, and email has the potential to reach a wide audience.
These features can also be misused. There are a few basic guidelines for the responsible
use of email that can help you avoid common mistakes while you enjoy the full benefits
of this technology.
The privacy of an email message cannot be guaranteed. An email message may be
forwarded, printed, or permanently stored by any recipient. Email can be misdirected,
even when you are careful. Do not put something in an email message that you would
not want read by everybody. And if you receive a message intended for someone else,
let the sender know.
Email does not show the subtleties of voice or body language. Avoid attempts at irony or
sarcasm. The most effective email is short, clear, and relevant. If you receive a message
that makes you upset, do not respond immediately, and in any case, avoid "flaming,"
that is, sending an angry or rude message.
Email Tips
As you use email, keep the following tips in mind:
• Email is easily forwarded to someone else. Although this is convenient, it is not
always appropriate. If you are unsure, ask the sender before you forward a message.
• Email replies may go to more people than you realize. When replying to a message
be sure to look at the list of recipients, especially addresses of mailing lists, which
may redistribute your message to dozens or hundreds of individuals.
• Email can be junk mail, so avoid unnecessary proliferation of messages.
• Email takes up computer space, so delete messages you no longer need.
• The integrity of an email message cannot be guaranteed. If a received message
seems out of character for the sender, double-check before taking it seriously.
• Email is meant for informal correspondence as well as scholarly and scientific
communications. You should not use email for official record purposes where a memo
would be required (e.g., personnel actions, organization changes, contracts, and
policy statements).
• Email should not be considered private. Confidential information should not be sent
by email.
Quitting Pine and Logging Out
To quit Pine:
1. At almost any place in Pine, press Q (Quit). You are asked:
Really quit pine?
2. Press y (yes) or press <Enter> to quit.
It is a good idea to log off your computer whenever you are through with it or when you
must leave it unattended.
52
Chapter 3 – Working With BRAILLEX ELba
3.7 – The Address Book
From the Control Center, select the entry "Email" pressing the letter "m" or using the
arrow keys or the Easy Access Bar and hitting <Enter>.. Once in the Email program,
press "a" for "address book.
BRAILLEX ELba's address book is not handled by a separate program, but it is integrated
in the email program. This does not mean, though, that it only contains information
relevant for sending email messages – it holds all information you typically want to have
in your address book. In the following you see a listing of all the information you can
store in this book:
Nickname
Firstname
Lastname
Company
Address1
Address2
City
State
ZIP
Country
Phone
Phone2
Fax
Mobile
Comment
Fcc
Email
:
:
:
:
:
:
:
:
:
:
:
:
:
:
:
:
:
The handling of the address book is described above in the chapter "Using the Address
Book" starting on page 48.
53
3.8 – The Day Planner
From the Control Center, select the entry "day planner" pressing the letter "d" or using
the arrow keys or the Easy Access Bar and hitting <Enter>.
You will get to a condensed list of all appointments; the cursor is located on the line
containing the next appointment you will have to keep. In case you haven't entered any
tasks yet, you will read "empty appointment list".
ELba day planner V0.22
Main menu
empty appointment list
^N new entry > next view
CR view
< prev view
^D delete
^E edit
^L load
^S Save
^Q quit
S setup
^P print
If you want to add a new appointment to the list, press Ctrl+n. You will get to a date list.
You read for example:
Date
: Jun 17 2003
The cursor is located on the first letter of the month (in countries using a date scheme
dd.mm.yyyy, the cursor will obviously be placed on the first digit of the day). The date
you see is today's date. If you want to set an appointment for a day close to the current
date, you can modify the date using the arrow keys. The up arrow decreases the months
/ days / years, the down arrow key increases the values.
You move from month to day and to year using the right and left arrow keys, or Tab and
Shift+Tab.
You can also enter a date directly; if you want to enter July 4th, 2003 for example, just
write the date separated with spaces: "07 04 2003" or "7 4 03" (leading zeroes may be
omitted) and hit Enter. You will then see the converted date "Jul 04 2003". Confirm with
Enter and you will get to the next line containing the time of the appointment.
The time is entered in the same way as the date: either use the up or down arrow keys
to decrease or increase the hours or the minutes, or enter the time directly. For 10:00
am for example, type "10:00" and hit Enter. Please note that even in those countries
using a 12-hour notation (like the USA for example), the time must be entered in 24hour notation; example: 17:00 for 5 pm. Once you hit Enter, the time will be converted
to the ore-defined standard. So after entering 17:00 for example, you will see the usual
"05:00pm". Confirm with Enter and you will get to the next field, "duration". You will
read:
Duration : not defined
If your appointment does not have a foreseeable duration, you can just go to the next
field hitting Enter or the Tab key. If instead your appointment has a time limit (i.e. 2
hours), you can indicate this in your day planner. Press Ctrl+u to define a duration. You
will see:
Duration : 00:00
54
Chapter 3 – Working With BRAILLEX ELba
Use the arrow keys (as above), or enter the time limit directly in hours and minutes. If
your appointment is supposed to last the whole day, press Ctrl++ u again. You will then
see:
Duration : full day
Confirm your duration settings with the Enter key or move to the next field with Tab.
Reminder : 00:15
You can have BRAILLEX ELba remind you of an appointment. The default value is
"00:15", i.e. an acoustical signal will remind you 15 minutes before the actual
appointment. This also works when the device is switched off at the time of the alarm. If
you want to modify the lead-time, proceed as described above; either use the arrow
keys or type in the time interval right away. In case you do NOT want a reminder, press
Ctrl+e (to clear the entry), or Ctrl+a (toggle: no alarm - set alarm). You will then read:
Reminder : not defined
Press enter and you will get to the next field:
Subject
:
Enter the purpose of the appointment; for example:
Subject
: Peter's birthday party
With Tab or the Enter key you will get to the last field in the mask, where you can add a
note, i.e.:
Don't forget present!
Saving an Appointment
In order to save your newly entered appointment, press Ctrl+s. You will get back to the
"condensed view" you came from before you started entering the appointment, and the
ursor is located on the new entry. In our case, it will read:
Jun Tue 17 2003 06:00pm a
Peter's birthday party
You may then once again view the complete entry by hitting Enter, or, if necessary,
modify the entry typing Ctrl+e. Below you will see once again the complete
appointment:
55
ELba day planner V0.25
View
Date
: Jun 17 2003
Time
: 06:00pm
Duration : not defined
Reminder : 00:15
Subject : Peter's birthday party
--- Note --Don't forget present!
ESC back
^C copy
^D delete
^E edit
^P print
UP previous
DN next
Recurrent Appointments
Appointments that are repeated on a regular basis need only be entered once. Before
saving the appointment, just press Ctrl+r and you will get a new line on the appointment
screen (above the subject line:
Period
: weekly
Press d for daily; w for weekly; m for monthly, and y for yearly events. As birthday
parties typically happen once a year, you would write "y".
Please note that recurrent appointments appear only once in the appointment list, but
they do appear in daily, weekly monthly and yearly lists. If you set an alarm, ELba will
remind you every time the alarm is due.
In our example, the yearly event will appear as follows:
Jun Tue 17 2003 06:00pm ay Peter's birthday party
The "ay" after the time and before the subject stands for "alarm, yearly".
Viewing an Appointment
If you want to visualize an appointment without modifying it, move the cursor to the
correspondent entry in the appointment list and hit Enter. In this viewing mode, you
have a number of options:
•
•
•
•
•
•
•
Press ESC to get back to the appointment list.
Press Ctrl+d to delete the appointment from the list.
Press Ctrl+e to edit or modify the appointment.
Press Ctrl+p to print the appointment
Press the up arrow to visualize the previous appointment
Press the down arrow to visualize the next appointment
Press Ctrl+C to copy the appointment to the clipboard (you can then enter the data
into your word processor or an email, for example).
Modifying an Appointment
If you want to modify your appointment, press Ctrl+e in the view mode or in the
appointment list. You will get a screen similar to the one you found when you entered a
56
Chapter 3 – Working With BRAILLEX ELba
new appointment. Once you have finished your modifications, press Ctrl+s to save the
modifications, or Esc to cancel the operation.
Deleting an Appointment
If you want to delete your appointment, press Ctrl+d in the view mode or in the
appointment list. Elba will ask you to confirm:
Really delete entry?
Press "y" to confirm that you want to delete the entry, or "n" or Enter to cancel the
operation.
Printing an Appointment
If you want to delete your appointment, press Ctrl+d in the view mode or in the
appointment list. You will get the message:
Select printer:
•
•
•
•
•
Press
Press
Press
Press
Press
d to select your default printer.
b to select your Braille embosser.
T to select your text printer.
r (for remote) to select the network printer.
Esc to cancel the operation.
For the different printers and their setup, please refer to the setup section of this
manual.
Changing the Calendar View
When you first start up the day planner, you see the so-called "condensed view", i.e. a
list that only shows the existing appointments. You can obviously also have different
views of the calendar.
Like in the email program, you can change the view using the left or right arrow keys or
the greater than ">" / smaller than "<" signs.
•
•
•
•
Starting from the condensed view, the left arrow or "<" gets you to a day view. By
default, this will be the current day. The cursor will typically be located at the current
time.
From the current day, another the left arrow or "<" gets you to a month view. By
default, this will be the current month. The cursor will typically be located on the
current day.
From the current month, another the left arrow or "<" gets you to a year view. By
default, this will be the current year. The cursor will typically be located on the
current month.
From the current year, another the left arrow or "<" gets you to a list of years. The
cursor will typically be located on the current year.
In any case, the appointments for the displayed time interval will show up. If there is
more than one appointment for the given period, the first one will show up.
At all levels, you can obviously change from the current date to other dates.
57
Setting Up the Day Planner
Press S in any of the lists to get to the setup screen. You then can modify a number of
parameters by cursoring down through the list and selecting the desired values with the
space bar.
Timeline settings (interval)
The timeline settings allow to enlarge or restrict the grid that shows up in the day view.
You define whether the default grid shows 15, 30, or 60 minute intervals. The more
precise the grid, the more you will have to cursor up or down to get to the desired time
within a day.
Timeline settings (weeks)
Some people (especially in Europe prefer to see dates organized in calendar weeks
rather than in months. If this is the case, check the " prefer weeks to months"
statement.
Date settings (digits of year)
Here you define whether you want to see the years with 4 or with 2 digits.
Timestyle settings
The 12h style means that "am" is used for the morning hours and "pm" for the afternoon
hours. If this option is not checked, the 24 hour notation will be used. Please note that
even with the 12 hour style checked, you will have to write 16:00 for 4:00 pm if you
enter the time directly in the appointment dialog.
The month first option means that dates are shown in the MM.DD.YYYY format rather
than in the DD.MM.YYYY format.
Alarm settings (warn before)
Here you set the default value for the alarm before the actual appointment.
The options are "do not warn", "0 min before" (i.e. sound an alarm at the actual time of
the appointment), "15 min before", "30 min before", and "60 min before". Please note
that you can overwrite the value you set here whenever you enter a new appointment or
you edit an existing one.
The "Open dayplanner" option defines whether you want ELba to open the day planner
(and show the upcoming appointment) when the alarm sounds.
Startup settings
Here you define which list shall come up when you open the day planner (see above, "
Changing the Calendar View "). The options are "years", "months", "days", "current
day", and "condensed".
Announcement settings
Here you set the verbosity values for the speech within the day planner. You can choose
whether ELba shall or not announce the menus, messages, and eventual questions via
the speech synthesizer.
Below you find a complete picture of the setup screen (with the default values).
58
Chapter 3 – Working With BRAILLEX ELba
ELba day planner V0.25
Setup
Timeline settings (interval)
============================
15 min interval ( )
30 min interval (*)
60 min interval ( )
Timeline settings (weeks)
=========================
prefer Weeks to Months [ ]
Date settings (digits of year)
==============================
Four digit date (*)
Two digit date ( )
Timestyle settings
==================
12h style
[X]
Month first [X]
Alarm settings (warn before)
============================
do not warn
( )
0 min before ( )
15 min before (*)
30 min before ( )
60 min before ( )
Open dayplanner [X]
Startup settings
================
years
months
days
current day
condensed
( )
( )
( )
( )
(*)
Announcement settings
=====================
Menus
[X]
Messages [X]
Questions [X]
ESC back
SPC[change]
^S save
Exiting the Day Planner
You exit the day planner with Ctrl+q. You will have to confirm with "y". If you have
modified any appointment, you will be asked the question: "Data not saved yet! Save?"
Answer with "y" (even if you have ended the editing of a new appointment with Ctrl+s)!
You will then get back to the control center.
59
3.9 – The Spreadsheet
Starting the Spreadsheet
From the Control Center, select the entry "Spreadsheet" pressing the letter "a" or using
the arrow keys or the Easy Access Bar and hitting <Enter>.
The spreadsheet calculator "sc" is based on rectangular tables much like a financial
spreadsheet and presents the data in a table organized as rows and columns of cells.
Each cell may have associated with it a numeric value, a label string, and/or an
expression (formula) which refers to a numeric value or label string, often based on
other cell values.
Once you have started the spreadsheet, you get a screen like this:
sc 7.15-FHP1:
A
Type '?' for help.
B
C
D
E
F
G
0
1
2
3
4
5
6
7
8
9
10
11
12
13
The screen is divided into four regions. The top line is for entering commands and
displaying cell values. The second line is for messages from sc. The third line and the
first four columns show the column and row numbers, from which are derived cell
addresses, e.g. A0 for the cell in column A, row 0. Note that column names are caseinsensitive: you can enter A0 or a0.
The rest of the screen forms a window looking at a portion of the table.
The screen has two cursors: a cell cursor and a character cursor, both indicated by the
hardware cursor. They differ when you type a command on the top line. Braillex ELba
will automatically jump to the active cursor, unless you manually switch to the other one
(see below).
First Steps With a Simple Spreadsheet
Let's assume you want to do a simple calculation, adding the numbers 10, 20, and 30. At
the cursor location (you see a "0" in the cursor line), just enter "10" and hit <Enter>. As
soon as you start typing the "1" of the number "10", the cursor will jump to the top line
of the screen and you see a prompt like this:
i> let A0 = 1
Once you have completed typing in the number "10" and hit <Enter>, you hear the
message "A1": The cursor has moved to the next line and is now placed in cell "A1".
Continue filling in the next two cell entering "20" in cell A1 and "30" in cell A2.
60
Chapter 3 – Working With BRAILLEX ELba
Cell A3 shall contain the sum of the 3 cells above. Write an equals sign "=". You see the
prompt:
i> let A3 =
You now have two options:
a) Write "a0+a1+a2" (without the quotes!) and hit <Enter>.
b) Write "@sum(a0:a3)" (without the quotes!) and hit <Enter>.
If you read up one line you will see the result in both cases. The first example is a simple
"manual" addition instruction, the second one a so-called range command. Range
commands will be explained in detail below.
Now you want to label the different numeric entries. As there is no place for that, you
first have to insert a new column in front of the current one. For this purpose, press "i".
You get the prompt:
Insert row/column: r=row c=column
As it is a column you want to insert, write a "c". You will find a blank column in front of
your numbers; the "A" cells have been moved to "B". Inserting (or deleting, copying,
etc.) complete rows or columns will be described more in detail in the section " Row and
Column Commands" below.
ELba is set to automatically enter numbers into a cell when you type numbers in. Texts
(labels) are introduced with a backslash "\" if you want to see them centered in the cell,
or with a smaller than sign "<" if you want them left justified, or ">" if you want them
right justified.
Write a a smaller than sign "<". You get the prompt:
i> leftstring A0 = "
Write the label, i.e. "January" and hit <Enter>. The spreadsheet program will
automatically add the quotes and move the cursor to the next line.
After filling in the cells A1 "<February", A2 "<March", and A3 "<Total", the small
spreadsheet looks like this:
A4 (10 2 0) []
0
1
2
3
4
5
6
7
8
9
10
11
12
13
A
January
February
March
Total
B
10.00
20.00
30.00
60.00
C
D
E
F
G
If you navigate around the screen with the arrow keys, the speech will announce the cell
name and the value. You might notice that there is a difference between the spoken
values ("10", "20", "30") and the presentation on the Braille display. In fact, the speech
reads the top line of the screen, the Braille display the actual cell. The top line contains,
besides the cell name (i.e. "B0") and the value or formula "[10]" also format information
in parenthesis, i.e. "(10 2 0)". This information formatting information reads like this:
61
the first number shows the global width of the current column (i.e. 10 characters). The
second number shows the number of digits to follow decimal points (i.e. 2), and the third
the cell format type (i.e. 0 for fixed point format, 1 for scientific notation, 2 for
engineering notation, 3 for dates with a two digit year, and 4 for dates with a four digit
year).
Please note that if a cell's numeric value is wider than the column width, the cell is filled
with asterisks. If a cell's label string is wider than the column width, it is truncated at the
start of the next non-blank cell in the row, if any.
You can modify these column settings on the fly. Write a lowercase "f". You get the
prompt:
Current format is 10 2 0
You can now modify the format to be used for showing the numeric values in the current
column:
The right arrow key increases, the left arrow key decreases the column width. The
new format is announced immediately.
The up arrow key increases, the down arrow key decreases the number of digits to
follow decimal points. The new format is announced immediately.
A number between 0 and 4 defines the format type (see above).
Finish the column formatting hitting <Enter> (or press Escape to abort). P=lease note
that this formatting always affects complete columns.
Before exiting the program, you now want to save the worksheet. Press Ctrl+S. You get
the message:
i> Put ["dest" range] "
Write a filename. The extension "sc" will be added automatically (please note though
that if you want to load that same sheet later, you will have to specify the filename
including the extension!). You exit the program with Ctrl+Q.
The spreadsheet program has a host of commands and functions; in the following, you
will find the most important ones. You will get to a complete list of functions if you recall
the program help pressing F1 or writing a question mark "?".
62
Chapter 3 – Working With BRAILLEX ELba
Cursor Control Commands
Spreadsheet Cursor Control Commands
Function
Key (combination)
Go to cell A0
Home
Cursor up to the previous row
Up arrow
Cursor down to the next row
Down arrow
Cursor backward one column
Left arrow
Cursor forward one column
Right arrow
Cursor a half page down
PgDn
Cursor a half page up
PgUp
Cursor up to row 0 of the current column.
^
Cursor down to the last valid row of the current column.
#
Move the cursor backward to column A of the current row.
Ctrl U + 0
Cursor forward to the last valid column of the current row.
$
Go to a cell. You will be prompted for a cell's name
g
Cell Entry and Editing Commands
Spreadsheet Cell Entry and Editing Commands
Function
Key (combination)
Enter a number into the current cell
0-9
Enter a number or expression into the current cell.
=
Enter a label string into the current cell to be left justified
<
Enter a label string into the current cell to be centered
\
Enter a label string into the current cell to be right justified
>
Left justify the string in the current cell.
{
Center the string in the current cell.
|
Right justify the string in the current cell.
}
Enter a format string into the current cell.
F (with more commands)
Edit the value associated with the current cell.
e (with more commands)
Edit the string associated with the current cell.
Clear the current cell. Deletes value, label, formula
x
Mark the current cell. You will be will prompted for a
lowercase letter to be used as a mark specifier.
m
Copy a previously marked cell to the current cell, updating
row and column references in its numeric or string
expression, if any. You will be prompted for the mark
specifier.
c
Switch to insert mode and append a '+' to the current
expression or value, if any
+
Switch to insert mode and append a '-' to the current
expression or value, if any
-
63
Numeric Expressions
Spreadsheet Numeric Expressions
Function
Key (combination)
Negation.
-e
Addition.
e+e
Subtraction.
e-e
Multiplication.
e*e
Division.
e/e
e1 mod e2.
e1%e2
Exponentiation.
e^e
Relationals: true (1) if and only if the indicated relation holds,
else false (0). Note that '<=', '!=', and '>=' are converted to
their '~()' equivalents.
e<e, e<=e
e=e, e!=e
e>=e, e>e
Boolean operator NOT.
~e
Boolean operator AND.
e&e
Boolean operator OR.
e|e
Conditional: If the first expression is true then the value of the
second is returned, otherwise the value of the third.
@if(e,e,e)
e?e:e
Operator precedence from highest to lowest is:
-, ~ ^ *, / +, - <, <=, =, !=, >=, > & | ?:
Numeric Functions
Spreadsheet Numeric Functions
64
Function
Key (combination)
Return the square root of e
@sqrt(e)
Return the exponential function of e
@exp(e)
Return the natural logarithm of e
@ln(e)
Return the base 10 logarithm of e
@log(e)
Return the largest integer not greater than e
@floor(e)
Return the smallest integer not less than e
@ceil(e)
Round e to the nearest integer
@rnd(e)
Round e to n decimal places
@round(e,n)
Return the absolute value of e
@abs(e) @fabs(e)
Return e1 raised to the power of e2
@pow(e1,e2)
Return sqrt(e1*e1+e2*e2)
@hypot(e1,e2)
A constant quite close to pi.
@pi
Convert e in degrees to radians
@dtr(e)
Convert e in radians to degrees
@rtd(e)
Return trigonometric functions of radian arguments
@sin(e) @cos(e)
@tan(e)
Return the arc sine of e in the range -pi/2 to pi/2
@asin(e)
Return the arc cosine of e in the range 0 to pi
@acos(e)
Return the arc tangent of e in the range -pi/2 to pi/2
@atan(e)
Chapter 3 – Working With BRAILLEX ELba
Returns the arc tangent of e1/e2 in the range -pi to pi
@atan2(e1,e2)
Return the maximum of the values of the expressions
@max(e1,e2,...)
Return the minimum of the values of the expressions
@min(e1,e2,...)
Convert string expression se to a numeric value
@ston(se)
Return 1 if string expression se1 has the same value as string
expression se2, 0 otherwise
@eqs(se1,se2)
Return the numeric value of a cell selected by name
@nval(se,e)
Force an error
@err
Financial Functions
Monthly payment. @pmt(60000,.01,360) computes the monthly
payments for a $60000 mortgage at 12% annual interest (.01
per month) for 30 years (360 months).
@pmt(e1,e2,e3)
@fv(e1,e2,e3)
Future value. @fv(100,.005,36) computes the future value for
36 monthly payments of $100 at 6% interest (.005 per month).
It answers the question: "How much will I have in 36 months if I
deposit $100 per month in a savings account paying 6% interest
compounded monthly?"
Present value. @pv(1000,.015,360) computes the present value @pv(e1,e2,e3)
of an ordinary annuity of 36 monthly payments of $1000 at 18%
annual interest. It answers the question: "How much can I
borrow at 18% for 30 years if I pay $1000 per month?"
Row and Column Commands
Spreadsheet Row and Column Commands
Function
Key (combination)
Insert a new blank row (column) before cursor position
ir, ic
Open a new blank row (column) behind cursor position
or, oc
Append a new row (column) behind cursor position as a copy of
the current one
ar, ac
Delete the current row (column). dd deletes the current cell
dr, dc, dd
Yank a copy of the current row (column) into the clipboard
yr, yc, yy
Paste copied / deleted rows/columns/cells back into the
spreadsheet.
pr, pc, pm, px, pt
Remove expressions from the affected rows (columns), leaving
only the values
vr, vc, vv
Hide ('zap') the current row (column). This keeps it in the data
base, though.
Zr, Zc
Show hidden rows (columns)
sr, sc
Set the format to be used for showing the numeric values in the
current column:
The right arrow key increases, the left arrow key decreases
the column width
The up arrow key increases, the down arrow key decreases
the number of digits to follow decimal points
0 defines fixed point format type, 1 scientific notation, 2
engineering notation, 3 dates with a two digit year, and 4
dates with a four digit year
f
65
Range Functions
Spreadsheet Range Functions
Function
Key (combination)
Return the number of rows in the specified range.
@rows(r)
Return the number of columns in the specified range.
@cols(r)
Sum all entries in the specified region
@sum(r)
Multiply together all entries in the specified region.
@prod(r)
Average all entries in the specified region.
@avg(r)
Count all entries in the specified region.
@count(r)
Return the maximum value in the specified region.
@max(r)
Return the minimum value in the specified region
@min(r)
Return the sample standard deviation of the cells in the specified @stddev(r)
region.
66
Evaluate the expression then search through the range r for a
matching value. The range should be either a single row or a
single columnIf it is a numeric expression, the range is searched
for the last value less than or equal to e. If the expression is a
string expression, the string portions of the cells in the range are
searched for an exact string match
@lookup(e,r)
@lookup(r,e)
@lookup(se,r)
@lookup(r,se)
Evaluate the expression then search through the first row in the
range r for a matching value. If it is a numeric expression, the
row is searched for the last value less than or equal to e. If the
expression is a string expression, the string portions of the cells
in the row are searched for an exact string match.
@hlookup(e,r,n)
@hlookup(r,e,n)
@hlookup(se,r,n)
@hlookup(r,se,n)
Evaluate the expression then search through the first column in
the range r for a matching valueIf it is a numeric expression, the
column is searched for the last value less than or equal to e. If
the expression is a string expression, the string portions of the
cells in the column are searched for an exact string match.
@vlookup(e,r,n)
@vlookup(r,e,n)
@vlookup(se,r,n)
@vlookup(r,se,n)
Use the values of expressions e1 and (optionally) e2 to index
into the range r. The numeric value at that position is returned.
With two arguments, the range should be either a single row or
a single column. An expression with the value 1 selects the first
item in the range, 2 selects the second item, etc. With three
arguments, the range must come first, and the second and third
arguments will then be interpreted as row and column,
respectively, for indexing into a two-dimensional table.
@index(e1,r)
@index(r,e1)
@index(r,e1,e2)
Use the values of expressions e1 and (optionally) e2 to index
into the range r. The string value at that position is returned.
With two arguments, the range should be either a single row or
a single column. An expression with the value 1 selects the first
item in the range, 2 selects the second item, etc. With three
arguments, the range must come first, and the second and third
arguments will then be interpreted as row and column,
respectively, for indexing into a two-dimensional table.
@stindex(e1,r)
@stindex(r,e1)
@stindex(r,e1,e2)
Chapter 3 – Working With BRAILLEX ELba
Range Commands
Spreadsheet Range Commands
Function
Key (combination)
Cut a range into the clipboard
/x
Copy a range to the clipboard.
/y
Copy a source range to a destination range.
/c
Move a source range to a destination range.
/m
Values only. (remove expressions)
/v
Sort a range
/s
Fill a range with constant values starting with a given value and
increasing by a given increment
/f
Assign a symbolic name to a cell or a range of cells
/d
Lock the current cell or a range of cells
/l
Opposite of the /l command: Unlock a locked cell
/U
List the currently defined range names, etc.
/S
Undefine a previously defined range name
/u
Assign a value format string to a range of cells
/F
Create, modify, and delete framed ranges
/r
Note Commands
A note is a cell or range of cells that can be jumped to quickly from another cell by
creating a special link in that cell. The note may contain text explaining the contents of
the cell containing the link, similar to a footnote, or it may simply be another part of the
spreadsheet that is related to the cell in some way.
Spreadsheet Note Commands
Function
Key (combination)
Add a note
na
Delete a note
nd
Show all notes on the current screen
ns
Jump to a note
*
File Commands
Spreadsheet File Commands
Function
Key (combination)
Open a new worksheet from a file.
Ctrl+O
Save the current worksheet to a file.
Ctrl+S
Save the current worksheet into a file if it has been modified,
and then quit.
ZZ
Write a listing of the current worksheet into a file in a form that
matches its appearance on the screen (print to a file).
W
Write a listing of the current worksheet to a file, but include
delimiters suitable for processing by the tbl, LaTeX, or TeX table
processors.
T
Merge the worksheet from the named file into the current table.
M
67
Miscellaneous Commands
Spreadsheet Miscellaneous Commands
68
Function
Key (combination)
Exit from the spreadsheet program
Ctrl+Q
Abort entry of the current command.
ESC
Help
F1, ?
Redraw the screen
Ctrl+L
Redraw the screen with special highlighting of cells to be filled in
Ctrl+R
Highlight cells which have expressions
Ctrl+X
Recalculate the spreadsheet.
@
Chapter 3 – Working With BRAILLEX ELba
3.10 – The MP3 Player
Starting the MP3 Player
From the Control Center, select the entry "MP3-Player" pressing the letter "p" or using
the arrow keys or the Easy Access Bar and hitting <Enter>.
The file manager is opened and you hear the message "building file list of mnt flash
elba". Use the arrow keys to scan your directory until you find the mp3 file you want to
play.
Note:
As mp3 files are pretty large (a normal song requires several megabytes of data), you
will typically have these files on an external media; either a flash-ROM card, a CD-ROM
drive or a hard drive in or connected to ELba's PC-card slot, or on a network server. In
the first case, you will have to look for the directory "pccard", in the second case for the
directory "netmount" or to sub-directories of these folders.
Specifically in the case of the network connection, this also means that you have to
activate this connection first.
In our example, we have a couple of songs on a PC-card hard drive. After we selected
the pccard directory, the screen looks like this:
UW PILOT 2.0
Dir: /mnt/flash/elba/pccard
..
(parent dir)
Here Comes the Sun.mp3
3.0 MB
John Denver - Take Me Home Country Road.mp3
3.0 MB
Swamp Thing.mp3
5.7 MB
The_Last_Song.mp3
4.0 MB
Unforgetable.mp3
5.0 MB
[ Select/View ".. parent dir" to return to previous directory. ]
^g Get Help ^q Quit
l Launch
d Delete
c Copy
a Associate v [View]
^f Find
r Rename
e Edit
Playing a Song
In order to play a song, move the Braille display to the corresponding file using the
arrow keys or the Easy Access Bar and write the letter "a" (for "associate" or press the
EAB two steps down. After a short while, the music starts.
Once the song you selected has been played, you will get back to the selection screen.
You can then select another song to play.
You can stop a song at any time pressing Ctrl+Q or pushing the EAB two steps up. This
also terminates the player program and brings you right back to the control center.
Exiting the MP3 Player
In order to exit the MP3 player, press Ctrl+Q or push the Easy Access Bar two steps up.
You will then get back to the control center.
69
3.11 – Calculator
From the Control Center, select the item "Calculator" pressing the letter "c" or using the
arrow keys or the Easy Access Bar to find the menu entry and hitting <Enter>. You will
get a prompt looking almost like a DOS prompt, " calc>", and hear "zero". At this
prompt, you can proceed to your arithmetic operations.
Calc is an interactive calculator which provides for easy large numeric calculations, but
which also can be easily programmed for difficult or long calculations. It can accept a
command line argument, in which case it executes that single command and exits.
Otherwise, it enters interactive mode. In this mode, it accepts commands one at a time,
processes them, and displays the answers. In the simplest case, commands are simply
expressions that are evaluated.
Doing Simple Arithmetic Operations:
You want to add the numbers 80 and 50. At the calc prompt, write "80+50" and hit
<Enter>. You will hear the result "130"; you can read the result on the Braille display if
you move the display one line up. The cursor is at the calc prompt again, and you can
continue doing calculations.
More examples:
You want to add two fractions. At he prompt, write "3/4 +5/4" and hit <Enter>. You
will hear the result "2"; you can read the result on the Braille display if you push the
Easy Access Bar one step up.
You want to calculate "5 to the power of 3". At the prompt, enter "5^3" and hit
<Enter>. You will hear the result "125"; you can read the result on the Braille display
if you push the Easy Access Bar one step up. The "^" sign has the Braille
combination 4,5,7 in US Braille.
You want to calculate the square root of 81. At the prompt, enter "sqrt(81)" and hit
<Enter>. You will hear the result "9"; you can read the result on the Braille display if
you push the Easy Access Bar one step up.
You want to calculate an expression with two variables. First assign a value to the
variables:
a=5
b=4
The calculator memorizes these variables. Now enter your formula:
(a^2 +b^2)
You will hear the result "41"; you can read the result on the Braille display if you
push the Easy Access Bar one step up.
The whole operation looks like this:
calc> a=5
calc> b=4
calc> (a^2+b^2)
41
calc>
You will find an extensive list of commands below.
Using the clipboard With the Calculator
You can copy both the operation and the result to the clipboard in case you want to use
the calculation in a document.
For example, write "15+27" and hit Ctrl+C BEFORE you hit <Enter>. Now go to your
editor and insert the copy with Ctrl+V. If you want to copy the result of the operation to
70
Chapter 3 – Working With BRAILLEX ELba
the clipboard, hit <Enter> after having typed in the operation (i.e. 15+27). Then press
Ctrl+C. You insert the result into your editor file as described above.
Calculator Help
Press F1 to access the extended help file for the scientific calculator. The help file is
provided in HTML format, so the program presenting the file is BRAILLEX ELba's Internet
browser. You exit the help file with "Q". You return to the calculator prompt.
Exiting the Scientific Calculator
In order to exit the calculator, press Ctrl+Q or type "exit" and hit <Enter>. You will get
back to the Control Center.
Calculator Functions
In the following, you will find a list of the calculator's main features and functions:
Calculator basic functions
Function
Key (combination)
Addition
+
Subtraction
-
Multiplication
*
Division
/
Exponentiation
^
Modulus
%
Integer divide
//
Result of the last command expression
. (dot)
Help
F1 or "help" (Enter)
For more complex calculations, variables can be used to save the intermediate results.
For example, the result of adding 7 to the previous result can be saved by typing:
curds = 15
whey = 7 + 2*curds
Calculator display modes
Function
Command
Alternate command
binary fractions
base(2)
config("mode", "binary")
octal fractions
base(8)
config("mode", "octal")
decimal floating point
base(10)
config("mode", "real")
hexadecimal fractions
base(16)
config("mode", "hex")
decimal integer
base(-10)
config("mode", "int")
decimal fractions
base(1/3)
config("mode", "frac")
decimal exponential
base(1e20)
config("mode", "binary")
binary fractions
base(2)
config("mode", "exp")
Return current mode
base()
71
Scientific Calculator Built-in Functions
72
Name
Args
Description
abs
1-2
absolute value within accuracy b
access
1-2
determine accessibility of file a for mode b
acos
1-2
arccosine of a within accuracy b
acosh
1-2
inverse hyperbolic cosine of a within accuracy b
acot
1-2
arccotangent of a within accuracy b
acoth
1-2
inverse hyperbolic cotangent of a within accuracy b
acsc
1-2
arccosecant of a within accuracy b
acsch
1-2
inverse csch of a within accuracy b
agd
1-2
inverse gudermannian function
appr
1-3
approximate a by multiple of b using rounding c
arg
1-2
argument (the angle) of complex number
argv
0-1
calc argc or argv string
asec
1-2
arcsecant of a within accuracy b
asech
1-2
inverse hyperbolic secant of a within accuracy b
asin
1-2
arcsine of a within accuracy b
asinh
1-2
inverse hyperbolic sine of a within accuracy b
atan
1-2
arctangent of a within accuracy b
atan2
2-3
angle to point (b,a) within accuracy c
atanh
1-2
inverse hyperbolic tangent of a within accuracy b
avg
0+
arithmetic mean of values
bernoulli
1
Bernoulli number for index a
bround
1-3
round value a to b number of binary places
catalan
1
catalan number for index a
ceil
1
smallest integer greater than or equal to number
cfappr
1-3
approximate a within accuracy b using continued fractions
comb
2
combinatorial number a!/b!(a-b)!
conj
1
complex conjugate of value
cos
1-2
cosine of value a within accuracy b
cosh
1-2
hyperbolic cosine of a within accuracy b
cot
1-2
cotangent of a within accuracy b
coth
1-2
hyperbolic cotangent of a within accuracy b
count
2
count listr/matrix elements satisfying some condition
cp
2
cross product of two vectors
csc
1-2
cosecant of a within accuracy b
csch
1-2
hyperbolic cosecant of a within accuracy b
den
1
denominator of fraction
det
1
determinant of matrix
dp
2
dot product of two vectors
epsilon
0-1
set or read allowed error for real calculations
Chapter 3 – Working With BRAILLEX ELba
Scientific Calculator Built-in Functions (continued)
Name
Args
Description
euler
1
Euler number
eval
1
evaluate expression from string to value
exp
1-2
exponential of value a within accuracy b
factor
1-3
lowest prime factor < b of a, return c if error
fcnt
2
count of times one number divides another
fib
1
Fibonacci number F(n)
frem
2
number with all occurrences of factor removed
fact
1
factorial
floor
1
greatest integer less than or equal to number
free
0+
free listed or all global variables
freebernoulli
0
free stored Benoulli numbers
freeeuler
0
free stored Euler numbers
freeglobals
0
free all global and visible static variables
freeredc
0
free redc data cache
freestatics
0
free all unscoped static variables
frac
1
fractional part of value
gcd
1+
greatest common divisor
gcdrem
2
a divided repeatedly by gcd with b
gd
1-2
gudermannian function
getenv
1
value of environment variable (or NULL)
hash
1+
return non-negative hash value for one or more values
head
2
return list of specified number at head of a list
highbit
1
high bit number in base 2 representation
hmean
0+
harmonic mean of values
hnrmod
4
v mod h*2^n+r, h>0, n>0, r = -1, 0 or 1
hypot
2-3
hypotenuse of right triangle within accuracy c
ilog
2
integral log of a to integral base b
ilog10
1
integral log of a number base 10
ilog2
1
integral log of a number base 2
im
1
imaginary part of complex number
indices
2
indices of a specified assoc or mat value
inputlevel
0
current input depth
insert
2+
insert values c ... into list a at position b
int
1
integer part of value
inverse
1
multiplicative inverse of value
iroot
2
integer b'th root of a
ismult
2
whether a is a multiple of b
isprime
1-2
whether a is a small prime, return b if error
jacobi
2
-1 => a is not quadratic residue mod b 1 => b is composite, or a
is quad residue of b
73
Scientific Calculator Built-in Functions (continued)
74
Name
Args
Description
lcm
1+
least common multiple
lcmfact
1
lcm of all integers up till number
lfactor
2
lowest prime factor of a in first b primes
links
1
links to number or string value
list
0+
create list of specified values
ln
1-2
natural logarithm of value a within accuracy b
lowbit
1
low bit number in base 2 representation
ltol
1-2
leg-to-leg of unit right triangle (sqrt(1 - a^2))
makelist
1
create a list with a null elements
matdim
1
number of dimensions of matrix
matfill
2-3
fill matrix with value b (value c on diagonal)
matmax
2
maximum index of matrix a dim b
matmin
2
minimum index of matrix a dim b
matsum
1
sum the numeric values in a matrix
mattrace
1
return the trace of a square matrix
mattrans
1
transpose of matrix
max
0+
maximum value
md5
0+
MD5 Hash Algorithm
memsize
1
number of octets used by the value, including overhead
meq
3
whether a and b are equal modulo c
min
0+
minimum value
minv
2
inverse of a modulo b
mmin
2
a mod b value with smallest abs value
mne
3
whether a and b are not equal modulo c
mod
2-3
residue of a modulo b, rounding type c
near
2-3
sign of (abs(a-b) - c)
nextcand
1-5
smallest value == d mod e > a, ptest(a,b,c) true
nextprime
1-2
return next small prime, return b if err
norm
1
norm of a value (square of absolute value)
null
0+
null value
num
1
numerator of fraction
ord
1
integer corresponding to character value
param
1
value of parameter n (or parameter count if n is zero)
perm
2
permutation number a!/(a-b)!
prevcand
1-5
largest value == d mod e < a, ptest(a,b,c) true
prevprime
1-2
return previous small prime, return b if err
pfact
1
product of primes up till number
pi
0-1
value of pi accurate to within epsilon
pix
1-2
number of primes <= a < 2^32, return b if error
Chapter 3 – Working With BRAILLEX ELba
Scientific Calculator Built-in Functions (continued)
Name
Args
Description
places
1-2
places after "decimal" point (-1 if infinite)
pmod
3
mod of a power (a ^ b (mod c))
polar
2-3
complex value of polar coordinate (a * exp(b*1i))
poly
1+
evaluates a polynomial given its coefficients or coefficient-list
pop
1
pop value from front of list
popcnt
1-2
number of bits in a that match b (or 1)
power
2-3
value a raised to the power b within accuracy c
ptest
1-3
probabilistic primality test
putenv
1-2
define an environment variable
quo
2-3
integer quotient of a by b, rounding type c
quomod
4
set c and d to quotient and remainder of a divided by b
rand
0-2
additive 55 random number [0,2^64), [0,a), or [a,b)
randbit
0-1
additive 55 random number [0,2^a)
random
0-2
Blum-Blum-Shub random number [0,2^64), [0,a), or [a,b)
randombit
0-1
Blum-Blum-Sub random number [0,2^a)
randperm
1
random permutation of a list or matrix
rcin
2
convert normal number a to REDC number mod b
rcmul
3
multiply REDC numbers a and b mod c
rcout
2
convert REDC number a mod b to normal number
rcpow
3
raise REDC number a to power b mod c
rcsq
2
square REDC number a mod b
re
1
real part of complex number
remove
1
remove value from end of list
reverse
1
reverse a copy of a matrix or list
root
2-3
value a taken to the b'th root within accuracy c
round
1-3
round value a to b number of decimal places
scale
2
scale value up or down by a power of two
scan
1+
scan standard input for assignment to one or more variables
scanf
2+
formatted scan of standard input for assignment to variables
search
2-4
search matrix or list for value b starting at index c
sec
1-2
sec of a within accuracy b
sech
1-2
hyperbolic secant of a within accuracy b
seed
0
return a 64 bit seed for a pseudo-random generator
sgn
1
sign of value (-1, 0, 1)
sha
0+
old Secure Hash Algorithm (SHS FIPS Pub 180)
sha1
0+
Secure Hash Algorithm (SHS-1 FIPS Pub 180-1)
sin
1-2
sine of value a within accuracy b
sinh
1-2
hyperbolic sine of a within accuracy b
sqrt
1-3
square root of value a within accuracy b
75
Scientific Calculator Built-in Functions (continued)
76
Name
Args
Description
srand
0-1
seed the rand() function
srandom
0-4
seed the random() function
ssq
1+
sum of squares of values
sum
0+
sum of list or object sums and/or other terms
swap
2
swap values of variables a and b (can be dangerous)
tan
1-2
tangent of a within accuracy b
tanh
1-2
hyperbolic tangent of a within accuracy b
trunc
1-2
truncate a to b number of decimal places
xor
1+
logical xor
Chapter 3 – Working With BRAILLEX ELba
3.12 – Voice Recorder
BRAILLEX ELba's voice recorder works like a digital tape recorder. You can record
messages via the built-in microphone located to the left of the Braille display, you can
listen to your recordings, assign names to them, edit the play list, etc.
Launching the Voice Recorder
Within the control center, write the letter "v" or move the display to the menu item "v
Voice Recorder" and hit <Enter>: You will get a screen like this:
ELba Voicerecorder Version 0.13
Tape: none
no tape in drive
Speed: 100% TOC-INFO: no tape
P[Play]
S Stop
SPC Pause
^Q Quit
^R Record
^E Edit
R Rewind
- Slower
M Merge
+ Faster
D Delete
N New
The first time you open the voice recorder, you will see the cursor sign on the Braille
display and the message:
no tape in drive
At this point, you need to insert a "tape", i.e. you need to open a file that will hold the
information. For this purpose, you press "n" for "new". You will be prompted to enter a
file name. Enter any name without extension (the extension .tap will be added
automatically.
Tape file: testtape
In case the file does not exist, you will be asked to confirm that the file shall be created:
No such tape file. Create?
Press "y" to confirm (or "n" to cancel the operation). An acoustical signal will confirm the
action: On the Braille display, you will see the message
The Tape is empty
You now have a tape recorder "ready to go". If you explore the screen, on the right side
of the top line you will see the tape name, on the bottom of the screen an indication of
the speed and the number of voice notes already recorded (in the TOC, or table of
contents), the remaining free takes in the file, and the free memory space in the tape.
The message looks like this:
Speed: 100% TOC-INFO: 000 / 128 free: 2M
ELba will remember the tape you have loaded when you exit the voice recorder, even
when you switch off the device. The next time you activate the voice recorder, it will
open the file used last automatically.
ELba can handle different tapes. Especially if you use external memory (a flash ROM card
or a hard drive), you can use multiple files. In order to change tapes, you "eject" the
open one pressing "e" and then open a new one or an other existing one (see above).
77
Recording Information
Once you have opened a recording file (or inserted a "tape", see above), you can start
recording your voice notes. Press Ctrl+r to start. ELba will confirm the action with a
tone. On the Braille display, you will see the message:
recording...
From this point on, ELba will record via its microphone until you pause
pressing the space bar, or you stop it pressing "s".
the action
Once you have stopped the recording (confirmed by another tone), you will get to the
table of contents, and the cursor is located on the last voice note. This may look like
this:
001
11:25:18 16/06/03 00:09s
You first get the number of the take, then the time and the date of the recording, and
finally, the length of the recording. Every new recording will add an entry to the list.
Listening to a Recording
In order to listen to a recording, you place the cursor on the recording you want to hear
and press "p" (for "play"), or just Enter. ELba will play the recording. You can interrupt
or resume at any time (with the space bar) or stop (pressing "s"), otherwise ELba will
stop automatically once the voice note has been completely played, and the cursor will
move to the next recording.
•
•
•
You can select another voice note by moving the cursor up or down.
You can speed up the tape pressing "+" (plus) or slow it down pressing "-" (minus).
You can also "rewind" the tape, i.e. go to the first take, pressing "r".
Editing a Recording
In order to facilitate finding your voice notes again, you can give these notes a name.
Press Ctrl+e (for edit) and you will get a prompt "enter subject" and a long text field.
The description of your voice note can be up to 47 characters long.
You can also merge two subsequent notes. For this purpose, press "m" on the previous
of the two notes and confirm with "y".
Finally, you can also delete single notes of your tape. Position the cursor on the note you
want to delete and press "d". Answer the question " Really delete recording?" with "y".
Activating Voice Recorder Functions With Hotkeys
Once you have activated a tape, you can also access a number of voice note functions
without explicitly opening the voice note program, directly out of an application.
78
Chapter 3 – Working With BRAILLEX ELba
Hotkeys for Voice Recorder Functions
Function
Key combination
Rewind tape
Play previous voice note
Play current voice note
Skip voice note
Pause
Stop recording / playing
Record new voice note
Ctrl+F2
Ctrl+F3
Ctrl+F4
Ctrl+F5
Ctrl+F6
Ctrl+F7
Ctrl+F8
Exiting the Voice Recorder
You exit the voice recorder with Ctrl+q.
79
3.13 – Tools
From the Control Center, select the item "Tools" pressing the letter "t" or using the
arrow keys or the Easy Access Bar to find the menu entry and hitting <Enter>. You will
get a sub-menu that looks like follows:
Tools V0.30
•p PC-card...
c Communication...
o Converter...
s Setup...
v Visualization
t System Tools...
r Enable remote access
x Linux Shell
PC-card
This menu item allows you to handle the cards you insert into the PC-card or PCMCIA
slot.
Important Note:
Like with Windows based computers, it is important to know that especially when you
remove such a card from its slot, you have to disable it first. If you forget about
disabling the card before taking it out, you risk data loss!!
From the Tools sub-menu, select the item "PC-card" pressing the letter "p" or using the
arrow keys or the Easy Access Bar to find the menu entry and hitting <Enter>. You will
get a sub-menu that looks like follows:
PCMCIA V0.29
•f Activate flash ROM or hard drive
s Activate Superdisk
c Activate CD-ROM
d Disable PC-card device
Activate Flash ROM or Hard Drive
Once you have inserted a PC-card or PCMCIA based hard drive into the slot, you need
this command to announce the flash ROM or hard drive to the system.
80
Chapter 3 – Working With BRAILLEX ELba
If you have disabled the card and left it inside the slot, you can re-activate it by selecting
"Activate flash ROM or hard drive" within the tools /PC-card menu.
Depending on the type of card you use (specifically for the larger hard drives), this
activation may take a couple of seconds. After the device has been activated, you will
get back to the Control Center.
You will find the contents of the PC-card in the "pccard" directory of your home folder.
Disable Flash ROM or Hard Drive
In order to disable your flash-ROM card or PC-card hard drive, select "Disable PC-card
device" within the tools /PC-card menu.
Please remember that only after having disabled the PC-card, you can take it out safely!
Without disabling it first, you risk data loss!
Activate Superdisk
Once you have inserted the card of a superdisk drive into the slot, you need this
command to announce the superdisk to the system.
You can re-activate the superdisk by selecting "Activate Superdisk" within the tools /PCcard menu.
This activation may take a couple of seconds. After the device has been activated, you
will get back to the Control Center.
You will find the contents of the superdisk in the "pccard" directory of your home folder.
Disable Superdisk
In order to disable your superdisk, select "Disable PC-card device" within the tools /PCcard menu.
Please remember that only after having disabled the PC-card, you can take out the card
or the media safely! Without disabling it first, you risk data loss!
Activate CD-ROM
Once you have inserted the card of a CD-ROM drive into the slot, you need this
command to announce the CD-ROM drive to the system.
You can re-activate the CD-ROM drive by selecting "Activate CD-ROM drive" within the
tools /PC-card menu.
This activation may take a couple of seconds. After the device has been activated, you
will get back to the Control Center.
You will find the contents of the CD-ROM in the "pccard" directory of your home folder.
Disable CD-ROM Drive
In order to disable your CD-ROM drive, select "Disable PC-card device" within the tools
/PC-card menu.
You should always disable the CD-ROM before removing the card from the slot or the
actual CD from its drive.
81
Communication
This menu item allows you to manage all kinds of connections of your BRAILLEX ELba to
computers or the Internet. The Communications menu looks like this:
Communication V0.31
•e Activate Ethernet connection
u Activate USB Network connection
d Activate dial-up connection
p Enable access to shared PC files
s Synchronize data with PC
a Allow network access to ELba files
c Terminate Ethernet connection
n Terminate USB Network connection
t Terminate serial connections
Activate Ethernet connection
BRAILLEX ELba's Ethernet port is not activated automatically. This helps avoiding
problems if you setup a network connection, but want to connect your device to the
Internet for example, when you are on the road and your usual network is not available.
To activate the Ethernet port, select
Communications menu. The hotkey is "e".
"Activate
Ethernet
connection"
in
the
You define the network settings in the Setup menu (described below).
Activate USB Network connection
BRAILLEX ELba's USB Network must also be activated manually.
To activate the USB Network, select "Activate USB Network connection" in the
Communications menu. The hotkey is "u".
You define the network settings in the Setup menu (described below).
Activate dial-up connection
With this command, you dial up to your Internet provider, either using BRAILLEX ELba's
internal modem or any other modem connected to the device. ELba even supports cable
modems and DSL connections. The hotkey for activating a dial-up connection is "d".
Once you have activated your dial-up connections, ELba gets back to the Control center.
You can then open an Internet session or send and receive email.
Enable access to shared PC files
With this command, you establish a connection to a Windows based computer in order to
transfer files back and forth. Once you have opened the ELba-PC connection, you fill find
a "netmount" directory within your home directory, which actually contains files on your
PC.
You can connect ELba via a network connection (Ethernet, USB, or wireless LAN), or via
the serial port. The hotkey for enabling access to shared PC files is "p". For setting up
the PC connection on the ELba side, please refer to the Network setup chapter Access to
shared PC files below.
82
Chapter 3 – Working With BRAILLEX ELba
The netmount directory corresponds to an "F" drive or similar on a Windows based
network server, once you have logged onto a network.
Once the PC connection is active, you can copy files back and forth (with the file
manager, for example). Every time you copy a file to the netmount directory, you copy it
to the PC; when you copy it from the netmount directory to another one, you get it from
the PC and copy it to an ELba directory.
You can also have files automatically synchronized with your PC files. This will be
described in the chapter "Synchronize data with PC" below.
Synchronize data with PC
This command can only be executed once you have activated the PC-ELba connection
described above in this chapter. The hotkey for synchronizing your ELba data with PC is
"s".
Once activated, ELba will compare its own files with the ones contained in a defined PC
directory and replace all older files with newer ones. If a file is completely missing on
one side, it will obviously be copied to this side automatically.
Allow network access to ELba files
This command can only be executed once you have established whatever network
connection activated the PC-ELba connection, be it Ethernet, USB, or wireless LAN
described above in this chapter. The hotkey for allowing network access to ELba files is
"a". ELba then starts a so-called Samba Server that makes ELba visible within a network.
IOnce you have activated the network connection and activated the SambaServer by
selecting "Allow network access to ELba files", you have two possibilities to activate the
connection from the PC:
1) Go to the "Network Neighborhood" icon on the desktop and make a right mouse click.
Select "Search for computers…". Write the name "elba" (or the name you assigned as
the hostname for the ELba unit in the Network setup).
An Internet Explorer window will come up, and you will see "Elba" in the right
window.
You will be asked for a user name ("Connect as"), and a password:
83
The user name is "elba", the password is "fhp4elba" (all in lowercase characters).
You now see an "elba" folder. You can enter it and see your ELba files. You can now
copy these files to the computer, or copy files from your computer to ELba.
2) Open the start menu and select "Run…".
Write the name "\\elba" (without the quotes) and hit Enter.
You will be asked for a user name ("Connect as"), and a password:
The user name is "elba", the password is "fhp4elba" (all in lowercase characters).
You now see an "elba" folder. You can enter it and see your ELba files. You can now
copy these files to the computer, or copy files from your computer to ELba.
Terminate Ethernet connection
This command disables the Ethernet port. It is obviously also disabled when you power
down the system. The hotkey for disabling the Ethernet port is "c".
Terminate USB Network connection
This command disables the USB network connection. It is obviously also disabled when
you power down the system. The hotkey for disabling the USB network "n".
Terminate serial connections
This command is used to hang up your modem or to terminate a serial PC connection.
The hotkey for terminating all ELba serial connections is "t".
Converter
The hotkey for selecting the converter item is "o".
84
Chapter 3 – Working With BRAILLEX ELba
Once you select the Converter item, you get to a sub-menu. Currently, this menu only
contains 2 items,
a
r
b
g
p
m
Convert
Convert
convert
convert
convert
convert
Word to ASCII
ASCII to RTF
ASCII to BRAILLE
BRAILLE to ASCII
PDI BrailleNote files
Blazie files (^M)
If you type "a" for "Convert Word to ASCII", you get the prompt:
File to convert:
Enter the name (and if necessary, also the full path) of the word document you want to
convert, and very shortly later you find a document with the same name, but with the
extension ".ASC", in text format.
The "Antiword" program used for this purpose can even maintain much of your text
formatting. After having converted the word document, you can edit it with the Editor.
You can abort the action at any time pressing Esc.
If you type "r" for "Convert ASCII to RTF", you get the prompt:
File to convert:
Enter the name (and if necessary, also the full path) of the text document you want to
convert, and very shortly later you find a document with the same name, but with the
extension ".RTF", in a format that can be read and will be automatically converted by
WinWord. If you use formatting tags in your document, the RTF converter will obviously
interpret these.
You can abort the action at any time pressing Esc.
Converters that do not appear in the Converter menu: Bookshare decoder and
Game interpreter
ELba has different converters that do not show up in the converter menu. Two of them
take immediate effect when you use the "associate" function in the File Manager:
Bookshare decoder
For licensing reasons, this program will currently be delivered with the US version only.
1. once you have downloaded your Bookshare book, go to file manager and highlight
the desired book.
2. Press a for associate.
3. You will be prompted for your Bookshare username and password. Once this is
entered your book will be uncompressed and unencrypted. You will now have two
copies of your book. The original one with the .bks extension and the new one with a
.brf extension.
4. Now exit the file manager and open your book in the document reader.
Note: The first time you run the Bookshare software, you will be prompted to accept the
license agreement. If you accept the agreement the software will run and you will not
see this prompt in the future. If you do not accept the agreement then the program will
end and you will be given the same prompt the next time you run the software.
85
Game interpreter
You can now play a wide variety of text adventure games on the Elba. Games that run
using a .z5 interpreter can now be run on the Elba.
Simply highlight the file in the file manager and press "a" for associate.
Visualization
The BRAILLEX ELba Visualization feature allows teachers, trainers or friends to have a
look onto ELba's display. There are two different ways ELba can visualize its display:
• via a VT100 terminal emulation on a computer screen (then you see the complete
Linux screen at once), or
• via a dedicated LCD display connected to BRAILLEX ELba's serial port.
Visualization via a VT100 terminal emulation
First you have to prepare the terminal emulation. The easiest is to use the Hyperterminal
program that comes with Windows.
1.
2.
3.
4.
From the Start Menu, select Programs/Accessories/Communications/HyperTerminal.
In the HyperTerminal window, move the focus to "Hypertrm" and hit <Enter>.
A "Connection Description" window pops up. Give the connection a name, i.e. "ELba".
In the "Connect To" Window, select Connect using "Direct to Com1" or whatever Com
port you want to use.
5. In the Window "COM1 Properties", select the following values:
Bits per second:
38400
Data bits:
8
Parity:
None
Stop bits:
1
Flow control:
None
6. Once you confirmed these values with Enter, a window with blank screen appears.
You are ready to start ELba's visualization. Don't forget to save the session values
before you exit the emulation!
From the Control Center, press T for "Tools" and V for "visualization". The ELba screen
will show up on the terminal window.
In order to end the visualization, select the Visualization item again. You see:
Stop visualization (y/n)?
Press "y" <Enter> and the visualization is stopped.
Please note that other programs accessing the serial port (like the BRAILLEX EL
emulation for accessing Windows computers, for example) will also stop the
visualization.
Visualization via an External LCD Display
BRAILLEX ELba can be equipped with an external LCD display reproducing the contents
of the Braille display in easy to read large letters. You connect the display to the serial
port. Once you are done, you activate the visualization:
1. Enter the BRAILLEX ELba setup (T for "Tools", then S for "Setup").
2. Select B for "Braille", then V "Visualization type". Use the down arrow key to select
"LCD". Hit <Enter> to confirm.
3. Exit the setup program pressing Ctrl + Q and hit "y" to save the settings.
4. From the Control Center, press T for "Tools" and V for "Visualization". The contents of
the Braille display will show up on the LCD display.
86
Chapter 3 – Working With BRAILLEX ELba
In order to end the visualization, select the visualization again. You see:
Stop visualization (y/n)?
Press "y" <Enter> and the visualization is stopped.
Please note that other programs accessing the serial port (like the BRAILLEX EL
emulation for accessing Windows computers, for example) will also stop the
visualization.
System Tools
The hotkey for selecting the system tools is "t". You get to a sub-menu that looks like
follows:
System Tools V0.30
•u Update
b Backup user data
r Restore user data
s Battery and connection status
f file system status
c format flash card
Update
This option allows you to update your device. You get the update file (always called
"update.tar" on any PC media, on a flash-ROM card or via the Internet (the start page of
your Internet browser contains a link to the Papenmeier service page containing the
update files.
Copy the update file to any directory that can be accessed by BRAILLEX ELba. This can
either be one of the ELba directories itself, or a PC-card inside the device (in this case,
you have to activate the PC-card or other media inside the PCMCIA slot, see the chapter
Tools/PCMCIA above), or a PC connected to ELba (see the chapter "Connect ELba – PC"
above).
Once this is done, call the Update tool. The hotkey for selecting update tool is "u". On
the Braille display, you will get the prompt:
Directory:
followed by the cursor sign. Enter the name of the directory containing the file
"update.tar". Depending on where this file is located, you have three possibilities:
• a regular BRAILLEX ELba directory
• the directory "pccard" or a sub-directory of pccard if the file is on a media linked to
BRAILLEX ELba via the PC-card slot (hard drive, flash-ROM, CD-ROM, superdisk)
• the directory "netmount" or a sub-directory of netmount if you have linked the device
to a PC containing the file.
Once you have entered the directory name followed by <Enter>, the update occurs
automatically. In some cases it might be advisable to reboot the device afterwards; this
information will come with the update file.
Backup user data
The hotkey for selecting the "Backup user data" feature is "b". If you select this feature,
all your user data and personal settings will be stored.
For the backup feature, you need an external storage media; either a PC connected to
ELba, or a PC-card, hard drive or superdisk.
87
If you have a PC connection active, the PC will be the storage place by default. If not,
any device connected via the PC-card slot.
After you launch the backup tool, all of your user files contained on the ELba internal
memory, and all relevant user settings will be stored to a compressed file called
"save.tar".
Restore user data
If you want to restore the data you have backed up before (see above), first connect
ELba to the PC (if your data have been stored there), or insert the PC-card into its slot
and activate it.
Afterwards call the Restore tool. The hotkey is "r". The system will then automatically
look for the file "save.tar" on one of the external media. You see the prompt:
Confirm overwriting? (y/n)
Press Y followed by <Enter> if you want to check all files that are both in the backup file
and on the system, or N followed by <Enter> if you want to restore the backup files
regardless.
Battery and connection status
You can check the charge of your battery (if the charger is not connected; in that case,
you get the message "charger active"). The battery charge is indicated in percent of the
maximum charge.
With the same command you are informed about possible active connections:
• Ethernet connection (Ethernet)
• Serial ELba-PC connection (PPPoS)
• Modem connection (Modem)
• Network drive mapped (SAMBA)
• NFS mount (NFS)
• Wireless LAN (WLAN)
• USB network (USBNET)
• File sharing (SAMBA-Server) , or:
• No connection.
File system status
You can check the amount of memory left in the (internal) flash memory.
The memory left is indicated in megabytes, and the used memory is shown in percent
used.
Format flash card
Typically, you do not need to format a flash card in order to use it with BRAILLEX ELba.
Sometimes it might happen, though, that after using this card in a Windows based
computer, you only see file names with the 8+3 character scheme (i.e. a maximum of 8
characters for the name itself, and 3 for the extension). In this case, you want to format
the card in order to be able to see long names again.
You can only format a card that is NOT activated.
Please note that all data on the card will be lost when you format it. This is why you
need to confirm the formatting.
Enable remote access
Once you have activated the ELba visualization feature (see below), and you need to
allow access to your system through a serial connection again, use this feature. The
hotkey for selecting the "Enable remote access" item is "r".
88
Chapter 3 – Working With BRAILLEX ELba
Linux Shell
The hotkey for selecting the Linux shell is "x".
You see a tilde followed by a greater than sign and a blank, then comes the cursor:
~>
The Linux shell works similar to the command prompt in DOS. You can now enter Linux
commands. Please note though that as an ELba user, your rights to access the system
are limited to the user file area.
You end the Linux shell by entering the command "exit" followed by <Enter>.
If you are a Linux expert, there is also means to provide you with root privileges. Please
contact your distributor or Papenmeier for the root password.
89
3.14 – Online Help
The online help is available on the Control Center level. If you press F1 within the
Control Center, you will get a command summary for the application the cursor is
currently located on. The help file is in HTML format and you actually use the Internet
browser to access that file.
You can obviously use the links in this file to access information on other applications,
too.
If you access the online help from the Control Center menu, you will immediately to the
Index (link 1) of the help file.
Important Note: Some of the applications (like the editor, the file manager,
etc.) have their own help files that came with the Linux applications. These do
not necessarily reflect the commands used within ELba, as for the purpose of
unifying the commands in the various applications (and adding more
functionality to some of them), many of the commands have changed.
3.15 – File Transfer From And To A PC
You have a number of possibilities to transfer data from ELba to a PC and vice versa:
Data exchange via external storage media
•
The simplest and definitely most mobile and flexible way is to use a compact flash
card. Flash cards are relatively inexpensive, have quite impressive storage
capabilities, and, as they are widely used for the file transfer from photo cameras or
regular PDAs to PCs, they can also be used with just about any PC nowadays. Newer
units often have card readers integrated, elder ones can easily be upgraded with very
inexpensive readers that connect to a USB port. The card then becomes a new PC
drive.
You copy the ELba files you want to transfer onto such a card using the file manager
and read them in a remote device like a PC. Or, the other way round, you copy a file
from your PC to a compact flash card and transfer it to the ELba.
The only thing you need to keep in mind when using those cards is that you need to
announce them to the ELba when you plug them into the PCMCIA port, and that you
MUST announce to the systems — both to the ELba and to the PC — that you want to
take them out. Within the ELba, you use the Tools/PCcard menu for that, for
Windows PCs it depends on the drivers and on the operating systems. In most cases
you make a right click on the drive name within the My computer window and select
"eject".
•
If you own a so-called Superdisk drive, you can also use regular floppy disks for the
file transfer. The handling is similar to the one described above for the compact flash
card (you don't need to tell your computer that you take them out, though).
Superdisk drives are pretty expensive, though if you want to use them for the file
tranfder between Elba and a PC.
Data exchange via network
There are two different methods to exchange data via network connections. These
methods work with any type of network available for ELba, i.e. the connections via
Ethernet, USB network, or wireless LAN.
90
Chapter 3 – Working With BRAILLEX ELba
1. The first possibility is to Enable access to shared PC files. You find this option in the
Tools / Communication menu. The hotkey is "p".
With this method, ELba creates a network drive that actually, as we are in Linux, us a
directory called "netmount", and which actually corresponds to a shared drive or
directory on the PC you access.
You can now use ELba's file manager to transfer files back and forth. See also
chapter Enable access to shared PC files on page 82.
You can also compare files on both the PC and the ELba side and synchronize data in
that sense that you copy the newer files to both sides. This is described in chapter
Synchronize data with PC on page 83.
2. The second option works the other way round: You access ELba files from a PC
connected to ELba via a network connection. If you activate whatever network
connection on the ELba and select Allow network access to ELba files in the Tools /
Communication menu, ELba becomes visible in the network, and you can access its
files from a PC. This so-called Samba Server method is described in chapter Allow
network access to ELba files starting on page 83.
This option, too, contains a data synchronization feature, which obviously this time,
works on the PC side. In the next chapter, we will describe the ElbaSync program,
which currently synchronizes data between the ELba address book and day planner
on one hand, and MS-Outlook on the other.
Synchronizing Address Book And Appointments With Outlook: The ElbaSync
Program
The ElbaSync program is a Windows program that is able to update ELba's address book
and / or day planner appointments with the contact list and the appointment of the
Outlook or Outlook express programs.
With ElbaSync you can synchronize files between a PC and BRAILLEX ELba via a network
connection. On the ELba side, you must obviously have a network connection activated
and Allow network access to ELba files (see ELba's Tools section).
When you start ElbaSync for the first time, the application will try to find an ELba
network drive and to login. If no ELba network drive can be found, or if the login
procedure fails with the standard values, you will have to enter the relevant data with
the help of dialog boxes. These dialogs are the regular Windows dialog boxes to establish
network connections.
After starting up the program, you will see an empty window with a menu containing
three items: File, Options, and Help.
91
The File menu contains the following commands:
Import, Export, Synchronize, New Connection, and Exit
Import
Export
Synchronize
New Connection
Exit
With the "Import" command you transfer the contacts (addresses) of
your ELba address book and / or the appointments of the ELba day
planner to MS-Outlook address book. If you wish, you can define up
front (in the Options menu), which type if data you want to transfer.
During the transfer you might need to specify what type of addresses
you have (business, private, or other).
With the "Export" command, you transfer your Outlook contacts and /
or the appointments to your ELba. If you wish, you can define up
front (in the Options menu), which type if data you want to transfer.
During the transfer you might need to specify what type of addresses
you have (business, private, or other).
With the "Synchronize" command, you synchronize the Outlook and
ELba contacts and appointments. If you wish, you can define up front
(in the Options menu), which type if data you want to transfer.
During the transfer you might need to specify what type of addresses
you have (business, private, or other).
With the "New Connection" command you establish a connection to
the ELba network drive.
With "Exit" you terminate the ElbaSync program. If you wish, you can
define in the Options menu whether the connection to ELba shall be
terminated on exit.
Important Note:
As the number and the characteristics of the fields for the contacts and appointments are
not identical between Outlook and the ELba applications, the data transfer in both
directions is not necessarily unequivocal. You should keep this in mind when you proceed
to the data synchronization.
The Options menu currently only contains one item, the Settings submenu. There you
control all options for the data synchronization with Outlook. The settings options are the
following:
Chose data to be
synchronized
Chose network folder
Further options
92
You have check boxes for Appointments and Contacts.
In the Destination edit field you specify the desired ELba
directory. By default, you find the drive character assigned to
the ELba network drive if a connection could be established. Use
the Browse button to select the destination folder via the regular
Windows dialog.
• Connect with ELba after startup
If this option is activated, the program will try to establish a
Chapter 3 – Working With BRAILLEX ELba
connection to ELba right after you launch it. The program will
then use the parameters it saved when you connected to
ELba in a previous ElbaSync session.
•
Automatic synchronization after startup
Defines whether the data synchronization shall be executed
automatically after you start the ElbaSync program.
•
Delete data in ELba folder before exporting
If this option is activated, the addresses and appointments
stored in ELba will be deleted before the data transfer from
Outlook.
•
Disconnect with ELba on exit
This option allows to automatically disconnect the connection
to ELba when you exit ElbaSync.
•
Show Address Dialog
This option allows to define whether you want to be asked
before the data transfer whether the business, private or
other contacts in Outlook shall be used for the
synchronization. If it is unselected, the last used settings will
be used. You can also chose whether the question shall come
for every single address or all further addresses from the
time you set the option.
Data exchange via Serial port
From the ELba, you can access PC files by installing a so-called Winshare access.
Depending on the operating system, it can be a little tricky to install (for the installation,
see chapter Access to shared PC files starting on page 112). This is why we do not really
recommend this procedure. Anyway: the actual connection and the automatic
synchronization is described in the chapters Enable access to shared PC files and
Synchronize data with PC above.
3.16 – System Maintenance: Upgrading ELba With New System Software
Major ELba upgrades typically come along with a Linux kernel upgrade. This cannot be
performed with the Tools/System Tools/Update utility described above (see chapter
Update page 87). For these major upgrades, you need:
•
•
A compact flash card
The update files that you either get from your distributor or that you download from
the Internet. These files must be copied onto the compact flash card.
The upgrading procedure is mostly automatic, and quite easy. You proceed as follows:
1. Insert the compact flash card (with its PCMCIA adapter) into ELba's PCMIA slot while
the device is switched OFF.
2. Power up ELba. After a short while, you will get a Braille menu that looks like follows
(Speech does NOT work in this procedure):
[
[
[
[
]
]
]
]
1 Save user data
2 Transfer system
3 Restore user data
Power down
93
3. If your ELba is not brand new, you will probably want to maintain the data on the
device. In this case, proceed in the order of the menu points: First save your data,
then transfer the system, and finally restore the data. The whole procedure will take
a couple of minutes. You will be prompted on the progress of the operation.
4. Once you are done with the upgrade, power down the unit.
5. Remove the compact flash card from the PCMCIA slot
6. Power up the device again, and you will have the upgraded software with your data
and settings.
94
Chapter 3 – Working With BRAILLEX ELba
3.17 – Screen Access To Windows Based PCs
BRAILLEX ELba can be used as a Braille display for accessing Windows based PCs. It
then works like one of the famous BRAILLEX EL displays. If you connect the supplied
keyboard cable with the PC, you can also use BRAILLEX ELba's keyboard to write on the
PC.
Activating and Ending the BRAILLEX EL Emulation
You activate the BRAILLEX EL emulation by pressing space plus dots 7 and 8 (BRAILLEX
ELba with QWERTY keyboard: Shift + Ctrl + Pause – Pause is the utmost top right key
on the keyboard).
Now you can start your screen reader program, and BRAILLEX ELba works as a PC
display.
Once you activate the BRAILLEX EL emulation, you also switch the direction of the
keyboard port of the device. If you had a keyboard connected to the device, it will
remain active (it will basically only accept the Shift + Ctrl + Pause – Pause toggle,
though). If you have the PC connected, you can now use the BRAILLEX ELba keyboard to
access your computer.
The same key combination (space plus dots 7 and 8 on the Braille keyboard, or Shift +
Ctrl + Pause on the QWERTY keyboard) also toggles back to the Control center, if you
press it again.
BRAILLEX ELba Used With the JAWS for Windows
For the Jaws screen reader, special BRAILLEX ELba key combinations have been
assigned.
When navigating in the active window, you can choose between three different modes,
which also influence the reaction of the navigation keys:
Navigation Mode
In the Navigation Mode, you just read across the screen when using the navigation
keys as described above;
PC Mode
in the PC mode, instead of moving the display across the screen when activating the
navigation keys, you move the cursor.
Combined Mode
The so-called Combined Mode is useful especially when it comes to reading long text
documents. Whenever you press a reading key and a line border is crossed, the PC
cursor is moved to the new line as well. This means that you can read a text without
having to bother about screen pages.
Unlike with the regular BRAILLEX EL displays, where you switch modes with a toggle switch on the
side of the Braille display, for the ELba you switch modes by a combination of thumb keys and the
Easy Access Bar:
Toggle Modes
Thumb keys
Space + right thumb key
(QWERTY keyboard: Control
menu + Right Windows key)
Easy Access Bar
Function
Two steps right
Toggle PC Mode / Navigation Mode
Two steps left
Toggle Combined / Navigation Mode
Please note that there is a difference in handling between the devices with
Braille keyboard and with QWERTY keyboard:
95
•
•
For thumb key – EAB combinations on devices with Braille keyboard, you
PRESS AND RELEASE the thumb key and then press the EAB within the
following 5 seconds.
For thumb key – EAB combinations on devices with QWERTY keyboard,
you press and HOLD the thumb key while you press the EAB.
Navigation
Normal screen navigation, is the default mode when you activate the BRAILLEX EL
emulation. In this mode, the movements of the Easy Access Bar have the following
meaning:
Navigation mode
Easy Access Bar
One step up
One step down
One step left
One step right
Two steps up
Two steps down
Two steps left
Two steps right
Function
Moves the display one line up.
Moves the display one line down.
Read backwards. Moves the display towards the left.
Read forwards. Moves the display towards the right.
Moves the display to the title bar
Moves the display to the last line of the window.
Cursor tracking on / off (toggle)
Toggle cursor shapes
PC Mode
In PC mode, the Easy Access Bar allows to navigate through an application. Press the
right thumb key / EAB combination (see above), and the EAB keys will emulate PC
keyboard functions:
PC Mode
Easy Access Bar
One step left
One step up
One step right
One step down
Two steps left
Two steps up
Two steps right
Two steps down
Function
PC Left arrow key
PC Up arrow key
PC Right arrow key
PC Down arrow key
(Shift)+(Tab)
(Alt); within a dialog box or menu: (Esc)
(Tab)
(Enter)
Combined Mode
The combined mode includes both screen navigation and cursor movement features.
When you move the Easy Access Bar up or down, the cursor is moved one line up or
down as well (cf. PC mode). When you move the Easy Access Bar to the right, the
function is the same as in navigation mode if the text line is longer than the display is.
The cursor remains at the original position. Once all the text has been displayed, another
“read forwards” command will move both the cursor and the display to the next line.
Pushing the Easy Access Bar one step left corresponds to “read backwards” if you are
within a long line of text. Otherwise, both cursor and display are moved one line up.
96
Chapter 3 – Working With BRAILLEX ELba
Combined Mode
Easy Access Bar
One step left
One step up
One step right
One
Two
Two
Two
Two
step down
steps up
steps down
steps left
steps right
Function
Read backwards (within a long line), or: move cursor and display to
previous line
Move cursor and display to previous line, maintaining the column
Read forwards (within a long line), or: move cursor and display to
next line
Move cursor and display to next line, maintaining the column
Moves the display to the title bar
Moves the display to the last line of the window.
Cursor tracking on / off (toggle)
Toggle cursor shapes
Reveal Text Attributes
You can have BRAILLEX ELba reveal four different text attributes upon a keystroke. The
Braille display then underlines the corresponding portion of text with dots 7+8. You can
select 4 attributes directly, or you can toggle between all available attributes.
You can, of course, also disable this function.
Reveal attributes
Thumb keys
Left thumb key
(QWERTY keyboard: Left
Windows key)
Easy Access Bar
One step left
One step up
One step right
One step down
Two steps left
Two steps right
Two steps up
Two steps down
Function
Reveal attribute 1: bold.
Reveal attribute 2: highlight.
Reveal attribute 3: italics.
Reveal attribute 4: underline.
Select attribute display (toggle
backwards)
Select attribute display (toggle
forwards)
Reveal ALL screen attributes
Disable the attribute display with
dots 7 + 8.
Braille presentation
When pressing the right thumb key, you access a number of Braille presentation
functions with the Easy Access Bar:
Presentation Options
Thumb keys
Easy Access Bar
One step left
One step up
Right thumb key
One step right
(QWERTY keyboard: Right
Windows key)
Two steps right
Two steps up
Two steps down
Function
Toggle 6 / 8 Dot Braille
Activate Task List.
Toggle BrailleGrade2 Translation
on/off
Expand word at cursor position in
grade 2 translation on/off
Select Line mode presentation
Select structured mode
presentation
97
Mouse Functions
You can activate mouse functions with BRAILLEX ELba, using the routing keys.
In order to execute a mouse click, you first move the Braille display to the relevant
position. Then you press a routing key at the desired position. This corresponds to a left
mouse click.
BRAILLEX ELba Used With Other Screen Readers
Not for all screen readers, special key assignments have been defined for BRAILLEX ELba
yet. But Elba is able to emulate all BRAILLEX EL functions, including the switches and
keys of the regular EL displays.
Emulation of the BRAILLEX EL Keys
For the EL keys, you have two options:
1) The key shall be pressed alone. After a general modality switch, i.e. after switching
the keyboard to "EL key management" pressing "left + right thumb" ("Left and right
Windows key" on the QWERTY keyboard), you press the corresponding key
combination (i.e. "space + left thumb" for the EL-function "Left key in front
position"). After that, the ELba keyboard can be used for normal input again.
2) The key shall be pressed along with the Easy Access Bar. For this purpose, you don't
need to activate the "EL key management"; just press the corresponding key
combination (i.e. "space + left thumb" for the EL-function "Left key in front position")
and then, you press the EAB. This command sequence activates the EL command.
Please note that there is a difference in handling between the devices with
Braille keyboard and with QWERTY keyboard:
• For thumb key – EAB combinations on devices with Braille keyboard, you
PRESS AND RELEASE the thumb key and then press the EAB within the
following 5 seconds.
• For thumb key – EAB combinations on devices with QWERTY keyboard, you
press and HOLD the thumb key while you press the EAB.
BRAILLEX EL Key Emulation
BRAILLEX EL Switches
Braille Keyboard ELba QWERTY keyboard ELba
Switch to EL key emulation
Left + right thumb
Left and right Windows key
Left key in rear position
Left thumb
Left Windows key
Left key in front position
Space + left thumb
Context Menu + left WinKey
Right key in rear position
Right thumb
Right Windows key
Right key in front position
Space + right thumb
Context Menu + right WinKey
Emulation of the BRAILLEX EL Switches
After a general modality switch, the Braille keys and special keys (right, left thumb,
space) are used to emulate the switches of the EL displays. Please note that the modality
switch is valid only for one command.
A timeout function switches back to normal Braille input if the command is not entered
within 5 seconds.
98
Chapter 3 – Working With BRAILLEX ELba
BRAILLEX EL Switch Emulation
BRAILLEX EL Keys
Braille Keyboard ELba
QWERTY keyboard ELba
Switch to EL key emulation
Left + right thumb
Left and right Windows key
Left switch in rear position
dot 1
Key F
Left switch in central position
dot 2
Key D
Left switch in front position
dot 3
Key S
Right switch in rear position
dot 4
Key J
Right switch in central position
dot 5
Key K
Right switch in front position
dot 6
Key L
Reset default positions
dot 7
Key A
3.18 – Sleep Mode
You can send Braillex Elba to sleep at any time, for example for moving it from one place
to another, or just for saving battery power. During sleep mode, the BRAILLEX ELba
keys are disabled, and the system is slowed down to minimal power requirements. On
the other hand, when you wake it up again pressing the on/off key on the backside of
the device, the device comes back within a second, and with all the applications active
that you had opened before.
You activate the sleep mode from the Control Center, with
l for "Sleep Mode".
You hear the message "going to sleep" and you feel the Braille cells fade away.
You wake the device up again pressing the on/off key on the left side of the back panel
of the device.
3.19 – Power down
In order to switch off BRAILLEX ELba, select the last menu item of the control center,
"Power down" (no shortcut!) and hit <Enter>. You will get a message: "are you sure
(y/n)?". If you are sure that you have saved all of your work, you type "y" to confirm. No
<Enter> required. After a couple of seconds the Braille dots will disappear and you will
hear a light click: Elba is switched off.
You can also use the on/off switch to switch the device off. You keep the on/off switch
pressed until you first hear intermittent beeps and then a longer, higher tone. As soon as
you hear the latter one, you can release the button. The same click as described above
confirms that BRAILLEX ELba is switched off.
Emergency Power Down
In case of a major problem, you can also switch BRAILLEX ELba off as follows:
Press the on/off switch and keep it pressed for about 15 seconds. In a quiet
environment, you will hear a slight click indicating that the device has been switched off.
Please note that Papenmeier strongly suggests to use the power down feature in the
control center. As its name indicates, the emergency power down is thought to be used
only in case of a problem.
99
Chapter 4 – ELba Setup
Chapter 4 – ELba Setup
4.1 – The Setup Menu
The setup menu allows adjustments of the speaker volume, date and time, power saving
options, Braille settings and network settings.
In the control center, select T for "Tools" and then S for "Setup" . The hotkey is "Left Ctrl
+ left Shift + s". ELba will open a sub-menu that looks like follows, with the cursor on
the first menu item "v Volume".
Generally speaking, all setup menu items have hotkey assignments, just like the control
center. You move through the menus using the arrow keys or the EAB; you select the
menu items with <Enter> or by pushing the EAB 2 steps down, or with the hotkey.
Once you have defined your settings, you exit the current menu with ESC (or EAB 2
steps up) to get to the previous level, or with Ctrl + Q. Before exiting the setup program
you are asked whether you want to exit saving the changes you made (then you press
"y"), or exit without changes (press "n"). If you want to continue the setup, ypi press
ESC.
ELba Setup Tool 0.75
Menu path: /
•[v Volume]
[d Date and Time]
[n Network]
[m Power Management]
[b Braille]
[o Voice]
[p Printers]
F1 Help
^Q Quit
^D Default(s) Menu path: /
4.2 – Volume Setup
Select the [Volume] item hitting Enter or using the "v" shortcut. You get to a 2-entry
submenu:
h Hardware speech
30
s Soundcard
70
The cursor is located in front of the word "Speech". Further to the right, you see the
currently selected value, "50". If you want to modify the hardware speech synthesizer
volume (only for devices with hardware speech!), hit <Enter> again. Valid values are 199, the higher the number you select the louder the speech synthesizer. Write the value
you want and hit <Enter> again. The modified setting will be immediately activated.
If you move down with the arrow key (or with the Easy Access Bar, or use the "s"
shortcut), you get to the second item in this sub-menu, "Soundcard". Here you define
the volume for playing your MP3 files and the Eloquence software speech (if applicable).
Proceed the same way as with the speech synthesizer settings.
You exit the volume setting hitting Escape or pushing the Easy Access Bar 2 steps up.
101
You can also exit the setup directly by pressing Ctrl + Q. You will be asked whether you
want to save the settings.
4.3 – Date and Time Setup
From the Setup menu, select [d Date and Time] hitting <Enter> or using the "d"
shortcut. You get to a 3-item sub-menu, with the cursor in front of the first item:
t Time
11:55
d Date
08/13/2002
z Timezone UTC (GMT)
In order to set the time, use the t shortcut or hit <Enter> when you see the cursor in
front of the "Time" item. Overwrite the existing time with the new one. Please note that
the time is to be set in 24-hour format, i.e. 3 pm is written as "15:00". A colon separates
the hours and minutes.
In order to modify the date, hit <Enter> at the "Date" item (shortcut: d). Enter the date
with the format mm/dd/yyyy (m standing for the month, d for the day, and y for the
year).
The last item in this sub-menu is "Timezone" (shortcut: z). This entry is used for the
time stamp of your email messages. You get to a list of possible entries. Use the up or
down arrow keys to select the right time zone. You will find the most current time zones
in the list. Some of them show up with their regular name (like "Eastern Time"), some
only the time zones relative to UTC (Coordinated Universal Time), which corresponds to
Greenwich Mean Time. Please note that with the up arrow, you go west, with the down
arrow east. Confirm the time zone that corresponds to your with <Enter>.
You exit the date and time setting hitting Escape or pushing the Easy Access Bar 2 steps
up.
You can also exit the setup directly by pressing Ctrl + Q. You will be asked whether you
want to save the settings.
4.4 – Network Setup
The Network settings contain the base for almost all communication purposes. Here you
define the configuration for the network connection to a PC, the dial-up to the Internet,
and the basic settings for email.
The network setup contains a pretty big sub-menu that looks like follows:
ELba Setup Tool 0.75
Menu path: /Network
•h Hostname
ELba
d Domainname
[u Dial up]
[e Ethernet]
[w Wireless LAN]
[n USB-Network]
[m Email account]
[i Internet home page]
[s Access to shared PC files]
[a Network access to ELba files]
F1 Help
^Q Quit
^D Default(s)
Device Identification
The menu starts with two entries that are used to identify BRAILLEX ELba within a
network. You read:
102
Chapter 4 – ELba Setup
h Hostname
d Domainname:
ELba
elba.org
Hostname designates the name of the device as it logs on to a network. This network
host typically needs a logon authorization from the network administrator that defines
the rights of that user within the network.
The domain name designates the name to the network or sub-nets you logon to.
In order to change the values, hit <Enter> at the respective names and overwrite the
existing values. If the new name is shorter than the old one, overwrite the remaining
characters with blanks (spaces).
Ethernet
The Ethernet section of the network setup contains the regular identification of your
BRAILLEX ELba within a regular network where you connect the BRAILLEX ELba via
Ethernet cable.
You typically need the help of your network supervisor to setup the values in this
section.
ELba Setup Tool 0.75
Menu path: /Network/Ethernet
•a Ethernet Autostart [ ]
u Use DHCP
[X]
-----------i IP-Address
n Netmask
b Broadcast
g Gateway
-----------d DNS
s Searchdomain
-----------t NTP Server
h HTTP Proxy
f FTP Proxy
F1 Help
•
•
^Q Quit
^D Default(s)
The "Ethernet Autostart" option is disabled by default. This means that when you
want to use the network, you will have to activate it manually (t for "Tools" / c for
"Communication" / e for "Activate Ethernet connection"). On the other hand, it will
avoid trouble if you activate network relevant applications (like email or Internet)
and do NOT have your usual network connected – because you are on the road, for
example.
Note: Your network must be disabled when ELba is not connected to it!
DHCP (Dynamic Host Configuration Protocol) is an easy way of configuring your ELba
network settings if your network supports this feature (ask the administrator!). You
can then leave all the other settings below open.
If you don't want to use DHCP, you have to configure your network as follows:
•
•
•
The IP address is the address BRAILLEX ELba takes within the network. You get it
from the network administrator; example: 192.168.51.225.
The netmask typically is (but need not be) 255.255.255.0
The broadcast typically is the same as the IP address, but has a "255" as the last
number (example: 192.168.51.255).
103
•
•
•
•
Gateway and DNS (domain name server) are values you get from the network
administrator. You can use multiple DNS, they are then separated by spaces.
You may leave Searchdomain empty, or put in your domain (i.e. papenmeier.de).
You may define an NTP server (NTP = Network Time Protocol) NTP is a protocol
designated to synchronize the clocks of computers over a network. You typically
define this server by its IP address.
Note: You must NOT define an NTP server if your ELba is not constantly
connected to a network.
The required settings for the http and ftp proxies come from your network
administrator. If you access the Internet via dial-up connection, you typically need
not specify any proxies.
If you do specify a proxy server, please respect the following syntax (for both the
http and ftp proxies). Don't forget the forward slash in the end!
http://"proxy-Address or server name":"port-No."/;
example:
http://proxy:3128/
Wireless LAN
ELba supports wireless LAN. You can chose from a variety of IEEE 802.11b compliant
cards; they may be in Compact Flash (CF) or PCMCIA format (CAUTION! ELba will
NOT work with Cardbus cards!).
Not for all available cards there are Linux drivers currently available, though. So
currently, the choice of cards (besides the format mentioned above) is limited to cards
with chipsets coming from Prism, Hermes, or Orinoco. Card manufacturers sometimes
change chipsets. So it might be interesting to check technical reference pages on the
Internet.
You find a pretty exhaustive list of currently available cards on a (German) site, under
http://wiki.uni-konstanz.de/wiki/bin/view/Wireless/ListeFunkkarten.
In the past, we have had good results with D-Link cards, such as the D-LinkAir DWL650H.
Please note that some cards have quite bulky antennas. As they stuck in the unit upsidedown, they might obstruct ELba's serial port.
Once the right card has been selected, you must get it to work in the unit. If the card
has the specs cited above, ELba should recognize it (and activate it!) automatically once
you insert it into the PCMCIA slot.
You can also check whether ELba recognized your card: Go to Tools / Linux Shell and
write the command:
iwconfig (Enter).
As long as no card is in the slot, the feedback will be as follows:
104
Chapter 4 – ELba Setup
~> iwconfig
lo
no wireless extensions.
eth0
no wireless extensions.
dummy0
no wireless extensions.
Once you have inserted a card, you will get precise values for the "eth1" connection (see
example below):
~> iwconfig
lo
no wireless extensions.
eth0
no wireless extensions.
dummy0 no wireless extensions.
eth1
IEEE 802.11-DS ESSID:"" Nickname:"Prism I"
Mode:Managed Frequency:42.9497GHz Access Point: 00:00:00:00:00:00
Bit Rate:11Mb/s
Tx-Power=15 dBm
Sensitivity:1/3
Retry min limit:8
RTS thr:off
Fragment thr:off
Power Management:off
Link Quality:0/92 Signal level:-68 dBm Noise level:-122 dBm
Rx invalid nwid:0 Rx invalid crypt:0 Rx invalid frag:0
Tx excessive retries:0 Invalid misc:0
Missed beacon:0
In this case, you still have to configure the connection to the access point. The Wireless
LAN settings menu looks looks this:
ELba Setup Tool 0.75
Menu path: /network/WLAN
d DHCP
[ ]
------------i IP Address
n Netmask
b Broadcast Address
g Gateway
------------s SSID
e Encryption key
------------t NTP (Time) Server
h HTTP Proxy
f FTP Proxy
Let's look at the different options:
DHCP
IP Address
Netmask
Broadcast Address
Gateway
SSID
As in the Ethernet settings, it typically makes sense to use the
DHCP option, this avoids the hassle defining IP addresses and the
like. Most access points support DHCP, so why not take advantage…
If DHCP is checked, you can forget about the next four settings
options. If not, please define IP Address, Netmask, Broadcast
Address, and Gateway.
SSID stands for Station ID. Typically, during the configuration of the
access point, a station ID is assigned. It might be empty, too. In
some cases, the connection will even work if the access point has an
ID assigned and it is NOT set in ELba. But this depends on the
router. Typically, the values should match.
105
Encryption key
The encryption key is definitely critical for a connection to the
access point. There are typically three different possibilities:
a) 128-bit encryption
b) 64-bit encryption
c) String
Using the string encryption is tedious (you would have to "translate"
the string code in hexadecimal values and enter it like this in the
ELba), so we strongly suggest you select another encryption
method if possible.
The 128-bit encryption consists of 26 characters. Please note that
these characters MUST be hexadecimal characters (i.e. numbers
from 0 to 9, and letters from a to f.). With these characters, you
can compose whatever code. Obviously, it must match the one
configured in the access point.
The 64-bit encryption consists of 10 characters. Please note that
these characters MUST be hexadecimal characters (i.e. numbers
from 0 to 9, and letters from a to f.). With these characters, you
can compose whatever code. Obviously, it must match the one
configured in the access point.
NTP (Time) Server
HTTP Proxy
FTP Proxy
Note:
When setting up the access point, you can restrict the user access.
At least for testing the connection we strongly suggest you set the
access point to "open system".
If you want, you can also define an NTP server (that adjusts the
ELba internal clock).
If you want to use the wireless LAN connection for surfing the
Internet, you might also need to specify an HTTP and an FTP proxy.
This depends on the network configuration.
USB-Network
A new type of network connections supported by ELba is a so-called USB network. Since
recently, a driver, the so-called Bahia Network Driver (BND) is available (free of charge)
from Bahia 21. The BND is a driver allowing TCP/IP over USB communication between a
Windows host and a Linux handheld based on Intel's StrongARM SA1110 (the processor
used in ELba). BND will work with Windows 98 SE, ME, 2000, and XP.
The actual version is 0.9.9.5 and will cease to work by the 31 october 2003. By this time
a new release will be available with bug correction. You can download the driver at the
following address: http://www.bahia21.com/it_bnd.htm.
Please note that only ELba units shipped after July, 2003 support the USB
network "out of the box". All elder models require a hardware modification.
Please contact your local distributor / service center.
Installation on the ELba side:
You configure the USB network in the Setup / Network / USB-Network menu. This menu
looks like follows:
106
Chapter 4 – ELba Setup
ELba Setup Tool 0.75
Menu path: /network/USBNET
d use DHCP
[ ]
------------i IP Address
n Netmask
b Broadcast Address
g Gateway
------------t NTP (Time) Server
h HTTP Proxy
f FTP Proxy
Let's look at the different options:
DHCP
IP Address
Netmask
Broadcast Address
Gateway
NTP (Time) Server
HTTP Proxy
FTP Proxy
The DHCP option will not work with most Windows computers (you
would need a real server supporting DHCP. This is why we
recommend a fixed IP in this case.
For reasons of simplicity, assign fixed IP addresses, i.e.
192.168.55.1 for the computer and 192.168.55.2 for the ELba. Stay
with these addresses unless they are already assigned otherwise
within the LAN subnet.
If you want, you can also define an NTP server (that adjusts the
ELba internal clock).
If you want to use the USB network connection for surfing the
Internet, you might also need to specify an HTTP and an FTP proxy.
This depends on the network configuration.
Installation on the PC side:
1. Connect ELba to the PC via USB cable and
activate the USB network on the ELba side: t
for Tools / c for Communication / u Activate
USB Network connection.
2. On the Windows computer, a box will pop
up: Found New Hardware: SA1100 USB NIC"
3. Then the Found New Hardware Wizard comes
up. Select "Search for a suitable driver for
my device (recommended)" using the arrow
keys or pressing Alt+S. Hit Alt+N or Enter
for "Next".
107
4. In the next box, Check the location where
you put the driver and hit Alt+N or Enter for
"Next".
5. Once the system has found the driver
information file (nettactop.inf), hit Alt+N or
Enter for "Next" again.
6. You then get a warning that the software
does not contain a Microsoft digital
signature. Answer the question whether you
want to continue the installation anyway with
Alt+Y or Enter.
7. Now you have to configure the network
parameters on the PC side. If you open the
Control panel in the Windows start / settings
menu, you will find a "Local Area Connection
2" that corresponds to the Bahia Network
Driver.
108
Chapter 4 – ELba Setup
8. Select this connection and hit Enter. Hit the
Properties button. Select "Internet Protocol
(TCP/IP)" and press the Properties button
again.
9. Select "Use the following IP address" (do
NOT obtain it automatically).
For reasons of simplicity, assign fixed IP
addresses, i.e. 192.168.55.1 for the
computer and 192.168.55.2 for the ELba.
Stay with these addresses unless they are
already assigned otherwise within the LAN
subnet. The subnet mask is 255.255.255.0
The default gateway would be
192.168.55.254 in this case, but it is
generally not necessary.
Close the Windows with the OK button and
you are done.
109
Email account
You can specify up to 3 different email accounts. First you select the account number,
and then you define the actual settings.
ELba Setup Tool 0.75
Menu path: /network/email
•n Email Account No.
1
[s Email account setup]
F1 Help
^Q Quit
^D Default(s)
The values for the email account settings either come from your network administrator
(if you access your email via a network), or from your email provider.
The "Account name" helps you identifying your account when ELba is connecting to your
provider. You then see the prompt "connecting to…"
Furthermore, you basically have to specify the servers for receiving email (POP3 server)
and sending mail (SMTP server), including the respective login names (user names) and
passwords.
The "leave mail on server" checkbox allows defining whether you want to leave your mail
on the server in order to be able to retrieve it later from another computer once you
have retrieved them with your ELba.
You may check or not check "POP before SMTP" (i.e. receive mail before sending).
Currently, the feature is not supported yet.
The option screen looks like this:
ELba Setup Tool 0.75
Menu path: /network/email/Account
•a Account name
EMAIL
------------s POP3 Server
l POP3 Login
p POP3 Password
o Leave Mail on Server[ ]
------------v SMTP Server
i SMTP Login
w SMTP Password
b POP before SMTP
[ ]
------------f From
r Reply-To
n Personal name
F1 Help
^Q Quit
^D Default(s)
The entries in the last section are used as follows:
• In the "From" line, you specify the email address as it shall appear in the header of
your email.
• In the "Reply-To" line, the same.
• In the "Personal name" you enter your name
110
Chapter 4 – ELba Setup
Internet home page
ELba Setup Tool 0.75
Menu path: /Network/Internet
•s Startup Homepage
F1 Help
^Q Quit
^D Default(s)
The startup homepage allows defining an Internet address that shall come up every time
you start the Internet browser.
Dial-up
Setting up the dial-up connections occurs in two steps. Once you have selected "Dial Up"
from the setup menu, you see a first question:
• No. of profile
1
You can set up two different profiles, so either accept the "1" by using the down arrow,
or hit <Enter> at the "No. of profile" prompt, write the number 2 and hit <Enter> again.
Use the down arrow or move the Easy Access Bar one step down to get to the "Provider"
item. Confirm with <Enter> You get to a lengthy sub-menu that looks like this:
ELba Setup Tool 0.75
Menu path: /Network/Dialup/Provider
•n Name
Arcor
-------------i Login
arcor
w Password
internet
c Dial Command
ATDT0192070\r
p PPPOE
[ ]
m Modem type
(Default)
s Speed
(Default)
[a advanced settings]
F1 Help
^Q Quit
^D Default(s)
Fill in the fields as follows:
Name
Name of the provider (just for you to remember)
Login
Your user name (you get it from your provider)
Password
Your user password (you get it from your provider)
Dial Command
Here you enter the phone number that shall be dialed.
If you have to dial a prefix to get an outside line (say a "9") and
need a pause after that, and the phone number is 123-456-7890,
the dial string will look like this: 9,1234567890"
PPPOE
Modem type
Speed
You may also specify the modem commands in this string, like "
ATDT". In this case, please enter a "\r" in the end as well.
Only check it if you use a DSL or cable modem. otherwise, leave it
blank. If PPPOE is checked, your internal modem won't work.
Select "default" or "internal modem" for the built-in modem, or
"external modem" for a modem connected to the serial port. If you
use a DSL or cable modem, this option will not be considered.
Select "default" (i.e. 57600) for the internal modem, or a slower
baud rate if the telephone connection is poor. If you use a DSL or
cable modem, this option will not be considered.
111
Advanced settings
ELba allows a number of extra settings that are typically not
required to define a dial-up connection. You find the list of
additional settings in the "advanced" section:
ELba Setup Tool 0.75
Menu path: /Network/Dialup/Provider/AdvProvider
l Local IP
r Remote IP
d DNS
t NTP (Time) Server
h HTTP Proxy
f FTP Proxy
a Authentication
o PPP Options
1 Init 1
2 Init 2
3 Init 3
4 Init 4
h Hangup Command
m MTU
Local IP
Remote IP
DNS
NTP (Time) Server
HTTP Proxy
FTP Proxy
Authentication
PPP Options
Init 1
Init 2
Init 3
Init 4
Hangup Command
MTU
If required, you may define a local IP here
If required, you may define a remote IP here
If required, you may define a Domain name server here
You may define an NTP server (NTP = Network Time Protocol) You
typically define this server by its IP address.
If required, you may define an HTTP proxy here
If required, you may define an FTP proxy here
It is only used if special authorization procedures are required (in
this case you get the necessary information from the provider).
Typically left blank
Typically left blank (default if blank: "'+++ATZ")
Typically left blank (default if blank: "'AT&FE0&D0&C0Q0V1")
Typically left blank (default if blank: "'ATS7=60S30=0M1")
Typically left blank (default if blank: "'ATX3")
Typically left blank
Typically left blank. In some cases (especially with DSL connections)
it has revealed necessary to limit the MTU (Maximum Transmission
Unit) that is normally negotiated automatically. In this case enter a
value, i.e. 128.
Access to shared PC files
This chapter will describe how to setup a file transfer channel to a PC where you access
so-called "shared files" on a Windows based PC using the ELba.
This connection must first of all be configured on both sides. Unfortunately, depending
on 1) whether you want to use a network connection or a serial connection for the file
transfer, and 2) which operating system you use on your PC, the procedure is slightly
different. We will therefore describe the different cases separately, operating system by
operating system.
Serial connections, the so-called DCC (Direct Cable Connections) do work quite
well once they have been installed successfully. But the installation has
revealed quite tricky, and this is why we do not really recommend using this file
transfer method. Nevertheless you will find step-by-step instructions below, in
chapter 5.3 – Installing the Winshare Connection via Serial Port starting on
page 139
112
Chapter 4 – ELba Setup
Important: Please note that if on the PC side, you have an NT like operating
system (Windows NT4, Windows 2000 or Windows XP), you need
administrator's privileges to be able to install the direct cable connection. You
might need to refer to the system's administrator to install the DCC.
In some cases, it might be necessary that you have your original Windows CD
handy to install further software.
Remarks valid for all Windows versions:
• File and printer sharing must be installed and configured in the network installation.
• The shares and access rights to the shared volumes (drives or directories) should be
global, at least for testing.
• "Netbios over TCP/IP" must be activated.
Within an existing network, the installation of the Winshare is quite easy:
1) On the PC side, add a new user and assign a password and the privileges (Control
panel / Users and Passwords).
2) Install the share (within the Windows Commander or "My Computer", make a right
mouse click at the drive or directory you want to share, go to "Sharing…" and assign
the privileges. At least for testing purposes, allow full control for everyone.
3) On the ELba side, if the network supports DHCP, the connection is easy. In the
Network / Ethernet setup, just check the option "use DHCP". Otherwise, assign any
free address within the subnet of the computer you want to access.
4) Within the Network/ Access to shared PC files setup, set the following values:
ELba PC file share Setup
Label
Value
Hostname: MyComputer
Share
MyShare
Login
Password
OS
----Windows 2000 / XP
Explanation
The computer name defined in the Network
Identification tab in the Local Area Connection
properties
Share Name – typically corresponds to the drive
or directory name you want to share (see Sharing
preparation above)
Can be left out (otherwise: user name)
Can be left out (otherwise: user password)
Depends on operating system used
If you do not have a network installed on the computer, proceed as follows:
1) In the Control Panel / Network, define the TCP/IP properties, set the following
values:
PC Network / TCP/IP properties
Label
IP Address:
Subnet Mask:
Standard-Gateway:
Value
192.168.55.1
255.255.255.0
192.168.55.254
2) add a new user and assign a password and the privileges (Control panel / Users and
Passwords).
113
3) Install the share (within the Windows Commander or "My Computer", make a right
mouse click at the drive or directory you want to share, go to "Sharing…" and assign
the privileges. At least for testing purposes, allow full control for everyone.
4) On the ELba side, set the Network / Ethernet settings as follows:
ELba Network / Ethernet Setup
Label
IP Address:
Subnet Mask:
Standard-Gateway:
Value
192.168.55.2
255.255.255.0
192.168.55.254
5) Within the Network/ Access to shared PC files setup, set the following values:
ELba PC file share Setup
Label
Value
Hostname:
MyComputer
Share
Login
Password
OS
PPPoS
Advanced Settings:
Serial port speed
Local IP
Remote IP
Mountpoint
Syncpoint
Explanation
The computer name defined in the Network
Identification tab in the Local Area
Connection properties
MyShare
Share Name – typically corresponds to the
drive or directory name you want to share
(see Sharing preparation above)
Elba
Can be left out (otherwise: user name)
secret
Can be left out (otherwise: user password)
Windows 2000 / Depends on operating system used
XP
NOT checked
Only for serial connection!
--192.168.55.2
192.168.55.1
/mnt/flash/elba/
netmount
sync
Only for serial connection!
Name of the directory within ELba that shall
be the shared directory
Directory for automatic synchronization
CAUTION: IN THIS CASE, YOU NEED A "CROSS-OVER" ETHERNET CABLE TO
CONNECT ELBA TO THE PC. A DIRECT CONNECTION WILL NOT WORK WITH A
"PATCH" CABLE!
114
Chapter 4 – ELba Setup
Network access to ELba files
In the Server setup, you can define an ELba-PC connection the other way round, i.e you
can setup a connection where you can see ELba and its files from a computer network.
There is a condition for this type of connection:
•
You MUST use a static IP address (you cannot use the convenient dynamic DHCP
configuration).
The actual ELba setup occurs in the Network/Server menu. You have 4 different
parameters you can influence:
•
•
•
•
You should specify the workgroup (or domain; you find the information when you
make a right mouse click on the "my computer" icon on the desktop, then select
properties and look into the network identification tab). Default value is
"WORKGROUP". The connection will also work if you do not specify the right
workgroup, but you probably won't see ELba in the network neighborhood.
You only need to specify a NETBIOS name if you want to see ELba under a different
name than the one specified under setup/network/hostname.
You only need to specify a WINS server if you work in a larger network and your
system administrator requires a WINS server.
You must define which types of network connections can be used to access ELba files
(check or uncheck Ethernet port, Wireless LAN, and / or USB network)
ELba Setup Tool 0.75
Menu path: /Network/SambaServer
•w Workgroup name
WORKGROUP
n Netbios name
i WINS Server
Allow access through:
e Ethernet port
[ ]
w Wireless LAN
[ ]
u USB network
[ ]
F1 Help
^Q Quit
^D Default(s)
115
4.5 – Power Management Setup
The power management setup contains a 3-item sub-menu, level 1 – level 3. You can
define sleep mode times for:
1. Level 1: The main board. After a given time (in seconds), the main processor is
slowed down, until it is activated by whatever interrupts. The minimum value is 10,
the maximum value 2550. Zero disables the main board sleep mode.
2. Level 2: The Braille display. After a given time (in seconds), the Braille display shuts
off, until any routing key activates it again. The minimum value is 10, the maximum
value 2550. Zero disables the Braille display sleep mode.
3. Level 3: The complete system. After a given time (in seconds), the Braille display
shuts off, until it is activated again when you press the on/off key on the backside of
the device (in fact, level 3 corresponds to an automatic sleep mode). The minimum
value is 10, the maximum value 2550. Zero disables the system sleep mode. If the
system sleep mode is disabled, the other ones won't work either. So if you want to
use Braille sleep mode for example without really using the automatic system sleep
mode, set the system sleep mode to maximum value and the Braille display sleep
mode to the value you like (i.e. 300 for 5 minutes).
In order to change any of the values, hit <Enter> when you get to the corresponding
levels, and overwrite the existing value. Confirm with <Enter> again. To leave the power
management menu, hit Escape.
4.6 – Braille Setup
This menu is currently only interesting if you have an ELba with a QWERTY keyboard and
you want to use it in Braille mode. More options will be implemented soon.
The complete menu has the following options:
Braille Setup
Menu item
Braille font
QUERTY keyboard
settings
Visualization type
Back translation
Values
Hit Enter and use the arrow keys for a selection of Braille fonts.
Hit Enter and use the arrow keys for a selection of QWERTY
keyboard usage: as a regular QWERTY keyboard, or as a Braille
keyboard.
Hit Enter and use the arrow keys to choose between visualization
on a VT100 terminal or an external LCD display.
Activate back translation at startup on/off
In order to change any of the values, hit <Enter> when you get to the corresponding
levels, and use the arrow keys to select. Confirm with <Enter> again. To leave the
Braille setup menu, hit Escape.
116
Chapter 4 – ELba Setup
4.7 – Speech Setup
The speech setup has the following options:
Speech Setup
Menu item
Language
Verbosity
Volume
Speed
Pitch
Values
1-4
1
2
3
4-7
1-10
1-10
1-10
Remarks
1 corresponds to first language, the languages 2-4
are optional.
normal speech
normal speech with attributes
normal speech with keyboard echo
free for future enhancements
Set the volume you like.
Sets synthesizer speed. 1 is slow, 10 is fast.
Sets speech pitch. 1 is low, 10 high.
In order to change any of the values, hit <Enter> when you get to the corresponding
levels, and overwrite the existing value. Confirm with <Enter> again. To leave the
speech setup menu, hit Escape.
4.8 – Saving Setup Values
After you have modified all the values in the setup program you like, hit Escape to exit
the setup menu. You get the following message:
Exit? (Y)=Save (N)=without saving (ESC)=back to setup
If you want to save the new values, hit "y", if you want to exit the setup program
without saving, hit "n", and if you want to continue changing values in the setup, hit
Escape.
117
Chapter 5 – Tables
Chapter 5 – Tables
5.1 – Quick Reference
Braille-Emulation of the PC-Special keys
Braille-Emulation of the PC-Special keys
PC key (combination
Braille Equivalent
Enter
Space + dot 8
Escape
Space + dot 7
Left arrow
Space + dot 1
Right arrow
Space + dot 4
Up arrow
Space + dot 2
Down arrow
Space + dot 5
Page up
Space + dot 3
Page down
Space + dot 6
Home
Space + dots 1+2
End
Space + dots 4+5
Insert
Space + dots 2+3
Del
Space + dots 5+6
Tab
Space + dots 3+7
Backspace
Space + dots 6+8
F1-F12
Right thumb + letters a-l
NumPad 1-0
Right thumb + numbers 1-0 (computer Braille!)
NumPad-operators
Right thumb + "+", "-", "*", "/" (computer Braille!)
NumPad Enter
Right thumb + dot 8
NumPad NumLock
Right thumb + letter "n"
Activate control center (Ctrl-Esc)
Space + dots 1,2,3,4,5,6 (or Ctrl-Esc)
Ctrl + Alt + Del
Space + dots 1,2,3,4,5,6,7,8
Toggle Stand-alone mode / PC terminal
Space + dots 7+8 (Ctrl + Shift + Pause)
Braille-Emulation of PC-Shift, Alt, Ctrl
In the way of "sticky keys", the key modifiers Shift, Alt, Ctrl and Insert (used in combination with
other keys in a popular screen reader program) are made available as a prefix for combinations
with other keys. The next keystroke entered within 5 seconds after the prefix will then have the
key modifier added. The prefix is abolished if you wait for more than 5 seconds or hit Left thumb +
dot 7.
Braille-Emulation of PC-Shift, Alt, Ctrl
PC modifier key
Braille Equivalent
Shift
Left thumb + dot 1
Ctrl
Left thumb + dot 2
Alt
Left thumb + dot 3
Shift + Ctrl
Left thumb + dots 1+2
Alt + Shift
Left thumb + dots 1+3
Alt + Ctrl
Left thumb + dots 2+3
Shift + Alt + Ctrl
Left thumb + dots 1+2+3
Insert (as key prefix, used in Jaws!)
Left thumb + dots 3+7
Disable prefix
Left thumb + dot 7
119
Braille-Emulation of EL-keys and switches
After a general modality switch, the Braille keys and special keys (right, left thumb, space) are
used to emulate the switches and keys of the EL displays. Please note that the modality switch is
valid only for one command.
A timeout function switches back to normal Braille input if the command is not entered within 5
seconds.
Braille-Emulation of EL-keys and switches
EL Switch
Braille keyboard unit
QWERTY keyboard unit
Switch normal keys – EL keys
Left + right thumb
Left and right Windows key
Left switch in rear position
dot 1
Key F
Left switch in central position
dot 2
Key D
Left switch in front position
dot 3
Key S
Right switch in rear position
dot 4
Key J
Right switch in central position
dot 5
Key K
Right switch in front position
dot 6
Key L
Reset default positions
dot 7
Key A
Left key in rear position
Left thumb
Left Windows key
Left key in front position
Space + left thumb
Context Menu + left Win key
Right key in rear position
Right thumb
Right Windows key
Right key in front position
Space + right thumb
Context Menu + right Win key
For the EL keys, you have two options:
3) The key shall be pressed alone. After switching the keyboard to "EL key management"
pressing "left + right thumb", you press the corresponding key combination twice (i.e. "space
+ left thumb" for the EL-function "Left key in front position"). After that, the ELba keyboard
can be used for normal input again.
4) The key shall be pressed along with the Easy Access Bar. For this purpose, first switch the
keyboard to "EL key management" pressing "left + right thumb", then you press the
corresponding key combination (i.e. "space + left thumb" for the EL-function "Left key in front
position"), and finally, you press the EAB. This command sequence activates the EL command
and switches the keyboard back to normal input.
Easy Access Bar Functions
Stand-alone functions
Depending on the applications, the EAB either has screen navigation functions, or emulates
specific keyboard keys to navigate through the options of an application. Once in the application,
you can switch the functionality of the EAB with a keystroke.
We distinguish between three working modes:
• Navigation mode
• Interaction mode
• Combined mode
The actual default EAB assignment may vary from application to application. A typical assignment
looks like this:
120
Chapter 5 – Tables
Navigation Mode Keys
Function
EAB keystroke
Read backwards
EAB 1 step left
Line up (maintain column)
EAB 1 step up
Read forwards
EAB 1 step right
Line down (maintain column)
EAB 1 step down
Display to start of text line
EAB 2 steps left
Line to first screen line
EAB 2 steps up
Display to end of text line
EAB 2 steps right
Line to last screen line
EAB 2 steps down
Interaction Mode Keys
Function
EAB keystroke
Read backwards
EAB 1 step left
Up arrow
EAB 1 step up
Read forwards
EAB 1 step right
Down arrow
EAB 1 step down
Home
EAB 2 steps left
Escape
EAB 2 steps up
End
EAB 2 steps right
Enter
EAB 2 steps down
Combined Mode Keys
Function
EAB keystroke
Read backwards / move cursor when changing line
EAB 1 step left
Up arrow
EAB 1 step up
Read forwards / move cursor when changing line
EAB 1 step right
Down arrow
EAB 1 step down
Display to start of text line
EAB 2 steps left
Page up
EAB 2 steps up
Display to end of text line
EAB 2 steps right
Page down
EAB 2 steps down
121
EAB Key Combinations
As 8 functions are not sufficient to access all BRAILLEX ELba functions, the device uses modifier
keys (corresponding to the keys on the EL displays). Furthermore, you can assign a complete new
set of commands to the EAB by selecting a different working mode.
For the devices with Braille keyboard, the thumb keys in the bottom row of the Braille keyboard
(right and left thumb, space) are used to modify the meaning of the EAB. For devices with
QWERTY keyboard, the thumb keys have the following analogies:
Thumb Key Analogies For Devices With QWERTY Keyboard
Braille Keyboard
QWERTY Keyboard
Left thumb key
Left Windows key
Right thumb key
Right Windows key
Space
Context Menu key
Please note that there is a difference in handling between the devices with Braille keyboard and
those with QWERTY keyboard:
• For thumb key – EAB combinations on devices with Braille keyboard, you PRESS AND
RELEASE the thumb key and then press the EAB within the following 5 seconds.
• For thumb key – EAB combinations on devices with QWERTY keyboard, you press and HOLD
the thumb key while you press the EAB.
Modality Switches
Modality Switches
Function
BRAILLEX ELba key combination
Status display on / off (toggle)
Right thumb + space + EAB 1 step right
Activate virtual vs. regular hard cursor (toggle)
Right thumb + space + EAB 1 step left
Speak ELba menu messages off / on (toggle)
Right thumb + space + EAB 1 step up
Grade 2 back translation for speech off / on (toggle)
Right thumb + space + EAB 1 step down
Toggle Interaction Mode / Navigation Mode
Right thumb + space + EAB 2 steps right
Toggle Combined Mode / Navigation Mode
Right thumb + space + EAB 2 steps left
Delete screen reader profile for current application
Right thumb + space + EAB 2 steps up
Save screen reader profile for current application
Right thumb + space + EAB 2 steps down
Braille Management Keys
Braille Management Keys
Function
BRAILLEX ELba key combination
Cursor tracking on/search cursor
Left thumb + EAB 1 step right
Cursor tracking off
Left thumb + EAB 1 step left
Attribute underlining on/off
Left thumb + EAB 2 steps right
Toggle computer Braille / grade 2
Left thumb + EAB 2 steps left
Change cursor shape (toggle)
Left thumb + EAB 1 steps up
Cursor on/off
Left thumb + EAB 1 step down
Compressed mode on/off
Left thumb + EAB 2 steps up
6 / 8 dot Braille (toggle)
Left thumb + EAB 2 steps down
122
Chapter 5 – Tables
Speech synthesizer management keys
Speech Synthesizer Management Keys
Function
BRAILLEX ELba key combination
Speed up
Left thumb + Space + EAB 1 step right
Speed down
Left thumb + Space + EAB 1 step left
Volume up
Left thumb + Space + EAB 1 step up
Volume down
Left thumb + Space + EAB 1 step down
Speak punctuation marks: off / some / all
Left thumb + Space + EAB 2 steps right
Speech off / on (toggle)
Left thumb + Space + EAB 2 steps left
Key echo: off / character / word (toggle)
Left thumb + Space + EAB 2 steps up
Cursor echo: off / on (toggle)
Left thumb + Space + EAB 2 steps down
Shut up
Left thumb key + right thumb key + space
(QWERTY keyboard: left Ctrl)
Speaker / language selection via setup program
Screen reader management keys
General screen reader management keys
Function
BRAILLEX ELba key combination
Read next word moving cursor (Ctrl right arrow)
Right thumb + EAB 1 step right
Read previous word moving cursor (Ctrl+left arrow)
Right thumb + EAB 1 step left
Read from top of screen to cursor pos.
Right thumb + EAB 2 steps up
Read from cursor position to end of file
Right thumb + EAB 2 steps down
Read line from cursor position
Right thumb + EAB 2 steps right
Read line to cursor position
Right thumb + EAB 2 steps left
Read previous line moving cursor (up arrow)
Right thumb + EAB 1 step up
Read next line moving cursor (down arrow)
Right thumb + EAB 1 step down
Shut up
Left thumb key + right thumb key + space
(QWERTY keyboard: left Ctrl)
Screen reader management keys in Virtual Cursor Mode
In addition to the regular cursor (hard cursor), BRAILLEX ELba knows a virtual cursor used for
screen reading purposes. You activate this virtual cursor pressing the right thumb key + space,
and afterwards pushing the EAB 1 step left.
Once you have activated the virtual cursor, it will have the same position as the hard cursor. You
can move it across the screen using the arrow keys or the equivalent Access Bar keystrokes. The
Braille display will follow the cursor movement as long as cursor tracking is activated, just as it
would for the regular hard cursor.
The routing keys work: if you press a routing key, the corresponding word will be spoken.
A double click on a routing key will move the hard cursor to the virtual cursor position and end the
virtual cursor mode.
123
Screen reader management keys in Virtual Cursor Mode
Function
BRAILLEX ELba key combination
Enable / disable Virtual Cursor Mode (toggle)
Right thumb + space + EAB 1 step left
Previous word (Ctrl+left arrow)
EAB 1 step left
Next word (Ctrl+right arrow)
EAB 1 step right
Read previous line (up arrow)
EAB 1 step up
Read next line (down arrow)
EAB 1 step down
Read line to cursor position
EAB 2 steps left
Read line from cursor position
EAB 2 steps right
Read from top of screen to cursor pos.
EAB 2 steps up
Read from cursor position to end of screen
EAB 2 steps down
Shut up
Left thumb key + right thumb key + space
(QWERTY keyboard: left Ctrl)
Key Assignment in BRAILLEX ELba applications
Control Center
Applications in the control center and their hotkeys
Application
Hotkey
Editor
e
Document Reader
r
File Manager
f
Internet Browser
I
Email
m
Spreadsheet
a
MP3-Player
p
Calculator
c
Tools
t
Sleep Mode
l
Power down
---
Hidden Applications in the control center and their hotkeys
Setup
Left Ctrl + left Shift + s
(Braille: Left thumb key + dots 1 + 2, then letter s)
Enable / disable PC screen reader emulation
Left Ctrl + left Shift + Pause
(Braille keyboard: space + dots 7+8)
Show battery status
Left Ctrl + F1 (Braille: left thumb + dot 2, then right
thumb + dot 1)
Announce date and time:
Left Ctrl + F12 (Braille: left thumb + dot 2, then
right thumb + dots 123)
124
Chapter 5 – Tables
Word processor (Editor)
Editor
Function
Key (combination)
Open existing document at startup
Move display with arrow keys and select with
(Enter)
Create new document at startup
n (you will get prompted for file name)
Save document
Ctrl+S
Quit editor
Ctrl+Q
Open / Insert file at cursor position
Ctrl+O
Mark / unmark text
Ctrl+T
Cut marked text (or text line if no marker is set)
Ctrl+X
Copy marked text
Ctrl+C
Paste text
Ctrl+V
Search for text
Ctrl+F
Move the cursor to the start of file
Ctrl+F, Ctrl+S
Move the cursor to the last line of the file
Ctrl+F, Ctrl+E
Move the cursor to the start of the current paragraph
Ctrl+F, up arrow
Move the cursor to the end of the current paragraph
Ctrl+F, down arrow
Replace a word
Ctrl+F, Ctrl+R
Automatic Line Adjustment
Ctrl+J
Get Help
Ctrl+G
Show cursor position
Ctrl+U
Default EAB assignment:
Navigation mode
File Manager
File Manager
Function
Key (combination)
Go to directory (you are prompted for dir name)
g
Create a new file or folder (slash in the end of file name
indicates folder)
n
Rename file or folder
r
Delete a file or folder
d
Edit a text
e, or EAB 2 steps left
Associate a file with another program (i.e. MP3 player,
converter, print routine, etc.)
a, or EAB 2 steps right
View a file
v, Enter, or EAB 2 steps down
Exit File Manager
Ctrl+Q
Default EAB assignment:
Interaction mode
125
Internet Browser
Internet Browser
Function
Key (combination)
Browsing
Select next link
Down arrow
Select previous link
Up arrow
Follow selected link
Right arrow, Return, Enter
Scrolling Keys
Return to previous topic
Left arrow
Scroll down to next page (Page-Down)
+ / PgDn / Space
Scroll up to previous page (Page-Up)
- / PgUp / CTRL-B
Go to first page of the current document (Home)
Home / CTRL-A
Go to last page of the current document (End)
End / CTRL-E
Go to the first link on the current line
^
Go to the last link on the current line
$
Go to the previous link in the current column
<
Go to the next link in the current column
>
Go to Toolbar or Banner in the current document
#
Jumping to Previously Visited Places
Go to the History Page
[backspace]
Return to main screen
m
Go to the Visited Links Page
V
List references (links) in current document
l
Follow link (or go to link) number:
numbers
Function
Key (combination)
Jumping to New Places
Goto a user specified URL or file
g
Edit the current address and use that as a go to URL.
G
Screen Refresh
Cancel transfer in progress
z
Show info about current document, URL and link
=
Toggle document source/rendered view
\
Reload current file and refresh the screen
CTRL-R
Refresh the screen
CTRL-L
Searching a Web page
Search for a string within the current document
/
Go to the next search string
n
Go to the previous search string
N
Bookmarks
View bookmark file
v
Add the current link to bookmark file
a
Exit the Browser
Quit (with verification)
q
Quick quit (without verification)
Q / Ctrl-D
126
Chapter 5 – Tables
Email
Email
Function
Key (combination)
Main menu
Help
Ctrl+G
Compose Message
m
Message Index
I
Folder List
f
Address Book
a
Setup
s
Quit
q
Message Editing
Send message
Ctrl+Q
Postpone sending a message
Ctrl+S
Attach one or more files to your email
Ctrl+E
Address Book
Add new address
a (in address book)
Take address from a message you are viewing or have T
selected in the index
Commands in folder list
Highlight the message you want to view
arrow keys
Read the highlighted message
Enter
Reply to a message
r
Forward a message
w
Move quickly to the index of another folder
G
Add a folder
F
Delete a (highlighted) folder or message
D
Save (highlighted) message
S
Expunge messages marked for deletion
X
Exit Email
Exit Email
q
Day Planner
Day Planner
Function
Key (combination)
New appointment
Load appointment file
Edit appointment
Save appointment file
Delete appointment
Print
View appointment
next view level
previous view level
Setup
Quit
Ctrl+n
Ctrl+l
Ctrl+e
Ctrl+s
Ctrl+d
Ctrl+p
CR
right arrow or ">"
left arrow or "<"
S
Ctrl+q
127
Day Planner: Viewer
Function
Key (combination)
Get back to the appointment list.
Delete the appointment from the list.
Edit or modify the appointment.
Print the appointment
Visualize the previous appointment
Visualize the next appointment
Copy the appointment to the clipboard (you can then enter the data
into your word processor or an email, for example).
ESC
Ctrl+d
Ctrl+e
Ctrl+p
up arrow
down arrow
Ctrl+c
Spreadsheet
Spreadsheet Cursor Control Commands
Function
Key (combination)
Go to cell A0
Home
Move the cell cursor up to the previous row
Up arrow
Move the cell cursor down to the next row
Down arrow
Move the cell cursor backward one column
Left arrow
Move the cell cursor forward one column
Right arrow
Move the cursor a half page down
PgDn
Move the cursor a half page up
PgUp
Move the cell cursor up to row 0 of the current column.
^
Move the cell cursor down to the last valid row of the current column.
#
Move the cell cursor backward to column A of the current row.
Ctrl U + 0
Move the cell cursor forward to the last valid column of the current row.
$
Go to a cell. You will be prompted for a cell's name
g
Move the current row to the top of the screen.
z<RETURN>
Move the current row to the center of the screen.
z.
Move the current column to the center of the screen.
z|
Center the current cell both horizontally and vertically.
zc
128
Chapter 5 – Tables
Spreadsheet Cell Entry and Editing Commands
Function
Key (combination)
Enter a number into the current cell
0-9
Enter a number or expression into the current cell.
=
Enter a label string into the current cell to be left justified
<
Enter a label string into the current cell to be centered
\
Enter a label string into the current cell to be right justified
>
Left justify the string in the current cell.
{
Center the string in the current cell.
|
Right justify the string in the current cell.
}
Enter a format string into the current cell.
F (with more commands)
Edit the value associated with the current cell.
e (with more commands)
Edit the string associated with the current cell.
Clear the current cell.
x
Mark the current cell.
m
Copy a previously marked cell to the current cell, updating row and column cx
references in its numeric or string expression, if any
Switch to insert mode and append a '+' to the current expression or value
+
Switch to insert mode and append a '-' to the current expression or value
-
Spreadsheet File Commands
Function
Key (combination)
Open a new worksheet from a file.
Ctrl+O
Save the current worksheet to a file.
Ctrl+S
Save the current worksheet into a file if it has been modified, and then quit.
ZZ
Write a listing of the current worksheet into a file in a form that matches its W
appearance on the screen (print to a file).
Write a listing of the current worksheet to a file, but include delimiters suitable T
for processing by the tbl, LaTeX, or TeX table processors.
Merge the worksheet from the named file into the current table.
M
Spreadsheet Miscellaneous Commands
Function
Key (combination)
Exit from the spreadsheet program
Ctrl+Q
Abort entry of the current command.
ESC
Help
F1, ?
Redraw the screen
Ctrl+L
Redraw the screen with special highlighting of cells to be filled in
Ctrl+R
Highlight cells which have expressions
Ctrl+X
Recalculate the spreadsheet.
@
129
Spreadsheet Numeric Expressions
Function
Key (combination)
Negation.
-e
Addition.
e+e
Subtraction.
e-e
Multiplication.
e*e
Division.
e/e
e1 mod e2.
e1%e2
Exponentiation.
e^e
Operator precedence from highest to lowest is:
-, ~ ^ *, / +, - <, <=, =, !=, >=, > & | ?:
For the (very long) list of spreadsheet functions, please refer to the description on pages 64 and
following.
MP3 Player
MP3 Player
Function
Key (combination)
Choose MP3 file to be played
up and down arrow keys (or: EAP up or down), Enter
to select a new directory (or EAB 2 steps down)
Play MP3 file
a, or EAB 2 steps right
Stop playing and exit MP3 player
Ctrl+Q (or EAB 2 steps up)
Default EAB assignment:
Interaction mode
Voice Note
Voice Note
Function
Key (combination)
New tape
N
Edit (enter subject)
Ctrl+E
Record
Ctrl+R
Rewind tape
R
Play
P or Enter
Faster
+
Slower
-
Pause
SPC
Stop
S
Merge two subsequent voice notes
M
Delete voice note
D
Quit
Ctrl+Q
Select another voice note
cursor up or down
130
Chapter 5 – Tables
Hotkeys for Voice Recorder Functions
Function
Key (combination)
Rewind tape
Ctrl+F2
Play previous voice note
Ctrl+F3
Play current voice note
Ctrl+F4
Skip voice note
Ctrl+F5
Pause
Ctrl+F6
Stop recording / playing
Ctrl+F7
Record new voice note
Ctrl+F8
Scientific Calculator
Scientific Calculator basic functions
Function
Key (combination)
Addition
+
Subtraction
-
Multiplication
*
Division
/
Exponentiation
^
Modulus
%
Integer divide
//
Result of the last command expression
. (dot)
Help
F1 or "help" (Enter)
Scientific Calculator display modes
Function
Command
Alternate command
binary fractions
base(2)
config("mode", "binary")
octal fractions
base(8)
config("mode", "octal")
decimal floating point
base(10)
config("mode", "real")
hexadecimal fractions
base(16)
config("mode", "hex")
decimal integer
base(-10)
config("mode", "int")
decimal fractions
base(1/3)
config("mode", "frac")
decimal exponential
base(1e20)
config("mode", "binary")
binary fractions
base(2)
config("mode", "exp")
Return current mode
base()
For the (very long) list of built-in functions, please refer to chapter Calculator Functions on page
71 and following.
131
5.2 – Installing the Winshare Connection via Network
BRAILLEX ELba - Windows 98 / 98SE / ME PC
Under Windows 98, please proceed as follows:
1. Install the network. If no network had been installed before, the Windows 98 CD is required
for this:
From the Start Menu, select Settings / Control Panel / Network. You get a dialog box.
• In the Configuration tab, add "File and printer sharing for Microsoft Networks"
• Press Alt R for the Properties button. For "Browse Master", select the value "Enabled".
•
•
132
Press Alt F for the File and Print Sharing button. Check "I want to give others access to my
files" and "I want to be able to allow others to print to my printers".
In the Access Control tab, check "Share-level access control".
Chapter 5 – Tables
•
In the Identification tab, check (or, of it has not been installed before), define the
Computer Name (in the picture below, it is MyComputer").
2. In the Network settings, check or define the TCP/IP properties. In our example, the IP address
is 192.168.55.14, the subnet mask is 255.255.255.0 You will need the IP address for the ELba
setup (see picture above).
3. Prepare the share on the computer (in our case, we will allow BRAILLEX ELba to access the
complete C: drive of the computer).
•
Open Windows Explorer or My Computer.
• Select the drive or directory you want to share and make a right mouse click or press the
context menu button or Shift+F10. From the context menu, select "Sharing"
• Enable the "Shared As" radio button and check (or enter) the Share Name (in our example
"C"). Set the Access Type radio button to "Full". Press Alt-A and Enter to accept the
settings.
4. Prepare BRAILLEX ELba for the WinShare:
133
•
From the Setup Menu, select "Network" and then "PC file share". Enter the values as
follows:
ELba PC file share Setup
Label
Value
Explanation
Hostname:
MyComputer
The computer name defined in the
Network Identification tab
Share
C
Share Name – typically corresponds
to the drive or directory name you
want to share (see Sharing
preparation above)
Login
--Can be left out (otherwise: user
name)
Password
--Can be left out (otherwise: user
password)
OS
Windows 98/98SE/ME
MUST be that!
PPPoS
--Only used for serial connection
Device
--Only used for serial connection
Speed
--Only used for serial connection
local IP
--Can be left out (is checked
automatically)
remote IP
192.168.55.14
IP address of computer
Mountpoint
/mnt/flash/elba/netmount Must not be changed!
Syncpoint
MyELba
Name you can assign freely.
•
You now can exit the settings and save them. BRAILLEX ELba and the computer are ready
for file sharing.
5. From the BRAILLEX ELba Control Panel, select "t" for Tools, then "c" for Communication and
"p" for Connect ELba-PC. There is no confirmation message.
You now can go to the File Manager. Within the user directory, you find a new directory, called
"netmount". Netmount corresponds to the PC drive (in our example, it is the C: drive)
Furthermore, you find the syncpoint, a directory called "MyELba", both in the ELba user
directory and in the computer's C: drive (i.e. netmount). If you copy any file into one or the
other MyELba directory and then call Tools/Communications/ "s" for Synchronize data with PC,
you will find the same files on both the ELba and the PC syncpoints.
BRAILLEX ELba - Windows 2000 PC
The chapter below assumes that if Windows 2000 is installed on a computer, a local area network
is installed, too. Consequently, we will not describe how to install the network itself.
Please note that for modifying network settings, you need administrator's privileges to the
computer. So if you don't have these rights yourself, please make sure that the network
administrator is around when you install the direct cable connection with BRAILLEX ELba.
Adjusting the network:
1. Check / install the IP address. Select the radio button "Use the following IP address" (do not
obtain it automatically.
2. I the Advanced options, in the WINS tab, select "Enable NetBIOS over TCP/IP".
134
Chapter 5 – Tables
Installing the Share:
3. Install the share: Open Windows Explorer, select the directory you want to share, make a
right mouse click and select "Sharing…". Please note that the share name must NOT contain
any spaces or any accentuated characters. You get the following dialog boxes (the second one
after having pressed the Permissions button):
4. Adjust the share permissions for the ELba user. If you use the anonymous connection
(dccwin), give ALL users full control over the shared directory.
Adjusting BRAILLEX ELba:
5. Prepare BRAILLEX ELba for the Ethernet connection:
• From the Setup Menu, select "Network" and then "PC file share". Enter the values as
follows:
135
ELba PC file share Setup
Label
Value
Hostname:
MyComputer
Share
MyShare
Login
---
Password
---
OS
PPPoS
Device
Speed
local IP
Win2000 / XP
---------
remote IP
Mountpoint
Syncpoint
192.168.55.14
/mnt/flash/elba/netmount
MyELba
Explanation
The computer name defined in the
Network Identification tab in the
Local Area Connection properties
Share Name – typically corresponds
to the drive or directory name you
want to share (see Sharing
preparation above)
Can be left out (otherwise: user
name)
Can be left out (otherwise: user
password)
MUST be that!
Only used for serial connection
Only used for serial connection
Only used for serial connection
Can be left out (is checked
automatically)
IP address of computer
Must not be changed!
Name you can assign freely.
•
You now can exit the settings and save them. BRAILLEX ELba and the computer are ready
for file sharing.
6. From the BRAILLEX ELba Control Panel, select "t" for Tools, then "c" for Communication and
"p" for Connect ELba-PC. There is no confirmation message.
You now can go to the File Manager. Within the user directory, you find a new directory, called
"netmount". Netmount corresponds to the PC drive (in our example, it is the C: drive)
Furthermore, you find the syncpoint, a directory called "MyELba", both in the ELba user
directory and in the computer's C: drive (i.e. netmount). If you copy any file into one or the
other MyELba directory and then call Tools/Communications/ "s" for Synchronize data with PC,
you will find the same files on both the ELba and the PC syncpoints.
BRAILLEX ELba - Windows XP PC
Adjusting the network:
1. In analogy to the Windows 2000 installation, setup the network. You find the installation
routine within the control panel.
2. Check / install the IP address. Select the radio button "Specify an IP address" (do not obtain it
automatically.
3. In the Advanced TCP/IP settings, in the WINS tab, select "Enable NetBIOS over TCP/IP".
136
Chapter 5 – Tables
Installing the Share:
4. Install the share:
• Open Windows Explorer, select the directory you want to share, make a right mouse click
and select "Sharing and Security…".
• In the Sharing tab, check "Share this folder on the network" and "Allow network users to
change my files". Please note that the share name must NOT contain any spaces or any
accentuated characters.
Adjusting BRAILLEX ELba:
5. Prepare BRAILLEX ELba for the Ethernet connection:
• From the Setup Menu, select "Network" and then "PC file share". Enter the values as
follows:
137
•
ELba PC file share Setup
Label
Value
Hostname:
MyComputer
Share
MyShare
Login
---
Password
---
OS
PPPoS
Device
Speed
local IP
Windows 2000 / XP
---------
remote IP
Mountpoint
Syncpoint
192.168.55.14
/mnt/flash/elba/netmount
MyELba
Explanation
The computer name defined in the
Network Identification tab in the
Local Area Connection properties
Share Name – typically corresponds
to the drive or directory name you
want to share (see Sharing
preparation above)
Can be left out (otherwise: user
name)
Can be left out (otherwise: user
password)
MUST be that!
Only used for serial connection
Only used for serial connection
Only used for serial connection
Can be left out (is checked
automatically)
IP address of computer
Must not be changed!
Name you can assign freely.
•
You now can exit the settings and save them. BRAILLEX ELba and the computer are ready
for file sharing.
6. From the ELba Control Panel, select "t" for Tools, then "c" for Communication and "p" for
Connect ELba-PC. There is no confirmation message.
Go to the File Manager. Within the user directory, you find a new one called "netmount".
Netmount corresponds to the shared PC directory (in our example, it is MyShare).
Furthermore, you find the syncpoint, a directory called "MyELba", both in the ELba user
directory and in the computer's MyShare directory. If you copy any file into one or the other
MyELba directory and then call Tools/Communications/ "s" for Synchronize data with PC, you
will find the same files on both the ELba and the PC syncpoints.
138
Chapter 5 – Tables
5.3 – Installing the Winshare Connection via Serial Port
Remarks valid for all Windows versions:
• Serial settings for the connection: 38400 baud, 8 data bit, no parity, 1 stop bit, and no flow
control.
For Windows 98, in theory 19200 baud is the maximum, but in all of our tests 38400 baud
worked flawlessly.
For the NT flavors, speed of up to 115200 baud is accepted.
• File and printer sharing must be installed and configured in the network installation.
• The shares and access rights to the shared volumes (drives or directories) should be global, at
least for testing.
• DCC via serial connection might be difficult if BRAILLEX ELba can reach the computer both via
serial and Ethernet connections.
• "Netbios over TCP/IP" must be activated
• In some operating systems (Win98, ME, 2000, XP), anonymous connects via serial port are
admissible (via the default name dccwin), Windows NT doesn't accept that. So always install a
"real" Windows user in the NT setup.
BRAILLEX ELba - Windows 98 / 98SE / ME PC
1. Install the network. If no network had been installed before, the Windows 98 CD is required
for this:
From the Start Menu, select Settings / Control Panel / Network. You get a dialog box.
• In the Configuration tab, add "File and printer sharing for Microsoft Networks"
• Press Alt R for the Properties button. For "Browse Master", select the value "Enabled".
• Press Alt F for the File and Print Sharing button. Check "I want to give others access to my
files" and "I want to be able to allow others to print to my printers".
• In the Access Control tab, check "Share-level access control".
• In the Identification tab, check (or, of it has not been installed before), define the
Computer Name (in our example, it is MyComputer").
2. Prepare the share on the computer (in our case, we will allow BRAILLEX ELba to access the
complete C: drive of the computer).
•
Open Windows Explorer or My Computer.
• Select the drive or directory you want to share and make a right mouse click or press the
context menu button or Shift+F10. From the context menu, select "Sharing"
• Enable the "Shared As" radio button and check (or enter) the Share Name (in our example
"C"). Set the Access Type radio button to "Full". Press Alt-A and Enter to accept the
settings.
3. Install the connection hardware:
• From the Start Menu / Settings / Control Panel, select Modems.
• Press Alt-A for Add. Select "other Modem" and hit <Enter> for "next".
• Check "Don't detect my modem, I will select it from a list" and hit <Enter>.
• From "Standard Modem Types" tab over to the models list and select "Dial-Up Networking
Serial Cable between 2 PCs".
• From the list of available COM ports, select the one you want to use and hit <Enter>.
• Confirm the "successfully installed" message and close the window.
• Now you will have to adjust the modem settings. From the Start Menu / Settings / Control
Panel, select System.
• In the Device Manager tab, select "Modem" and then "Serial cable on COM1 (or any COM
port you want to use). Hit Alt-R for the Properties Button. Hit Alt-M for "Maximum speed"
and write 38400.
• In the "Connection" tab, select the following values:
Data bits: 8: Parity: None; Stop bits: 1
• In the "Advanced" options (hit Alt-V), uncheck "Use flow control".
• Your Modem is now installed.
4. Install the connection software:
139
•
•
•
From the Start Menu / Accessories / Communications start "Direct Cable Connection". (If
the program is not installed, go to the Control Panel / Add/Remove Software and select
the "Windows Setup" tab. You find the program when you press the "Details" button under
"communications"). Check the box in front of the program and click the OK button. You
will need the Windows CD in this case.
Once you have started Direct Cable Connection, press Alt-H for "Change".
Verify that the radio button in the next box is set to "host". Press Alt N for "Next".
•
•
•
Select the COM port you want to use and press Alt N for "Next".
Uncheck "Use password protection" in the next box and hit <Enter> for "Finish".
The computer will now wait for ELba to connect. After a while, you will get a warning
message ("Waiting to connect via Serial cable on COM1. Is the guest computer running?").
• In the future, you will need to run the Direct Cable Connection program every time you
want to connect ELba to the PC, but instead of the "Change" button on the first box, you
will just press the "Listen" button (Alt L).
5. Prepare BRAILLEX ELba for the WinShare:
• From the Setup Menu, select "Network" and then "PC file share". Enter the values as
follows:
ELba PC file share Setup
Label
Value
Hostname:
MyComputer
•
Share
C
Login
---
Password
---
OS
PPPoS
Windows 98/98SE/ME
yes
Device
/dev/ttyExtern
Speed
local IP
38400
192.168.55.2
remote IP
192.168.55.1
Mountpoint
Syncpoint
/mnt/flash/elba/netmount
MyELba
Explanation
The computer name defined in the
Network Identification tab
Share Name – typically corresponds
to the drive or directory name you
want to share (see Sharing
preparation above)
Can be left out (otherwise: user
name)
Can be left out (otherwise: user
password)
MUST be that!
Select serial connection instead of
Ethernet connection
Selects external serial port (please
mind the exact spelling including
capitalization!)
Baud rate for serial connection
Default value (must be maintained,
unless you have a conflict with a
"real" network connection).
Default value (must be maintained,
unless you have a conflict with a
"real" network connection).
Must not be changed!
Name you can assign freely.
You now can exit the settings and save them. BRAILLEX ELba and the computer are ready
for file sharing.
6. On the computer side, run the Direct Cable Connection program and press the "Listen" button
(Alt L).
7. From the BRAILLEX ELba Control Panel, select "t" for Tools, then "c" for Communication and
"p" for Connect ELba-PC. There is no confirmation message.
You now can go to the File Manager. Within the user directory, you find a new directory, called
"netmount". Netmount corresponds to the PC drive (in our example, it is the C: drive)
140
Chapter 5 – Tables
Furthermore, you find the syncpoint, a directory called "MyELba", both in the ELba user
directory and in the computer's C: drive (i.e. netmount). If you copy any file into one or the
other MyELba directory and then call Tools/Communications/ "s" for Synchronize data with PC,
you will find the same files on both the ELba and the PC syncpoints.
BRAILLEX ELba - Windows 2000 PC
Adjusting the network:
1. Check / install the IP address. Select the radio button "Use the following IP address" (do not
obtain it automatically.
2. I the Advanced options, in the WINS tab, select "Enable NetBIOS over TCP/IP".
Installing the Share:
3. Install the share: Open Windows Explorer, select the directory you want to share, make a
right mouse click and select "Sharing…". Please note that the share name must NOT contain
any spaces or any accentuated characters. You get the following dialog boxes (the second one
after having pressed the Permissions button):
4. Adjust the share permissions for the ELba user. If you use the anonymous connection
(dccwin), give ALL users full control over the shared directory.
5. Install the direct serial connection:
• From the Phone and Modem Options in the Control Panel, install a null modem (Comms
Cable between two computers) cable connection. If this is your first attempt at this,
Windows will probably whinge to setup the area codes. For the baud rate, set it at 115,200
bps. Since this is a direct cable connection, and no modem is actually being used on this
machine at all, enter some duff data for this section.
• Once you've got the null modem driver installed, point it to the port you've you the
hotsync cradle on. In this case, COM1.
• From within the "Network and Dial-Up Connections" section in control panel, select "Make
New Connection".
• Set it up to Accept incoming connections. (The "Connect Directly" setting is the opposite of
what we are doing here, its the Win2k box doing what BRAILLEX ELba is doing in this
instance)
• Point the connection to the Null modem device we just setup. You can set the baud rate
and other comms settings from the properties tab. Make sure Hardware flow control is
taken off, and the hardware settings are 8N1.
• Don't select allow virtual private connections (VPN — that would be too slow).
• Install a new user or allow your local user account to use the connection.
• In the next box, under TCP/IP properties, allow everything.
• For reasons of simplicity, assign fixed IP addresses, i.e. 192.168.55.1 and 192.168.55.2.
Stay with these addresses unless they are already assigned otherwise within the LAN
subnet. Do not allow calling computers to specify their own IP address, i.e. Windows will
assign these addresses within the given interval. (192.168.55.1 and 192.168.55.2)
• Select a name for the connection.
• If they aren't started already, start the "Remote Access Connection Manager" and "Routing
and Remote Access" services from within the Services applet (Hidden in the
Start\Programs\Administrative Tools\Services instead of the control panel).
• After configuration of all this, go back into the Users tab of the Incoming Connections
entry in "Network and Dial-Up Connections" and check the "Always allow directly
connected devices such as palmtop computers to connect without providing a password".
This means you don't have to stick a uid and password in the ELba. If this is unchecked,
and you do not provided the correct user id and password on the ELba, you will get the
error message "Error: incomplete setup. Check phone number & username. (0x121A)".
Sticking the NT username and password will enable it to login. An advantage of this
setting is during connection you will get an icon in the Network section with the user ID
you've logged in as. Otherwise you'd just get the "Unauthenticated User" icon. A
141
disadvantage is it appears the password is stored as plaintext within the ELba
configuration file.
6. Prepare BRAILLEX ELba for the serial connection:
• From the Setup Menu, select "Network" and then "PC file share". Enter the values as
follows:
142
Chapter 5 – Tables
ELba PC file share Setup
Label
Value
Hostname:
MyComputer
Share
MyShare
Login
Password
OS
PPPoS
Device
----Windows 2000 / XP
yes
/dev/ttyExtern
Speed
local IP
115200
192.168.55.2
remote IP
192.168.55.1
Mountpoint
Syncpoint
/mnt/flash/elba/netmount
MyELba
Explanation
The computer name defined in the
Network Identification tab in the
Local Area Connection properties
Share Name – typically corresponds
to the drive or directory name you
want to share (see Sharing
preparation above)
Leave out (otherwise: user name)
Leave out (otherwise: user password)
MUST be that!
Select serial connection
Selects external serial port (please
mind the exact spelling including
capitalization!)
Baud rate for serial connection
Default value (must be maintained,
unless you have a conflict with a
"real" network connection).
Default value (must be maintained,
unless you have a conflict with a
"real" network connection).
Must not be changed!
Name you can assign freely.
•
You now can exit the settings and save them. BRAILLEX ELba and the computer are ready
for file sharing.
7. From the BRAILLEX ELba Control Panel, select "t" for Tools, then "c" for Communication and
"p" for Connect ELba-PC. There is no confirmation message.
Now go to the File Manager. Within the user directory, you find a new directory, called
"netmount" that corresponds to the PC directory (in our example, MyShare).
Furthermore, you find the syncpoint, a directory called "MyELba", both in the ELba user
directory and in the computer's MyShare directory. If you copy any file into one or the other
MyELba directory and then call Tools/Communications/ "s" for Synchronize data with PC, you
will find the same files on both the ELba and the PC syncpoints.
BRAILLEX ELba - Windows XP PC
Adjusting the network:
1. In the Control Panel, click at Network / Network Tasks / Create a new connection. This will
open the New Connection Wizard.
•
First you have go install a dummy modem and have to type in a couple of telephone
number details. They don't really matter, but unless you fill them in, you won't be able to
install a serial connection later.
• Select "Set up an advanced connection" and hit the Next button.
• Establish a direct connection with another computer selecting "Connect directly to another
computer".
• Define the XP computer as the host.
• Select the appropriate COM port (in our case: COM1).
• After having pressed the Next button, select a user or add a new one (in our case, the
generic "dccwin" user, without any password. Make sure the user is checked as one who
can connect to the computer.
• This completes the New Connection Wizard.
143
•
•
•
•
•
Back in the Network connections, select "Incoming connections" and hit the right mouse
button to get to the properties.
In the General tab, press the Properties button for "Communications cable between 2
computers" and define the com port settings:
In the General tab, select 115200 bps, and NO flow control.
In the Advanced tab, select 8 data bit, no parity, and 1 stop bit.
In the Users tab, check "Always allow directly connected devices such as palmtop
computers to connect without providing a password".
In the Networking tab, check the Internet Protocol (TCP/IP) properties
Check the box "Allow callers to access my local area network". Select "Specify TCP/IP
Address" and define the addresses. In our case, we defined the default range:
192.168.55.1 and 192.168.55.2. Uncheck the box "Allow calling computer to specify its
own IP address".
Installing the Share:
2. Install the share:
• Open Windows Explorer, select the directory you want to share, make a right mouse click
and select "Sharing and Security…".
• In the Sharing tab, check "Share this folder on the network" and "Allow network users to
change my files". Please note that the share name must NOT contain any spaces or any
accentuated characters.
3. Prepare BRAILLEX ELba for the serial connection:
• From the Setup Menu, select "Network" and then "PC file share". Enter the values as
follows:
ELba PC file share Setup
Label
Value
Hostname:
MyComputer
Share
MyShare
Login
Password
OS
PPPoS
----WinXP
yes
Device
/dev/ttyExtern
Speed
local IP
115200
192.168.55.2
remote IP
192.168.55.1
Mountpoint
Syncpoint
/mnt/flash/elba/netmount
MyELba
Explanation
The computer name defined in the
Network Identification tab in the
Local Area Connection properties
Share Name – typically corresponds
to the drive or directory name you
want to share
Leave out (otherwise: user name)
Leave out (otherwise: user password)
MUST be that!
Select serial connection instead of
Ethernet connection
Selects external serial port (please
mind the exact spelling including
capitalization!)
Baud rate for serial connection
Default value (must be maintained,
unless you have a conflict with a
"real" network connection).
Default value (must be maintained,
unless you have a conflict with a
"real" network connection).
Must not be changed!
Name you can assign freely.
• You now can exit the settings and save them.
4. From the ELba Control Panel, select "t" for Tools, then "c" for Communication and "p" for
Connect ELba-PC. There is no confirmation message.
144
Chapter 5 – Tables
Go to the File Manager. Within the user directory, you find a new one called "netmount".
Netmount corresponds to the shared PC directory (in our example, it is MyShare).
Furthermore, you find the syncpoint, a directory called "MyELba", both in the ELba user
directory and in the computer's MyShare directory. If you copy any file into one or the other
MyELba directory and then call Tools/Communications/ "s" for Synchronize data with PC, you
will find the same files on both the ELba and the PC syncpoints.
145
Chapter 5 – Tables
5.4 – Braille Tables
American Computer Braille, 8-Dot Code
Dec Hex
000
00
001
002
003
004
005
006
007
008
009
010
011
012
013
014
015
016
017
018
019
020
021
022
023
024
025
026
027
028
029
030
031
032
033
034
035
036
037
038
039
040
041
042
043
044
045
046
047
048
049
050
051
052
053
054
055
056
057
058
059
060
061
062
063
01
02
03
04
05
06
07
08
09
0A
0B
0C
0D
0E
0F
10
11
12
13
14
15
16
17
18
19
1A
1B
1C
1D
1E
1F
20
21
22
23
24
25
26
27
28
29
2A
2B
2C
2D
2E
2F
30
31
32
33
34
35
36
37
38
39
3A
3B
3C
3D
3E
3F
Braille
---4--78
1-----78
12----78
1--4--78
1--45-78
1---5-78
12-4--78
12-45-78
12--5-78
-2-4--78
-2-45-78
1-3---78
123---78
1-34--78
1-345-78
1-3-5-78
1234--78
12345-78
123-5-78
-234--78
-2345-78
1-3--678
123--678
-2-45678
1-34-678
1-345678
1-3-5678
-2-4-678
12--5678
12-45678
---45-78
---45678
--------234-6-----5----3456-12-4-6-1--4-6-1234-6---3----123-56--23456-1----6---34-6------6---3--6----4-6---34-----3-56--2------23-----2--5---2--56--2---6--23-5---23-56--23--6---3-5--1---56----56--12---6-123456---345--1--456--
Chr
Description
Dec
Hex
^@
NUL
064
40
^A
^B
^C
^D
^E
^F
^G
^H
^I
^J
^K
^L
^M
^N
^O
^P
^Q
^R
^S
^T
^U
^V
^W
^X
^Y
^Z
^[
^\
^]
^^
^_
SOH
STX
ETX
EOT
ENQ
ACK
BELL
BACKSPACE
HOR. TAB.
LINE FEED
VERT. TAB.
FORM FEED
CARRIAGE RETURN
SO
SI
DLE
DC1
DC2
DC3
DC4
NAK
SYN
ETB
CAN
EM
END OF FILE
ESCAPE
IS4
IS3
IS2
IS1
SPACE
exclamation point
double quote
number/ pound
dollar
percent
ampersand
single quote
left parenthesis
right parenthesis
asterisk
plus
comma
hyphen
period
forward slash
number zero
number one
number two
number three
number four
number five
number six
number seven
number eight
number nine
colon
semi colon
less than
equals
greater than
question mark
065
066
067
068
069
070
071
072
073
074
075
076
077
078
079
080
081
082
083
084
085
086
087
088
089
090
091
092
093
094
095
096
097
098
099
100
101
102
103
104
105
106
107
108
109
110
111
112
113
114
115
116
117
118
119
120
121
122
123
124
125
126
127
41
42
43
44
45
46
47
48
49
4A
4B
4C
4D
4E
4F
50
51
52
53
54
55
56
57
58
59
5A
5B
5C
5D
5E
5F
60
61
62
63
64
65
66
67
68
69
6A
6B
6C
6D
6E
6F
70
71
72
73
74
75
76
77
78
79
7A
7B
7C
7D
7E
7F
!
"
#
$
%
&
'
(
)
*
+
,
.
/
0
1
2
3
4
5
6
7
8
9
:
;
<
=
>
?
Braille
---4--71-----712----71--4--71--45-71---5-712-4--712-45-712--5-7-2-4--7-2-45-71-3---7123---71-34--71-345-71-3-5-71234--712345-7123-5-7-234--7-2345-71-3--67123--67-2-45671-34-671-345671-3-567-2-4-6712--56712-4567---45-7---4567---4---1------12-----1--4---1--45--1---5--12-4---12-45--12--5---2-4----2-45--1-3----123----1-34---1-345--1-3-5--1234---12345--123-5---234----2345--1-3--6-123--6--2-456-1-34-6-1-3456-1-3-56--2-4-6-12--56-12-456----45-----456--
Chr
Description
@
at
A
B
C
D
E
F
G
H
I
J
K
L
M
N
O
P
Q
R
S
T
U
V
W
X
Y
Z
[
\
]
^
_
`
a
b
c
d
e
f
g
h
i
j
k
l
m
n
o
p
q
r
s
t
u
v
w
x
y
z
{
|
}
~
uppercase A
uppercase B
uppercase C
uppercase D
uppercase E
uppercase F
uppercase G
uppercase H
uppercase I
uppercase J
uppercase K
uppercase L
uppercase M
uppercase N
uppercase O
uppercase P
uppercase Q
uppercase R
uppercase S
uppercase T
uppercase U
uppercase V
uppercase W
uppercase X
uppercase Y
uppercase Z
left bracket
backslash
right bracket
caret
underscore
ASCII grave
lowercase a
lowercase b
lowercase c
lowercase d
lowercase e
lowercase f
lowercase g
lowercase h
lowercase i
lowercase j
lowercase k
lowercase l
lowercase m
lowercase n
lowercase o
lowercase p
lowercase q
lowercase r
lowercase s
lowercase t
lowercase u
lowercase v
lowercase w
lowercase x
lowercase y
lowercase z
left brace
broken vert. bar
right brace
ASCII tilde
DEL
147
American Computer Braille, 8-Dot Code
Dec Hex
128
80
129
130
131
132
133
134
135
136
137
138
139
140
141
142
143
144
145
146
147
148
149
150
151
152
153
154
155
156
157
158
159
160
161
162
163
164
165
166
167
168
169
170
171
172
173
174
175
176
177
178
179
180
181
182
183
184
185
186
187
188
189
190
191
81
82
83
84
85
86
87
88
89
8A
8B
8C
8D
8E
8F
90
91
92
93
94
95
96
97
98
99
9A
9B
9C
9D
9E
9F
A0
A1
A2
A3
A4
A5
A6
A7
A8
A9
AA
AB
AC
AD
AE
AF
B0
B1
B2
B3
B4
B5
B6
B7
B8
B9
BA
BB
BC
BD
BE
BF
148
Braille
1234-6712--56-8
12---6-8
1----678
--345--8
123-56-8
--345678
1234-678
12---678
12-4-6-8
-234-6-8
12-456-8
1--4-678
--34---8
----567--34567-23----8
--345-78
--345-71--45678
-2-4-6-8
--34-6-8
1---5678
-23456-8
1-3456-8
--3-5--8
-23--6-8
----5--8
---4-67---4-6-8
-23-5-712-4-678
1----6-8
1--4-6-8
1--456-8
1---56-8
1-345--8
-2--56712--5--8
-2-45--8
--3----8
1--4567-2--5678
123--6-8
1-3--6-8
--3--67123-5678
-2345678
------78
--3--678
-23-5678
-23---71-3-56-8
-2---6-8
-2-456-8
--3--6-8
1--4---8
123-567123456-8
12-45--8
-2---678
---4-678
--34-678
-2----78
Chr
Description
Dec
Hex
Ç
C cedilla
192
C0
ü
é
â
ä
à
å
ç
ê
ë
è
ï
î
ì
Ä
Å
É
æ
Æ
ô
ö
ò
û
ù
ÿ
Ö
Ü
¢
£
¥
P
ƒ
á
í
ó
ú
ñ
Ñ
ª
º
¿
_
¬
½
¼
¡
«
»
░
▒
▓
│
┤
╡
╢
╖
╕
╣
║
╗
╝
╜
╛
┐
u dieresis
e acute
a circumflex
a dieresis
a grave
a ring
c cedilla
e circumflex
e dieresis
e grave
i dieresis
i circumflex
i grave
A dieresis
A ring
E acute
ae digraph
AE digraph
o circumflex
o dieresis
o grave
u circumflex
u grave
y dieresis
O dieresis
U dieresis
Cent
Pound
Yen
Peseta
Florin
a acute
i acute
o acute
u acute
n tilde
N tilde
a underscored
o underscored
rev. question mark
mirrored negation
logical negation
1/2
1/4
rev. exclamation
left quote
right quote
25 % field
50 % field
75 % field
vertical bar
T, foot left
T, double foot left
double T, foot left
upper right corner
upper right corner
double T, foot left
double vertical bar
upper right corner
lower left corner
lower left corner
lower left corner
upper right corner
193
194
195
196
197
198
199
200
201
202
203
204
205
206
207
208
209
210
211
212
213
214
215
216
217
218
219
220
221
222
223
224
225
226
227
228
229
230
231
232
233
234
235
236
237
238
239
240
241
242
243
244
245
246
247
248
249
250
251
252
253
254
255
C1
C2
C3
C4
C5
C6
C7
C8
C9
CA
CB
CC
CD
CE
CF
D0
D1
D2
D3
D4
D5
D6
D7
D8
D9
DA
DB
DC
DD
DE
DF
E0
E1
E2
E3
E4
E5
E6
E7
E8
E9
EA
EB
EC
ED
EE
EF
F0
F1
F2
F3
F4
F5
F6
F7
F8
F9
FA
FB
FC
FD
FE
FF
Braille
Chr
Description
--3---78
-2----71-3----8
-23--67-----6712-4-67-----6-8
--2---67-23---78
-23-567-------8
12345--8
12-4---8
-2--5-78
----5678
1----67----5-7--34-67-2-----8
123----8
-2-4---8
1234-6-8
1-3-5--8
123-5--8
--3-567-----678
-2--5-712345678
12---67-23--678
--3-5678
-2345671------8
--3456-8
-2--5--8
1234---8
--3-5-7-234---8
1-34---8
-2345--8
-23-5--8
-2--56-8
--3-56-8
1--45--8
-234-678
-234-671---5--8
----5-78
-23-56-8
-23-5-78
---45--8
----56-8
--34--71---567--34--78
--3-5-78
---456-8
---4---8
--3---71--4-671-34-6-8
12-----8
1234567------7-
└
lower left corner
┴
┬
├
─
┼
╞
╟
╚
╔
╩
╦
╠
═
╬
╧
╨
╤
╥
╙
╘
╒
╓
╫
╪
┘
┌
█
▄
▌
▐
▀
α
ß
Γ
¶
Σ
σ
µ
τ
Φ
Θ
Ω
δ
∞
φ
ε
∩
≡
±
≥
≤
⌠
⌡
÷
≈
°
·
·
√
ⁿ
²
■
_
T, foot up
T, foot down
T, foot right
horizontal bar
simple cross
T, foot right
T, foot right
lower left corner
upper left corner
T, foot up
T, foot down
T, foot right
double horiz. bar
cross, double vert
T, foot up
T, foot up
T, foot down
T, foot down
lower left corner
lower left corner
upper left corner
upper left corner
cross, double vert
cross, double hor.
lower right corner
upper left corner
100 % field
block lower half
block left half
block right half
block upper half
alpha
beta/German dble s
gamma
pi
uppercase Sigma
sigma
my
tau
uppercase Phi
uppercase Theta
uppercase Omega
delta
infinite sign
phi
epsilon
unified
identical
plus-minus
equal/greater than
equal/less than
integral upper part
Integral lower part
divided by
roughly equals
ring
upper dot
centered dot
radix
exponential n
exponential 2
small square
blank
Chapter 5 – Tables
British Computer Braille, 8 Dot Code
Dec Hex
000
00
001
002
003
004
005
006
007
008
009
010
011
012
013
014
015
016
017
018
019
020
021
022
023
024
025
026
027
028
029
030
031
032
033
034
035
036
037
038
039
040
041
042
043
044
045
046
047
048
049
050
051
052
053
054
055
056
057
058
059
060
061
062
063
01
02
03
04
05
06
07
08
09
0A
0B
0C
0D
0E
0F
10
11
12
13
14
15
16
17
18
19
1A
1B
1C
1D
1E
1F
20
21
22
23
24
25
26
27
28
29
2A
2B
2C
2D
2E
2F
30
31
32
33
34
35
36
37
38
39
3A
3B
3C
3D
3E
3F
Braille
--345-78
1-----78
12----78
1--4--78
1--45-78
1---5-78
12-4--78
12-45-78
12--5-78
-2-4--78
-2-45-78
1-3---78
123---78
1-34--78
1-345-78
1-3-5-78
1234--78
12345-78
123-5-78
-234--78
-2345-78
1-3--678
123--678
-2-45678
1-34-678
1-345678
1-3-5678
123-5678
--34--78
-2345678
-234-678
---45678
---------3456----4-------56----456-----4-61234-6---3-------45----345----3-5---23-5---2-------3--6--2--56---34---123456-1----6-12---6-1--4-6-1--456-1---56-12-4-6-12-456-12--56--2-4-6--2--5---23-----23--6--23-56---3-56--2---6--
Chr
Description
Dec
Hex
^@
NUL
064
40
^A
^B
^C
^D
^E
^F
^G
^H
^I
^J
^K
^L
^M
^N
^O
^P
^Q
^R
^S
^T
^U
^V
^W
^X
^Y
^Z
^[
^\
^]
^^
^_
SOH
STX
ETX
EOT
ENQ
ACK
BELL
BACKSPACE
HOR. TAB.
LINE FEED
VERT. TAB.
FORM FEED
CARRIAGE RETURN
SO
SI
DLE
DC1
DC2
DC3
DC4
NAK
SYN
ETB
CAN
EM
END OF FILE
ESCAPE
IS4
IS3
IS2
IS1
SPACE
exclamation point
double quote
number/ pound
dollar
percent
ampersand
single quote
left parenthesis
right parenthesis
asterisk
plus
comma
hyphen
period
forward slash
number zero
number one
number two
number three
number four
number five
number six
number seven
number eight
number nine
colon
semi colon
less than
equals
greater than
question mark
065
066
067
068
069
070
071
072
073
074
075
076
077
078
079
080
081
082
083
084
085
086
087
088
089
090
091
092
093
094
095
096
097
098
099
100
101
102
103
104
105
106
107
108
109
110
111
112
113
114
115
116
117
118
119
120
121
122
123
124
125
126
127
41
42
43
44
45
46
47
48
49
4A
4B
4C
4D
4E
4F
50
51
52
53
54
55
56
57
58
59
5A
5B
5C
5D
5E
5F
60
61
62
63
64
65
66
67
68
69
6A
6B
6C
6D
6E
6F
70
71
72
73
74
75
76
77
78
79
7A
7B
7C
7D
7E
7F
!
"
#
$
%
&
'
(
)
*
+
,
.
/
0
1
2
3
4
5
6
7
8
9
:
;
<
=
>
?
Braille
-234-671-----712----71--4--71--45-71---5-712-4--712-45-712--5-7-2-4--7-2-45-71-3---7123---71-34--71-345-71-3-5-71234--712345-7123-5-7-234--7-2345-71-3--67123--67-2-45671-34-671-345671-3-567123-567--34--7-234567-----67----5---234-6-1------12-----1--4---1--45--1---5--12-4---12-45--12--5---2-4----2-45--1-3----123----1-34---1-345--1-3-5--1234---12345--123-5---234----2345--1-3--6-123--6--2-456-1-34-6-1-3456-1-3-56-123-56---34-6--23456------6----4567-
Chr
Description
@
at
A
B
C
D
E
F
G
H
I
J
K
L
M
N
O
P
Q
R
S
T
U
V
W
X
Y
Z
[
\
]
^
_
`
a
b
c
d
e
f
g
h
i
j
k
l
m
n
o
p
q
r
s
t
u
v
w
x
y
z
{
|
}
~
uppercase A
uppercase B
uppercase C
uppercase D
uppercase E
uppercase F
uppercase G
uppercase H
uppercase I
uppercase J
uppercase K
uppercase L
uppercase M
uppercase N
uppercase O
uppercase P
uppercase Q
uppercase R
uppercase S
uppercase T
uppercase U
uppercase V
uppercase W
uppercase X
uppercase Y
uppercase Z
left bracket
backslash
right bracket
caret
underscore
ASCII grave
lowercase a
lowercase b
lowercase c
lowercase d
lowercase e
lowercase f
lowercase g
lowercase h
lowercase i
lowercase j
lowercase k
lowercase l
lowercase m
lowercase n
lowercase o
lowercase p
lowercase q
lowercase r
lowercase s
lowercase t
lowercase u
lowercase v
lowercase w
lowercase x
lowercase y
lowercase z
left brace
broken vert. bar
right brace
ASCII tilde
DEL
149
British Computer Braille, 8-Dot Code
Dec Hex
128
129
130
131
132
133
134
135
136
137
138
139
140
141
142
143
144
145
146
147
148
149
150
151
152
153
154
155
156
157
158
159
160
161
162
163
164
165
166
167
168
169
170
171
172
173
174
175
176
177
178
179
180
181
182
183
184
185
186
187
188
189
190
191
150
80
81
82
83
84
85
86
87
88
89
8A
8B
8C
8D
8E
8F
90
91
92
93
94
95
96
97
98
99
9A
9B
9C
9D
9E
9F
A0
A1
A2
A3
A4
A5
A6
A7
A8
A9
AA
AB
AC
AD
AE
AF
B0
B1
B2
B3
B4
B5
B6
B7
B8
B9
BA
BB
BC
BD
BE
BF
Braille
1234-6712--56-8
12---6-8
1----678
--345--8
123-56-8
--345678
1234-678
12---678
12-4-6-8
-234-6-8
12-456-8
1--4-678
--34---8
----567--34567-23----8
---4--78
---4--71--45678
-2-4-6-8
--34-6-8
1---5678
-23456-8
1-3456-8
--3-5--8
-23--6-8
-2-4-678
---4-67-2-4-67-234---8
12-4-678
1----6-8
1--4-6-8
1--456-8
1---56-8
1-345--8
-2--56712--5--8
-2-45--8
--3----8
123-5--8
-2--5678
123--6-8
1-3--6-8
--3--67----5678
---45-78
------78
--3--678
-23-5678
-23---71-3-56-8
-2-----8
1----67-23--678
1234-6-8
---45-7123456-8
12-45--8
-2---678
----5--8
---4-6-8
-2----78
Chr
Ç
ü
é
â
ä
à
å
ç
ê
ë
è
ï
î
ì
Ä
Å
É
æ
Æ
ô
ö
ò
û
ù
ÿ
Ö
Ü
¢
£
¥
P
ƒ
á
í
ó
ú
ñ
Ñ
ª
º
¿
_
¬
½
¼
¡
«
»
░
▒
▓
│
┤
╡
╢
╖
╕
╣
║
╗
╝
╜
╛
┐
Description
C cedilla
u dieresis
e acute
a circumflex
a dieresis
a grave
a ring
c cedilla
e circumflex
e dieresis
e grave
i dieresis
i circumflex
i grave
A dieresis
A ring
E acute
ae digraph
AE digraph
o circumflex
o dieresis
o grave
u circumflex
u grave
y dieresis
O dieresis
U dieresis
Cent
Pound
Yen
Peseta
Florin
a acute
i acute
o acute
u acute
n tilde
N tilde
a underscored
o underscored
rev. question mark
mirrored negation
logical negation
1/2
1/4
rev. exclamation
left quote
right quote
25 % field
50 % field
75 % field
vertical bar
T, foot left
T, double foot left
double T, foot left
upper right corner
upper right corner
double T, foot left
double vertical bar
upper right corner
lower left corner
lower left corner
lower left corner
upper right corner
Dec
192
193
194
195
196
197
198
199
200
201
202
203
204
205
206
207
208
209
210
211
212
213
214
215
216
217
218
219
220
221
222
223
224
225
226
227
228
229
230
231
232
233
234
235
236
237
238
239
240
241
242
243
244
245
246
247
248
249
250
251
252
253
254
255
Hex
C0
C1
C2
C3
C4
C5
C6
C7
C8
C9
CA
CB
CC
CD
CE
CF
D0
D1
D2
D3
D4
D5
D6
D7
D8
D9
DA
DB
DC
DD
DE
DF
E0
E1
E2
E3
E4
E5
E6
E7
E8
E9
EA
EB
EC
ED
EE
EF
F0
F1
F2
F3
F4
F5
F6
F7
F8
F9
FA
FB
FC
FD
FE
FF
Braille
--3---78
-2----71-3----8
-23--67--345-712-4-67--34-678
--34-67-23---78
-23-567-------8
12345--8
12-4---8
-2--5-78
12-45678
---4-678
-2345--8
--3-56712---67-23-5--8
--3-5-78
-2-4---8
-2--5--8
1--4-67-23-56-8
-----678
-2--5-712345678
12--5671---5--8
----5-712-4567-2--56-8
--3456-8
1--4567----5-78
1-3-5--8
-2---671-34---8
1234---8
-23-5-7-2---6-8
1---567--3-5678
-2-456-8
--3-56-8
---45--8
----56-8
--3--6-8
-23-5-78
123----8
1-34-6-8
1--45--8
--3-5-712--5678
-----6-8
---456-8
---4---8
--3---71------8
1--4---8
12-----8
1234567------7-
Chr
└
┴
┬
├
─
┼
╞
╟
╚
╔
╩
╦
╠
═
╬
╧
╨
╤
╥
╙
╘
╒
╓
╫
╪
┘
┌
█
▄
▌
▐
▀
α
ß
Γ
¶
Σ
σ
µ
τ
Φ
Θ
Ω
δ
∞
φ
ε
∩
≡
±
≥
≤
⌠
⌡
÷
≈
°
·
·
√
ⁿ
²
■
_
Description
lower left corner
T, foot up
T, foot down
T, foot right
horizontal bar
simple cross
T, foot right
T, foot right
lower left corner
upper left corner
T, foot up
T, foot down
T, foot right
double horiz. bar
cross, double vert
T, foot up
T, foot up
T, foot down
T, foot down
lower left corner
lower left corner
upper left corner
upper left corner
cross, double vert
cross, double hor.
lower right corner
upper left corner
100 % field
block lower half
block left half
block right half
block upper half
alpha
beta/German dble s
gamma
pi
uppercase Sigma
sigma
my
tau
uppercase Phi
uppercase Theta
uppercase Omega
delta
infinite sign
phi
epsilon
unified
identical
plus-minus
equal/greater than
equal/less than
integral upper part
Integral lower part
divided by
roughly equals
ring
upper dot
centered dot
radix
exponential n
exponential 2
small square
blank
Chapter 6 – Important Advice
Chapter 6 – Important Advice
6.1 – Purpose of the Device
BRAILLEX ELba is intended to be used for the purpose of compensation for the visual
handicap of blind people.
According to the European Council directive 93/42/EEC (Medical Devices Directive), they
have therefore been classified as active class I medical devices.
These products may only be used in home or office environments. In medical facilities,
this product may only be used in office rooms.
The connected PC must comply with the standards regarding safety and EMC (electromagnetic compatibility) relevant for the area where it is used.
6.2 – Safety Advice
Before starting to operate BRAILLEX ELba, the user should read this manual.
The device shall only be installed by a trained person.
The device may only be used with the original accessories and in combination with the
products foreseen for this purpose by F. H. Papenmeier. If a combination with other
devices is necessary, those devices must comply with the relevant standards.
The device may only be used in closed and dry rooms. The ambient temperature
must not exceed 40° C (ca. 100° F). Do not expose the device to direct sunlight or
humidity (rain).
Repairs and maintenance work may only be undertaken by F. H. Papenmeier or by
authorized service centers.
There are no known risks for your health that might be caused by the use of this
product.
6.3 – General Precautions
Our products guarantee optimum safety and reduce to a minimum the strain caused
through over-exertion. However, when respecting some precautions you can contribute
to avoid prejudice to your health or damage to the product.
If a cellular phone is used close to the product, a minimum distance of 30 cm (1 ft) shall
be respected.
Do not expose the product to strong pressure, and do not drop any objects on the
product. This might damage the product or lead to malfunctions. The external power
supply heats up during normal use. Even if you don’t estimate the temperature very
high, it may temporarily affect the dermal tissue. We suggest that you avoid skin contact
with the power supply for longer periods.
In order to avoid repetitive strain injury at your hands caused through long-time use of
the function elements and reading the Braille display, we suggest pauses and relaxation
exercise. In specialized bookshops you also find literature on how to equip a workplace
in an ergonomically way and on how to avoid strain through an appropriate sitting
position.
151
6.4 – CE-Marking — Technical Specifications
The BRAILLEX EL devices and their original accessories comply with the relevant
standards regarding the electro-magnetic compatibility (EMC) and the safety, and are
marked with the CE sign.
FHP cannot guarantee however that these products still comply with these EMC
standards if they are connected to cables or devices not produced by F. H. Papenmeier.
In this case, the person(s) who connected the cables or devices are responsible for
taking care that the combination complies with the required standards. In order to avoid
EMC problems, you should observe the following advice:
Only connect accessories and devices marked with the CE mark.
Only use shielded connecting cables.
6.5 – EC and FCC Declarations of Conformity
152
EC Declaration of Conformity
We,
F. H. Papenmeier GmbH & Co KG
Talweg 2
D-58239 Schwerte, Germany
Name and address of the manufacturer or of the
introducer of the product on the market who is established in the EU
herewith take the sole responsibility to confirm that the products:
BRAILLEX ELba
(Part nos of variants: RS#1860.101.00, RS#1860.121.00, RS#1860.141.00, and
RS#1860.171.00)
Type designation and, if applicable, article no.
which refers to this declaration, are medical devices class I, and are in accordance with
the following standards or standardized documents:
1.
2.
3.
4.
5.
EN
EN
EN
EN
EN
55 022:1994/ A1:1995
61 000-3-2:1995
61 000-3-3:1995
50 082-1:1997
60950: 1998
(Title and/or number and date of the standard(s) or other standardized documents)
According to the requirement(s) of the following directive(s):
93/42/EEC (Medical Devices Directive)
Jürgen Bornschein, Chief Engineer
F.H. Papenmeier GmbH & Co KG, Talweg 2, D-58239 Schwerte, Germany
Schwerte, March 11th, 2002
Name, address, date and legally binding signature of the person responsible
153
FCC 47 CFR Ch.1 §2.906
Declaration of Conformity
We,
F. H. Papenmeier GmbH & Co KG
Talweg 2
D-58239 Schwerte, Germany
Name and address of the manufacturer
herewith take the sole responsibility to confirm that the products:
BRAILLEX ELba
(Part nos of variants: RS#1860.101.00, RS#1860.121.00, RS#1860.141.00, and
RS#1860.171.00)
Type designation and, if applicable, article no.
is in accordance with the following standards or standardized documents:
FCC 47 CFR Ch.1 Part 15
Per Sections 15.107(e), i.e.
IEC/CISPR 22:1997 Class B
(EN 55 022:1998 Kl. B)
Per Sections 15.109(g), i.e.
IEC/CISPR 22:1997 Class B
(EN 55 022:1998 Kl. B)
Per Sections 15.107(e), i.e.
IEC/CISPR 14:1998
(EN 55 014-1:1993
+ A1:1997
+ A2:1999)
RF emission
conducted noise
radiated el. noise
cond. noise, clicks
The following operating conditions and installation arrangements have to be presumed:
Use of original parts
This confirmation is based on test report
21100589
001
TÜV Rheinland Product Safety GmbH, 51101 Köln,
Germany
FCC Registration Number 91096, 2001-July-25
Jürgen Bornschein, Chief Engineer
F.H. Papenmeier GmbH & Co KG, Talweg 2, D-58239 Schwerte, Germany
Schwerte, March 11th, 2002
Name, address, date and legally binding signature of the person being responsible
154
Index
A
D
Access to ELba files via Network. 89
Access to Windows PC ............ 101
Address book
Launching ........................... 56
Day planner
Launching ........................... 57
Day Planner
Changing the Calendar View .. 60
Deleting an appointment ....... 60
Exiting the application........... 63
Modifying an appointment ..... 60
Printing an appointment ........ 60
Recurrent appointments ........ 59
Save appointment ................ 58
Setup ................................. 61
Viewing an appointment ........ 59
Dial-up connection
Activate .............................. 88
Directories .............................. 31
Directory
Path syntax ......................... 32
Document reader
Launching ........................... 30
purpose .............................. 30
B
Backup user data ..................... 94
Battery.....................................6
Charging...............................6
Replacement .........................6
Battery status ...................94, 95
Bookshare decoder .................. 92
Braille
Back translation ................... 20
Switch between computer and grade 2
Braille............................. 20
Braille Tables
American Computer Braille .. 155
British Computer Braille ...... 157
C
Calculator
Basic functions .................... 76
Built-in functions.................. 77
Clipboard ............................ 75
Display Modes ..................... 76
Exit .................................... 76
Functions ............................ 76
Help ................................... 76
Simple operations ................ 75
Carrying bag .............................6
CD-ROM ................................. 86
CE Medical Devices Directive ...... II
CE sign................................. 160
Cleaning ...................................7
compensation........................ 159
connector
Ethernet ...............................1
external power supply.............1
keyboard port........................1
modem.................................1
parallel port ..........................1
PC-card slot ..........................1
serial port .............................1
USB port...............................1
Control center
hotkey..................................9
Control Center...........................8
Selection of Applications..........8
Cursor routing ......................... 12
E
Easy Access Bar.........................4
Commands Combined Mode ... 11
Commands Interaction Mode.. 11
Commands Navigation Mode .. 10
General commands............... 10
Easy Access Bar and thumb keys 11
Braille management.............. 12
Further Braille management commands 12
QWERTY keyboard analogies.. 11
Screen reader commands ...... 13
Screen reader commands in Virtual Cursor
Mode .............................. 13
Speech synthesizer commands13
Email
Address book....................... 52
Attachments ........................ 46
Delete folder........................ 50
Delete message ................... 51
Exit .................................... 55
Expunge message ................ 51
Folders ............................... 48
Forward message ................. 48
Guidelines ........................... 55
Help ................................... 44
Introduction ........................ 43
Main menu .......................... 43
New folder .......................... 50
New message ...................... 44
Preparation ......................... 43
Print message...................... 54
Receive mail ........................ 47
Reply to mail ....................... 47
155
Save message ..................... 50
Send message ..................... 46
Start program...................... 43
Starting .............................. 43
Undelete message ................ 51
Use address book in message 54
EMC..................................... 160
End applications ........................9
Ethernet port
Activate .............................. 88
Disable ............................... 91
EU Medical Devices Directive ...... II
I
Internet browser
Bookmarks .......................... 40
Exit .................................... 38
Forms................................. 41
History page ........................ 39
Link list............................... 39
Links .................................. 38
Move to start of document ..... 39
Navigation........................... 38
New web page ..................... 39
Prepare............................... 38
F
FCC Declaration ..................... 162
FCC Radio Frequency Interference Statement
.......................................... II
File converter .......................... 91
File manager
Files and directories.............. 31
Launching ........................... 31
purpose .............................. 31
File Manager
Convert file menu ................ 34
Convert WinWord file ............ 34
copy file.............................. 33
Delete file ........................... 33
Delete folder ....................... 33
Edit text ............................. 34
Exit .................................... 37
File viewer .......................... 35
Move to directory ................. 32
New file .............................. 33
New folder .......................... 32
Rename file......................... 33
Rename folder ..................... 33
Search for files .................... 32
File synchronization with PC ...... 89
File Viewer
Email attachment ................. 36
Export ................................ 36
Movements ......................... 36
Printing .............................. 36
Search................................ 36
Files....................................... 31
Flash ROM .............................. 86
J
Jaws
attributes .......................... 103
Braille presentation ............ 103
Combined mode ................. 102
PC mode ........................... 102
screen navigation ............... 102
K
Key Assignment
Braille keyboard .....................2
Braille keys for Shift, Ctrl, Alt ...3
Keyboard layout
QWERTY keyboard..................2
keys.........................................4
Kill an application that hangs ..... 18
L
Linux
Command menu................... 10
Screen dimensions ............... 10
Shell .................................. 95
Title bar .............................. 10
M
Game interpreter ..................... 92
misfunctions.......................... 159
MP3 player.............................. 73
Exit .................................... 74
Play song ............................ 73
Music ..................................... 73
H
N
Hard drive .............................. 86
Hotkeys
control center .................. 9, 17
Navigating through files and directories.... 31
G
156
O
on/off switch
position ................................1
P
PC connection
Function ............................. 88
Physical description
Back panel ............................1
Front panel ...........................1
Top ......................................1
Power saving
Sleep mode ......................... 15
power supply ............................7
Power up
Connecting charger ................8
On-off switch.........................8
Q
Quick Reference
Braille-Emulation of PC-Shift, Alt, Ctrl . 125
Braille-Emulation of the PC-Special keys
................................... 125
Easy Access Bar Functions ... 127
EL-keys and switches.......... 127
Key Assignment ELba applications ...... 131
R
Restore user data .................... 94
S
safety .................................. 159
Safety Advice ........................ 159
Screen reader
Jaws ................................ 101
Other screen reader programs104
Start and stop emulation..... 101
Service.....................................7
Setup
Access to shared PC files).... 118
Braille .............................. 122
Date and time ................... 108
Dial-up connection ............. 117
Email account .................... 116
Launching ......................... 107
Network............................ 108
Power Management ............ 122
Saving values .................... 123
Speech ............................. 123
startup homepage .............. 117
USB Network ..................... 112
Volume............................. 107
Winshare via network for 98 / 98SE / ME
................................... 139
Winshare via Network for Win2000 .....142
Winshare via network for WinXP144
Wireless LAN ..................... 110
Sleep mode........................... 105
Spreadsheet
First steps ........................... 64
Launching ........................... 64
Spreadsheet commands
Cell entry and editing............ 67
Cursor control...................... 67
File commands..................... 71
Miscellaneous ...................... 72
Notes ................................. 71
Numeric expressions............. 68
Numeric functions ................ 68
Range commands................. 71
Range functions ................... 70
Rows and columns................ 69
Status
Battery and commections 94, 95
Superdisk ............................... 86
Switch and key emulation ...........5
Switch applications............... 9, 18
switches ...................................4
Switching off
Control center...............15, 105
Emergency power down .15, 105
On/off switch ................15, 105
T
Tools
Communication .................... 88
Overview ...................... 85, 86
PC-card .............................. 85
System tools ....................... 93
Transport
Hints ....................................6
U
Update ................................... 93
USB Network
Activate .............................. 88
V
Visualization............................ 92
via LCD............................... 93
via terminal ......................... 92
Voice Recorder
Editing the recording ............ 83
Exiting the application........... 84
Handling multiple tapes......... 82
Hotkey Functions ................. 83
Launching ........................... 82
Listening to a Recording ........ 83
157
Pause ................................. 83
Playing a tape...................... 83
Recording ........................... 83
Recording Information .......... 83
W
Word processor
Automatic Indent ................. 26
Cursor location .................... 28
Cut text .............................. 21
Defining Heading Lines and Formatting
Characters ...................... 27
Exiting................................ 21
Formatting text.................... 26
Global replace...................... 25
Go to end of file ................... 23
Go to end of paragraph ......... 24
Go to line number ................ 23
Go to start of file.................. 23
Go to start of paragraph........ 23
Help ................................... 28
158
Insert file ............................ 21
Insert Mode......................... 25
Launching ........................... 19
Line length .......................... 26
Mark text ............................ 21
New document..................... 20
Open a document at startup .. 19
Overwrite Mode.................... 25
Paste text ........................... 21
Repeated replace ................. 25
Saving a document............... 20
Search - Repeat ................... 24
Search and replace ............... 24
Search backwards ................ 24
Search case sensitive............ 24
Search for word ................... 24
Search text ......................... 22
Spell checker ....................... 26
Text alignment..................... 26
Text centered ...................... 26
Text left aligned ................... 26
Text right aligned ................. 26