1
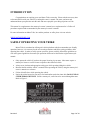
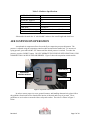
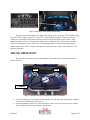
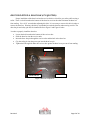
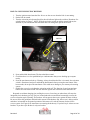
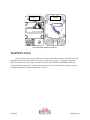
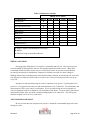
GLADIATOR OWNER’S MANUAL Motor Trike, Inc. P.O. Box 611 22667 FM 15 Troup, Texas 75789-0611 (800) 90-TRIKE Revision 2 TABLE OF CONTENTS INTRODUCTION ........................................................................................................................................ 3 SAFELY OPERATING YOUR TRIKE ....................................................................................................... 3 CAPACITY LIMITS .................................................................................................................................... 4 SPECIFICATIONS ....................................................................................................................................... 4 AIR SUSPENSION OPERATION ............................................................................................................... 5 TRUNK OPERATION ................................................................................................................................. 6 PARKING ..................................................................................................................................................... 7 AVAILABLE ACCESSORIES & OPTIONS .............................................................................................. 7 RECEIVER HITCH & DRAW BAR (IF EQUIPPED) ............................................................................ 8 ELECTRIC REVERSE (IF EQUIPPED) ................................................................................................. 9 MAINTENANCE ....................................................................................................................................... 11 WARRANTY ............................................................................................................................................. 14 THANK YOU ............................................................................................................................................. 14 Revision 2 Page 2 of 14 INTRODUCTION Congratulations on acquiring your new Motor Trike conversion. Please take the necessary time to become familiar with your vehicle by reading this owner’s manual. The more you know and understand about your particular unit the safer and more enjoyable your riding experience will be. This manual is a supplement to the motorcycle owner’s manual, not a replacement for it. Follow all procedures required and recommended by the motorcycle owner’s manual. For more information on Motor Trike, Inc. and the products we offer please visit our website. WWW.MOTORTRIKE.COM SAFELY OPERATING YOUR TRIKE Motor Trike is committed to offering safe vehicle platforms which accommodate user friendly operation; however, it is necessary for the user to take precautions and follow safety guidelines while operating the vehicle. In order to safely operate your trike, please carefully follow these guidelines as well as the general guidelines for motorcycle operation which can be found in the original motorcycle manual: Only operate the vehicle if you have the proper licensing in your state. Most states require a motorcycle license or a trike license to operate a three wheeled vehicle. Always wear a helmet and appropriate safety gear while operating/riding this vehicle. Become familiar with the vehicle’s controls before operating the vehicle, using the motorcycle’s owner’s manual as a reference. Follow all traffic laws while operating the vehicle. Notice the sticker located on your unit’s fuel tank and/or trunk door inner skin: DO NOT LEAN. STEER THROUGH TURNS. Unlike a motorcycle, a trike has to be steered through the turns. Refer to Figure 1. Figure 1: Vehicle Operation Warning Sticker (Gladiator Sticker Shown) Revision 2 Page 3 of 14 Follow the maintenance schedule set forth by this owner’s manual and the original motorcycle owner’s manual in order to ensure the vehicle functions properly. The maintenance schedule can be found in the Maintenance/ Service section of each owner’s manual. Do not load the trike with passengers, cargo, accessories, etc. that will result in exceeding the recommended load capacity. This will ensure the vehicle is operating within its designed conditions. CAPACITY LIMITS In order to ensure safe operating conditions for your trike, it is imperative to follow the load limits and guidelines listed below in Table 1. These guidelines and load limits are a combination of the motorcycle manufacturer’s recommended capacity limits, found in the original owner’s manual, and Motor Trike’s capacity limits. Table 1: Gladiator Capacity Limits CAPCITY LIMIT DESCRIPTION MAXIMUM TOTAL WEIGHT CAPACITY 500 LBS INCLUDES PASSENGERS, CARGO, ACCESSORIES, AND TRAILER TONGUE WEIGHT MAXIMUM TOTAL CARGO CAPCITY 60 LBS TOTAL CARGO CAPACITY OF THE TOURING AND TRIKE TRUNK TOURING TRUNK CARGO CAPACITY 20 LBS TRIKE TRUNK CARGO CAPCITY 40 LBS MAXIMUM TRAILER TONQUE WEIGHT 100 LBS MAXIMUM TRAILER WEIGHT 400 LBS EXCLUDED FROM THE MAXIMUM TOTAL WEIGHT CAPACITY LOAD LIMITS & GUIDELINES YOUR TRIKE HAS BEEN DESIGNED TO CARRY ONE DRIVER AND ONE PASSENGER. DIFFERENCES IN ACCELERATION AND BRAKING MAY BE NOTICED WHEN RIDING WITH AND WITHOUT A PASSENGER, CARGO, OR TRAILER. AS LONG AS THESE ITEMS ARE WITHIN THE GIVEN LOAD LIMITS AND GUIDELINES, SAFE OPERATION OF THE TRIKE CAN STILL BE ACHIEVED. PLEASE NOTE THAT EXCEEDING THE MAXIMUM WEIGHT CAPACITY OR IMPROPERLY LOADING YOUR TRIKE CAN SERIOUSLY IMPAIR THE TRIKE'S HANDLING, BRAKING, AND STABILITY. DISREGARDING THE LOAD LIMITS AND GUIDELINES OUTLINED ABOVE CAN LEAD TO A CRASH, SERIOUS INJURY, OR DEATH. SPECIFICATIONS The specifications shown in Table 2 are taken from a base model Gladiator kit without any additional accessories. Revision 2 Page 4 of 14 Table 2: Gladiator Specifications OVERALL LENGTH*: WHEEL BASE*: OVERALL WIDTH: TRACK WIDTH: BASE WEIGHT: TIRE SIZE: WHEEL SIZE: MAX. LOAD CAPACITY: 104" 64" 55" 43.5" 1200 lbs 225/60/R15 15" X 7" Bolt Pattern: 5 X 4.5" 500 lbs *Measured with stock rake. 4° rake kit adds 3 inches to the overall length and wheel base AIR SUSPENSION OPERATION An on-board air compressor allows for on-the-fly air suspension pressure adjustment. The pressure is adjusted using the suspension control module mounted to the handle bars. To increase air spring pressure, press and hold the “UP” button until the desired pressure is reached. To reduce the pressure, press the “DOWN” button. DO NOT OPERATE THE VEHICLE WITH LESS THAN 15 PSI OR MORE THAN 100 PSI IN THE AIR SPRINGS. Figure 2 shows the suspension control module. UP VOLTAGE (V) DWN PRESSURE (PSI) SUSPENSION CONTROL MODULE Figure 2: Suspension Control Module In order to ensure proper tire wear, ground clearance, and handling characteristics please follow the guidelines listed on the sticker found on the interior of the trunk and/or top of gas tank. These guidelines are set in order to ensure the riders safety and comfort. The sticker is shown in Figure 3 below: Revision 2 Page 5 of 14 Figure 3: Air Spring Pressure Sticker Trunk Location The suspension control module also displays the voltage of the 12v system. The acceptable range for your vehicle’s voltage is between 11V and 14V. If the displayed voltage is greater than 14 volts, contact your local Motor Trike dealer to have the electrical system inspected on your vehicle. If the displayed voltage is below 11V despite how much you have ridden the bike, you may have a problem with the bikes charging system. Follow the recommended procedure for inspecting and charging the battery found in your owner’s manual. If this does not resolve the issue, contact your local Motor Trike dealer for assistance. TRUNK OPERATION The trunk door is opened by rotating the t-handles on the trunk door to unlatch the trunk door. Refer to Figure 4. OPEN OPEN T-HANDLES Figure 4: Opening Trunk (Shown with Optional Chrome Nerf Bumper) To close the trunk, place your hands on the t-handles, press the door shut, and rotate the t-handles in the reverse direction shown in Figure 4. Lock both t-handles with the keys provided with your trike. If you lose your keys please contact your local Motor Trike dealer to arrange replacements. Revision 2 Page 6 of 14 PARKING When parking your trike, extra precaution needs to be taken in order to ensure the vehicle cannot roll away which could cause vehicle damage or personal injury. Several recommended steps that will help to ensure the trike is securely parked include: Lock the steering lock. Leave the transmission in gear. Park on level ground. Apply parking brake if equipped. AVAILABLE ACCESSORIES & OPTIONS Motor Trike offers an extensive line of accessories in order to further customize your trike. The accessories can be ordered and installed through your local Motor Trike dealer or ordered directly through Motor Trike. See Table 3 for a list of our most popular accessories and options. Table 3: Available Accessories and Options ACCESSORIES/OPTIONS FENDER BRAS PLAIN DESCRIPTION CUSTOMIZE YOUR TRIKE WITH NEW REAR WHEELS OR ADD A MATCHING FRONT WHEEL. PROTECT THE FRONT OF YOUR TRIKE FENDERS FENDER BRAS EMBROIDERED LOOK GOOD PROTECTING YOUR TRIKE FENDERS TRUNK CARPET GIVE YOUR TRUNK A FINISHED LOOK EMBROIDERED TRUNK MAT PROTECT YOUR TRUNK CARPET WITH STYLE RAKE KIT REDUCE STEERING EFFORT AND RIDER FATIGUE CHROME NERF BUMPER CUSTOMIZE YOUR TRIKE WITH A CHROME BUMPER LIGHT BAR CUSTOMIZE YOUR TRIKE AND BE MORE VISIBLE CENTRAMATICS INCREASE FRONT TIRE LIFE WITH A SMOOTH FRONT END TROG TRAX PROTECT YOUR FEET FROM THE ELEMENTS WITH STYLE FOG LIGHTS FOR TROX TRAX SEE AND BE SEEN. ADD LIGHTS TO YOUR TROG TRAX TRAILER RECEIVER HITCH PULL ONE OF OUR TRAILERS THAT MATCHES YOUR TRIKE LIL'DUECE TRAILER ADD 4 TIMES MORE STORAGE IN A SLEEK PACKAGE ELECTRIC REVERSE EASILY BACK YOUR TRIKE UP AND GET ON THE ROAD TRIKE COVER PROTECT YOUR TRIKE MOTOR TRIKE LUGGAGE BAG LUGGAGE THAT MATCHES YOUR TRIKE PARKING BRAKE KNOW YOUR TRIKE ISN'T GOING TO ROLL AWAY! CUSTOM PAINT GET THE LOOK YOU WANT THAT NO ONE ELSE HAS LED TAIL LIGHT UPGRADE UPGRADE AND CUSTOMIZE YOUR TRIKE WIDE SELECTION OF WHEELS Visit WWW.MOTORTRIKE.COM or contact your local Motor Trike dealer for more details. Revision 2 Page 7 of 14 RECEIVER HITCH & DRAW BAR (IF EQUIPPED) Proper installation of the draw bar into the receiver hitch is critical for your safety while towing a trailer. There is a bolt located on the bottom of the draw bar receiver tube that eliminates the draw bar from rattling. Use a 9/16” wrench when adjusting this bolt. It is necessary to remove this bolt in order to remove the draw bar. Warning, this bolt is not intended to retain the drawbar when towing a trailer. The draw bar pin and safety pin must be installed. Refer to Figure 5 and Figure 6 below. In order to properly install the draw bar: Loosen the bolt located on the bottom of the receiver tube. Slide the draw bar into the receiver tube. Insert the draw bar pin through the receiver tube and the hole in the draw bar. Clip the safety pin into the groove put into the draw bar pin. Tighten the bolt supplied under the receiver tube against the draw bar to prevent it from rattling. DRAW BAR DRAW BAR PIN SAFETY PIN Figure 5: Draw Bar Components Revision 2 Page 8 of 14 RECIEVER TUBE PROPERLY INSTALLED DRAW BAR WITH SAFETY CLIP DRAW BAR ANTI-RATTLE BOLT Figure 6: Properly Installed Draw Bar Safety Pin ELECTRIC REVERSE (IF EQUIPPED) If used within the recommendations below, the electric reverse will meet all of your expectations. Before reversing, always check that the path behind the trike is clear and announce that you are backing up to anyone nearby. Be sure to follow these guidelines will using your reverse: The electric reverse should not be operated longer than 15 seconds at a time. The bike should be driven several miles in between reverse uses to allow the battery to fully charge. Use the motorcycles voltmeter as a guide. Do not stall the reverse for more than 3 seconds. If you encounter a hill or curb that can not be climbed, remove as much weight as possible and try again. If the reverse still does not climb the hill, you may be asking it do something beyond its capability. Do not make further repeated attempts. Always operate the reverse while sitting on the driver’s seat with both feet on the floor boards and both hands on the handlebars. Extended use and limited charging can and will lead to electric reverse and battery damage. Motor Trike is not responsible for damage that is caused by exceeding the recommended duration or frequency of use. The electric reverse will not perform well if the motorcycles battery is in poor condition or if the battery doesn’t have a sufficient charge. Revision 2 Page 9 of 14 HOW TO USE THE ELECTRIC REVERSE: 1. Turn the ignition on and start the bike. Never use the reverse when the bike is not running. 2. Put the bike in neutral. 3. Turn the activation switch on and look for the red indicator light on the switch to illuminate. See switch location in Figure 7. NOTE: With the activation switch on and the neutral light on, the function of your horn button and start button has been changed to operate the reverse. ACTIVATION SWITCH Figure 7: Activation Switch Location. View of Right Side of Bike 4. Press and hold the horn button. The horn should not sound. 5. Check that there is a clear path behind you. And announce that you are backing up to anyone nearby. 6. Press the start button to back up. Warning: Always check that the bike is in neutral, the activation switch is illuminated, and press and hold the horn button before pressing the start button. If the horn sounds, do not press the start button. This could cause damage to your motorcycles starting system. 7. Disable the reverse by switching the activation switch off. The function of your horn and start buttons are returned to normal. The red indicator light on the activation switch should be off. Repeated use without charging time, stalling the reverse for too long or other abuse will cause the integrated circuit breaker(s) to trip. They are located under the seat and must be manually reset for the reverse to function again. Warning: The breakers will not protect the reverse against all forms of abuse. Be sure to follow the guidelines outlined in this manual. If the breakers flip, the reverse is being used far and above its intended use. Repeated operation of this nature will void the warranty for the electric reverse system. See Figure 8 for instructions on resetting the breaker(s). If you have style A there are two breakers. If you have style B there is only one breaker. Revision 2 Page 10 of 14 STYLE A STYLE B Figure 8: Resetting the Reverse Breaker(s) MAINTENANCE If your vehicle requires professional services, Motor Trike has an extensive dealer network with specially trained technicians capable of servicing or repairing your vehicle. To locate the authorized Motor Trike dealer nearest you, go to the Motor Trike web site (WWW.MOTORTRIKE.COM) and access the Dealer Locater link. To help ensure your vehicle is serviced at the proper intervals, we have included a maintenance schedule found below in Table 4. Revision 2 Page 11 of 14 Table 4: Maintenance Schedule FREQUENCY (Miles) COMPONENT Tire Pressure Wheels and Tires Air Suspension Pressure Lighting Belt Tension Brake Fluid Brake Rotors/ Pads CV Boots DAILY X 3,000 6,000 12,000 100,000 X X X X X X X Suspension Alignment Electric Reverse X X X: Inspect, Adjust, Lubricate/Replace if necessary R: Replace L: Lubricate using recommended lubricant WHEELS AND TIRES Having properly inflated tires is essential to a comfortable and safe ride. The tire pressures on your unit should be checked before each use, this includes both the front and rear tires. Motor Trike recommends 24 PSI (166 KPa) for the rear tires. Follow the front tire air pressure recommendations provided by the motorcycle manufacturer. Improper tire inflation can result in a drastic change in handling characteristics including but not limited to head shake, vibration, increased body roll, and a stiff ride. Improper tire inflation can also lead to a tire blow out. Check your tire pressure before you go on every ride. Improper tire and wheel balancing can result in vibrations at any speeds. To prolong the life of your tires, it is suggested to have the tires and wheels balanced every 12,000 miles. Tire maintenance and replacement are vital to your vehicle’s performance. If you are experiencing uneven or improper tire wear, the alignment needs to be checked at your local Motor Trike dealer. To ensure safety, performance, and reliability, Motor Trike does NOT recommend changing the tire or wheel sizes. The rear lug nuts should be torqued to 85 ft-lbs every 3,000 miles. AIR SUSPENSION PRESSURE Be sure to check that your suspension air pressure is within the recommended range before and during every ride. Revision 2 Page 12 of 14 LIGHTING Check that all lights are working properly before you ride your trike. This includes the brake lights, head lights, turn signals, and marker lights. BELT TENSION Belt tension should be checked every 3,000 miles. The belt tension should be set to the factory specifications provided in the motorcycle owner’s manual. DIFFERENTIAL GREASE The differential lubrication is maintenance free. It does not require replacement at any interval. CV BOOTS The CV boots should be cleaned and checked at 6,000 mile intervals. Clean the CV boots by wiping them down with a rag; do not use any chemicals. Thoroughly inspect the boots for cracks, tears, or holes which could allow contaminants to damage the CV joints. If you do encounter any damage to the CV boots, contact your local Motor Trike dealer and have it replaced as soon as possible. Prolonged use of the vehicle with a damaged CV boot will cause damage to the CV joint and surrounding components. SUSPENSION ALIGNMENT In order to increase the life of the tires and to ensure proper ride and handling characteristics, the rear suspension alignment should be checked every 12,000 miles by an authorized Motor Trike dealer. If you notice that the tires are wearing prematurely or in an unusual fashion, have the alignment checked before the 12,000 mile increment. ELECTRICAL The trike kit wire harness, which powers and controls all of the electrical items on the trike kit, is connected to the battery under the seat. If you experience an electrical problem with any of the trike electrical systems check the in-line 15 amp fuse located on the wire running to the battery. DO NOT REPLACE THE FUSE WITH ONE OF HIGHER VALUE. If you replace the fuse and it blows again please contact your local Motor Trike dealer. ELECTRIC REVERSE Grease the teeth on the reverse motor gear every time you change your motorcycle’s engine oil. The reverse motor is located at the rear of the vehicle under the trunk floor. Use an automotive wheel bearing grease. Check the battery connections every time you change your motorcycle’s engine oil. Revision 2 Page 13 of 14 Check that all reverse wiring is properly secured every time you change your motorcycle’s engine oil. Warning: All large red cables have a constant 12 volts. Follow the battery maintenance plan recommended by the manufacturer of your battery. WARRANTY Your Motor Trike, Inc. trike kit carries a 3 year/ 60,000 mile warranty. The start date of warranty coverage will be determined by the date on the warranty card that is turned in by the customer or dealer upon purchasing the unit. If equipped, the electric reverse is covered by a 1 year warranty. Any modification or changes to the Motor Trike kit, failure to follow the guidelines noted above and/or improper maintenance will void all warranties. Misuse, abuse, accidents, unreasonable use, or Acts of God will not be covered under warranty. Normal wear items are not covered under warranty. THANK YOU Thank you for purchasing our trike conversion. We hope you have many safe, comfortable riding miles on our product. We invite you, in your travels, to stop by our manufacturing plant in Troup, Texas, for a tour and to meet the people who designed and manufactured your Motor Trike. We believe you will be impressed by what you witness and the people you will meet. Again, thank you for your business and we look forward to meeting you in the future. Revision 2 Page 14 of 14