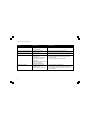
1
WiFi - Internet Radio
Operating instruction
Mode d’emploi
381RE01-A
GB
F
Instruccions de manejo
E
Gebruiksaanwijzing
NL
Bedienungsanleitung
D
Table of Contents
Important Safety Instructions ................................................. 2-3
Chapter 1 Getting Started .......................................................... 4
Product and Accessories: ......................................................... 4
Power on the radio ..................................................................... 5
Controls ..................................................................................... 6
Using the Wi-Fi Radio ................................................................ 7
Remote Control ...................................................................... 8-9
Navigate Menu Selections ...................................................... 10
Menu navigation: ..................................................................... 10
Entering Texts .......................................................................... 11
To enter texts: .......................................................................... 11
Language Setup ....................................................................... 11
Connecting Devices to the Radio ............................................ 12
Chapter 2 Getting Connected .................................................. 13
Connecting to wireless network ............................................... 14
Connecting to wired network .................................................... 15
Chapter 3 Listening to the Radio .............................................. 16
Internet Radio .......................................................................... 16
To listen to the internet radio: ................................................... 16
To search for stations on the internet: ................................ 16-17
To listen to the Podcasts: ........................................................ 17
To listen to My Favourites / My Added Station: ....................... 18
Music Player ........................................................................... 20
To play music in the Music Player’s shared folders: ............... 20
To play music in the Music Player’s shared media: ................ 20
Shared Folder .......................................................................... 21
To share media using Windows Media Player 11: ................... 22
Shared Folder Setup .......................................................... 23-24
Shared Media (UPnP) ............................................................. 24
To setup your PC for shared media: ....................................... 24
FM Radio ................................................................................. 25
To listen to the FM radio: ......................................................... 25
1
To change FM stations: ........................................................... 25
Auxiliary Input (AUX IN) .......................................................... 26
To play music using AUX IN: .................................................. 26
Radio Station Preset ................................................................ 27
On the remote control you will find numeric keys 1-10
that are used to store preset stations. See Remote Control
on page 5 for more details. When no station is assigned
to a number, “Preset empty” is displayed on the screen.
Presets are available in the following modes: .......................... 27
To recall a preset: .................................................................... 27
To assign the current radio station to a preset key: ................. 27
Last Listened ........................................................................... 27
To recall last listened: .............................................................. 27
Chapter 4 Clock Operation ...................................................... 28
Clock Setup ............................................................................. 28
Date Setup ............................................................................... 28
Time Zone Setup ..................................................................... 29
DST Setup ............................................................................... 29
Auto Update ............................................................................. 30
Set 12/24 Hour ........................................................................ 30
Set Sleep Time ........................................................................ 30
Set Alarms................................................................................ 31
Alarm setup ........................................................................ 31-32
Chapter 5 Upgrade and Reset ................................................. 33
Software Upgrade .................................................................... 33
Upgrade via internet: ............................................................... 33
Upgrade via USB ................................................................ 33-34
Factory Reset .......................................................................... 34
Chapter 6 Trouble Shooting ..................................................... 35
Chapter 7 Product Specification ......................................... 36-28
Important Safety Instructions
1. Read and understand all safety and operating instructions before
the radio is operated.
9. Don’t install near any heat sources such as radiators, heat registers,
stoves, or other apparatus (including amplifiers) that produce heat.
2. Retain instruction: The safety and operating instructions should be
retained for future reference.
10. If the provided plug doesn’t fit into your outlet, consult an electrician
for replacement of the obsolete outlet.
3. Heed warnings. All warnings on the appliance and operating
instructions should be followed.
4. Follow all operations and use instructions.
11. Power sources: The radio should be operated only from the type of
power source indicated on the marking label.
If you are not sure of the type of power supply to your home,
consult your radio dealer or power company.
5. Water and moisture: The appliance should not be used near water.
Do not use near a bathtub, washbowl, laundry tub, kitchen sink,
wet basement, swimming pool, etc.
12. Power cords: The power cord should be positioned so it is not
walked on, pinched, or items placed on top of it. Pay particular
attention to cords at plugs, convenience receptacles, and the point
6. Unplug the radio from the AC power outlet before cleaning. Use only a
damp cloth for cleaning the exterior of the radio. Clean the radio only
with dry cloth.
7. Do not place the radio on an unstable cart, stand, bracket or table.
The radio may fall, causing serious personal injury and damage
to the radio.
8. Ventilation: This radio should be situated so that its location or
position does not interfere with its proper ventilation. For example,
the radio should not be used on a bed, sofa, rug or other soft
surfaces that may block the ventilation openings. It should not be
placed in a built-in situation like a cabinet that may reduce air flow
through the ventilation openings.
where they exit from the unit. Unplug the power cord by gripping the
power plug, not the cord. Operate the radio using only the current
type of power source indicated. If you are not sure of the type
of power supply to your home, consult your dealer or local
power company.
13. Do not overload wall outlets or extension cords. This can result in a
risk of fire or electrical shock. Never insert objects of any kind into
the radio through opening. The objects may touch dangerous
voltage points or short out parts. This could cause a fire or
electrical shock.
GB
14. Only use attachment/accessories specified by the manufacturer.
2
15. If the radio is left attended and unused for long periods of time,
unplug it form the unattended wall outlet. This will prevent damage
caused by lightning or power line surges.
Notice:
The changes or modifications not expressly approved by the party
responsible for compliance could void the user’s authority to operate
the equipment.
16. If the radio is left unattended and unused for a long period of time,
remove the batteries. The batteries may leak and damage furniture
of your radio.
IMPORTANT NOTE:
To comply with the FCC RF exposure compliance requirements,
no change to the antenna or the device is permitted. Any change to the
antenna or the device could result in the device exceeding the RF
exposure requirements and void user’s authority to operate the device.
17. Do not attempt to service the receiver yourself. Removing the cover
may expose you to dangerous voltage, and will void the warranty.
Refer all servicing to authorized service personnel.
18. Object and Liquid Entry-Never push objects of any kind into this
radio through opening as they may touch dangerous voltage points
or short-out parts that could result in a fire or electric shock.
Never spill liquid of any kind of product.
19. The appliance should be serviced by qualified service
personnel when:
The power supply cord or the plug has been damaged.
Objects have fallen or liquid had been spilled into the radio.
The radio has been exposed to rain or water.
The radio does not appear to operate normally or exhibits a
marked change in performance.
The radio has been dropped, or the enclosure damaged.
20. Excessive sound pressure on ear- and headphones could impair
the hearing ability.
Higher setting that idle on the equalizer leads to higher signal
voltages on the output for ear- and headphones.
3
FCC INFORMATION
The Federal Communication Commission Radio Frequency Interference
Statement includes the following paragraph:
The equipment has been tested and found to comply with the limits
for a Class B Digital Device, pursuant to part 15 of the FCC Rules.
These limits are designed to provide reasonable protection against
harmful interference in a residential installation. This equipment
generates, uses and can radiate radio frequency energy and, if not
installed and used in accordance with the instruction, may cause
harmful interference to radio communication. However, there is no
grantee that interference will not occur in a particular installation.
If this equipment dose cause harmful interference to radio or television
reception, which can be determined by turning the equipment off and on,
the user is encouraged to try to correct the interference by one or more
of the following measures:
- Reorient or relocate the receiving antenna.
- Increase the separation between the equipment and receiver.
- Connect the equipment into an outlet on a circuit different from that to
which the receiver is connected.
- Consult the dealer or an experienced radio/TV technician for help.
The user should not modify or change this equipment without written
approval form SANGEAN ELECTRONICS INC. Modification could void
authority to use this equipment.
Chapter 1 Getting Started
Congratulations on your purchase of the Sangean WFR-1 Wi-Fi Radio.
Check the package and ensure all the items are present:
Power Cable
Product and Accessories:
Power Cable: used to power the radio.
(When this radio is purchased in the US,
the US related accessories will be provided)
Remote Control: used for remote operation of the radio.
WFR-1 Wi-Fi Radio: your Wi-Fi radio
Remote Control
WFR-1 Wi-Fi Radio
GB
4
Power on the radio
1. Connect the power cable with the radio and plug it in to a live
outlet as shown.
(When this radio is purchased in the US,
the US related accessories will be provided)
2. Press the STANDBY button to turn on the radio.
Note:
Use only the adapter supplied with the radio. Connecting an
incompatible power supply will cause permanent damage to the radio.
5
Controls
(Front)
1.
2.
3.
4.
5.
6.
LCD display
STANDBY button
BAND button
INFO button
TIMER button
EQ button
7.
8.
9.
10.
11.
12.
BACK button
PRESET STOP button
FORWARD button
VOLUME DOWN button
VOLUME UP button
Turning knob
GB
6
Using the Wi-Fi Radio
Refer to the following illustrations to familiarize yourself with the buttons and controls of the radio.
1
2
3
4
5
6
7
Item
LCD display
STANDBY button
BAND button
INFO button
TIMER button
EQ button
BACK button
8
9
PRESET STOP button
FORWARD button
10
11
12
VOLUME DOWN button
VOLUME UP button
Turning knob
Description
Screen that display texts
Turn on/off the radio
Press to switch between modes
Press to display information on the LCD
Press to set sleep time and alarms
Press to enter Equalizer setu
Navigation button. Press to activate the menu/go backward one page in menu selections. In Music
player mode, press to skip to the previous track. In setup screens, press to go to the previous field
Press to enter the Preset menu. In Music player mode press to stop the track
Navigation button. Press to confirm a selection in menus. Press to move to the left when entering user name
or password
In Music player mode, press to skip to the next track. In setup screens, press to go to the next field
Press to turn the volume down
Press to turn the volume up
Rotate to enter menu selections/
navigate through selections
Press the knob to
confirm selections
7
Remote control
1.
2.
3.
4.
5.
6.
7.
8.
9.
10.
11.
12.
13.
14.
15.
16.
17.
18.
EQ button
Mute button
TUNE + button
Back button
TIMER button
TUNE - button
FM button
iRadio button
AUX IN button
Mplayer button
INFO button
Enter button
FORWARD button
Stop button
Preset 7,8,9 /rewind, pause, fast forward
Radio Preset buttons
Volume buttons
Power button
GB
8
Remote Control
You can control the radio with the remote control. See the following illustration for descriptions of each button.
1
2
3
4
Item
EQ button
Mute button
TUNE + button
Back button
5
6
7
8
9
10
11
12
13
TIMER button
TUNE - button
FM button
iRadio button
AUX IN button
Mplayer button
INFO button
Enter button
FORWARD button
14
15
Stop button
Preset 7,8,9 /rewind,
pause, fast forward
Radio Preset buttons
Volume buttons
Power button
16
17
18
9
Description
Press to enter Equalizer setup
Press to mute the radio
Navigation button used to go up
Navigation button. Press to activate the menu/go backward one page in menu selections. In Music
player mode, press to go to the previous track. In setup screens, press to go to the previous field
Press to set sleep time and alarms
Navigation button used to go down
Press to enter FM radio mode
Press to enter internet radio mode.
Press to enter auxiliary input mode
Press to enter Music player mode
Press to display information on the LCD
Press to confirm selection
Navigation button. Press to confirm a selection in menus. Press to move to the left when entering user
name or password. In Music player mode, press to skip to the next track. In setup screens, press to go to
the next field
Press to stop current action. In Music player mode press to stop the track
Press to listen to preset stations 7, 8, 9/
Also for rewind, pause, fast forward
Press to listen to preset stations
Press to turn the volume up/down
Turn on/off the radio
Navigate Menu Selections
There are two ways to navigate through the menu selections.
Press BACK to activate the menu then:
1. Navigate through the selections by rotating the Turning knob on the
radio clockwise or counter clockwise to move the > symbol and
press the Turning knob to confirm the selection.
Use FORWARD/BACK to enter/go to previous menu.
2. Use the navigation buttons (TUNE +, TUNE-, BACK, FWD) on the
remote control to move the > symbol and press enter to confirm
the selection. Use FORWARD/BACK to enter/go to previous menu.
See Using the Wi-Fi Radio for descriptions of the Turning knob and
Navigation buttons.
Menu navigation:
1
2
GB
10
Entering Texts
To start using the radio, text entering may be required. For example,
entering user name, password, search station, etc.
To enter texts:
Rotate the Turning knob to highlight the text/number/symbol.
Press the Turning knob to confirm.
Use < to delete.
Use C to cancel and exit
Use
to enter when you are done.
Language Setup
Choose the language to display on the screen.
Go to >Main menu>Language and select the language.
11
Connecting Devices to the Radio
See the following illustration for descriptions of the outlets on the back panel.
1
2
3
4
5
6
Item
Headphone jack
LINE OUT jack
AUX IN
LAN socket
USB socket
Power cord socket
Description
Connect to a headphone
Connect to an external speaker
Connect to external Aux devices
Connect to Ethernet
Connect to a USB device
Connect to the power cable
GB
12
Chapter 2 Getting Connected
Before you can use your internet radio, you must have the following:
A broadband internet connection or
A wireless access point (Wi-Fi) or a wired Ethernet connection
(10 or 100 M bits/sec with RJ45 connection) connected to your
broadband internet, preferably via a router. In many cases the
broadband modem, router and wireless access point will be a single
combined unit supplied by your Internet Service Provider or bought
from a computer store.
If your wireless network is configured to use Wired Equivalent Privacy
(WEP) or Wi-Fi Protected Access (WPA) data encryption then you
need to know the WEP or WPA key so you can get the internet radio
to communicate with the network.
IMPORTANT:
Before you continue, make sure that your wireless access point or
router is powered up and working with your broadband internet service
(use your computer to verify this). To get this part of the system working
you must read the instructions supplied with the wireless access point
or router.
13
Connecting to wireless network
To setup the wireless network:
1. Make sure you are within range of a wireless network.
2. Go to >Main menu>System setup > Internet setup > Wizard >
[name of the wireless network].
3. You will be prompted to enter password:
Rotate the Turning knob to highlight the text/number/symbol
Press the Turning knob to confirm.
< to delete
C to cancel and exit
to enter when you are done
4. The screen will show “Connected” when connection had been made.
GB
14
Connecting to wired network
To setup the wired network:
1. Connect the radio to the wired network using an Ethernet cable
as shown.
2. Go to >Main menu> System setup > Internet setup > Wizard >
[Wired] from the menu selections.
3. Enter the password when prompted.
Rotate the Turning knob to highlight the text/number/symbol
Press the Turning knob to confirm.
< to delete
C to cancel and exit
to enter when you are done
4. The screen will show “Connected” when connection had been made.
If you have problems with your wired connection, the lights by the
LAN (RJ-45) connector may help you to identify the possible cause
of the problem:
Green ON = Link established, Flashing = Data transfer
Yellow ON = 100M bps link, OFF = 10M bps link
15
Chapter 3 Listening to the Radio
Internet Radio
To listen to the internet radio:
From the menu selections go to >Main menu > Internet radio or
press the iRadio button on the remote. The radio will play the last
played radio station.
If you would like to select other stations, follow the instruction below.
To search for stations on the internet:
Press BACK to activate the menu and go to Station list.
In The Station list you will find 5 different ways to search for stations.
Go to >Station list>Stations from the menu selection you will find:
1. Location:
enables you to choose a radio station from the list first by geographic
region and then by country.
GB
16
2. Genre:
enables you to choose radio stations according to their content,
for example Classic, Rock, Sport, News, etc.
3. Search station:
enables you to search for a station by entering the name or
a keyword.
4. Popular station:
enables you to view a list of popular stations and choose from them.
5. New station:
enables you to view a list of the newest stations and choose
from them.
To listen to the Podcasts:
Go to >Station list>Podcasts and you will find 3 options:
1. Location:
enables you to choose a radio station from the list first by
geographic region and then by country.
2. Genre:
enables you to choose podcasts according to their content,
for example Classic, Rock, Sport, News, etc.
3. Search station:
enables you to search for a podcast by entering the name or
a keyword.
17
To listen to My Favourites / My Added Station:
My Favourites and My added stations allow you to add internet
radio stations using Frontier’s website and listen to those stations on
your radio.
Go to>Station list>My Favourites / >Station list>My Added Station.
Register online:
Before first use, please follow the instructions to register on
the website:
1. Go to >Station list>Help>Get access code. The display will show
the Access code.
2. Visit the website using your computer
http://www.wifiradio-frontier.com then click on “register here” and
fill out the form with the access code shown on the display.
You can leave blank on “WiFi radio model”.
GB
18
Frontier Website
3. After the registration, the web page shows “My favourite” and
“My added station” for operating these 2 functions. After this one
time registration, every time you would like to use these functions,
just go to the website: and enter the email address and password.
To edit My Favourites:
1. Use Browse or Search for stations on the web site to find
a station,
2. Click the “Add” icon and the station is added to
My Favourite folder.
To edit My Added Stations:
My Added Stations allows you to add the internet radio stations if
you know the web address of the internet radios.
1. Click the arrow under My added stations and you will be asked to
enter the web address. Enter the URL exactly as described on
the web page.
2. Click the “Add” icon to add the station.
19
Music Player
To play music in the Music Player’s shared folders:
1. Go to >Main menu>Music Player> Shared folders>
[name of computer]>[name of folders]. User name and password
may be required.
2. Find and select the audio file you want to listen to in the folder and
press the Turning knob to play.
3. Use Forward/Back to go to next/previous track.
To play music in the Music Player’s shared media:
1. Go to >Main menu>Music Player> Shared media>
[name of computer]>[media categories]. The UpnP server makes
Media categories available. For example, ‘Music’ or ‘Playlists’.
User name and password may be required.
2. Find and select the audio file you want to listen to in the folder and
press the Turning knob to play.
3. Use Forward/Back to go to next/previous track.
GB
20
Shared Folder
The Windows Media Player 11 allows you to play audio files that are
stored on a computer or a computer on your network.
Your radio supports two file access methods. It can connect to Shared
Folders on the network. It can also connect with file server applications
using the Universal Plug and Play (UPnP) protocol known as
Shared Media.
All of the supported file types are playable in Windows Shares mode.
When using a UPnP server, the playable file types are dependant on the
server software used. For example, Microsoft Windows Media Player11
can serve MP3, WMA and WAV files. To be able to play the other
supported file types via UPnP you may need to install additional
third-party software.
When using Windows Shares, music selection is by Artist,
by Album and optionally by track within an Album. When using a Shared
Media UPnP server, the search and selection criteria are determined by
the server, but typically include additional options such as Genre.
Many server applications also allow you to access files according to the
folders within which they are stored.
21
To share media using Windows Media Player 11:
1. Open Media Player and click the arrow below Library tab then
choose Options.
2. Click the Configure Sharing button.
3. Check the Share my media to: check box. WiFi Radio is shown as
an Unknown Device.
4. Click the Settings button.
GB
22
5. Name your Share media and choose the settings.
6. Finally, check the box to choose to Allow new devices and
computers automatically or not.
7. Click Ok when you are done.
Shared Folder Setup
Computer:
Setup your PC to allow the radio to access your audio files via
Windows Shares.
1. Ensure that your PC is available on the same network as your
internet radio.
2. Use Windows Explorer to locate the folder where your audio files
are stored.
3. Right click on the folder.
4. Select ‘Properties’.
5. Click on ‘Sharing’.
6. Select ‘Share this folder on the network’ and ‘Allow network users
to change my files’.
23
Wi-Fi Radio:
Setup your radio to connect to the computer if user name and
password are required to log in.
1. Go to >Main menu>System setup>Internet setup>PC settings.
2. Enter the user name and password.
Shared Media (UPnP)
Shared Media uses Windows Media Player (WMP) 11 and above as
media server. This mode does not require any setting in the radio,
but the PC needs to be configured to allow the radio access to
the media. You will only have to do it once.
To setup your PC for shared media:
1. If your PC is running Microsoft Windows XP or Windows Vista then
you can use Microsoft’s Windows Media Player 11 (WMP 11) to act
as your UPnP (Universal Plug and Play) media server. If not already
installed on your PC, Windows Media Player 11 may be downloaded
from Microsoft’s website.
2. Once installed, WMP 11 can create a library from all the media files
available to it on your PC. To add new media files to the library,
select ‘File > Add to Library… > Advanced Options’, click ‘Add’ and
choose the files you wish to add and click ‘OK’.
GB
24
FM Radio
To listen to the FM radio:
From the menu selections go to >Main menu > FM or press the
FM button on the remote.
The radio will play the last played radio station. If you would like to
select other stations, follow the instruction below.
To change FM stations:
1. Rotate the Turning knob on the radio clockwise or counter clockwise
or press the TUNE+ / TUNE- buttons on the remote to
increase/decrease the radio frequencies. Or
2. Press the Turning knob on the radio or
on the remote control to
scan and go to the next available FM station.
25
Auxiliary Input (AUX IN)
Auxiliary Input allows you to play music from an audio source such as
an iPod or a DVD player.
To play music using AUX IN:
1. Connect the device to the radio using an AUX cable as shown
2. Go to >Main menu>Auxiliary input or press AUX IN on the remote.
3. Start playing sound from the auxiliary device; adjust the device and
radio volume when necessary.
GB
26
Radio Station Preset
On the remote control you will find numeric keys 1-10 that are used to
store preset stations. See Remote Control on page 5 for more details.
When no station is assigned to a number, “Preset empty” is displayed
on the screen. Presets are available in the following modes:
Internet Radio
FM
To recall a preset:
Short press a numeric key on the remote (1-10).
To assign the current radio station to a preset key:
Press and hold the numeric key (1-10) for about 5 seconds.
Preset stored will be displayed on the screen.
Last Listened
The last 10 listened stations are stored on the radio.
To recall last listened:
Choose Last listened from the menu and select the station.
27
Chapter 4 Clock Operation
The radio must have the clock / date set to use the alarm functionality.
Clock Setup
1. To setup the time go to >Main menu>System setup>Time setup>
Set clock.
2. Use TUNE+/TUNE- or Turning knob to adjust the values and use
FORWARD/BACK to move back and forth between fields.
Press the Turning knob or
to confirm.
Date Setup
1. To setup the time go to >Main menu>System setup>Time setup>
Set date.
2. Use TUNE+/TUNE- or Turning knob to adjust the values and
FORWARD/BACK to move back and forth between fields.
Press the Turning knob or
to confirm.
GB
28
Time Zone Setup
1. To setup the time go to >Main menu>System setup>Time setup>
Set time zone.
2. Use TUNE+/TUNE- or Turning knob to adjust the values and
FORWARD/BACK to move back and forth between fields.
Press the Turning knob or
to confirm.
DST Setup
1. To setup the daylight saving time go to >Main menu>System setup>
Time setup> Set DST.
2. Use TUNE+/TUNE- or Turning knob to switch On or Off.
Press the Turning knob or
29
to confirm.
Auto Update
Auto update menu allows the user to select whether or not the time is
to be synchronized with the internet.
To setup the auto update go to >Main menu>System setup>
Time setup> Auto update and Choose the source of the update.
Set 12/24 Hour
12/24 hour setup allows you to change the clock display format.
To setup the auto update go to >Main menu>System setup>
Time setup>Set 12/24 hour.
Set Sleep Time
Sleep time allows you to set the time to turn the radio off automatically.
1. To setup the auto update go to >Main menu>System setup>
Time setup>Set sleep time. Or press the Timer button on the radio.
GB
2. Use TUNE+/TUNE- or Turning knob to toggle between off,
15 minutes, 30 minutes, 45 minutes, and 60 minutes.
30
Set Alarms
1. To setup the alarm go to >Main menu>System setup>Time setup>
Alarms. Or Press the Timer button twice on the radio.
2. Choose Alarm1 or Alarm2 to enter Alarm setup.
Alarm setup
Time: Enter the time to set the alarm off.
On/Off: Use this option to turn the alarm on/off.
31
Mode: Choose the source of what to play when time is up:
Buzzer, Internet radio, or FM.
Last listened:
a. Buzzer: choose a preset buzzer.
b. iRadio, FM: choose one of the last listened stations.
Volume: Use TUNE + or TUNE – or the Turning knob to adjust
the volume.
Save: The settings will not be saved and activated until this option
has been selected.
GB
32
Chapter 5 Upgrade and Reset
Software Upgrade
There are two mechanisms to upgrade the radio.
Upgrade via internet:
Go to >Main menu>System setup>Software upgrade
If there is a newer version of software available, the user will be
asked to confirm the upgrade. If the radio lost power during the upgrade,
it may restart automatically in USB upgrade mode.
Upgrade via USB
A user may choose to use this method instead of Internet Software
Upgrade if a network connection is not available or the power was
removed from the radio during Internet software upgrade.
1. Connect the radio with the PC using an USB cable.
2. Start the upgrade.exe utility on the PC.
3. Utility will ask you to run the Software upgrade wizard on the
Wi-Fi radio.
33
4. If the radio is not yet in upgrade mode (showing the text
“Waiting for PC wizard…”), enter the Software upgrade mode by
removing the power, then holding down the keys <skip backward>
and <skip forward> while turning the radio on again.
5. The upgrade will automatically start and takes approximately
2 minutes.
6. Upon completion, the radio will automatically reboot and load the
new software.
Note:
Do not disconnect power during the update process. Update will fail if
power is disconnected.
Factory Reset
If you wish to completely reset your radio to its initial state this may be
performed by following this procedure.
1. Go to >Main menu>System setup>Factory reset
2. Press the Select (Turning knob or ?) to confirm rest.
3. The display will show “Restarting” for several seconds.
4. When the display shows “Welcome to Internet radio”,
the Factory reset is done.
GB
34
Chapter 6 Trouble Shooting
Problem
Unable to connect to Wi-Fi network
or Unable to get internet listing
Unable to hear sound in AUX IN mode
Unable to find PC or music folder
using scan
Unable to connect to certain stations
Connections are unstable
Possible Cause
1. Router might be down
2. Wrong network
password entered
Aux device or radio volume
not adjusted correctly
Sharing not enabled
Possible Solution
1. Check if PC is able to connect to the network
2. Check if the network key is correct
1. Selected internet radio station
might be down
2. The station does not support the
format used by the internet
radio station
3. Radio is not broadcasting at this
time of day or reached
maximum allowed listeners
1. Interference caused by other
electronic products
2. Internet may be out of bandwidth
1. Check if PC is able to access the internet radio portal
(http://www.wifiradio-frontier.com) when connected to the
same Wi-Fi network
2. Try connecting to the radio station again later
Increase the volume on the radio and the aux device
Enable sharing. See Music Player on page 20 for more details
1. Try moving the radio to another location
2. Try connecting to a wired network and if the problem persists,
turn off programs that are using the internet on your PC to
preserve bandwidth
35
Chapter 7 Product Specification
TUNER
MEDIA
CLOCK
DISPLAY
FM
Frequency
MW
WiFi
Ethernet
Stereo
RDS/RBDS
Frequency (kHz)
IEEE 802.11 b / g (GHz)
IEEE 802.3
Internet Radio (iRadio)
Media Player (mPlayer)
Preset
CD
SD
USB
Aux-in
Others
Real time
Alarm
Sleep
Nap
Others
(MHz)
US: 87.8-108
EU: 87.5-108
Earphones / Speaker
PS/PTY/RT
522 - 1710
2.4 - 2.4835
*
vTuner
*
30
CD / CDR / CDRW
*
Radio control - iRadio
Tuner / Media / Buzzer
LCD / VFD
View area (mm)
Graphic / Character type
Back light
Others
iRadio
Tuner/Media
*
Snooze
LCD
59 x 33.5
Graphic 128 x 64
*
GB
36
FEATURE
AUDIO
AMPLIFIER
SPEAKER
I/O Socket
37
EQ
Record - SD / Flash
Rewind - SDRAM
Record - SD / Flash
Program upgrade
Others
Tone control
Treble / Bass control
DBB
EQ (Sound effect selection)
Others
Speaker output (TYP)
Earphones output
Others
Size
Impedance
Magnetically shield
Others
AC / DC - in
Aux - in
Line - out
Digital - out
Earphones
SD
USB
Ext. Antenna
RJ - 45
Others
Via USB-B
*
6
5W + 5W
5 + 5 mW
3 inches x 2
8 ohms
*
AC
*
*
*
USB-B
WiFi, FM, AM-loop
*
DIMENSIONS
Width
Height
Depth
Weight
( mm )
( mm )
( mm )
(g)
326
108
210
2946
If at any time in the future you should need to dispose of this product please note that: Waste electrical products should not
be disposed of with household waste. Please recycle where facilities exist. Check with your Local Authority or retailer for
recycling advice. (Waste Electrical and Electronic Equipment Directive)
GB
38