1
Operator's Manual
12-in. 4.0 Amp
Weedwacker ®
Electric
Trimmer
Model No.
172.74536
Z_CAUTION:
Read, understand and follow
all Safety Rules and Operating Instructions in
this Manual before using this product.
WARRANTY
SAFETY
ASSEMBLY
OPERATION
MAINTENANCE
PARTS LIST
ESPAI_OL
Sears, Roebuck and Co., Hoffman Estates, IL 60179 U.S.A.
Visit our Craftsman ® website: www.sears.com/craftsman
Warranty .......................................................
Safety Symbols ........ . .....................................
Safety Instructions ..........................................
Unpacking .....................................................
Description ....................................................
Assembly and Adjustments .............................
Operation ...........................................................
Maintenance ..........................................................
Acessories .............................................................
Repair Parts ...........................................................
Spanish ..................................................................
Page
Page
Page
Page
Page
Page
Page
Page
Page
Page
Page
2
3
4-9
9
10-11
12-16
16-19
20
21
22-23
25-47
ONE-YEAR
FULL WARRANTY
ON CRAFTSMAN
WEEDWACKER®
ELECTRIC TRIMMER
If this Craftsman product fails due to defect in material or workmanship
within one year from the date of purchase, RETURN IT TO ANY SEARS
STORE OR OTHER CRAFTSMAN
OUTLET IN THE UNITED STATES
FOR FREE REPLACEMENT.
This warranty excludes the cutting line, which is an expendable part that
can wear out from normal use in less than one year.
If this line Craftsman product is used for commercial or rental purposes,
this warranty applies for 30 days from the date of purchase.
This warranty gives you specific legal rights, and you may also have other
rights, which vary from state to state.
Sears, Roebuck and Co., Dept. 817 WA, Hoffman Estates, IL 60179
SAVE THESE INSTRUCTIONS!
READ ALL INSTRUCTIONS!
2
The purpose of safety symbols is to attract your attention to possible dangers.
The safety symbols, and the explanations with them, deserve your careful
attention
and understanding.
The symbol warnings DO NOT by themselves
eliminate any danger. The instructions and warnings they give are no substitutes
for proper accident prevention measures.
,/_ WARNING: BE SURE to read and understand all safety Instructions in
this manual, including all safety alert symbols such as "DANGER", "WARNING"
and "CAUTION", BEFORE using this trimmer. Failure to follow all instructions
listed below may result in electric shock, fire and/or serious personal injury.
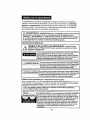
SYMBOL
//_
I
I
MEANING
CAUTION. May
be used
in conjunction
with other symbols
or
SAFETY
ALERT
SYMBOL:
IndicatesDANGER,
WARNING,OR
pictographs.
Failure to obey this safety warning WILL result in death or
serious Injury to yourself or to others. Always follow the
safety precautions to reduce the risk of fire, electric shock
and personal injury.
I/kWARNING
Failure to obey this safety warning CAN result In death or
] serious injury to yourself or to others. Always follow the
safety precautions to reduce the risk of fire, electric shock
and personal Injury.
Failure to obey this safety warning MAY result in personal
injury to yourse]f or others or property damage. Always
follow the safety precautions to reduce the risk of fire,
electric shock and personal injury.
1 CAUTnON
I
DAMAGE PREVENTION AND INFORMATION MESSAGES
These inform user of important information and/or instructions that could lead to
equipment or other property damage if not followed. Each message is preceded by the
word "NOTE:" as in the example below:
NOTE:
not
followed.
Equipment and/or property damage may result if these instructions are
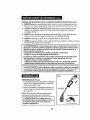
WEAR
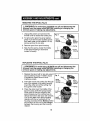
YOUR
,_WARNING:
The operation of any trimmer can
result in foreign objects being thrown into your eyes,
which can result in severe eye damage. Before
beginning power tool operation, ALWAYS wear
safety goggles or safety glasses with side shields and
a full-face shield when needed. We recommend a Wide
Vision Safety Mask for use over eyeglasses or standard
safety glasses with side shields, available at Sears
Stores or other Craftsman Outlets.
3
I
]
handle and efficient tool; if used improperly or without the due precautions
could become aIf dangerous
tool. this
For electric
pleasanttrimmer
and safe
I it_.WARNING:
correctly used,
is awork,
quick,ALWAYS
easy to
strictly comply with the safety rules that are contained in this manual.
manual before using this electric trimmer. Failure to follow all instructions
I listed
/KWARNING:
SURE
to readshock,
and understand
instructions
in this
below may BE
result
in electric
fire and/or all
serious
personal
injury.
i plug
Z_WARNING:
in this tool until
To avoid
the following
mistakesinstructions
that could have
causebeen
serious
read injury,
and understood.
DO NOT
WORK AREA SAFETY
1. ALWAYS avoid dangerous conditions. DO NOT use in wet or damp areas
or expose to rain.
2. DO NOT operate in the presence of flammable liquids, gases, or dust.
Electric tools create sparks which may ignite dust or fumes.
3. ALWAYS keep bystanders and visitors at a safe distance while operating
a trimmer. NEVER allow children near the tool. Flying objects can injure
anyone in the area.
4. CHILDPROOF your tools with padlocks and master switches. Lock tools
away when not in use. This trimmer is not a toy.
5. DO NOT use trimmer at night. ALWAYS make sure you have adequate lighting.
6. BEFORE using the trimmer, remove any stones, sticks, debris or objects
that could be entangled in or thrown by the trimmer.
PERSONAL
SAFETY
• I
z_WARNING:
The operation of any trimmer can result in FOREIGN
OBJECTS BEING THROWN, which can result in personal injury or
property damage. ALWAYS use proper safety equipment.
1. KNOW your tool, Read the operator's
trimmer's applications
and limitations,
hazards related to this tool.
manual carefully. Learn the electric
as well as the specific potential
2. STAY ALERT, watch what you are doing and use common sense when
operating this tool.
3.
DO NOT use tool while tired or under the influence of drugs, alcohol or
medication. A moment of inattention while operating this tool may result
in serious personal injury.
4
PERSONAL SAFETY cont.
4. DRESS properly. Long sleeves and long pants are advised. Wear eye
protection. Trimmer can pick up objects like rocks and send them flying at
fast speeds. Secure long hair above shoulder length. DO NOT wear loose
clothing or jewelry. Keep your hair, clothing, and gloves away from moving
parts. Loose clothing or long hair can be caught in moving parts.
5. DO NOT overreach. Keep proper footing and balance at all times.
Proper footing and balance enables better control of the tool in
unexpected situations.
6. USE SAFETY EQUIPMENT. Always wear eye protection, such as nonfogging, vented goggles or face shield. Proper work shoes with non-slip
soFes, heavy-duty non-slip gloves, hard hat, and hearing protection must be
used for appropriate conditions.
TOOL
USE AND CARE
z_WARNING:
SAFETY
BE SURE
operating
this tool. Failure
in electric
shock,
fire and/or
to read and understand
to follow
serious
all instructions
personal
all instructions
listed below
before
I
may result I
injury.
I
1. DO NOT use the tool if switch does not turn it "On" or "Off". Any tool that
cannot be controlled with the switch is dangerous and must be repaired,
2. DISCONNECT
the plug from
the power
source
before
making
any
adjustments,
changing accessories
or storing the tool. Such preventive
safety measures reduce the risk of starting the tool accidentally.
3. STORE idle tools out of the reach of children and other untrained
persons. Children MUST NOT operate the tool.
Tools are dangerous in the hands of untrained users.
4. MAINTAIN tools with care. ALWAYS keep cutting tools clean and
in good working order.
5. CHECK for misalignment
or binding of moving parts, breakage of parts,
and any other condition that may affect the tool's operation. If damaged,
have the tool serviced before using. Many accidents are caused by poorly
maintained tools,
6. USE ONLY accessories
that are recommended
Accessories
that may be suitable
when used on another tool.
for this tool.
for one tool may become hazardous
5
ELECTRICALSAFETY
i
when installing
I_WARNING:
or removing
plug
Do
not permit the
fingers
from
the outlet,
to touch
the terminals
1. Double insulated tools are equipped with a
polarized plug (one blade is wider than the
other). This plug will fit in a polarized outlet
only one way. If the plug does not fit fully in the
outlet, reverse the plug. If it still does not fit, contact
a qualified electrician
to install a polarized outlet.
Do not change or alter the plug in any way.
2. Double insulation [] eliminates
Cover of
Grounded
Outlet Box-
of plug
I
I
@
the need for the
three-wire grounded power cord and grounded
power supply system. Applicable only to Class II
(double-insulated)
tools.This trimmer is a double
insulated toor.
I
I
A CAUTION:
This trimmer has a 12-in.
must be plugged into a proper extension
/k WARNING:
normal safety
Pigtail Power Cord that
cord (see page 7).
Double insulation
DOES NOT take the place of
precautions
when operating
this tool.
3. BEFORE plugging in the tool, BE SURE that the outlet voltage supplied is
within the voltage marked on the tool's data plate, DO NOT use "AC only"
rated tools with a DC power supply,
4. DO NOT expose tools to rain or wet conditions or use electric tools
in wet or damp locations. Water entering an electric tool will increase
the risk of electric shock.
5. If operating an electric tool in damp locations is unavoidable,
ALWAYS USE a Ground Fault Circuit Interrupter to supply power to
your tool. ALWAYS WEAR electrician's rubber gloves and footwear
in damp conditions.
6. When operating a power tool outside, ALWAYS use an outdoor extension
cord marked "W-A" or "W". these cords are rated for outdoor use and
reduce the risk of electric shock.
7. INSPECT tool cords for damage. Have damaged tool cords repaired at
a Sears Service Center. BE SURE to stay constantly aware of the cord
location and keep it well away from the spinning cutting lines.
8. DO NOT abuse the cord. NEVER use the cord to carry the tool by or
to pull the plug from the outlet. Keep cord away from heat, oil, sharp
edge or moving parts. Replace damaged cords immediately. Damaged
cords increase the risk of electric shock.
EXTENSION
CORDS
Use a proper extension cord. ONLY use cords listed by Underwriters
Laboratories (UL). Other extension cords can cause a drop in line voltage,
resulting in a loss of power and overheating of tool.
For this tool an AWG (American Wire Gauge) size of a least 14-gauge is
recommended for an extension cord of 25- ft. or less in length. Use 12-gauge
for an extension cord of 50-ft. Extension
cords 100-ft. or longer are not
recommended.
Remember, a smaller wire gauge size has greater capacity than a larger
number (14-gauge wire has more capacity than 16-gauge wire; 12-gauge wire
has more capacity than 14-gauge). When in doubt use the smaller number.
When operating a power tool outdoors, use an outdoor extension cord marked
"W-A" or "W". These cords are rated for outdoor use and reduce the risk of
electric shock.
I
Position the cord so that it will not get caught on bushes, hedges,
tree trunks, lawnmowers
or other obstructions
while you are working
Z_
cord clear of the work area.
withCAUTION:
the trimmer.Keep the extension
replace immediately.
Never use tool with a damaged
cord since
touching
the damaged
area could cause electrical
shock, resulting
I A WARNING:Check
extension
cords before each use. If damaged
in serious injury.
The label on your tool may include the following
V .................................................................
A ................................................................
Hz ..............................................................
W ................................................................
rain ...................... ......................................
,%, ..............................................................
............................................................
no ..............................................................
[] ................................................................
.../rain ........................................................
Z_ ...............................................................
symbols.
Volts
Amps
Hertz
Watts
Minutes
Alternating Current
Direct Current
No-load Speed
Class II construction
Revolutions or Strokes per minute
indicates danger, warning caution.
It means attentioni Your safety is involved.
7
SERVICESAFETY
I.
If any part of this trimmer is missing or should break, bend,
any way; or should any electrical component fail to perform
SHUT OFF the power switch and remove the trimmer plug from
source and have the missing, damaged or failed parts replaced
resuming operation.
or failin
properly:
the power
BEFORE
2. Tool service should be performed at a Sears Parts and Repair Center.
Service or maintenance performed by unqualified personnel could result in
a risk of injury.
3. When servicing a tool, use only identical replacement
parts.
Follow instructions
in the maintenance
section of this manual.
Use of unauthorized
parts or failure to follow maintenance
may create a risk of electric shock or injury.
SAFETY
RULES
FOR ELECTRIC
instructions
TRIMMERS
1.
KNOW your electric tool. Read operator's manual carefully. Learn the
applications and limitations, as well as the specific potential hazards related
to this tool. Following this rule will reduce the risk of electric shock, fire or
serious injury.
2.
DO NOT use trimmer at night. ALWAYS make sure that you have adequate lighting.
3.
Use trimmer
4.
ALWAYS hold the trimmer by both the main handle and the auxiliary
for greater control and balance.
5.
AVOID accidental starting.
finger on the switch.
6.
DO NOT carry the trimmer by the cord or yank the cord to disconnect it from
the power receptacle. Keep cord away from heat, oil and sharp edges.
7.
DO NOT grasp the exposed cutting line when picking up or holding the trimmer.
8.
DO NOT FORCE the trimmer. Do net try to cut more than what the trimmer is
designed for. It will do a better job with less chance of injury when used at the
rate for which it is designed.
9.
MAINTAIN the trimmer
replace it if damaged.
ONLY when grass and weeds are dry.
DO NOT carry a plugged
with care. ALWAYS
in trimmer
handle
with your
inspect the extension
cord and
10. KEEP the handle dry, clean and free of oil and grease. Use a clean cloth
when cleaning. DO NOT use solvents, brake fluids, gasoline, or other
petroleum products to clean the trimmer. They can damage plastic parts.
1I.
NEVER, for any reason, touch the cutting line or other moving parts during use.
12. KEEP guard in place
from cutting line.
and in good working order. Keep hands and feet away
8
SAFETY
RULES
FOR ELECTRIC
TRIMMERS
cont,
13. ALWAYS store the trimmer indoors when not in use. It should be stored in
a dry place, high up or locked in a place that is out of the reach of children.
14. WHEN LENGTHENING
NEW CUTTING LINE, be careful of the line cutter
on the guard. Cutter is sharp and can cause injury (see page 12, Fig. 4).
15. ALWAYS use only the accessories provided by or sold by Sears. Use of any
other accessories may create a hazardous situation.
16. ALWAYS
keep ventilation
openings
clear of debris.
17. BEFORE using the trimmer, remove any stones, sticks, debris or
objects that could be entangled in or thrown by the trimmer.
z_WARNING:Some
dust particles created by lawn and garden tools
contain chemicals known to cause cancer, birth defects or other
reproductive harm. Some examples of these chemicals are:
, Compounds in fertilizers,
herbicides, pesticides, and insecticides.
, Arsenic and chromium from chemically treated lumber.
Your risk from these exposures varies, depending upon how often you
do this type of work. To reduce your exposure to these chemicals:
• Work in a well-ventilated area
• Work with approved safety equipment, such as those dust masks
that are specially designed to filter out microscopic particles.
_WARNING:NEVER
reach under the trimmer (cutting line area)
until trimmer has completely stopped. The trimmer's cutting line
will continue to rotate for a few seconds after it is switched off.
Fig. 1
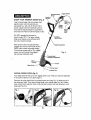
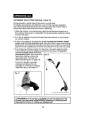
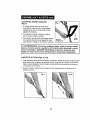
UNPACKING (Fig. 1)
1. The trimmer comes fully assembled except
for the guard and edge guide which must
be attached.
Trimmer
2. Remove the trimmer, guard, and edge guide
from the carton and inspect your trimmer.
NOTE: Do not discard box or packing
material until all parts are examined.
Guard
1. Trimmer
2. Guard
3. Edge guide
_"
Edge guide
not
/_ WARNING:If
plug in the trimmer
any part
untilof the
the damaged
trimmer is
part
missing
is repaired
or damaged,
or replaced.
do
9
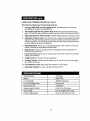
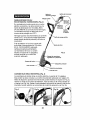
Handle Rotation
Button
KNOWYOURTRIMMER/EDGER(Fig. 2)
Handle
Auxiliary
X
Cord
Retention
Hook
Your trimmer/edger has a precision built
electric motor and it should only be
connected to a 120-volt, 60 HzAC ONLY
power supply (normal household current).
The trimmer should always be used with a
GFCI (Ground Fault Circuit Interrupter) outlet.
Trigger
Switch
Handle
Pigtail
Power
Cord
DO NOT operate this trimmer on
direct current (DC). The large voltage
drop would cause a loss of power and
the motor would overheat.
AUXllla
Handler_nob
If the trimmer does not operate when
plugged into correct 120-volt.60 Hz ACONLY outlet, check the power supply.
The trimmer comes with a 12-in. pigtail
power cord and should be plugged
into a proper extension cord,
Height Adjustment
Fig. 2
rrlmmer
Head
Motor
Housing
PIGTAIL
POWER
CORD (Fig. 3)
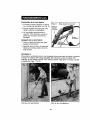
Your edger trimmer has a 12-inch pigtail power cord. This cord must be attached
to a proper extension cord (see page 7).
Remove the plug guard from the pigtail power cord (see Fig. 3). Make a loop in
the extension cord. Push loop through hole in the handle (see Fig. 3a). Fasten
loop around cord retention hook. Plug trimmer's power cord into extension cord
plug (see Fig. 3b).
Fig. 3
Fig. 3b
10
KNOW YOUR TRIMMER/EDGER
This Trimmer/Edger
cont. (Fig. 2)
has the following
features:
1.
4.0 Amp, 8000 RPM (no-load speed) motor. Provides power for trimming
and edging in medium duty applications.
2.
180 ° Rotating Handle with Comfort Grip allows you to use the trimmer as an
edger. The comfort grip provides increased operator comfort with reduced vibration.
3.
Adjustable
4.
Adjustable
Trimmer Head. Your trimmer has a 4-position tilting head that easily
adjusts to the right working angle for optimum operator control and comfort in
all trimming tasks, from trimming around hard-to-reach flower beds and shrubs,
to deck supports, fences and stairways.
5.
Adjustable Shaft. Allows you to change the length of the shaft from 16 to 25
inches, providing a comfortable working height.
6.
Edge Guide provides a cutting guide for protecting
being cut by trimmer line.
7.
Bump-Feed
Head allows you to simply bump the trimmer head for convenient
cutting line extension.
8.
Trigger
9.
Rotating Handle. Rotating handle allows you to use the trimmer as an edger
(for vertical trimming).
Position
Handle
provides added comfort,
maximum
control.
flowers and plants from
Switch. Full length for easy operation.
10. Cord Retention
11. Lightweight
Cutting
Assist
Hook helps keep the extension
cord in place.
design for easy use and handling comfort.
12 inches
Swath
Speed
8000 RPM
Line Diameter
.065-inch
Line Feed Mechanism
Bump head
Power Head -RIt
4 positions
Adjust Height of Shaft
From 16 to 25 inches
Cord Length
12-inch
Power Requirement
120-volt,
11
dual line
Pigtail
Power cord
60 Hertz AC Only
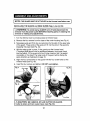
I NOTE: THE GUARD MUST BE ATTACHED to the trimmer head before use. I
INSTALLING THE GUARD and EDGE GUIDE (Figs. 4, 4a and 4b)
trimmer from the power outlet BEFORE installing parts or cleaning the
I trimmer
WARNING:
To avoid
injury, ALWAYS turn off and disconnect the
or making
any adjustments.
1. Turn the trimmer over to provide
2. Remove
the four screws
access to trimmer head.
from the base of the motor housing
(see Fig. 4).
3. Take edge guide and fit its two curved ends into the slots in the upper side
of the guard. These ends of the guide will fit into the slots in the guard by
snapping into place (see Fig. 4a).
4. With the edge guide in place, fit the guard over the trimmer head.
(The edge guide should now be positioned between the trimmer head
and the guard). Fit the guard onto the trimmer head so that it is seated
completely on the head. The larger side of the guard will be facing the
same direction as illustrated on page 10.
5. Align the four screw holes on the guard with the four screw
trimmer head (see Fig. 4b).
6.
Insert the four screws
Fig. 4
and tighten.
holes on the
DO NOT over-tighten.
Fourscrews
Fig. 4b
Guard
\
Motor
Housing'
Fig. 4a
Edge
screwho]es
on Guard
A CAUTION:
BE CAREFUL OF LINE CUTTER ON GUARD.
Cutter is sharp and can cause injury, (see Fig. 4b).
12
Line Cutter
I
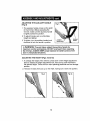
ADJUSTING
(Fig. 5)
THE AUXILIARY HANDLE
1. The auxiliary handle comes on the shaft
of the trimmer. Before operating the
trimmer, make sure the auxiliary handle
is tightly locked into position.
2. To adjust handle, pick a comfortable
height and tighten.
3. To tighten, turn the auxiliary handle knob
clockwise to lock the handle in position.
Auxlnary
handle knob
Auxiliary
handle
Z_WARNING:
To avoid injury, adjust the auxiliary handle for
maximum control and balance. DO NOT overreach when operating
the trimmer. ALWAYS KEEP proper balance for better control of the
tool in unexpected
situations.
ADJUSTING
THE HEIGHT (Figs. 6 and 6a)
1. To change the height of the trimmer, press down on the height adjustment
latch to release the height adjustment lock, then pull or push the shaft to
the desired height. There are four main operating positions and one storage
position.
2. Release the latch, then pull up on the shaft, making sure it locks into position.
Fig. 6
13
ADJUSTING
THE CUTTING
ANGLE
(Figs. 7 and 7a)
t
trimmer from the power outlet BEFORE installing or changing the
I Z_WARNING:To
avoid injury, ALWAYS turn off and disconnect
the
trimmer line or making any adjustments.
I
I
Your trimmer has a 4-position tilting head that easily adjusts to the right working
angle for optimum operator control and comfort. To adjust the trimmer head angle:
1. Press the black trimmer
head adjustment
button on the motor housing,
2. Move the trimmer head to one of four different angles and release the button.
Head will click into position. Easily readjust the angle to a more comfortable
or efficient 3osition as needed.
Fig. 7
Fig. 7a
/
,/
/
ALWAYS turn the switch to the "off" position. Failure to do so could
I /kWARNING:BEFORE
connecting your trimmer to the power outlet,
result in accidental start-up, which may cause serious personal injury.
THE CUTTING
LINE
or holding the trimmer,
I up
AWARNING:DO
NOT grasp the exposed cutting line when picking
A double-wound cord of monofilament cutting line is pre-installed on the trimmer.
When the cutting line needs replacing, install a new pre-wound spool,
or refill the spool with new line (see page 15).
14
I
I
REMOVING THE SPOOL (Fig. 8)
z_ WARNING:To
avoid injury, ALWAYS turn off and disconnect the
trimmer from the power outlet BEFORE installing or changing the
trimmer spool or making any adjustments.
1. Unplug the power cord and turn the
trimmer over to access the cutting line.
2. To remove the spool housing retainer,
press in on the two tabs located across
from each other on the retainer. Lift up,
remove and set to one side.
3. Remove
Fig. 8
Spool
Spool
housing
retainer
spool from spool housing.
4. Note that the spring inside the middle
of the spool housing is loose and
comes out easily.
REPLACING
line
housing
THE SPOOL (Fig. 9)
• trimmer from the power outlet BEFORE installing or changing the
I trimmer
_WARNING:To
avoid injury,
ALWAYS turn off and disconnect the
spool or making
any adjustments;
1. Replace the spool with a new pre-wound
spool (Craftsman Spool 71-85967). Spool
is available at Sears Stores or other
Craftsman outlets.
2. Insert the end of one cutting line through
one of the eyelets in the spool housing.
Insert the other end of the cutting line
through the other eyelet.
3.
Place the spool over the middle of the
spool housing (with the spring inside).
Once spool is over the middle of the
spool housing, pull the cutting lines to
release them from the spool rail notches.
Line up the tabs of the spool housing
retainer with the cut out parts of the
housing and press firmly. Make sure the
two sections of the line are not caught
between the housing and the housing
retainer.
15
Fig. 9
Spool
1
REFILLING
THE SPOOL
(Fig. 10)
If you do not purchase a new pre-wound
spool, you may purchase .065-inch
double-wound monofilament cutting line,
(Craftsman Cutting Line 71-85822) to
refill the spool that was provided with your
trimmer. Cutting line is available at Sears
stores or other Craftsman outlets.
Fig. 10
Spool
Section
1. Remove the spool from the trimmer head
(see steps 1through 3 in "Removingthe Spool").
2. Cut a length of cutting line to approximately
25 feet (7.6 m) long and fold it in half.
Notches
3. Loop the fold point all the way down into
one of the notches on the middle rail of
the spool to anchor the line (Fig. 10).
4. Wind the line evenly and tightly in the direction of the arrow on the base of
the spool. Make sure each section of the spool contains a separate half of
the line (Fig. 10), DO NOT wind the line beyond the edge of the cutting spool.
5. Leave about six inches of cutting line unwound in each section. Stabilize
these two ends of cutting line by inserting them across from each other into
the notches in the top rail of the spool. Note that the cutting line in the bottom
section will have to pass through notches in both the middle and the top rail.
6. Insert the end of one line through one of the eyelets in the spool housing.
Insert the other line through the other eyelet. Tug on the lines to release
them from the notches on the top spool rail.
7. Replace the spool and spool housing
(See steps 4 and 5 in "Replacing the Spool").
I
I
I
i
A WARNING:
To avoid injury, DO NOT carry the trimmer with your
finger on the trigger switch.
z_WARNING:
If any part of the trimmer is missing or damaged, DO
NOT plug in the trimmer until the damaged part is repaired or replaced.
TURNING
TRIMMER
Your edger/trimmer
(see Fig.11).
"ON"
AND "OFF"
has an extended length (4-finger) on/off trigger switch
16
Turning Trimmer "ON"
Fig. 11
1. Plug the trimmer's pigtail power cord
into extension cord (see Fig. 11).
2. Squeeze
trimmer.
trigger
Trigger Switch
Handle
Han_lle
Rotation
Button
switch to start
3. The trimmer will stay "ON" as long
as the trigger switch is squeezed.
Turning Trimmer "OFF"
1. Release the trigger switch to
turn trimmer "OFF".
2. Allow at least 5 seconds for the
cutting spool (line) to stop rotating.
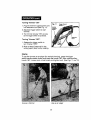
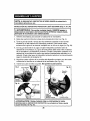
Edging
To use the trimmer as an edger (for vertical trimming), press the trigger
switch handle rotation button and rotate the handle 180 °. Also rotate auxiliary
handle 180°. Loosen knob, rotate handle, and tighten knob. (See Figs. 11 and 13)
Use as a trimmer
Use as an edger
17
EXTENDING
THE CUTTING
LINE (Fig. 14 and 15)
During operation, cutting lines shorten due to normal wear.
For greater convenience and efficiency, your trimmer has been equipped
with a bump feed head that allows you to simply bump the trimmer head to
extend the cutting lines while the trimmer is operating.
1. While the trimmer is on and spinning, gently bump the spool housing on a
firm surface (hard ground or sidewalk). This should release additional cutting
line from the spool.
2. If no line is released, bump the trimmer head more sharply or try bumping it
on a firmer surface.
3. If there is no change in the cutting line length, un-plug
the trimmer's
pigtail
power cord from the extension
cord. After the trimmer head stops rotating,
gently pull at the cutting lines manually. Once the lines are pulled out (extended),
plug the trimmer's pigtail power cord into the extension cord and resume cutting.
4. If the cutting line still does not feed from the spool, the spool might be empty
or the cutting line may be tangled or jammed on the spool. Un-plug the
trimmer's
pigtail power cord from
the extension
cord. After the trimmer
Fig. 15
head stops rotating, remove the
spool (see steps 1 through 3 in
"Removing
the Spool" on page 15).
If the line is tangled or jammed,
untangle and replace the line,
see page 16. If the spool is empty,
replace the spool, see page 15.
A WARNING:To
avoid injury, ALWAYS turn off and disconnect the
trimmer from the power outlet BEFORE checking or installing parts,
cleaning the trimmer or making any adjustments.
18
I
OPERATING TIPS
,
Before each use make sure the protective guard is tightly installed.
Tighten the guard screws, but DO NOT over tighten.
2.
Be sure to check the auxiliary handle before each use, to make sure it is
firmly tightened.
3.
Before trimming, inspect the area for string, wire, branches, rocks, toys,
or other objects that could be entangled in or thrown by the cutting line.
4.
Stand with the cutting head tipped down at an angle in front, guiding
the trimmer in a semi-circular
motion around you.
5.
Cut from left to right whenever possible. Cutting to the right improves the
unit's cutting efficiency. Clippings are thrown away from the operator.
6. To produce a smoothly trimmed area, move the trimmer in and
out of the area being cut with constant speed and height.
7.
Use only the tip of the cutting line to do the trimming, especially near walls
and fences. Trimming with the side of the cutting line may overload the
motor, wear out the line faster, and break the line more often.
8.
DO NOT rest the trimmer spool on the ground while you are trimming.
This will cause spool wear.
9. When cutting vegetation that is over 6 inches in height, work from top to
bottom in small increments to avoid premature line wear or engine drag.
10. When the trimmer is stopped and the spool stops rotating, the cutting
line will relax and may recede. Feed extra cutting line before storing the
trimmer to prevent losing the line in the spool housing,
11. If the diameter of the cutting area gets smaller, the line is worn down and
needs to be advanced.
12. If the trimmer is not cutting correctly, the cutting line may not be feeding
properly. Remove and rewind the line spool. (See REFILLING THE SPOOL).
trimmer from the power outlet BEFORE checking or installing parts,
I z_WARNING:To
avoid
injury, ALWAYS
turn off and disconnect the
cleaning the trimmer
or making
any adjustments.
19
z_WARNING:To
avoid injury, ALWAYS turn off and disconnect the
trimmer from the power outlet BEFORE installing line, cleaning the
trimmer or making any adjustments,
I
GENERAL MAINTENANCE
Keep your trimmer clean and in good repair for maximum long-lasting
performance;
Before each use, inspect the switch and cord for damage.
Check for damaged,
missing, or worn parts. Check for loose screws,
misalignment,
moving parts that are jammed, or any other conditions that
may affect the operation,
if abnormal vibration or noise occurs, turn off the
tool immediately
and have the problem corrected before further use.
DO NOT use the trimmer if it has any broken parts. Have damaged,
missing, worn or broken parts replaced before using trimmer.
CLEANING
/hWARNING:
trimmer
trimmer
To avoid injury, ALWAYS
from the power outlet BEFORE
or making any adjustments.
_,WARNING:
To avoid damage
turn off and disconnect
installing
or electric
line, cleaning
shock,
the
the
DO NOT use strong
solvents or detergents
on the plastic housing or plastic components,
Certain household
cleaners may damage plastic and may also cause
a shock hazard,
Wipe the outside
down or wash
area to remove
grass clippings
of the trimmer
with a dry, soft cloth.
DO NOT hose
the trimmer with water. Scrape the guard and spool
dried clippings and mud. Brush or blow dust, debris and
out of the air vents. Keep the vents free of obstruction.
2O
I
I
I
I
CUTTINGLINE
Replace the cutting line ONLY with nylon monofilament
double-wound
.065 line
(Craftsman Cutting Line 71-85822). When winding your own spool, ALWAYS
wind the line in the same direction as the arrow on the spool.
SPOOL
Replace spool with a new pre-wound spool (Craftsman Spool 71-85967).
Line and spools are available at Sears Stores or other Craftsman outlets
i
trimmer from the power outlet BEFORE installing line, cleaning the
I Z_WARNING:
To avoid
injury, ALWAYS turn off and disconnect the
trimmer or making
any adjustments.
21
I
WEEDWACKER
ELECTRIC
TRIMMER
- MODEL
NUMBER
172.74536
The Model Number will be found on the Nameplate. Always mention the Model Number in all correspondence regarding your tool,
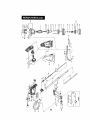
lo
PartNo.
Description
1
Screw M3x8
2
Cable Clamp
3
Carbon Brush Assmebty
4
Roar Bracket
101
Stator Assy
5
Internal Cable 50
6
Stator
7
Rotor
8
Limit Plate
9
Front Bracket Assy
10
Screw M3x8
11
Shaft Retaining Ring B
12
Spring Washer 4
13
Screw M4x40
14
Motor Mount Plate
16
Washer 6
17
Cutting Head Assy
18
Nut M6
19
_nsulat{on Cap
20
Spring 1x13x29.5
103
Spool Assy
21
Cutting Line
102
Line Feeder
22
Cutting Head Cap
23
Screw ST3.gx 16
24
Swivel Shell Set
26
Spring 1x8x12
27
Adjustment-Knob
28
Housing Set
30
Guard
Quantit,/
2
2
2
1
1
2
1
1
1
1
6
1
2
2
1
1
1
1
1
1
1
1
1
1
19
1
1
1
1
1
Part No,
Description
Quantity
31
32
33
Cutting Blade
Space Guard
Screw St3.gx13
1
1
4-
109
34
35
36
37
Cord And Plug
Cord With Plug
Cable Protector
Terminal Port 1.5xl
Switch
1
1
1
1
1
38
39
41
42
43
44
Cord Clamp
Handle Housing Set
Sprin 9 0.7x4+5x15
Switch Lever
Linkage
Button
1
1
1
1
1
1
45
46
47
48
49
50
51
52
108
53
55
107
54
56
57
58
Sprin9 0.7x4.5x15
Tighten Collar
Rotate Collar
Internal Cable
Upper Sheath
Screw St3.5x8
Telescope Tube
Lower Sheath
Release Button
Locking Knob
Bolt M6×70
Side Handle
Steady Handle
Steady Handle Cover
Nut M6
Washer 8
SEE BACK PAGE FOR PARTS ORDERING INSTRUCTIONS.
1
1
1
1
1
2
1
1
1
1
1
1
1
1
1
1
J
/
J
NOTES
24
Manual del operador
Recortadora
el ctrica
Weedwacker
de 4.0 Amp,
12 pulgadas
Modelo No.
172.74536
z_PRECAUCION:
Lea, comprenda y siga
todas las Normas de Seguridad e Instrucciones
de Funcionamiento de este manual antes de
utilizar este producto.
GARANTiA
SEGURIDAD
ENSAMBLAJE
FUNCIONAMIENTO
MANTENIMIENTO
LISTA DE PIEZAS
Sears, Roebuck and Co., Hoffman Estates, IL 60179 U.S.A.
Visite nuestro sitio Web de Craftsman®: www.sears.com/craftsman
Garant[a ......................................................
Sfmbolos de seguridad ...................................
Instrucciones de seguridad ..............................
Desembalaje ................................................
Descripci6n .................
;.................................
Ensamblaje y ajustes .....................................
Funcionamiento .............................................
Mantenimiento .......................................................
Accesorios ............................................................
Piezas de reparaci6n ............................................
P&gma
P_.gina
P&gina
P&glna
P&gina
P_,gina
P&glna
P&gina
P&gina
P&gina
26
27
28-33
33
34-35
36-40
40-43
44
45
46-47
UN AI_IO DE GARANTiA EN LA RECORTADORA
ELI_CTRICA WEEDWACKER ® DE CRAFTSMAN
Si este producto Craftsman tiene alguna falla debido a alg.On defecto de material
o fabricaci6n dentro del afio de la fecha de Compra, DE.VUELVALO A LA TIENDA
O CENTRO DE REPARACION Y PIEZAS SEARS MAS CERCANO U OTROS
PUNTOS DE VENTA CRAFTSMAN EN LOS ESTADOS UNIDOS PARA SU
REPARACION G RATUITA.
Esta garantia no incluye la I[nea de corte, que es una pieza fungible que se
puede desgastar con el uso normal en menos de un afio.
Si este producto Craftsman se utiliza con fines cornerciales o de rent&
esta garantfa es v_.lida s61o por 30 dfas desde la fecha de compra.
Esta garantia le proporciona derechos legales espec[ficos.
otros derechos, los cuales vafian de estado en estado.
Usted puede tener
Sears, ROebuck and Co., Dept. 817 WA, Hoffman Estates, IL 60179
iGUARDE ESTAS INSTRUCCIONES!
iLEA TODAS LAS INSTRUCCIONES!
26
La finalidad de los simbolos de seguridad es atraer su atenciSn a los posibles
peligros. Los simbolos de seguridad y sus explicaciones merecen su detallada
atenci6n y comprensi6n. Las advertencias de los simbolos por si mismas NO
eliminan el peligro. Las instrucciones y advertencias que brindan no sustituyen
las medidas adecuadas de prevenci6n de accidentes.
I
I
de este manual, incluyendo todos los simbolos de alerta de seguridad como
"PELIGRO", "ADVERTENCIA" y "PRECAUCION" ANTES de utilizar esta herramienta.
El incumplimiento
de las instrucciones
a continuacibn
resultar
Z_
ADVERTENCIA:
ASEGURESE enumeradas
de leer y comprender
todas puede
las instrucciones
I
en descarga el_ctrica, incendio y/o lesiones personales graves.
SIGNIFICADO
/_
DE S[MBOLOS
ADVERTENCIA
S[MBOLO DE
O PRECAUCION.
ALERTA DE
Pueden
SEGURIDAD:
usarse en conjuncibn
IndicaPELIGRO,
con otros
s[mbolos o pictogramas.
El incumplimiento de esta advertencia de seguridad
RESULTARA en lesionas graves para usted u otros. Siempre
siga las precauciones de seguridad para reducir el riesgo de
incendio, descarga eldctrica y lesiones personales.
I
[ Z_ADVERTENCIA
IZ_PRECAUCI6N
El
incumplimiento
esta advertencia
seguridad
PUEDE
resultar
en lesionesdegraves
para usted de
u otros.
Siempre
siga
las precauciones de seguridad para reducir el riesgo de
incendio, descarga eldctrica y lesiones personales.
El incumplimiento de esta advertencia de seguridad PUEDE
I resultar en lesiones graves para usted u otros. Siempre siga
las precauciones de seguridad para reducir el riesgo de
incendio, descarga el_ctrica y lesiones personales.
MENSAJES DE INFORMACION
Y PREVENCIC)N DE PELIGRO
Estos mensajes brindan al usuario information y/o instrucciones importantes que podrfan
conducir al daflo de los equipos u otros daflos materiales si no se cumpliesen. Cada mensaje
es precedido por la palabra "NOTA:" como en e! ejernplo a continuacion:
I
siOTA:
no seSesiguen
pueden
estas
preducir
instrucciones.
dafios a los equipos
USESUS
u otros dafios materia]es
z_ADVERTENCIA:
El funclonamiento de cualquier recortadora
puede causar la proyecci6n de objetos extrafios hacia los ojos,
Io cual puede ocasionardafios graves en los ajos. Antes de poner
en funcionamiento una herramientaeldctrica,SIEMPRE use galas
de seguridad o anteojos de seguridad con protector lateral y
protector facial completo cuando sea necesario. Recomendamos
una m&scara de seguridad de visibn amplia para usar sobre los
anteojoa o anteojos de aeguridadest_ndar con protector lateral,
disponibles en las Tiendas Sears u otros centros de venta
Craftsman.
27
I
Ji KADVERTENCIA:
Si esta recortadora el6ctrica se usa correctamente, se trata de
una herramienta r_ipida,eficiente y de f6cil manejo. Si no se la usa de manera correcta
o si no se siguen las precauciones indicadas, podria volverse una herramienta peligrosa.
Para un trabajo seguro y agradable, SIEMPRE cumpla estrictamente con las normas de
seguridad que se establecen en este manual.
I z_ADVERTENCIA:
ASEGORESE de leer y comprender todas las instrucciones de este
manual antes de usar esta recortadora el_ctrica. El incump!imiento de las instrucciones
enumeradas a continuaci6n puede resultar en descarga electrica, incendio y/o lesiones
personales graves.
J AADVERTENCIA:
Para evitar errores que podrian causar lesiones graves, NO
enchufe esta herramienta hasta haber leido y comprendido !as siguientes instrucciones.
SEGURIDAD
DEL AREA
DE TRABAJO
1. SIEMPRE evite situaciones
peligrosas. NO use esta herramienta
en lugares hQmedes ni la exponga a la Iluvia.
el6ctrica
2. NO la haga funcionar en presencia de liquidos inflamables, gases o polvo. Las
herramientas
el6ctricas crean chispas que pueden encender el polvo o humo.
3. SIEMPRE mantenga alas personas que est&n cerca de las inmediaciones
y visitantes alejados mientras utiliza una recortadera.
NUNCA permita que
los niSos est6n cerca de la herramienta.
Los objetos que vuelan pueden
lastimar a cualquier persona que se encuentre en el _.rea.
4. Haga sus herramientas A PRUEBA
maestros. Guarde las herramientas
recortadora
no es un juguete.
DE NINOS con candados e interruptores
bajo Ilave cuando no las utiliza. Esta
5. NO use la recortadora durante la noche. SIEMPRE aseg0rese de contar
con una iluminaci6n adecuada.
6. ANTES de usar la recortadora, retire cualquier piedra, palo, desecho u
objeto que pudiera enredarse o ser lanzado por la recortadora.
SEGURIDAD
PERSONAL
PROYECCION DE OBJETOS EXTRAI_OS, Io cual puede producir da_os
I AADVERTENCIA:
El funcionamiento de una recortadora puede causar la
personales o materiales, SIEMPRE use equipo de seguridad adecuado.
1. FAMILIARiCESE
con su herramienta.
Lea cuidadosamente
el manual del
operador. Aprenda las aplicaciones y limites de la recortadora el6ctrica,
asi como los peligros potenciales especificos relacionados con esta herramienta.
2. PERMANEZCA
ALERTA, mire Io que est& haciendo
cuando hace funcienar esta herramienta.
y use el sentido comDn
3. NO use la herramienta
cuando est6 cansado o bajo la influencia de drogas,
alcohol o medicaci6n. Un momento de distracciSn mientras usa esta herramienta
podfia
resultar en lesiones personales
28
graves.
I
SEGURIDADPERSONALcont.
4. ViSTASE adecuadamente,
Se recomiendan
mangas largas y pantalones
largos. Use protecci6n ocular. La recortadora puede arrastrar objetos
como piedras y hacerlos volar a velocidades r&pidas. Aseg_rese de que
el cabello largo este arriba de la altura de los hombros. NO use ropas
sueltas ni joyas. Mantenga su cabello, ropa y guantes alejados de las piezas
en movimiento. La ropa suelta o el cabello largo puede quedar atrapado en
las piezas en movimiento.
5. NO intente hacer demasiado. Mantenga un equilibrio adecuado en todo
momento. El equilibrio adecuado le permitir& Iograr un mejor control de la
herramienta en situaciones inesperadas.
6. UTILICE UN EQUIPO DE SEGURIDAD.
Siempre use protecci6n ocular, tal
como gafas antiempafiantes
con ventilaci6n o m_.scara facial. Se debe usar
calzado con suela antideslizante,
guantes reforzados antideslizantes,
casco
y protecci6n auditiva para las condiciones adecuadas.
USO DE LA HERRAMIENTA Y SEGURIDAD
z_.ADVERTENCIA:
ASEGURESE
EN LOS CUIDADOS CR[TICOS
de leer y comprender
todas
las
instrucciones
de este manual antes de usar esta herramienta.
El incumplimiento
de las instrucciones enumeradas a continuaci6n
resultar
en descarga
e _ctrica,
ncend
o y/o es ones persona
puede
es graves.
1. NO use la herramienta si el interruptor no puede encenderla ni apagarla.
Cualquier herramienta que no se pueda controlar con el interruptor es
peligrosa y se debe reparar.
2. DESCONECTE el enchufe del generador antes de hacer cualquier ajuste,
cambiar accesorios o guardar la herramienta. Estas medidas de seguridad
preventivas reducen el riesgo de activar la herramienta accidentalmente.
3. GUARDE las herramientas que no estd usando fuera del alcance de los nifios
y de otras personas no capacitadas. Los nifios NO DEBEN usar la herramienta.
Las herramientas son peligrosas en las manos de los usuarios no capacitados.
4. MANTENGA las herramientas con cuidado. SIEMPRE mantenga
herramientas de corte limpias yen buen funcionamiento.
las
5. ASEGURESE de que no haya ninguna desalineacibn,
atasco de piezas
m6viles, ruptura de piezas asi como tampoco ninguna otra condici6n que
pudiera afectar el funcionamiento
de la herramienta. Si la herramienta
est_
dafiada, haga que realicen un servicio de ajustes y reparaciones antes de
usarla. Muchos accidentes son causados pot herramientas
mantenidas
deficientemente.
6. USE SOLAMENTE los accesorios que se recomiendan para esta herramienta.
Los accesorios que pueden ser adecuados para una herramienta pueden
volverse peligrosos cuando se utilizan en otra herramienta.
29
SEGURIDADELF:CTRICA
A ADVERTENCIA:
No permita que los dedos hagan contacto con las
terminales del enchufe mientras instala o quite el enchufe del tomacorriente,
1. Las herramientas con aislamiento doble est_n
equipadas con un enchufe polarizado (una hoja es
rods amplia que la otra). Este enchufe encajar_ en un
tomacorriente polarizado de una sola manera, Si el
enchufe no entra por completo en el tomacorriente, d61e
la vuelta, Si sigue sin entrar, p6ngase en contacto con un
electricista competente para instalar un tomacorriente
polarizado. No haga ningSn tipo de cambio en el enchufe.
Tapa de
Gaja de
conectada
sa]ida _
a tierra
_
2. El aislamiento doble _]elimina la necesidad del sistema
do cord6n el6ctrico de tres hilos y el sistema de suministro
de energfa conectado a tierra. Aplicable solamente alas
herramientas Clase II (con aislamiento doble). Esta
recortadora es una herramienta de aislamiento doble.
I
,'_
PRECAUCION:
Esta recortadora
tiene de
unextensi6n
cordbn el6ctrico
en (ver
espiral
de 12
pulgadas
que se debe enchufar
en un cordbn
adecuado
p_,gina31).
[ seguridad
z_ADVERTENCIA:
normales cuando
El aislamiento
hace funcionar
dobleesta
NO herramienta.
reemplaza las precauciones de
3. ANTES de enchufar la herramienta, ASEGURESE de que la tensi6n del tomacorriente
suministrada se encuentre dentro del margen de la tensi6n especificada en la placa del
fabricante. NO utilice herramientas con capacidad nominal "CA solamente" con una fuente
de energfa CC.
4. NO exponga las herramientas a la Iluvia ni a situaciones h5medas asf como
tampoco use herramientas el_ctricas en lugares ht_medos. Si entra agua en una
herramienta el6ctrica, hay mayor rlesgo de que se produzcan descargas el6ctricas.
5. Si la situaci6n de la herramienta el6ctrica en lugares hOmedos es inevitable, SIEMPRE
USE un interruptor de circuitos para fallos a tierra o un GFCi (per sus siglas on ingl6s)
para suministrar la energia electrica a la herramienta. SlEMPRE USE guantes de goma
para electricista y calzado antideslizante en situaciones h_medas.
6. AI utilizar una herramienta el_ctrica a la intemperie, SIEMPRE use un cord6n de extensi6n
para intemperie marcado 'W-A" o "W". Estos cordones tienen capacidad nominal para uso
a la intemperie y reducen el riesgo de que se produzcan descargas el_ctricas.
7. INSPECCIONE los cordones de la herramienta para ver si est_n da5ados. Haga
reparar los cordones de la herramienta da_ados en el Centre de Servicios Sears.
ASEGORESE do ser consciente en todo momento de la ubicaci6n del cord6n y de
mantenerlo alejado de las Iineas de corte giratorias.
8. NO ABUSE del cordbn. NUNCA use el cord6n para Ilevar la herramienta ni pare
sacar el enchufe del tomacorriente. Mantenga el cord6n alejado del calor, el aceite,
los hordes afilados o las piezas m6viles. Reemplace los cordones dafiados inmediatamente.
Los cordones daSados aumentan el riesgo de que se produzcan descargas el6ctricas.
3O
CORDONES
DE EXTENSION
Utilice un cord6n de extensibn adecuado. Utilice SOLAMENTE los cordones autorizados
per UnderwritersLaboratories(UL). Cualquier otrocable de extensi6n puede ocasionaruna caida
en la tensi6nde linea resultando en p_rdida de potencia y recalentamiento de la herramienta.
Para esta herramienta, la escala de calibres norteamericanos para alambres y cables o AWG
(per sus siglas en ingl6s) recomienda un tamaBo mfnimo de calibre 14 para un cordSn de
extensi6n de 25 pies o de una Iongitud menor. Utilice calibre 12 para los cordones de extensi6n
de 50 pies. No se recomiendan los cordones de extensi6n de 100 pies o inferiores.
Recuerde que un tama5o de calibrador de alambres m_,s pequeSo tiene una capacidad
m_s grande que un nu_meromayor (el alambre de calibre 12 tiene una capacidad m_ grande
que el de calibre 14). Si tiene alguna duda, utilice el calibre de un di_.metro menor.
AI utilizar una herramienta el6ctrica a la intemperie, use un cord6n de extensi6n para intemperie
marcado "W-A" o "W". Estos cordones tienen capacidad nominal para uso a la intemperie y
reducen el riesgo de que se produzcan descargas el_ctricas.
Z_ PRECAUCION:
Mantenga el cordbn de extensibn alejado del &rea de
trabajo. Coloque'el cord6n de modo que no quede atrapado en los arbustos,
cercados, troncos de z_rboles, m_quinas de cortar el c_sped o cualquier otra
obstruccibn mientras usa la recortadora,
ADVERTENCIA:
Controle
los cordones
de extensibn
[
I
antes de cada
uso. Si estuvieran dahados, reempldcelos inmediatamente.
Nunca use la
herramienta con un cord6n dahado ya que si hace contacto con el &rea
dahada se pueden producir descargas el6ctricas o lesiones graves.
La etiqueta
de su herramienta
puede incluir los siguientes
V .................................................................
A ................................................................
Hz ..............................................................
W ................................................................
min ............................................................
..............................................................
............................................................
no ..............................................................
[] ................................................................
.../rain ........................................................
i_k...............................................................
sfmbolos:
Voltios
Amperios
Hereios
Watts
Minutos
Corriente alterna
Corriente directa
Velocidad sin carga
Construcci6n clase II
Revoluciones o golpes per minuto
Indica seRales de peligro, advertencia
o precauciSn. Significa: iiiatenci6n!!!
Su
seguridad est& en juego.
31
SEGURIDADDELSERVICIO
1. Si alguna pieza de esta recortadora faltara, se rompiera, doblara, o tuviera una falla,
o si algQn componente eldctrico no funcionara correctamente: DESCONECTE el
interruptorde energia el_ctrica, quite el enchufe del generador y cambie las piezas faltantes,
dafiadas o con fallas ANTES de reanudar el funcionamiento.
2. Los servicios de ajuste y reparaciones de las herramientas se deben realizar en un
Centre de Reparaci6n y Piezas Sears. El servicio de ajustes o el mantenimiento realizado
por personal no competente podrfa resultar en un riesgo de lesi6n.
3. AI realizar servicio de ajustes y reparaciones de una herramienta, utilice solamente
piezas de repuesto id_nticas. Sigua las instrucciones en la seccibn de mantenimiento
de este manual. El uso de piezas no autorizadas o el incumplimientode las instrucciones
de mantenimiento puede ocasionar el riesgo de que se produzcan descargas el_ctricaso
esiones.
NORMAS
DE SEGURIDAD
PARA LAS RECORTADORAS
ELI_CTRICAS
1. FAMILIARiCESE con su herramienta. Lea cuidadosamente el manual del operador.
Aprenda las aplicacionesy limites, asi como los peligros potenciales especificos
relacionades con esta herramienta. El seguimiento de esta norma reducir&el riesgo de
que se produzca alguna descarga el6ctrica, incendio o lesi6n grave.
2. NO use la recortadora durante la noche. SIEMPRE aseg_rese de contar con una
iluminaci6n adecuada.
3. Utilice la recofladora SOLAMENTE cuando el c6sped y las hierbas silvestres est_n secas.
4. SIEMPRE sostenga ]a recortadora del mango principal y el mango auxiliar para un mayor
control y equilibrio.
5. EVITE el arranque accidental. NO ]leve una recortadora enchufada con el dedo en el
interruptor.
6. NO Iteve la recortadora del cord6n ni tire del cord6n para desconectarla del recept&culo de
suministro de energia. Mantenga el cord6n alejado del calor, el aceite y los bordes afilados.
7. NO haga contacto con la Ifnea de corte expuesta cuando levanta o sostiene la recortadora.
8. NO FUERCE la recortadora. No trate de cortar m_.sde Io que la recortadora est,. diseSad
para cortar. Har_. un mejor trabajo con menos posibilidadde lesi6n cuando la utiliza a la
capacidad nominal para la que rue diseSada.
9. MANTENGA la recortadora con cuidado. SIEMPRE inspeccione el cord6n de extensi6n y
reempl_.celo si estuviera dafiado.
10. MANTENGA el mango seco, limpioy sin sustancias aceitosas o grasosas. Use un trapo
limpio para limpiar. NO use solventes, Iiquidos para freno, gasolina ni productos a base de
petr61eo para limpiar la recortadora. Pueden hacerle daSo alas piezas plAsticas.
11. NUNCA, por ninguna raz6n, haga contacto con la linea de corte n{ ninguna otra pieza en
movimiento durante el uso.
12, MANTENG A los dispositivos protectores en su lugar y en buen funcionamiento.
Mantenga las manos y pies alejades de la Iinea de corte.
32
NORMAS
DE SEGURIDAD
PARA LAS RECORTADORAS
ELECTRICAS
cont.
13. SIEMPRE guarde la recortadora bajo techo cuando no la usa. Se debe guardar en un
lugar seco, en Io alto y asegurada de modo tal que est6 fuera del alcance de los niflos.
14. CUANDO ALARGA LA LINEA DE CORTE, tenga cuidado con la cortadora de Ifnea
situada en el dispositivo protector. La cortadora es filosa y puede causar lesiones
(ver pAgina 36, Fig. 4).
15. SIEMPRE utilice solamente los accesorios que recomienda o vende Sears para este
producto. El uso de otros accesorios puede crear una situacion peligrosa.
16. SIEMPRE mantenga las aberturas de ventilaci6n ]ibres de obstrucciones.
17. ANTES de usar la recortadora, retire cualquier piedra, palo, desecho u objeto que pudiera
enredarse o ser lanzado per la recortadora.
AkADVERTENClA:
Algunas partfculas de polvo creadas por las herramientas
de cdsped y jardineria contienen sustancias qoimicas que pueden producir cancer,
defectos al nacer o cualquier otra lesi6n de reproduccibn. Algunos ejemplos de
estas sustancias quimicae son:
• Compuestos en fertilizantes, herbicidas, pesticidas e insecticidas.
• Arsdnico y cromo de madera tratada quimicamente.
Su riesgo por estas exposiciones varia, segfin la frecuencia con que realiza este
tipo de trabajos. Para reducir su exposicibn a estas euetancias quJmicas:
• Trabaje en Areas con buena ventilaci6n.
• Trabaje con equipos de seguridad aprobados, tales como mascarillas antipolvo
especialmente disehadas para no dejar pasar las particulas microsc6picas.
Ak ADVERTENClA:
NUNCAextiendala mane o los dedos per debajo de la recortadora
(zona de Ifneade corte) hastaque 6sta se haya detenidopot completo.La Iinea de code de
la recortadoracontinuarAgirando por algunossegundosdespu_sde desconectarla.
Fig. 1
DESEMBALAJE
(Fig. 1)
1. La recortadora viene completamente ensamblada
excepto por el dispositivo protector y la guia de
borde que se deben afiadir.
2. Retire la recortadora, el dispositivo protector y la
guia de borde de la caja de cart6n e inspeccione
su recertadora.
Recortadora
NOTA: No tire la caja ni el material de embalaje
hasta que todas las piezas sean examinadas.
Dispositivo protector
AkADVERTENCIA:
Si alguna pieza de la
recortadora faltara o estuviera dafiada, no enchufe
la recortadora hasta que la pieza dafiada sea
reparada o reemplazada.
33
""
--
:
,<,
Guia de borde
Gatlllo del lnterruptor
eot6n de
rotaci6n de mango
Mango auxl]lar
FAMILIAR[CESE
CON SU
RECORTADORA/BORDEADORA
(Fig. 2)
Su recortadora de bordes cuenta con un motor
el6ctrico a precisi6n y se debe conectar a una
fuente de alimentaci6n de 120 voltios, 60Hz,
CA SOLAMENTE (la corriente normal del hogar).
La recortadora siempre se debe usar con un
tomacorriente protegido con GFCI.
NO haga funcionar esta herramienta con corriente
continua (CC). Una caicla de voltaje significativa
puede causar perdida de potencia y el motor se
recalentar&.
Si la recortadora no funciona cuaedo est,.
enchufada al tomacorriente de 120 voltios,
60 Hz, CA SOLAMENTE adecuado,
verifique la fuente de alimentaci6n.
La recortadora viene con un cord6n
el6ctrico en espiral de 12 pulgadas y
se debe enchufar a un cord6n de
extensi6n adecuado.
Cord6n
eI_ctrico
en esplral
de mango auxiliar
AJuste de altura
Fig. 2
Cabezal de recortadore
regulablo en 4 poslciones
posltlvo protector
Gufa de borde
_l_._.
II _
CORDON
Cabezal de recortadore
Linea de corte
EL_=CTRICO EN ESPIRAL (Fig. 3)
Su recortadora de bordes tiene un cord6n el6ctrico en espiral de 12 pulgadas.
Este cord6n se debe conectar a un cord6n de extensi6n adecuado (ver p&gina 31).
Retire el dispositivo protector de enchufe del cord6n el6ctrico en espiral (ver Fig. 3).
Realice un bucle en el cord6n de extensi6n. Pase er bucle por el orificio ubicado en
el mango (ver Fig. 3a). Ajuste el bucle alrededor del gancho de retenci6n del cordon.
Enchufe el cord6n el_ctrico en el enchufe del cord6n de extensi6n (ver Fig. 3b).
Fig. 3
Fig, 3b
34
FAMILIARICESE
CON SU RECORTADORA
/ BORDEADORA
(Fig. 2)
Esta recortadora de bordes tiene las siguientes caracteristioas:
1. Motor de 4.0 Amp, 8000 RPM (velocidad sin carga). Brinda potencia para
recortar y bordear en aplicaciones de resistencia mediana.
2. El mango giratorio de 180 ° con empuSadora
recortadora como bordeadora. La empu5adura
de trabajo c6moda con vibraci6n reducida.
3. El mango au×iliar
regulable
de confo_ le permite utilizar la
de confort permite una posici6n
brinda confort agregado y m&ximo control.
4. Cabezal de reeortadora regulable. Su recortadora tiene un cabezal inclinable
en 4 posiciones que se ajusta f_.cilmente al _ngulo de trabajo adecuado para
un control de funcionamiento y confort 6ptimos en todas las tareas de recorte,
desde recortes alrededor de arbustos y canteros de flores dificiles de Ilegar
hasta soportes de superficies planas, cercos y escaleras.
5. Eje regulable. Le permite cambiar la Iongitud del eje de 16 a 25 pulgadas,
brindando una altura de trabajo confortable.
6. La guia de borde brinda una guia de corte para proteger las flores y plantas de
la linea de corte.
7. El cabezal con alimentacibn por golpe le permite golpear simplemente el
cabezal de la recortadora para una extensi6n conveniente de la linea de corte,
8. Longitud total de] gatillo del interruptor
para un f&cil funcionarniento.
9. Mango giratorio. El mango giratorio le permite usar la recortadora
bordeadora (para el recorte vertical).
10. El gancho
de retencibn
11. De diseSo
Iiviano para el uso fb,cil y confort de manejo.
del cordbn mantiene el cord6n de extensi6n en su lugar.
Franja de corte
Velocidad
I2 pulgadas
8000 RPM
Diametro de linea
0.065 pulg. en linea dual
Mecanismo de alimentacidn
como
de linea
Alimentacidn
por golpe
Inclinaci6n del cabezal de potencia
4 posiciones
Ajuste de altura del eje
De 16 a 25 pulgadas
Longitud de cord6n
Cord6n el6ctrico en espiral de 12 pulgadas
Potencia requerida
120-volt, 60 Hertz, CA SOLAMENTE
35
I
I recortadora
NOTA: El DISPOSITIVO
PROTECTOR
antes de su uso.
SE DEBE ANADIR al cabezal de la
I
I
INSTALACION DEL DISPOSITIVO PROTECTOR y GUIA DE BORDE (Figs. 4, 4a y 4b)
_ADVERTENCIA:
Para evitar cualquier lesi6n, SIEMPRE apague y
desconecte la recortadora del tomacorriente
ANTES de Instalar piezas,
de Ilmpiar la recortadora o de reallzar ajustes.
1. Volte6 la recortadora
para acceder
I
I
al cabezal de la recortadora.
2. Retire los cuatro tornillos de la base de la carcasa
del motor (ver Fig. 4).
3. Tome la guia de borde y encaje sus dos extremos curvados en las ranuras
situadas en e[ lade superior del dispositivo protector. Para insertar estos
extremos de la guia en las ranuras, enc_.jelos con un clic en su lugar (vet Fig. 4a).
4. Con la guia de borde en su lugar, encaje el dispositivo protector sobre el
cabezal de la recortadora. (La guia de borde ahora debe estar entre el cabezal
de la recortadora y el dispositivo protector). Encaje el dispositivo protector en el
cabezal de la recortadora de modo que quede completamente
asentado en el
cabezal. El lado m&s largo del dispositivo protector estar& en la misma direcci6n
seg_n la ilustraci6n de fa p&gina 34.
5. Aline6 los cuatro orificios de los tornillos del dispositivo
orificios de los torniflos en el cabezal de la recortadora
6. Inserte los cuatro torniflos y apriete. NO apriete
Fig. 4
protector con los cuatro
(ver Fig. 4b).
excesivamente.
Fig. 4b
Cuatro tornirlos
Dispositivo
protector
\
Carcasa
del motor"
Fig. 4a
Guia de borde
orificios de
tomlllos erl
dlsposltivo protector
I
z_PRECAUCION:
Cortadora de linea
TENGA CUIDADO CON LA CORTADORA DE L|NEA
MONTADA EN EL DISPOSITIVO PROTECTOR. La cortadora es filosa y puede
causar lesiones (ver Fig. 4b).
36
I
AJUSTE DEL MANGO AUXILIAR
(Fig. 5)
1. El mango auxiliar viene en el eje de la
recortadora. Antes de usar la recortadora,
aseg_rese de que el mango auxiliar est_
ajustado firmemente.
2. Para ajustar el mango, escoja una altura
que le queda c6moda y apriete.
3. Para apretar, gire la peritla del mango auxiliar
en el sentido contrario alas agujas del reloj
para ajustar el mango en su posici6n correcta.
Pedlla del
mango auxiliar
Z_ADVERTENCIA:
Para evitar cualquier lesibn, ajuste el mango auxiliar
para un m_ximo control y equilibrio. NO intente hacer demasiado cuando
usa la recortadora. SIEMPRE MANTENGA el equilibrio adecuado para
Iograr un mejor control de la herramienta en situaciones inesperadas.
AJUSTE
DE ALTURA
(Figs.
6 y 6a)
1. Para cambiar la altura de la recortadora, presione el pestillo de ajuste de altura hacia
abajo para soltar la palanca de ajuste de altura, luego tire de o empuje el eje hasta
Iograr la altura deseada. Existen cuatro posiciones de funcionamiento principales y
una posici6n de memoria.
2. Suelte el pestilto, luego tire del eje hacia arriba, asegur&ndose de ajustarlo en la
posiciSn correcta.
,;i__ _
Fig. 6
,o os,_*
37
AJUSTE DEL ANGULO DE CORTE (Figs. 7 y 7a)
z_ADVERTENCIA:
Para evitar cualquier lesibn, SIEMPRE apague y
desconecte la recortadora del tomacorriente
ANTES de instalar o cambiar
piezas o de realizar
ajustes.
Su recortadora tiene un cabezal inclinable en 4 posiciones que se ajusta f&cilmente
al &ngulo de trabajo adecuado para un control de funcionamiento y confort 5ptimos.
Para ajustar el #,ngulo del cabezal de la recortadora:
1. Pulse el botSn negro de ajuste de cabezal de la recortadora situado en la carcasa
del motor.
2. Mueva el cabeza] de la recortadora hacia uno de los cuatro _.ngulos diferentes y
suelte el botSn. El cabezal se encajar& con un clic en la posiciSn correcta. Vuetva
a ajustar f&cilmente el &ngulo a una posici6n m&s cSmoda o eficiente seg_n las
necesidades.
Fig. 7a
Fig. 7
/
Z_ADVERTENCIA: ANTES de conectar su recortadora a un tomacorriente, [
SIEMPRE coloque el interruptor en posicibn "OFF". Caso contrario, se podria
ocasionar
un arranque accidental,
LA LINEA
DE CORTE
causando
lesiones
personales
graves.
cuando
levanta o sostJene
la recortadora.
I A
ADVERTENCIA:
NO haga
contacto con la linea de corte expuesta
Un cord6n de dos arrollamientos
de la linea de corte de monofilamento
se
preinstala en la recortadora. Para cambiar la linea de corte, instale una nueva
bobina devanada o vuelva a rellenar la bobina con la nueva linea (ver p&gina 39).
38
I
I
EXTRACCI(_N
DE LA BOBINA
(Fig. 8)
/h ADVERTENCIA:
Para evitar cualquier lesibn, SIEMPRE apague y
desconecte la recortadora del tomacorriente ANTES de instalar o cambiar
piezas o de realizar ajustes.
1. Desenchufe el cord6n el6ctrico y volte_
la recortadora para acceder a la linea de
corte.
2. Para quitar el are de tope de la carcasa
de bebina, presione las dos lengeetas
situadas una frente a la otra en el are de
tope. Lev&ntelo, retirelo y ap_rtelo hacia
un costado.
I
Fig. 8
Boblna
Riet de
boblna con
3. Quite la bobina de la carcasa de bobina.
4. Tenga presente que el resorte que est,.
dentro de la carcasa de bobina est,. flojo
y Io puede quitar f_.cilmente.
REEMPLAZO
DE LA BOBINA
Llnea
de corte i
(Fig. 9)
desconecte la recortadora del tomacorriente ANTES de instalar o cambiar
I piezas
z_,ADVERTENCIA:
Para evitar cualquier lesibn, SIEMPRE apague y
o de realizar ajustes.
1. Reemplace la bobina per una nueva
bobina devanada. (Bobina Craftsman pieza
no. 71-85967). La bobina est#, disponible en
las tiendas Sears u otros centros de venta
Craftsman.
Fig. 9
Boblna
Rlel de
boblna con
Are de tope
de la carcasa
de boblna
2. Inserte el extreme de una I[nea de corte per
una de las aberturas en la carcasa de bobina.
Inserte el otro extreme de la linea de corte
per la otra abertura.
3. Pase la bobina per el medio de la carcasa de
bobina (con el resorte hacia adentro). Una
vez que la bobina est6 en el medio de la
carcasa de bobina, tire de las I[neas de corte
para soltarlas de las muescas de los rieles
de bobina. Aline6 las lengLietas del are de
tope de la carcasa de bobina con las piezas
de corte de la carcasa y presione firrnemente.
Asegl3rese de que las dos secciones de la
linea no queden atascadas entre la carcasa
y el are de tope de la carcasa.
39
Linea
de corte !
Abertura
Carcasa
de bobina
\
',
I
RELLENODE LA BOBINA(Fig. 10)
Si no compra una nueva bobina devanada,
puede adquirir una linea de corte de monofilamento de dos arrollamientos de 0.065
pulgadas, (Linea de corte Craftsman 71-85822)
para rellenar la bobina que se proporcion6 con
su recortadora. La linea de corte est,, disponible
en las Tiendas Sears u otros centros de venta
Craftsman.
Fig. 10
Bobina
Secclbn
inferior
1. Retire la bobina del cabezal de la recortadora
(ver pasos 1 a 3 en "Extracci6n de la bobina").
2. Corte una Iongitud de la Iinea de corte de
aproximadamente 25 pies (7.6 m) de largo y
d6blela por la mitad.
Muescas
derleles
de bobina
3. Realice un bucle en el punto de pliegue hacia abajo en direcci6n a una de las muescas
situadas en el riel intermedio de la bobina para asegurar la linea (Fig. 10).
4. Devane la Iinea firme y uniformemente en la direcci6n de la flecha en la base de la
bobina. AsegOrese de que cada secci6n de la bobina contenga una mitad de la Iinea
por separado (Fig. 10). NO devane la linea m&s all& del extremo de la bobina de corte.
5. Deje alrededor de seis pulgadas de la I[nea de corte desbobinadas en cada secci6n.
Para estabilizar estos dos extremos de la linea de corte, ins_rtelos de manera
transversal en las muescas situadas en el riel superior de la bobina. Tenga presente
que la linea de corte en la secci6n inferior deberA atravesar las muescas en el riel
intermedio y superior.
6. Inserte el extremo de una Iinea de corte por una de las aberturas en la carcasa de
bobina. Inserte la otra linea por la otra abertura. _re de las Ifneas para soltarlas de
las muescas en el riel de bobina superior.
7. Reemplace la bobina y la carcasa de bobina
(Vet pasos 4 y 5 en "Reemplazo de la bobina").
z_ADVERTENClA:
Para evitar cualquier lesi6n, NO Ileve la recortadora con el
dedo en el gatillo del interruptor.
AkADVERTENCIA:
Si alguna pieza de la recortadora estuviera daSada o faltara,
NO enchufe la recortadora hasta que la pieza dafiada se haya reparado o reemplazado,
Encendido
de la recortadora
y Apagado
de la recortadora
Su recortadora tiene un gatillo de interruptor de encendido/apagado
]ongitud extendida (4 dedos) (ver Fig. 11).
40
con una
Encendido de la recortadora
Fig. 11
1. Enchufe el cord6n el_ctrico en espiral
en el cord6n de extensi6n (ver Fig. 11).
Mango de gatUlo del interruptor
Bot6n de
rotaci6n
de mango
2. Apriete el gatillo del interruptor para
hacer funcionar la recortadora.
3. La recortadora permanecera, en
posici6n "ON" siempre y cuando el
gatillo del interruptor este siendo
apretado.
Apagado
de la recortadora
1. Suelte el gatillo del interruptor para
apagar la recortadora.
2. Aguarde, como minimo, 5 segundos
hasta que la (Ifnea) bobina de corte
deje de girar.
Bordeadora
Para usar la recortadora como una bordeadora (para recortes verticales), presione
el bot6n de rotaci6n del mango del gatillo del interruptor y gire el mango 180 °.
Adem&s, gire el mango auxiliar 180 °. Afloje la perilla, haga girar el mango y ajuste
la perilla (ver Figs. 11 y 13).
Uso de una recortadora
Uso de una bordeadora
41
EXTENSION
DE LA LINEA
DE CORTE
(Fig. 14 y 15)
Durante el funcionamiento, las lineas de corte so acodan per el use normal. Para una
mayor conveniencia y eficiencia, su recortadora ha sido equipada con un cabezal de
alimentaci6n por golpes que le permite simplemente golpear e[ eabezal de la recortadora
para extender Las [[neas de corte mientras usa la recortadora.
1. Mientras la recortadora est_ funeionando y girando, golpe6 suavemente la careasa
de bobina contra una superficie firme (piso duro o pavimento). Esto deberia soltar
Ifnea de corte adicional de la bebina.
2. Si no se suelta ninguna line& golpe_ el cabezal de la recortadora con m&s fuerza
o trate de golpearlo contra una superficie at_n m#.s dura.
3. Si no hay ning_n cambio en la Iongitud de la linea de corte, desenchufe el cordbn
el6ctrico en espiral del cordon de extensi6n. Cuando el cabezal de la recortadora
haya dejado de girar, tire con suavidad de las lineas de corte manualmente.
Una vez que las lineas est_n afuera (extendidas), enchufe el cord6n el_ctrico en
espiral en el cord6n de extensi6n y reanude el code.
4. Si la linea de corte sigue sin alimentar la bobina, la bobina podria estar vacia o la
Iinea de corte podria estar enredada o atascada en la bobina. Desenchufe el cord6n
el_ctrico en espiral de la reeortadora del cord6n de extensi6n. Cuando el cabezal de
la recortadora haya dejado de girar, retire
la bobina (ver pasos 1 a 3 en "Extracci6n
Fig. 15
de la bobina" en la p&gina 39). Si la linea
est& enredada o atascada, desenrede y
reemplace ]a linea, ver p&gina 40. Si la
bobina est', vacfa, reemplace la bobina,
ver p&gina 39.
Fig. 14
desconecte
la recortadora
del tomacorriente
ANTES de inspeccionar
o
I ,_ADVERTENCIA:
Para laevitar
cualquiero de
leslbn,
SIEMPRE
instalar plezas, de Ilmpiar
recortadora
reallzar
ajustes. apague y
42
CONSEJOS
PRACTICOS PARA UN BUEN FUNCIONAMIENTO
1. Antes de cada uso, asegt_rese de que el dispositivo protector este instalado
firmemente. Ajuste los tornillos del dispositivo protector, pero NO los ajuste
excesivamente.
2. Aseg_rese
comprobar
de inspeccionar el mango auxiliar antes de cada uso, para
que est,. ajustado firmemente.
3. Antes de recortar, inspeccione el #,rea para detectar la presencia de aiguna
cuerda, alambre, rama, piedra, juguete o cualquier otro objeto que pudiera
enredarse o ser lanzado por [a linea de corte.
4. Permanezca con el cabezal de corte inClinado hacia abajo en un &ngulo
hacia adelante, de modo que _ste guie la recortadora en un movimiento
semicircular alrededor de usted.
5. Corte de izquierda a derecha cuando sea posible. El corte hacia la derecha
mejora la eficiencia de corte de la unidad. Los recortes esta.n alejados del
operador.
6. Para obtener
un _rea recortada de manera
uniforme,
mueva la recortadora
hacia adentro y hacia afuera del &rea que est& cortando
altura constantes.
a una velocidad
y
7. Utilice solamente la punta de la linea de corte para hacer el recorte,
especialmente
cerca de paredes y cercos. El recorte con el lado de la linea
de corte puede sobrecargar el motor, desgastar la linea m#.s r_.pidamente y
romper la linea con mayor frecuencia.
8. NO apoye la bobina de la recortadora sobre el piso mientras
Esto podria producir el desgaste de la bobina.
est,. recortando.
9. Cuando est,. cortando vegetaciSn con una altura mayor de 6 pulgadas,
trabaje de arriba hacia abajo en pequeSos incrementos para evitar el
desgaste prematuro de la linea o el frenado del motor.
10. Cuando la recortadora se detiene y la bobina deja de girar, la I[nea de corte
se aflojara, y podr_. Ilegar a retroceder. Alimente la linea de corte adicional
antes de guardar la recortadora para evitar que la Ifnea quede floja en la
carcasa de bobina.
11. Si el di&metro del _.rea de corte se torna m_.s pequeSo, la I[nea est#, gastada
y debe ser aumentada.
12. Si la recortadora no est,. cortando correctamente,
la linea de corte puede no
estar alimentando de manera adecuada. Retire y rebobine la bobina de la
linea. (Ver RELLENO DE LA BOBtNA).
desconecte
la recortadora
del tomacorriente
ANTES de instalar la linea,
I AADVERTENCIA:
cualquier
lesibn, SIEMPRE apague y
de limpiar la recortadoraParao evitar
de realizar
ajustes,
43
i
desconecte
la recortadora
] _ADVERTENCIA:
de limpiar la recortadoraParao
MANTENIMIENTO
del tomacorriente
ANTES de instalar la linea,
evitar
cualquier
lesi6n, SIEMPRE apague y
de realizar
ajustes.
I
I
GENERAL
Mantenga [a recortadora limpia yen buen funcionamiento
para un rendimiento
6ptimo y de larga duraci6n. Antes de cada uso, inspeccione el interruptor y el
cord6n para detectar la presencia de algL_n daSo. Asegt_rese de que no hayan
piezas daSadas, faltantes ni gastadas. Asegt)rese de que no hayan tornillos
flojos, desalineaci6n,
piezas en movimiento atascado ni ninguna otra condici6n
que pudiera afectar el funcionamiento.
Ante una vibraci6n o ruido anormal,
desenchufe la herramienta inmediatamente
y corrija el problema antes de
volver a usarla. NO use la recortadora si tiene alguna pieza rota. Reemplace
las piezas daSadas, faitantes, gastadas o rotas antes de usar la recortadora.
LIMPIEZA
I
desconecte
la recortadora del tomacorriente
ANTES de instalar la linea,
I de
AADVERTENCIA:
evitar
cualquier
lesibn, SIEMPRE apague y
limpiar la recortadoraParao de
realizar
ajustes,
I
]
I
utilice solventes ni detergentes fuertes en la carcasa u otros componentes
de pl_stico. Algunos limpiadores hogareSos pueden daSar el plbstico y,
I z_ADVERTENCIA:
Para evitar cualquier daSo o descarga el_ctrica, NO
adem&s, causar alguna descarga.
Limpie la parte externa de la recortadora
con un trapo suave y seco.
NO limpie la recortadora
con agua ni la lave con una manguera.
Restriegue el dispositivo protector y el _.rea de la bobina para eliminar recortes
secos y barro. Limpie las ventilaciones de aire con un cepillo o con chorros de
aire para eliminar el polvo, los desechos y los recortes de cesped. Mantenga ]as
ventilaciones sin obstrucciones.
44
I
I
L[NEA DE CORTE
Reemplace la linea de corte SOLAMENTE con una linea de dos arrollamientos
de monofilamento de nylon de 0.065 pulgadas (Linea de corte Craftsman 71-85822).
AI devanar ]a bobina, StEMPRE devane la linea en la misma direcci6n que la
flecha que aparece en la bobina.
BOBINA
Reemplace
la bobina con una nueva bobina devanada
La linea de corte y bobinas est&n disponibles
de venta Craftsman.
(Bobina Craftsman
71-85967).
en las Tiendas Sears u otros centros
I
desconecte
la recortadora
del tomacorriente
ANTES
de instalar la linea,
apague y
J de
ik ADVERTENCIA:
cualquier
lesibn, SIEMPRE
limpiar la recortadoraParao evitar
de realizar
ajustes.
45
I
J
RECORTADORA
ELECTRICA
WEEDWACKER
- MODELO
NUMERO
172.74536
El numero de modelo se encuentra en la place de informaci6n.
Siempre mencione el nQmerode modelo en cualquier correspondencia que se refiera a su herramienta.
Plaza No.
4_
O_
Descripcibn
Cantidad
Pieza No.
Descripcion
TornilloM3x8
Abrazaderade cables
2
2
31
32
3
4
101
5
6
7
8
Ensamblajede escobillade carbon
Mensuiaposterior
Ensamblajedel estator
Cable interne50
Estator
Rotor
Placede limite
2
1
1
2
1
1
1
33
109
34
35
36
37
38
9
10
11
12
13
14
16
Ensamblajede m_nsuladelantera
TornilloM3x8
Anillode retenci6ndel eje 8
Arandelade resorte
TornilloM4x40
Placade suspensiondel motor
Arandela6
1
6
1
2
2
1
1
39
41
42
43
44
45
46
Juego de la carcasa del mango
Resorte 0.7x4.5x15
Pa]ancadel interruptor
Acoplamiento
Bot6n
Rosette 0.7x4.5x15
Ajustar anillo
1
1
1
1
1
1
1
17
18
Ensamblaledel cabezalde corie
Tuerca M6
1
1
47
48
Girar aeillo
Cable intemo
1
1
19
20
Casquillode aislamiento
Resorte lx13x29.5
1
1
49
50
Fundasuperior
TornilloST3.5x8
1
2
103
21
102
Eosamblajede ta bobina
Linea de corte
Alimeniadorde linea
1
1
1
51
52
108
Tubo tetescopico
Fundaintedor
Bot6n de desconexiOn
1
1
1
22
23
Casquillodel cabezalde corte
TornilloST3.9x16
1
19
Perillade fiiaci6n
Perno M6x70
1
1
24
26
27
Juego de la estructurabasculante
Resorte 1x8x12
Pedllade ajuste
1
1
1
Mango lateral
Mango fijo
Tapadot mango fijo
1
1
1
28
30
Juego de la carcasa
Dispositivoprotector
1
1
53
55
107
54
56
THoja de torte
Dispositivoprotectorde espac_o
Cantidad
1
2
TornilloST3,Px13
Cord6ny enchufe
Cord6ncon enchufe
Protectorde cable
Puertode terminal 1,5xl
Interruptor
Abrazaderade eordones
1
1
4 "
1
1
1
1
1
1
57
Tuerca M6
1
58
Arandela 8
1
SI DESEA OB'fENER INSTRUCCIONESPARA ORDENAR PIEZAS, CONSULTEAL DORSO DE P.&GINA.
\
\
108-
--2O
Your Home
For repair-in
your home-of all major brand appliances,
lawn and garden equipment, or heating and cooling system,
no matter who made it, no matter who sold it!
For the replacement parts, accessories and
owner's manuals that you need to do-it-yourself•
For Sears professional
...............
installation
of home appliances
and items like garage door openers and water heaters
...............
1 800 4 MY HOME ®
............................
.........
(1 800 469-4663)
Call anytime, day or night (U.S .A. and Canada)
www.sears,com
www,seara.ca
............
....,........
!i
.......
Our Home
........
..........
For repair ef carry in items like vacuums lawn equipment
............ and electronic call or go on-line for the location of your nearest
.............
...........
!i i!i!iil i!
........
u
_
Sears
Parts & Repair
1 800 488
s
Center
1222
.....
........
?4
.............
iiiiill
Call anytime , day or night (U .S.A. only)
ii!
................
............
www. sears ,corn
..........
To purchase a protection agreement (U S A )
..................................
or maintenance
..........
agreement
(Canada)
1- 800 - 827 - 6655 (U.S.A).
on a product
serviced
.........
by Sears:
1- 800 - 361 - 6665 (Canada)
........
i iil ii iil
:
);
r
.........
.........
u
.............
Pare pedirsewicio de reparacidn
Au Canada pour service en franq.ais:
...............
a6omicilio yparaordenar piezas:
1 888 SU HOGAR ®
1 800 LE FOYER Mc
(I 800 533÷ 6937)
.................
(1 888 764 6427)
.,,.,
oo,=.o _,,_
.........
....
................
....
;ii!i ii iliiiii!_iii
..... Sears
© Seam Brands, LLC
® Registered Trademark / m_Trademark / sM Service Mark of Sears Brands, LLC
® Mares Registrada / TM Mares de F.brica / SMMarca de Servicio de Sears Brands, LLC
Mc Marque de commerce / Up Marque d_pos_e de Sears Brands, LLC
.......